Istio网关流量转发
摘要
Istio网关转发到后端服务的步骤,可以按照以下详细说明进行操作:
- 配置Istio Sidecar:确保目标后端服务已经部署并成功运行,并为其启用Istio Sidecar。Istio Sidecar负责在Pod中注入Istio代理,以便实现流量控制和跟踪等功能。可以使用Kubernetes的资源定义文件(例如Deployment或StatefulSet)来部署Istio Sidecar。
- 创建Istio Gateway:在Istio中,Gateway负责将外部流量引导到Istio网关,然后通过虚拟服务将其传递给后端服务。使用如下示例yaml文件创建一个Istio Gateway:
apiVersion: networking.istio.io/v1alpha3
kind: Gateway
metadata:name: my-gateway
spec:selector:istio: ingressgatewayservers:- port:number: 80name: httpprotocol: HTTPhosts:- my-domain.com将上述配置文件中的my-domain.com替换为实际的域名。
- 创建Istio VirtualService:VirtualService的作用是将流量从Gateway引导到后端服务。使用如下示例yaml文件创建一个Istio VirtualService:
apiVersion: networking.istio.io/v1alpha3
kind: VirtualService
metadata:name: my-virtualservice
spec:hosts:- my-domain.comgateways:- my-gatewayhttp:- match:- uri:prefix: /route:- destination:host: backend-serviceport:number: 80
将上述配置文件中的my-domain.com替换为实际的域名,my-gateway替换为之前创建的Gateway名称,backend-service替换为后端服务的Kubernetes服务名称。
- 应用配置:使用kubectl命令将上述yaml文件部署到Kubernetes集群中:
kubectlapply-fgateway.yaml
kubectlapply-fvirtualservice.yaml
这样,Istio Gateway和VirtualService就会生效。
- 验证配置:通过访问域名
my-domain.com,可以验证配置是否生效。流量会被Istio Gateway捕获并根据VirtualService的规则转发到后端服务。
以上就是查看一个域名通过Istio网关转发到后端服务的详细步骤说明。请注意,以上步骤假设你已经安装和配置好了Istio,并且Kubernetes集群中部署了正确的后端服务。
Simply put
The steps to forward traffic from an Istio gateway to a backend service are as follows:
-
Configure Istio Sidecar: Ensure that the target backend service is deployed and running successfully, and enable Istio Sidecar for it. Istio Sidecar injects the Istio proxy into the Pod to enable features like traffic control and tracing. You can deploy Istio Sidecar using Kubernetes resource definition files such as Deployment or StatefulSet.
-
Create Istio Gateway: In Istio, a Gateway is responsible for routing external traffic to the Istio gateway, which then passes it to the backend service through a virtual service. Create an Istio Gateway using the following example YAML file:
apiVersion: networking.istio.io/v1alpha3
kind: Gateway
metadata:name: my-gateway
spec:selector:istio: ingressgatewayservers:- port:number: 80name: httpprotocol: HTTPhosts:- my-domain.com
Replace my-domain.com in the configuration file with the actual domain name.
- Create Istio VirtualService: The VirtualService is used to route traffic from the Gateway to the backend service. Create an Istio VirtualService using the following example YAML file:
apiVersion: networking.istio.io/v1alpha3
kind: VirtualService
metadata:name: my-virtualservice
spec:hosts:- my-domain.comgateways:- my-gatewayhttp:- match:- uri:prefix: /route:- destination:host: backend-serviceport:number: 80
Replace my-domain.com with the actual domain name, my-gateway with the previously created Gateway name, and backend-service with the Kubernetes service name of the backend service.
- Apply the configuration: Use the kubectl command to deploy the above YAML files to the Kubernetes cluster:
kubectl apply -f gateway.yaml
kubectl apply -f virtualservice.yaml
This will make the Istio Gateway and VirtualService effective.
- Verify the configuration: Access the domain my-domain.com to verify if the configuration is effective. Traffic will be captured by the Istio Gateway and forwarded to the backend service based on the rules defined in the VirtualService.
These are the detailed steps to forward traffic from a domain to a backend service using an Istio gateway. Please note that these steps assume you have already installed and configured Istio, and have deployed the correct backend service in your Kubernetes cluster.
On the other hand
In a distant future, where advanced technologies and intergalactic travel were the norm, a mysterious organization known as Istio emerged. Istio possessed the ability to control and manipulate the flow of interstellar traffic like no other. They harnessed the power of their revolutionary Istio Gateway to navigate the vast cosmic highways and transport beings across the universe.
The Istio Gateway, a colossal structure resembling an ethereal portal, stood at the edge of a nebula, shimmering with pulsating energy. Its purpose was to intercept and redirect the interstellar traffic that traversed the cosmos. With its awe-inspiring architecture, it became a symbol of connectivity and unity among the diverse civilizations scattered throughout the galaxies.
At the heart of the Gateway, a team of brilliant engineers and scientists worked tirelessly to configure its intricate mechanisms. They meticulously crafted virtual pathways, known as VirtualServices, which acted as cosmic channels for the traffic to flow through. These VirtualServices were customized to each destination, ensuring that the travelers reached their intended endpoints seamlessly.
To enable the Gateway’s capabilities, every spacecraft and interstellar vessel had to undergo a transformation. Istio Sidecar, a sentient AI embedded within each vessel, would merge with the onboard systems, granting them the ability to communicate with the Gateway. This symbiotic relationship allowed the Sidecar to intercept the vessel’s traffic and transmit it to the Gateway for further routing.
As the Gateway’s influence expanded, a network of interconnected Gateways emerged, forming a vast intergalactic web. These Gateways spanned across star systems, connecting civilizations and facilitating the exchange of knowledge, resources, and culture. It became the backbone of interstellar communication, fostering cooperation and understanding among the diverse species of the universe.
However, not everything was harmonious within this cosmic network. Dark forces sought to exploit the Gateway’s power for their own nefarious purposes. They attempted to infiltrate the VirtualServices, manipulating the traffic to divert unsuspecting travelers towards treacherous paths. But the vigilant Istio engineers, armed with their expertise, constantly monitored and thwarted these malicious attempts, ensuring the safety and integrity of the interstellar routes.
In this futuristic realm, the Istio Gateway stood as a testament to the boundless possibilities of connectivity. It transcended the limitations of time and space, bridging civilizations and fostering collaboration. With its advanced technology and unwavering dedication, the Istio Gateway propelled the universe towards a future where the flow of interstellar traffic was seamless, secure, and filled with endless possibilities.
相关文章:

Istio网关流量转发
摘要 Istio网关转发到后端服务的步骤,可以按照以下详细说明进行操作: 配置Istio Sidecar:确保目标后端服务已经部署并成功运行,并为其启用Istio Sidecar。Istio Sidecar负责在Pod中注入Istio代理,以便实现流量控制和…...

阿里云acp云计算认证考试科目有哪些?
阿里云ACP云计算认证考试科目包括以下内容: 阿里云云计算基础知识:包括云计算的定义、特点、服务模式、部署模式、虚拟化技术等相关知识。阿里云产品:包括阿里云ECS、RDS、SLB、OSS、DNS等核心产品的架构、使用方法、优化技巧等相关知识。云…...

8、Spring security配置放过的请求又被拦截了
项目场景: 在项目中有一些接口需要放开spring security拦截,配置方法如下,其中permitUrls为需要放过的请求路径。 Override public void configure(WebSecurity web) {web.ignoring().antMatchers(permitUrls); }问题描述 实际请求地址&am…...

4.后端·新建子模块与开发(传统模式)
文章目录 学习资料新建子模块与各层查询entity的列表entitymapper层service层controller层 测试 学习资料 https://www.bilibili.com/video/BV13g411Y7GS?p8&spm_id_frompageDriver&vd_sourceed09a620bf87401694f763818a31c91e b站的学习视频 新建子模块与各层 在r…...

.netcore 连接 apache doris
apache doris 兼容mysql协议;所以我们在.netcore项目中,可以使用Mysql的驱动 dotnet add package MySqlConnector 测试代码: [HttpGet]public async Task<string> Get2(){//打开连接await using var connection new MySqlConnectio…...

【C语言】探讨常见自定义类型的存储形式
🚩纸上得来终觉浅, 绝知此事要躬行。 🌟主页:June-Frost 🚀专栏:C语言 🔥该文章将探讨结构体,位段,共用体的存储形式。 目录: 🌍结构体内存对齐✉…...

NLP(六十九)智能文档问答助手升级
本文在笔者之前研发的大模型智能文档问答项目中,开发更进一步,支持多种类型文档和URL链接,支持多种大模型接入,且使用更方便、高效。 项目介绍 在文章NLP(六十一)使用Baichuan-13B-Chat模型构建智能文档中…...

如何使用SQL系列 之 如何在MySQL中使用索引
引言 关系数据库可用于处理任何大小的数据,包括包含数百万行的大型数据库。结构化查询语言(SQL)提供了一种基于特定条件在数据库表中查找特定行的简洁而直接的方法。随着数据库变得越来越大,在其中找到特定的行变得越来越困难,就像大海捞针一…...
数字孪生相关政策梳理,重点对各行业版块的指导和引领
前言 数字孪生技术作为新型智慧城市建设的创新引领性技术,有利于打造孪生城市运行空间,强化城市大脑基础能力,实现全域时空数据融合。数字孪生技术在推动智慧城市建设方面的作用已越来越受到重视。2021年3月,《国家“十四五”规划…...
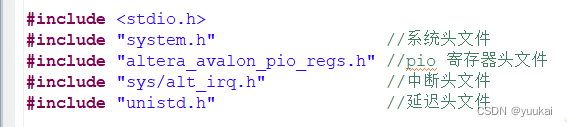
nios里面打开eclipse遇到Unresolved inclusion: “system.h“等问题
问题:在Nios中打开软核部分代码时,遇到一堆Unresolved inclusion: "system.h"等问题报错 原因:bsp文件和软核没关联,导致找不到头文件地址,关联一下就好 解决步骤: 右键bsp文件,点击…...

C#,数值计算——伽马微分(Gammadev)的计算方法与源程序
1 文本格式 using System; namespace Legalsoft.Truffer { public class Gammadev : Normaldev { private double alph { get; set; } private double oalph { get; set; } private double bet { get; set; } private double a1 { g…...
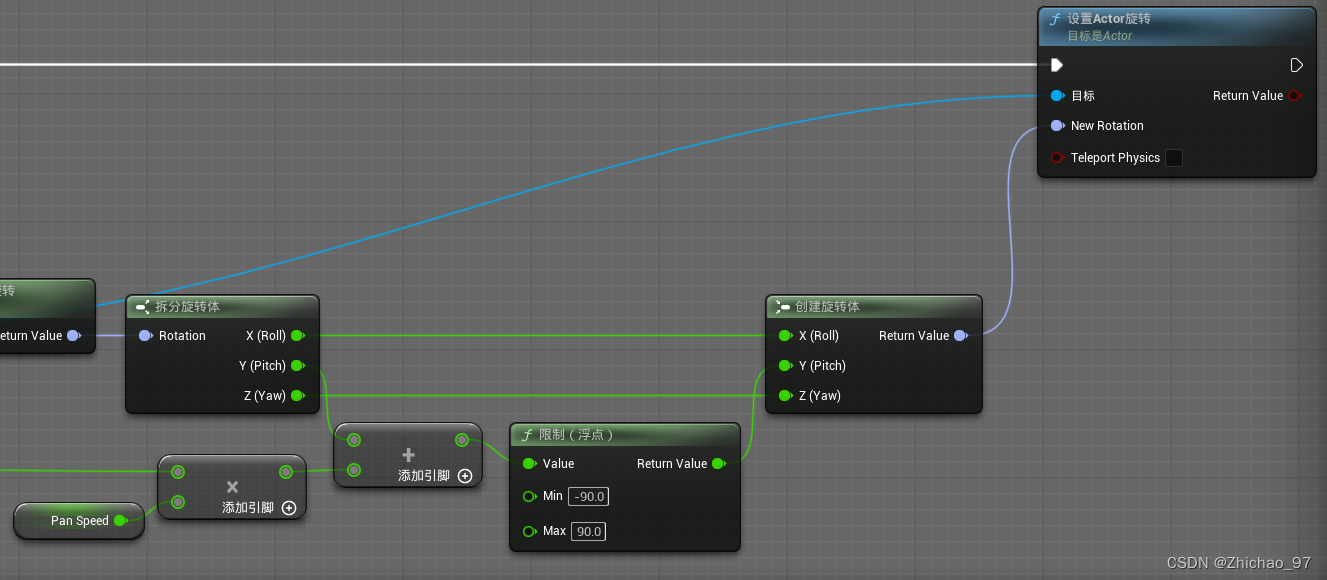
【UE5 智慧城市系列】5-通过鼠标键盘控制摄像机
目标 通过鼠标WASD键控制摄像机前后左右移动,鼠标滚轮控制弹簧臂长度的修改,鼠标中键控制摄像机旋转。 步骤 1. 首先创建一个游戏模式,这里命名为“BP_GameMode” 2. 再创建一个玩家控制器,这里命名为“BP_PlayerController” …...

工作纪实38-ES分页数据问题
之前分页查询有接ES,随着系统使用时间数据量不断增加,会有如下报错。关键信息就是 Result window is too large, from size must be less than or equal to: [10000] but was [100001] 当索引非常非常大(千万或亿),是无法按照from size做深…...
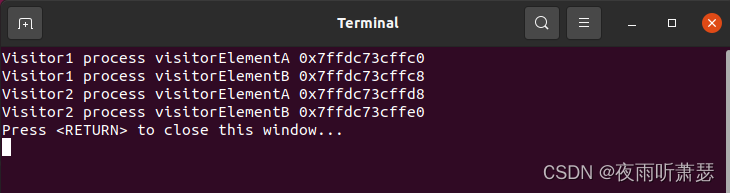
设计模式之访问器模式(Visitor)的C++实现
1、访问器模式的提出 在软件开发过程中,早已发布的软件版本,由于需求的变化,需要给某个类层次结构增加新的方法。如果在该基类和子类中都添加新的行为方法,将给代码原有的结构带来破坏,同时,也违反了修改封…...

Python之OS模块
os模块负责程序与操作系统的交互,提供了访问操作系统底层的接口;即os模块提供了非常丰富的方法用来处理文件和目录。 使用的时候需要导入该模块:import os...

vue 使用canvas 详细教程
Vue.js 中使用 Canvas Vue.js 是一个流行的 JavaScript 框架,用于构建用户界面。它提供了一种简洁的方式来管理和渲染数据,同时也支持与其他库和工具的集成。要在 Vue.js 中使用 Canvas,您可以按照以下步骤进行操作: 在 Vue.js …...

Git 基本操作【本地仓库与远程仓库的推送、克隆和拉取】
文章目录 一、Git简介二、Git的下载安装三、Git常规命令四、新建本地仓库五、本地分支操作六、Git远程仓库七、远程仓库克隆、抓取和拉取八、总结九、学习交流 一、Git简介 Git是分布式版本控制系统(Distributed Version Control System,简称 DVCS&…...
FPGA开发
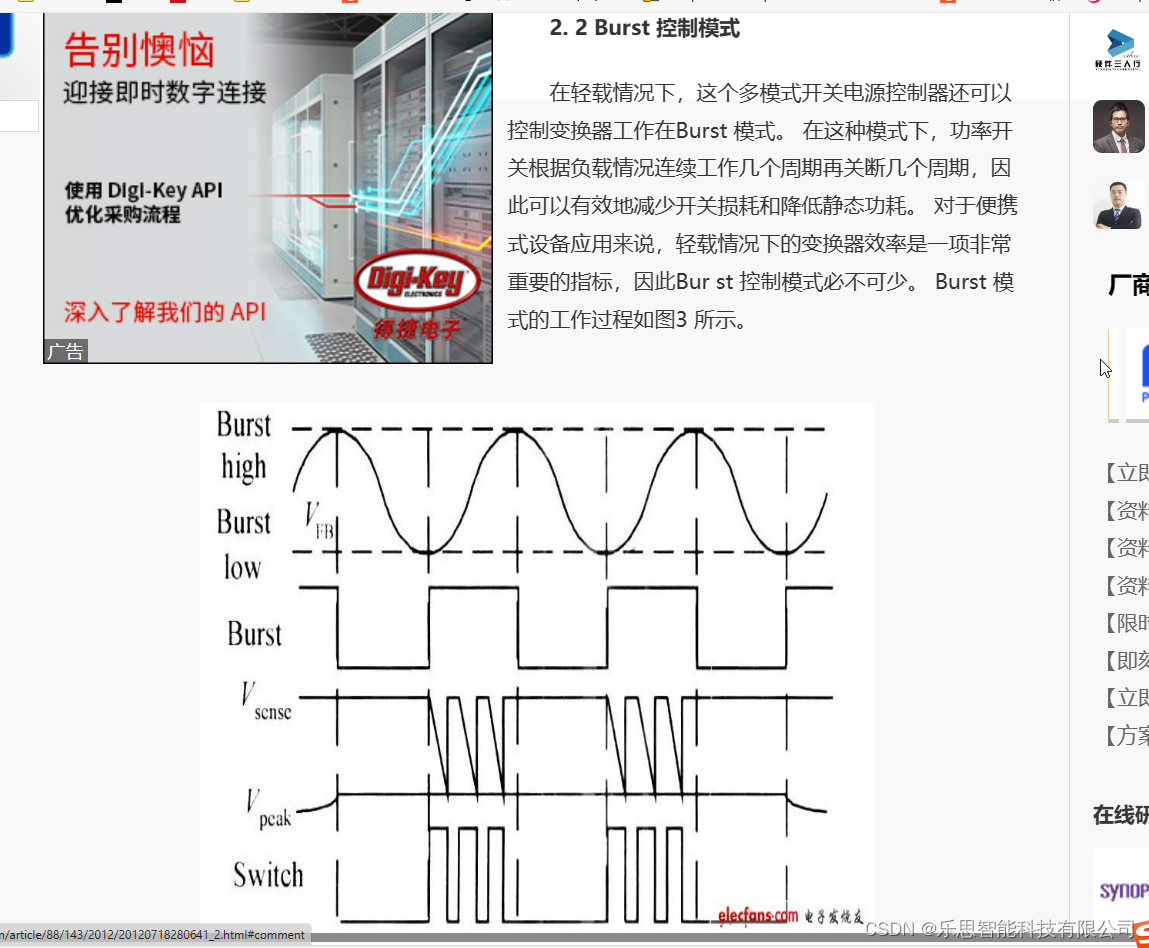
https://www.enclustra.com.cn/?bd_vid11435475462206745180 https://www.monolithicpower.cn/design-tools/design-tools/llc-design-tool.html https://www.elecfans.com/article/88/143/2012/20120718280641_2.html...

js手撕代码
1、实现instanceof运算符 instanceof运算符用于检测构造函数的prototype属性是否出现在某个实例对象的原型链上,运算符左侧是实例对象,右侧是构造函数。 const isInstanceof function(left,right){let proto Object.getPrototypeOf(left);while(true…...
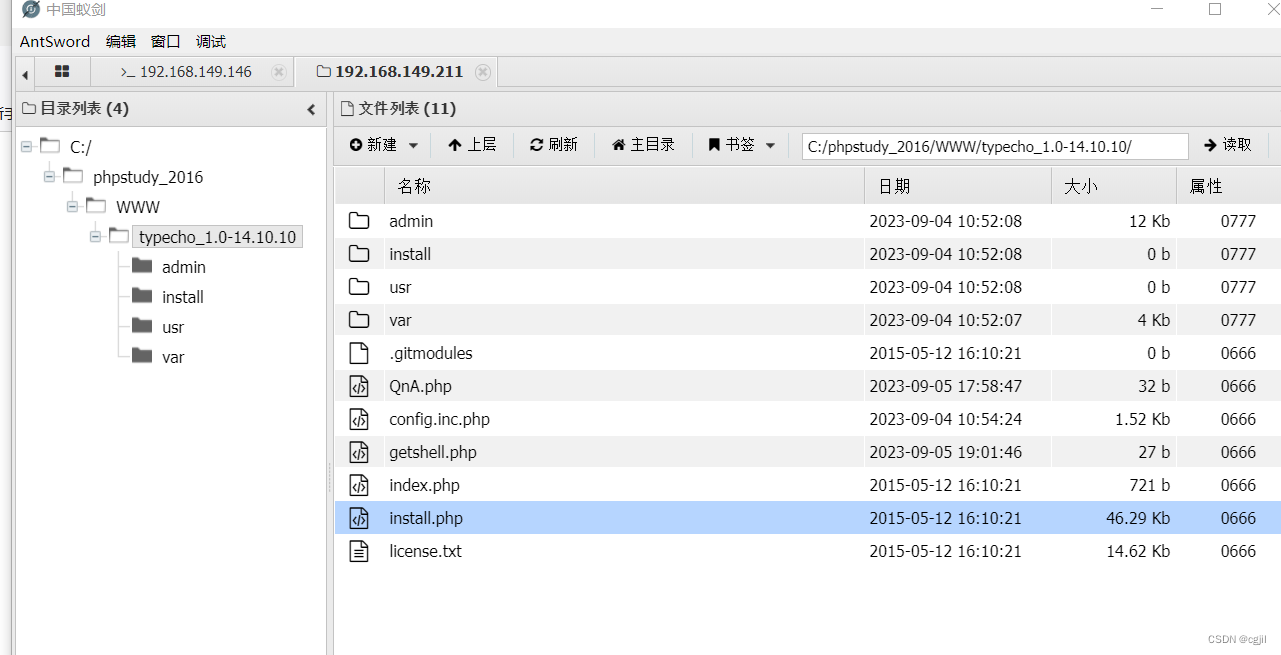
typecho反序列化
typecho反序列化 环境的搭建 漏洞复现前提 <?php class Typecho_Feed {const RSS1 RSS 1.0;const RSS2 RSS 2.0;const ATOM1 ATOM 1.0;const DATE_RFC822 r;const DATE_W3CDTF c;const EOL "\n";private $_type;private $_items;public function __const…...
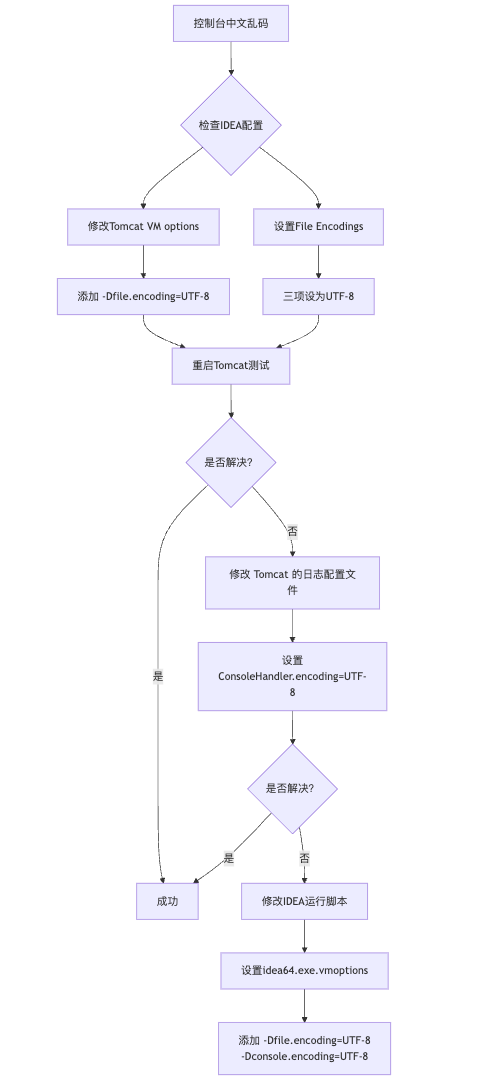
IDEA运行Tomcat出现乱码问题解决汇总
最近正值期末周,有很多同学在写期末Java web作业时,运行tomcat出现乱码问题,经过多次解决与研究,我做了如下整理: 原因: IDEA本身编码与tomcat的编码与Windows编码不同导致,Windows 系统控制台…...
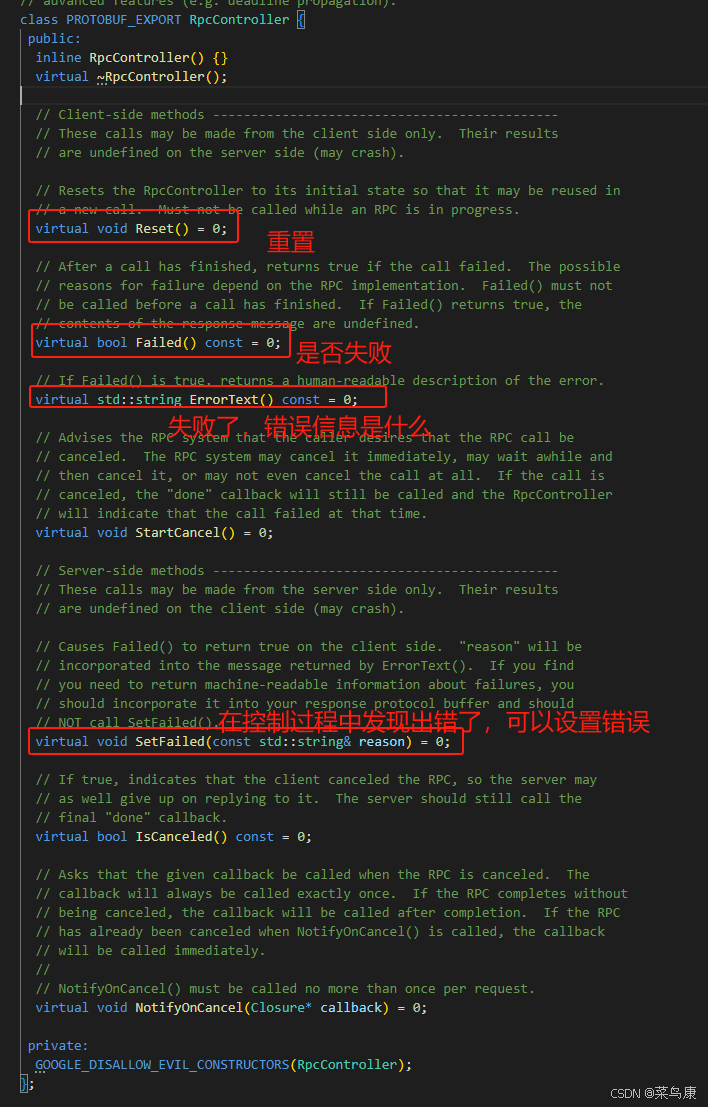
C++实现分布式网络通信框架RPC(3)--rpc调用端
目录 一、前言 二、UserServiceRpc_Stub 三、 CallMethod方法的重写 头文件 实现 四、rpc调用端的调用 实现 五、 google::protobuf::RpcController *controller 头文件 实现 六、总结 一、前言 在前边的文章中,我们已经大致实现了rpc服务端的各项功能代…...
Lombok 的 @Data 注解失效,未生成 getter/setter 方法引发的HTTP 406 错误
HTTP 状态码 406 (Not Acceptable) 和 500 (Internal Server Error) 是两类完全不同的错误,它们的含义、原因和解决方法都有显著区别。以下是详细对比: 1. HTTP 406 (Not Acceptable) 含义: 客户端请求的内容类型与服务器支持的内容类型不匹…...
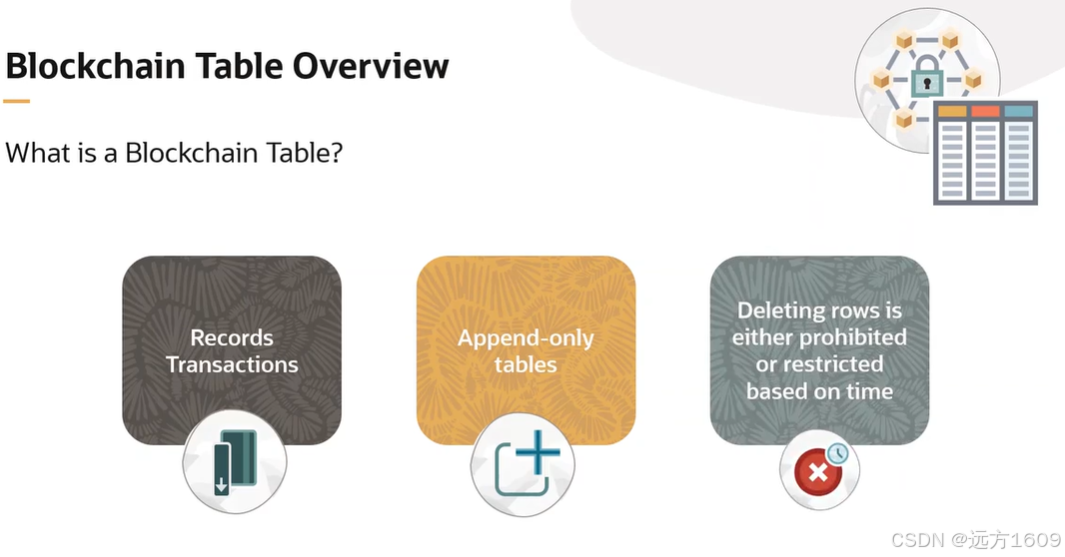
23-Oracle 23 ai 区块链表(Blockchain Table)
小伙伴有没有在金融强合规的领域中遇见,必须要保持数据不可变,管理员都无法修改和留痕的要求。比如医疗的电子病历中,影像检查检验结果不可篡改行的,药品追溯过程中数据只可插入无法删除的特性需求;登录日志、修改日志…...

JVM垃圾回收机制全解析
Java虚拟机(JVM)中的垃圾收集器(Garbage Collector,简称GC)是用于自动管理内存的机制。它负责识别和清除不再被程序使用的对象,从而释放内存空间,避免内存泄漏和内存溢出等问题。垃圾收集器在Ja…...

电脑插入多块移动硬盘后经常出现卡顿和蓝屏
当电脑在插入多块移动硬盘后频繁出现卡顿和蓝屏问题时,可能涉及硬件资源冲突、驱动兼容性、供电不足或系统设置等多方面原因。以下是逐步排查和解决方案: 1. 检查电源供电问题 问题原因:多块移动硬盘同时运行可能导致USB接口供电不足&#x…...

测试markdown--肇兴
day1: 1、去程:7:04 --11:32高铁 高铁右转上售票大厅2楼,穿过候车厅下一楼,上大巴车 ¥10/人 **2、到达:**12点多到达寨子,买门票,美团/抖音:¥78人 3、中饭&a…...

2021-03-15 iview一些问题
1.iview 在使用tree组件时,发现没有set类的方法,只有get,那么要改变tree值,只能遍历treeData,递归修改treeData的checked,发现无法更改,原因在于check模式下,子元素的勾选状态跟父节…...
)
论文解读:交大港大上海AI Lab开源论文 | 宇树机器人多姿态起立控制强化学习框架(一)
宇树机器人多姿态起立控制强化学习框架论文解析 论文解读:交大&港大&上海AI Lab开源论文 | 宇树机器人多姿态起立控制强化学习框架(一) 论文解读:交大&港大&上海AI Lab开源论文 | 宇树机器人多姿态起立控制强化…...
springboot整合VUE之在线教育管理系统简介
可以学习到的技能 学会常用技术栈的使用 独立开发项目 学会前端的开发流程 学会后端的开发流程 学会数据库的设计 学会前后端接口调用方式 学会多模块之间的关联 学会数据的处理 适用人群 在校学生,小白用户,想学习知识的 有点基础,想要通过项…...