AI项目六:基于YOLOV5的CPU版本部署openvino
若该文为原创文章,转载请注明原文出处。
一、CPU版本DEMO测试
1、创建一个新的虚拟环境
conda create -n course_torch_openvino python=3.82、激活环境
conda activate course_torch_openvino3、安装pytorch cpu版本
pip install torch torchvision torchaudio -i https://pypi.tuna.tsinghua.edu.cn/simple
4、安装
使用的是yolov5-5版本,github上下载。
pip install -r requirements.txt -i https://pypi.tuna.tsinghua.edu.cn/simple
5、运行demo
python demo.py完整代码
import cv2
import numpy as np
import torch
import time# model = torch.hub.load('./yolov5', 'custom', path='./weights/ppe_yolo_n.pt',source='local')  # local repo
model = torch.hub.load('./yolov5', 'custom', 'weights/poker_n.pt',source='local')
model.conf = 0.4cap = cv2.VideoCapture(0)fps_time = time.time()while True:ret,frame = cap.read()frame = cv2.flip(frame,1)img_cvt = cv2.cvtColor(frame,cv2.COLOR_BGR2RGB)# Inferenceresults = model(img_cvt)result_np = results.pandas().xyxy[0].to_numpy()for box in result_np:l,t,r,b = box[:4].astype('int')cv2.rectangle(frame,(l,t),(r,b),(0,255,0),5)cv2.putText(frame,str(box[-1]),(l,t-20),cv2.FONT_ITALIC,1,(0,255,0),2)now = time.time()fps_text = 1/(now - fps_time)fps_time =  nowcv2.putText(frame,str(round(fps_text,2)),(50,50),cv2.FONT_ITALIC,1,(0,255,0),2)cv2.imshow('demo',frame)if cv2.waitKey(10) & 0xFF == ord('q'):breakcap.release()
cv2.destroyAllWindows()
运行正常
二、YOLOV5转换成openvino
1、安装onnx
pip install onnx==1.11.0
2、修改文件
修改export.py 的第121行,修改成
opset_version=103、导出onnx
使用训练好的best.pt文件,把best.pt转成onnx文件
转换命令为:
python export.py --weights ../weights/best.pt --img 640 --batch 14、转成openvino
转换前先安装环境
pip install openvino-dev[onnx]==2021.4.0
pip install openvino==2021.4.0
验证一下,输入mo -h
![]()
接下来转换模型,使用下面命令导出模型
mo --input_model weights/best.onnx --model_name weights/ir_model -s 255 --reverse_input_channels --output Conv_294,Conv_245,Conv_196会生成3个文件, ir_model.xml就是要用的文件。

5、运行
python yolov5_demo.py -i cam -m weights/ir_model.xml -d CPU代码:
import logging
import os
import sys
from argparse import ArgumentParser, SUPPRESS
from math import exp as exp
from time import time,sleep
import numpy as np
import cv2
from openvino.inference_engine import IENetwork, IECorelogging.basicConfig(format="[ %(levelname)s ] %(message)s", level=logging.INFO, stream=sys.stdout)
log = logging.getLogger()def build_argparser():parser = ArgumentParser(add_help=False)args = parser.add_argument_group('Options')args.add_argument('-h', '--help', action='help', default=SUPPRESS, help='Show this help message and exit.')args.add_argument("-m", "--model", help="Required. Path to an .xml file with a trained model.",required=True, type=str)args.add_argument("-i", "--input", help="Required. Path to an image/video file. (Specify 'cam' to work with ""camera)", required=True, type=str)args.add_argument("-l", "--cpu_extension",help="Optional. Required for CPU custom layers. Absolute path to a shared library with ""the kernels implementations.", type=str, default=None)args.add_argument("-d", "--device",help="Optional. Specify the target device to infer on; CPU, GPU, FPGA, HDDL or MYRIAD is"" acceptable. The sample will look for a suitable plugin for device specified. ""Default value is CPU", default="CPU", type=str)args.add_argument("-t", "--prob_threshold", help="Optional. Probability threshold for detections filtering",default=0.5, type=float)args.add_argument("-iout", "--iou_threshold", help="Optional. Intersection over union threshold for overlapping ""detections filtering", default=0.4, type=float)return parserclass YoloParams:# ------------------------------------------- Extracting layer parameters ------------------------------------------# Magic numbers are copied from yolo samplesdef __init__(self,  side):self.num = 3 #if 'num' not in param else int(param['num'])self.coords = 4 #if 'coords' not in param else int(param['coords'])self.classes = 80 #if 'classes' not in param else int(param['classes'])self.side = sideself.anchors = [10.0, 13.0, 16.0, 30.0, 33.0, 23.0, 30.0, 61.0, 62.0, 45.0, 59.0, 119.0, 116.0, 90.0, 156.0,198.0,373.0, 326.0] #if 'anchors' not in param else [float(a) for a in param['anchors'].split(',')]def letterbox(img, size=(640, 640), color=(114, 114, 114), auto=True, scaleFill=False, scaleup=True):# Resize image to a 32-pixel-multiple rectangle https://github.com/ultralytics/yolov3/issues/232shape = img.shape[:2]  # current shape [height, width]w, h = size# Scale ratio (new / old)r = min(h / shape[0], w / shape[1])if not scaleup:  # only scale down, do not scale up (for better test mAP)r = min(r, 1.0)# Compute paddingratio = r, r  # width, height ratiosnew_unpad = int(round(shape[1] * r)), int(round(shape[0] * r))dw, dh = w - new_unpad[0], h - new_unpad[1]  # wh paddingif auto:  # minimum rectangledw, dh = np.mod(dw, 64), np.mod(dh, 64)  # wh paddingelif scaleFill:  # stretchdw, dh = 0.0, 0.0new_unpad = (w, h)ratio = w / shape[1], h / shape[0]  # width, height ratiosdw /= 2  # divide padding into 2 sidesdh /= 2if shape[::-1] != new_unpad:  # resizeimg = cv2.resize(img, new_unpad, interpolation=cv2.INTER_LINEAR)top, bottom = int(round(dh - 0.1)), int(round(dh + 0.1))left, right = int(round(dw - 0.1)), int(round(dw + 0.1))img = cv2.copyMakeBorder(img, top, bottom, left, right, cv2.BORDER_CONSTANT, value=color)  # add bordertop2, bottom2, left2, right2 = 0, 0, 0, 0if img.shape[0] != h:top2 = (h - img.shape[0])//2bottom2 = top2img = cv2.copyMakeBorder(img, top2, bottom2, left2, right2, cv2.BORDER_CONSTANT, value=color)  # add borderelif img.shape[1] != w:left2 = (w - img.shape[1])//2right2 = left2img = cv2.copyMakeBorder(img, top2, bottom2, left2, right2, cv2.BORDER_CONSTANT, value=color)  # add borderreturn imgdef scale_bbox(x, y, height, width, class_id, confidence, im_h, im_w, resized_im_h=640, resized_im_w=640):gain = min(resized_im_w / im_w, resized_im_h / im_h)  # gain  = old / newpad = (resized_im_w - im_w * gain) / 2, (resized_im_h - im_h * gain) / 2  # wh paddingx = int((x - pad[0])/gain)y = int((y - pad[1])/gain)w = int(width/gain)h = int(height/gain)xmin = max(0, int(x - w / 2))ymin = max(0, int(y - h / 2))xmax = min(im_w, int(xmin + w))ymax = min(im_h, int(ymin + h))# Method item() used here to convert NumPy types to native types for compatibility with functions, which don't# support Numpy types (e.g., cv2.rectangle doesn't support int64 in color parameter)return dict(xmin=xmin, xmax=xmax, ymin=ymin, ymax=ymax, class_id=class_id.item(), confidence=confidence.item())def entry_index(side, coord, classes, location, entry):side_power_2 = side ** 2n = location // side_power_2loc = location % side_power_2return int(side_power_2 * (n * (coord + classes + 1) + entry) + loc)def parse_yolo_region(blob, resized_image_shape, original_im_shape, params, threshold):# ------------------------------------------ Validating output parameters ------------------------------------------    out_blob_n, out_blob_c, out_blob_h, out_blob_w = blob.shapepredictions = 1.0/(1.0+np.exp(-blob)) # ------------------------------------------ Extracting layer parameters -------------------------------------------orig_im_h, orig_im_w = original_im_shaperesized_image_h, resized_image_w = resized_image_shapeobjects = list()side_square = params.side * params.side# ------------------------------------------- Parsing YOLO Region output -------------------------------------------bbox_size = int(out_blob_c/params.num) #4+1+num_classesindex=0for row, col, n in np.ndindex(params.side, params.side, params.num):bbox = predictions[0, n*bbox_size:(n+1)*bbox_size, row, col]x, y, width, height, object_probability = bbox[:5]class_probabilities = bbox[5:]if object_probability < threshold:continuex = (2*x - 0.5 + col)*(resized_image_w/out_blob_w)y = (2*y - 0.5 + row)*(resized_image_h/out_blob_h)if int(resized_image_w/out_blob_w) == 8 & int(resized_image_h/out_blob_h) == 8: #80x80, idx = 0elif int(resized_image_w/out_blob_w) == 16 & int(resized_image_h/out_blob_h) == 16: #40x40idx = 1elif int(resized_image_w/out_blob_w) == 32 & int(resized_image_h/out_blob_h) == 32: # 20x20idx = 2width = (2*width)**2* params.anchors[idx * 6 + 2 * n]height = (2*height)**2 * params.anchors[idx * 6 + 2 * n + 1]class_id = np.argmax(class_probabilities)confidence = object_probabilityobjects.append(scale_bbox(x=x, y=y, height=height, width=width, class_id=class_id, confidence=confidence,im_h=orig_im_h, im_w=orig_im_w, resized_im_h=resized_image_h, resized_im_w=resized_image_w))if index >30:breakindex+=1return objectsdef intersection_over_union(box_1, box_2):width_of_overlap_area = min(box_1['xmax'], box_2['xmax']) - max(box_1['xmin'], box_2['xmin'])height_of_overlap_area = min(box_1['ymax'], box_2['ymax']) - max(box_1['ymin'], box_2['ymin'])if width_of_overlap_area < 0 or height_of_overlap_area < 0:area_of_overlap = 0else:area_of_overlap = width_of_overlap_area * height_of_overlap_areabox_1_area = (box_1['ymax'] - box_1['ymin']) * (box_1['xmax'] - box_1['xmin'])box_2_area = (box_2['ymax'] - box_2['ymin']) * (box_2['xmax'] - box_2['xmin'])area_of_union = box_1_area + box_2_area - area_of_overlapif area_of_union == 0:return 0return area_of_overlap / area_of_uniondef main():args = build_argparser().parse_args()# ------------- 1. Plugin initialization for specified device and load extensions library if specified -------------ie = IECore()if args.cpu_extension and 'CPU' in args.device:ie.add_extension(args.cpu_extension, "CPU")# -------------------- 2. Reading the IR generated by the Model Optimizer (.xml and .bin files) --------------------model = args.modelnet = ie.read_network(model=model)# ---------------------------------------------- 4. Preparing inputs -----------------------------------------------input_blob = next(iter(net.input_info))#  Defaulf batch_size is 1net.batch_size = 1# Read and pre-process input imagesn, c, h, w = net.input_info[input_blob].input_data.shape# labels_map = [x.strip() for x in f]labels_map = ['person', 'bicycle', 'car', 'motorcycle', 'airplane', 'bus', 'train', 'truck', 'boat', 'traffic light','fire hydrant', 'stop sign', 'parking meter', 'bench', 'bird', 'cat', 'dog', 'horse', 'sheep', 'cow','elephant', 'bear', 'zebra', 'giraffe', 'backpack', 'umbrella', 'handbag', 'tie', 'suitcase', 'frisbee','skis', 'snowboard', 'sports ball', 'kite', 'baseball bat', 'baseball glove', 'skateboard', 'surfboard','tennis racket', 'bottle', 'wine glass', 'cup', 'fork', 'knife', 'spoon', 'bowl', 'banana', 'apple','sandwich', 'orange', 'broccoli', 'carrot', 'hot dog', 'pizza', 'donut', 'cake', 'chair', 'couch','potted plant', 'bed', 'dining table', 'toilet', 'tv', 'laptop', 'mouse', 'remote', 'keyboard', 'cell phone','microwave', 'oven', 'toaster', 'sink', 'refrigerator', 'book', 'clock', 'vase', 'scissors', 'teddy bear','hair drier', 'toothbrush']input_stream = 0 if args.input == "cam" else args.inputis_async_mode = Truecap = cv2.VideoCapture(input_stream)number_input_frames = int(cap.get(cv2.CAP_PROP_FRAME_COUNT))number_input_frames = 1 if number_input_frames != -1 and number_input_frames < 0 else number_input_frameswait_key_code = 1# Number of frames in picture is 1 and this will be read in cycle. Sync mode is default value for this caseif number_input_frames != 1:ret, frame = cap.read()else:is_async_mode = Falsewait_key_code = 0# ----------------------------------------- 5. Loading model to the plugin -----------------------------------------exec_net = ie.load_network(network=net, num_requests=2, device_name=args.device)cur_request_id = 0next_request_id = 1render_time = 0parsing_time = 0# ----------------------------------------------- 6. Doing inference -----------------------------------------------initial_w = int(cap.get(cv2.CAP_PROP_FRAME_WIDTH))initial_h = int(cap.get(cv2.CAP_PROP_FRAME_HEIGHT))origin_im_size = (initial_h,initial_w)while cap.isOpened():# Here is the first asynchronous point: in the Async mode, we capture frame to populate the NEXT infer request# in the regular mode, we capture frame to the CURRENT infer requestif is_async_mode:ret, next_frame = cap.read()else:ret, frame = cap.read()if not ret:breakif is_async_mode:request_id = next_request_idin_frame = letterbox(frame, (w, h))else:request_id = cur_request_idin_frame = letterbox(frame, (w, h))in_frame0 = in_frame# resize input_frame to network sizein_frame = in_frame.transpose((2, 0, 1))  # Change data layout from HWC to CHWin_frame = in_frame.reshape((n, c, h, w))# Start inferencestart_time = time()exec_net.start_async(request_id=request_id, inputs={input_blob: in_frame})# Collecting object detection resultsobjects = list()if exec_net.requests[cur_request_id].wait(-1) == 0:output = exec_net.requests[cur_request_id].output_blobsstart_time = time()for layer_name, out_blob in output.items():layer_params = YoloParams(side=out_blob.buffer.shape[2])objects += parse_yolo_region(out_blob.buffer, in_frame.shape[2:],frame.shape[:-1], layer_params,args.prob_threshold)parsing_time = time() - start_time# Filtering overlapping boxes with respect to the --iou_threshold CLI parameterobjects = sorted(objects, key=lambda obj : obj['confidence'], reverse=True)for i in range(len(objects)):if objects[i]['confidence'] == 0:continuefor j in range(i + 1, len(objects)):if intersection_over_union(objects[i], objects[j]) > args.iou_threshold:objects[j]['confidence'] = 0# Drawing objects with respect to the --prob_threshold CLI parameterobjects = [obj for obj in objects if obj['confidence'] >= args.prob_threshold]for obj in objects:# Validation bbox of detected objectif obj['xmax'] > origin_im_size[1] or obj['ymax'] > origin_im_size[0] or obj['xmin'] < 0 or obj['ymin'] < 0:continuecolor = (0,255,0)det_label = labels_map[obj['class_id']] if labels_map and len(labels_map) >= obj['class_id'] else \str(obj['class_id'])cv2.rectangle(frame, (obj['xmin'], obj['ymin']), (obj['xmax'], obj['ymax']), color, 2)cv2.putText(frame,"#" + det_label + ' ' + str(round(obj['confidence'] * 100, 1)) + ' %',(obj['xmin'], obj['ymin'] - 7), cv2.FONT_ITALIC, 1, color, 2)# Draw performance stats over frameasync_mode_message = "Async mode: ON"if is_async_mode else "Async mode: OFF"cv2.putText(frame, async_mode_message, (10, int(origin_im_size[0] - 20)), cv2.FONT_ITALIC, 1,(10, 10, 200), 2)fps_time = time() - start_timeif fps_time !=0:fps = 1 / fps_timecv2.putText(frame, 'fps:'+str(round(fps,2)), (50, 50), cv2.FONT_ITALIC, 1, (0, 255, 0), 2)cv2.imshow("DetectionResults", frame)if is_async_mode:cur_request_id, next_request_id = next_request_id, cur_request_idframe = next_framekey = cv2.waitKey(wait_key_code)# ESC keyif key == 27:break# Tab keyif key == 9:exec_net.requests[cur_request_id].wait()is_async_mode = not is_async_modelog.info("Switched to {} mode".format("async" if is_async_mode else "sync"))cv2.destroyAllWindows()if __name__ == '__main__':sys.exit(main() or 0)
三、总结
通过openvino加速,CPU没有GPU下,从原本的20帧左右提升到50多帧,效果还可以,就 是用自己的模型,训练出来的效果不怎么好。
使用树莓派等嵌入板子使用openvino效果还可以。
如有侵权,或需要完整代码,请及时联系博主。
相关文章:
AI项目六:基于YOLOV5的CPU版本部署openvino
若该文为原创文章,转载请注明原文出处。 一、CPU版本DEMO测试 1、创建一个新的虚拟环境 conda create -n course_torch_openvino python3.8 2、激活环境 conda activate course_torch_openvino 3、安装pytorch cpu版本 pip install torch torchvision torchau…...

记录YDLidar驱动包交叉编译时出现的一点问题
由于一不小心把交叉编译的系统根目录破坏了,所以一股脑将交叉编译系统根目录全删了重新安装,安装后,交叉编译发现ydlidar的ros包驱动出现了库无法链接的错误(刚刚还是好好的),但是又想不起来之前是怎么解决的了,所以还…...

嵌入式学习笔记(32)S5PV210的向量中断控制器
6.6.1异常处理的2个阶段 可以将异常处理分为2个阶段来理解。第一个阶段是异常向量表跳转;第二个阶段是进入了真正的异常处理程序irq_handler之后的部分。 6.6.2回顾:中断处理的第一个阶段(异常向量表跳转阶段)处理 (…...

linux下安装qt、qt触摸屏校准tslib
linux下安装qt 在 Linux 系统下安装 Qt,可以通过以下步骤进行操作:1. 下载 Qt 安装包:首先,你需要从 Qt 官方网站(https://www.qt.io/)下载适用于 Linux 的 Qt 安装包。选择与你的系统和需求相匹配的版本&…...
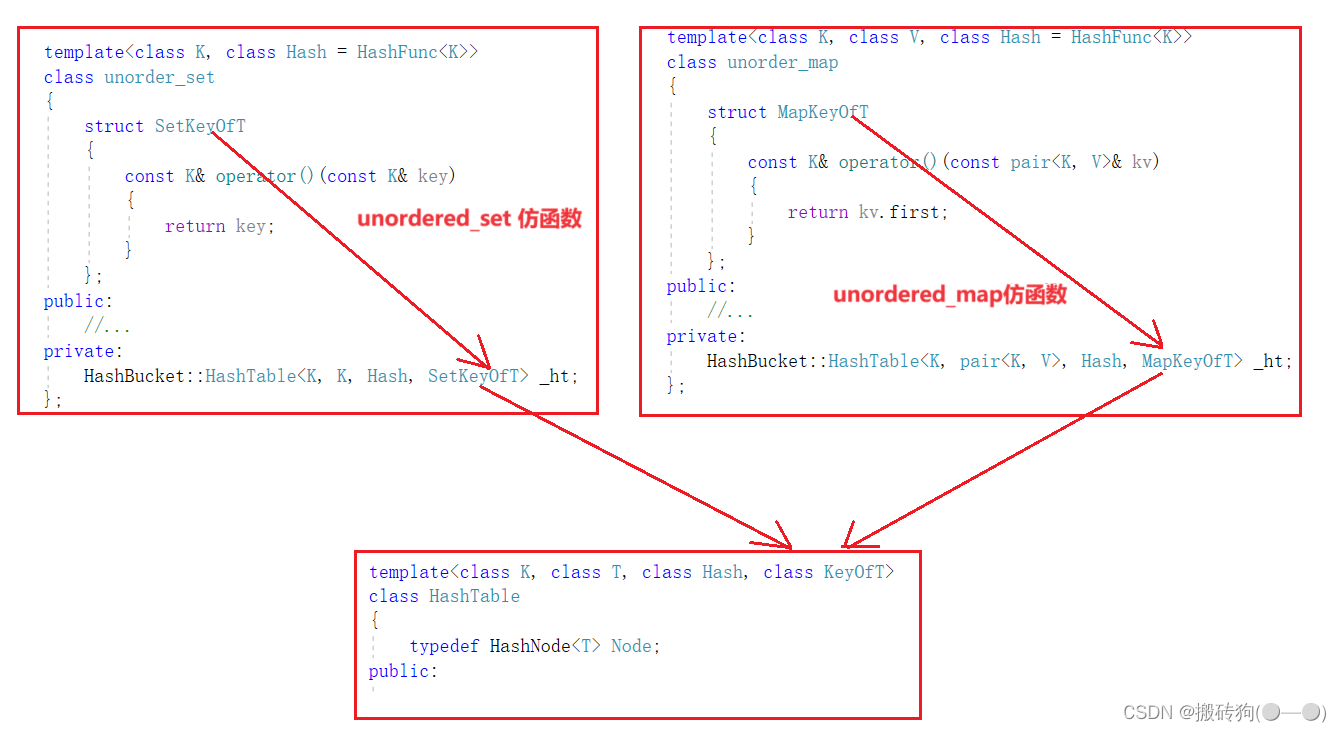
C++之unordered_map,unordered_set模拟实现
unordered_map,unordered_set模拟实现 哈希表源代码哈希表模板参数的控制仿函数增加正向迭代器实现*运算符重载->运算符重载运算符重载! 和 运算符重载begin()与end()实现 unordered_set实现unordered_map实现map/set 与 unordered_map/unordered_set对比哈希表…...

React Router,常用API有哪些?
react-router React Router是一个用于构建单页面应用程序(SPA)的库,它是用于管理React应用中页面导航和路由的工具。SPA是一种Web应用程序类型,它在加载初始页面后,通过JavaScript来动态加载并更新页面内容࿰…...

JVM类加载和双亲委派机制
当我们用java命令运行某个类的main函数启动程序时,首先需要通过类加载器把类加载到JVM,本文主要说明类加载机制和其具体实现双亲委派模式。 一、类加载机制 类加载过程: 类加载的过程是将类的字节码加载到内存中的过程,主要包括…...

P-MVSNet ICCV-2019 学习笔记总结 译文 深度学习三维重建
文章目录 5 P-MVSNet ICCV-20195.0 主要特点5.1 文章概述5.2 研究方法5.2.1 特征提取5.2.2 学习局域匹配置信5.2.3 深度图预测5.2.4 Loss方程MVSNet系列最新顶刊 对比总结5 P-MVSNet ICCV-2019 深度学习三维重建 P-MVSNet-ICCV-2019(原文、译文、批注) 下载 5.0 主要特点 …...
vueshowpdf 移动端pdf文件预览
1、安装 npm install vueshowpdf -S2、参数 属性说明类型默认值v-model是否显示pdf--pdfurlpdf的文件地址String- scale 默认放大倍数 Number1.2 minscale 最小放大倍数 Number0.8 maxscale 最大放大倍数 Number2 3、事件 名称说明回调参数closepdf pdf关闭事件-pdferr文…...

C#根据excel文件中的表头创建数据库表
C#根据excel文件中的表头创建数据库表 private void button1_Click(object sender, EventArgs e){string tableName tableNameTextBox.Text;string connectionString "";using (OpenFileDialog openFileDialog new OpenFileDialog()){openFileDialog.Filter &quo…...
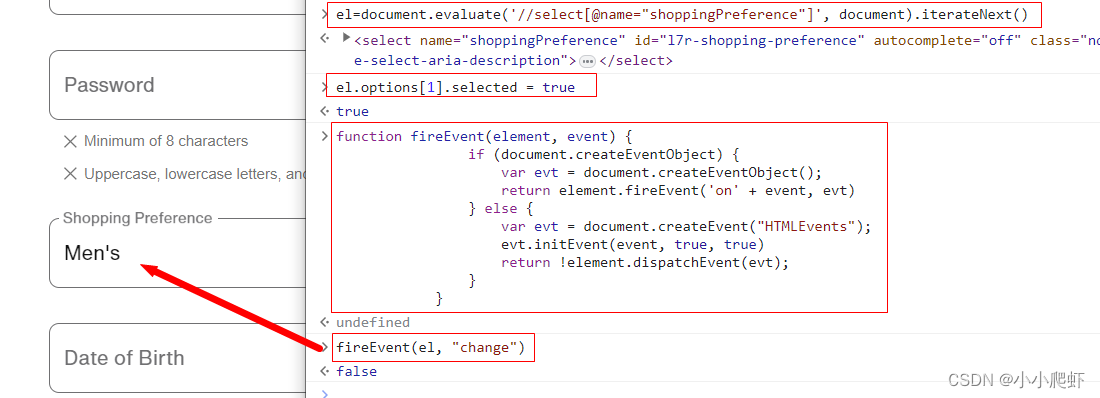
js通过xpath定位元素并且操作元素以下拉框select为例
js也可以使用xpath定位元素,现在实例讲解。 页面上有一个下拉框,里面内容有三个,用F12看一下 一、使用xpath定位这个下拉框select eldocument.evaluate(//select[name"shoppingPreference"], document).iterateNext()二、为下拉框…...
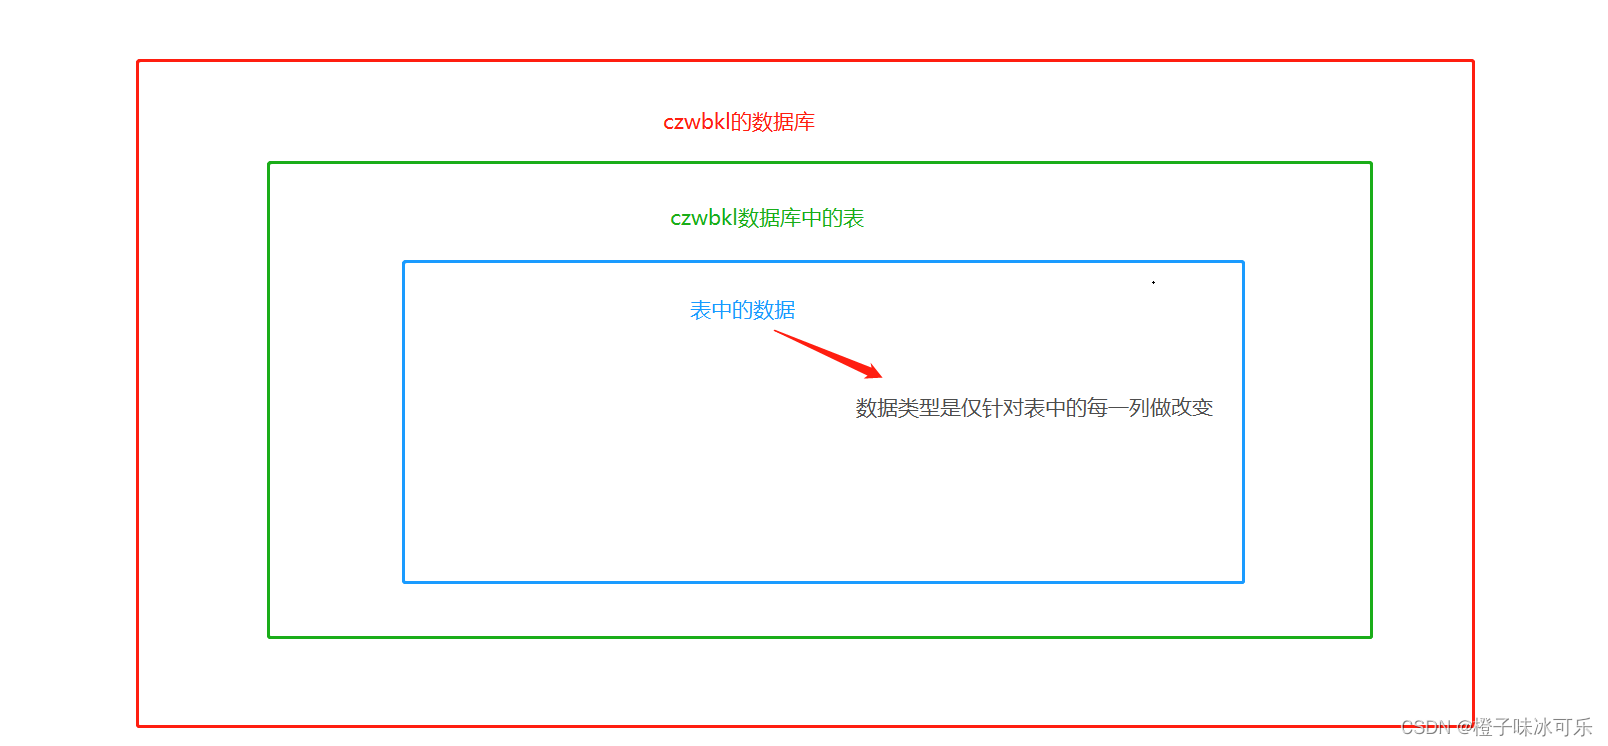
数据类型
目录 1.数值类型 整数类型 int 小数类型 double 2.字符类型 固定长度字符串 char 可变长度字符串 varchar 3.日期时间类型 日期类型:date 日期时间类型:datetime MySQL从小白到总裁完整教程目录:https://blog.csdn.net/weixin_67859959/article…...

vue 模板应用
一,模板应用也就是对DOM的操作 二,如何使用 通过标签里面添加ref 和vue中使用 this.$refs.ref的名字.操作 进行使用 <template><h3>模板引用</h3><div ref"cont" class"cont">{{ content }}</div>&…...
Golang教程与Gin教程合集,入门到实战
GolangGin框架GormRbac微服务仿小米商城项目实战视频教程Docker Swarm K8s云原生分布式部署 介绍: Go即Golang,是Google公司2009年11月正式对外公开的一门编程语言,它不仅拥有静态编译语言的安全和高性能,而 且又达到了动态语言开…...

国家网络安全周 | 天空卫士荣获“2023网络安全优秀创新成果大赛优胜奖”
9月11日上午,四川省2023年国家网络安全宣传周在泸州开幕。在开幕式上,为2023年网络安全优秀创新成果大赛——成都分站赛暨四川省“熊猫杯”网络安全优秀作品大赛中获奖企业颁奖,天空卫士银行数据安全方案获得优秀解决方案奖。 本次比赛由四川…...
)
Swift学习笔记一(Array篇)
目录 0 绪论 1 数组的创建和初始化 2.数组遍历 2.1通过键值对遍历 2.2 通过forEach遍历 2.3 通过for in遍历 2.3.1 for in 搭配 enumerated 2.3.2 for in的另一种形式 2.3.2 for in 搭配 indices 2.4 通过Iterator遍历器遍历 3 数组的操作 3.1 contains 判断数组包含…...

C++项目实战——基于多设计模式下的同步异步日志系统-②-前置知识补充-不定参函数
文章目录 专栏导读不定参函数C风格不定参函数不定参宏函数 专栏导读 🌸作者简介:花想云 ,在读本科生一枚,C/C领域新星创作者,新星计划导师,阿里云专家博主,CSDN内容合伙人…致力于 C/C、Linux 学…...

C++使用Boost库加入UDP组播时程序崩溃
程序崩溃情况 本程序运行在Oracle VM VirtualBox虚拟的Ubuntu20.04上 terminate called after throwing an instance of ‘boost::wrapexceptboost::system::system_error’ what(): set_option: No such device 已放弃 (核心已转储) ** C使用Boost库加入组播的代码 #inclu…...

华为HCIA(四)
链路聚合可以负载分担,增加带宽,提高可靠性 Eth-trunk的传输速率和成员端口数量喝带宽有关 路由器分割广播域,交换机分割冲突域 指定端口:DP;根端口:RP;阻塞端口:AP 如果目的MAC不在交换机MAC中&…...
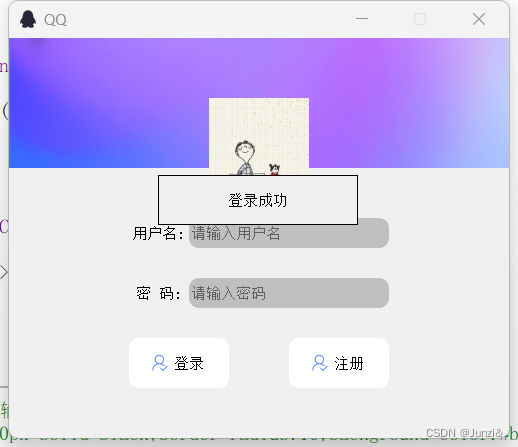
Qt --- Day01
效果图: 头像的圆形未实现 单击登陆,触发信号与槽 enter_widget.h #ifndef ENTER_H #define ENTER_H#include <QDialog> #include<QLabel> #include<QTimer> class enter_widget : public QDialog {Q_OBJECT public:explicit enter_…...

Docker 离线安装指南
参考文章 1、确认操作系统类型及内核版本 Docker依赖于Linux内核的一些特性,不同版本的Docker对内核版本有不同要求。例如,Docker 17.06及之后的版本通常需要Linux内核3.10及以上版本,Docker17.09及更高版本对应Linux内核4.9.x及更高版本。…...

使用VSCode开发Django指南
使用VSCode开发Django指南 一、概述 Django 是一个高级 Python 框架,专为快速、安全和可扩展的 Web 开发而设计。Django 包含对 URL 路由、页面模板和数据处理的丰富支持。 本文将创建一个简单的 Django 应用,其中包含三个使用通用基本模板的页面。在此…...

Linux 文件类型,目录与路径,文件与目录管理
文件类型 后面的字符表示文件类型标志 普通文件:-(纯文本文件,二进制文件,数据格式文件) 如文本文件、图片、程序文件等。 目录文件:d(directory) 用来存放其他文件或子目录。 设备…...
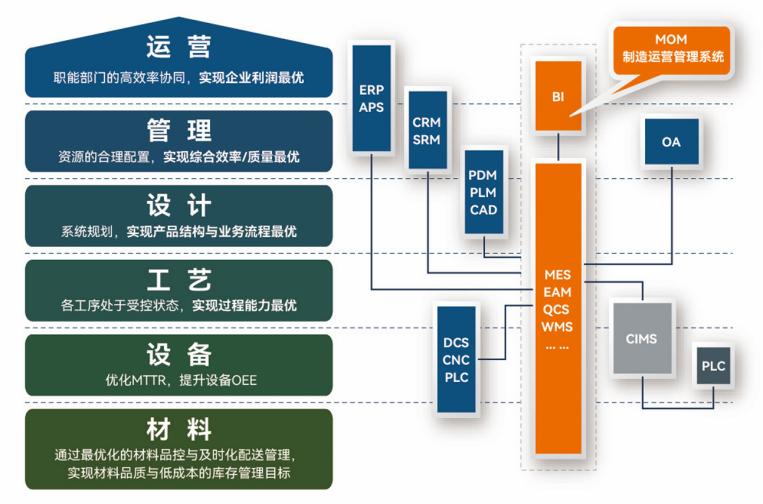
盘古信息PCB行业解决方案:以全域场景重构,激活智造新未来
一、破局:PCB行业的时代之问 在数字经济蓬勃发展的浪潮中,PCB(印制电路板)作为 “电子产品之母”,其重要性愈发凸显。随着 5G、人工智能等新兴技术的加速渗透,PCB行业面临着前所未有的挑战与机遇。产品迭代…...

Admin.Net中的消息通信SignalR解释
定义集线器接口 IOnlineUserHub public interface IOnlineUserHub {/// 在线用户列表Task OnlineUserList(OnlineUserList context);/// 强制下线Task ForceOffline(object context);/// 发布站内消息Task PublicNotice(SysNotice context);/// 接收消息Task ReceiveMessage(…...

2024年赣州旅游投资集团社会招聘笔试真
2024年赣州旅游投资集团社会招聘笔试真 题 ( 满 分 1 0 0 分 时 间 1 2 0 分 钟 ) 一、单选题(每题只有一个正确答案,答错、不答或多答均不得分) 1.纪要的特点不包括()。 A.概括重点 B.指导传达 C. 客观纪实 D.有言必录 【答案】: D 2.1864年,()预言了电磁波的存在,并指出…...
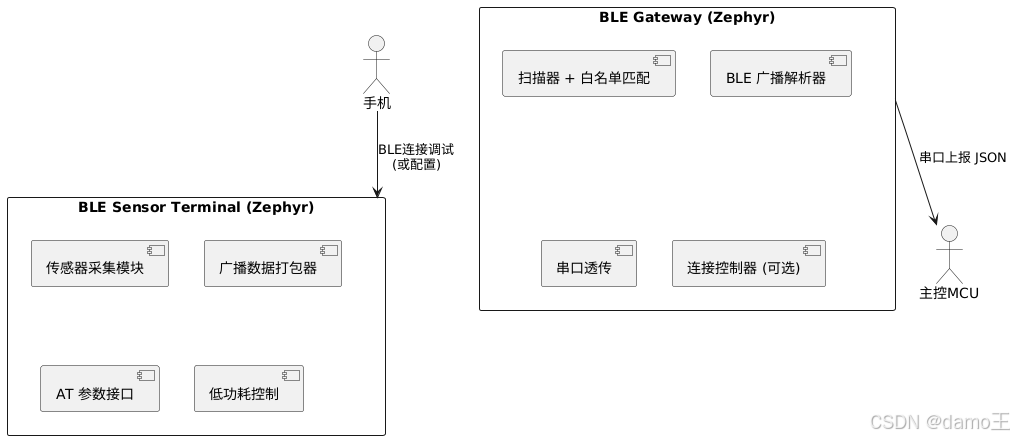
【Zephyr 系列 10】实战项目:打造一个蓝牙传感器终端 + 网关系统(完整架构与全栈实现)
🧠关键词:Zephyr、BLE、终端、网关、广播、连接、传感器、数据采集、低功耗、系统集成 📌目标读者:希望基于 Zephyr 构建 BLE 系统架构、实现终端与网关协作、具备产品交付能力的开发者 📊篇幅字数:约 5200 字 ✨ 项目总览 在物联网实际项目中,**“终端 + 网关”**是…...
【OSG学习笔记】Day 16: 骨骼动画与蒙皮(osgAnimation)
骨骼动画基础 骨骼动画是 3D 计算机图形中常用的技术,它通过以下两个主要组件实现角色动画。 骨骼系统 (Skeleton):由层级结构的骨头组成,类似于人体骨骼蒙皮 (Mesh Skinning):将模型网格顶点绑定到骨骼上,使骨骼移动…...
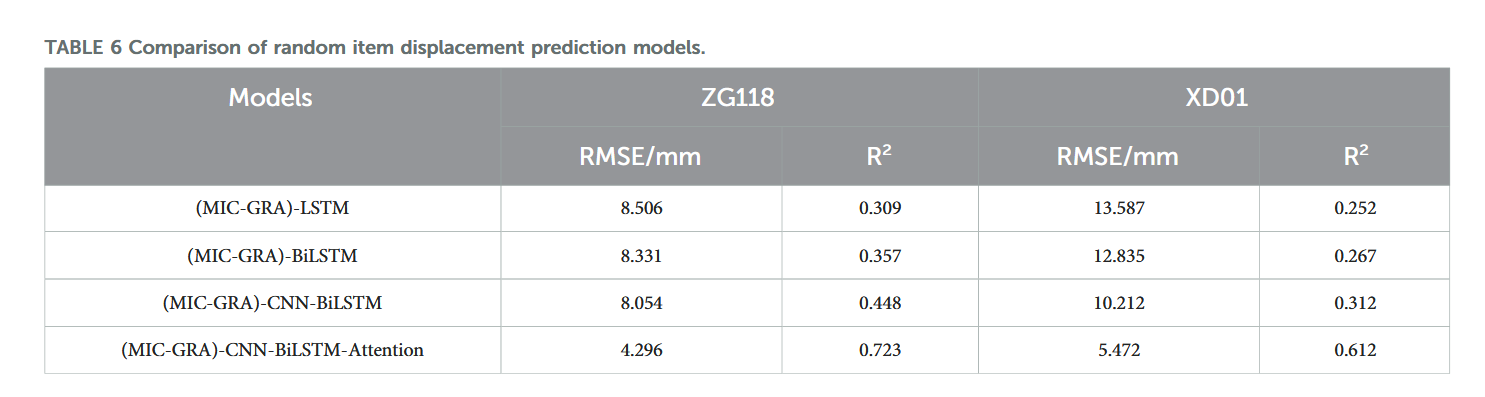
【论文阅读28】-CNN-BiLSTM-Attention-(2024)
本文把滑坡位移序列拆开、筛优质因子,再用 CNN-BiLSTM-Attention 来动态预测每个子序列,最后重构出总位移,预测效果超越传统模型。 文章目录 1 引言2 方法2.1 位移时间序列加性模型2.2 变分模态分解 (VMD) 具体步骤2.3.1 样本熵(S…...

如何在最短时间内提升打ctf(web)的水平?
刚刚刷完2遍 bugku 的 web 题,前来答题。 每个人对刷题理解是不同,有的人是看了writeup就等于刷了,有的人是收藏了writeup就等于刷了,有的人是跟着writeup做了一遍就等于刷了,还有的人是独立思考做了一遍就等于刷了。…...