SpringBoot结合MyBatis实现多数据源配置
SpringBoot结合MyBatis实现多数据源配置
一、前提条件
1.1、环境准备
SpringBoot框架实现多数据源操作,首先需要搭建Mybatis的运行环境。
由于是多数据源,也就是要有多个数据库,所以,我们创建两个测试数据库,分别是:【sp-demo01】和【sp-demo02】,如下图所示:

具体SQL代码:
- 创建【sp-demo01】数据库。
-- 创建数据库
CREATE DATABASE sp-demo01;-- ----------------------------
-- Table structure for t_emp
-- ----------------------------
DROP TABLE IF EXISTS `t_emp`;
CREATE TABLE `t_emp` (`emp_id` int(11) NOT NULL AUTO_INCREMENT COMMENT '员工ID',`emp_name` varchar(255) NOT NULL COMMENT '员工姓名',`age` int(11) DEFAULT NULL COMMENT '年龄',`dept_id` int(11) NOT NULL COMMENT '部门ID',PRIMARY KEY (`emp_id`)
) ENGINE=InnoDB AUTO_INCREMENT=3002 DEFAULT CHARSET=utf8;-- ----------------------------
-- Records of t_emp
-- ----------------------------
INSERT INTO `t_emp` VALUES ('2001', 'Lucy', '21', '1002');
INSERT INTO `t_emp` VALUES ('3001', 'Tom', '25', '1001');
- 创建【sp-demo02】数据库。
-- 创建数据库
CREATE DATABASE sp-demo02;-- ----------------------------
-- Table structure for t_dept
-- ----------------------------
DROP TABLE IF EXISTS `t_dept`;
CREATE TABLE `t_dept` (`dept_id` int(11) NOT NULL AUTO_INCREMENT COMMENT '部门ID',`dept_name` varchar(255) NOT NULL COMMENT '部门名称',`desc` varchar(255) DEFAULT NULL COMMENT '描述',PRIMARY KEY (`dept_id`)
) ENGINE=InnoDB AUTO_INCREMENT=1003 DEFAULT CHARSET=utf8;-- ----------------------------
-- Records of t_dept
-- ----------------------------
INSERT INTO `t_dept` VALUES ('1001', '研发部', '编写程序');
INSERT INTO `t_dept` VALUES ('1002', '测试部', '寻找bug');
1.2、如何配置
MyBatis框架中,提供了一个**【@MapperScan】注解,该注解作用是指定mapper接口所在的路径,并且这个注解中,也可以指定使用哪个【SqlSessionFactory】对象,只需要通过该注解的【sqlSessionFactoryRef】**属性即可实现。
这里的SqlSessionFactory就相当于是一个数据库,如果我们要配置多数据源,那就相当于是要在工程里面创建多个SqlSessionFactory对象,然后再使用的时候指定具体的SqlSessionFactory对象即可。

配置数据源,需要创建三个对象,分别是下面三个:
- 第一个对象:创建DataSource对象。
- 第二个对象:创建SqlSessionFactory对象。
- 第三个对象:创建SqlSessionTmplate对象。
知道了这个知识,那就可以进行多数据源配置啦。
二、多数据源配置
这里,我们就创建两个数据源作为测试案例,两个数据源分别叫做【MasterDataSource】和【SlaveDataSource】。
2.1、创建数据源配置类
(1)创建Master配置类
在工程中,创建一个【MasterDataSourceConfig】配置类,代码如下所示:
package com.spring.boot.demo.config;import com.alibaba.druid.spring.boot.autoconfigure.DruidDataSourceBuilder;
import org.apache.ibatis.session.SqlSessionFactory;
import org.mybatis.spring.SqlSessionFactoryBean;
import org.mybatis.spring.SqlSessionTemplate;
import org.mybatis.spring.annotation.MapperScan;
import org.mybatis.spring.boot.autoconfigure.SpringBootVFS;
import org.springframework.beans.factory.annotation.Qualifier;
import org.springframework.boot.context.properties.ConfigurationProperties;
import org.springframework.context.annotation.Bean;
import org.springframework.context.annotation.Configuration;
import org.springframework.context.annotation.Primary;
import org.springframework.core.io.support.PathMatchingResourcePatternResolver;import javax.sql.DataSource;/*** @author Js* @version 1.0.0* @Date: 2023/09/06 19:16:30* @Description*/
@MapperScan(basePackages = "com.spring.boot.demo.master.mapper",sqlSessionFactoryRef = "masterSqlSessionFactory",sqlSessionTemplateRef = "masterSqlSessionTemplate"
)
@Configuration
public class MasterDataSourceConfig {// 默认指定 master 作为主数据源@Primary// 注入数据源@Bean("masterDataSource")// 指定 master 数据源的配置信息前缀@ConfigurationProperties(prefix = "spring.datasource.master")public DataSource masterDataSource() {// 手动创建 Druid 数据源对象return DruidDataSourceBuilder.create().build();}// 创建 SqlSessionFactory 对象@Bean("masterSqlSessionFactory")public SqlSessionFactory masterSqlSessionFactory(@Qualifier("masterDataSource") DataSource masterDataSource) throws Exception {// 创建 SqlSessionFactoryBean 对象SqlSessionFactoryBean factoryBean = new SqlSessionFactoryBean();// 设置数据源factoryBean.setDataSource(masterDataSource);// 设置 mapper 映射文件路径PathMatchingResourcePatternResolver resolver = new PathMatchingResourcePatternResolver();factoryBean.setMapperLocations(resolver.getResources("classpath:mappers/master/**/*.xml"));// 设置 VFSfactoryBean.setVfs(SpringBootVFS.class);// 返回 SqlSessionFactory 对象return factoryBean.getObject();}// 创建 SqlSessionTemplate 对象@Bean("masterSqlSessionTemplate")public SqlSessionTemplate masterSqlSessionTemplate(@Qualifier("masterSqlSessionFactory") SqlSessionFactory masterSqlSessionFactory) {// 创建 SqlSessionTemplate 对象return new SqlSessionTemplate(masterSqlSessionFactory);}}
(2)创建Slave配置类
在工程中,创建一个【SlaveDataSourceConfig】配置类,代码如下所示:
package com.spring.boot.demo.config;import com.alibaba.druid.spring.boot.autoconfigure.DruidDataSourceBuilder;
import org.apache.ibatis.session.SqlSessionFactory;
import org.mybatis.spring.SqlSessionFactoryBean;
import org.mybatis.spring.SqlSessionTemplate;
import org.mybatis.spring.annotation.MapperScan;
import org.mybatis.spring.boot.autoconfigure.SpringBootVFS;
import org.springframework.beans.factory.annotation.Qualifier;
import org.springframework.boot.context.properties.ConfigurationProperties;
import org.springframework.context.annotation.Bean;
import org.springframework.context.annotation.Configuration;
import org.springframework.core.io.support.PathMatchingResourcePatternResolver;import javax.sql.DataSource;/*** @author Js* @version 1.0.0* @Date: 2023/09/06 19:30:45* @Description*/
@MapperScan(basePackages = "com.spring.boot.demo.slave.mapper",sqlSessionFactoryRef = "slaveSqlSessionFactory",sqlSessionTemplateRef = "slaveSqlSessionTemplate"
)
@Configuration
public class SlaveDataSourceConfig {// 注入数据源@Bean("slaveDataSource")// 指定 slave 数据源的配置信息前缀@ConfigurationProperties(prefix = "spring.datasource.slave")public DataSource slaveDataSource() {// 手动创建 Druid 数据源对象return DruidDataSourceBuilder.create().build();}// 创建 SqlSessionFactory 对象@Bean("slaveSqlSessionFactory")public SqlSessionFactory slaveSqlSessionFactory(@Qualifier("slaveDataSource") DataSource slaveDataSource) throws Exception {// 创建 SqlSessionFactoryBean 对象SqlSessionFactoryBean factoryBean = new SqlSessionFactoryBean();// 设置数据源factoryBean.setDataSource(slaveDataSource);// 设置 mapper 映射文件路径PathMatchingResourcePatternResolver resolver = new PathMatchingResourcePatternResolver();factoryBean.setMapperLocations(resolver.getResources("classpath:mappers/slave/**/*.xml"));// 设置 VFSfactoryBean.setVfs(SpringBootVFS.class);// 返回 SqlSessionFactory 对象return factoryBean.getObject();}// 创建 SqlSessionTemplate 对象@Bean("slaveSqlSessionTemplate")public SqlSessionTemplate slaveSqlSessionTemplate(@Qualifier("slaveSqlSessionFactory") SqlSessionFactory slaveSqlSessionFactory) {// 创建 SqlSessionTemplate 对象return new SqlSessionTemplate(slaveSqlSessionFactory);}}
2.2、添加数据源配置信息
在【application.yml】中添加master、slave两个数据源的配置信息,如下:
# 配置数据源
spring:datasource:# master 数据源信息master:driver-class-name: com.mysql.cj.jdbc.Driver # 数据库驱动url: jdbc:mysql://localhost:3306/sp-demo01?serverTimezone=Asia/Shanghai&useUnicode=true&characterEncoding=UTF-8 # 数据库地址username: rootpassword: root# slave 数据源信息slave:driver-class-name: com.mysql.cj.jdbc.Driver # 数据库驱动url: jdbc:mysql://localhost:3306/sp-demo02?serverTimezone=Asia/Shanghai&useUnicode=true&characterEncoding=UTF-8 # 数据库地址username: rootpassword: root
2.3、创建Mapper接口
(1)创建Master的mapper接口
在【com.spring.boot.demo.master.mapper】包下面,创建【EmpMapper】类。
package com.spring.boot.demo.master.mapper;import com.spring.boot.demo.pojo.EmpBo;import java.util.List;public interface EmpMapper {/*** 查询所有员工*/List<EmpBo> queryAll();
}
(2)创建Slave的mapper接口
在【com.spring.boot.demo.slave.mapper】包下面,创建【DeptMapper】类。
package com.spring.boot.demo.slave.mapper;import com.spring.boot.demo.pojo.DeptBo;
import org.apache.ibatis.annotations.Param;public interface DeptMapper {/*** 根据 ID 查询部门* @param deptId* @return*/DeptBo getDeptById(@Param("deptId") Integer deptId);
}
2.4、创建XML映射文件
(1)创建Master的XML映射文件
在【mappers/master】目录下面,新建【EmpMapper.xml】映射文件。
<?xml version="1.0" encoding="UTF-8" ?>
<!DOCTYPE mapper PUBLIC "-//mybatis.org//DTD Mapper 3.0//EN""http://mybatis.org/dtd/mybatis-3-mapper.dtd">
<mapper namespace="com.spring.boot.demo.master.mapper.EmpMapper"><select id="queryAll" resultType="com.spring.boot.demo.pojo.EmpBo">selectemp_id as empId,emp_name as empName,age,dept_id as deptIdfrom t_emp</select>
</mapper>
(2)创建Slave的XML映射文件
在【mappers/slave】目录下面,新建【DeptMapper.xml】映射文件。
<?xml version="1.0" encoding="UTF-8" ?>
<!DOCTYPE mapper PUBLIC "-//mybatis.org//DTD Mapper 3.0//EN""http://mybatis.org/dtd/mybatis-3-mapper.dtd">
<mapper namespace="com.spring.boot.demo.slave.mapper.DeptMapper"><select id="getDeptById" resultType="com.spring.boot.demo.pojo.DeptBo" parameterType="java.lang.Integer">selectdept_id as deptId,dept_name as deptNamefrom t_deptwhere dept_id = #{deptId}</select>
</mapper>
2.5、编写测试类
package com.spring.boot.demo.controller;import com.spring.boot.demo.master.mapper.EmpMapper;
import com.spring.boot.demo.pojo.DeptBo;
import com.spring.boot.demo.pojo.EmpBo;
import com.spring.boot.demo.slave.mapper.DeptMapper;
import org.springframework.beans.factory.annotation.Autowired;
import org.springframework.web.bind.annotation.GetMapping;
import org.springframework.web.bind.annotation.RequestMapping;
import org.springframework.web.bind.annotation.RestController;import java.util.List;/**
* @author Js* @version 1.0.0* @Date: 2023/09/06 20:30:10* @Description*/
@RestController
@RequestMapping("/api")
public class TestController {@Autowiredprivate EmpMapper empMapper;@Autowiredprivate DeptMapper deptMapper;@GetMapping("/demo")public String demo() {// 查询所有员工信息List<EmpBo> empBoList = empMapper.queryAll();System.out.println(empBoList);// 查询每一个员工的部门信息for (EmpBo empBo : empBoList) {DeptBo deptBo = deptMapper.getDeptById(empBo.getDeptId());System.out.println(deptBo);}return "测试成功";}}
2.6、运行测试
经过上面几个步骤之后,最终的工程目录结果应该是下面这样子的,如下图:

启动工程,浏览器访问【http://localhost:8080/api/demo】,查看控制台输出结果。

到此,SpringBoot结合MyBatis框架实现多数据源配置就成功啦。
相关文章:
SpringBoot结合MyBatis实现多数据源配置
SpringBoot结合MyBatis实现多数据源配置 一、前提条件 1.1、环境准备 SpringBoot框架实现多数据源操作,首先需要搭建Mybatis的运行环境。 由于是多数据源,也就是要有多个数据库,所以,我们创建两个测试数据库,分别是…...

单个vue echarts页面
<template> <div ref"history" class"echarts"></div> </template> <script> export default{ data () { return {}; }, methods: { history(){ let myChart this.$echarts.init(this.$refs.history); // 绘制图表 myCha…...
【web开发】6、Django(1)
提示:文章写完后,目录可以自动生成,如何生成可参考右边的帮助文档 文章目录 一、Django是什么?二、使用步骤1.安装Django2.创建项目3.创建app4.快速上手5.模板继承 数据库操作1.安装第三方模块2.自己创建数据库3.DJango链接数据库…...
第29节-PhotoShop基础课程-滤镜库
文章目录 前言1.滤镜库2.Camera Raw滤镜 (用来对图片进行预处理,最全面的一个)3.神经滤镜(2022插件 需要先下载)4.液化(胖-> 瘦 矮->高)5.其它滤镜1.自适应广角2.镜头矫正 把图片放正3.消…...
)
空间(蓝桥杯)
空间 本题为填空题,只需要算出结果后,在代码中使用输出语句将所填结果输出即可。 小蓝准备用 256MB 的内存空间开一个数组,数组的每个元素都是 32 位 二进制整数,如果不考虑程序占用的空间和维护内存需要的辅助空间,…...
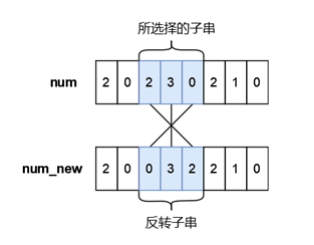
蓝桥杯2023年第十四届省赛真题-更小的数--题解
目录 蓝桥杯2023年第十四届省赛真题-更小的数 题目描述 输入格式 输出格式 样例输入 样例输出 提示 【思路解析】 【代码实现】 蓝桥杯2023年第十四届省赛真题-更小的数 时间限制: 3s 内存限制: 320MB 提交: 895 解决: 303 题目描述 小蓝有一个长度均为 n 且仅由数字…...

SpringBoot详解
文章目录 SpringBoot的特点Spring,SpringBoot的区别SpringBoot常用注解标签SpringBoot概述SpringBoot简单Demo搭建读取配置文件的内容 SpringBoot自动配置Condition自定义beanSpringBoot常用注解原理EnableAutoConfiguration SpringBoot监听机制SpringBoot启动流程分…...

typescript 类型断言
typescript 类型断言 TypeScript 是一种在 JavaScript 基础上开发的强类型语言,它为开发者提供了类型安全性和其他有用的特性。类型断言是 TypeScript 中的一种特性,允许开发者在编译时确定变量或表达式的类型。类型断言有多种使用场景,包括…...

如何确定自己是否适合做程序员?
如果你不确定你是否注定要成为一名程序员,这里有六个迹象可能表明你不适合。 1. 你缺乏实验创造力 尽管编程的基础是逻辑,但它在很大程度上是一种创造性的艺术。新程序就像一张空白的画布。画笔和调色板是语言、框架和库。您需要对自己的创作和创造力有…...
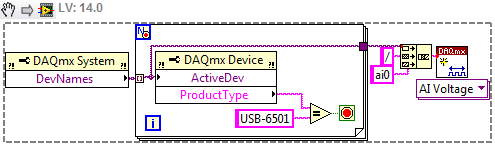
LabVIEW以编程方式查找系统中DAQ设备的设备名称
LabVIEW以编程方式查找系统中DAQ设备的设备名称 使用DAQmx VI,“创建虚拟通道”函数,这个函数需要物理通道输入端。当使用相同型号的新设备(例如,两个不同的USB-6210)运行可执行文件时,代码会中断…...

23、mysql数据库的安装
(无图,简易版本) 一、下载 点开下面的链接:https://dev.mysql.com/downloads/mysql/ 点击Download 就可以下载对应的安装包了 二、解压 下载完成后我们得到的是一个压缩包,将其解压,我们就可以得到MyS…...
【实战详解】如何快速搭建接口自动化测试框架?Python + Requests
摘要: 本文主要介绍如何使用Python语言和Requests库进行接口自动化测试,并提供详细的代码示例和操作步骤。希望能对读者有所启发和帮助。 前言 随着移动互联网的快速发展,越来越多的应用程序采用Web API(也称为RESTful API&…...

Linux安全加固:保护你的服务器
🌷🍁 博主猫头虎(🐅🐾)带您 Go to New World✨🍁 🦄 博客首页——🐅🐾猫头虎的博客🎐 🐳 《面试题大全专栏》 🦕 文章图文…...

【C++初阶】C++STL详解(四)—— vector的模拟实现
📝个人主页:Sherry的成长之路 🏠学习社区:Sherry的成长之路(个人社区) 📖专栏链接:C初阶 🎯长路漫漫浩浩,万事皆有期待 【C初阶】CSTL详解(三…...

VS code 下 makefile 【缺少分隔符 停下来】 报错解决方法
首先来看报错的makefile源码 再来看报错的信息: 第5行缺少分隔符,其实不止是第5行,只要是前面需要加tab留白的行都会报这个错误,比如说第7行第11行 编译的时候,前面的留白必须是按tab键生成的 但是!&…...

虹科案例 | Zuellig Pharma和ELPRO通过符合GDP标准的温度监测和高效的温度数据管理为未来发展奠定基础
在本案例研究中,您将了解Zuellig Pharma 实施了温度监测解决方案,以一致的数据结构获取各国和各种运输方式的数据; 通过将温度数据上传到其数据库管理系统,显著提高了其效率; 并建立了为未来管理决策提供数据增值使用的基础。 项目合作伙伴 …...

为啥我的第二个for循环不加框红的代码就运行失效呢?(文末赠书)
点击上方“Python爬虫与数据挖掘”,进行关注 回复“书籍”即可获赠Python从入门到进阶共10本电子书 今 日 鸡 汤 苟全性命于乱世,不求闻达于诸侯。 大家好,我是皮皮。 一、前言 前几天在Python最强王者群【哎呦喂 是豆子~】问了一…...

Java高级之注解
文章目录 一、注解1.1、Annotation的使用示例1.2、自定义注解1.3、元注解1.4、通过反射获取注解信息---未完成1.5、jdk 8 中注解的新特性 一、注解 注解:Annotation 注解是一种趋势,一定程度上 可以说:框架 注解 反射 设计模式 jdk 5.0 新…...
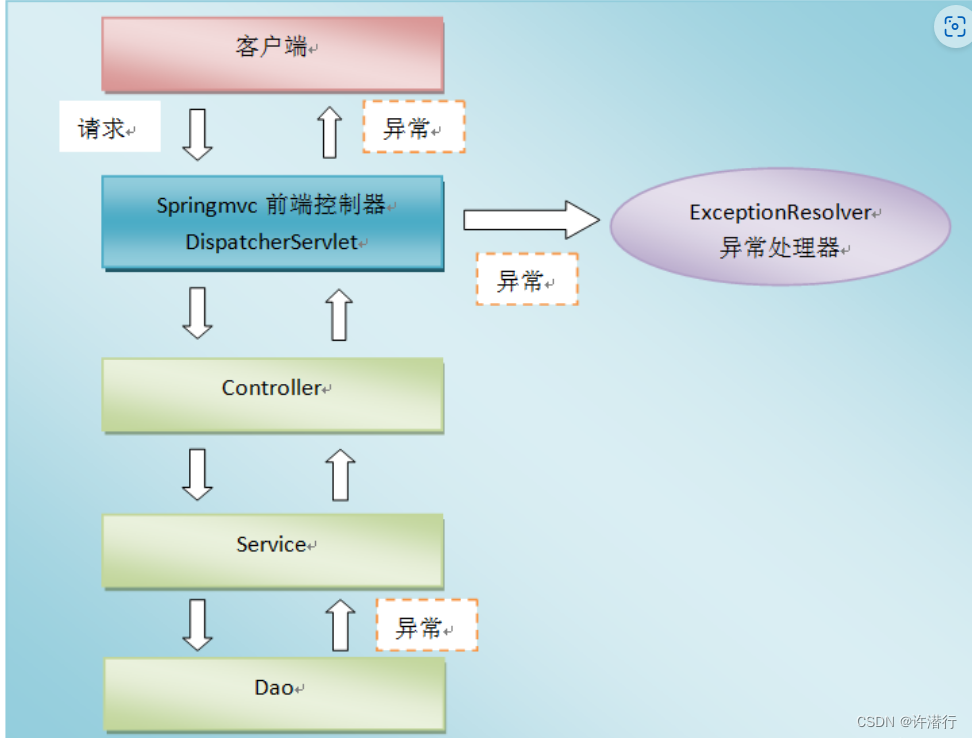
【SpringMVC】JSON数据传输与异常处理的使用
文章目录 一、Jackson1.1 Jackson是什么1.2 常用注解1.3 实例1.3.1导入依赖1.3.2 配置spring-mvc.xml1.3.3 JsonController.java 二、Spring MVC异常处理机制2.1 使用原因2.2 SpringMVC异常处理2.2.1 异常处理机制流程图2.2.2 异常处理的三种方式 一、Jackson 1.1 Jackson是什…...
LeNet-5
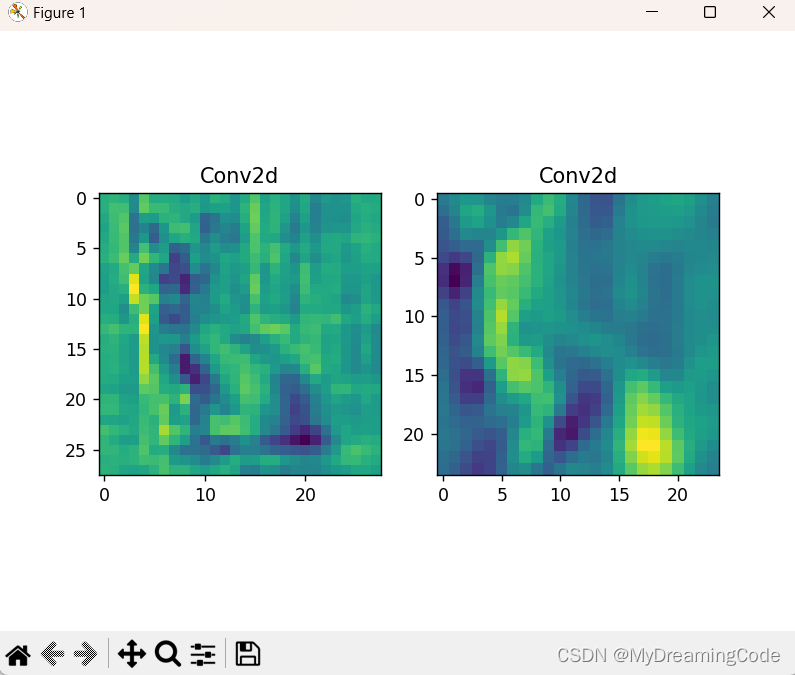
目录 一、知识点 二、代码 三、查看卷积层的feature map 1. 查看每层信息 2. show_featureMap.py 背景:LeNet-5是一个经典的CNN,由Yann LeCun在1998年提出,旨在解决手写数字识别问题。 一、知识点 1. iter()next() iter():…...

DSub:Android平台上最完整的Subsonic音乐客户端指南
DSub:Android平台上最完整的Subsonic音乐客户端指南 【免费下载链接】Subsonic Home of the DSub Android client fork 项目地址: https://gitcode.com/gh_mirrors/su/Subsonic DSub是一款专为Android设备设计的开源Subsonic客户端,让您能够随时随…...

Cadence 17.4 实战指南:从零到一构建高速PCB设计流程
1. 初识Cadence 17.4:高速PCB设计的起点 第一次打开Cadence 17.4时,那个蓝底白字的启动界面让我想起了刚入行时的场景。作为电子设计自动化(EDA)领域的标杆工具,Cadence Allegro系列一直是高速PCB设计的首选。不同于其…...

关键基础设施网络安全防御指南:从漏洞扫描到实战加固
1. 项目概述:一场迫在眉睫的网络空间风暴最近,如果你关注网络安全动态,会发现一种前所未有的紧迫感正在美国的关键基础设施领域蔓延。这种感觉,就像暴风雨来临前,气压骤降带来的那种沉闷与不安。作为一名在工业控制系统…...

从零构建现代化Web组件库:架构设计、开发实践与工程化指南
1. 项目概述:从零到一理解现代Web组件库如果你是一名前端开发者,或者正在构建一个需要大量交互界面的Web应用,那么“组件库”这个词对你来说一定不陌生。今天我们不聊那些耳熟能详的巨头库,而是聚焦于一个更具象、更贴近实际开发场…...

5分钟快速上手:TMSpeech离线语音转文字终极指南
5分钟快速上手:TMSpeech离线语音转文字终极指南 【免费下载链接】TMSpeech 腾讯会议摸鱼工具 项目地址: https://gitcode.com/gh_mirrors/tm/TMSpeech TMSpeech是一款完全免费的Windows离线语音转文字工具,能够实时将电脑声音或麦克风输入转换为文…...

别再死记硬背真值表了!用74LS147芯片实战,5分钟搞懂优先编码器工作原理
用74LS147芯片实战:5分钟直观理解优先编码器 在数字电路的学习中,优先编码器是一个让许多初学者感到困惑的概念。传统的教学方法往往从抽象的真值表和逻辑表达式开始,却忽略了最关键的"优先"机制在实际电路中的体现。本文将带你用一…...

LinkSwift网盘直链下载助手:告别限速,实现九大网盘全速下载的终极指南
LinkSwift网盘直链下载助手:告别限速,实现九大网盘全速下载的终极指南 【免费下载链接】Online-disk-direct-link-download-assistant 一个基于 JavaScript 的网盘文件下载地址获取工具。基于【网盘直链下载助手】修改 ,支持 百度网盘 / 阿里…...

VisionPro新手避坑指南:从CogPMAlignTool到Blob分析,这10个工具别再乱用了
VisionPro新手避坑指南:10个核心工具的正确打开方式 第一次打开VisionPro的工具栏时,面对数十个名称相似的图标,大多数工程师都会陷入选择困难。更棘手的是,许多工具的参数设置存在微妙的相互影响——一个看似无关的阈值调整可能…...

告别龟速下载:手把手教你离线部署Wine 5.0的Mono与Gecko组件
1. 为什么你需要离线安装Wine组件 每次在Linux上配置Wine运行Windows程序时,最让人头疼的就是等待Mono和Gecko组件下载的过程。我曾经在一个网络状况不太好的服务器上安装Wine,光是下载这两个组件就花了整整三个小时,期间还因为网络波动失败…...

ANSYS FLUENT:从网格划分到结果可视化的CFD求解全流程解析
1. ANSYS FLUENT入门:为什么选择这款CFD工具 第一次接触计算流体力学仿真时,面对市面上五花八门的CFD软件,我完全不知道该从哪入手。后来在导师建议下尝试了ANSYS FLUENT,才发现它特别适合像我这样的新手。FLUENT最吸引人的地方在…...