CMake教程-第 1 步:基本起点
CMake教程-第 1 步:基本起点
- 1 CMake教程介绍
- 2 学习步骤
- Step 1: A Basic Starting Point
- Step 2: Adding a Library
- Step 3: Adding Usage Requirements for a Library
- Step 4: Adding Generator Expressions
- Step 5: Installing and Testing
- Step 6: Adding Support for a Testing Dashboard
- Step 7: Adding System Introspection
- Step 8: Adding a Custom Command and Generated File
- Step 9: Packaging an Installer
- Step 10: Selecting Static or Shared Libraries
- Step 11: Adding Export Configuration
- Step 12: Packaging Debug and Release
- 3 Step 1: A Basic Starting Point
- 3.1 Exercise 1 - Building a Basic Project
- 3.1.1 目标
- 3.1.2 Helpful Resources(有用的资源)
- 3.1.3 Files to Edit(需编辑的文件)
- 3.1.4 Getting Started(入门指南)
- 3.1.5 Build and Run(构建并运行)
- 3.1.6 解决方案
- 3.1.7 CMakeLists.txt
- 3.1.8 tutorial.cxx
- 3.2 Exercise 2 - Specifying the C++ Standard
- 3.2.1 目标
- 3.2.2 Helpful Resources(有用的资源)
- 3.2.3 Files to Edit(需要编辑的文件)
- 3.2.4 Getting Started(入门指南)
- 3.2.5 Build and Run(构建并运行)
- 3.2.6 解决方案
- 3.2.7 CMakeLists.txt
- 3.2.8 tutorial.cxx
- 3.3 Exercise 3 - Adding a Version Number and Configured Header File
- 3.3.1 目标
- 3.3.2 Helpful Resources(有用的资源)
- 3.3.3 Files to Edit(需要编辑的文件)
- 3.3.4 Getting Started(入门指南)
- 3.3.5 Build and Run(构建并运行)
- 3.3.6 解决方案
- 3.3.7 CMakeLists.txt
- 3.3.8 tutorial.cxx
- 3.3.9 TutorialConfig.h.in
- 3.3.10 TutorialConfig.h
该文档是基于CMake的官方教程翻译而来,并稍微添加了自己的理解:
cmake的官方网站为:CMake Tutorial
1 CMake教程介绍
The CMake tutorial provides a step-by-step guide that covers common build system issues that CMake helps address. Seeing how various topics all work together in an example project can be very helpful.
CMake 教程提供了一个循序渐进的指南,涵盖了 CMake 可帮助解决的常见构建系统问题。在一个示例项目中了解各个主题是如何协同工作的,会非常有帮助。
2 学习步骤
The tutorial source code examples are available in this archive. Each step has its own subdirectory containing code that may be used as a starting point. The tutorial examples are progressive so that each step provides the complete solution for the previous step.
本文档中提供了教程源代码示例。每个步骤都有自己的子目录,其中包含可用作起点的代码。教程示例是循序渐进的,因此每一步都提供了前一步的完整解决方案。
Step 1: A Basic Starting Point
- Exercise 1 - Building a Basic Project
- Exercise 2 - Specifying the C++ Standard
- Exercise 3 - Adding a Version Number and Configured Header File
Step 2: Adding a Library
- Exercise 1 - Creating a Library
- Exercise 2 - Adding an Option
Step 3: Adding Usage Requirements for a Library
- Exercise 1 - Adding Usage Requirements for a Library
- Exercise 2 - Setting the C++ Standard with Interface Libraries
Step 4: Adding Generator Expressions
- Exercise 1 - Adding Compiler Warning Flags with Generator Expressions
Step 5: Installing and Testing
- Exercise 1 - Install Rules
- Exercise 2 - Testing Support
Step 6: Adding Support for a Testing Dashboard
- Exercise 1 - Send Results to a Testing Dashboard
Step 7: Adding System Introspection
- Exercise 1 - Assessing Dependency Availability
Step 8: Adding a Custom Command and Generated File
Step 9: Packaging an Installer
Step 10: Selecting Static or Shared Libraries
Step 11: Adding Export Configuration
Step 12: Packaging Debug and Release
3 Step 1: A Basic Starting Point
Where do I start with CMake? This step will provide an introduction to some of CMake’s basic syntax, commands, and variables. As these concepts are introduced, we will work through three exercises and create a simple CMake project.
如何开始使用 CMake?本步骤将介绍 CMake 的一些基本语法、命令和变量。在介绍这些概念的同时,我们将通过三个练习来创建一个简单的 CMake 项目。
Each exercise in this step will start with some background information. Then, a goal and list of helpful resources are provided. Each file in the Files to Edit section is in the Step1 directory and contains one or more TODO comments. Each TODO represents a line or two of code to change or add. The TODO s are intended to be completed in numerical order, first complete TODO 1 then TODO 2, etc. The Getting Started section will give some helpful hints and guide you through the exercise. Then the Build and Run section will walk step-by-step through how to build and test the exercise. Finally, at the end of each exercise the intended solution is discussed.
本步骤中的每个练习都会先介绍一些背景信息。然后是目标和有用资源列表。要编辑的文件 "部分中的每个文件都位于 Step1 目录中,包含一个或多个 TODO 注释。每个 TODO 都代表需要修改或添加的一两行代码。TODO 按数字顺序完成,首先完成 TODO 1,然后完成 TODO 2 等。入门 "部分将提供一些有用的提示,并指导你完成练习。然后,在 "构建和运行 "部分,将逐步介绍如何构建和测试练习。最后,在每个练习的结尾都会讨论预期的解决方案。
Also note that each step in the tutorial builds on the next. So, for example, the starting code for Step2 is the complete solution to Step1.
还请注意,教程中的每一步都是在下一步的基础上进行的。例如,步骤 2 的起始代码就是步骤 1 的完整解决方案。
3.1 Exercise 1 - Building a Basic Project
The most basic CMake project is an executable built from a single source code file. For simple projects like this, a CMakeLists.txt file with three commands is all that is required.
最基本的 CMake 项目是由单个源代码文件构建的可执行文件。对于像这样的简单项目,只需一个包含三条命令的 CMakeLists.txt 文件即可。
Note: Although upper, lower and mixed case commands are supported by CMake, lower case commands are preferred and will be used throughout the tutorial.
注意:虽然 CMake 支持大写、小写和混合大小写命令,但整个教程都将使用小写命令。
Any project’s top most CMakeLists.txt must start by specifying a minimum CMake version using the cmake_minimum_required() command. This establishes policy settings and ensures that the following CMake functions are run with a compatible version of CMake.
任何项目的 CMakeLists.txt 文件都必须首先使用 cmake_minimum_required() 命令指定 CMake 的最小版本。这将建立策略设置,并确保以下 CMake 功能在兼容的 CMake 版本下运行。
To start a project, we use the project() command to set the project name. This call is required with every project and should be called soon after cmake_minimum_required(). As we will see later, this command can also be used to specify other project level information such as the language or version number.
要启动一个项目,我们需要使用 project() 命令来设置项目名称。每个项目都需要调用该命令,并且应在 cmake_minimum_required() 之后尽快调用。稍后我们将看到,该命令还可用于指定其他项目级信息,如语言或版本号。
Finally, the add_executable() command tells CMake to create an executable using the specified source code files.
最后,add_executable() 命令告诉 CMake 使用指定的源代码文件创建一个可执行文件。
3.1.1 目标
Understand how to create a simple CMake project.
了解如何创建一个简单的 CMake 项目。
3.1.2 Helpful Resources(有用的资源)
- add_executable()
- cmake_minimum_required()
- project()
3.1.3 Files to Edit(需编辑的文件)
- CMakeLists.txt
3.1.4 Getting Started(入门指南)
The source code for tutorial.cxx is provided in the Help/guide/tutorial/Step1 directory and can be used to compute the square root of a number. This file does not need to be edited in this step.
在 Help/guide/tutorial/Step1 目录中提供了 tutorial.cxx 的源代码,可用于计算一个数字的平方根。本步骤无需编辑该文件。
In the same directory is a CMakeLists.txt file which you will complete. Start with TODO 1 and work through TODO 3.
在同一目录下有一个 CMakeLists.txt 文件,您将完成该文件。从 TODO 1 开始,直到 TODO 3。
3.1.5 Build and Run(构建并运行)
Once TODO 1 through TODO 3 have been completed, we are ready to build and run our project! First, run the cmake executable or the cmake-gui to configure the project and then build it with your chosen build tool.
完成 TODO 1 到 TODO 3 后,我们就可以构建和运行我们的项目了!首先,运行 cmake 可执行文件或 cmake-gui 配置项目,然后使用所选的构建工具构建项目。
For example, from the command line we could navigate to the Help/guide/tutorial directory of the CMake source code tree and create a build directory:
例如,我们可以从命令行导航到 CMake 源代码树的 Help/guide/tutorial 目录,并创建一个构建目录:
mkdir Step1_build
Next, navigate to that build directory and run cmake to configure the project and generate a native build system:
接下来,导航到构建目录,运行 cmake 配置项目并生成本地构建系统:
cd Step1_build
cmake ../Step1
Then call that build system to actually compile/link the project:
然后调用构建系统来实际编译/链接项目:
cmake --build .
Finally, try to use the newly built Tutorial with these commands:
最后,尝试用这些命令使用新构建的 Tutorial:
Tutorial 4294967296
Tutorial 10
Tutorial
3.1.6 解决方案
As mentioned above, a three line CMakeLists.txt is all that we need to get up and running. The first line is to use cmake_minimum_required() to set the CMake version as follows:
如上所述,我们只需三行 CMakeLists.txt 即可开始运行。第一行是使用 cmake_minimum_required()设置 CMake 版本,如下所示:
- TODO 1: Click to show/hide answer
TODO 1: CMakeLists.txt
cmake_minimum_required(VERSION 3.10)
The next step to make a basic project is to use the project() command as follows to set the project name:
制作基本项目的下一步是使用如下的 project() 命令设置项目名称:
- TODO 2: Click to show/hide answer
TODO 2: CMakeLists.txt
project(Tutorial)
The last command to call for a basic project is add_executable(). We call it as follows:
基本项目需要调用的最后一条命令是 add_executable()。调用方法如下
- TODO 3: Click to show/hide answer
TODO 3: CMakeLists.txt
add_executable(Tutorial tutorial.cxx)
3.1.7 CMakeLists.txt
# TODO 1: Set the minimum required version of CMake to be 3.10
cmake_minimum_required(VERSION 3.10)# TODO 2: Create a project named Tutorial
project(Tutorial)# TODO 3: Add an executable called Tutorial to the project
add_executable(Tutorial tutorial.cxx)
3.1.8 tutorial.cxx
// A simple program that computes the square root of a number
#include <cmath>
#include <cstdlib> // TODO 5: Remove this line
#include <iostream>
#include <string>// TODO 11: Include TutorialConfig.hint main(int argc, char* argv[])
{if (argc < 2) {// TODO 12: Create a print statement using Tutorial_VERSION_MAJOR//          and Tutorial_VERSION_MINORstd::cout << "Usage: " << argv[0] << " number" << std::endl;return 1;}// convert input to double// TODO 4: Replace atof(argv[1]) with std::stod(argv[1])const double inputValue = atof(argv[1]);// calculate square rootconst double outputValue = sqrt(inputValue);std::cout << "The square root of " << inputValue << " is " << outputValue<< std::endl;return 0;
}
3.2 Exercise 2 - Specifying the C++ Standard
CMake has some special variables that are either created behind the scenes or have meaning to CMake when set by project code. Many of these variables start with CMAKE_. Avoid this naming convention when creating variables for your projects. Two of these special user settable variables are CMAKE_CXX_STANDARD and CMAKE_CXX_STANDARD_REQUIRED. These may be used together to specify the C++ standard needed to build the project.
CMake 有一些特殊的变量,它们或者是在幕后创建的,或者是在项目代码中设置时对 CMake 有意义的。其中许多变量以 CMAKE_ 开头。在为您的项目创建变量时,请避免使用这种命名约定。其中两个特殊的用户可设置变量是 CMAKE_CXX_STANDARD 和 CMAKE_CXX_STANDARD_REQUIRED。这两个变量可以一起使用,以指定构建项目所需的 C++ 标准。
3.2.1 目标
Add a feature that requires C++11.
添加一项需要 C++11 的功能。
3.2.2 Helpful Resources(有用的资源)
- CMAKE_CXX_STANDARD
- CMAKE_CXX_STANDARD_REQUIRED
- set()
3.2.3 Files to Edit(需要编辑的文件)
- CMakeLists.txt
- tutorial.cxx
3.2.4 Getting Started(入门指南)
Continue editing files in the Step1 directory. Start with TODO 4 and complete through TODO 6.
继续编辑 Step1 目录中的文件。从 TODO 4 开始,完成 TODO 6。
First, edit tutorial.cxx by adding a feature that requires C++11. Then update CMakeLists.txt to require C++11.
首先,编辑 tutorial.cxx,添加需要 C++11 的功能,然后更新 CMakeLists.txt,使其需要 C++11。
3.2.5 Build and Run(构建并运行)
Let’s build our project again. Since we already created a build directory and ran CMake for Exercise 1, we can skip to the build step:
让我们再次构建项目。由于我们已经在练习 1 中创建了构建目录并运行了 CMake,因此可以跳过构建步骤:
cd Step1_build
cmake --build .
Now we can try to use the newly built Tutorial with same commands as before:
现在,我们可以尝试使用新构建的 Tutorial,命令与之前的相同:
Tutorial 4294967296
Tutorial 10
Tutorial
3.2.6 解决方案
We start by adding some C++11 features to our project by replacing atof with std::stod in tutorial.cxx. This looks like the following:
我们首先在 tutorial.cxx 中将 atof 替换为 std::stod,为项目添加一些 C++11 功能。如下所示:
- TODO 4: Click to show/hide answer
TODO 4: tutorial.cxxconst double inputValue = std::stod(argv[1]);
To complete TODO 5, simply remove #include .
要完成 TODO 5,只需删除 #include 即可。
We will need to explicitly state in the CMake code that it should use the correct flags. One way to enable support for a specific C++ standard in CMake is by using the CMAKE_CXX_STANDARD variable. For this tutorial, set the CMAKE_CXX_STANDARD variable in the CMakeLists.txt file to 11 and CMAKE_CXX_STANDARD_REQUIRED to True. Make sure to add the CMAKE_CXX_STANDARD declarations above the call to add_executable().
我们需要在 CMake 代码中明确说明它应该使用正确的标志。在 CMake 中启用对特定 C++ 标准的支持的一种方法是使用 CMAKE_CXX_STANDARD 变量。在本教程中,将 CMakeLists.txt 文件中的 CMAKE_CXX_STANDARD 变量设为 11,并将 CMAKE_CXX_STANDARD_REQUIRED 设为 True。确保将 CMAKE_CXX_STANDARD 声明添加到 add_executable() 的调用之上。
- TODO 6: Click to show/hide answer
TODO 6: CMakeLists.txt
set(CMAKE_CXX_STANDARD 11)
set(CMAKE_CXX_STANDARD_REQUIRED True)
3.2.7 CMakeLists.txt
# TODO 1: Set the minimum required version of CMake to be 3.10
cmake_minimum_required(VERSION 3.10)# TODO 2: Create a project named Tutorial
project(Tutorial)# TODO 6: Set the variable CMAKE_CXX_STANDARD to 11
#         and the variable CMAKE_CXX_STANDARD_REQUIRED to True
set(CMAKE_CXX_STANDARD 11)
set(CMAKE_CXX_STAND_REQUIRED True)# TODO 3: Add an executable called Tutorial to the project
add_executable(Tutorial tutorial.cxx)
3.2.8 tutorial.cxx
// A simple program that computes the square root of a number
#include <cmath>
// #include <cstdlib> // TODO 5: Remove this line
#include <iostream>
#include <string>// TODO 11: Include TutorialConfig.hint main(int argc, char* argv[])
{if (argc < 2) {// TODO 12: Create a print statement using Tutorial_VERSION_MAJOR//          and Tutorial_VERSION_MINORstd::cout << "Usage: " << argv[0] << " number" << std::endl;return 1;}// convert input to double// TODO 4: Replace atof(argv[1]) with std::stod(argv[1])//const double inputValue = atof(argv[1]);const double inputValue = std::stod(argv[1]);// calculate square rootconst double outputValue = sqrt(inputValue);std::cout << "The square root of " << inputValue << " is " << outputValue<< std::endl;return 0;
}
3.3 Exercise 3 - Adding a Version Number and Configured Header File
Sometimes it may be useful to have a variable that is defined in your CMakelists.txt file also be available in your source code. In this case, we would like to print the project version.
有时,在 CMakelists.txt 文件中定义的变量也可以在源代码中使用。在这种情况下,我们希望打印项目版本。
One way to accomplish this is by using a configured header file. We create an input file with one or more variables to replace. These variables have special syntax which looks like @VAR@. Then, we use the configure_file() command to copy the input file to a given output file and replace these variables with the current value of VAR in the CMakelists.txt file.
其中一种方法是使用配置头文件。我们创建一个输入文件,其中包含一个或多个要替换的变量。这些变量有特殊的语法,看起来像 @VAR@。然后,我们使用 configure_file() 命令将输入文件复制到给定的输出文件,并用 CMakelists.txt 文件中 VAR 的当前值替换这些变量。
While we could edit the version directly in the source code, using this feature is preferred since it creates a single source of truth and avoids duplication.
虽然我们可以直接在源代码中编辑版本,但我们更倾向于使用这一功能,因为它可以创建一个单一的真相源,并避免重复。
3.3.1 目标
Define and report the project’s version number.
定义和报告项目版本号。
3.3.2 Helpful Resources(有用的资源)
- _VERSION_MAJOR
- _VERSION_MINOR
- configure_file()
- target_include_directories()
3.3.3 Files to Edit(需要编辑的文件)
- CMakeLists.txt
- tutorial.cxx
3.3.4 Getting Started(入门指南)
Continue to edit files from Step1. Start on TODO 7 and complete through TODO 12. In this exercise, we start by adding a project version number in CMakeLists.txt. In that same file, use configure_file() to copy a given input file to an output file and substitute some variable values in the input file content.
继续编辑步骤 1 中的文件。从 TODO 7 开始,完成 TODO 12。在本练习中,我们首先在 CMakeLists.txt 中添加项目版本号。在同一文件中,使用 configure_file() 将给定的输入文件复制到输出文件,并在输入文件内容中替换一些变量值。
Next, create an input header file TutorialConfig.h.in defining version numbers which will accept variables passed from configure_file().
接下来,创建一个输入头文件 TutorialConfig.h.in,定义版本号,接受 configure_file() 传递的变量。
Finally, update tutorial.cxx to print out its version number.
最后,更新 tutorial.cxx,打印出版本号。
3.3.5 Build and Run(构建并运行)
Let’s build our project again. As before, we already created a build directory and ran CMake so we can skip to the build step:
让我们再次构建项目。和之前一样,我们已经创建了一个构建目录并运行了 CMake,因此可以跳过构建步骤:
cd Step1_build
cmake --build .
Verify that the version number is now reported when running the executable without any arguments.
验证在不带任何参数的情况下运行可执行文件时,是否会报告版本号。
执行可执行程序会输出如下的log:
Tutorial Version 1.0
Usage: ./Tutorial number
3.3.6 解决方案
In this exercise, we improve our executable by printing a version number. While we could do this exclusively in the source code, using CMakeLists.txt lets us maintain a single source of data for the version number.
在本练习中,我们将通过打印版本号来改进我们的可执行程序。虽然我们可以只在源代码中打印版本号,但使用 CMakeLists.txt 可以让我们保持版本号的单一数据源。
First, we modify the CMakeLists.txt file to use the project() command to set both the project name and version number. When the project() command is called, CMake defines Tutorial_VERSION_MAJOR and Tutorial_VERSION_MINOR behind the scenes.
首先,我们修改 CMakeLists.txt 文件,使用 project() 命令来设置项目名称和版本号。调用 project() 命令时,CMake 会在幕后定义 Tutorial_VERSION_MAJOR 和 Tutorial_VERSION_MINOR。
- TODO 7: Click to show/hide answer
TODO 7: CMakeLists.txt
project(Tutorial VERSION 1.0)
Then we used configure_file() to copy the input file with the specified CMake variables replaced:
然后,我们使用 configure_file() 复制输入文件,并替换指定的 CMake 变量:
- TODO 8: Click to show/hide answer
TODO 8: CMakeLists.txt
configure_file(TutorialConfig.h.in TutorialConfig.h)
Since the configured file will be written into the project binary directory, we must add that directory to the list of paths to search for include files.
由于配置文件将写入项目二进制目录,我们必须将该目录添加到搜索包含文件的路径列表中。
Note: Throughout this tutorial, we will refer to the project build and the project binary directory interchangeably. These are the same and are not meant to refer to a bin/ directory.
注意:在本教程中,我们将交替使用项目构建目录和项目二进制目录。它们是相同的,并不是指 bin/ 目录。
We used target_include_directories() to specify where the executable target should look for include files.
我们使用 target_include_directories() 来指定目标可执行文件应在何处查找包含文件。
- TODO 9: Click to show/hide answer
TODO 9: CMakeLists.txttarget_include_directories(Tutorial PUBLIC"${PROJECT_BINARY_DIR}")
TutorialConfig.h.in is the input header file to be configured. When configure_file() is called from our CMakeLists.txt, the values for @Tutorial_VERSION_MAJOR@ and @Tutorial_VERSION_MINOR@ will be replaced with the corresponding version numbers from the project in TutorialConfig.h.
TutorialConfig.h.in 是要配置的输入头文件。当从 CMakeLists.txt 调用 configure_file() 时,@Tutorial_VERSION_MAJOR@ 和 @Tutorial_VERSION_MINOR@ 的值将被替换为 TutorialConfig.h 中项目的相应版本号。
- TODO 10: Click to show/hide answer
TODO 10: TutorialConfig.h.in
// the configured options and settings for Tutorial
#define Tutorial_VERSION_MAJOR @Tutorial_VERSION_MAJOR@
#define Tutorial_VERSION_MINOR @Tutorial_VERSION_MINOR@
Next, we need to modify tutorial.cxx to include the configured header file, TutorialConfig.h.
接下来,我们需要修改 tutorial.cxx,以包含配置的头文件 TutorialConfig.h。
- TODO 11: Click to show/hide answer
TODO 11: tutorial.cxx
#include "TutorialConfig.h"
Finally, we print out the executable name and version number by updating tutorial.cxx as follows:
最后,我们对 tutorial.cxx 进行如下更新,打印出可执行文件的名称和版本号:
- TODO 12: Click to show/hide answer
TODO 12 : tutorial.cxxif (argc < 2) {// report versionstd::cout << argv[0] << " Version " << Tutorial_VERSION_MAJOR << "."<< Tutorial_VERSION_MINOR << std::endl;std::cout << "Usage: " << argv[0] << " number" << std::endl;return 1;}
3.3.7 CMakeLists.txt
# TODO 1: Set the minimum required version of CMake to be 3.10
cmake_minimum_required(VERSION 3.10)# TODO 2: Create a project named Tutorial
project(Tutorial)# TODO 7: Set the project version number as 1.0 in the above project command
project(Tutorial VERSION 1.0)# TODO 6: Set the variable CMAKE_CXX_STANDARD to 11
#         and the variable CMAKE_CXX_STANDARD_REQUIRED to True
set(CMAKE_CXX_STANDARD 11)
set(CMAKE_CXX_STAND_REQUIRED True)# TODO 8: Use configure_file to configure and copy TutorialConfig.h.in to
#         TutorialConfig.h
configure_file(TutorialConfig.h.in TutorialConfig.h)# TODO 3: Add an executable called Tutorial to the project
add_executable(Tutorial tutorial.cxx)# TODO 9: Use target_include_directories to include ${PROJECT_BINARY_DIR}
target_include_directories(Tutorial PUBLIC"${PROJECT_BINARY_DIR}")
3.3.8 tutorial.cxx
// A simple program that computes the square root of a number
#include <cmath>
// #include <cstdlib> // TODO 5: Remove this line
#include <iostream>
#include <string>// TODO 11: Include TutorialConfig.h
#include "TutorialConfig.h"int main(int argc, char* argv[])
{if (argc < 2) {// TODO 12: Create a print statement using Tutorial_VERSION_MAJOR//          and Tutorial_VERSION_MINOR// report versionstd::cout << argv[0] << " Version " << Tutorial_VERSION_MAJOR << "." << Tutorial_VERSION_MINOR << std::endl;std::cout << "Usage: " << argv[0] << " number" << std::endl;return 1;}// convert input to double// TODO 4: Replace atof(argv[1]) with std::stod(argv[1])//const double inputValue = atof(argv[1]);const double inputValue = std::stod(argv[1]);// calculate square rootconst double outputValue = sqrt(inputValue);std::cout << "The square root of " << inputValue << " is " << outputValue<< std::endl;return 0;
}
3.3.9 TutorialConfig.h.in
// the configured options and settings for Tutorial
// TODO 10: Define Tutorial_VERSION_MAJOR and Tutorial_VERSION_MINOR
#define Tutorial_VERSION_MAJOR @Tutorial_VERSION_MAJOR@
#define Tutorial_VERSION_MINOR @Tutorial_VERSION_MINOR@
3.3.10 TutorialConfig.h
经过cmake --build .构建之后生成的TutorialConfig.h内容如下所示:
// the configured options and settings for Tutorial
// TODO 10: Define Tutorial_VERSION_MAJOR and Tutorial_VERSION_MINOR
#define Tutorial_VERSION_MAJOR 1
#define Tutorial_VERSION_MINOR 0
相关文章:

CMake教程-第 1 步:基本起点
CMake教程-第 1 步:基本起点 1 CMake教程介绍2 学习步骤Step 1: A Basic Starting PointStep 2: Adding a LibraryStep 3: Adding Usage Requirements for a LibraryStep 4: Adding Generator ExpressionsStep 5: Installing and TestingStep 6: Adding Support for…...

Linux 或者 Docker 容器通过 date 设置系统时间
目录 1. Linux2. Docker 容器2.1 进入容器内部修改2.2 可能会遇到的问题 1. Linux 要在Linux系统中设置日期和时间,可以使用date命令。 使用以下命令格式来设置日期和时间: sudo date -s "YYYY-MM-DD HH:MM:SS"其中,YYYY表示年份…...

Docker 容器中运行 Kibana
Kibana 的 Docker 镜像可以从 Elastic 官网上的 Docker 镜像仓库获取。该镜像是随 X-Pack 一起打包的。 X-Pack 在这个 image 中是预装好的。安装了 X-Pack,Kibana 会去连接同样带有 X-Pack 的 Elasticsearch 集群。 获取镜像 向 Elastic Docker 仓库发送一条 do…...

【23种设计模式】建造者模式【⭐⭐⭐】
个人主页:金鳞踏雨 个人简介:大家好,我是金鳞,一个初出茅庐的Java小白 目前状况:22届普通本科毕业生,几经波折了,现在任职于一家国内大型知名日化公司,从事Java开发工作 我的博客&am…...

进阶指针(一)
✨博客主页:小钱编程成长记 🎈博客专栏:进阶C语言 进阶指针(一) 0.回顾初阶指针1.字符指针1.1 相关面试题 2.数组指针3.指针数组3.1 数组指针的定义3.2 &数组名VS数组名3.3 数组指针的使用 4.数组传参和指针传参4.…...
)
Linux: code: name: void dev_deactivate(struct net_device *dev)
一开始看这个函数,还以为要做,网卡设备的down操作。 后来一看代码,原来这个函数是在net/sched/sch_generic.c 文件里,而且不是要做网络接口的down操作。操作的结果是:deactivate transmissions on several devices&…...
语义分割——灰度图像转伪彩色图像
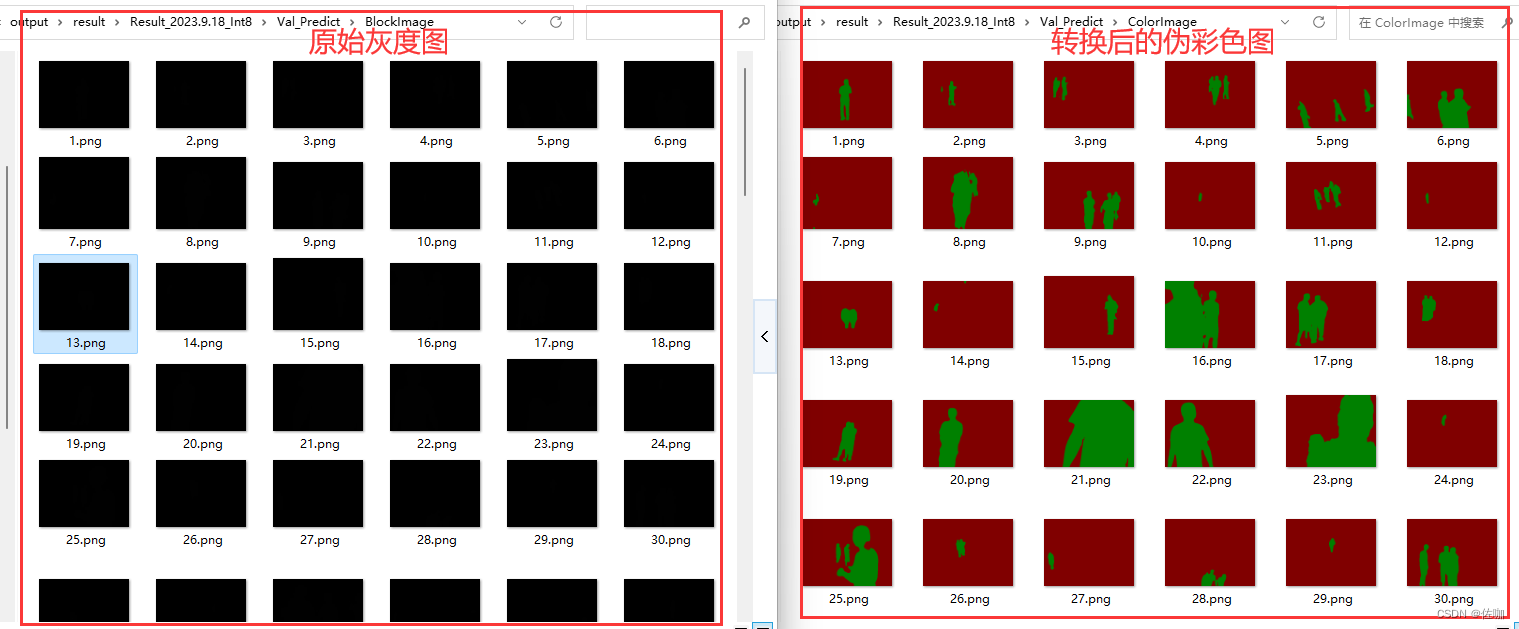
目录 检验灰度图检验代码 灰度图转伪彩色图代码转换代码使用细则 示例转换结果总结 检验灰度图 制作语义分割数据集或用训练好模型测试图像时,得到的结果是灰度图像,如下: 检验代码 上面图像灰度值不是全是全为0,灰度范围在[0…...
观察级水下机器人使用系列之七机械手臂
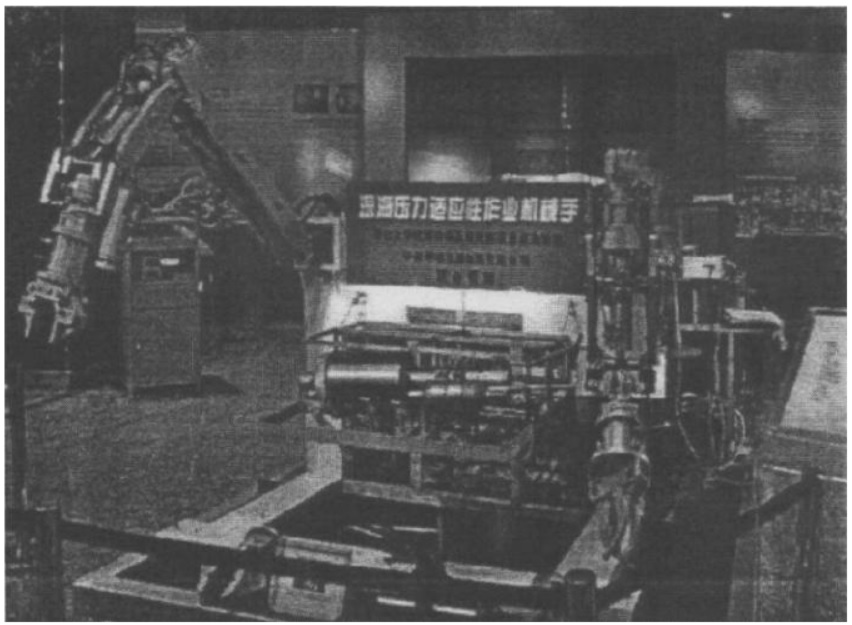
本期是观察级水下机器人使用系列的最后一期,主要讲ROV所使用的机械臂。机械臂正式名称为5功能电动机械,型号为BE-500,由法国公司Ocean Innovation System设计的,可代替人工进行水下作业,完成海底样品采集、打捞、设备定…...

char s[]和char *s的区别,数组和指针的,堆和栈指针的一些思考
最近在学习的时候看到一个概念,数组不等价于指针,很合理但又很难理解。 例如char s[]和char *s有什么区别,前者是数组,后者是指针,个人学习成果如下: 1.char s[]和char *s的区别 char s[]: …...
)
Flutter快速入门学习(二)
目录 Dart介绍 一些Dart的重要概念 Dart语法学习 变量 内建类型 Number String Boolean List Set Map Symbol 函数 参数类型(可选参数,必选参数) 函数作为另一个函数的参数 匿名函数 运算符 关系运算符 类型判定运算符 赋…...
【Phoenix】phoenix实现每个Primarykey主键保留N版本数据,CDC数据记录为Changelog格式
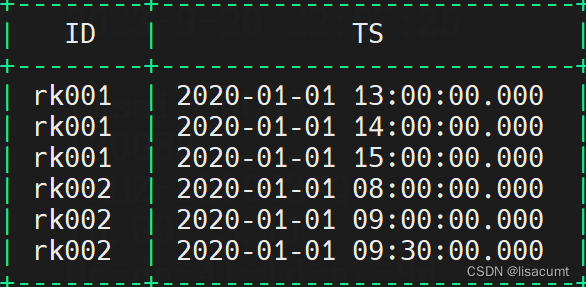
一、背景: CDC数据中包含了,数据的变更过程。当CDC写入传统数据库最终每一个primary key下会保存一条数据。当然可以使用特殊手段保存多分记录但是显然造成了数据膨胀。 另外数据湖Hudi(0.13.1)是不支持保存所有Changelog其Compaction机制会清除所有旧版…...

阿里云服务器开放的一个新端口,重启防火墙,端口未启动
问题: 阿里云网页开放的一个新端口后,重启防火墙,端口未启动,之前配置的也都停止了。 解决: 原因可能是阿里的服务控制了,只能一个个端口开启了。把新配置新端口也单独启用。 开启80端口指令 firewall-cm…...
【PHPCUSTOM】打包PHP程序为EXE
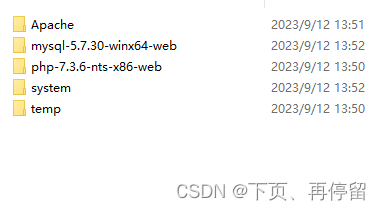
目录 一、下载PHPCUSTOM 二、PHP网站打包 1、打开PHPCUSTOM 2、配置参数 3、生成exe文件 网上很多PHP程序打包成EXE的文章,但是都不能用,最后找到了PHPCUSTOM,使用PHPCUSTOM可以把PHP程序打包成exe。我们都知道PHP是服务端语言ÿ…...
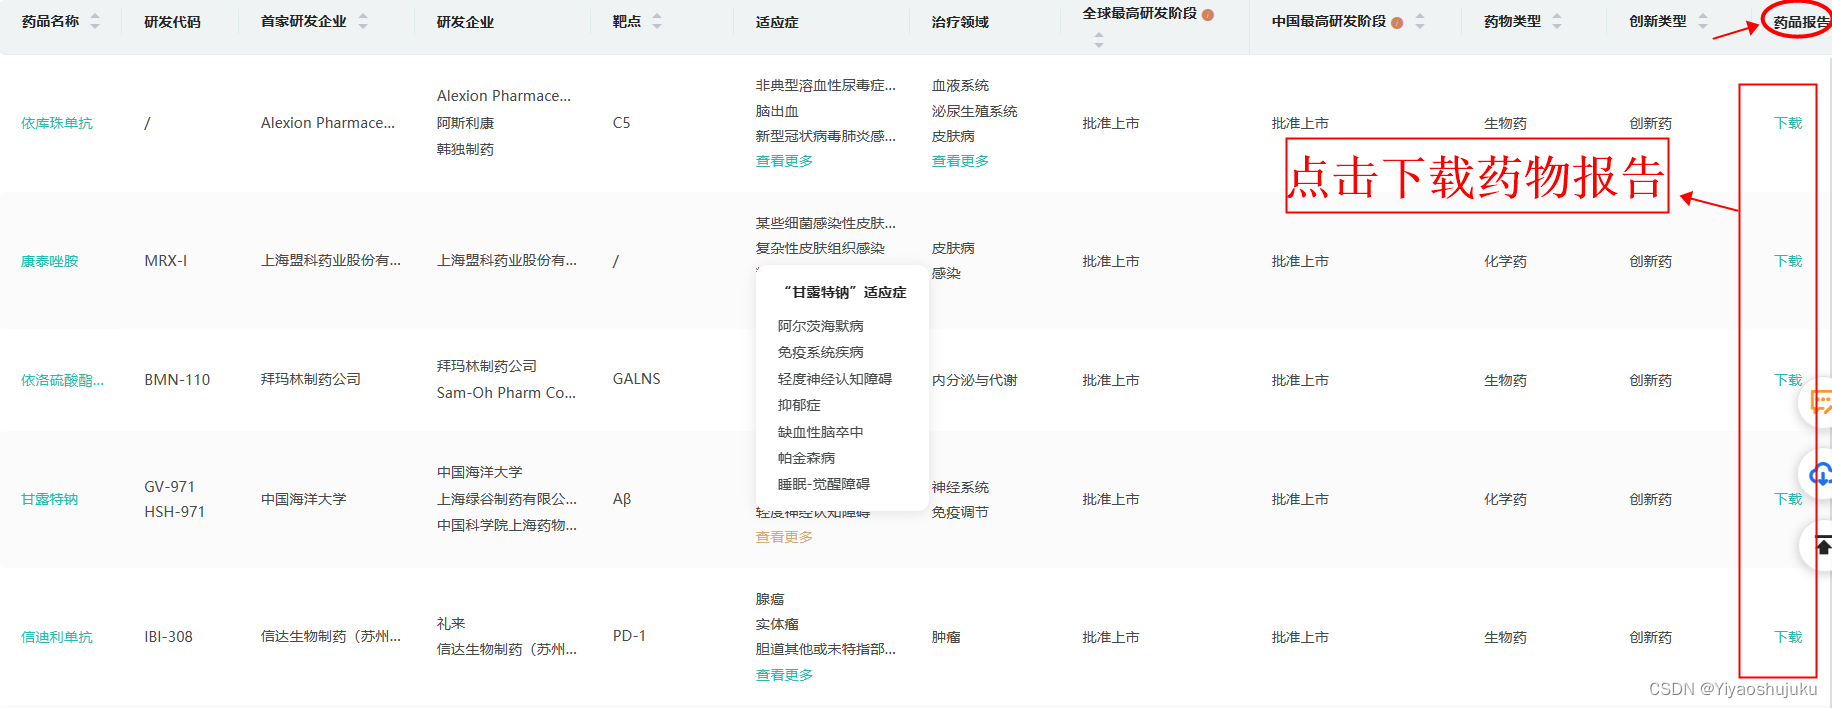
药品咨询报告合集整理平台打包(一共36597份)【专题推荐】
<医药行业从业者必看>笔者今天分享高价值医药行业报告36500余份的获取/下载方法,报告涵盖了医药细分领域研究报告药品报告(所有上市药品)医药行业分析报告医药环境观察报告药品市场调研报告药品靶点研究报告医药白皮书;数据…...

数字化管理新革命,AI数字人CEO登场引领变革!
王一博老板乐华娱乐CEO杜华推出了她的双生数字人华华子,专门替自己直播卖货。在没有任何宣传的情况下,仅仅在短短的10分钟直播时间内,观众人数就飙升至30万人!同时,“杜华AI华华子直播”更是迅速登上了微博热搜榜。这一…...
FPGA/数字IC(芯海科技2022)面试题 2(解析版)
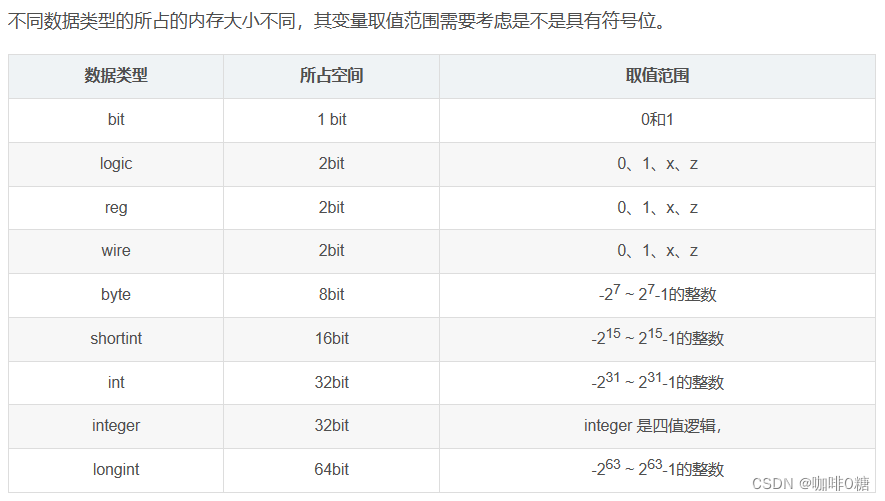
以下仅为学习参考(非原创),如有疑惑欢迎评论区指出! 一、单选题(共20题,每题3分,共60分) 1. D触发器:Tsetup3ns,Thold1ns,Tck2q1ns, 该D触发器最大可运行时…...

SpringMVC之JSON数据返回与异常处理机制---全方面讲解
一,JSON数据返回的理解 在Spring MVC中,当需要将数据以JSON格式返回给客户端时,可以使用ResponseBody注解或RestController注解将Controller方法的返回值直接转化为JSON格式并返回。这使得开发者可以方便地将Java对象转换为JSON,并…...

信息化发展53
数据标准化 1 、数据标准化是实现数据共享的基础。 2 、数据标准化的主要内容包括元数据标准化、数据元标准化、数据模式标准化、数据分类与编码标准化和数据标准化管理。 元数据标准化 1 、元数据是关于数据的数据( Data About Data )。其实质是用于…...

Java学习笔记——字符/字符串
在 Java 语言中,字符串都被设计成「不可变」的类型,即无法直接修改字符串的某一位字符,需要新建一个字符串实现 StringBuilder 字符 字符是用单引号括起来的单个字母,在Java中,表示字符的数据类型为char。一个字符…...
数据结构与算法基础-(1)
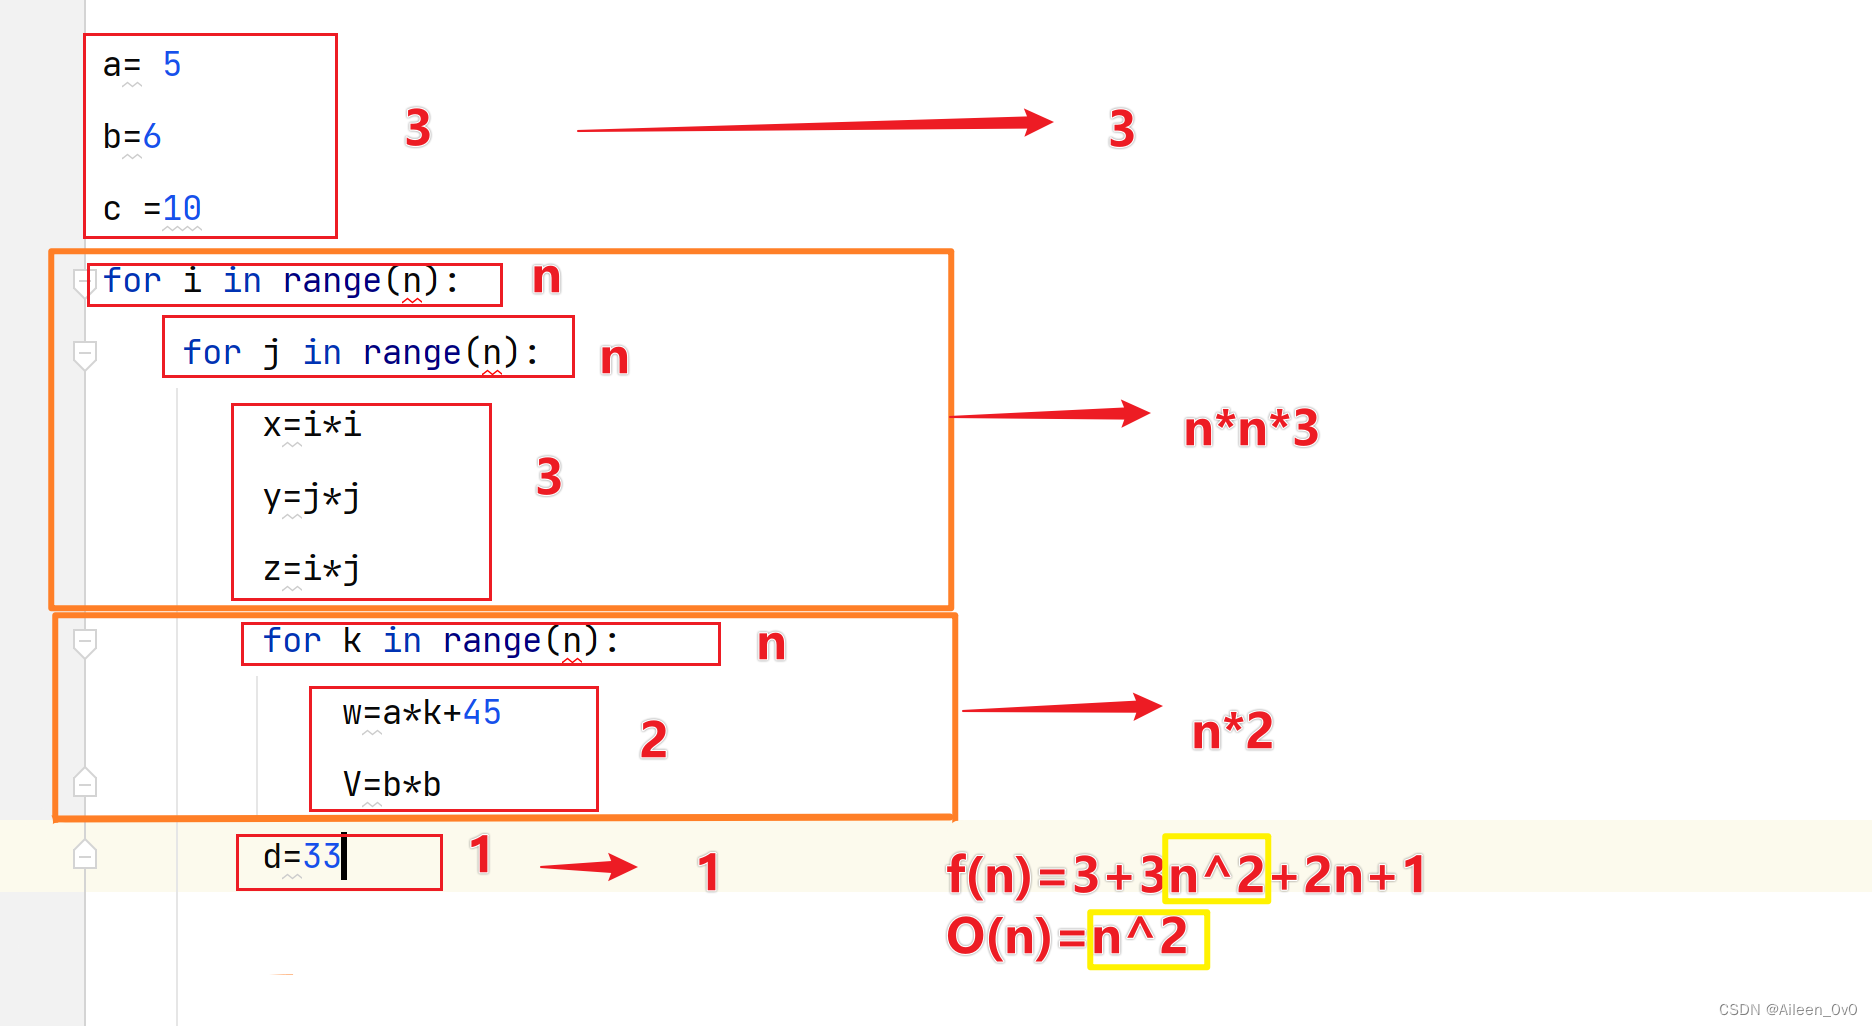
🌈write in front🌈 🧸大家好,我是Aileen🧸.希望你看完之后,能对你有所帮助,不足请指正!共同学习交流. 🆔本文由Aileen_0v0🧸 原创 CSDN首发🐒 如…...

内存分配函数malloc kmalloc vmalloc
内存分配函数malloc kmalloc vmalloc malloc实现步骤: 1)请求大小调整:首先,malloc 需要调整用户请求的大小,以适应内部数据结构(例如,可能需要存储额外的元数据)。通常,这包括对齐调整,确保分配的内存地址满足特定硬件要求(如对齐到8字节或16字节边界)。 2)空闲…...

pam_env.so模块配置解析
在PAM(Pluggable Authentication Modules)配置中, /etc/pam.d/su 文件相关配置含义如下: 配置解析 auth required pam_env.so1. 字段分解 字段值说明模块类型auth认证类模块,负责验证用户身份&am…...
-----深度优先搜索(DFS)实现)
c++ 面试题(1)-----深度优先搜索(DFS)实现
操作系统:ubuntu22.04 IDE:Visual Studio Code 编程语言:C11 题目描述 地上有一个 m 行 n 列的方格,从坐标 [0,0] 起始。一个机器人可以从某一格移动到上下左右四个格子,但不能进入行坐标和列坐标的数位之和大于 k 的格子。 例…...

三体问题详解
从物理学角度,三体问题之所以不稳定,是因为三个天体在万有引力作用下相互作用,形成一个非线性耦合系统。我们可以从牛顿经典力学出发,列出具体的运动方程,并说明为何这个系统本质上是混沌的,无法得到一般解…...

如何在最短时间内提升打ctf(web)的水平?
刚刚刷完2遍 bugku 的 web 题,前来答题。 每个人对刷题理解是不同,有的人是看了writeup就等于刷了,有的人是收藏了writeup就等于刷了,有的人是跟着writeup做了一遍就等于刷了,还有的人是独立思考做了一遍就等于刷了。…...
使用LangGraph和LangSmith构建多智能体人工智能系统
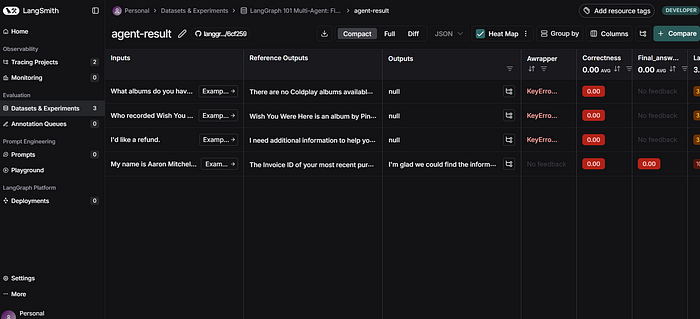
现在,通过组合几个较小的子智能体来创建一个强大的人工智能智能体正成为一种趋势。但这也带来了一些挑战,比如减少幻觉、管理对话流程、在测试期间留意智能体的工作方式、允许人工介入以及评估其性能。你需要进行大量的反复试验。 在这篇博客〔原作者&a…...
的使用)
Go 并发编程基础:通道(Channel)的使用
在 Go 中,Channel 是 Goroutine 之间通信的核心机制。它提供了一个线程安全的通信方式,用于在多个 Goroutine 之间传递数据,从而实现高效的并发编程。 本章将介绍 Channel 的基本概念、用法、缓冲、关闭机制以及 select 的使用。 一、Channel…...
MySQL的pymysql操作
本章是MySQL的最后一章,MySQL到此完结,下一站Hadoop!!! 这章很简单,完整代码在最后,详细讲解之前python课程里面也有,感兴趣的可以往前找一下 一、查询操作 我们需要打开pycharm …...

解析“道作为序位生成器”的核心原理
解析“道作为序位生成器”的核心原理 以下完整展开道函数的零点调控机制,重点解析"道作为序位生成器"的核心原理与实现框架: 一、道函数的零点调控机制 1. 道作为序位生成器 道在认知坐标系$(x_{\text{物}}, y_{\text{意}}, z_{\text{文}}…...

字符串哈希+KMP
P10468 兔子与兔子 #include<bits/stdc.h> using namespace std; typedef unsigned long long ull; const int N 1000010; ull a[N], pw[N]; int n; ull gethash(int l, int r){return a[r] - a[l - 1] * pw[r - l 1]; } signed main(){ios::sync_with_stdio(false), …...
