docker-compose部署elk(8.9.0)并开启ssl认证
docker部署elk并开启ssl认证
- docker-compose部署elk
- 部署所需yml文件 —— docker-compose-elk.yml
- 部署
- 配置elasticsearch和kibana并开启ssl
- 配置基础数据认证
- 配置elasticsearch和kibana开启https访问
- 配置logstash
- 创建springboot项目进行测试
- kibana创建视图,查询日志
docker-compose部署elk
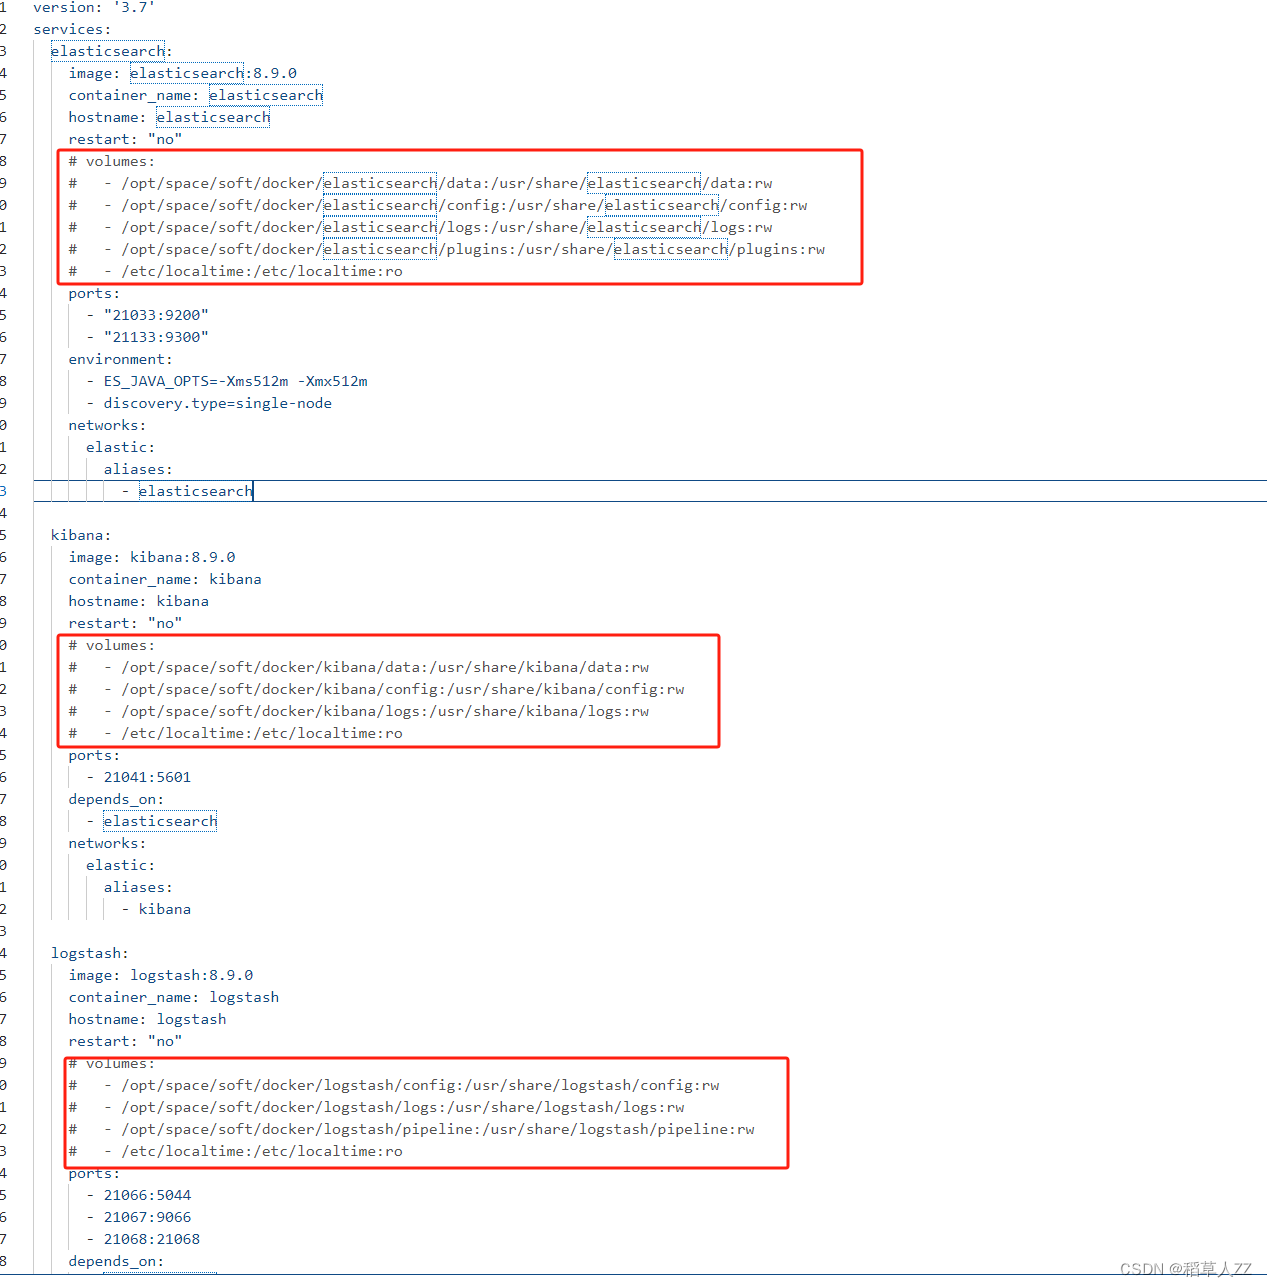
部署所需yml文件 —— docker-compose-elk.yml
version: '3.7'
services:elasticsearch:image: elasticsearch:8.9.0container_name: elasticsearchhostname: elasticsearchrestart: "no"volumes:- /opt/space/soft/docker/elasticsearch/data:/usr/share/elasticsearch/data:rw- /opt/space/soft/docker/elasticsearch/config:/usr/share/elasticsearch/config:rw- /opt/space/soft/docker/elasticsearch/logs:/usr/share/elasticsearch/logs:rw- /opt/space/soft/docker/elasticsearch/plugins:/usr/share/elasticsearch/plugins:rwports:- "21033:9200"- "21133:9300"networks:elastic:aliases:- elasticsearchkibana:image: kibana:8.9.0container_name: kibanahostname: kibanarestart: "no"volumes:- /opt/space/soft/docker/kibana/data:/usr/share/kibana/data:rw- /opt/space/soft/docker/kibana/config:/usr/share/kibana/config:rw- /opt/space/soft/docker/kibana/logs:/usr/share/kibana/logs:rwports:- 21041:5601depends_on:- elasticsearchnetworks:elastic:aliases:- kibanalogstash:image: logstash:8.9.0container_name: logstashhostname: logstashrestart: "no"volumes:- /opt/space/soft/docker/logstash/config:/usr/share/logstash/config:rw- /opt/space/soft/docker/logstash/logs:/usr/share/logstash/logs:rw- /opt/space/soft/docker/logstash/pipeline:/usr/share/logstash/pipeline:rwports:- 21066:5044- 21067:9066- 21068:21068depends_on:- elasticsearchnetworks:elastic:aliases:- logstashnetworks:elastic:name: elasticdriver: bridge
这里做了端口映射以及挂载数据卷。
部署
1.使用docker-compose命令部署
docker-compose -f docker-compose-elk.yml up -d
部署前需要先将挂载的数据卷注释掉,用于拷贝配置文件到本地磁盘
- 创建所需目录,拷贝配置文件到本地,并设置读写权限为 777
cd /opt/space/soft/docker/
sudo mkdir -p elasticsearch/{config,data,logs,plugins}
sudo mkdir -p kibana/{config,data,logs}
sudo mkdir -p logstash/{config,pipeline,logs}sudo docker cp elasticsearch:/usr/share/elasticsearch/config ./elasticsearch/
sudo docker cp kibana:/usr/share/kibana/config ./kibana/
sudo docker cp  logstash:/usr/share/logstash/config ./logstash/
sudo docker cp  logstash:/usr/share/logstash/pipeline ./logstash/sudo chmod 777 -R /opt/space/soft/docker/elasticsearch/*
sudo chmod 777 -R /opt/space/soft/docker/kibana/*
sudo chmod 777 -R /opt/space/soft/docker/logstash/*
- 修改jvm参数(作者电脑配置不够高,所以需要进行修改)
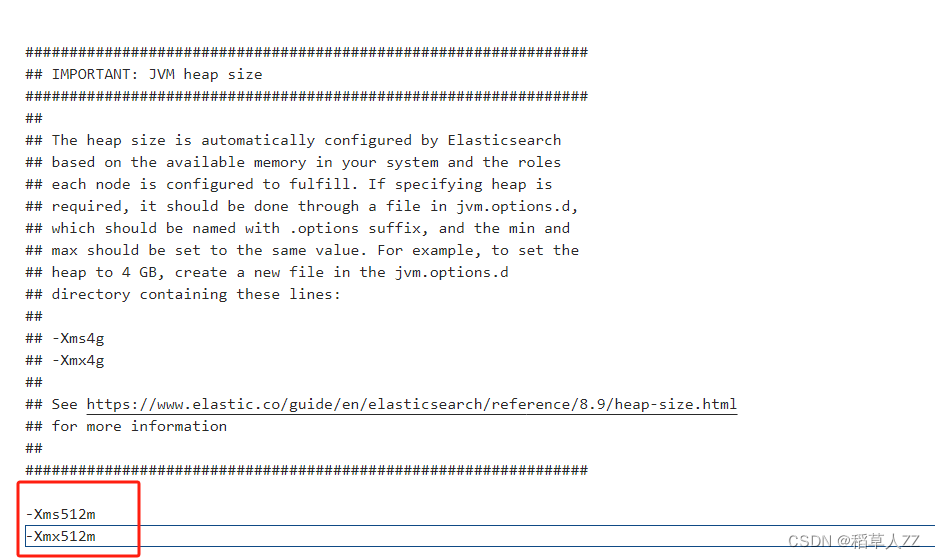
3.1 修改elasticsearch的jvm参数
打开/opt/space/soft/docker/elasticsearch/config/jvm.options文件,按图中所示进行配置。
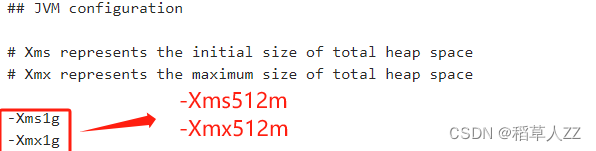
3.2 修改logstash的jvm参数
打开/opt/space/soft/docker/logstash/config/jvm.options文件,按图中所示进行配置。
- 放开docker-compose-elk.yml文件内挂载数据卷的注释,并执行下列命令。
docker-compose  -f docker-compose-elk.yml stop
docker-compose  -f docker-compose-elk.yml rm
docker-compose  -f docker-compose-elk.yml up -d
配置elasticsearch和kibana并开启ssl
配置基础数据认证
参考文档
- 进入elasticsearch的docker容器内
docker exec -it elasticsearch bash
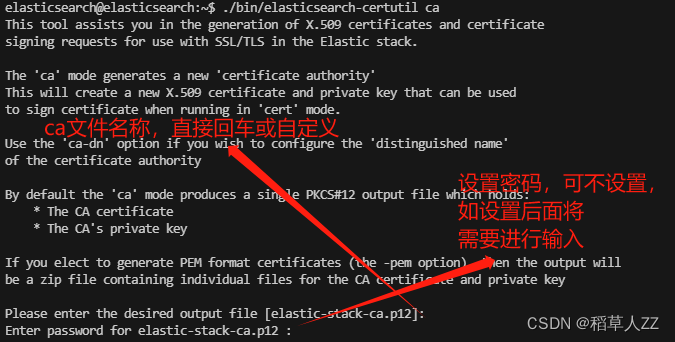
- 生成elastic-stack-ca.p12
./bin/elasticsearch-certutil ca
- 生成elastic-certificates.p12
./bin/elasticsearch-certutil cert --ca elastic-stack-ca.p12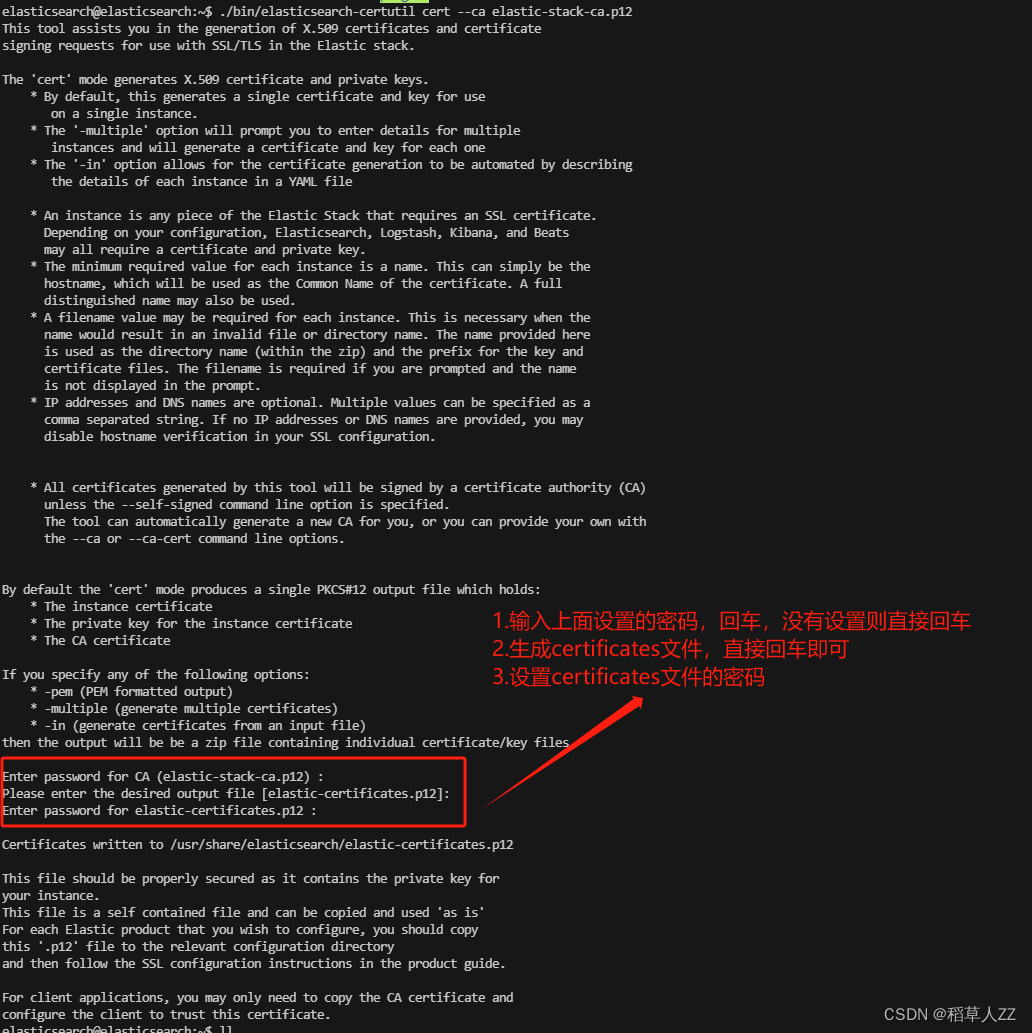
4. 拷贝elastic-certificates.p12到目录/usr/share/elasticsearch/config/certs,删除elastic-stack-ca.p12
mv elastic-certificates.p12 config/certs/
mv elastic-stack-ca.p12 ./config/
elastic-stack-ca.p12文件保留下来,后面有用
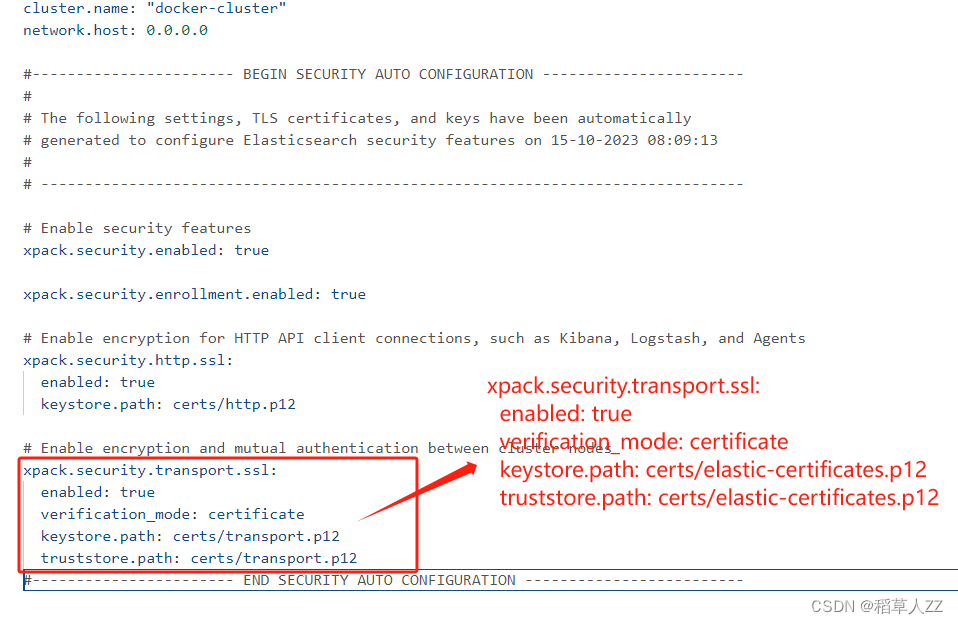
5.设置elasticsearch.yml配置文件
安装如图所示进行修改
xpack.security.transport.ssl:enabled: trueverification_mode: certificatekeystore.path: certs/elastic-certificates.p12truststore.path: certs/elastic-certificates.p12
6.如果certificate设置了密码,需要执行一下两个命令
./bin/elasticsearch-keystore add xpack.security.transport.ssl.keystore.secure_password./bin/elasticsearch-keystore add xpack.security.transport.ssl.truststore.secure_password


此处可能出现以下错误,需要退出容器,给提示的文件设置所属用户
sudo chown linux当前登录用户名 elasticsearch/config/elasticsearch.keystore

- 退出elasticsearch容器,给certificates文件赋予777权限
sudo chmod 777 elasticsearch/config/certs/elastic-certificates.p12
- 重启elasticsearch容器
docker restart elasticsearch
配置elasticsearch和kibana开启https访问
参考文档
- 再次进入elasticsearch的docker容器内
docker exec -it elasticsearch bash
- 生成elasticsearch-ssl-http.zip
命令所需操作过长,此处不在截图
elasticsearch@elasticsearch:~$ ./bin/elasticsearch-certutil http## Elasticsearch HTTP Certificate UtilityThe 'http' command guides you through the process of generating certificates
for use on the HTTP (Rest) interface for Elasticsearch.This tool will ask you a number of questions in order to generate the right
set of files for your needs.## Do you wish to generate a Certificate Signing Request (CSR)?A CSR is used when you want your certificate to be created by an existing
Certificate Authority (CA) that you do not control (that is, you don't have
access to the keys for that CA). If you are in a corporate environment with a central security team, then you
may have an existing Corporate CA that can generate your certificate for you.
Infrastructure within your organisation may already be configured to trust this
CA, so it may be easier for clients to connect to Elasticsearch if you use a
CSR and send that request to the team that controls your CA.If you choose not to generate a CSR, this tool will generate a new certificate
for you. That certificate will be signed by a CA under your control. This is a
quick and easy way to secure your cluster with TLS, but you will need to
configure all your clients to trust that custom CA.## 生成CSR 输入n
Generate a CSR? [y/N]n## Do you have an existing Certificate Authority (CA) key-pair that you wish to use to sign your certificate?If you have an existing CA certificate and key, then you can use that CA to
sign your new http certificate. This allows you to use the same CA across
multiple Elasticsearch clusters which can make it easier to configure clients,
and may be easier for you to manage.If you do not have an existing CA, one will be generated for you.## 是否使用存在的ca 输入y(在基础配置时生成了)
Use an existing CA? [y/N]y## What is the path to your CA?Please enter the full pathname to the Certificate Authority that you wish to
use for signing your new http certificate. This can be in PKCS#12 (.p12), JKS
(.jks) or PEM (.crt, .key, .pem) format.
## 输入ca文件的地址
CA Path: /usr/share/elasticsearch/config/elastic-stack-ca.p12
Reading a PKCS12 keystore requires a password.
It is possible for the keystore's password to be blank,
in which case you can simply press <ENTER> at the prompt
## 输入文件设置的密码
Password for elastic-stack-ca.p12:## How long should your certificates be valid?Every certificate has an expiry date. When the expiry date is reached clients
will stop trusting your certificate and TLS connections will fail.Best practice suggests that you should either:
(a) set this to a short duration (90 - 120 days) and have automatic processes
to generate a new certificate before the old one expires, or
(b) set it to a longer duration (3 - 5 years) and then perform a manual update
a few months before it expires.You may enter the validity period in years (e.g. 3Y), months (e.g. 18M), or days (e.g. 90D)## 设置过期时间
For how long should your certificate be valid? [5y] 5y## Do you wish to generate one certificate per node?If you have multiple nodes in your cluster, then you may choose to generate a
separate certificate for each of these nodes. Each certificate will have its
own private key, and will be issued for a specific hostname or IP address.Alternatively, you may wish to generate a single certificate that is valid
across all the hostnames or addresses in your cluster.If all of your nodes will be accessed through a single domain
(e.g. node01.es.example.com, node02.es.example.com, etc) then you may find it
simpler to generate one certificate with a wildcard hostname (*.es.example.com)
and use that across all of your nodes.However, if you do not have a common domain name, and you expect to add
additional nodes to your cluster in the future, then you should generate a
certificate per node so that you can more easily generate new certificates when
you provision new nodes.## 是否为每一个节点生成证书 输入n
Generate a certificate per node? [y/N]n## Which hostnames will be used to connect to your nodes?These hostnames will be added as "DNS" names in the "Subject Alternative Name"
(SAN) field in your certificate.You should list every hostname and variant that people will use to connect to
your cluster over http.
Do not list IP addresses here, you will be asked to enter them later.If you wish to use a wildcard certificate (for example *.es.example.com) you
can enter that here.## 节点的hostname,设置为elasticsearch,敲两次回车
Enter all the hostnames that you need, one per line.
When you are done, press <ENTER> once more to move on to the next step.elasticsearchYou entered the following hostnames.- elasticsearch## 配置是否正确
Is this correct [Y/n]y## Which IP addresses will be used to connect to your nodes?If your clients will ever connect to your nodes by numeric IP address, then you
can list these as valid IP "Subject Alternative Name" (SAN) fields in your
certificate.If you do not have fixed IP addresses, or not wish to support direct IP access
to your cluster then you can just press <ENTER> to skip this step.## 节点的ip(可以在宿主机通过命令docker inspect elasticsearch查看),设置为172.27.0.2,敲两次回车
Enter all the IP addresses that you need, one per line.
When you are done, press <ENTER> once more to move on to the next step.172.27.0.2You entered the following IP addresses.- 172.27.0.2
## 配置是否正确
Is this correct [Y/n]y## Other certificate optionsThe generated certificate will have the following additional configuration
values. These values have been selected based on a combination of the
information you have provided above and secure defaults. You should not need to
change these values unless you have specific requirements.Key Name: elasticsearch
Subject DN: CN=elasticsearch
Key Size: 2048## 是否更改任意项
Do you wish to change any of these options? [y/N]n## What password do you want for your private key(s)?Your private key(s) will be stored in a PKCS#12 keystore file named "http.p12".
This type of keystore is always password protected, but it is possible to use a
blank password.If you wish to use a blank password, simply press <enter> at the prompt below.
## 输入生成文件的密码(可不设置,设置需要在后面进行配置)
Provide a password for the "http.p12" file:  [<ENTER> for none]
## 再次输入生成文件的密码
Repeat password to confirm: ## Where should we save the generated files?A number of files will be generated including your private key(s),
public certificate(s), and sample configuration options for Elastic Stack products.These files will be included in a single zip archive.## 生成压缩文件的地址和名称,直接敲回车即可
What filename should be used for the output zip file? [/usr/share/elasticsearch/elasticsearch-ssl-http.zip] Zip file written to /usr/share/elasticsearch/elasticsearch-ssl-http.zip
- 移动elasticsearch-ssl-http.zip压缩包
mv elasticsearch-ssl-http.zip ./config/
- 解压,并移动elasticsearc的http.p12文件,删除其余文件
unzip config/elasticsearch-ssl-http.zip
mv elasticsearch/http.p12 ./config/certs/
rm -rf elasticsearch/  kibana/
- 设置密码是需要执行该命令,没有设置则跳过
./bin/elasticsearch-keystore add xpack.security.http.ssl.keystore.secure_password

7. 退出elasticsearch容器,给http.p12文件赋予777权限
sudo chmod 777 elasticsearch/config/certs/http.p12
- 重启elasticsearch容器
docker restart elasticsearch
10.进入容器给elastic用户设置密码,验证https访问
修改密码参考资料
bin/elasticsearch-reset-password -u elastic -i

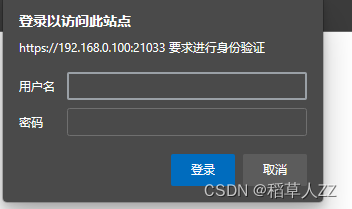
浏览器访问
https://宿主机IP:映射端口
作者这里宿主机IP为192.168.0.100 映射端口为21033
故访问https://192.168.0.100:21033/
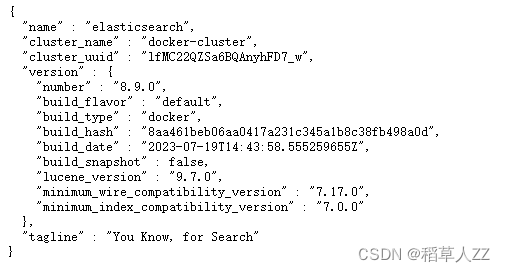
访问需要帐号密码进行验证,帐号为elastic 密码为刚刚设置的密码
登录成功后可看到elasticsearch配置
11. 复制压缩包(第二步生成的)内kibana文件夹下elasticsearch-ca.pem到kibana的配置文件夹内
12. 配置kibana_system用户的密码
进入elasticsearch容器内,执行下列命令
bin/elasticsearch-reset-password -u kibana_system -i
- 生成kibana用https访问的公钥和私钥
./bin/elasticsearch-certutil csr -name kibana-server
会生成一个压缩文件,解压后有一下文件
/kibana-server
|_ kibana-server.csr
|_ kibana-server.key
- 将kibana-server.csr和kibana-server.key两个文件拷贝到kibana配置文件夹内
- 执行下列命令,生成
openssl x509 -req -days 3650 -in kibana-server.csr -signkey kibana-server.key -out kibana-server.crt
- 打开kibana配置文件kibana.yml,添加和修改以下配置(IP自查)
server.host: "0.0.0.0"
server.shutdownTimeout: "5s"
elasticsearch.hosts: [ "https://172.27.0.2:9200" ]
monitoring.ui.container.elasticsearch.enabled: true
elasticsearch.ssl.certificateAuthorities: ["/usr/share/kibana/config/elasticsearch-ca.pem"]
elasticsearch.username: "kibana_system"
elasticsearch.password: "12步设置的密码"server.ssl.certificate: "/usr/share/kibana/config/kibana-server.crt"
server.ssl.key: "/usr/share/kibana/config/kibana-server.key"
server.ssl.enabled: true
# 设置中文访问
i18n.locale: "zh-CN"
- 给生成的四个文件设置777权限
sudo chmod 777 elasticsearch-ca.pem kibana-server.csr kibana-server.key kibana-server.crt
- 重启kibana
- 登录kibana控制台验证
浏览器访问
https://宿主机IP:映射端口
作者这里宿主机IP为192.168.0.100 映射端口为21041
故访问https://192.168.0.100:21041/
访问需要帐号密码进行验证,帐号为elastic 密码为刚刚设置的密码,登录成功后选择自己浏览
配置logstash
- 设置elasticsearch内置用户logstash_system密码(上面已经设置过两个用户的密码了,此处就当留一个考点吧)
- 生成logstash和elasticsearch之间的安全认证文件(文件elastic-certificates.p12大家还有印象吗?)
#如果设置有密码此命令需要输入密码
openssl pkcs12 -in elasticsearch/config/certs/elastic-certificates.p12 -cacerts -nokeys -chain  -out logstash.pem
- 移动logstash.pem文件到logstash配置文件目录下,并设置777权限
sudo chmod 777 logstash.pem
- 配置logstash.yml文件
http.host: "0.0.0.0"xpack.monitoring.enabled: true
xpack.monitoring.elasticsearch.username: logstash_system
xpack.monitoring.elasticsearch.password: 第一步设置的密码#这里必须用 https 这里必须用 https 这里必须用 https
xpack.monitoring.elasticsearch.hosts: [ "https://172.27.0.2:9200" ]
#你的ca.pem 的所在路径
xpack.monitoring.elasticsearch.ssl.certificate_authority: "/usr/share/logstash/config/logstash.pem"
xpack.monitoring.elasticsearch.ssl.verification_mode: certificate
# 探嗅 es节点,设置为 false
xpack.monitoring.elasticsearch.sniffing: false
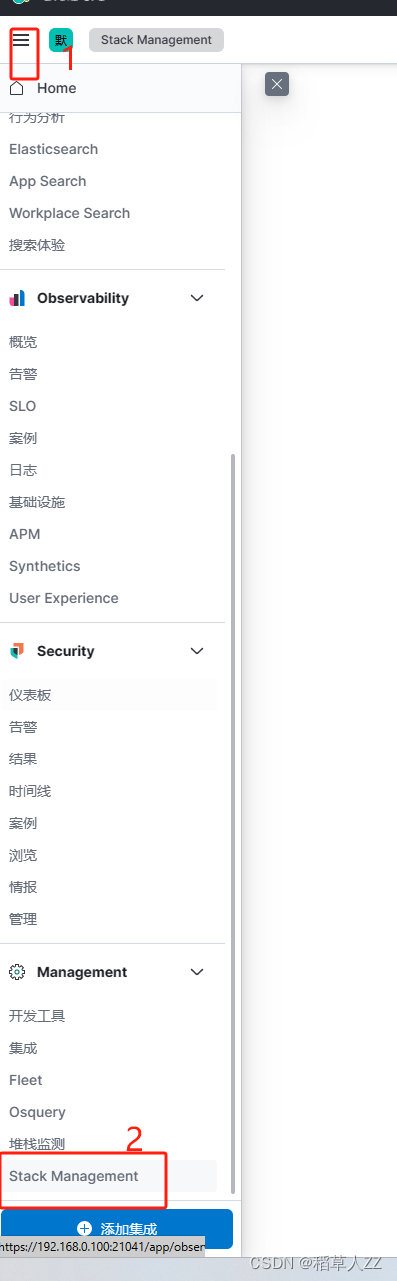
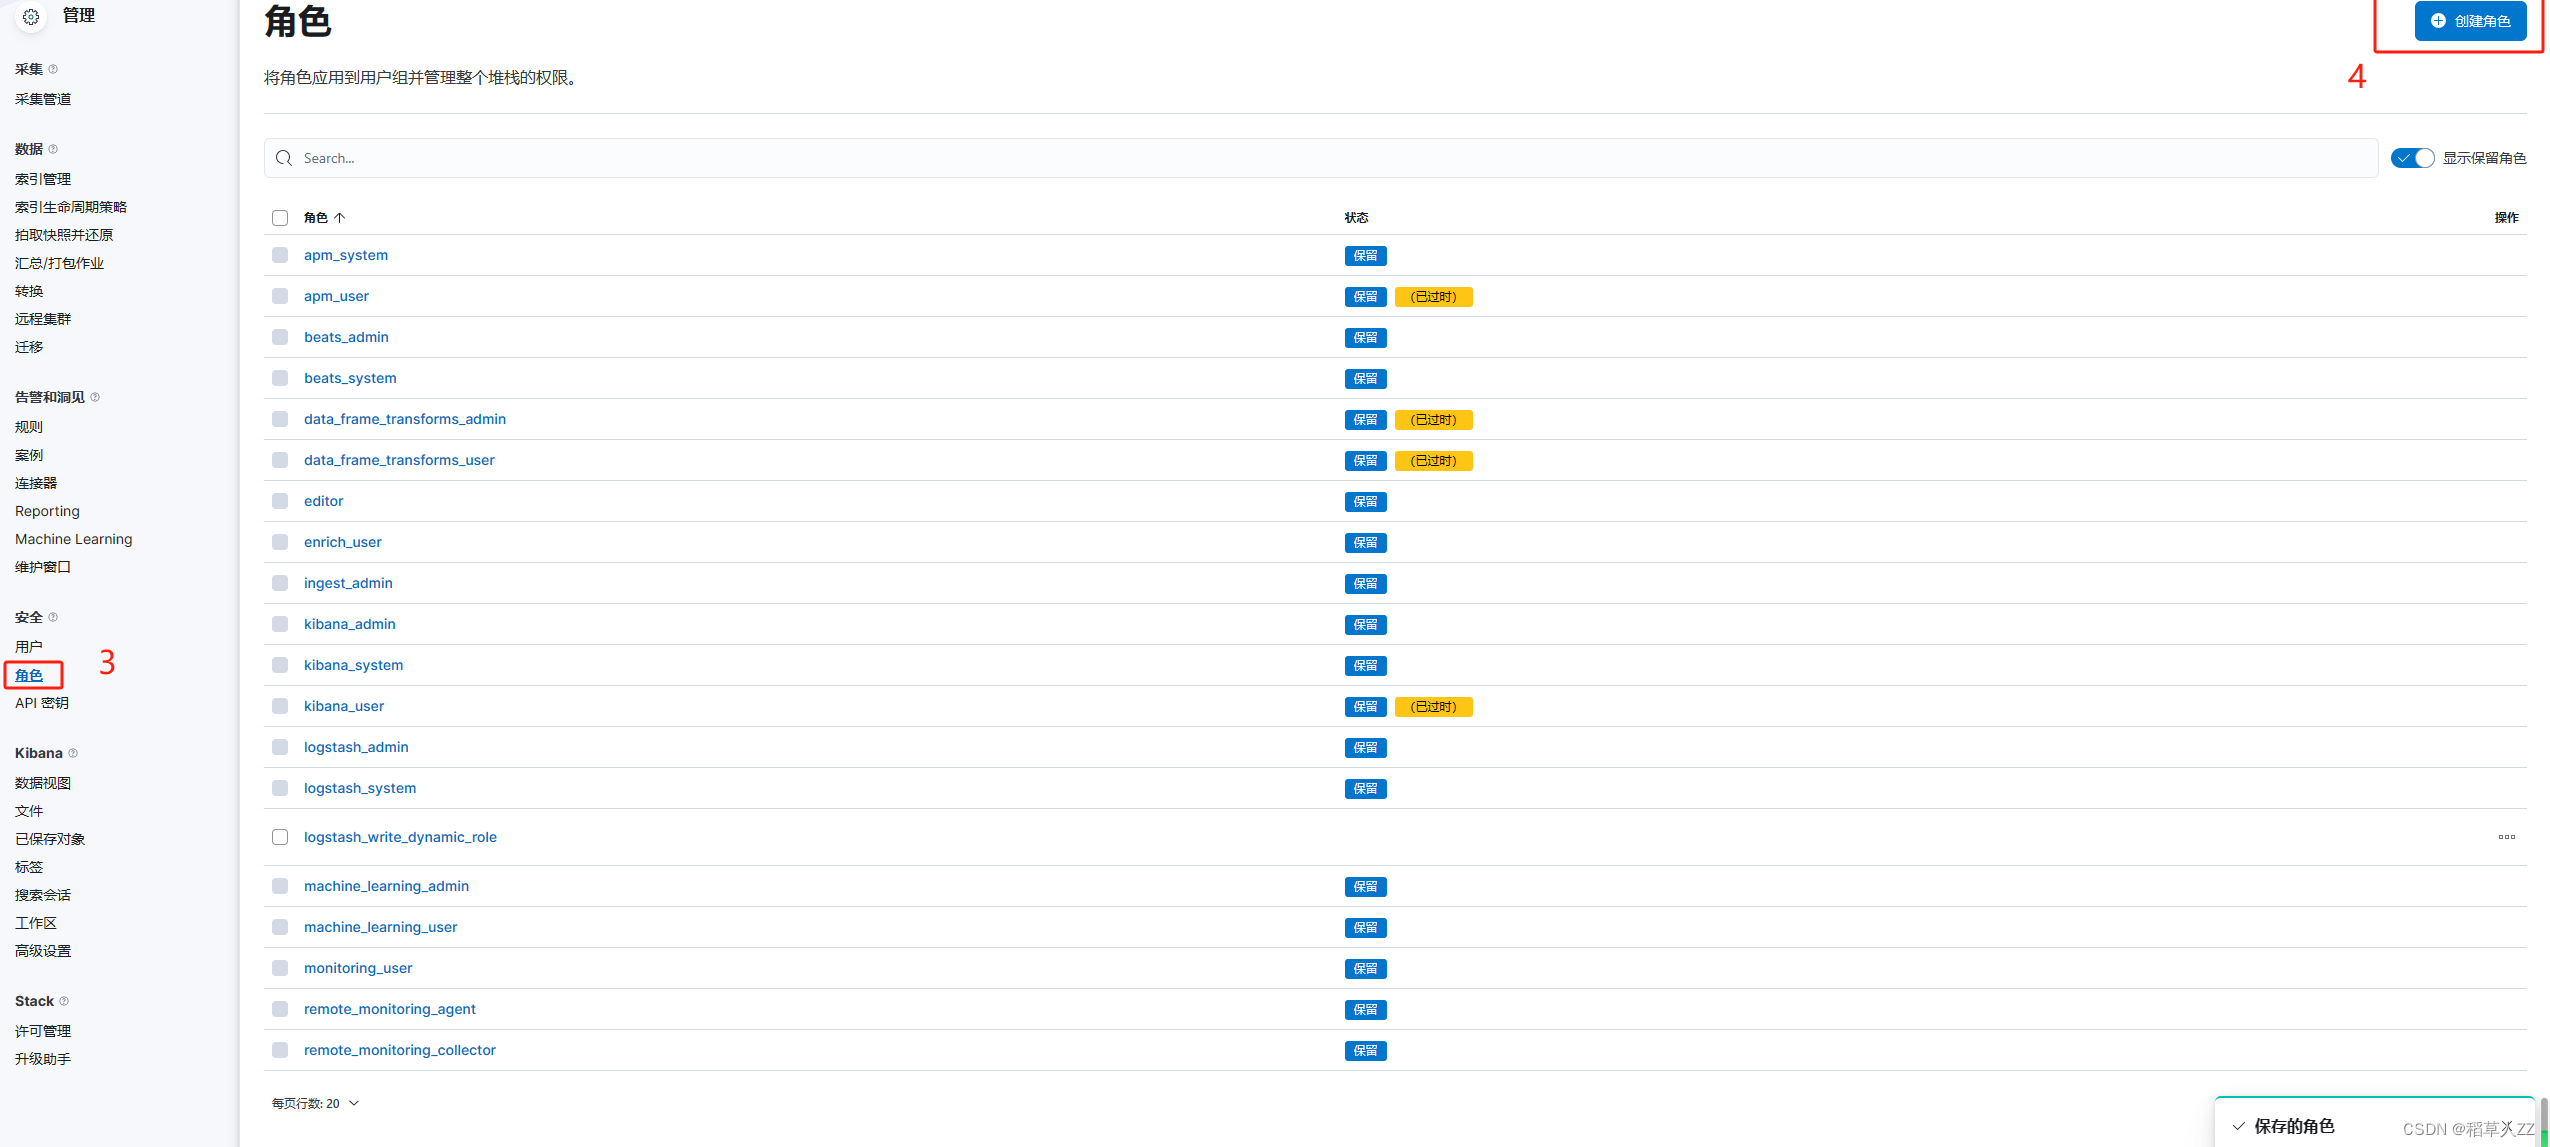
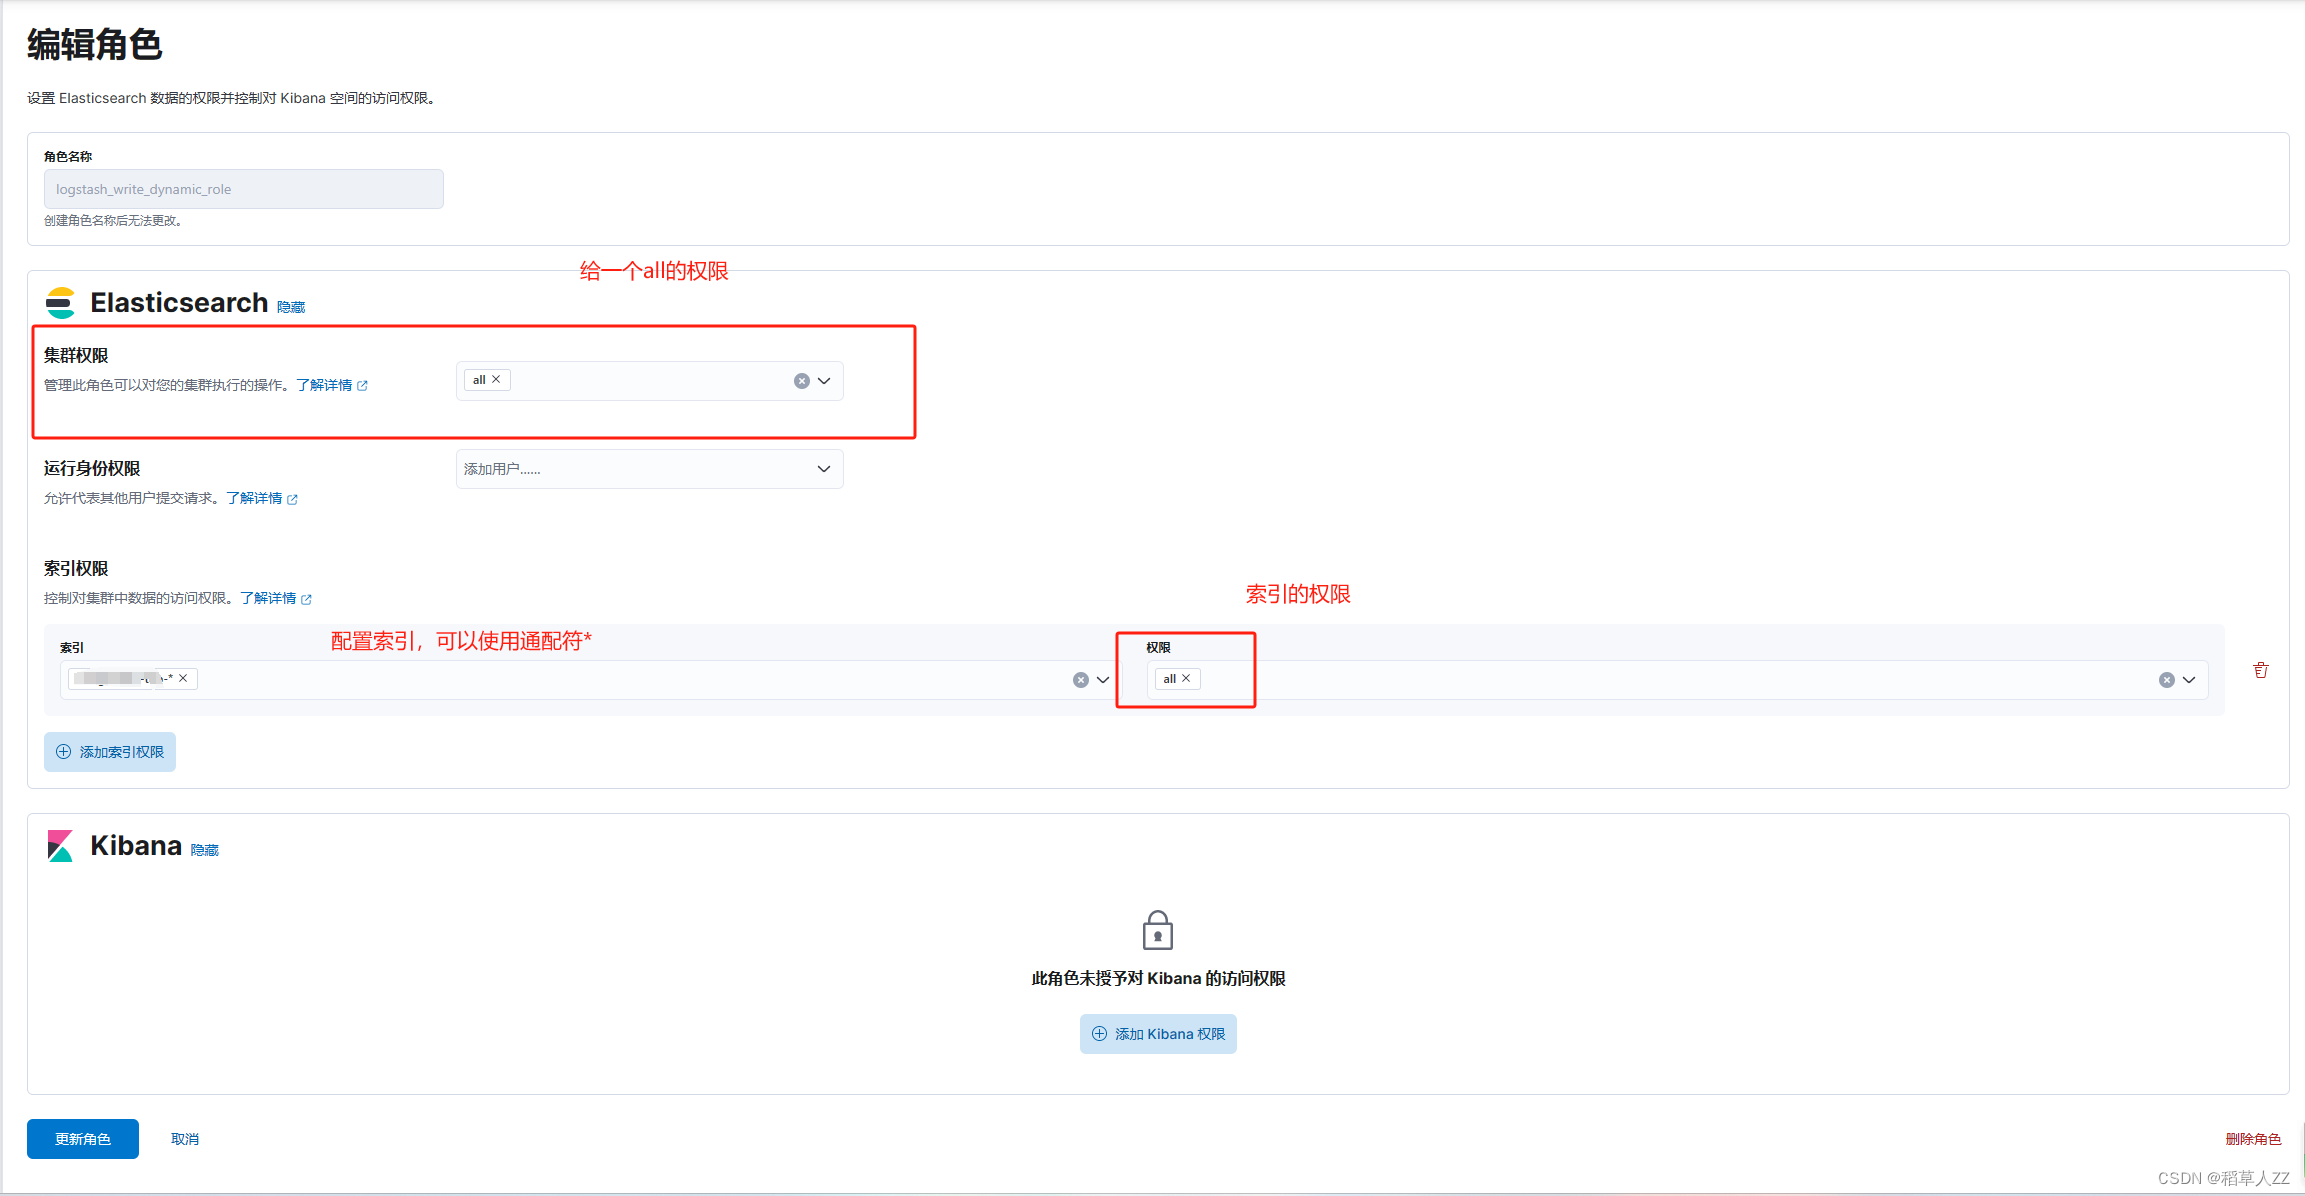
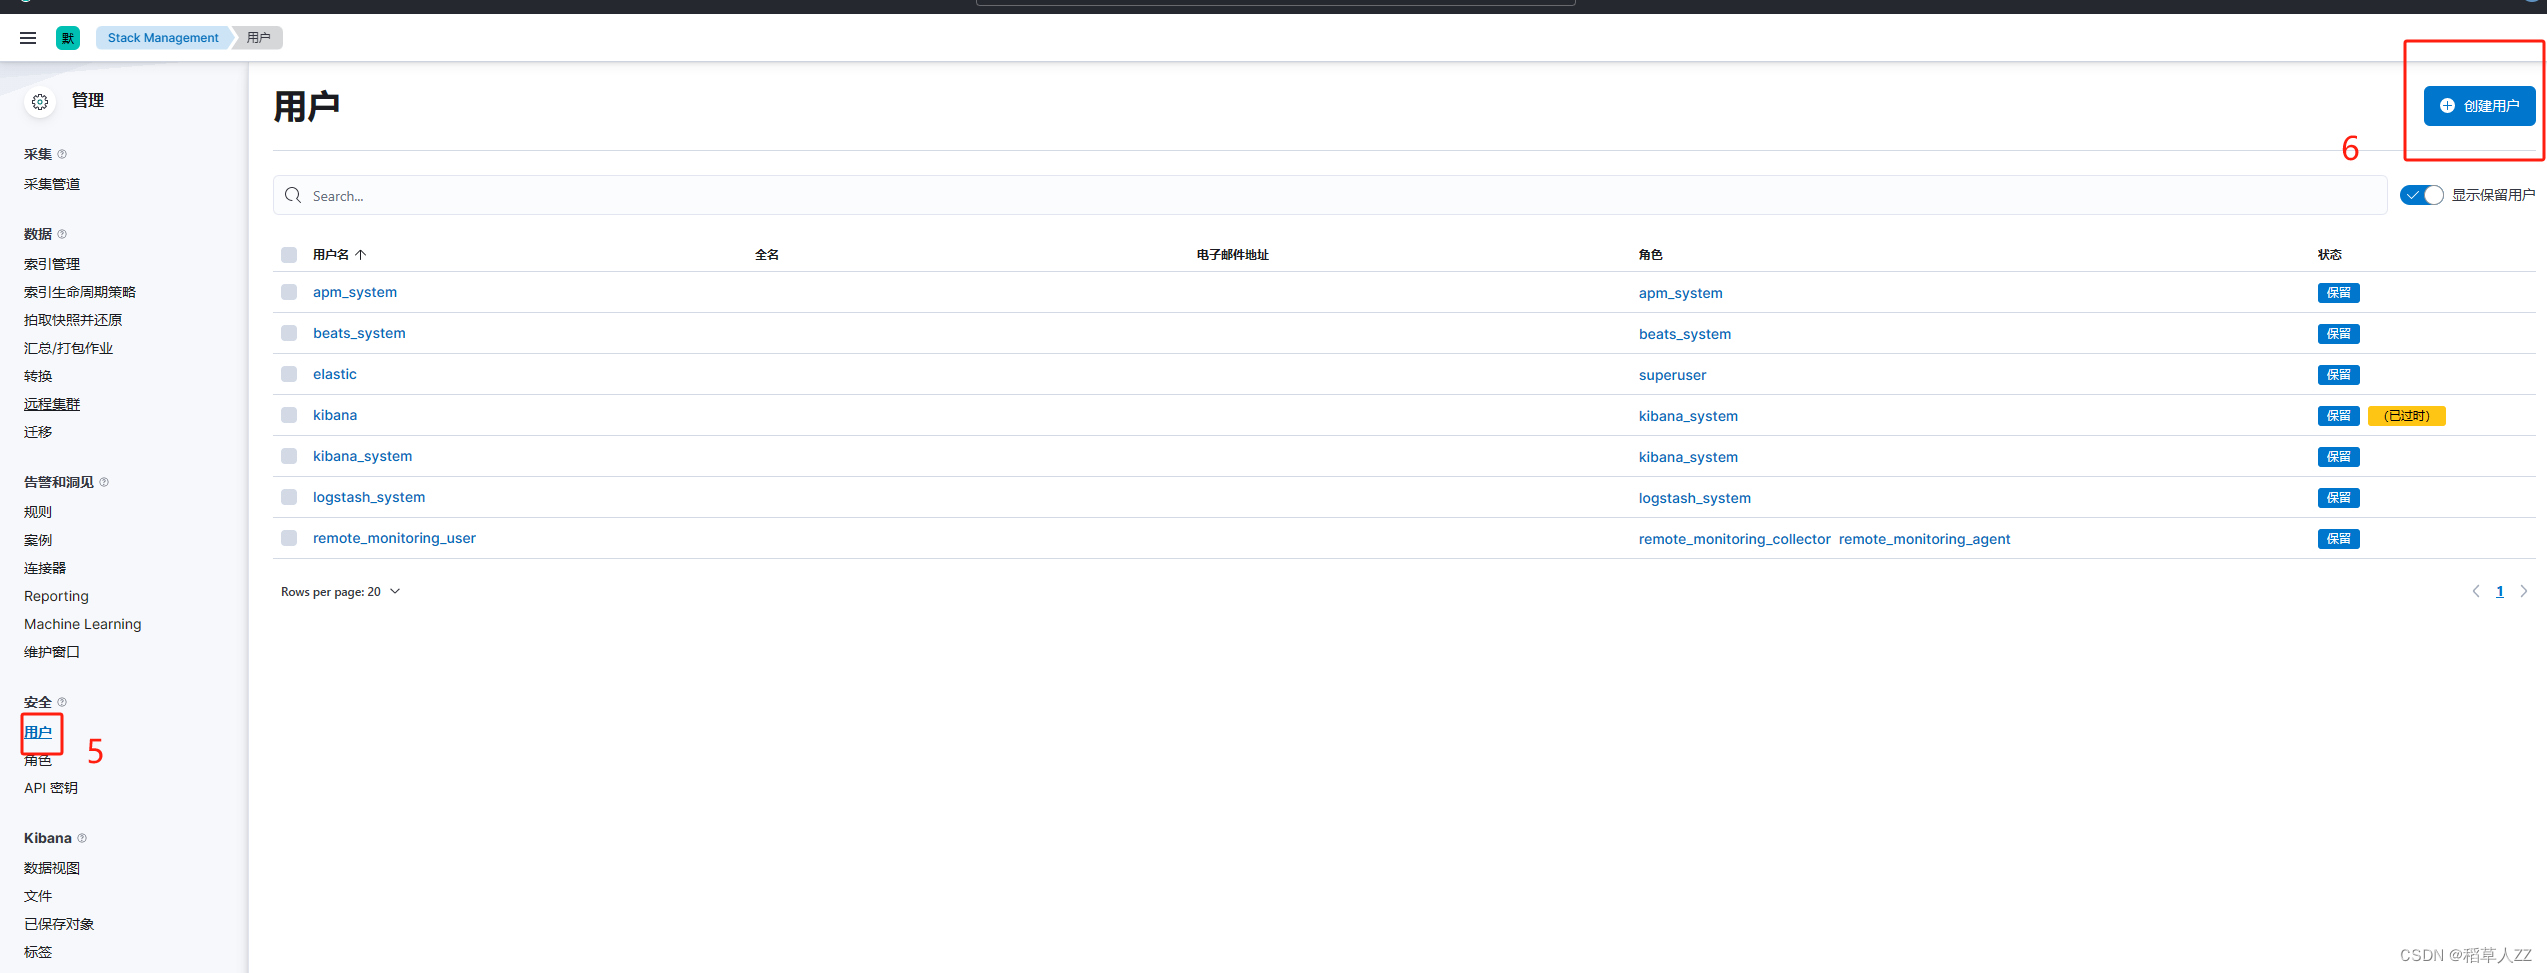
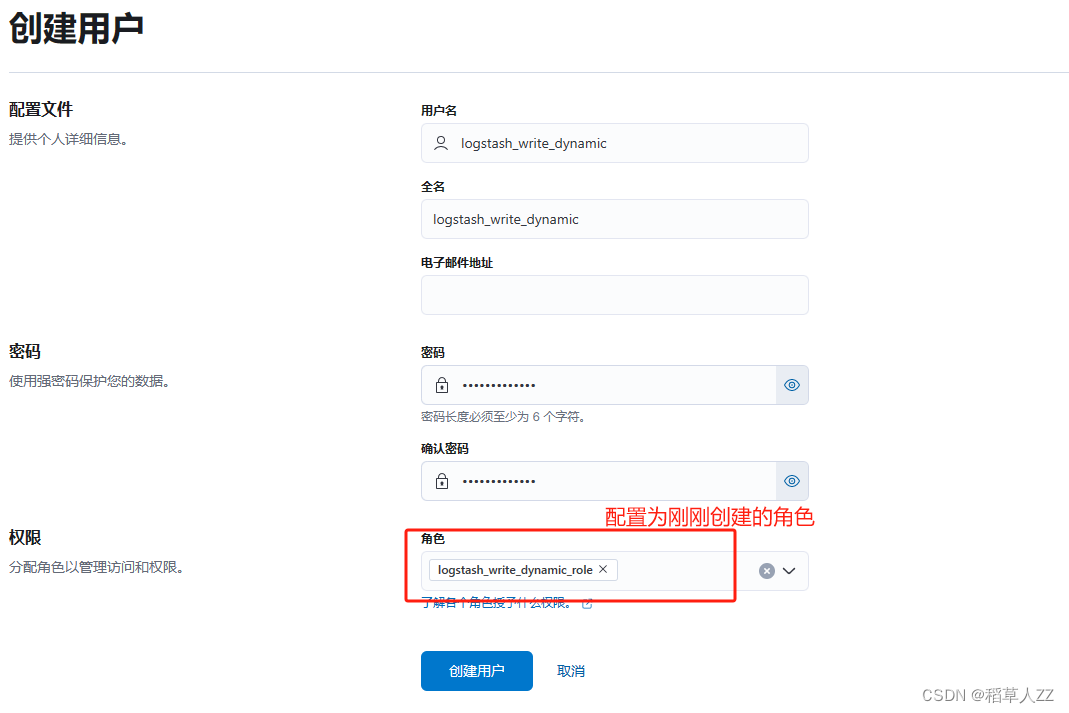
- 使用kabina配置一个新的elasticsearch用户给logstash使用
- 在pipeline目录下,增加logstash.conf文件
配置如下
# Sample Logstash configuration for creating a simple
# Beats -> Logstash -> Elasticsearch pipeline.input {tcp {port => 21068codec => json_lines}
}output {elasticsearch {hosts => ["https://172.27.0.2:9200"]index => "自定义索引名称-%{+YYYY.MM.dd}"user => "自定义用户"password => "自定义密码"ssl_enabled => truessl_certificate_authorities => ["/usr/share/logstash/config/logstash.pem"]}
}
- 重启logstash
创建springboot项目进行测试
- 在pom文件内添加依赖
<dependency><groupId>net.logstash.logback</groupId><artifactId>logstash-logback-encoder</artifactId><version>7.4</version></dependency>
- 配置logback.xml文件,添加以下appender
destination配置问logstash的地址,需要哪些数据请自定义。
<springProperty scope="context" name="appName" source="spring.application.name"/><springProperty scope="context" name="port" source="server.port"/><appender name="LOGSTASH" class="net.logstash.logback.appender.LogstashTcpSocketAppender"><destination>ip:port</destination><encoder class="net.logstash.logback.encoder.LoggingEventCompositeJsonEncoder"><timestamp><timeZone>Asia/Shanghai</timeZone></timestamp><providers><pattern><pattern>{"index":"index-%d{yyyy-MM-dd}","appName":"${appName}","pid": "${PID:-}","port":"${port}","timestamp":"%d{yyyy-MM-dd HH:mm:ss.SSS}","thread":"%thread","level":"%level","class": "%logger","message": "%message","stack_trace":"%exception"}</pattern></pattern></providers></encoder><keepAliveDuration>5 minutes</keepAliveDuration></appender>
- 将新增加appender的名字添加到root内
<root level="INFO"><appender-ref ref="ERROR"/><appender-ref ref="WARN"/><appender-ref ref="INFO"/><appender-ref ref="DEBUG"/><appender-ref ref="LOGSTASH"/><appender-ref ref="STDOUT"/></root>
4.启动验证
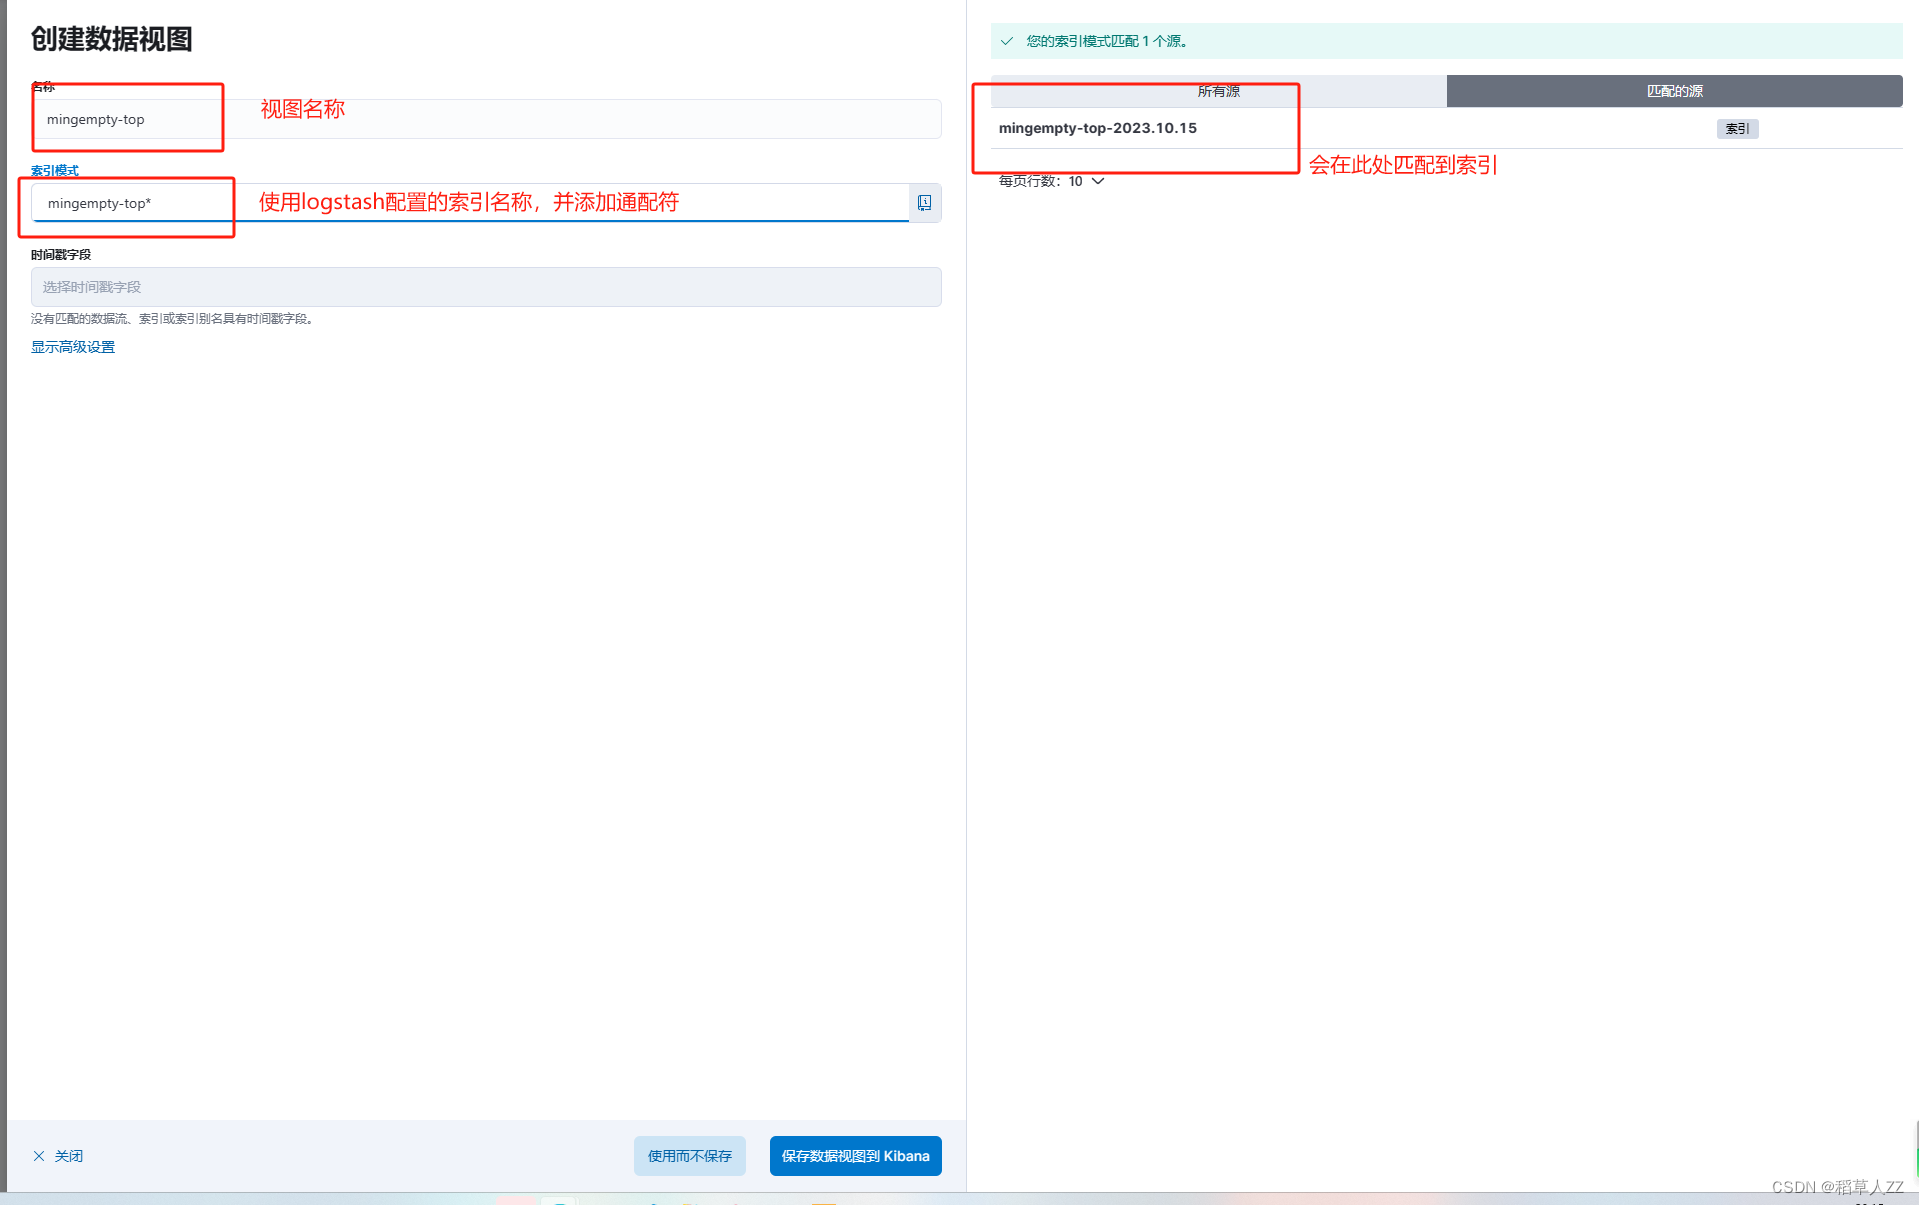
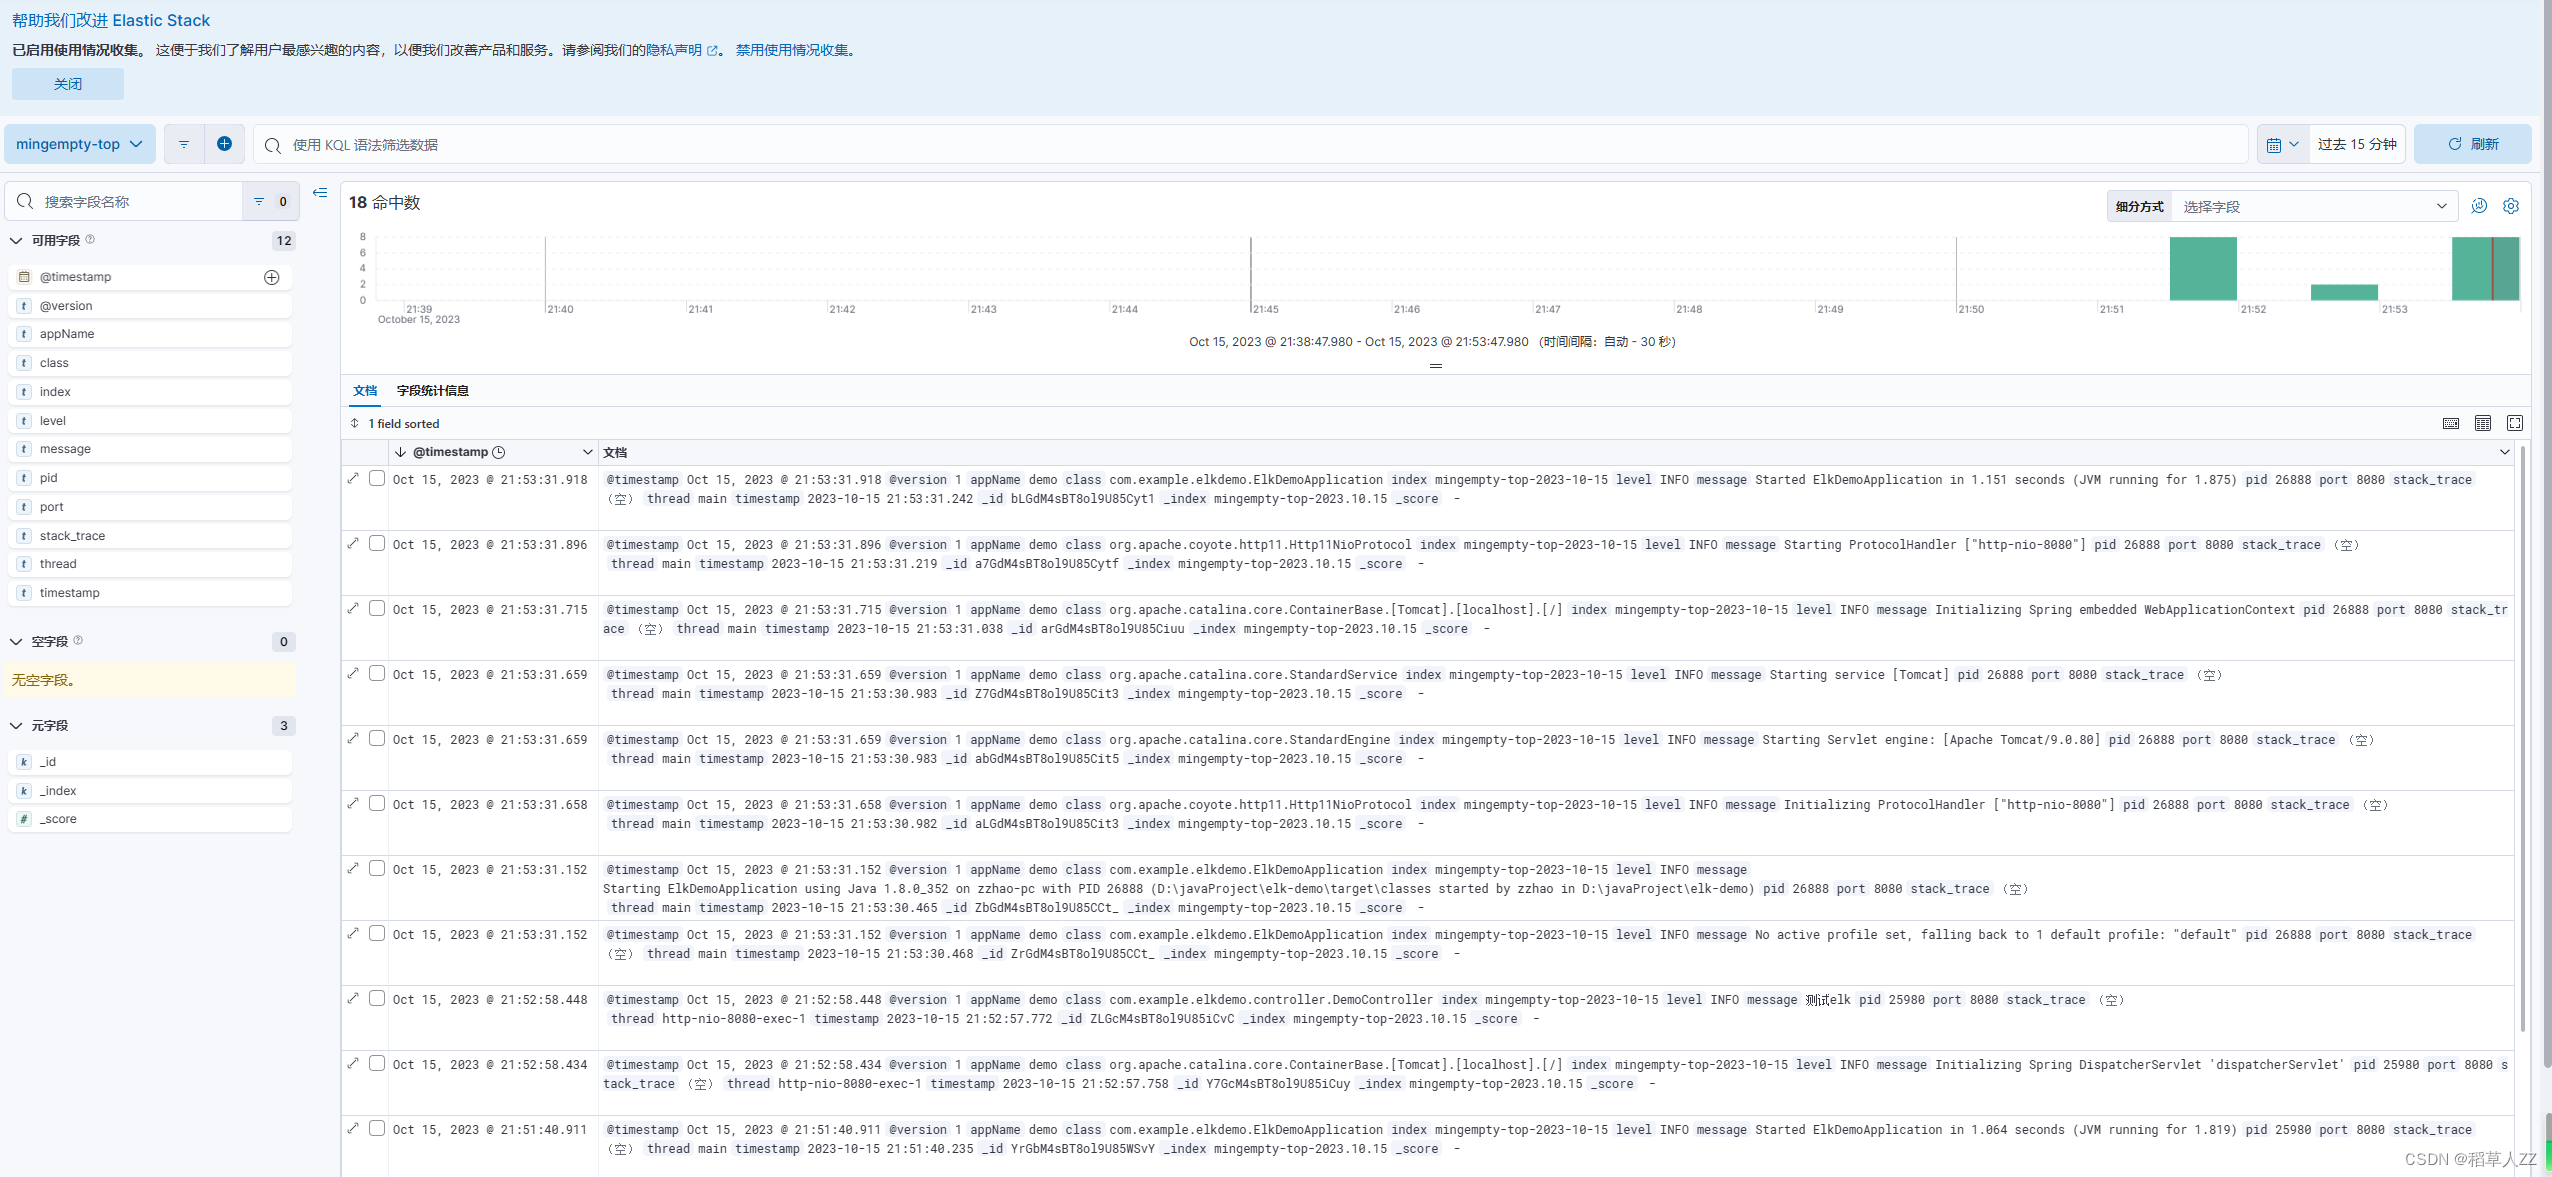
kibana创建视图,查询日志

相关文章:
docker-compose部署elk(8.9.0)并开启ssl认证
docker部署elk并开启ssl认证 docker-compose部署elk部署所需yml文件 —— docker-compose-elk.yml部署配置elasticsearch和kibana并开启ssl配置基础数据认证配置elasticsearch和kibana开启https访问 配置logstash创建springboot项目进行测试kibana创建视图,查询日志…...
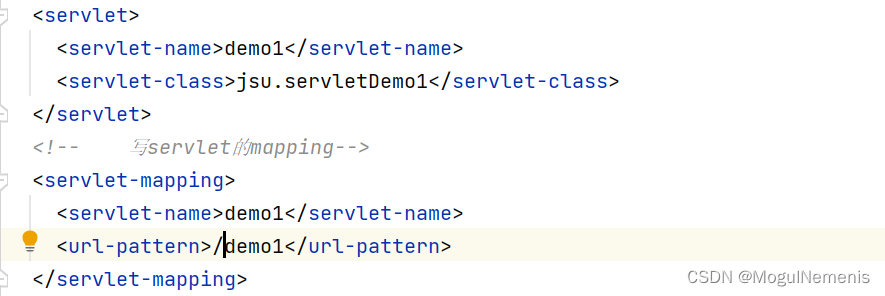
解决java.lang.IllegalArgumentException: servlet映射中的<url pattern>[demo1]无效
当我使用tomcat启动使用servlet项目时,出现了报错: java.lang.IllegalArgumentException: servlet映射中的<url pattern>[demo1]无效 显示路径错误,于是去检查Web.xml中的配置,发现是配置文件的路径写错了,少写了…...

软件测试学习(三)易用性测试、测试文档、软件安全性测试、网站测试
目录 易用性测试 用户界面测试 优秀Ul由什么构成 符合标准和规范 直观 一致 灵活 舒适 正确 实用 为有残疾障碍的人员测试:辅助选项测试 测试文档 软件文档的类型 文档测试的重要性 软件安全性测试 了解黑客的动机 威胁模式分析 网站测试 网页基…...
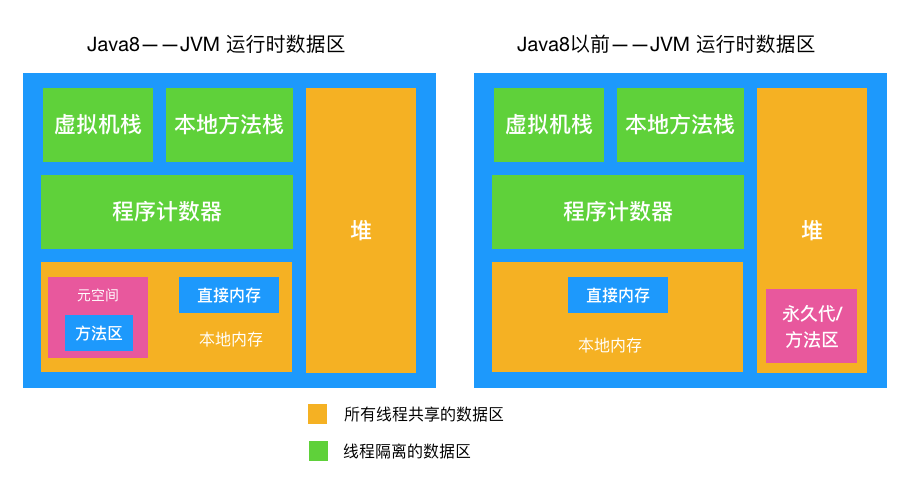
Java中,对象一定在堆中分配吗?
在我们的日常编程实践中,我们经常会遇到各种类型的对象,比如字符串、列表、自定义类等等。这些对象在内存中是如何存储的呢? 你可能会毫不犹豫地回答:“在堆中!”如果你这样回答了,那你大部分情况下是正确…...

AI:38-基于深度学习的抽烟行为检测
🚀 本文选自专栏:AI领域专栏 从基础到实践,深入了解算法、案例和最新趋势。无论你是初学者还是经验丰富的数据科学家,通过案例和项目实践,掌握核心概念和实用技能。每篇案例都包含代码实例,详细讲解供大家学习。 📌📌📌本专栏包含以下学习方向: 机器学习、深度学…...
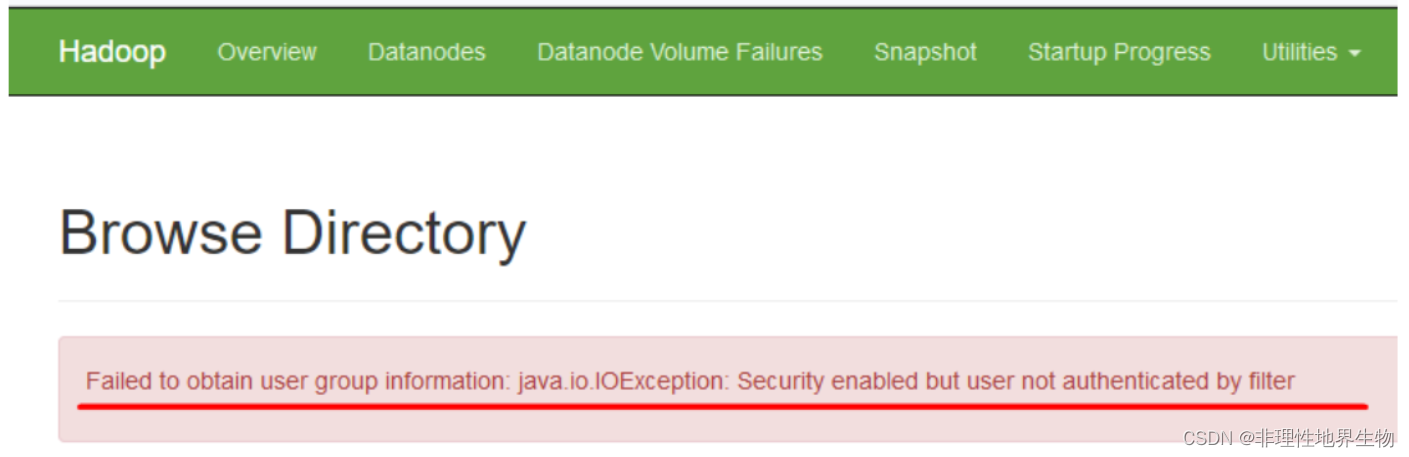
Hadoop 配置 Kerberos 认证
1、安装 Kerberos 服务器和客户端 1.1 规划 服务端: bigdata3 客户端(Hadoop集群): bigdata0 bigdata1 bigdata2 192.168.50.7 bigdata0.example.com bigdata0 192.168.50.8 bigdata1.example.com bigdata1 192.168.50.9 b…...

在 Elasticsearch 中实现自动完成功能 2:n-gram
在第一部分中,我们讨论了使用前缀查询,这是一种自动完成的查询时间方法。 在这篇文章中,我们将讨论 n-gram - 一种索引时间方法,它在基本标记化后生成额外的分词,以便我们稍后在查询时能够获得更快的前缀匹配。 但在此…...

美客多、亚马逊卖家如何运用自养账号进行有效测评?
到了10月,卖家朋友们都在忙着准备Q4旺季吧! 首先,祝愿所有看到这条推文的卖家朋友,今年旺季都能爆单,赚得盆满钵满! 测评是珑哥常谈,一直备受关注,不论是新老卖家都是一个逃不开的…...
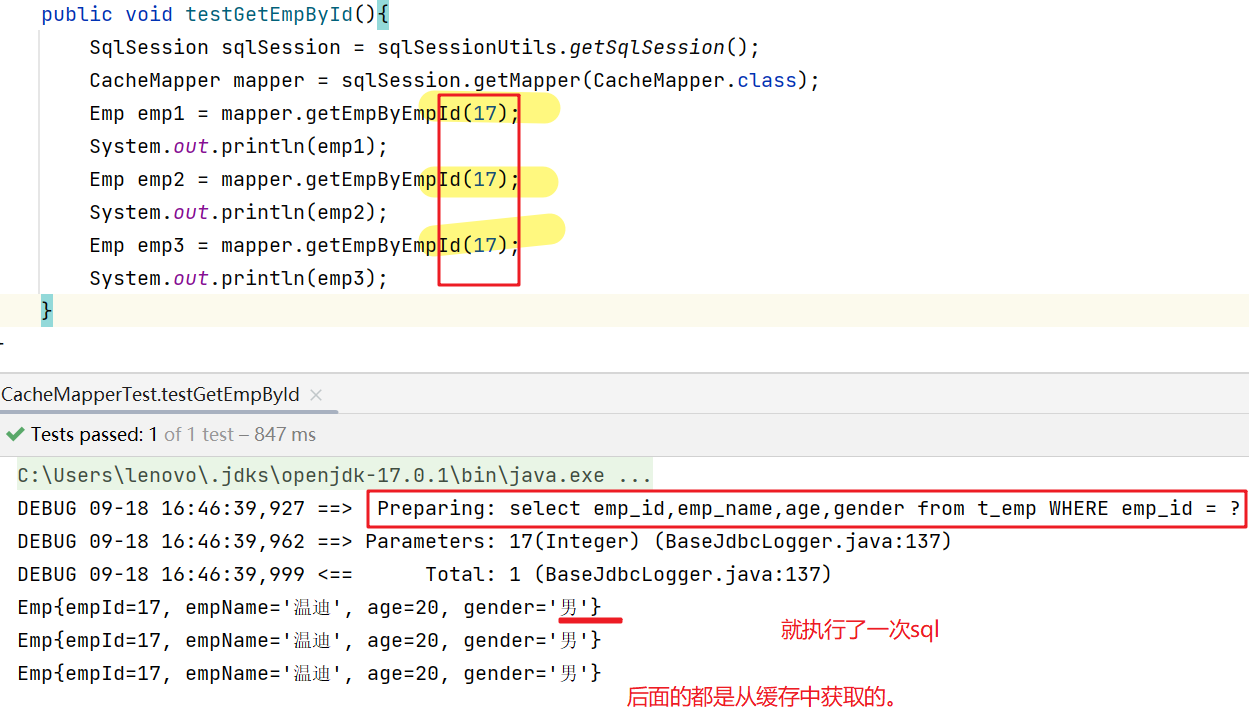
MyBatis的缓存,一级缓存,二级缓存
10、MyBatis的缓存 10.1、MyBatis的一级缓存 一级缓存是SqlSession级别的,通过同一个SqlSession对象 查询的结果数据会被缓存,下次执行相同的查询语句,就 会从缓存中(缓存在内存里)直接获取,不会重新访问…...
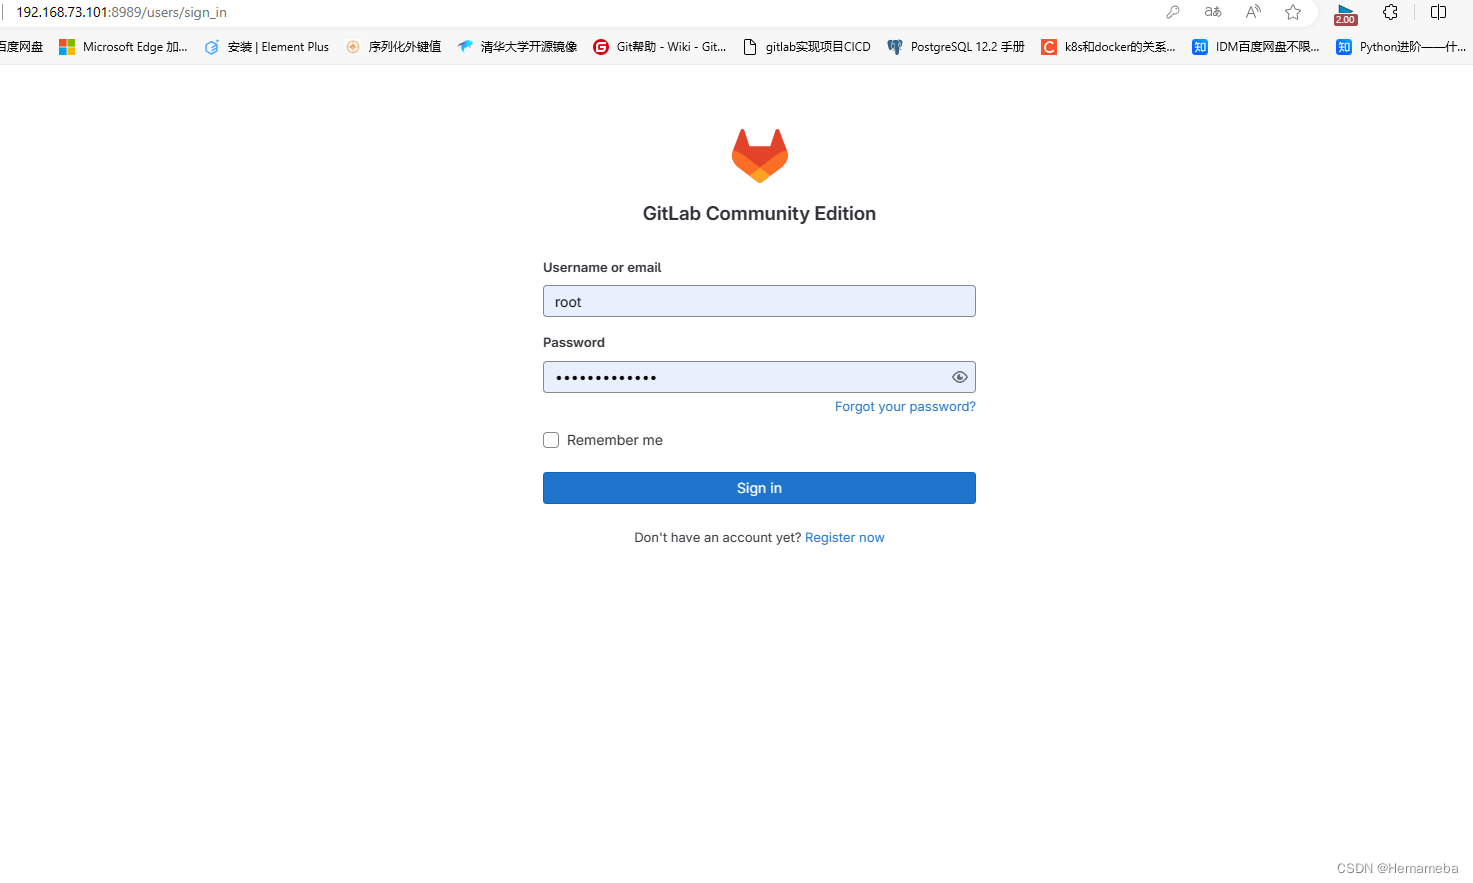
GitLab(1)——GitLab安装
目录 一、使用设备 二、使用rpm包安装 Gitlab国内清华源下载地址: ①下载命令如下: ②安装命令如下: ③删除rpm包 ④配置 ⑤重载 ⑥重启 ⑦配置自启动 ⑧打开8989端口并重启防火墙 三、GitLab登录 ①访问GitLab的URL ②输入用户…...

退税政策线上VR互动科普展厅为税收工作带来了强大活力
缴税纳税是每个公民应尽的义务和责任,由于很多人缺乏专业的缴税纳税操作专业知识和经验,因此为了提高大家的缴税纳税办事效率和好感度,越来越多地区税务局开始引进VR虚拟现实、web3d开发和多媒体等技术手段,基于线上为广大公民提供…...
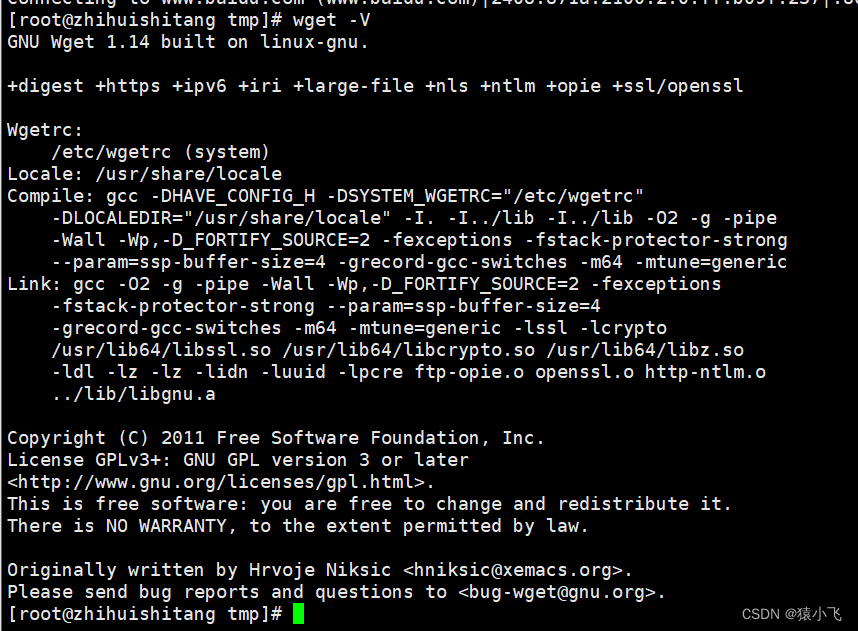
centos 7.9离线安装wget
1.下载安装包 登录到wget官网上下载最新的wget的rpm安装包到本地 http://mirrors.163.com/centos/7/os/x86_64/Packages/ 2.上传安装包到服务器 3.安装 rpm -ivh wget-1.14-18.el7_6.1.x86_64.rpm 4.查看版本 wget -V...

【Java学习之道】网络编程的基本概念
引言 这一章我们将一同进入网络编程的世界。在开始学习网络编程之前,我们需要先了解一些基本概念。那么,我们就从“什么是网络编程”这个问题开始吧。 一、网络编程的基本概念 1.1 什么是网络编程 网络编程,顾名思义,就是利用…...

Restful API 设计示例
Restful API 设计示例 一 ,HTTP状态码 ✔️正例: 200: 返回成功 说明:200表示成功,4xx表示客户端异常,5xx表示服务端异常,参见HTTP 的返回码含义 ❌反例: 除了200就是500 说明࿱…...

为知笔记一个日记模板
<!DOCTYPE HTML><html><head> <meta http-equiv"Content-Type" content"text/html; charsetunicode"> <title>日记:</title><style id"wiz_custom_css">html, .wiz-editor-body {font-siz…...
软件测试中如何测试算法?
广义的算法是指解决问题的方案,小到求解数学题,大到制定商业策略,都可以叫做算法。而我们 今天讨论的软件测试中的算法,对应的英文单词为Algorithm ,专指计算机处理复杂问题的程序或 指令。 随着最近几年人工智能等领域的快速发展,算法受到前所未有的重视,算法测试也随之兴起。…...

CMOS图像传感器——Sony Ta-Kuchi图像传感器
2023 年国际图像传感器研讨会于 5 月在苏格兰克里夫举行,第四场会议重点关注汽车传感器,汽车应用中 CMOS 图像传感器 (CIS) 的技术要求与消费(移动)设备中的要求不同。毕竟,很少有人关心车载摄像头的像素数或图像美观度。主要驱动因素是安全性、可靠性和成本。 而汽车领域…...
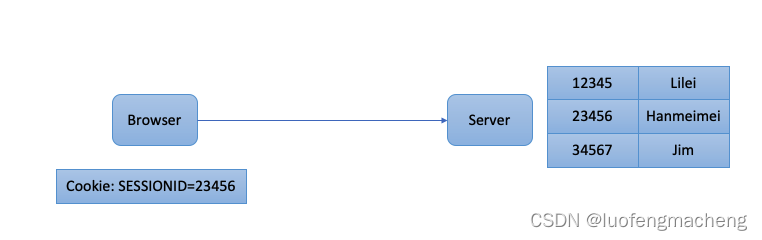
一文理解登录鉴权(Cookie、Session、Jwt、CAS、SSO)
1 前言 登录鉴权是任何一个网站都无法绕开的部分,当系统要正式上线前都会要求接入统一登陆系统,一方面能够让网站只允许合法的用户访问,另一方面,当用户在网站上进行操作时也需要识别操作的用户,用作后期的操作审计。…...
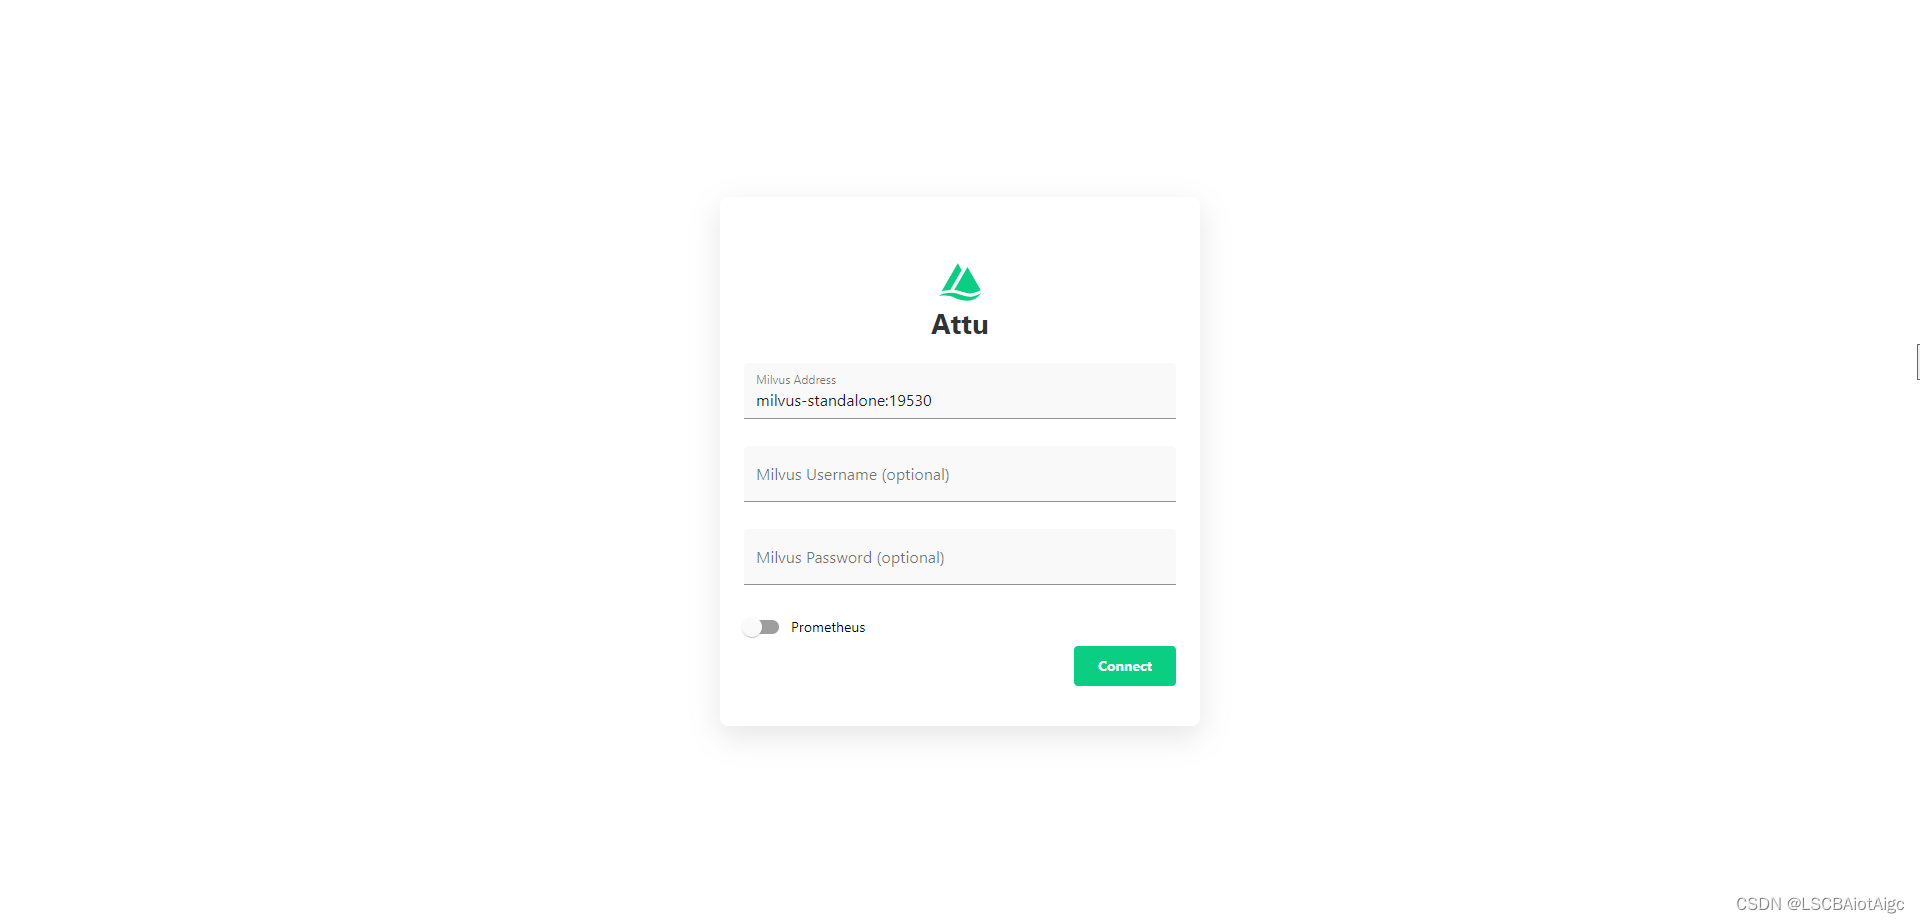
LangChain结合milvus向量数据库以及GPT3.5结合做知识库问答之一 --->milvus的docker compose安装
https://github.com/milvus-io/milvus/releaseshttps://github.com/milvus-io/milvus/releases 以下步骤均在Linux环境中进行: 将milvus-standalone-docker-compose.yml下载到本地。 1、新建一个目录milvus 2、将milvus-standalone-docker-compose.yml放到milvu…...

安装nginx,配置https,并解决403问题
nginx安装 下载nginx:下载地址 上传到/opt目录 解压nginx,并进入解压后到目录 cd /opt tar -zxvf nginx-1.25.2.tar.gz cd nginx-1.25.2编译(with-http_ssl_module为https模块) ./configure --with-http_ssl_module安装 make install默认的安装目录为…...
)
浏览器访问 AWS ECS 上部署的 Docker 容器(监听 80 端口)
✅ 一、ECS 服务配置 Dockerfile 确保监听 80 端口 EXPOSE 80 CMD ["nginx", "-g", "daemon off;"]或 EXPOSE 80 CMD ["python3", "-m", "http.server", "80"]任务定义(Task Definition&…...
)
进程地址空间(比特课总结)
一、进程地址空间 1. 环境变量 1 )⽤户级环境变量与系统级环境变量 全局属性:环境变量具有全局属性,会被⼦进程继承。例如当bash启动⼦进程时,环 境变量会⾃动传递给⼦进程。 本地变量限制:本地变量只在当前进程(ba…...

逻辑回归:给不确定性划界的分类大师
想象你是一名医生。面对患者的检查报告(肿瘤大小、血液指标),你需要做出一个**决定性判断**:恶性还是良性?这种“非黑即白”的抉择,正是**逻辑回归(Logistic Regression)** 的战场&a…...

【OSG学习笔记】Day 16: 骨骼动画与蒙皮(osgAnimation)
骨骼动画基础 骨骼动画是 3D 计算机图形中常用的技术,它通过以下两个主要组件实现角色动画。 骨骼系统 (Skeleton):由层级结构的骨头组成,类似于人体骨骼蒙皮 (Mesh Skinning):将模型网格顶点绑定到骨骼上,使骨骼移动…...

python执行测试用例,allure报乱码且未成功生成报告
allure执行测试用例时显示乱码:‘allure’ �����ڲ����ⲿ���Ҳ���ǿ�&am…...

docker 部署发现spring.profiles.active 问题
报错: org.springframework.boot.context.config.InvalidConfigDataPropertyException: Property spring.profiles.active imported from location class path resource [application-test.yml] is invalid in a profile specific resource [origin: class path re…...
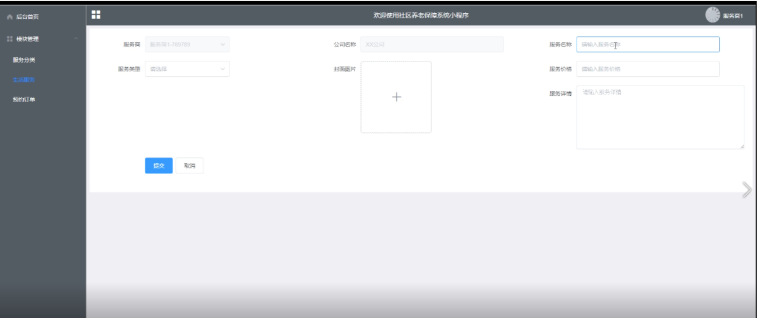
Springboot社区养老保险系统小程序
一、前言 随着我国经济迅速发展,人们对手机的需求越来越大,各种手机软件也都在被广泛应用,但是对于手机进行数据信息管理,对于手机的各种软件也是备受用户的喜爱,社区养老保险系统小程序被用户普遍使用,为方…...
处理vxe-table 表尾数据是单独一个接口,表格tableData数据更新后,需要点击两下,表尾才是正确的
修改bug思路: 分别把 tabledata 和 表尾相关数据 console.log() 发现 更新数据先后顺序不对 settimeout延迟查询表格接口 ——测试可行 升级↑:async await 等接口返回后再开始下一个接口查询 ________________________________________________________…...
详细解析)
Caliper 负载(Workload)详细解析
Caliper 负载(Workload)详细解析 负载(Workload)是 Caliper 性能测试的核心部分,它定义了测试期间要执行的具体合约调用行为和交易模式。下面我将全面深入地讲解负载的各个方面。 一、负载模块基本结构 一个典型的负载模块(如 workload.js)包含以下基本结构: use strict;/…...
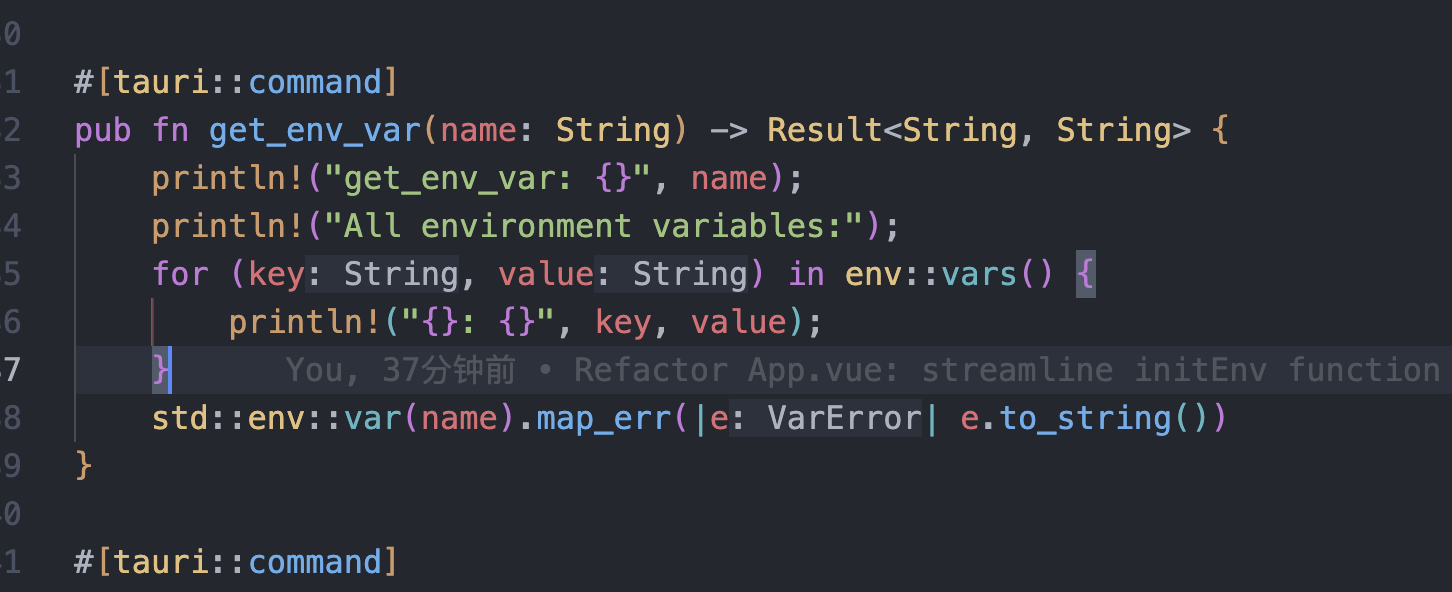
tauri项目,如何在rust端读取电脑环境变量
如果想在前端通过调用来获取环境变量的值,可以通过标准的依赖: std::env::var(name).ok() 想在前端通过调用来获取,可以写一个command函数: #[tauri::command] pub fn get_env_var(name: String) -> Result<String, Stri…...