《第一行代码》 第八章:应用手机多媒体
一,使用通知
第一步,创建项目,书写布局
<LinearLayout xmlns:android="http://schemas.android.com/apk/res/android"android:orientation="vertical"android:layout_width="match_parent"android:layout_height="match_parent"><Buttonandroid:id="@+id/send_notice"android:layout_width="wrap_content"android:layout_height="wrap_content"android:text="发送通知"/>
</LinearLayout>
第二步:修改活动代码,写发起通知
public class MainActivity extends AppCompatActivity implements View.OnClickListener{@Overrideprotected void onCreate(Bundle savedInstanceState) {super.onCreate(savedInstanceState);setContentView(R.layout.activity_main);Button sendNotice=(Button) findViewById(R.id.send_notice);sendNotice.setOnClickListener(this);}@Overridepublic void onClick(View view) {switch(view.getId()){case R.id.send_notice://接收一个字符串用于明确是哪个服务,创建一个通知管理器manager,对通知进行管理NotificationManager manager =(NotificationManager) getSystemService(NOTIFICATION_SERVICE);//高版本需要渠道,注意这里Build.VERSION_CODES.O是opq的o,不是数字0if(Build.VERSION.SDK_INT >= Build.VERSION_CODES.O){NotificationChannel notificationChannel=new NotificationChannel("1","name",NotificationManager.IMPORTANCE_HIGH);//如果这里用IMPORTANCE_HIGH就需要在系统的设置里开启渠道,通知才能正常弹出if(manager!=null){manager.createNotificationChannel(notificationChannel);}}//使用Builder来创建构造器,并完成基本的参数配置Notification notification=new NotificationCompat.Builder(MainActivity.this,"1").setContentTitle("这是标题").setContentText("这是内容").setWhen(System.currentTimeMillis()).setSmallIcon(R.mipmap.ic_launcher).setLargeIcon(BitmapFactory.decodeResource(getResources(),R.mipmap.ic_launcher)).build();if(manager!=null){manager.notify(1,notification);}break;default:break;}}
}
第三步,书写点击通知后的回调事件
新建NotificationActivity活动,修改对应的布局:
<RelativeLayout xmlns:android="http://schemas.android.com/apk/res/android"android:layout_width="match_parent"android:layout_height="match_parent"><TextViewandroid:layout_width="wrap_content"android:layout_height="wrap_content"android:layout_centerInParent="true"android:textSize="24sp"android:text="文本内容"/>
</RelativeLayout>
修改活动代码:
public class MainActivity extends AppCompatActivity implements View.OnClickListener{@Overrideprotected void onCreate(Bundle savedInstanceState) {super.onCreate(savedInstanceState);setContentView(R.layout.activity_main);Button sendNotice=(Button) findViewById(R.id.send_notice);sendNotice.setOnClickListener(this);}@Overridepublic void onClick(View view) {switch(view.getId()){case R.id.send_notice://回调事件,打开新的活动Intent intent =new Intent(this,NotificationActivity.class);PendingIntent pi=PendingIntent.getActivity(this,0,intent,0);//接收一个字符串用于明确是哪个服务,创建一个通知管理器manager,对通知进行管理NotificationManager manager =(NotificationManager) getSystemService(NOTIFICATION_SERVICE);//高版本需要渠道,注意这里Build.VERSION_CODES.O是opq的o,不是数字0if(Build.VERSION.SDK_INT >= Build.VERSION_CODES.O){NotificationChannel notificationChannel=new NotificationChannel("1","name",NotificationManager.IMPORTANCE_HIGH);//如果这里用IMPORTANCE_HIGH就需要在系统的设置里开启渠道,通知才能正常弹出if(manager!=null){manager.createNotificationChannel(notificationChannel);}}//使用Builder来创建构造器,并完成基本的参数配置Notification notification=new NotificationCompat.Builder(MainActivity.this,"1").setContentTitle("这是标题").setContentText("这是内容").setWhen(System.currentTimeMillis()).setSmallIcon(R.mipmap.ic_launcher).setLargeIcon(BitmapFactory.decodeResource(getResources(),R.mipmap.ic_launcher)).setContentIntent(pi).build();if(manager!=null){manager.notify(1,notification);}break;default:break;}}
}
主要是这几行代码:
//回调事件,打开新的活动
Intent intent =new Intent(this,NotificationActivity.class);
PendingIntent pi=PendingIntent.getActivity(this,0,intent,0);
//....
Notification notification=new NotificationCompat.Builder(MainActivity.this,"1").setContentIntent(pi)//这里注册回调函数.build();
第四步:关闭通知
在我们点击通知之后,需要把该通知移除掉,这个移除有两种方法。
【1】注册时声明
Notification notification=new NotificationCompat.Builder(MainActivity.this,"1").setAutoCancel(true).build();
【2】执行好回调后执行
我们点击通知是打开一个新的活动页,于是可以在新的活动页中,拿到该通知管理器,然后调用通知管理器的关闭通知,找到对应要关闭的通知就行关闭即可:
public class NotificationActivity extends AppCompatActivity {@Overrideprotected void onCreate(Bundle savedInstanceState) {super.onCreate(savedInstanceState);setContentView(R.layout.notification_layout);NotificationManager manager=(NotificationManager) getSystemService(NOTIFICATION_SERVICE);manager.cancel(1);}
}
二,调用摄像头和相册
第一步:新建项目,修改布局
新建CameraAlbumTest项目,修改布局:
<LinearLayout xmlns:android="http://schemas.android.com/apk/res/android"android:orientation="vertical"android:layout_width="match_parent"android:layout_height="match_parent"><Buttonandroid:id="@+id/take_photo"android:layout_width="match_parent"android:layout_height="wrap_content"android:text="照相"/><ImageViewandroid:id="@+id/picture"android:layout_width="wrap_content"android:layout_height="wrap_content"android:layout_gravity="center_horizontal"/></LinearLayout>
第二步:修改对应的activity
public class MainActivity extends AppCompatActivity {public static final int TAKE_PHOTO=1;private ImageView picture;private Uri imageUri;@Overrideprotected void onCreate(Bundle savedInstanceState) {super.onCreate(savedInstanceState);setContentView(R.layout.activity_main);Button takePhoto =(Button) findViewById(R.id.take_photo);picture=(ImageView) findViewById(R.id.picture);takePhoto.setOnClickListener(new View.OnClickListener(){@Overridepublic void onClick(View view) {//创建file对象用于存储拍照后的图片File outputImage=new File(getExternalCacheDir(),"output_image.jpg");try {if(outputImage.exists()){outputImage.delete();}} catch (IOException e){e.printStackTrace();}if(Build.VERSION.SDK_INT>=24){imageUri= FileProvider.getUriForFile(MainActivity.this,"com.example.cameraalbumtest.fileprovider",outputImage);}else{imageUri=Uri.fromFile(outputImage);}//启动相机程序Intent intent =new Intent("android.media.action.IMAGE_CAPTURE");intent.putExtra(MediaStore.EXTRA_OUTPUT,imageUri);startActivityForResult(intent,TAKE_PHOTO);}});}@Overrideprotected void onActivityResult(int requestCode, int resultCode,Intent data) {super.onActivityResult(requestCode, resultCode, data);switch (requestCode) {case TAKE_PHOTO:if (resultCode == RESULT_OK) {try {//将拍摄的照片显示出来Bitmap bitmap = BitmapFactory.decodeStream(getContentResolver().openInputStream(imageUri));picture.setImageBitmap(bitmap);} catch (FileNotFoundException e) {e.printStackTrace();}}break;default:break;}}
}
第三步:在menifest文件中对内容提供器进行注册
<providerandroid:authorities="com.example.cameraalbumtest.fileprovider"android:name="androidx.core.content.FileProvider"android:exported="false"android:grantUriPermissions="true"><meta-data android:name="android.support.FILE_PROVIDER_PATHS" android:resource="@xml/file_paths"/></provider>
其中meta-data来指定uri的共享路径,下面我们来创建它:
右击 res目录一New-Directory,创建一个xml目录,接着右击xml目录-New-File,创建一个file paths.xml文件。然后修改file paths.xml文件中的内容,如下所示:
<?xml version="1.0" encoding="utf-8"?>
<paths xmlns:android="http://schemas.android.com/apk/res/android"><external-pathname="my_images"path=""/>
</paths>
其中,external-path 就是用来指定 Uri 共享的name 属性的值可以随便填,path 属性的值表示共享的具体路径。这里设置空值就表示将整个 SD卡进行共享,当然你可以仅共享我们存放output imagejpg这张图片的路径
另外还有一点要注意,在Android 4.4系统之前,访问SD卡的应用关联目录也是要声明权限的,从 4.4 系统开始不再需要权限声明。那么我们为了能够兼容老版本系统的手机,还需要在AndroidManifest.xml中声明一下访问SD卡的权限:
<uses-permission android:name="android.permission.WRITE_EXTERNAL_STORAGE"/>
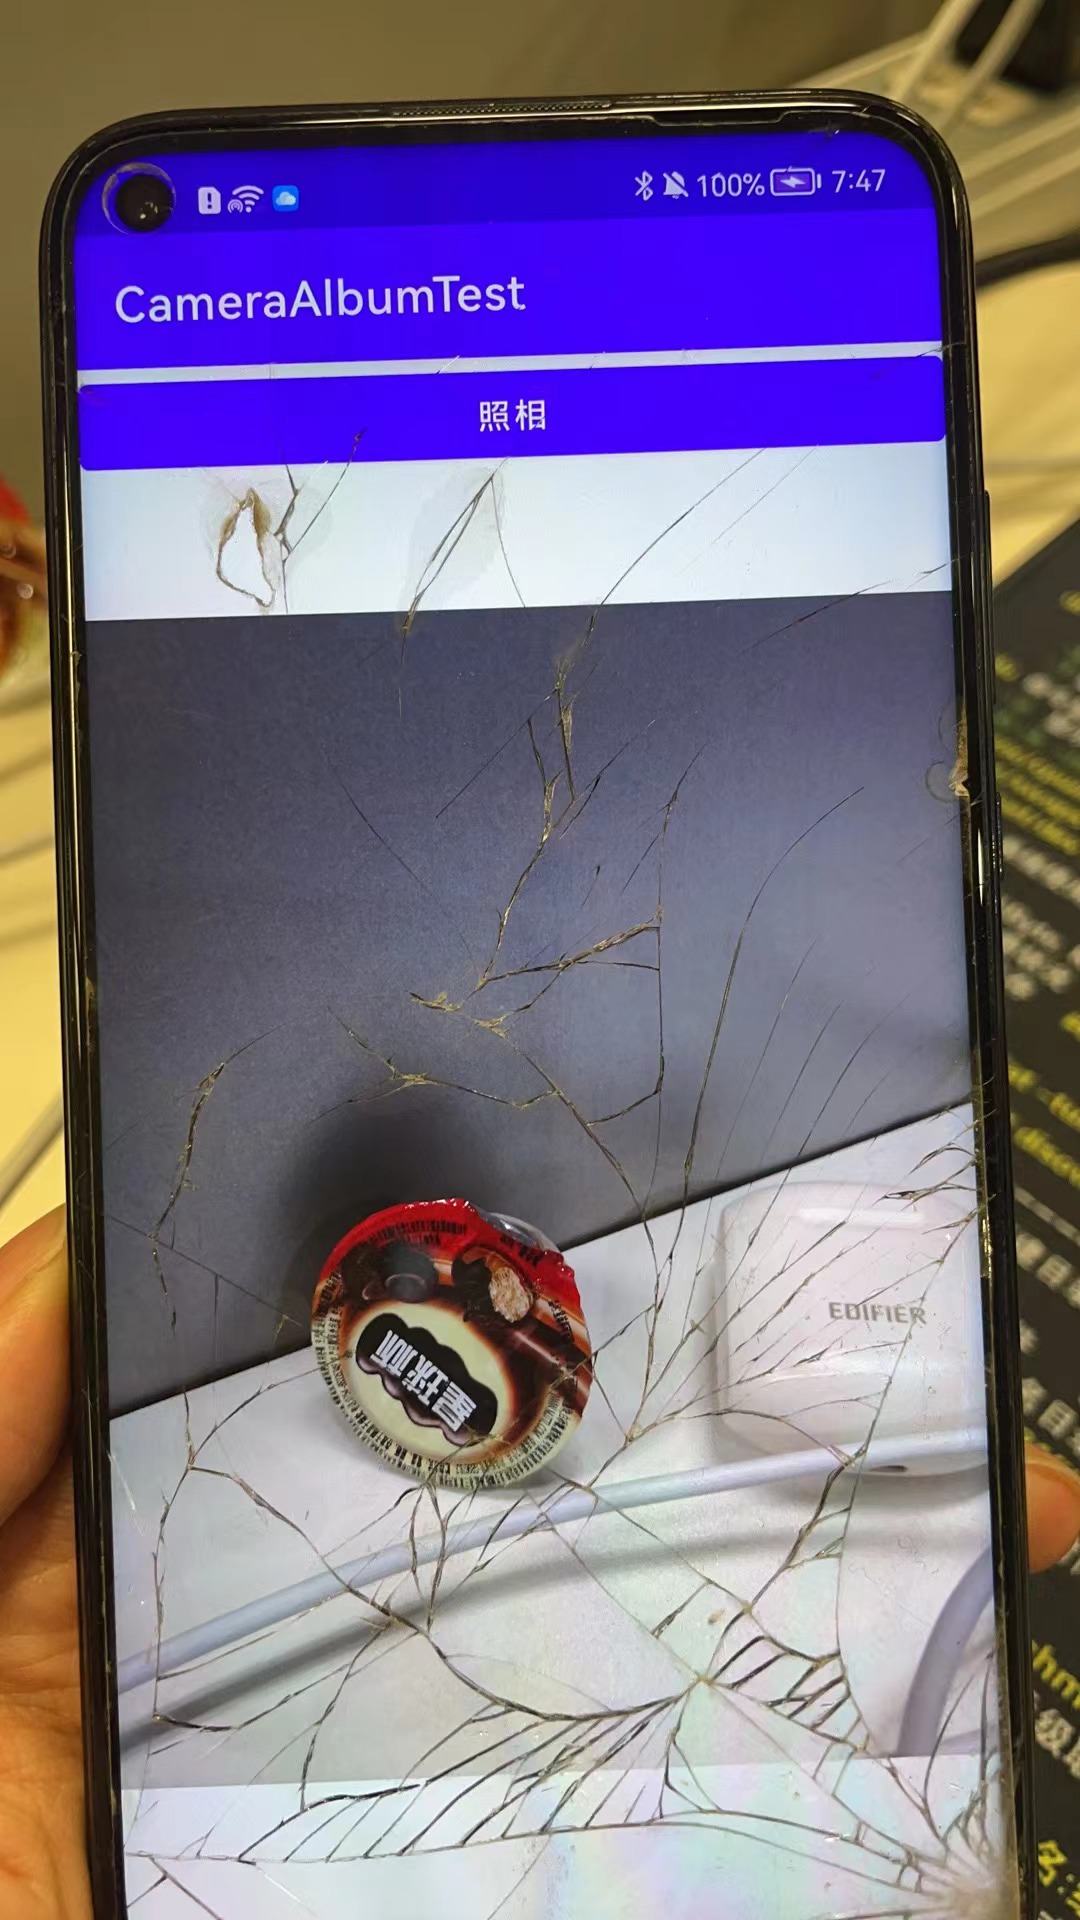
实现的效果:
第四步:从相册中选择照片
修改布局,增加一个点击打开相册的按钮:
<LinearLayout xmlns:android="http://schemas.android.com/apk/res/android"android:orientation="vertical"android:layout_width="match_parent"android:layout_height="match_parent"><Buttonandroid:id="@+id/take_photo"android:layout_width="match_parent"android:layout_height="wrap_content"android:text="照相"/><Buttonandroid:id="@+id/choose_from_album"android:layout_width="match_parent"android:layout_height="wrap_content"android:text="choose photos"></Button><ImageViewandroid:id="@+id/picture"android:layout_width="wrap_content"android:layout_height="wrap_content"android:layout_gravity="center_horizontal"/></LinearLayout>
1.建立点击事件及布局,进行运行时权限处理,WRITE_EXTERNAL_STORAGE为程序对SD卡的读写能力。大于6.0动态申请权限后调用openAlbum()方法,小于6.0直接调用openAlbum()方法
Button chooseFromAlbum =(Button) findViewById(R.id.choose_from_album);
chooseFromAlbum.setOnClickListener(new View.OnClickListener(){@Overridepublic void onClick(View view) {if (ContextCompat.checkSelfPermission(MainActivity.this, Manifest.permission.WRITE_EXTERNAL_STORAGE) != PackageManager.PERMISSION_GRANTED) {ActivityCompat.requestPermissions(MainActivity.this, new String[]{Manifest.permission.WRITE_EXTERNAL_STORAGE}, 1);} else {openAlbum();}}
});
2.openAlbum中构建Intent对象,指定action为android.intent.action.GET_CONTENT,为Intent设定必要参数,调用startActivityForResult来打开相册程序选择照片,其中第二个参数为CHOOSE_PHOTO的2
 private void openAlbum() {Intent intent01 = new Intent("android.intent.action.GET_CONTENT");intent01.setType("image/*");startActivityForResult(intent01, CHOOSE_PHOTO);
}
3.这样在onActivityResult中进入CHOOSE_PHOTO进行处理,为了兼容新旧版本,4.4以上调handleImageOnKitKat方法; 4.4以下调handleImageBeforeKitKat方法。因为4.4以后选择相册中的照片不在返回真实的Uri,因此需要解析。
case CHOOSE_PHOTO:if (resultCode == RESULT_OK) {if (Build.VERSION.SDK_INT >= 19) {handleImageOnKitKat(data);} else {handleImageBeforeKitKat(data);}}
4.1.handleImageOnKitKat解析了封装的Uri,(1)如果是document类型的Uri,则通过document id处理。若URi的authority是media格式,还需要进一步的解析,通过字符串分割获得真实ID,用ID构建新Uri和判断语句,将其传至getImagePath方法中。可以获取真实路径了(2)如果是content类型的uri,则使用普通方法去处理(3)如果是File类型的uri,直接获取图片路径即可,最后调用displayImage根据图片路径显示图片。
4.2.handleImageBeforeKitKat方法中Uri未经封装,无需解析,直接getIamgePath获取真实路径,再调用displayImage方法显示于界面。
@TargetApi(19)private void handleImageOnKitKat (Intent data){String imagePath = null;Uri uri = data.getData();if (DocumentsContract.isDocumentUri(this, uri)) {//如果是document类型的Uri,则通过document id处理String docId = DocumentsContract.getDocumentId(uri);if ("com.android.providers.media.documents".equals(uri.getAuthority())) {String id = docId.split(":")[1];//解析出数字格式的idString selection = MediaStore.Images.Media._ID + "=" + id;imagePath = getImagePath(MediaStore.Images.Media.EXTERNAL_CONTENT_URI, selection);} else ("com.android.providers.downloads.documents".equals(uri.getAuthority())) {Uri contentUri = ContentUris.withAppendedId(Uri.parse("content://downloads/public downloads"), Long.valueOf(docId));imagePath = getImagePath(contentUri, null);}}else if ("content".equalsIgnoreCase(uri.getScheme())) {imagePath = getImagePath(uri,null);}else if("file".equalsIgnoreCase(uri.getScheme())) {imagePath=uri.getPath();}displayImage(imagePath);//根据图片路径显示图片}private void handleImageBeforeKitKat(Intent data) {Uri uri = data.getData();String imagePath = getImagePath(uri,null);displayImage(imagePath);}对应的displayImage方法:
@SuppressLint("Range")private String getImagePath(Uri uri, String selection) {String path = null;//通过Uri和Selection来获取真是的路径图片Cursor cursor = getContentResolver().query(uri,null,selection,null,null);if (cursor != null) {if (cursor.moveToFirst()) {path = cursor.getString(cursor.getColumnIndex(MediaStore.Images.Media.DATA));}cursor.close();}return path;}private void displayImage(String imagePath) {if (imagePath != null) {if (Build.VERSION.SDK_INT >= 29) {picture.setImageURI(getImageContentUri(MainActivity.this, imagePath));} else {Bitmap bitmap = BitmapFactory.decodeFile(imagePath);picture.setImageBitmap(bitmap);}} else {Toast.makeText(this, "failed to get image", Toast.LENGTH_SHORT).show();}}/*** 将图片转换成Uri* @param context 传入上下文参数* @param path 图片的路径* @return 返回的就是一个Uri对象*/public static Uri getImageContentUri(Context context, String path) {Cursor cursor = context.getContentResolver().query(MediaStore.Images.Media.EXTERNAL_CONTENT_URI,new String[] { MediaStore.Images.Media._ID }, MediaStore.Images.Media.DATA + "=? ",new String[] { path }, null);if (cursor != null && cursor.moveToFirst()) {int id = cursor.getInt(cursor.getColumnIndex(MediaStore.MediaColumns._ID));Uri baseUri = Uri.parse("content://media/external/images/media");return Uri.withAppendedPath(baseUri, "" + id);} else {// 如果图片不在手机的共享图片数据库,就先把它插入。if (new File(path).exists()) {ContentValues values = new ContentValues();values.put(MediaStore.Images.Media.DATA, path);return context.getContentResolver().insert(MediaStore.Images.Media.EXTERNAL_CONTENT_URI, values);} else {return null;}}}
总体的所有代码:
public class MainActivity extends AppCompatActivity {public static final int TAKE_PHOTO=1;private ImageView picture;private Uri imageUri;public static final int CHOOSE_PHOTO = 2;@Overrideprotected void onCreate(Bundle savedInstanceState) {super.onCreate(savedInstanceState);setContentView(R.layout.activity_main);Button takePhoto =(Button) findViewById(R.id.take_photo);picture=(ImageView) findViewById(R.id.picture);Button chooseFromAlbum =(Button) findViewById(R.id.choose_from_album);chooseFromAlbum.setOnClickListener(new View.OnClickListener(){@Overridepublic void onClick(View view) {if (ContextCompat.checkSelfPermission(MainActivity.this, Manifest.permission.WRITE_EXTERNAL_STORAGE) != PackageManager.PERMISSION_GRANTED) {ActivityCompat.requestPermissions(MainActivity.this, new String[]{Manifest.permission.WRITE_EXTERNAL_STORAGE}, 1);} else {openAlbum();}}});takePhoto.setOnClickListener(new View.OnClickListener(){@Overridepublic void onClick(View view) {//创建file对象用于存储拍照后的图片File outputImage=new File(getExternalCacheDir(),"output_image.jpg");try {if(outputImage.exists()){outputImage.delete();}outputImage.createNewFile();}catch(IOException e){e.printStackTrace();}if(Build.VERSION.SDK_INT>=24){imageUri= FileProvider.getUriForFile(MainActivity.this,"com.example.cameraalbumtest.fileprovider",outputImage);}else{imageUri= Uri.fromFile(outputImage);}//启动相机程序Intent intent =new Intent("android.media.action.IMAGE_CAPTURE");intent.putExtra(MediaStore.EXTRA_OUTPUT,imageUri);startActivityForResult(intent,TAKE_PHOTO);}});}private void openAlbum() {Intent intent01 = new Intent("android.intent.action.GET_CONTENT");intent01.setType("image/*");startActivityForResult(intent01, CHOOSE_PHOTO);}@Overrideprotected void onActivityResult(int requestCode, int resultCode,Intent data) {super.onActivityResult(requestCode, resultCode, data);switch (requestCode) {case TAKE_PHOTO:if (resultCode == RESULT_OK) {try {//将拍摄的照片显示出来Bitmap bitmap = BitmapFactory.decodeStream(getContentResolver().openInputStream(imageUri));picture.setImageBitmap(bitmap);} catch (FileNotFoundException e) {e.printStackTrace();}}break;case CHOOSE_PHOTO:if (resultCode == RESULT_OK) {if (Build.VERSION.SDK_INT >= 19) {handleImageOnKitKat(data);} else {Toast.makeText(this, "2", Toast.LENGTH_SHORT).show();handleImageBeforeKitKat(data);}}break;default:break;}}@TargetApi(19)private void handleImageOnKitKat (Intent data){String imagePath = null;Uri uri = data.getData();if (DocumentsContract.isDocumentUri(this, uri)) {//如果是document类型的Uri,则通过document id处理String docId = DocumentsContract.getDocumentId(uri);if ("com.android.providers.media.documents".equals(uri.getAuthority())) {String id = docId.split(":")[1];//解析出数字格式的idString selection = MediaStore.Images.Media._ID + "=" + id;imagePath = getImagePath(MediaStore.Images.Media.EXTERNAL_CONTENT_URI, selection);} else if("com.android.providers.downloads.documents".equals(uri.getAuthority())){Uri contentUri = ContentUris.withAppendedId(Uri.parse("content://downloads/public downloads"), Long.valueOf(docId));imagePath = getImagePath(contentUri, null);}}else if ("content".equalsIgnoreCase(uri.getScheme())) {imagePath = getImagePath(uri,null);}else if("file".equalsIgnoreCase(uri.getScheme())) {imagePath=uri.getPath();}displayImage(imagePath);//根据图片路径显示图片}private void handleImageBeforeKitKat(Intent data) {Uri uri = data.getData();String imagePath = getImagePath(uri,null);displayImage(imagePath);}@SuppressLint("Range")private String getImagePath(Uri uri, String selection) {String path = null;//通过Uri和Selection来获取真是的路径图片Cursor cursor = getContentResolver().query(uri,null,selection,null,null);if (cursor != null) {if (cursor.moveToFirst()) {path = cursor.getString(cursor.getColumnIndex(MediaStore.Images.Media.DATA));}cursor.close();}return path;}private void displayImage(String imagePath) {if (imagePath != null) {if (Build.VERSION.SDK_INT >= 29) {picture.setImageURI(getImageContentUri(MainActivity.this, imagePath));} else {Bitmap bitmap = BitmapFactory.decodeFile(imagePath);picture.setImageBitmap(bitmap);}} else {Toast.makeText(this, "failed to get image", Toast.LENGTH_SHORT).show();}}/*** 将图片转换成Uri* @param context   传入上下文参数* @param path      图片的路径* @return      返回的就是一个Uri对象*/public static Uri getImageContentUri(Context context, String path) {Cursor cursor = context.getContentResolver().query(MediaStore.Images.Media.EXTERNAL_CONTENT_URI,new String[] { MediaStore.Images.Media._ID }, MediaStore.Images.Media.DATA + "=? ",new String[] { path }, null);if (cursor != null && cursor.moveToFirst()) {int id = cursor.getInt(cursor.getColumnIndex(MediaStore.MediaColumns._ID));Uri baseUri = Uri.parse("content://media/external/images/media");return Uri.withAppendedPath(baseUri, "" + id);} else {// 如果图片不在手机的共享图片数据库,就先把它插入。if (new File(path).exists()) {ContentValues values = new ContentValues();values.put(MediaStore.Images.Media.DATA, path);return context.getContentResolver().insert(MediaStore.Images.Media.EXTERNAL_CONTENT_URI, values);} else {return null;}}}
}
相关文章:
《第一行代码》 第八章:应用手机多媒体
一,使用通知 第一步,创建项目,书写布局 <LinearLayout xmlns:android"http://schemas.android.com/apk/res/android"android:orientation"vertical"android:layout_width"match_parent"android:layout_he…...
C++设计模式(20)——迭代器模式
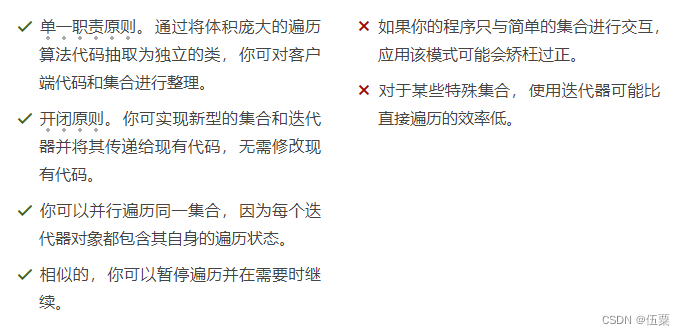
亦称: Iterator 意图 迭代器模式是一种行为设计模式, 让你能在不暴露集合底层表现形式 (列表、 栈和树等) 的情况下遍历集合中所有的元素。 问题 集合是编程中最常使用的数据类型之一。 尽管如此, 集合只是一组对…...
戴尔Latitude 3410电脑 Hackintosh 黑苹果efi引导文件
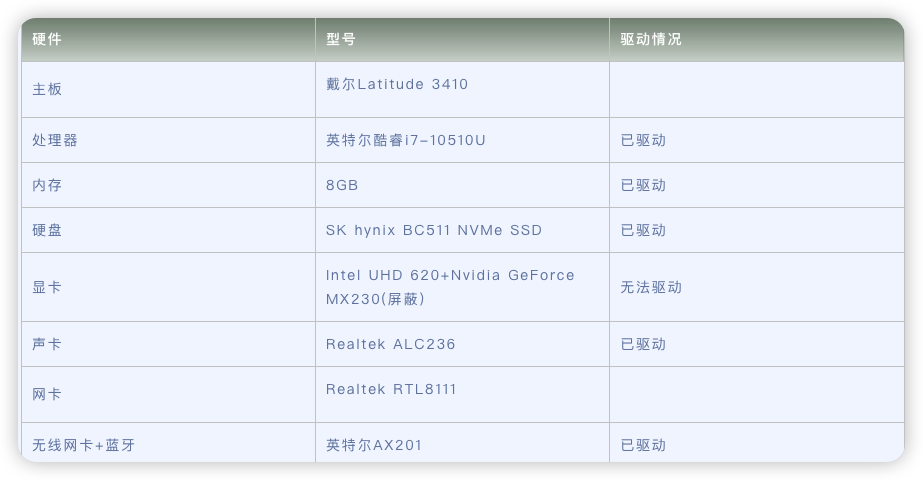
原文来源于黑果魏叔官网,转载需注明出处。硬件型号驱动情况主板戴尔Latitude 3410处理器英特尔酷睿i7-10510U已驱动内存8GB已驱动硬盘SK hynix BC511 NVMe SSD已驱动显卡Intel UHD 620Nvidia GeForce MX230(屏蔽)无法驱动声卡Realtek ALC236已驱动网卡Realtek RTL81…...
)
一起Talk Android吧(第五百零四回:如何调整组件在约束布局中的位置)
文章目录 背景介绍调整方法一调整方法二经验分享各位看官们大家好,上一回中咱们说的例子是"解决retrofit被混淆后代码出错的问题",这一回中咱们说的例子是" 如何调整组件在约束布局中的位置"。闲话休提,言归正转, 让我们一起Talk Android吧! 背景介绍…...
ssh连不上实验室的物理机了
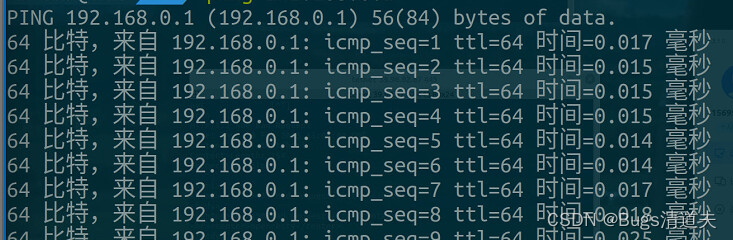
实验室的电脑,不能在校外用 ssh 连接了 192.168.1.33 是本地地址,掩码16位,图1。 192.168.1.14 是实验室的另一台可以ssh连接的物理机,掩码16。 192.168.0.1 是无线路由器地址。 192.168.0.2 是192.168.1.14上的虚拟机地址&#…...

selinux讲解
Selinux讲解 1、selinux的概述 Selinux的历史 Linux安全性与windows在不开启防御措施的时候是一样的;同样是C2级别的安全防护安全级别评定: D–>C1–>C2–>B1–>B2–>B3–>A1 D级,最低安全性C1级,主存取控制…...
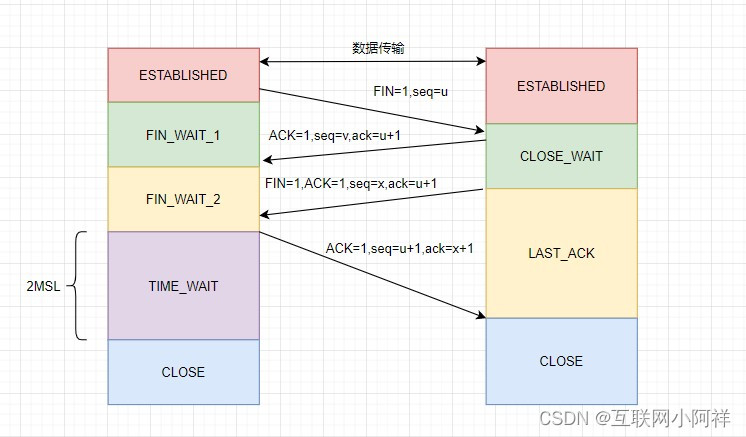
【计算机网络】TCP底层设计交互原理
文章目录1.TCP底层三次握手详细流程2.TCP洪水攻击介绍和ss命令浅析3.Linux服务器TCP洪水攻击入侵案例4.TCP洪水攻击结果分析和解决方案5.TCP底层四次挥手详细流程1.TCP底层三次握手详细流程 TCP的可靠性传输机制:TCP三次我手的流程 一次握手:客户端发送一…...
Kotlin1.8新特性
Kotlin1.8.0新特性 新特性概述 JVM 的新实验性功能:递归复制或删除目录内容提升了 kotlin-reflect 性能新的 -Xdebug 编译器选项,提供更出色的调试体验kotlin-stdlib-jdk7 与 kotlin-stdlib-jdk8 合并为 kotlin-stdlib提升了 Objective-C/Swift 互操作…...
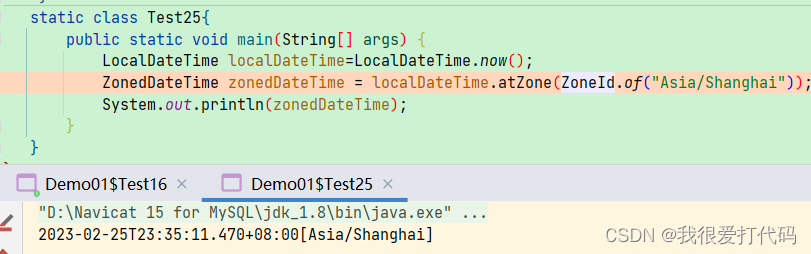
【Java8】
1、接口中默认方法修饰为普通方法 在jdk8之前,interface之中可以定义变量和方法,变量必须是public、static、final的,方法必须是public、abstract的,由于这些修饰符都是默认的。 接口定义方法: public抽象方法需要子类实现 接口定…...
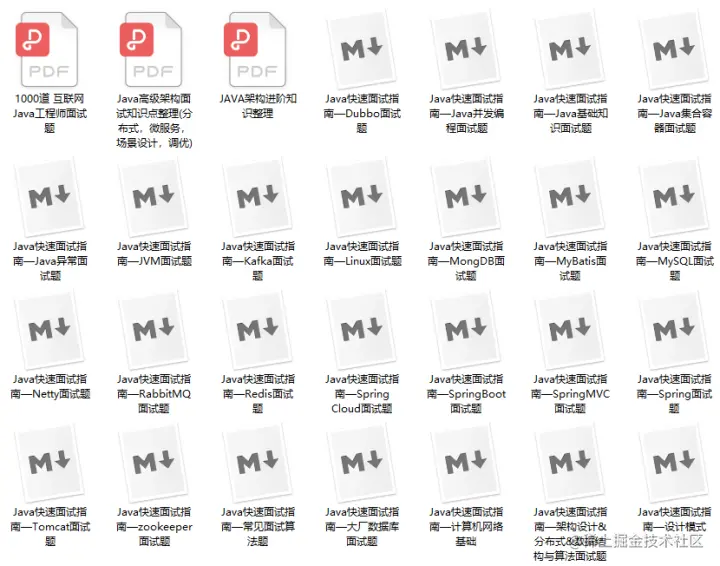
阿里 Java 程序员面试经验分享,附带个人学习笔记、路线大纲
背景经历 当时我工作近5年,明显感觉到了瓶颈期。说句不好听的成了老油条,可以每天舒服的混日子(这也有好处,有时间准备面试)。这对于个人成长不利,长此以往可能面临大龄失业。所以我觉得需要痛下决心改变一…...
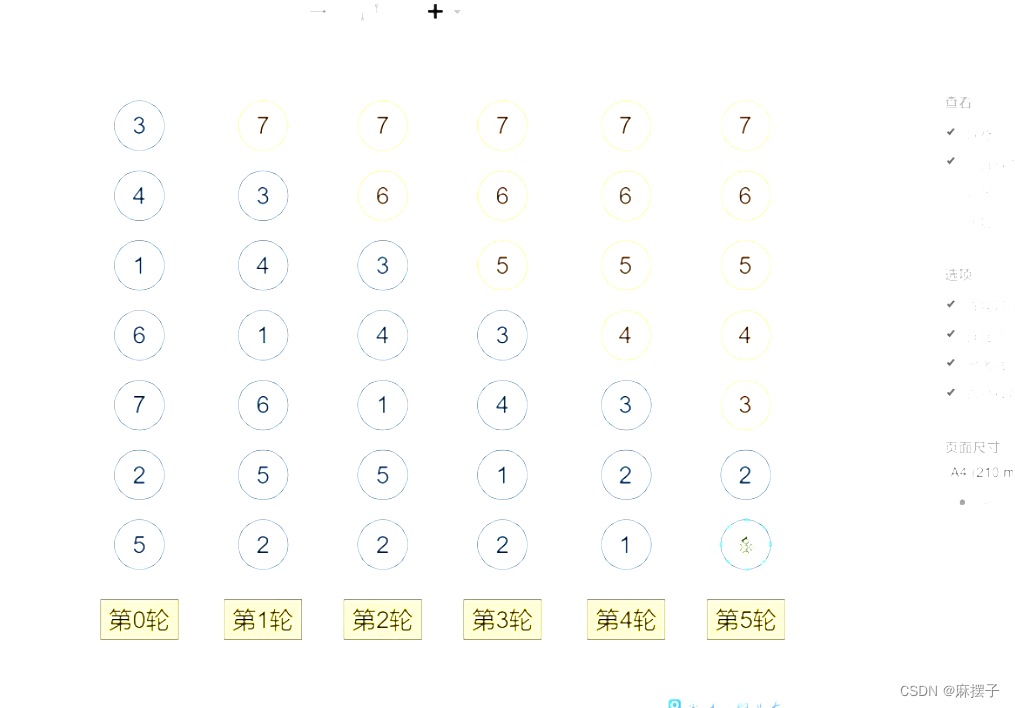
十大算法基础——上(共有20道例题,大多数为简单题)
一、枚举(Enumerate)算法 定义:就是一个个举例出来,然后看看符不符合条件。 举例:一个数组中的数互不相同,求其中和为0的数对的个数。 for (int i 0; i < n; i)for (int j 0; j < i; j)if (a[i] …...
)
【PAT甲级题解记录】1018 Public Bike Management (30 分)
【PAT甲级题解记录】1018 Public Bike Management (30 分) 前言 Problem:1018 Public Bike Management (30 分) Tags:dijkstra最短路径 DFS Difficulty:剧情模式 想流点汗 想流点血 死而无憾 Address:1018 Public Bike Managemen…...
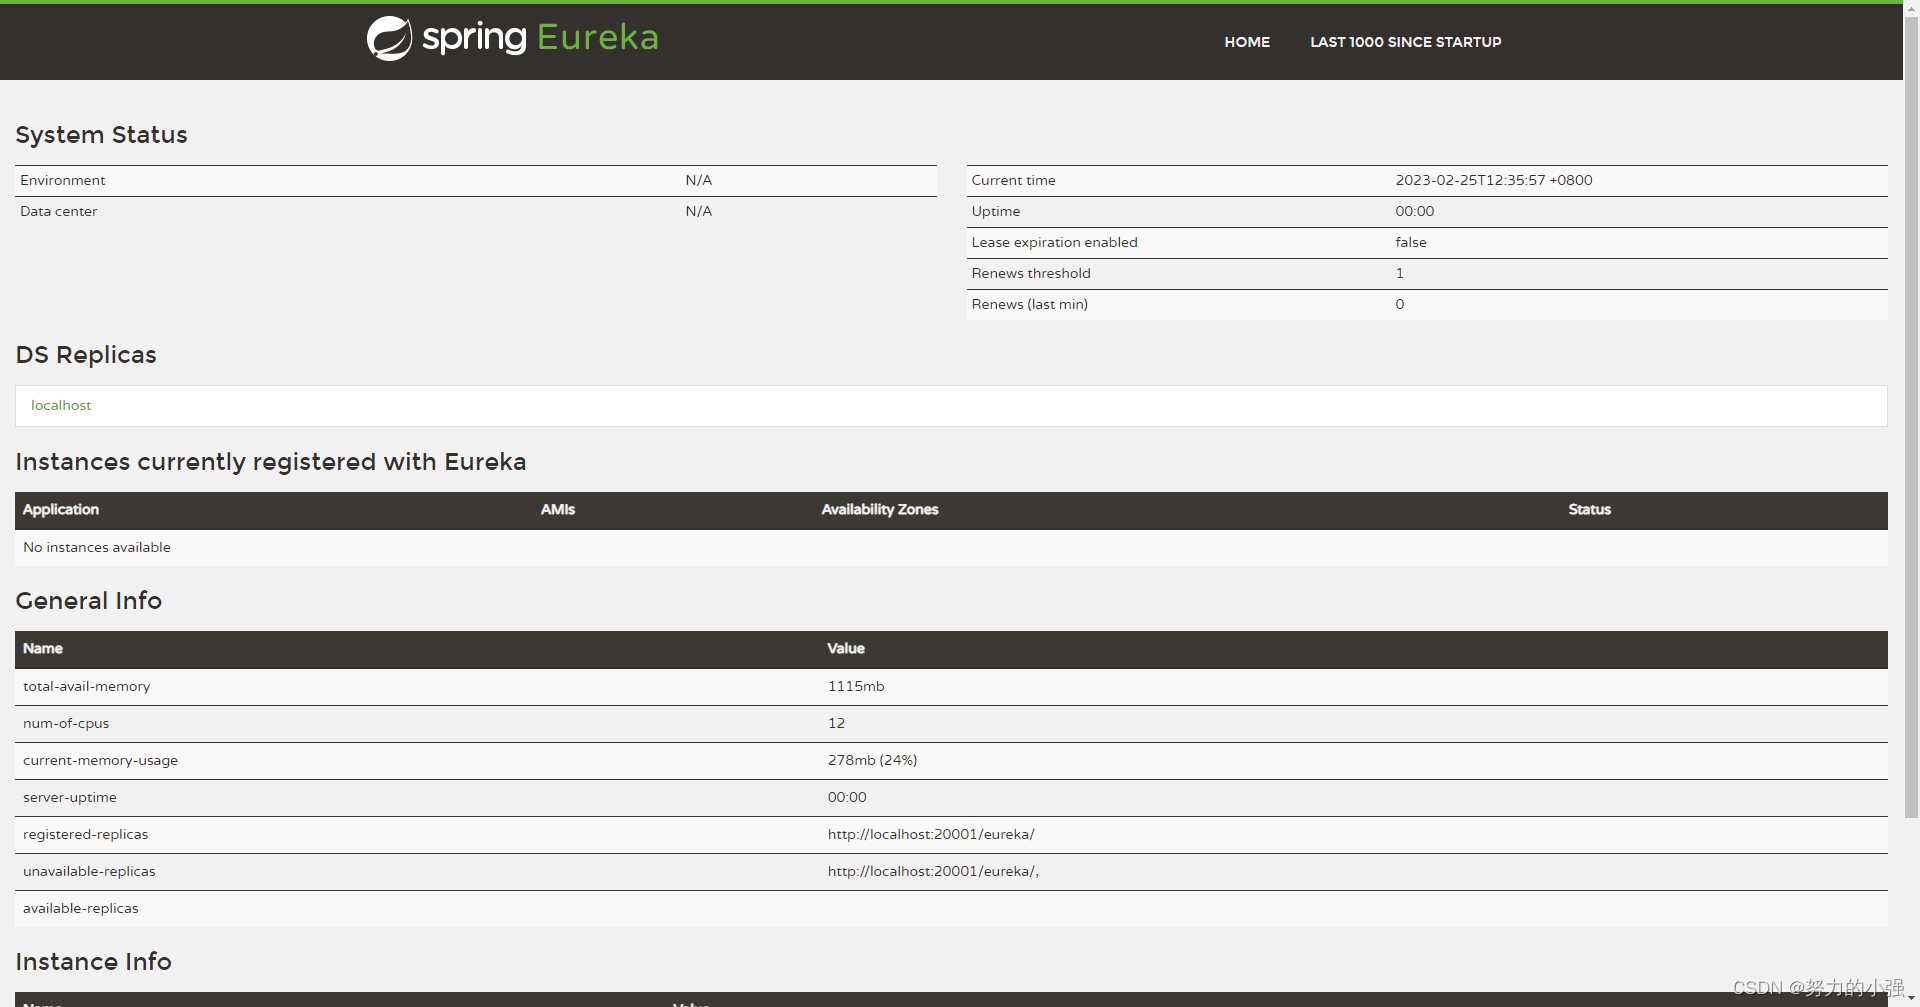
SpringCloud————Eureka概述及单机注册中心搭建
Spring Cloud Eureka是Netflix开发的注册发现组件,本身是一个基于REST的服务。提供注册与发现,同时还提供了负载均衡、故障转移等能力。 Eureka组件的三个角色 服务中心服务提供者服务消费者 Eureka Server:服务器端。提供服务的注册和发现…...
 分页)
原生django raw() 分页
def change_obj_to_dict(self,temp):dict {}dict["wxh_name"] temp.wxh_namedict["types"] temp.typesdict["subject"] temp.subjectdict["ids"] temp.ids# 虽然产品表里没有替代型号,但是通过sql语句的raw()查询可以…...

Android 9.0 Settings 搜索功能屏蔽某个app
1.概述 在9.0的系统rom产品定制化开发过程中,在系统Settings的开发功能中,最近产品需求要求去掉搜索中屏蔽某个app的搜索,就是根据包名,不让搜索出某个app., 在系统setting中,搜索功能中,根据包名过滤掉某个app的搜索功能,所以需要熟悉系统Settings中的搜索的相关功能,…...
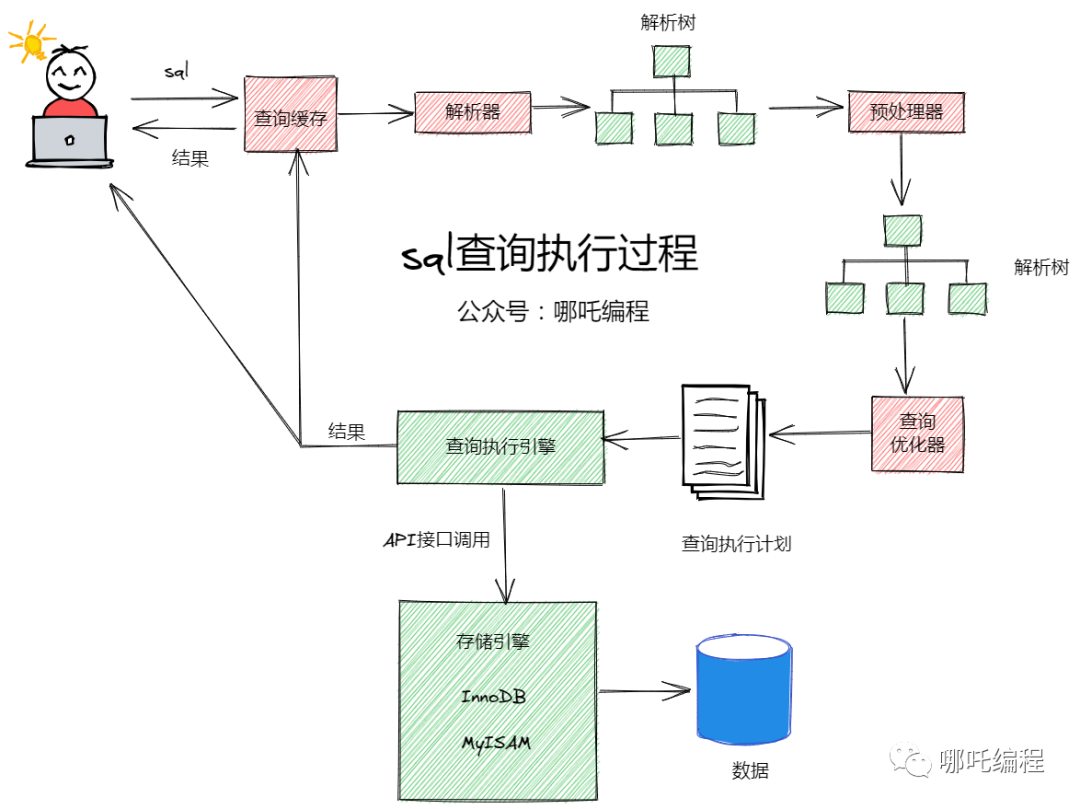
SQL性能优化的47个小技巧,果断收藏!
1、先了解MySQL的执行过程 了解了MySQL的执行过程,我们才知道如何进行sql优化。 客户端发送一条查询语句到服务器; 服务器先查询缓存,如果命中缓存,则立即返回存储在缓存中的数据; 未命中缓存后,MySQL通…...

SE | 哇哦!让人不断感叹真香的数据格式!~
1写在前面 最近在用的包经常涉及到SummarizedExperiment格式的文件,不知道大家有没有遇到过。🤒 一开始觉得这种格式真麻烦,后面搞懂了之后发现真是香啊,爱不释手!~😜 2什么是SummarizedExperiment 这种cla…...

运行Qt后出现无法显示字库问题的解决方案
问题描述:运行后字体出现问题QFontDatabase: Cannot find font directory解决前提: 其实就是移植后字体库中是空的,字没办法进行显示本质就是我们只需要通过某种手段将QT界面中的字母所调用的库进行填充即可此处需要注意的是,必须…...
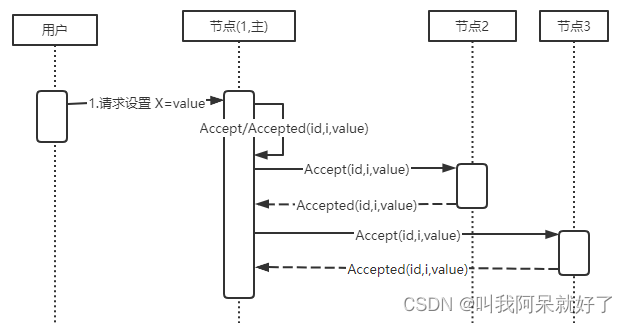
数据库浅谈之共识算法
数据库浅谈之共识算法 HELLO,各位博友好,我是阿呆 🙈🙈🙈 这里是数据库浅谈系列,收录在专栏 DATABASE 中 😜😜😜 本系列阿呆将记录一些数据库领域相关的知识 …...

代码随想录算法训练营 || 贪心算法 455 376 53
Day27贪心算法基础贪心的本质是选择每一阶段的局部最优,从而达到全局最优。刷题或者面试的时候,手动模拟一下感觉可以局部最优推出整体最优,而且想不到反例,那么就试一试贪心。做题的时候,只要想清楚 局部最优 是什么&…...
AudioSeal Pixel Studio行业落地:教育音频防盗录、金融语音存证、媒体内容溯源
AudioSeal Pixel Studio行业落地:教育音频防盗录、金融语音存证、媒体内容溯源 1. 引言:当声音需要“身份证” 想象一下,你花了几周时间精心录制了一套付费课程音频,刚上线没多久,就发现它被录屏、剪辑后,…...

Verdi高效调试实战指南:从信号追踪到问题定位
1. Verdi调试工具的核心价值 第一次接触Verdi时,我和大多数新手一样被它复杂的界面吓到了。但经过几个实际项目的磨练后,我发现这确实是数字IC验证工程师的"瑞士军刀"。不同于普通的波形查看工具,Verdi最强大的地方在于它能将代码、…...

一文讲透|全学科适配的降AI率工具 —— 千笔·降AIGC助手
在AI技术迅猛发展的今天,越来越多的学生和研究人员开始依赖AI工具辅助论文写作,以提高效率、优化内容。然而,随着学术审查标准的不断升级,AI生成内容的痕迹越来越容易被查重系统识别,导致论文因“AI率超标”而被退回修…...

RecyclerView Demo - Android列表组件详解
RecyclerView Demo - Android列表组件详解 📚 目录 项目介绍 环境要求 快速开始 项目结构 代码详解 运行效果 常见问题 扩展学习 项目介绍 这是一个专门为Android初学者设计的 RecyclerView 演示项目。 RecyclerView是什么? RecyclerView是Android Jetpack组件库中的一个…...

RT-Thread实战:STM32硬件看门狗配置与多任务喂狗策略详解
RT-Thread实战:STM32硬件看门狗配置与多任务喂狗策略详解 在嵌入式系统开发中,系统稳定性是至关重要的考量因素。当系统运行在复杂电磁环境或长时间无人值守的场景时,硬件看门狗(Watchdog)成为保障系统可靠性的最后一道…...

如何用Lightbox2打造惊艳网页图片画廊:初学者必备的终极指南
如何用Lightbox2打造惊艳网页图片画廊:初学者必备的终极指南 【免费下载链接】lightbox2 THE original Lightbox script (v2). 项目地址: https://gitcode.com/gh_mirrors/li/lightbox2 Lightbox2是一款经典的JavaScript图片画廊库,能够为网页图片…...

Lychee-rerank-mm在VSCode插件开发中的应用:智能代码搜索
Lychee-rerank-mm在VSCode插件开发中的应用:智能代码搜索 让代码搜索像对话一样自然 作为一名开发者,你一定遇到过这样的情况:明明记得项目中有个处理用户登录的模块,但就是想不起来具体文件名;或者想找一个特定的函数…...

UEC++Part6--碰撞预设、委托、auto补充
一、碰撞预设1、碰撞设置主要4种类型NoCollision(无碰撞)、query、Physics、Probe。语法如图,其余类似。ALBox->SetCollisionEnabled(ECollisionEnabled::QueryAndPhysics);ALBox->SetCollisionEnabled(ECollisionEnabled::QueryOnly);2、自身碰撞类型ALBox-&…...

小白也能懂:GME多模态向量-Qwen2-VL-2B搭建企业智能文档库
小白也能懂:GME多模态向量-Qwen2-VL-2B搭建企业智能文档库 1. 为什么企业需要智能文档库? 1.1 传统文档管理的痛点 想象一下这样的场景:你记得某个重要数据在一份PDF的第37页的图表里,但用关键词搜索怎么也找不到;或…...

盛思锐SEN66 - PC套件体验
套件里面线束设计得很体贴, 传感器i2C < - > 协议桥网口|协议桥usb-micro < - > usb-a到pc : 套件pc软件,安装过程一路next, 这里不赘述;安装好后直接双击打开ControlCenter.请记得, 先把套件通过协议桥, 接到pc的usb上; 因为如果是后插, 那么还要"刷新"…...