部署K8S
防火强的初始化:
[root@k8s-node-12 ~]# systemctl stop firewalld NetworkManager
[root@k8s-node-12 ~]# systemctl disable firewalld NetworkManager
Removed symlink /etc/systemd/system/multi-user.target.wants/NetworkManager.service.
Removed symlink /etc/systemd/system/multi-user.target.wants/firewalld.service.
Removed symlink /etc/systemd/system/dbus-org.freedesktop.nm-dispatcher.service.
Removed symlink /etc/systemd/system/network-online.target.wants/NetworkManager-wait-online.service.
Removed symlink /etc/systemd/system/dbus-org.fedoraproject.FirewallD1.service.
[root@k8s-node-12 ~]# sed -ri 's#(SELINUX=).*#\1disabled#' /etc/selinux/config
[root@k8s-node-12 ~]# setenforce 0
[root@k8s-node-12 ~]# iptables -F
[root@k8s-node-12 ~]# iptables -X
[root@k8s-node-12 ~]# iptables -Z
[root@k8s-node-12 ~]# iptables -P FORWARD ACCEPT
关闭swap:
k8s默认禁用swap功能
[root@k8s-node-11 ~]# swapoff -a
防止开机自动挂载swap分区
[root@k8s-node-11 ~]# sed -i '/ swap /  s/^\(.*\)$/#\1/g'  /etc/fstab
yum源的配置:
[root@k8s-node-11 yum.repos.d]# cat CentOS-Base.repo
# CentOS-Base.repo
#
# The mirror system uses the connecting IP address of the client and the
# update status of each mirror to pick mirrors that are updated to and
# geographically close to the client.  You should use this for CentOS updates
# unless you are manually picking other mirrors.
#
# If the mirrorlist= does not work for you, as a fall back you can try the
# remarked out baseurl= line instead.
#
#[base]
name=CentOS-$releasever - Base
mirrorlist=http://mirrorlist.centos.org/?release=$releasever&arch=$basearch&repo=os&infra=$infra
#baseurl=http://mirror.centos.org/centos/$releasever/os/$basearch/
gpgcheck=1
gpgkey=file:///etc/pki/rpm-gpg/RPM-GPG-KEY-CentOS-7#released updates
[updates]
name=CentOS-$releasever - Updates
mirrorlist=http://mirrorlist.centos.org/?release=$releasever&arch=$basearch&repo=updates&infra=$infra
#baseurl=http://mirror.centos.org/centos/$releasever/updates/$basearch/
gpgcheck=1
gpgkey=file:///etc/pki/rpm-gpg/RPM-GPG-KEY-CentOS-7#additional packages that may be useful
[extras]
name=CentOS-$releasever - Extras
mirrorlist=http://mirrorlist.centos.org/?release=$releasever&arch=$basearch&repo=extras&infra=$infra
#baseurl=http://mirror.centos.org/centos/$releasever/extras/$basearch/
gpgcheck=1
gpgkey=file:///etc/pki/rpm-gpg/RPM-GPG-KEY-CentOS-7#additional packages that extend functionality of existing packages
[centosplus]
name=CentOS-$releasever - Plus
mirrorlist=http://mirrorlist.centos.org/?release=$releasever&arch=$basearch&repo=centosplus&infra=$infra
#baseurl=http://mirror.centos.org/centos/$releasever/centosplus/$basearch/
gpgcheck=1
enabled=0
gpgkey=file:///etc/pki/rpm-gpg/RPM-GPG-KEY-CentOS-7[root@k8s-node-11 yum.repos.d]#
源配置具体步骤一:
[root@k8s-node-11 network-scripts]# curl -o /etc/yum.repos.d/CentOS-Base.repo https://mirrors.aliyun.com/repo/Centos-7.repo% Total    % Received % Xferd  Average Speed   Time    Time     Time  CurrentDload  Upload   Total   Spent    Left  Speed
100  2523  100  2523    0     0    287      0  0:00:08  0:00:08 --:--:--   777
[root@k8s-node-11 network-scripts]# curl -o /etc/yum.repos.d/epel.repo http://mirrors.aliyun.com/repo/epel-7.repo% Total    % Received % Xferd  Average Speed   Time    Time     Time  CurrentDload  Upload   Total   Spent    Left  Speed
100   664  100   664    0     0     77      0  0:00:08  0:00:08 --:--:--   162
[root@k8s-node-11 network-scripts]# sed -i '/aliyuncs/d' /etc/yum.repos.d/*.repo
[root@k8s-node-11 network-scripts]# yum clean all && yum makecache fast
已加载插件:fastestmirror, langpacks
正在清理软件源: base epel extras updates
Cleaning up list of fastest mirrors
已加载插件:fastestmirror, langpacks
Determining fastest mirrors
base                                                                                                                                                                                        | 3.6 kB  00:00:00
epel                                                                                                                                                                                        | 4.7 kB  00:00:00
extras                                                                                                                                                                                      | 2.9 kB  00:00:00
updates                                                                                                                                                                                     | 2.9 kB  00:00:00
(1/7): epel/x86_64/group_gz                                                                                                                                                                 |  99 kB  00:00:08
(2/7): epel/x86_64/updateinfo                                                                                                                                                               | 1.0 MB  00:00:08
(3/7): base/7/x86_64/group_gz                                                                                                                                                               | 153 kB  00:00:08
(4/7): epel/x86_64/primary_db                                                                                                                                                               | 7.0 MB  00:00:01
(5/7): base/7/x86_64/primary_db                                                                                                                                                             | 6.1 MB  00:00:09
(6/7): updates/7/x86_64/primary_db                                                                                                                                                          |  24 MB  00:00:02
(7/7): extras/7/x86_64/primary_db                                                                                                                                                           | 250 kB  00:00:12
元数据缓存已建立
[root@k8s-node-11 network-scripts]#
源配置具体步骤二:
[root@k8s-master-10 ~]# curl -o /etc/yum.repos.d/CentOS-Base.repo https://mirrors.aliyun.com/repo/Centos-7.repo% Total % Received % Xferd Average Speed Time Time Time CurrentDload Upload Total Spent Left Speed
100 2523 100 2523 0 0 288 0 0:00:08 0:00:08 --:--:-- 783
[root@k8s-master-10 ~]# curl -o /etc/yum.repos.d/epel.repo http://mirrors.aliyun.com/repo/epel-7.repo% Total % Received % Xferd Average Speed Time Time Time CurrentDload Upload Total Spent Left Speed
100 664 100 664 0 0 76 0 0:00:08 0:00:08 --:--:-- 160
[root@k8s-master-10 ~]# sed -i '/aliyuncs/d' /etc/yum.repos.d/*.repo
[root@k8s-master-10 ~]# yum clean all && yum makecache fast
已加载插件:fastestmirror, langpacks
Repository base is listed more than once in the configuration
Repository updates is listed more than once in the configuration
Repository extras is listed more than once in the configuration
Repository centosplus is listed more than once in the configuration
Repository contrib is listed more than once in the configuration
正在清理软件源: base docker-ce-stable epel extras updates
Cleaning up list of fastest mirrors
已加载插件:fastestmirror, langpacks
Repository base is listed more than once in the configuration
Repository updates is listed more than once in the configuration
Repository extras is listed more than once in the configuration
Repository centosplus is listed more than once in the configuration
Repository contrib is listed more than once in the configuration
Determining fastest mirrors
base | 3.6 kB 00:00:00
docker-ce-stable | 3.5 kB 00:00:00
epel | 4.7 kB 00:00:00
extras | 2.9 kB 00:00:00
updates | 2.9 kB 00:00:00
(1/9): epel/x86_64/group_gz | 99 kB 00:00:08
(2/9): base/7/x86_64/group_gz | 153 kB 00:00:08
(3/9): docker-ce-stable/7/x86_64/updateinfo | 55 B 00:00:08
(4/9): docker-ce-stable/7/x86_64/primary_db | 117 kB 00:00:08
(5/9): epel/x86_64/updateinfo | 1.0 MB 00:00:00
(6/9): base/7/x86_64/primary_db | 6.1 MB 00:00:09
(7/9): epel/x86_64/primary_db | 7.0 MB 00:00:00
(8/9): extras/7/x86_64/primary_db | 250 kB 00:00:08
(9/9): updates/7/x86_64/primary_db | 24 MB 00:00:10
元数据缓存已建立
[root@k8s-master-10 ~]#NTP配置:
[root@k8s-node-12 network-scripts]# yum install chrony -y
已加载插件:fastestmirror, langpacks
Loading mirror speeds from cached hostfile
软件包 chrony-3.4-1.el7.x86_64 已安装并且是最新版本
无须任何处理
[root@k8s-node-12 network-scripts]# systemctl start chronyd
[root@k8s-node-12 network-scripts]# systemctl enable chronyd
[root@k8s-node-12 network-scripts]# date
2023年 10月 24日 星期二 21:01:39 CST
[root@k8s-master-10 ~]# ntpdate -u ntp.aliyun.com
24 Oct 21:21:01 ntpdate[2672]: adjust time server 203.107.6.88 offset 0.005337 sec
[root@k8s-master-10 ~]# hwclock -w
修改Linux内核参数,开启数据包转发功能:
#容器跨主机通信,底层走的iptables,内核级别的数据包转发:
[root@k8s-master-10 ~]# cat <<EOF> /etc/sysctl.d/k8s.conf
> net.bridge.bridge-nf-call-ip6tables = 1
> net.bridge.bridge-nf-call-iptables = 1
> net.ipv4.ip_forward = 1
> vm.max_map_count=262144
> EOF加载读取内核参数配置文件:
[root@k8s-node-12 network-scripts]# sysctl -p /etc/sysctl.d/k8s.conf
报错如下:
sysctl: cannot stat /proc/sys/net/bridge/bridge-nf-call-ip6tables: 没有那个文件或目录
sysctl: cannot stat /proc/sys/net/bridge/bridge-nf-call-iptables: 没有那个文件或目录
net.ipv4.ip_forward = 1
vm.max_map_count = 262144
解决方法:
root@k8s-node-12 network-scripts]# modprobe br_netfilter
[root@k8s-node-12 network-scripts]# sysctl -p
完美解决:
[root@k8s-node-12 network-scripts]# sysctl -p /etc/sysctl.d/k8s.conf
net.bridge.bridge-nf-call-ip6tables = 1
net.bridge.bridge-nf-call-iptables = 1
net.ipv4.ip_forward = 1
vm.max_map_count = 262144
安装docker基础环境:
yum remove docker docker-common docker-selinux docker-engine -y
curl -o /etc/yum.repos.d/docker-ce.repo https://mirrors.aliyun.com/docker-ce/linux/centos/docker-ce.repo
yum makecache fast
yum list docker-ce --showduplicates
yum install docker-ce-19.03.15 docker-ce-cli-19.03.15 -y
mkdir -p /etc/docker/
vi daemon.json
{"registry-mirrors":["https://ms9glx6x.mirror.aliyuncs.com"],"exec-opts":["native.cgroupdriver=systemd"]
}systemctl start docker && systemctl enable docker
安装K8S的初始化工具kubeadm命令(主节点执行)
# 安装k8s集群环境初始化的工具
# kubelet-1.19.3  #组件,增删改查pod在具体机器上,pod可以运行主节点上,node节点上;
# kubeadm-1.19.3  #k8s版本 1.19.3,自动拉取k8s基础组件镜像的一个工具;
# kubectl-1.19.3  #管理,维护k8s客户端和服务端交付的一个命令行工具;
所有机器执行
设置阿里云源
curl -o /etc/yum.repos.d/Centos-7.repo  http://mirrors.aliyun.com/repo/Centos-7.repo
curl -o /etc/yum.repos.d/docker-ce.repo http://mirrors.aliyun.com/docker-ce/linux/centos/docker-ce.repocat <<EOF > /etc/yum.repos.d/kubernetes.repo
[kubernetes]
name=Kubernetes
baseurl=https://mirrors.aliyun.com/kubernetes/yum/repos/kubernetes-el7-x86_64
enabled=1
gpgcheck=0
repo_gpgcheck=0
gpgkey=https://mirrors.aliyun.com/kubernetes/yum/doc/yum-key.gpg
https://mirrors.aliyun.com/kubernetes/yum/doc/rpm-package-key.gpg
EOFyum clean all && yum makecacheyum list kubeadm --showduplicatesyum install kubelet-1.19.3 kubeadm-1.19.3 kubectl-1.19.3 ipvsadm
k8s安装完毕后,设置所有节点的kubelet开机运行
#查看kubeadm版本信息,初始化k8s版本信息
[root@k8s-node-12 ~]#  kubeadm version
kubeadm version: &version.Info{Major:"1", Minor:"19", GitVersion:"v1.19.3", GitCommit:"1e11e4a2108024935ecfcb2912226cedeafd99df", GitTreeState:"clean", BuildDate:"2020-10-14T12:47:53Z", GoVersion:"go1.15.2", Compiler:"gc", Platform:"linux/amd64"}设置开机自启
systemctl enable docker
systemctl enable kubelet
初始化k8s-master主节点(只在主节点执行)
kubeadm init \
--apiserver-advertise-address=192.168.208.128 \
--image-repository registry.aliyuncs.com/google_containers \
--kubernetes-version v1.19.3 \
--service-cidr=10.1.0.0/16 \
--pod-network-cidr=10.2.0.0/16 \
--service-dns-domain=cluster.local \
--ignore-preflight-errors=Swap \
--ignore-preflight-errors=NumCPU
k8s-master成功装好
Your Kubernetes control-plane has initialized successfully!To start using your cluster, you need to run the following as a regular user:===========================================================================================
#创建k8s集群配置文件
#制定了,默认的ssl证书在那?api-server的地址等mkdir -p $HOME/.kubesudo cp -i /etc/kubernetes/admin.conf $HOME/.kube/configsudo chown $(id -u):$(id -g) $HOME/.kube/config===========================================================================================
#pod分布再多机器上,pod互相之间链接,得部署,集群网络,选用flannel网络插件
#安装使用即可。
You should now deploy a pod network to the cluster.
Run "kubectl apply -f [podnetwork].yaml" with one of the options listed at:https://kubernetes.io/docs/concepts/cluster-administration/addons/#使用如下命令,将k8s-node加入集群即可
Then you can join any number of worker nodes by running the following on each as root:kubeadm join 192.168.208.128:6443 --token n8zyxz.7w7kbbd1rjiygo21 \--discovery-token-ca-cert-hash sha256:e0f3fa4a1f0b2edd106828f586f7d9d78cb6ca51334f05456cc70a7ead7bceac
查看工作节点信息
[root@k8s-master-10 docker]# kubectl get nodes
NAME            STATUS     ROLES    AGE   VERSION
k8s-master-10   NotReady   master   26m   v1.19.3
[root@k8s-master-10 docker]# kubectl get nodes -owide
NAME            STATUS     ROLES    AGE   VERSION   INTERNAL-IP       EXTERNAL-IP   OS-IMAGE                KERNEL-VERSION           CONTAINER-RUNTIME
k8s-master-10   NotReady   master   27m   v1.19.3   192.168.208.128   <none>        CentOS Linux 7 (Core)   3.10.0-1160.el7.x86_64   docker://19.3.15
NotReady:未就绪,因为网络环境没配置;
其他节点加入集群
kubeadm join 192.168.208.128:6443 --token n8zyxz.7w7kbbd1rjiygo21 \--discovery-token-ca-cert-hash sha256:e0f3fa4a1f0b2edd106828f586f7d9d78cb6ca51334f05456cc70a7ead7bceac 加入集群后,查看工作节点信息。查看k8s集群用到了那些节点。
[root@k8s-master-10 docker]# kubectl get nodes -owide
NAME            STATUS     ROLES    AGE     VERSION   INTERNAL-IP       EXTERNAL-IP   OS-IMAGE                KERNEL-VERSION           CONTAINER-RUNTIME
k8s-master-10   NotReady   master   41m     v1.19.3   192.168.208.128   <none>        CentOS Linux 7 (Core)   3.10.0-1160.el7.x86_64   docker://19.3.15
k8s-node-11     NotReady   <none>   8m21s   v1.19.3   192.168.208.130   <none>        CentOS Linux 7 (Core)   3.10.0-1160.el7.x86_64   docker://19.3.15
k8s-node-12     NotReady   <none>   8m14s   v1.19.3   192.168.208.129   <none>        CentOS Linux 7 (Core)   3.10.0-1160.el7.x86_64   docker://19.3.15
如何让集群就绪?部署网络插件
#1、下载网络插件,配置文件,yaml以及配置文件
git clone --depth 1 https://github.com/coreos/flannel.git
#2、在k8s主节点上,应用这个yaml,基于yaml,创建具体的pod过程
#3、如果需要修改pod运行网络话,要修改配置文件
/root/flannel-master/Documentation/kube-flannel.yml#创建k8s资源,都是写这种yml文件了;
[root@k8s-master-10 Documentation]# grep 'Network' -A 5 kube-flannel.yml "Network": "10.2.0.0/16","Backend": {"Type": "vxlan"}}
---
--hostNetwork: truepriorityClassName: system-node-criticaltolerations:- operator: Existseffect: NoScheduleserviceAccountName: flannel
[root@k8s-master-10 Documentation]#修改第二处,夸主机的容器通信,最终不得走宿主机的物理网卡。
#告诉flannel物理网卡是谁
containers:- name: kube-flannelimage: docker.io/flannel/flannel:v0.22.3command:- /opt/bin/flanneldargs:- --ip-masq- --kube-subnet-mgr- --iface=ens33
基于kubectl命令,应用这个yml文件,读取、以及创建pod资源
配置k8s命令补缺(重要)
k8s命令太多,务必要配置补全
yum install bash-completion -y
source /usr/share/bash-completion/bash_completion
source <(kubectl completion bash)
echo "source <(kubectl completion bash)" >> ~/.bashrc
kubectl create -f ./kube-flannel.yml
查看当前机器的容器,关于flannel网络插件的进程
[root@k8s-master-10 Documentation]# docker ps | grep flannel
53844bcdd167   e23f7ca36333                                        "/opt/bin/flanneld -…"   8 minutes ago   Up 8 minutes             k8s_kube-flannel_kube-flannel-ds-mpgf6_kube-flannel_9cf25cba-14b6-4768-8ff0-6ec821f22769_0
4a86528f1db0   registry.aliyuncs.com/google_containers/pause:3.2   "/pause"                  9 minutes ago   Up 9 minutes             k8s_POD_kube-flannel-ds-mpgf6_kube-flannel_9cf25cba-14b6-4768-8ff0-6ec821f22769_0
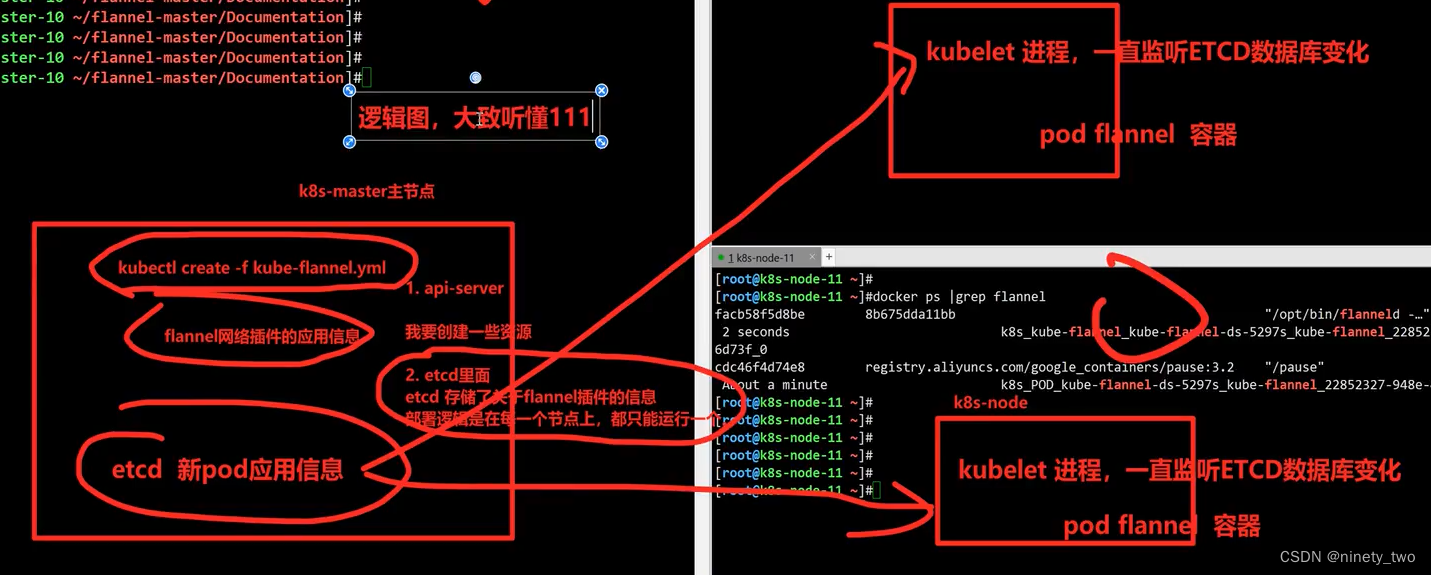
status状态都是Ready,至此,所有机器,都走flannel进行集群通信了。
[root@k8s-master-10 Documentation]# kubectl get nodes
NAME            STATUS   ROLES    AGE     VERSION
k8s-master-10   Ready    master   4h53m   v1.19.3
k8s-node-11     Ready    <none>   4h20m   v1.19.3
k8s-node-12     Ready    <none>   4h20m   v1.19.3
[root@k8s-master-10 Documentation]# kubectl get nodes -o wide
NAME            STATUS   ROLES    AGE     VERSION   INTERNAL-IP       EXTERNAL-IP   OS-IMAGE                KERNEL-VERSION           CONTAINER-RUNTIME
k8s-master-10   Ready    master   4h53m   v1.19.3   192.168.208.128   <none>        CentOS Linux 7 (Core)   3.10.0-1160.el7.x86_64   docker://19.3.15
k8s-node-11     Ready    <none>   4h21m   v1.19.3   192.168.208.130   <none>        CentOS Linux 7 (Core)   3.10.0-1160.el7.x86_64   docker://19.3.15
k8s-node-12     Ready    <none>   4h21m   v1.19.3   192.168.208.129   <none>        CentOS Linux 7 (Core)   3.10.0-1160.el7.x86_64   docker://19.3.15
创建一个Pod
[root@k8s-master-10 Documentation]# kubectl run linux0224-pod-1-nginx --image=nginx:1.14.1
pod/linux0224-pod-1-nginx created
查看pod信息
[root@k8s-master-10 Documentation]# kubectl get pods -owide
NAME                    READY   STATUS    RESTARTS   AGE    IP         NODE          NOMINATED NODE   READINESS GATES
linux0224-pod-1-nginx   1/1     Running   0          107s   10.2.1.2   k8s-node-11   <none>           <none>
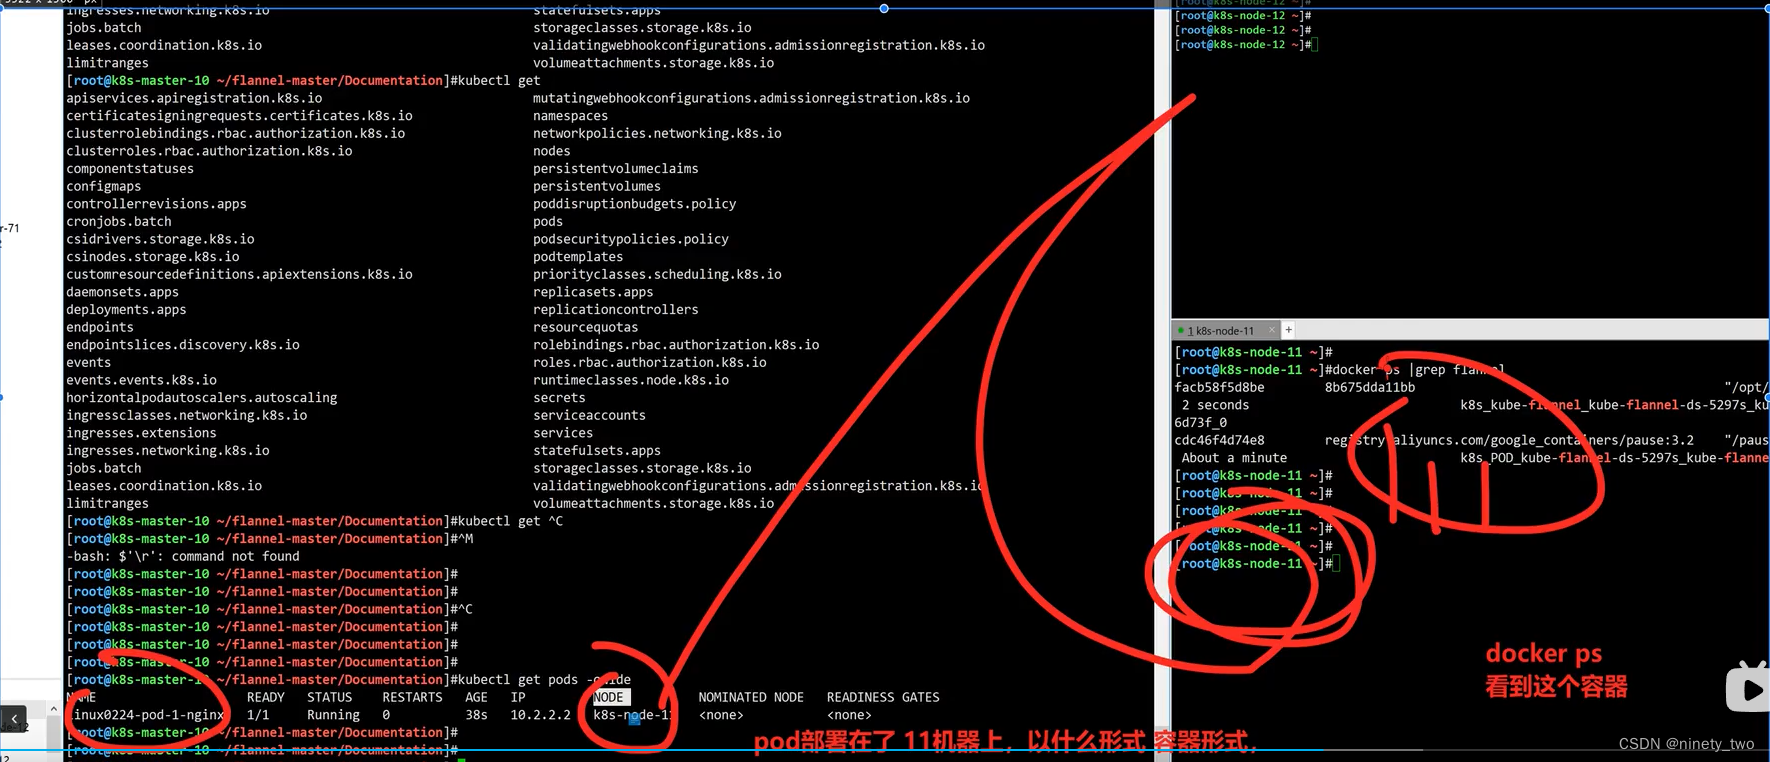
pod的ip是k8s集群,才能访问的一个ip,无法在外部访问,外部访问得设置更多访问规则
[root@k8s-master-10 Documentation]# curl 10.2.1.2
<!DOCTYPE html>
<html>
<head>
<title>Welcome to nginx!</title>
<style>body {width: 35em;margin: 0 auto;font-family: Tahoma, Verdana, Arial, sans-serif;}
</style>
</head>
<body>
<h1>Welcome to nginx!</h1>
<p>If you see this page, the nginx web server is successfully installed and
working. Further configuration is required.</p><p>For online documentation and support please refer to
<a href="http://nginx.org/">nginx.org</a>.<br/>
Commercial support is available at
<a href="http://nginx.com/">nginx.com</a>.</p><p><em>Thank you for using nginx.</em></p>
</body>
</html>
[root@k8s-master-10 Documentation]#
[root@k8s-master-10 Documentation]# curl 10.2.1.2 -I
HTTP/1.1 200 OK
Server: nginx/1.14.1
Date: Sun, 29 Oct 2023 12:44:34 GMT
Content-Type: text/html
Content-Length: 612
Last-Modified: Tue, 06 Nov 2018 13:28:31 GMT
Connection: keep-alive
ETag: "5be196ff-264"
Accept-Ranges: bytes
修改页面显示信息
直接在容器上修改
[root@k8s-node-11 docker]# docker exec 9395505ba67d sh -c "echo '<meta charset-utf-8> 书季辛苦了~' > /usr/share/nginx/html/index.html "[root@k8s-master-10 Documentation]# curl 10.2.1.2
<meta charset-utf-8> 书季辛苦了~容器集群上修改,基于k8s命令
[root@k8s-master-10 Documentation]# kubectl exec linux0224-pod-1-nginx -- sh -c "echo '辛苦了书季,散会,下午好好消化下' >/usr/share/nginx/html/index.html"
[root@k8s-master-10 Documentation]# curl 10.2.1.2
辛苦了书季,散会,下午好好消化下
相关文章:
部署K8S
防火强的初始化: [rootk8s-node-12 ~]# systemctl stop firewalld NetworkManager [rootk8s-node-12 ~]# systemctl disable firewalld NetworkManager Removed symlink /etc/systemd/system/multi-user.target.wants/NetworkManager.service. Removed symlink /et…...

[NSSCTF 2nd] web刷题记录
文章目录 php签到MyBox非预期解预期解 php签到 源代码 <?phpfunction waf($filename){$black_list array("ph", "htaccess", "ini");$ext pathinfo($filename, PATHINFO_EXTENSION);foreach ($black_list as $value) {if (stristr($ext, …...
)
MyBatis获取参数值的两种方式(重点)
文章目录 简介单个字面量类型的参数多个字面量类型的参数map集合类型的参数实体类类型的参数使用Param标识参数总结 简介 MyBatis获取参数值的两种方式:${}和#{}${}的本质就是字符串拼接,#{}的本质就是占位符赋值${}使用字符串拼接的方式拼接sql&#x…...
Cesium弹窗可随地图移动
目录 项目地址实现效果实现方法 项目地址 https://github.com/zhengjie9510/webgis-demo 实现效果 实现方法 handler new Cesium.ScreenSpaceEventHandler(viewer.scene.canvas) handler.setInputAction((click) > {if (listener) {listener()listener undefinedthis.v…...

MySQL WITH AS及递归查询
MySQL WITH AS及递归查询 WITH AS 官网:WITH 是 SQL 中的一个关键字,用于创建临时表达式(也称为 Common Table Expression,CTE),它允许你在一个查询中临时定义一个表达式,然后在后续的查询中引…...
Harbor私有镜像仓库搭建
本文基于:https://zhuanlan.zhihu.com/p/143779176 1.环境准备 IP:192.168.10.136/24 操作系统:centos7 2.安装Docker、Docker-compose 2.1安装Docker-CE $ wget https://mirrors.aliyun.com/docker-ce/linux/centos/docker-ce.repo -O /etc/yum.re…...
线段树 区间赋值 + 区间加减 + 求区间最值
线段树好题:P1253 扶苏的问题 - 洛谷 | 计算机科学教育新生态 (luogu.com.cn) 区间赋值 区间加减 求区间最大。 对于区间赋值和区间加减来说,需要两个懒标记,一个表示赋值cover,一个表示加减add。 区间赋值的优先级大于区间加…...
大模型之十九-对话机器人
大语言模型的最早应用是Chatbot,其实我最早接触语义理解在2014年,2014年做智能音箱的时候,那时也是国内第一批做智能音箱的,在现在看起来当时的智能音箱比较傻,很多问题无法回答,长下文效果也不好ÿ…...
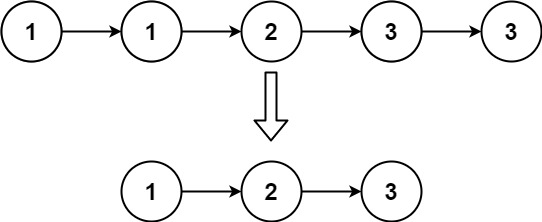
『力扣刷题本』:删除排序链表中的重复元素
一、题目 给定一个已排序的链表的头 head , 删除所有重复的元素,使每个元素只出现一次 。返回 已排序的链表 。 示例 1: 输入:head [1,1,2] 输出:[1,2]示例 2: 输入:head [1,1,2,3,3] 输出&am…...
Android S从桌面点击图标启动APP流程 (六)
系列文章 Android S从桌面点击图标启动APP流程 (一)Android S从桌面点击图标启动APP流程 (二) Android S从桌面点击图标启动APP流程 (三) Android S从桌面点击图标启动APP流程 (四) Android S从桌面点击图标启动APP流程 (五) Android 12的源码链接: android 1…...
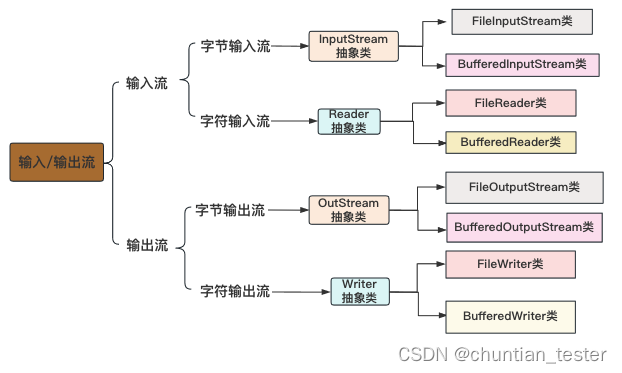
Java I/O (输入/输出)
1.流的概念 流是一种有序的数据序列,根据操作类型,可以分为输入流和输出流两种。I/O流(输入输出)提供了一条通道程序,可以使用这条通道把源中的字节序列送到目的地。 1.1 输入流: 程序从指向源的输入流中读…...
nodejs+vue食力派网上订餐系统-计算机毕业设计
采用当前流行的B/S模式以及3层架构的设计思想通过 技术来开发此系统的目的是建立一个配合网络环境的食力派网上订餐系统,这样可以有效地解决食力派网上订餐管理信息混乱的局面。 本设计旨在提高顾客就餐效率、优化餐厅管理、提高订单准确性和客户的满意度。本系统采…...
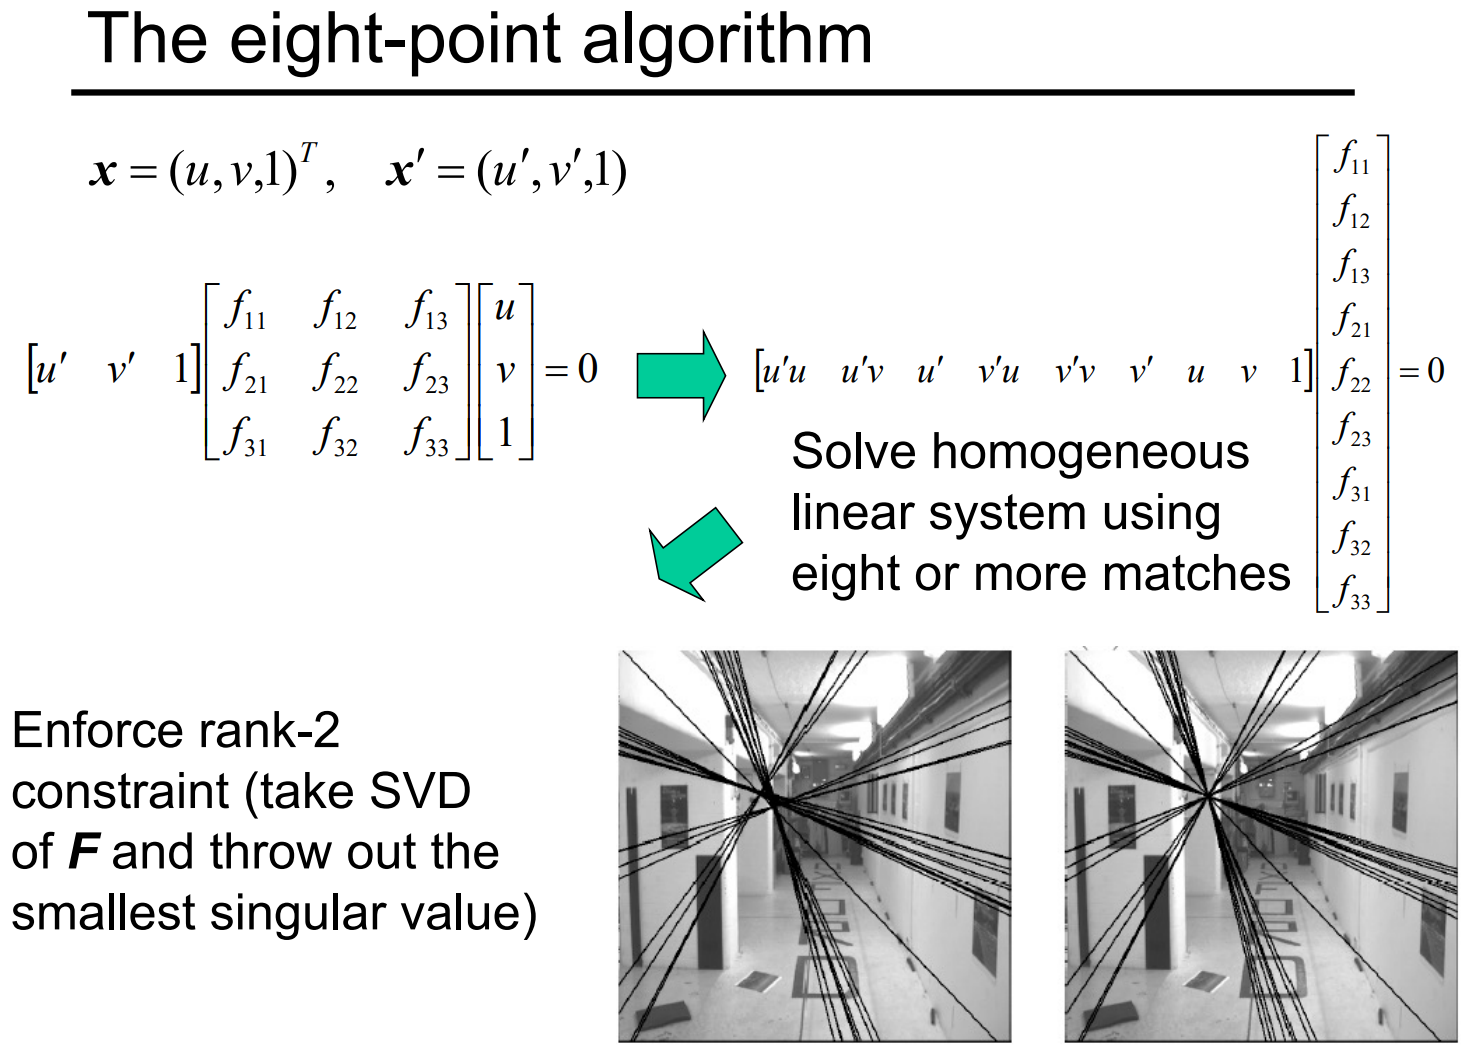
【计算机视觉】对极几何
文章目录 一、极线约束(Epipolar Constraint)二、相机标定过的情况三、相机没有标定过的情况四、八点算法(eight-point algorithm) 我的《计算机视觉》系列参考UC Berkeley的CS180课程,PPT可以在课程主页看到。 在上一…...
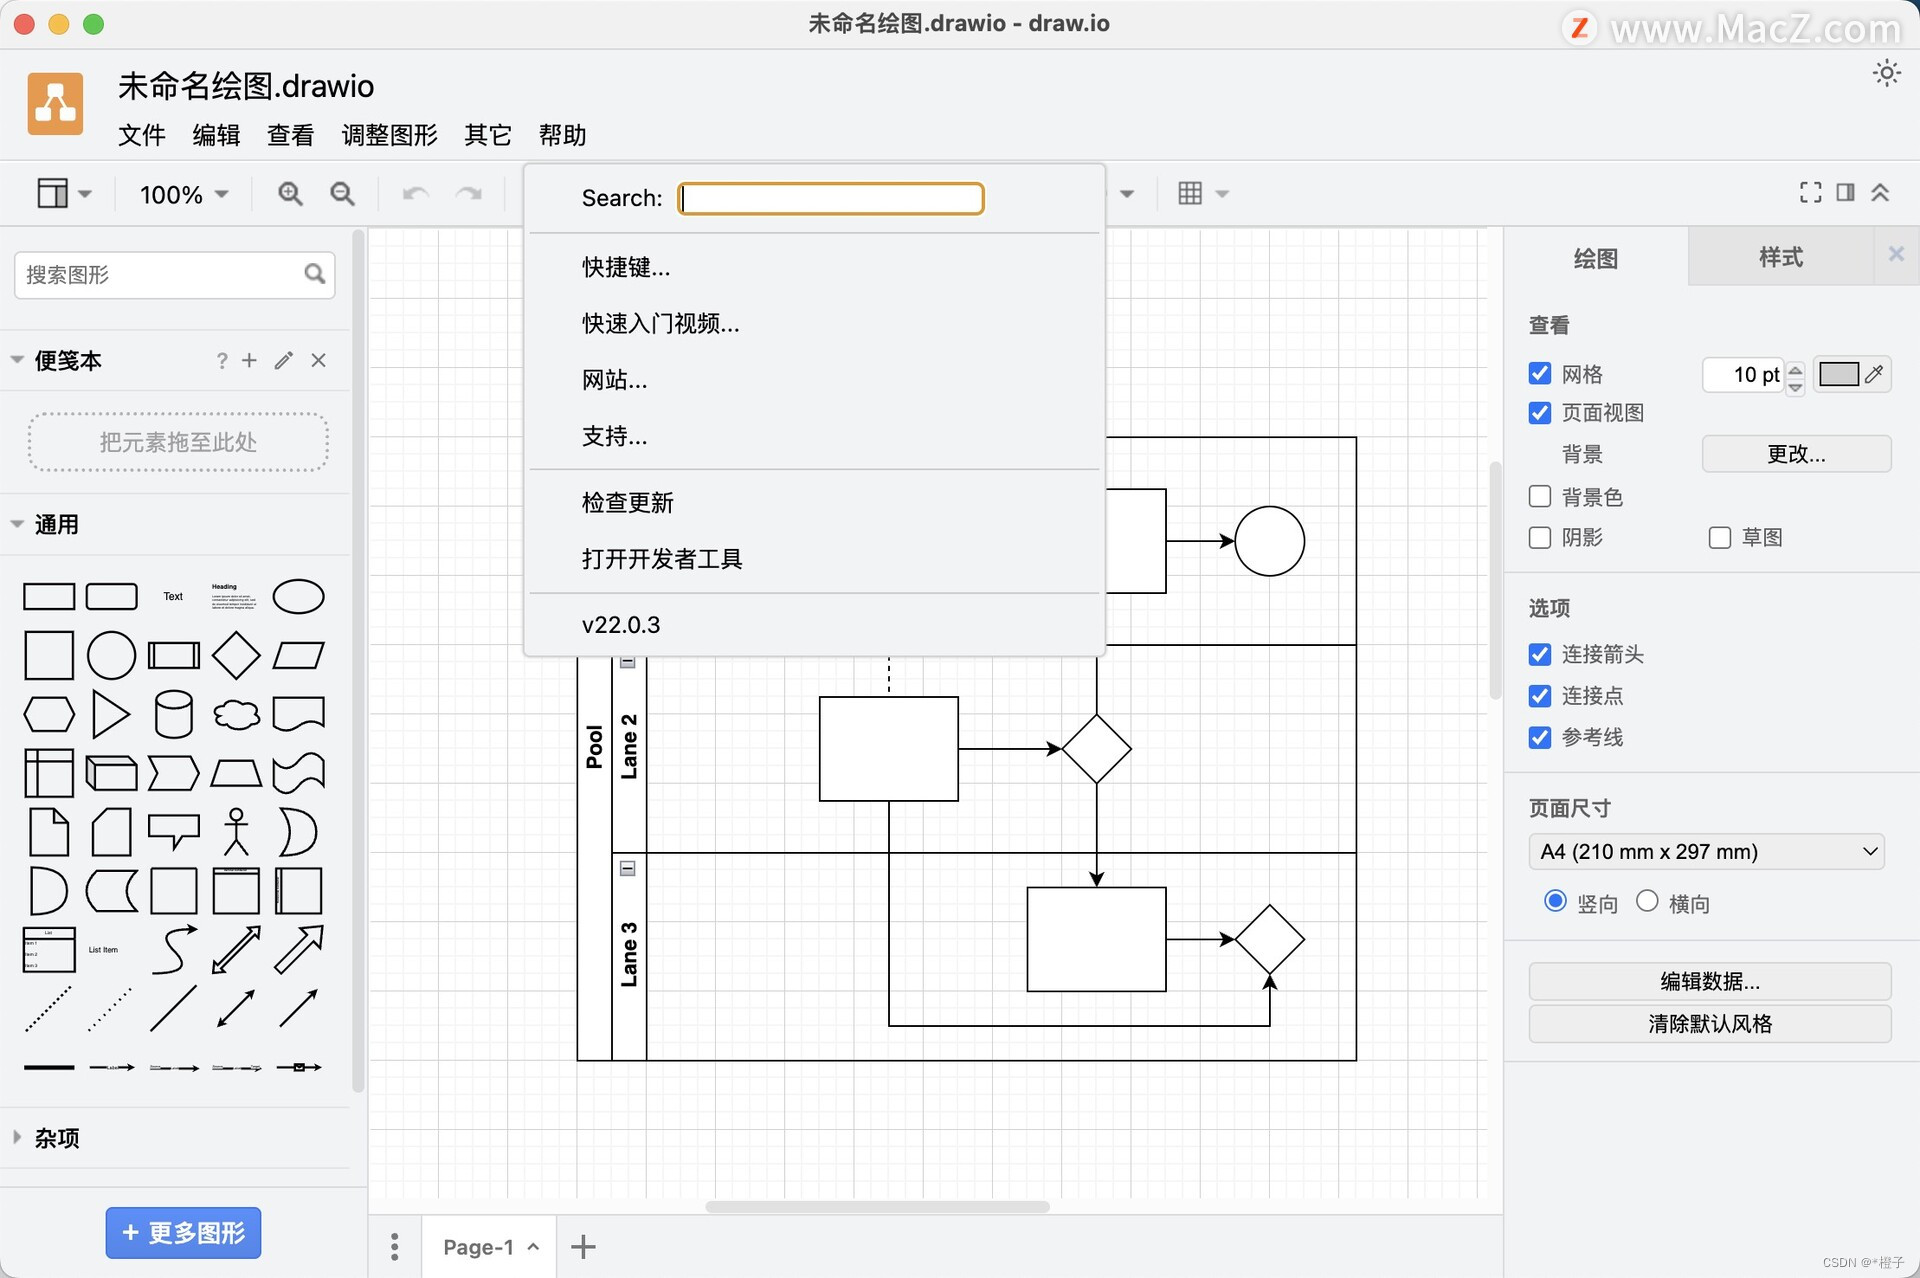
强大易于编辑的流程图组织图绘制工具draw.io Mac苹果中文版
draw.io可以绘制多种类型的图表,包括但不限于流程图、组织结构图、网络图、UML图、电气工程图等。draw.io提供了丰富的图形元素和编辑功能,使用户能够轻松地创建和编辑各种复杂的图表。同时,该软件还支持多种导出格式,方便用户在不…...
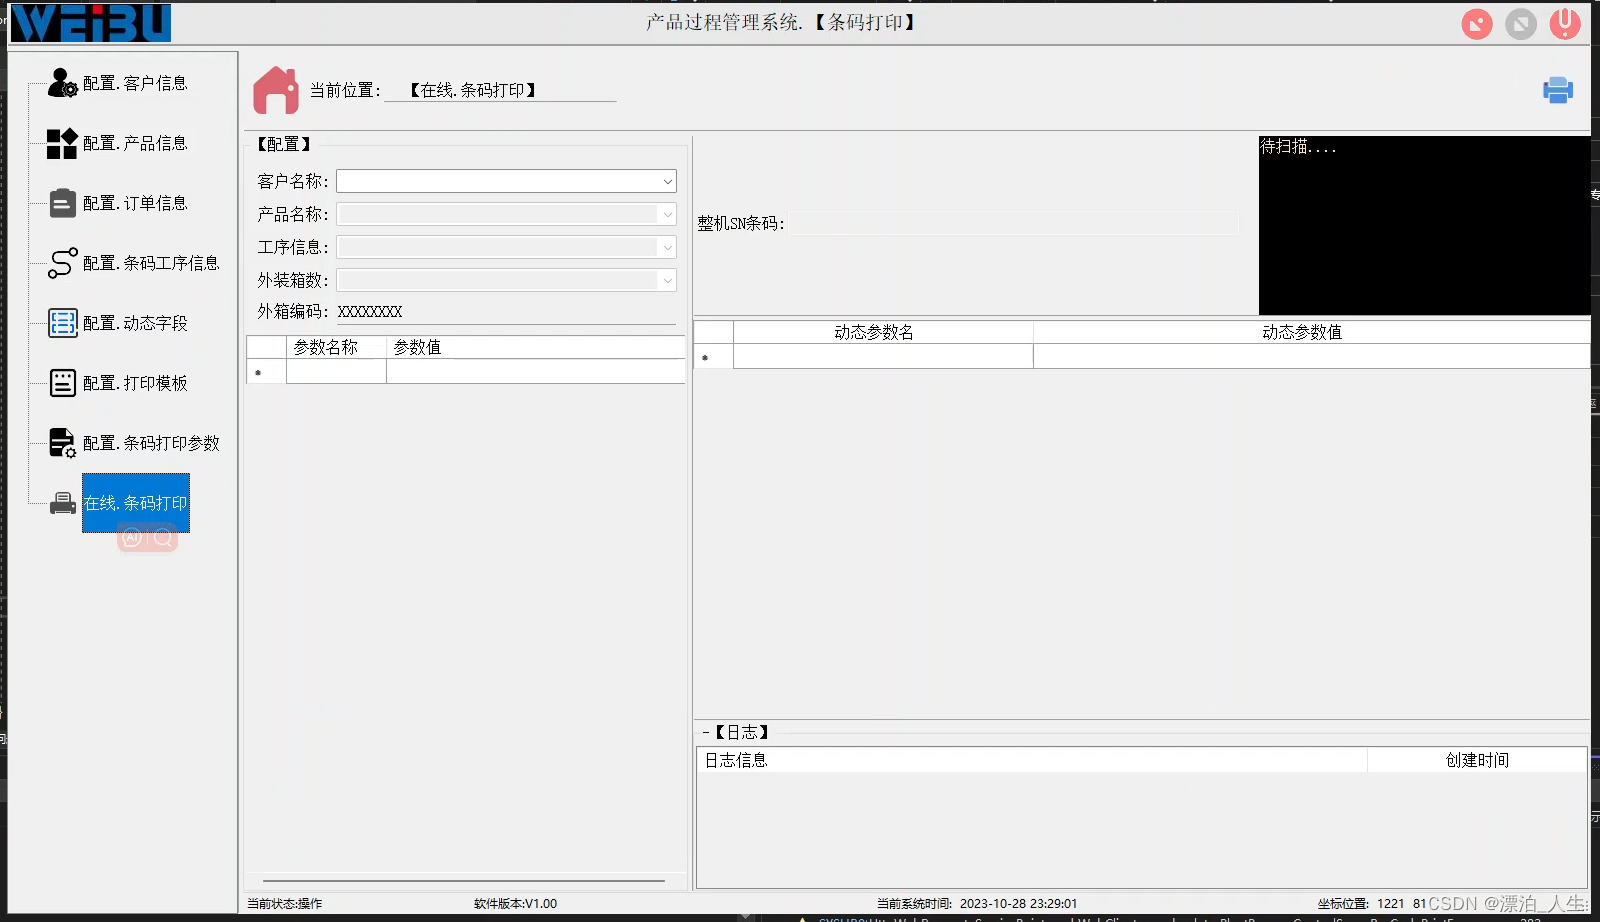
c# .net6 在线条码打印基于
条码打印基于:BarTender、ORM EF架构 UI展示: 主页代码: using NPOI.OpenXmlFormats.Spreadsheet; using ServerSide.Models; using System; using System.Collections.Generic; using System.ComponentModel; using System.Data; using System.Drawi…...

Hive SQL的编译过程
1.MapReduce实现基本SQL操作的原理 详细讲解SQL编译为MapReduce之前,我们先来看看MapReduce框架实现SQL基本操作的原理 1.1 Join的实现原理 select u.name, o.orderid from order o join user u on o.uid = u.uid; 在map的输出value中为不同表的数据打上tag标记,在reduce阶段…...

[架构之路-245/创业之路-76]:目标系统 - 纵向分层 - 企业信息化的呈现形态:常见企业信息化软件系统 - 企业资源管理计划ERP
目录 前言: 一、企业信息化的结果:常见企业信息化软件 1.1 企业资源管理计划 1.1.1 什么是ERP:企业最常用的信息管理系统 1.1.2 ERP的演进过程 1.1.3 EPR模块 1.1.4 EPR五个层级 1.1.5 企业EPR业务总体流程图 1.1.6 什么类型的企业需…...
数据库简史:多主数据库架构的由来和华为参天引擎的机遇
注:本文发表后,收到了很多后台反馈,其中关于大型机的早期成就不容省略。微调重发本文,纯属个人观点,错谬之处,仍然期待指正。 2023年10月13日,在北京举办的“2023金融业数据库技术大会"上&…...
C语言每日一练(二)
单链表经典算法专题 一、 单链表相关经典算法OJ题1:移除链表元素 解法一:在原链表中删除Node.nextnext的节点 typedef struct ListNode ListNode; struct ListNode* removeElements( ListNode* head, int val) {ListNode* pcur head;ListNode* pre h…...
HashJoin 在 Apache Arrow 和PostgreSQL 中的实现
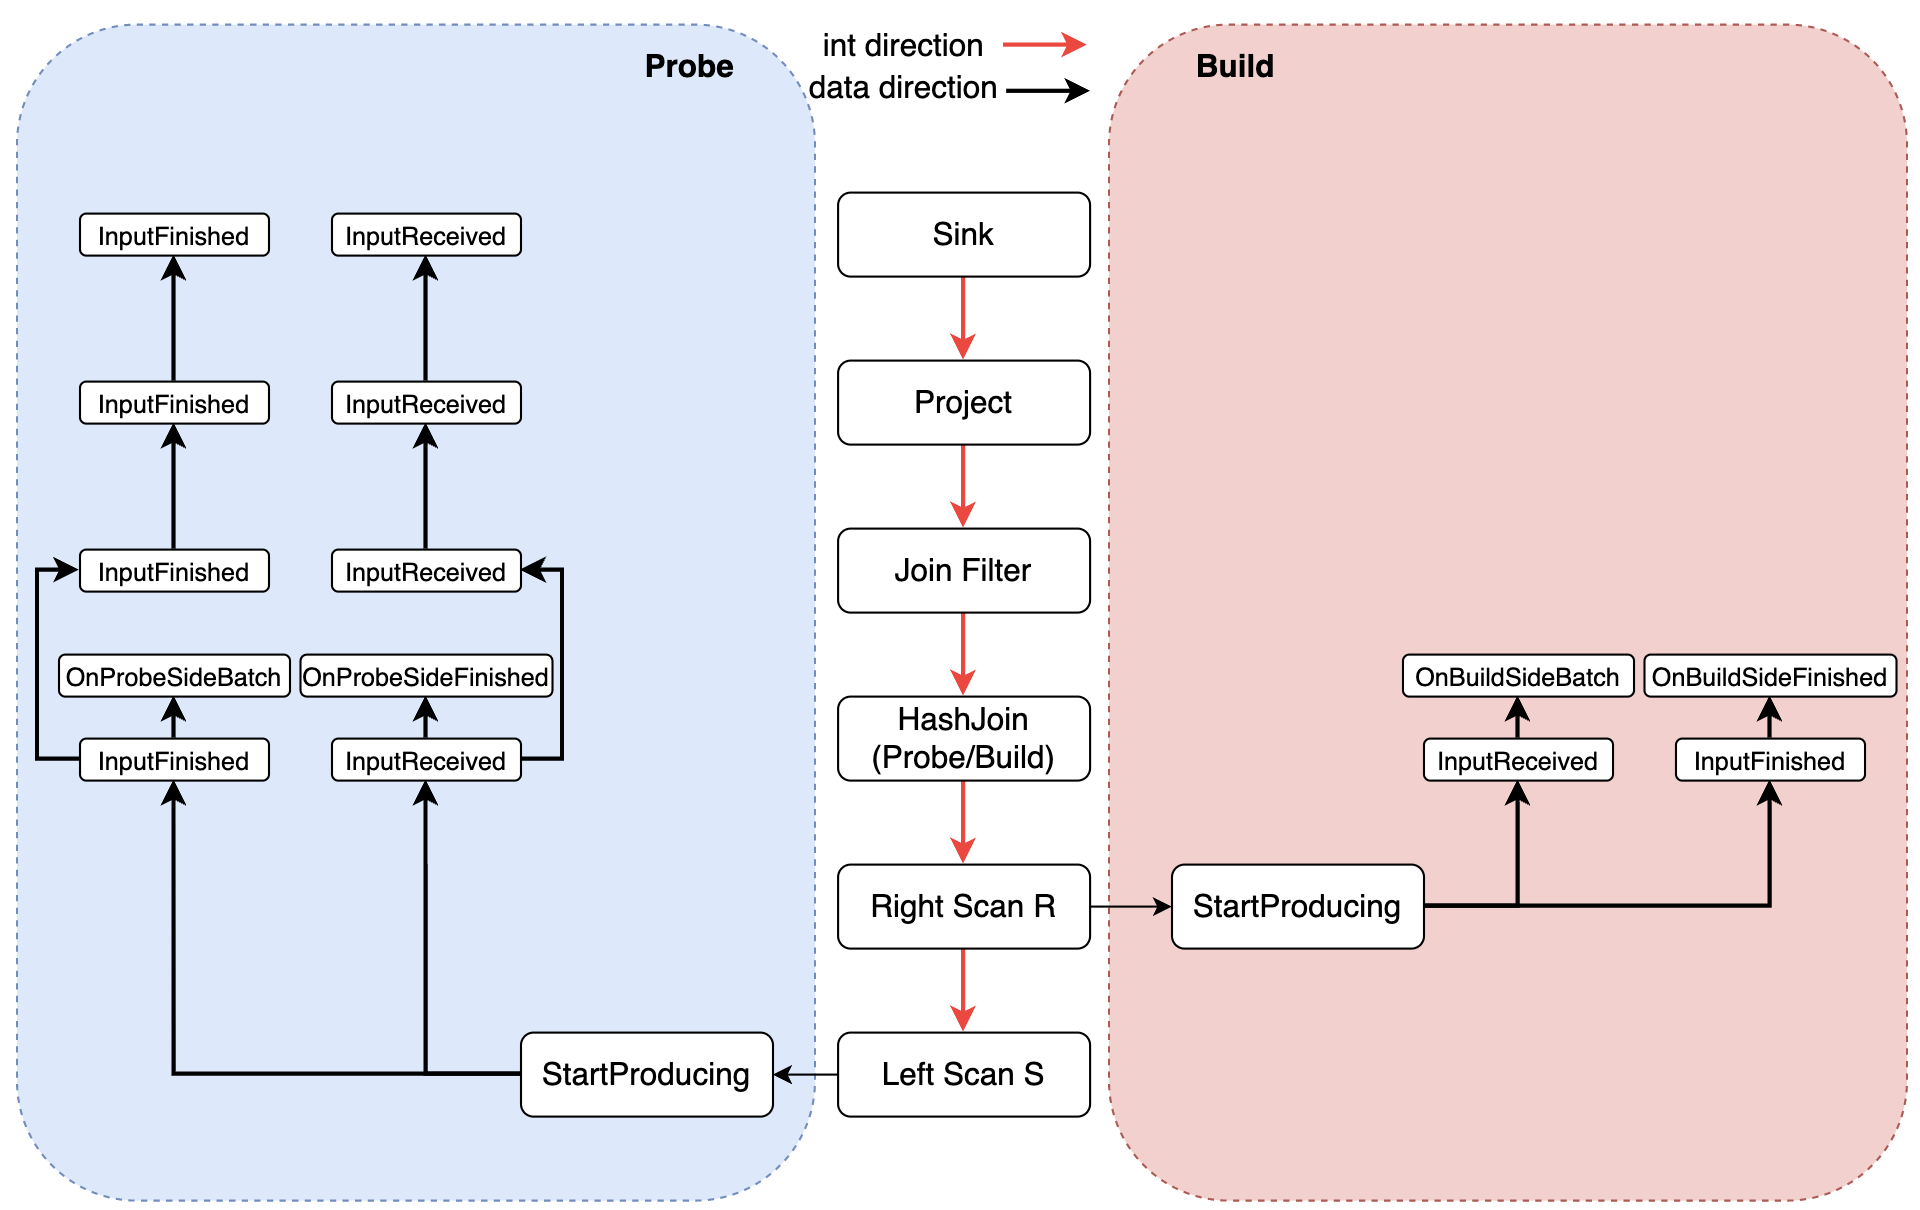
文章目录 背景PostgreSQL HashJoin实现PG 执行器架构HashJoin 基本流程HashJoin 实现细节Join 类型HashJoin 的划分阶段HashJoin 的分批处理阶段JOIN 类型的状态机转换HashJoin 的投影和过滤 Arrow Acero HashJoin实现Acero 基本框架HashJoin 基本流程 总结 背景 近两个月转到…...
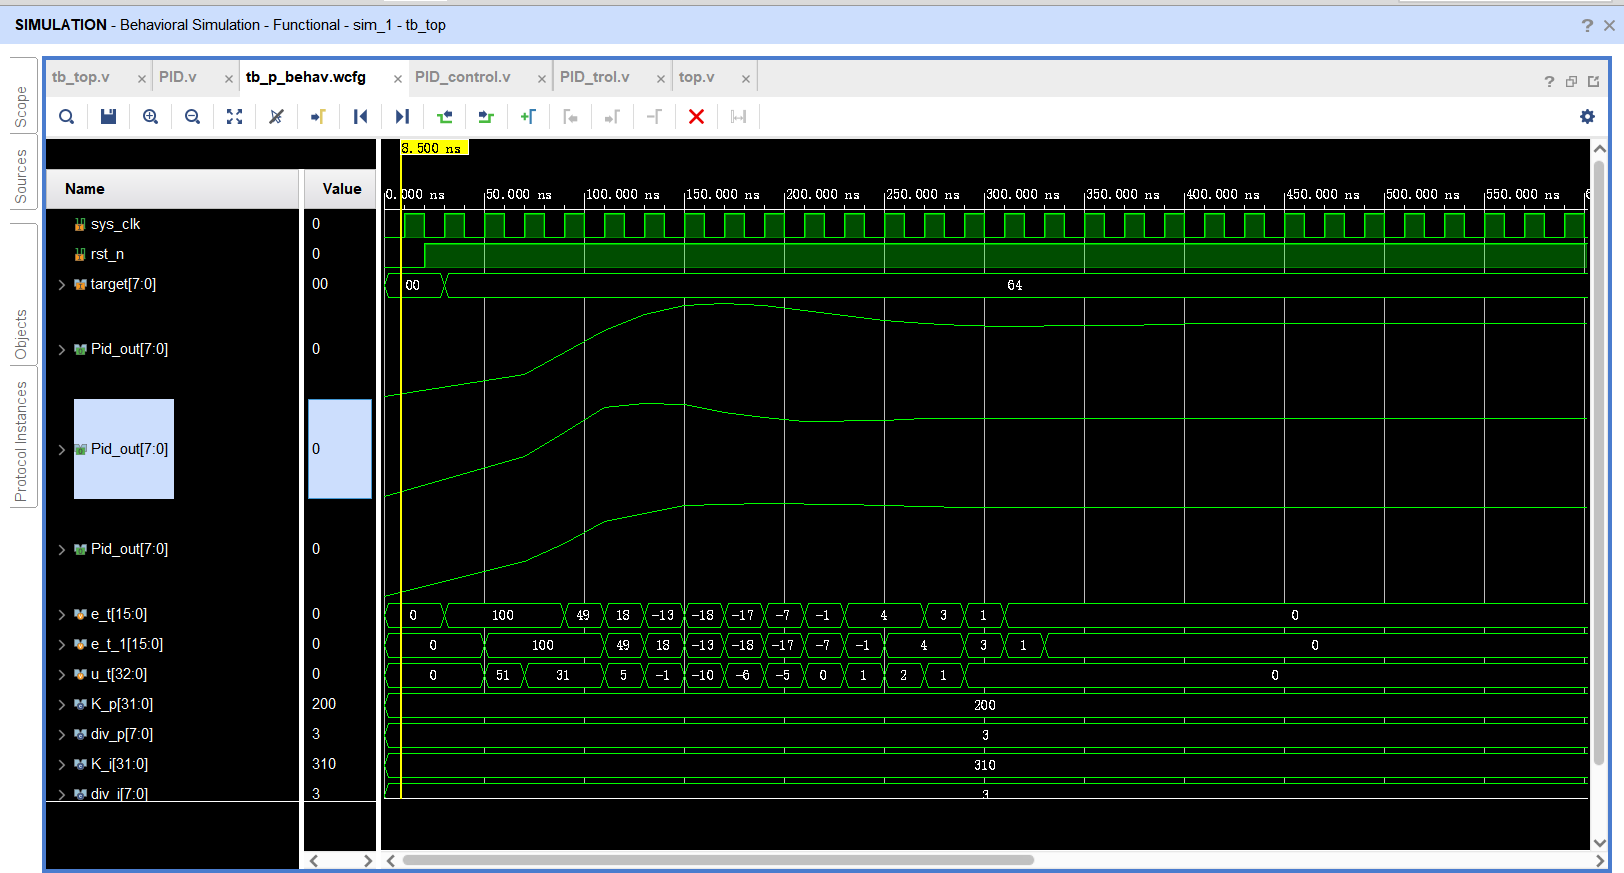
基于FPGA的PID算法学习———实现PID比例控制算法
基于FPGA的PID算法学习 前言一、PID算法分析二、PID仿真分析1. PID代码2.PI代码3.P代码4.顶层5.测试文件6.仿真波形 总结 前言 学习内容:参考网站: PID算法控制 PID即:Proportional(比例)、Integral(积分&…...

从零实现富文本编辑器#5-编辑器选区模型的状态结构表达
先前我们总结了浏览器选区模型的交互策略,并且实现了基本的选区操作,还调研了自绘选区的实现。那么相对的,我们还需要设计编辑器的选区表达,也可以称为模型选区。编辑器中应用变更时的操作范围,就是以模型选区为基准来…...

条件运算符
C中的三目运算符(也称条件运算符,英文:ternary operator)是一种简洁的条件选择语句,语法如下: 条件表达式 ? 表达式1 : 表达式2• 如果“条件表达式”为true,则整个表达式的结果为“表达式1”…...
【单片机期末】单片机系统设计
主要内容:系统状态机,系统时基,系统需求分析,系统构建,系统状态流图 一、题目要求 二、绘制系统状态流图 题目:根据上述描述绘制系统状态流图,注明状态转移条件及方向。 三、利用定时器产生时…...
uniapp微信小程序视频实时流+pc端预览方案
方案类型技术实现是否免费优点缺点适用场景延迟范围开发复杂度WebSocket图片帧定时拍照Base64传输✅ 完全免费无需服务器 纯前端实现高延迟高流量 帧率极低个人demo测试 超低频监控500ms-2s⭐⭐RTMP推流TRTC/即构SDK推流❌ 付费方案 (部分有免费额度&#x…...

重启Eureka集群中的节点,对已经注册的服务有什么影响
先看答案,如果正确地操作,重启Eureka集群中的节点,对已经注册的服务影响非常小,甚至可以做到无感知。 但如果操作不当,可能会引发短暂的服务发现问题。 下面我们从Eureka的核心工作原理来详细分析这个问题。 Eureka的…...
相比,优缺点是什么?适用于哪些场景?)
Redis的发布订阅模式与专业的 MQ(如 Kafka, RabbitMQ)相比,优缺点是什么?适用于哪些场景?
Redis 的发布订阅(Pub/Sub)模式与专业的 MQ(Message Queue)如 Kafka、RabbitMQ 进行比较,核心的权衡点在于:简单与速度 vs. 可靠与功能。 下面我们详细展开对比。 Redis Pub/Sub 的核心特点 它是一个发后…...

uniapp 实现腾讯云IM群文件上传下载功能
UniApp 集成腾讯云IM实现群文件上传下载功能全攻略 一、功能背景与技术选型 在团队协作场景中,群文件共享是核心需求之一。本文将介绍如何基于腾讯云IMCOS,在uniapp中实现: 群内文件上传/下载文件元数据管理下载进度追踪跨平台文件预览 二…...
Java后端检查空条件查询
通过抛出运行异常:throw new RuntimeException("请输入查询条件!");BranchWarehouseServiceImpl.java // 查询试剂交易(入库/出库)记录Overridepublic List<BranchWarehouseTransactions> queryForReagent(Branch…...

Shell 解释器 bash 和 dash 区别
bash 和 dash 都是 Unix/Linux 系统中的 Shell 解释器,但它们在功能、语法和性能上有显著区别。以下是它们的详细对比: 1. 基本区别 特性bash (Bourne-Again SHell)dash (Debian Almquist SHell)来源G…...