Springboot整合 Thymeleaf增删改查一篇就够了

很早之前写过Thymeleaf的文章,所以重新温习一下,非前后端分离,仅仅只是学习
- 官网: https://www.thymeleaf.org/
SpringBoot可以快速生成Spring应用,简化配置,自动装配,开箱即用。
JavaConfigurationjava类来代替XML的配置。对常用的第三方库提供了配置方案,可以很容易的与Spring进行整合,快速进行企业级开发。

优势:不需要配置任何XML文件、内嵌tomcat、默认支持JSON,不需要进行转换、支持RESTful。
使用时:启动类必须覆盖所有与业务相关的类,即启动类所在的包必须是业务类所在包的同包或者⽗包,如果没有覆盖,业务类就不会⾃动装配到IoC容器中。
YAML是不同于Properties的另外⼀种⽂件格式,同样可以⽤来写配置⽂件,Spring Boot默认⽀持YAML格式,
YAML的优点在于编写简单,结构清晰,利⽤缩紧的形式来表示层级关系。
相⽐于Properties,YAML可以进⼀步简化配置⽂件的编写,更加⽅便。属性名和属性值之间必须⾄少⼀个空格。
如果Properties和YAML两种类型的⽂件同时存在,Properties的优先级更⾼。
配置⽂件除了可以放置在resources路径下之外,还有3个地⽅可以放置,优先级顺序如下所示:
1、根路径下的config中的配置⽂件
2、根路径下的配置⽂件
3、resources路径下的config中的配置⽂件
4、resources路径下的配置⽂件
可以直接在Handler中读取YAML⽂件中的数据,⽐如在业务⽅法中向客户端返回当前服务的端⼝信息。
@Value("${server.port}")
private String port;
JSP:动态网页技术,底层为Servlet,可在html代码中编写Java代码
JSP底层原理:它是一种中间层组件,开发者可以在这个组件中将java代码与html代码整合,由JSP引擎将组件转为Servlet,再把混合代码翻译为Servlet的响应语句,输出给客户端。
环境搭建
1、创建基于Maven的Web项⽬,pom.xml
 <!-- Spring项目转为SpringBoot-->
<parent><artifactId>spring-boot-starter-parent</artifactId><groupId>org.springframework.boot</groupId><version>2.3.4.RELEASE</version>
</parent><dependencies><dependency><groupId>org.springframework.boot</groupId><artifactId>spring-boot-starter-web</artifactId></dependency><!-- 引入Spring Boot 内嵌的Tomcat对jsp的解析包--><dependency><groupId>org.apache.tomcat.embed</groupId><artifactId>tomcat-embed-jasper</artifactId><version>9.0.33</version>   <!--报错 <version>7.0.59</version>--><scope>provided</scope></dependency><!-- servlet 依赖的jar包start--><dependency><groupId>javax.servlet</groupId><artifactId>servlet-api</artifactId><version>2.3</version><scope>provided</scope></dependency><!-- jsp 依赖的jar包start--><dependency><groupId>javax.servlet.jsp</groupId><artifactId>javax.servlet.jsp-api</artifactId><version>2.3.1</version></dependency><!-- jstl标签 依赖的jar包start--><dependency><groupId>javax.servlet</groupId><artifactId>jstl</artifactId></dependency></dependencies>
2、创建Handler
@Controller
@RequestMapping("/hello")
public class HelloHandler {@GetMapping("/index")public ModelAndView index(){ModelAndView modelAndView = new ModelAndView("index");modelAndView.addObject("msg","hello springboot jsp");return modelAndView;}
}
3、JSP
<%@ page language="java" contentType="text/html; charset=UTF-8" pageEncoding="UTF-8" %>
<%@ page isELIgnored="false" %>
<html>
<head><title>Title</title>
</head>
<body><h2>${msg}</h2>
</body>
</html>
4、application.yml(配置视图解析器)
server:port: 8080
#springmvc视图解析器
spring:mvc:view:prefix: /suffix: .jsp
5、编写启动类Application.java
@SpringBootApplication
public class Application {public static void main(String[] args) {SpringApplication.run(Application.class, args);}
}
6、更新web.xml,防止加载其他xml片段的时候包报错
<?xml version="1.0" encoding="UTF-8"?>
<web-app xmlns:xsi="http://www.w3.org/2001/XMLSchema-instance"xmlns="http://java.sun.com/xml/ns/javaee"xsi:schemaLocation="http://java.sun.com/xml/ns/javaee http://java.sun.com/xml/ns/javaee/web-app_3_0.xsd"version="3.0"><display-name>Archetype Created Web Application</display-name>
</web-app>
实际运用(crud)
1、pom.xml导入jstl依赖
报错: NoSuchMethodError: org.apache.tomcat.JarScanner.scan,只需要在Dependencies下找到自己引入的tomcat,比如我自己引入的是7.0.59,展开后下面9.0.33是springboot自带的,将版本改为9.0.33就可以了,问题解决!
2、实体类User:id和name
3、Handler中创建业务⽅法,返回User对象
@Controller
@RequestMapping("/user")
public class UserHandler {@Autowiredprivate UserService userService;@GetMapping("/findAll")public ModelAndView findAll(){
//        User user1 = new User(1, "jack");
//        User user2 = new User(2, "jack2");
//        List userList = Arrays.asList(user1, user2);ModelAndView modelAndView = new ModelAndView("findAll");modelAndView.addObject("userList",userService.findAll());return modelAndView;}@PostMapping("/save")public String save(User user){ //写一个save页面formuserService.save(user);return "redirect:/user/findAll";}@GetMapping("/deleteById/{id}")public String deleteById(@PathVariable("id") Integer id){userService.deleteById(id);return "redirect:/user/findAll";}@GetMapping("/findById/{id}")public ModelAndView findById(@PathVariable("id") Integer id){ModelAndView modelAndView = new ModelAndView("update");modelAndView.addObject("user",userService.findById(id));return modelAndView;}@PostMapping("/update")public String update(User user){//写一个update页面form,但先要根据id查询数据,在修改userService.update(user);return "redirect:/user/findAll";}
}
4、Repository
public interface UserService {public Collection findAll();public User findById(Integer id);public void save(User user);public void deleteById(Integer id);public void update(User user);
}
5、Service
@Repository
public class UserRepositoryImpl implements UserRepository {public static Map map;static {map = new HashMap<>();map.put(1,new User(1,"jack1"));map.put(2,new User(2,"jack2"));map.put(3,new User(3,"jack3"));}@Overridepublic Collection findAll() {return map.values();}@Overridepublic User findById(Integer id) {return map.get(id);}@Overridepublic void save(User user) {map.put(user.getId(),user);}@Overridepublic void deleteById(Integer id) {map.remove(id);}@Overridepublic void update(User user) {map.put(user.getId(),user);}
}
6、JSP
findAll.jsp
<%@ page language="java" contentType="text/html; charset=UTF-8" pageEncoding="UTF-8" %>
<%@ page isELIgnored="false" %>
<%@ taglib prefix="c" uri="http://java.sun.com/jsp/jstl/core" %>
<html>
<body><table><tr><th>编号</th><th>姓名</th><th>操作</th></tr><c:forEach items="${userList}" var="users"><tr><td>${users.id}</td><td>${users.name}</td><td><a href="/user/deleteById/${users.id}">删除</a><a href="/user/findById/${users.id}">修改</a></td></tr></c:forEach></table>
</body>
</html>
save.jsp
<form action="/user/save" method="post"><input type="text" name="id" /><input type="text" name="name" /><input type="submit" value="保存" />
</form>
update.jsp
<form action="/user/update" method="post"><input type="text" name="id" value="${user.id}" readonly /><input type="text" name="name" value="${user.name}" /><input type="submit" value="修改" />
</form>
Thymeleaf是⽬前较为流⾏的视图层技术,Spring Boot官⽅推荐使⽤Thymeleaf。
它可以实现前后端分离的交互方式,即视图与业务数据分开响应,还可以直接将服务端返回的数据生成为HTML文件,同时也可以处理XML、JavaScript、CSS等格式。
Thymeleaf最大的特点是既可以直接在浏览器打开(静态方法),也可以结合服务端,将业务数据填充到html后,动态生成的页面(动态方法)???
1 使用
1、创建Maven⼯程,不需要创建Web⼯程,pom.xml
spring-boot-starter-parentorg.springframework.boot2.3.4.RELEASEorg.springframework.bootspring-boot-starter-weborg.springframework.bootspring-boot-starter-thymeleaf2、application.yml
classpath:一般用来指代"src/main/resources"下的资源路径,其本质其实是指项目打包后target的classes下的路径
spring:thymeleaf:prefix: classpath:/templates/ #模板路径suffix: .html #模板后缀servlet:content-type: text/html #设置content-typeencoding: utf-8 #编码格式mode: HTML5 #校验h5格式cache: false #关闭缓存(在开发过程中可以立即看到修改后的结果)
3、创建Handler
@Controller
@RequestMapping("/hello")
public class HelloHandler {@GetMapping("/index")public ModelAndView index(){ModelAndView modelAndView = new ModelAndView("index");modelAndView.addObject("name","小明");return modelAndView;}
}
4、启动类
@SpringBootApplication
public class Application {public static void main(String[] args) {SpringApplication.run(Application.class,args);}
}
5、templates目录下编写HTML
<!DOCTYPE html>
<html lang="en">
<!--引入标签-->
<html xmlns:th="http://www.thymeleaf.org">
<head><meta charset="UTF-8"><title>Title</title>
</head>
<body><!--name的值会覆盖hello--><p th:text="${name}">hello</p>
</body>
</html>
2 注意
如果需要加载后台返回的业务数据,则需要在HTML⻚⾯中使⽤Thymeleaf模版标签来完成。
1、需要引⼊模版标签 <html xmlns:th="http://www.thymeleaf.org"></html>
2、通过特定的标签完成操作 <p th:text="${name}">hello</p>
Thymeleaf模版标签不同于JSTL,Thymeleaf模版标签是直接嵌⼊到HTML原⽣标签内部。
3 Thymeleaf常⽤标签【重点】
th:text用于文本的显示,将业务数据的值填充到html标签中。
th:if用于条件判断,对业务数据的值进行判断。成立,则显示内容。
<p th:if="${score>=90}">优秀</p>
<p th:if="${score<90}">不优秀</p>th:unless也⽤作条件判断,逻辑与th:if恰好相反,如果条件不成⽴则显示,否则不显示。
th:switch th:case两个结合起来使⽤,⽤作多条件等值判断,
<div th:switch="${id}"><p th:case="1">a</p><p th:case="2">b</p><p th:case="3">c</p>
</div>th:action⽤来指定请求的URL,相当于form表单中的action属性、【重点】
如果action的值直接写在HTML中,则需要使⽤@{},
<form th:action="@{/hello/login}" method="post">
<input type="submit"/></form>如果是从后台传来的数据,则使⽤${}。
@GetMapping("/redirect/{url}")
public Stringredirect(@PathVariable("url") String url, Model model){model.addAttribute("url","/hello/login");return url;
}
<form th:action="${url}" method="post">
<input type="submit"/></form>th:each⽤来 遍历集合(类似foreach)
<table><tr th:each="user:${userList}"><td th:text="${user.id}"></td><td th:text="${user.name}"></td></tr>
</table>th:value⽤来给标签赋值
<input type="text" th:value="${idValue}"/>th:src⽤来引⼊静态资源,相当于HTML原⽣标签img、script的src属性。
<img th:src="${src}"/>如果src的值直接写在HTML中: <img th:src="@{/1.png}">
th:href⽤作设置超链接的href
List<User> list = Arrays.asList(new User(1,"jack"),new User(2,"tom"));
ModelAndView modelAndView = new ModelAndView("index");
modelAndView.addObject("list",list);
modelAndView.addObject("userName","tom");<select><option th:each="user:${list}"th:value="${user.id}"th:text="${user.name}"th:selected="${user.name == userName}"></option>
</select>结合th:each来使⽤,⾸先 遍历list集合 动态创建option元素,根据每次遍历出的user.name与业务数据中的userName是否相等来决定是否要选择。
th:attr给HTML标签的任意属性赋值
<input th:attr="value=${attr}"/>
等价于
<input th:value="${attr}"/>
4 Thymeleaf对象
Thymeleaf支持访问Servlet Web的原生资源,HttpServletRequest、HttpServletResponse、HttpSession、ServletContext。
- request:获取HttpServletRequest对象
- response:获取HttpServletResponse对象
- session:获取HttpSession对象
- *servletContext:获取ServletContext对象
@GetMapping("/servlet")
public String servlet(HttpServletRequest request){request.setAttribute("value","request");request.getSession().setAttribute("value","session");request.getServletContext().setAttribute("value","servletContext");return "servletTest";
}
<p th:text="${#request.getAttribute('value')}"></p>
<p th:text="${#session.getAttribute('value')}"></p>
<p th:text="${#servletContext.getAttribute('value')}"></p>
<p th:text="${#response}"></p>
[注意]Thymeleaf⽀持直接访问session, ${#request.getAttribute('name')}也可以简化 ${name}
5 Thymeleaf内置对象
dates:⽇期格式化、calendars:⽇期操作、numbers:数字格式化、
strings:字符串格式化、bools:boolean、arrays:数组内置对象、
lists:List集合内置对象、sets:Set集合内置对象、maps:Map集合内置对象
index.html:
date格式化:<span th:text="${#dates.format(date,'yyyy-MM-dd')}"></span><br/>
当前时间:<span th:text="${#dates.createNow()}"></span><br/>
当前日期:<span th:text="${#dates.createToday()}"></span><br/>
Calendar格式化:<span th:text="${#calendars.format(calendar,'yyyy-MM-dd')}"></span><br/>number百分比格式化(小数点左右保留两位:0.06-->06.00%):
<span th:text="${#numbers.formatPercent(number,2,2)}"></span><br/>
boolean是否为true:<span th:text="${#bools.isTrue(boolean)}"></span><br/>String类型的name是否为空:<span th:text="${#strings.isEmpty(string)}"></span><br/>
name的长度:<span th:text="${#strings.length(string)}"></span><br/>
String类型的name拼接:<span th:text="${#strings.concat('yu ',string)}"></span><br/>
String类型的name拼接:<span th:text="${#strings.concat(string,' yu')}"></span><br/>arrays的⻓度:<span th:text="${#arrays.length(array)}"></span><br/>
arrays是否包含jack:<span th:text="${#arrays.contains(array,'jack')}"></span><br/>
List是否为空:<span th:text="${#lists.isEmpty(list)}"></span><br/>
List的⻓度:<span th:text="${#lists.size(list)}"></span><br/>Set是否为空:<span th:text="${#sets.isEmpty(set)}"></span><br/>
Set的⻓度:<span  th:text="${#sets.size(set)}"></span><br/>
Map是否为空:<span th:text="${#maps.isEmpty(map)}"></span><br/>
Map⻓度:<span th:text="${#maps.size(map)}"></span><br/>
Handler:
@GetMapping("/inner")
public ModelAndView inner(){ModelAndView modelAndView = new ModelAndView("index");modelAndView.addObject("date",new Date()); //日期Calendar calendar = Calendar.getInstance();calendar.set(2022,4,27);modelAndView.addObject("calendar",calendar);modelAndView.addObject("number",0.06);modelAndView.addObject("string","hello world");modelAndView.addObject("boolean",true);modelAndView.addObject("array",Arrays.asList("jack","tom"));List list = new ArrayList<>();list.add(new User(1,"jack1"));list.add(new User(2,"tom1"));modelAndView.addObject("list",list);Set set = new HashSet<>();set.add(new User(1,"jack2"));set.add(new User(2,"tom2"));modelAndView.addObject("set",set);Map map = new HashMap<>();map.put(1,new User(1,"jack3"));map.put(2,new User(2,"tom3"));modelAndView.addObject("map",map);return modelAndView;
}
JdbcTemplate是Spring自带的JDBC模块组件,底层对JDBC进行了封装。用法与mybatis一样,需要自定义sql语句,它实现了数据库的连接,SQL语句的执行,结果集的封装。
缺点:灵活性比如mybatis,因为mybatis的SQL语句定义在xml配置文件中,更有利于维护和扩展。
而JdbcTemplate以硬编码的方式将SQL直接写在Java代码中,不利于维护扩展。
1、pom.xml
org.springframework.bootspring-boot-starter-jdbcmysqlmysql-connector-java2、创建实体类
3、创建UserRepository接口以及实现类
@Repository
public class UserRepositoryImpl implements UserRepository {@Autowiredprivate JdbcTemplate jdbcTemplate; //直接引入@Overridepublic List findAll() {return jdbcTemplate.query("select * from user",new BeanPropertyRowMapper<>(User.class));}@Overridepublic User findById(Integer id) {return jdbcTemplate.queryForObject("select * from user where id = ?",new Object[]{id},new BeanPropertyRowMapper<>(User.class));}@Overridepublic void save(User user) {jdbcTemplate.update("insert into user(username,password) values(?,?)",user.getUsername(),user.getPassword());}@Overridepublic void update(User user) {jdbcTemplate.update("update user set username=?,password=? where id=? ",user.getUsername(),user.getPassword(),user.getId());}@Overridepublic void delete(Integer id) {jdbcTemplate.update("delete from user where id=?",id);}
}
4、测试
@SpringBootTest
class SpringbootApplicationTests {@Autowiredprivate UserRepositoryImpl userRepository;@Testvoid testJdbc() {List userList = userRepository.findAll();System.out.println(userList);}
}
query方法
1、 query(String sql, RowMapper<t> rowMapper)</t>
其中的RowMapper是一个接口,作用是解析结果集,将JDBC查询出来的ResultSet对象转化为POJO。
调用query方法时要指定类的结构 new BeanPropertyRowMapper<>(User.class)
@FunctionalInterface
public interface RowMapper {@NullableT mapRow(ResultSet rs, int rowNum) throws SQLException;
}
2、 queryForObject(String sql, @Nullable Object[] args, RowMapper<t> rowMapper)</t>
该⽅法⽤来 查询⼀条数据,并将结果封装成⼀个POJO
update方法
增加、删除、修改的操作都可以调用个这个方法。
1、pom.xml(spring的web项目)
org.springframework.bootspring-boot-starter-parent2.6.7org.springframework.bootspring-boot-starter-webmysqlmysql-connector-javaorg.mybatis.spring.bootmybatis-spring-boot-starter2.2.22、application.yml
#端口
server:port: 8080tomcat:uri-encoding: UTF-8
###############################
mybatis:mapper-locations: classpath:/mapping/*.xml # mapper.xml文件的路径type-aliases-package: com.yu.entity  # 全限定名(包名+类名)起别名
###############################
spring:datasource:url: jdbc:mysql://127.0.0.1:3306/school?useSSL=false&characterEncoding=utf8&serverTimezone=GMTdriver-class-name: com.mysql.cj.jdbc.Driverusername: rootpassword: 12345
3、实体类User
4、创建UserRepository接口
public interface UserRepository {public List findAll();public User findById(Integer id);public void save(User user);public void update(User user);public void delete(Integer id);
}
5、/resources/mapping创建UserRepository.xml【关注点】
select * from userselect * from user where id=#{id}insert into user(username,password) values(#{username},#{password})update user set username=#{usernamw},password=#{password} where id=#{id}delete from user where id=#{id}6、创建Handler
@RestController
@RequestMapping("/user")
public class UserHandler {@Autowiredprivate UserRepository userRepository;@GetMapping("/findAll")public List findAll(){return userRepository.findAll();}@GetMapping("/findById/{id}")public User findById(@PathVariable("id") Integer id){return userRepository.findById(id);}@PostMapping("/save")public int save(@RequestBody User user){return userRepository.save(user);}@PutMapping("/update")public int update(@RequestBody User user){return userRepository.update(user);}@DeleteMapping("/delete/{id}")public int delete(@PathVariable("id") Integer id){return userRepository.delete(id);}
}
7、创建启动类,扫描mapper
@SpringBootApplication
@MapperScan("com.yu.repository") #扫描mapper
public class SpringbootApplication {public static void main(String[] args) {SpringApplication.run(SpringbootApplication.class, args);}
}
总结:
1、注意application配置文件中,需要配置mybatis的mapper文件路径,以及别名。
2、在resources的mapping文件夹下创建对应的Mapper.xml文件(sql语句),还有命名空间
3、启动类添加注解: @MapperScan(“com.yu.repository”) 。作用是指定要变成实现类的接口所在的包,然后包下面的所有接口在编译之后都会生成相应的实现类。
JPA和Spring Data JPA的关系
JPA(java persistence API)java持久层规范。定义了一系列ORM接口,它本身不能直接使用,接口必须实现才能使用,Hibernate框架就是一个实现了JPA规范的框架。
Spring Data JPA是Spring框架提供的对JPA规范的抽象,通过约定的命名规范完成持久层接口的编写,
在不需要实现接口的情况下,就可以完成对数据库的操作。
简单理解:通过Spring Data JPA只需要定义接口而不需要实现,就能完成CRUD的操作。
Spring Data JPA本身并不是⼀个具体的实现,它只是⼀个抽象层,底层还是需要Hibernate这样的JPA来提供⽀持。
Hibernate 是一款全自动的 ORM 框架,它能够自动生成的 SQL 语句并自动执行,实现对数据库进行操作,
Spring Data JPA和Spring JdbcTemplate的关系
Spring JdbcTemplate是Spring框架提供的⼀套操作数据库的模版,
Spring Data JPA是JPA的抽象。
1、pom.xml
<!-- Spring Boot 集成 Spring Data JPA -->
<dependency><groupId>org.springframework.boot</groupId><artifactId>spring-boot-starter-data-jpa</artifactId>
</dependency>
2、application.yml
#端口
server:port: 8080tomcat:uri-encoding: UTF-8spring:datasource:url: jdbc:mysql://127.0.0.1:3306/school?useSSL=false&characterEncoding=utf8&serverTimezone=GMTdriver-class-name: com.mysql.cj.jdbc.Driverusername: rootpassword: 12345# 显示sql语句,并格式化 jpa: show-sql: trueproperties:hibernate:format_sql: true
3、实体类。完成实体类与数据表的映射【重点】
import javax.persistence.*;
@Data
@Entity(name = "user")//将类与表名联系起来(name为表名)
public class User {@Id@GeneratedValue(strategy = GenerationType.IDENTITY)private Integer id;@Columnprivate String username;@Columnprivate String password;
}
注解分析:
- @Entity将实体类与数据表进行映射,其中name = "user"指定表名
- @Id将实体类中的成员变量与数据表的主键进行映射,⼀般都是id
- @GeneratedValue表示自动生成主键,strategy为主键选择生成策略(GenerationType.IDENTITY:主键由数据库自动生成(主要是自动增长型))
- @Column将实体类中的成员变量与数据表的普通字段进行映射
4、创建UserRepository
只需要继承JpaRepository,不需要实现方法,也不需要写SQL语句。
import org.springframework.data.jpa.repository.JpaRepository;public interface UserRepository extends JpaRepository {
} // 其中JpaRepository,一个指实体类,另一个是表的主键的类型
5、创建Handler
@RestController
@RequestMapping("/user")
public class UserHandler {@Autowiredprivate UserRepository userRepository;@GetMapping("/findAll")public List findAll(){return userRepository.findAll();}@GetMapping("/findById/{id}")public User findById(@PathVariable("id") Integer id){return userRepository.findById(id).get(); //  Optional findById(ID id);防止空指针}@PostMapping("/save")public void save(@RequestBody User user){userRepository.save(user);}@PutMapping("/update")public void update(@RequestBody User user){userRepository.save(user);}@DeleteMapping("/deleteById/{id}")public void deleteById(@PathVariable("id") Integer id){userRepository.deleteById(id);}
}
6、【重点】在继承JpaRepsitory的基础上,开发者也可以自定义方法。
public interface UserRepository extends JpaRepository {// 这个自定义的方法要特别注意// By后面的为字段名的首字母大写。不能写其他的,例如findByName则报错public User findByUsername(String username);
}
@GetMapping("/findByUsername/{username}")
public User findByUsername(@PathVariable("username") String username){return userRepository.findByUsername(username);
}
Spring Security:利用Spring IoC/DI和AOP功能,为系统提供了声明式安全访问控制功能,减少了为系统安全而编写大量重复代码的工作。
整合Spring Security
1、创建spring的Maven⼯程,pom.xml
spring-boot-starter-parent 这是Spring Boot的父级依赖,这样当前的项目就是Spring Boot项目了。
spring-boot-starter-parent 是一个特殊的starter,它用来提供相关的Maven默认依赖。使用它之后,常用的包依赖可以省去version标签。
<parent><groupId>org.springframework.boot</groupId><artifactId>spring-boot-starter-parent</artifactId><version>2.3.4.RELEASE</version>
</parent><dependencies><dependency><groupId>org.springframework.boot</groupId><artifactId>spring-boot-starter-web</artifactId></dependency><dependency><groupId>org.springframework.boot</groupId><artifactId>spring-boot-starter-security</artifactId></dependency><dependency><groupId>org.springframework.boot</groupId><artifactId>spring-boot-starter-thymeleaf</artifactId></dependency>
</dependencies>
2、Handler
@Controller
public class SecurityHandler {@GetMapping("/index")public String index(){return "index";}
}
3、前端thymeleaf的html
<form method="post" action="/logout"><input type="submit" value="退出">
</form>
4、application.yml
spring:thymeleaf:prefix: classpath:/templates/suffix: .html
5、Application
@SpringBootApplication
public class Application {public static void main(String[] args) {SpringApplication.run(Application.class,args);}
}
自定义用户密码(默认登录页面)
spring:thymeleaf:prefix: classpath:/templates/suffix: .htmlsecurity:user:name: adminpassword: 12345权限管理
用户---->角色---->权限:将权限交给角色,再把角色赋予用户。
举例:
定义两个资源:index.html、admin.html
定义两个角色:ADMIN可以访问index.html和admin.html、USER只能访问index.html
1、config包下面创建SecurityConfig类
@Configuration // 配置类
@EnableWebSecurity // 开启web安全验证
public class SecurityConfig extends WebSecurityConfigurerAdapter {/*** 角色和资源的关系* @param http* @throws Exception*/@Overrideprotected void configure(HttpSecurity http) throws Exception {http.authorizeRequests().antMatchers("/admin").hasRole("ADMIN").antMatchers("/index").access("hasRole('ADMIN') or hasRole('USER')").anyRequest().authenticated().and().formLogin().loginPage("/login").permitAll().and().logout().permitAll().and().csrf().disable();}/*** 用户和角色的关系* @param auth* @throws Exception*/@Overrideprotected void configure(AuthenticationManagerBuilder auth) throws Exception {auth.inMemoryAuthentication().passwordEncoder(new MyPasswordEncoder()).withUser("user").password(new MyPasswordEncoder().encode("000")).roles("USER").and().withUser("admin").password(new MyPasswordEncoder().encode("123")).roles("ADMIN","USER");}
}
2、自定义MyPassowrdEncoder
public class MyPasswordEncoder implements PasswordEncoder {@Overridepublic String encode(CharSequence charSequence) {return charSequence.toString();}@Overridepublic boolean matches(CharSequence charSequence, String s) {return s.equals(charSequence.toString());}
}
3、Handler
@Controller
public class SecurityHandler {@GetMapping("/index")public String index(){return "index";}@GetMapping("/admin")public String admin(){return "admin"; //转发到admin页面}@GetMapping("/login")public String login(){return "login";}
}
4、login.html
<html xmlns:th="http://www.thymeleaf.org">
<body><!-- spring security的param.error --><p th:if="${param.error}">用户名或密码错误</p><form th:action="@{/login}" method="post"><!-- 这里的name必须是username -->用户名:<input type="text" name="username"><br/>密 码:<input type="password" name="password"><br/><input type="submit" value="登录"></form>
</body>
5、index.html(USER、ADMIN)
<body><p>欢迎回来</p><form method="post" action="/logout"><input type="submit" value="退出"></form>
</body>
6、admin.html(ADMIN)
<body><p>后台管理系统</p><form method="post" action="/logout"><input type="submit" value="退出"></form>
</body>
相关文章:
Springboot整合 Thymeleaf增删改查一篇就够了
很早之前写过Thymeleaf的文章,所以重新温习一下,非前后端分离,仅仅只是学习 官网: https://www.thymeleaf.org/ SpringBoot可以快速生成Spring应用,简化配置,自动装配,开箱即用。 JavaConfigur…...

BigScience bloom模型
简介项目叫 BigScience,模型叫 BLOOM,BLOOM 的英文全名代表着大科学、大型、开放科学、开源的多语言语言模型。拥有 1760 亿个参数的模型.BLOOM 是去年由 1000 多名志愿研究人员,学者 在一个名为“大科学 BigScience”的项目中创建的.BLOOM 和今天其他可用大型语言模型存在的一…...

Squid服务的缓存概念
Squid缓存概念 squid是一个缓存服务器的守护进程 之前涉及的缓存服务:redis 2-8原则:80%的访问就是从20%的数据提供的;因此把20%的数据给到缓存–>完美解决等待时间; nginx是没有缓存的服务的;那么专业的事情就…...
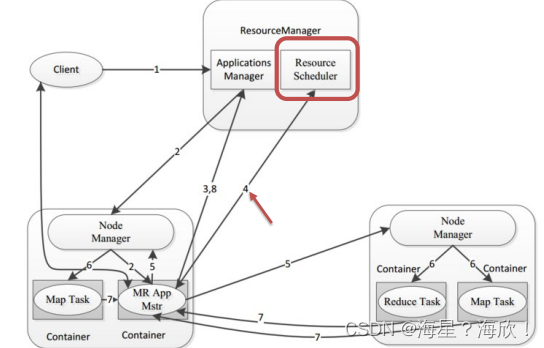
Hadoop YARN
目录Hadoop YARN介绍Hadoop YARN架构、组件程序提交YARN交互流程YARN资源调度器Scheduler调度器策略FIFO SchedulerCapacity SchedulerFair SchedulerHadoop YARN介绍 YARN是一个通用资源管理系统和调度平台,可为上层应用提供统一的资源管理和调度 上图࿱…...

使用 Macrobenchmark 测试 Android 应用性能
etpack Compose 是推荐用于构建原生 Android 界面的新工具包。后续简称Jetpack Compose为Compose。在了解State之前需要先对Compose及申明性编程式有个大概的了解。State初体验好了,在你有一定了解的基础上,我们先来运行几个Demo,初步了解为何…...
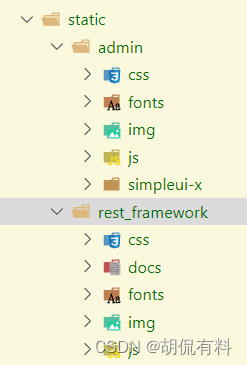
【django】django-simpleui配置后,后台显示空白页解决方法
every blog every motto: You can do more than you think. https://blog.csdn.net/weixin_39190382?typeblog 0. 前言 django后台显示空白页解决方法 1. 正文 添加完simpleui以后,后台显示一片空白,一脸问号??? …...
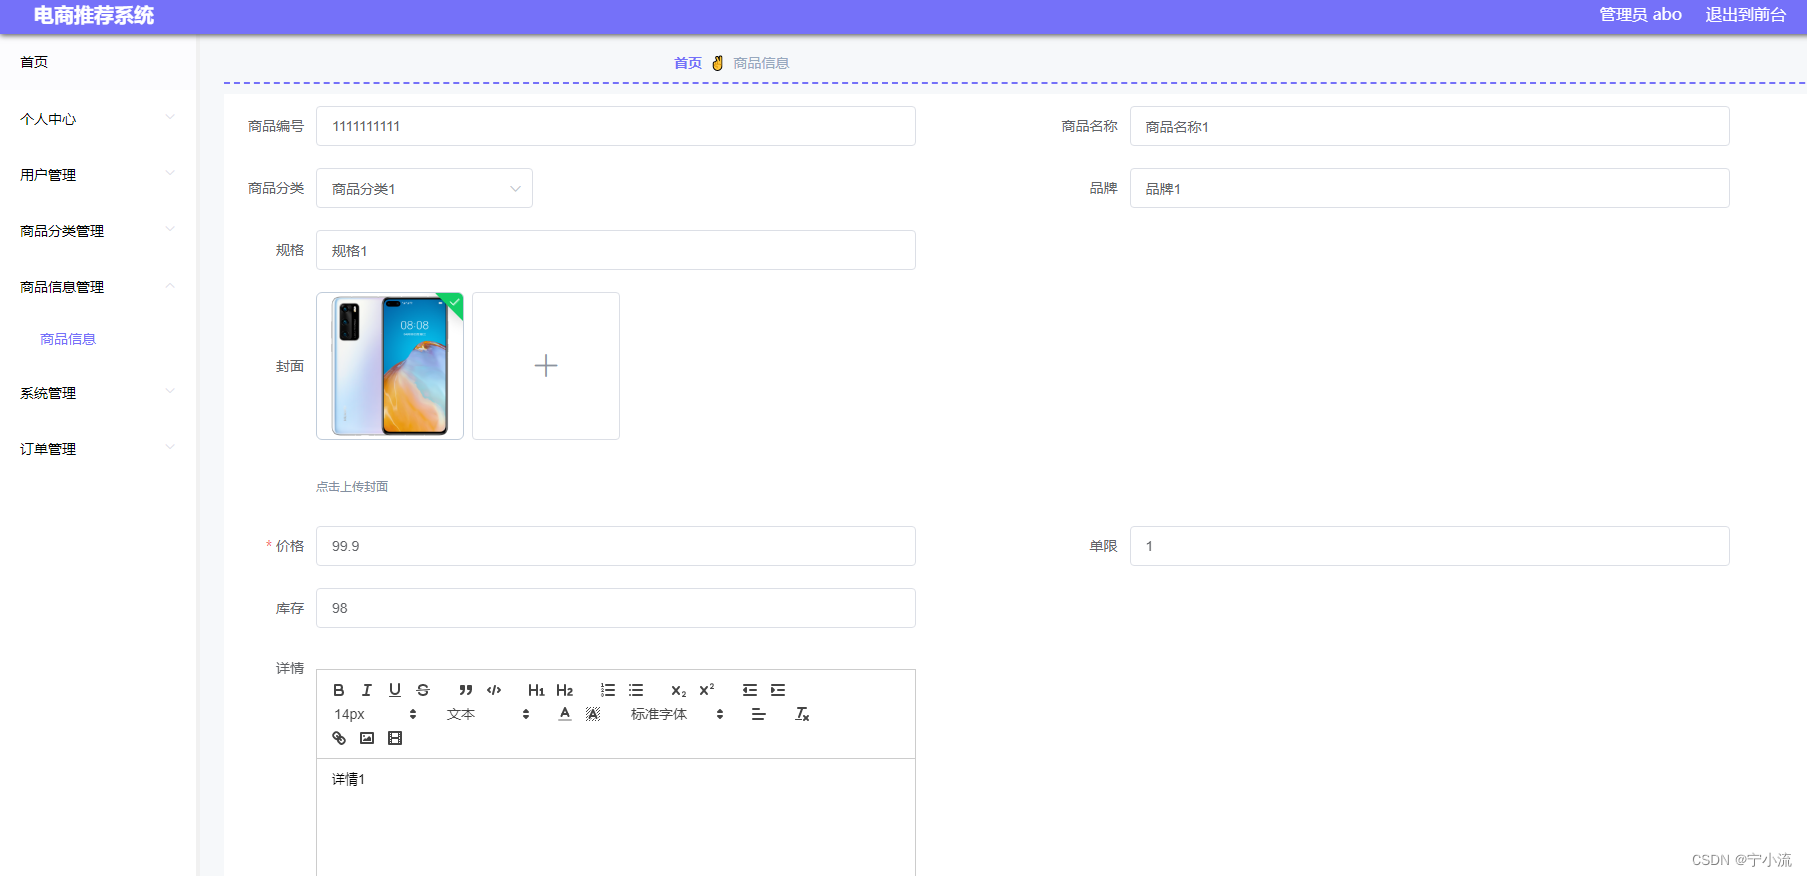
【035】基于Vue的电商推荐管理系统(含源码数据库、超详细论文)
摘 要:基于Vue+Nodejs+mysql的电商推荐管理系统,这个项目论文超详细,er图、接口文档、功能展示、技术栈等说明特别全!!! (文末附源码数据库、课设论文获取方式࿰…...

【c++】模板1—函数模板
文章目录函数模板语法函数模板注意事项案例—数组选择排序普通函数和函数模板的区别普通函数和函数模板调用规则模板的局限性函数模板语法 函数模板作用: 建立一个通用函数,其函数返回值类型和形参类型可以不具体制定,用一个虚拟的类型来代表…...

windows10 wsl子系统固定ip启动分配网卡法
WSL设置添加固定IP 在Win端添加一个固定IP 192.168.50.99 用于X-Server界面显示.在WSL端添加一个固定IP 192.168.50.16 用于和Win端通讯 在win端创建批处理文件 创建一个批处理文件 我的文件位置是D:\powershell\static_ip.bat 向vEthernet (WSL)网卡添加一个IP 192.168.50.…...

ARM+Linux日常开发笔记
ARMLinux开发命令 文章目录ARMLinux开发命令一、虚拟机1.ssh服务项目2.文件相关3.系统相关4. 虚拟机清理内存二、ARM核板1.设备重启三、调试1. 应该调试一、虚拟机 1.ssh服务项目 启动ssh服务 sudo /etc/init.d/ssh restart2.文件相关 查看文件大小显示kb ll -h 查看目录文件…...
在线文档技术-编辑器篇
这是在线文档技术的第二篇文章,本文将对目前市面上所有的主流编辑器和在线文档进行一次深入的剖析和研究,从而使大家对在线文档技术有更深入的了解,也让更多人能够参与其开发与设计中来。 注意:出于对主流文档产品的尊重…...

top -p pid为什么超过100%
CPU:Cores, and Hyper-Threading 超线程(Hyper-Threading ) 超线程是Intel最早提出一项技术,最早出现在2002年的Pentium4上。单个采用超线程的CPU对于操作系统来说就像有两个逻辑CPU,为此P4处理器需要多加入一个Logic…...

#高光谱图像分类#:分类的方法有哪些?
高光谱图像分类方法可以根据分类粒度的不同分为基于像素的分类和基于对象的分类 高光谱图像分类方法可以根据分类粒度的不同分为基于像素的分类和基于对象的分类。 基于像素的分类:这种分类方法是针对每个像素进行分类,将像素的光谱信息作为输入特征&am…...

观察者模式
观察者模式常常用于以下场景:事件驱动系统:当事件发生时,通知所有对该事件感兴趣的观察者。发布/订阅模型:一个主题(发布者)可以有多个订阅者(观察者),当主题发生改变时&…...
前端组件库自定义主题切换探索-03-webpack-theme-color-replacer webpack 同时替换多个颜色改造
接上一篇《前端组件库自定义主题切换探索-02-webpack-theme-color-replacer webpack 的实现逻辑和原理-02》 这篇我们来开始改造,让这个插件最终能达到我们的目的: 首先修改plugin.config.js。 插件首先要在vue.config.js引用注册,因此先对…...
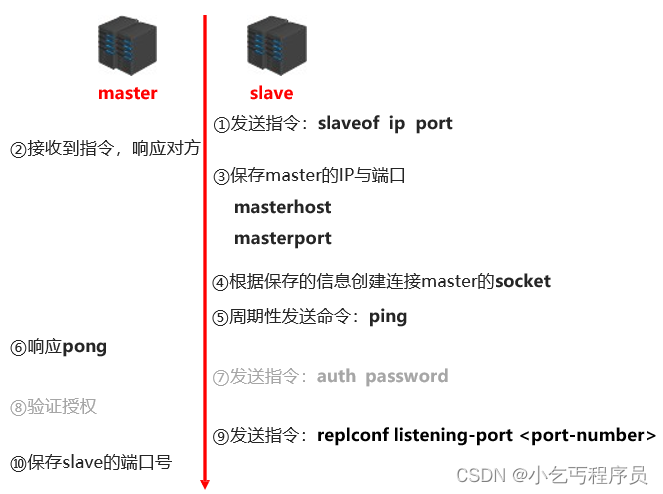
Redis高级-主从复制相关操作
2.1 主从复制简介 2.1.1 高可用 首先我们要理解互联网应用因为其独有的特性我们演化出的三高架构 高并发 应用要提供某一业务要能支持很多客户端同时访问的能力,我们称为并发,高并发意思就很明确了 高性能 性能带给我们最直观的感受就是:速…...

SPI总线设备驱动模型
SPI总线设备驱动模型 文章目录SPI总线设备驱动模型参考资料:一、平台总线设备驱动模型二、 数据结构2.1 SPI控制器数据结构2.2 SPI设备数据结构2.3 SPI设备驱动三、 SPI驱动框架3.1 SPI控制器驱动程序3.2 SPI设备驱动程序致谢参考资料: 内核头文件&…...

开发同事辞职,接手到垃圾代码怎么办?
小王新加入了一家公司,这家公司有点年头,所以连屎山都是发酵过的,味道很冲。和大多数时运不济的程序员一样,到了这种公司,做的大多数工作,就是修补这些祖传代码,为其添砖加瓦。每当被折腾的筋疲…...

gRPC简介
grpc简介 grpc介绍可以参考官网。无论是rpc还是grpc,可以这样理解,都知道过去使用的单单体架构,而在2011年5月威尼斯的一个软件架构会议上提出了微服务架构,围绕业务功能进行组织(organized around business capability)…...

《MySQL系列-InnoDB引擎25》表-InnoDB逻辑存储结构
InnoDB逻辑存储结构 从InnoDB存储引擎的逻辑存储结构看,所有数据都被逻辑地存放在一个空间中,称之为表空间(tablespace)。表空间又由段(segment)、区(extent)、页(page)组成。页在一些文档中有时也称为块(block),InnoDB存储引擎的逻辑存储结构…...

Element Plus:Vue 3企业级UI组件库的全方位解析与实践指南
Element Plus:Vue 3企业级UI组件库的全方位解析与实践指南 【免费下载链接】element-plus 🎉 A Vue.js 3 UI Library made by Element team 项目地址: https://gitcode.com/GitHub_Trending/el/element-plus Element Plus作为基于Vue 3的企业级UI…...

OpenClaw模型微调:gemma-3-12b-it针对自动化任务的专项优化
OpenClaw模型微调:gemma-3-12b-it针对自动化任务的专项优化 1. 为什么需要专项优化? 当我第一次将OpenClaw接入gemma-3-12b-it模型时,发现了一个有趣的现象:这个号称"指令优化"的模型在处理简单问答时表现优异&#x…...

2025届毕业生推荐的五大降AI率方案解析与推荐
Ai论文网站排名(开题报告、文献综述、降aigc率、降重综合对比) TOP1. 千笔AI TOP2. aipasspaper TOP3. 清北论文 TOP4. 豆包 TOP5. kimi TOP6. deepseek 人工智能写作工具,是借助自然语言处理以及深度学习技术制造的智能辅助系统&#…...

2026届毕业生推荐的AI学术工具实测分析
Ai论文网站排名(开题报告、文献综述、降aigc率、降重综合对比) TOP1. 千笔AI TOP2. aipasspaper TOP3. 清北论文 TOP4. 豆包 TOP5. kimi TOP6. deepseek 于毕业论文写作进程里,人工智能工具可充作辅助方式用以提高效率。学生能借AI开展…...
)
一台机器也能玩转StarRocks?手把手教你搭建单机测试环境(附避坑指南)
一台机器玩转StarRocks:单机测试环境搭建实战与避坑指南 当你想快速验证StarRocks的功能特性,或者进行本地开发测试时,单机部署是最便捷的选择。虽然官方并不推荐在生产环境中使用单机模式,但对于个人开发者、学生或测试场景来说&…...

告别subfloat!LaTeX中minipage+subfigure排版多图的最佳实践
LaTeX多图排版进阶指南:minipage与subfigure的黄金组合 在学术论文和技术文档写作中,图片排版往往是让人头疼的问题。特别是当需要处理多张图片并为其添加子标题时,传统的subfloat方法常常会遇到标题溢出、无法自动换行等令人沮丧的情况。本文…...

[视频碎片修复]:解决B站缓存无法播放问题的技术方案与实践指南
[视频碎片修复]:解决B站缓存无法播放问题的技术方案与实践指南 【免费下载链接】BilibiliCacheVideoMerge 项目地址: https://gitcode.com/gh_mirrors/bi/BilibiliCacheVideoMerge 问题溯源:B站缓存的技术困境与用户痛点 缓存分割机制的技术解析…...

新手福音:无需下载安装,在快马平台直接上手体验wsl开发
作为一个刚接触WSL的新手,最头疼的就是漫长的下载安装过程。记得我第一次尝试在Windows上安装WSL时,光是等待wsl --install命令完成就花了近一个小时,中间还因为网络问题失败了好几次。这种体验对初学者来说真的很劝退。 后来我发现了一个更简…...

3步构建企业级AI应用:无代码开发新范式
3步构建企业级AI应用:无代码开发新范式 【免费下载链接】Awesome-Dify-Workflow 分享一些好用的 Dify DSL 工作流程,自用、学习两相宜。 Sharing some Dify workflows. 项目地址: https://gitcode.com/GitHub_Trending/aw/Awesome-Dify-Workflow …...

MedGemma-X实战案例:如何用AI辅助完成日常放射科阅片工作
MedGemma-X实战案例:如何用AI辅助完成日常放射科阅片工作 1. 引言:当AI遇见放射科 在繁忙的放射科工作中,医生们每天需要解读数十甚至上百张影像。一张普通的胸部X光片,就包含了肺野、纵隔、肋骨、膈肌等多个需要评估的解剖结构…...