【MongoDB】集群搭建实战 | 副本集 Replica-Set | 分片集群 Shard-Cluster | 安全认证
文章目录
- MongoDB 集群架构
- 副本集
- 主节点选举原则
- 搭建副本集
- 主节点
- 从节点
- 仲裁节点
- 连接节点
- 添加副本从节点
- 添加仲裁者节点
- 删除节点
- 副本集读写操作
- 副本集中的方法
- 分片集群
- 分片集群架构目标
- 第一个副本集
- 第二个副本集
- 配置集
- 初始化副本集
- 路由集
- 添加分片
- 开启分片
- 集合分片
- 删除分片
- 安全认证
- MongoDB用户和角色权限
- 副本集安全认证
- 创建副本集认证的key文件
- 修改配置文件指定keyfile
- 分片集群安全认证
MongoDB 集群架构
副本集
MongoDB副本集(Replica Set)是一组维护相同数据集的 MongoDB 实例,它可以提供数据的冗余和高可用性。
-
副本集由一个主节点(Primary)和多个从节点(Secondary)组成。
- 客户端所有写操作都会发送到主节点,主节点会记录oplog,然后将写操作同步到从节点。
- 从节点可以进行读操作和选举新的主节点,从而在主节点故障时实现高可用性。
-
副本集可以有一个或多个仲裁节点(Arbiter)。
- 仲裁节点不持有数据,只参与投票来进行选举。
类似于有自动故障恢复功能的主从集群。用多台机器进行同一数据的异步和同步,从而使得多台机器拥有同一数据的多个副本。并且当主库宕机时不需要用户干预的情况下自动切换其他备份服务器做主库。还可以利用副本服务器做只读服务器,实现读写分离,提高负载。通常在生产环境中使用3或5节点副本集,且部署主从节点到不同机器上,可以提供更高的数据冗余和可用性。
副本集使用(主-从-仲裁)节点的架构:
- 数据冗余: 数据同步到从节点上,提高数据可用性
- 高可用性: 主节点故障时可以快速选举新的主节点
- 读写分离: 不同类型的压力分别在不同的节点上执行,从节点可以承担读操作的负载
- 数据分发: 将数据从一个区域复制到另一个区域,减少另一个区域的读延迟
- 异地容灾: 在数据中心故障时快速切换到异地
主从复制和副本集区别:
主从集群和副本集最大区别就是副本集没有固定的“主节点”;整个集群会选出一个“主节点”,当其挂掉后,又在剩下的从节点中选中其他节点为“主节点”,副本集总有一个活跃点 {主、primary} 和一个或多个备份节点 {从、secondary}。
主节点选举原则
MongoDB在副本集中,会自动进行主节点的选举,主节点选举的触发条件:
- 主节点故障
- 主节点网络不可达(默认心跳信息为10秒)
- 人工干预(rs.stepDown(600))
一旦触发选举,就要根据一定的规则来选主节点。
选举规则是根据票数来决定谁获胜:
- 票数最高,且获得了"大多数"成员的投票支持的节点获胜
“大多数”的定义为:假设副本集内投票成员数量为N,则大多数为 N/2+1。例如:3个投票成员,则大多数的值是2。当副本集内存活的数量不足大多数时,整个副本集将无法选举出Primary,副本集将无法提供写服务,处于只读状态。
- 若票数相同,且都获得了"大多数"成员的投票支持的,数据新的节点获胜。
数据的新旧是通过操作日志oplog来对比的。
搭建副本集
目标:搭建一主一副本一仲裁:

主节点
- 建立存放数据和日志的目录
mkdir -p ~/mongodb/replicaset/rs_27017/log ~/mongodb/replicaset/rs_27017/data/db
- 新建或修改配置文件
vim ~/mongodb/replicaset/rs_27017/mongod.conf
mongod.conf:
- 注意: /home/cauchy 这里是用户的家目录不能用 ~ 代替,
cd && pwd查看家目录路径。
# Where and how to store data.
storage:dbPath: /home/cauchy/mongodb/replicaset/rs_27017/data/db# where to write logging data.
systemLog:destination: filelogAppend: truepath: /home/cauchy/mongodb/replicaset/rs_27017/log/mongod.log# network interfaces
net:port: 27017bindIp: 0.0.0.0# how the process runs
processManagement:fork: truetimeZoneInfo: /usr/share/zoneinfopidFilePath: /home/cauchy/mongodb/replicaset/rs_27017/log/mongod.pidreplication:replSetName: rs#sharding:# security:
#   authorization: enabled
- 启动节点服务
sudo mongod -f ~/mongodb/replicaset/rs_27017/mongod.conf

从节点
mkdir -p ~/mongodb/replicaset/rs_27018/log ~/mongodb/replicaset/rs_27018/data/db
vim ~/mongodb/replicaset/rs_27018/mongod.conf
mongod.conf:
# Where and how to store data.
storage:dbPath: /home/cauchy/mongodb/replicaset/rs_27018/data/db# where to write logging data.
systemLog:destination: filelogAppend: truepath: /home/cauchy/mongodb/replicaset/rs_27018/log/mongod.log# network interfaces
net:port: 27018bindIp: 0.0.0.0# how the process runs
processManagement:fork: truetimeZoneInfo: /usr/share/zoneinfopidFilePath: /home/cauchy/mongodb/replicaset/rs_27018/log/mongod.pidreplication:replSetName: rs#sharding:# security:
#   authorization: enabled
sudo mongod -f ~/mongodb/replicaset/rs_27018/mongod.conf
仲裁节点
mkdir -p ~/mongodb/replicaset/rs_27019/log ~/mongodb/replicaset/rs_27019/data/db
vim ~/mongodb/replicaset/rs_27019/mongod.conf
mongod.conf:
# Where and how to store data.
storage:dbPath: /home/cauchy/mongodb/replicaset/rs_27019/data/db# where to write logging data.
systemLog:destination: filelogAppend: truepath: /home/cauchy/mongodb/replicaset/rs_27019/log/mongod.log# network interfaces
net:port: 27019bindIp: 0.0.0.0# how the process runs
processManagement:fork: truetimeZoneInfo: /usr/share/zoneinfopidFilePath: /home/cauchy/mongodb/replicaset/rs_27019/log/mongod.pidreplication:replSetName: rs#sharding:# security:
#   authorization: enabled
sudo mongod -f ~/mongodb/replicaset/rs_27019/mongod.conf
连接节点
- 连接端口(27017)节点,使之成为主节点
mongosh --port=27017
- 初始化副本集
rs.initiate() # 使用默认配置初始化

- 查看副本集信息
使用 rs.conf()、rs.status() 查看相应的信息

可以看到目前副本集中只有一个成员(members),主机(ac34057c51af:27017),仲裁节点(arbiterOnly:false),优先级权值(priority:1),并且当前(27017)节点初始化后变为主节点(primary)。
添加副本从节点
在主节点中添加从节点,将其他成员加入到副本集中
语法:
rs.add(host, arbiterOnly)
| Parameter | Type | Description |
|---|---|---|
| host | string or document | 要添加到副本集的新成员。指定为字符串或配置文档:1)如果是一个字符串,则需要指定新成员的主机名和可选的端口号;2)如果是一个文档,请指定在members数组中找到的副本集成员配置文档。您必须在成员配置文档中指定主机字段。有关文档配置字段的说明,详见下方文档:“主机成员的配置文档” |
| arbiterOnly | boolean | 可选的。仅在值为字符串时适用。如果为true,则添加的主机是仲裁者。 |
主机成员的配置文档:(可通过 rs.conf() 查看)
{_id:<int>,host:<string>,arbiterOnly:<boolean>,buildIndexes:<boolean>,hidden:<boolean>,priority:<number>,tags:<document>,slaveDelay:<int>,votes:<number>
}
- 将27018的副本节点加添加到副本集中
主机名直接用主机成员的配置文档中的即可
rs.add("ac34057c51af:27018", false)

添加仲裁者节点
rs.add(host,arbiterOnly) 或者 rs.addArb(host)
如下添加仲裁节点 rs.addArb("ac34057c51af:27019"):

【错误信息】:【Reconfig attempted to install a config that would change the implicit default write concern. Use the setDefaultRWConcern command to set a cluster-wide write concern and try the reconfig again.】
【解决】:设置全局默认写入关注点,详细的 Write Concern 和 Read Concern 可参考官网文档。
-
以下操作将全局写入关注设置为:
w: 2
db.adminCommand({"setDefaultRWConcern" : 1,"defaultWriteConcern" : {"w" : 2}
})
设置完成后,再次执行:
rs.addArb("ac34057c51af:27019")

删除节点
从副本集中删除节点
rs.remove(host)
副本集读写操作
- 主节点
use test
db.comment.insert({userid: "001", username: "cauchy", content: "专家有言:早上空腹不能吃饭", timestamp: new Date()})
成功读写操作:

- 从节点
mongosh --port=27018

目前无法读取任何数据,需要主动承认自己是从节点:
db.getMongo().setReadPref("primaryPreferred")
执行成功,从节点只读不可写:

Read Preference:Read Preference — MongoDB Manual
readPreference 主要控制客户端 driver 从副本集(Replica Set)读数据的时候如何路由,如下图,这个特性可以方便的配置读写分离、就近去读等策略。

读策略各模式:
-
primary:只从 primary 节点读数据(默认模式)
-
primaryPreferred:先主后从。优先从 primary 读取,primary 不可用时从 secondary 读
-
secondary:只从副本集中 secondary 节点读数据
-
secondaryPreferred:先从后主。优先从 secondary 读取,如果 secondary 不可用时就从 primary 读
-
nearest:就近。根据网络距离,就近读取,根据客户端与服务端的 PingTime 实现
副本集中的方法
可以通过 rs.help() 返回副本集功能的基本帮助文档

分片集群
分片是一种跨多台机器分布数据的方法,MongoDB使用分片来支持具有非常大的数据集和高吞吐量操作的部署。
换句话说:分片就是将数据拆分,将其分散到不同的机器上的过程。
-
分片包含的组件
- 分片(存储):每个分片包含分片数据的子集。每个分片都可以部署为副本集。
- mongos(路由):mongos充当查询路由器,在客户端应用程序和分片集群之间提供接口。
- config servers("调度"的配置):配置服务器存储群集的元数据和配置设置。

分片集群架构目标

第一个副本集
- 创建存放数据和日志的目录
mkdir -p ~/mongodb/sharded_cluster/shardrs_01_27018/data/db ~/mongodb/sharded_cluster/shardrs_01_27018/log
mkdir -p ~/mongodb/sharded_cluster/shardrs_01_27118/data/db ~/mongodb/sharded_cluster/shardrs_01_27118/log
mkdir -p ~/mongodb/sharded_cluster/shardrs_01_27218/data/db ~/mongodb/sharded_cluster/shardrs_01_27218/log
- 新建或修改配置文件
vim ~/mongodb/sharded_cluster/shardrs_01_27018/mongod.conf
vim ~/mongodb/sharded_cluster/shardrs_01_27118/mongod.conf
vim ~/mongodb/sharded_cluster/shardrs_01_27218/mongod.conf
shardrs_01_27018/mongod.conf
# mongod.conf# for documentation of all options, see:
#   http://docs.mongodb.org/manual/reference/configuration-options/# Where and how to store data.
storage:dbPath: /home/cauchy/mongodb/sharded_cluster/shardrs_01_27018/data/db
#  engine:
#  wiredTiger:# where to write logging data.
systemLog:destination: filelogAppend: truepath: /home/cauchy/mongodb/sharded_cluster/shardrs_01_27018/log/mongod.log# network interfaces
net:port: 27018bindIp: 0.0.0.0# how the process runs
processManagement:fork: truetimeZoneInfo: /usr/share/zoneinfopidFilePath: /home/cauchy/mongodb/sharded_cluster/shardrs_01_27018/log/mongod.pid# security:
#   authorization: enabled#operationProfiling:replication:replSetName: shardrs_01sharding:clusterRole: shardsvr#sharding:## Enterprise-Only Options:#auditLog:
shardrs_01_27118/mongod.confshardrs_01_27218/mongod.conf
同理修改即可。
第二个副本集
mkdir -p ~/mongodb/sharded_cluster/shardrs_02_27318/data/db ~/mongodb/sharded_cluster/shardrs_02_27318/log
mkdir -p ~/mongodb/sharded_cluster/shardrs_02_27418/data/db ~/mongodb/sharded_cluster/shardrs_02_27418/log
mkdir -p ~/mongodb/sharded_cluster/shardrs_02_27518/data/db ~/mongodb/sharded_cluster/shardrs_02_27518/log
vim ~/mongodb/sharded_cluster/shardrs_02_27318/mongod.conf
vim ~/mongodb/sharded_cluster/shardrs_02_27418/mongod.conf
vim ~/mongodb/sharded_cluster/shardrs_02_27518/mongod.conf
shardrs_02_27318/mongod.conf
# mongod.conf# for documentation of all options, see:
#   http://docs.mongodb.org/manual/reference/configuration-options/# Where and how to store data.
storage:dbPath: /home/cauchy/mongodb/sharded_cluster/shardrs_02_27318/data/db
#  engine:
#  wiredTiger:# where to write logging data.
systemLog:destination: filelogAppend: truepath: /home/cauchy/mongodb/sharded_cluster/shardrs_02_27318/log/mongod.log# network interfaces
net:port: 27318bindIp: 0.0.0.0# how the process runs
processManagement:fork: truetimeZoneInfo: /usr/share/zoneinfopidFilePath: /home/cauchy/mongodb/sharded_cluster/shardrs_02_27318/log/mongod.pid# security:
#   authorization: enabled#operationProfiling:replication:replSetName: shardrs_02sharding:clusterRole: shardsvr#sharding:## Enterprise-Only Options:#auditLog:
shardrs_02_27418/mongod.confshardrs_02_27518/mongod.conf
同理修改即可。
配置集
mkdir -p ~/mongodb/sharded_cluster/configrs_27019/data/db ~/mongodb/sharded_cluster/configrs_27019/log
mkdir -p ~/mongodb/sharded_cluster/configrs_27119/data/db ~/mongodb/sharded_cluster/configrs_27119/log
mkdir -p ~/mongodb/sharded_cluster/configrs_27219/data/db ~/mongodb/sharded_cluster/configrs_27219/log
configrs_27019/mongod.conf
# mongod.conf# for documentation of all options, see:
#   http://docs.mongodb.org/manual/reference/configuration-options/# Where and how to store data.
storage:dbPath: /home/cauchy/mongodb/sharded_cluster/configrs_27019/data/db
#  engine:
#  wiredTiger:# where to write logging data.
systemLog:destination: filelogAppend: truepath: /home/cauchy/mongodb/sharded_cluster/configrs_27019/log/mongod.log# network interfaces
net:port: 27019bindIp: 0.0.0.0# how the process runs
processManagement:fork: truetimeZoneInfo: /usr/share/zoneinfopidFilePath: /home/cauchy/mongodb/sharded_cluster/configrs_27019/log/mongod.pid# security:
#   authorization: enabled#operationProfiling:replication:replSetName: configrssharding:clusterRole: configsvr## Enterprise-Only Options:#auditLog:
configrs_27119/mongod.confconfigrs_27219/mongod.conf
同理修改即可。
初始化副本集
-
两个副本集的初始化,和上文副本集中,连接节点处讲解一致
-
配置集没有仲裁节点,将两个节点以从节点的方式加入即可
路由集
mongos服务,不是mongod服务
- 仅需要创建日志目录
mkdir -p ~/mongodb/sharded_cluster/mongos_27017/log
mkdir -p ~/mongodb/sharded_cluster/mongos_27117/log
- 新建或修改配置文件
vim ~/mongodb/sharded_cluster/mongos_27017/mongos.conf
vim ~/mongodb/sharded_cluster/mongos_27117/mongos.conf
mongos_27017/mongos.conf
# where to write logging data.
systemLog:destination: filelogAppend: truepath: /home/cauchy/mongodb/sharded_cluster/mongos_27017/log/mongod.log# network interfaces
net:port: 27017bindIp: 0.0.0.0# how the process runs
processManagement:fork: truetimeZoneInfo: /usr/share/zoneinfopidFilePath: /home/cauchy/mongodb/sharded_cluster/mongos_27017/log/mongod.pid# security:
#   authorization: enabled#operationProfiling:# replication:sharding:configDB: configrs/ac34057c51af:27019,ac34057c51af:27119,ac34057c51af:27219#sharding:## Enterprise-Only Options:#auditLog:
mongos_27117/mongos.conf
# where to write logging data.
systemLog:destination: filelogAppend: truepath: /home/cauchy/mongodb/sharded_cluster/mongos_27117/log/mongod.log# network interfaces
net:port: 27117bindIp: 0.0.0.0# how the process runs
processManagement:fork: truetimeZoneInfo: /usr/share/zoneinfopidFilePath: /home/cauchy/mongodb/sharded_cluster/mongos_27117/log/mongod.pid# security:
#   authorization: enabled#operationProfiling:# replication:sharding:configDB: configrs/ac34057c51af:27019,ac34057c51af:27119,ac34057c51af:27219#sharding:## Enterprise-Only Options:#auditLog:
- 启动路由节点 mongos 服务
sudo mongos -f ~/mongodb/sharded_cluster/mongos_27017/mongos.conf
sudo mongos -f ~/mongodb/sharded_cluster/mongos_27117/mongos.conf
此时路由还不能找到分片,要添加分片到路由中。
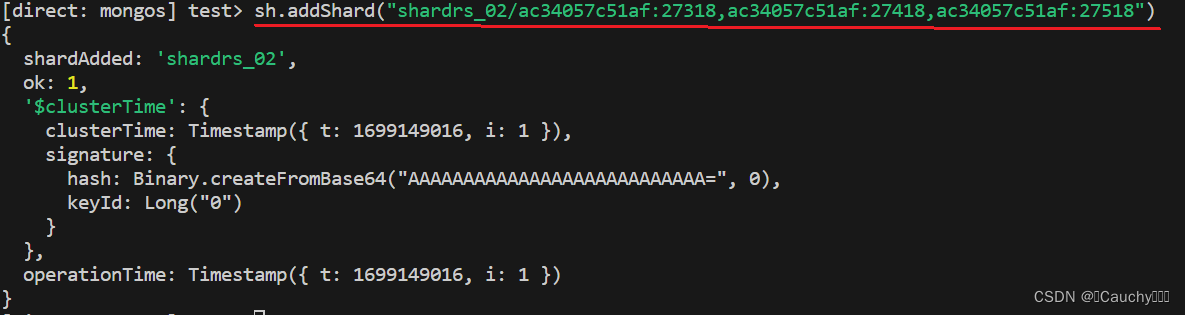
添加分片
语法:
sh.addShard("IP:Port")
- 添加第一套副本集

- 添加第二套副本集
开启分片
sh.enableSharding("库名") 需要先对对库开启分片功能

集合分片
对集合分片,必须使用 sh.shardCollection() 方法指定集合和分片键
-
片键(Shard Key)是每条记录都必须包含的,且建立了索引的单个字段或复合字段,MongoDB 按照片键将数据划分到不同的数据块中,并将数据块均衡地分布到所有分片中。
- MongoDB 使用基于哈希的分片方式(随机平均分配)或者基于范围的分片方式(数值大小分配)
语法:
sh.shardCollection(namespace,key,unique)
| Parameter | Type | Description |
|---|---|---|
| namespace | string | 要(分片)共享对目标集合对命名空间,格式:<database>.<collection> |
| key | document | 用作分片键的索引规范文档。shard键决定MongoDB如何在shard之间分发文档。除非集合为空,否则索引必须在shard collection命令之前存在。如果集合为空,则MongoDB在对集合进行分片之前创建索引,前提是支持分片键的索引不存在。简单来说:由包含字段和该字段的索引遍历方向的文档组成。 |
| unique | boolean | 当值为true,片键字段上会限制为确保是唯一索引,哈希策略片键不支持唯一索引,默认为false |
测试 test_db 库的 comment 集合,以 username 为键,以哈希策略来分片:
sh.shardCollection("test_db.comment", {"username": "hashed"})

- 分片规则一:哈希策略
对于基于哈希的分片,MongoDB 计算一个学段的哈希值,并用这个哈希值来创建数据块。
在使用基于哈希分片的系统中,拥有"相近"片键的文档很可能不会存储在同一个数据块中,因此数据的分离性更好一些
测试哈希策略:
for(var i=0;i<1000;i++){db.comment.insert({userid: i, username: "cauchy"+i})}

在分片1中查看:
mongosh --port=27018
use test_db
db.comment.countDocuments()

在分片2中查看:

- 分片规则二:范围策略
对于基于范围的分片,MongoDB按照片键的范围把数据分成不同部分。假设有一个数字的片键想象一个从负无穷到正无穷的直线,每一个片键的值都在直线上画了一个点。MongoDB 把这条直线划分为更短的不重叠的片段,并称之为数据块,每个数据块包含了片键在一定范围内的数据。
在使用片键做范围划分的系统中,拥有相近"片键的文档很可能存储诸在同一个数据块中,因此也会存储在同一个分片中。
sh.shardCollection("test_db.author", {"age": 1})

删除分片
use config
db.databases.remove({"_id": "test_db"})
db.shards.remove({_id: "shardrs_01"})
db.shards.remove({_id: "shardrs_02"})
安全认证
MongoDB用户和角色权限
参考上篇博客
副本集安全认证
创建副本集认证的key文件

- 生成一个key文件到当前文件夹中
可以使用任何方法生成密钥文件。例如,以下操作使用 openssl 生成密码文件,然后使用 chmod 来更改文件权限
仅为文件所有者提供读取权限:
openssl rand -base64 128 > ./mongo.keyfile
chmod 400 ./mongo.keyfile
所有副本集节点都必须要用同一份keyfile,一般是在一台机器上生成,然后拷贝到其他机器上,且必须有读的权
限。
一定要保证密钥文件一致,文件位置随便。但是为了方便查找,建议每台机器都防放到一个固定的位置,都防放到和配
置文件一起的目录中。
- 将该文件分别拷贝到多个目录中
cp mongo.keyfile ~/mongodb/replicaset/rs_27017
cp mongo.keyfile ~/mongodb/replicaset/rs_27018
cp mongo.keyfile ~/mongodb/replicaset/rs_27019
修改配置文件指定keyfile
...
security:keyFile: /home/cauchy/mongodb/replicaset/rs_27017/mongo.keyfileauthorization: enabled
...
...
security:keyFile: /home/cauchy/mongodb/replicaset/rs_27018/mongo.keyfileauthorization: enabled
...
...
security:keyFile: /home/cauchy/mongodb/replicaset/rs_27019/mongo.keyfileauthorization: enabled
...
分片集群安全认证
每个节点上都要添加 keyfile,其他步骤同副本集一样。
参考:https://www.bilibili.com/video/BV1bJ411x7mq
相关文章:
【MongoDB】集群搭建实战 | 副本集 Replica-Set | 分片集群 Shard-Cluster | 安全认证
文章目录 MongoDB 集群架构副本集主节点选举原则搭建副本集主节点从节点仲裁节点 连接节点添加副本从节点添加仲裁者节点删除节点 副本集读写操作副本集中的方法 分片集群分片集群架构目标第一个副本集第二个副本集配置集初始化副本集路由集添加分片开启分片集合分片删除分片 安…...
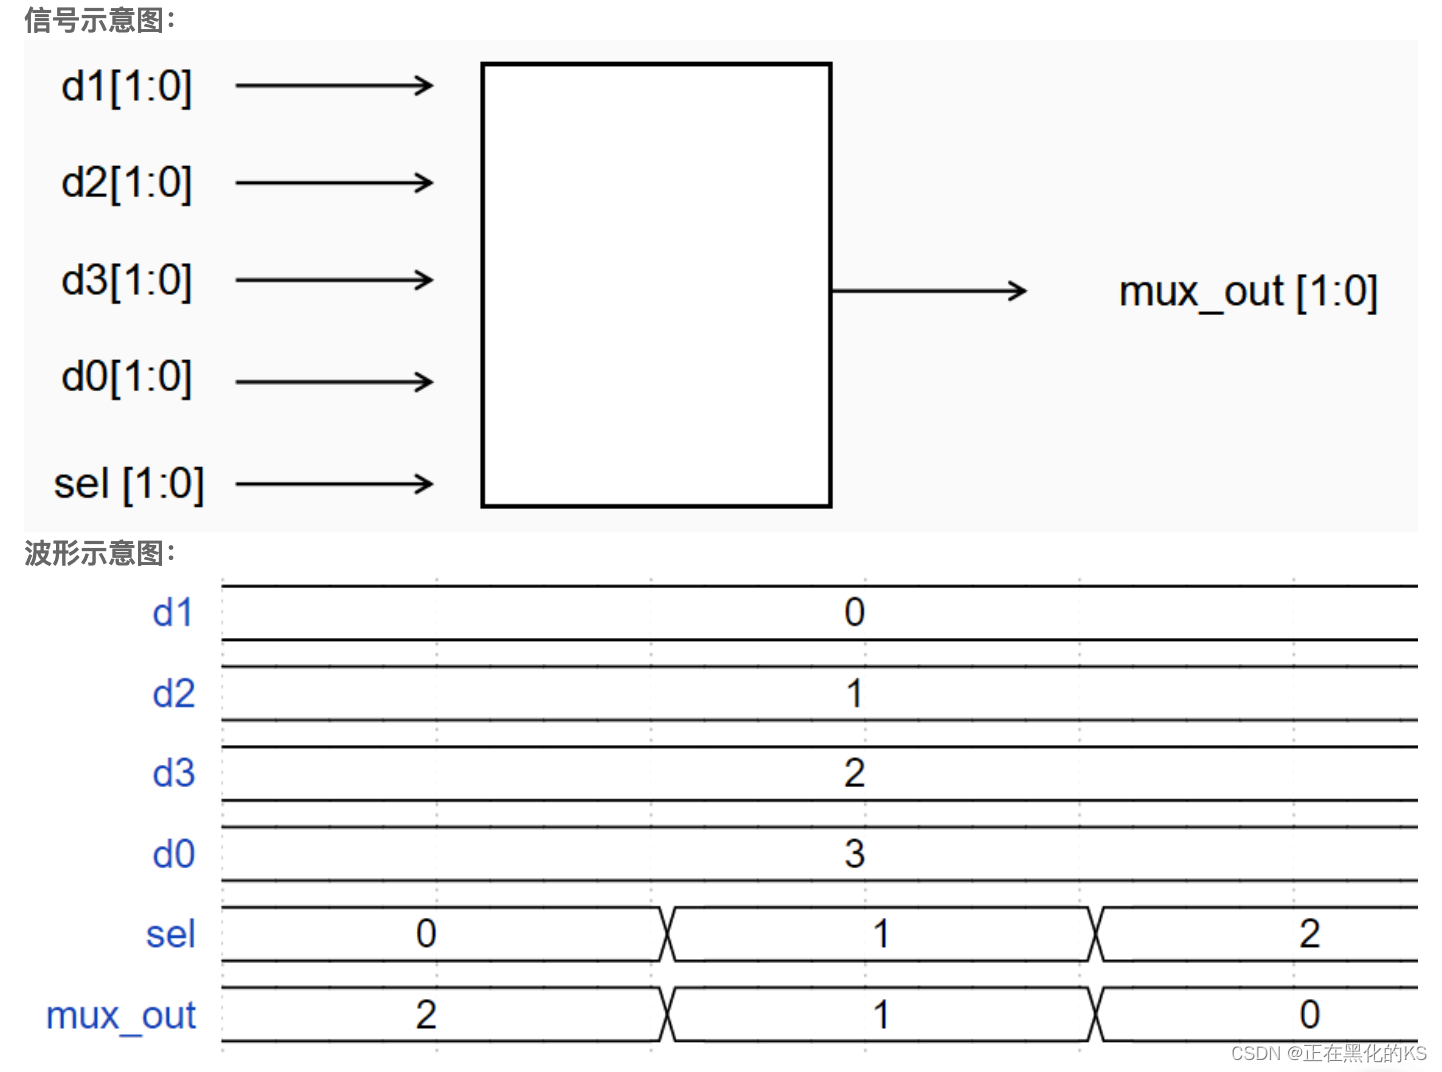
「Verilog学习笔记」四选一多路器
专栏前言 本专栏的内容主要是记录本人学习Verilog过程中的一些知识点,刷题网站用的是牛客网 分析 通过波形示意图我们可以发现,当sel为0,1,2时,输出mux_out分别为d3,d2,d1,那么sel3…...
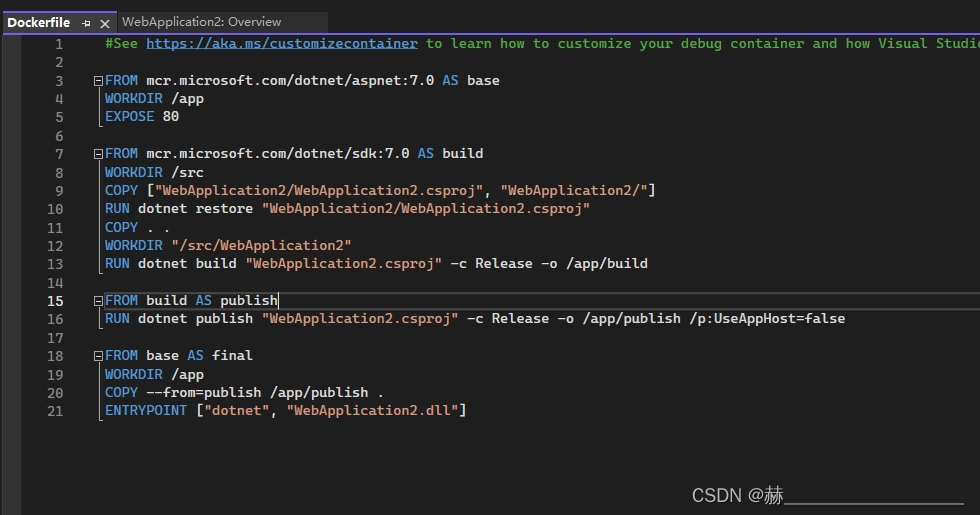
asp.net 创建docker容器
首先创建asp.net web api 创建完成后如下图 添加docker支持 添加docker支持 添加linux docker支持...

Linux项目自动化构建工具-make/Makefile使用
make/Makefile使用介绍 make是一个命令makefile是一个在当前目录下存在的一个具有特定格式的文本文件 下面我们设计一个场景,实现make命令对我们code.c文件进行编译和删除。 1 #include<stdio.h> 2 3 int main() 4 { 5 printf("hello,world!…...
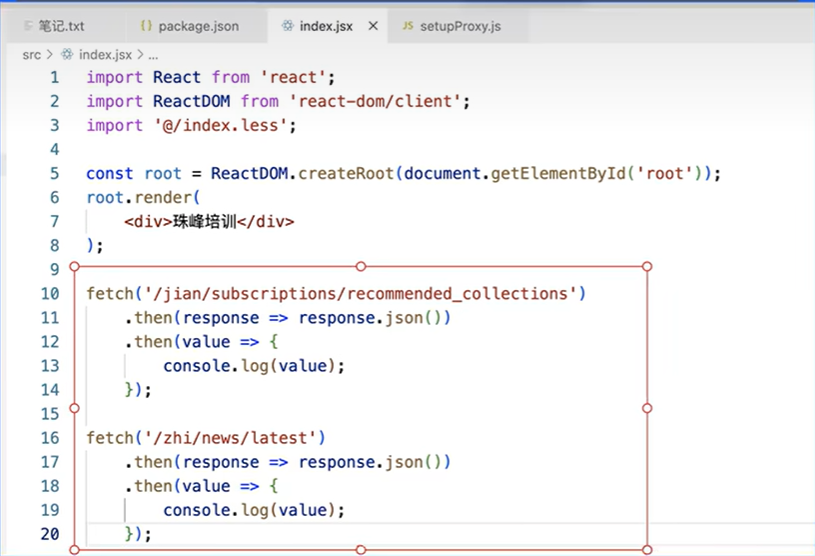
【React】03.脚手架的进阶应用
文章目录 暴露webpack配置暴露前后的区别config文件夹:scripts文件夹:package.json 常见的配置修改1.把sass改为less2.配置别名3.修改域名和端口号4.修改浏览器兼容5.处理Proxy跨域 2023年最新珠峰React全家桶【react基础-进阶-项目-源码-淘系-面试题】 …...
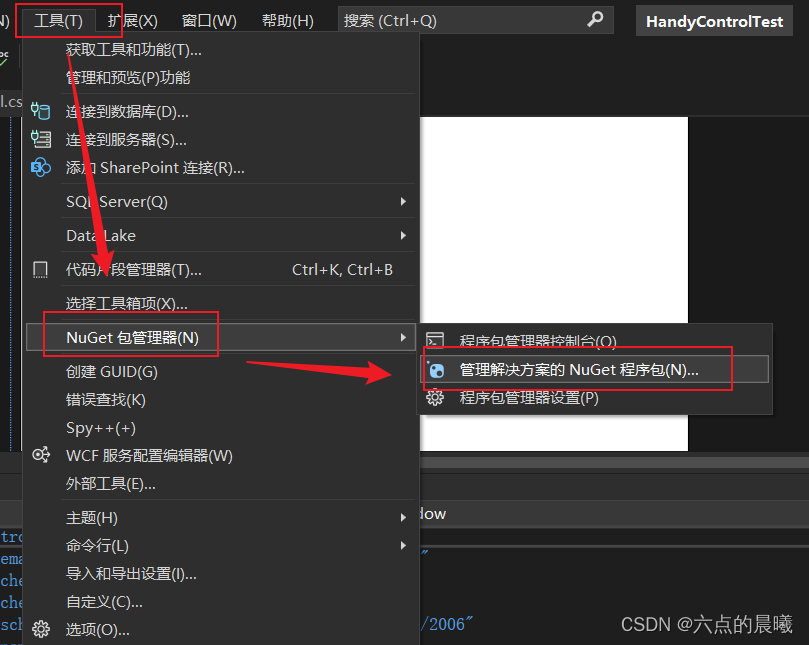
WPF开源控件HandyControl——零基础教程
学习Handycontrol的过程中,为后边快速开发,写的零基础教程,尽量看完就可以实践! 参考教程 中文文档:欢迎使用HandyControl | HandyOrg Github代码:https://github.com/HandyOrg/HandyControl 使用教程:WPF-HandyControl安装和使用 - 掘金 安装配置教程 创建wpf项目 …...
chinese-stable-diffusion中文场景文生图prompt测评集合
腾讯混元大模型文生图操作指南.dochttps://mp.weixin.qq.com/s/u0AGtpwm_LmgnDY7OQhKGg腾讯混元大模型再进化,文生图能力重磅上线,这里是一手实测腾讯混元的文生图在人像真实感、场景真实感上有比较明显的优势,同时,在中国风景、动…...

K-均值聚类算法
K-均值聚类算法是一种常用的无监督学习算法,目的是将一组数据点分为 K 个聚类。它的主要思想是通过迭代的方式不断调整聚类中心的位置,使得数据点与最近的聚类中心之间的距离最小。 算法步骤如下: 初始化 K 个聚类中心,可以随机…...

Xbox漫游指南
以Xbox series s为例 开机启动 用手柄连接,注意两颗电池要方向相反插入,虽然里面2个插槽长一样; Xbox APP极其难用,放弃,直接用手柄连接 转区 只需要一个空U盘,大小不限制,格式化为NTPS格式…...

降低毕业论文写作压力的终极指南
亲爱的同学们,时光荏苒,转眼间你们即将踏入毕业生的行列。毕业论文作为本科和研究生阶段的重要任务,不仅是对所学知识的综合运用,更是一次对自己学术能力和专业素养的全面考验。然而,论文写作常常伴随着压力和焦虑&…...
 与SELECT COUNT( 1 ) 区别)
SELECT COUNT( * ) 与SELECT COUNT( 1 ) 区别
在 SQL 中,SELECT COUNT(*) 和 SELECT COUNT(1) 都用于统计符合条件的行数,但它们在具体实现和效率上有一些区别。 SELECT COUNT(*):这是一种常见且通用的写法,它会统计所有符合查询条件的行数,包括所有列,…...

[python 刷题] 1248 Count Number of Nice Subarrays
[python 刷题] 1248 Count Number of Nice Subarrays 题目如下: Given an array of integers nums and an integer k. A continuous subarray is called nice if there are k odd numbers on it. Return the number of nice sub-arrays. 这道题和 1343 Number of S…...
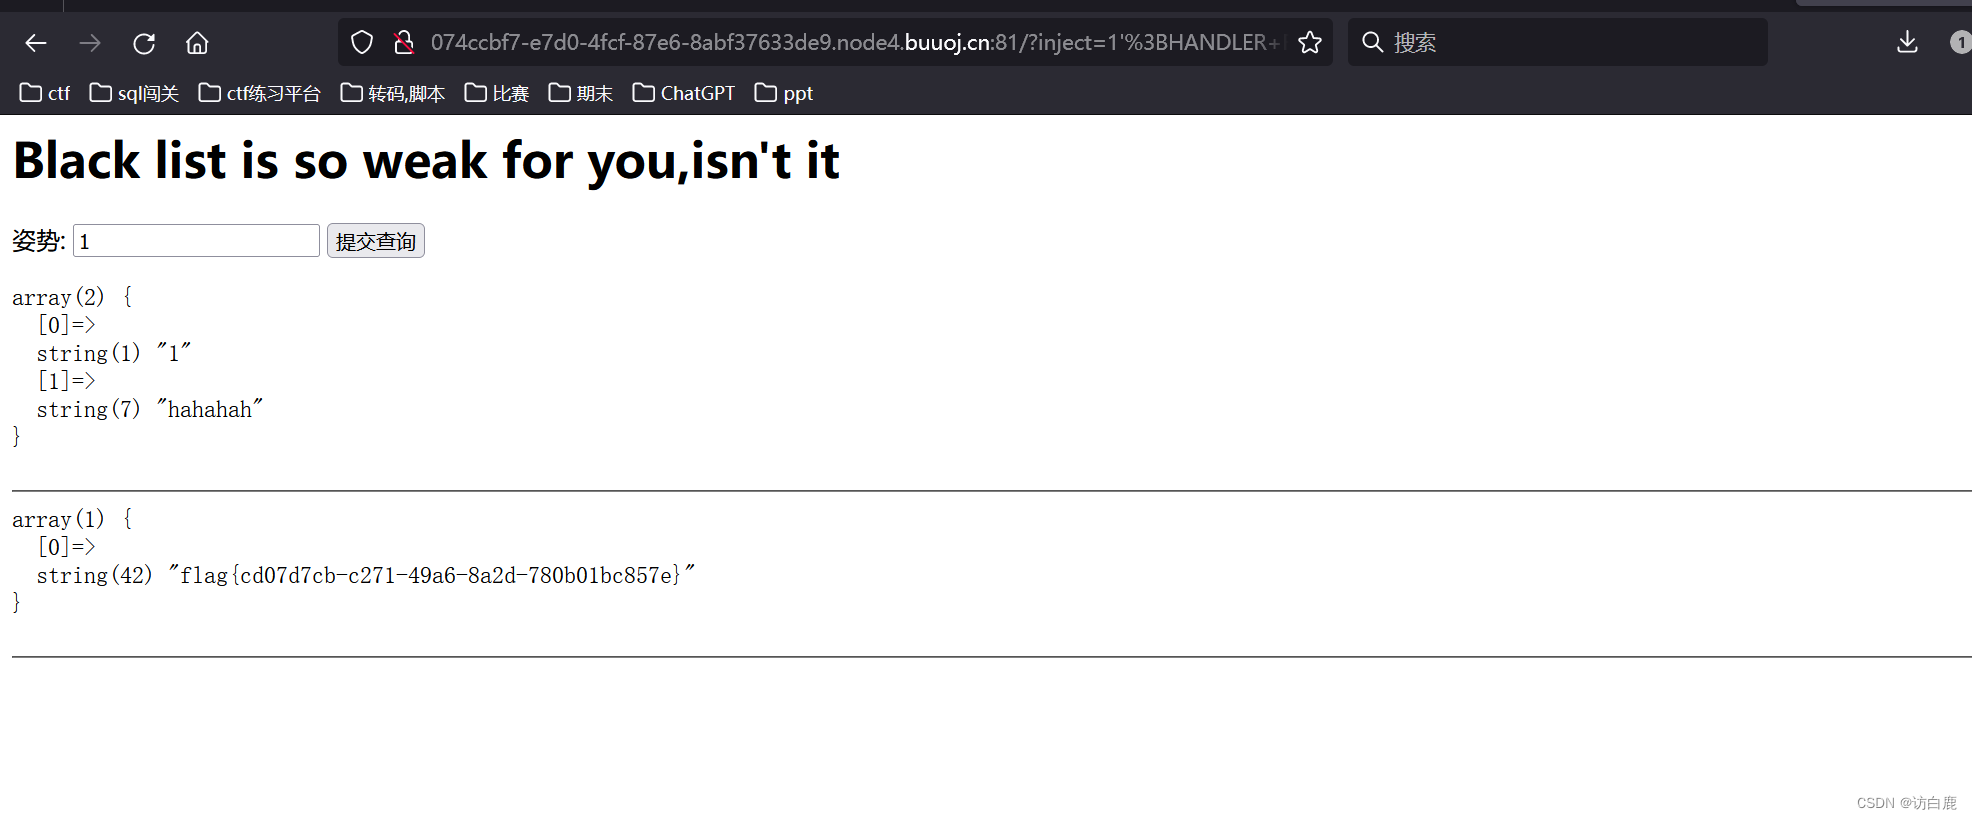
堆叠注入 [GYCTF2020]Blacklist1
打开题目 判断注入点 输入1,页面回显 输入1 页面报错 输入 1 # 页面正常,说明是单引号的字符型注入 我们输入1; show databases; # 说明有6个数据库 1; show tables; # 说明有三个表 我们直接查看FlagHere的表结构 1;desc FlagHere;# 发…...

算法:Java构建二叉树并递归实现二叉树的前序、中序、后序遍历
先自定义一下二叉树的类: // Definition for a binary tree node. public class TreeNode {int val;TreeNode left;TreeNode right;TreeNode() {}TreeNode(int val) { this.val val; }TreeNode(int val, TreeNode left, TreeNode right) {this.val val;this.left…...

既然有了字节流,为什么还要有字符流?
字符流和字节流之间的区别主要在于它们处理数据的方式和用途: 字节流:字节流以字节为单位进行数据的读取和写入,适用于处理二进制数据,如图像、音频和视频文件。字节流是处理底层数据的理想选择,它不会对数据进行编码…...
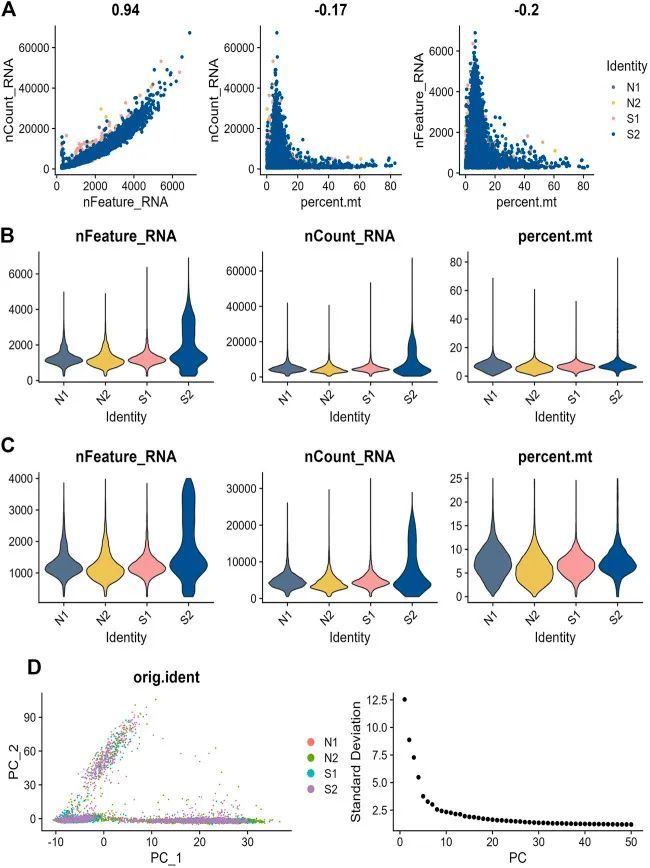
3+单细胞+代谢+WGCNA+机器学习
今天给同学们分享一篇生信文章“Identification of new co-diagnostic genes for sepsis and metabolic syndrome using single-cell data analysis and machine learning algorithms”,这篇文章发表Front Genet.期刊上,影响因子为3.7。 结果解读&#x…...
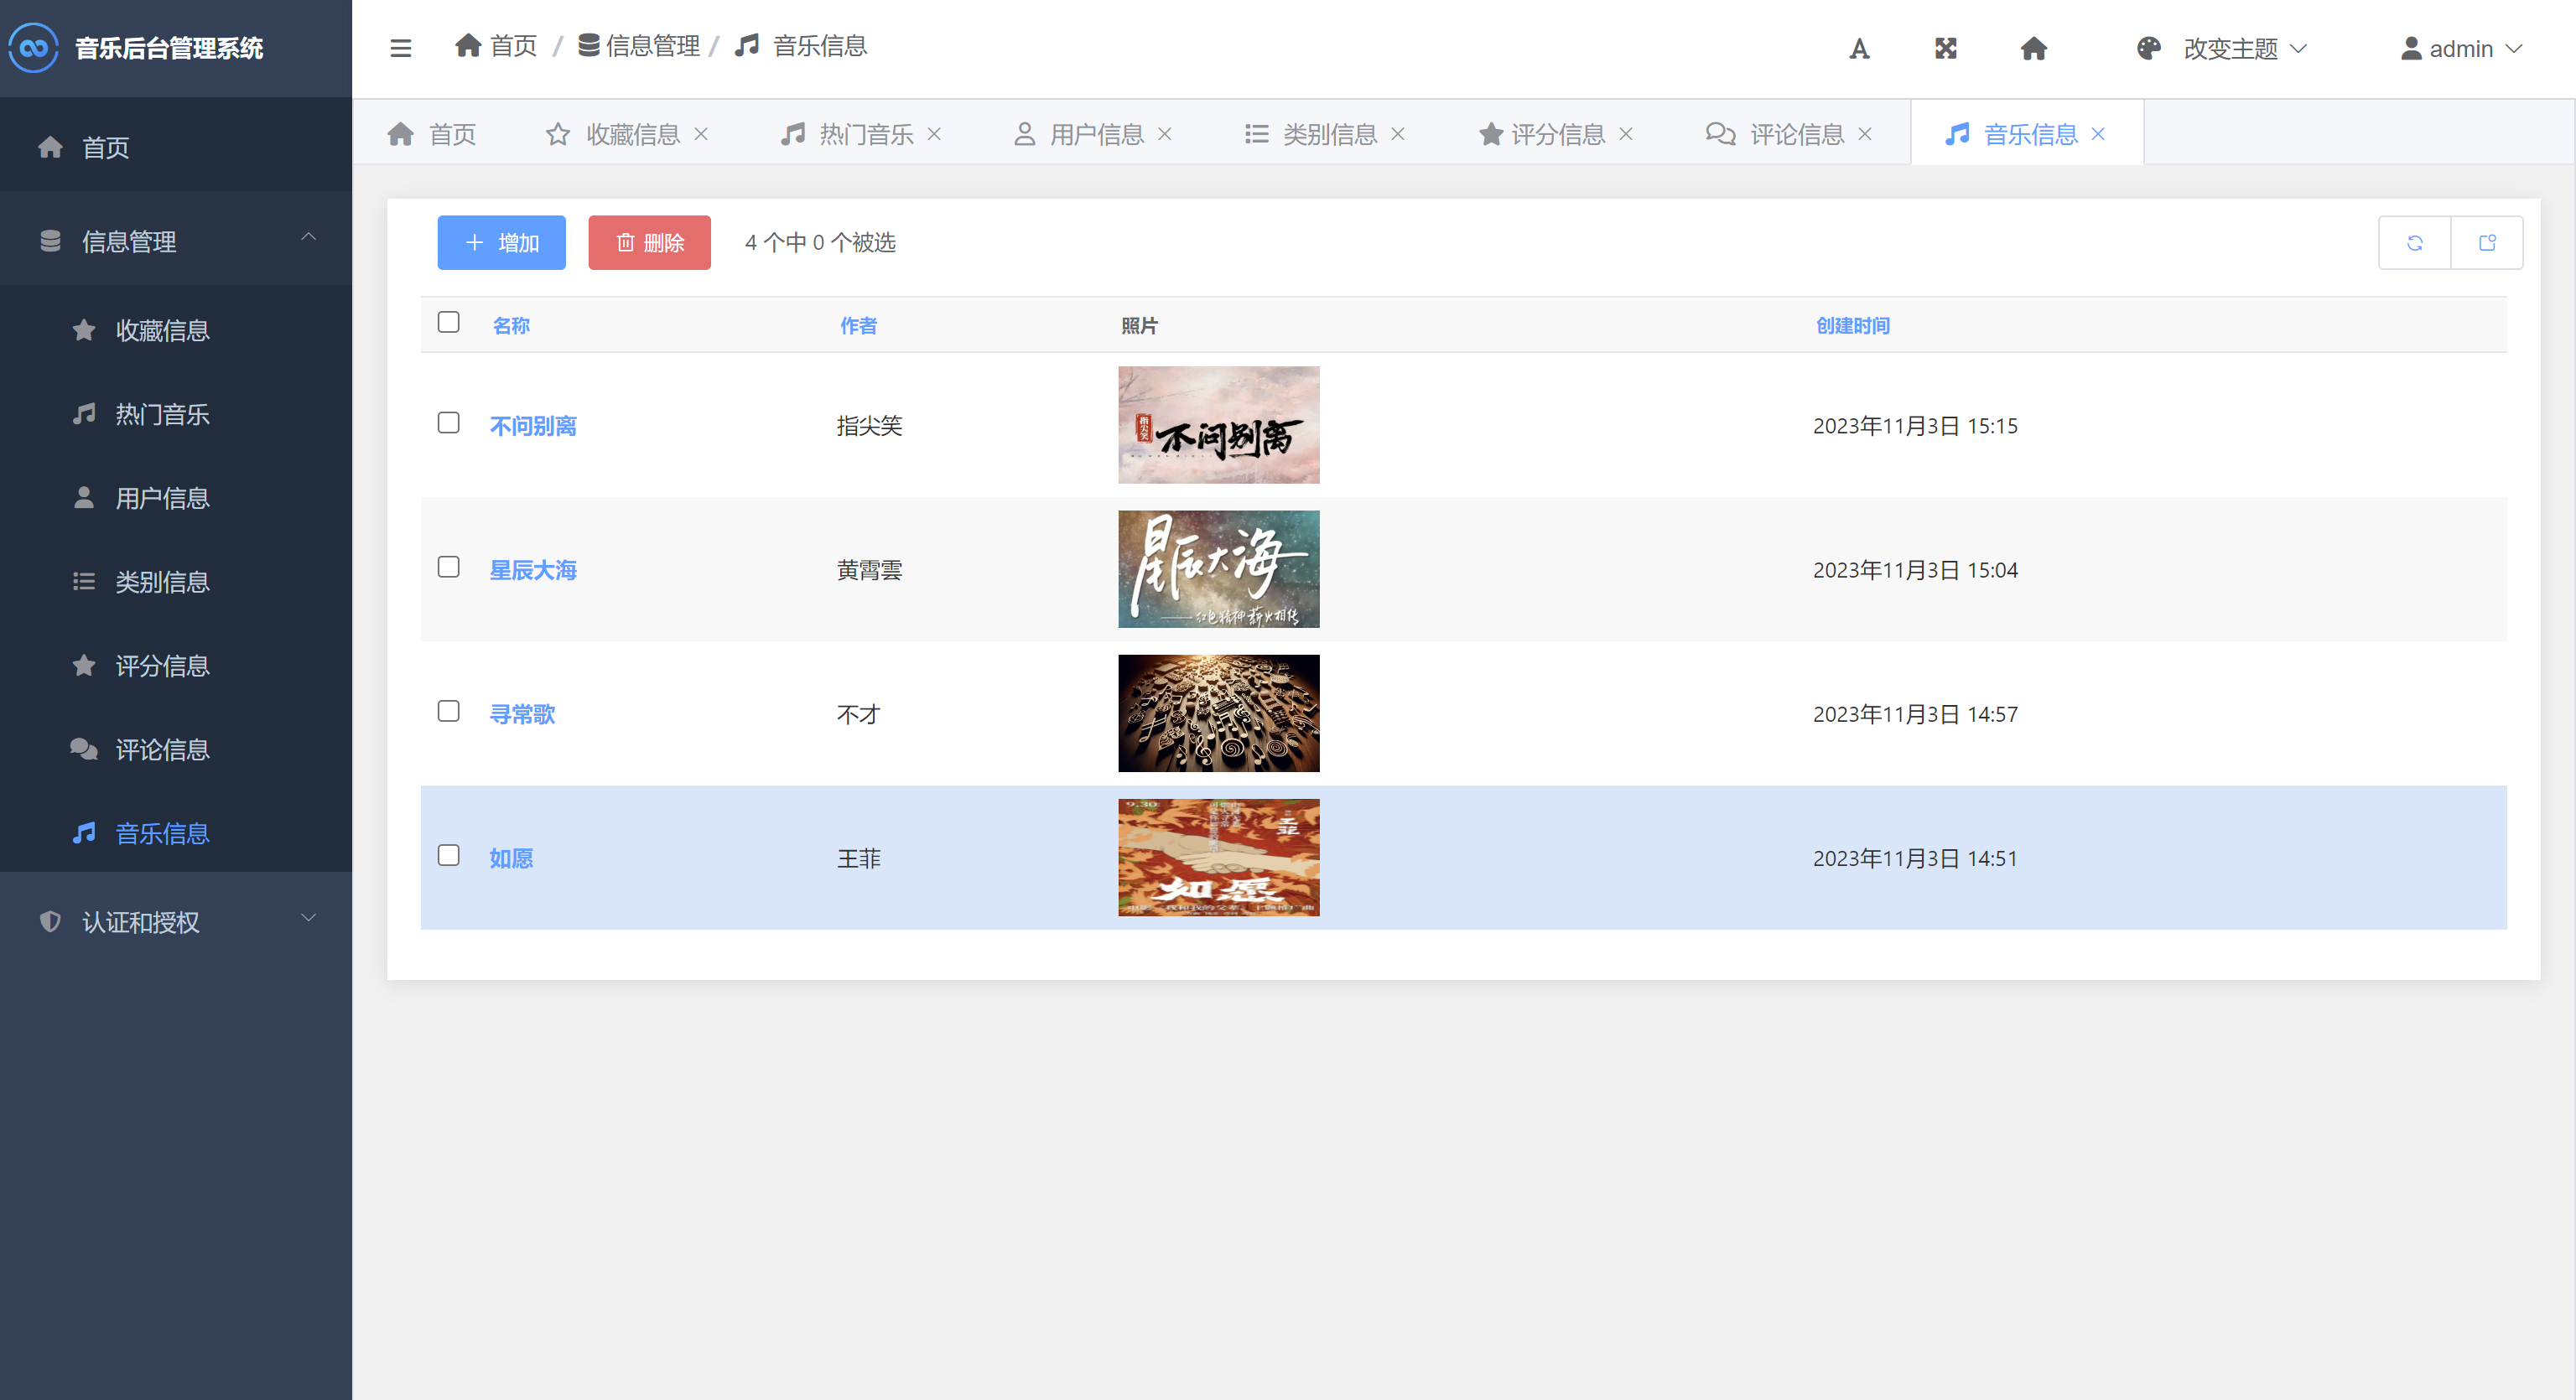
音乐推荐与管理系统Python+Django网页界面+协同过滤推荐算法
一、介绍 音乐推荐与管理系统。本系统采用Python作为主要开发语言,前端使用HTML、CSS、BootStrap等技术搭建界面平台,后端使用Django框架处理请求,并基于Ajax等技术实现前端与后端的数据通信。在音乐个性推荐功能模块中采用通过Python编写协…...
You Only Look Once: Unified, Real-Time Object Detection)
(论文阅读15/100)You Only Look Once: Unified, Real-Time Object Detection
文献阅读笔记 简介 题目 You Only Look Once: Unified, Real-Time Object Detection 作者 Joseph Redmon, Santosh Divvala, Ross Girshick, Ali Farhadi 原文链接 https://arxiv.org/pdf/1506.02640.pdf 《You Only Look Once: Unified, Real-Time Object Detection》…...

init进程启动过程
首语 init进程是Android系统中用户空间的第一个进程,进程号为1,是Android系统启动的一个关键步骤,作为第一个进程,它的主要工作是创建Zygote和启动属性服务等。init进程是由多个源文件共同组成的,源码目录在system/co…...
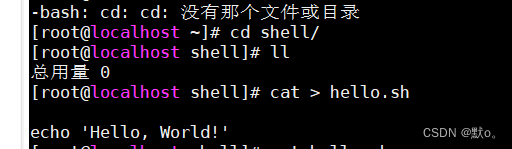
全网最详细的【shell脚本的入门】
🏅我是默,一个在CSDN分享笔记的博主。📚📚 🌟在这里,我要推荐给大家我的专栏《Linux》。🎯🎯 🚀无论你是编程小白,还是有一定基础的程序员,这…...

19c补丁后oracle属主变化,导致不能识别磁盘组
补丁后服务器重启,数据库再次无法启动 ORA01017: invalid username/password; logon denied Oracle 19c 在打上 19.23 或以上补丁版本后,存在与用户组权限相关的问题。具体表现为,Oracle 实例的运行用户(oracle)和集…...

SciencePlots——绘制论文中的图片
文章目录 安装一、风格二、1 资源 安装 # 安装最新版 pip install githttps://github.com/garrettj403/SciencePlots.git# 安装稳定版 pip install SciencePlots一、风格 简单好用的深度学习论文绘图专用工具包–Science Plot 二、 1 资源 论文绘图神器来了:一行…...
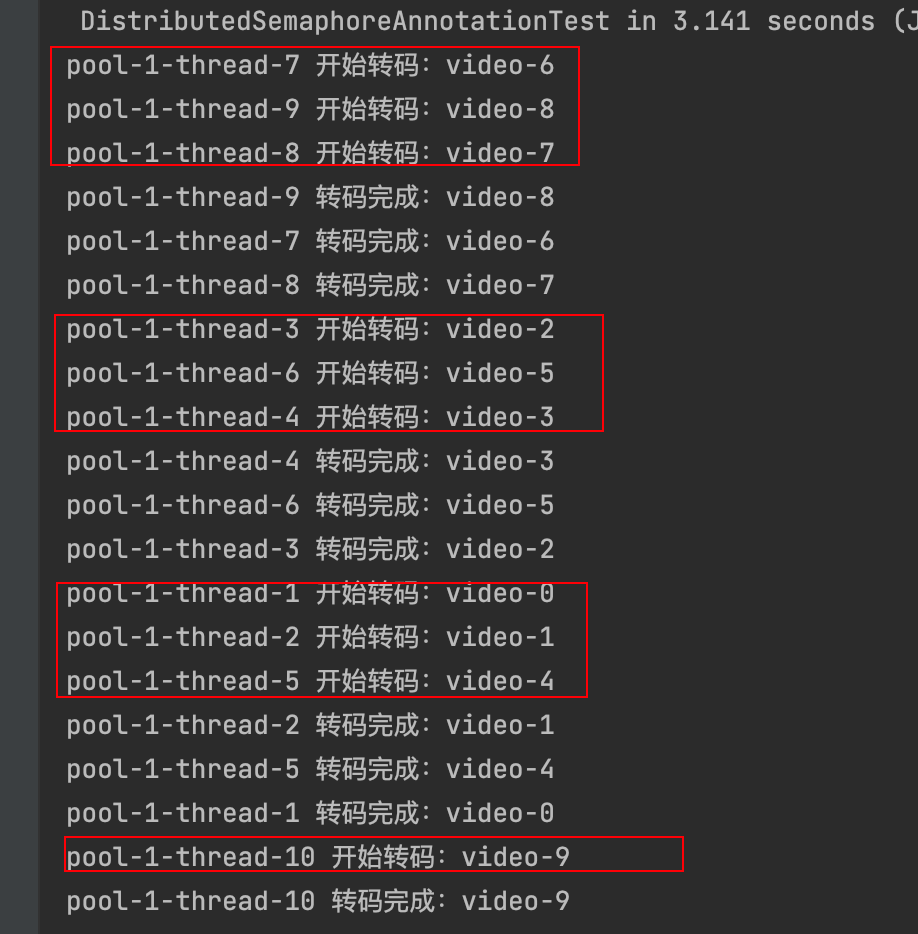
令牌桶 滑动窗口->限流 分布式信号量->限并发的原理 lua脚本分析介绍
文章目录 前言限流限制并发的实际理解限流令牌桶代码实现结果分析令牌桶lua的模拟实现原理总结: 滑动窗口代码实现结果分析lua脚本原理解析 限并发分布式信号量代码实现结果分析lua脚本实现原理 双注解去实现限流 并发结果分析: 实际业务去理解体会统一注…...
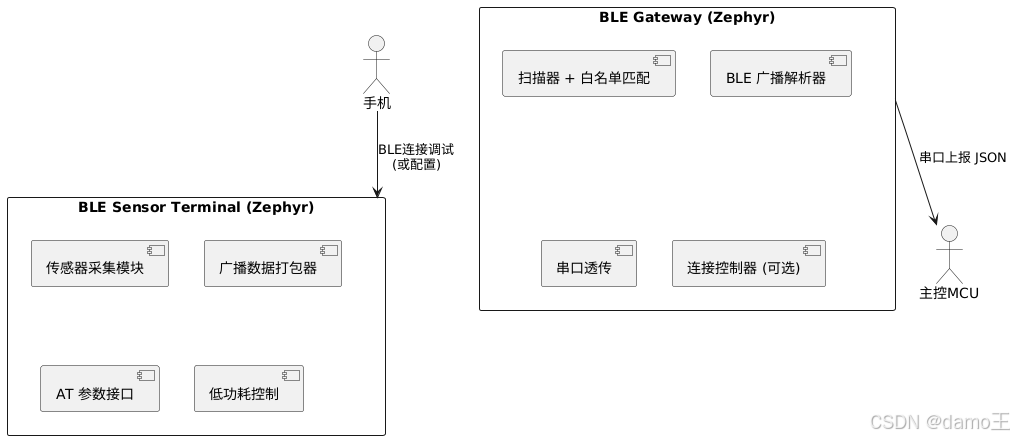
【Zephyr 系列 10】实战项目:打造一个蓝牙传感器终端 + 网关系统(完整架构与全栈实现)
🧠关键词:Zephyr、BLE、终端、网关、广播、连接、传感器、数据采集、低功耗、系统集成 📌目标读者:希望基于 Zephyr 构建 BLE 系统架构、实现终端与网关协作、具备产品交付能力的开发者 📊篇幅字数:约 5200 字 ✨ 项目总览 在物联网实际项目中,**“终端 + 网关”**是…...
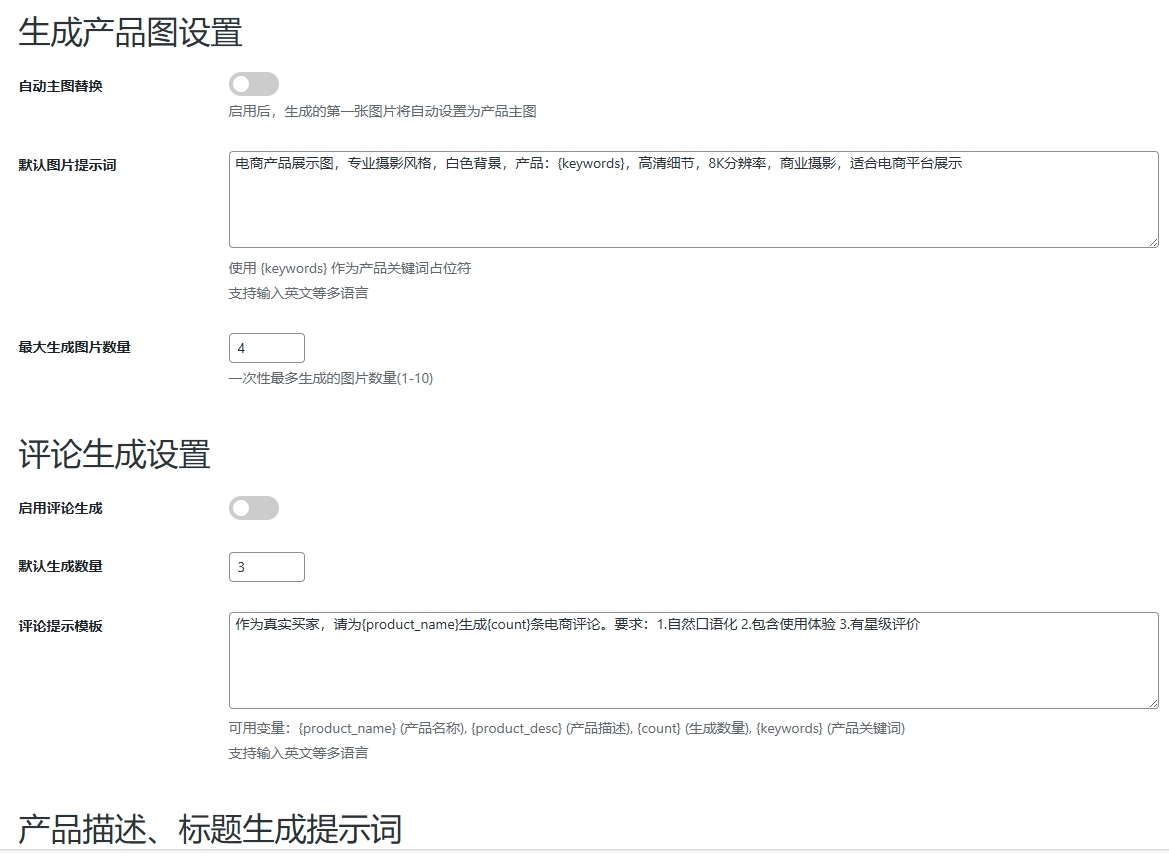
WordPress插件:AI多语言写作与智能配图、免费AI模型、SEO文章生成
厌倦手动写WordPress文章?AI自动生成,效率提升10倍! 支持多语言、自动配图、定时发布,让内容创作更轻松! AI内容生成 → 不想每天写文章?AI一键生成高质量内容!多语言支持 → 跨境电商必备&am…...
Android 之 kotlin 语言学习笔记三(Kotlin-Java 互操作)
参考官方文档:https://developer.android.google.cn/kotlin/interop?hlzh-cn 一、Java(供 Kotlin 使用) 1、不得使用硬关键字 不要使用 Kotlin 的任何硬关键字作为方法的名称 或字段。允许使用 Kotlin 的软关键字、修饰符关键字和特殊标识…...

html-<abbr> 缩写或首字母缩略词
定义与作用 <abbr> 标签用于表示缩写或首字母缩略词,它可以帮助用户更好地理解缩写的含义,尤其是对于那些不熟悉该缩写的用户。 title 属性的内容提供了缩写的详细说明。当用户将鼠标悬停在缩写上时,会显示一个提示框。 示例&#x…...

Golang——6、指针和结构体
指针和结构体 1、指针1.1、指针地址和指针类型1.2、指针取值1.3、new和make 2、结构体2.1、type关键字的使用2.2、结构体的定义和初始化2.3、结构体方法和接收者2.4、给任意类型添加方法2.5、结构体的匿名字段2.6、嵌套结构体2.7、嵌套匿名结构体2.8、结构体的继承 3、结构体与…...

Qt 事件处理中 return 的深入解析
Qt 事件处理中 return 的深入解析 在 Qt 事件处理中,return 语句的使用是另一个关键概念,它与 event->accept()/event->ignore() 密切相关但作用不同。让我们详细分析一下它们之间的关系和工作原理。 核心区别:不同层级的事件处理 方…...

实战三:开发网页端界面完成黑白视频转为彩色视频
一、需求描述 设计一个简单的视频上色应用,用户可以通过网页界面上传黑白视频,系统会自动将其转换为彩色视频。整个过程对用户来说非常简单直观,不需要了解技术细节。 效果图 二、实现思路 总体思路: 用户通过Gradio界面上…...