YoloV8目标检测与实例分割——目标检测onnx模型推理
一、模型转换
1.onnxruntime
ONNX Runtime(ONNX Runtime或ORT)是一个开源的高性能推理引擎,用于部署和运行机器学习模型。它的设计目标是优化执行使用Open Neural Network Exchange(ONNX)格式定义的模型,ONNX是一种用于表示机器学习模型的开放标准。
ONNX Runtime提供了几个关键功能和优势:
-
跨平台兼容性:ONNX Runtime旨在与各种硬件和操作系统平台兼容,包括Windows、Linux以及各种加速器,如CPU、GPU和FPGA。这使得在不同环境中轻松部署和运行模型成为可能。
-
高性能:ONNX Runtime经过性能优化,能够提供低延迟的模型执行。它针对不同的硬件平台进行了优化,以确保模型高效运行。
-
多框架支持:ONNX Runtime可以与使用不同的机器学习框架创建的模型一起使用,包括PyTorch、TensorFlow等,这要归功于其对ONNX格式的支持。
-
模型转换:ONNX Runtime可以将来自支持的框架的模型转换为ONNX格式,从而更容易在各种部署场景中使用这些模型。
-
多语言支持:ONNX Runtime可用于多种编程语言,包括C++、C#、Python等,使其可以被广泛的开发人员使用。
-
自定义运算符:它支持自定义运算符,允许开发人员扩展其功能以支持特定操作或硬件加速。
ONNX Runtime广泛用于各种机器学习应用的生产部署,包括计算机视觉、自然语言处理等。它由ONNX社区积极维护,并持续接受更新和改进。
2. pt模型与onnx模型
.pt 模型和 .onnx 模型是两种不同的模型文件格式,用于表示深度学习模型。它们之间的主要区别包括:
-
文件格式:
- .pt 模型:这是PyTorch框架的权重文件格式,通常以
.pt或.pth扩展名保存。它包含了模型的权重参数和模型结构的定义。这个文件格式是PyTorch特定的。 - .onnx 模型:这是ONNX(Open Neural Network Exchange)格式的模型文件,通常以
.onnx扩展名保存。ONNX是一种中间表示格式,独立于任何特定的深度学习框架,用于跨不同框架之间的模型转换和部署。
- .pt 模型:这是PyTorch框架的权重文件格式,通常以
-
框架依赖:
- .pt 模型:它依赖于PyTorch框架,因此在加载和运行时需要使用PyTorch库。这限制了它在不同框架上的直接使用。
- .onnx 模型:ONNX 模型是独立于深度学习框架的,可以在支持ONNX的不同框架中加载和运行,例如ONNX Runtime、TensorFlow、Caffe2等。
-
跨平台兼容性:
- .pt 模型:它通常需要在不同平台上进行PyTorch的兼容性配置,可能需要额外的工作和依赖处理。
- .onnx 模型:由于ONNX的独立性,更容易在不同平台和硬件上进行部署,无需担心框架依赖性问题。
3.Yolov8 .pt模型转换onnx
如果想跨平台兼容性,.pt 模型要在不同框架中使用或进行跨平台部署,要使用代码或库将其转换为 ONNX 格式。ONNX转换工具可以将PyTorch模型转换为ONNX格式。
from ultralytics import YOLO# load model
model = YOLO('yolov8m.pt')# Export model
success = model.export(format="onnx")
二、模型推理
1.环境部署
onnx模型模型推理只要依赖onnxruntime库,图像处理要依赖opencv,所以只要安装这两个库就行,不用安装过多的依赖。
pip install onnxruntime
pip install opencv-python
pip install numpy
pip install gradio
2.部署代码
utils.py
import numpy as np
import cv2class_names = ['person', 'bicycle', 'car', 'motorcycle', 'airplane', 'bus', 'train', 'truck', 'boat', 'traffic light','fire hydrant', 'stop sign', 'parking meter', 'bench', 'bird', 'cat', 'dog', 'horse', 'sheep', 'cow','elephant', 'bear', 'zebra', 'giraffe', 'backpack', 'umbrella', 'handbag', 'tie', 'suitcase', 'frisbee','skis', 'snowboard', 'sports ball', 'kite', 'baseball bat', 'baseball glove', 'skateboard', 'surfboard','tennis racket', 'bottle', 'wine glass', 'cup', 'fork', 'knife', 'spoon', 'bowl', 'banana', 'apple','sandwich', 'orange', 'broccoli', 'carrot', 'hot dog', 'pizza', 'donut', 'cake', 'chair', 'couch','potted plant', 'bed', 'dining table', 'toilet', 'tv', 'laptop', 'mouse', 'remote', 'keyboard','cell phone', 'microwave', 'oven', 'toaster', 'sink', 'refrigerator', 'book', 'clock', 'vase','scissors', 'teddy bear', 'hair drier', 'toothbrush']# Create a list of colors for each class where each color is a tuple of 3 integer values
rng = np.random.default_rng(3)
colors = rng.uniform(0, 255, size=(len(class_names), 3))def nms(boxes, scores, iou_threshold):# Sort by scoresorted_indices = np.argsort(scores)[::-1]keep_boxes = []while sorted_indices.size > 0:# Pick the last boxbox_id = sorted_indices[0]keep_boxes.append(box_id)# Compute IoU of the picked box with the restious = compute_iou(boxes[box_id, :], boxes[sorted_indices[1:], :])# Remove boxes with IoU over the thresholdkeep_indices = np.where(ious < iou_threshold)[0]# print(keep_indices.shape, sorted_indices.shape)sorted_indices = sorted_indices[keep_indices + 1]return keep_boxesdef multiclass_nms(boxes, scores, class_ids, iou_threshold):unique_class_ids = np.unique(class_ids)keep_boxes = []for class_id in unique_class_ids:class_indices = np.where(class_ids == class_id)[0]class_boxes = boxes[class_indices,:]class_scores = scores[class_indices]class_keep_boxes = nms(class_boxes, class_scores, iou_threshold)keep_boxes.extend(class_indices[class_keep_boxes])return keep_boxesdef compute_iou(box, boxes):# Compute xmin, ymin, xmax, ymax for both boxesxmin = np.maximum(box[0], boxes[:, 0])ymin = np.maximum(box[1], boxes[:, 1])xmax = np.minimum(box[2], boxes[:, 2])ymax = np.minimum(box[3], boxes[:, 3])# Compute intersection areaintersection_area = np.maximum(0, xmax - xmin) * np.maximum(0, ymax - ymin)# Compute union areabox_area = (box[2] - box[0]) * (box[3] - box[1])boxes_area = (boxes[:, 2] - boxes[:, 0]) * (boxes[:, 3] - boxes[:, 1])union_area = box_area + boxes_area - intersection_area# Compute IoUiou = intersection_area / union_areareturn ioudef xywh2xyxy(x):# Convert bounding box (x, y, w, h) to bounding box (x1, y1, x2, y2)y = np.copy(x)y[..., 0] = x[..., 0] - x[..., 2] / 2y[..., 1] = x[..., 1] - x[..., 3] / 2y[..., 2] = x[..., 0] + x[..., 2] / 2y[..., 3] = x[..., 1] + x[..., 3] / 2return ydef draw_detections(image, boxes, scores, class_ids, mask_alpha=0.3):det_img = image.copy()img_height, img_width = image.shape[:2]font_size = min([img_height, img_width]) * 0.0006text_thickness = int(min([img_height, img_width]) * 0.001)det_img = draw_masks(det_img, boxes, class_ids, mask_alpha)# Draw bounding boxes and labels of detectionsfor class_id, box, score in zip(class_ids, boxes, scores):color = colors[class_id]draw_box(det_img, box, color)label = class_names[class_id]caption = f'{label} {int(score * 100)}%'draw_text(det_img, caption, box, color, font_size, text_thickness)return det_imgdef detections_dog(image, boxes, scores, class_ids, mask_alpha=0.3):det_img = image.copy()img_height, img_width = image.shape[:2]font_size = min([img_height, img_width]) * 0.0006text_thickness = int(min([img_height, img_width]) * 0.001)# det_img = draw_masks(det_img, boxes, class_ids, mask_alpha)# Draw bounding boxes and labels of detectionsfor class_id, box, score in zip(class_ids, boxes, scores):color = colors[class_id]draw_box(det_img, box, color)label = class_names[class_id]caption = f'{label} {int(score * 100)}%'draw_text(det_img, caption, box, color, font_size, text_thickness)return det_imgdef draw_box( image: np.ndarray, box: np.ndarray, color: tuple[int, int, int] = (0, 0, 255),thickness: int = 2) -> np.ndarray:x1, y1, x2, y2 = box.astype(int)return cv2.rectangle(image, (x1, y1), (x2, y2), color, thickness)def draw_text(image: np.ndarray, text: str, box: np.ndarray, color: tuple[int, int, int] = (0, 0, 255),font_size: float = 0.001, text_thickness: int = 2) -> np.ndarray:x1, y1, x2, y2 = box.astype(int)(tw, th), _ = cv2.getTextSize(text=text, fontFace=cv2.FONT_HERSHEY_SIMPLEX,fontScale=font_size, thickness=text_thickness)th = int(th * 1.2)cv2.rectangle(image, (x1, y1),(x1 + tw, y1 - th), color, -1)return cv2.putText(image, text, (x1, y1), cv2.FONT_HERSHEY_SIMPLEX, font_size, (255, 255, 255), text_thickness, cv2.LINE_AA)def draw_masks(image: np.ndarray, boxes: np.ndarray, classes: np.ndarray, mask_alpha: float = 0.3) -> np.ndarray:mask_img = image.copy()# Draw bounding boxes and labels of detectionsfor box, class_id in zip(boxes, classes):color = colors[class_id]x1, y1, x2, y2 = box.astype(int)# Draw fill rectangle in mask imagecv2.rectangle(mask_img, (x1, y1), (x2, y2), color, -1)return cv2.addWeighted(mask_img, mask_alpha, image, 1 - mask_alpha, 0)
YOLODet.py
import time
import cv2
import numpy as np
import onnxruntimefrom detection.utils import xywh2xyxy, draw_detections, multiclass_nms,detections_dogclass YOLODet:def __init__(self, path, conf_thres=0.7, iou_thres=0.5):self.conf_threshold = conf_thresself.iou_threshold = iou_thres# Initialize modelself.initialize_model(path)def __call__(self, image):return self.detect_objects(image)def initialize_model(self, path):self.session = onnxruntime.InferenceSession(path,providers=onnxruntime.get_available_providers())# Get model infoself.get_input_details()self.get_output_details()def detect_objects(self, image):input_tensor = self.prepare_input(image)# Perform inference on the imageoutputs = self.inference(input_tensor)self.boxes, self.scores, self.class_ids = self.process_output(outputs)return self.boxes, self.scores, self.class_idsdef prepare_input(self, image):self.img_height, self.img_width = image.shape[:2]input_img = cv2.cvtColor(image, cv2.COLOR_BGR2RGB)# Resize input imageinput_img = cv2.resize(input_img, (self.input_width, self.input_height))# Scale input pixel values to 0 to 1input_img = input_img / 255.0input_img = input_img.transpose(2, 0, 1)input_tensor = input_img[np.newaxis, :, :, :].astype(np.float32)return input_tensordef inference(self, input_tensor):start = time.perf_counter()outputs = self.session.run(self.output_names, {self.input_names[0]: input_tensor})# print(f"Inference time: {(time.perf_counter() - start)*1000:.2f} ms")return outputsdef process_output(self, output):predictions = np.squeeze(output[0]).T# Filter out object confidence scores below thresholdscores = np.max(predictions[:, 4:], axis=1)predictions = predictions[scores > self.conf_threshold, :]scores = scores[scores > self.conf_threshold]if len(scores) == 0:return [], [], []# Get the class with the highest confidenceclass_ids = np.argmax(predictions[:, 4:], axis=1)# Get bounding boxes for each objectboxes = self.extract_boxes(predictions)# Apply non-maxima suppression to suppress weak, overlapping bounding boxes# indices = nms(boxes, scores, self.iou_threshold)indices = multiclass_nms(boxes, scores, class_ids, self.iou_threshold)return boxes[indices], scores[indices], class_ids[indices]def extract_boxes(self, predictions):# Extract boxes from predictionsboxes = predictions[:, :4]# Scale boxes to original image dimensionsboxes = self.rescale_boxes(boxes)# Convert boxes to xyxy formatboxes = xywh2xyxy(boxes)return boxesdef rescale_boxes(self, boxes):# Rescale boxes to original image dimensionsinput_shape = np.array([self.input_width, self.input_height, self.input_width, self.input_height])boxes = np.divide(boxes, input_shape, dtype=np.float32)boxes *= np.array([self.img_width, self.img_height, self.img_width, self.img_height])return boxesdef draw_detections(self, image, draw_scores=True, mask_alpha=0.4):return detections_dog(image, self.boxes, self.scores,self.class_ids, mask_alpha)def get_input_details(self):model_inputs = self.session.get_inputs()self.input_names = [model_inputs[i].name for i in range(len(model_inputs))]self.input_shape = model_inputs[0].shapeself.input_height = self.input_shape[2]self.input_width = self.input_shape[3]def get_output_details(self):model_outputs = self.session.get_outputs()self.output_names = [model_outputs[i].name for i in range(len(model_outputs))]
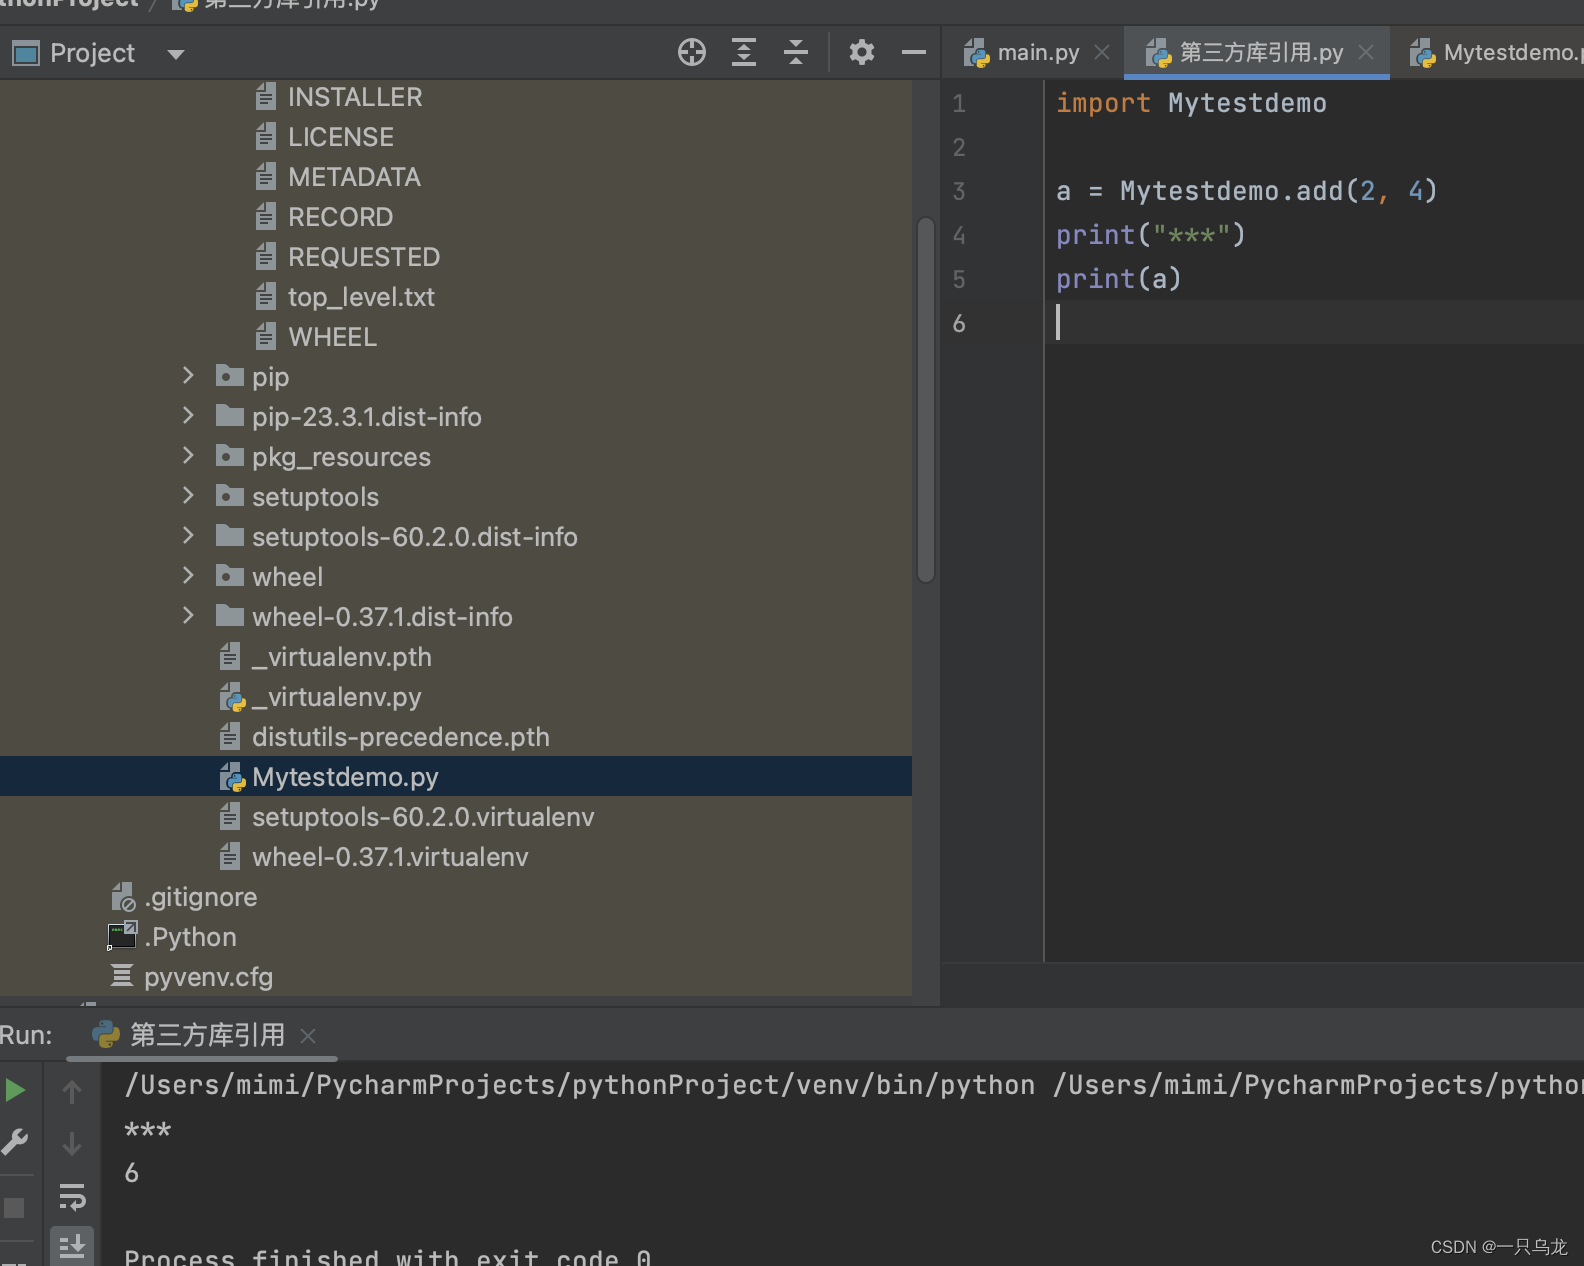
3. 模型测试
图像推理:
import cv2
import numpy as np
from detection import YOLODet
import gradio as grmodel = 'yolov8m.onnx'
yolo_det = YOLODet(model, conf_thres=0.5, iou_thres=0.3)def det_img(cv_src):yolo_det(cv_src)cv_dst = yolo_det.draw_detections(cv_src)return cv_dstif __name__ == '__main__':input = gr.Image()output = gr.Image()demo = gr.Interface(fn=det_img, inputs=input, outputs=output)demo.launch()

视频推理:
def detectio_video(input_path,model_path,output_path):cap = cv2.VideoCapture(input_path)fps = int(cap.get(5))t = int(1000 / fps)videoWriter = Nonedet = YOLODet(model_path, conf_thres=0.3, iou_thres=0.5)while True:# try:_, img = cap.read()if img is None:breakdet(img)cv_dst = det.draw_detections(img)if videoWriter is None:fourcc = cv2.VideoWriter_fourcc('m', 'p', '4', 'v')videoWriter = cv2.VideoWriter(output_path, fourcc, fps, (cv_dst.shape[1], cv_dst.shape[0]))videoWriter.write(cv_dst)cv2.imshow("detection", cv_dst)cv2.waitKey(t)if cv2.getWindowProperty("detection", cv2.WND_PROP_AUTOSIZE) < 1:# 点x退出breakcap.release()videoWriter.release()cv2.destroyAllWindows()
测试结果:
目标检测
相关文章:
YoloV8目标检测与实例分割——目标检测onnx模型推理
一、模型转换 1.onnxruntime ONNX Runtime(ONNX Runtime或ORT)是一个开源的高性能推理引擎,用于部署和运行机器学习模型。它的设计目标是优化执行使用Open Neural Network Exchange(ONNX)格式定义的模型,…...
pcigo图床插件的简单开发
1.前言: 如果想写一个图床并且投入使用,那么,接入picgo一定是一个不错的选择。picgo有着windows,mac,linux等多个客户端版本。实用且方便。 2. 开发的准备: 2.0. 需要安装一个node node这里我就不详细说…...
Find My手机保护壳|苹果Find My与手机保护壳结合,智能防丢,全球定位
随着科技水平的快速发展,科技美容这一行业做为新型产业新生而出。时尚IT品牌随着市场的多元化发展。针对手机品牌和功能的增加而呈多样化,将手机保护壳按质地分有PC壳,皮革 ,硅胶,布料,硬塑,皮套…...

encode和decode的区别
字节序列和字符串是Python中两种不同的数据类型,它们的主要区别在于表示和处理方式! 字节序列(Bytes): 字节序列是一种二进制数据类型,它由一系列字节组成。字节是计算机存储信息的基本单位,每…...

建设项目管理中的 5 大预算挑战
为建设项目管理制定可靠、准确的预算是一项艰巨的任务,对于中小型建筑企业来说尤其如此。预算必须精确,同时还要考虑到每项工作的独特性和复杂性。 一项建筑行业相关调查统计了参与施工预算流程的人员所面临的最大挑战,分别是时间、预算、不…...

vue2 集成 - 超图-SuperMap iClient3D for WebGL
1:下载SuperMap iClient3D for WebGL SuperMap iClient3D for WebGL产品包 打开资源目录如下 2:格式化项目中所用的依赖包 开发指南 从超图官网下载SuperMap iClient3D 11i (2023) SP1 for WebGL_CN.zip解压后,将Build目录下的SuperMap3D复制到项目中 \public\static…...

FPGA设计过程中有关数据之间的并串转化
1.原理 并串转化是指的是完成串行传输和并行传输两种传输方式之间的转换的技术,通过移位寄存器可以实现串并转换。 串转并,将数据移位保存在寄存器中,再将寄存器的数值同时输出; 并转串,将数据先进行移位࿰…...

hologres基础知识一文全
1 功能特性 1.1多场景查询分析 Hologres支持行存、列存、行列共存等多种存储模式和索引类型,同时满足简单查询、复杂查询、即席查询等多样化的分析查询需求。Hologres使用大规模并行处理架构,分布式处理SQL,提高资源利用率,实现海量数据极速分析。 亚秒级交互式分析 Holo…...

阿里云oss迁移到AWS S3
这里写自定义目录标题 0.项目背景1.rclone 方式2.rsync方式3.注意 0.项目背景 公司迁移要求:从阿里云oss到亚马逊s3,数据量大概500G-2T左右。 开启阿里云oss 加速模式,这样能够跨机房和区域加速。 主要采用以下两种方式同步数据,…...
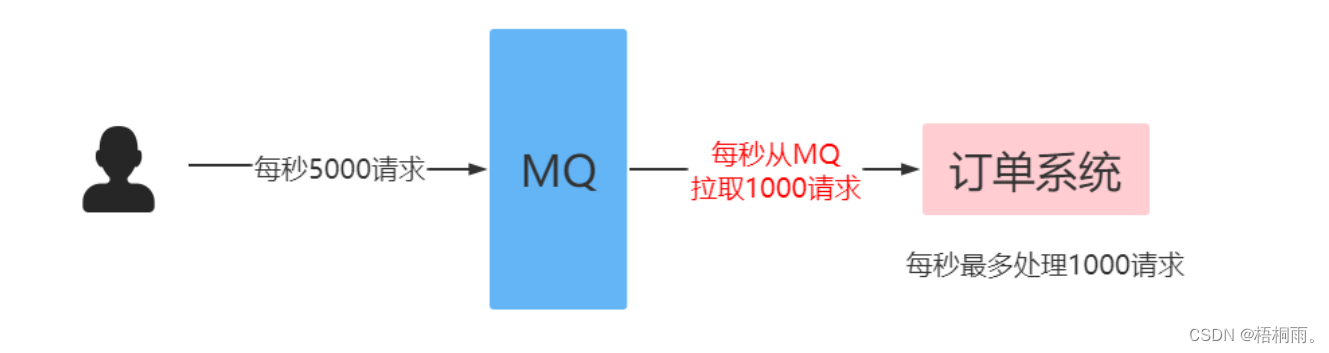
RabbitMQ(高级特性):限流
消费端限流 在rabbitmq中,使用消费端限流必须开启手动签收信息 过MQ可以对请求进行“削峰填谷”,即通过消费端限流的方式限制消息的拉取速度,达到保护消费端的目的。 生产者批量发送消息: Test public void testSendBatch() {…...

LeetCode--570. 至少有5名直接下属的经理
文章目录 1 题目描述2 测试用例3 解题思路3.1 解法 1 1 题目描述 表: Employee ---------------------- | Column Name | Type | ---------------------- | id | int | | name | varchar | | department | varchar | | managerId | in…...
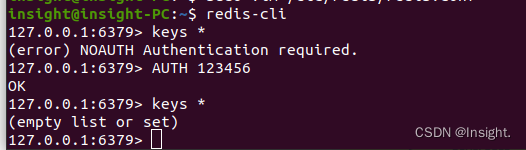
Ubuntu20.04下安装Redis环境
apt安装Redis环境 更新apt-get安装镜像源 安装Redis sudo apt-get install -y redis-server设置密码 # 编辑Redis的配置文件redis.conf,如果不知道配置文件的位置可以执行whereis redis.conf查看 sudo vim /etc/redis/redis.conf取消文件中的requirepass注释&am…...
什么是用户体验测试? 为什么很重要?
在当今数字化时代,用户体验(User Experience,简称UX)已经成为产品成功的关键因素之一。无论是应用程序、网站、硬件设备还是软件,提供出色的用户体验不仅能够吸引更多用户,还能够增加用户满意度,提高品牌忠诚度&#x…...

Android 图片翻面动画
一、需求描述 项目需要实现塔罗牌的翻面效果,需要点击图片后,图片实现翻面,并且翻面过程中,替换成图片资源,类似于扑克牌翻面。 二、实现思路 图片实现翻面效果,并且在动画执行到一半(刚好到图…...
如何恢复已删除的PDF文件?4个常用方法分享(含操作步骤)!
“不小心删除了一些比较重要的PDF文件,大家能不能帮帮忙呀?有没有方法可以恢复已经删除的PDF文件呢?” PDF文件在我们的日常工作和生活中扮演着重要的角色,我们可能经常都需要使用到它。但不可避免的是,我们在使用电脑…...
head first python 第一章-新代码更新pypi
目录 第一步:了解目录结构 第三部分:实操 第一步:了解目录结构 目录结构如下,需要自己构建12345文件。 文件1:.pypirc [distutils] index-servers pypipypitest[pypi] #这里的[]内容需要和上面保持一致&am…...
mysql之备份和恢复
(一)备份 1、备份的种类 (1)完全备份:将整个数据库完整的进行备份 (2)增量备份:在完全备份的基础上,对后续新增的内容进行备份 2、备份的需求 (1&#x…...

【音视频 | Ogg】libogg库详细介绍以及使用——附带libogg库解析.opus文件的C源码
😁博客主页😁:🚀https://blog.csdn.net/wkd_007🚀 🤑博客内容🤑:🍭嵌入式开发、Linux、C语言、C、数据结构、音视频🍭 🤣本文内容🤣&a…...

如何使用群晖NAS的Audio Station结合内网穿透实现远程访问本地曲库
文章目录 本教程解决的问题是:按照本教程方法操作后,达到的效果是本教程使用环境:1 群晖系统安装audiostation套件2 下载移动端app3 内网穿透,映射至公网 很多老铁想在上班路上听点喜欢的歌或者相声解解闷儿,于是打开手…...

要在CentOS中安装Docker
要在CentOS中安装Docker,请按照以下步骤进行操作: 首先,确保系统已更新到最新版本。运行以下命令: sudo yum update接下来,安装需要的软件包以允许使用HTTPS进行软件包下载。运行以下命令: sudo yum ins…...

手把手教你搞定用友T3-标准版-11.2安装:从SQL Server 2008R2到环境检测的保姆级避坑指南
手把手教你搞定用友T3-标准版-11.2安装:从SQL Server 2008R2到环境检测的保姆级避坑指南 对于财务和IT新手来说,企业级财务软件的安装往往是一道令人望而生畏的门槛。用友T3作为国内广泛使用的财务管理系统,其标准版11.2的安装过程涉及多个技…...

ThinkPHP8项目实战:Gitee流水线自动化部署全流程解析
1. 为什么选择Gitee流水线部署ThinkPHP8项目 国内开发者选择Gitee流水线部署ThinkPHP项目有几个天然优势。首先是网络稳定性,代码推送和构建过程都在国内服务器完成,避免了跨国网络波动带来的构建失败问题。其次是响应速度,从代码提交到部署完…...

Qwen-Image镜像惊艳案例:RTX4090D解析科研论文插图并生成方法论总结
Qwen-Image镜像惊艳案例:RTX4090D解析科研论文插图并生成方法论总结 1. 科研助手新体验:当AI遇到学术论文 想象一下这样的场景:你正在阅读一篇复杂的科研论文,面对密密麻麻的图表和数据,需要花费数小时才能理解其中的…...

Spring_couplet_generation 效率工具:使用Typora编写精美的项目技术文档
Spring_couplet_generation 效率工具:使用Typora编写精美的项目技术文档 每次项目做到一半,你是不是也遇到过这种情况:想给队友解释一下某个接口怎么用,结果发现当初自己随手记的笔记已经看不懂了;或者项目要上线了&a…...

C语言编程避坑指南:SWUSTOJ期末题库中的常见错误与优化技巧
C语言编程避坑指南:SWUSTOJ期末题库中的常见错误与优化技巧 作为计算机专业学生必修的编程语言,C语言以其高效性和底层控制能力成为教学体系的核心。但在实际编程练习中,尤其是面对SWUSTOJ这类在线评测系统的题库时,初学者常常陷…...
)
Raycast 插件开发实战:从零到一实现中文 OCR 功能(含百度 API 配置指南)
Raycast 插件开发实战:从零构建中文OCR工具 引言 在效率工具领域,Raycast正以惊人的速度崛起。这款macOS平台的效率启动器不仅继承了Spotlight的快速响应特性,更通过开放的插件生态系统为用户提供了无限可能。作为一名长期关注生产力工具的…...

嵌入式Linux容器化开发环境构建与实践
1. 嵌入式容器化开发环境构建实践在嵌入式Linux开发实践中,环境不一致问题长期困扰着工程师团队。典型场景包括:本地可编译通过的代码在同事机器上因工具链版本差异报错;更换开发板后交叉编译器ABI不兼容导致链接失败;CI流水线中因…...

Chrome密码恢复工具:三分钟找回所有Chrome保存密码的实用方案
Chrome密码恢复工具:三分钟找回所有Chrome保存密码的实用方案 【免费下载链接】chromepass Get all passwords stored by Chrome on WINDOWS. 项目地址: https://gitcode.com/gh_mirrors/chr/chromepass 你是否曾经在登录重要网站时,明明记得在Ch…...

Nanbeige 4.1-3B实战教程:接入RAG模块,在像素终端中查询本地知识库并高亮引用
Nanbeige 4.1-3B实战教程:接入RAG模块,在像素终端中查询本地知识库并高亮引用 1. 项目背景与目标 Nanbeige 4.1-3B像素冒险聊天终端是一款融合复古游戏美学与AI对话功能的创新界面。本教程将指导您如何为其接入RAG(检索增强生成)模块,实现以…...

利用Batch Normalization优化VAE训练:突破后验坍塌的KL散度困境
1. 为什么VAE训练中会出现后验坍塌? 我第一次用LSTM作为VAE的解码器时,遇到了一个诡异现象:模型生成的文本看似合理,但隐变量z完全失去了意义。后来才明白这就是典型的后验坍塌(posterior collapse)。简单来…...