Spring Boot 配置主从数据库实现读写分离
一、前言
现在的 Web 应用大都是读多写少。除了缓存以外还可以通过数据库 “主从复制” 架构,把读请求路由到从数据库节点上,实现读写分离,从而大大提高应用的吞吐量。
通常,我们在 Spring Boot 中只会用到一个数据源,即通过 spring.datasource 进行配置。前文 《在 Spring Boot 中配置和使用多个数据源》 介绍了一种在 Spring Boot 中定义、使用多个数据源的方式。但是这种方式对于实现 “读写分离” 的场景不太适合。首先,多个数据源都是通过 @Bean 定义的,当需要新增额外的从数据库时需要改动代码,非常不够灵活。其次,在业务层中,如果需要根据读、写场景切换不同数据源的话只能手动进行。
对于 Spring Boot “读写分离” 架构下的的多数据源,我们需要实现如下需求:
- 可以通过配置文件新增数据库(从库),而不不需要修改代码。
- 自动根据场景切换读、写数据源,对业务层是透明的。
幸运的是,Spring Jdbc 模块类提供了一个 AbstractRoutingDataSource 抽象类可以实现我们的需求。
它本身也实现了 DataSource 接口,表示一个 “可路由” 的数据源。
核心的代码如下:
public abstract class AbstractRoutingDataSource extends AbstractDataSource implements InitializingBean {// 维护的所有数据源@Nullableprivate Map<Object, DataSource> resolvedDataSources;// 默认的数据源@Nullableprivate DataSource resolvedDefaultDataSource;// 获取 Jdbc 连接@Overridepublic Connection getConnection() throws SQLException {return determineTargetDataSource().getConnection();}@Overridepublic Connection getConnection(String username, String password) throws SQLException {return determineTargetDataSource().getConnection(username, password);}// 获取目标数据源protected DataSource determineTargetDataSource() {Assert.notNull(this.resolvedDataSources, "DataSource router not initialized");// 调用  determineCurrentLookupKey() 抽象方法,获取 resolvedDataSources 中定义的 key。Object lookupKey = determineCurrentLookupKey();DataSource dataSource = this.resolvedDataSources.get(lookupKey);if (dataSource == null && (this.lenientFallback || lookupKey == null)) {dataSource = this.resolvedDefaultDataSource;}if (dataSource == null) {throw new IllegalStateException("Cannot determine target DataSource for lookup key [" + lookupKey + "]");}return dataSource;}// 抽象方法,返回 resolvedDataSources 中定义的 key。需要自己实现@Nullableprotected abstract Object determineCurrentLookupKey();
}
核心代码如上,它的工作原理一目了然。它在内部维护了一个 Map<Object, DataSource> 属性,维护了多个数据源。
当尝试从 AbstractRoutingDataSource 数据源获取数据源连接对象 Connection 时,会调用 determineCurrentLookupKey() 方法得到一个 Key,然后从数据源 Map<Object, DataSource> 中获取到真正的目标数据源,如果 Key 或者是目标数据源为 null 则使用默认的数据源。
得到目标数据数据源后,返回真正的 Jdbc 连接。这一切对于使用到 Jdbc 的组件(Repository、JdbcTemplate 等)来说都是透明的。
了解了 AbstractRoutingDataSource 后,我们来看看如何使用它来实现 “读写分离”。
二、实现思路
首先,创建自己的 AbstractRoutingDataSource 实现类。把它的默认数据源 resolvedDefaultDataSource 设置为主库,从库则保存到 Map<Object, DataSource> resolvedDataSources 中。
在 Spring Boot 应用中通常使用 @Transactional 注解来开启声明式事务,它的默认传播级别为 REQUIRED,也就是保证多个事务方法之间的相互调用都是在同一个事务中,使用的是同一个 Jdbc 连接。它还有一个 readOnly 属性表示是否是只读事务。
于是,我们可以通过 AOP 技术,在事务方法执行之前,先获取到方法上的 @Transactional 注解从而判断是读、还是写业务。并且把 “读写状态” 存储到线程上下文(ThreadLocal)中!
在 AbstractRoutingDataSource 的 determineCurrentLookupKey 方法中,我们就可以根据当前线程上下文中的 “读写状态” 判断当前是否是只读业务,如果是,则返回从库 resolvedDataSources 中的 Key,反之则返回 null 表示使用默认数据源也就是主库。
三、初始化数据库
首先,在本地创建 4 个不同名称的数据库,用于模拟 “MYSQL 主从” 架构。
-- 主库
CREATE DATABASE `demo_master` CHARACTER SET 'utf8mb4' COLLATE 'utf8mb4_general_ci';
-- 从库
CREATE DATABASE `demo_slave1` CHARACTER SET 'utf8mb4' COLLATE 'utf8mb4_general_ci';
-- 从库
CREATE DATABASE `demo_slave2` CHARACTER SET 'utf8mb4' COLLATE 'utf8mb4_general_ci';
-- 从库
CREATE DATABASE `demo_slave3` CHARACTER SET 'utf8mb4' COLLATE 'utf8mb4_general_ci';
如上,创建了 4 个数据库。1 个主库,3 个从库。它们本质上毫无关系,并不是真正意义上的主从架构,这里只是为了方便演示。
接着,在这 4 个数据库下依次执行如下 SQL 创建一张名为 test 的表。
该表只有 2 个字段,1 个是 id 表示主键,一个是 name 表示名称。
CREATE TABLE `test` (`id` int NOT NULL COMMENT 'ID',`name` varchar(50) CHARACTER SET utf8mb4 COLLATE utf8mb4_general_ci DEFAULT NULL COMMENT '名称',PRIMARY KEY (`id`)
) ENGINE=InnoDB DEFAULT CHARSET=utf8mb4 COLLATE=utf8mb4_general_ci;
最后,初始化数据。往不同的数据库插入对应的记录。
INSERT INTO `demo_master`.`test` (`id`, `name`) VALUES (1, 'master');
INSERT INTO `demo_slave1`.`test` (`id`, `name`) VALUES (1, 'slave1');
INSERT INTO `demo_slave2`.`test` (`id`, `name`) VALUES (1, 'slave2');
INSERT INTO `demo_slave3`.`test` (`id`, `name`) VALUES (1, 'slave3');
不同数据库节点下 test 表中的 name 字段不同,用于区别不同的数据库节点。
四、创建应用
创建 Spring Boot 应用,添加 spring-boot-starter-jdbc 和 mysql-connector-j (MYSQL 驱动)依赖:
<dependency><groupId>org.springframework.boot</groupId><artifactId>spring-boot-starter-jdbc</artifactId>
</dependency>
<dependency><groupId>com.mysql</groupId><artifactId>mysql-connector-j</artifactId>
</dependency>
五、配置定义
我们需要在 application.yaml 中定义上面创建好的所有主、从数据库。
app:datasource:master: # 唯一主库jdbcUrl: jdbc:mysql://127.0.0.1:3306/demo_master?useUnicode=true&characterEncoding=UTF-8&serverTimezone=GMT%2b8&allowMultiQueries=trueusername: rootpassword: rootslave: # 多个从库slave1:jdbcUrl: jdbc:mysql://127.0.0.1:3306/demo_slave1?useUnicode=true&characterEncoding=UTF-8&serverTimezone=GMT%2b8&allowMultiQueries=trueusername: rootpassword: rootslave2:jdbcUrl: jdbc:mysql://127.0.0.1:3306/demo_slave2?useUnicode=true&characterEncoding=UTF-8&serverTimezone=GMT%2b8&allowMultiQueries=trueusername: rootpassword: rootslave3:jdbcUrl: jdbc:mysql://127.0.0.1:3306/demo_slave3?useUnicode=true&characterEncoding=UTF-8&serverTimezone=GMT%2b8&allowMultiQueries=trueusername: rootpassword: root
在 app.datasource.master 下配置了唯一的一个主库,也就是写库。然后在 app.datasource.slave 下以 Map 形式配置了多个从库(也就是读库),每个从库使用自定义的名称作为 Key。
数据源的实现使用的是默认的 HikariDataSource,并且数据源的配置是按照 HikariConfig 类定义的。也就是说,你可以根据 HikariConfig 的属性在配置中添加额外的设置。
有了配置后,还需要定义对应的配置类,如下:
package cn.springdoc.demo.db;import java.util.Map;
import java.util.Objects;
import java.util.Properties;import org.springframework.boot.context.properties.ConfigurationProperties;
import org.springframework.boot.context.properties.bind.ConstructorBinding;@ConfigurationProperties(prefix = "app.datasource")  //  配置前缀
public class MasterSlaveDataSourceProperties {// 主库private final Properties master;// 从库private final Map<String, Properties> slave;@ConstructorBinding // 通过构造函数注入配置文件中的值public MasterSlaveDataSourceProperties(Properties master, Map<String, Properties> slave) {super();Objects.requireNonNull(master);Objects.requireNonNull(slave);this.master = master;this.slave = slave;}public Properties master() {return master;}public Map<String, Properties> slave() {return slave;}
}
还需要在 main 类上使用 @EnableConfigurationProperties 注解来加载我们的配置类:
package cn.springdoc.demo;import org.springframework.boot.SpringApplication;
import org.springframework.boot.autoconfigure.SpringBootApplication;
import org.springframework.boot.context.properties.EnableConfigurationProperties;
import org.springframework.context.annotation.EnableAspectJAutoProxy;import cn.springdoc.demo.db.MasterSlaveDataSourceProperties;@SpringBootApplication
@EnableAspectJAutoProxy
@EnableConfigurationProperties(value = {MasterSlaveDataSourceProperties.class}) // 指定要加载的配置类
public class DemoApplication {public static void main(String[] args) {SpringApplication.run(DemoApplication.class, args);}
}
这里还使用 @EnableAspectJAutoProxy 开启了 AOP 的支持,后面会用到。
六、创建 MasterSlaveDataSourceMarker
创建一个 MasterSlaveDataSourceMarker 类,用于维护当前业务的 “读写状态”。
package cn.springdoc.demo.db;public class MasterSlaveDataSourceMarker {private static final ThreadLocal<Boolean> flag = new ThreadLocal<Boolean>();// 返回标记public static Boolean get() {return flag.get();}// 写状态,标记为主库public static void master() {flag.set(Boolean.TRUE);}// 读状态,标记为从库public static void slave() {flag.set(Boolean.FALSE);}// 清空标记public static void clean() {flag.remove();}
}
通过 ThreadLocal<Boolean> 在当前线程中保存当前业务的读写状态。
如果 get() 返回 null 或者 true 则表示非只读,需要使用主库。反之则表示只读业务,使用从库。
七、创建 MasterSlaveDataSourceAop
创建 MasterSlaveDataSourceAop 切面类,在事务方法开始之前执行。
package cn.springdoc.demo.db;import org.aspectj.lang.ProceedingJoinPoint;
import org.aspectj.lang.annotation.Around;
import org.aspectj.lang.annotation.Aspect;
import org.aspectj.lang.annotation.Pointcut;
import org.aspectj.lang.reflect.MethodSignature;
import org.slf4j.Logger;
import org.slf4j.LoggerFactory;
import org.springframework.core.Ordered;
import org.springframework.core.annotation.Order;
import org.springframework.stereotype.Component;
import org.springframework.transaction.annotation.Transactional;@Aspect
@Component
@Order(Ordered.HIGHEST_PRECEDENCE)  // 在事务开始之前执行
public class MasterSlaveDataSourceAop {static final Logger log = LoggerFactory.getLogger(MasterSlaveDataSourceAop.class);@Pointcut(value = "@annotation(org.springframework.transaction.annotation.Transactional)")public void txMethod () {}@Around("txMethod()")public Object handle (ProceedingJoinPoint joinPoint) throws Throwable {// 获取当前请求的主从标识try {// 获取事务方法上的注解Transactional transactional = ((MethodSignature) joinPoint.getSignature()).getMethod().getAnnotation(Transactional.class);if (transactional != null && transactional.readOnly()) {log.info("标记为从库");MasterSlaveDataSourceMarker.slave();    // 只读,从库} else {log.info("标记为主库");MasterSlaveDataSourceMarker.master(); // 可写,主库}// 执行业务方法Object ret = joinPoint.proceed();return ret;} catch (Throwable e) {throw e;} finally {MasterSlaveDataSourceMarker.clean();}}
}
首先,通过 @Order(Ordered.HIGHEST_PRECEDENCE) 注解保证它必须比声明式事务 AOP 更先执行。
该 AOP 会拦截所有声明了 @Transactional 的方法,在执行前从该注解获取 readOnly 属性从而判断是否是只读业务,并且在 MasterSlaveDataSourceMarker 标记。
八、创建 MasterSlaveDataSource
现在,创建 AbstractRoutingDataSource 的实现类 MasterSlaveDataSource:
package cn.springdoc.demo.db;import java.util.List;
import java.util.concurrent.atomic.AtomicInteger;import org.slf4j.Logger;
import org.slf4j.LoggerFactory;
import org.springframework.jdbc.datasource.lookup.AbstractRoutingDataSource;public class MasterSlaveDataSource extends AbstractRoutingDataSource {static final Logger log = LoggerFactory.getLogger(MasterSlaveDataSource.class);// 从库的 Key 列表private List<Object> slaveKeys;// 从库 key 列表的索引private AtomicInteger index = new AtomicInteger(0);@Overrideprotected Object determineCurrentLookupKey() {// 当前线程的主从标识Boolean master = MasterSlaveDataSourceMarker.get();if (master == null || master || this.slaveKeys.isEmpty()) {// 主库,返回 null,使用默认数据源log.info("数据库路由:主库");return null;}// 从库,从 slaveKeys 中选择一个 Keyint index = this.index.getAndIncrement() % this.slaveKeys.size();if (this.index.get() > 9999999) {this.index.set(0); }Object key = slaveKeys.get(index);log.info("数据库路由:从库 = {}", key);return key;}public List<Object> getSlaveKeys() {return slaveKeys;}public void setSlaveKeys(List<Object> slaveKeys) {this.slaveKeys = slaveKeys;}
}
其中,定义了一个 List<Object> slaveKeys 字段,用于存储在配置文件中定义的所有从库的 Key。
在 determineCurrentLookupKey 方法中,判断当前业务的 “读写状态”,如果是只读则通过 AtomicInteger 原子类自增后从 slaveKeys 轮询出一个从库的 Key。反之则返回 null 使用主库。
九、创建 MasterSlaveDataSourceConfiguration 配置类
最后,需要在 @Configuration 配置类中,创建 MasterSlaveDataSource 数据源 Bean。
package cn.springdoc.demo.db;import java.util.ArrayList;
import java.util.HashMap;
import java.util.Map;
import java.util.Properties;import javax.sql.DataSource;import org.springframework.context.annotation.Bean;
import org.springframework.context.annotation.Configuration;import com.zaxxer.hikari.HikariConfig;
import com.zaxxer.hikari.HikariDataSource;@Configuration
public class MasterSlaveDataSourceConfiguration {@Beanpublic DataSource dataSource(MasterSlaveDataSourceProperties properties) {MasterSlaveDataSource dataSource = new MasterSlaveDataSource();// 主数据库dataSource.setDefaultTargetDataSource(new HikariDataSource(new HikariConfig(properties.master())));// 从数据库Map<Object, Object> slaveDataSource = new HashMap<>();// 从数据库 KeydataSource.setSlaveKeys(new ArrayList<>());for (Map.Entry<String,Properties> entry : properties.slave().entrySet()) {if (slaveDataSource.containsKey(entry.getKey())) {throw new IllegalArgumentException("存在同名的从数据库定义:" + entry.getKey());}slaveDataSource.put(entry.getKey(), new HikariDataSource(new HikariConfig(entry.getValue())));dataSource.getSlaveKeys().add(entry.getKey());}// 设置从库dataSource.setTargetDataSources(slaveDataSource);return dataSource;}
}
首先,通过配置方法注入配置类,该类定义了配置文件中的主库、从库属性。
使用 HikariDataSource 实例化唯一主库数据源、和多个从库数据源,并且设置到 MasterSlaveDataSource 对应的属性中。
同时还存储每个从库的 Key,且该 Key 不允许重复。
十、测试
1、创建 TestService
创建用于测试的业务类。
package cn.springdoc.demo.service;import org.springframework.jdbc.core.JdbcTemplate;
import org.springframework.stereotype.Service;
import org.springframework.transaction.annotation.Transactional;@Service
public class TestService {final JdbcTemplate jdbcTemplate;public TestService(JdbcTemplate jdbcTemplate) {super();this.jdbcTemplate = jdbcTemplate;}// 只读@Transactional(readOnly = true)public String read () {return this.jdbcTemplate.queryForObject("SELECT `name` FROM `test` WHERE id = 1;", String.class);} // 先读,再写@Transactionalpublic String write () {this.jdbcTemplate.update("UPDATE `test` SET `name` = ? WHERE id = 1;", "new name");return this.read();}
}
通过构造函数注入 JdbcTemplate(spring jdbc 模块自动配置的)。
Service 类中定义了 2 个方法。
- read():只读业务,从表中检索 name 字段返回。
- write:可写业务,先修改表中的 name 字段值为: new name,然后再调用 read() 方法读取修改后的结果、返回。
2、创建测试类
创建测试类,如下:
package cn.springdoc.demo.test;import org.junit.jupiter.api.Test;
import org.slf4j.Logger;
import org.slf4j.LoggerFactory;
import org.springframework.beans.factory.annotation.Autowired;
import org.springframework.boot.test.context.SpringBootTest;
import org.springframework.boot.test.context.SpringBootTest.WebEnvironment;import cn.springdoc.demo.service.TestService;@SpringBootTest(webEnvironment = WebEnvironment.RANDOM_PORT)
public class DemoApplicationTests {static final Logger log = LoggerFactory.getLogger(DemoApplicationTests.class);@AutowiredTestService testService;@Testpublic void test() throws Exception {// 连续4次读log.info("read={}", this.testService.read());log.info("read={}", this.testService.read());log.info("read={}", this.testService.read());log.info("read={}", this.testService.read());// 写log.info("write={}", this.testService.write());}
}
在测试类方法中,连续调用 4 次 TestService 的 read() 方法。由于这是一个只读方法,按照我们的设定,它会在 3 个从库之间轮询使用。由于我们故意把三个从库 test 表中 name 的字段值设置得不一样,所以这里可以通过返回的结果看出来是否符合我们的预期。
最后调用了一次 write() 方法,按照设定会路由到主库。先 UPDATE 修改数据,再调用 read() 读取数据,虽然 read() 设置了 @Transactional(readOnly = true),但因为入口方法是 write(),所以 read() 还是会从主库读取数据(默认的事务传播级别)。
执行测试,输出的日志如下:
[           main] c.s.demo.db.MasterSlaveDataSourceAop     : 标记为从库
[           main] c.s.demo.db.MasterSlaveDataSource        : 数据库路由:从库 = slave1
[           main] c.s.demo.test.DemoApplicationTests       : read=slave1
[           main] c.s.demo.db.MasterSlaveDataSourceAop     : 标记为从库
[           main] c.s.demo.db.MasterSlaveDataSource        : 数据库路由:从库 = slave2
[           main] c.s.demo.test.DemoApplicationTests       : read=slave2
[           main] c.s.demo.db.MasterSlaveDataSourceAop     : 标记为从库
[           main] c.s.demo.db.MasterSlaveDataSource        : 数据库路由:从库 = slave3
[           main] c.s.demo.test.DemoApplicationTests       : read=slave3
[           main] c.s.demo.db.MasterSlaveDataSourceAop     : 标记为从库
[           main] c.s.demo.db.MasterSlaveDataSource        : 数据库路由:从库 = slave1
[           main] c.s.demo.test.DemoApplicationTests       : read=slave1
[           main] c.s.demo.db.MasterSlaveDataSourceAop     : 标记为主库
[           main] c.s.demo.db.MasterSlaveDataSource        : 数据库路由:主库
[           main] c.s.demo.test.DemoApplicationTests       : write=new name
你可以看到,对于只读业务。确实轮询了三个不同的从库,符合预期。最后的 write() 方法也成功地路由到了主库,执行了修改并且返回了修改后的结果。
十一总结
通过 AbstractRoutingDataSource 可以不使用任何第三方中间件就可以在 Spring Boot 中实现数据源 “读写分离”,这种方式需要在每个业务方法上通过 @Transactional 注解明确定义是读还是写。
相关文章:

Spring Boot 配置主从数据库实现读写分离
一、前言 现在的 Web 应用大都是读多写少。除了缓存以外还可以通过数据库 “主从复制” 架构,把读请求路由到从数据库节点上,实现读写分离,从而大大提高应用的吞吐量。 通常,我们在 Spring Boot 中只会用到一个数据源࿰…...
【MongoDB】索引 - 单字段索引
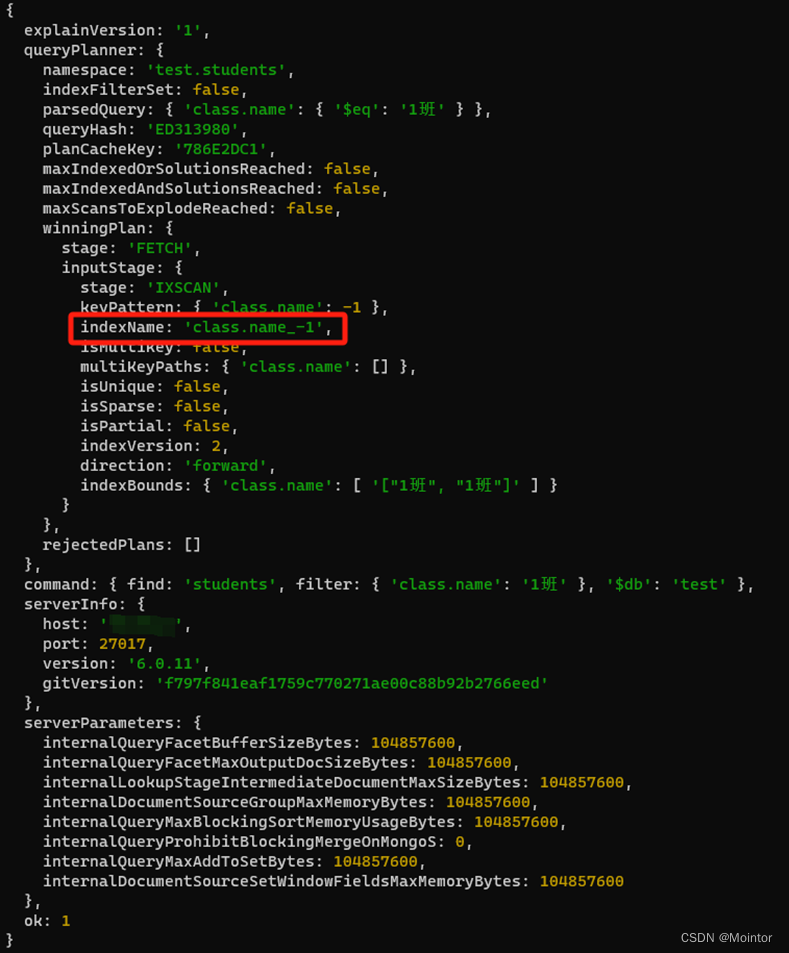
MongoDB支持在集合文档中的任意字段上创建索引,默认情况下所有的集合都有一个_id字段的索引,用户和应用可以新增索引用于查询和操作。 一、准备工作 这里准备一些学生数据 db.students.insertMany([{ _id: 1, name: "张三", age: 20, clas…...

评估大型语言模型:综述
论文地址:https://arxiv.org/pdf/2310.19736v2.pdf github: tjunlp-lab/awesome-llms-evaluation-… 发表团队:Tianjin University 摘要 将LLM评估划分三点:知识和能力评估、一致性评估和安全性评估。特定领域化评估benchmark评…...
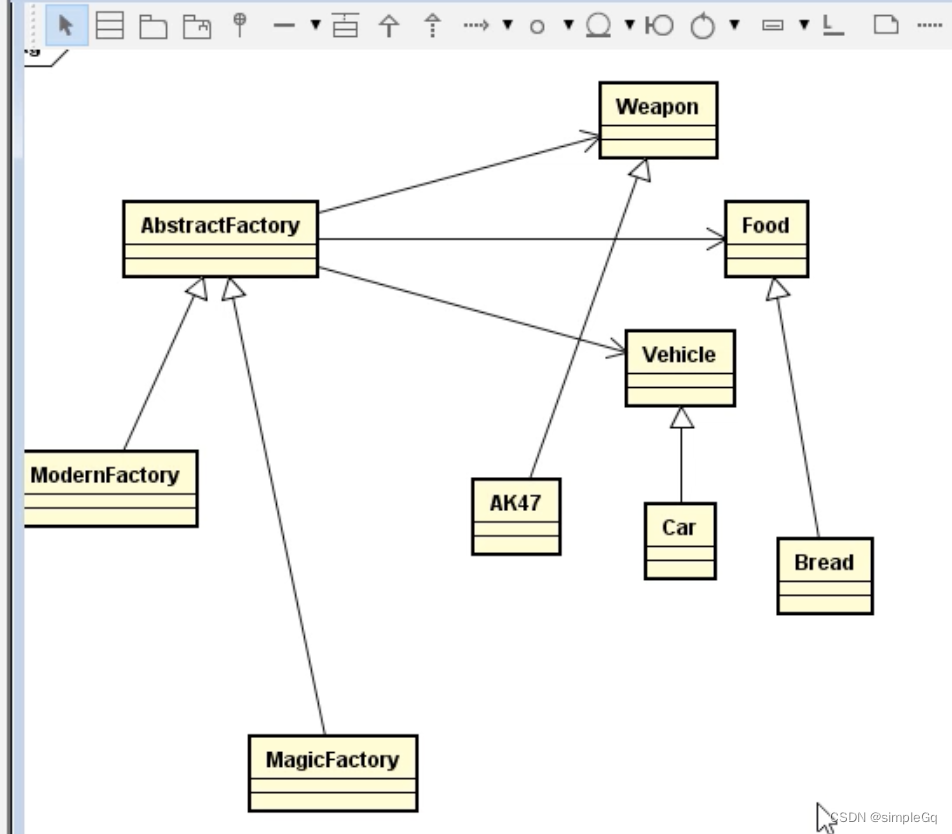
设计模式之工厂模式(Factory)
任何可以产生对象的方法或类,都可以称为工厂。 下面的代码定义了Car这种交通工具: public class Car {public void go() {System.out.println("Car go wuwuwuwuw....");} }然后在main函数里面想要调用调用Car的go方法,就需要new一个car对象&…...
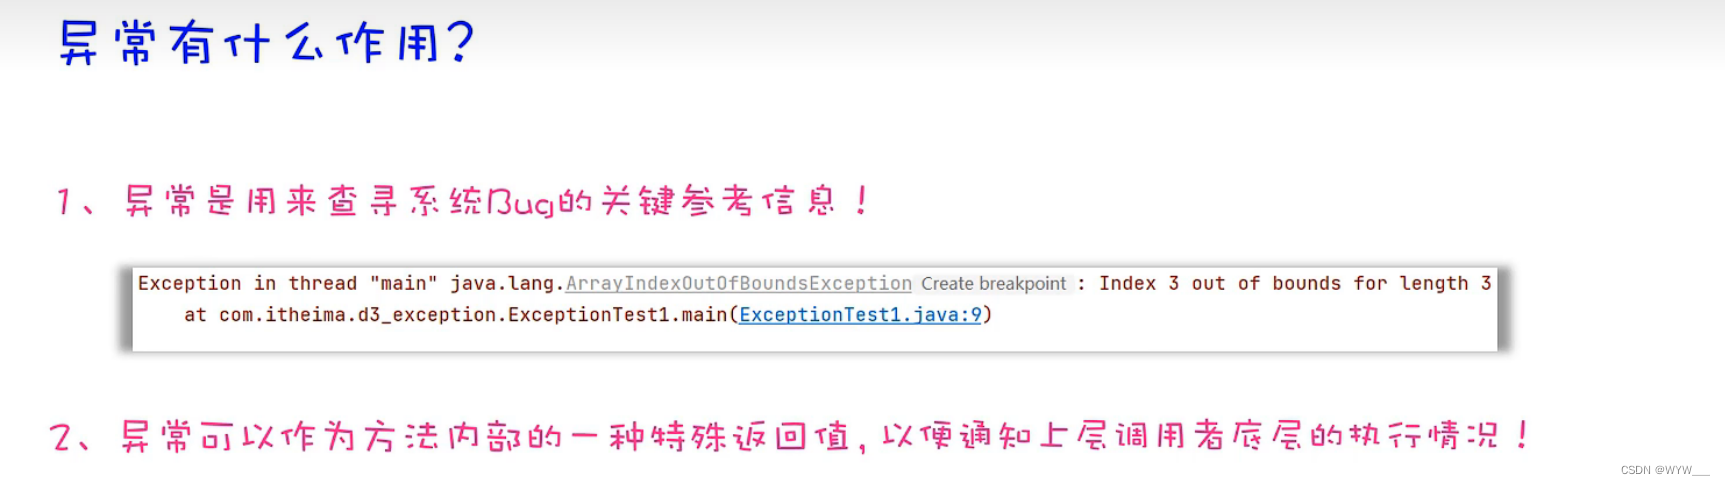
2023/11/6 JAVA学习
处理编译异常的两种方法 第一种 第二种 问题比较容易犯,编译时异常...

Android-JobService
JobService 这里写目录标题 JobService一、API详解1 onStartJob2 onStopJob 二、onStartJob | onStopJob 返回值case 1case 2case 3 ref: 深入理解JobScheduler与JobService的使用 - 掘金 (juejin.cn) (28条消息) JobService的使用介绍_TechMerger的博客-CSDN博客 (28条消息) J…...

GraphQL入门与开源的GraphQL引擎Hasura体验
背景 Hasura 是一个开源的 GraphQL 引擎,它可以帮助开发人员快速构建和部署现代应用程序的后端。它提供了一个自动化的 GraphQL API ,可以直接连接到现有的数据库,并提供实时数据推送和订阅功能。 Hasura 团队总部位于印度。 下载安装 脚本…...

Javascript知识点详解:this关键字的指向问题
目录 this 关键字 涵义 实质 使用场合 使用注意点 避免多层 this 避免数组处理方法中的 this 避免回调函数中的 this 绑定 this 的方法 Function.prototype.call() Function.prototype.apply() Function.prototype.bind() 箭头函数中的 this this 关键字 涵义 t…...

数据库的备份和恢复
备份:完全备份,增量备份 完全备份:将整个数据库完整的进行备份 增量备份:在完全备份基础的之上,对后续新增的内容进行备份 备份的需求 1生产环境中,数据的安全性至关重要,任何数据都可能产生非…...

DS图—图非0面积/bfs【数据结构】
DS图—图非0面积 题目描述 编程计算由"1"围成的下列图形的面积。面积计算方法是统计"1"所围成的闭合曲线中"0"点的数目。如图所示,在10*10的二维数组中,"1"围住了15个点,因此面积为15。 提示&…...
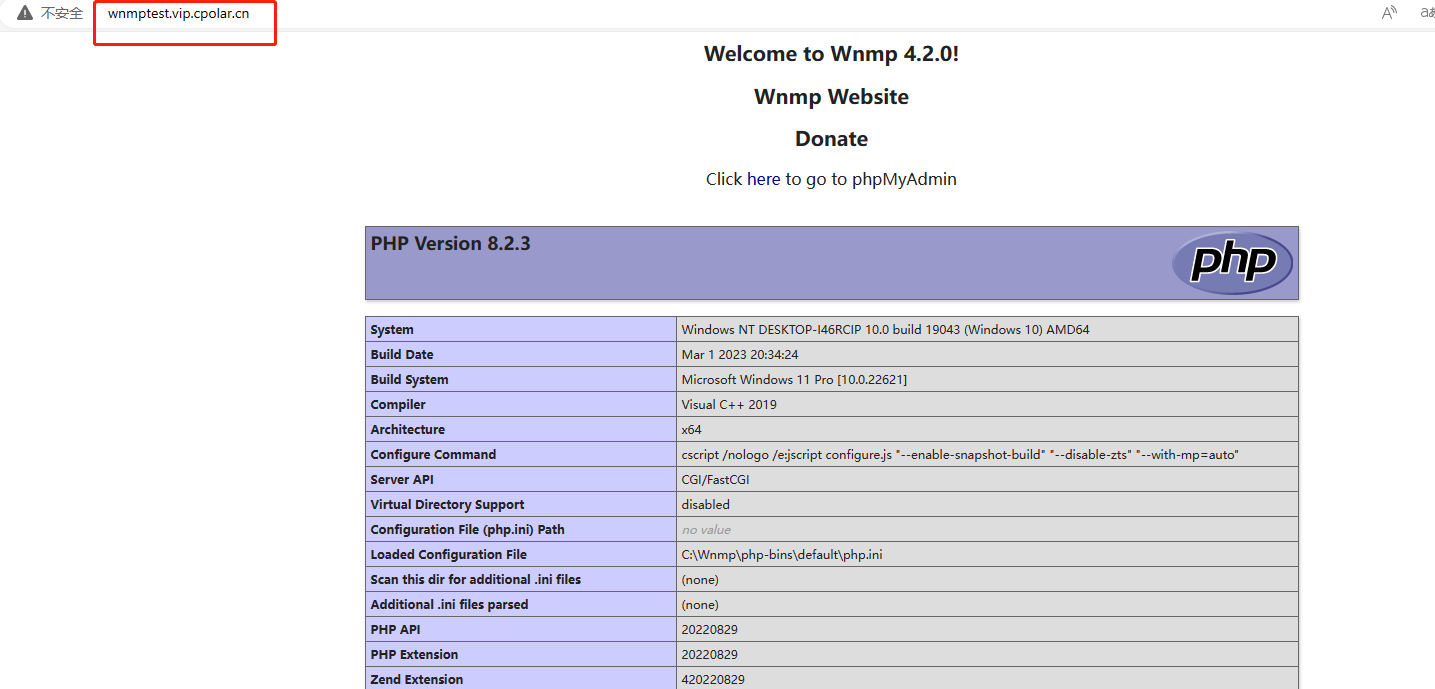
Wnmp服务安装并结合内网穿透实现公网远程访问——“cpolar内网穿透”
文章目录 前言1.Wnmp下载安装2.Wnmp设置3.安装cpolar内网穿透3.1 注册账号3.2 下载cpolar客户端3.3 登录cpolar web ui管理界面3.4 创建公网地址 4.固定公网地址访问 前言 WNMP是Windows系统下的绿色NginxMysqlPHP环境集成套件包,安装完成后即可得到一个Nginx MyS…...
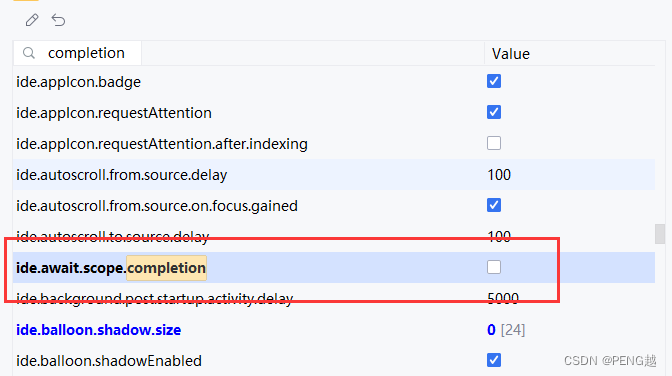
2023版Pycharm关闭一直显示closing project,正在关闭项目
点击 帮助 下的 查找操作 英文版为 Help 下的 Find Action 输入 Registry 禁用 ide.await.scope.completion 即可 PS:按 Ctrl F 输入可以快速检索...
Gradle笔记 二 Gradle的基础Groovy
学习Groovy的必要性 首先Gradle是由Groovy写成的,而且构建脚本的语法都遵循Groovy的语法,所以要学好Gradle的前提是要基本了解Groovy的语法。 Groovy 简介 在某种程度上,Groovy可以被视为Java的一种脚本化改良版,Groovy也是运行在JVM上&am…...
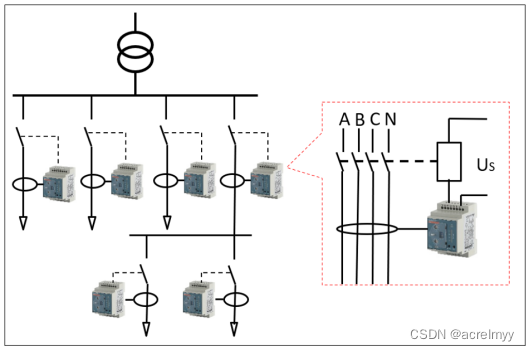
浅谈剩余电流动作继电器在电动伸缩门的应用
摘 要:随着时代的发展,越来越多的小区、厂区、园区和学校等场所的大门安装了电动伸缩门,几乎可以说随处可见。电动伸缩门是一种长期在户外使用的设备,工作电压为220 V(过去也有380 V),其电机是处…...

stable diffusion安装踩坑之clip安装、git报错
clip本地安装环境链接问题 本节主要记录一下在windows安装stable diffusion时,clip脚本安装不上,本地安装时如何链接到当前库的问题 首先,在脚本安装clip不成功时,脚本会输出一个commend指令,复制到浏览器就可以很快…...
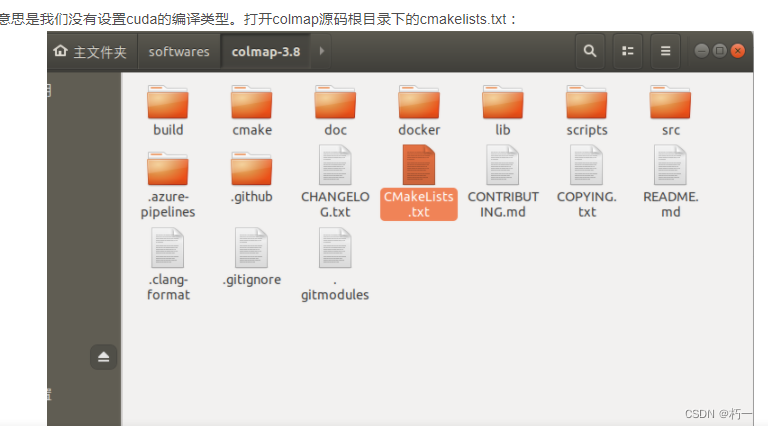
colmap gpu服务器安装
1.官方安装说明 https://colmap.github.io/install.html 后边有编译支持gpu的步骤!!! 2.sudo apt-get install libgtest-dev 3.cmakelists.txt 250行 set(CMAKE_CUDA_ARCHITECTURES “native”) 4. sudo apt-get install libqt5core5a sud…...
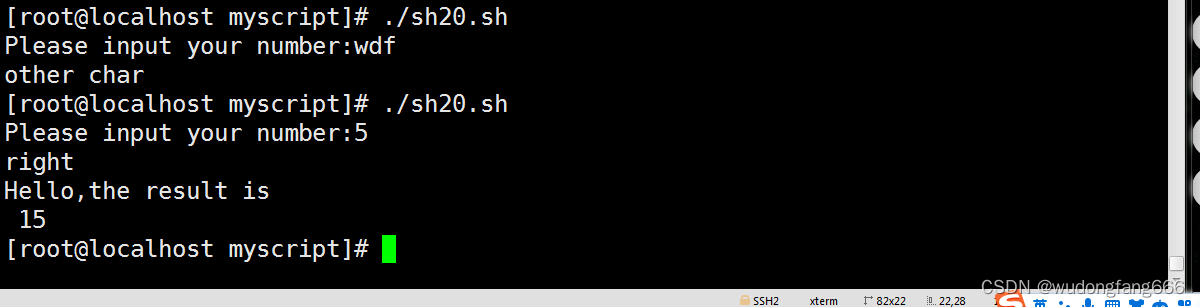
linux内的循环
格式 while 【 条件判断 】 do 语句体 done 上图 第一次代码,输入语句在外面,结果输入完(非hello)程序不断循环,没办法,ctrlc给程序终止了,然后把用户输入的语句放到了循环体里面…...
的学习笔记)
强化学习(RL)的学习笔记
1. 前言 (1)PPO的优点 PPO(Proximal Policy Optimization)算法相比其他强化学习方法有几个显著优点: 稳定性和鲁棒性:PPO通过限制策略更新的幅度来避免训练过程中的大幅波动,这增加了算法的稳…...

2023世界传感器大会开幕,汉威科技多领域创新产品引瞩目
11月5日,2023世界传感器大会在郑州国际会展中心正式拉开帷幕。据悉,本次大会由河南省人民政府、中国科学技术协会主办,郑州市人民政府、河南省工业和信息化厅、河南省科学技术协会、中国仪器仪表学会承办。 大会由“一会一赛一展”组成&#…...

什么是机器学习中的正则化?
1. 引言 在机器学习领域中,相关模型可能会在训练过程中变得过拟合和欠拟合。为了防止这种情况的发生,我们在机器学习中使用正则化操作来适当地让模型拟合在我们的测试集上。一般来说,正则化操作通过降低过拟合和欠拟合的可能性来帮助大家获得…...

K8S认证|CKS题库+答案| 11. AppArmor
目录 11. AppArmor 免费获取并激活 CKA_v1.31_模拟系统 题目 开始操作: 1)、切换集群 2)、切换节点 3)、切换到 apparmor 的目录 4)、执行 apparmor 策略模块 5)、修改 pod 文件 6)、…...

STM32+rt-thread判断是否联网
一、根据NETDEV_FLAG_INTERNET_UP位判断 static bool is_conncected(void) {struct netdev *dev RT_NULL;dev netdev_get_first_by_flags(NETDEV_FLAG_INTERNET_UP);if (dev RT_NULL){printf("wait netdev internet up...");return false;}else{printf("loc…...

服务器硬防的应用场景都有哪些?
服务器硬防是指一种通过硬件设备层面的安全措施来防御服务器系统受到网络攻击的方式,避免服务器受到各种恶意攻击和网络威胁,那么,服务器硬防通常都会应用在哪些场景当中呢? 硬防服务器中一般会配备入侵检测系统和预防系统&#x…...

学习STC51单片机32(芯片为STC89C52RCRC)OLED显示屏2
每日一言 今天的每一份坚持,都是在为未来积攒底气。 案例:OLED显示一个A 这边观察到一个点,怎么雪花了就是都是乱七八糟的占满了屏幕。。 解释 : 如果代码里信号切换太快(比如 SDA 刚变,SCL 立刻变&#…...
集成 Mybatis-Plus 和 Mybatis-Plus-Join)
纯 Java 项目(非 SpringBoot)集成 Mybatis-Plus 和 Mybatis-Plus-Join
纯 Java 项目(非 SpringBoot)集成 Mybatis-Plus 和 Mybatis-Plus-Join 1、依赖1.1、依赖版本1.2、pom.xml 2、代码2.1、SqlSession 构造器2.2、MybatisPlus代码生成器2.3、获取 config.yml 配置2.3.1、config.yml2.3.2、项目配置类 2.4、ftl 模板2.4.1、…...

多模态图像修复系统:基于深度学习的图片修复实现
多模态图像修复系统:基于深度学习的图片修复实现 1. 系统概述 本系统使用多模态大模型(Stable Diffusion Inpainting)实现图像修复功能,结合文本描述和图片输入,对指定区域进行内容修复。系统包含完整的数据处理、模型训练、推理部署流程。 import torch import numpy …...

日常一水C
多态 言简意赅:就是一个对象面对同一事件时做出的不同反应 而之前的继承中说过,当子类和父类的函数名相同时,会隐藏父类的同名函数转而调用子类的同名函数,如果要调用父类的同名函数,那么就需要对父类进行引用&#…...

云原生时代的系统设计:架构转型的战略支点
📝个人主页🌹:一ge科研小菜鸡-CSDN博客 🌹🌹期待您的关注 🌹🌹 一、云原生的崛起:技术趋势与现实需求的交汇 随着企业业务的互联网化、全球化、智能化持续加深,传统的 I…...
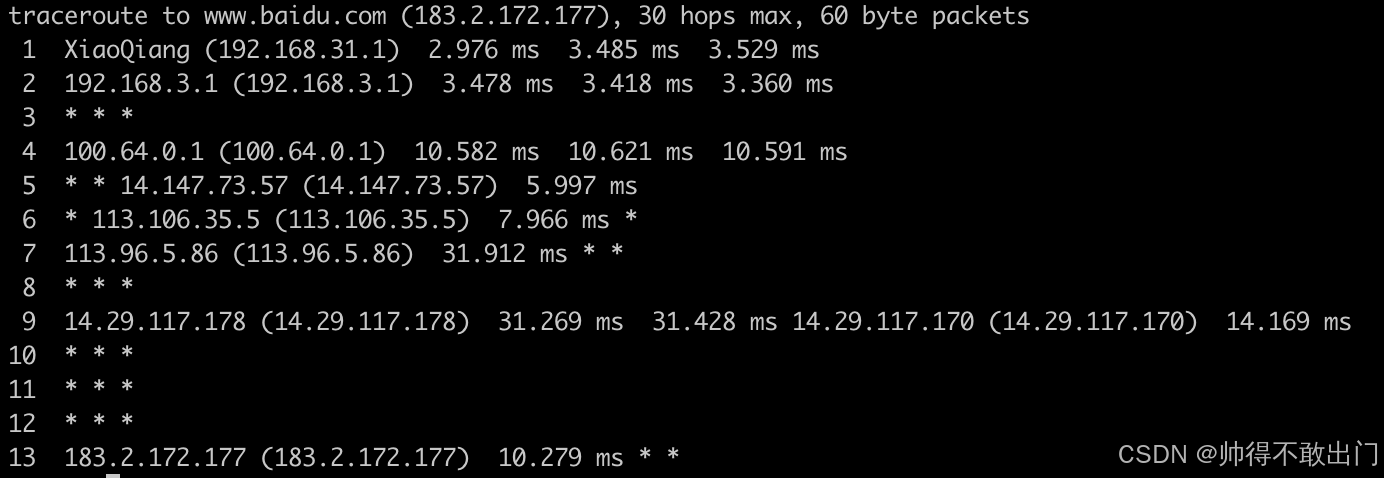
Android Framework预装traceroute执行文件到system/bin下
文章目录 Android SDK中寻找traceroute代码内置traceroute到SDK中traceroute参数说明-I 参数(使用 ICMP Echo 请求)-T 参数(使用 TCP SYN 包) 相关文章 Android SDK中寻找traceroute代码 设备使用的是Android 11,在/s…...
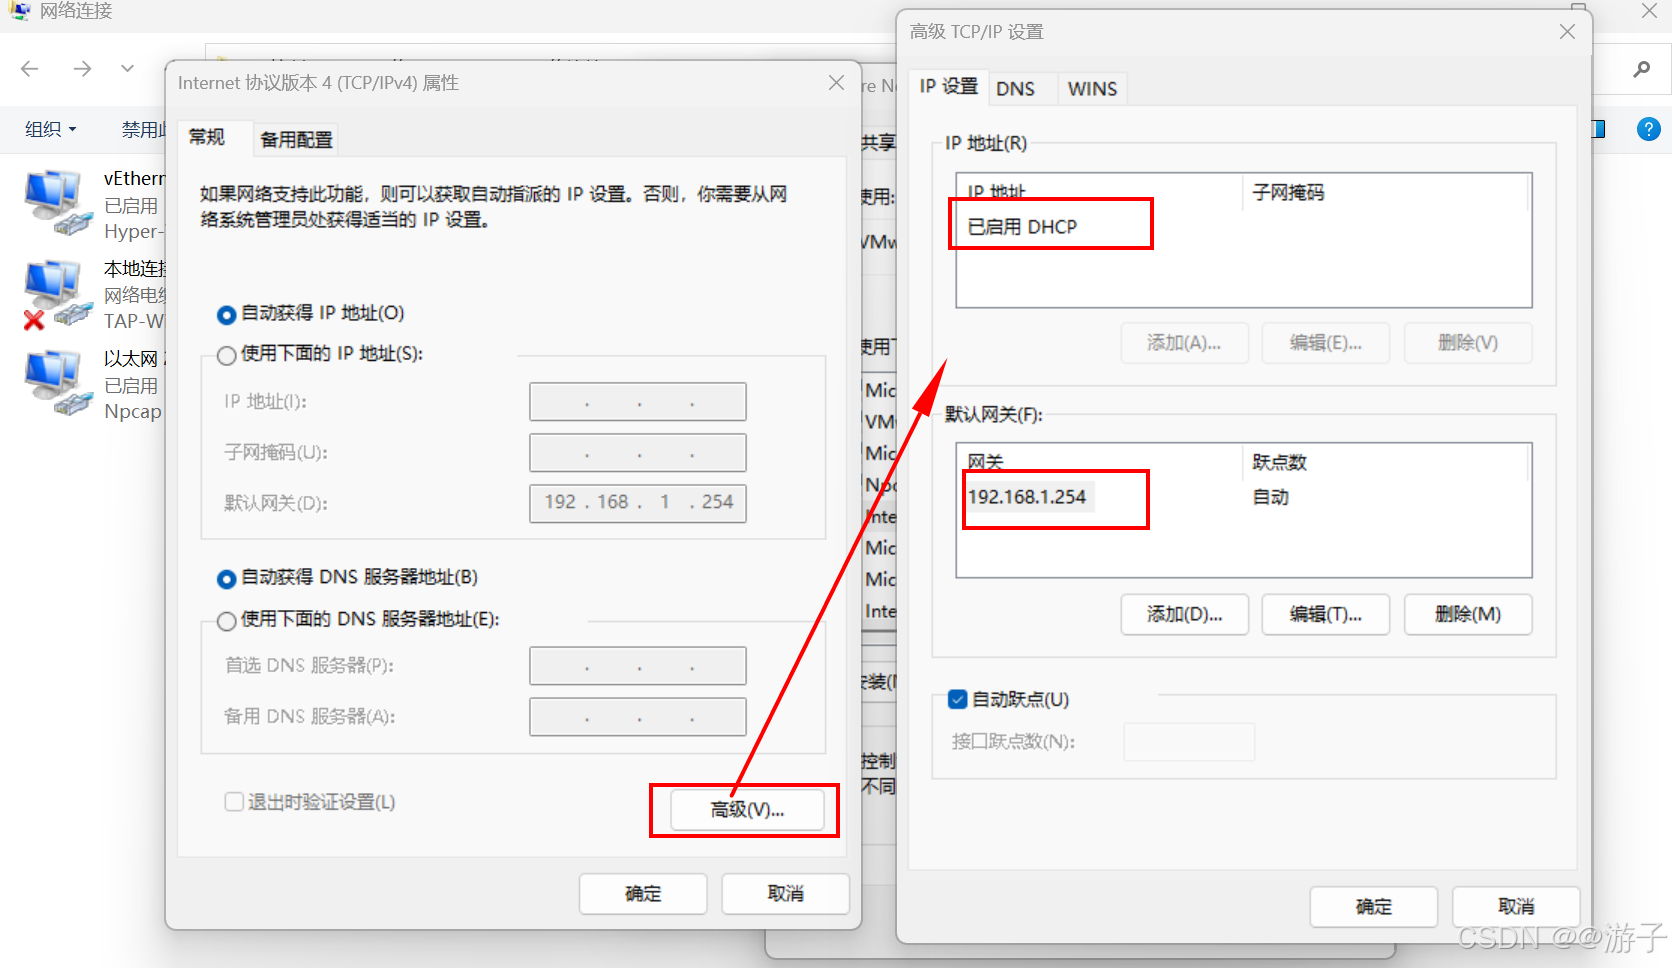
虚拟机网络不通的问题(这里以win10的问题为主,模式NAT)
当我们网关配置好了,DNS也配置好了,最后在虚拟机里还是无法访问百度的网址。 第一种情况: 我们先考虑一下,网关的IP是否和虚拟机编辑器里的IP一样不,如果不一样需要更改一下,因为我们访问百度需要从物理机…...