Bounding boxes augmentation for object detection
Different annotations formats
Bounding boxes are rectangles that mark objects on an image. There are multiple formats of bounding boxes annotations. Each format uses its specific representation of bouning boxes coordinates 每种格式都使用其特定的边界框坐标表示。. Albumentations supports four formats: pascal_voc, albumentations, coco, and yolo .
Let's take a look at each of those formats and how they represent coordinates 坐标 of bounding boxes.
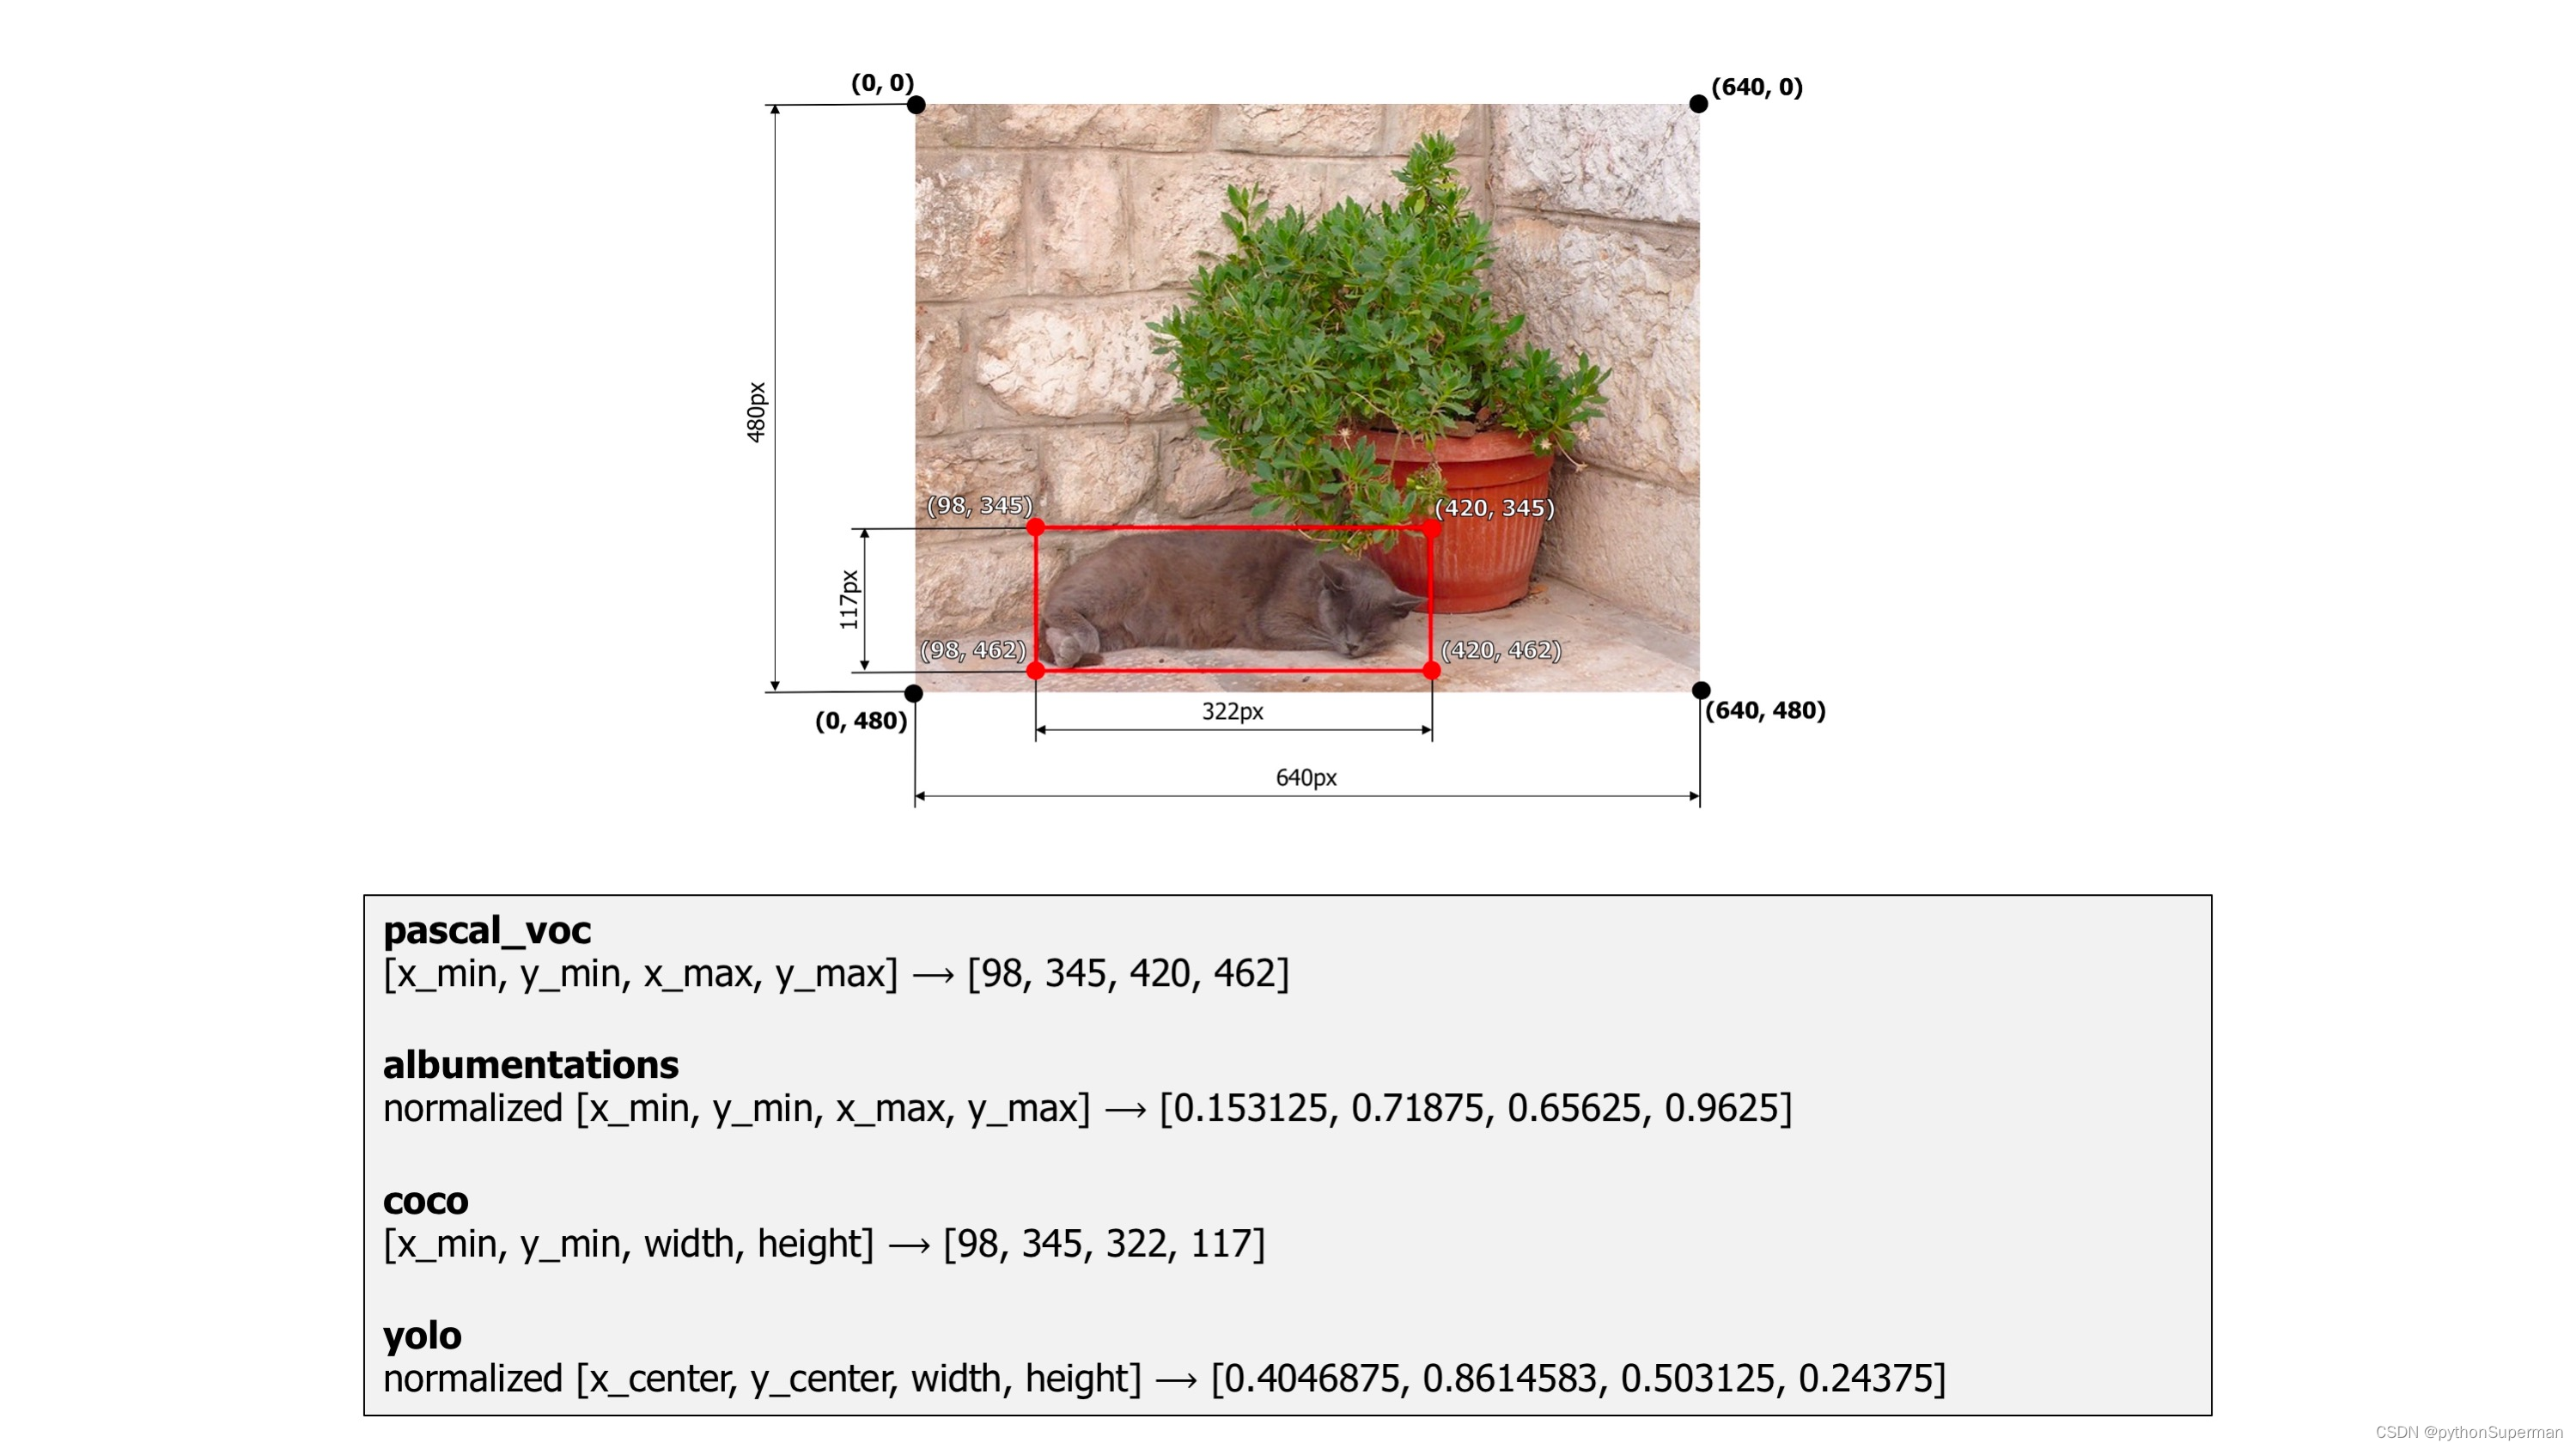
As an example, we will use an image from the dataset named Common Objects in Context. It contains one bounding box that marks a cat. The image width is 640 pixels, and its height is 480 pixels. The width of the bounding box is 322 pixels, and its height is 117 pixels.

An example image with a bounding box from the COCO dataset
pascal_voc
pascal_voc is a format used by the Pascal VOC dataset. Coordinates of a bounding box are encoded with four values in pixels: [x_min, y_min, x_max, y_max]. x_min and y_min are coordinates of the top-left corner of the bounding box. x_max and y_max are coordinates of bottom-right corner of the bounding box.
Coordinates of the example bounding box in this format are [98, 345, 420, 462].
albumentations
albumentations is similar to pascal_voc, because it also uses four values [x_min, y_min, x_max, y_max] to represent a bounding box. But unlike pascal_voc, albumentations uses normalized values. To normalize values, we divide coordinates in pixels for the x- and y-axis by the width and the height of the image.
Coordinates of the example bounding box in this format are [98 / 640, 345 / 480, 420 / 640, 462 / 480] which are [0.153125, 0.71875, 0.65625, 0.9625].
Albumentations uses this format internally 内部 to work with bounding boxes and augment them.
coco
coco is a format used by the Common Objects in Context COCOCOCO dataset.
In coco, a bounding box is defined by four values in pixels [x_min, y_min, width, height]. They are coordinates of the top-left corner along with the width and height of the bounding box.
Coordinates of the example bounding box in this format are [98, 345, 322, 117].
yolo
In yolo, a bounding box is represented by four values [x_center, y_center, width, height]. x_center and y_center are the normalized coordinates of the center of the bounding box. To make coordinates normalized, we take pixel values of x and y, which marks the center of the bounding box on the x- and y-axis. Then we divide the value of x by the width of the image and value of y by the height of the image. width and height represent the width and the height of the bounding box. They are normalized as well.
Coordinates of the example bounding box in this format are [((420 + 98) / 2) / 640, ((462 + 345) / 2) / 480, 322 / 640, 117 / 480] which are [0.4046875, 0.840625, 0.503125, 0.24375].
Bounding boxes augmentation
Just like with images and masks augmentation, the process of augmenting bounding boxes consists of 4 steps.
- You import the required libraries.
- You define an augmentation pipeline.
- You read images and bounding boxes from the disk.
- You pass an image and bounding boxes to the augmentation pipeline and receive augmented images and boxes.
Note
Some transforms in Albumentation don't support bounding boxes. If you try to use them you will get an exception. Please refer to this article to check whether a transform can augment bounding boxes.
Step 1. Import the required libraries.
import albumentations as A
import cv2
Step 2. Define an augmentation pipeline.
Here an example of a minimal declaration of an augmentation pipeline that works with bounding boxes.
transform = A.Compose([A.RandomCrop(width=450, height=450),A.HorizontalFlip(p=0.5),A.RandomBrightnessContrast(p=0.2),
], bbox_params=A.BboxParams(format='coco'))
Note that unlike image and masks augmentation, Compose now has an additional parameter bbox_params. You need to pass an instance of A.BboxParams to that argument. A.BboxParams specifies settings for working with bounding boxes. format sets the format for bounding boxes coordinates.
It can either be pascal_voc, albumentations, coco or yolo. This value is required because Albumentation needs to know the coordinates' source format for bounding boxes to apply augmentations correctly.
Besides format, A.BboxParams supports a few more settings.
Here is an example of Compose that shows all available settings with A.BboxParams:
transform = A.Compose([A.RandomCrop(width=450, height=450),A.HorizontalFlip(p=0.5),A.RandomBrightnessContrast(p=0.2),
], bbox_params=A.BboxParams(format='coco', min_area=1024, min_visibility=0.1, label_fields=['class_labels']))
min_area and min_visibility
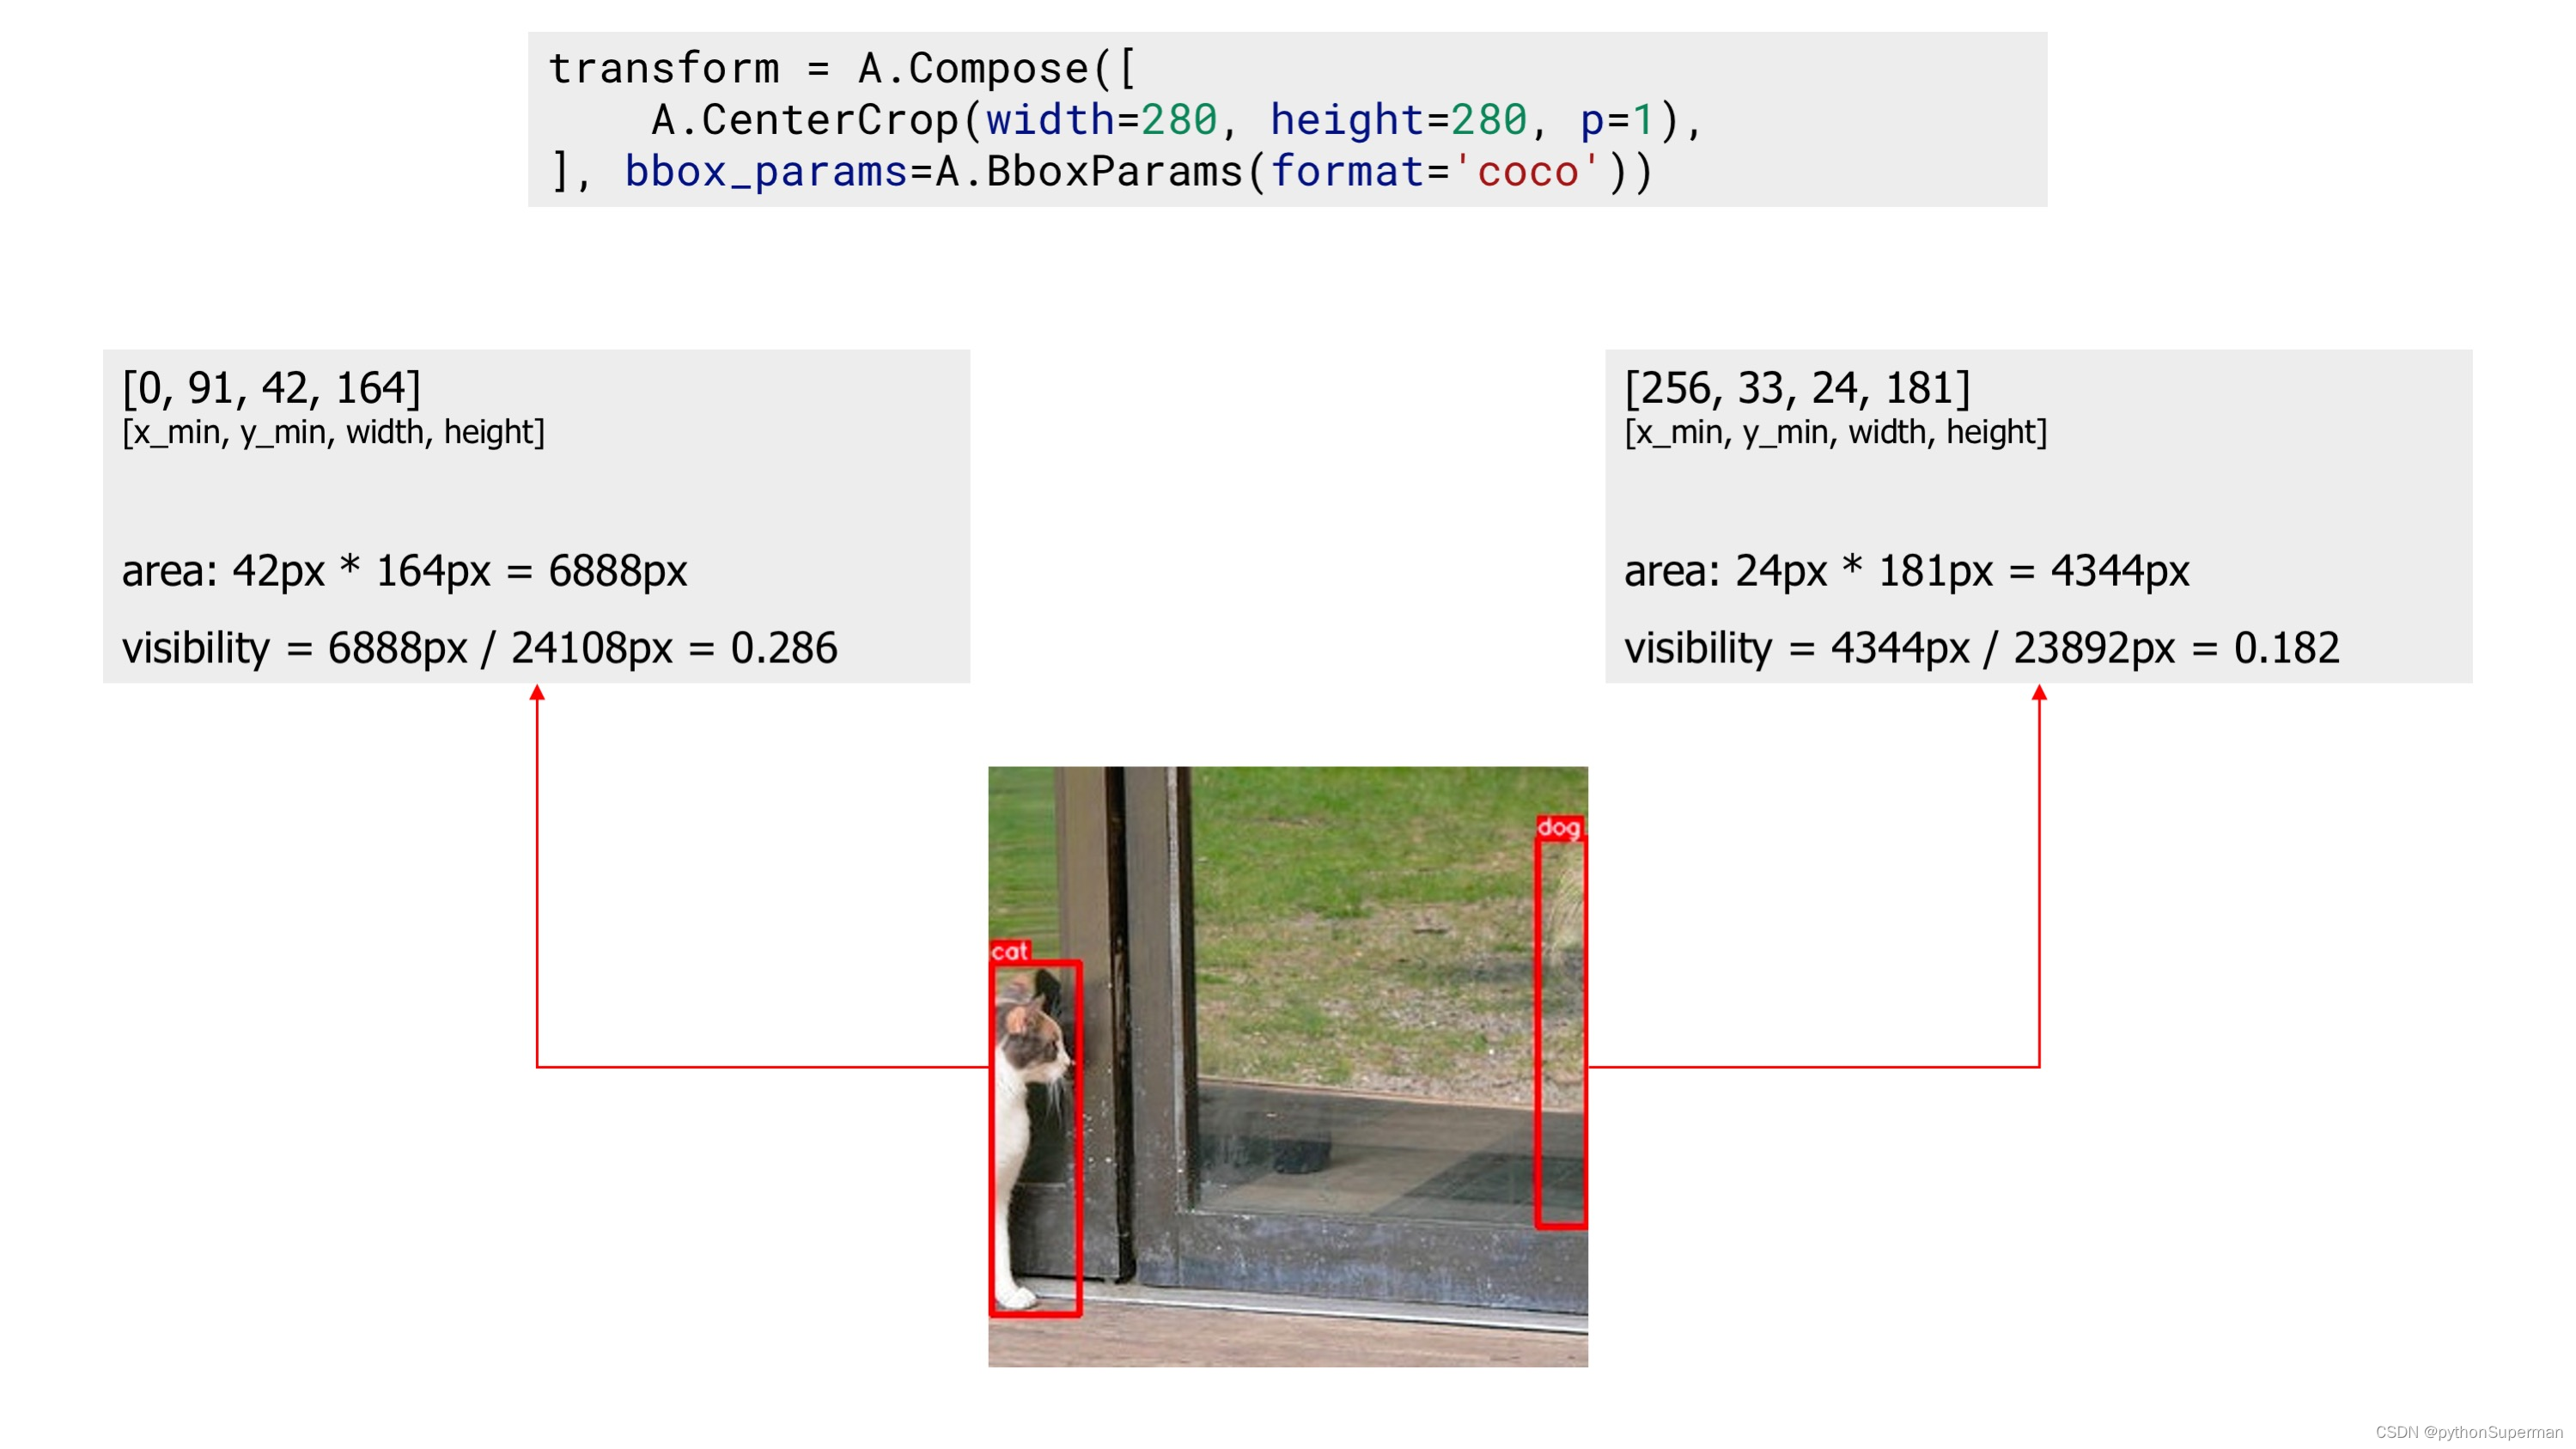
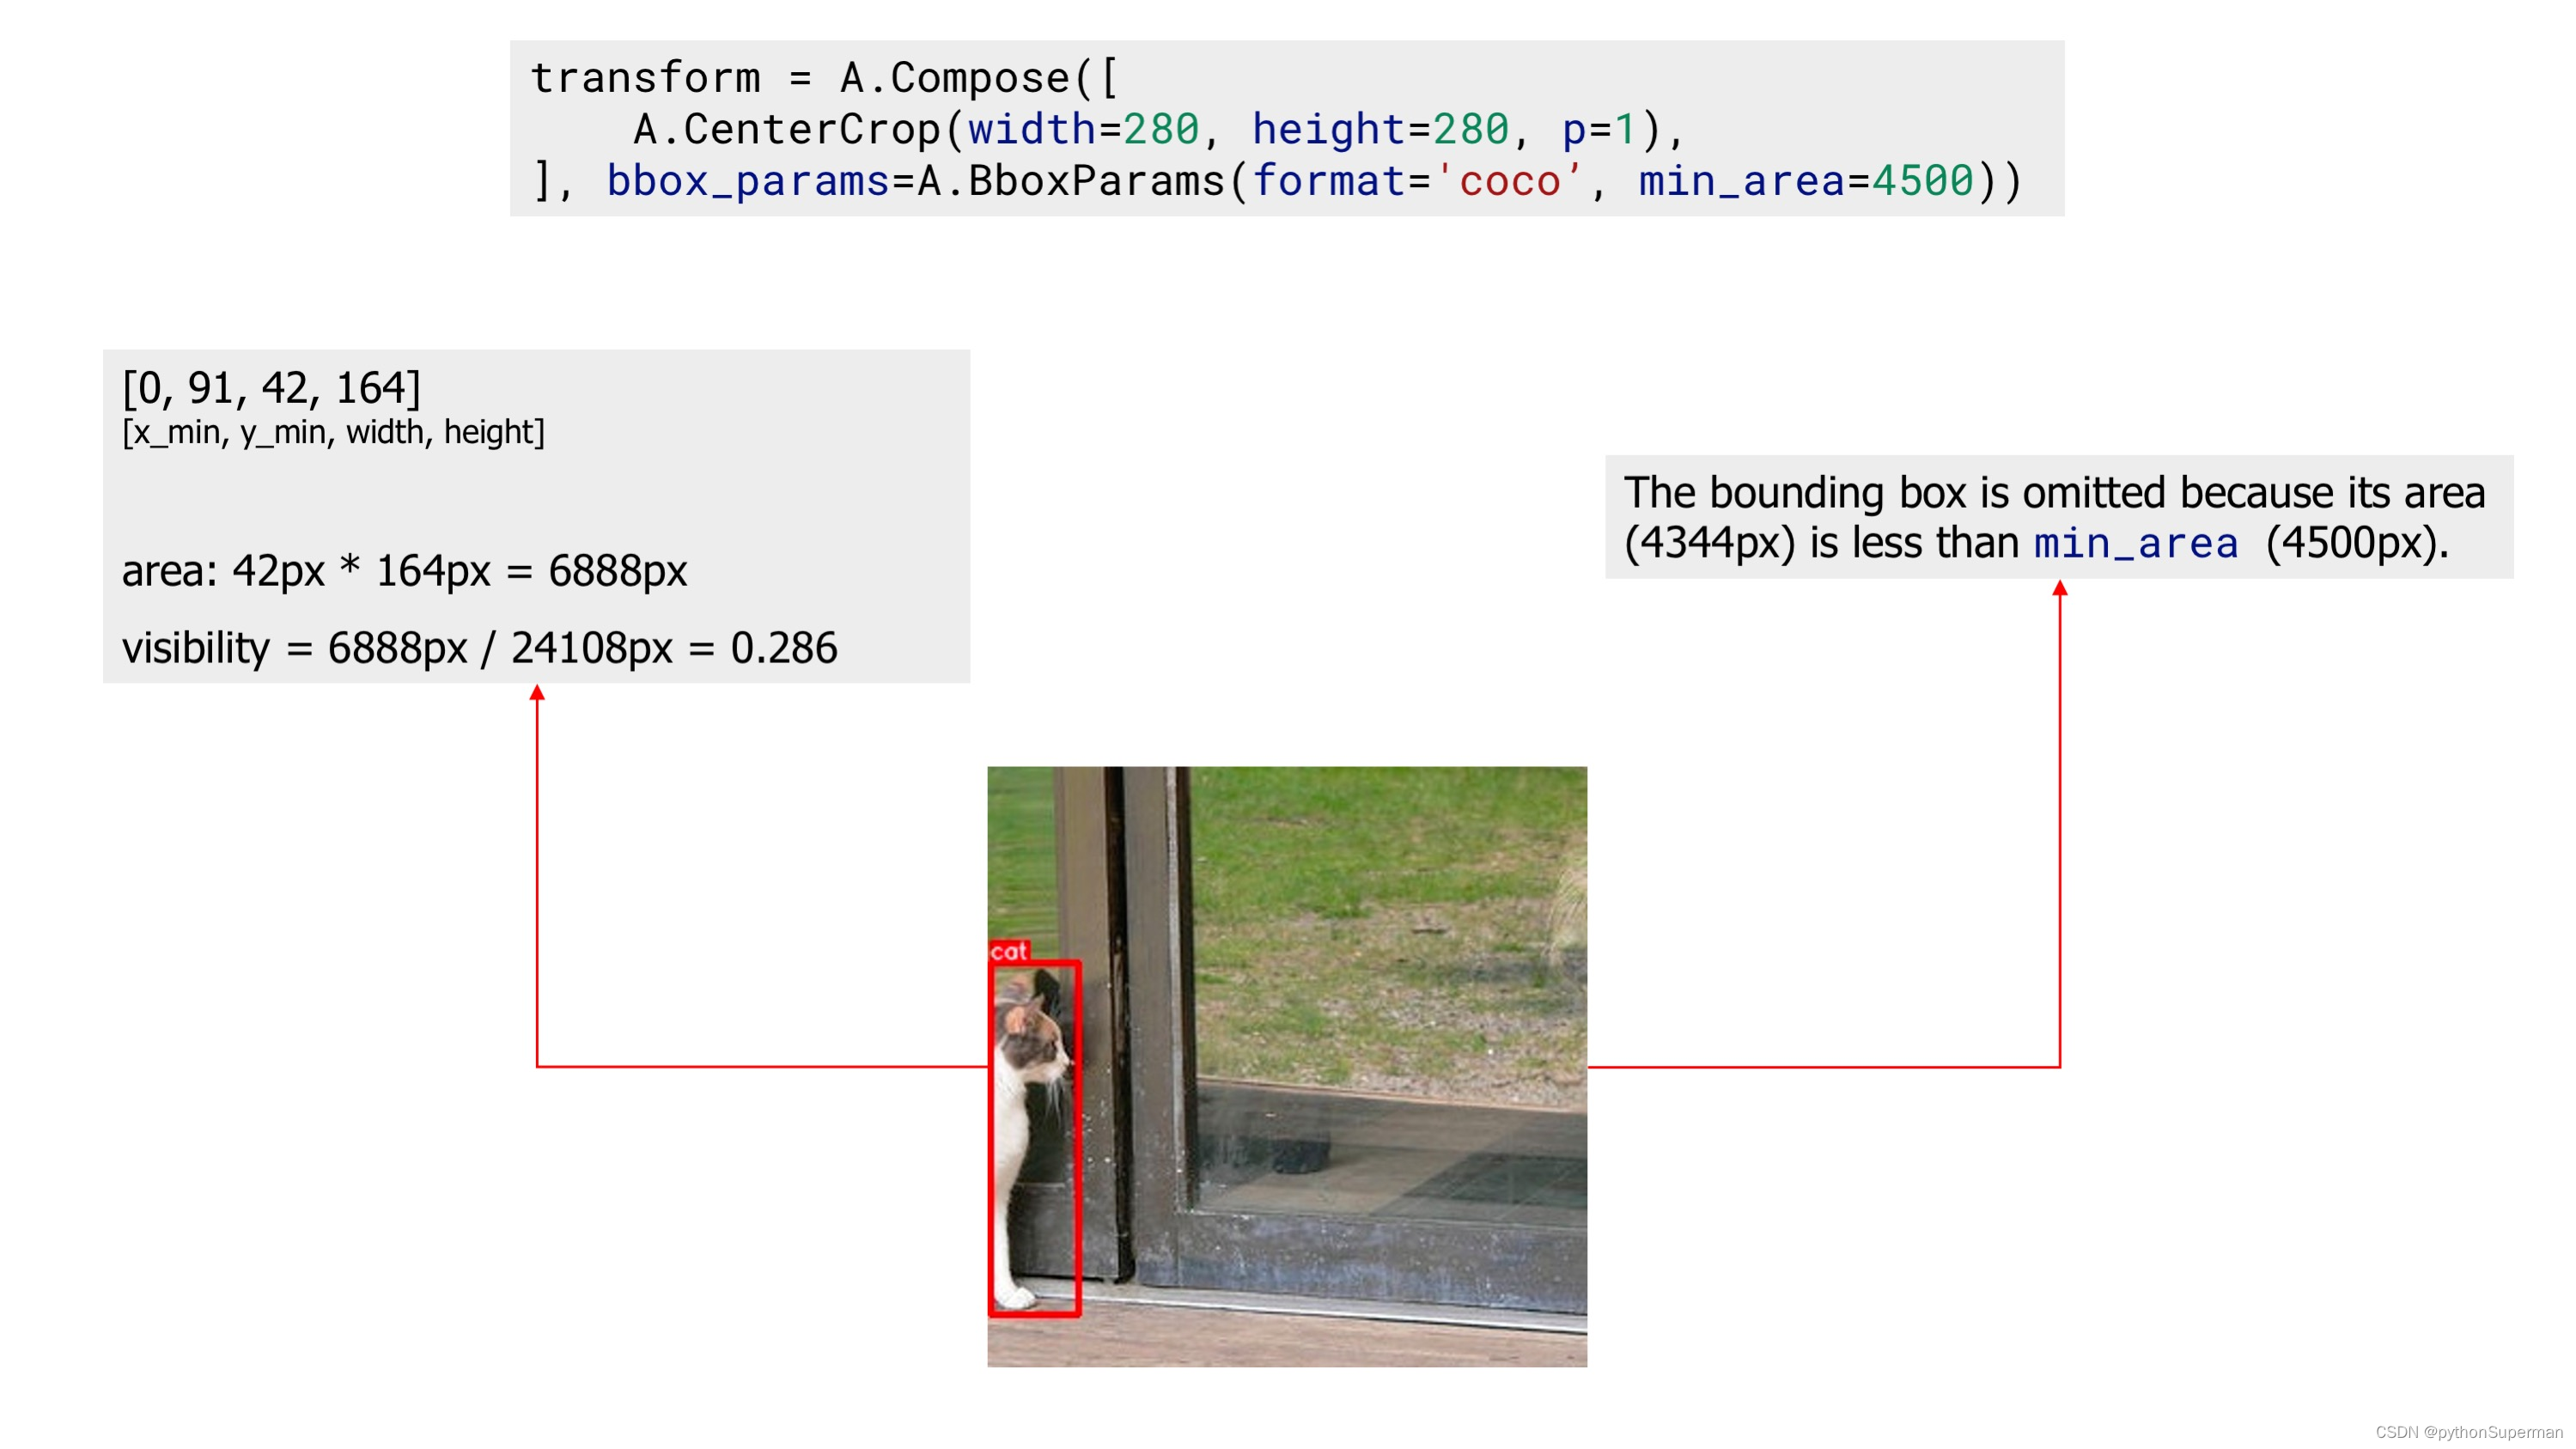
min_area and min_visibility parameters control what Albumentations should do to the augmented bounding boxes if their size has changed after augmentation. The size of bounding boxes could change if you apply spatial augmentations 空间增强 , for example, when you crop 裁剪 a part of an image or when you resize an image.
min_area is a value in pixels 是以像素为单位的值. If the area of a bounding box after augmentation becomes smaller than min_area, Albumentations will drop that box. So the returned list of augmented bounding boxes won't contain that bounding box.
min_visibility is a value between 0 and 1. If the ratio of the bounding box area after augmentation to the area of the bounding box before augmentation becomes smaller than min_visibility, Albumentations will drop that box. So if the augmentation process cuts the most of the bounding box, that box won't be present in the returned list of the augmented bounding boxes.
Here is an example image that contains two bounding boxes. Bounding boxes coordinates are declared using the coco format.
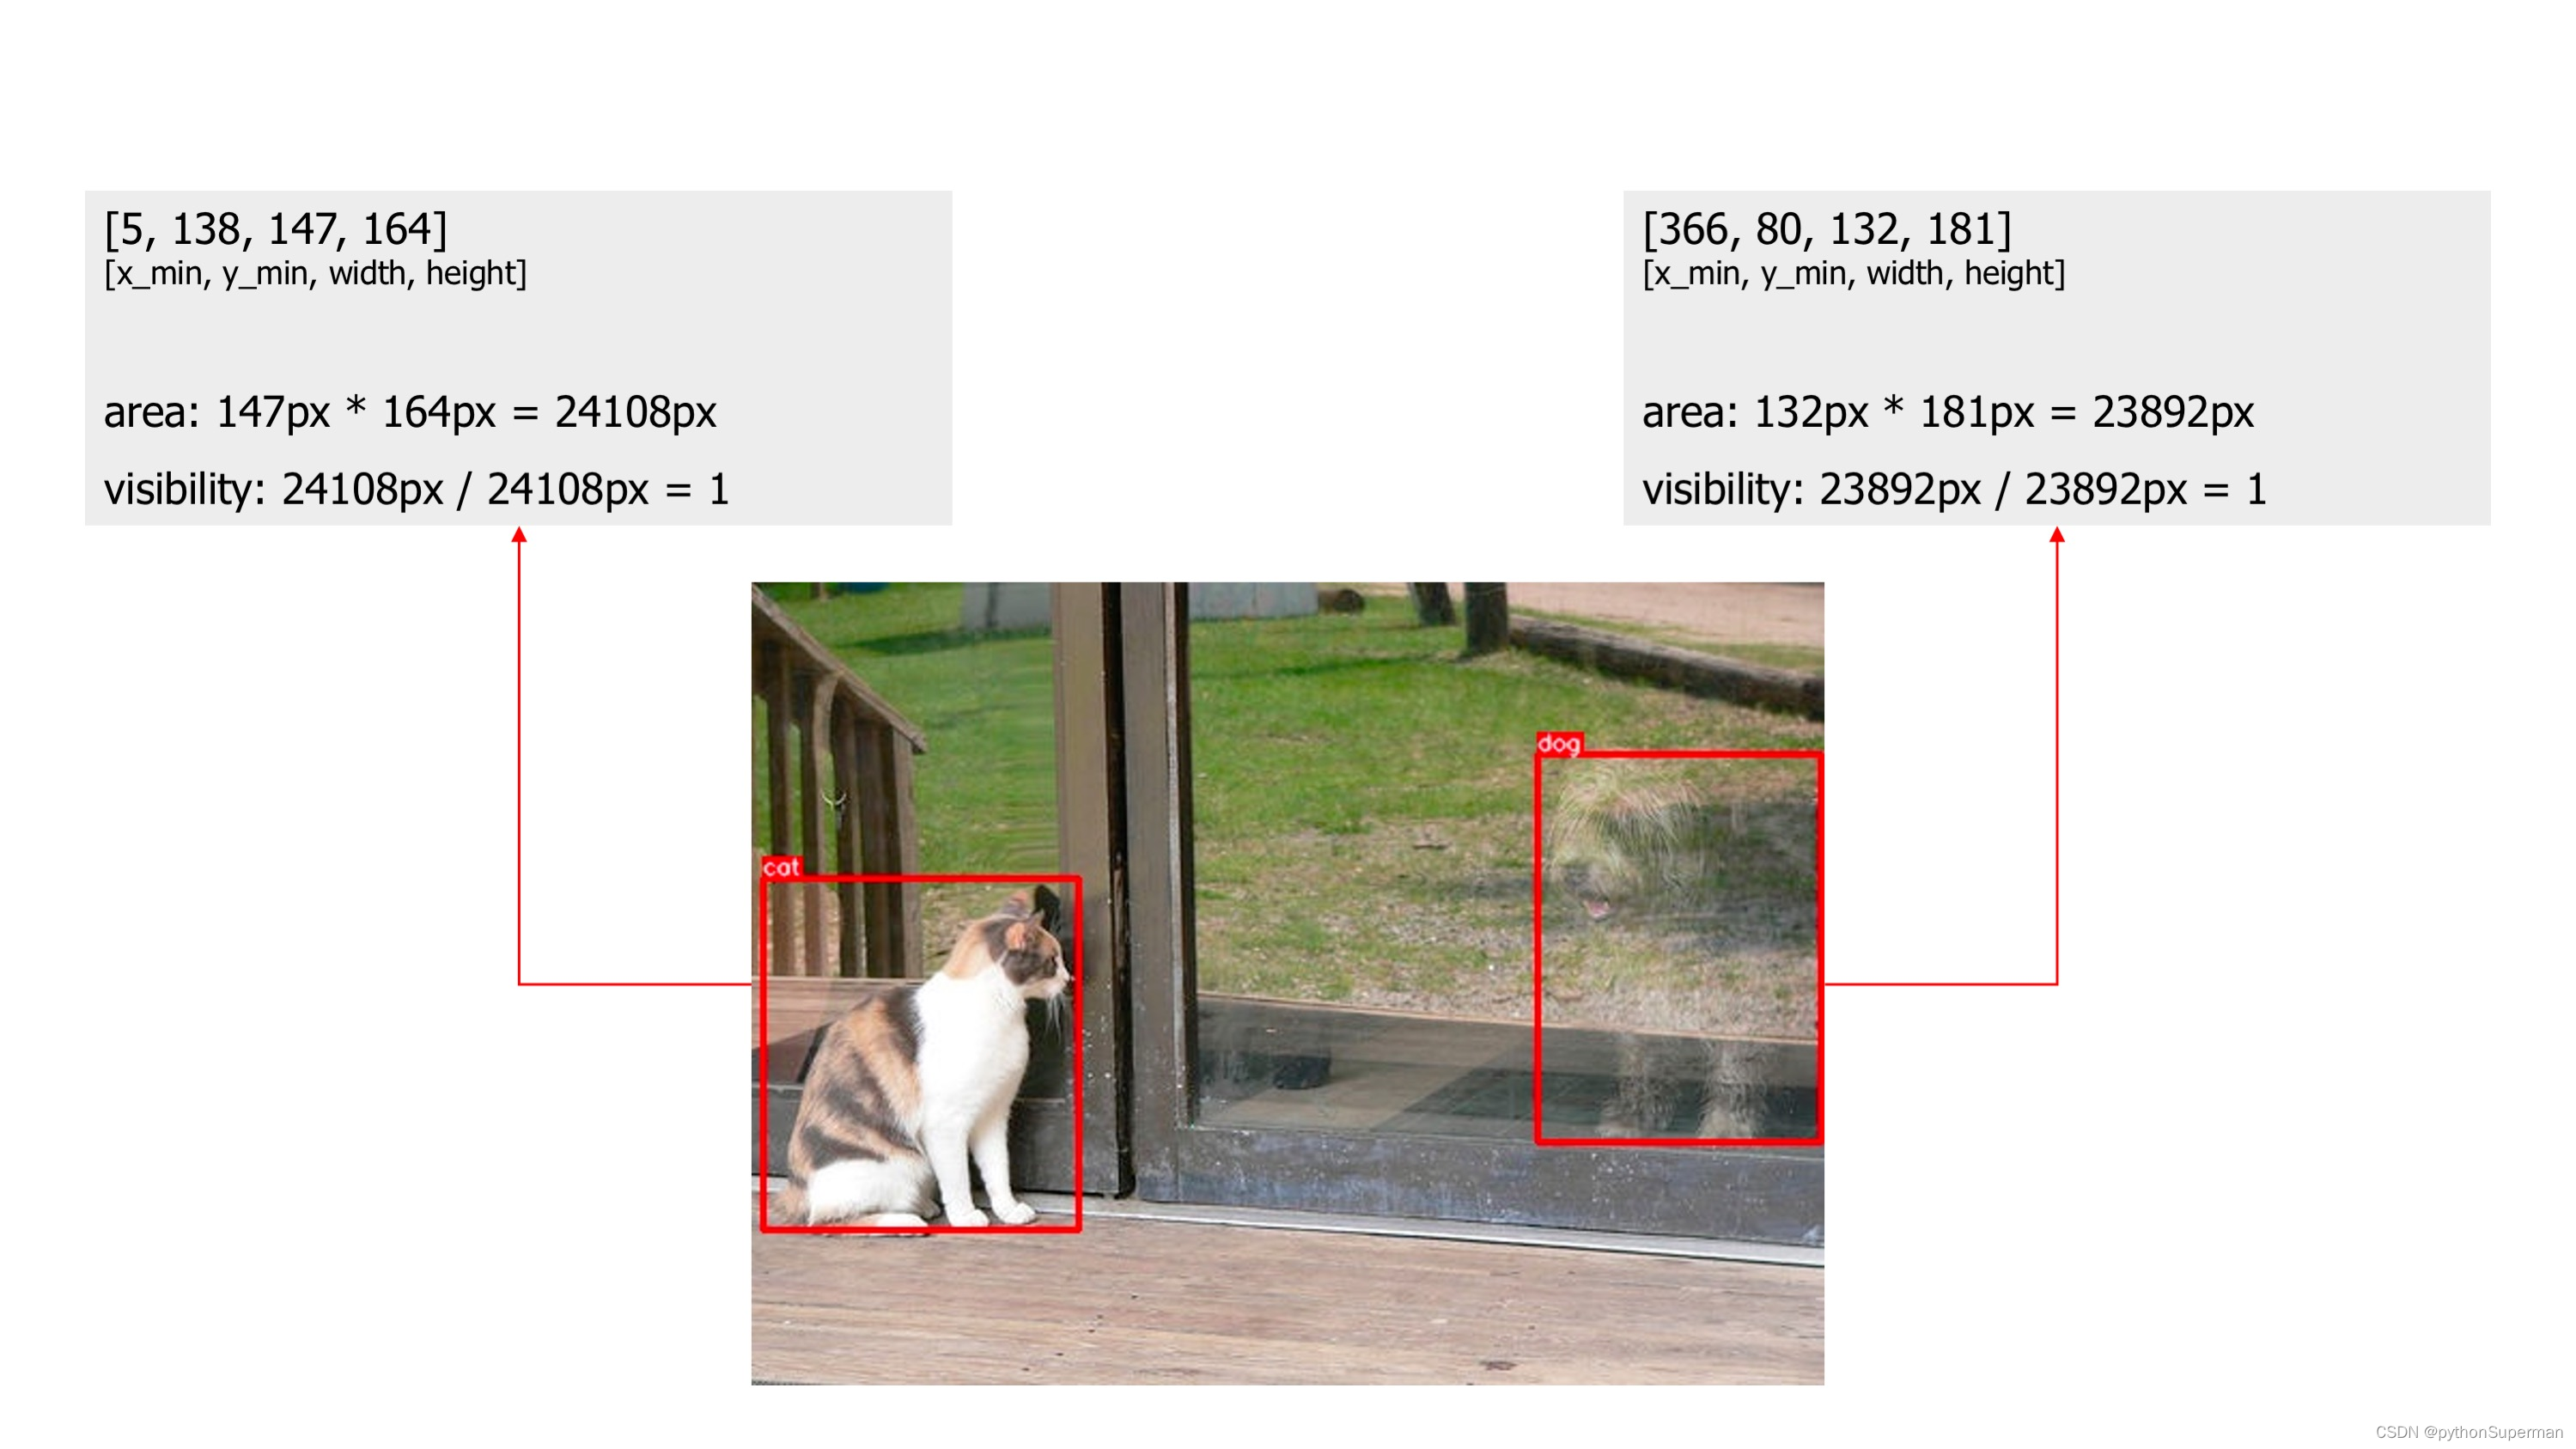
An example image with two bounding boxes
First, we apply the CenterCrop augmentation without declaring parameters min_area and min_visibility. The augmented image contains two bounding boxes.
An example image with two bounding boxes after applying augmentation
Next, we apply the same CenterCrop augmentation, but now we also use the min_area parameter. Now, the augmented image contains only one bounding box, because the other bounding box's area after augmentation became smaller than min_area, so Albumentations dropped that bounding box.
An example image with one bounding box after applying augmentation with 'min_area'
Finally, we apply the CenterCrop augmentation with the min_visibility. After that augmentation, the resulting image doesn't contain any bounding box, because visibility of all bounding boxes after augmentation are below threshold set by min_visibility.
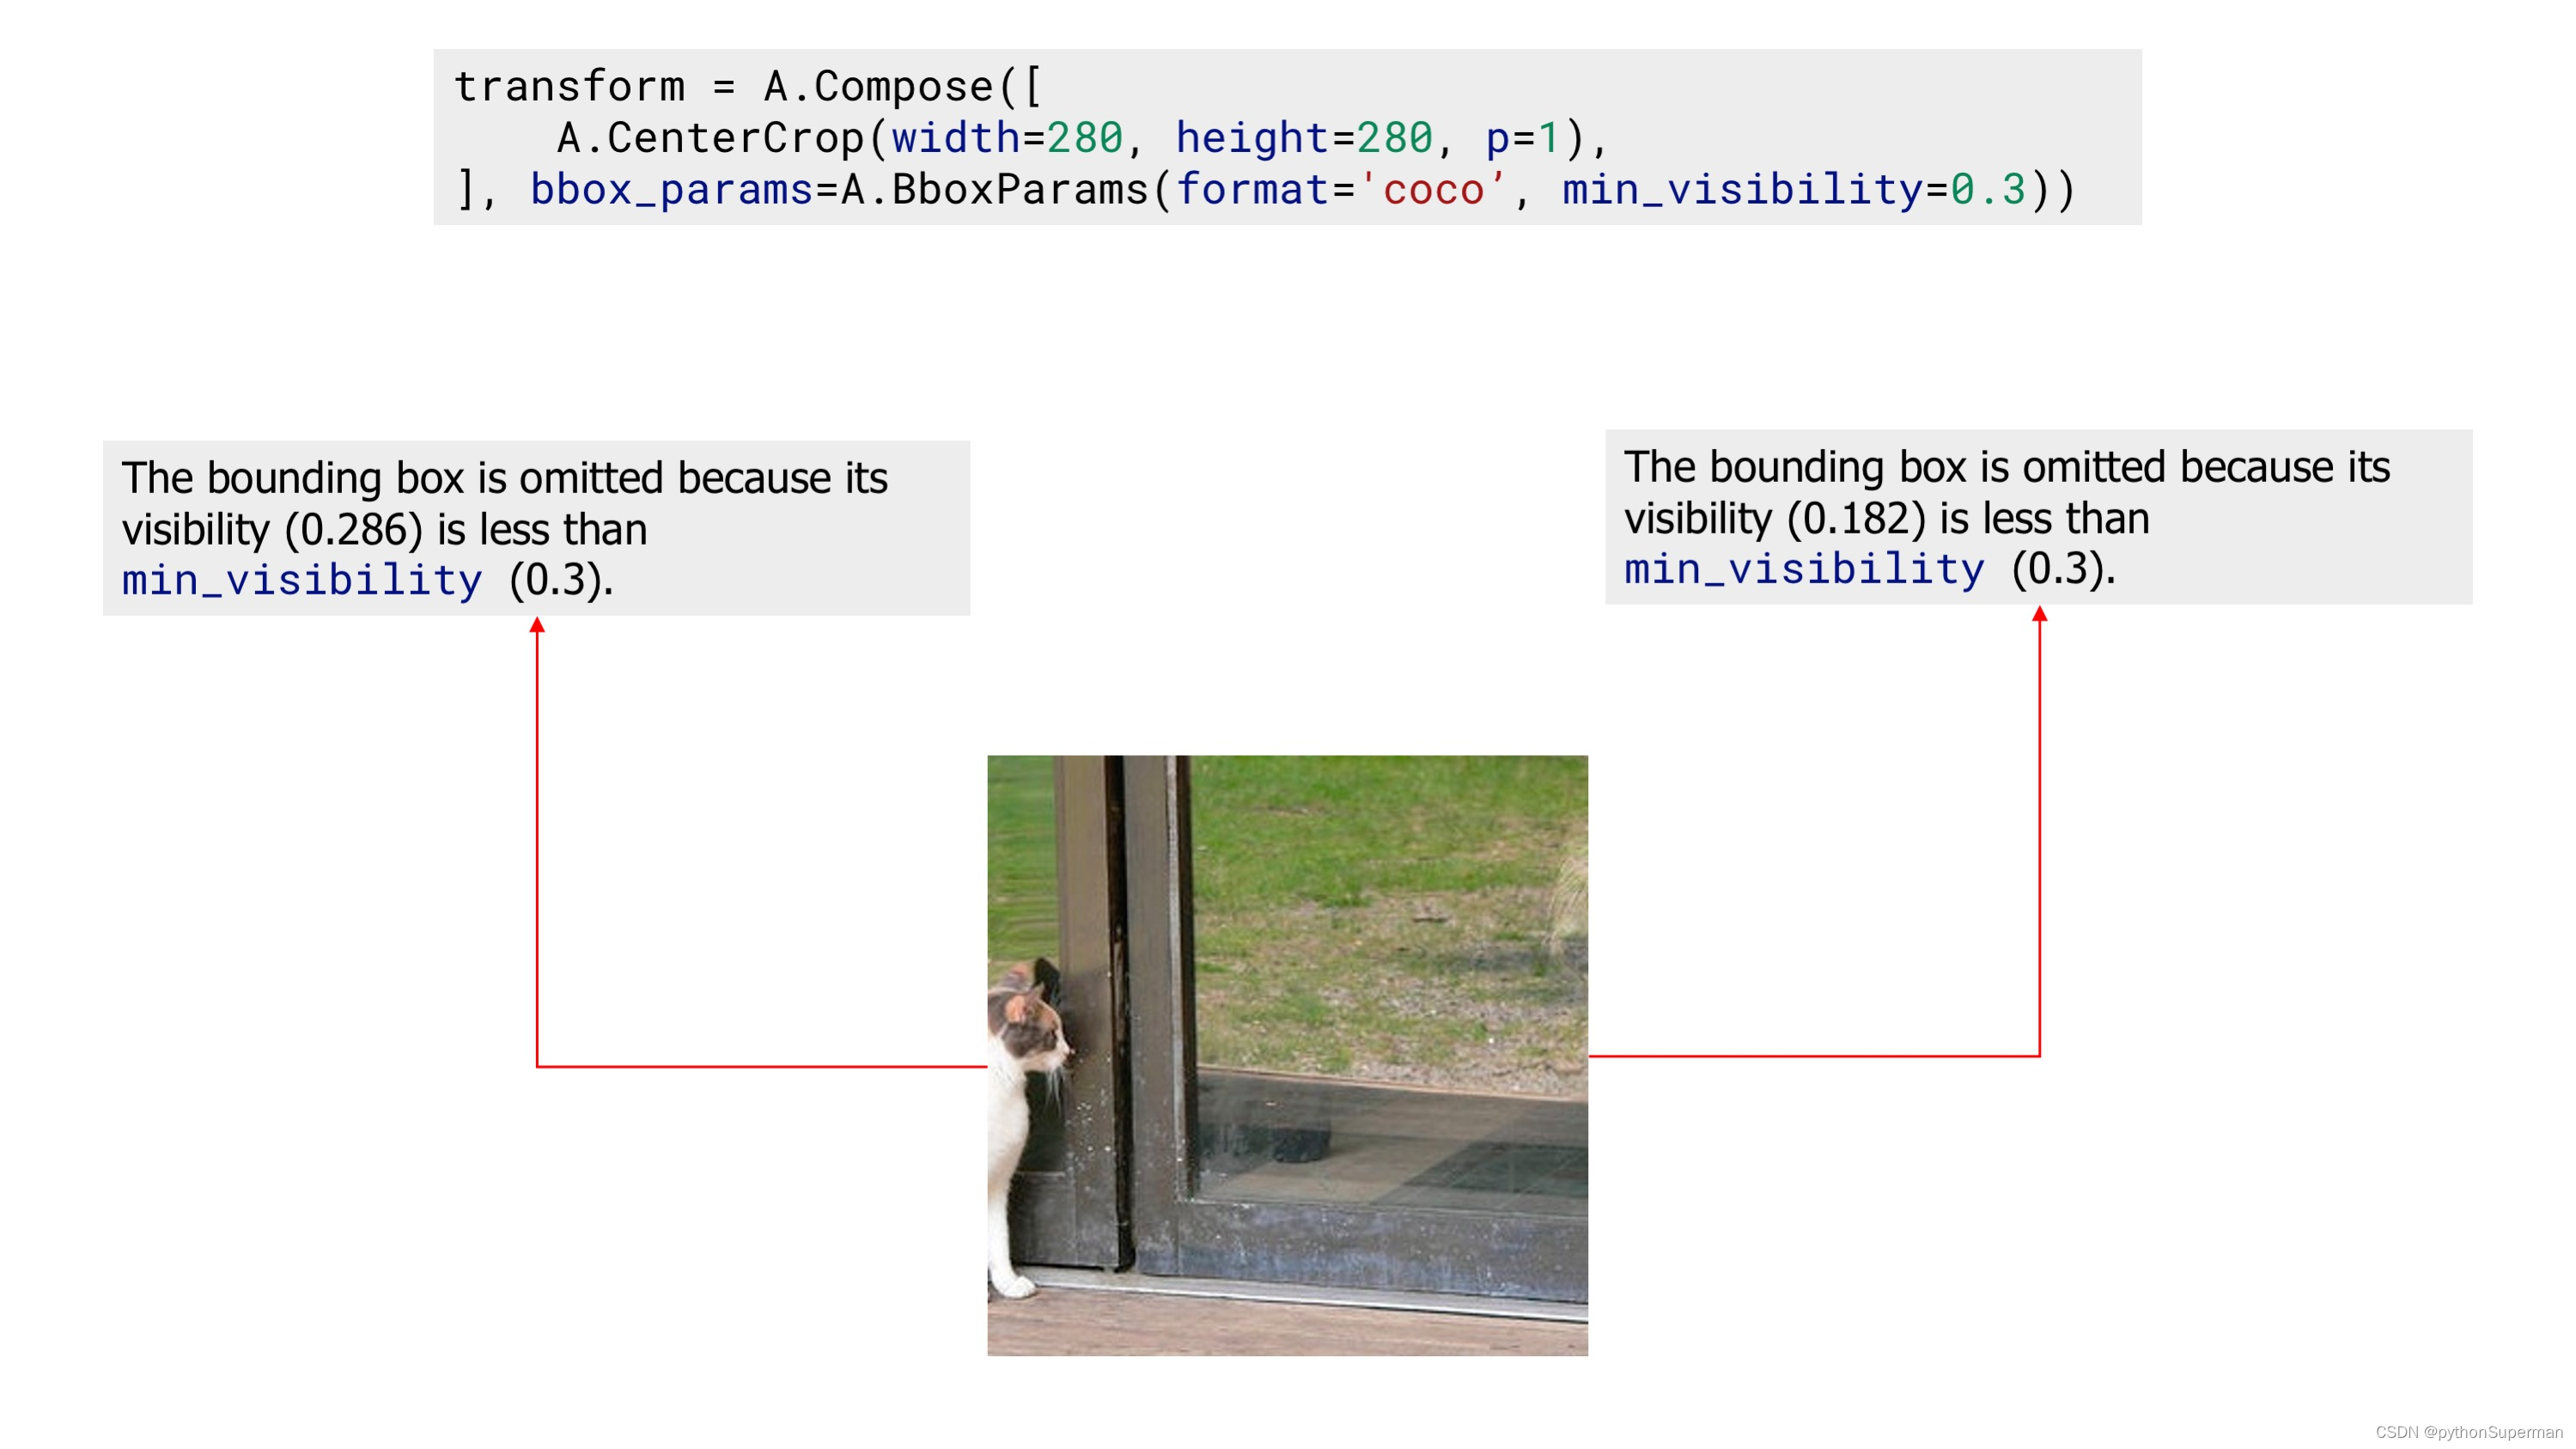
An example image with zero bounding boxes after applying augmentation with 'min_visibility'
Class labels for bounding boxes
Besides coordinates, each bounding box should have an associated class label that tells which object lies inside the bounding box. There are two ways to pass a label for a bounding box.
Let's say you have an example image with three objects: dog, cat, and sports ball. Bounding boxes coordinates in the coco format for those objects are [23, 74, 295, 388], [377, 294, 252, 161], and [333, 421, 49, 49].
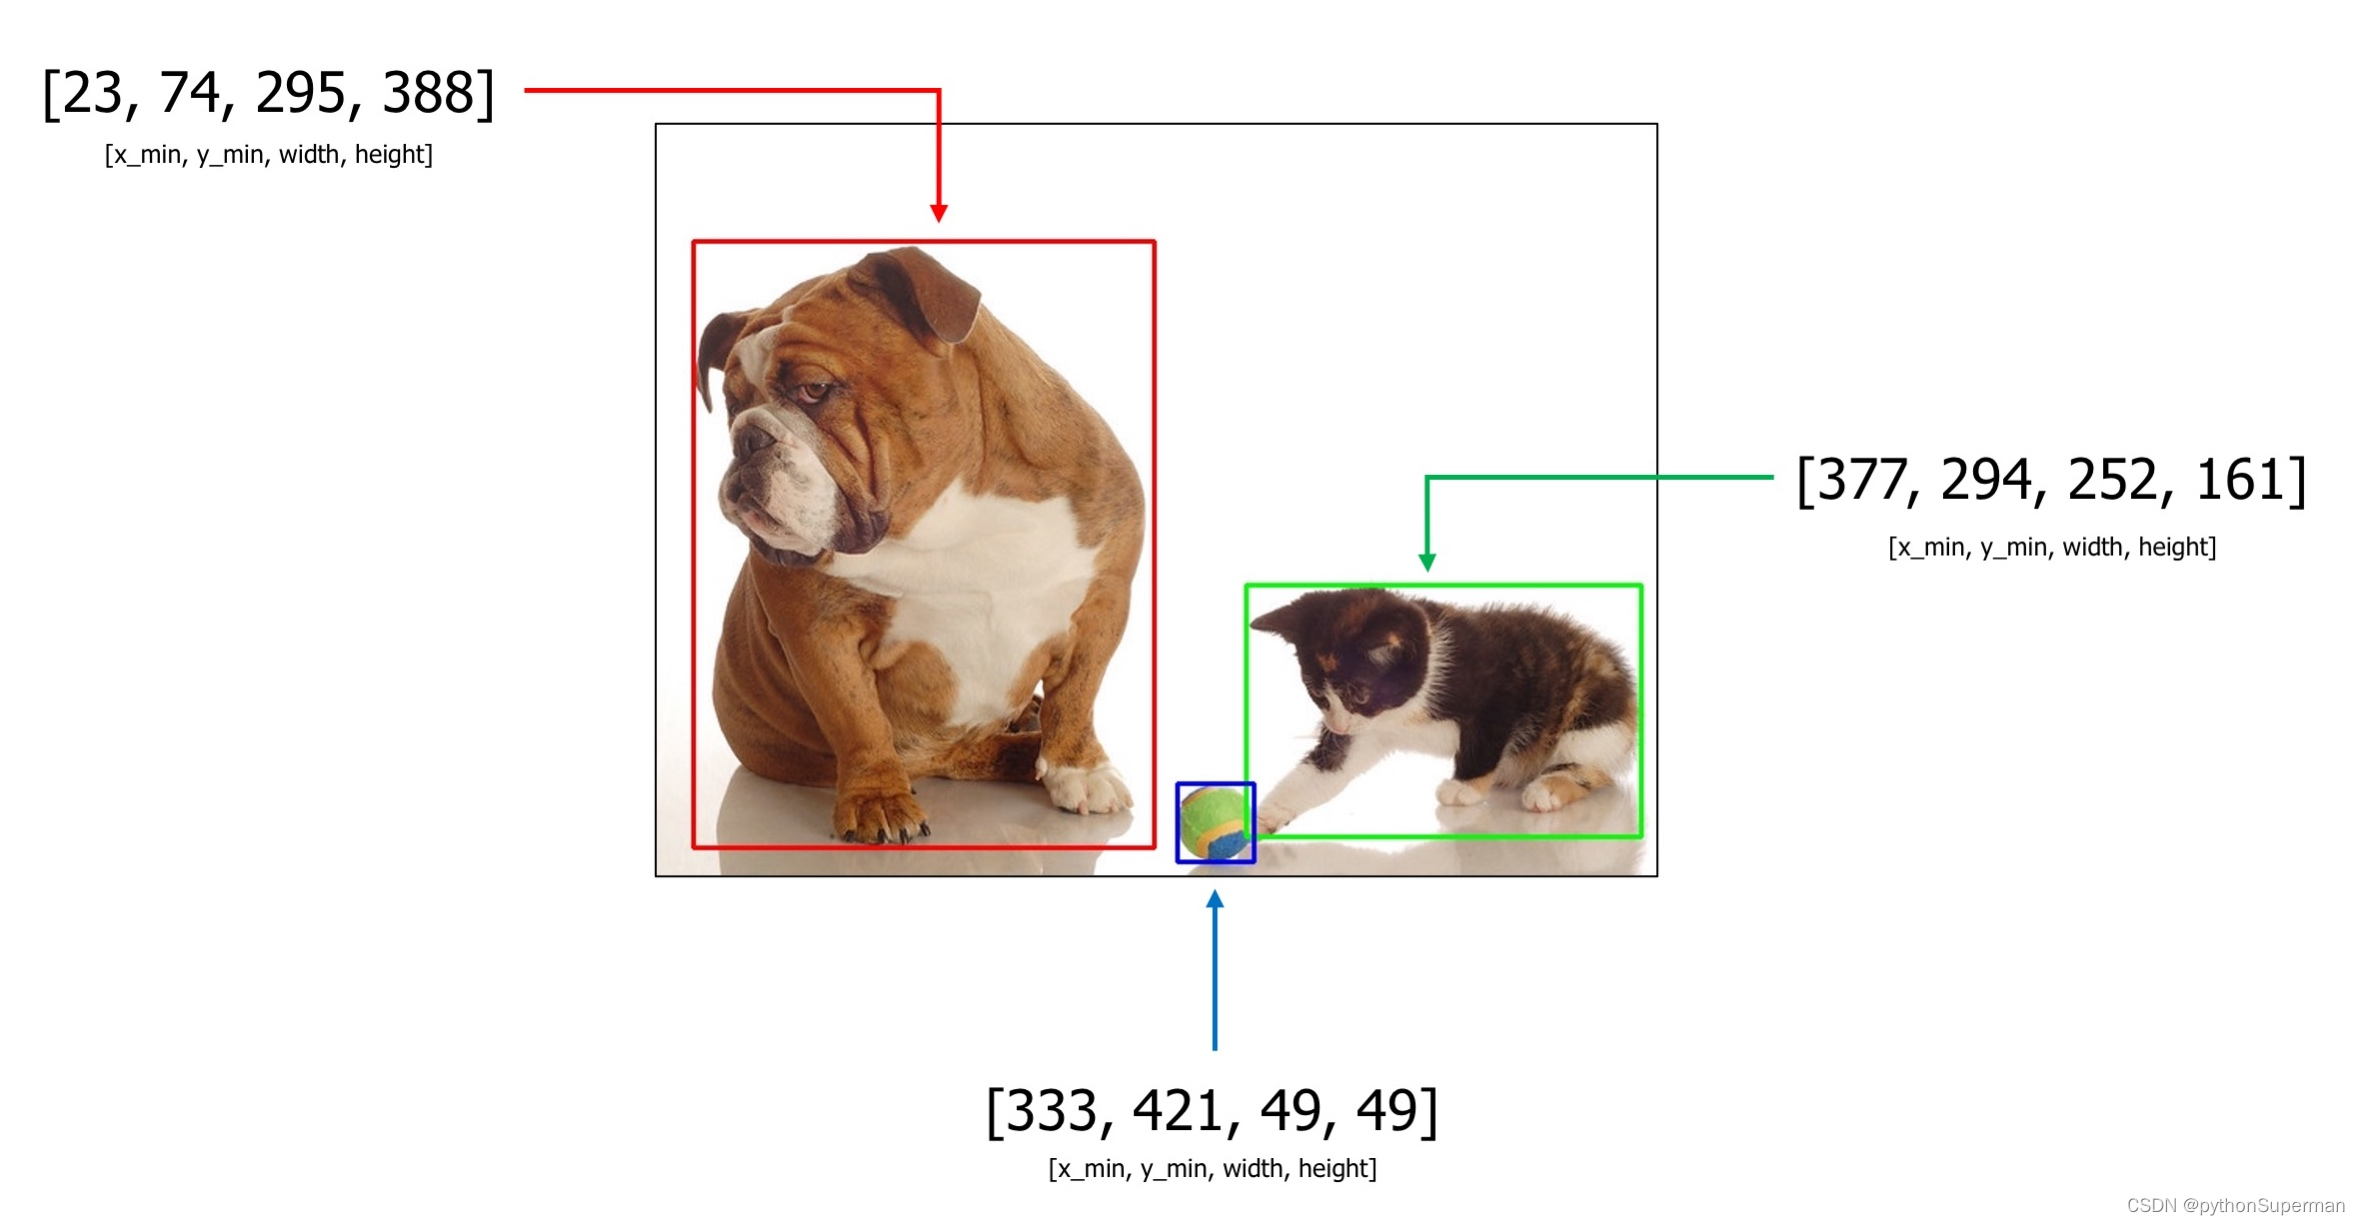
An example image with 3 bounding boxes from the COCO dataset
1. You can pass labels along with bounding boxes coordinates by adding them as additional values to the list of coordinates.
For the image above, bounding boxes with class labels will become [23, 74, 295, 388, 'dog'], [377, 294, 252, 161, 'cat'], and [333, 421, 49, 49, 'sports ball'].
Class labels could be of any type: integer, string, or any other Python data type. For example, integer values as class labels will look the following:
[23, 74, 295, 388, 18],[377, 294, 252, 161, 17], and[333, 421, 49, 49, 37].
Also, you can use multiple class values for each bounding box, for example [23, 74, 295, 388, 'dog', 'animal'], [377, 294, 252, 161, 'cat', 'animal'], and [333, 421, 49, 49, 'sports ball', 'item'].
2.You can pass labels for bounding boxes as a separate list (the preferred way).
For example, if you have three bounding boxes like [23, 74, 295, 388], [377, 294, 252, 161], and [333, 421, 49, 49] you can create a separate list with values like ['cat', 'dog', 'sports ball'], or [18, 17, 37] that contains class labels for those bounding boxes. Next, you pass that list with class labels as a separate argument to the transform function. Albumentations needs to know the names of all those lists with class labels to join them with augmented bounding boxes correctly. Then, if a bounding box is dropped after augmentation because it is no longer visible, Albumentations will drop the class label for that box as well. Use label_fields parameter to set names for all arguments in transform that will contain label descriptions for bounding boxes (more on that in Step 4).
Step 3. Read images and bounding boxes from the disk.
Read an image from the disk.
image = cv2.imread("/path/to/image.jpg")
image = cv2.cvtColor(image, cv2.COLOR_BGR2RGB)
Bounding boxes can be stored on the disk in different serialization formats: JSON, XML, YAML, CSV, etc. So the code to read bounding boxes depends on the actual format of data on the disk.
After you read the data from the disk, you need to prepare bounding boxes for Albumentations.
Albumentations expects that bounding boxes will be represented 表示 as a list of lists. Each list contains information about a single bounding box. A bounding box definition should have at list four elements that represent the coordinates of that bounding box. The actual meaning of those four values depends on the format of bounding boxes (either pascal_voc, albumentations, coco, or yolo). Besides four coordinates, each definition of a bounding box may contain one or more extra values. You can use those extra values to store additional information about the bounding box, such as a class label of the object inside the box. During augmentation, Albumentations will not process those extra values. The library will return them as is along with the updated coordinates of the augmented bounding box 库将按原样返回它们以及增强边界框的更新坐标.
Step 4. Pass an image and bounding boxes to the augmentation pipeline and receive augmented images and boxes.
As discussed in Step 2, there are two ways of passing class labels along with bounding boxes coordinates:
1. Pass class labels along with coordinates.
So, if you have coordinates of three bounding boxes that look like this:
bboxes = [[23, 74, 295, 388],[377, 294, 252, 161],[333, 421, 49, 49],
]
you can add a class label for each bounding box as an additional element of the list along with four coordinates. So now a list with bounding boxes and their coordinates will look the following:
bboxes = [[23, 74, 295, 388, 'dog'],[377, 294, 252, 161, 'cat'],[333, 421, 49, 49, 'sports ball'],
]
or with multiple labels per each bounding box:
bboxes = [[23, 74, 295, 388, 'dog', 'animal'],[377, 294, 252, 161, 'cat', 'animal'],[333, 421, 49, 49, 'sports ball', 'item'],
]
You can use any data type for declaring class labels. It can be string, integer, or any other Python data type.
Next, you pass an image and bounding boxes for it to the transform function and receive the augmented image and bounding boxes.
transformed = transform(image=image, bboxes=bboxes)
transformed_image = transformed['image']
transformed_bboxes = transformed['bboxes']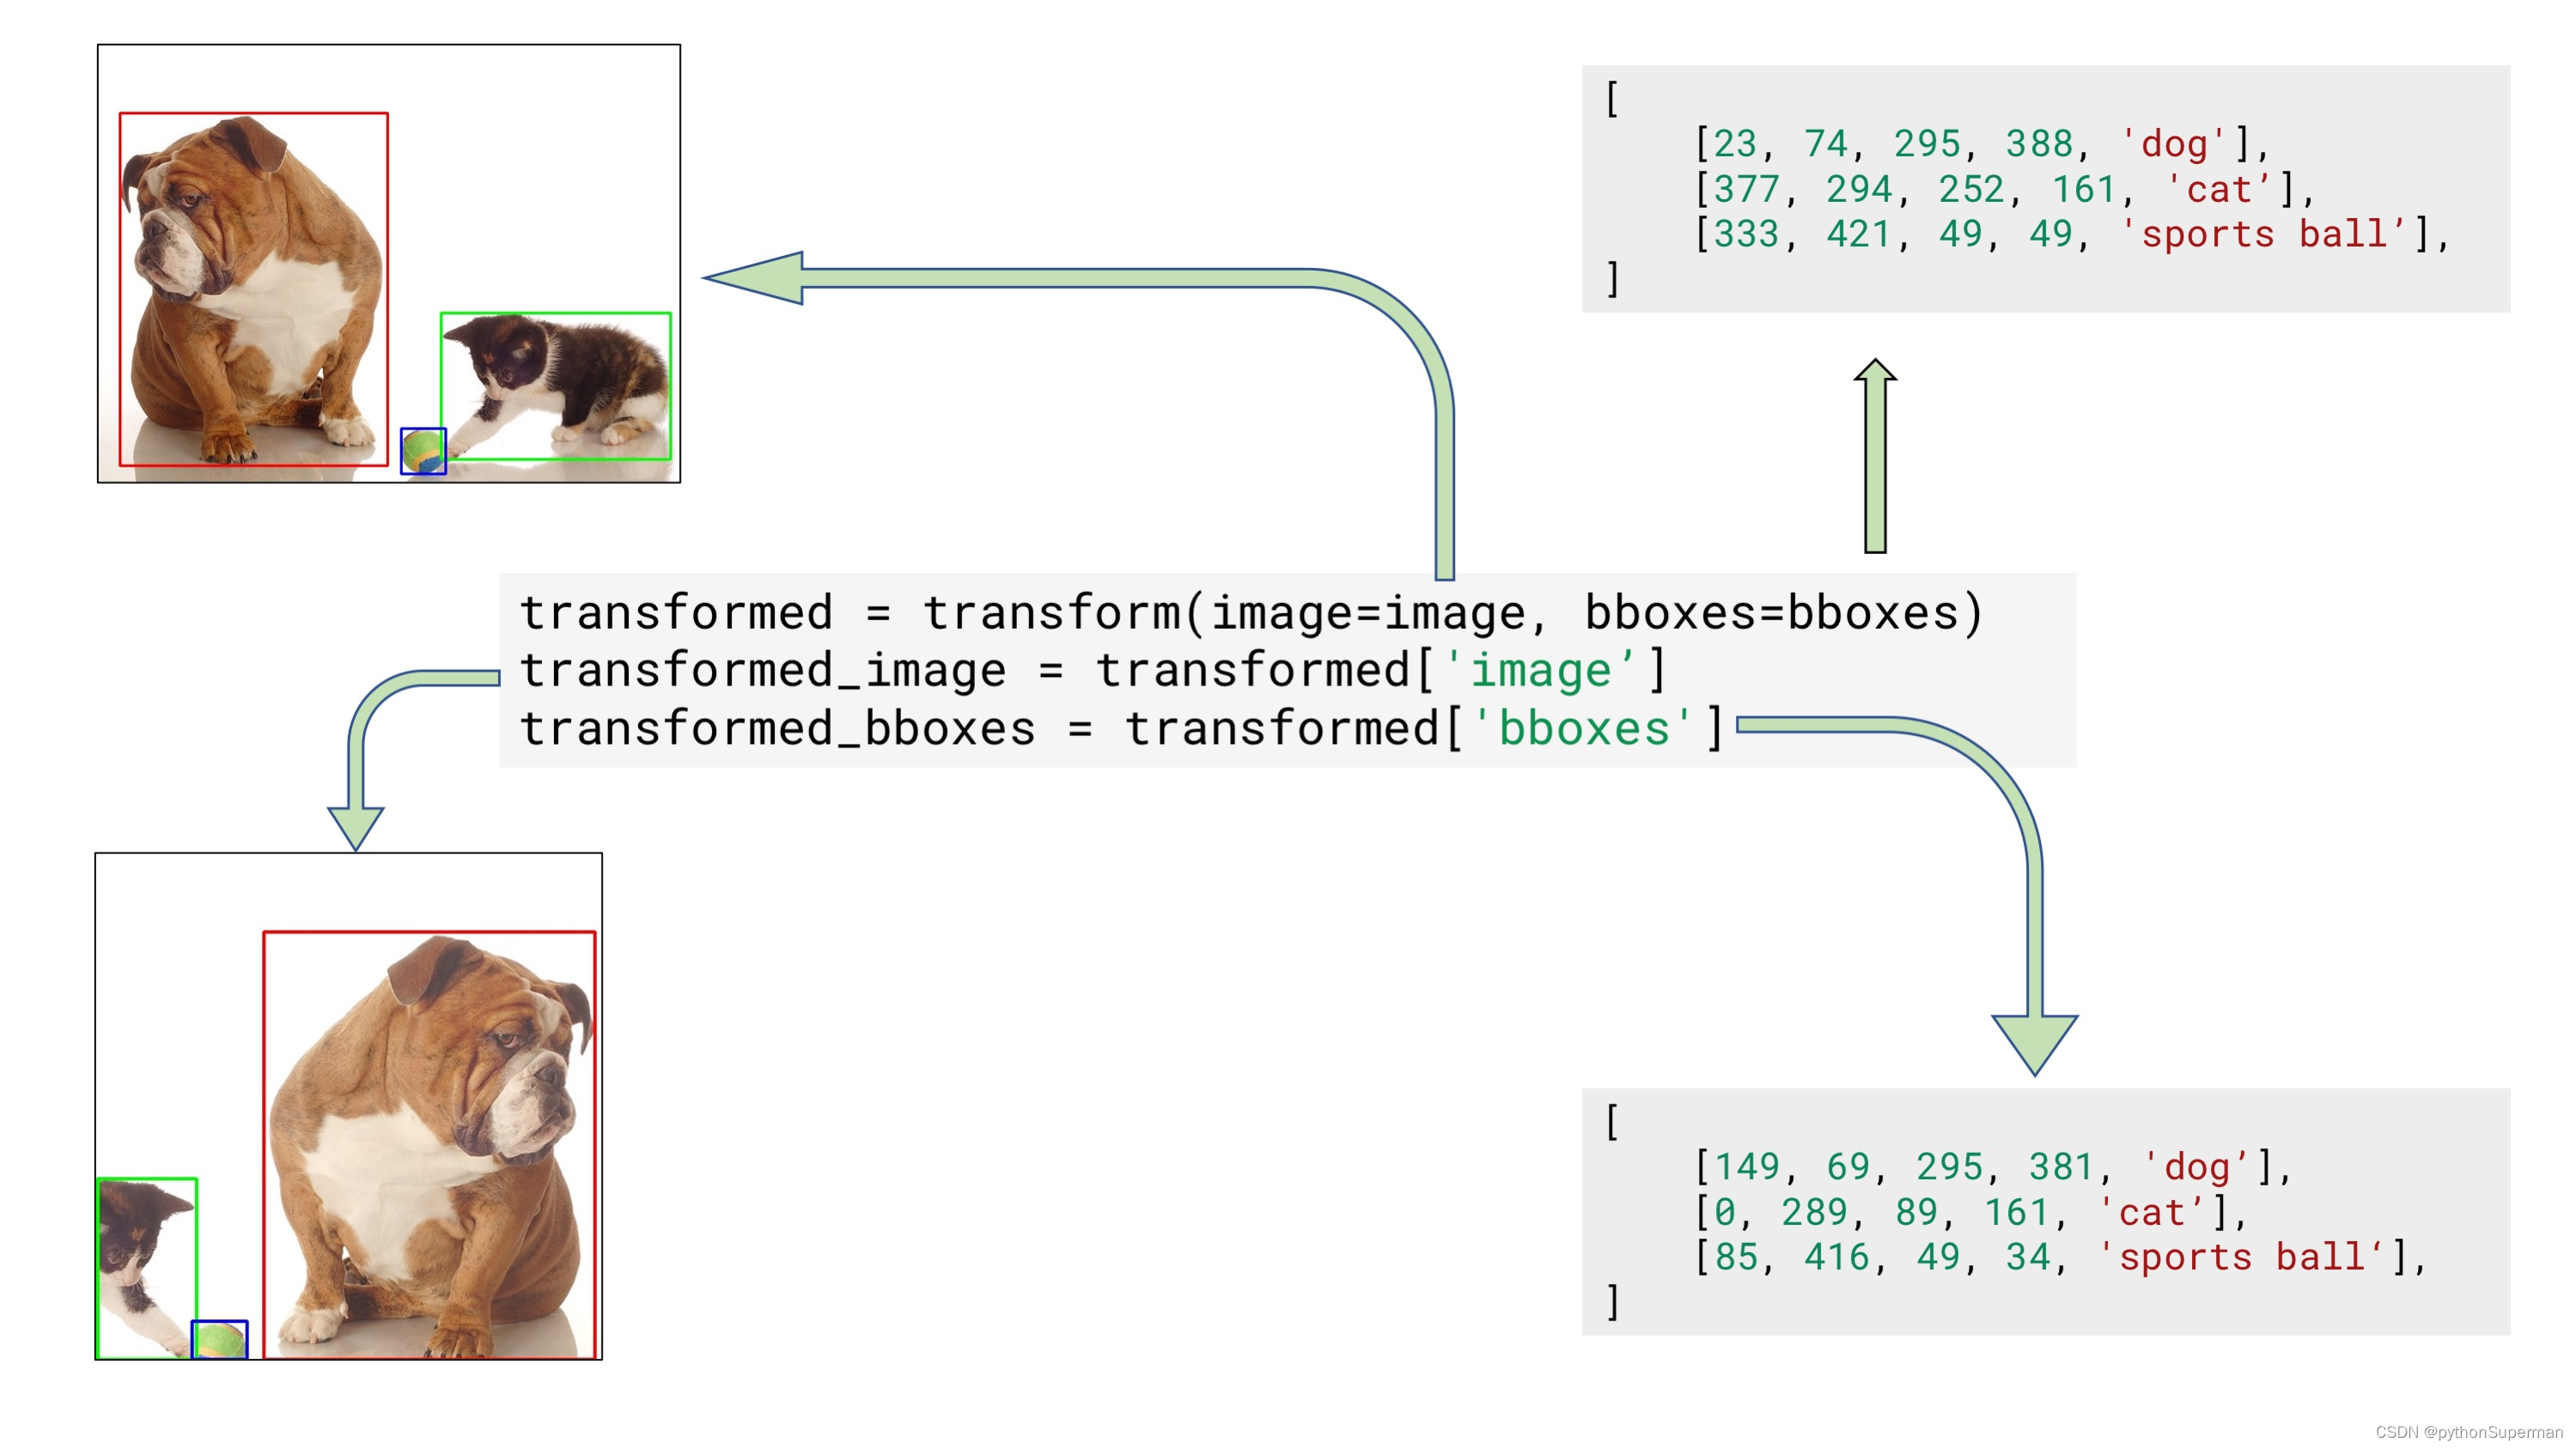
Example input and output data for bounding boxes augmentation
2. Pass class labels in a separate argument to transform (the preferred way).
Let's say you have coordinates of three bounding boxes
bboxes = [[23, 74, 295, 388],[377, 294, 252, 161],[333, 421, 49, 49],
]
You can create a separate list that contains class labels for those bounding boxes:
class_labels = ['cat', 'dog', 'parrot']Then you pass both bounding boxes and class labels to transform. Note that to pass class labels, you need to use the name of the argument that you declared in label_fields when creating an instance of Compose in step 2. In our case, we set the name of the argument to class_labels.
transformed = transform(image=image, bboxes=bboxes, class_labels=class_labels)
transformed_image = transformed['image']
transformed_bboxes = transformed['bboxes']
transformed_class_labels = transformed['class_labels']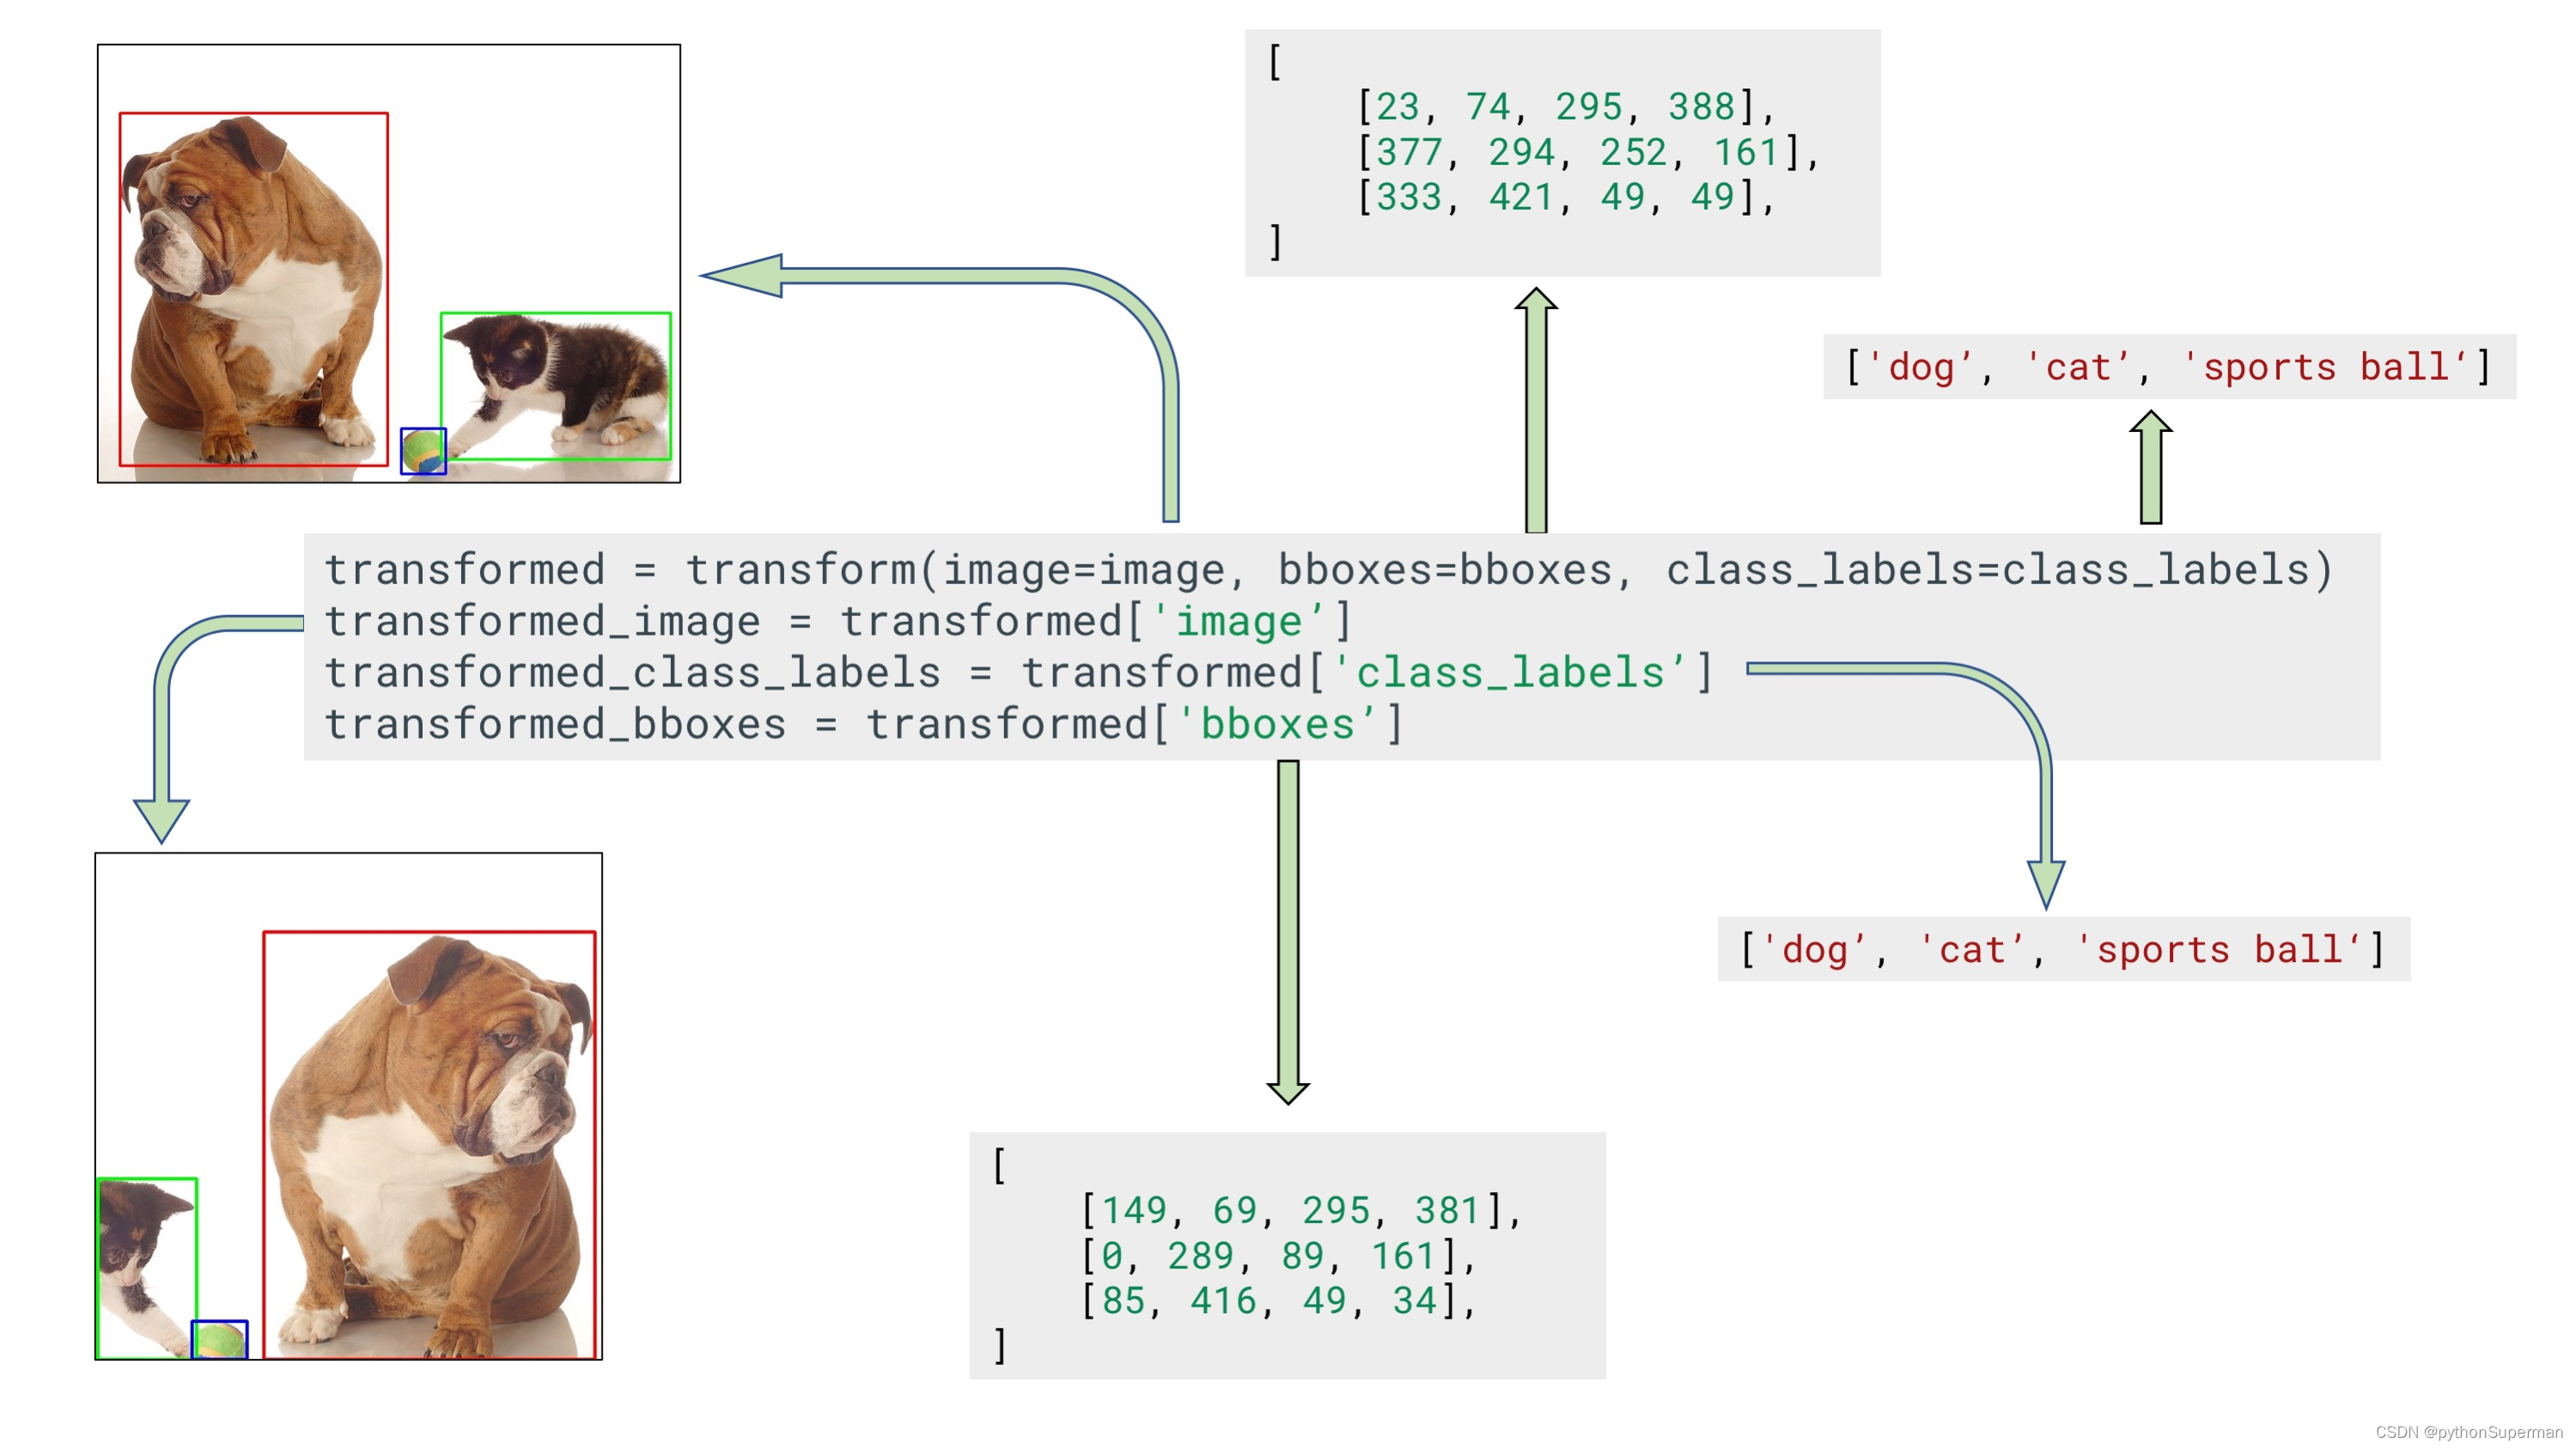
Example input and output data for bounding boxes augmentation with a separate argument for class labels
Note that label_fields expects a list, so you can set multiple fields that contain labels for your bounding boxes. So if you declare Compose like
transform = A.Compose([A.RandomCrop(width=450, height=450),A.HorizontalFlip(p=0.5),A.RandomBrightnessContrast(p=0.2),
], bbox_params=A.BboxParams(format='coco', label_fields=['class_labels', 'class_categories'])))
you can use those multiple arguments to pass info about class labels, like
class_labels = ['cat', 'dog', 'parrot']
class_categories = ['animal', 'animal', 'item']transformed = transform(image=image, bboxes=bboxes, class_labels=class_labels, class_categories=class_categories)
transformed_image = transformed['image']
transformed_bboxes = transformed['bboxes']
transformed_class_labels = transformed['class_labels']
transformed_class_categories = transformed['class_categories']
相关文章:
Bounding boxes augmentation for object detection
Different annotations formats Bounding boxes are rectangles that mark objects on an image. There are multiple formats of bounding boxes annotations. Each format uses its specific representation of bouning boxes coordinates 每种格式都使用其特定的边界框坐标…...
【计算机网络学习之路】HTTP请求
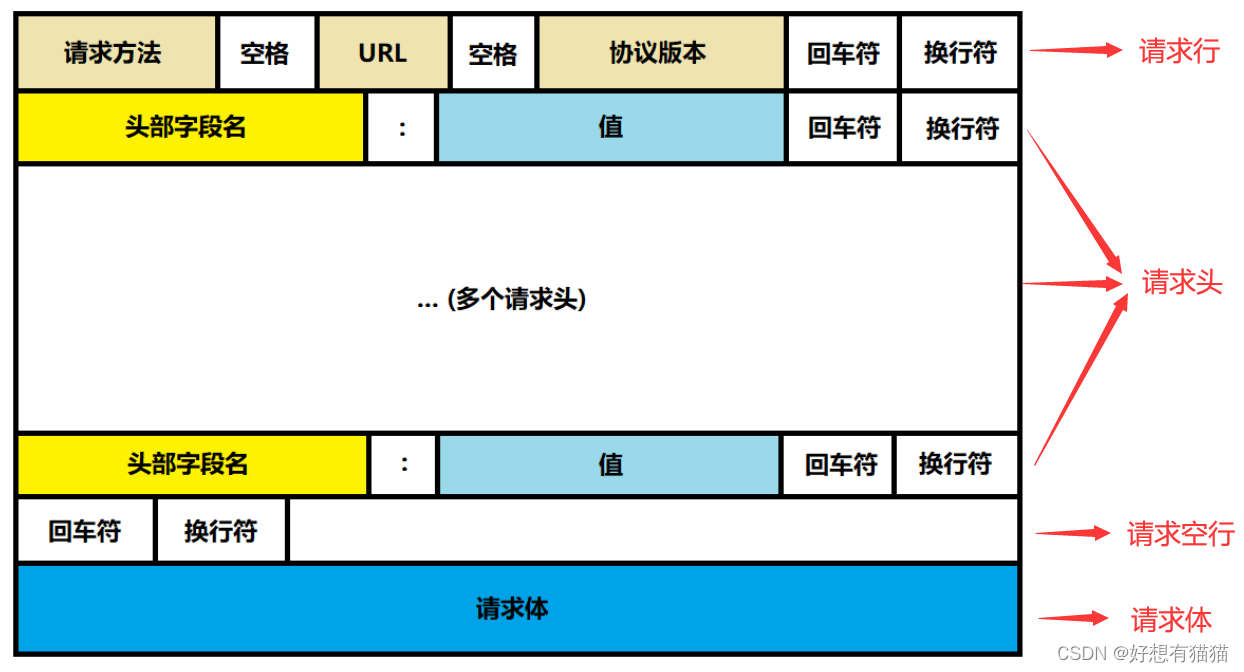
目录 前言 HTTP请求报文格式 一. 请求行 HTTP请求方法 GET和POST的区别 URL 二. 请求头 常见的Header 常见的额请求体数据类型 三. 请求体 结束语 前言 HTTP是应用层的一个协议。实际我们访问一个网页,都会像该网页的服务器发送HTTP请求,服务…...

java之字符串常用处理函数
在Java中,你可以使用Collections.sort()方法对字符串中的字符进行排序。这个方法会按照字母顺序对字符进行排序。 以下是一个例子: import java.util.Arrays; import java.util.Collections; public class Main { public static void main(…...
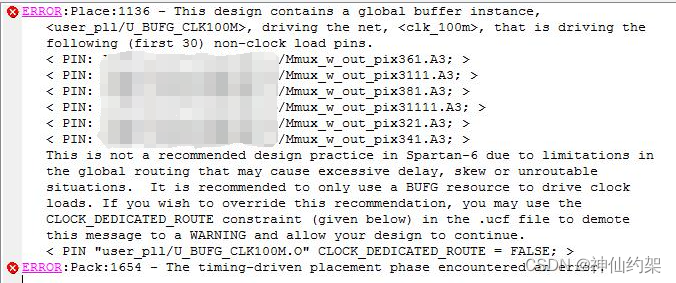
【XILINX】ERROR:Place:1136 - This design contains a global buffer instance
记录一个ISE软件使用过程中遇到的问题及解决方案。 芯片:spartan6 问题 ERROR:Place:1136 - This design contains a global buffer instance, , driving the net,>, that is driving the following (first 30) non-clock load pins. This is not a recommended…...
【文件上传系列】No.0 利用 FormData 实现文件上传、监控网路速度和上传进度(原生前端,Koa 后端)
利用 FormData 实现文件上传 基础功能:上传文件 演示如下: 概括流程: 前端:把文件数据获取并 append 到 FormData 对象中后端:通过 ctx.request.files 对象拿到二进制数据,获得 node 暂存的文件路径 前端…...

web前端之JavaScrip的笔试题
MENU Promise笔试题-02prototype和__proto__的笔试题JavaScript引用类型值值操和运算符优先级比较--笔试原型与原型链--笔试-05作用域-笔试事件队列-笔试题JavaScript之变量提升-笔试题JavaScript之原型链--笔试题 Promise笔试题-02 console.log(1); // 宏仁务 2 setTimeout(_…...

生活、工作常用API免费接口
身份证识别OCR:传入身份证照片,识别照片文字信息并返回,包括姓名、身份证号码、性别、民族、出生年月日、地址、签发机关及有效期。二维码识别OCR:对图片中的二维码、条形码进行检测和识别,返回存储的文字内容。银行卡…...

PHP使用mkcert本地开发生成HTTPS证书 PhpEnv集成环境
PHP使用mkcert本地开发生成HTTPS证书 PhpEnv集成环境 前言一、介绍 mkcert二、安装/使用 mkcert1. 安装2. 使用 总结 前言 本地开发时有些功能只有在 https 证书的情况下才能使用, 例如一些 Web API 一、介绍 mkcert Github地址 mkcert 是一个制作本地可信开发证书的简单工具。…...

DHTMLX Scheduler PRO 6.0.5 Crack
功能丰富的 JavaScript调度程序 DHTMLX Scheduler 是一个 JavaScript 日程安排日历,具有 10 个视图和可定制的界面,用于开发任何类型的日程安排应用程序。 DHTMLX JS 调度程序库的主要特性 我们的 JS 调度程序最需要的功能之一是时间轴视图。借助时间轴…...

AddressSanitizer和LeakSanitizer有什么区别
AddressSanitizer(ASan)和LeakSanitizer(LSan)都是用于内存错误检测的工具,它们的主要区别在于检测的问题类型和应用场景。 AddressSanitizer(ASan): ASan是一种用于检测内存错误的工具…...
-CoreDNS+ETCD实现DNS服务发现)
CoreDNS实战(二)-CoreDNS+ETCD实现DNS服务发现
1 引言 在前面的文章中讲了如何搭建一个内网的DNS服务,但是这里有个问题,mxsm-register.local表示局域网的注册中心域名,如果需要将每台部署了注册中心的IP地址写到CoreDNS的配置文件中。这样就需要每次都去修改 Corefile 配置文件。那有没有…...

B站缓存视频M4S合并MP4(js + ffmpeg )
文章目录 B站缓存视频转MP4(js ffmpeg )1、说明 2、ffmpeg2.1 下载地址2.2 配置环境变量2.3 测试2.4 转换MP4命令 3、处理程序 B站缓存视频转MP4(js ffmpeg ) 注意:这样的方式只用于个人之间不同设备的离线观看。请…...
学习IO的第四天
作业 : 使用两个子进程完成两个文件的拷贝,子进程1拷贝前一半内容,子进程2拷贝后一般内容,父进程用于回收两个子进程的资源 #include <head.h>int main(int argc, const char *argv[]) {int rd -1;if((rdopen("./01_test.c&quo…...
Linux:缓冲区的概念理解
文章目录 缓冲区什么是缓冲区?缓冲区的意义是什么?缓冲区的刷新方式 理解缓冲区用户缓冲区和内核缓冲区缓冲区在哪里? 本篇主要总结的是关于缓冲区的概念理解,以及再次基础上对文件的常用接口进行一定程度的封装 缓冲区 什么是缓…...

中山大学李华山、王彪课题组开发 SEN 机器学习模型,高精度预测材料性能
内容一览:了解全局晶体对称性并分析等变信息,对于预测材料性能至关重要,但现有的、基于卷积网络的算法尚且无法完全实现这些需求。针对于此,中山大学的李华山、王彪课题组,开发了一款名为 SEN 的机器学习模型ÿ…...
二百一十、Hive——Flume采集的JSON数据文件写入Hive的ODS层表后字段的数据残缺
一、目的 在用Flume把Kafka的数据采集写入Hive的ODS层表的HDFS文件路径后,发现HDFS文件中没问题,但是ODS层表中字段的数据却有问题,字段中的JSON数据不全 二、Hive处理JSON数据方式 (一)将Flume采集Kafka的JSON数据…...

【开放集检测OSR】开放集检测和闭集检测的区别和联系:从模型角度进行理解
定义一个分类器: D t r a i n { ( x i , y i ) } i 1 N ⊂ X C D_{train} \{(x_i, y_i)\}^N _{i1} ⊂ X C Dtrain{(xi,yi)}i1N⊂XC X:输入空间 ( x i , y i ) (x_i, y_i) (xi,yi): 输入的图像x以及其对象的类别标签yC :已知…...
【Flink】Flink核心概念简述
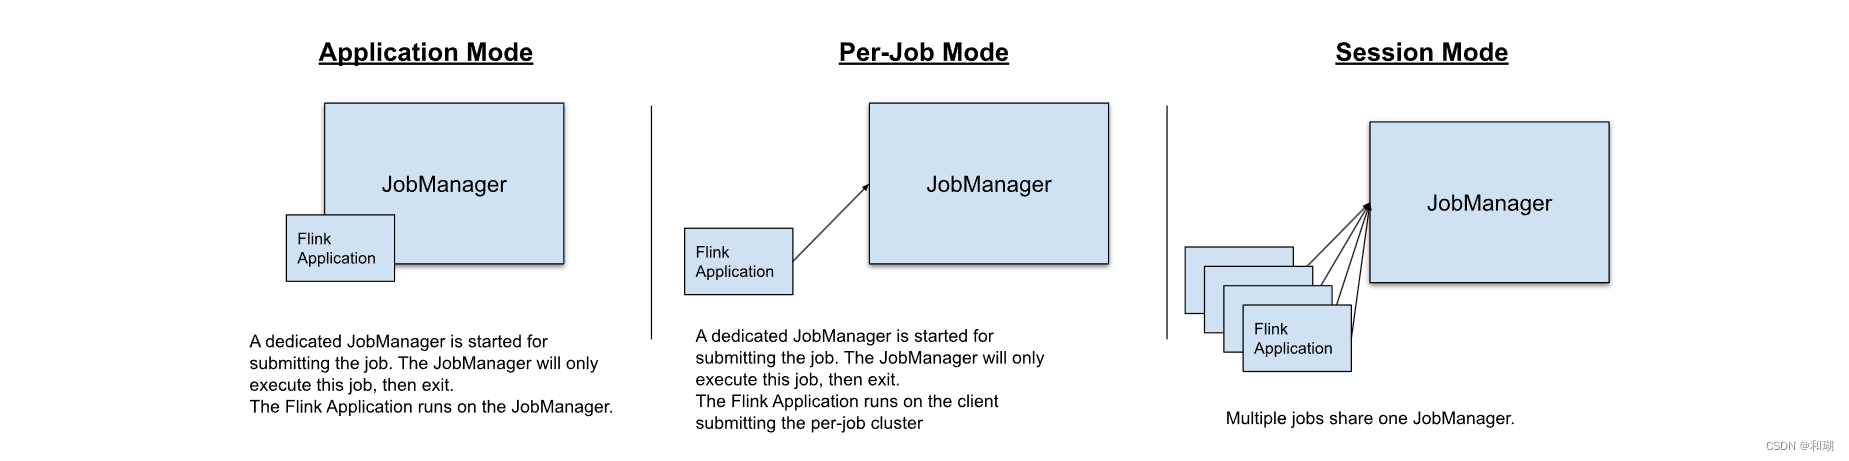
目录 一、Flink 简介二、Flink 组件栈1. API & Libraries 层2. runtime层3. 物理部署层 三、Flink 集群架构四、Flink基本编程模型五、Flink 的部署模式六、Flink 任务的执行模式五、Flink 的优点 一、Flink 简介 Apache Flink 的前身是柏林理工大学一个研究性项目&#x…...

linux-tar命令、解压、压缩
压缩 文件夹 命令:tar -zcvf ~/test/tar_t.tar.gz /target/ 将/target/文件夹及其子文件夹和文件压缩成tar_t.tar.gz文件,并放于~/test/路径下 文件 命令:tar -zcvf ~/test/tar_t.tar.gz /target/file 将/target/file文件压缩成tar_t.tar…...

Kafka Connect :构建强大分布式数据集成方案
Kafka Connect 是 Apache Kafka 生态系统中的关键组件,专为构建可靠、高效的分布式数据集成解决方案而设计。本文将深入探讨 Kafka Connect 的核心架构、使用方法以及如何通过丰富的示例代码解决实际的数据集成挑战。 Kafka Connect 的核心架构 Kafka Connect 的核…...
)
Vivado GUI隐藏技巧:如何手动修改OOC模式IP的时钟频率(附200MHz实战案例)
Vivado GUI隐藏技巧:如何手动修改OOC模式IP的时钟频率(附200MHz实战案例) 在FPGA开发中,Vivado的IP核(IP Catalog)功能极大提升了设计效率,但OOC(Out-of-Context)模式下IP核的时钟频率设置却常常让初学者困惑。当你在G…...

OpenClaw高阶技巧:Qwen3.5-9B模型微调适配专属自动化场景
OpenClaw高阶技巧:Qwen3.5-9B模型微调适配专属自动化场景 1. 为什么需要定制化模型? 去年我在尝试用OpenClaw处理医疗文献时遇到了一个典型问题:当我让AI助手整理PubMed上的最新论文摘要时,它总是把"随机对照试验(RCT)&quo…...
的优化策略与实现原理)
深入解析时钟网络延迟(Clock Network Latency)的优化策略与实现原理
最近在搞一个分布式系统项目,性能压测时总发现吞吐量上不去,延迟时高时低。经过一番排查,定位到了“时钟网络延迟”这个平时不太起眼,但影响巨大的问题上。今天就来聊聊这个“时钟网络延迟”(Clock Network Latency&am…...

深入解析cosyvoice接口:从技术原理到高效集成实践
在智能语音交互领域,cosyvoice接口正扮演着越来越重要的角色。它让智能客服能够进行更自然流畅的多轮对话,为在线教育平台提供了实时语音评测与反馈的能力,同时也让各类智能硬件实现了精准的远场语音唤醒和指令识别。这些场景都离不开一个稳定…...

基于CosyVoice与Docker的AI辅助开发实战:从模型部署到生产环境优化
最近在搞一个AI语音合成的项目,用到了CosyVoice这个不错的TTS模型。但在部署环节,真是踩了不少坑,从开发机到测试服务器,再到生产环境,各种Python版本、CUDA版本、依赖库冲突的问题层出不穷,让人头疼。后来…...

OpenClaw安全防护指南:ollama-QwQ-32B任务执行权限管控
OpenClaw安全防护指南:ollama-QwQ-32B任务执行权限管控 1. 为什么需要关注OpenClaw的安全防护? 去年冬天,我在调试一个自动整理照片的OpenClaw任务时,不小心让AI把整个图片文件夹按修改日期重命名了——包括那些珍贵的原始文件。…...

Cherry Studio容器化部署实战指南:从环境搭建到生产运维
Cherry Studio容器化部署实战指南:从环境搭建到生产运维 【免费下载链接】cherry-studio 🍒 Cherry Studio is a desktop client that supports for multiple LLM providers. Support deepseek-r1 项目地址: https://gitcode.com/GitHub_Trending/ch/c…...
)
实战指南:如何用Mask R-CNN在iSAID数据集上提升航空影像分割效果(附调参技巧)
航空影像实例分割实战:Mask R-CNN在iSAID数据集上的调优策略 航空影像分析正逐渐成为城市规划、灾害监测和国防安全等领域的关键技术。与常规自然图像不同,这类影像通常包含大量密集分布的小目标,且目标尺度变化极大——从几个像素的小型车辆…...

光伏系统中的最大功率跟踪:滑模控制与传统方法的巧妙结合
光伏发电系统,滑膜控制结合扰动观察法和电导增量法,可更快实现 最大功率跟踪。在光伏发电系统的领域里,最大功率跟踪(MPPT)技术一直是提升发电效率的关键所在。传统的扰动观察法和电导增量法在MPPT方面各有优劣&#x…...

论文开题不再愁!书匠策AI来助你一臂之力
在学术的浩瀚海洋中,每一位扬帆起航的学子都渴望找到那座指引方向的灯塔,尤其是在撰写论文开题报告这一关键时刻。开题报告,作为论文的起点,不仅承载着研究的方向与目的,更是展现研究者学术素养与创新能力的重要窗口。…...