使用python脚本部署k8s集群
1.环境规划:
| 节点 | IP地址 | 操作系统 | 配置 |
|---|---|---|---|
| 脚本运行节点 | 192.168.174.5 | centos7.9 | 2G2核 |
| server | 192.168.174.150 | centos7.9 | 2G2核 |
| client1 | 192.168.174.151 | centos7.9 | 2G2核 |
| client2 | 192.168.174.152 | centos7.9 | 2G2 |
2.运行准备:
yum install -y python python-pippip install pexpect3.导入的python模块
sys:键盘输入模块,linux脚本使用不了,不明白
os:linux上执行命令的模块
pexpect:捕获linux命令的模块,适用与问答交互
subprocess:linux上执行命令,获取命令输出
re:字符串匹配模块
3.变量定义:
master_addresses=["192.168.174.150"]           # 主节点们的IP地址
master_domains=["server"]                          # 域名们
client_addresses=["192.168.174.151","192.168.174.152"]           # 从节点们的IP地址
client_domains=["client1","client2"]                          # 域名们host_username="root"                                         # ssh连接的用户,控制端的用户为root
host_passwd="110119"                                         # ssh连接的用户密码yum_mount_dev="/dev/cdrom"                                   # 本地yum源挂载设备路径
yum_mount_dir="/mnt/cdrom"                                   # 本地yum源挂载点chrony_allows_addresses="192.168.174.0"                       # chrony主节点允许那个网段的从节点来同步时间
4.ssh免密配置:
# 1.本地创建ssh公钥
if os.path.exists("/root/.ssh/id_rsa.pub") == True:print("\033[32m"+"ssh公钥已创建"+"\033[0m")                # 输出绿色字体
else:print("\033[32m"+"ssh公钥未创建,开始创建"+"\033[0m")child = pexpect.spawn('ssh-keygen -t rsa -b 1024')child.expect('Enter file in which to save the key')child.sendline('')child.expect('Enter passphrase')child.sendline('')child.expect('Enter same passphrase again')child.sendline('')child.expect(pexpect.EOF)               # 用于等待子进程的结束print(child.before.decode())            # 等待命令执行完毕并打印输出信息print("\033[32m" + "ssh公钥已创建" + "\033[0m")print("\n")# 向被控主机添加公钥的方法
def add_ssh_public_key_client(address,username,password):print("\033[32m"+"{}正在被添加公钥".format(address)+"\033[0m")# BatchMode=yes:表示使SSH在连接过程中不会提示输入密码,而直接尝试免密连接,-o ConnectTimeout=5:表示限制连接超时时间为5秒public_key_flag=os.system("ssh {}@{} -o BatchMode=yes 'exit' &> /dev/null".format(username,address))if public_key_flag== 0:print("\033[32m" + "{}已经可以ssh连接".format(address) + "\033[0m")returnchild = pexpect.spawn('ssh-copy-id -i /root/.ssh/id_rsa.pub {}@{}'.format(username,address))try:child.expect('Are you sure you want to continue connecting')except pexpect.exceptions.TIMEOUT:       # 如果try块中的咨询超时5秒没有出现就会出现异常pexpect.TIMEOUTprint("\033[32m"+"{}已经不是首次ssh连接了".format(address)+"\033[0m")else:                         # 是否回答咨询yeschild.sendline('yes')finally:child.expect('password')child.sendline(password)child.expect(pexpect.EOF)               # 用于等待子进程的结束print(child.before.decode())            # 等待命令执行完毕并打印输出信息
# 测试ssh连接的方法
def test_ssh_connection(all_flag,address,username):print("\033[32m" + "{}测试是否可以ssh连接".format(address) + "\033[0m")flag=os.system('ssh {}@{} -o ConnectTimeout=5 "exit"'.format(username,address))if flag==0:print("\033[32m" + "Success: {}可以ssh免密连接".format(address) + "\033[0m")else:print("\033[1;31m" + "Failed: {}ssh免密连接失败".format(address) + "\033[0m")     # 输出红色字体all_flag=1return all_flag# 本地的密钥开始加入被控制主机
for i in range(0, len(master_addresses)):add_ssh_public_key_client(master_addresses[i],host_username,host_passwd)print("\n")
for i in range(0, len(client_addresses)):add_ssh_public_key_client(client_addresses[i],host_username,host_passwd)print("\n")
# 测试ssh连接
for i in range(0, len(master_addresses)):final_flag=test_ssh_connection(0,master_addresses[i],host_username)
for i in range(0, len(client_addresses)):final_flag = test_ssh_connection(0, client_addresses[i], host_username)
if final_flag ==1:sys.exit("ssh测试失败,请检查!")
else:print("\033[32m" + "Success: 全部可以ssh免密连接" + "\033[0m")
print("\n")
5.配置防火墙和selinux
# 2.配置防火墙和selinux的方法
def set_firwalld_selinux(address,username):print("\033[32m" + "{}正在配置防火墙和selinux".format(address + "\033[0m"))fir_flag=os.system('ssh {}@{} "systemctl stop firewalld;systemctl disable firewalld"'.format(username,address))if fir_flag!=0:print("\033[1;31m" + "Failed: 防火墙修改失败" + "\033[0m")sys.exit("请检查!")sel_flag=os.system("ssh {}@{} 'sed -i 's/SELINUX=.*/SELINUX=disabled/' /etc/selinux/config'".format(username,address))if sel_flag!=0:print("\033[1;31m" + "Failed: selinux修改失败" + "\033[0m")sys.exit("请检查!")
# 配置防火墙和selinux
for i in range(0, len(master_addresses)):set_firwalld_selinux(master_addresses[i],host_username)
for i in range(0, len(client_addresses)):set_firwalld_selinux(client_addresses[i],host_username)
print("\n")
6.配置域名映射
# 3.配置域名映射
print("\033[32m" + "本地开始配置域名映射" + "\033[0m")
with open("/etc/hosts","w") as f:                      # w重写,a添加,只读f.write("127.0.0.1   localhost localhost.localdomain localhost4 localhost4.localdomain4\n")f.write("::1         localhost localhost.localdomain localhost6 localhost6.localdomain6\n")for i in range(0, len(master_addresses)):f.write("{} {}\n".format(master_addresses[i],master_domains[i]))for i in range(0, len(client_addresses)):f.write("{} {}\n".format(client_addresses[i],client_domains[i]))
# 复制本地的/etc/hosts覆盖掉远程主机的/etc/hosts文件
for i in range(0, len(master_addresses)):os.system("scp /etc/hosts {}@{}:/etc/hosts".format(host_username,master_addresses[i]))
for i in range(0, len(client_addresses)):os.system("scp /etc/hosts {}@{}:/etc/hosts".format(host_username,client_addresses[i]))# 使用域名首次ssh连接
# 首次域名ssh连接的方法
def first_domain_name_con(domain,username,password):print("\033[32m"+"{}首次ssh连接".format(domain)+"\033[0m")# BatchMode=yes:表示使SSH在连接过程中不会提示输入密码,而直接尝试免密连接,-o ConnectTimeout=5:表示限制连接超时时间为5秒os.system("ssh -o BatchMode=yes -o ConnectTimeout=5 {}@{} 'exit' &> /dev/null".format(username, domain))first_domain_flag = os.system("ssh -o BatchMode=yes -o ConnectTimeout=5 {}@{} 'exit'".format(username, domain))if first_domain_flag == 0:print("\033[32m" + "{}已经可以ssh连接".format(domain) + "\033[0m")returnchild = pexpect.spawn('ssh {}@{} "exit"'.format(username,domain))try:connecting_tuple = child.expect('Are you sure you want to continue connecting')except pexpect.exceptions.TIMEOUT:print("\033[32m"+"{}已经不是首次ssh连接了".format(domain)+"\033[0m")else:child.sendline('yes')child.expect(pexpect.EOF)               # 用于等待子进程的结束print(child.before.decode())            # 等待命令执行完毕并打印输出信息for i in range(0, len(master_domains)):first_domain_name_con(master_domains[i],host_username,host_passwd)
for i in range(0, len(client_domains)):first_domain_name_con(client_domains[i], host_username, host_passwd)print("\n")
7.配置主机名
print("\033[32m" + "开始配置主机名" + "\033[0m")
# 配置主机名的方法
def set_hostname(username, address,hostname):print("\033[32m" + "{}配置主机名".format(address) + "\033[0m")set_hostname_flag=os.system('ssh {}@{} "hostnamectl set-hostname {}"'.format(username, address,hostname))if set_hostname_flag != 0:print("\033[1;31m" + "Failed: {}配置主机名".format(address) + "\033[0m")sys.exit("请检查!")
for i in range(0, len(master_addresses)):set_hostname(host_username,master_addresses[i],master_domains[i])
for i in range(0, len(client_addresses)):set_hostname(host_username,client_addresses[i],client_domains[i])
8.配置yum源
# 配置yum源的方法
def config_local_yum(username,address):print("\033[32m" + "{}开始配置本地yum源".format(address) + "\033[0m")os.system("ssh {}@{} 'mkdir -p {} && mount {} {}'".format(username,address,yum_mount_dir,yum_mount_dev,yum_mount_dir))sed_local_yum='echo "{} {} iso9660 defaults  0  0" >> /etc/fstab'.format(yum_mount_dev,yum_mount_dir)os.system("ssh {}@{} '{}'".format(username, address,sed_local_yum))os.system("scp /etc/yum.repos.d/centos-local.repo {}@{}:/etc/yum.repos.d/centos-local.repo".format(username,address))repolist_flag=os.system("ssh {}@{} '{}'".format(username, address, "yum clean all && yum repolist"))if repolist_flag != 0:print("\033[1;31m" + "Failed: {}配置yum源失败".format(address) + "\033[0m")sys.exit("请检查!")
# 配置扩展源的方法
def config_epel_yum(username,address):print("\033[32m" + "{}开始配置扩展源".format(address) + "\033[0m")epel_flag=os.system("ssh {}@{} '{}'".format(username, address, "yum install epel-release -y"))if epel_flag != 0:print("\033[1;31m" + "Failed: {}配置扩展源失败".format(address) + "\033[0m")sys.exit("请检查!")
# 配置远程阿里源的方法
def config_remote_yum(username,address):print("\033[32m" + "{}开始配置远程阿里源".format(address) + "\033[0m")os.system("ssh {}@{} '{}'".format(username, address, "yum install -y wget && wget -O /etc/yum.repos.d/CentOS-Base.repo http://mirrors.aliyun.com/repo/Centos-7.repo"))repolist_flag=os.system("ssh {}@{} '{}'".format(username, address, "yum clean all && yum repolist"))if repolist_flag != 0:print("\033[1;31m" + "Failed: {}配置远程阿里源失败".format(address) + "\033[0m")sys.exit("请检查!")with open("/etc/yum.repos.d/centos-local.repo", "w") as f:  # w重写,a添加,只读f.write("[centos7.9]\n")f.write("name=centos7.9\n")f.write("baseurl=file://{}\n".format(yum_mount_dir))f.write("enabled=1\n")f.write("gpgcheck=0\n")for i in range(0, len(master_addresses)):config_local_yum(host_username, master_addresses[i])config_epel_yum(host_username, master_addresses[i])config_remote_yum(host_username, master_addresses[i])
for i in range(0, len(client_addresses)):config_local_yum(host_username, client_addresses[i])config_epel_yum(host_username, client_addresses[i])config_remote_yum(host_username, client_addresses[i])
print("\n")
9.配置chrony服务器
print("\033[32m" + "开始配置chrony" + "\033[0m")
# 配置chrony主服务器的方法
def chrony_master_service(username,address):print("\033[32m" + "{}配置主chrony".format(address) + "\033[0m")# 安装chronychrony_flag = os.system("ssh {}@{} 'yum install -y chrony'".format(username,address))if chrony_flag != 0:print("\033[1;31m" + "Failed: {}chrony安装失败".format(address) + "\033[0m")sys.exit("请检查!")# 开启同步地址范围chrony_master_allows_addresses = "sed -i 's/#allow 192.168.0.0\/16/allow {}\/24/' /etc/chrony.conf".format(chrony_allows_addresses)os.system('ssh {}@{} "{}"'.format(username, address, chrony_master_allows_addresses))# 开启stratum层数chrony_master_allows_stratum = "sed -i 's/#local stratum 10/local stratum 10/' /etc/chrony.conf"os.system('ssh {}@{} "{}"'.format(username, address, chrony_master_allows_stratum))# 重启服务chrony_service = "systemctl restart chronyd && systemctl enable chronyd &> /dev/null"os.system('ssh {}@{} "{}"'.format(username, address, chrony_service))os.system('ssh {}@{} "sleep 5"'.format(username, address))# 开启时间同步os.system('ssh {}@{} "timedatectl set-ntp true"'.format(username, address))
# 配置chrony同步节点的方法
def chrony_master_client(username,address):print("\033[32m" + "{}配置同步chrony".format(address) + "\033[0m")# 安装chronychrony_flag = os.system("ssh {}@{} 'yum install -y chrony'".format(username,address))if chrony_flag != 0:print("\033[1;31m" + "Failed: {}chrony安装失败".format(address) + "\033[0m")sys.exit("请检查!")# 删除默认的server地址sed_chrony_delete = "sed -i '{}' /etc/chrony.conf".format('/^server/d')os.system('ssh {}@{} "{}"'.format(username,address,sed_chrony_delete))# 添加自定义的server地址for j in range(0, len(master_addresses)):sed_chrony_add = "sed -i '{}' /etc/chrony.conf".format("2a\server {} iburst".format(master_addresses[j]))os.system('ssh {}@{} "{}"'.format(username, address, sed_chrony_add))# 重启服务chrony_service = "systemctl restart chronyd && systemctl enable chronyd &> /dev/null"os.system('ssh {}@{} "{}"'.format(username,address,chrony_service))# 开启时间同步os.system('ssh {}@{} "timedatectl set-ntp true"'.format(username, address))os.system('ssh {}@{} "sleep 5"'.format(username, address))chrony_time = "chronyc sources -v | sed -n '{}'".format("/^\^\*/p")chrony_output = subprocess.check_output('ssh {}@{} "{}"'.format(username,address,chrony_time) ,shell=True)# 输出结果print(chrony_output)if chrony_output == "" or chrony_output is None:print("\033[1;31m" + "Failed: {}时间同步失败".format(address) + "\033[0m")sys.exit("请检查!")for i in range(0, len(master_addresses)):chrony_master_service(host_username,master_addresses[i])
for i in range(0, len(client_addresses)):chrony_master_client(host_username,client_addresses[i])
print("\n")
10.禁用swap分区,修改linux的内核参数,配置ipvs功能
# 禁用swap分区的方法
def disable_swap(username,address):print("\033[32m" + "{}禁用swap分区".format(address) + "\033[0m")os.system('ssh {}@{} "{}"'.format(username, address,"sed -i 's/\/dev\/mapper\/centos-swap/#\/dev\/mapper\/centos-swap/' /etc/fstab"))# 修改linux的内核参数的方法
def update_linux_kernel(username, address):print("\033[32m" + "{}修改linux的内核参数".format(address) + "\033[0m")os.system("scp /etc/sysctl.d/kubernetes.conf {}@{}:/etc/sysctl.d/kubernetes.conf".format(username,address))os.system('ssh {}@{} "sysctl -p"'.format(username, address))os.system('ssh {}@{} "modprobe br_netfilter"'.format(username, address))os.system('ssh {}@{} "lsmod | grep br_netfilter"'.format(username, address))# 配置ipvs功能的方法
def config_ipvs(username, address):print("\033[32m" + "{}配置ipvs功".format(address) + "\033[0m")os.system('ssh {}@{} "yum install -y ipset ipvsadm"'.format(username, address))os.system("scp /etc/sysconfig/modules/ipvs.modules {}@{}:/etc/sysconfig/modules/ipvs.modules".format(username,address))os.system('ssh {}@{} "chmod +x /etc/sysconfig/modules/ipvs.modules"'.format(username, address))os.system('ssh {}@{} "/bin/bash /etc/sysconfig/modules/ipvs.modules"'.format(username, address))os.system('ssh {}@{} "lsmod | grep -e ip_vs -e nf_conntrack_ipv4"'.format(username, address))with open("/etc/sysctl.d/kubernetes.conf", "w") as f:  # w重写,a添加,只读f.write("net.bridge.bridge-nf-call-ip6tables = 1\n")f.write("net.bridge.bridge-nf-call-iptables = 1\n")f.write("net.ipv4.ip_forward = 1")
with open("/etc/sysconfig/modules/ipvs.modules", "w") as f:  # w重写,a添加,只读f.write("#!/bin/bash\n")f.write("modprobe -- ip_vs\n")f.write("modprobe -- ip_vs_rr\n")f.write("modprobe -- ip_vs_wrr\n")f.write("modprobe -- ip_vs_sh\n")f.write("modprobe -- nf_conntrack_ipv4\n")for i in range(0, len(master_addresses)):disable_swap(host_username,master_addresses[i])update_linux_kernel(host_username, master_addresses[i])config_ipvs(host_username, master_addresses[i])
for i in range(0, len(client_addresses)):disable_swap(host_username,client_addresses[i])update_linux_kernel(host_username, client_addresses[i])config_ipvs(host_username, client_addresses[i])
print("\n")
11.重启主机并判断可以ssh登陆
def is_ssh_host(username,address):print("\033[32m" + "{}开始重启主机".format(address) + "\033[0m")os.system('ssh {}@{} "reboot"'.format(username, address))os.system('sleep 5')for j in range(0,100):connect_time_flag=os.system('ssh {}@{} -o ConnectTimeout=5 "exit"'.format(username, address))os.system('sleep 3')if j == 99:print("\033[1;31m" + "Failed: {}设备连接超时".format(address) + "\033[0m\n")sys.exit("请检查!")if connect_time_flag==0:print("\033[32m" + "{}已可以ssh登陆".format(address) + "\033[0m\n")breakelse:print("\033[32m" + "{}设备正在重启".format(address) + "\033[0m\n")for i in range(0, len(master_addresses)):is_ssh_host(host_username, master_addresses[i])
for i in range(0, len(client_addresses)):is_ssh_host(host_username, client_addresses[i])
print("\n")
12.安装Docker和k8s组件
# 安装docker的方法
def install_docker(username,address):print("\033[32m" + "{}开始安装Docker".format(address) + "\033[0m")os.system('ssh {}@{} "wget -O /etc/yum.repos.d/docker-ce.repo http://mirrors.aliyun.com/docker-ce/linux/centos/docker-ce.repo"'.format(username, address))os.system('ssh {}@{} "yum install -y --setopt=obsoletes=0 docker-ce-18.06.3.ce-3.el7"'.format(username, address))os.system('ssh {}@{} "mkdir -p /etc/docker"'.format(username, address))os.system("scp /etc/docker/daemon.json {}@{}:/etc/docker/daemon.json".format(username,address))os.system("scp /etc/sysconfig/docker {}@{}:/etc/sysconfig/docker".format(username, address))systemctl_docker_flag=os.system('ssh {}@{} "systemctl restart docker && systemctl enable docker"'.format(username, address))if systemctl_docker_flag != 0:print("\033[1;31m" + "Failed: {}docker服务启动失败,请检查".format(address) + "\033[0m")sys.exit("请检查!")
# 安装k8s组件的方法
def install_k8s_module(username,address):print("\033[32m" + "{}开始安装k8s组件r".format(address) + "\033[0m")os.system("scp /etc/yum.repos.d/kubernetes.repo {}@{}:/etc/yum.repos.d/kubernetes.repo".format(username, address))os.system('ssh {}@{} "yum install --setopt=obsoletes=0 kubeadm-1.17.4-0 kubelet-1.17.4-0 kubectl-1.17.4-0 -y"'.format(username, address))os.system("scp /etc/sysconfig/kubelet {}@{}:/etc/sysconfig/kubelet".format(username, address))systemctl_k8s_flag=os.system('ssh {}@{} "systemctl enable kubelet"'.format(username, address))if systemctl_k8s_flag != 0:print("\033[1;31m" + "Failed: {}kubelet服务开机自启设置失败,请检查".format(address) + "\033[0m")sys.exit("请检查!")os.system('mkdir -p /etc/docker')
with open("/etc/docker/daemon.json", "w") as f:  # w重写,a添加,只读f.write("{\n")f.write('"storage-driver": "devicemapper",\n')f.write('"exec-opts": ["native.cgroupdriver=systemd"],\n')f.write('"registry-mirrors": ["https://ja9e22yz.mirror.aliyuncs.com"]\n')f.write("}\n")with open("/etc/sysconfig/docker", "w") as f:  # w重写,a添加,只读f.write("OPTIONS='--selinux-enabled --log-driver=journald --signature-verification=false'\n")with open("/etc/yum.repos.d/kubernetes.repo", "w") as f:  # w重写,a添加,只读f.write("[kubernetes]\n")f.write("name=Kubernetes\n")f.write("baseurl=http://mirrors.aliyun.com/kubernetes/yum/repos/kubernetes-el7-x86_64\n")f.write("enabled=1\n")f.write("gpgcheck=0\n")f.write("repo_gpgcheck=0\n")f.write("gpgkey=http://mirrors.aliyun.com/kubernetes/yum/doc/yum-key.gpg http://mirrors.aliyun.com/kubernetes/yum/doc/rpm-package-key.gpg\n")
with open("/etc/sysconfig/kubelet", "w") as f:  # w重写,a添加,只读f.write('KUBELET_CGROUP_ARGS="--cgroup-driver=systemd"\n')f.write('KUBE_PROXY_MODE="ipvs"\n')for i in range(0, len(master_addresses)):install_docker(host_username, master_addresses[i])install_k8s_module(host_username, master_addresses[i])
for i in range(0, len(client_addresses)):install_docker(host_username, client_addresses[i])install_k8s_module(host_username, client_addresses[i])
13.准备集群镜像
def plan_k8s_images(username,address):print("\033[32m" + "{}准备集群镜像".format(address) + "\033[0m")kubeadm_images_output =subprocess.check_output('ssh {}@{} "kubeadm config images list"'.format(username, address),shell=True)kubeadm_images = [line.strip() for line in kubeadm_images_output.split('\n')]kubeadm_images.remove("")for kubeadm_image in kubeadm_images:kubeadm_image=kubeadm_image.split("/")[1]print("\033[1;33;40m" + "正在操作{}相关镜像".format(kubeadm_image) + "\033[0m")  # 黄色字体os.system('ssh {}@{} "docker pull registry.cn-hangzhou.aliyuncs.com/google_containers/{}"'.format(username, address,kubeadm_image))os.system('ssh {}@{} "docker tag registry.cn-hangzhou.aliyuncs.com/google_containers/{} k8s.gcr.io/{}"'.format(username, address,kubeadm_image,kubeadm_image))os.system('ssh {}@{} "docker rmi registry.cn-hangzhou.aliyuncs.com/google_containers/{}"'.format(username, address,kubeadm_image))
# 如果后面集群初始化出现镜像缺失问题,请重新拉取镜像
for i in range(0, len(master_addresses)):plan_k8s_images(host_username, master_addresses[i])plan_k8s_images(host_username, master_addresses[i])
for i in range(0, len(client_addresses)):plan_k8s_images(host_username, client_addresses[i])plan_k8s_images(host_username, client_addresses[i])
print("\n")
14.集群初始化
# 主节点方法
def k8s_init_master(username,address):print("\033[32m" + "{}集群主节点初始化".format(address) + "\033[0m")kubeadm_init_flag=os.system('ssh {}@{} "kubectl cluster - info &> /dev/null"'.format(username, address))if kubeadm_init_flag == 0:kubeadm_output=subprocess.check_output('ssh {}@{} "{}"'.format(username, address, "cat $HOME/kubeadm_init.txt"),shell=True)else:kubeadm_init_command="kubeadm init --kubernetes-version=v1.17.4 --pod-network-cidr=10.244.0.0/16 --service-cidr=10.96.0.0/12 --apiserver-advertise-address={}".format(address)kubeadm_output = subprocess.check_output('ssh {}@{} "{}"'.format(username, address,kubeadm_init_command),shell=True)lines_with_token = re.findall(r'--token.*', kubeadm_output, re.DOTALL)os.system('ssh {}@{} "{}"'.format(username, address, "echo '{}' > $HOME/kubeadm_init.txt".format(kubeadm_output)))token_cert_list = lines_with_token[0].split(' ')print(token_cert_list)kubeadm_codes = []for k in range(0,len(token_cert_list)):if (token_cert_list[k]=="--token" or token_cert_list[k]=="--discovery-token-ca-cert-hash") and k+1<len(token_cert_list):kubeadm_codes.append(token_cert_list[k+1])if len(kubeadm_codes)!=2:print("\033[1;31m" + "Failed: {}节点初始化失败".format(address) + "\033[0m")sys.exit("请检查!")os.system('ssh {}@{} "mkdir -p $HOME/.kube"'.format(username, address))os.system('ssh {}@{} "cp -i /etc/kubernetes/admin.conf $HOME/.kube/config"'.format(username, address))os.system('ssh {}@{} "chown $(id -u):$(id -g) $HOME/.kube/config"'.format(username, address))return kubeadm_codes
# 从节点方法
def k8s_init_node(username, address,master_address,kubeadm_codes):print("\033[32m" + "{}集群从节点初始化".format(address) + "\033[0m")kubeadm_join_command="kubeadm join {}:6443 --token {} \--discovery-token-ca-cert-hash {}".format(master_address,kubeadm_codes[0],kubeadm_codes[1])kubeadm_join_flag=os.system('ssh {}@{} "{}"'.format(username, address,kubeadm_join_command))if kubeadm_join_flag != 0:print("\033[1;31m" + "Failed: {}kubeadm join到{}".format(address,master_address) + "\033[0m")sys.exit("请检查!")for i in range(0, len(master_addresses)):kubeadm_codes=k8s_init_master(host_username, master_addresses[i])for j in range(0, len(client_addresses)):k8s_init_node(host_username, client_addresses[j],master_addresses[i],kubeadm_codes)os.system('ssh {}@{} "kubectl get nodes"'.format(host_username, master_addresses[i]))
print("\n")
15.安装网络插件
def install_kube_flannel(username, address):print("\033[32m" + "{}安装网络插件".format(address) + "\033[0m")os.system('ssh {}@{} "wget https://raw.githubusercontent.com/coreos/flannel/master/Documentation/kube-flannel.yml"'.format(username, address))os.system('ssh {}@{} "kubectl apply -f kube-flannel.yml"'.format(username, address))os.system('sleep 90')os.system('ssh {}@{} "kubectl get nodes"'.format(username, address))for i in range(0, len(master_addresses)):install_kube_flannel(host_username, master_addresses[i])
print("\n")
16.完整脚本:
# coding=UTF-8
import sys,os,pexpect,subprocess,remaster_addresses=["192.168.174.150"]           # 主节点们的IP地址
master_domains=["server"]                          # 域名们
client_addresses=["192.168.174.151","192.168.174.152"]           # 从节点们的IP地址
client_domains=["client1","client2"]                          # 域名们host_username="root"                                         # ssh连接的用户,控制端的用户为root
host_passwd="110119"                                         # ssh连接的用户密码yum_mount_dev="/dev/cdrom"                                   # 本地yum源挂载设备路径
yum_mount_dir="/mnt/cdrom"                                   # 本地yum源挂载点chrony_allows_addresses="192.168.174.0"                       # chrony主节点允许那个网段的从节点来同步时间# ping主机
def ping_hosts(address):ping_flag=os.system("ping -c 3 {}".format(address))if ping_flag != 0:print("\033[1;31m" + "Failed:{address} ping失败" + "\033[0m")sys.exit("请检查!")
for i in range(0, len(master_addresses)):ping_hosts(master_addresses[i])print("\n")
for i in range(0, len(client_addresses)):ping_hosts(client_addresses[i])print("\n")# 1.本地创建ssh公钥
if os.path.exists("/root/.ssh/id_rsa.pub") == True:print("\033[32m"+"ssh公钥已创建"+"\033[0m")                # 输出绿色字体
else:print("\033[32m"+"ssh公钥未创建,开始创建"+"\033[0m")child = pexpect.spawn('ssh-keygen -t rsa -b 1024')child.expect('Enter file in which to save the key')child.sendline('')child.expect('Enter passphrase')child.sendline('')child.expect('Enter same passphrase again')child.sendline('')child.expect(pexpect.EOF)               # 用于等待子进程的结束print(child.before.decode())            # 等待命令执行完毕并打印输出信息print("\033[32m" + "ssh公钥已创建" + "\033[0m")print("\n")# 向被控主机添加公钥的方法
def add_ssh_public_key_client(address,username,password):print("\033[32m"+"{}正在被添加公钥".format(address)+"\033[0m")# BatchMode=yes:表示使SSH在连接过程中不会提示输入密码,而直接尝试免密连接,-o ConnectTimeout=5:表示限制连接超时时间为5秒public_key_flag=os.system("ssh {}@{} -o BatchMode=yes 'exit' &> /dev/null".format(username,address))if public_key_flag== 0:print("\033[32m" + "{}已经可以ssh连接".format(address) + "\033[0m")returnchild = pexpect.spawn('ssh-copy-id -i /root/.ssh/id_rsa.pub {}@{}'.format(username,address))try:child.expect('Are you sure you want to continue connecting')except pexpect.exceptions.TIMEOUT:       # 如果try块中的咨询超时5秒没有出现就会出现异常pexpect.TIMEOUTprint("\033[32m"+"{}已经不是首次ssh连接了".format(address)+"\033[0m")else:                         # 是否回答咨询yeschild.sendline('yes')finally:child.expect('password')child.sendline(password)child.expect(pexpect.EOF)               # 用于等待子进程的结束print(child.before.decode())            # 等待命令执行完毕并打印输出信息
# 测试ssh连接的方法
def test_ssh_connection(all_flag,address,username):print("\033[32m" + "{}测试是否可以ssh连接".format(address) + "\033[0m")flag=os.system('ssh {}@{} -o ConnectTimeout=5 "exit"'.format(username,address))if flag==0:print("\033[32m" + "Success: {}可以ssh免密连接".format(address) + "\033[0m")else:print("\033[1;31m" + "Failed: {}ssh免密连接失败".format(address) + "\033[0m")     # 输出红色字体all_flag=1return all_flag# 本地的密钥开始加入被控制主机
for i in range(0, len(master_addresses)):add_ssh_public_key_client(master_addresses[i],host_username,host_passwd)print("\n")
for i in range(0, len(client_addresses)):add_ssh_public_key_client(client_addresses[i],host_username,host_passwd)print("\n")
# 测试ssh连接
for i in range(0, len(master_addresses)):final_flag=test_ssh_connection(0,master_addresses[i],host_username)
for i in range(0, len(client_addresses)):final_flag = test_ssh_connection(0, client_addresses[i], host_username)
if final_flag ==1:sys.exit("ssh测试失败,请检查!")
else:print("\033[32m" + "Success: 全部可以ssh免密连接" + "\033[0m")
print("\n")# 2.配置防火墙和selinux的方法
def set_firwalld_selinux(address,username):print("\033[32m" + "{}正在配置防火墙和selinux".format(address + "\033[0m"))fir_flag=os.system('ssh {}@{} "systemctl stop firewalld;systemctl disable firewalld"'.format(username,address))if fir_flag!=0:print("\033[1;31m" + "Failed: 防火墙修改失败" + "\033[0m")sys.exit("请检查!")sel_flag=os.system("ssh {}@{} 'sed -i 's/SELINUX=.*/SELINUX=disabled/' /etc/selinux/config'".format(username,address))if sel_flag!=0:print("\033[1;31m" + "Failed: selinux修改失败" + "\033[0m")sys.exit("请检查!")
# 配置防火墙和selinux
for i in range(0, len(master_addresses)):set_firwalld_selinux(master_addresses[i],host_username)
for i in range(0, len(client_addresses)):set_firwalld_selinux(client_addresses[i],host_username)
print("\n")# 3.配置域名映射
print("\033[32m" + "本地开始配置域名映射" + "\033[0m")
with open("/etc/hosts","w") as f:                      # w重写,a添加,只读f.write("127.0.0.1   localhost localhost.localdomain localhost4 localhost4.localdomain4\n")f.write("::1         localhost localhost.localdomain localhost6 localhost6.localdomain6\n")for i in range(0, len(master_addresses)):f.write("{} {}\n".format(master_addresses[i],master_domains[i]))for i in range(0, len(client_addresses)):f.write("{} {}\n".format(client_addresses[i],client_domains[i]))
# 复制本地的/etc/hosts覆盖掉远程主机的/etc/hosts文件
for i in range(0, len(master_addresses)):os.system("scp /etc/hosts {}@{}:/etc/hosts".format(host_username,master_addresses[i]))
for i in range(0, len(client_addresses)):os.system("scp /etc/hosts {}@{}:/etc/hosts".format(host_username,client_addresses[i]))# 使用域名首次ssh连接
# 首次域名ssh连接的方法
def first_domain_name_con(domain,username,password):print("\033[32m"+"{}首次ssh连接".format(domain)+"\033[0m")# BatchMode=yes:表示使SSH在连接过程中不会提示输入密码,而直接尝试免密连接,-o ConnectTimeout=5:表示限制连接超时时间为5秒os.system("ssh -o BatchMode=yes -o ConnectTimeout=5 {}@{} 'exit' &> /dev/null".format(username, domain))first_domain_flag = os.system("ssh -o BatchMode=yes -o ConnectTimeout=5 {}@{} 'exit'".format(username, domain))if first_domain_flag == 0:print("\033[32m" + "{}已经可以ssh连接".format(domain) + "\033[0m")returnchild = pexpect.spawn('ssh {}@{} "exit"'.format(username,domain))try:connecting_tuple = child.expect('Are you sure you want to continue connecting')except pexpect.exceptions.TIMEOUT:print("\033[32m"+"{}已经不是首次ssh连接了".format(domain)+"\033[0m")else:child.sendline('yes')child.expect(pexpect.EOF)               # 用于等待子进程的结束print(child.before.decode())            # 等待命令执行完毕并打印输出信息for i in range(0, len(master_domains)):first_domain_name_con(master_domains[i],host_username,host_passwd)
for i in range(0, len(client_domains)):first_domain_name_con(client_domains[i], host_username, host_passwd)print("\n")# 4.配置主机名(主机名即域名)
print("\033[32m" + "开始配置主机名" + "\033[0m")
# 配置主机名的方法
def set_hostname(username, address,hostname):print("\033[32m" + "{}配置主机名".format(address) + "\033[0m")set_hostname_flag=os.system('ssh {}@{} "hostnamectl set-hostname {}"'.format(username, address,hostname))if set_hostname_flag != 0:print("\033[1;31m" + "Failed: {}配置主机名".format(address) + "\033[0m")sys.exit("请检查!")
for i in range(0, len(master_addresses)):set_hostname(host_username,master_addresses[i],master_domains[i])
for i in range(0, len(client_addresses)):set_hostname(host_username,client_addresses[i],client_domains[i])# 5.配置yum源
# 配置yum源的方法
def config_local_yum(username,address):print("\033[32m" + "{}开始配置本地yum源".format(address) + "\033[0m")os.system("ssh {}@{} 'mkdir -p {} && mount {} {}'".format(username,address,yum_mount_dir,yum_mount_dev,yum_mount_dir))sed_local_yum='echo "{} {} iso9660 defaults  0  0" >> /etc/fstab'.format(yum_mount_dev,yum_mount_dir)os.system("ssh {}@{} '{}'".format(username, address,sed_local_yum))os.system("scp /etc/yum.repos.d/centos-local.repo {}@{}:/etc/yum.repos.d/centos-local.repo".format(username,address))repolist_flag=os.system("ssh {}@{} '{}'".format(username, address, "yum clean all && yum repolist"))if repolist_flag != 0:print("\033[1;31m" + "Failed: {}配置yum源失败".format(address) + "\033[0m")sys.exit("请检查!")
# 配置扩展源的方法
def config_epel_yum(username,address):print("\033[32m" + "{}开始配置扩展源".format(address) + "\033[0m")epel_flag=os.system("ssh {}@{} '{}'".format(username, address, "yum install epel-release -y"))if epel_flag != 0:print("\033[1;31m" + "Failed: {}配置扩展源失败".format(address) + "\033[0m")sys.exit("请检查!")
# 配置远程阿里源的方法
def config_remote_yum(username,address):print("\033[32m" + "{}开始配置远程阿里源".format(address) + "\033[0m")os.system("ssh {}@{} '{}'".format(username, address, "yum install -y wget && wget -O /etc/yum.repos.d/CentOS-Base.repo http://mirrors.aliyun.com/repo/Centos-7.repo"))repolist_flag=os.system("ssh {}@{} '{}'".format(username, address, "yum clean all && yum repolist"))if repolist_flag != 0:print("\033[1;31m" + "Failed: {}配置远程阿里源失败".format(address) + "\033[0m")sys.exit("请检查!")with open("/etc/yum.repos.d/centos-local.repo", "w") as f:  # w重写,a添加,只读f.write("[centos7.9]\n")f.write("name=centos7.9\n")f.write("baseurl=file://{}\n".format(yum_mount_dir))f.write("enabled=1\n")f.write("gpgcheck=0\n")for i in range(0, len(master_addresses)):config_local_yum(host_username, master_addresses[i])config_epel_yum(host_username, master_addresses[i])config_remote_yum(host_username, master_addresses[i])
for i in range(0, len(client_addresses)):config_local_yum(host_username, client_addresses[i])config_epel_yum(host_username, client_addresses[i])config_remote_yum(host_username, client_addresses[i])
print("\n")# 6.安装必要工具
def yum_necessary_tools(username,address):print("\033[32m" + "{}开始安装必要工具".format(address) + "\033[0m")yum_tool_flag=os.system("ssh {}@{} '{}'".format(username, address,"yum install -y bash-completion vim net-tools tree psmisc lrzsz dos2unix"))if yum_tool_flag != 0:print("\033[1;31m" + "Failed: {}安装必要工具失败".format(address) + "\033[0m")sys.exit("请检查!")
for i in range(0, len(master_addresses)):yum_necessary_tools(host_username, master_addresses[i])
for i in range(0, len(client_addresses)):yum_necessary_tools(host_username, client_addresses[i])
print("\n")# 7.配置chrony服务器
print("\033[32m" + "开始配置chrony" + "\033[0m")
# 配置chrony主服务器的方法
def chrony_master_service(username,address):print("\033[32m" + "{}配置主chrony".format(address) + "\033[0m")# 安装chronychrony_flag = os.system("ssh {}@{} 'yum install -y chrony'".format(username,address))if chrony_flag != 0:print("\033[1;31m" + "Failed: {}chrony安装失败".format(address) + "\033[0m")sys.exit("请检查!")# 开启同步地址范围chrony_master_allows_addresses = "sed -i 's/#allow 192.168.0.0\/16/allow {}\/24/' /etc/chrony.conf".format(chrony_allows_addresses)os.system('ssh {}@{} "{}"'.format(username, address, chrony_master_allows_addresses))# 开启stratum层数chrony_master_allows_stratum = "sed -i 's/#local stratum 10/local stratum 10/' /etc/chrony.conf"os.system('ssh {}@{} "{}"'.format(username, address, chrony_master_allows_stratum))# 重启服务chrony_service = "systemctl restart chronyd && systemctl enable chronyd &> /dev/null"os.system('ssh {}@{} "{}"'.format(username, address, chrony_service))os.system('ssh {}@{} "sleep 5"'.format(username, address))# 开启时间同步os.system('ssh {}@{} "timedatectl set-ntp true"'.format(username, address))
# 配置chrony同步节点的方法
def chrony_master_client(username,address):print("\033[32m" + "{}配置同步chrony".format(address) + "\033[0m")# 安装chronychrony_flag = os.system("ssh {}@{} 'yum install -y chrony'".format(username,address))if chrony_flag != 0:print("\033[1;31m" + "Failed: {}chrony安装失败".format(address) + "\033[0m")sys.exit("请检查!")# 删除默认的server地址sed_chrony_delete = "sed -i '{}' /etc/chrony.conf".format('/^server/d')os.system('ssh {}@{} "{}"'.format(username,address,sed_chrony_delete))# 添加自定义的server地址for j in range(0, len(master_addresses)):sed_chrony_add = "sed -i '{}' /etc/chrony.conf".format("2a\server {} iburst".format(master_addresses[j]))os.system('ssh {}@{} "{}"'.format(username, address, sed_chrony_add))# 重启服务chrony_service = "systemctl restart chronyd && systemctl enable chronyd &> /dev/null"os.system('ssh {}@{} "{}"'.format(username,address,chrony_service))# 开启时间同步os.system('ssh {}@{} "timedatectl set-ntp true"'.format(username, address))os.system('ssh {}@{} "sleep 5"'.format(username, address))chrony_time = "chronyc sources -v | sed -n '{}'".format("/^\^\*/p")chrony_output = subprocess.check_output('ssh {}@{} "{}"'.format(username,address,chrony_time) ,shell=True)# 输出结果print(chrony_output)if chrony_output == "" or chrony_output is None:print("\033[1;31m" + "Failed: {}时间同步失败".format(address) + "\033[0m")sys.exit("请检查!")for i in range(0, len(master_addresses)):chrony_master_service(host_username,master_addresses[i])
for i in range(0, len(client_addresses)):chrony_master_client(host_username,client_addresses[i])
print("\n")# 8.禁用swap分区,修改linux的内核参数,配置ipvs功能
# 禁用swap分区的方法
def disable_swap(username,address):print("\033[32m" + "{}禁用swap分区".format(address) + "\033[0m")os.system('ssh {}@{} "{}"'.format(username, address,"sed -i 's/\/dev\/mapper\/centos-swap/#\/dev\/mapper\/centos-swap/' /etc/fstab"))# 修改linux的内核参数的方法
def update_linux_kernel(username, address):print("\033[32m" + "{}修改linux的内核参数".format(address) + "\033[0m")os.system("scp /etc/sysctl.d/kubernetes.conf {}@{}:/etc/sysctl.d/kubernetes.conf".format(username,address))os.system('ssh {}@{} "sysctl -p"'.format(username, address))os.system('ssh {}@{} "modprobe br_netfilter"'.format(username, address))os.system('ssh {}@{} "lsmod | grep br_netfilter"'.format(username, address))# 配置ipvs功能的方法
def config_ipvs(username, address):print("\033[32m" + "{}配置ipvs功".format(address) + "\033[0m")os.system('ssh {}@{} "yum install -y ipset ipvsadm"'.format(username, address))os.system("scp /etc/sysconfig/modules/ipvs.modules {}@{}:/etc/sysconfig/modules/ipvs.modules".format(username,address))os.system('ssh {}@{} "chmod +x /etc/sysconfig/modules/ipvs.modules"'.format(username, address))os.system('ssh {}@{} "/bin/bash /etc/sysconfig/modules/ipvs.modules"'.format(username, address))os.system('ssh {}@{} "lsmod | grep -e ip_vs -e nf_conntrack_ipv4"'.format(username, address))with open("/etc/sysctl.d/kubernetes.conf", "w") as f:  # w重写,a添加,只读f.write("net.bridge.bridge-nf-call-ip6tables = 1\n")f.write("net.bridge.bridge-nf-call-iptables = 1\n")f.write("net.ipv4.ip_forward = 1")
with open("/etc/sysconfig/modules/ipvs.modules", "w") as f:  # w重写,a添加,只读f.write("#!/bin/bash\n")f.write("modprobe -- ip_vs\n")f.write("modprobe -- ip_vs_rr\n")f.write("modprobe -- ip_vs_wrr\n")f.write("modprobe -- ip_vs_sh\n")f.write("modprobe -- nf_conntrack_ipv4\n")for i in range(0, len(master_addresses)):disable_swap(host_username,master_addresses[i])update_linux_kernel(host_username, master_addresses[i])config_ipvs(host_username, master_addresses[i])
for i in range(0, len(client_addresses)):disable_swap(host_username,client_addresses[i])update_linux_kernel(host_username, client_addresses[i])config_ipvs(host_username, client_addresses[i])
print("\n")# 9.重启主机并判断可以ssh登陆(如果要执行此内容需python脚本运行在集群之外的节点,不然手动重启)
def is_ssh_host(username,address):print("\033[32m" + "{}开始重启主机".format(address) + "\033[0m")os.system('ssh {}@{} "reboot"'.format(username, address))os.system('sleep 5')for j in range(0,100):connect_time_flag=os.system('ssh {}@{} -o ConnectTimeout=5 "exit"'.format(username, address))os.system('sleep 3')if j == 99:print("\033[1;31m" + "Failed: {}设备连接超时".format(address) + "\033[0m\n")sys.exit("请检查!")if connect_time_flag==0:print("\033[32m" + "{}已可以ssh登陆".format(address) + "\033[0m\n")breakelse:print("\033[32m" + "{}设备正在重启".format(address) + "\033[0m\n")for i in range(0, len(master_addresses)):is_ssh_host(host_username, master_addresses[i])
for i in range(0, len(client_addresses)):is_ssh_host(host_username, client_addresses[i])
print("\n")# 10.安装Docker和k8s组件
# 安装docker的方法
def install_docker(username,address):print("\033[32m" + "{}开始安装Docker".format(address) + "\033[0m")os.system('ssh {}@{} "wget -O /etc/yum.repos.d/docker-ce.repo http://mirrors.aliyun.com/docker-ce/linux/centos/docker-ce.repo"'.format(username, address))os.system('ssh {}@{} "yum install -y --setopt=obsoletes=0 docker-ce-18.06.3.ce-3.el7"'.format(username, address))os.system('ssh {}@{} "mkdir -p /etc/docker"'.format(username, address))os.system("scp /etc/docker/daemon.json {}@{}:/etc/docker/daemon.json".format(username,address))os.system("scp /etc/sysconfig/docker {}@{}:/etc/sysconfig/docker".format(username, address))systemctl_docker_flag=os.system('ssh {}@{} "systemctl restart docker && systemctl enable docker"'.format(username, address))if systemctl_docker_flag != 0:print("\033[1;31m" + "Failed: {}docker服务启动失败,请检查".format(address) + "\033[0m")sys.exit("请检查!")
# 安装k8s组件的方法
def install_k8s_module(username,address):print("\033[32m" + "{}开始安装k8s组件r".format(address) + "\033[0m")os.system("scp /etc/yum.repos.d/kubernetes.repo {}@{}:/etc/yum.repos.d/kubernetes.repo".format(username, address))os.system('ssh {}@{} "yum install --setopt=obsoletes=0 kubeadm-1.17.4-0 kubelet-1.17.4-0 kubectl-1.17.4-0 -y"'.format(username, address))os.system("scp /etc/sysconfig/kubelet {}@{}:/etc/sysconfig/kubelet".format(username, address))systemctl_k8s_flag=os.system('ssh {}@{} "systemctl enable kubelet"'.format(username, address))if systemctl_k8s_flag != 0:print("\033[1;31m" + "Failed: {}kubelet服务开机自启设置失败,请检查".format(address) + "\033[0m")sys.exit("请检查!")os.system('mkdir -p /etc/docker')
with open("/etc/docker/daemon.json", "w") as f:  # w重写,a添加,只读f.write("{\n")f.write('"storage-driver": "devicemapper",\n')f.write('"exec-opts": ["native.cgroupdriver=systemd"],\n')f.write('"registry-mirrors": ["https://ja9e22yz.mirror.aliyuncs.com"]\n')f.write("}\n")with open("/etc/sysconfig/docker", "w") as f:  # w重写,a添加,只读f.write("OPTIONS='--selinux-enabled --log-driver=journald --signature-verification=false'\n")with open("/etc/yum.repos.d/kubernetes.repo", "w") as f:  # w重写,a添加,只读f.write("[kubernetes]\n")f.write("name=Kubernetes\n")f.write("baseurl=http://mirrors.aliyun.com/kubernetes/yum/repos/kubernetes-el7-x86_64\n")f.write("enabled=1\n")f.write("gpgcheck=0\n")f.write("repo_gpgcheck=0\n")f.write("gpgkey=http://mirrors.aliyun.com/kubernetes/yum/doc/yum-key.gpg http://mirrors.aliyun.com/kubernetes/yum/doc/rpm-package-key.gpg\n")
with open("/etc/sysconfig/kubelet", "w") as f:  # w重写,a添加,只读f.write('KUBELET_CGROUP_ARGS="--cgroup-driver=systemd"\n')f.write('KUBE_PROXY_MODE="ipvs"\n')for i in range(0, len(master_addresses)):install_docker(host_username, master_addresses[i])install_k8s_module(host_username, master_addresses[i])
for i in range(0, len(client_addresses)):install_docker(host_username, client_addresses[i])install_k8s_module(host_username, client_addresses[i])# 11.准备集群镜像
def plan_k8s_images(username,address):print("\033[32m" + "{}准备集群镜像".format(address) + "\033[0m")kubeadm_images_output =subprocess.check_output('ssh {}@{} "kubeadm config images list"'.format(username, address),shell=True)kubeadm_images = [line.strip() for line in kubeadm_images_output.split('\n')]kubeadm_images.remove("")for kubeadm_image in kubeadm_images:kubeadm_image=kubeadm_image.split("/")[1]print("\033[1;33;40m" + "正在操作{}相关镜像".format(kubeadm_image) + "\033[0m")  # 黄色字体os.system('ssh {}@{} "docker pull registry.cn-hangzhou.aliyuncs.com/google_containers/{}"'.format(username, address,kubeadm_image))os.system('ssh {}@{} "docker tag registry.cn-hangzhou.aliyuncs.com/google_containers/{} k8s.gcr.io/{}"'.format(username, address,kubeadm_image,kubeadm_image))os.system('ssh {}@{} "docker rmi registry.cn-hangzhou.aliyuncs.com/google_containers/{}"'.format(username, address,kubeadm_image))
# 如果后面集群初始化出现镜像缺失问题,请重新拉取镜像
for i in range(0, len(master_addresses)):plan_k8s_images(host_username, master_addresses[i])plan_k8s_images(host_username, master_addresses[i])
for i in range(0, len(client_addresses)):plan_k8s_images(host_username, client_addresses[i])plan_k8s_images(host_username, client_addresses[i])
print("\n")# 12.集群初始化
# 主节点方法
def k8s_init_master(username,address):print("\033[32m" + "{}集群主节点初始化".format(address) + "\033[0m")kubeadm_init_flag=os.system('ssh {}@{} "kubectl cluster - info &> /dev/null"'.format(username, address))if kubeadm_init_flag == 0:kubeadm_output=subprocess.check_output('ssh {}@{} "{}"'.format(username, address, "cat $HOME/kubeadm_init.txt"),shell=True)else:kubeadm_init_command="kubeadm init --kubernetes-version=v1.17.4 --pod-network-cidr=10.244.0.0/16 --service-cidr=10.96.0.0/12 --apiserver-advertise-address={}".format(address)kubeadm_output = subprocess.check_output('ssh {}@{} "{}"'.format(username, address,kubeadm_init_command),shell=True)lines_with_token = re.findall(r'--token.*', kubeadm_output, re.DOTALL)os.system('ssh {}@{} "{}"'.format(username, address, "echo '{}' > $HOME/kubeadm_init.txt".format(kubeadm_output)))token_cert_list = lines_with_token[0].split(' ')print(token_cert_list)kubeadm_codes = []for k in range(0,len(token_cert_list)):if (token_cert_list[k]=="--token" or token_cert_list[k]=="--discovery-token-ca-cert-hash") and k+1<len(token_cert_list):kubeadm_codes.append(token_cert_list[k+1])if len(kubeadm_codes)!=2:print("\033[1;31m" + "Failed: {}节点初始化失败".format(address) + "\033[0m")sys.exit("请检查!")os.system('ssh {}@{} "mkdir -p $HOME/.kube"'.format(username, address))os.system('ssh {}@{} "cp -i /etc/kubernetes/admin.conf $HOME/.kube/config"'.format(username, address))os.system('ssh {}@{} "chown $(id -u):$(id -g) $HOME/.kube/config"'.format(username, address))return kubeadm_codes
# 从节点方法
def k8s_init_node(username, address,master_address,kubeadm_codes):print("\033[32m" + "{}集群从节点初始化".format(address) + "\033[0m")kubeadm_join_command="kubeadm join {}:6443 --token {} \--discovery-token-ca-cert-hash {}".format(master_address,kubeadm_codes[0],kubeadm_codes[1])kubeadm_join_flag=os.system('ssh {}@{} "{}"'.format(username, address,kubeadm_join_command))if kubeadm_join_flag != 0:print("\033[1;31m" + "Failed: {}kubeadm join到{}".format(address,master_address) + "\033[0m")sys.exit("请检查!")for i in range(0, len(master_addresses)):kubeadm_codes=k8s_init_master(host_username, master_addresses[i])for j in range(0, len(client_addresses)):k8s_init_node(host_username, client_addresses[j],master_addresses[i],kubeadm_codes)os.system('ssh {}@{} "kubectl get nodes"'.format(host_username, master_addresses[i]))
print("\n")# 12.安装网络插件
def install_kube_flannel(username, address):print("\033[32m" + "{}安装网络插件".format(address) + "\033[0m")os.system('ssh {}@{} "wget https://raw.githubusercontent.com/coreos/flannel/master/Documentation/kube-flannel.yml"'.format(username, address))os.system('ssh {}@{} "kubectl apply -f kube-flannel.yml"'.format(username, address))os.system('sleep 90')os.system('ssh {}@{} "kubectl get nodes"'.format(username, address))for i in range(0, len(master_addresses)):install_kube_flannel(host_username, master_addresses[i])
print("\n")
相关文章:

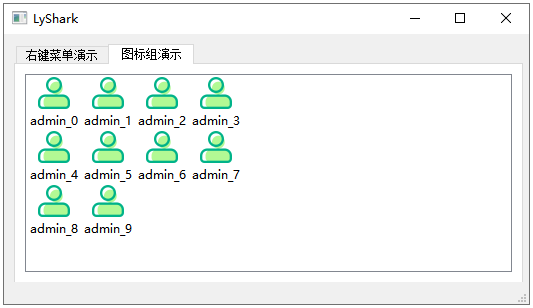
使用python脚本部署k8s集群
1.环境规划: 节点IP地址操作系统配置脚本运行节点192.168.174.5centos7.92G2核server192.168.174.150centos7.92G2核client1192.168.174.151centos7.92G2核client2192.168.174.152centos7.92G2 2.运行准备: yum install -y python python-pip pip in…...

【C语言】操作符详解(四):结构成员访问操作符
目录 结构成员访问操作符 结构体 结构体的声明 结构体变量的定义和初始化 结构成员访问操作符 结构体成员的直接访问 结构体成员的间接访问 结构成员访问操作符 结构体 ⭐C语言已经提供了内置类型,如: char、short、int、long、float、double等,但…...

【算法】二分法
1、二分法 1.1 二分法原理 每次将查找的范围缩小一半,直到最后找到记录或者找不到记录返回。 要求:采用二分法查找时,数据需是排好序的。 1.2二分法思路 判断某个数是否在数组中存在(例:判断3是否在数组中存在&#…...

2023.12.18 JAVA学习day03,while与for循环
目录 0.switch 判断语句 一.for循环 1.简单练习 2.使用for循环计算1-100求和, 以及偶数求和 3.进阶练习,配合键盘录入与判断使用循环 二.while循环 三种格式的区别: 0.switch 判断语句 switch (表达式) { case 1: 语句体1; break; case …...

使用Pytorch从零开始构建StyleGAN2
这篇博文是关于 StyleGAN2 的,来自论文Analyzing and Improving the Image Quality of StyleGAN,我们将使用 PyTorch 对其进行干净、简单且可读的实现,并尝试尽可能地还原原始论文。 如果您没有阅读 StyleGAN2 论文。或者不知道它是如何工作…...
C++ Qt 开发:ListWidget列表框组件
Qt 是一个跨平台C图形界面开发库,利用Qt可以快速开发跨平台窗体应用程序,在Qt中我们可以通过拖拽的方式将不同组件放到指定的位置,实现图形化开发极大的方便了开发效率,本章将重点介绍ListWidget列表框组件的常用方法及灵活运用。…...

手机天线市场分析:预计2029年将达到576亿美元
手机天线,即手机上用于接收信号的设备,旧式手机有外凸式天线,新式手机多数已隐藏在机身内。这类天线主要都在手机内部,手机外观上看不到里面的东西。 手机天线主要就内置及外置天线两种,内置天线客观上必然比外置天线弱…...

FPGA引脚分配的问题
今天在做一个FPGA的实验时,在引脚分配时失败了,出现了如下报错: 我当时分配的引脚是PIN_AE19,然而奇怪的是我之前并未分配这个引脚,我使用的开发工具是Quartus II 9.1 Web Edition,算个老版本了。 有的网站…...
)
面试经典150题(27-28)
leetcode 150道题 计划花两个月时候刷完,今天(第十三天)完成了2道(27-28)150: 今天这两道是真的汗流浃背!!! 27.(209. 长度最小的子数组)题目描述: 给定一…...

计算机图形学头歌合集(题集附解)
目录 CG1-v1.0-点和直线的绘制 第1关:OpenGL点的绘制 第2关:OpenGL简单图形绘制 第3关:OpenGL直线绘制 第4关:0<1直线绘制-dda算法<> 第5关:0<1直线绘制-中点算法<> 第6关:一般直线绘…...

MacBook Air提供了丰富多彩的截图选项,大到整个屏幕,小到具体的区域
本指南将带你了解在MacBook Air笔记本电脑上进行屏幕截图的各种方法。它涵盖了所有用于截屏的键盘快捷键,还包括如何启动MacBook Air屏幕录制和更改屏幕截图设置的信息。 如何在MacBook Air上进行屏幕截图 在MacBook上进行整个屏幕截图的最快、最简单的方法是使用command+sh…...
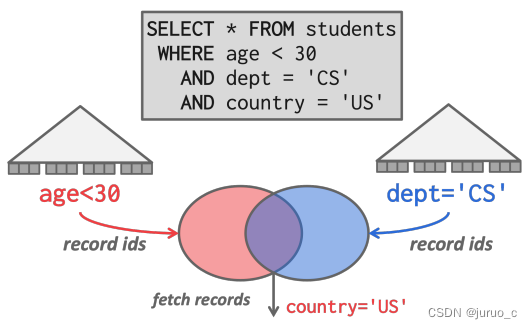
【CMU 15-445】Lecture 12: Query Execution I 学习笔记
Query Execution I Processing ModelsIterator ModelMaterialization ModelVectorization Model Access MethodsSequential ScanIndex Scan Modification QueriesHalloween Problem 本节课主要介绍SQL语句执行的相关机制。 Processing Models 首先是处理模型,它定义…...

低代码开发平台的优势及应用场景分析
文章目录 低代码是什么?低代码起源低代码分类低代码的能力低代码的需求市场需要专业开发者需要数字化转型需要 低代码的趋势如何快速入门低代码开发低代码应用领域 低代码是什么? 低代码(Low-code)是著名研究机构Forrester于2014…...

ES常见查询总结
目录 1:查询总数2:查询所有数据3:查询指定条数4:根据ID查询5:一个查询字符串搜索6:match搜索7:term搜索8:bool搜索9:must多条件匹配查询10:Should满足一个条件查询11: must_not必须不匹配查询12:多个字段查询内容13:一个字段查询多个内容14:通配符和正则匹配15:前缀查询16:短语…...

Spring Boot Docker Compose 支持中文文档
本文为官方文档直译版本。原文链接 Spring Boot Docker Compose 支持中文文档 引言服务连接自定义镜像跳过特定的容器使用特定Compose文件等待容器就绪控制 Docker Compose 的生命周期激活 Docker Compose 配置文件 引言 Docker Compose 是一种流行的技术,可用于为…...

智慧城市/一网统管建设:人员危险行为检测算法,为城市安全保驾护航
随着人们压力的不断增加,经常会看见在日常生活中由于小摩擦造成的大事故。如何在事故发生时进行及时告警,又如何在事故发生后进行证据搜索与事件溯源?旭帆科技智能视频监控人员危险行为/事件检测算法可以给出答案。 全程监控,有源…...
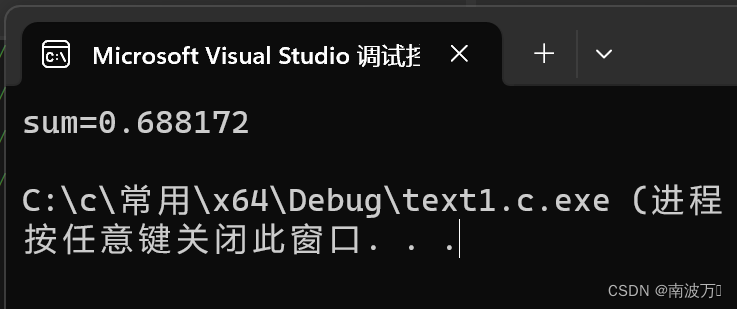
C语言:求和1+1/2-1/3+1/4-1/5+……-1/99+1/100
#include<stdio.h> int main() {int i 0;double sum 0.0;int flag 1;for (i 1;i < 100;i){sum 1.0 / i * flag;flag -flag;}printf("sum%lf\n", sum);return 0; }...

学习什么知识不会过时
近况💁🏻 最近这段时间,我真的很糟糕。工作中满负荷做需求,闲了就想玩游戏放松,业余搞些东西的时间很少。本来就有些焦虑,这种状态下更是有些 suffering。究其原因,都是因为部门转换的问题。 一…...
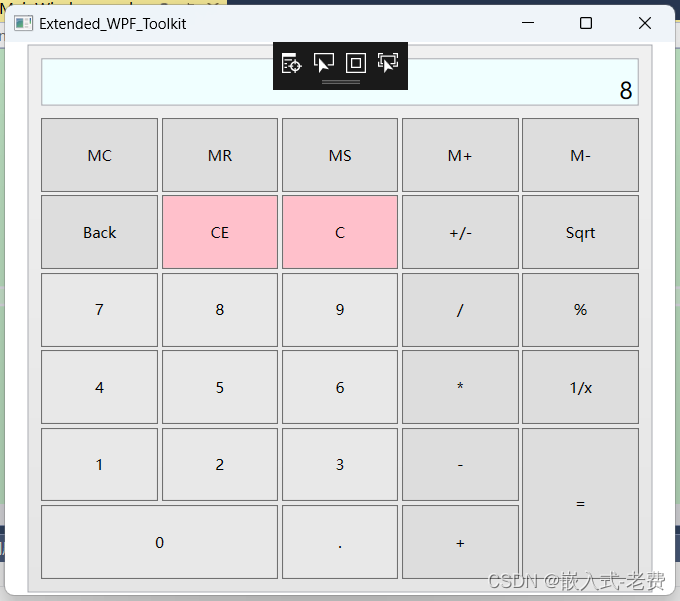
C# WPF上位机开发(ExtendedWPFToolkit扩展包使用)
【 声明:版权所有,欢迎转载,请勿用于商业用途。 联系信箱:feixiaoxing 163.com】 虽然个人人为当前的c# wpf内容已经足够多,但是肯定还是有很多个性化的需求没有满足。比如说不够好看,比如说动画效果不好&a…...

【IOS开发】传感器 SensorKit
资源 官方文档 https://developer.apple.com/search/?qmotion%20graph&typeDocumentation SensorKit 使应用程序能够访问选定的原始数据或系统从传感器处理的指标。 步骤信息加速度计或旋转速率数据用户手腕上手表的配置物理环境中的环境光有关用户日常通勤或旅行的详细…...

收藏!AI抢人大战杀疯了:应届博士年薪500万,程序员/小白必看上车指南
2026年的AI行业,最炸裂的新闻从来不是某款新模型发布,也不是某项技术突破,而是一句足以让所有从业者震惊的消息:应届博士生年薪500万 💰 没错,就是500万!而且这绝非个例,已经成为AI…...

终极指南:如何用MobaXterm中文版高效解决远程服务器管理5大痛点
终极指南:如何用MobaXterm中文版高效解决远程服务器管理5大痛点 【免费下载链接】Mobaxterm-Chinese Mobaxterm simplified Chinese version. Mobaxterm 的简体中文版. 项目地址: https://gitcode.com/gh_mirrors/mo/Mobaxterm-Chinese MobaXterm中文版作为专…...
本地7分钟超简单集成教程)
【最新】2026年3月OpenClaw(Clawdbot)本地7分钟超简单集成教程
【最新】2026年3月OpenClaw(Clawdbot)本地7分钟超简单集成教程。OpenClaw是什么?OpenClaw怎么部署?本文面向零基础用户,完整说明在轻量服务器与本地Windows11、macOS、Linux系统中部署OpenClaw(Clawdbot&am…...

VideoAgentTrek-ScreenFilter详细步骤:图片检测+视频逐帧分析全流程
VideoAgentTrek-ScreenFilter详细步骤:图片检测视频逐帧分析全流程 你是不是经常遇到这样的烦恼?面对一堆视频素材,想快速找出所有包含屏幕(比如电脑显示器、手机、电视)的画面,手动一帧一帧看,…...

STM32CubeMX新手避坑指南:从安装到第一个LED闪烁项目
STM32CubeMX新手避坑指南:从安装到第一个LED闪烁项目 第一次接触STM32开发时,面对复杂的外设配置和底层寄存器操作,很多初学者都会感到无从下手。ST公司推出的STM32CubeMX工具正是为了解决这一痛点而生——它通过图形化界面简化了芯片配置流程…...

零基础玩转LongCat-Image-Edit:一句话让图片里的猫变狗,效果惊艳
零基础玩转LongCat-Image-Edit:一句话让图片里的猫变狗,效果惊艳 1. 什么是LongCat-Image-Edit? LongCat-Image-Edit是美团LongCat团队开源的一款文本驱动图像编辑模型。它最大的特点就是能用一句话指令修改图片内容,而且只改动…...

LrcHelper:网易云音乐双语歌词下载与多设备适配工具全攻略
LrcHelper:网易云音乐双语歌词下载与多设备适配工具全攻略 【免费下载链接】LrcHelper 从网易云音乐下载带翻译的歌词 Walkman 适配 项目地址: https://gitcode.com/gh_mirrors/lr/LrcHelper 价值定位:三类用户的歌词解决方案 LrcHelper作为一款…...

GLM-4.7-Flash快速入门:Ollama可视化界面,10分钟开启AI对话
GLM-4.7-Flash快速入门:Ollama可视化界面,10分钟开启AI对话 1. 认识GLM-4.7-Flash:30B级别的高效模型 GLM-4.7-Flash是智谱AI推出的30B参数规模混合专家模型(MoE),在轻量级部署场景下展现出卓越的性能表现…...

Echarts横向树图配置指南:从数据准备到直角连接线实现
Echarts横向树图实战:从数据建模到直角连接线高级配置 在数据可视化领域,树状结构的高效呈现一直是企业级应用的核心需求。无论是组织架构展示、项目流程梳理还是决策路径分析,横向树图都能以符合人类阅读习惯的方式清晰呈现层级关系。Echart…...

Confluence 8.5.18 - windows 安装部署详解
本文我们所讲述的是Confluence - 8.5.18 -windows版本版本的详细安装破解步骤,与Confluence - 8.0.0之前的版本不同的是,部分文件名称发生了变化,以前的破解方式已不适用。 1.首先我们先准备安装所需要的文件,所需文件可以直接在…...