GEM5 Garent CPU cache消息传递路径:1. NI部分
简介
我们仔细分析下图怎么连的,以及消息传递路径。
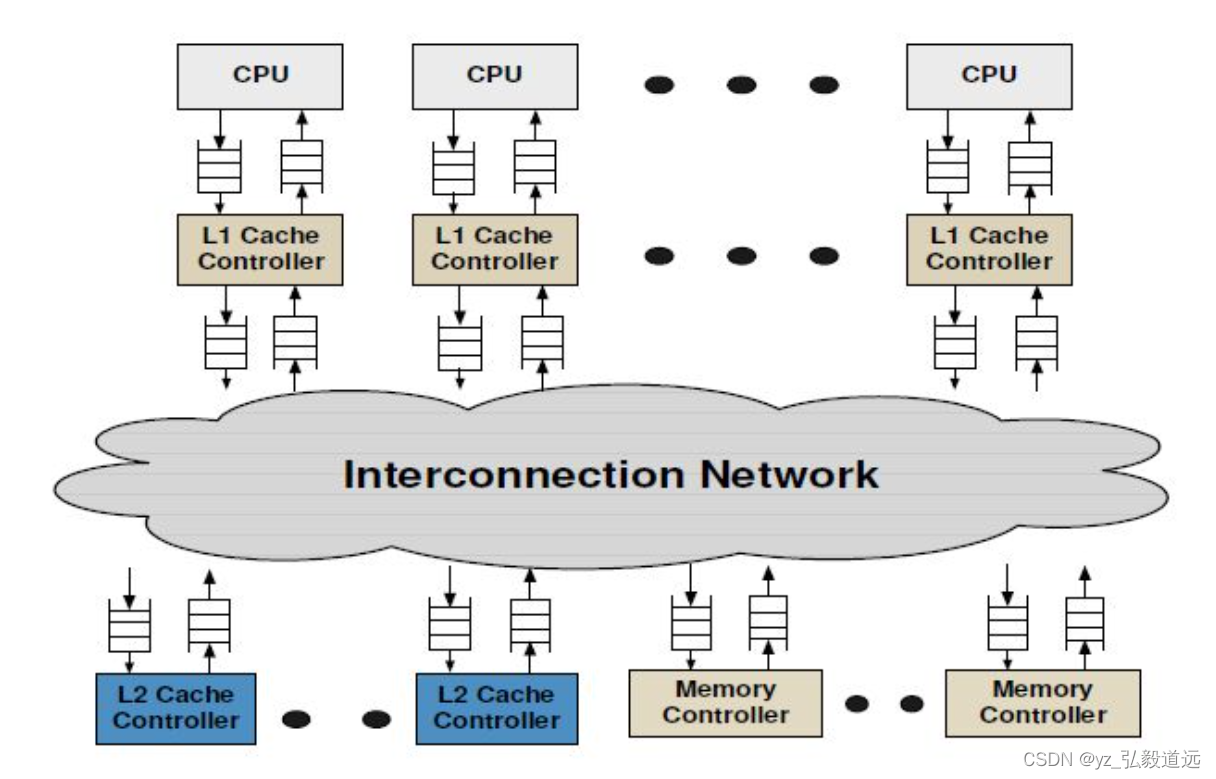
图来自https://www.gem5.org/documentation/general_docs/ruby/
代码的连接
fs.py->ruby.py-> gem5/configs/ruby/MESI_Two_Level.py 中的
create_system( options, full_system, system, dma_ports, bootmem, ruby_system, cpus ):
cpu_sequencers = []
cpu_seq = RubySequencer(version=i,dcache=l1d_cache,clk_domain=clk_domain,ruby_system=ruby_system,
l1_cntrl.sequencer = cpu_seq  #关联Sequencer与L1缓存控制器
exec("ruby_system.l1_cntrl%d = l1_cntrl" % i)# 动态添加Sequencer到Ruby系统cpu_sequencers.append(cpu_seq) # 将Sequencer添加到列表
)
创建一个RubySequencer实例cpu_seq。RubySequencer是gem5中Ruby缓存一致性协议的一部分,它充当CPU和Ruby缓存系统之间的接口。
version=i:为这个sequencer指定一个版本号或ID,通常对应于处理器核心的ID。
dcache=l1d_cache:将这个sequencer关联到一个L1数据缓存(L1D)实例。
clk_domain=clk_domain:为sequencer指定时钟域。
ruby_system=ruby_system:将这个sequencer关联到整个Ruby系统。
然后关联Sequencer与L1缓存控制器
l1_cntrl.sequencer = cpu_seq
这行代码将cpu_seq作为sequencer设置给L1缓存控制器(l1_cntrl)。这意味着L1缓存控制器将使用cpu_seq来处理来自CPU的请求。
动态添加Sequencer到Ruby系统
exec("ruby_system.l1_cntrl%d = l1_cntrl" % i)
使用exec函数动态地将L1缓存控制器(l1_cntrl)添加到Ruby系统中。这里,控制器被命名为l1_cntrl%d(其中%d是通过格式化字符串替换为i的值),这样每个控制器都有一个唯一的名称。
将Sequencer添加到列表。然后最后会返回这个cpu_sequencers给到 ruby.py中的create system。
cpu_sequencers.append(cpu_seq)
ruby.py中的create system声明,ruby._cpu_ports是我们刚创建的cpu_sequencers。
ruby._cpu_ports = cpu_sequencersruby.num_of_sequencers = len(cpu_sequencers)
FS.PY中将l1dcache相连的 ruby._cpu_ports (同时也是cpu_sequencers)和cpu相连。
for (i, cpu) in enumerate(test_sys.cpu):# Tie the cpu ports to the correct ruby system portscpu.clk_domain = test_sys.cpu_clk_domaincpu.createThreads()cpu.createInterruptController()test_sys.ruby._cpu_ports[i].connectCpuPorts(cpu)
这里调用了 gem5/src/mem/ruby/system/Sequencer.py 中的connectCpuPorts
def connectCpuPorts(self, cpu):"""Helper for connecting all cpu memory request output ports to thisobject's in_ports.This assumes the provided cpu object is an instance of BaseCPU. Non-cpuobjects should use connectInstPort and connectDataPort."""import m5.objectsassert isinstance(cpu, m5.objects.BaseCPU)# this connects all cpu mem-side ports to self.in_portscpu.connectAllPorts(self.in_ports, self.in_ports, self.interrupt_out_port)
而这使用了 cpu.connectAllPorts。 在gem5/src/cpu/BaseCPU.py中
def connectAllPorts(self, cached_in, uncached_in, uncached_out):self.connectCachedPorts(cached_in)self.connectUncachedPorts(uncached_in, uncached_out)
def connectCachedPorts(self, in_ports):for p in self._cached_ports:exec(f"self.{p} = in_ports")
def connectUncachedPorts(self, in_ports, out_ports):for p in self._uncached_interrupt_response_ports:exec(f"self.{p} = out_ports")for p in self._uncached_interrupt_request_ports:exec(f"self.{p} = in_ports")
分析
- CPU与Sequencer的连接
Ruby的Sequencer(RubySequencer)充当了CPU和Ruby缓存系统之间的桥梁。
每个CPU核心通过它的内存端口连接到一个对应的Sequencer。这是通过connectCpuPorts函数完成的,该函数定义在Sequencer.py中。
connectCpuPorts函数调用cpu.connectAllPorts,将CPU的所有缓存相关端口(包括用于缓存请求的端口和中断请求/响应端口)连接到Sequencer的端口。 - Sequencer与L1缓存的连接
在MESI Two Level协议中,每个Sequencer都与一个私有的L1数据缓存(L1D)相关联。
当CPU发出缓存请求时,这些请求首先被发送到对应的Sequencer。然后,Sequencer负责将这些请求转发到L1缓存。
如果L1缓存命中,请求的数据直接从L1缓存返回给CPU。如果未命中,请求被进一步发送到L2缓存。 - L1缓存与L2缓存的连接
L2缓存是一个共享缓存,为所有的CPU核心服务。
在MESI Two Level协议中,L1缓存与L2缓存维持包含关系(Inclusion),这意味着L1缓存中的所有数据也必须存在于L2缓存中。
当L1缓存未命中时,L1缓存控制器(L1 cache controller)会将请求发送到L2缓存控制器(L2 cache controller)进行处理。 - 连接的整体流程
当CPU需要读取或写入内存时,它通过与之相连的Sequencer发出请求。
Sequencer首先检查与之关联的L1缓存是否能满足这个请求。
如果L1缓存未命中,请求会被发送到共享的L2缓存。
L2缓存检查是否能满足该请求。如果不能,请求可能会被发送到更高级别的缓存或内存系统。
这个流程确保了gem5仿真中的内存访问请求能够正确地在多级缓存体系结构中流动,同时维护缓存一致性和数据的有效性。
我们刚刚讲了cpu找l1cache的连接,下面看l1 和l2之间的连接。这里的连接是通过noc的,也就是通过routers。
l1 l2 和 noc routers
fs.py 调用 ruby.create_system,用了configs/network/Network.py 中的 Network.create_network(options, ruby)
network是什么
gem5/configs/ruby/Ruby.py 中 create_system调用了 gem5/configs/network/Network.py 中create_network,使用了下面的代码创建了一个network。
network = GarnetNetwork(
ruby_system=ruby,
topology=options.topology,
routers=[],
ext_links=[],
int_links=[],
netifs=[],
)
GarnetNetwork初始化/创建
gem5/configs/network/Network.py 中的 GarnetNetwork 来自于 gem5/src/mem/ruby/network/garnet/GarnetNetwork.py 中 class GarnetNetwork(RubyNetwork):
而 RubyNetwork 来自于 gem5/src/mem/ruby/network/Network.py class RubyNetwork(ClockedObject)。
if options.network == "garnet":NetworkClass = GarnetNetworkIntLinkClass = GarnetIntLinkExtLinkClass = GarnetExtLinkRouterClass = GarnetRouterInterfaceClass = GarnetNetworkInterface
如我另一篇博客里 gem5 garnet l1 l2 cache的创建与相连 所说 ,每个router有3个extlinks链接了l1 l2和dir。同时有int links和其他router相连。
在
# Create the network topology
topology.makeTopology(
options, network, IntLinkClass, ExtLinkClass, RouterClass
)
之后,是初始化。
# Initialize network based on topology
Network.init_network(options, network, InterfaceClass)
我们看config.ini中的结果:
l1_cntrl0.sequencer一边是cpu的指令与数据cacheport作为inport,一边并没有outort,而是有一个port叫 mem_request_port。
[system.ruby.l1_cntrl0.sequencer]
in_ports=system.cpu.icache_port system.cpu.dcache_port system.cpu.mmu.itb.walker.port system.cpu.mmu.dtb.walker.port system.cpu.interrupts.int_requestor
mem_request_port=system.iobus.cpu_side_ports[3]#  system.ruby.l1_cntrl0.sequencer.mem_request_port
查看 system.iobus发现cpu_side_ports[3] 是system.ruby.l1_cntrl0.sequencer.mem_request_port。
[system.iobus]
cpu_side_ports=system.pc.south_bridge.io_apic.int_requestor \
system.sys_port_proxy.pio_request_port   \
system.ruby.l1_cntrl0.sequencer.pio_request_port  \
system.ruby.l1_cntrl0.sequencer.mem_request_port
default=system.pc.default_bus.cpu_side_ports[0]
mem_side_ports=system.pc.south_bridge.cmos.pio system.pc.south_bridge.dma1.pio system.pc.south_bridge.ide.pio system.pc.south_bridge.keyboard.pio system.pc.south_bridge.pic1.pio system.pc.south_bridge.pic2.pio system.pc.south_bridge.pit.pio system.pc.south_bridge.speaker.pio system.pc.south_bridge.io_apic.pio system.pc.com_1.pio system.pc.fake_com_2.pio system.pc.fake_com_3.pio system.pc.fake_com_4.pio system.pc.fake_floppy.pio system.pc.pci_host.pio system.ruby.l1_cntrl0.sequencer.pio_response_port system.ruby.io_controller.dma_sequencer.in_ports[0]
这里相当于自己引用自己,其实是一个东西。而定义不在结果里,在代码src/mem/ruby/system/Sequencer.py中。还有一个插曲,这个之前叫 mem_master_port ,被弃用了,现在2023年叫mem_request_port。
class RubyPort(ClockedObject):mem_request_port = RequestPort("Ruby mem request port")mem_master_port = DeprecatedParam(mem_request_port, "`mem_master_port` is now called `mem_request_port`")# sequencer里把它和piobus.cpu_side_ports连起来def connectIOPorts(self, piobus):self.mem_request_port = piobus.cpu_side_ports
哪里用了def connectIOPorts(self, piobus):呢? 还是ruby.creatysystem
# Create a port proxy for connecting the system port. This is# independent of the protocol and kept in the protocol-agnostic# part (i.e. here).sys_port_proxy = RubyPortProxy(ruby_system=ruby)if piobus is not None:sys_port_proxy.pio_request_port = piobus.cpu_side_ports# Give the system port proxy a SimObject parent without creating a# full-fledged controllersystem.sys_port_proxy = sys_port_proxy# Connect the system port for loading of binaries etcsystem.system_port = system.sys_port_proxy.in_portssetup_memory_controllers(system, ruby, dir_cntrls, options)# Connect the cpu sequencers and the piobusif piobus != None:for cpu_seq in cpu_sequencers:cpu_seq.connectIOPorts(piobus)
src/mem/ruby/protocol/MESI_Two_Level-L1cache.sm
然后我们看一些不是python的代码:src/mem/ruby/protocol/MESI_Two_Level-L1cache.sm 。
SLICC 文件以“.sm”结尾,因为它们是状态机文件。
创建 requestToL1Cache:
// To this node's L1 cache FROM the network// a L2 bank -> this L1MessageBuffer * requestToL1Cache, network="From", virtual_network="2",vnet_type="request";// a L2 bank -> this L1MessageBuffer * responseToL1Cache, network="From", virtual_network="1",vnet_type="response";
使用 requestToL1Cache: 当前的cpu接到了其他地方传来的request,这个request需要进入当前cpu的l1cache。
// Request InterChip network - request from this L1 cache to the shared L2in_port(requestL1Network_in, RequestMsg, requestToL1Cache, rank = 1) {if(requestL1Network_in.isReady(clockEdge())) {peek(requestL1Network_in, RequestMsg, block_on="addr") {assert(in_msg.Destination.isElement(machineID));Entry cache_entry := getCacheEntry(in_msg.addr);TBE tbe := TBEs[in_msg.addr];if (in_msg.Type == CoherenceRequestType:INV) {trigger(Event:Inv, in_msg.addr, cache_entry, tbe);} else if (in_msg.Type == CoherenceRequestType:GETX ||in_msg.Type == CoherenceRequestType:UPGRADE) {// upgrade transforms to GETX due to racetrigger(Event:Fwd_GETX, in_msg.addr, cache_entry, tbe);} else if (in_msg.Type == CoherenceRequestType:GETS) {trigger(Event:Fwd_GETS, in_msg.addr, cache_entry, tbe);} else if (in_msg.Type == CoherenceRequestType:GET_INSTR) {trigger(Event:Fwd_GET_INSTR, in_msg.addr, cache_entry, tbe);} else {error("Invalid forwarded request type");}}}}
分析代码
这段代码定义了一个输入端口(in_port),称为requestL1Network_in,用于接收来自L1网络的请求消息(RequestMsg)。
消息被发送到名为requestToL1Cache的缓冲区。
消息处理逻辑
当requestL1Network_in端口在当前时钟边沿(clockEdge())准备好接收消息时,代码开始处理接收到的消息。
使用peek函数查看端口上的消息,根据消息中的地址(addr)来阻塞或触发进一步的动作。
消息的目的地(Destination)被检查,确保它是指向当前机器的(machineID)。
根据消息类型触发不同事件
根据接收到的消息类型(in_msg.Type),代码触发不同的事件。事件类型可能包括无效化(Invalidation, INV)、获取写权限(GETX)/升级(UPGRADE)、获取共享读权限(GETS)或获取指令(GET_INSTR)等。
对于每种类型的消息,触发相应的事件,并传递相关参数,如地址(addr)、缓存条目(cache_entry)和事务缓冲条目(TBE)。
在这之前,我们需要知道in_msg来自于哪里:来自peek函数。
peek 函数
// Peek is a special function. Any code inside a peek statement has// a special variable declared and populated: in_msg. This contains// the message (of type RequestMsg in this case) at the head.// "forward_in" is the port we want to peek into// "RequestMsg" is the type of message we expect.
注释说明peek是一个特殊的函数。在peek语句内部的代码有一个特殊的变量in_msg被声明并赋值。
in_msg变量
in_msg包含位于输入端口队列头部的消息。在这种情况下,消息的类型是RequestMsg。
通过peek操作,可以查看但不移除端口队列头部的消息。
代码中的peek使用
在peek(requestL1Network_in, RequestMsg, block_on=“addr”) {…}这段代码中,requestL1Network_in是要被peek的端口,RequestMsg是期望的消息类型。
in_msg在peek的作用域内被自动声明,指向requestL1Network_in端口队列头部的RequestMsg类型消息。
in_msg的应用
在peek的代码块中,可以直接使用in_msg访问和处理当前被检视的消息。
例如,可以检查消息的类型(in_msg.Type),地址(in_msg.addr)等属性,并根据这些属性执行不同的操作。
总结peek函数
这段注释说明了peek在SLICC代码中的特殊用法,以及如何利用这个特殊的peek函数和in_msg变量来处理输入端口上的消息。这是实现gem5中复杂缓存一致性协议的关键机制之一,允许开发者以一种高效且声明式的方式来处理协议中的消息。
in_msg处理方式: 无效化(Invalidation, INV)消息
if (in_msg.Type == CoherenceRequestType:INV) {trigger(Event:Inv, in_msg.addr, cache_entry, tbe);
}
当接收到无效化请求时,触发一个无效化事件(Event:Inv)。
这种消息通常意味着其他某个缓存控制器或目录控制器要求使得当前缓存中的特定数据块无效。
该事件会使用请求的内存地址(in_msg.addr)、相关的缓存条目(cache_entry)和事务缓冲条目(TBE)作为参数。
in_msg处理方式: 获取写权限(GETX)或升级(UPGRADE)消息
else if (in_msg.Type == CoherenceRequestType:GETX ||in_msg.Type == CoherenceRequestType:UPGRADE) {trigger(Event:Fwd_GETX, in_msg.addr, cache_entry, tbe);
}
接收到GETX或UPGRADE消息时,触发一个前向写权限获取事件(Event:Fwd_GETX)。
这表示请求者需要写权限。如果是UPGRADE请求,它通常来自已拥有读权限但现在需要写权限的缓存。
事件同样携带内存地址、缓存条目和TBE作为参数
获取共享读权限(GETS)消息
else if (in_msg.Type == CoherenceRequestType:GETS) {trigger(Event:Fwd_GETS, in_msg.addr, cache_entry, tbe);
}
接收到GETS消息时,触发一个前向读权限获取事件(Event:Fwd_GETS)。
这表示请求者需要共享的读权限,而不是独占的写权限。
同样使用内存地址、缓存条目和TBE作为参数。
获取指令(GET_INSTR)消息
else if (in_msg.Type == CoherenceRequestType:GET_INSTR) {trigger(Event:Fwd_GET_INSTR, in_msg.addr, cache_entry, tbe);
}
接收到GET_INSTR消息时,触发一个前向获取指令事件(Event:Fwd_GET_INSTR)。
这种消息通常用于指令缓存请求,请求者需要读取指令数据。
包含内存地址、缓存条目和TBE作为参数。
Input/output network definitions
/*************************************************************************/// Input/output network definitions// Output ports. This defines the message types that will flow ocross the// output buffers as defined above. These must be "to" networks.// "request_out" is the name we'll use later to send requests.// "RequestMsg" is the message type we will send (see MSI-msg.sm)// "requestToDir" is the name of the MessageBuffer declared above that// we are sending these requests out of.out_port(request_out, RequestMsg, requestToDir);out_port(response_out, ResponseMsg, responseToDirOrSibling);// Input ports. The order here is/(can be) important. The code in each// in_port is executed in the order specified in this file (or by the rank// parameter). Thus, we must sort these based on the network priority.// In this cache, the order is responses from other caches, forwards, then// requests from the CPU.// Like the out_port above// "response_in" is the name we'll use later when we refer to this port// "ResponseMsg" is the type of message we expect on this port// "responseFromDirOrSibling" is the name of the buffer this in_port is// connected to for responses from other caches and the directory
这段注释是gem5中SLICC代码的一部分,解释了如何在缓存一致性协议中定义输入端口(in_port)和输出端口(out_port)。这些端口用于处理不同类型的消息,并将它们发送到或从缓存的不同网络接收。以下是对这段注释的解读:
输出端口定义
定义输出端口:
out_port(request_out, RequestMsg, requestToDir); 和 out_port(response_out, ResponseMsg, responseToDirOrSibling); 定义了两个输出端口。
这些输出端口用于将消息发送到其他网络组件,如目录控制器或兄弟缓存。
request_out和response_out是在代码中用来引用这些端口的名称。
RequestMsg和ResponseMsg指明通过这些端口发送的消息类型。
requestToDir和responseToDirOrSibling是与这些端口关联的消息缓冲区(MessageBuffer)的名称。
输入端口定义
定义输入端口:
输入端口的定义和输出端口类似,但用于接收消息。
输入端口的顺序可能会影响处理消息的优先级。注释中提到,端口中的代码按照在文件中指定的顺序(或通过rank参数)执行。
例如,in_port(response_in, ResponseMsg, responseFromDirOrSibling);定义了一个输入端口response_in,用于接收类型为ResponseMsg的消息,这些消息来自于其他缓存或目录,并存储在responseFromDirOrSibling消息缓冲区中。
注意顺序
src/learning_gem5/part3/MSI-cache.sm: In this cache, the order is responses from other caches, forwards, then requests
先处理response,然后是forward,然后是requests. 在这之前,是先处理自己的出。
小结就是,先出,然后再进。进的inport是response然后forward然后是requests.
比如这个caches的inports就是
 // "response_in" is the name we'll use later when we refer to this port// "ResponseMsg" is the type of message we expect on this port// "responseFromDirOrSibling" is the name of the buffer this in_port is// connected to for responses from other caches and the directory.
in_port(response_in, ResponseMsg, responseFromDirOrSibling) {
。。。// Forward requests for other caches.
in_port(forward_in, RequestMsg, forwardFromDir) {
。。。// The "mandatory queue" is the port/queue from the CPU or other processor.
// This is *always* a RubyRequest
in_port(mandatory_in, RubyRequest, mandatoryQueue) {
NI 内部
NI中的wakeup处理message并且生成flits
src/mem/ruby/network/garnet/NetworkInterface.cc
###wakeup():
- 会遍历检查 inNode_ptr 中 MessageBuffer的所有VNET,是否有消息准备就绪(b->isReady(curTime))。
- 消息转换(flit化):如果协议缓冲区有准备就绪的消息,flitisizeMessage函数被调用,将该消息转换为一个或多个flits。flitisizeMessage根据消息大小和网络配置确定需要多少flits来表示这个消息,并将它们放入NI的输出队列。
- 从协议缓冲区中移除消息: 一旦消息被成功转换为flits并加入到输出队列,该消息从协议缓冲区中出队(b->dequeue(curTime))。
void NetworkInterface::wakeup()for (int vnet = 0; vnet < inNode_ptr.size(); ++vnet) {MessageBuffer *b = inNode_ptr[vnet];if (b == nullptr) {continue;}if (b->isReady(curTime)) { // Is there a message waitingmsg_ptr = b->peekMsgPtr();if (flitisizeMessage(msg_ptr, vnet)) {b->dequeue(curTime);}}}
NI中的 生成flits细节
核心是瞬间虚空完成,不管有很多个flit还是一个flit。
// Embed the protocol message into flits
bool
NetworkInterface::flitisizeMessage(MsgPtr msg_ptr, int vnet)
{Message *net_msg_ptr = msg_ptr.get();NetDest net_msg_dest = net_msg_ptr->getDestination();// gets all the destinations associated with this message.std::vector<NodeID> dest_nodes = net_msg_dest.getAllDest();// Number of flits is dependent on the link bandwidth available.// This is expressed in terms of bytes/cycle or the flit sizeOutputPort *oPort = getOutportForVnet(vnet);assert(oPort);int num_flits = (int)divCeil((float) m_net_ptr->MessageSizeType_to_int(net_msg_ptr->getMessageSize()), (float)oPort->bitWidth());DPRINTF(RubyNetwork, "Message Size:%d vnet:%d bitWidth:%d\n",m_net_ptr->MessageSizeType_to_int(net_msg_ptr->getMessageSize()),vnet, oPort->bitWidth());// loop to convert all multicast messages into unicast messagesfor (int ctr = 0; ctr < dest_nodes.size(); ctr++) {// this will return a free output virtual channelint vc = calculateVC(vnet);if (vc == -1) {return false ;}MsgPtr new_msg_ptr = msg_ptr->clone();NodeID destID = dest_nodes[ctr];Message *new_net_msg_ptr = new_msg_ptr.get();if (dest_nodes.size() > 1) {NetDest personal_dest;for (int m = 0; m < (int) MachineType_NUM; m++) {if ((destID >= MachineType_base_number((MachineType) m)) &&destID < MachineType_base_number((MachineType) (m+1))) {// calculating the NetDest associated with this destIDpersonal_dest.clear();personal_dest.add((MachineID) {(MachineType) m, (destID -MachineType_base_number((MachineType) m))});new_net_msg_ptr->getDestination() = personal_dest;break;}}net_msg_dest.removeNetDest(personal_dest);// removing the destination from the original message to reflect// that a message with this particular destination has been// flitisized and an output vc is acquirednet_msg_ptr->getDestination().removeNetDest(personal_dest);}// Embed Route into the flits// NetDest format is used by the routing table// Custom routing algorithms just need destIDRouteInfo route;route.vnet = vnet;route.net_dest = new_net_msg_ptr->getDestination();route.src_ni = m_id;route.src_router = oPort->routerID();route.dest_ni = destID;route.dest_router = m_net_ptr->get_router_id(destID, vnet);// initialize hops_traversed to -1// so that the first router increments it to 0route.hops_traversed = -1;m_net_ptr->increment_injected_packets(vnet);m_net_ptr->update_traffic_distribution(route);int packet_id = m_net_ptr->getNextPacketID();for (int i = 0; i < num_flits; i++) {m_net_ptr->increment_injected_flits(vnet);flit *fl = new flit(packet_id,i, vc, vnet, route, num_flits, new_msg_ptr,m_net_ptr->MessageSizeType_to_int(net_msg_ptr->getMessageSize()),oPort->bitWidth(), curTick());fl->set_src_delay(curTick() - msg_ptr->getTime());niOutVcs[vc].insert(fl);}m_ni_out_vcs_enqueue_time[vc] = curTick();outVcState[vc].setState(ACTIVE_, curTick());}return true ;
}
NI中的 flit离开NI进入router: scheduleFlit
getOutportForVnet确定与flit的虚拟网络(vnet)对应的输出端口(OutputPort)。
插入flit到发送队列: 然后,flit被插入到该输出端口的flit发送队列(outFlitQueue)中。
安排网络链路发送: 最后,安排与输出端口关联的网络链路(NetworkLink)在下一个时钟周期发送这些flit。这是通过调用该链路的scheduleEventAbsolute方法实现的,确保在下一个时钟边沿发送flit。
NI 中的outport
wakeup插入了一个flit。 oPort是NI定义的一个类,其中outFlitQueue是一个FlitQueue。
oPort->outFlitQueue()->insert(t_flit);flitBuffer *outFlitQueue(){return _outFlitQueue;}
#include “mem/ruby/slicc_interface/Message.hh”
#include “mem/ruby/common/Consumer.hh”
garnet的NI外部
刚刚我们讲了比较简单的部分,如果NI收到了message,如何传出去。但是这个message是怎么进入NI的,从CACHE还是ROUTER进来的呢?
我们一步步看下来。
NI的实例化
src/mem/ruby/network/garnet/GarnetNetwork.cc 中初始化garnet的时候,顺便实例化了X个ni,NI的数目是p.netifs的长度。
// record the network interfacesfor (std::vector<ClockedObject*>::const_iterator i = p.netifs.begin();i != p.netifs.end(); ++i) {NetworkInterface *ni = safe_cast<NetworkInterface *>(*i);m_nis.push_back(ni);ni->init_net_ptr(this);}
NetworkInterface.hh定义NI中的 inNode_ptr用来接受协议注入的消息messages from the protocol
src/mem/ruby/network/garnet/NetworkInterface.hh:
// The Message buffers that takes messages from the protocolstd::vector<MessageBuffer *> inNode_ptr;// The Message buffers that provides messages to the protocolstd::vector<MessageBuffer *> outNode_ptr;
NetworkInterface.cc NI::addNode 实例化了inNode_ptr
src/mem/ruby/network/garnet/NetworkInterface.cc 讲一个虚空的inNode_ptr通过addnode这个函数,和输入的messagebuffer建立起了联系。这之后,对传进来的buffer进行操作,就是对NI中的 inNode_ptr进行操作。
void
NetworkInterface::addNode(std::vector<MessageBuffer *>& in,std::vector<MessageBuffer *>& out)
{inNode_ptr = in;outNode_ptr = out;for (auto& it : in) {if (it != nullptr) {it->setConsumer(this);}}
}
NI 的addnode在 garnetnetwork中调用:
src/mem/ruby/network/garnet/GarnetNetwork.cc:
garnetnetwork中的 m_toNetQueues[i]现在等效于 NI中的inNode_ptr 了。
GarnetNetwork::init()//yz:只初始化一次for (int i=0; i < m_nodes; i++) {m_nis[i]->addNode(m_toNetQueues[i], m_fromNetQueues[i]);}
m_toNetQueues 定义于ruby network : ruby/network/Network.hh
然后我们看 对应的 src/mem/ruby/network/Network.hh
定义了类型:是 vector<std::vector<MessageBuffer*> 一串[一串messagebuffer]
// vector of queues from the components
std::vector<std::vector<MessageBuffer*> > m_toNetQueues;
src/mem/ruby/network/Network.cc中给 m_toNetQueues注入了值
m_toNetQueues被 setToNetQueue函数操作了。
src/mem/ruby/network/garnet/GarnetNetwork.cc: 引用了 #include “mem/ruby/network/Network.hh”
src/mem/ruby/network/Network.cc中指定了这一串输入的message:
void
Network::setToNetQueue(NodeID global_id, bool ordered, int network_num,std::string vnet_type, MessageBuffer *b)
{NodeID local_id = getLocalNodeID(global_id);checkNetworkAllocation(local_id, ordered, network_num, vnet_type);while (m_toNetQueues[local_id].size() <= network_num) {m_toNetQueues[local_id].push_back(nullptr);}m_toNetQueues[local_id][network_num] = b;
}
插播一些ruby与garnet的代码复用关系
ruby简单一点,garnet则复杂一些,很多功能ruby是有的,garnet是把传输过程变得复杂且具体了起来。
例如,本来ruby是直接操作m_toNetQueues的,现在garnet 把m_toNetQueues和NI中的inNode_ptr等同了起来。
setToNetQueue 改变了m_toNetQueues ,是在哪里调用的setToNetQueue呢?
搜索setToNetQueue会发现代码里没有,于是怀疑在python代码或者sm文件里暗含了等效的对象,并且调用的是那个等效的对象。
于是我们寻找python和sm文件。
debug进行中,未果
换个思路找:
结果中system.ruby.l2_cntrl0.L2cache.m_demand_accesses 来自CacheMemory: ADD_STAT(m_demand_accesses, “Number of cache demand accesses”,
m_demand_hits + m_demand_misses),
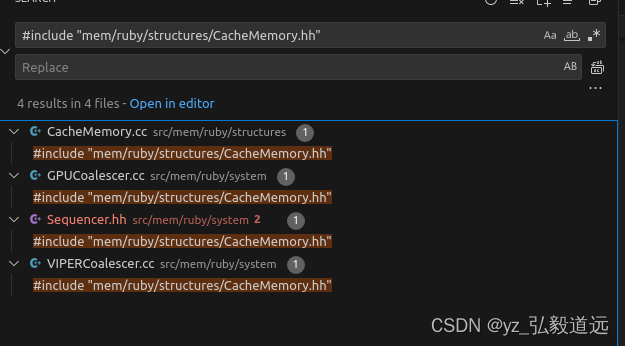
CacheMemory来自#include “mem/ruby/structures/CacheMemory.hh”
一共也只有4个文件用了这个头文件,除了它自己的cc,我们主要发现了sequencer 是用过的,但是印象里我们只在那里连了l1.
setToNetQueue 只有void 初始化没有调用。在哪里调用呢?

garnet read me work flow
Garnet Network Parameters and Setup:
- GarnetNetwork.py
- defaults can be overwritten from command line (see configs/network/Network.py)
- GarnetNetwork.hh/cc
- sets up the routers and links
- collects stats
CODE FLOW
-
NetworkInterface.cc::wakeup()
- Every NI connected to one coherence protocol controller on one end, and one router on the other.
- receives messages from coherence protocol buffer in appropriate vnet and converts them into network packets and sends them into the network.
- garnet adds the ability to capture a network trace at this point.
- receives flits from the network, extracts the protocol message and sends it to the coherence protocol buffer in appropriate vnet.
- manages flow-control (i.e., credits) with its attached router.
- The consuming flit/credit output link of the NI is put in the global event queue with a timestamp set to next cycle.
The eventqueue calls the wakeup function in the consumer.
-
NetworkLink.cc::wakeup()
- receives flits from NI/router and sends it to NI/router after m_latency cycles delay
- Default latency value for every link can be set from command line (see configs/network/Network.py)
- Per link latency can be overwritten in the topology file
- The consumer of the link (NI/router) is put in the global event queue with a timestamp set after m_latency cycles.
The eventqueue calls the wakeup function in the consumer.
- receives flits from NI/router and sends it to NI/router after m_latency cycles delay
-
Router.cc::wakeup()
- Loop through all InputUnits and call their wakeup()
- Loop through all OutputUnits and call their wakeup()
- Call SwitchAllocator’s wakeup()
- Call CrossbarSwitch’s wakeup()
- The router’s wakeup function is called whenever any of its modules (InputUnit, OutputUnit, SwitchAllocator, CrossbarSwitch) have
a ready flit/credit to act upon this cycle.
-
InputUnit.cc::wakeup()
- Read input flit from upstream router if it is ready for this cycle
- For HEAD/HEAD_TAIL flits, perform route computation, and update route in the VC.
- Buffer the flit for (m_latency - 1) cycles and mark it valid for SwitchAllocation starting that cycle.
- Default latency for every router can be set from command line (see configs/network/Network.py)
- Per router latency (i.e., num pipeline stages) can be set in the topology file
-
OutputUnit.cc::wakeup()
- Read input credit from downstream router if it is ready for this cycle
- Increment the credit in the appropriate output VC state.
- Mark output VC as free if the credit carries is_free_signal as true
-
SwitchAllocator.cc::wakeup()
- Note: SwitchAllocator performs VC arbitration and selection within it.
- SA-I (or SA-i): Loop through all input VCs at every input port, and select one in a round robin manner.
- For HEAD/HEAD_TAIL flits only select an input VC whose output port has at least one free output VC.
- For BODY/TAIL flits, only select an input VC that has credits in its output VC.
- Place a request for the output port from this VC.
- SA-II (or SA-o): Loop through all output ports, and select one input VC (that placed a request during SA-I) as the winner for this output port in a round robin manner.
- For HEAD/HEAD_TAIL flits, perform outvc allocation (i.e., select a free VC from the output port).
- For BODY/TAIL flits, decrement a credit in the output vc.
- Read the flit out from the input VC, and send it to the CrossbarSwitch
- Send a increment_credit signal to the upstream router for this input VC.
- for HEAD_TAIL/TAIL flits, mark is_free_signal as true in the credit.
- The input unit sends the credit out on the credit link to the upstream router.
- Reschedule the Router to wakeup next cycle for any flits ready for SA next cycle.
-
CrossbarSwitch.cc::wakeup()
- Loop through all input ports, and send the winning flit out of its output port onto the output link.
- The consuming flit output link of the router is put in the global event queue with a timestamp set to next cycle.
The eventqueue calls the wakeup function in the consumer.
If a clock domain crossing(CDC) or Serializer-Deserializer unit is
instantiated, then the Network Brisge takes over the flit in HeteroGarnet.
- NetworkBridge::wakeup()
- Check if SerDes is enabled and do appropriate calculations for
serializing or deserializing the flits - Check if CDC is enabled and schedule all the flits according
to the consumers clock domain.
- Check if SerDes is enabled and do appropriate calculations for
相关文章:
GEM5 Garent CPU cache消息传递路径:1. NI部分
简介 我们仔细分析下图怎么连的,以及消息传递路径。 图来自https://www.gem5.org/documentation/general_docs/ruby/ 代码的连接 fs.py->ruby.py-> gem5/configs/ruby/MESI_Two_Level.py 中的 create_system( options, full_system, system, dma_ports, b…...
Java设计模式之单例模式以及如何防止通过反射破坏单例模式
单例模式 单例模式使用场景 什么是单例模式?保障一个类只能有一个对象(实例)的代码开发模式就叫单例模式 什么时候使用? 工具类!(一种做法,所有的方法都是static,还有一种单…...

python flask+vue实现前后端图片上传
python flaskvue实现前后端图片上传 vue代码如下: <template><div><input type"file" change"handleFileChange"/><button click"uploadFile">上传</button><br><img :src"imageUrl&…...

centos7安装开源日志系统graylog5.1.2
安装包链接:链接:https://pan.baidu.com/s/1Zl5s7x1zMWpuKfaePy0gPg?pwd1eup 提取码:1eup 这里采用的shell脚本安装,脚本如下: 先使用命令产生2个参数代入到脚本中: 使用pwgen生成password_secret密码 …...
5G+云渲染技术:将如何快速推进XR和元宇宙?
XR(扩展现实)领域正在以惊人的速度增长。目前,到 2024 年,一些专家表示这个行业的价值将达到 3000 亿美元。 这个行业发展如此迅速的部分原因是 XR 将在商业环境中的带来巨大利益。近年来,很多企业遇到了将增强现实和…...

【leetcode234】回文链表Java代码讲解
12.21 234. 回文链表 给你一个单链表的头节点 head ,请你判断该链表是否为回文链表。如果是,返回 true ;否则,返回 false 。 示例 1: 输入:head [1,2,2,1] 输出:true示例 2: 输入&a…...
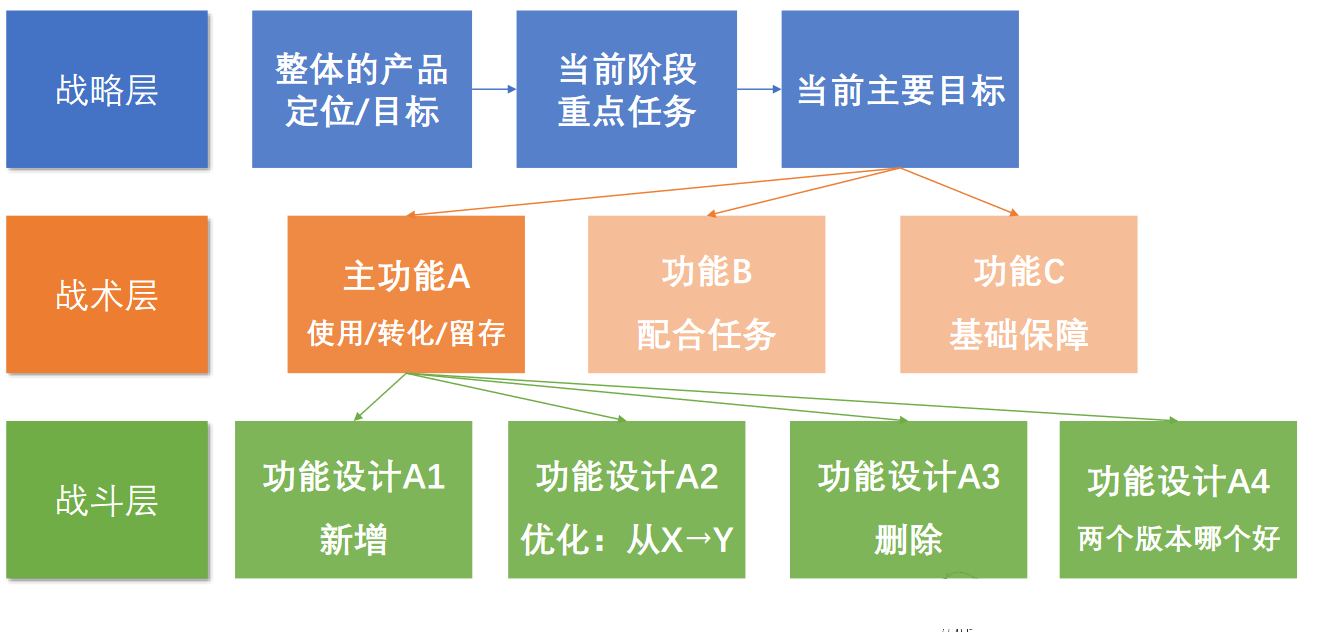
指标体系构建-02-从0开始,梳理数据指标体系
指标体系构建-02-从0开始,梳理数据指标体系 一个例子,看懂并列式指标梳理 并列式指标体系,一般用于:描述个体情况 当我们想从几个不同角度,描述问题的时候,就需要并列关系 举个栗子🌰…...

高速视频采集卡设计方案:620-基于PCIe的高速视频采集卡
一、产品概述 基于PCIe的高速视频采集卡,通过PCIe3.0X8传输到存储计算服务器,实现信号的分析、存储。 北京太速科技 产品固化FPGA逻辑,适配视频连续采集,缓存容量2GB,开源的PCIe QT客户端软件,…...

MyBatis:动态 SQL 标签
MyBatis 动态 SQL 标签if 标签where 标签trim 标签choose 、when 、otherwise 标签foreach 标签附 动态 SQL 标签 MyBatis 动态 SQL 标签,是一组预定义的标签,用于构建动态的 SQL 语句,允许在 SQL 语句中使用条件、循环和迭代等逻辑。通过使…...
福建农林大学 html +css + JavaScript 期末复习 -- 保姆级
html css JavaScript 期末复习(保姆级复盘) 考试题型 1、选择题 20题 30分 2、判断题 15题 15分 3、程序题 3 题 30分 4、综合题 2 题 25分 1、网页第一代文本标签(直接上代码,看保姆级注解) <!-- doctype: docum…...
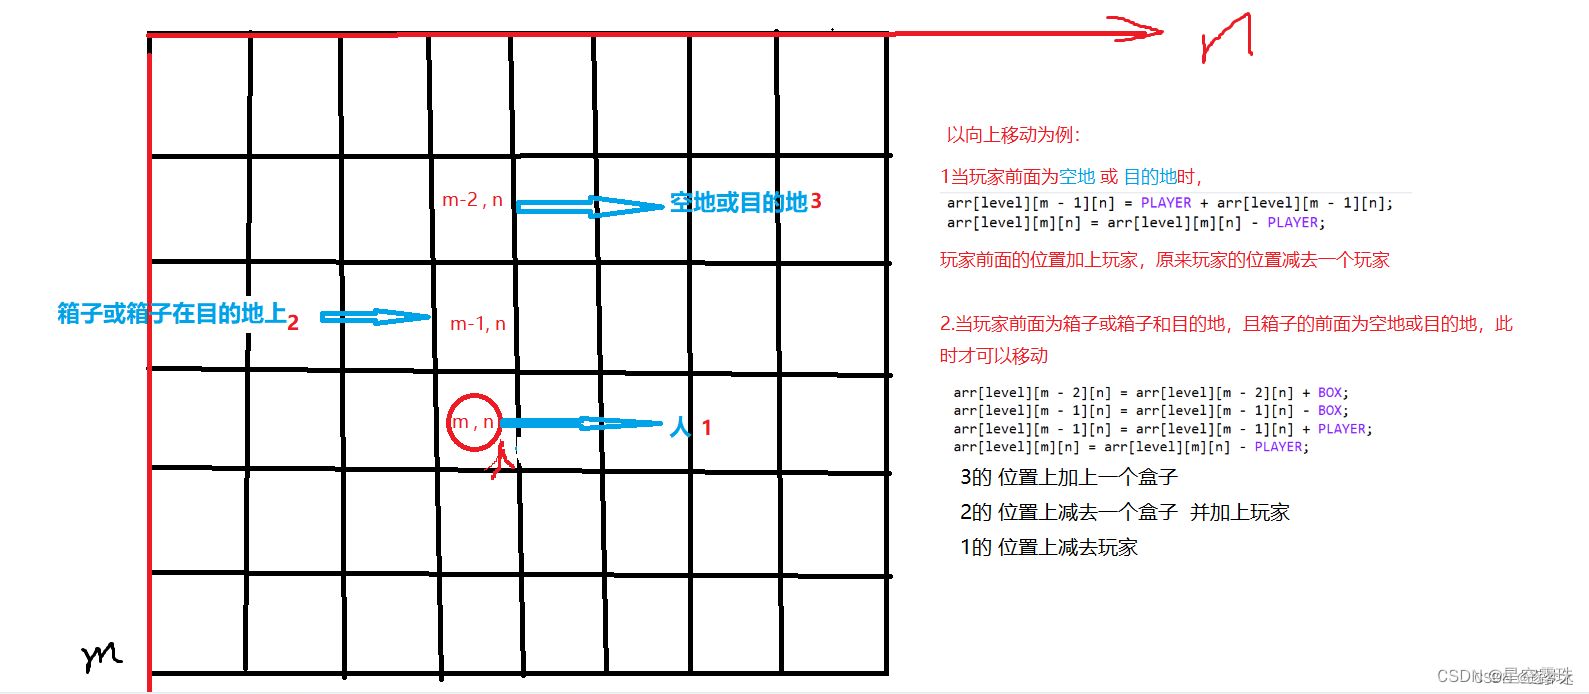
推箱子小游戏
--print("开发流程步骤:I、绘制推箱子地图并初始化 ----- 几*几大小的地图 \n\n II、根据宏定义和推箱子地图上的数字来选择不同的图形\n\n III、获取玩家坐标 -----------重点\n\n …...
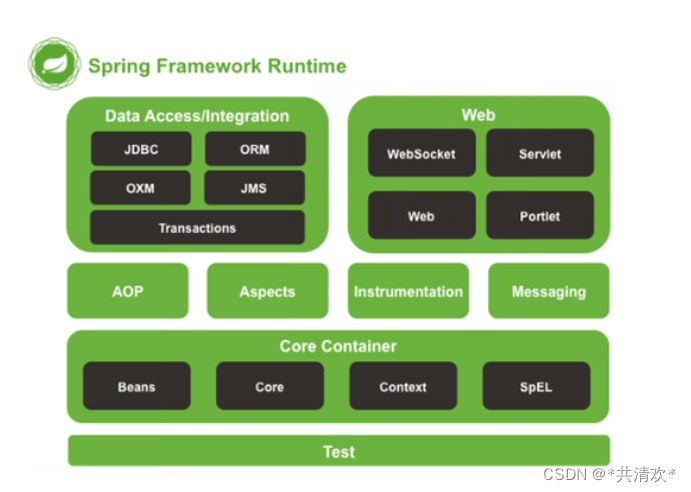
Spring简介
一:Spring是什么 Spring是分层的Java SE/EE应用full-stack(各层都有对应解决方案)轻量级(api较少,学习成本较低)开源框架,以IOC(Inverse Of Control:反转控制)和AOP(Asp…...

万德高科携手航天科技AIRIOT打造智慧能碳管理平台, 助力碳达峰碳中和
“十四五”时期,我国生态文明建设进入了以降碳为重点战略方向、推动减污降碳协同增效、促进经济社会发展全面绿色转型、实现生态环境质量改善由量变到质变的关键时期。“实施数字化赋能行动”,聚焦能源管理、节能降碳、低碳能力等典型场景,推…...

金融软件开发的 4 大挑战
与大多数行业一样,金融行业不断发展,同样给软件和解决方案开发带来了挑战。虽然这些挑战并不独特,也不新颖,但是随着时间的推移,金融体系越来越复杂,这些挑战的影响也越来越大。 在上一篇文章中࿰…...

oppo 手机刷机流程
一、操作步骤: 一)解锁BootLoader 以下是一种常见的方法,可以尝试获取OPPO手机的Root权限(以参考信息为准,具体步骤可能因设备型号和系统版本而有所不同): 11). 解锁Bootloader:首…...

SQL---数据抽样
内容导航 类别内容导航机器学习机器学习算法应用场景与评价指标机器学习算法—分类机器学习算法—回归机器学习算法—聚类机器学习算法—异常检测机器学习算法—时间序列数据可视化数据可视化—折线图数据可视化—箱线图数据可视化—柱状图数据可视化—饼图、环形图、雷达图统…...
)
C 库函数 - strxfrm()
描述 C 库函数 size_t strxfrm(char *dest, const char *src, size_t n) 根据程序当前的区域选项中的 LC_COLLATE 来转换字符串 src 的前 n 个字符,并把它们放置在字符串 dest 中。 声明 下面是 strxfrm() 函数的声明。 size_t strxfrm(char *dest, const char …...

选型前必看,CRM系统在线演示为什么重要?
在CRM挑选环节中,假如企业需要深入了解CRM管理系统的功能和功能,就需要CRM厂商提供在线演示。简单的说,就是按照企业的需要,检测怎样通过CRM进行。如今我们来谈谈CRM在线演示的作用。 在线演示 1、了解CRM情况 熟悉系统功能&…...

微软官宣放出一个「小模型」,仅2.7B参数,击败Llama2和Gemini Nano 2
就在前一阵谷歌深夜炸弹直接对标 GPT-4 放出 Gemini 之后,微软这两天也紧锣密鼓进行了一系列动作。尽管时间日趋圣诞假期,但是两家巨头硬碰硬的军备竞赛丝毫没有停止的意思。 就在昨日,微软官宣放出一个“小模型” Phi-2,这个 Ph…...

成为一名FPGA工程师:面试题与经验分享
在现代科技领域,随着数字电子技术的迅猛发展,FPGA(可编程逻辑器件)工程师成为了备受瞩目的职业之一。FPGA工程师不仅需要掌握硬件设计的基本原理,还需要具备良好的编程能力和解决问题的实践经验。面对如此竞争激烈的行…...
)
数据分析报告必备:用Python Seaborn的boxplot函数,一眼识别数据中的‘捣蛋鬼’(异常值)
数据分析报告必备:用Python Seaborn的boxplot函数,一眼识别数据中的‘捣蛋鬼’(异常值) 当你第一次拿到一份销售数据或用户行为日志时,最令人头疼的往往不是常规数据的分析,而是那些隐藏在角落里的"捣…...
)
STC单片机驱动数码管亮度不够?手把手教你用S8550/S8050三极管搞定(附完整代码)
STC单片机驱动数码管亮度提升实战:三极管驱动方案详解 刚接触单片机开发的朋友们,一定遇到过这样的困扰:明明代码写对了,电路也连好了,可数码管显示的亮度就是不够,在光线稍强的环境下几乎看不清。这其实是…...

LayerDivider终极指南:5分钟掌握AI智能图像分层技术
LayerDivider终极指南:5分钟掌握AI智能图像分层技术 【免费下载链接】layerdivider A tool to divide a single illustration into a layered structure. 项目地址: https://gitcode.com/gh_mirrors/la/layerdivider 在数字创意设计的世界里,你是…...
)
Cadence IC617下tsmc18rf与tsmcN65工艺库安装避坑全记录(附转换失败备用包)
Cadence IC617工艺库安装实战:从CDB-OA转换失败到应急方案全解析 在半导体设计领域,工艺库的安装是每位工程师必须掌握的基础技能。当面对Cadence IC617环境下tsmc18rf与tsmcN65工艺库的安装时,许多用户会发现即使严格遵循教程步骤࿰…...
)
别再乱敲空格了!EndNote文献模板编排的4个隐藏语法规则(附实战避坑)
EndNote文献模板编排的隐藏语法规则与实战避坑指南 如果你曾经在EndNote中尝试自定义文献模板,却总是遇到莫名其妙的格式错乱问题,比如多余的标点符号、无法隐藏的独立文字,或者字段之间的间距异常,那么这篇文章就是为你准备的。我…...

mirrors/monster-labs/control_v1p_sd15_qrcode_monster用户体验改进建议:让模型更易用
mirrors/monster-labs/control_v1p_sd15_qrcode_monster用户体验改进建议:让模型更易用 【免费下载链接】control_v1p_sd15_qrcode_monster 项目地址: https://ai.gitcode.com/hf_mirrors/monster-labs/control_v1p_sd15_qrcode_monster mirrors/monster-la…...

终极Win11Debloat指南:5分钟让Windows 11系统轻量化运行
终极Win11Debloat指南:5分钟让Windows 11系统轻量化运行 【免费下载链接】Win11Debloat A simple, lightweight PowerShell script that allows you to remove pre-installed apps, disable telemetry, as well as perform various other changes to declutter and …...

开发者技能图谱全解析:从基础到实战的成长指南
1. 项目概述:一个面向开发者的技能图谱与实战指南最近在GitHub上看到一个挺有意思的项目,叫disco-trooper/skills。初看这个名字,你可能会联想到“星际战士”和“技能”,感觉有点酷,又有点摸不着头脑。实际上ÿ…...

深入ADSP21593内存映射:FIRA驱动中那个神秘的MP_OFFSET到底在做什么?
深入解析ADSP21593内存映射:FIRA驱动中MP_OFFSET的底层逻辑 在ADSP21593的开发过程中,许多开发者都会遇到一个看似简单却令人困惑的操作:当配置FIRA加速器的TCB(传输控制块)时,为什么需要对数据地址进行右…...

终极指南:如何用OmenSuperHub解锁惠普游戏本的真实性能
终极指南:如何用OmenSuperHub解锁惠普游戏本的真实性能 【免费下载链接】OmenSuperHub 使用 WMI BIOS控制性能和风扇速度,自动解除DB功耗限制。 项目地址: https://gitcode.com/gh_mirrors/om/OmenSuperHub 还在为惠普OMEN游戏本官方软件的功能限…...