机器学习算法(11)——集成技术(Boosting——梯度提升)
一、说明
在在这篇文章中,我们学习了另一种称为梯度增强的集成技术。这是我在机器学习算法集成技术文章系列中与bagging一起介绍的一种增强技术。我还讨论了随机森林和 AdaBoost 算法。但在这里我们讨论的是梯度提升,在我们深入研究梯度提升之前,了解决策树很重要。因此,如果您不熟悉决策树,那么理解梯度提升可能并不容易。请参阅本文以更好地了解决策树。
二、建立模型
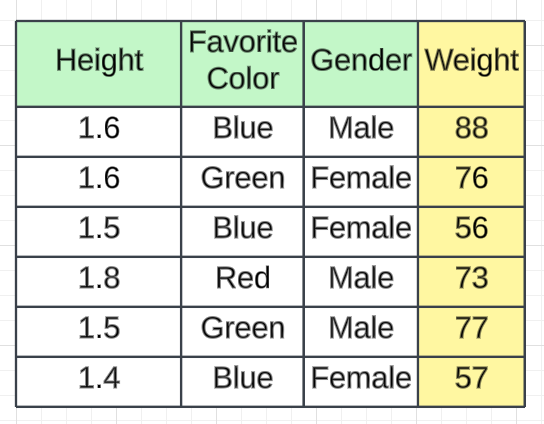
我们以身高、最喜欢的颜色、性别作为独立特征,体重作为输出特征的数据集为例。我们有 6 条记录。
2.1 步骤1:
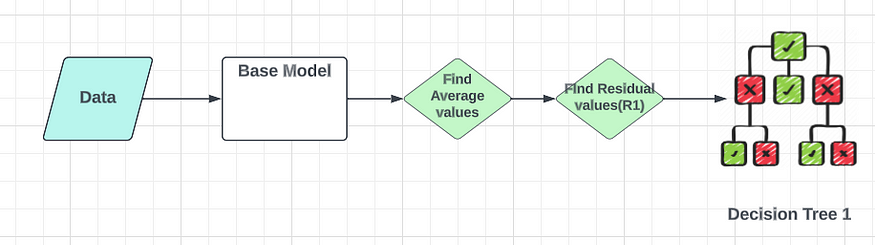
决策树的第一步是计算基本模型,它是所有权重的平均值。
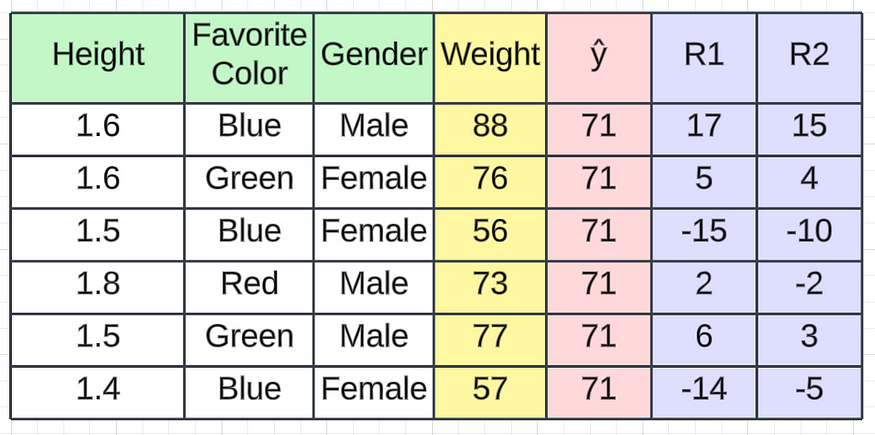
Average Salary(ŷ) = (88 + 76 + 56 + 73 + 77 + 57)/ 6 = 71.17 ≈ 71当我们给出训练数据集时,预测值为71.17。这只是我们计算的平均工资。为了更好的解释,我们将其用作≈71 。
2.2 第2步:
在第二步中,我们将计算残差,也称为伪残差。在回归中,我们使用损失函数来计算误差。有不同的损失函数,例如均方误差、回归和对数损失的均方根误差以及分类的铰链损失。根据所选的损失函数,我们将计算残差。在这种情况下,我们将使用一个简单的损失函数。损失将通过从预测值中减去实际值来计算(例如,我们使用此计算),从而产生一个名为R1的新列,表示残差。
例如,如果我们从 88 中减去 71 ,则第一条记录的残差将为17。

2.3 步骤3:
建立好这个基础模型后,我们将依次添加一棵决策树。在这个决策树中,我的输入是身高、最喜欢的颜色和性别。我的依赖特征不是重量。这将是残余误差 R1。基于此我们可以创建决策树。
现在我们有了一个基本模型和一个决策树。我们已经训练了决策树。当我们将新数据传递给决策树时,它将预测残差值的输出。我们将其命名为残差 2(R2)输出。

在此基础上,让我们检查一下预测的进展情况。假设我们得到这样的 R2 值。
R2 值
因此,每当我们通过基本模型获取第一条记录时,它将是71(我们计算的平均值)。转到决策树 1,我们将获得一些残差值。从上图中,您可以看到我们获得的第一条记录的残差值(R2)为 15 。如果我们将其与 71 相加,我们将得到一个值86,该值非常接近实际值。
1st Record
==================
R1 = 15
Average Weight = 71
Predicted Weight = 71 + 15 = 86然而,这凸显了决策树模型中的过度拟合问题。我们想要创建一个具有低方差和低偏差的通用模型。在这种情况下,我们的偏差较低,但方差较高,这意味着当引入新的测试数据时,该值可能会下降。为了解决这个问题,我们将向模型添加学习率Alpha (α)和 R2 值。学习率应该在 0 到 1 之间。
Assume α = 0.1
Predicted Weight = Avearge Weight + α (R2 Value)= 71 + (0.1)15 = 72.5在这里您可以看到72.5,这与实际重量存在显着差异。将根据残差 2(R2) 值和相同的独立特征添加额外的决策树来解决此问题。该决策树将依次计算我的下一个残差。通用公式可以写成:
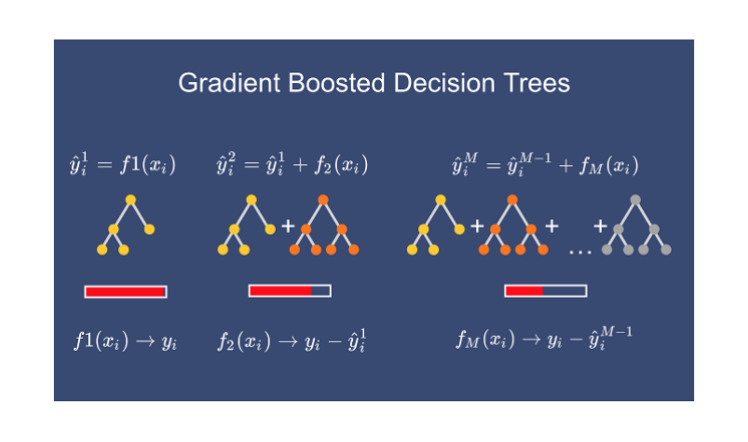
F(x) = h0x + α1 h1x + α2 h2x + α3 h3x + ....... + αn hnxF(x) = i = 1 -> n Σ αi hixh0x = Base Model
hnxn = Output given by any desicion tree目标是通过根据残差顺序创建决策树来减少残差。Alpha(α)次要参数将使用次要参数调整来决定。

基本上,在基本模型之后,我们会依次使用决策树来增强模型。这就是为什么它被称为增强技术。
三、该算法背后的伪代码
现在我们将深入研究我们创建的伪算法背后的数学原理。尽管看起来很复杂,但我们将分解每个步骤以帮助您理解该过程。我们使用的数据集包括身高、喜欢的颜色、性别和体重,共有 6 条记录。身高、喜欢的颜色和性别是我的独立特征,体重是我的从属特征。
3.1 遵循伪算法所需的基本步骤
- 提供输入——独立和相关特征。
- 提供损失函数——这对于分类问题(对数损失和铰链损失)或回归问题(均方误差、均方根误差)可能有所不同。所有的损失函数应该是可微的(能够求导数)。
- 找出梯度提升算法中需要多少棵树。
3.2 计算步骤
3.2.1 步骤1 -
梯度提升的第一步是构建一个基础模型来预测训练数据集中的观察结果。为简单起见,我们取目标列 (ŷ) 的平均值,并假设其为预测值,如红色列下方所示。

为什么我说我们取目标列的平均值?嗯,这涉及到数学。从数学上讲,第一步可以写为:

---------------------------------------------
F0(x) = arg min γ (i = 1 -> n Σ Loss(y,γ))
---------------------------------------------L      = loss function
γ      = predicted value
argmin = we have to find a predicted value/γ for which the loss function is minimum.Loss Function (Regresion)
==========================
Loss  = [i = 0 -> n Σ 1/n (yi - γi)²]yi     = observed value (weight)
γ      = predicted value// Now we need to find a minimum value of γ such that this loss function is minimum.
// We use to differentiate this loss function and then put it equal to 0 right? Yes, we will do the same here.
d(Loss)/ dγ = d([i = 0 -> n Σ 1/n (yi - γi)²])/ dγ
d(Loss)/ dγ = 2/2(i = 0 -> n Σ (yi - γi)) * (-1) = - (i = 0 -> n Σ (yi - γi)) - equation 1// Let’s see how to do this with the help of our example.
// Remember that yi is our observed value and γi is our predicted value, by plugging the values in the above formula we get:
d(Loss)/ dγ = - [88 - γ + 76 - γ + 56 - + 73 - γ + 77 - γ + 57 - γ]= - 427 + 6γd(Loss)/ dγ = 0
- 427 + 6γ  = 0
6γ          = 427
γ           = 71.16 ≈ 71// We end up over an average of the observed weight and this is why I asked you to take the average of the target column and assume it to be your first prediction.Hence for γ=71, the loss function will be minimum so this value will become our prediction for the base model.
==============================================================================================================
3.2.2 第2步-
下一步是计算伪残差,即(观测值 - 预测值)。图中R1是计算出的残值。
问题又来了,为什么只是观察到预测?一切都有数学证明,我们看看这个公式从何而来。这一步可以写成:

----------------------------------
rim = - [dL(y1, F(x1)) / dF(x1)]
----------------------------------F(xi) = previous model output
m     = number of DT made// From the equation 1 We are just taking the derivative of loss function
d(Loss)/ dγ = - (i = 0 -> n Σ (yi - γi)) = -(i = 0 -> n Σ (Observed - Predicted))// If you see the formula of residuals above, we see that the derivative of the loss function is multiplied by a negative sign, so now we get:
Observed - Predicted
// The predicted value here is the prediction made by the previous model.
// In our example the prediction made by the previous model (initial base model prediction) is 71, to calculate the residuals our formula becomes:
(Observed - 71)Finding the rim values for the dataset
-----------------------------------------
r11 = 1st Record of model 1 = (y - ŷ) = 88 - 71 = 17
r21 = 2nd Record of model 1 = (y - ŷ) = 76 - 71 = 5
r31 = 3rd Record of model 1 = (y - ŷ) = 56 - 71 = -15
r41 = 4th Record of model 1 = (y - ŷ) = 73 - 71 = 2
r51 = 5th Record of model 1 = (y - ŷ) = 77 - 71 = 6
r61 = 6th Record of model 1 = (y - ŷ) = 57 - 71 = -14
3.2.3 步骤3—
下一步,我们将根据这些伪残差建立模型并进行预测。我们为什么要做这个?
因为我们希望最小化这些残差,最小化残差最终将提高我们的模型准确性和预测能力。因此,使用残差作为目标和原始特征高度、最喜欢的颜色和性别,我们将生成新的预测。请注意,在这种情况下,预测将是错误值,而不是预测的权重,因为我们的目标列现在是错误的(R1)。
3.2.4 步骤4 -
在此步骤中,我们找到决策树每个叶子的输出值。这意味着可能存在1 个叶子获得超过 1 个残差的情况,因此我们需要找到所有叶子的最终输出。为了找到输出,我们可以简单地取叶子中所有数字的平均值,无论只有 1 个数字还是多于 1 个数字。
让我们看看为什么我们要取所有数字的平均值。从数学上讲,该步骤可以表示为:

-----------------------------------------------
γm = argmin γ [i = 1 -> n Σ L(y1, Fm-1(x1) + γhm(xi))]
-------------------------------------------------hm(xi) = DT made on residuals
m      = number of DT
γm     = output value of a particular leaf // m = 1 we are talking about the 1st DT and when it is “M” we are talking about the last DT.
// The output value for the leaf is the value of γ that minimizes the Loss function[Fm-1(xi)+ γhm(xi))] = This is similar as step 1 equation but here the difference is that we are taking previous predictions whereas earlier there was no previous prediction.Let’s understand this even better with the help of an example. Suppose this is our regressor tree:Height(> 1.5)/            \/              \/                \Fav Clr               Gender/ \                    / \/   \                  /   \/     \                /     \R1,1     R2,1           R3,1    R4,117        5, 2           -15    6, -14γm = argmin γ [i = 1 -> n Σ L(y1, Fm-1(x1) + γhm(xi))]
// Using lost function we can write this as,
L(y1, Fm-1(x1) + γhm(xi) = 1/2 (y1 - (Fm-1(x1) + γhm(xi)))^2
Then,
γm = argmin γ [i = 1 -> n Σ 1/2 (y1 - (Fm-1(x1) + γhm(xi)))^2]Let's see 1st residual goes in R1,1
γ1,1 = argmin 1/2(80 - (71 + γ))^2//Now we need to find the value for γ for which this function is minimum.
// So we find the derivative of this equation w.r.t γ and put it equal to 0.
d (γ1,1) / d γ = d (1/2(88 - (71 + γ))^2) / dγ
0              = d (1/2(88 - (71 + γ))^2) / dγ
80 - (71 + γ)  = 0
γ              = 17Let's see 1st residual goes in R2,1
γ2,1 = argmin 1/2(76 - (71 + γ))^2  +  1/2(73 - (71 + γ))^2//Now we need to find the value for γ for which this function is minimum.
// So we find the derivative of this equation w.r.t γ and put it equal to 0.
d (γ2,1) / d γ = d (1/2(76 - (71 + γ))^2  +  1/2(73 - (71 + γ))^2) / dγ
0              = d (1/2(76 - (71 + γ))^2  +  1/2(73 - (71 + γ))^2) / dγ
-2γ + 5 + 2    = 0
γ              =  7 /2 = 3.5Let's see 1st residual goes in R3,1
γ3,1 = argmin 1/2(56 - (71 + γ))^2 //Now we need to find the value for γ for which this function is minimum.
// So we find the derivative of this equation w.r.t γ and put it equal to 0.
d (γ3,1) / d γ = d (1/2(56 - (71 + γ))^2) / dγ
0              = d (1/2(56 - (71 + γ))^2) / dγ
-γ - 15        = 0
γ              = -15Let's see 1st residual goes in R4,1
γ4,1 = argmin 1/2(77 - (71 + γ))^2  +  1/2(57 - (71 + γ))^2//Now we need to find the value for γ for which this function is minimum.
// So we find the derivative of this equation w.r.t γ and put it equal to 0.
d (γ4,1) / d γ = d (1/2(77 - (71 + γ))^2  +  1/2(57 - (71 + γ))^2) / dγ
0              = d (1/2(77 - (71 + γ))^2  +  1/2(57 - (71 + γ))^2) / dγ
-2γ + 6 -14    = 0
γ              =  -8/2 = -4// We end up with the average of the residuals in the leaf R2,1 and R4,1. Hence if we get any leaf with more than 1 residual, we can simply find the average of that leaf and that will be our final output.
现在计算所有叶子的输出后,我们得到,

3.2.5 步骤 5 —
这最终是我们必须更新先前模型的预测的最后一步。它可以更新为:
---------------------------
Fm(x) = Fm-1(x) + vmhm(x)
---------------------------
m       = number of decision trees made
Fm-1(x) = prediction of the base model (previous prediction)
Hm(x)   = recent DT made on the residuals// since F1-1= 0 , F0 is our base model hence the previous prediction is 71.
vm is the learning rate that is usually selected between 0-1. It reduces the effect each tree has on the final prediction, and this improves accuracy in the long run. Let’s take vm=0.1 in this example.Let’s calculate the new prediction now:New Prediction F1(x) = 71 + 0.1 * Height(> 1.5)/            \/              \/                \Fav Clr               Gender/ \                    / \/   \                  /   \/     \                /     \R1,1     R2,1           R3,1    R4,117        5, 2           -15    6, -14
假设我们想要找到高度为 1.7 的第一个数据点的预测。这个数据点将经过这个决策树,它得到的输出将乘以学习率,然后添加到之前的预测中。
现在,更新预测后,我们需要再次迭代步骤 2 中的步骤以找到另一个决策树。这种情况将会发生,直到我们通过基于残差顺序创建决策树来减少残差。
现在假设m=2,这意味着我们已经构建了 2 个决策树,现在我们想要有新的预测。
这次我们将把之前的预测F1(x)添加到对残差进行的新 DT 中。我们将一次又一次地迭代这些步骤,直到损失可以忽略不计。
New Prediction F2(x) = 71 + (0.1 * DT value) + (0.1 * DT value)这就是梯度提升算法的全部内容。我希望您对这个主题有更好的理解。我们下一篇文章讨论XgBoost算法。
相关文章:
机器学习算法(11)——集成技术(Boosting——梯度提升)
一、说明 在在这篇文章中,我们学习了另一种称为梯度增强的集成技术。这是我在机器学习算法集成技术文章系列中与bagging一起介绍的一种增强技术。我还讨论了随机森林和 AdaBoost 算法。但在这里我们讨论的是梯度提升,在我们深入研究梯度提升之前…...

使用GBASE南大通用负载均衡连接池
若要使用负载均衡连接池功能,需要在连接串中配置相关的关键字。有关更详细的关键字信息在 GBASE南大通用 连接参数表‛中介绍。假设存在如下场景: 现有集群中存在 4 个节点: 192.168.9.173, 192.168.9.174, 192.168.9.175, 192.168.9.17…...
Flink 数据序列化
为 Flink 量身定制的序列化框架 大家都知道现在大数据生态非常火,大多数技术组件都是运行在JVM上的,Flink也是运行在JVM上,基于JVM的数据分析引擎都需要将大量的数据存储在内存中,这就不得不面临JVM的一些问题,比如Ja…...
【并发设计模式】聊聊两阶段终止模式如何优雅终止线程
在软件设计中,抽象出了23种设计模式,用以解决对象的创建、组合、使用三种场景。在并发编程中,针对线程的操作,也抽象出对应的并发设计模式。 两阶段终止模式- 优雅停止线程避免共享的设计模式- 只读、Copy-on-write、Thread-Spec…...
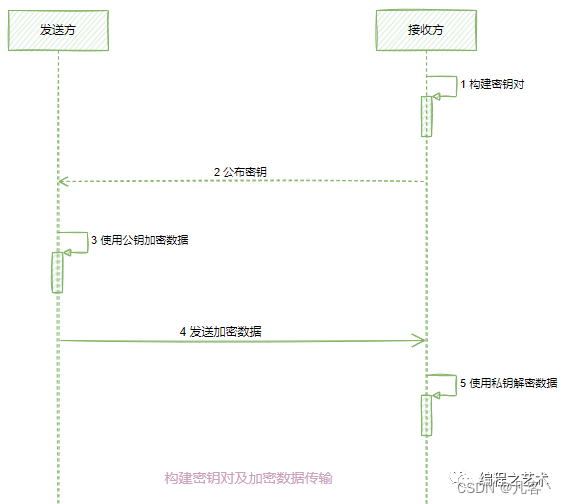
Java实现非对称加密【详解】
Java实现非对称加密 1. 简介2. 非对称加密算法--DH(密钥交换)3. 非对称加密算法--RSA非对称加密算法--EIGamal5. 总结6 案例6.1 案例16.2 案例2 1. 简介 公开密钥密码学(英语:Public-key cryptography)也称非对称式密…...

simulinkveristandlabview联合仿真——模型导入搭建人机界面
目录 1.软件版本 2.搭建simulink仿真模型 编译错误 3.导入veristand并建立工程 4.veristand导入labview labview显示veristand工程数据 labview设置veristand工程数据 运行labview工程 1.软件版本 matlab2020a,veristand2020 R4,labview2020 SP…...
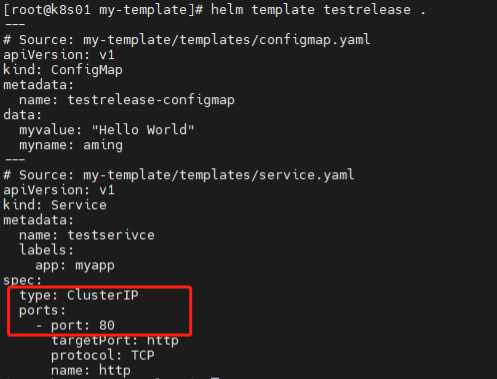
k8s中Helm工具实践
k8s中Helm工具实践 1)安装redis-cluster 先搭建一个NFS的SC(只需要SC,不需要pvc),具体步骤此文档不再提供,请参考前面相关章节。 下载redis-cluster的chart包 helm pull bitnami/redis-cluster --untar…...
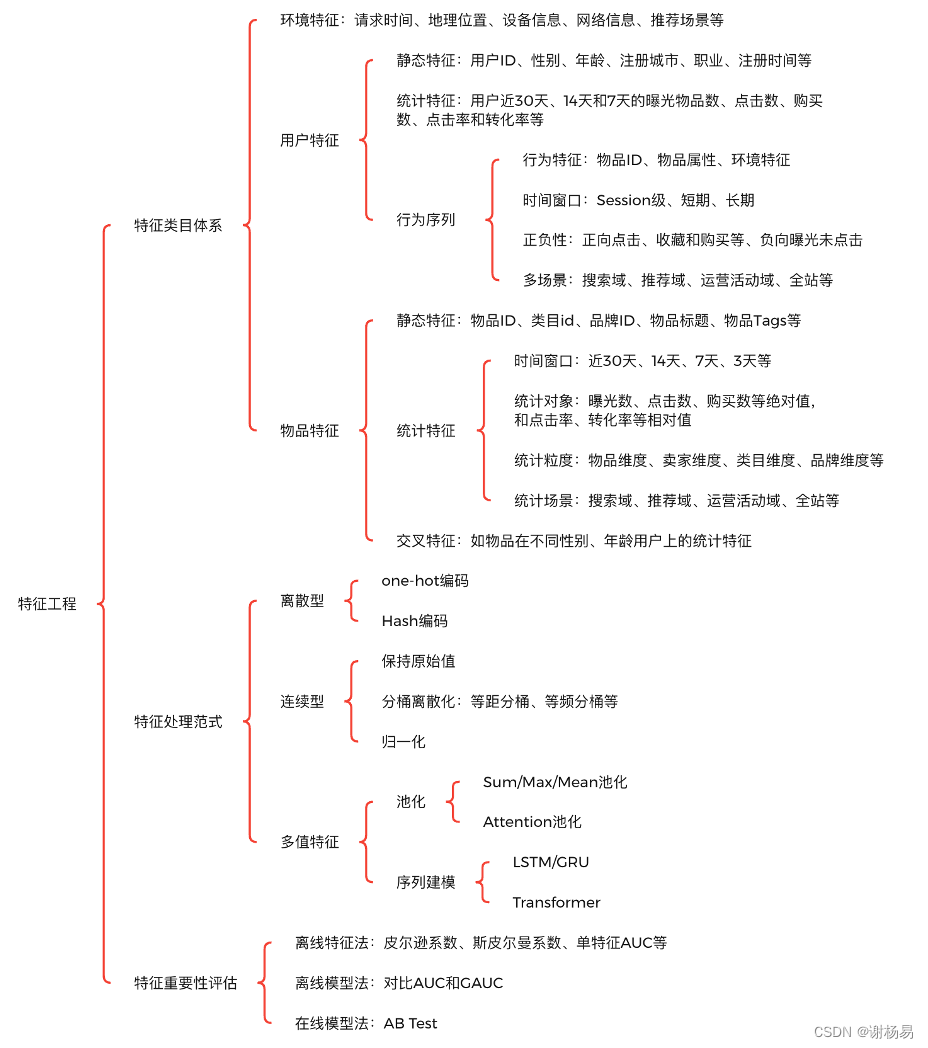
推荐算法架构7:特征工程(吊打面试官,史上最全!)
系列文章,请多关注 推荐算法架构1:召回 推荐算法架构2:粗排 推荐算法架构3:精排 推荐算法架构4:重排 推荐算法架构5:全链路专项优化 推荐算法架构6:数据样本 推荐算法架构7:特…...

Web前端 ---- 【Vue】vue路由守卫(全局前置路由守卫、全局后置路由守卫、局部路由path守卫、局部路由component守卫)
目录 前言 全局前置路由守卫 全局后置路由守卫 局部路由守卫之path守卫 局部路由守卫之component守卫 前言 本文介绍Vue2最后的知识点,关于vue的路由守卫。也就是鉴权,不是所有的组件任何人都可以访问到的,需要权限,而根据权限…...

uniapp点击tabbar之前做判断
在UniApp中,可以通过监听 tabBar 的 click 事件来在点击 tabBar 前做判断。具体步骤如下: 在 pages.json 文件中配置 tabBar,例如: {"pages":[{"path":"pages/home/home","name":"h…...
DLLNotFoundException:xxx tolua... 错误打印
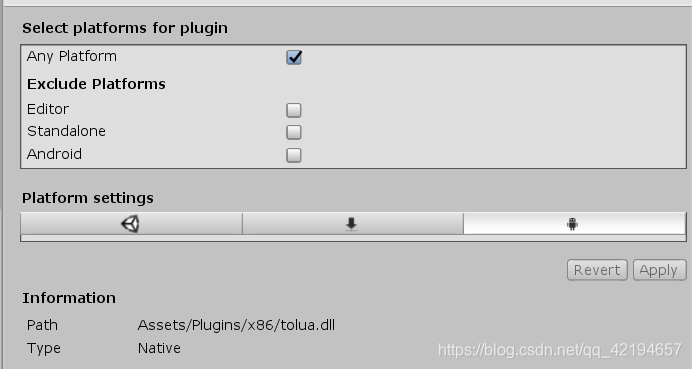
DLLNotFoundException:xxx tolua... 错误打印 一、DLLNotFoundException介绍二、Plugins文件夹文件目录结构如下: 三、Plugins中的Android文件夹四、Plugins中的IOS文件夹这里不说了没测试过不过原理应该也是选择对应的平台即可五、Plugins中的x86和X86_64文件夹 一…...
Python量化投资——金融数据最佳实践: 使用qteasy+tushare搭建本地金融数据仓库并定期批量更新【附源码】
用qteasytushare实现金融数据本地化存储及访问 目的什么是qteasy什么是tushare为什么要本地化使用qteasy创建本地数据仓库qteasy支持的几种本地化仓库类型配置本地数据仓库配置tushare 的API token 配置本地数据源 —— 用MySQL数据库作为本地数据源下载金融历史数据 数据的定期…...
)
【投稿】北海 - Rust与面向对象(二)
模板方法 Rust提供了trait,类似于面向对象的接口,不同的是,将传统面向对象的虚函数表从对象中分离出来,trait仍然是一个函数表,只不过是独立的,它的参数self指针可以指向任何实现了该trait的结构。 从对象中…...
HarmonyOS构建第一个ArkTS应用(FA模型)
构建第一个ArkTS应用(FA模型) 创建ArkTS工程 若首次打开DevEco Studio,请点击Create Project创建工程。如果已经打开了一个工程,请在菜单栏选择File > New > Create Project来创建一个新工程。 选择Application应用开发&a…...

阿里云 ARMS 应用监控重磅支持 Java 21
作者:牧思 & 山猎 前言 今年的 9 月 19 日,作为最新的 LTS (Long Term Support) Java 版本,Java 21 正式 GA,带来了不少重量级的更新,详情请参考 The Arrival of Java 21 [ 1] 。虽然目前 Java 11 和 Java 17 都…...

C++ 类的析构函数和构造函数
构造函数 类的构造函数是类的一种特殊的成员函数,它会在每次创建类的新对象时执行。主要用来在创建对象时初始化对象即为对象成员变量赋初始值。 构造函数的名称与类的名称是完全相同的,并且不会返回任何类型,也不会返回 void。构造函数可用…...

STM32——CAN协议
文章目录 一.CAN协议的基本特点1.1 特点1.2 电平标准1.3 基本的五个帧1.4 数据帧 二.数据帧解析2.1 帧起始和仲裁段2.2 控制段2.3 数据段和CRC段2.4 ACK段和帧结束 三.总线仲裁四.位时序五.STM32CAN控制器原理与配置5.1 STM32CAN控制器介绍5.2 CAN的模式5.3 CAN框图 六 手册寄存…...

数据结构-如何巧妙实现一个栈?逐步解析与代码示例
文章目录 引言1.栈的基本概念2.选择数组还是链表?3. 定义栈结构4.初始化栈5.压栈操作6.弹栈操作7.查看栈顶和判断栈空9.销毁栈操作10.测试并且打印栈内容栈的实际应用结论 引言 栈是一种基本但强大的数据结构,它在许多算法和系统功能中扮演着关键角色。…...

web前端之拖拽API、vue3实现图片上传拖拽排序、拖放、投掷、复制、若依、vuedraggable
MENU vue2html5原生dom原生JavaScript实现跨区域拖放vue2实现跨区域拖放vue2mousedown实现全屏拖动,全屏投掷vue3element-plusvuedraggable实现图片上传拖拽排序vue2transition-group实现拖动排序原生拖拽排序 vue2html5原生dom原生JavaScript实现跨区域拖放 关键代…...
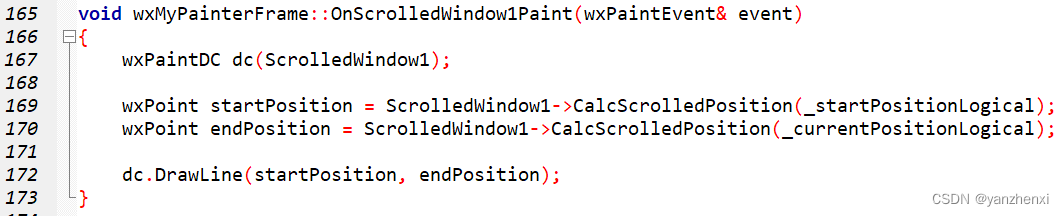
第11章 GUI Page403~405 步骤三 设置滚动范围
运行效果: 源代码: /**************************************************************** Name: wxMyPainterApp.h* Purpose: Defines Application Class* Author: yanzhenxi (3065598272qq.com)* Created: 2023-12-21* Copyright: yanzhen…...

Proteus仿真STM32蓝牙小车,手把手教你用VSPD虚拟串口搞定HC-05模块通讯
基于Proteus的STM32蓝牙小车仿真开发实战指南 在嵌入式系统学习与开发过程中,硬件资源的限制常常成为阻碍项目进展的瓶颈。特别是对于学生和电子爱好者而言,购置各种传感器模块、通信设备不仅成本高昂,还可能面临物流等待和兼容性问题。本文将…...

点亮8086最小系统的LED
1.效果图2.原理图3.汇编程序led_port equ 800horg 0efffh start:nop;MOV DX,800H ;800H是板子上8个LED的端口地址号mov dx,led_portMOV AL,0aaH ;一亮一灭间隔点亮OUT DX,ALmov cx,0loop $mov dx,led_portMOV AL,00H ;一亮一灭间隔点亮OUT DX,ALmov cx,0loop $jm…...

3步解锁Warframe音乐创作:智能演奏系统完全指南
3步解锁Warframe音乐创作:智能演奏系统完全指南 【免费下载链接】ShawzinBot Convert a MIDI input to a series of key presses for the Shawzin 项目地址: https://gitcode.com/gh_mirrors/sh/ShawzinBot 你是否曾经在Warframe中看着Shawzin乐器࿰…...

终极指南:如何用Blender 3MF插件轻松搞定3D打印文件转换
终极指南:如何用Blender 3MF插件轻松搞定3D打印文件转换 【免费下载链接】Blender3mfFormat Blender add-on to import/export 3MF files 项目地址: https://gitcode.com/gh_mirrors/bl/Blender3mfFormat 还在为3D打印文件格式转换而头疼吗?每次从…...

全栈开发的未来消亡论:2026年技术人该如何重新定位?
在2026年的技术浪潮中,“全栈开发者消亡论”正引发行业内的广泛热议。AI工具的爆发式增长、云原生技术的深度普及,正在以前所未有的速度颠覆传统开发模式。对于软件测试从业者而言,这场变革既是前所未有的挑战,也是实现职业跃迁的…...

DeepLearningForNLPInPytorch代码解析:深入理解词嵌入与词向量技术
DeepLearningForNLPInPytorch代码解析:深入理解词嵌入与词向量技术 【免费下载链接】DeepLearningForNLPInPytorch An IPython Notebook tutorial on deep learning for natural language processing, including structure prediction. 项目地址: https://gitcode…...

LLMs-from-scratch-CN性能优化技巧:从FLOPS分析到高效注意力实现
LLMs-from-scratch-CN性能优化技巧:从FLOPS分析到高效注意力实现 【免费下载链接】LLMs-from-scratch-CN LLMs-from-scratch项目中文翻译 项目地址: https://gitcode.com/gh_mirrors/llm/LLMs-from-scratch-CN LLMs-from-scratch-CN是一个专注于LLM模型构建与…...

Tauri 2.0 + Next.js 16 桌面应用开发模板全解析
1. 项目概述与核心价值 如果你正在寻找一个能快速启动桌面应用开发的现代技术栈模板,那么 kvnxiao/tauri-nextjs-template 绝对值得你花时间研究。这个模板将两个看似不同领域的技术——用于构建现代Web前端的Next.js和用于创建跨平台桌面应用的Tauri——巧妙地结…...

TLS/SSL与IPsec安全机制解析
网络安全的核心协议栈并非单一协议,而是指在不同网络层次上协同工作、共同构建安全通信通道的一系列协议集合。其核心目标是通过加密、认证、完整性校验等手段,保障数据在传输过程中的机密性、完整性和可用性。 一、核心协议栈分层详解 网络安全协议通…...

中国词元:构建自主AI生态的“黄金三角“
中国正在人工智能领域掀起一场深刻的生态重构革命。“中国词元"这一创新概念——由国产大模型、国产GPU和绿色能源构成的"黄金三角”,正成为打破西方技术垄断、构建自主可控AI基础设施的核心路径。在这场关乎国家科技未来的战略布局中,模力方舟…...