关于tf.gather函数batch_dims参数用法的理解
关于tf.gather函数batch_dims参数用法的理解
- 0 前言
- 1. 不考虑batch_dims
- 2. 批处理(考虑batch_dims)
- 2.1 batch_dims=1
- 2.2 batch_dims=0
- 2.3 batch_dims>=2
- 2.4 batch_dims再降为1
- 2.5 再将axis降为1
- 2.6 batch_dims<0
- 2.7 batch_dims总结
- 3. 补充
- 4. 参数和返回值
- 5. 其他相关论述
- 6. 附件
截至发稿(2023年3月2日)之前,全网对这个问题的解释都不是很清楚(包括官网和英文互联网),尤其是对batch_dims本质物理含义的解释,以下内容根据tf.gather官网进行翻译,并补充。
0 前言
根据索引indices从参数 axis 轴收集切片。 (弃用的参数,应该指下文的validate_indices)
tf.gather(params, indices, validate_indices=None, axis=None, batch_dims=0, name=None
)
已弃用:一些参数已弃用:(validate_indices)。 它们将在未来的版本中被删除。 更新说明: validate_indices参数无效。 索引(indices)总是在 CPU 上验证,从不在 GPU 上验证。
1. 不考虑batch_dims
根据索引indices从轴参数axis收集切片。indices必须是任意维度(通常是1-D)的整数张量。
Tensor.getitem适用于标量、tf.newaxis 和 python切片
tf.gather 扩展索引功能以处理索引(indices)张量。
在最简单的情况下,它与标量索引功能相同:
>>> params = tf.constant(['p0', 'p1', 'p2', 'p3', 'p4', 'p5'])
>>> params[3].numpy()
b'p3'
>>> tf.gather(params, 3).numpy()
b'p3'
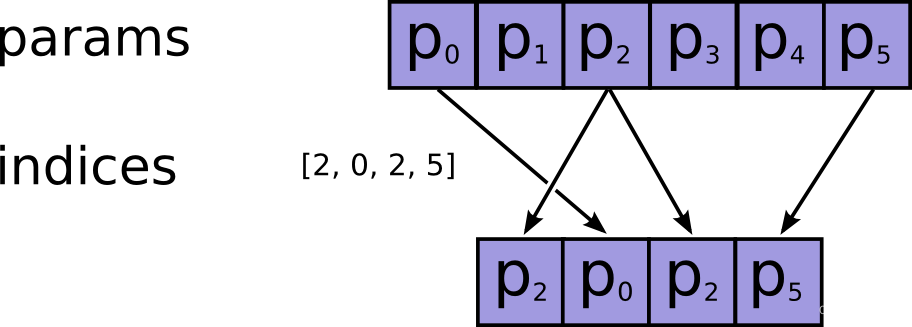
最常见的情况是传递索引的单轴张量(这不能表示为python切片,因为索引不是连续的):
>>> indices = [2, 0, 2, 5]
>>> tf.gather(params, indices).numpy()
array([b'p2', b'p0', b'p2', b'p5'], dtype=object)
过程如下图所示:
索引可以有任何形状(shape)。 当参数params有 1 个轴(axis)时,输出形状等于输入形状:
>>> tf.gather(params, [[2, 0], [2, 5]]).numpy()
array([[b'p2', b'p0'],
[b'p2', b'p5']], dtype=object)
参数params也可以有任何形状。 gather 可以根据参数axis(默认为 0)在任何轴(axis)上选择切片。 它下面例程用于收集(gather)矩阵中的第一行,然后是列:
>>> params = tf.constant([[0, 1.0, 2.0],
...                       [10.0, 11.0, 12.0],
...                       [20.0, 21.0, 22.0],
...                       [30.0, 31.0, 32.0]])
>>> tf.gather(params, indices=[3,1]).numpy()
array([[30., 31., 32.],[10., 11., 12.]], dtype=float32)
>>> tf.gather(params, indices=[2,1], axis=1).numpy()
array([[ 2., 1.],[12., 11.],[22., 21.],[32., 31.]], dtype=float32)
更一般地说:输出形状与输入形状相同,索引轴(indexed-axis)由索引(indices)的形状代替。
>>> def result_shape(p_shape, i_shape, axis=0):
...   return p_shape[:axis] + i_shape + p_shape[axis+1:]
>>>
>>> result_shape([1, 2, 3], [], axis=1)
[1, 3]
>>> result_shape([1, 2, 3], [7], axis=1)
[1, 7, 3]
>>> result_shape([1, 2, 3], [7, 5], axis=1)
[1, 7, 5, 3]
例如下面的例程:
>>> params.shape.as_list()
[4, 3]
>>> indices = tf.constant([[0, 2]])
>>> tf.gather(params, indices=indices, axis=0).shape.as_list()
[1, 2, 3]
>>> tf.gather(params, indices=indices, axis=1).shape.as_list()
[4, 1, 2]
>>> params = tf.random.normal(shape=(5, 6, 7, 8))
>>> indices = tf.random.uniform(shape=(10, 11), maxval=7, dtype=tf.int32)
>>> result = tf.gather(params, indices, axis=2)
>>> result.shape.as_list()
[5, 6, 10, 11, 8]
这是因为每个索引都从params中获取一个切片,并将其放置在输出中的相应位置。 对于上面的例子
>>> # For any location in indices
>>> a, b = 0, 1
>>> tf.reduce_all(
...     # the corresponding slice of the result
...     result[:, :, a, b, :] ==
...     # is equal to the slice of `params` along `axis` at the index.
...     params[:, :, indices[a, b], :]
...  ).numpy()
True
除此之外,我们再给indices增加一个元素,当进行gather的时候是沿着params的axis=1的上一个维度的元素进行循环的。即params的axis=0的元素分别为[0, 1.0, 2.0]、[10.0, 11.0, 12.0]、[20.0, 21.0, 22.0]、[30.0, 31.0, 32.0],然后逐次对这四个元素里面的params的axis=1的元素进行取indices对应的元素,四次循环完成整个gather
>>> tf.gather(params, indices=[[2,1], [1,0]], axis=1).numpy()
array([[[ 2.,  1.],[ 1.,  0.]],[[12., 11.],[11., 10.]],[[22., 21.],[21., 20.]],[[32., 31.],[31., 30.]]], dtype=float32)
2. 批处理(考虑batch_dims)
batch_dims参数可以让您从批次的每个元素中收集不同的项目。
ps:
可以先直接跳到到2.7 batch_dims总结,前后对照阅读。
2.1 batch_dims=1
使用batch_dims=1相当于在params和indices的第一个轴(是指axis=0轴)上有一个外循环(在axis=0轴上的元素上进行循环):
>>> params = tf.constant([
...     [0, 0, 1, 0, 2],
...     [3, 0, 0, 0, 4],
...     [0, 5, 0, 6, 0]])
>>> indices = tf.constant([
...     [2, 4],
...     [0, 4],
...     [1, 3]])
>>> tf.gather(params, indices, axis=1, batch_dims=1).numpy()
array([[1, 2],
[3, 4],
[5, 6]], dtype=int32)
等价于:
>>> def manually_batched_gather(params, indices, axis):
...            batch_dims=1
...            result = []
...            for p,i in zip(params, indices):  # 这就是上文所说的外循环
...                   r = tf.gather(p, i, axis=axis-batch_dims)
...                   result.append(r)
...            return tf.stack(result)
>>> manually_batched_gather(params, indices, axis=1).numpy()
array([[1, 2],[3, 4],[5, 6]], dtype=int32)
接下来将循环里zip的结果打印如下,说明外循环将params和indices在第一个轴上先zip成三个元组
pprint(list(zip(params.numpy().tolist(), indices.numpy().tolist())))
# [([0, 0, 1, 0, 2], [2, 4]),
# ([3, 0, 0, 0, 4], [0, 4]),
# ([0, 5, 0, 6, 0], [1, 3])]
然后分别对[0, 0, 1, 0, 2]与[2, 4]、[3, 0, 0, 0, 4]与 [0, 4]、[0, 5, 0, 6, 0]与[1, 3],沿着重组之后的axis = 0(即重组之前的axis = 1,这就是为什么后面所说的必须axis>=batch_dims)进行gather。
2.2 batch_dims=0
所以可以总结:batch_dims是指最终对哪一个维度的张量进行对照gather,所以当batch_dims=0时,实际上就是将两个整个张量组包,也就是上面第一阶段的省略batch_dims的状态。
此时,相当于将两个张量在外面添加一个维度之后再zip,相当于没zip直接gather。所以,以下两条指令等价,因为batch_dims默认值为0。
params = tf.constant([[  # 相对于上文该张量增加了一个维度[0, 0, 1, 0, 2],[3, 0, 0, 0, 4],[0, 5, 0, 6, 0]]])
indices = tf.constant([[  # 相对于上文该张量增加了一个维度[2, 4],[0, 4],[1, 3]]])
pprint(list(zip(params.numpy().tolist(), indices.numpy().tolist())))
# [([[0, 0, 1, 0, 2], [3, 0, 0, 0, 4], [0, 5, 0, 6, 0]],
#   [[2, 4], [0, 4], [1, 3]])]tf.gather(params, indices, axis=1, batch_dims=0).numpy()
# 等价于
tf.gather(params, indices, axis=1).numpy()
# 输出结果为
# array([[[1, 2],
#         [0, 2],
#         [0, 0]],
#
#        [[0, 4],
#         [3, 4],
#         [0, 0]],
#
#        [[0, 0],
#         [0, 0],
#         [5, 6]]], dtype=int32)
2.3 batch_dims>=2
较高的batch_dims值相当于在params和indices的外轴上进行多个嵌套循环。 所以整体形状函数是
>>> def batched_result_shape(p_shape, i_shape, axis=0, batch_dims=0):
...             return p_shape[:axis] + i_shape[batch_dims:] + p_shape[axis+1:]>>> batched_result_shape(
...              p_shape=params.shape.as_list(),
...              i_shape=indices.shape.as_list(),
...              axis=1,
...              batch_dims=1)
[3, 2]
>>> tf.gather(params, indices, axis=1, batch_dims=1).shape.as_list()
[3, 2]
举例来说,params和indices升高一个维度,即batch_dims=2,这时按照约束条件只能axis=2
params = tf.constant([  # 升高一个维度[[0, 0, 1, 0, 2],[3, 0, 0, 0, 4],[0, 5, 0, 6, 0]],[[1, 8, 4, 2, 2],[9, 6, 2, 3, 0],[7, 2, 8, 6, 3]]])
indices = tf.constant([  # 升高一个维度[[2, 4],[0, 4],[1, 3]],[[1, 3],[2, 1],[4, 2]]])
# 进行batch_dims高值gather计算
tf.gather(params, indices, axis=2, batch_dims=2).numpy()
# 则上面的运算等价于
def manually_batched_gather_3d(params, indices, axis):batch_dims=2result = []for p,i in zip(params, indices):  # 这里面进行了batch_dims层(也就是2层)嵌套for循环result_2 = []for p_2, i_2 in zip(p,i):r = tf.gather(p_2, i_2, axis=axis-batch_dims)  # 这里告诉我们为什么axis必须>=batch_dimsresult_2.append(r)result.append(result_2)return tf.stack(result)
manually_batched_gather_3d(params, indices, axis=2).numpy()
# array([[[1, 2],
#         [3, 4],
#         [5, 6]],
#
#        [[8, 2],
#         [2, 6],
#         [3, 8]]], dtype=int32)
下面来解释一下上面程序的运行过程,在上面的manually_batched_gather_3d运行过程中第一层zip的作用如下
pprint(list(zip(params.numpy().tolist(), indices.numpy().tolist())))
# 打印得到如下list,该list有两个元组组成,都是将两个参数的axis=0轴上的两个二维张量,分别进行了组包
# [([[0, 0, 1, 0, 2],
#    [3, 0, 0, 0, 4],
#    [0, 5, 0, 6, 0]],  # 到这儿为params的axis=0轴上的[0]二维张量
#   [[2, 4],
#    [0, 4],
#    [1, 3]]),  # 到这儿为indices的axis=0轴上的[0]二维张量
#
#  ([[1, 8, 4, 2, 2],
#    [9, 6, 2, 3, 0],
#    [7, 2, 8, 6, 3]],  # 到这儿为params的axis=0轴上的[1]二维张量
#   [[1, 3],
#    [2, 1],
#    [4, 2]])]  # 到这儿为indices的axis=0轴上的[1]二维张量
然后进入第一层for循环的第一次循环,将zip之后的两个元组中的第一个元组,拿过来分别赋给p、i:
p=tf.Tensor(
[[0 0 1 0 2][3 0 0 0 4][0 5 0 6 0]], shape=(3, 5), dtype=int32)
i=tf.Tensor(
[[2 4][0 4][1 3]], shape=(3, 2), dtype=int32)
在第二层for之前插入,得到第二层的zip结果
print(list(zip(p.numpy().tolist(), i.numpy().tolist())))
# [([0, 0, 1, 0, 2], [2, 4]),
#  ([3, 0, 0, 0, 4], [0, 4]),
#  ([0, 5, 0, 6, 0], [1, 3])]
则开始第二层for的第一次循环,则
# p_2 = tf.Tensor([0 0 1 0 2], shape=(5,), dtype=int32)
# i_2 = tf.Tensor([2 4], shape=(2,), dtype=int32)
# r = tf.Tensor([1 2], shape=(2,), dtype=int32)
这之后第二层for循环再进行2次循环,退回到第一层大循环,第一层大循环再进行一次上述循环即完成了整个循环。
2.4 batch_dims再降为1
你会发现,下面两条指令等价,即batch_dims=1只有一层循环,只zip一次
tf.gather(params, indices, axis=2, batch_dims=1).numpy()
# 等价于
manually_batched_gather(params, indices, axis=2).numpy()
# [[[[1 2]
#    [0 2]
#    [0 0]]
#
#   [[0 4]
#    [3 4]
#    [0 0]]
#
#   [[0 0]
#    [0 0]
#    [5 6]]]
#
#
#  [[[8 2]
#    [4 8]
#    [2 4]]
#
#   [[6 3]
#    [2 6]
#    [0 2]]
#
#   [[2 6]
#    [8 2]
#    [3 8]]]]
2.5 再将axis降为1
还需修改一下indices,因为下文有对indices的约束——必须在 [0, params.shape[axis]] 范围内,此时params.shape为(2, 3, 5),则params.shape[1]=3,所以indices只能等于0或1或2,如果>=3索引的时候就会溢出。此时还是batch_dims=1只有一层循环,只zip一次,只是改变了索引轴。
indices = tf.constant([[[1, 0],[2, 1],[2, 0]],[[2, 0],[0, 1],[1, 2]]])
tf.gather(params, indices, axis=1, batch_dims=1).numpy()
# 等价于
manually_batched_gather(params, indices, axis=1).numpy()
# array([[[[3, 0, 0, 0, 4],
#          [0, 0, 1, 0, 2]],
#
#         [[0, 5, 0, 6, 0],
#          [3, 0, 0, 0, 4]],
#
#         [[0, 5, 0, 6, 0],
#          [0, 0, 1, 0, 2]]],
#
#
#        [[[7, 2, 8, 6, 3],
#          [1, 8, 4, 2, 2]],
#
#         [[1, 8, 4, 2, 2],
#          [9, 6, 2, 3, 0]],
#
#         [[9, 6, 2, 3, 0],
#          [7, 2, 8, 6, 3]]]], dtype=int32)>>
2.6 batch_dims<0
因为params和indices一共由3各维度——0、1、2,其对应的负维度就是-3、-2、-1,所以下面两条指令等价
a = tf.gather(params, indices, axis=2, batch_dims=1).numpy()
pprint(a)
# 等价于
a = tf.gather(params, indices, axis=2, batch_dims=-2).numpy()
pprint(a)
2.7 batch_dims总结
故个人认为,batch_dims是由batch和dimensions两个单词缩写而成,因为dimensions为复数所以可以翻译为“批量维度数”(自己翻译没有查到文献),可以指批处理batch_dims个维度,如果是正数可以理解成嵌套几层循环或者进行几次zip,如果是负数需要转化为对应的正维度再进行上述理解;也可以是指组包到哪一个维度上,如果是负数也同样适用于这种解释。
batch_dims极大的扩展了gather的功能,使你可以将params和indices在对应的某个维度上分别进行gather然后再stack。
ps:关于batch_dims的这个解释同样也适用于tf.gather_nd。
3. 补充
如果您需要使用诸如 tf.argsort 或 tf.math.top_k 之类的操作的索引,其中索引的最后一个维度在相应位置索引到输入的最后一个维度,这自然会出现。 在这种情况下,您可以使用 tf.gather(values, indices, batch_dims=-1)。
4. 参数和返回值
| 参数 | |
|---|---|
params | 从中收集值的Tensor(张量)。其秩(rank)必须至少为axis + 1。 |
indices | 索引张量。 必须是以下类型之一:int32、int64。 这些值必须在 [0, params.shape[axis]] 范围内。 |
validate_indices | 已弃用,没有任何作用。 索引总是在 CPU 上验证,从不在 GPU 上验证。 注意:在 CPU 上,如果发现越界索引,则会引发错误。 在 GPU 上,如果发现越界索引,则将 0 存储在相应的输出值中。 |
axis | 一个Tensor((张量))。 必须是以下类型之一:int32、int64。 从参数params中的axis轴收集索引。 必须大于或等于batch_dims。 默认为第一个** |
batch_dims | 一个integer(整数)。 批量维度(batch dimensions)的数量。 必须小于或等于 rank(indices)。 |
name | 操作的名称(可选)。 |
| 返回值 |
|---|
一个Tensor(张量), 与params具有相同的类型。 |
5. 其他相关论述
下面几篇博客,相对于官网手册都有新的信息增量,可以作为参考
- 知网《tf.gather()函数》,使用索引推演的方式在维度和操作两个方面进行理解,但是其关于
batch_dims的描述不够充分且有些片面; - 知乎《tf.gather()函数总结》,举了一个新的例子,但是
batch_dims还是只到了1,没有很好的归纳其真正的物理意义; - CSDN《tf.gather函数》,跟上一篇的情况差不多。
6. 附件
上文用到的调试程序,可以忽略
import tensorflow as tf
from pprint import pprintparams = tf.constant([[0, 1.0, 2.0],[10.0, 11.0, 12.0],[20.0, 21.0, 22.0],[30.0, 31.0, 32.0]])
a = tf.gather(params, indices=[[2,1], [1,0]], axis=1).numpy()
pprint(a)params = tf.constant([[0, 0, 1, 0, 2],[3, 0, 0, 0, 4],[0, 5, 0, 6, 0]])
indices = tf.constant([[2, 4],[0, 4],[1, 3]])a = tf.gather(params, indices, axis=1, batch_dims=1).numpy()
pprint(a)
a = tf.gather(params, indices, axis=1, batch_dims=-1).numpy()
pprint(a)def manually_batched_gather(params, indices, axis):batch_dims=1result = []for p,i in zip(params, indices):r = tf.gather(p, i, axis=axis-batch_dims)result.append(r)return tf.stack(result)
manually_batched_gather(params, indices, axis=1).numpy()pprint(list(zip(params.numpy().tolist(), indices.numpy().tolist())))tf.gather(params, indices, axis=1, batch_dims=0).numpy()
tf.gather(params, indices, axis=1).numpy()
# tf.gather(params, indices, axis=0, batch_dims=0).numpy()params = tf.constant([[[0, 0, 1, 0, 2],[3, 0, 0, 0, 4],[0, 5, 0, 6, 0]]])
indices = tf.constant([[[2, 4],[0, 4],[1, 3]]])
pprint(list(zip(params.numpy().tolist(), indices.numpy().tolist())))# [([[0, 0, 1, 0, 2], [3, 0, 0, 0, 4], [0, 5, 0, 6, 0]],
#   [[2, 4], [0, 4], [1, 3]])]params_1 = [[0, 0, 1, 0, 2],[3, 0, 0, 0, 4],[0, 5, 0, 6, 0]],
indices_1 = [[2, 4],[0, 4],[1, 3]]# a = tf.gather(params_1, indices_1, axis=0).numpy()params = tf.constant([[[0, 0, 1, 0, 2],[3, 0, 0, 0, 4],[0, 5, 0, 6, 0]],[[1, 8, 4, 2, 2],[9, 6, 2, 3, 0],[7, 2, 8, 6, 3]]])
indices = tf.constant([[[2, 4],[0, 4],[1, 3]],[[1, 3],[2, 1],[4, 2]]])a = tf.gather(params, indices, axis=2, batch_dims=2).numpy()
pprint(a)
a = tf.gather(params, indices, axis=2, batch_dims=-1).numpy()
pprint(a)print(list(zip(params.numpy().tolist(), indices.numpy().tolist())))# [([[0, 0, 1, 0, 2],
#    [3, 0, 0, 0, 4],
#    [0, 5, 0, 6, 0]],
#   [[2, 4],
#    [0, 4],
#    [1, 3]]),
#
#  ([[1, 8, 4, 2, 2],
#    [9, 6, 2, 3, 0],
#    [7, 2, 8, 6, 3]],
#   [[1, 3],
#    [2, 1],
#    [4, 2]])]def manually_batched_gather_3(params, indices, axis):batch_dims=2result = []for p,i in zip(params, indices):result_2 = []print(list(zip(p.numpy().tolist(), i.numpy().tolist())))for p_2, i_2 in zip(p,i):r = tf.gather(p_2, i_2, axis=axis-batch_dims)result_2.append(r)result.append(result_2)return tf.stack(result)
manually_batched_gather_3(params, indices, axis=2).numpy()# <tf.Tensor: shape=(2, 3, 2), dtype=int32, numpy=
# array([[[1, 2],
#         [3, 4],
#         [5, 6]],
#
#        [[8, 2],
#         [2, 6],
#         [3, 8]]], dtype=int32)>># [([0, 0, 1, 0, 2], [2, 4]),
#  ([3, 0, 0, 0, 4], [0, 4]),
#  ([0, 5, 0, 6, 0], [1, 3])]a = tf.gather(params, indices, axis=2, batch_dims=1).numpy()
pprint(a)
a = tf.gather(params, indices, axis=2, batch_dims=-2).numpy()
pprint(a)
manually_batched_gather(params, indices, axis=2).numpy()
# [[[[1 2]
#    [0 2]
#    [0 0]]
#
#   [[0 4]
#    [3 4]
#    [0 0]]
#
#   [[0 0]
#    [0 0]
#    [5 6]]]
#
#
#  [[[8 2]
#    [4 8]
#    [2 4]]
#
#   [[6 3]
#    [2 6]
#    [0 2]]
#
#   [[2 6]
#    [8 2]
#    [3 8]]]]indices = tf.constant([[[1, 0],[2, 1],[2, 0]],[[2, 0],[0, 1],[1, 2]]])a = tf.gather(params, indices, axis=1, batch_dims=1).numpy()
pprint(a)
a = tf.gather(params, indices, axis=1, batch_dims=-2).numpy()
pprint(a)
manually_batched_gather(params, indices, axis=1).numpy()
# array([[[[3, 0, 0, 0, 4],
#          [0, 0, 1, 0, 2]],
#
#         [[0, 5, 0, 6, 0],
#          [3, 0, 0, 0, 4]],
#
#         [[0, 5, 0, 6, 0],
#          [0, 0, 1, 0, 2]]],
#
#
#        [[[7, 2, 8, 6, 3],
#          [1, 8, 4, 2, 2]],
#
#         [[1, 8, 4, 2, 2],
#          [9, 6, 2, 3, 0]],
#
#         [[9, 6, 2, 3, 0],
#          [7, 2, 8, 6, 3]]]], dtype=int32)>>
相关文章:
关于tf.gather函数batch_dims参数用法的理解
关于tf.gather函数batch_dims参数用法的理解0 前言1. 不考虑batch_dims2. 批处理(考虑batch_dims)2.1 batch_dims12.2 batch_dims02.3 batch_dims>22.4 batch_dims再降为12.5 再将axis降为12.6 batch_dims<02.7 batch_dims总结3. 补充4. 参数和返回值5. 其他相关论述6. 附…...

日常操作linux常用命令
cd /mnt/opt/cqstt/logs/stt-erp docker logs -f --tail1000 stt-erp # 查看物理CPU个数 cat /proc/cpuinfo| grep "physical id"| sort| uniq| wc -l # 查看每个物理CPU中core的个数(即核数) cat /proc/cpuinfo| grep "cpu cores"| uniq # 查看逻辑CPU的…...

【Java集合框架】篇二:Collection接口方法
JDK不提供此接口的任何直接实现类,而是提供更具体的子接口(如:Set和List)去实现。 Collection 接口是 List和Set接口的父接口,该接口里定义的方法既可用于操作 Set 集合,也可用于操作 List 集合。方法如下…...

PHP入门指南:简单易学的语法和丰富的调试工具与安全性最佳实践
PHP是一种非常流行的服务器端编程语言,它被广泛地应用于Web开发中。如果您想学习Web开发,那么PHP是一个非常好的选择。在本文中,我将介绍PHP的一些基础知识,包括语法、变量、函数、数组、数据库连接、调试和安全性等。PHP的语法PH…...

前端面试题--HTML篇
一、src和href的区别src指向外部资源的位置,指向的内容会嵌入到文档中当前标签所在的位置;href指向网络资源的位置,建立和当前元素或当前文档之间的链接。二、对HTML语义化的理解根据内容的结构化,选择合适的标签。优点࿱…...
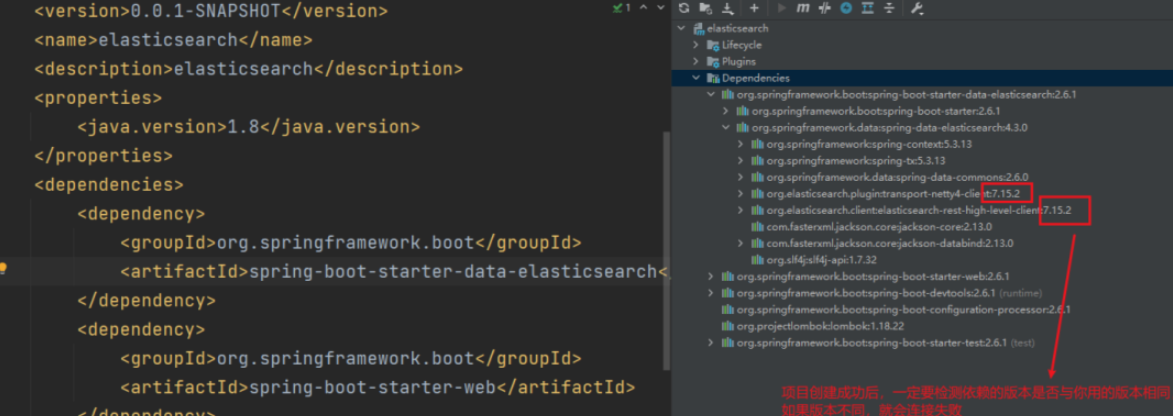
SpringBoot集成ElasticSearch,实现模糊查询,批量CRUD,排序,分页,高亮
导入elasticsearch依赖在pom.xml里加入如下依赖:<dependency><groupId>org.springframework.boot</groupId><artifactId>spring-boot-starter-data-elasticsearch</artifactId> </dependency>非常重要:检查依赖版本…...
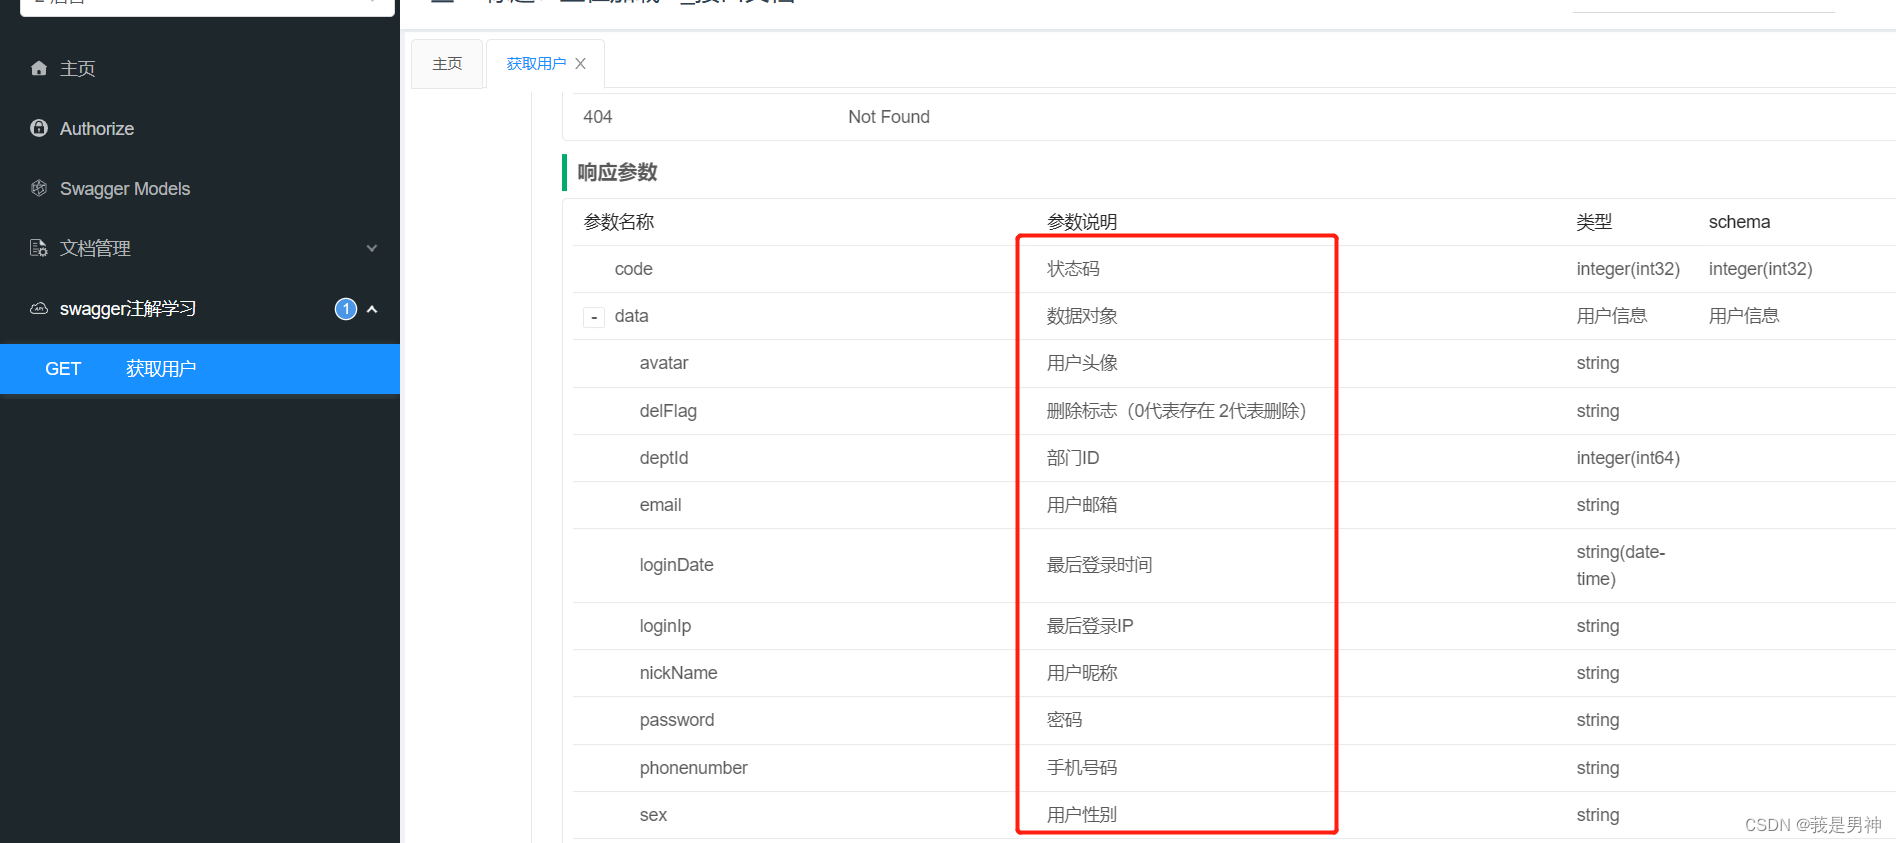
常用Swagger注解汇总
常用Swagger注解汇总 前言 在实际编写后端代码的过程中,我们可能经常使用到 swagger 注解,但是会用不代表了解,你知道每个注解都有什么属性吗?你都用过这些属性吗?了解它们的作用吗?本文在此带大家总结一下…...

关于 TypeScript 声明文件
declare var 声明全局变量declare function 声明全局方法declare class 声明全局类declare enum 声明全局枚举类型declare namespace 声明(含有子属性的)全局对象interface 和 type 声明全局类型export 导出变量export namespace 导出(含有子…...

SpringBoot学习-原理篇
SpringBoot原理篇springboot技术本身就是为了加速spring程序的开发的,可以大胆的说,springboot技术没有自己的原理层面的设计,仅仅是实现方案进行了改进。将springboot定位成工具,你就不会去想方设法的学习其原理了。就像是将木头…...
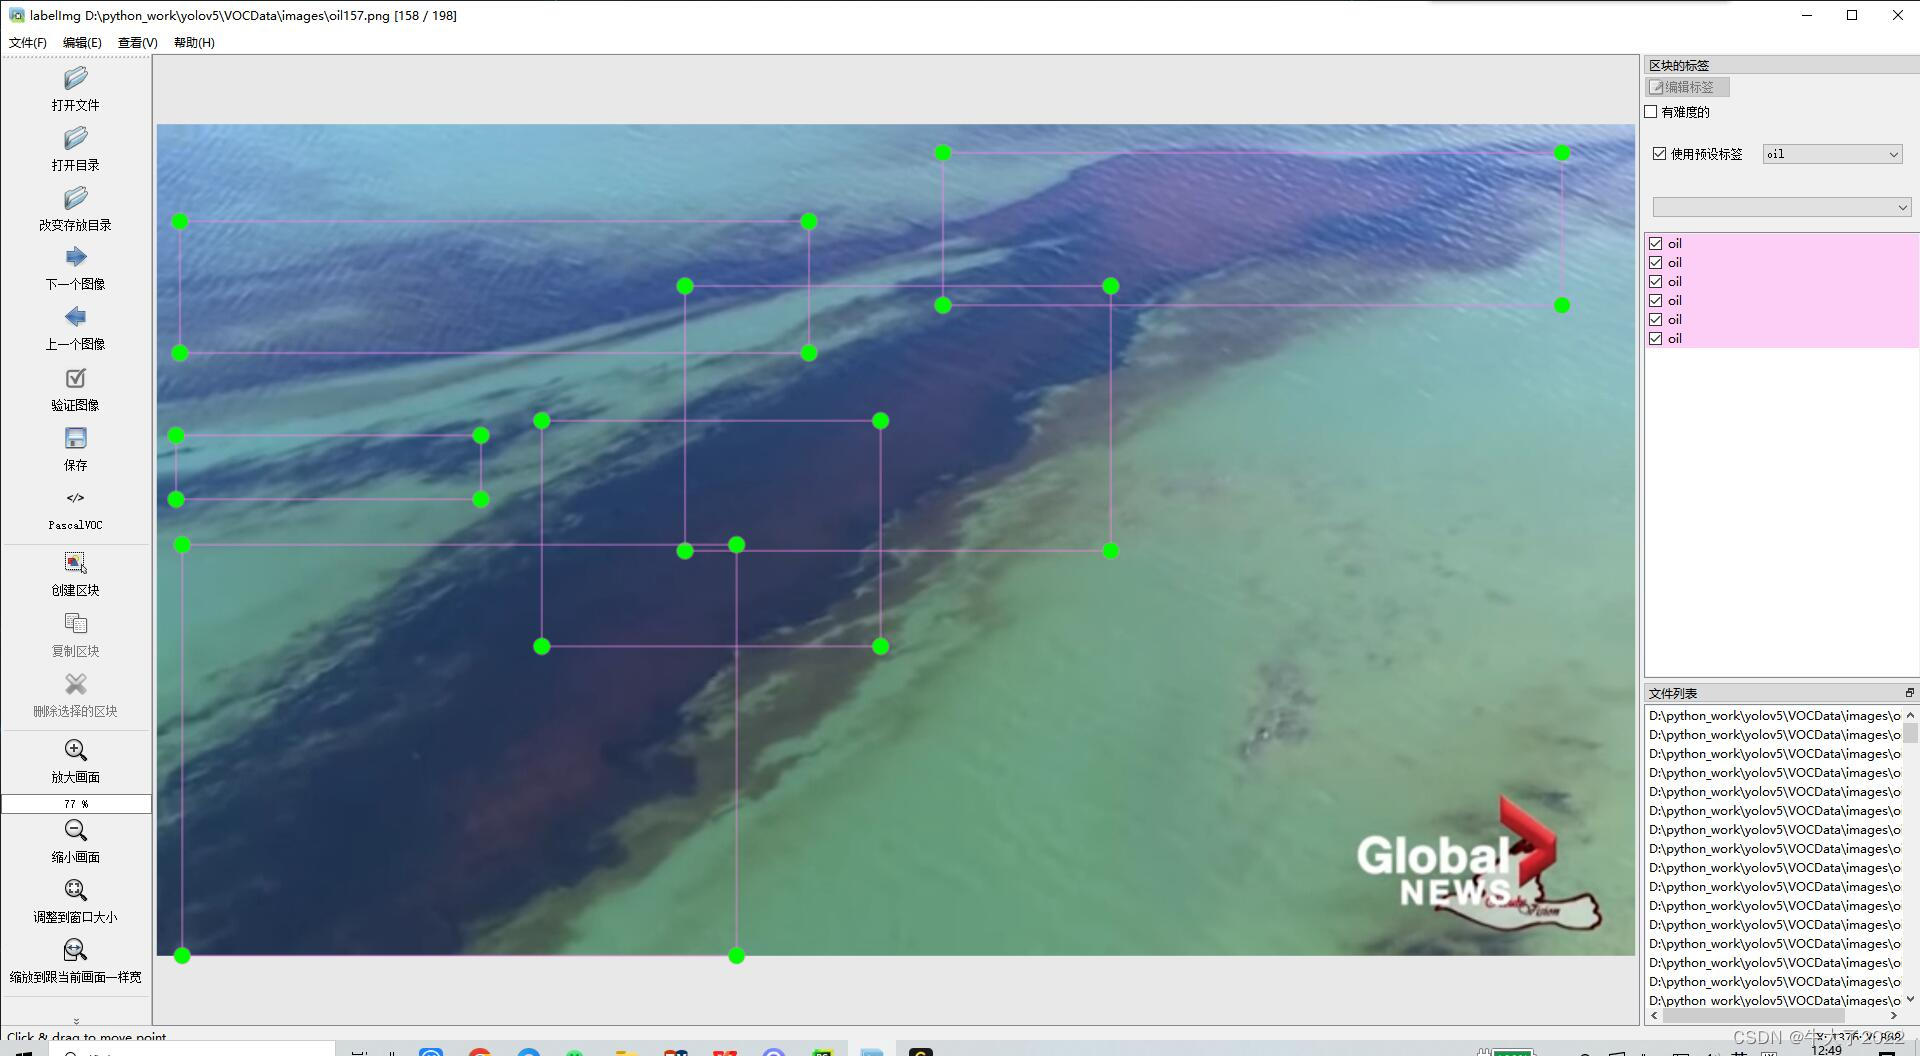
目标检测YOLOv5数据集怎么找?
完整的配置-标注-训练-识别在我这篇博客小白YOLOv5全流程-训练实现数字识别_yolov5数字识别_牛大了2022的博客-CSDN博客 模型部分剖析可以看我每周深度学习笔记部分。关于训练的数据集怎么搞很多人问过我,我在这篇文章给大家一点我的经验和建议。 数据集是什么 简…...
安卓短信自动填充踩坑
安卓短信自动填充踩坑 前言 最近弄了个短信自动填充功能,一开始觉得很简单,不就是动态注册个广播接收器去监听短信消息不就可以了吗?结果没这么简单,问题就出在机型的适配上。小米的短信权限、荣耀的短信监听都是坑,…...

【抽象类和接口的区别】
抽象类和接口都是Java中实现多态的机制,它们都是用来约束子类必须要实现的方法。但是它们有以下区别: 实现方式 实现方式:抽象类是一个类,而接口是一个接口。一个类只能继承一个抽象类,但可以实现多个接口。 构造方…...

接口导出文件功能
1.写接口 export function getExport(params) { return fetch({ url: ******.export, method: post, data: params, responseType:blob, }) } 2.编写前端页面 <el-button :loading"exportDisable" :disabled&quo…...

深圳大学计软《面向对象的程序设计》实验9 期中复习
A. 机器人变身(类与对象)【期中模拟】 题目描述 编写一个机器人类,包含属性有机器名、血量、伤害值、防御值、类型和等级。其中血量、伤害和防御和等级、类型相关: 普通型机器人,类型为N,血量、伤害、防…...

python之异步编程
一、异步编程概述 异步编程是一种并发编程的模式,其关注点是通过调度不同任务之间的执行和等待时间,通过减少处理器的闲置时间来达到减少整个程序的执行时间;异步编程跟同步编程模型最大的不同就是其任务的切换,当遇到一个需要等…...

为什么很多计算机专业大学生毕业后还会参加培训?
基于IT互联网行业越来越卷的现状,就算是科班出身,很多也是达不到用人单位的要求。面对这样的现实情况,有的同学会选择继续深造,比如考个研,去年考研人数457万人次,可见越来越的同学是倾向考研提升学历来达到…...
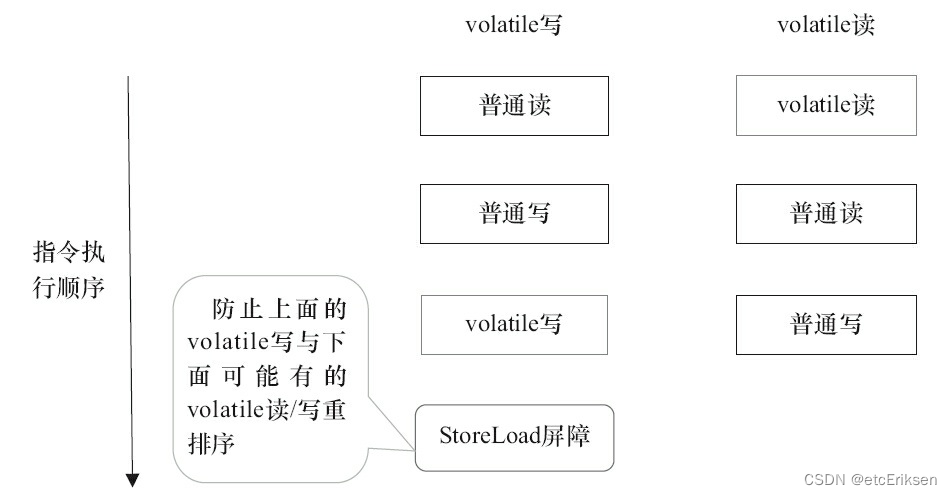
JUC并发编程之JMM_synchronized_volatile
目录 JUC并发编程之JMM_synchronized_volatile 什么是JMM模型? JMM和JVM的区别 JMM不同于JVM内存区域模型 主内存 工作内存 Java内存模型与硬件内存架构的关系 JMM存在的必要性 数据同步八大原子操作 同步规则分析 并发编程的可见性,原子性与有序…...
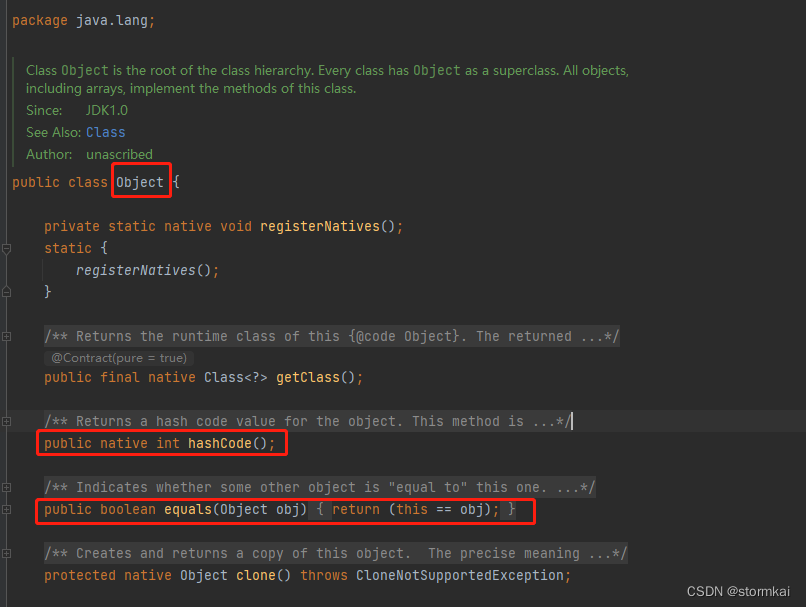
hashCode 和 equals 的处理
文章目录hashCode 和 equals 的处理1. 阿里巴巴编程规范要求2. equals和hashcode的分析2.1 Object方法2.2 只覆写(Override)equals带来的问题问题演示问题分析问题处理hashCode 和 equals 的处理 1. 阿里巴巴编程规范要求 2. equals和hashcode的分析 2…...

17. OPenGL实现旋转移动物体
1. 说明: 整体思路:如果想实现动态,可以使用一个矩阵和我们给定的坐标值进行相乘,实时的改变坐标值 类似于坐标的齐次变换,然后使用一个定时器,在规定时间内触发重新绘制的函数。 实际效果: OP…...

《SQL基础》14. 存储过程 · 存储函数
存储过程 存储函数存储过程基本语法变量系统变量用户定义变量局部变量if判断参数case判断while循环repeat循环loop循环游标条件处理程序存储函数存储过程 存储过程是事先经过编译并存储在数据库中的一段SQL语句的集合。调用存储过程可以简化应用开发人员的工作,减…...
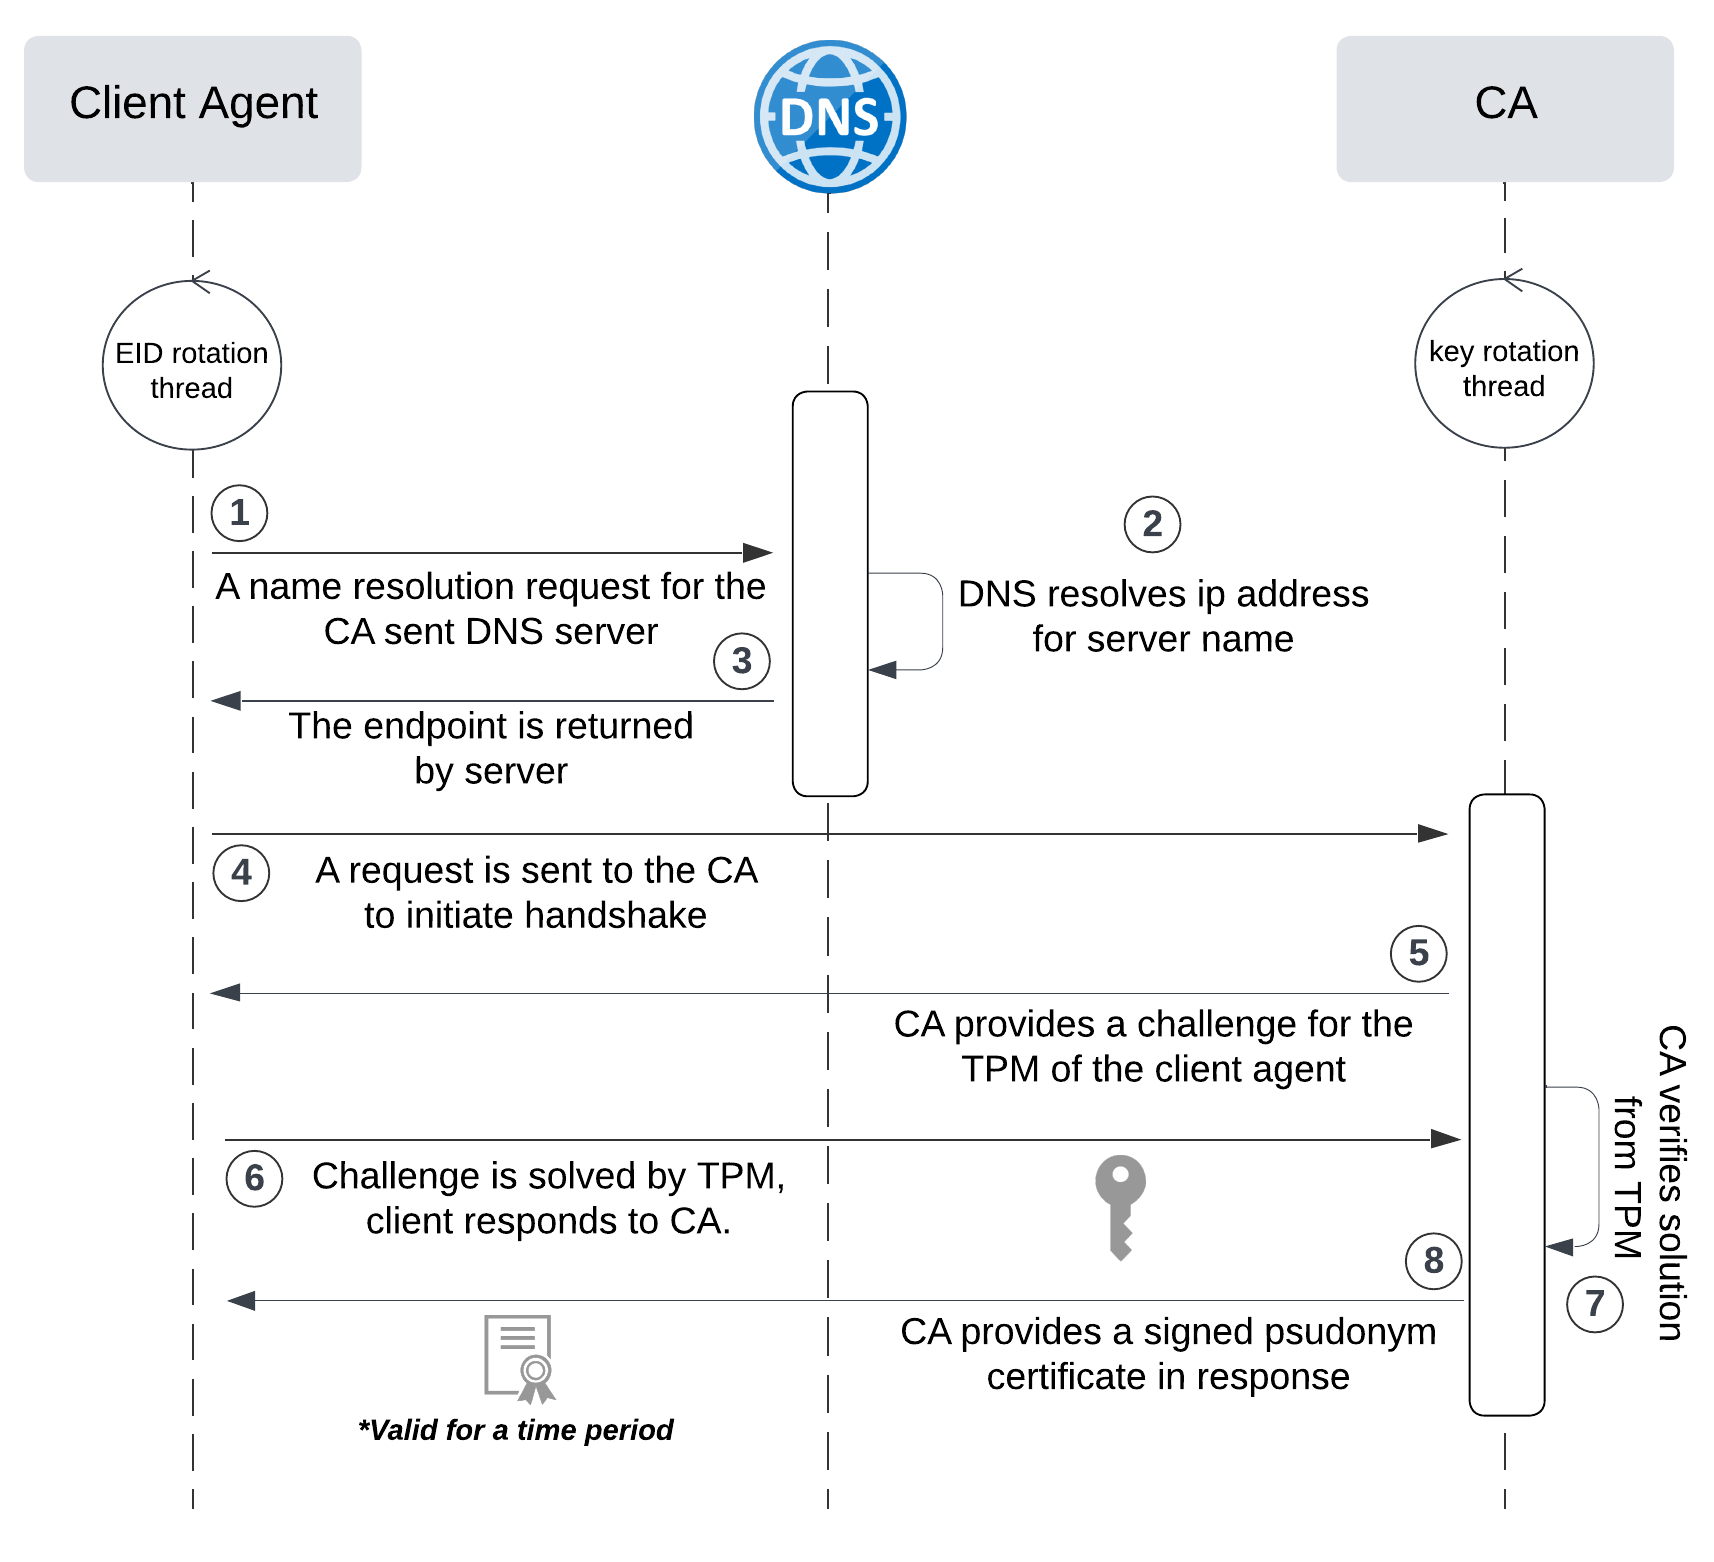
网络六边形受到攻击
大家读完觉得有帮助记得关注和点赞!!! 抽象 现代智能交通系统 (ITS) 的一个关键要求是能够以安全、可靠和匿名的方式从互联车辆和移动设备收集地理参考数据。Nexagon 协议建立在 IETF 定位器/ID 分离协议 (…...
React第五十七节 Router中RouterProvider使用详解及注意事项
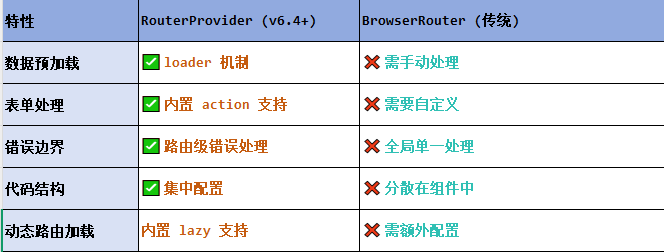
前言 在 React Router v6.4 中,RouterProvider 是一个核心组件,用于提供基于数据路由(data routers)的新型路由方案。 它替代了传统的 <BrowserRouter>,支持更强大的数据加载和操作功能(如 loader 和…...

FFmpeg 低延迟同屏方案
引言 在实时互动需求激增的当下,无论是在线教育中的师生同屏演示、远程办公的屏幕共享协作,还是游戏直播的画面实时传输,低延迟同屏已成为保障用户体验的核心指标。FFmpeg 作为一款功能强大的多媒体框架,凭借其灵活的编解码、数据…...

STM32+rt-thread判断是否联网
一、根据NETDEV_FLAG_INTERNET_UP位判断 static bool is_conncected(void) {struct netdev *dev RT_NULL;dev netdev_get_first_by_flags(NETDEV_FLAG_INTERNET_UP);if (dev RT_NULL){printf("wait netdev internet up...");return false;}else{printf("loc…...

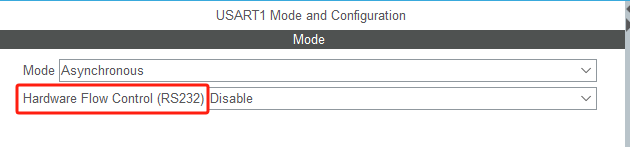
STM32F4基本定时器使用和原理详解
STM32F4基本定时器使用和原理详解 前言如何确定定时器挂载在哪条时钟线上配置及使用方法参数配置PrescalerCounter ModeCounter Periodauto-reload preloadTrigger Event Selection 中断配置生成的代码及使用方法初始化代码基本定时器触发DCA或者ADC的代码讲解中断代码定时启动…...

大语言模型如何处理长文本?常用文本分割技术详解
为什么需要文本分割? 引言:为什么需要文本分割?一、基础文本分割方法1. 按段落分割(Paragraph Splitting)2. 按句子分割(Sentence Splitting)二、高级文本分割策略3. 重叠分割(Sliding Window)4. 递归分割(Recursive Splitting)三、生产级工具推荐5. 使用LangChain的…...

EtherNet/IP转DeviceNet协议网关详解
一,设备主要功能 疆鸿智能JH-DVN-EIP本产品是自主研发的一款EtherNet/IP从站功能的通讯网关。该产品主要功能是连接DeviceNet总线和EtherNet/IP网络,本网关连接到EtherNet/IP总线中做为从站使用,连接到DeviceNet总线中做为从站使用。 在自动…...

CRMEB 框架中 PHP 上传扩展开发:涵盖本地上传及阿里云 OSS、腾讯云 COS、七牛云
目前已有本地上传、阿里云OSS上传、腾讯云COS上传、七牛云上传扩展 扩展入口文件 文件目录 crmeb\services\upload\Upload.php namespace crmeb\services\upload;use crmeb\basic\BaseManager; use think\facade\Config;/*** Class Upload* package crmeb\services\upload* …...

20个超级好用的 CSS 动画库
分享 20 个最佳 CSS 动画库。 它们中的大多数将生成纯 CSS 代码,而不需要任何外部库。 1.Animate.css 一个开箱即用型的跨浏览器动画库,可供你在项目中使用。 2.Magic Animations CSS3 一组简单的动画,可以包含在你的网页或应用项目中。 3.An…...
STM32HAL库USART源代码解析及应用
STM32HAL库USART源代码解析 前言STM32CubeIDE配置串口USART和UART的选择使用模式参数设置GPIO配置DMA配置中断配置硬件流控制使能生成代码解析和使用方法串口初始化__UART_HandleTypeDef结构体浅析HAL库代码实际使用方法使用轮询方式发送使用轮询方式接收使用中断方式发送使用中…...