开源预约挂号平台 - 从0到上线
文章目录
- 开源预约挂号平台 - 从0到上线
- 演示地址
- 源码地址
- 可以学到的技术
- 前端技术
- 后端技术
- 部署上线
- 开发工具
- 其他技术
- 业务功能
- 项目讲解
- 前端
- 创建项目 - 安装`PNPM` - 使用`VSCODE `- 安装插件
- 首页
- 顶部与底部 - 封装组建 - 使用`scss`左右布局
- 中间内容部分
- 路由 -` vue-router`
- `BANNER`- 走马灯效果 - 使用`elementplus`
- 搜索区 - 自动填充组建 - 深度选择器
- `AXIOS`发起请求
- 筛选区
- 表格部分与分页 - 使用`TypeScript`类型
- 筛选区与首页表格父子组件传参
- 医院部分
- 使用 `Pinia`仓库
- 科室滑动效果
- 登录模块
- 自定义表单验证
- 验证码功能
- `Token`功能
- 挂号功能
- 挂号列表动画功能
- 卡片印章样式
- 订单详情
- 实名认证
- 前端上传图片功能
- 就诊人管理
- 级联选择器
- 路由鉴权与`Nprogress`加载进度条
- 后端
- 框架图
- 创建表
- 业务表
- 字段表
- 配置表
- 数据初始化 -` BRP.COM.Init`
- REST接口 - `BRP.COM.REST.Api`
- 统一入口,统一错误处理 - `BRP.COM.SafeRun`
- `ORM`映射的使用
- `JWT`功能
- 后端处理上传文件
- 部署
- 部署云
- 华为云创建服务器流程
- 阿里云创建服务器流程
- 在安装`Linux`,`Centos`系统中安装数据库
- 创建数据库
- 创建命名空间
- 创建Application
- 三库分离
- 创建灾备数据库
- 备份数据库
- 恢复数据库
- 将数据库加入MIRROR
- 部署`NGINX`
- 打包前端文件
- 跨越问题处理
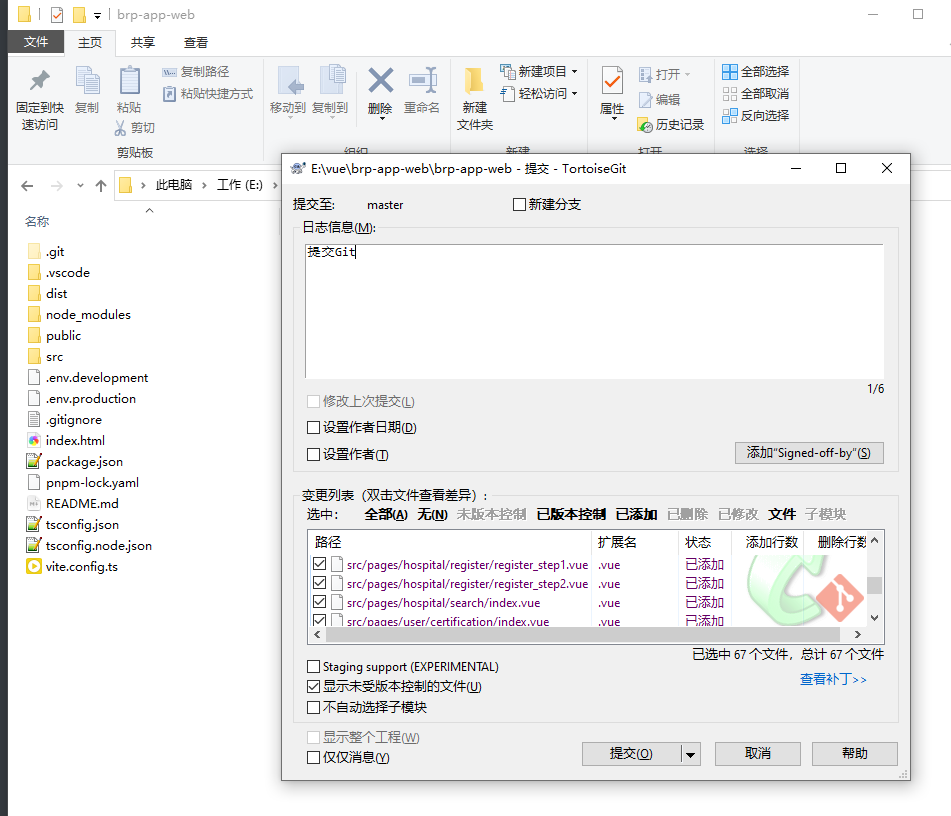
- 使用`Git`进行版本控制
- 上传`Github`
- **创造价值,分享学习,一起成长,相伴前行,欢迎大家提出意见,共同交流。**
开源预约挂号平台 - 从0到上线
- 项目缩写名称:
BRP-Booking Registration Platform
演示地址
- 预约挂号平台

源码地址
- 前端源码 - https://github.com/yaoxin521123/brp-app-web.git
- 后端源码 - https://github.com/yaoxin521123/brp-iris.git
可以学到的技术
前端技术
Vue3,Vite,TypeScript,vue-router,Pinia,elementplus,AXIOS,scss
后端技术
IRIS2023,REST,统一入口,统一错误处理,ORM,JWT,自研框架,后端处理上传文件
部署上线
- 华为云,
Centos7.9,Ngnix,创建独立命名空间,创建独立数据库,创建独立Applicaion,三库分离,打包前端文件,跨域问题,创建灾备服务器,备份数据库,恢复数据库,将数据库加入MIRROR
开发工具
vscode,IRIS2023
其他技术
SVG矢量图使用,路由鉴权,封装全局组件,HTTP上传图片,使用Git进行版本控制,上传Github
业务功能
- 手机登录,扫码二维码登录,微信支付,预约挂号,医院详情,预约通知,实名认证,挂号订单,就诊人管理
项目讲解
由于篇幅有限,以下为重点功能讲解,可参考项目源码对比观看。
前端
创建项目 - 安装PNPM - 使用VSCODE - 安装插件
- 先安装
node.js与npm。
- 下载地址:https://nodejs.cn/download/
下一步安装即可。
C:\Users\hp>node -v
v16.14.0C:\Users\hp>npm -v
8.3.1
- 打开
cmd,安装pnpm。
npm install -g pnpm
注:网络不好可以替换镜像地址。
获取当前配置的镜像地址
pnpm get registry设置新的镜像地址
pnpm set registry https://registry.npm.taobao.org
- 在任意路径下打开
cmd,创建vue3项目。依次填写名称 -brp-app-web,Vue,TypeScript。
E:\vue>pnpm create vite
../.pnpm-store/v3/tmp/dlx-13224          |   +1 +
../.pnpm-store/v3/tmp/dlx-13224          | Progress: resolved 1, reused 0, downloaded 1, added 1, done
√ Project name: ... brp-app-web
Select a framework :  Vue
Seiect a variant : TypeScript
- 使用
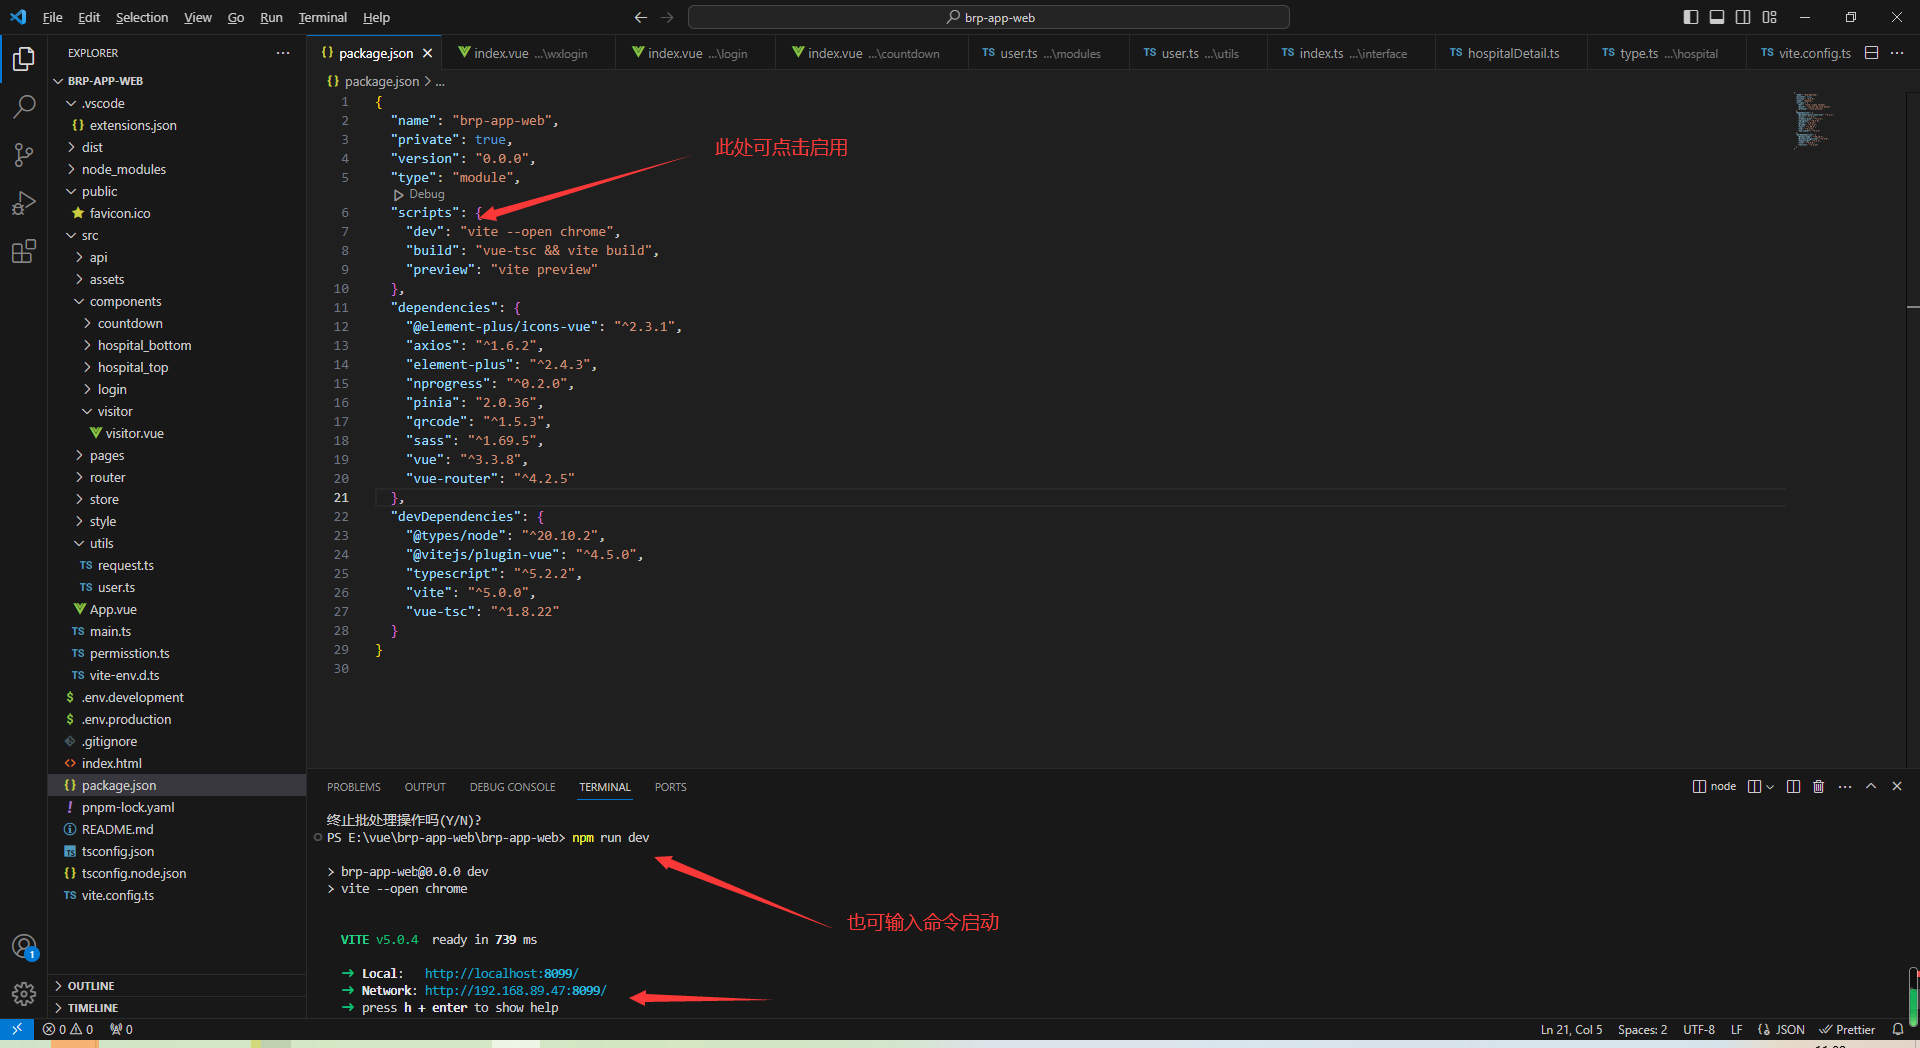
vscode打开项目,在terminl中输入pnpm run dev即可启动项目。
vscode推荐使用v3插件如下:
Element UI Snippets - v0.7.2Prettier - Code formatter - v10.1.0TypeScript Vue Plugin (Volar) - v1.8.26Wink Snippets - v1.0.5
- 在
main.ts文件中引入必要的依赖包
import { createApp } from "vue";
import "@/style/reset.scss";
import App from "@/App.vue";
import router from "@/router";
import ElementPlus from "element-plus";
import "element-plus/dist/index.css";
//@ts-ignore
import zhCn from "element-plus/dist/locale/zh-cn.mjs";
import pinia from "@/store";
const app = createApp(App);
app.use(router);
app.use(ElementPlus, {locale: zhCn,
});
app.use(pinia);
app.mount("#app");
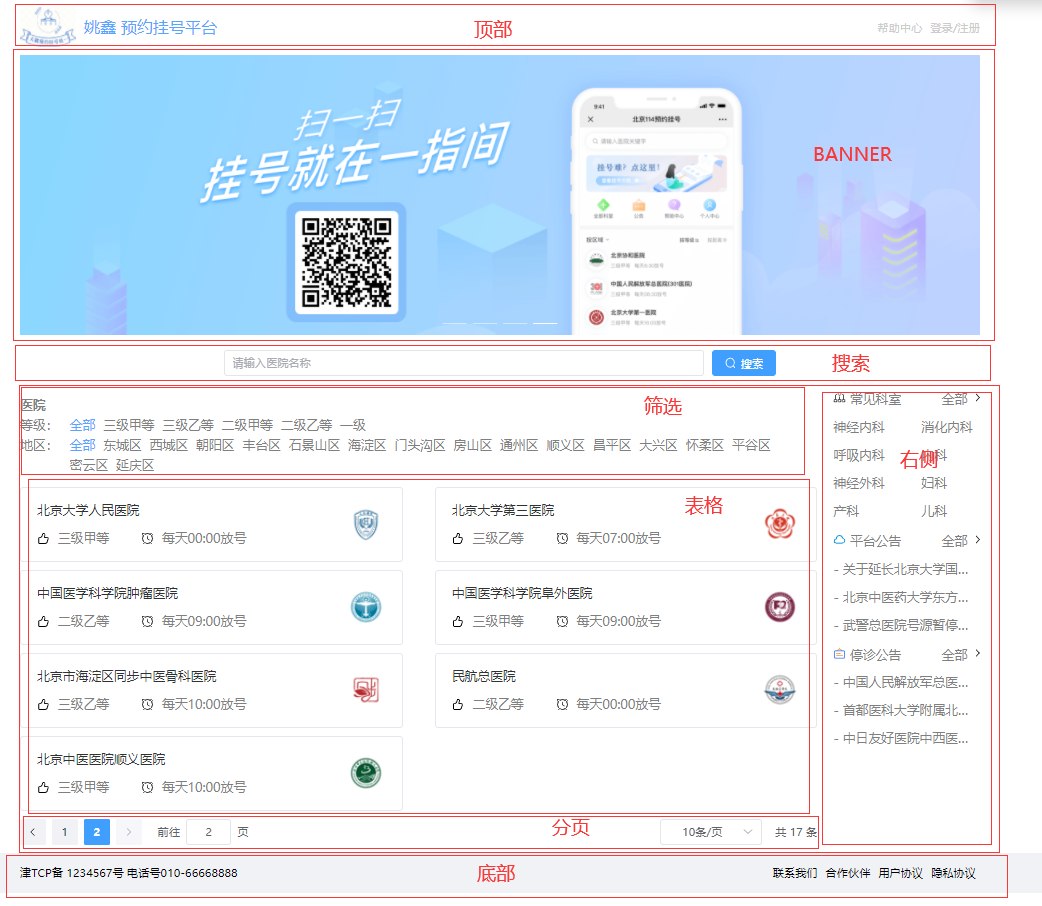
首页
首页分为顶部,底部,中间内容部分:BANNER区,搜索区,筛选区,表格,分页,右侧。
顶部与底部 - 封装组建 - 使用scss左右布局
- 将顶部与底部封装为全局组件。
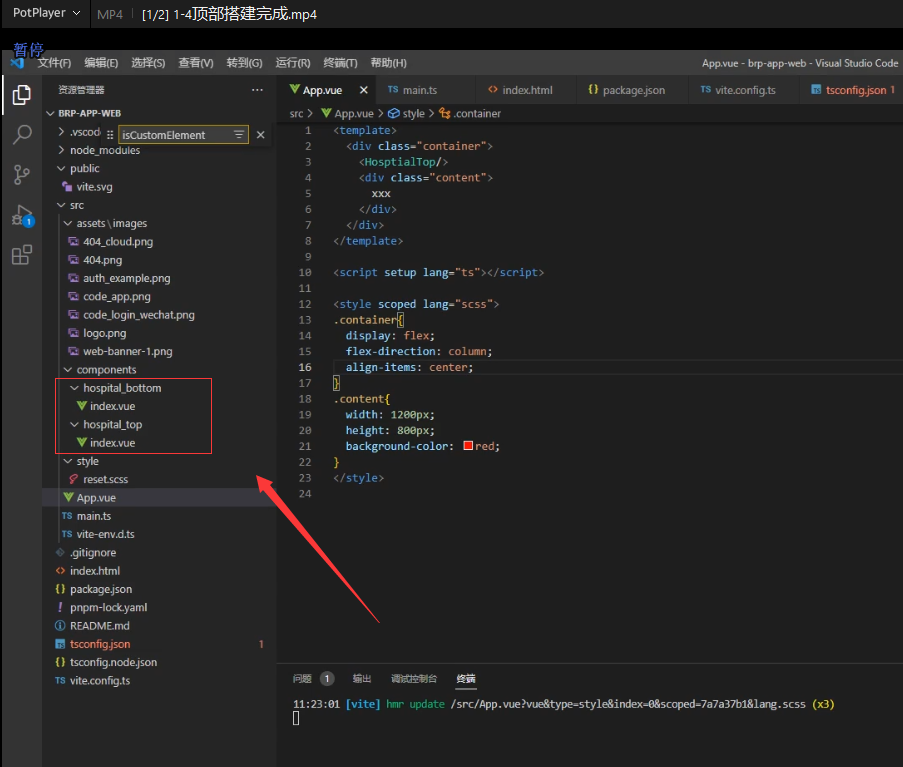
- 将全局组件引入到
main.ts中
...
import HosptialTop from "@/components/hospital_top/index.vue";
import HosptialBottom from "@/components/hospital_bottom/index.vue";
...
const app = createApp(App);
app.component("HosptialTop", HosptialTop);
app.component("HosptialBottom", HosptialBottom);
app.mount("#app");
注:再使用ts中有代码提示报错,运行时没有报错,可以使用//@ts-ignore忽略。
- 在
App.vue中引入全局组件,该文件为入口文件。
- 布局分部为头部,中部,底部,中间部用于内容切换路由跳转等。
<template><div class="container"><HosptialTop /><div class="content"><router-view></router-view></div><HosptialBottom /><Login /></div>
</template>
- 实现头部与底部左右布局,以头部
scss样式举例。
注:使用scss前需要先安装scss 在项目目录中使用cmd执行pnpm i scss命令即可。
- 先让
top浮动display: flex;居中justify-content: center;并在位置固定position: fix;层级在最上z-index: 999; - 在
content中让left与right浮动起来,在左右两侧justify-content: space-between; - 其余为宽高大小,居中等属性。
注:后面的前端界面中有大量左右布局均为此方式,后面不再赘述。

<style scoped lang="scss">
.top {position: fix;z-index: 999;width: 100%;height: 70px;background: #fff;display: flex;justify-content: center;.content {width: 1200px;height: 70px;background: white;display: flex;justify-content: space-between;.left {display: flex;justify-content: center;align-items: center;img {width: 70px;height: 50px;margin-right: 10px;}p {font-size: 20px;color: #55a6fe;}}.right {display: flex;justify-content: center;align-items: center;font-size: 14px;color: #ccc;.help {margin-right: 10px;}}}
}
</style>
中间内容部分
路由 - vue-router
- 中间内容部分需要使用路由来切换页面,首先创建文件
router/index.ts编写路由。
注:使用vue-router时需要在项目目录中打开cmd执行命令pnpm i vue-router安装路由。
createRouter为创建路由配置方法。scrollBehavior()方法每次路由跳转滚动条自动回到顶部。component: () => import("@/pages/home/index.vue"),懒加载路由,import中文件为路由的路径。
import { createRouter, createWebHistory } from "vue-router";
export default createRouter({history: createWebHistory(),routes: [{path: "/home",component: () => import("@/pages/home/index.vue"),meta: {title: "首页",},},],scrollBehavior() {return {left: 0,top: 0,};},
});
- 在
main.ts中引入路由。
...
import router from "@/router";
...
app.use(router);
...
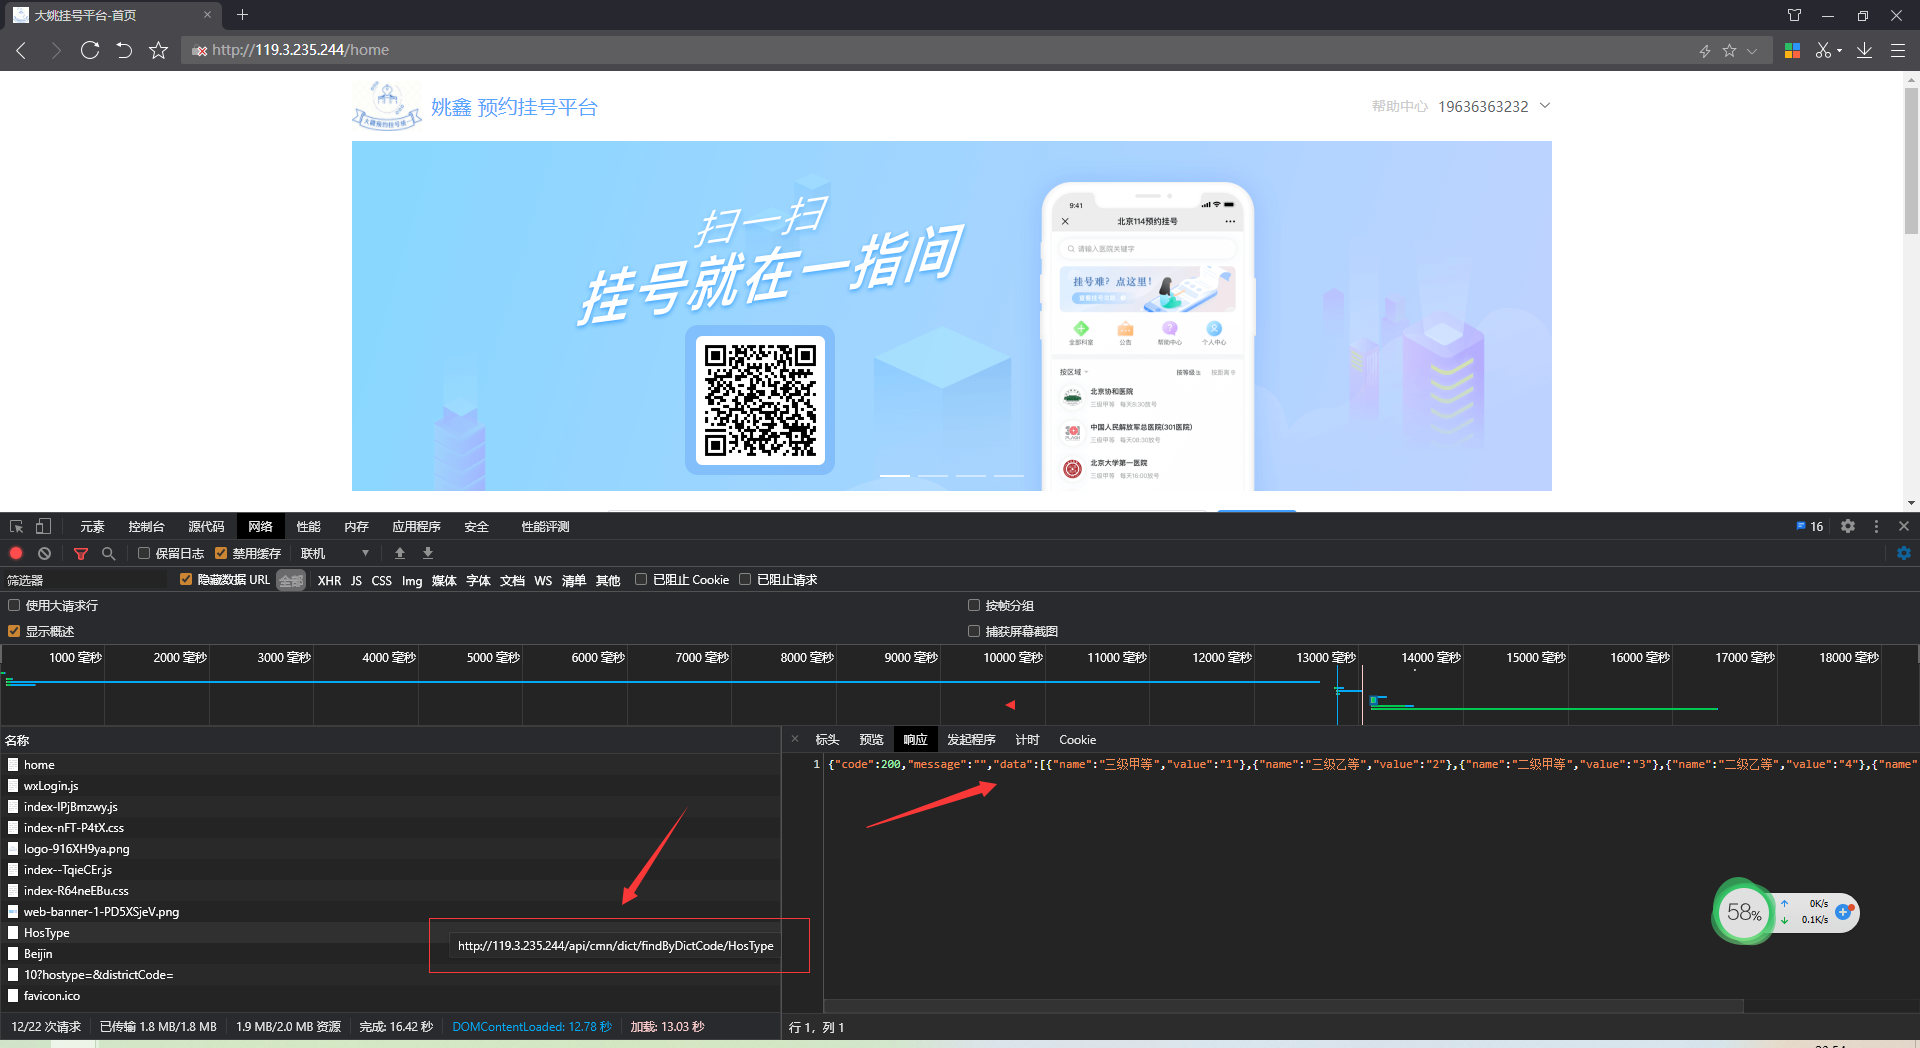
- 设置好路由后在地址栏就可以输入路由名称进行路由跳转。
- http://119.3.235.244/home
- http://119.3.235.244/hospital
BANNER- 走马灯效果 - 使用elementplus
-
创建组件
pages-carousel-index.vue。 -
使用组件
el-carousel,循环4次,设置img图片即可。
<el-carousel height="350px"><el-carousel-item v-for="item in 4" :key="item"><img src="@/assets/images/web-banner-1.png" alt="" /></el-carousel-item></el-carousel>

搜索区 - 自动填充组建 - 深度选择器
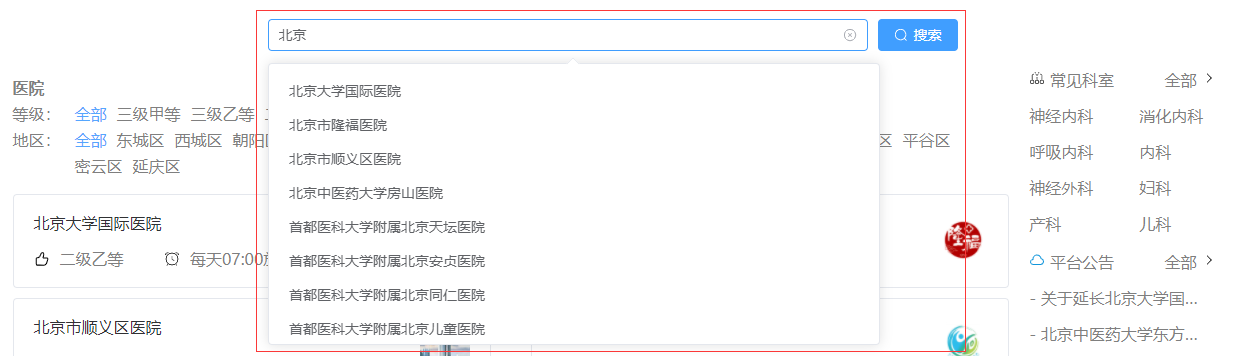
-
创建组件
pages-search-index.vue。 -
使用组件
el-autocomplete
:fetch-suggestions="fetchData"为搜索时防抖的触发方法根据输入内容进行后台查询。
<el-autocompleteclearableplaceholder="请输入医院名称"v-model="hosname":fetch-suggestions="fetchData":trigger-on-focus="false"@select="goDetail"/>
- 由于搜索组件的宽度为深层样式,所以这里使用
::v-deep()修改组件内部的样式。
注:如果去掉scoped关键字,则样式为全局样式。
<style scoped lang="scss">
.search {width: 100%;height: 50px;display: flex;justify-content: center;align-items: center;margin: 10px 0px;::v-deep(.el-input__wrapper) {width: 600px;margin-right: 10px;}
}
</style>
AXIOS发起请求
- 创建文件
utils-request.ts,编写代码如下。
注:需要安装axios库pnpm i axios。
- 利用
axios.create方法创建一个axios实例:可以设置基础路径、超时的时间的设置。 - 利用
axios请求、响应拦截器功能,请求拦截器,一般可以在请求头中携带公共的参数token,响应拦截器,可以简化服务器返回的数据,处理http网络错误。 - 对外暴露
axios。
import axios from "axios";
import { ElMessage } from "element-plus";
import userUserStore from "@/store/modules/user";const request = axios.create({//baseURL: import.meta.env.VITE_API_BASE_URL,baseURL: "/api",timeout: 5000,
});request.interceptors.request.use((config) => {let userStore = userUserStore();if (userStore.userInfo.token) {config.headers.token = userStore.userInfo.token;}return config;
});request.interceptors.response.use((response) => {return response.data;},(error) => {let status = error.response.status;console.log(status);switch (status) {case 404:ElMessage({type: "error",message: error.message,});break;case 500 | 501 | 502 | 503 | 504 | 505:ElMessage({type: "error",message: "服务器挂了",});break;case 401:ElMessage({type: "error",message: "参数有误",});break;}return Promise.reject(new Error(error.message));}
);export default request;
筛选区
pages - home - level - index.vue与pages - home - region- index.vue

- 筛选静态 代码为
ul>li,样式浮动,使用flex按照比例划分区域。等级:占0.5份,其他占9份,并增加鼠标滑过样式。 - 将筛选区封装为组件使用。
.content {display: flex;.left {margin-right: 10px;flex: 0.5;}.hospital {flex: 9;display: flex;li {margin-right: 10px;&.active {color: #55a6fe;}}li:hover {color: #55a6fe;cursor: pointer;}}}
表格部分与分页 - 使用TypeScript类型
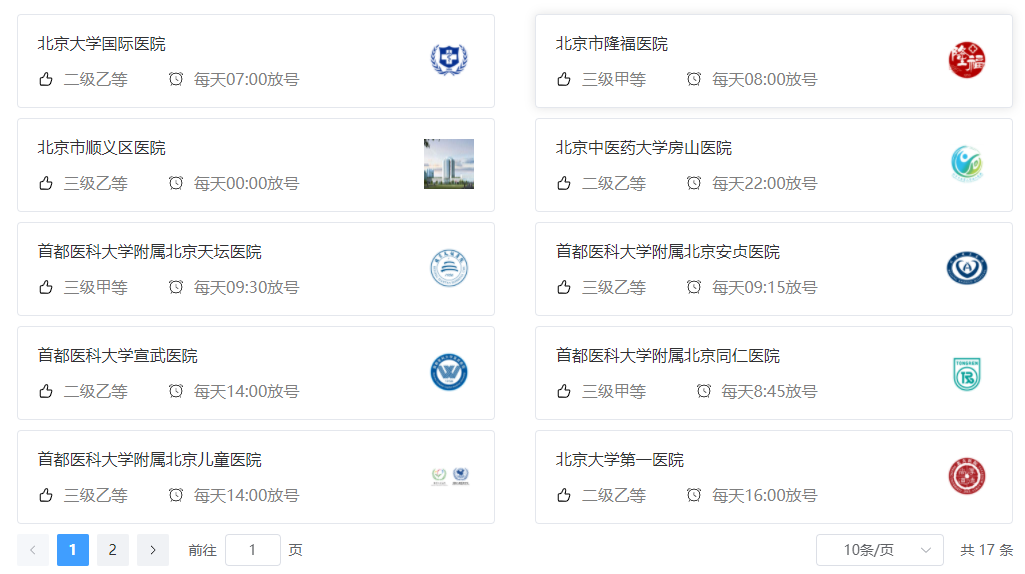
- 表格显示内容为后端接口返回的数据。首先定义接口返回数据类型。
api - home - type.ts
注:表格的样式与绑定数据不再赘述,参考elementUI官方即可。
ResponseData- 定义首页模块ts数据类型Hospital- 代表已有的医院数据的ts类型Content- 存储全部已有医院的数组类型HospitalResponseData- 获取已有医院接口返回的数据ts类型
export interface ResponseData {code: number;message: string;ok: boolean;
}
export interface Hospital {id: string;createTime: string;updateTime: string;isDeleted: number;params: {hostypeString: string;fullAddress: string;};hoscode: string;hosname: string;hostype: string;provinceCode: string;cityCode: string;districtCode: string;address: string;logoData: string;intro: string;route: string;status: number;bookingRule: {cycle: number;releaseTime: string;stopTime: string;quitDay: number;quitTime: string;rule: string[];};
}
export type Content = Hospital[];export interface HospitalResponseData extends ResponseData {data: {content: Content;pageable: {sort: {sorted: boolean;unsorted: boolean;empty: boolean;};pageNumber: number;pageSize: number;offset: number;paged: boolean;unpaged: boolean;};totalPages: number;totalElements: number;last: boolean;first: boolean;sort: {sorted: boolean;unsorted: boolean;empty: boolean;};numberOfElements: number;size: number;number: number;empty: boolean;};
}
- 引入数据类型定义接口方法并暴露
reqHospital。api - home - index.ts
- 通过枚举管理首页模块的接口地址
import request from "@/utils/request";
import type {HospitalResponseData,
} from "./type";
enum API {HOSPITAL_URL = "/hosp/hospital/",
}
export const reqHospital = (page: number,limit: number,hostype = "",districtCode = ""
) =>request.get<any, HospitalResponseData>(API.HOSPITAL_URL +`${page}/${limit}?hostype=${hostype}&districtCode=${districtCode}`);
- 在首页中发起请求获取数据。
page.index.vue
onMounted- 页面加载完毕时回调的钩子。getHospitalInfo- 获取已有的医院的数据
<script setup lang="ts">
...
onMounted(() => {getHospitalInfo();
});
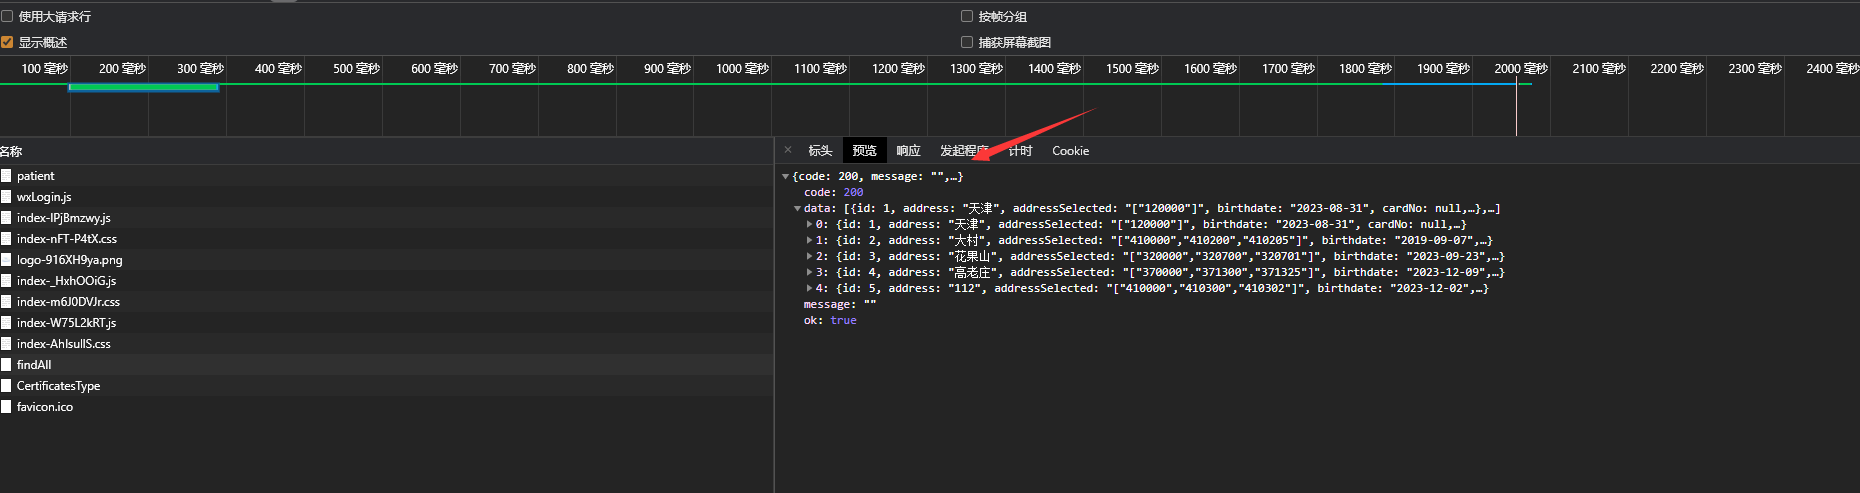
const getHospitalInfo = async () => {let result: HospitalResponseData = await reqHospital(pageNo.value,pageSize.value,hosType.value,districtCode.value);if (result.code == 200) {hasHospitalArr.value = result.data.content;total.value = result.data.totalElements;}
};
...
</script>
- 点击分页时需要触发对应的回调方法
<el-paginationclass="pagination"v-model:current-page="pageNo"v-model:page-size="pageSize":page-sizes="[10, 20, 30, 40]":background="true"layout="prev, pager, next, jumper,->,sizes,total":total="total"@current-change="currentChange"@size-change="sizeChange"/>
sizeChange- 分页器下拉菜单发生变化的时候会触发currentChange- 分页器页码发生变化时候回调
const currentChange = () => {getHospitalInfo();
};const sizeChange = () => {pageNo.value = 1;getHospitalInfo();
};
筛选区与首页表格父子组件传参
- 给筛选区组件添加自定义回调方法。
<!-- 等级子组件 --><Level @getLevel="getLevel" /><!--地区 --><Region @getRegion="getRegion" />
- 在父组件编写回调方法
- 组件自定义事件:获取儿子给父组件传递过来的等级参数
- 子组件自定义事件:获取子组件传递过来的地区参数
const getLevel = (level: string) => {hosType.value = level;getHospitalInfo();
};
const getRegion = (region: string) => {districtCode.value = region;getHospitalInfo();
};
- 在子组件接受参数并触发回调方法,通知父组件,父组件拿到参数可以根据参数做后台筛选。
- 点击不同区域按钮回调
- 给父组件传递区域的参数
const changeLevel = (level: string) => {regionFlag.value = level;$emit("getRegion", level);
};let $emit = defineEmits(["getRegion"]);
医院部分
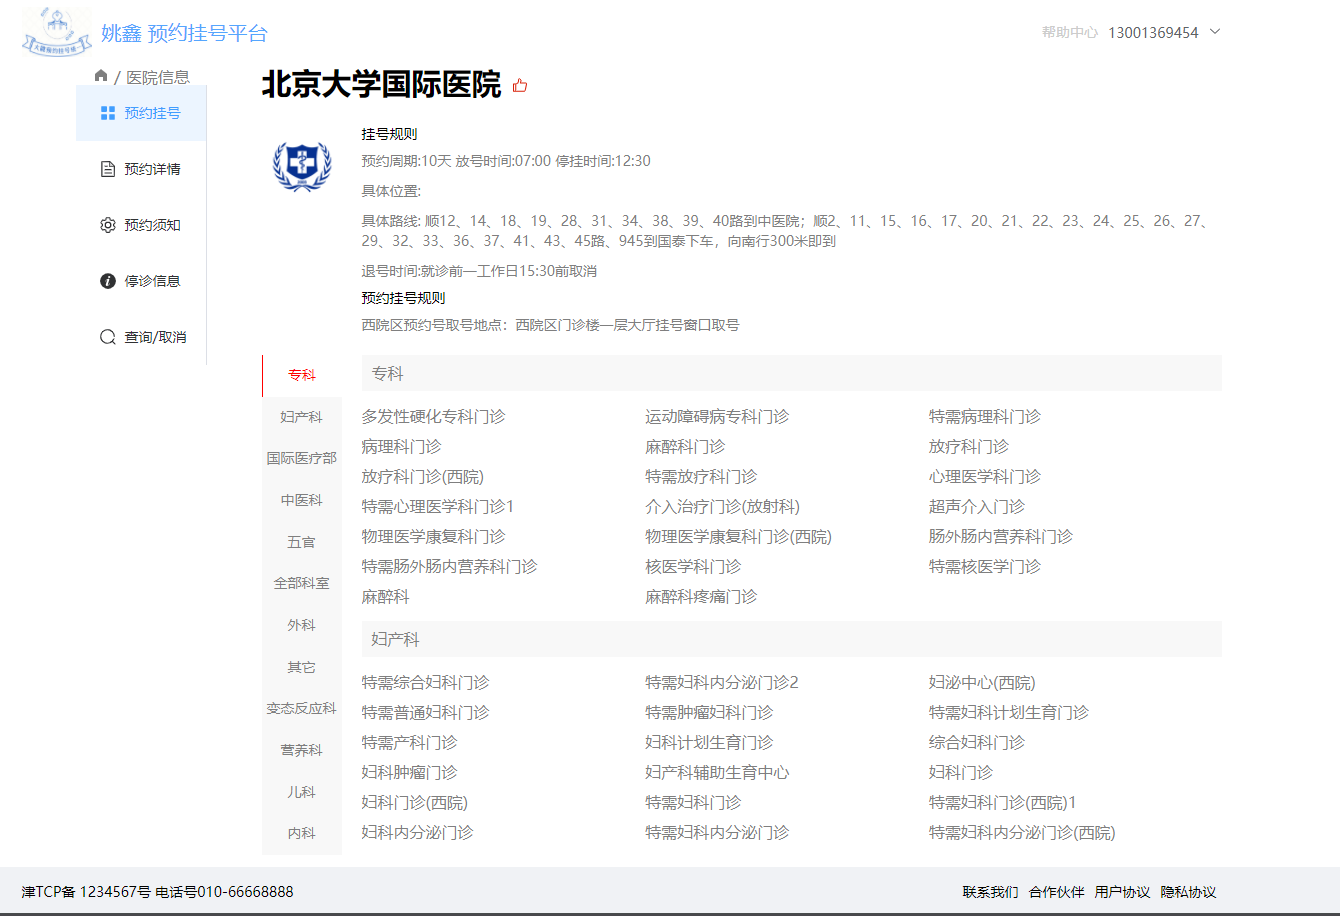
使用 Pinia仓库
- 由于
hospital路由的多个二级路由,需要获取点击医院的信息。所以使用Pinia仓库进行数据缓存。把获得信息提供给多个二级路由使用,这样就可以不用每个页面再次获取医院信息。 - 创建
Pinia仓库。store - modules - hospitalDetail.ts
注:使用pinia前需要先安装pnpm i pinia
useDetailStore为定义的全局数据。state- 表示返回的数据。actions- 触发的回调方法给state中数据赋值。
import { defineStore } from "pinia";
import { reqHospitalDetail, reqHospitalDeparment } from "@/api/hospital";
import type {HospitalDetailData,HospitalDetail,
} from "@/api/hospital/type";
import { DetailState } from "@/store/modules/interface";
const useDetailStore = defineStore("Detail", {state: (): DetailState => {return {hospitalInfo: {} as HospitalDetail,};},actions: {async getHospital(hoscode: string) {let result: HospitalDetailData = await reqHospitalDetail(hoscode);if (result.code == 200) {this.hospitalInfo = result.data;}},},getters: {},
});export default useDetailStore;
hospital - index.vue中使用pinia
- 组件挂载完毕,通知
pinia仓库发请求获取医院详情的数据,存储仓库当中。
...
import { useRouter, useRoute } from "vue-router";
import { onMounted } from "vue";
import useDetailStore from "@/store/modules/hospitalDetail";
let detailStore = useDetailStore();
let $router = useRouter();
let $route = useRoute();onMounted(() => {detailStore.getHospital($route.query.hoscode as string);
});- 其他
hospital二级路由拿到数据后获取展示即可。\pages\hospital\detail\index.vue
- 引入医院详情仓库的数据
<script setup lang="ts">
import useDetailStore from "@/store/modules/hospitalDetail";
let hospitalStore = useDetailStore();
</script>
科室滑动效果

- 展示为左右两个部分,左侧为科室总称,右侧为改科室的子科室。
deparment- 放置每一个医院的科室的数据deparmentInfo- 用一个div代表:大科室与小科室- 每一个大的科室下小科室
<div class="deparment"><div class="leftNav"><ul><li@click="chaneIndex(index)":class="{ active: index == currentIndex }"v-for="(deparment, index) in hospitalStore.deparmentArr":key="deparment.depcode">{{ deparment.depname }}</li></ul></div><div class="deparmentInfo"><divclass="showDeparment"v-for="deparment in hospitalStore.deparmentArr":key="deparment.depcode"><h1 class="cur" style="padding: 10px;">{{ deparment.depname }}</h1><ul><li@click="showLogin(item)"v-for="item in deparment.children":key="item.depcode">{{ item.depname }}</li></ul></div></div></div>
- 左侧大的科室点击的事件
- 点击导航获取右侧科室(大的科室
H1标题) - 滚动到对应科室的位置
behavior: "smooth", 过渡动画效果block: "start", 滚动到位置 默认起始位置
let currentIndex = ref<number>(0);
const chaneIndex = (index: number) => {currentIndex.value = index;let allH1 = document.querySelectorAll(".cur");allH1[currentIndex.value].scrollIntoView({behavior: "smooth",block: "start",});
};
- 滑动样式
&::-webkit-scrollbar { display: none;}隐藏滚动条flex-direction: column;浮动布局为列布局
.deparment {width: 100%;height: 500px;display: flex;margin-top: 20px;.leftNav {width: 80px;height: 100%;ul {width: 100%;height: 100%;background: rgb(248, 248, 248);display: flex;flex-direction: column;li {flex: 1;text-align: center;color: #7f7f7f;font-size: 14px;line-height: 40px;&.active {border-left: 1px solid red;color: red;background: white;}}}}.deparmentInfo {flex: 1;margin-left: 20px;height: 100%;overflow: auto;&::-webkit-scrollbar {display: none;}.showDeparment {h1 {background-color: rgb(248, 248, 248);color: #7f7f7f;}ul {display: flex;flex-wrap: wrap;li {color: #7f7f7f;width: 33%;line-height: 30px;}}}}}
登录模块
登录为全局组件,包含手机号登录,微信扫码登录表单验证等功能。
自定义表单验证
- 自定义校验规则:手机号码自定义校验规则
- 验证码自定义校验规则
const validatorPhone = (_: any, value: any, callback: any) => {const reg = /^1[3-9]\d{9}$/;if (reg.test(value)) {callback();} else {callback(new Error("请输入正确的号码格式"));}
};
const validatorCode = (_: any, value: any, callback: any) => {if (/^\d{6}$/.test(value)) {callback();} else {callback(new Error("请输入正确的验证码格式"));}
};
const rules = {phone: [{ trigger: "blur", validator: validatorPhone }],code: [{ trigger: "blur", validator: validatorCode }],
};
验证码功能

- 将验证码功能封装为组件
\components\countdown\index.vue
time- 倒计时的事件watch- 监听父组件传递过来props数据变化timer- 开启定时器$emit('getFlag',false);通知父组件倒计时模式结束let $emit = defineEmits(["getFlag"]);接受父组件传递过来的props->flag:用于控制计数器组件显示与隐藏的
<template><div><span>获取验证码({{ time }}s)</span></div>
</template><script setup lang="ts">
import { ref, watch } from "vue";
let props = defineProps(["flag"]);
let time = ref<number>(5);
watch(() => props.flag,() => {let timer = setInterval(() => {time.value--;if (time.value == 0) {$emit("getFlag", false);clearInterval(timer);}}, 1000);},{immediate: true,}
);
let $emit = defineEmits(["getFlag"]);
</script>
- 登录组件中引入验证码组件
<Countdown v-if="flag" :flag="flag" @getFlag="getFlag" />
- 点击验证码按钮时触发事件
getFlag- 计数器子组件绑定的自定义事件。当倒计时为零的时候,通知父组件倒计时组件隐藏getCode- 获取验证码按钮的回调
const getCode = async () => {flag.value = true;try {await userStore.getCode(loginParams.phone);loginParams.code = userStore.code;} catch (error) {ElMessage({type: "error",message: (error as Error).message,});}
};const getFlag = (val: boolean) => {flag.value = val;
};
Token功能
- 登录成功后将
token存户到pinia。
await userStore.userLogin(loginParams);调用userStore方法
const login = async () => {await form.value.validate();console.log(form.value.validate());try {await userStore.userLogin(loginParams);userStore.visiable = false;let redirect = $route.query.redirect;if (redirect) {$router.push(redirect as string);} else {$router.push("/home");}} catch (error) {ElMessage({type: "error",message: (error as Error).message,});}
};
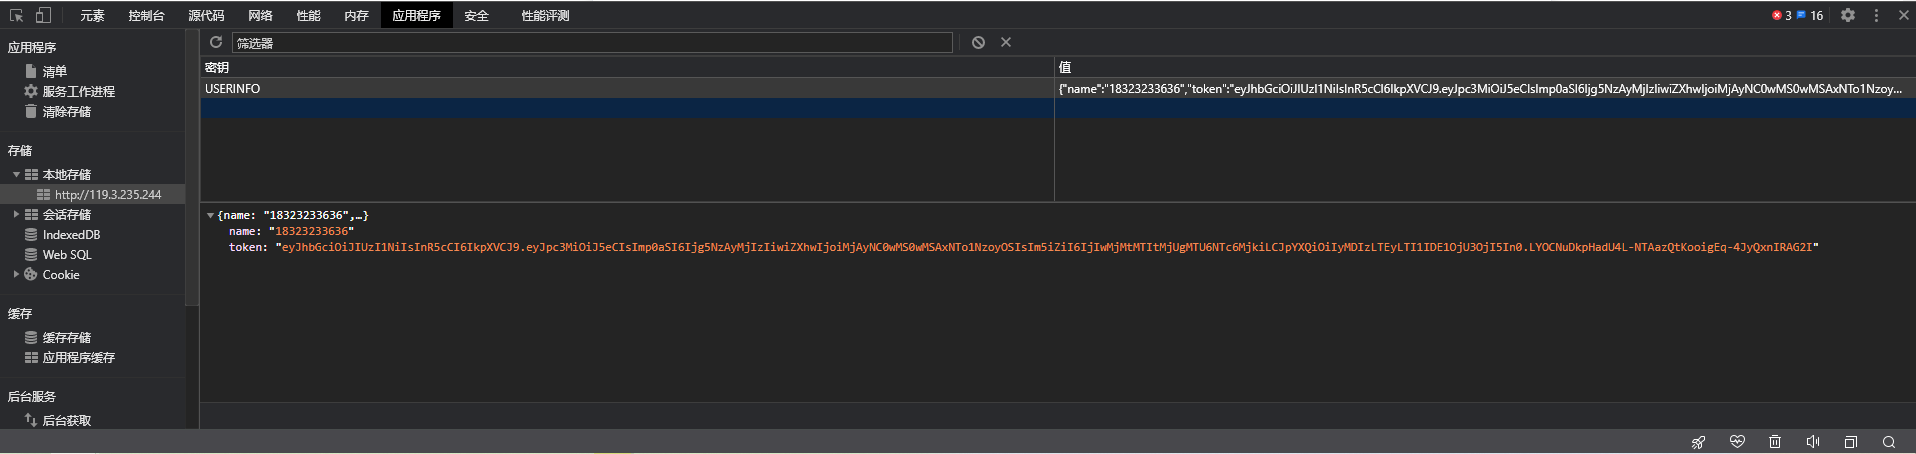
SET_TOKEN(JSON.stringify(this.userInfo));本地存储localStorage持久化存储用户信息。
async userLogin(loginData: LoginData) {let result: UserLoginResponseData = await reqUserLogin(loginData);if (result.code == 200) {this.userInfo = result.data;SET_TOKEN(JSON.stringify(this.userInfo));return 'ok';} else {return Promise.reject(new Error(result.message));}},
export const SET_TOKEN = (userInfo:string)=>{localStorage.setItem('USERINFO',userInfo);
}
- 在
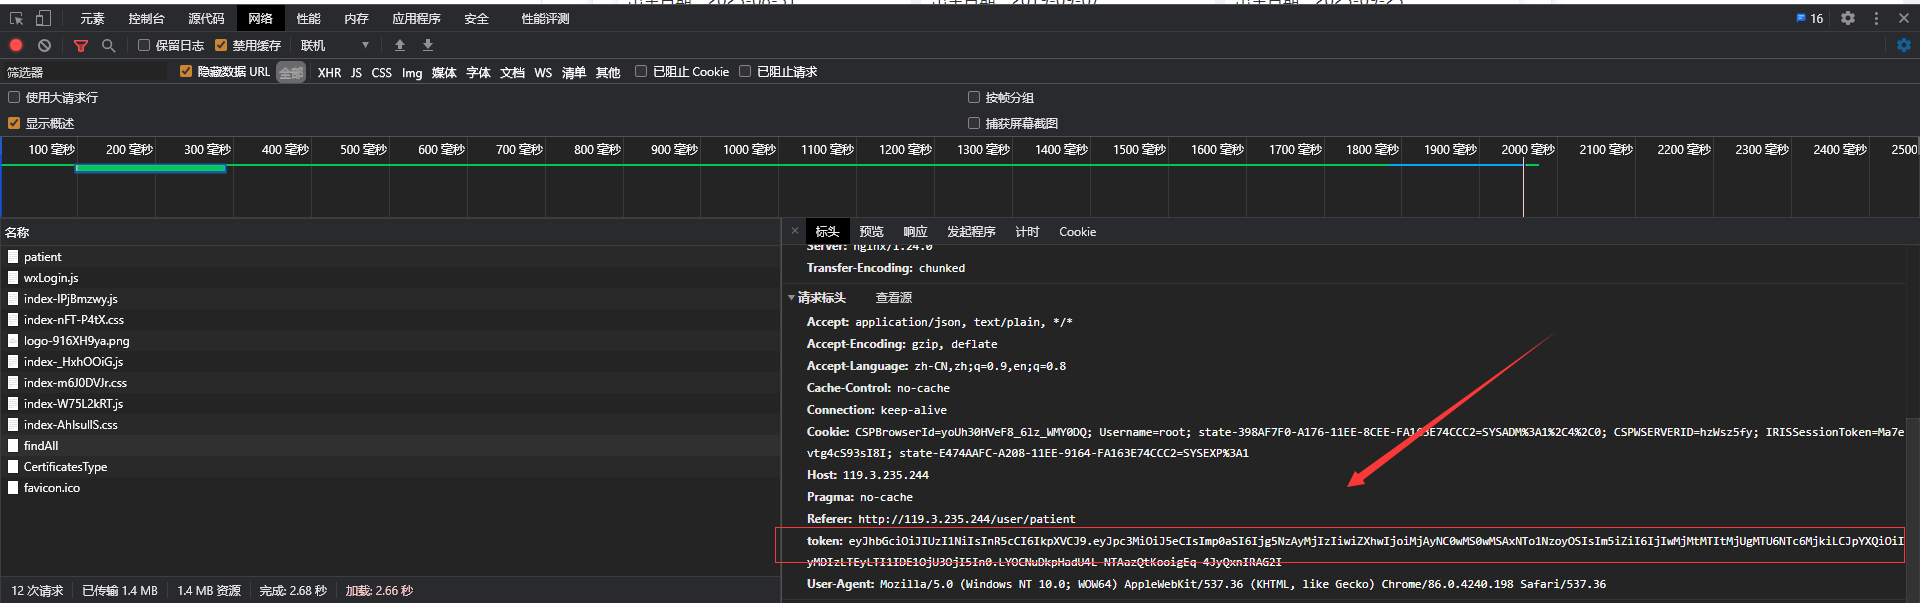
axios中进行拦截请求头每次携带localStorage中的token信息
config:请求拦截器回调注入的对象(配置对象),配置对象的身上最终要的一件事情headers属性
request.interceptors.request.use((config) => {let userStore = useUserStore();if (userStore.userInfo.token) {config.headers.token = userStore.userInfo.token;}return config;
});
挂号功能

注:这里显示了为什么要将登录注册为全局组件,因为项目分为两个部分,一个部分是不用登录可展示的部分,另一部分是登录之后的功能。挂号就是必须要登录之后才展示的功能。
挂号列表动画功能

\pages\hospital\register\register_step1.vue文件中样式
cur: item.workDate == workTime.workDate,根据条件添加cur属性,有cur属性代表当前点击元素,从而进行放大。
<divclass="item"@click="changeTime(item)":class="{active: item.status == -1 || item.availableNumber == -1,cur: item.workDate == workTime.workDate,}"v-for="item in workData.bookingScheduleList":key="item">
transform: scale(1.1);动画放大了1.1倍
.container {width: 100%;display: flex;margin: 30px 0px;.item {flex: 1;width: 100%;border: 1px solid skyblue;margin: 0px 5px;color: #7f7f7f;transition: all 0.5s;&.active {border: 1px solid #ccc;.top1 {background: #ccc;}}&.cur {transform: scale(1.1);}.top1 {background: #e8f2ff;height: 30px;width: 100%;text-align: center;line-height: 30px;}.bottom {width: 100%;height: 60px;text-align: center;line-height: 60px;}}}
卡片印章样式

- 将就诊人封装为单独的组件。
components\visitor\visitor.vue
- 给印章添加
transition标签并声明名称为confirm
<template><div class="visitor">
...<div class="bottom"><p>证件类型:{{ user.param?.certificatesTypeString }}</p><p>证件号码:{{ user.certificatesNo }}</p><p>用户性别:{{ user.sex == 0 ? "女生" : "男士" }}</p><p>出生日期:{{ user.birthdate }}</p><p>手机号码:{{ user.phone }}</p><p>婚姻状况:{{ user.isMarry == 0 ? "未婚" : "已婚" }}</p><p>详细地址:{{ user.address }}</p><transition name="confirm"><div class="confirm" v-if="index == currentIndex">已选择</div></transition></div></div>
</template>
- 编写样式
position: absolute;绝对定位border-radius: 50%;圆角50%opacity: 0.5;透明度0.5transform: rotate(35deg);印章旋转角度.confirm-enter-from,.confirm.enter-active, .confirm-enter-to出入动画,持续动画时间。
.bottom {position: relative;padding: 0px 10px;p {line-height: 40px;}.confirm {position: absolute;width: 200px;height: 200px;color: red;border-radius: 50%;border: 1px dashed red;text-align: center;line-height: 200px;left: 15%;top: 15%;opacity: 0.5;transform: rotate(35deg);font-weight: 900;}.confirm-enter-from {transform: scale(1);}.confirm.enter-active {transform: all 0.3s;}.confirm-enter-to {transform: scale(1.2);}}
订单详情

- 订单详情根据路由是否带参数决定显示详细界面,还是列表界面。
pages\user\order\allOrder\index.vuepages\user\order\detail\index.vue
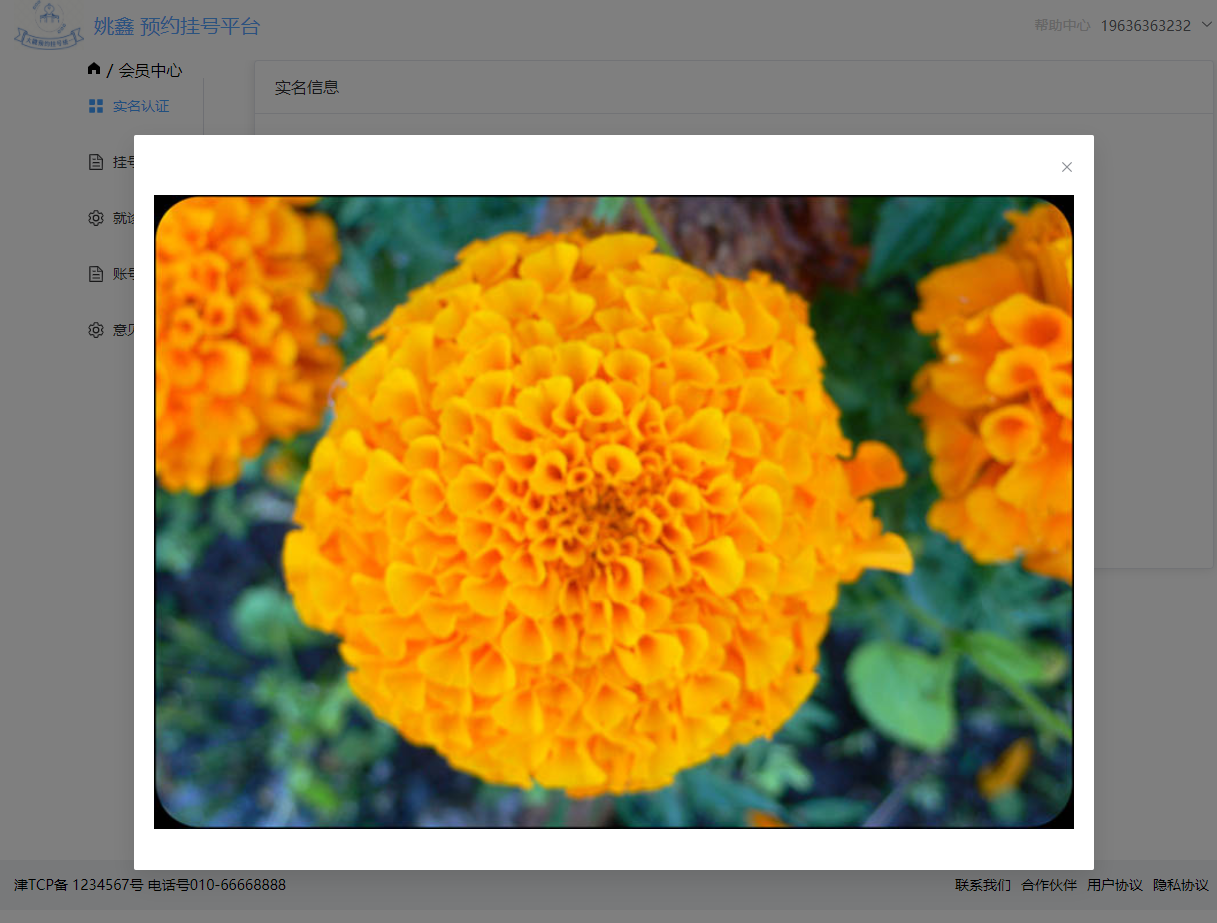
实名认证

- 业务逻辑,在第一次登录时需要先实名认证,认证后该界面显示认证结果。
前端上传图片功能
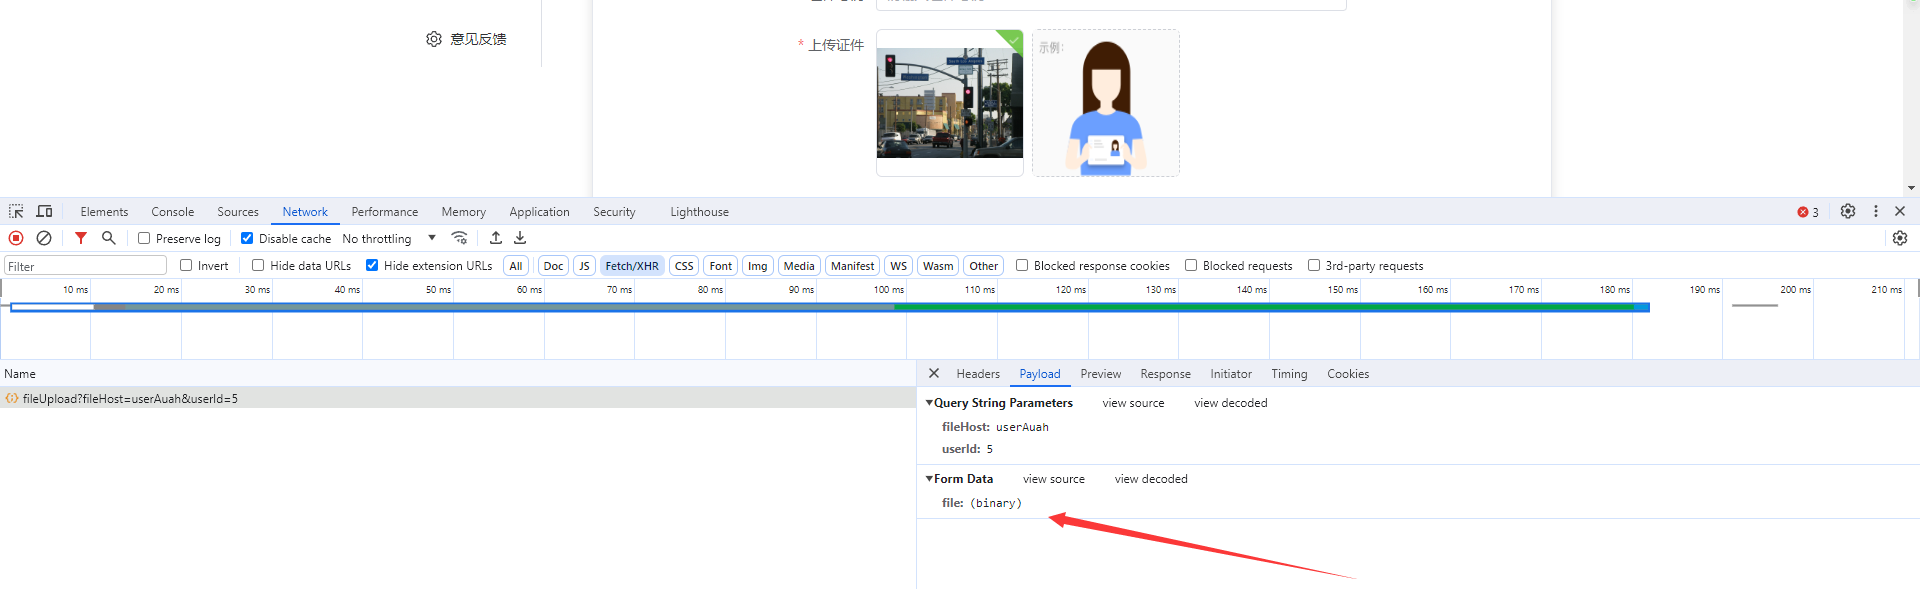
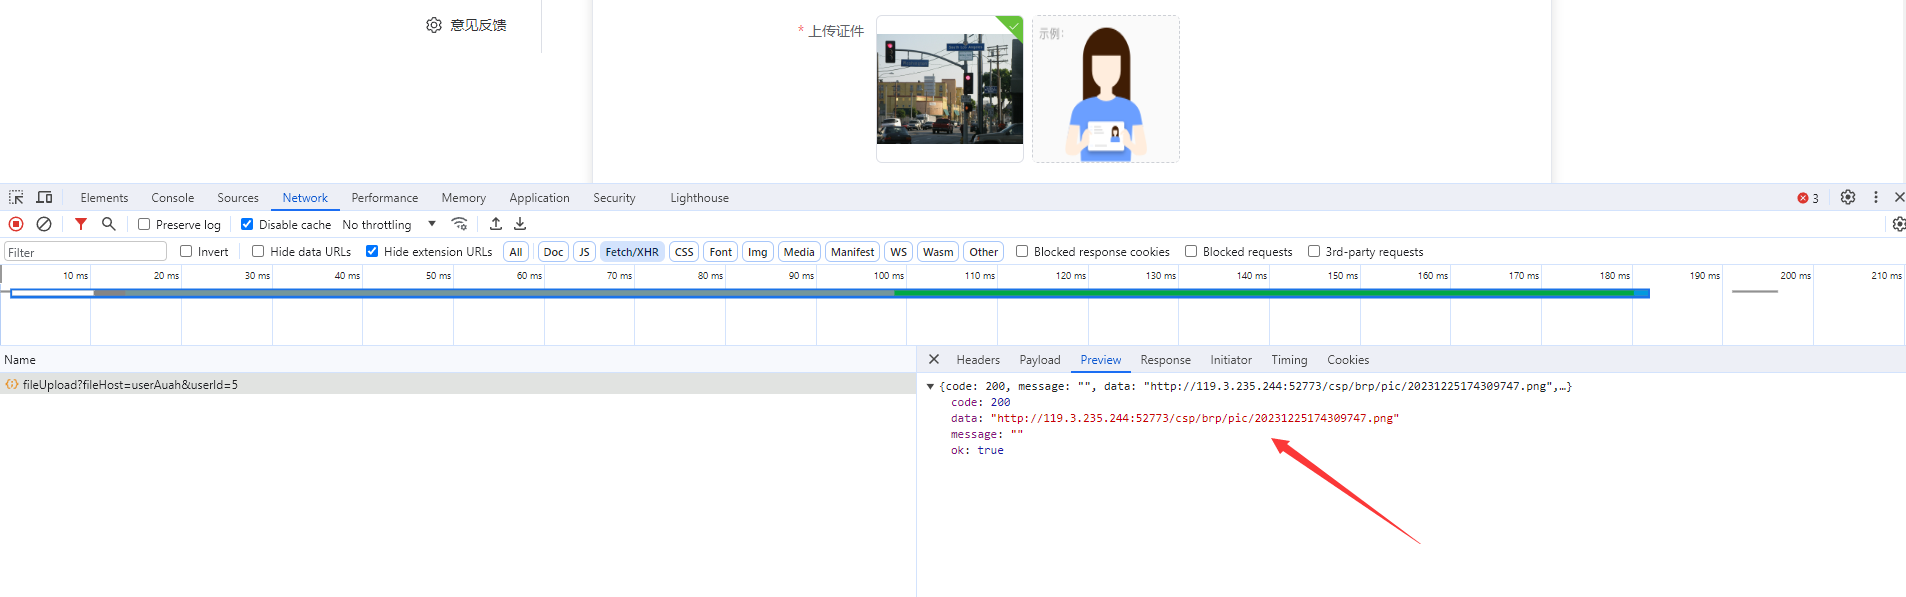
pages\user\certification\index.vue中使用el-upload控件
- :action=“
/api/oss/file/fileUpload?fileHost=userAuah&userId=${userInfo.id}” 该属性表示选择图片后上传的后端服务器地址。
<el-uploadref="upload"list-type="picture-card":limit="1":on-exceed="exceedhandler":on-success="successhandler":on-preview="handlePictureCardPreview":on-remove="handleRemove":action="`/api/oss/file/fileUpload?fileHost=userAuah&userId=${userInfo.id}`"><imgstyle="width: 100%; height: 100%"src="@\assets\images\auth_example.png"alt=""/></el-upload>
- 编写ts方法
exceedhandler- 超出数量的钩子successhandler- 图品上传成功的钩子handlePictureCardPreview- 照片墙预览的钩子handleRemove- 删除图片的钩子
注:预览图片的地址为后端上传成功后返回的地址。
const exceedhandler = () => {ElMessage({type: "error",message: "图片只能上传一张图片",});
};
const successhandler = (response: any) => {form.value.clearValidate("certificatesUrl");params.certificatesUrl = response.data;console.log(params.certificatesUrl);
};
const handlePictureCardPreview = () => {//触发预览的钩子的时候,对话框显示dialogVisible.value = true;
};
const handleRemove = () => {params.certificatesUrl = "";
};
就诊人管理

- 就诊人管理主要是针对患者的增删改查功能。
级联选择器

- 使用
el-cascader级联选择器
<el-cascader :props="props" v-model="userParams.addressSelected" style="width: 100%" />
- 在
ts中引入级联选择器配置
lazyLoad(node: any, resolve: any)- 加载级联选择器数据方法resolve(showData);- 注入组件需要展示的数据id: item.value,- 每次回传id查询下一级的选择列表。
import type { CascaderProps } from "element-plus";const props: CascaderProps = {lazy: true,async lazyLoad(node: any, resolve: any) {let result: any = await reqCity(node.data.id || "86");let showData = result.data.map((item: any) => {return {id: item.value,label: item.name,value: item.value,leaf: !item.hasChildren,};});resolve(showData);},
};
路由鉴权与Nprogress加载进度条
- 路由鉴权:就是路由能不能被访问到权限设置->全局守卫完成
let whiteList- 存储用户未登录可以访问路由得路径router.beforeEach((to, from, next)- 前置守卫Nprogress.start();访问路由组件的之前,进度条开始动document.title = 大姚挂号平台-${to.meta.title};动态设置网页左上角的标题let token = userStore.userInfo.token;判断是否有tokenrouter.afterEach((to, from)- 后置路由Nprogress.done();- 访问路由组件成功,进度条消息
import router from "./router";
import Nprogress from 'nprogress';
import useUserStore from '@/store/modules/user';
import pinia from '@/store'
let userStore = useUserStore(pinia);
import "nprogress/nprogress.css"
let whiteList = ["/home", '/hospital/register', '/hospital/detail', '/hospital/notice', '/hospital/close', '/hospital/search'];
router.beforeEach((to, from, next) => {Nprogress.start();document.title = `大姚挂号平台-${to.meta.title}`;let token = userStore.userInfo.token;if (token) {next();} else {if (whiteList.includes(to.path)) {next();} else {userStore.visiable = true;next({ path: '/home', query: { redirect: to.fullPath } })}}});router.afterEach((to, from) => {Nprogress.done();
})
后端
框架图
注:后端架构在《浅谈一下个人基于IRIS后端业务开发框架的理解》此博文中详细阐述,所以不再赘述。

创建表
业务表
- 用户表 -
BRP.BS.Account - 预约表 -
BRP.BS.BookingSchedule - 医生表 -
BRP.BS.Doctor - 挂号表 -
BRP.BS.Doctor - 就诊人表 -
BRP.BS.Patient
字段表
- 区域表 -
BRP.CT.Region - 订单状态表 -
BRP.CT.OrderStatus - 医院级别表 -
BRP.CT.Level - 医院表 -
BRP.CT.Hospital - 科室表 -
BRP.CT.Department - 城市表 -
BRP.CT.City - 证件类型表 -
BRP.CT.CertificatesType
配置表
- 配置表 -
BRP.CT.Config
所有表的关键字和父类如下:
%JSON.Adaptor- 用于导入导出json数据BRP.COM.Map-ORM映射类
Class BRP.CT.Hospital Extends (%Persistent, %JSON.Adaptor, BRP.COM.Map) [ ClassType = persistent, Inheritance = left, ProcedureBlock, SqlRowIdName = id ]
注:字段就不一一列举了,可下源代码自行导入。
数据初始化 - BRP.COM.Init
- 所有表创建完后进行初始化数据。
- 将文件放入数据文件指定目录。
- 执行方法
w ##class(BRP.COM.Init).InitRegion("/brp/")即可。
Class BRP.COM.Init Extends %RegisteredObject
{/// w ##class(BRP.COM.Init).InitRegion("/brp/")
ClassMethod Init(path)
{tsd ..InitRegion(path _ "region.txt")d ..InitLevel(path _ "level.txt")d ..InitHospital(path _ "hospital.txt")d ..InitDepartment(path _ "department.txt")d ..InitBookingSchedule()d ..InitDocotr(path _ "doctor.txt")d ..InitPatient(path _ "patient.txt")d ..InitOrderStatus()d ..InitCertificatesType(path _ "certificatesType.txt")d ..InitCity(path _ "city.txt")d ..InitCitySecond()b ;alltcq $$$OK
}/// 初始化区域数据
/// w ##class(BRP.COM.Init).InitRegion("/brp/region.txt")
ClassMethod InitRegion(path)
{tss json = {}.%FromJSONFile(path)s iter = json.%GetIterator()while (iter.%GetNext(.key, .val)){s id = ##class(Util.GenerateClassUtils).SaveJson2Entity(val, "BRP.CT.Region")w "生成id:" _ id,!}b ;22tcq $$$OK
}
...
}
REST接口 - BRP.COM.REST.Api
CONTENTTYPE- 接口返回数据格式CHARSET- 编码类型REST接口有GET,POST,PUT,DELETE请求方法。$g(%request.Data("districtCode", 1))- 为路径中的Query参数。s content = %request.Content- 为获取POST请求参数内容。
Class BRP.COM.REST.Api Extends %CSP.REST
{Parameter CONTENTTYPE = "application/json";Parameter CHARSET = "utf-8";/// http://119.3.235.244:52773/api/hosp/hospital/1/10
/// w ##class(BRP.COM.REST.Api).QueryHospitalByPage(1,10)
ClassMethod QueryHospitalByPage(page, limit) As %Status
{s pDistrictCode = $g(%request.Data("districtCode", 1))s pHostype = $g(%request.Data("hostype",1 )) s json = ##class(BRP.COM.SafeRun).Execute("BRP.API.Hospital", "Query", pHostype, pDistrictCode)s json = ##class(BRP.COM.SafeRun).ReturnResultPage(json, page, limit)w jsonq $$$OK
}/// http://119.3.235.244:52773/api/cmn/dict/findByDictCode/HosType
/// w ##class(BRP.COM.REST.Api).QueryRegion("HosType")
ClassMethod QueryRegion(dictCode) As %Status
{if (dictCode = "HosType") {s json = ##class(BRP.COM.SafeRun).Execute("BRP.API.Level", "Query")} elseif (dictCode = "CertificatesType") {s json = ##class(BRP.COM.SafeRun).Execute("BRP.API.CertificatesType", "Query")} else {s json = ##class(BRP.COM.SafeRun).Execute("BRP.API.Region", "Query")}w jsonq $$$OK
}.../// Url顺序区别参数多的放到下方,否则执行不到对应的路径
XData UrlMap
{
<Routes>
<Route Url="/cmn/dict/findByDictCode/:dictCode" Method="GET" Call="QueryRegion"/>
<Route Url="/hosp/hospital/department/:hoscode" Method="GET" Call="QueryDepartment"/>
<Route Url="/hosp/hospital/getSchedule/:scheduleId" Method="GET" Call="GetDoctorDataById"/>
<Route Url="/hosp/hospital/findByHosname/:hosname" Method="GET" Call="QueryHospital"/>
<Route Url="/hosp/hospital/:page/:limit" Method="GET" Call="QueryHospitalByPage"/>
<Route Url="/hosp/hospital/:hoscode" Method="GET" Call="GetHospitalData"/>
<Route Url="/sms/send/:phone" Method="GET" Call="GetCaptcha"/>
<Route Url="/user/login" Method="POST" Call="Login"/>
<Route Url="/hosp/hospital/auth/getBookingScheduleRule/:page/:limit/:hoscode/:depcode" Method="GET" Call="QueryBookingSchedule"/>
<Route Url="/hosp/hospital/auth/findScheduleList/:hoscode/:depcode/:workDate" Method="GET" Call="QueryDoctor"/>
<Route Url="/user/patient/auth/findAll" Method="GET" Call="QueryPatient"/>
<Route Url="/order/orderInfo/auth/submitOrder/:hoscode/:scheduleId/:patientId" Method="POST" Call="SubmitOrder"/>
<Route Url="/order/orderInfo/auth/getOrderInfo/:id" Method="GET" Call="GetOrderDataById"/>
<Route Url="/order/orderInfo/auth/cancelOrder/:id" Method="GET" Call="CancelOrder"/>
<Route Url="/order/orderInfo/auth/:page/:limit" Method="GET" Call="QueryOrder"/>
<Route Url="/order/orderInfo/auth/getStatusList" Method="GET" Call="QueryOrderStatus"/>
<Route Url="/user/patient/auth/save" Method="POST" Call="SavePatient"/>
<Route Url="/user/patient/auth/update" Method="PUT" Call="SavePatient"/>
<Route Url="/user/patient/auth/remove/:id" Method="DELETE" Call="DeletePatient"/>
<Route Url="/cmn/dict/findByParentId/:parentId" Method="GET" Call="QueryCity"/>
<Route Url="/user/auth/getUserInfo" Method="GET" Call="GetUserInfo"/>
<Route Url="/oss/file/fileUpload" Method="POST" Call="UploadFile"/>
<Route Url="/user/auth/userAuah" Method="POST" Call="UserAuah"/></Routes>
}}
统一入口,统一错误处理 - BRP.COM.SafeRun
注:统一入口,统一错误处理在《通用的异常处理程序机制与处理返回值方案》此博文中详细阐述,所以不再赘述。
Class BRP.COM.SafeRun Extends (%RegisteredObject, BRP.COM.Base)
{/// desc:统一入口网关,方便统一操作日志,错误等。
ClassMethod Gateway()
{s pClassName = $g(%request.Data("ClassName", 1))s pMethodName = $g(%request.Data("MethodName",1 )) s params = ..GetMethodParams(pClassName, pMethodName)	s ^yx("Gateway") = $lb(pClassName,pMethodName,params)q ..Execute(pClassName, pMethodName, params)
}/// desc:所有程序中错误军抛出异常,统一处理
/// w ##class(IMP.Common.SafeRun).Execute("IMP.Perms.Biz", "QueryRole")
ClassMethod Execute(pClassName, pMethodName, pParams...)
{s $ecode = ""try{d ..GetInfo()#; 判断方法是否有参数,没有参数不用串pParams,否则报错。if (##class(BRP.UTIL.Class).GetParamsList(pClassName, pMethodName) = ""){s result = $classmethod(pClassName, pMethodName)} else {s result = $classmethod(pClassName, pMethodName, pParams...)}} catch e {locktro:($tl > 0)if (e.%IsA("BRP.COM.Exception.SessionException")){ret ..Session2Json()} s data = e.Datas:$lv(data) data = $$Format^%qcr(data, 1)s msg = e.Name _ e.Location _ " *" _ data _ $zes ret = $$LOG^%ETN(msg)#; SQL异常if (e.%IsA("BRP.COM.Exception.SqlException")){s msg = e.AsSystemError()ret ..Failure2Json(msg)} elseif (e.%IsA("%Exception.SystemException")){	// 系统异常ret ..Failure2Json($ze )} elseif (e.%IsA("BRP.COM.Exception.ErrorException")){		// 通用错误异常ret ..Failure2Json(msg)} elseif (e.%IsA("%Exception.StatusException")){	// Status错误异常s msg = e.DisplayString()ret ..Failure2Json(msg)} elseif (e.%IsA("BRP.COM.Exception.WarningException")){	// 警告信息s msg = e.AsSystemError()ret ..Warning2Json(msg)} else {	// 其他兜底异常if (msg = ""){s msg = $ze} ret ..Failure2Json(msg)}}ret ..ReturnResult(result)
}ClassMethod HandleToken(token)
{throw:(token = "") $$$WarningException("token异常:", "请先登录")s ret = ##class(Util.Jwt).VerifyJwt(token)q ret
}}ORM映射的使用
注:ORM映射的使用在《只需要改造一下实体类,以后再也不用写SQL了》此博文中详细阐述,所以不再赘述。
以查询区域Rest接口演示后端框架与ORM的使用
- 在
BRP.BL.QUERY.Region中编写查询区域数组的方法。
BRP.CT.Region- 为区域实体表。Query方法为封装的ORM映射返回的列表方法可直接返回数组。
Class BRP.BL.QUERY.Region Extends %RegisteredObject
{ClassMethod Query()
{q ##class(BRP.CT.Region).Query()
}}
BRP>zw ##class(BRP.BL.QUERY.Region).Query()
[{"id":17,"createTime":"2020-06-23 15:48:57","dictCode":null,"hasChildren":false,"isDeleted":0,"name":"东城区","param":null,"parentId":110100,"updateTime":"2020-06-23 15:52:57","value":"110101"},{"id":18,"createTime":"2020-06-23 15:48:57","dictCode":null,"hasChildren":false,"isDeleted":0,"name":"西城区","param":null,"parentId":110100,"updateTime":"2020-06-23 15:52:57","value":"110102"},{"id":19,"createTime":"2020-06-23 15:48:57","dictCode":null,"hasChildren":false,"isDeleted":0,"name":"朝阳区","param":null,"parentId":110100,"updateTime":"2020-06-23 15:52:57","value":"110105"},{"id":20,"createTime":"2020-06-23 15:48:57","dictCode":null,"hasChildren":false,"isDeleted":0,"name":"丰台区","param":null,"parentId":110100,"updateTime":"2020-06-23 15:52:57","value":"110106"},{"id":21,"createTime":"2020-06-23 15:48:57","dictCode":null,"hasChildren":false,"isDeleted":0,"name":"石景山区","param":null,"parentId":110100,"updateTime":"2020-06-23 15:52:57","value":"110107"},{"id":22,"createTime":"2020-06-23 15:48:57","dictCode":null,"hasChildren":false,"isDeleted":0,"name":"海淀区","param":null,"parentId":110100,"updateTime":"2020-06-23 15:52:57","value":"110108"},{"id":23,"createTime":"2020-06-23 15:48:57","dictCode":null,"hasChildren":false,"isDeleted":0,"name":"门头沟区","param":null,"parentId":110100,"updateTime":"2020-06-23 15:52:57","value":"110109"},{"id":24,"createTime":"2020-06-23 15:48:57","dictCode":null,"hasChildren":false,"isDeleted":0,"name":"房山区","param":null,"parentId":110100,"updateTime":"2020-06-23 15:52:57","value":"110111"},{"id":25,"createTime":"2020-06-23 15:48:57","dictCode":null,"hasChildren":false,"isDeleted":0,"name":"通州区","param":null,"parentId":110100,"updateTime":"2020-06-23 15:52:57","value":"110112"},{"id":26,"createTime":"2020-06-23 15:48:57","dictCode":null,"hasChildren":false,"isDeleted":0,"name":"顺义区","param":null,"parentId":110100,"updateTime":"2020-06-23 15:52:57","value":"110113"},{"id":27,"createTime":"2020-06-23 15:48:57","dictCode":null,"hasChildren":false,"isDeleted":0,"name":"昌平区","param":null,"parentId":110100,"updateTime":"2020-06-23 15:52:57","value":"110114"},{"id":28,"createTime":"2020-06-23 15:48:57","dictCode":null,"hasChildren":false,"isDeleted":0,"name":"大兴区","param":null,"parentId":110100,"updateTime":"2020-06-23 15:52:57","value":"110115"},{"id":29,"createTime":"2020-06-23 15:48:57","dictCode":null,"hasChildren":false,"isDeleted":0,"name":"怀柔区","param":null,"parentId":110100,"updateTime":"2020-06-23 15:52:57","value":"110116"},{"id":30,"createTime":"2020-06-23 15:48:57","dictCode":null,"hasChildren":false,"isDeleted":0,"name":"平谷区","param":null,"parentId":110100,"updateTime":"2020-06-23 15:52:57","value":"110117"},{"id":31,"createTime":"2020-06-23 15:48:57","dictCode":null,"hasChildren":false,"isDeleted":0,"name":"密云区","param":null,"parentId":110100,"updateTime":"2020-06-23 15:52:57","value":"110118"},{"id":32,"createTime":"2020-06-23 15:48:57","dictCode":null,"hasChildren":false,"isDeleted":0,"name":"延庆区","param":null,"parentId":110100,"updateTime":"2020-06-23 15:52:57","value":"110119"}] ; <DYNAMIC ARRAY>- 在
BRP.API.Region继承BRP.BL.QUERY.Region并重写Query()并返回。
##super()- 调用父同名方法
Class BRP.API.Region Extends BRP.BL.QUERY.Region
{/// zw ##class(BRP.API.Region).Query()
ClassMethod Query()
{q ##super()
}}- 使用统一入口调用接口方法如下:
s json = ##class(BRP.COM.SafeRun).Execute("BRP.API.Level", "Query")
- 在
Rest中定义方法
ClassMethod QueryRegion(dictCode) As %Status
{s json = ##class(BRP.COM.SafeRun).Execute("BRP.API.Region", "Query")w jsonq $$$OK
}
- 在
XData路由中定义路径与方法,请求方式。
XData UrlMap
{
<Routes>
<Route Url="/cmn/dict/findByDictCode/:dictCode" Method="GET" Call="QueryRegion"/>
</Routes>
}
- 在浏览器中输入接口路径
http://119.3.235.244:52773/api/cmn/dict/findByDictCode/1

JWT功能
注:JWT功能在《基于M实现的JWT解决方案》此博文中详细阐述,所以不再赘述。
- 登录成功后,生成
JWT并将JWT保存到用户表或临时Global,用于后续对比。
ClassMethod Login(phone = "", pCaptcha = "")
{s captchaData = ^BRP("Login", "GetCaptcha", phone)s captcha = $lg(captchaData, 1)throw:(captcha '= pCaptcha) $$$LoginException("验证码错误")s id = $o(^BRP.BS.AccountI("Phone", phone, ""))if id = "" {s obj = ##class(BRP.BS.Account).%New()} else {s obj = ##class(BRP.BS.Account).%OpenId(id)}	s jwt = ##class(Util.Jwt).GenerateJwt()s obj.name = phones obj.phone = phones obj.token = jwts sc = obj.%Save()throw:($$$ISERR(sc)) $$$LoginException($system.Status.GetErrorText(sc))s obj = {}s obj.name = phones obj.token = jwtq obj
}
- 前端携带登录成功后生成的
TOKEN,后端在必要的接口中进行判断。
s token = $g(%request.CgiEnvs("HTTP_TOKEN"))获取头信息中的TOKEN。HandleToken为验证token是否合法。
ClassMethod QueryDoctor(hoscode, depcode, workDate) As %Status
{s token = $g(%request.CgiEnvs("HTTP_TOKEN"))s json = ##class(BRP.COM.SafeRun).Execute("BRP.COM.SafeRun", "HandleToken", token)if ({}.%FromJSON(json).code = 0) {w json} else{s json = ##class(BRP.COM.SafeRun).Execute("BRP.API.Doctor", "Query", hoscode, depcode, workDate)w json}q $$$OK
}
- 如果未携带
TOKEN会提示请先登录。

- 携带
TOKEN并成功数据返回正常数据。
后端处理上传文件
- 后端处理上传文件功能对应前端
HTTP上传图片功能。
- 定义后端
REST上传文件接口与路由。
s binaryStream = $g(%request.MimeData("file", 1))获取前端上传的文件流
<Route Url="/oss/file/fileUpload" Method="POST" Call="UploadFile"/>
ClassMethod UploadFile() As %Status
{s binaryStream = $g(%request.MimeData("file", 1))s userId = $g(%request.Data("userId",1 )) s json = ##class(BRP.COM.SafeRun).Execute("BRP.API.Amount", "UploadFile", userId , binaryStream)w jsonq $$$OK
}
- 实现将文件保存到本地并返回可显示的
http图片路径。
ClassMethod UploadFile(userId, binaryStream)
{s del = "\"s path = "C:\InterSystems\IRISHealth2023\CSP\brp\pic"if $$$isUNIX {s del = "/"s path = "/isc/iris/csp/brp/pic"}s bool = ##class(%File).CreateDirectoryChain(path, .return)s fileName = $zstrip($zdt($now(), 8, , 3), "*E'N") _ ".png"s fullFileName = path _ del _ fileName#dim fileBinaryStream as %Stream.FileBinary = ##class(%Stream.FileBinary).%New()s sc = fileBinaryStream.LinkToFile(fullFileName)$$$ThrowOnError(sc)s sc =  fileBinaryStream.CopyFromAndSave(binaryStream)$$$ThrowOnError(sc)s obj = ##class(BRP.BS.Account).%OpenId(userId)s obj.certificatesPhysicalUrl = fullFileNames sc = obj.%Save()$$$ThrowOnError(sc)q "http://119.3.235.244:52773/csp/brp/pic/" _ fileName
}
- 前端进行预览即可。
部署
部署云
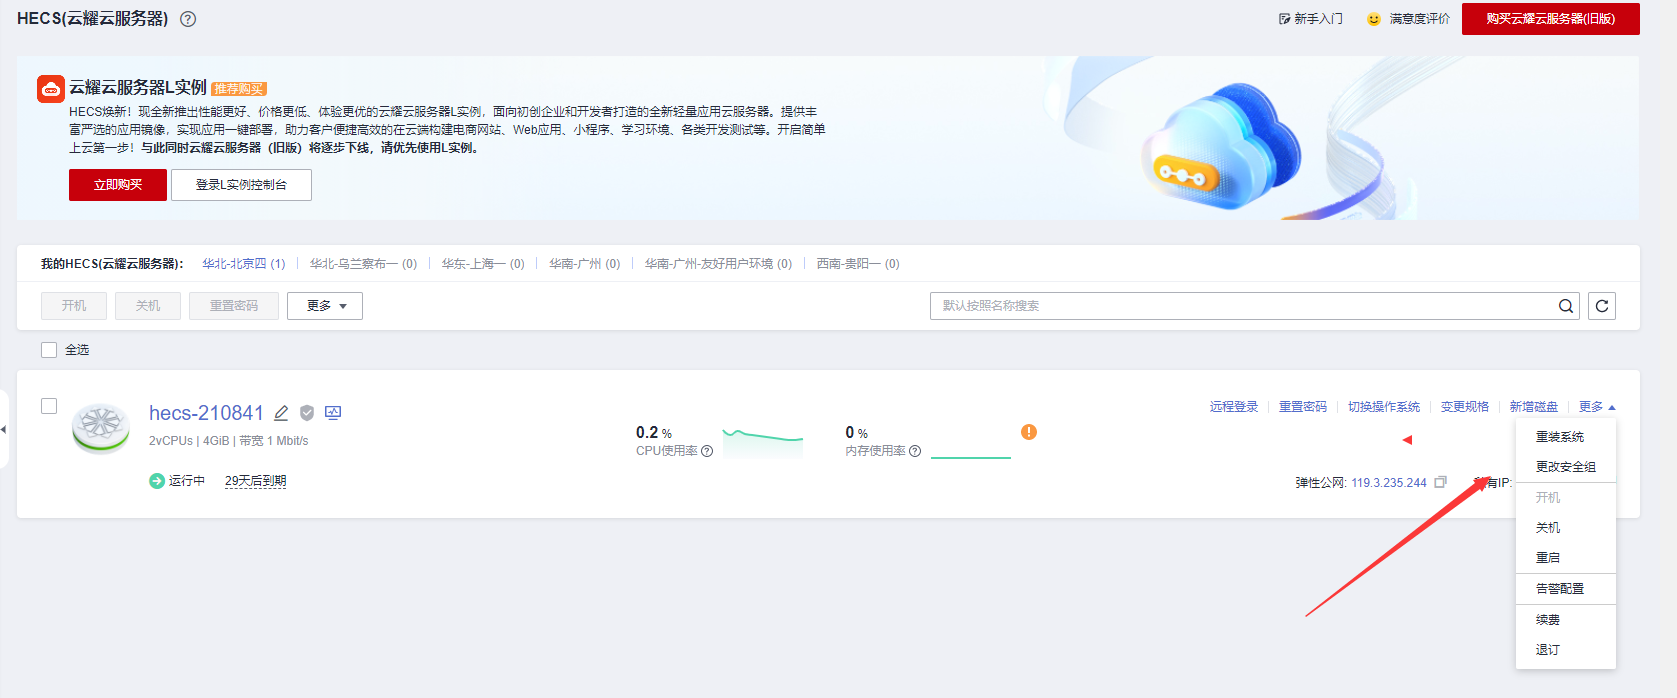
- 云服务器选择使用华为云与阿里云。
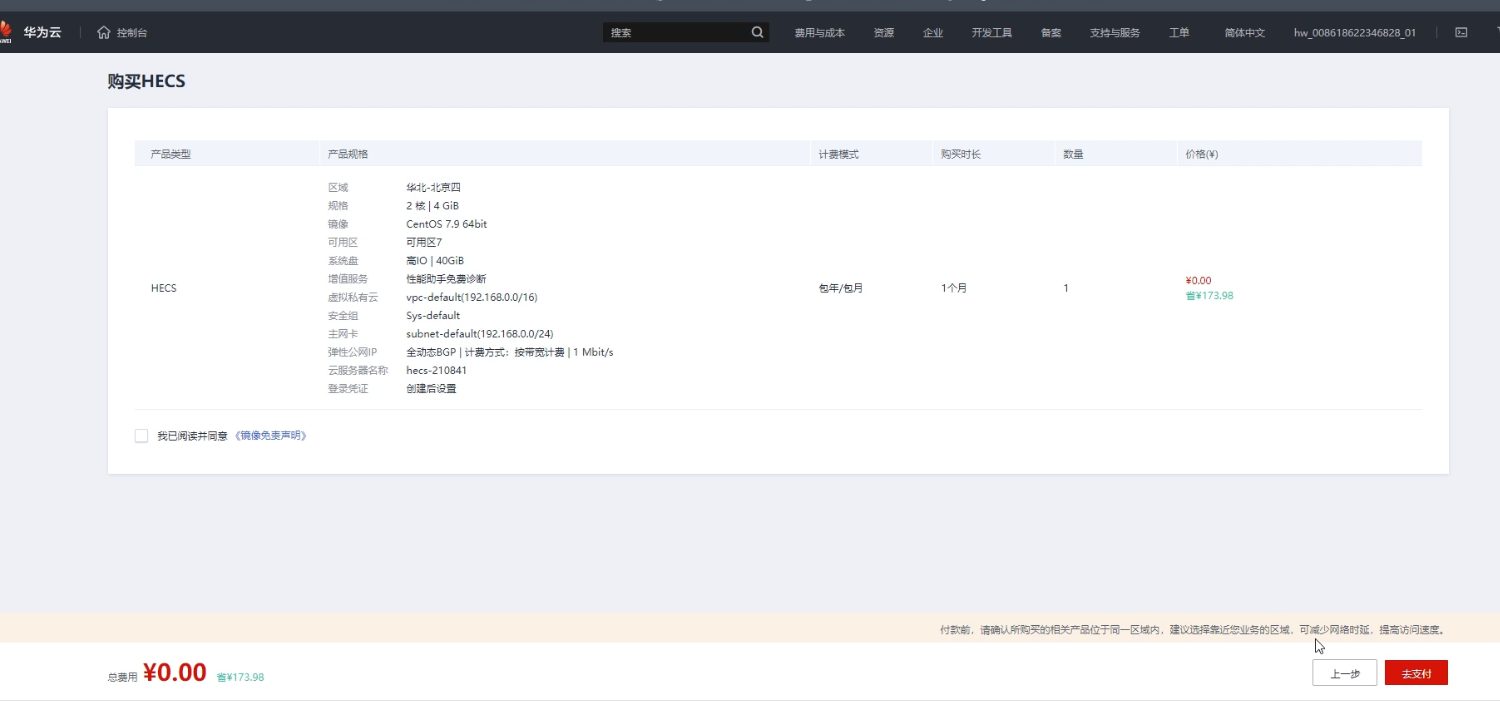
华为云创建服务器流程
- 首先注册华为云帐号,并登录
- 华为云地址:https://activity.huaweicloud.com/
- 如果提示已注册过,则选择直接开通华为云。
- 选择服务器,
2核4G,1个月免费体验,点击立即体验
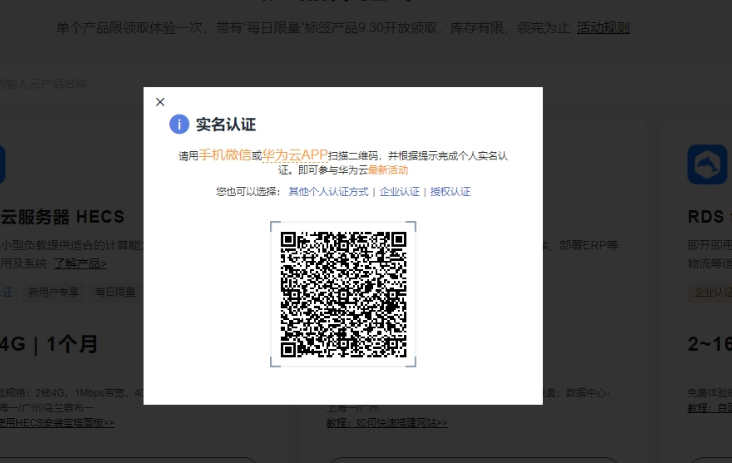
- 如果没有实名认证,先扫码实名认证
- 选择合适的服务器区域与操作系统,这里选择了
CentOS7.9,点击立即购买
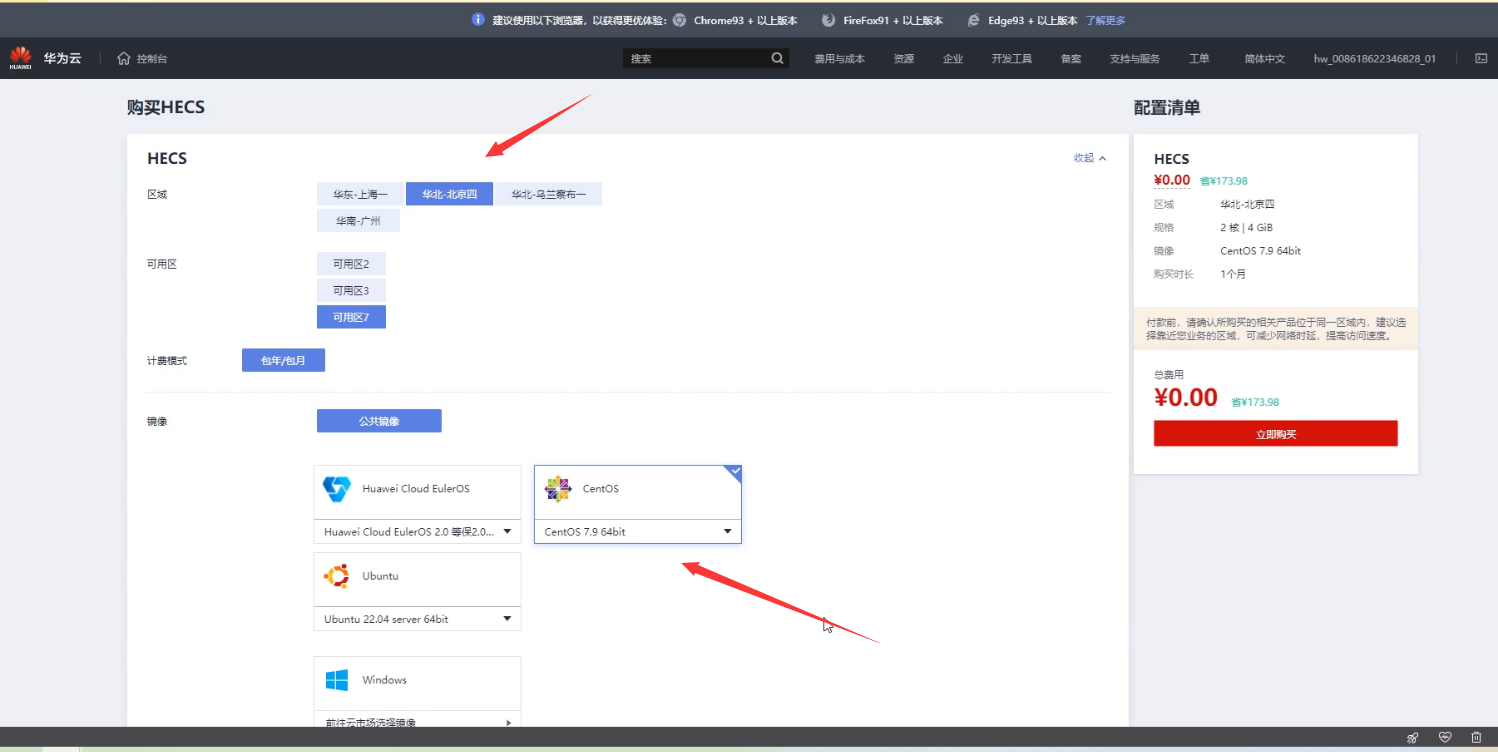
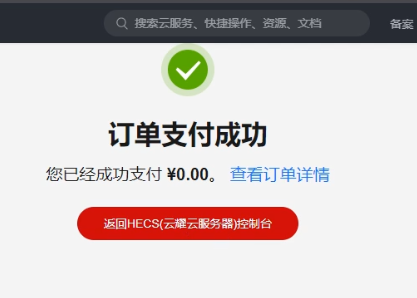
- 去支付即可。
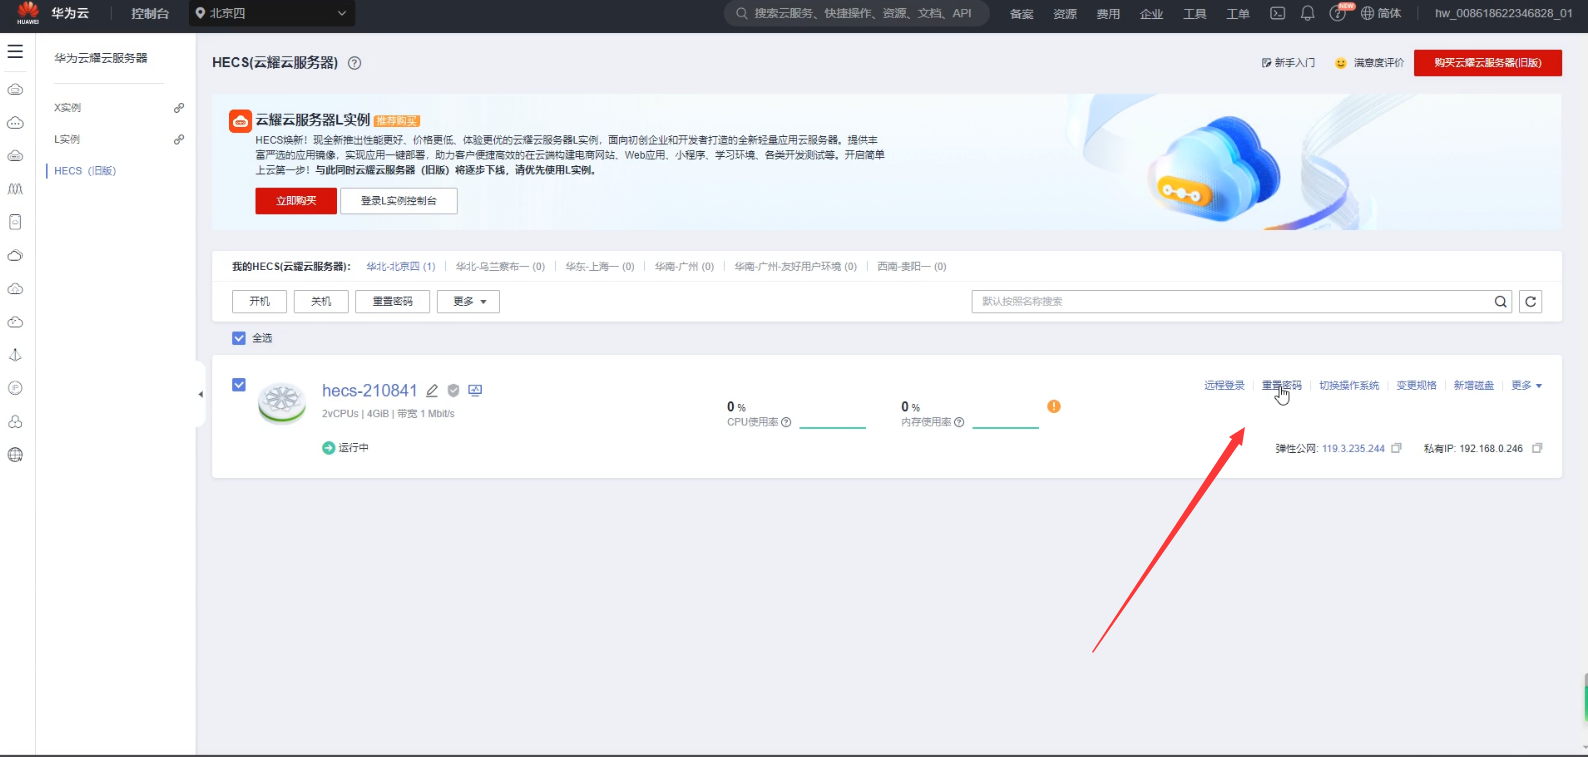
- 点击返回
HECS云服务器。
- 点击重置密码,该密码为登录云服务器密码。之后就可以通过配置
Xshell访问云服务器了。
阿里云创建服务器流程
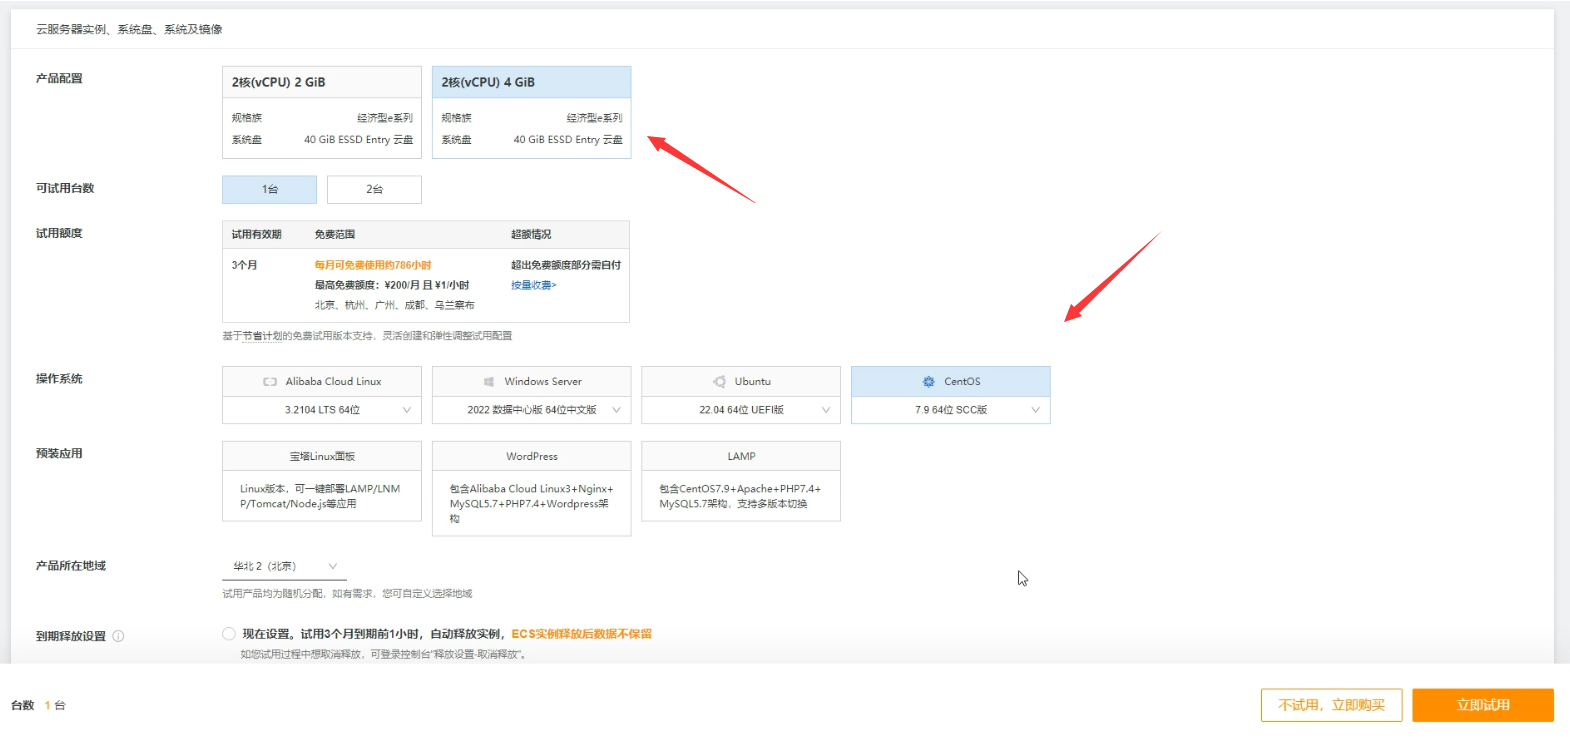
- 首先注册登录阿里云,选择云服务器。
- 地址:https://www.aliyun.com/
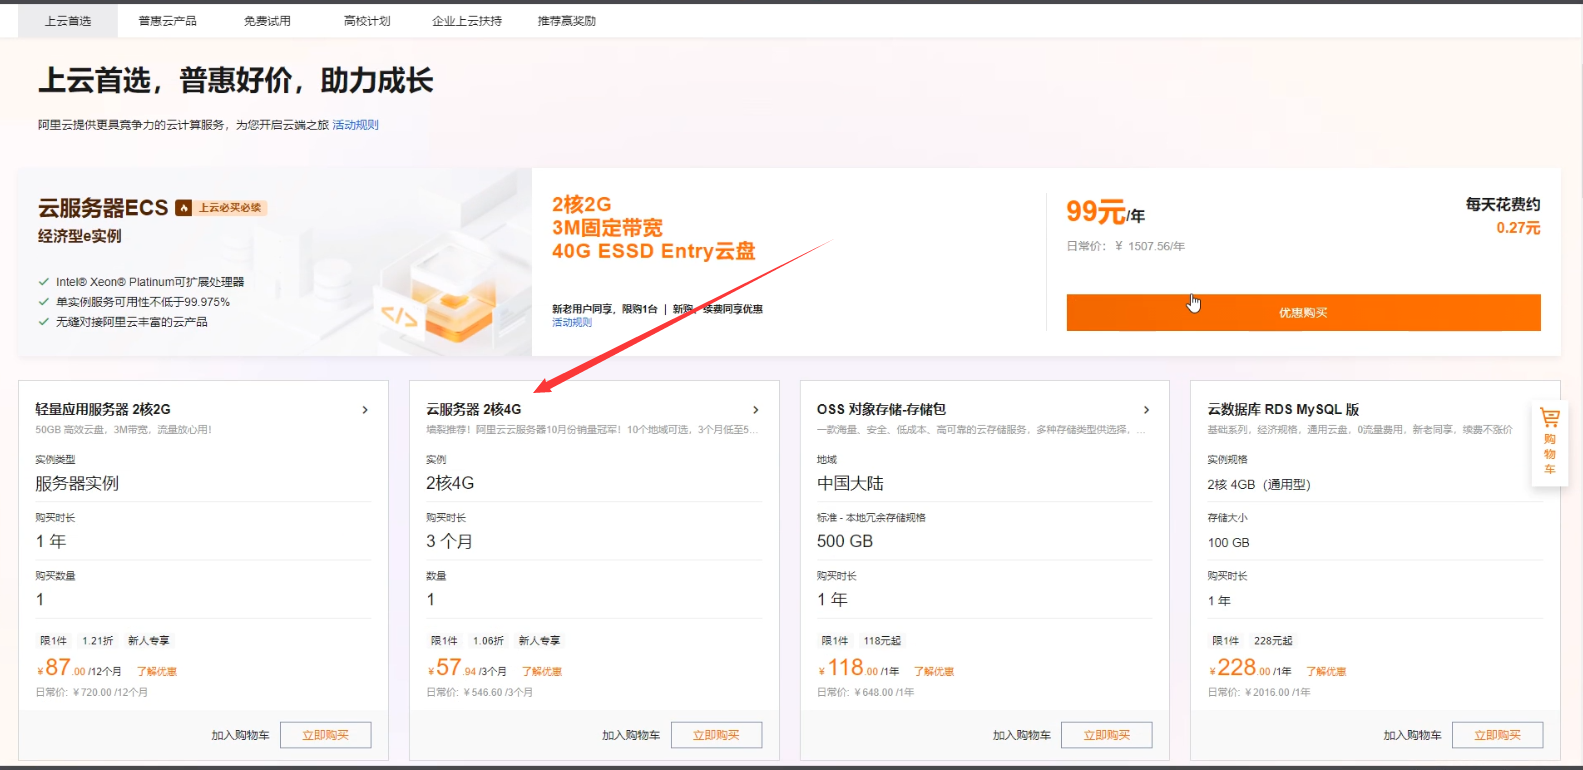
- 点击免费试用。
- 选择产品配置,与操作系统。点击立即试用。
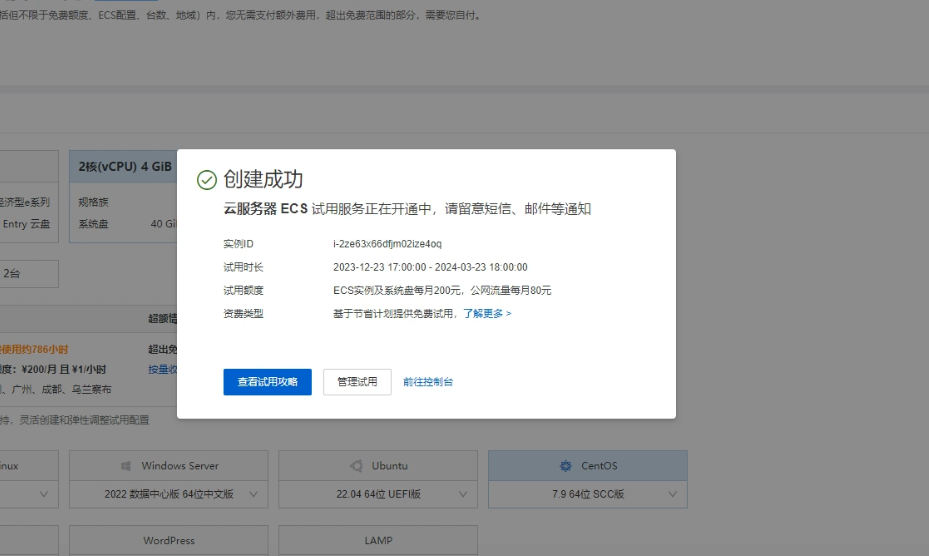
- 之后会提示创建成功。点击前往控制台。
- 创建成功,点击远程连接。
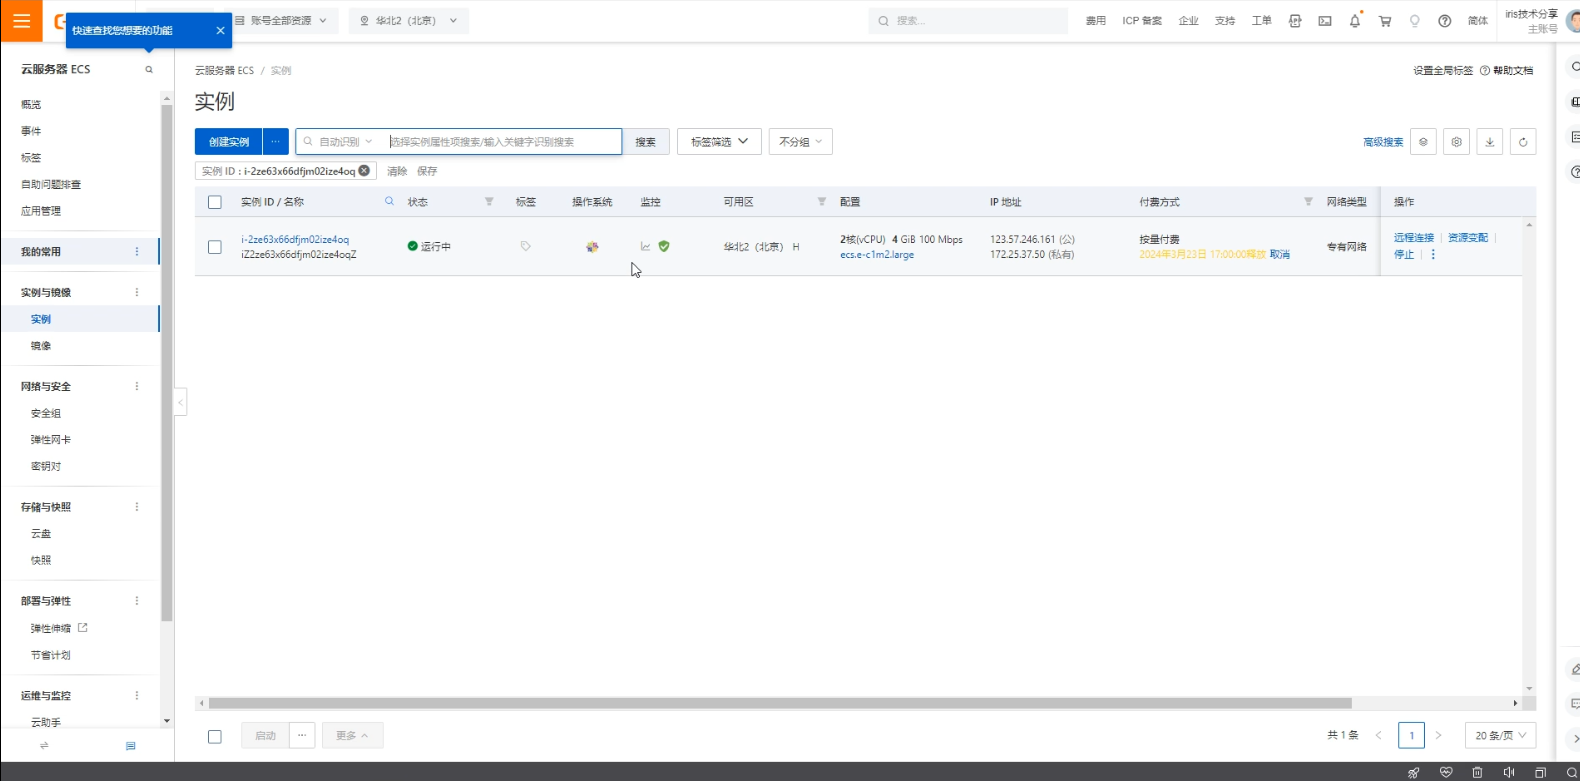
- 点击重置密码会后,就可以试用
Xshell登录了。
在安装Linux,Centos系统中安装数据库
- 在
ISC官网点击下载连接,此时会让你登录帐号,如果没有请先注册。
- 选择社区版。
3.选择IRIS,并选择操作系统与版本,最后点击下载。
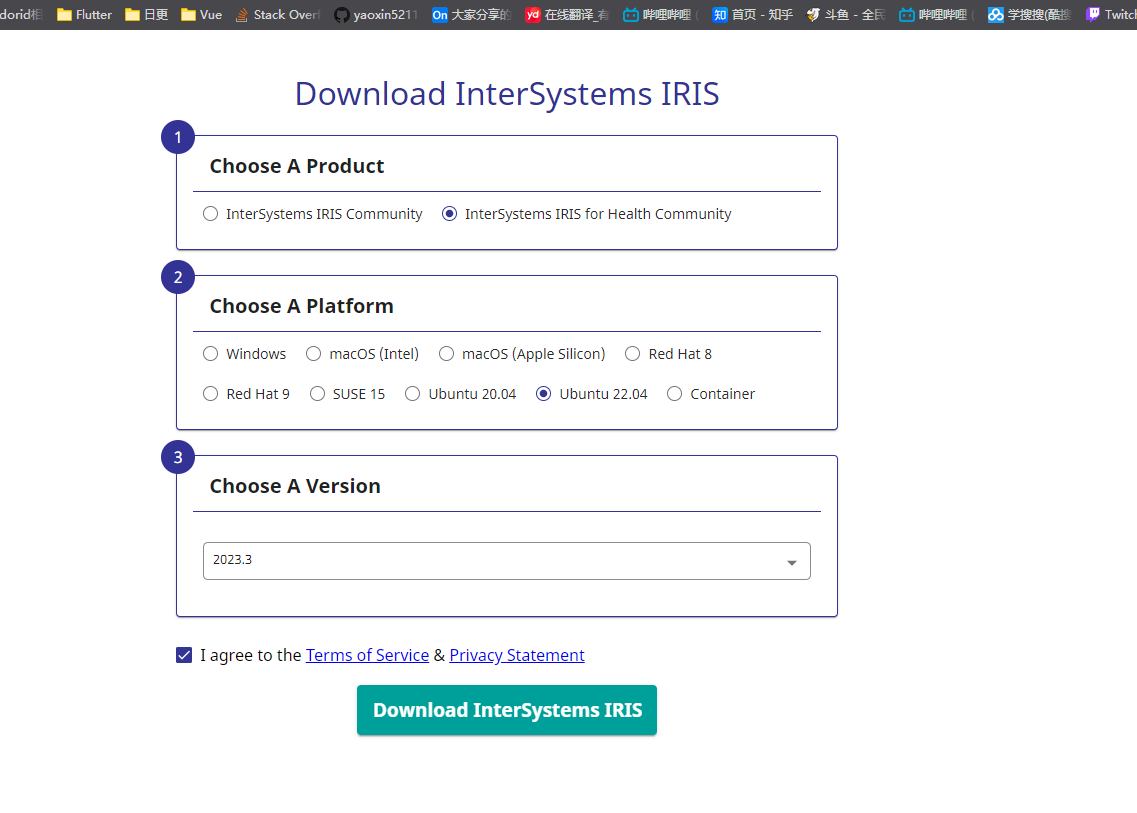
- 下载完成后将文件上传到云服务器。在跟目录新建文件夹
/isc
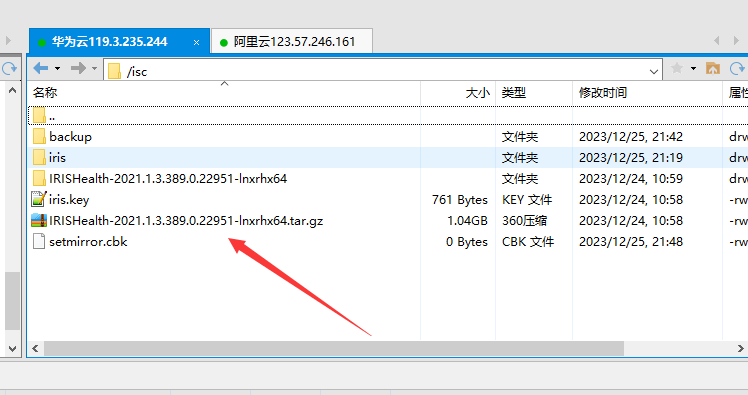
- 执行如下命令,解压安装包
cd /isc
tar -zxvf IRISHealth-2021.1.3.389.0.22951-lnxrhx64.tar.gz
cd到解压的目录
cd /isc/IRISHealth-2021.1.3.389.0.22951-lnxrhx64
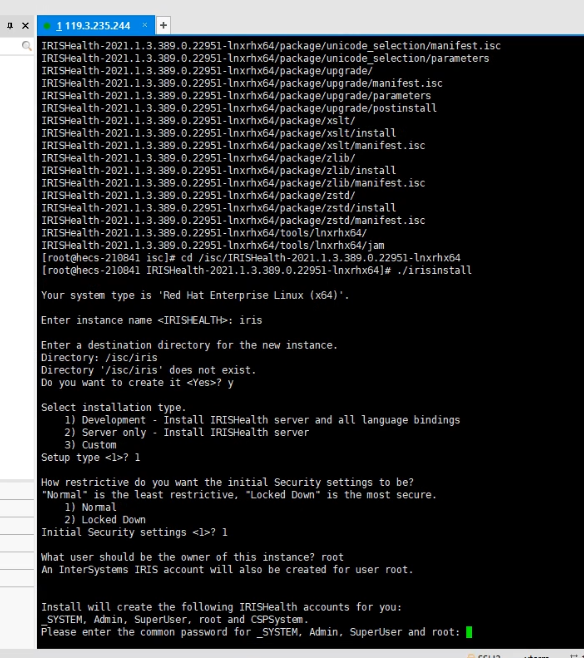
- 执行命令
./irisinstall,最后会提示安装完成即可。
- 安装完数据库后,需要修改云服务器安全组,开放端口。
- 安全组,点击配置规则
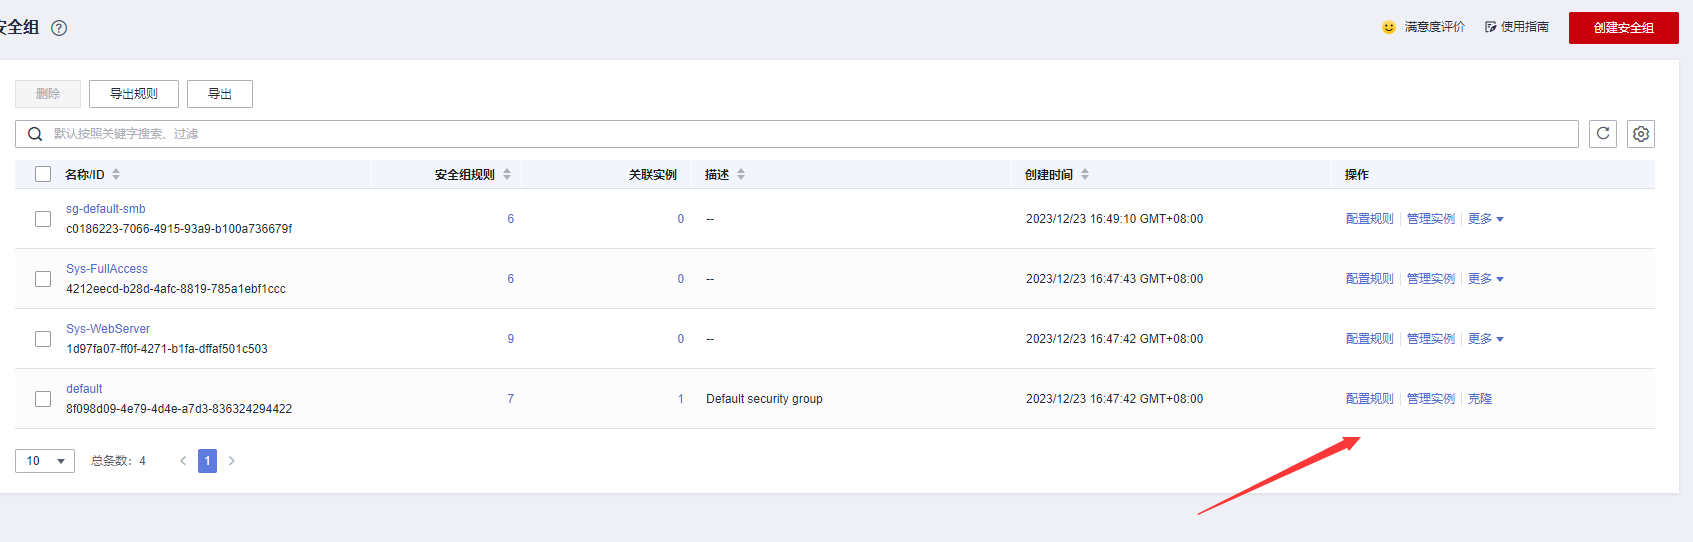
- 添加规则,添加如下端口
51773,52773,1972,80,8088,2188。
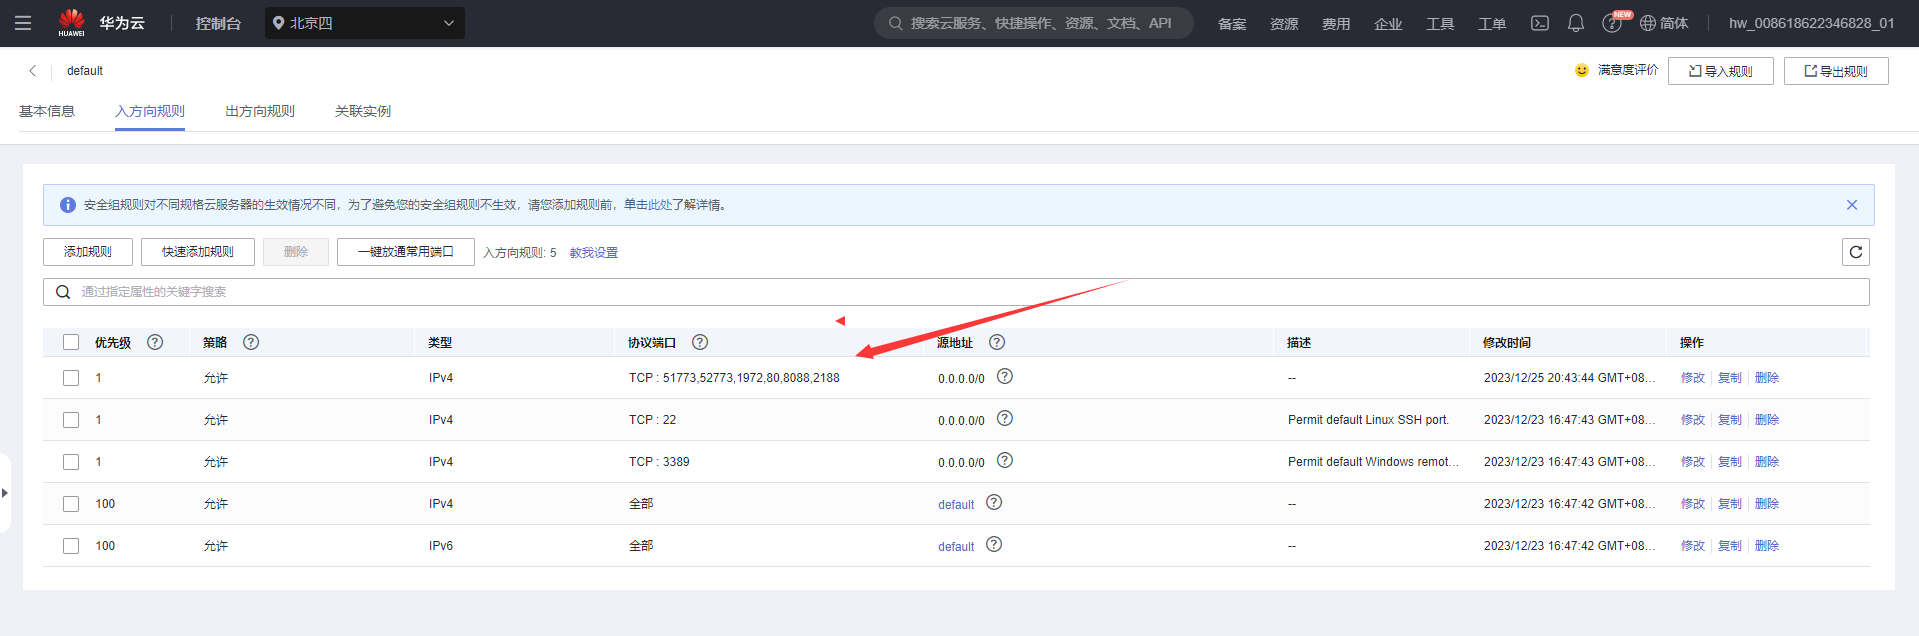
- 配置完后端口就可以通过
studio访问云库与云portal了。

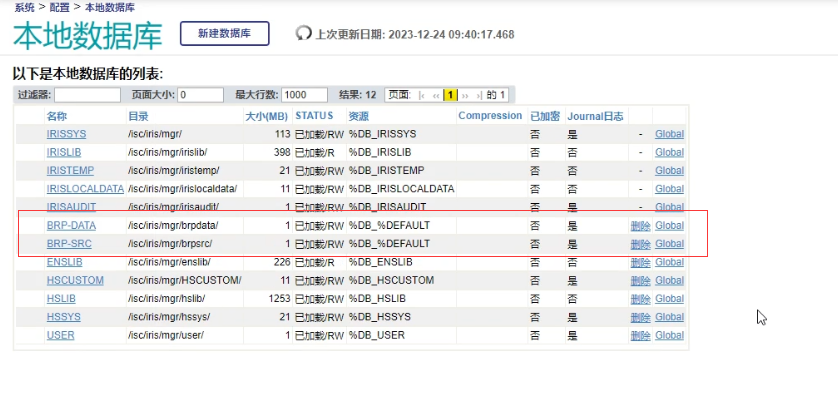
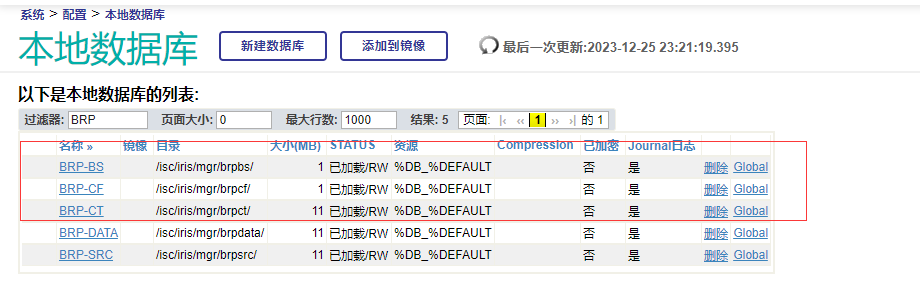
创建数据库
- 打开
portal>系统 > 配置 > 本地数据库,点击创建数据库

- 创建
BRP-DATA数据库用于保存Global与BRP-SRC数据库用于保存例程。下一步到完成即可。

- 创建完城后如下:
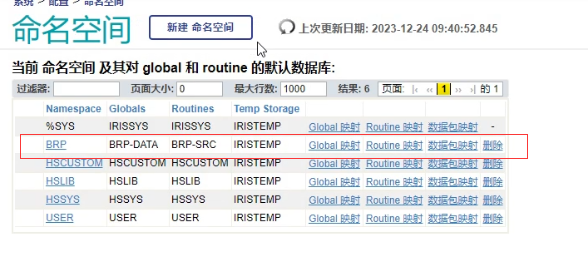
创建命名空间
- 在 系统 > 配置 > 命名空间 中点击新建命名空间。填写如下:
- 命名空间为:
BRP Global数据库为:BRP-DATARoutine数据库为:BRP-SRC
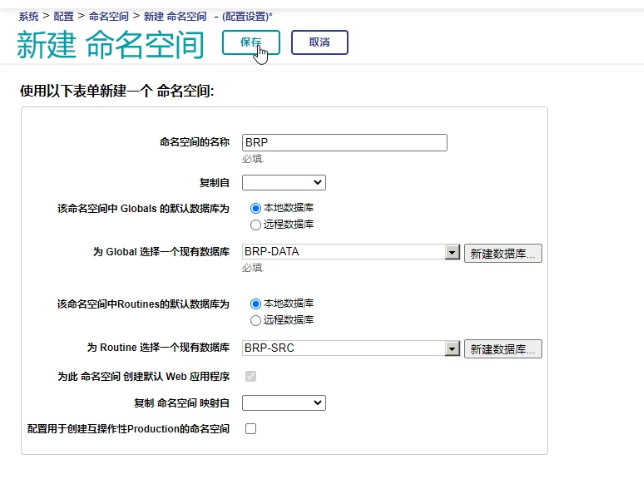
- 点击保存后,该命名空间创建成功
创建Application
- 系统 > 安全管理 >
Web应用程序,点击新建应用程序填写如下:
- 名称:
/api - 描述:预约挂号接口
- 命名空间:
BRP - 启用:
REST - 分派类:
BRP.COM.REST.Api
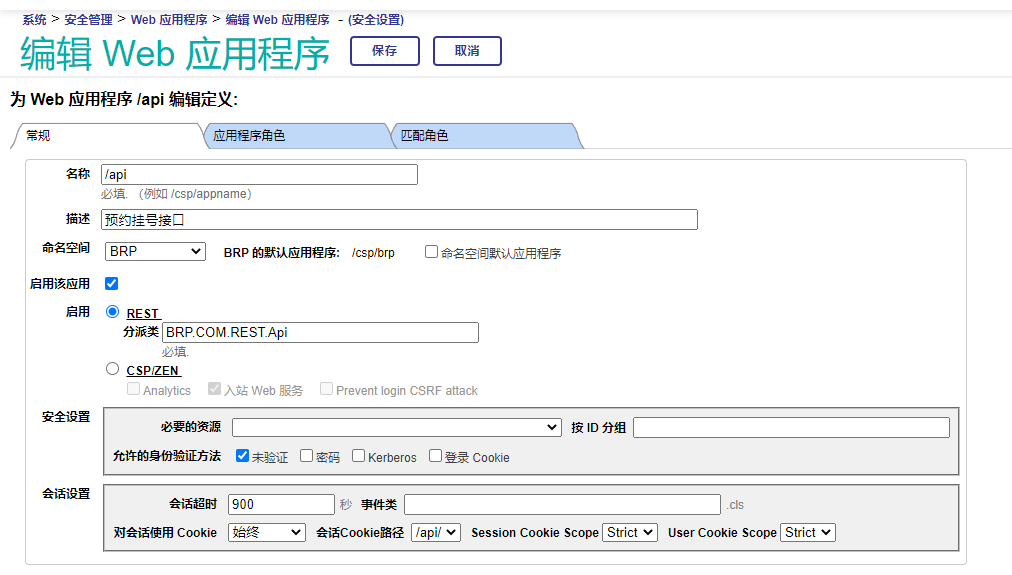
- 保存成功后
rest接口可通过http访问。
Application中的/api路径会自动追加到定义的路由路径中。

- 如果
HTTP接口返回403,是因为UnknownUser权限不足,重新分配权限。

三库分离
- 根据创建数据库操作,分别创建
BRP-CF,BRP-BS,BRP-CT数据库。
BRP-CF:配置数据库BRP-CT:字典数据库BRP-BS:业务数据库
- 在系统 > 配置 > 命名空间,选在
BRP命名空间,选择Global映射。增加如下映射。
BRP.BS*开头的Global映射到BRP-BS库中BRP.CF*开头的Global映射到BRP-BS库中BRP.CT*开头的Global映射到BRP-BS库中
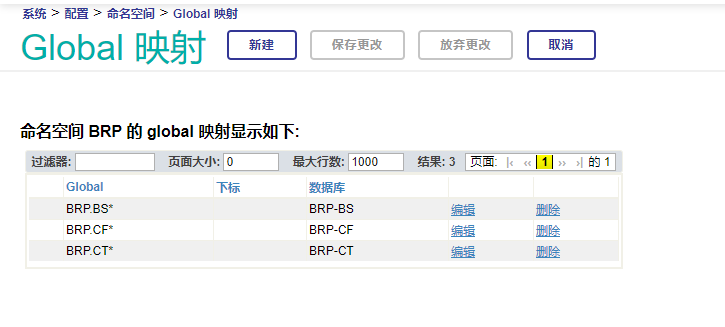
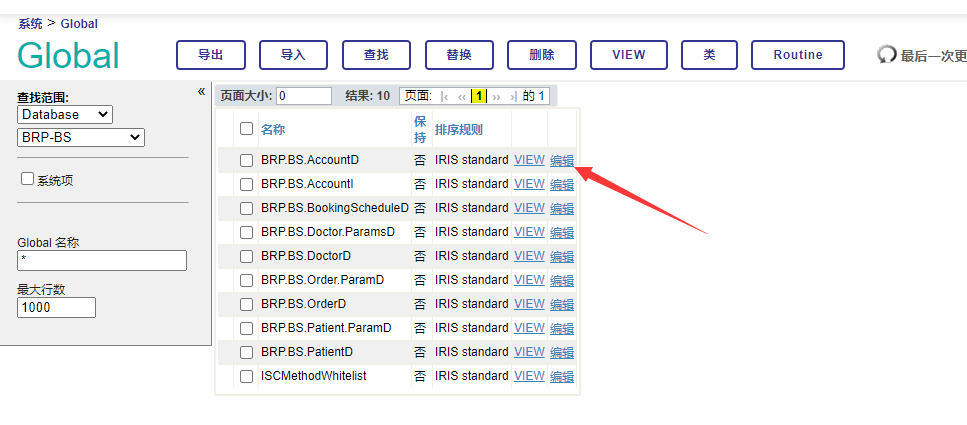
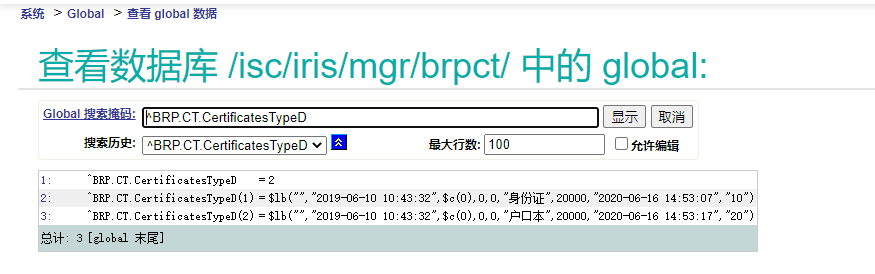
- 在系统 >
Global中,验证三库分离是否成功。
- 选择
Databse查看对应的Global数据是否值,并且Global节点是否映射正确。
创建灾备数据库
- 分别为华为云服务器与阿里云服务器启用
ISCAgent服务。
systemctl start ISCAgentsystemctl status ISCAgentsystemctl enable ISCAgent
[root@hecs-210841 ~]# systemctl start ISCAgent
[root@hecs-210841 ~]# systemctl status ISCAgent
● ISCAgent.service - InterSystems AgentLoaded: loaded (/etc/systemd/system/ISCAgent.service; enabled; vendor preset: disabled)Active: active (running) since Mon 2023-12-25 20:40:46 CST; 13h agoMain PID: 18214 (ISCAgent)CGroup: /system.slice/ISCAgent.service├─18214 /usr/local/etc/irissys/ISCAgent├─18215 /usr/local/etc/irissys/ISCAgent├─20695 /usr/local/etc/irissys/ISCAgent└─20697 /usr/local/etc/irissys/ISCAgent
[root@hecs-210841 ~]# systemctl enable ISCAgent- 启用后,进入
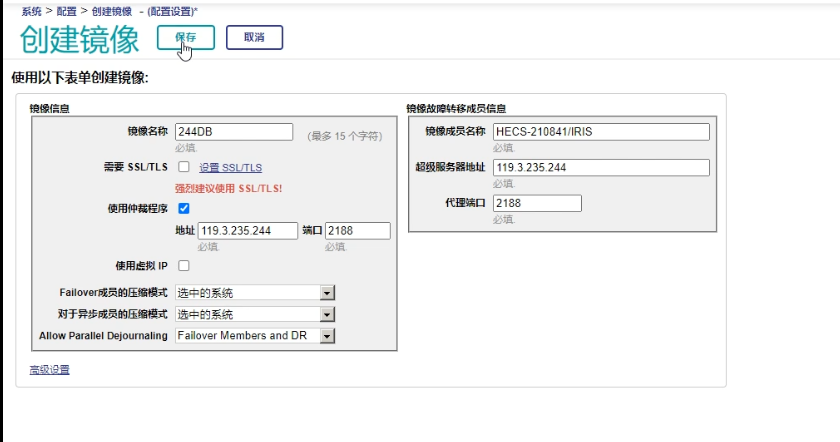
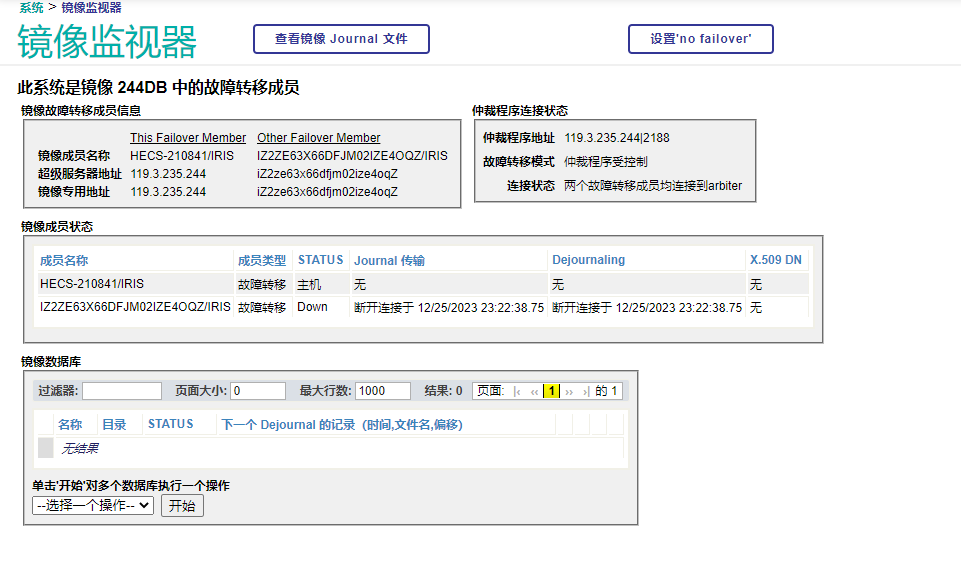
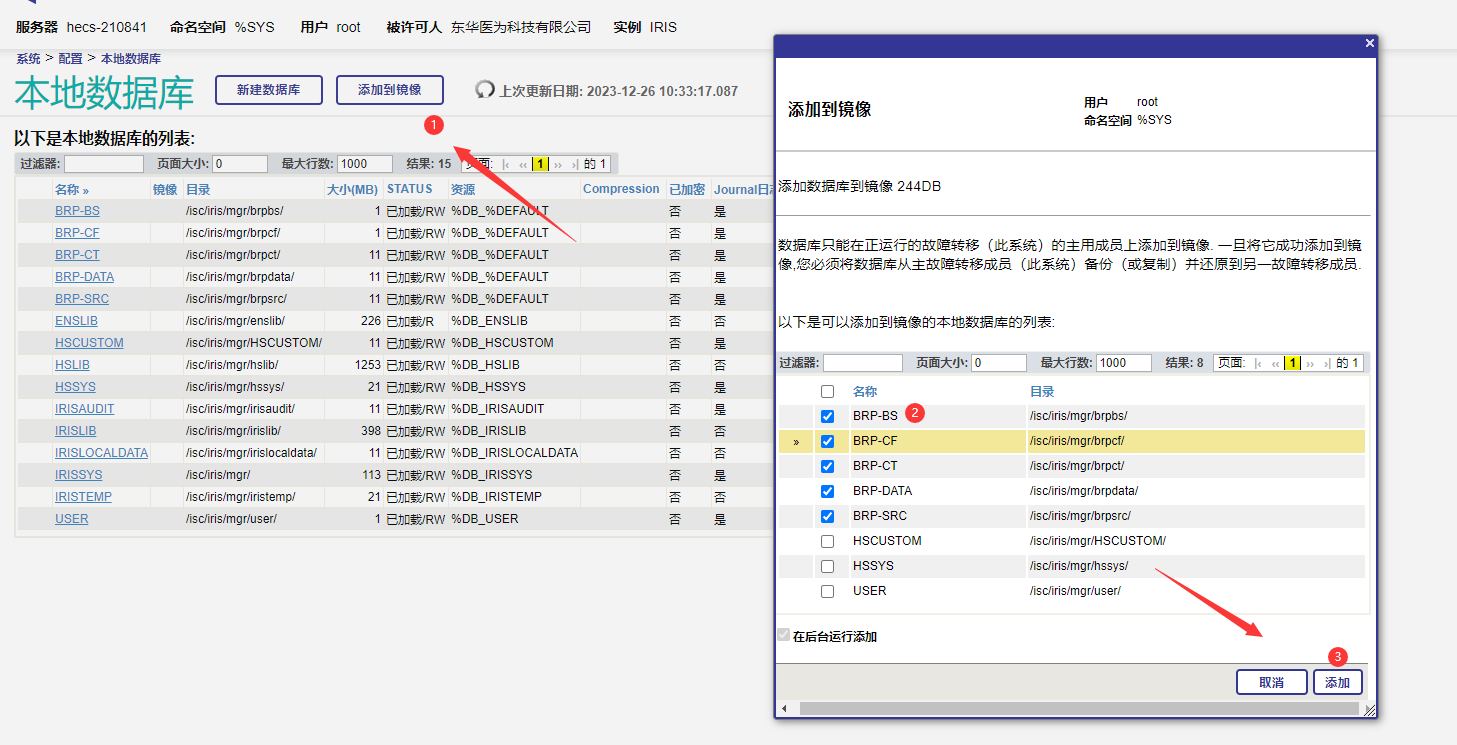
portal,配置 - 镜像设置- 创建镜像才菜单可以使用了,在DB华为云上创建镜像。
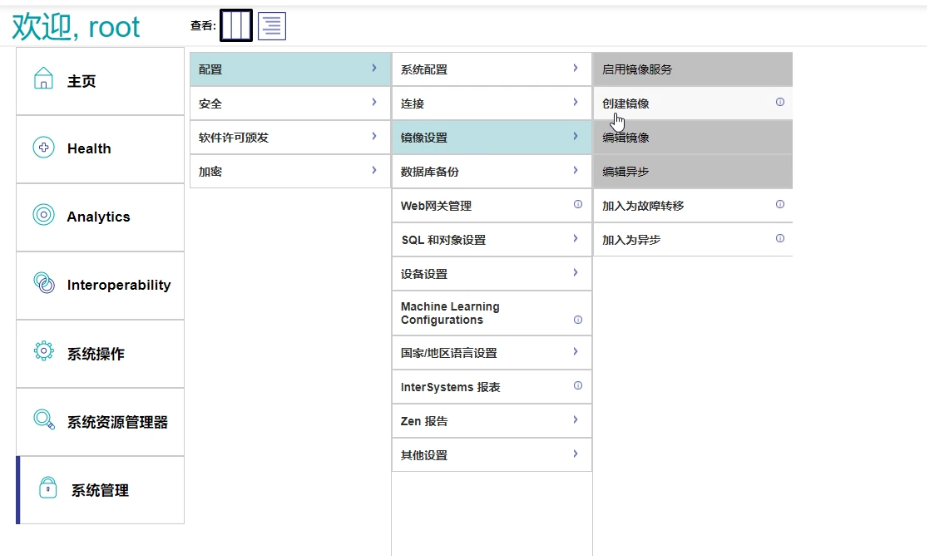
- 填写如下信息:
- 镜像名称:
244DB - 不要使用SSL/TLS
- 使用仲裁程序填写地址:
XXX.XXX.XXX.XXX - 端口号默认:
2188 - 填写超级服务器地址:
XXX.XXX.XXX.XXX
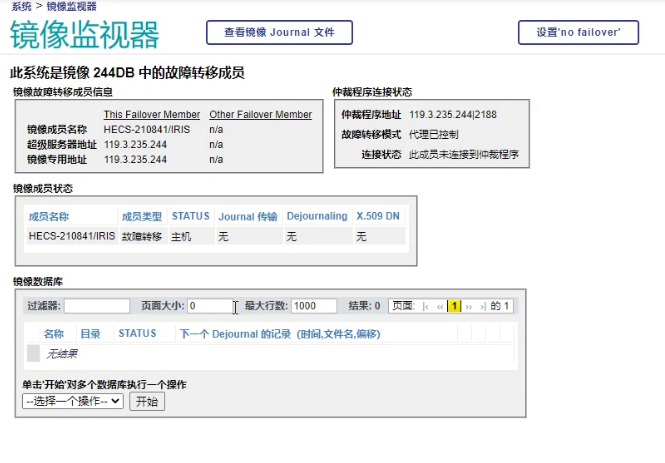
- 成功后,系统 - 镜像监视器显示如下图:
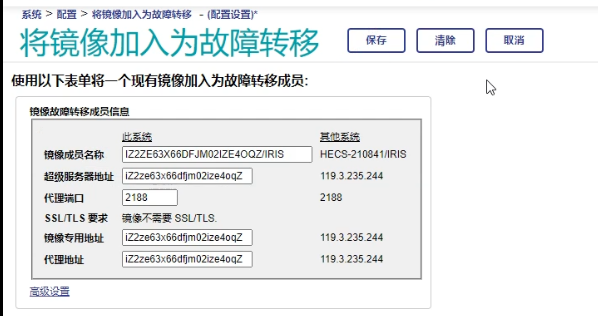
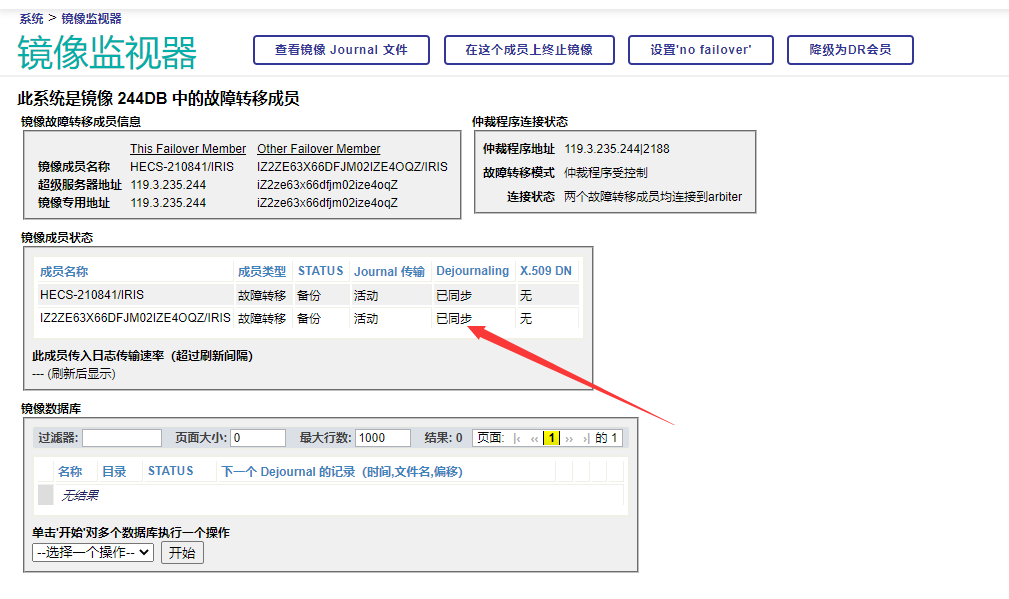
- 在阿里云
MIRROR上,点击 系统 > 配置 > 将镜像加入为故障转移。
- 镜像名称 :
244DB - 代理地址为:华为云地址
- 端口默认
- 实例名称:
IRIS
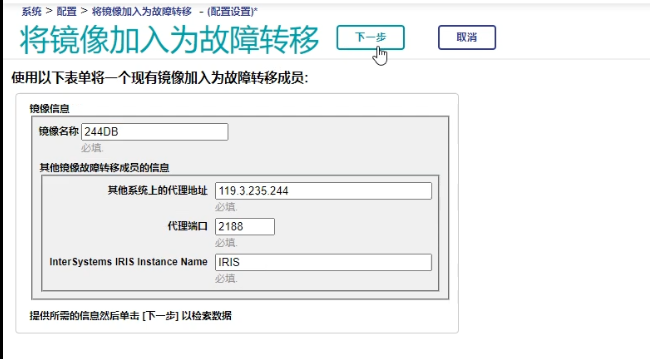
- 下一步 - 保存
- 回到华为云
DB上查看镜像监视器,发现镜像成功
- 回到阿里云上查看镜像监视器,发现已同步成功
备份数据库
- 在
DB上执行如下命令进行数据库备份,然后在MIRROR上进行数据恢复。
%SYS>d ^BACKUP1) Backup
2) Restore ALL
3) Restore Selected or Renamed Directories
4) Edit/Display List of Directories for Backups
5) Abort Backup
6) Display Backup volume information
7) Monitor progress of backup or restoreOption? 1*** The time is: 2023-12-26 10:14:36 ***InterSystems IRIS Backup Utility--------------------------
What kind of backup:1. Full backup of all in-use blocks2. Incremental since last backup3. Cumulative incremental since last full backup4. Exit the backup program
1 => y?? Type the number of the function you wantWhat kind of backup:1. Full backup of all in-use blocks2. Incremental since last backup3. Cumulative incremental since last full backup4. Exit the backup program
1 => 1
Specify output device (type STOP to exit)
Device: /isc/FullDBList_user.cbk => /isc/setmirror.cbk =>
Backing up to device: /isc/FullDBList_user.cbk => /isc/setmirror.cbk
Description: backupdbBacking up the following directories:/isc/iris/mgr//isc/iris/mgr/HSCUSTOM//isc/iris/mgr/brpbs//isc/iris/mgr/brpcf//isc/iris/mgr/brpct//isc/iris/mgr/brpdata//isc/iris/mgr/brpsrc//isc/iris/mgr/hslib//isc/iris/mgr/hssys//isc/iris/mgr/irisaudit//isc/iris/mgr/user/Start the Backup (y/n)? => y
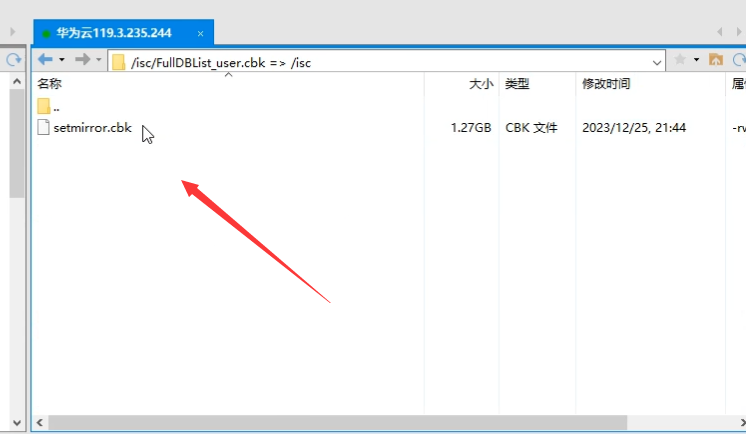
- 备份成功后,将备份文件发送到
MIRROR服务器上。
scp本地cbk路径,要发送的服务器地址。- 输入
MIRROR服务器密码,等待传送数据即可。
scp /isc/setmirror.cbk root@123.57.246.161:/isc
Enter passphrase for key '/root/.ssh/id_rsa':
root@123.57.246.161's password:
setmirror.cbk
恢复数据库
- 在阿里云
MIRROR服务器上执行如下命令进行数据库恢复。
%SYS>do ^DBREST         Cache DBREST UtilityRestore database directories from a backup archiveRestore: 1. All directories2. Selected and/or renamed directories3. Display backup volume information4. Exit the restore program1 => 2Do you want to set switch 10 so that other processes will be
prevented from running during the restore? Yes => yesSpecify input file for volume 1 of backup 1(Type STOP to exit)
Device: /isc/setmirror.cbkThis backup volume was created by:IRIS for UNIX (Red Hat Enterprise Linux for x86-64) 2021.1.3The volume label contains:Volume number      1Volume backup      DEC 25 2023 09:43PM FullPrevious backup      Last FULL backup    Description        /isc/setmirror.cbkBuffer Count       0Mirror name        244DBFailover Member    HECS-210841/IRIS
Is this the backup you want to start restoring? Yes => yes
This backup was made on the other mirror member.
Limit restore to mirrored databases? noFor each database included in the backup file, you can:-- press RETURN to restore it to its original directory;-- type X, then press RETURN to skip it and not restore it at all.-- type a different directory name.  It will be restored to the directoryyou specify.  (If you specify a directory that already contains a database, the data it contains will be lost)./isc/iris/mgr/ =>
/isc/iris/mgr/HSCUSTOM/ =>
/isc/iris/mgr/brpbs/ =>
/isc/iris/mgr/brpcf/ =>
/isc/iris/mgr/brpct/ =>
/isc/iris/mgr/brpdata/ =>
/isc/iris/mgr/brpsrc/ =>
/isc/iris/mgr/hslib/ =>
/isc/iris/mgr/hssys/ =>
/isc/iris/mgr/irisaudit/ =>
/isc/iris/mgr/user/ => Do you want to change this list of directories? No => Restore will overwrite the data in the old database. Confirm Restore? No => yes***Restoring /isc/iris/mgr/ at 09:36:09
13107 blocks restored in 0.4 seconds for this pass, 13107 total restored.***Restoring /isc/iris/mgr/HSCUSTOM/ at 09:36:10
1397 blocks restored in 0.1 seconds for this pass, 1397 total restored....***Restoring /isc/iris/mgr/user/ at 09:36:45
1 blocks restored in 0.0 seconds for this pass, 79 total restored.Specify input file for volume 1 of backup following DEC 25 2023  09:43PM(Type STOP to exit)
Device: Do you have any more backups to restore? Yes => no
Mounting /isc/iris/mgr//isc/iris/mgr/        ... (Mounted)Mounting /isc/iris/mgr/HSCUSTOM//isc/iris/mgr/HSCUSTOM/  ... (Mounted)
...Mounting /isc/iris/mgr/user//isc/iris/mgr/user/   ... (Mounted)Restoring a directory restores the globals in it only up to the
date of the backup.  If you have been journaling, you can apply
journal entries to restore any changes that have been made in the
globals since the backup was made.What journal entries do you wish to apply?1. All entries for the directories that you restored2. All entries for all directories3. Selected directories and globals4. No entriesApply: 1 => 1We know something about where journaling was at the time of the backup:
0: offset 198000 in /isc/iris/mgr/journal/MIRROR-244DB-20231225.003Are journal files created by this IRIS instance and located in their original
paths? (Uses journal.log to locate journals)?   enter Yes or No, please
Are journal files created by this IRIS instance and located in their original
paths? (Uses journal.log to locate journals)? yes
The earliest journal entry since the backup was made is at
offset 198000 in /isc/iris/mgr/journal/MIRROR-244DB-20231225.003Do you want to start from that location? Yes => Yes
/isc/iris/mgr/journal/MIRROR-244DB-20231225.003 is NOT in journal history log /isc/iris/mgr/journal.log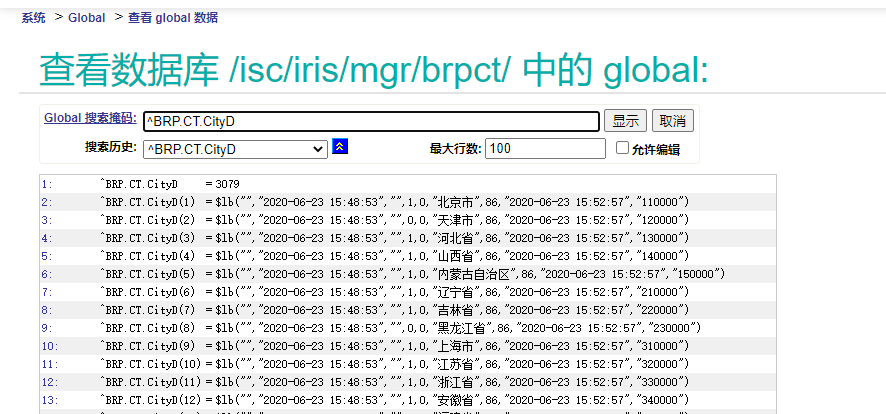
You might have specified a wrong journal history log[Not restored]%SYS>- 恢复成功后查看
MIRROR数据Global恢复成功。
将数据库加入MIRROR
- 在系统 - 配置 - 本地数据库,点击添加到镜像,选择
MIRROR的数据库,添加即可。
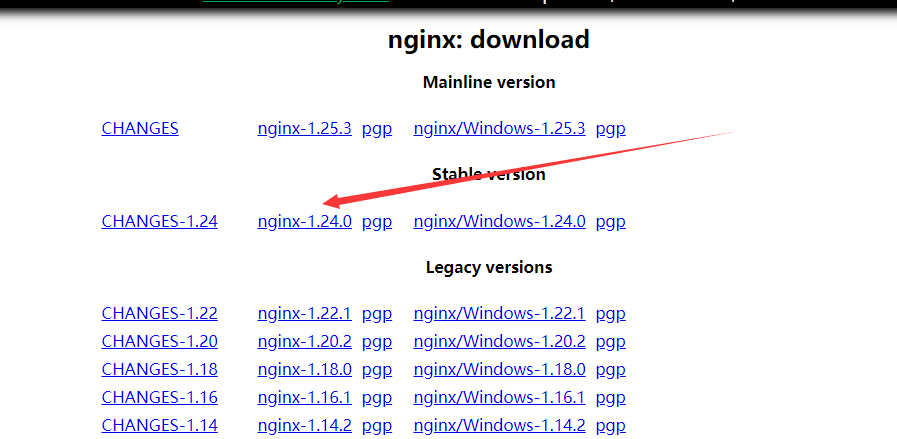
部署NGINX
- 在官网下载
nginx包
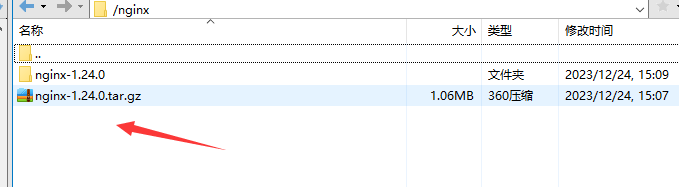
- 下载完成后,上传到云服务器。运行命令解压。
tar -zxvf nginx-1.24.0.tar.gz
- 解压后执行
./configurem配置命令,发现有很多not found

- 安装依赖。
yum install gcc-c++
yum install -y pcre pcre-devel
yum install -y zlib zlib-devel
yum install -y openssl openssl-devel
make && make install
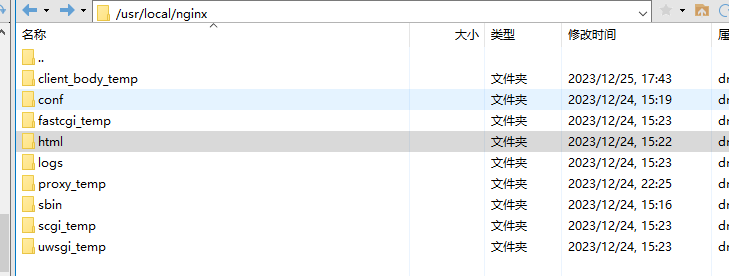
- 安装成功进入
/usr/local/nginx查看文件是否存在conf、sbin、html文件夹,若存在则安装成功
打包前端文件
- 在
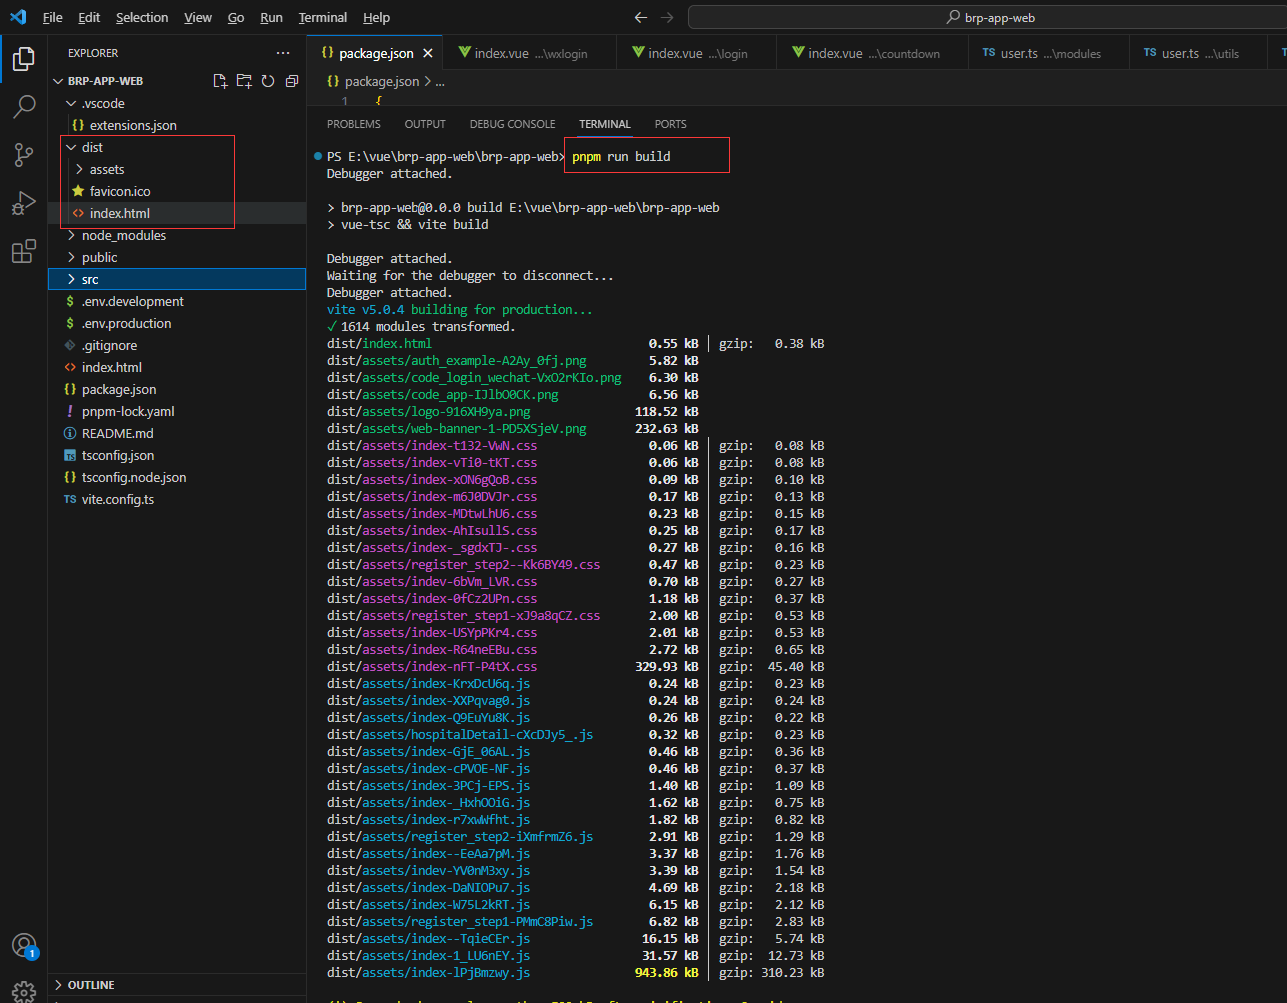
brp-web-app项目的termina中执行打包命令pnpm run build。会生成的打包文件dist。
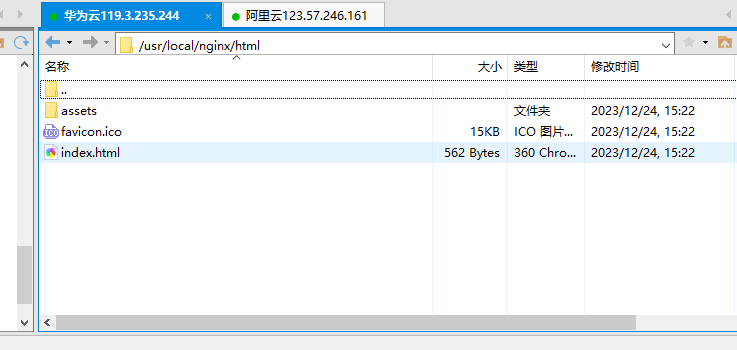
- 将
dist文件放入到云服务器nginx的html目录中
- 执行命令
./nginx启动。若/usr/local/nginx/logs中error.log无报错则表示启动成功。
跨越问题处理
- 启动
nginx后发现无法访问后台接口提示404或CORS跨越错误。需要做出如下修改:
- 在前端文件
vite.config.ts中增加如下配置:
- 表示前端需要代理的跨域后端的接口。
/api表示路径中包含此路径代表是需要代理的请求。
import { defineConfig } from "vite";
import vue from "@vitejs/plugin-vue";
import path from "path";
// https://vitejs.dev/config/
export default defineConfig({...server: {proxy: {"/api": {target: "http://119.3.235.244:52773/",changeOrigin: true,},},},
});- 在
\utils\request.ts中增加如下配置:
- 此配置代表会为后端请求自动增加
/api路径。
const request = axios.create({baseURL: "/api",timeout: 5000,
});
- 在
ngnix的conf路径下nginx.conf做出如下修改:
location /api表示在ngnix中为此路径字段替换为http://119.3.235.244:52773进行转发。
注:此处的/api与http://119.3.235.244:52773后边均不带/,写成/api/与http://119.3.235.244:52773/则代理失败。需要与前端文件的vite配置路径一一对应。
server {listen 80;server_name localhost;client_header_buffer_size 1M;large_client_header_buffers 4 1M;#charset koi8-r;#access_log logs/host.access.log main;location / {root html;try_files $uri $uri/ /index.html last;index index.html index.htm;client_max_body_size 100M;}location /api {proxy_pass http://119.3.235.244:52773;break;}}
- 重新启用
./nginx -s quit && ./nginx*,查看跨越问题是否解决。
使用Git进行版本控制
注:Git详细使用可以查看《Git使用大全》
- 在项目目录创建
Git仓库
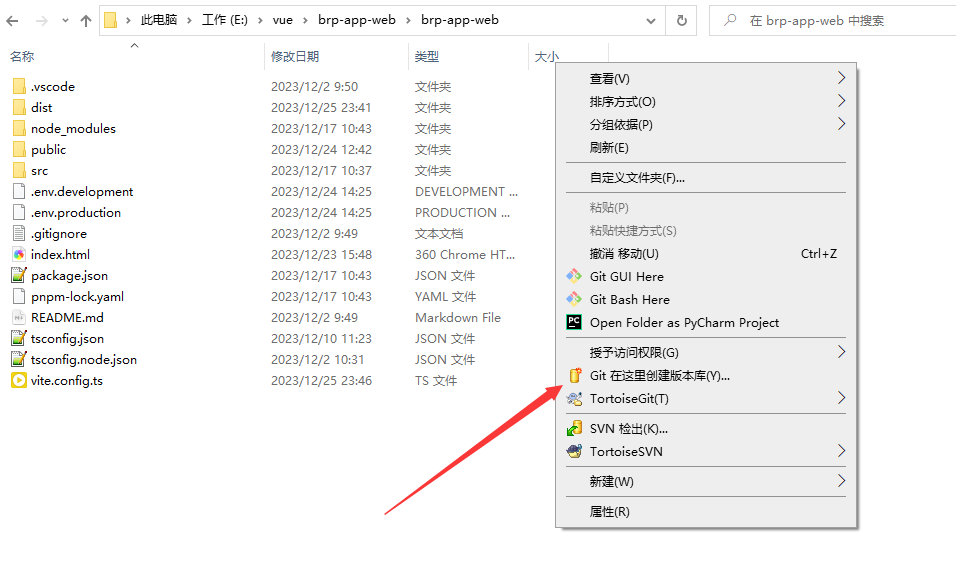
- 添加并提交。
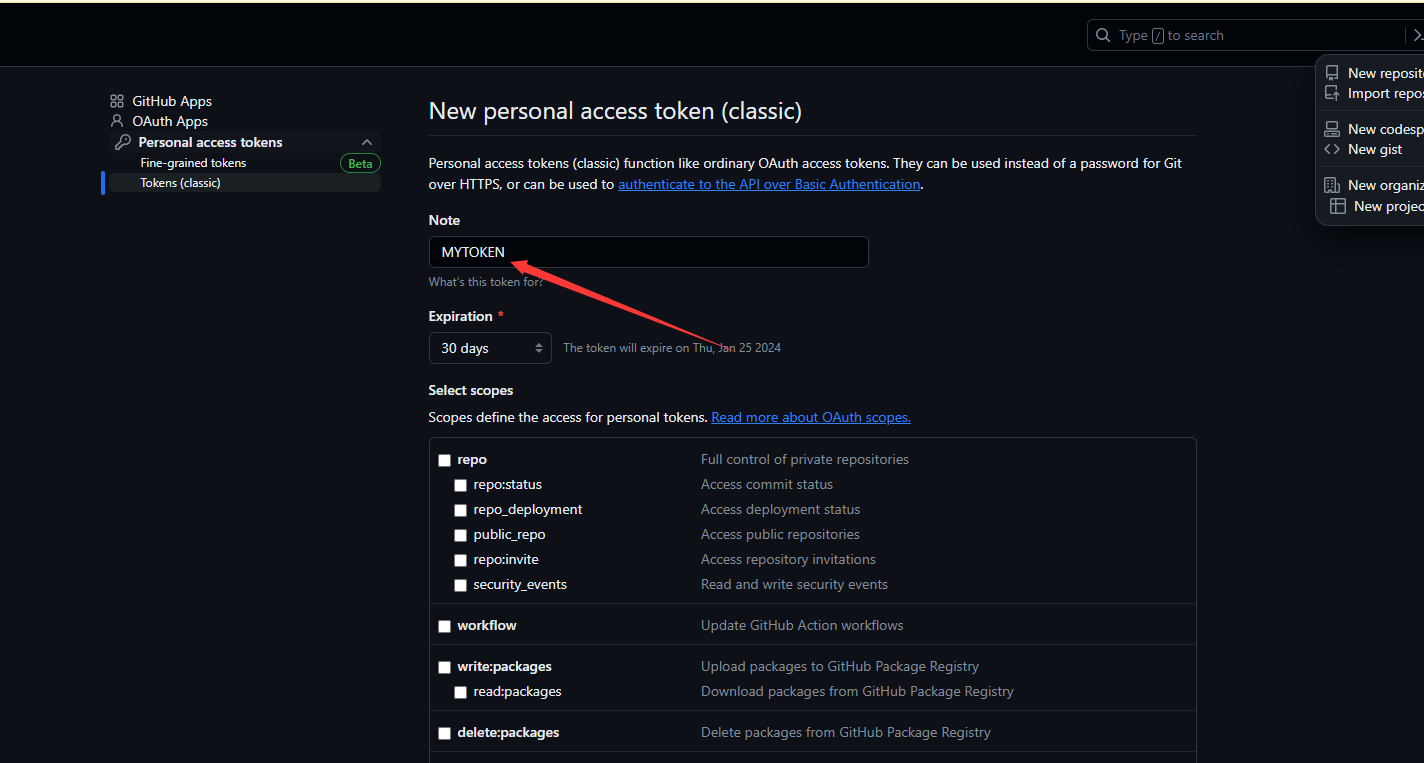
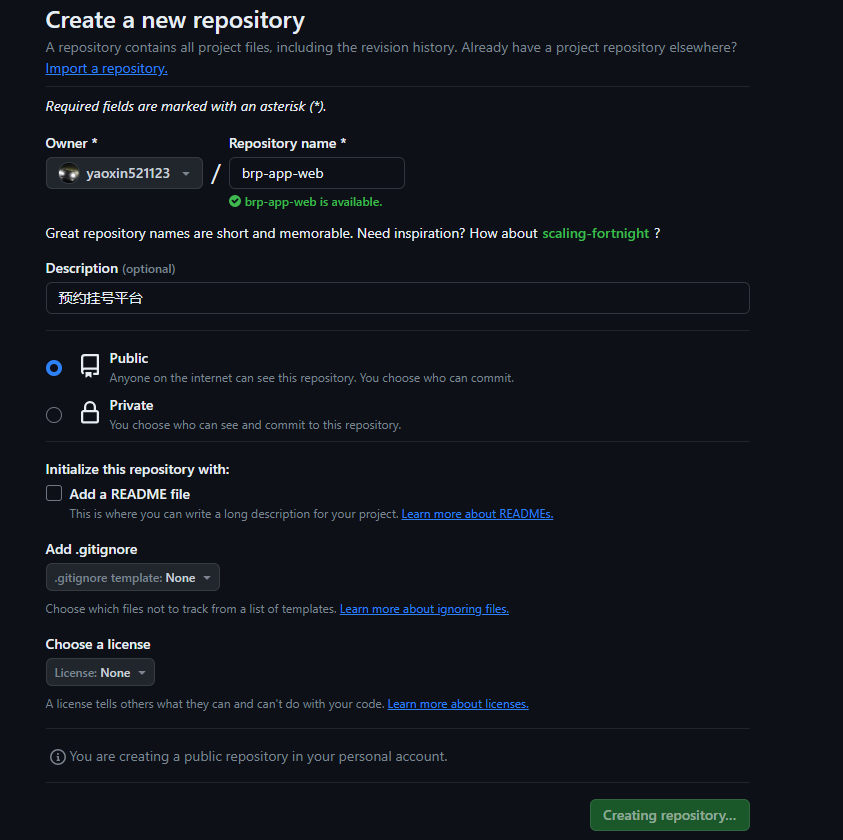
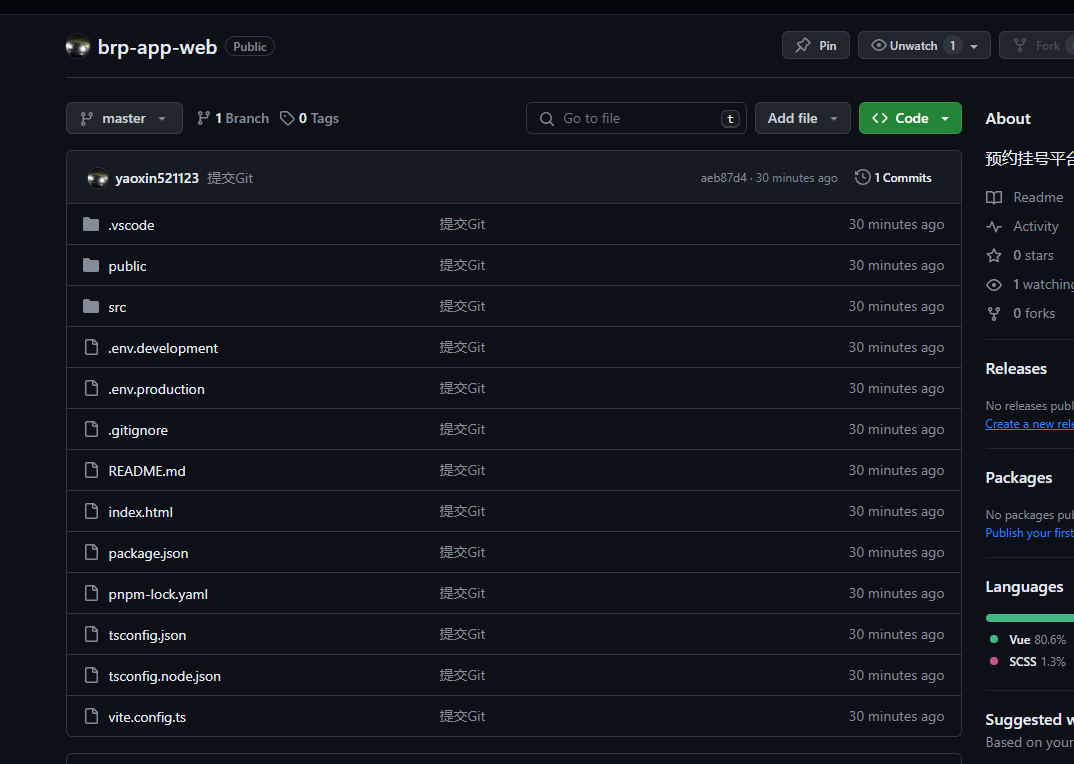
上传Github
- 在
git上生成token
- 在
Github上创建仓库brp-app-web,选择公开仓库。
- 用小乌龟
Push到GitHub远程仓库。
- 输入账号密码
- 再次输入帐号,密码使用刚生成的
Token。

- 查看文件是否推送成功
创造价值,分享学习,一起成长,相伴前行,欢迎大家提出意见,共同交流。
相关文章:
开源预约挂号平台 - 从0到上线
文章目录 开源预约挂号平台 - 从0到上线演示地址源码地址可以学到的技术前端技术后端技术部署上线开发工具其他技术业务功能 项目讲解前端创建项目 - 安装PNPM - 使用VSCODE - 安装插件首页顶部与底部 - 封装组建 - 使用scss左右布局中间内容部分路由 - vue-routerBANNER- 走马…...

Vue3的proxy
vue3.0中,使用proxy替换了原来遍历对象使用Object.defineProperty方法给属性添加set/get vue的核心能力之一是监听用户定义的状态变化并响应式刷新DOM vue2是通过替换状态对象属性的getter和setter来实现的,vue3则通过proxy进行 改为proxy后,可以突破vue当前的…...

Vue Router的介绍与引入
在这里是记录我引入Vue Router的全过程,引入方面也最好先看官方文档 一.介绍 Vue Router 是 Vue.js 的官方路由。它与 Vue.js 核心深度集成,让用 Vue.js 构建单页应用变得轻而易举。功能包括: 嵌套路由映射动态路由选择模块化、基于组件的…...

StratifiedKFold解释和代码实现
StratifiedKFold解释和代码实现 文章目录 一、StratifiedKFold是什么?二、 实验数据设置2.1 实验数据生成代码2.2 代码结果 三、实验代码3.1 实验代码3.2 实验结果3.3 结果解释3.4 数据打乱对这种交叉验证的影响。 四、总结 一、StratifiedKFold是什么? …...

四十八----react实战
一、项目中css模块化管理 1、css-loader 以下可以使用styles.xxx方式使用class是因为使用css-loader配置了module。 import styles from ./index.less export const App(){return <div className={styles.xxx}>hello word</div> }//webpack配置 {test:/\.css$/,u…...
三步实现Java的SM2前端加密后端解密
秦医如毒,无药可解。 话不多说,先上需要用到的js文件下载链接 和 jsp前端代码。 第一步:下载两个必备的js文件—— crypto-js.js、sm2.js 。 它们的下载链接如下↓(该网页不魔法上网的话会很卡,毕竟github&#x…...
)
1分钟带你了解golang(go语言)
Golang:也被称为Go语言,是一种开源的编程语言。由Google的Robert Griesemer、Rob Pike和Ken Thompson于2007年开始设计,2009年11月正式对外发布。(被誉为21世纪的C语言) 像python一样的优雅,有c一样的性能…...

CSS-4
平面转换 整体认识 div {margin: 100px 0;width: 100px;height: 100px;background-color: pink;/* 过渡效果 */transition: all 1s;}/* 当鼠标悬停到div时,进行平面转换 */div:hover {transform: translate(800px) rotate(360deg) scale(2) skew(180deg);}作用&…...

Python为何适合开发AI项目?
Python在人工智能(AI)项目中的流行和广泛应用归因于多个因素,其中一些主要原因包括: 1、易学易用: Python语法简洁清晰,易于学习和理解。这使得新手能够更容易上手,并且对于处理复杂的AI算法和…...

总结心得:各设计模式使用场景
单例模式:创建单个对象 工厂模式:创建对象交给工厂完成,当需要创建的对象是一系列相互关联或相互依赖的产品族时 原型模式:克隆对象,避免创建初始化开销 建造者模式:创建一个复杂对象,该对象…...

详解Vue3中的事件监听方式
本文主要介绍Vue3中的事件监听方式。 目录 一、v-on指令二、使用符号简写三、事件修饰符四、动态事件名五、常见的监听事件六、自定义事件 在Vue3中,事件监听的方式与Vue2有一些不同。 下面是Vue3中事件监听方式的详细介绍: 一、v-on指令 Vue3中仍然使…...

Unity关于easySave2 easySave3保存数据的操作;包含EasySave3运行报错的解决
关于easySave2 easySave3保存数据的操作;包含EasySave3运行报错的解决 /// 数据存储路径(Easy Save的默认储存位置为:Application.persistentDataPath,为了方便我们可以给它指定储存路径) #region 存储数据/*/// /// 存…...

2022年全球软件质量效能大会(QECon上海站)-核心PPT资料下载
一、峰会简介 近年来,以云计算、移动互联网、物联网、工业互联网、人工智能、大数据及区块链等新一代信息技术构建的智能化应用和产品出现爆发式增长,突破了对于软件形态的传统认知,正以各种展现方式诠释着对新型智能软件的定义。这也使得对…...

【python报错】UserWarning: train_labels has been renamed targets
UserWarning: train_labels has been renamed targetswarnings.warn(“train_labels has been renamed targets”) 这是一条 Python 警告信息,它表示 train_labels 这个变量已经被重命名为 targets,在将来的版本中可能会移除 train_labels。因此&#x…...
算法专题四:前缀和
前缀和 一.一维前缀和(模板):1.思路一:暴力解法2.思路二:前缀和思路 二. 二维前缀和(模板):1.思路一:构造前缀和数组 三.寻找数组的中心下标:1.思路一:前缀和 四.除自身以外数组的乘积ÿ…...
探索动画之帧动画)
STM32学习笔记十五:WS2812制作像素游戏屏-飞行射击游戏(5)探索动画之帧动画
本章又是个重要的章节——动画。 动画,本质上时一系列静态的画面连续播放,欺骗人眼产生动画效果。这个原理自打十九世纪电影诞生开始,就从来没变过。 我们的游戏中也需要一些动画效果,比如,被击中时的受伤效果&#…...
)
期末复习(程序设计)
根据字符出现频率排序 【问题描述】 给定一个字符串 s ,根据字符出现的 频率 对其进行降序排序。一个字符出现的频率是它出现在字符串中的次数。 返回已排序的字符串。 频率相同的的字符按ascii值降序排序。 s不包含空格、制表符、换行符等特殊字符。 【输入格…...
html-css-js移动端导航栏底部固定+i18n国际化全局
需求:要做一个移动端的仿照小程序的导航栏页面操作,但是这边加上了i18n国家化,由于页面切换的时候会导致国际化失效,所以写了这篇文章 1.效果 切换页面的时候中英文也会跟着改变,不会导致切换后回到默认的语言 2.实现…...

Ubuntu Linux 入门指南:面向初学者
目录 1. Ubuntu Linux 简介 Ubuntu 的由来 Ubuntu 与其他 Linux 发行版的比较 Debian: Fedora: openSUSE: Arch Linux: Linux Mint: 第二部分:安装 Ubuntu 1. 准备安装 系统需求 创建 Ubuntu 启…...

常见算法面试题目
前言 总结一些常见的算法题目,每一个题目写一行思路,方便大家复习。具体题目的来源是下面的网站。 剑指offer 剑指offe2 leetcode200题 leetcode 100题 leetcode150题 leetcode 75题 文章目录 前言二叉树非递归遍历牛客JZ31 栈的压入、弹出序列 (…...

可靠性+灵活性:电力载波技术在楼宇自控中的核心价值
可靠性灵活性:电力载波技术在楼宇自控中的核心价值 在智能楼宇的自动化控制中,电力载波技术(PLC)凭借其独特的优势,正成为构建高效、稳定、灵活系统的核心解决方案。它利用现有电力线路传输数据,无需额外布…...

高等数学(下)题型笔记(八)空间解析几何与向量代数
目录 0 前言 1 向量的点乘 1.1 基本公式 1.2 例题 2 向量的叉乘 2.1 基础知识 2.2 例题 3 空间平面方程 3.1 基础知识 3.2 例题 4 空间直线方程 4.1 基础知识 4.2 例题 5 旋转曲面及其方程 5.1 基础知识 5.2 例题 6 空间曲面的法线与切平面 6.1 基础知识 6.2…...
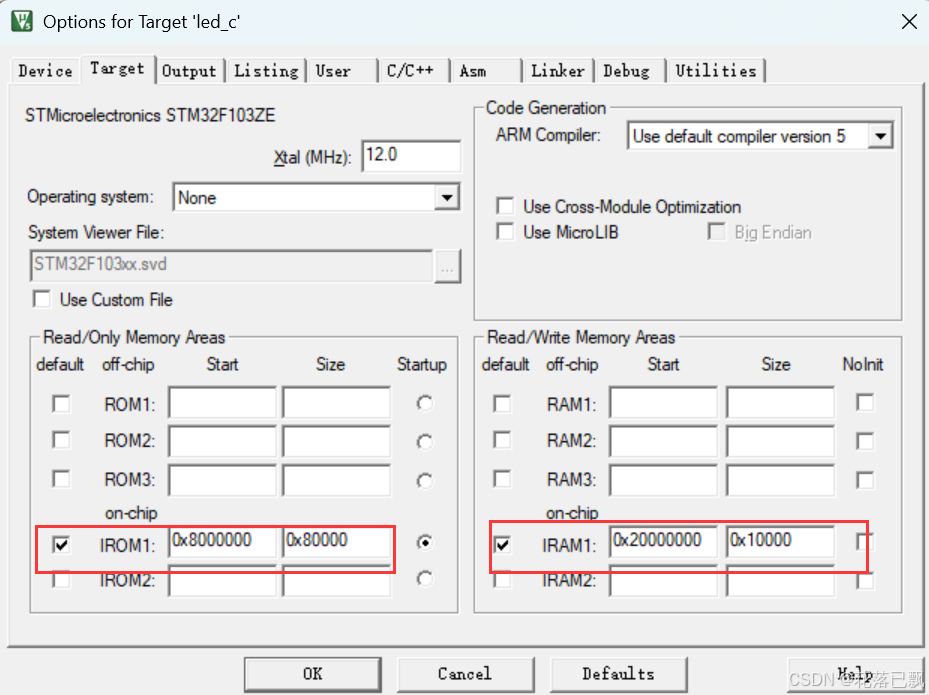
Keil 中设置 STM32 Flash 和 RAM 地址详解
文章目录 Keil 中设置 STM32 Flash 和 RAM 地址详解一、Flash 和 RAM 配置界面(Target 选项卡)1. IROM1(用于配置 Flash)2. IRAM1(用于配置 RAM)二、链接器设置界面(Linker 选项卡)1. 勾选“Use Memory Layout from Target Dialog”2. 查看链接器参数(如果没有勾选上面…...

Spring AI与Spring Modulith核心技术解析
Spring AI核心架构解析 Spring AI(https://spring.io/projects/spring-ai)作为Spring生态中的AI集成框架,其核心设计理念是通过模块化架构降低AI应用的开发复杂度。与Python生态中的LangChain/LlamaIndex等工具类似,但特别为多语…...

如何在最短时间内提升打ctf(web)的水平?
刚刚刷完2遍 bugku 的 web 题,前来答题。 每个人对刷题理解是不同,有的人是看了writeup就等于刷了,有的人是收藏了writeup就等于刷了,有的人是跟着writeup做了一遍就等于刷了,还有的人是独立思考做了一遍就等于刷了。…...

docker 部署发现spring.profiles.active 问题
报错: org.springframework.boot.context.config.InvalidConfigDataPropertyException: Property spring.profiles.active imported from location class path resource [application-test.yml] is invalid in a profile specific resource [origin: class path re…...
10-Oracle 23 ai Vector Search 概述和参数
一、Oracle AI Vector Search 概述 企业和个人都在尝试各种AI,使用客户端或是内部自己搭建集成大模型的终端,加速与大型语言模型(LLM)的结合,同时使用检索增强生成(Retrieval Augmented Generation &#…...
算法岗面试经验分享-大模型篇
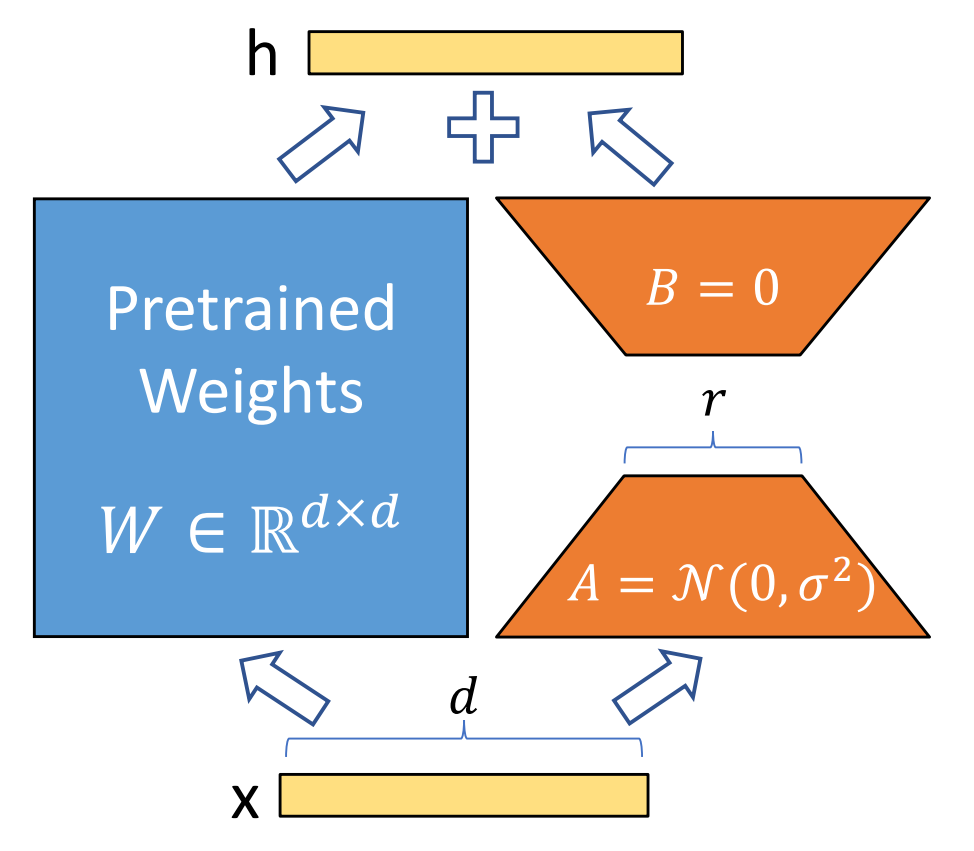
文章目录 A 基础语言模型A.1 TransformerA.2 Bert B 大语言模型结构B.1 GPTB.2 LLamaB.3 ChatGLMB.4 Qwen C 大语言模型微调C.1 Fine-tuningC.2 Adapter-tuningC.3 Prefix-tuningC.4 P-tuningC.5 LoRA A 基础语言模型 A.1 Transformer (1)资源 论文&a…...
:观察者模式)
JS设计模式(4):观察者模式
JS设计模式(4):观察者模式 一、引入 在开发中,我们经常会遇到这样的场景:一个对象的状态变化需要自动通知其他对象,比如: 电商平台中,商品库存变化时需要通知所有订阅该商品的用户;新闻网站中࿰…...
【JVM】Java虚拟机(二)——垃圾回收
目录 一、如何判断对象可以回收 (一)引用计数法 (二)可达性分析算法 二、垃圾回收算法 (一)标记清除 (二)标记整理 (三)复制 (四ÿ…...