笔记--学习mini3d代码
主要是记录学习mini3d代码时,查的资料;
从github下载的代码:
GitHub - skywind3000/mini3d: 3D Software Renderer in 700 Lines !!3D Software Renderer in 700 Lines !! Contribute to skywind3000/mini3d development by creating an account on GitHub.![]() https://github.com/skywind3000/mini3d
https://github.com/skywind3000/mini3d
1. 数学运算
1.1 类型定义以及结构体
typedef unsigned int IUINT32;//=====================================================================
// 数学库:此部分应该不用详解,熟悉 D3D 矩阵变换即可
//=====================================================================
typedef struct { float m[4][4]; } matrix_t;
typedef struct { float x, y, z, w; } vector_t;
typedef vector_t point_t;
定义了向量类型(vector_t)、矩阵类型(matrix_t)、点类型(point_t);
1.2 基础判断方法
int CMID(int x, int min, int max) { return (x < min)? min : ((x > max)? max : x); }// 计算插值:t 为 [0, 1] 之间的数值
float interp(float x1, float x2, float t) { return x1 + (x2 - x1) * t; }
CMID使用用来将x的值约束在min和max之间的有效值;如果小于min,则返回min;如果大于max,则返回max;
interp用来计算两个数值之间的线性插值,在x1到x2范围内的值,分割x1-x2为两部分,即0-t和t-1两部分,可以计算得到t点对应的数值。范围在[x1,x2]内;
1.3 向量(点)运算
向量的运算主要有,对向量取模、归一化处理求得单位向量、加、减、点积、叉积;
坐标点的运算,则只有加、减、插值;
这里有困惑的地方是,按照GAMES101中的说法,点的w都是1,向量的w都是0,这里在加减、叉积、插值等运算中都将w设置为了1;不过也可能是代码比较简洁,省略了这个地方;
// | v |
float vector_length(const vector_t *v) {float sq = v->x * v->x + v->y * v->y + v->z * v->z;return (float)sqrt(sq);
}// z = x + y
void vector_add(vector_t *z, const vector_t *x, const vector_t *y) {z->x = x->x + y->x;z->y = x->y + y->y;z->z = x->z + y->z;z->w = 1.0;
}// z = x - y
void vector_sub(vector_t *z, const vector_t *x, const vector_t *y) {z->x = x->x - y->x;z->y = x->y - y->y;z->z = x->z - y->z;z->w = 1.0;
}// 矢量点乘
float vector_dotproduct(const vector_t *x, const vector_t *y) {return x->x * y->x + x->y * y->y + x->z * y->z;
}// 矢量叉乘
void vector_crossproduct(vector_t *z, const vector_t *x, const vector_t *y) {float m1, m2, m3;m1 = x->y * y->z - x->z * y->y;m2 = x->z * y->x - x->x * y->z;m3 = x->x * y->y - x->y * y->x;z->x = m1;z->y = m2;z->z = m3;z->w = 1.0f;
}// 矢量插值,t取值 [0, 1]
void vector_interp(vector_t *z, const vector_t *x1, const vector_t *x2, float t) {z->x = interp(x1->x, x2->x, t);z->y = interp(x1->y, x2->y, t);z->z = interp(x1->z, x2->z, t);z->w = 1.0f;
}// 矢量归一化
void vector_normalize(vector_t *v) {float length = vector_length(v);if (length != 0.0f) {float inv = 1.0f / length;v->x *= inv; v->y *= inv;v->z *= inv;}
}
1.4 矩阵运算
1.4.1 矩阵间运算
包括了矩阵之间的加法、减法以及矩阵乘法;
// c = a + b
void matrix_add(matrix_t *c, const matrix_t *a, const matrix_t *b) {int i, j;for (i = 0; i < 4; i++) {for (j = 0; j < 4; j++)c->m[i][j] = a->m[i][j] + b->m[i][j];}
}// c = a - b
void matrix_sub(matrix_t *c, const matrix_t *a, const matrix_t *b) {int i, j;for (i = 0; i < 4; i++) {for (j = 0; j < 4; j++)c->m[i][j] = a->m[i][j] - b->m[i][j];}
}// c = a * b
void matrix_mul(matrix_t *c, const matrix_t *a, const matrix_t *b) {matrix_t z;int i, j;for (i = 0; i < 4; i++) {for (j = 0; j < 4; j++) {z.m[j][i] = (a->m[j][0] * b->m[0][i]) +(a->m[j][1] * b->m[1][i]) +(a->m[j][2] * b->m[2][i]) +(a->m[j][3] * b->m[3][i]);}}c[0] = z;
}
1.4.2 矩阵与常数
// c = a * f
void matrix_scale(matrix_t *c, const matrix_t *a, float f) {int i, j;for (i = 0; i < 4; i++) {for (j = 0; j < 4; j++) c->m[i][j] = a->m[i][j] * f;}
}
1.4.3 矩阵与向量
在该代码中,将向量设置为行向量,则与矩阵的乘法为向量右乘矩阵;
// y = x * m
void matrix_apply(vector_t *y, const vector_t *x, const matrix_t *m) {float X = x->x, Y = x->y, Z = x->z, W = x->w;y->x = X * m->m[0][0] + Y * m->m[1][0] + Z * m->m[2][0] + W * m->m[3][0];y->y = X * m->m[0][1] + Y * m->m[1][1] + Z * m->m[2][1] + W * m->m[3][1];y->z = X * m->m[0][2] + Y * m->m[1][2] + Z * m->m[2][2] + W * m->m[3][2];y->w = X * m->m[0][3] + Y * m->m[1][3] + Z * m->m[2][3] + W * m->m[3][3];
}
1.4.4 初始化矩阵
// 设置为单位矩阵
void matrix_set_identity(matrix_t *m) {m->m[0][0] = m->m[1][1] = m->m[2][2] = m->m[3][3] = 1.0f; m->m[0][1] = m->m[0][2] = m->m[0][3] = 0.0f;m->m[1][0] = m->m[1][2] = m->m[1][3] = 0.0f;m->m[2][0] = m->m[2][1] = m->m[2][3] = 0.0f;m->m[3][0] = m->m[3][1] = m->m[3][2] = 0.0f;
}
// 设置为全0矩阵
void matrix_set_zero(matrix_t *m) {m->m[0][0] = m->m[0][1] = m->m[0][2] = m->m[0][3] = 0.0f;m->m[1][0] = m->m[1][1] = m->m[1][2] = m->m[1][3] = 0.0f;m->m[2][0] = m->m[2][1] = m->m[2][2] = m->m[2][3] = 0.0f;m->m[3][0] = m->m[3][1] = m->m[3][2] = m->m[3][3] = 0.0f;
}
1.5 缩放、平移、旋转
齐次矩阵被用于图形学中对图像的缩放、平移以及旋转的操作;
2D图像使用三维齐次矩阵,3D图像使用四维齐次矩阵;多出来的一个维度是w和平移值;一般情况下w为0表示该行向量或者列向量为向量,w为1表示该行或者该列为一个点;
关于缩放、平移以及旋转的原理,请查图形学相关章节;
平移
// 平移变换
void matrix_set_translate(matrix_t *m, float x, float y, float z) {matrix_set_identity(m);m->m[3][0] = x;m->m[3][1] = y;m->m[3][2] = z;
}
缩放
// 缩放变换
void matrix_set_scale(matrix_t *m, float x, float y, float z) {matrix_set_identity(m);m->m[0][0] = x;m->m[1][1] = y;m->m[2][2] = z;
}
旋转
实现绕(x,y,z)向量旋转theta度的变换矩阵,一般情况下,使用四元数的旋转计算公式即可;
// 旋转矩阵
void matrix_set_rotate(matrix_t *m, float x, float y, float z, float theta) {float qsin = (float)sin(theta * 0.5f);float qcos = (float)cos(theta * 0.5f);vector_t vec = { x, y, z, 1.0f };float w = qcos;vector_normalize(&vec);x = vec.x * qsin;y = vec.y * qsin;z = vec.z * qsin;m->m[0][0] = 1 - 2 * y * y - 2 * z * z;m->m[1][0] = 2 * x * y - 2 * w * z;m->m[2][0] = 2 * x * z + 2 * w * y;m->m[0][1] = 2 * x * y + 2 * w * z;m->m[1][1] = 1 - 2 * x * x - 2 * z * z;m->m[2][1] = 2 * y * z - 2 * w * x;m->m[0][2] = 2 * x * z - 2 * w * y;m->m[1][2] = 2 * y * z + 2 * w * x;m->m[2][2] = 1 - 2 * x * x - 2 * y * y;m->m[0][3] = m->m[1][3] = m->m[2][3] = 0.0f;m->m[3][0] = m->m[3][1] = m->m[3][2] = 0.0f;    m->m[3][3] = 1.0f;
}
详细内容请参见四元数的旋转:
四元数和旋转(Quaternion & rotation)![]() https://zhuanlan.zhihu.com/p/78987582
https://zhuanlan.zhihu.com/p/78987582
也可以看之前的笔记,关于绕任意轴旋转的笔记: VTK笔记-几何变换-绕任意轴旋转![]() https://blog.csdn.net/liushao1031177/article/details/119829226
https://blog.csdn.net/liushao1031177/article/details/119829226
2. MVP变换
2.1 模型视图变换
在计算投影图像之前,需要将相机平移到世界原点位置,将相机的朝向-z方向,将相机的向上方向与+y平行;
在移动和旋转相机的同时,将物体也一并移动和缩放;通过这一变换,就形成了标准的投影变换前的坐标系,后面只要通过投影变换、View变换就可以得到渲染2D图像;
详细的计算步骤,查看博客:
3、计算机图形学——模型视图变换、投影变换与视口变换![]() https://blog.csdn.net/Master_Cui/article/details/119219663
https://blog.csdn.net/Master_Cui/article/details/119219663
matrix_set_lookat函数是一并计算了平移和旋转后的变换矩阵;
// 设置摄像机
void matrix_set_lookat(matrix_t *m, const vector_t *eye, const vector_t *at, const vector_t *up) {vector_t xaxis, yaxis, zaxis;vector_sub(&zaxis, at, eye);vector_normalize(&zaxis);vector_crossproduct(&xaxis, up, &zaxis);vector_normalize(&xaxis);vector_crossproduct(&yaxis, &zaxis, &xaxis);m->m[0][0] = xaxis.x;m->m[1][0] = xaxis.y;m->m[2][0] = xaxis.z;m->m[3][0] = -vector_dotproduct(&xaxis, eye);m->m[0][1] = yaxis.x;m->m[1][1] = yaxis.y;m->m[2][1] = yaxis.z;m->m[3][1] = -vector_dotproduct(&yaxis, eye);m->m[0][2] = zaxis.x;m->m[1][2] = zaxis.y;m->m[2][2] = zaxis.z;m->m[3][2] = -vector_dotproduct(&zaxis, eye);m->m[0][3] = m->m[1][3] = m->m[2][3] = 0.0f;m->m[3][3] = 1.0f;
}
程序使用投影变换是采用D3DXMatrixPerspectiveFovLH的方法,z轴的映射范围为[0,1],x和y的范围为[-1,1],其计算方法和GAMES101中的方法有所不同:
按照GAMES101的投影变换的博客,可以参照上面那篇博客;
这是解析同样这个代码的笔记:
光栅化渲染器 学习笔记 - 知乎![]() https://zhuanlan.zhihu.com/p/74510058
https://zhuanlan.zhihu.com/p/74510058
其中fovy是fov的角度,aspect是屏幕的宽高比,zn为前裁剪平面z坐标;zf为后裁剪平面z坐标;
// D3DXMatrixPerspectiveFovLH
void matrix_set_perspective(matrix_t *m, float fovy, float aspect, float zn, float zf) {float fax = 1.0f / (float)tan(fovy * 0.5f);matrix_set_zero(m);m->m[0][0] = (float)(fax / aspect);m->m[1][1] = (float)(fax);m->m[2][2] = zf / (zf - zn);m->m[3][2] = - zn * zf / (zf - zn);m->m[2][3] = 1;
}
计算后的点坐标满足下面的等式:
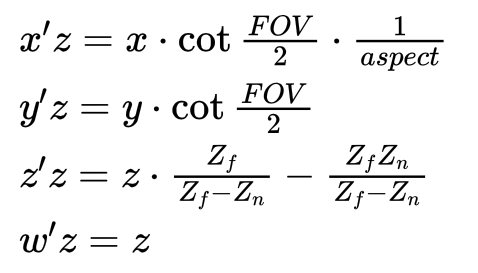
因为变换后的w的值是z;
定义一个记录变换信息的结构体transform_t,内部有三个变换矩阵,和一个由三个变换矩阵右乘后的结果变换矩阵,以及平面的宽w和高h;
//=====================================================================
// 坐标变换
//=====================================================================
typedef struct { matrix_t world;         // 世界坐标变换matrix_t view;          // 摄影机坐标变换matrix_t projection;    // 投影变换matrix_t transform;     // transform = world * view * projectionfloat w, h;             // 屏幕大小
}    transform_t;
调用方法transform_update可以更新ts对象内的transform最终变换矩阵;
// 矩阵更新,计算 transform = world * view * projection
void transform_update(transform_t *ts) {matrix_t m;matrix_mul(&m, &ts->world, &ts->view);matrix_mul(&ts->transform, &m, &ts->projection);
}
在初始时,由初设的宽度和高度,计算出初始的变换矩阵,这里将world和view设置为单位矩阵,FOV为45度,相机在原点,前裁剪平面位于(0,0,1)处,后裁剪平面位于(0,0,500)处;
// 初始化,设置屏幕长宽
void transform_init(transform_t *ts, int width, int height) {float aspect = (float)width / ((float)height);matrix_set_identity(&ts->world);matrix_set_identity(&ts->view);matrix_set_perspective(&ts->projection, 3.1415926f * 0.5f, aspect, 1.0f, 500.0f);ts->w = (float)width;ts->h = (float)height;transform_update(ts);
}
计算x坐标投影变换到视平面上的坐标:
// 将矢量 x 进行 project
void transform_apply(const transform_t *ts, vector_t *y, const vector_t *x) {matrix_apply(y, x, &ts->transform);
}
// 检查齐次坐标同 cvv 的边界用于视锥裁剪
int transform_check_cvv(const vector_t *v) {float w = v->w;int check = 0;if (v->z < 0.0f) check |= 1;if (v->z > w) check |= 2;if (v->x < -w) check |= 4;if (v->x > w) check |= 8;if (v->y < -w) check |= 16;if (v->y > w) check |= 32;return check;
}还不清楚这的x是什么坐标,这里的w值会是什么样子??
w是计算后的投影变换的结果,从结果上看值是等于z的;
这里加日志或者断点,看看-------------------
// 归一化,得到屏幕坐标
void transform_homogenize(const transform_t *ts, vector_t *y, const vector_t *x) {float rhw = 1.0f / x->w;y->x = (x->x * rhw + 1.0f) * ts->w * 0.5f;y->y = (1.0f - x->y * rhw) * ts->h * 0.5f;y->z = x->z * rhw;y->w = 1.0f;
}
和顶点相关的结构体:
//=====================================================================
// 几何计算:顶点、扫描线、边缘、矩形、步长计算
//=====================================================================
// 颜色
typedef struct { float r, g, b; } color_t;
// 纹理uv坐标
typedef struct { float u, v; } texcoord_t;
// 顶点信息
typedef struct { point_t pos;    // 三维坐标点texcoord_t tc;  // 纹理坐标color_t color;  // RGB颜色float rhw;      // W的倒数} vertex_t;typedef struct {vertex_t v;     // 边上的某一个点,用作输出或者标识;vertex_t v1;    // vertex_t v2;    // 边的两个端点} edge_t;
typedef struct { float top;      // 梯形上边的y值 float bottom;   // 梯形底边的y值edge_t left;    // 梯形左腰边信息edge_t right;   // 梯形右腰边信息} trapezoid_t;
typedef struct { vertex_t v, step; int x, y, w; } scanline_t;
Reciprocal of Homogeneous W的缩写是rhw,是齐次矩阵中的w的倒数;
void vertex_rhw_init(vertex_t *v) {float rhw = 1.0f / v->pos.w;v->rhw = rhw;v->tc.u *= rhw;v->tc.v *= rhw;v->color.r *= rhw;v->color.g *= rhw;v->color.b *= rhw;
}
这里没有看懂,记录下,后面看看这个博客:
深入探索透视纹理映射(下)![]() https://blog.csdn.net/popy007/article/details/5570803
https://blog.csdn.net/popy007/article/details/5570803
顶点间的运算
// 齐次坐标中所有元素的插值;
void vertex_interp(vertex_t *y, const vertex_t *x1, const vertex_t *x2, float t) {vector_interp(&y->pos, &x1->pos, &x2->pos, t);y->tc.u = interp(x1->tc.u, x2->tc.u, t);y->tc.v = interp(x1->tc.v, x2->tc.v, t);y->color.r = interp(x1->color.r, x2->color.r, t);y->color.g = interp(x1->color.g, x2->color.g, t);y->color.b = interp(x1->color.b, x2->color.b, t);y->rhw = interp(x1->rhw, x2->rhw, t);
}
// 顶点之间的除法,可以看做是做了一个变相的插值;
void vertex_division(vertex_t *y, const vertex_t *x1, const vertex_t *x2, float w) {float inv = 1.0f / w;y->pos.x = (x2->pos.x - x1->pos.x) * inv;y->pos.y = (x2->pos.y - x1->pos.y) * inv;y->pos.z = (x2->pos.z - x1->pos.z) * inv;y->pos.w = (x2->pos.w - x1->pos.w) * inv;y->tc.u = (x2->tc.u - x1->tc.u) * inv;y->tc.v = (x2->tc.v - x1->tc.v) * inv;y->color.r = (x2->color.r - x1->color.r) * inv;y->color.g = (x2->color.g - x1->color.g) * inv;y->color.b = (x2->color.b - x1->color.b) * inv;y->rhw = (x2->rhw - x1->rhw) * inv;
}
// 两个顶点的加法,即使齐次坐标的各个元素的加法;
void vertex_add(vertex_t *y, const vertex_t *x) {y->pos.x += x->pos.x;y->pos.y += x->pos.y;y->pos.z += x->pos.z;y->pos.w += x->pos.w;y->rhw += x->rhw;y->tc.u += x->tc.u;y->tc.v += x->tc.v;y->color.r += x->color.r;y->color.g += x->color.g;y->color.b += x->color.b;
}
计算三角形,可以计算到待绘制三角形的信息,使用与x平行的线扫描方式,因此将三角形按照y方向的直线分割最为简单;
trapezoid_init_triangle方法分别根据三种不同的情况,生成0个、1个或2个梯形信息;包括了top的y最大值、y最小值,梯形的左腰边两端的顶点,梯形右腰边两端的顶点;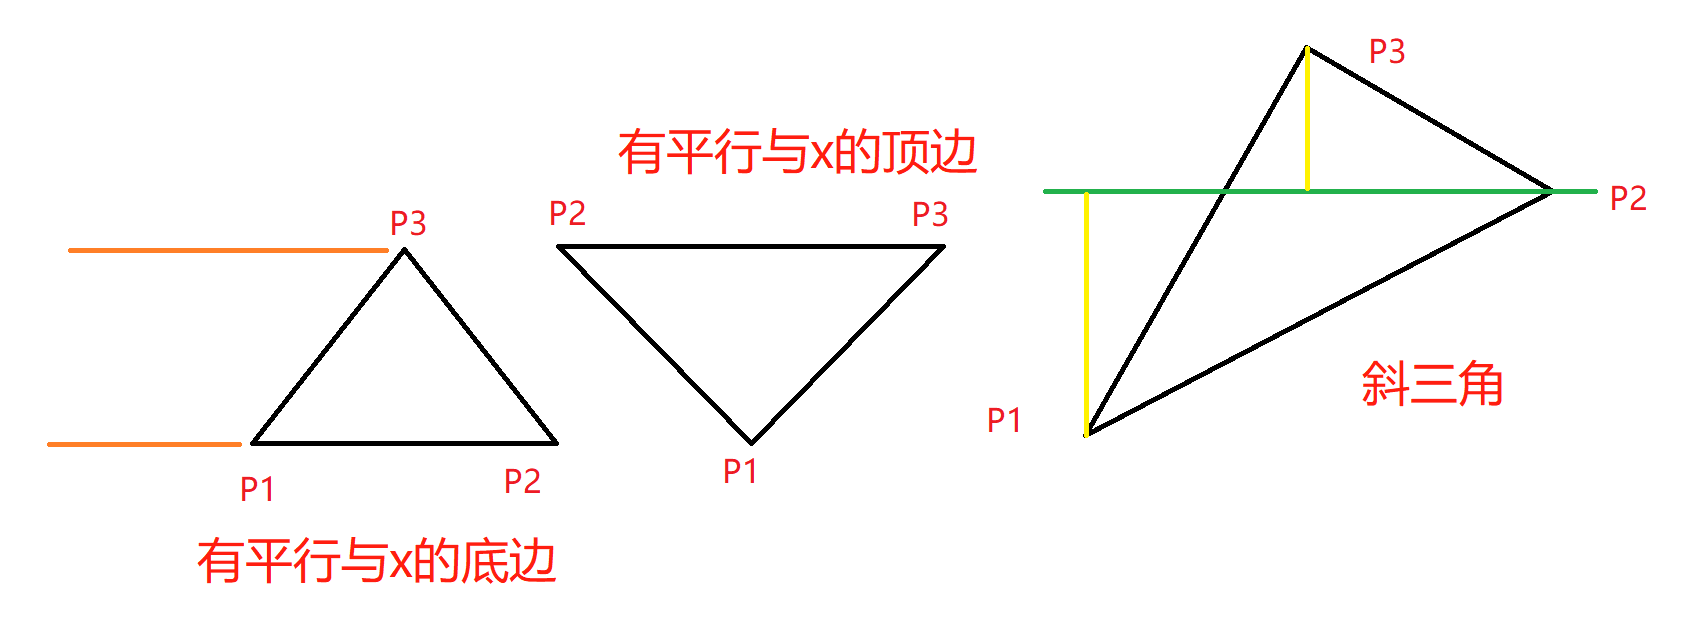
在之前学习TinyRenderer的时,填充三角网格的方法即是分别填充上三角形和下三角形;学习TinyRenderer![]() https://blog.csdn.net/liushao1031177/article/details/128733314
https://blog.csdn.net/liushao1031177/article/details/128733314
具体代码如下:
// 根据三角形生成 0-2 个梯形,并且返回合法梯形的数量
int trapezoid_init_triangle(trapezoid_t *trap, const vertex_t *p1, const vertex_t *p2, const vertex_t *p3) {const vertex_t *p;float k, x;// 三个点按照y,从小到大排列;if (p1->pos.y > p2->pos.y) p = p1, p1 = p2, p2 = p;if (p1->pos.y > p3->pos.y) p = p1, p1 = p3, p3 = p;if (p2->pos.y > p3->pos.y) p = p2, p2 = p3, p3 = p;// 如果三点在同一y方向上,或者在同一个x方向上,即共线,返回个数为0;if (p1->pos.y == p2->pos.y && p1->pos.y == p3->pos.y) return 0;if (p1->pos.x == p2->pos.x && p1->pos.x == p3->pos.x) return 0;// 如果前面两个点y相等,就以这两个点为三角形的底边;if (p1->pos.y == p2->pos.y) {    // triangle down// 底边上的两个点根据x坐标排序if (p1->pos.x > p2->pos.x) p = p1, p1 = p2, p2 = p;// 梯形的上下两个y值trap[0].top = p1->pos.y;trap[0].bottom = p3->pos.y;// 左侧腰,边上两个顶点;trap[0].left.v1 = *p1;trap[0].left.v2 = *p3;// 右侧腰,边上两个顶点;trap[0].right.v1 = *p2;trap[0].right.v2 = *p3;// 应该是用来判别方向的,感觉和梯形数据没啥关系;// 不对,由于已经根据Y排序了,这里不应该出现top小于bottom的情况;// 因此是用来验证结果的合法性;return (trap[0].top < trap[0].bottom)? 1 : 0;}// 如果后面两个点相等,则可以用这两个点作为倒三角的上边;if (p2->pos.y == p3->pos.y) {    // triangle up// 上边上的两个点根据x坐标排序if (p2->pos.x > p3->pos.x) p = p2, p2 = p3, p3 = p;trap[0].top = p1->pos.y;trap[0].bottom = p3->pos.y;trap[0].left.v1 = *p1;trap[0].left.v2 = *p2;trap[0].right.v1 = *p1;trap[0].right.v2 = *p3;// 同上return (trap[0].top < trap[0].bottom)? 1 : 0;}// 如果没有两个点在一个水平方向上,则三角形为斜着的;// 根据中间的点的Y坐标分割三角形;// 分为上三角和下三角trap[0].top = p1->pos.y;trap[0].bottom = p2->pos.y;trap[1].top = p2->pos.y;trap[1].bottom = p3->pos.y;k = (p3->pos.y - p1->pos.y) / (p2->pos.y - p1->pos.y);x = p1->pos.x + (p2->pos.x - p1->pos.x) * k;if (x <= p3->pos.x) {        // triangle lefttrap[0].left.v1 = *p1;trap[0].left.v2 = *p2;trap[0].right.v1 = *p1;trap[0].right.v2 = *p3;trap[1].left.v1 = *p2;trap[1].left.v2 = *p3;trap[1].right.v1 = *p1;trap[1].right.v2 = *p3;} else {                    // triangle righttrap[0].left.v1 = *p1;trap[0].left.v2 = *p3;trap[0].right.v1 = *p1;trap[0].right.v2 = *p2;trap[1].left.v1 = *p1;trap[1].left.v2 = *p3;trap[1].right.v1 = *p2;trap[1].right.v2 = *p3;}// 会有两个三角形return 2;
}
使用 trapezoid_edge_interp方法可以计算到y=y的直线与梯形的左腰和右腰边的交点,这里是分别计算了用y分割两个边的比例,然后插值得到目标点的坐标;
这里应该没有必要必要分别计算t1和t2,感觉t1和t2在数值上应该是相等的;
需要验证一下。。。。。。。
// 按照 Y 坐标计算出左右两条边纵坐标等于 Y 的顶点
void trapezoid_edge_interp(trapezoid_t *trap, float y) {float s1 = trap->left.v2.pos.y  - trap->left.v1.pos.y;float s2 = trap->right.v2.pos.y - trap->right.v1.pos.y;float t1 = (y - trap->left.v1.pos.y) / s1;float t2 = (y - trap->right.v1.pos.y) / s2;vertex_interp(&trap->left.v, &trap->left.v1, &trap->left.v2, t1);vertex_interp(&trap->right.v, &trap->right.v1, &trap->right.v2, t2);
}
vertex_division可以计算出每个扫描点之前的差值,用于做线绘制时使用;
// 根据左右两边的端点,初始化计算出扫描线的起点和步长
void trapezoid_init_scan_line(const trapezoid_t *trap, scanline_t *scanline, int y) {float width = trap->right.v.pos.x - trap->left.v.pos.x;scanline->x = (int)(trap->left.v.pos.x + 0.5f);scanline->w = (int)(trap->right.v.pos.x + 0.5f) - scanline->x;scanline->y = y;scanline->v = trap->left.v;if (trap->left.v.pos.x >= trap->right.v.pos.x) scanline->w = 0;vertex_division(&scanline->step, &trap->left.v, &trap->right.v, width);
}
画布-绘制设备
设备信息结构体:
//=====================================================================
// 渲染设备
//=====================================================================
typedef struct {transform_t transform;      // 坐标变换器int width;                  // 窗口宽度int height;                 // 窗口高度IUINT32 **framebuffer;      // 像素缓存:framebuffer[y] 代表第 y行float **zbuffer;            // 深度缓存:zbuffer[y] 为第 y行指针IUINT32 **texture;          // 纹理:同样是每行索引int tex_width;              // 纹理宽度int tex_height;             // 纹理高度float max_u;                // 纹理最大宽度:tex_width - 1float max_v;                // 纹理最大高度:tex_height - 1int render_state;           // 渲染状态IUINT32 background;         // 背景颜色IUINT32 foreground;         // 线框颜色
} device_t;#define RENDER_STATE_WIREFRAME      1        // 渲染线框
#define RENDER_STATE_TEXTURE        2        // 渲染纹理
#define RENDER_STATE_COLOR          4        // 渲染颜色
初始化设备,清理设备;
// 设备初始化,fb为外部帧缓存,非 NULL 将引用外部帧缓存(每行 4字节对齐)
void device_init(device_t *device, int width, int height, void *fb) {int need = sizeof(void*) * (height * 2 + 1024) + width * height * 8;char *ptr = (char*)malloc(need + 64);char *framebuf, *zbuf;int j;assert(ptr);device->framebuffer = (IUINT32**)ptr;device->zbuffer = (float**)(ptr + sizeof(void*) * height);ptr += sizeof(void*) * height * 2;device->texture = (IUINT32**)ptr;ptr += sizeof(void*) * 1024;framebuf = (char*)ptr;zbuf = (char*)ptr + width * height * 4;ptr += width * height * 8;if (fb != NULL) framebuf = (char*)fb;for (j = 0; j < height; j++) {device->framebuffer[j] = (IUINT32*)(framebuf + width * 4 * j);device->zbuffer[j] = (float*)(zbuf + width * 4 * j);}device->texture[0] = (IUINT32*)ptr;device->texture[1] = (IUINT32*)(ptr + 16);memset(device->texture[0], 0, 64);device->tex_width = 2;device->tex_height = 2;device->max_u = 1.0f;device->max_v = 1.0f;device->width = width;device->height = height;device->background = 0xc0c0c0;device->foreground = 0;transform_init(&device->transform, width, height);device->render_state = RENDER_STATE_WIREFRAME;
}// 删除设备
void device_destroy(device_t *device) {if (device->framebuffer) free(device->framebuffer);device->framebuffer = NULL;device->zbuffer = NULL;device->texture = NULL;
}
设置当前纹理,将bits指针指向的纹理二维数组的行首指针赋值给texture;更新设备信息中纹理相关的数据;
// 设置当前纹理
void device_set_texture(device_t *device, void *bits, long pitch, int w, int h) {char *ptr = (char*)bits;int j;assert(w <= 1024 && h <= 1024);for (j = 0; j < h; ptr += pitch, j++)     // 重新计算每行纹理的指针device->texture[j] = (IUINT32*)ptr;device->tex_width = w;device->tex_height = h;device->max_u = (float)(w - 1);device->max_v = (float)(h - 1);
}
根据坐标读取纹理
IUINT32 device_texture_read(const device_t *device, float u, float v) {int x, y;u = u * device->max_u;v = v * device->max_v;x = (int)(u + 0.5f);y = (int)(v + 0.5f);x = CMID(x, 0, device->tex_width - 1);y = CMID(y, 0, device->tex_height - 1);return device->texture[y][x];
}
在设备上绘制点线面
// 画点
void device_pixel(device_t *device, int x, int y, IUINT32 color) {if (((IUINT32)x) < (IUINT32)device->width && ((IUINT32)y) < (IUINT32)device->height) {device->framebuffer[y][x] = color;}
}// 绘制线段
void device_draw_line(device_t *device, int x1, int y1, int x2, int y2, IUINT32 c) {int x, y, rem = 0;if (x1 == x2 && y1 == y2) {device_pixel(device, x1, y1, c);}    else if (x1 == x2) {int inc = (y1 <= y2)? 1 : -1;for (y = y1; y != y2; y += inc) device_pixel(device, x1, y, c);device_pixel(device, x2, y2, c);}    else if (y1 == y2) {int inc = (x1 <= x2)? 1 : -1;for (x = x1; x != x2; x += inc) device_pixel(device, x, y1, c);device_pixel(device, x2, y2, c);}    else {int dx = (x1 < x2)? x2 - x1 : x1 - x2;int dy = (y1 < y2)? y2 - y1 : y1 - y2;if (dx >= dy) {if (x2 < x1) x = x1, y = y1, x1 = x2, y1 = y2, x2 = x, y2 = y;for (x = x1, y = y1; x <= x2; x++) {device_pixel(device, x, y, c);rem += dy;if (rem >= dx) {rem -= dx;y += (y2 >= y1)? 1 : -1;device_pixel(device, x, y, c);}}device_pixel(device, x2, y2, c);}    else {if (y2 < y1) x = x1, y = y1, x1 = x2, y1 = y2, x2 = x, y2 = y;for (x = x1, y = y1; y <= y2; y++) {device_pixel(device, x, y, c);rem += dx;if (rem >= dy) {rem -= dy;x += (x2 >= x1)? 1 : -1;device_pixel(device, x, y, c);}}device_pixel(device, x2, y2, c);}}
}// 绘制扫描线
void device_draw_scanline(device_t *device, scanline_t *scanline) {IUINT32 *framebuffer = device->framebuffer[scanline->y];float *zbuffer = device->zbuffer[scanline->y];int x = scanline->x;int w = scanline->w;int width = device->width;int render_state = device->render_state;for (; w > 0; x++, w--) {if (x >= 0 && x < width) {float rhw = scanline->v.rhw;if (rhw >= zbuffer[x]) {    float w = 1.0f / rhw;zbuffer[x] = rhw;if (render_state & RENDER_STATE_COLOR) {float r = scanline->v.color.r * w;float g = scanline->v.color.g * w;float b = scanline->v.color.b * w;int R = (int)(r * 255.0f);int G = (int)(g * 255.0f);int B = (int)(b * 255.0f);R = CMID(R, 0, 255);G = CMID(G, 0, 255);B = CMID(B, 0, 255);framebuffer[x] = (R << 16) | (G << 8) | (B);}if (render_state & RENDER_STATE_TEXTURE) {float u = scanline->v.tc.u * w;float v = scanline->v.tc.v * w;IUINT32 cc = device_texture_read(device, u, v);framebuffer[x] = cc;}}}vertex_add(&scanline->v, &scanline->step);if (x >= width) break;}
}
// 清空 framebuffer 和 zbuffer
void device_clear(device_t *device, int mode) {int y, x, height = device->height;for (y = 0; y < device->height; y++) {IUINT32 *dst = device->framebuffer[y];IUINT32 cc = (height - 1 - y) * 230 / (height - 1);cc = (cc << 16) | (cc << 8) | cc;if (mode == 0) cc = device->background;for (x = device->width; x > 0; dst++, x--) dst[0] = cc;}for (y = 0; y < device->height; y++) {float *dst = device->zbuffer[y];for (x = device->width; x > 0; dst++, x--) dst[0] = 0.0f;}
}
// 主渲染函数
void device_render_trap(device_t *device, trapezoid_t *trap) {scanline_t scanline;int j, top, bottom;top = (int)(trap->top + 0.5f);bottom = (int)(trap->bottom + 0.5f);for (j = top; j < bottom; j++) {if (j >= 0 && j < device->height) {trapezoid_edge_interp(trap, (float)j + 0.5f);trapezoid_init_scan_line(trap, &scanline, j);device_draw_scanline(device, &scanline);}if (j >= device->height) break;}
}// 根据 render_state 绘制原始三角形
void device_draw_primitive(device_t *device, const vertex_t *v1, const vertex_t *v2, const vertex_t *v3) {point_t p1, p2, p3, c1, c2, c3;int render_state = device->render_state;// 按照 Transform 变化transform_apply(&device->transform, &c1, &v1->pos);transform_apply(&device->transform, &c2, &v2->pos);transform_apply(&device->transform, &c3, &v3->pos);// 裁剪,注意此处可以完善为具体判断几个点在 cvv内以及同cvv相交平面的坐标比例// 进行进一步精细裁剪,将一个分解为几个完全处在 cvv内的三角形if (transform_check_cvv(&c1) != 0) return;if (transform_check_cvv(&c2) != 0) return;if (transform_check_cvv(&c3) != 0) return;// 归一化transform_homogenize(&device->transform, &p1, &c1);transform_homogenize(&device->transform, &p2, &c2);transform_homogenize(&device->transform, &p3, &c3);// 纹理或者色彩绘制if (render_state & (RENDER_STATE_TEXTURE | RENDER_STATE_COLOR)) {vertex_t t1 = *v1, t2 = *v2, t3 = *v3;trapezoid_t traps[2];int n;t1.pos = p1; t2.pos = p2;t3.pos = p3;t1.pos.w = c1.w;t2.pos.w = c2.w;t3.pos.w = c3.w;vertex_rhw_init(&t1); // 初始化 wvertex_rhw_init(&t2); // 初始化 wvertex_rhw_init(&t3); // 初始化 w// 拆分三角形为0-2个梯形,并且返回可用梯形数量n = trapezoid_init_triangle(traps, &t1, &t2, &t3);if (n >= 1) device_render_trap(device, &traps[0]);if (n >= 2) device_render_trap(device, &traps[1]);}if (render_state & RENDER_STATE_WIREFRAME) { // 线框绘制device_draw_line(device, (int)p1.x, (int)p1.y, (int)p2.x, (int)p2.y, device->foreground);device_draw_line(device, (int)p1.x, (int)p1.y, (int)p3.x, (int)p3.y, device->foreground);device_draw_line(device, (int)p3.x, (int)p3.y, (int)p2.x, (int)p2.y, device->foreground);}
}//=====================================================================
// Win32 窗口及图形绘制:为 device 提供一个 DibSection 的 FB
//=====================================================================
int screen_w, screen_h, screen_exit = 0;
int screen_mx = 0, screen_my = 0, screen_mb = 0;
int screen_keys[512]; // 当前键盘按下状态
static HWND screen_handle = NULL; // 主窗口 HWND
static HDC screen_dc = NULL; // 配套的 HDC
static HBITMAP screen_hb = NULL; // DIB
static HBITMAP screen_ob = NULL; // 老的 BITMAP
unsigned char *screen_fb = NULL; // frame buffer
long screen_pitch = 0;int screen_init(int w, int h, const TCHAR *title); // 屏幕初始化
int screen_close(void); // 关闭屏幕
void screen_dispatch(void); // 处理消息
void screen_update(void); // 显示 FrameBuffer// win32 event handler
static LRESULT screen_events(HWND, UINT, WPARAM, LPARAM); #ifdef _MSC_VER
#pragma comment(lib, "gdi32.lib")
#pragma comment(lib, "user32.lib")
#endif// 初始化窗口并设置标题
int screen_init(int w, int h, const TCHAR *title) {WNDCLASS wc = { CS_BYTEALIGNCLIENT, (WNDPROC)screen_events, 0, 0, 0, NULL, NULL, NULL, NULL, _T("SCREEN3.1415926") };BITMAPINFO bi = { { sizeof(BITMAPINFOHEADER), w, -h, 1, 32, BI_RGB, w * h * 4, 0, 0, 0, 0 } };RECT rect = { 0, 0, w, h };int wx, wy, sx, sy;LPVOID ptr;HDC hDC;screen_close();wc.hbrBackground = (HBRUSH)GetStockObject(BLACK_BRUSH);wc.hInstance = GetModuleHandle(NULL);wc.hCursor = LoadCursor(NULL, IDC_ARROW);if (!RegisterClass(&wc)) return -1;screen_handle = CreateWindow(_T("SCREEN3.1415926"), title,WS_OVERLAPPED | WS_CAPTION | WS_SYSMENU | WS_MINIMIZEBOX,0, 0, 0, 0, NULL, NULL, wc.hInstance, NULL);if (screen_handle == NULL) return -2;screen_exit = 0;hDC = GetDC(screen_handle);screen_dc = CreateCompatibleDC(hDC);ReleaseDC(screen_handle, hDC);screen_hb = CreateDIBSection(screen_dc, &bi, DIB_RGB_COLORS, &ptr, 0, 0);if (screen_hb == NULL) return -3;screen_ob = (HBITMAP)SelectObject(screen_dc, screen_hb);screen_fb = (unsigned char*)ptr;screen_w = w;screen_h = h;screen_pitch = w * 4;AdjustWindowRect(&rect, GetWindowLong(screen_handle, GWL_STYLE), 0);wx = rect.right - rect.left;wy = rect.bottom - rect.top;sx = (GetSystemMetrics(SM_CXSCREEN) - wx) / 2;sy = (GetSystemMetrics(SM_CYSCREEN) - wy) / 2;if (sy < 0) sy = 0;SetWindowPos(screen_handle, NULL, sx, sy, wx, wy, (SWP_NOCOPYBITS | SWP_NOZORDER | SWP_SHOWWINDOW));SetForegroundWindow(screen_handle);ShowWindow(screen_handle, SW_NORMAL);screen_dispatch();memset(screen_keys, 0, sizeof(int) * 512);memset(screen_fb, 0, w * h * 4);return 0;
}int screen_close(void) {if (screen_dc) {if (screen_ob) { SelectObject(screen_dc, screen_ob); screen_ob = NULL; }DeleteDC(screen_dc);screen_dc = NULL;}if (screen_hb) { DeleteObject(screen_hb); screen_hb = NULL; }if (screen_handle) { CloseWindow(screen_handle); screen_handle = NULL; }return 0;
}static LRESULT screen_events(HWND hWnd, UINT msg, WPARAM wParam, LPARAM lParam) {switch (msg) {case WM_CLOSE: screen_exit = 1; break;case WM_KEYDOWN: screen_keys[wParam & 511] = 1; break;case WM_KEYUP: screen_keys[wParam & 511] = 0; break;default: return DefWindowProc(hWnd, msg, wParam, lParam);}return 0;
}void screen_dispatch(void) {MSG msg;while (1) {if (!PeekMessage(&msg, NULL, 0, 0, PM_NOREMOVE)) break;if (!GetMessage(&msg, NULL, 0, 0)) break;DispatchMessage(&msg);}
}void screen_update(void) {HDC hDC = GetDC(screen_handle);BitBlt(hDC, 0, 0, screen_w, screen_h, screen_dc, 0, 0, SRCCOPY);ReleaseDC(screen_handle, hDC);screen_dispatch();
}//=====================================================================
// 主程序
//=====================================================================
vertex_t mesh[8] = {{ { -1, -1, 1, 1 }, { 0, 0 }, { 1.0f, 0.2f, 0.2f }, 1 },{ { 1, -1, 1, 1 }, { 0, 1 }, { 0.2f, 1.0f, 0.2f }, 1 },{ { 1, 1, 1, 1 }, { 1, 1 }, { 0.2f, 0.2f, 1.0f }, 1 },{ { -1, 1, 1, 1 }, { 1, 0 }, { 1.0f, 0.2f, 1.0f }, 1 },{ { -1, -1, -1, 1 }, { 0, 0 }, { 1.0f, 1.0f, 0.2f }, 1 },{ { 1, -1, -1, 1 }, { 0, 1 }, { 0.2f, 1.0f, 1.0f }, 1 },{ { 1, 1, -1, 1 }, { 1, 1 }, { 1.0f, 0.3f, 0.3f }, 1 },{ { -1, 1, -1, 1 }, { 1, 0 }, { 0.2f, 1.0f, 0.3f }, 1 },
};void draw_plane(device_t *device, int a, int b, int c, int d) {vertex_t p1 = mesh[a], p2 = mesh[b], p3 = mesh[c], p4 = mesh[d];p1.tc.u = 0, p1.tc.v = 0, p2.tc.u = 0, p2.tc.v = 1;p3.tc.u = 1, p3.tc.v = 1, p4.tc.u = 1, p4.tc.v = 0;device_draw_primitive(device, &p1, &p2, &p3);device_draw_primitive(device, &p3, &p4, &p1);
}void draw_box(device_t *device, float theta) {matrix_t m;matrix_set_rotate(&m, -1, -0.5, 1, theta);device->transform.world = m;transform_update(&device->transform);draw_plane(device, 0, 1, 2, 3);draw_plane(device, 7, 6, 5, 4);draw_plane(device, 0, 4, 5, 1);draw_plane(device, 1, 5, 6, 2);draw_plane(device, 2, 6, 7, 3);draw_plane(device, 3, 7, 4, 0);
}void camera_at_zero(device_t *device, float x, float y, float z) {point_t eye = { x, y, z, 1 }, at = { 0, 0, 0, 1 }, up = { 0, 0, 1, 1 };matrix_set_lookat(&device->transform.view, &eye, &at, &up);transform_update(&device->transform);
}void init_texture(device_t *device) {static IUINT32 texture[256][256];int i, j;for (j = 0; j < 256; j++) {for (i = 0; i < 256; i++) {int x = i / 32, y = j / 32;texture[j][i] = ((x + y) & 1)? 0xffffff : 0x3fbcef;}}device_set_texture(device, texture, 256 * 4, 256, 256);
}int main(void)
{device_t device;int states[] = { RENDER_STATE_TEXTURE, RENDER_STATE_COLOR, RENDER_STATE_WIREFRAME };int indicator = 0;int kbhit = 0;float alpha = 1;float pos = 3.5;TCHAR *title = _T("Mini3d (software render tutorial) - ")_T("Left/Right: rotation, Up/Down: forward/backward, Space: switch state");if (screen_init(800, 600, title)) return -1;device_init(&device, 800, 600, screen_fb);camera_at_zero(&device, 3, 0, 0);init_texture(&device);device.render_state = RENDER_STATE_TEXTURE;while (screen_exit == 0 && screen_keys[VK_ESCAPE] == 0) {screen_dispatch();device_clear(&device, 1);camera_at_zero(&device, pos, 0, 0);if (screen_keys[VK_UP]) pos -= 0.01f;if (screen_keys[VK_DOWN]) pos += 0.01f;if (screen_keys[VK_LEFT]) alpha += 0.01f;if (screen_keys[VK_RIGHT]) alpha -= 0.01f;if (screen_keys[VK_SPACE]) {if (kbhit == 0) {kbhit = 1;if (++indicator >= 3) indicator = 0;device.render_state = states[indicator];}} else {kbhit = 0;}draw_box(&device, alpha);screen_update();Sleep(1);}return 0;
}从0开始制作软渲染器(三)本文开始编写渲染器的代码。 本着色器很大程度上参考了韦易笑大神的RenderHelp渲染器。我的渲染器的理论是跟着Games101和《Fundamentals of Computer Graphics, Fourth Edition》这本书来的,和韦大神渲染器中的方程不太一样(尤其是透视投影,深度测试的地方),所以如果要跟着我这系列博客学习,请务必从头看到尾,以避免公式和细节不一致的情况出现。 最 https://visualgmq.gitee.io/2022/03/08/%E4%BB%8E0%E5%BC%80%E5%A7%8B%E5%88%B6%E4%BD%9C%E8%BD%AF%E6%B8%B2%E6%9F%93%E5%99%A8%EF%BC%88%E4%B8%89%EF%BC%89/
纹理UV坐标UV![]() https://baike.baidu.com/item/UV/2490475?fr=aladdin
https://baike.baidu.com/item/UV/2490475?fr=aladdin
相关文章:
笔记--学习mini3d代码
主要是记录学习mini3d代码时,查的资料; 从github下载的代码: GitHub - skywind3000/mini3d: 3D Software Renderer in 700 Lines !!3D Software Renderer in 700 Lines !! Contribute to skywind3000/mini3d development by creating an a…...
图片服务器
文章目录一、项目简介二、功能及场景三、业务设计四、数据库设计准备图片表准备实体类五、API设计常用功能封装文件上传文件上传获取图片列表接口获取图片内容删除图片接口六、项目优化七、测试自动化测试测试用例一、项目简介 图片服务器:解决项目中插入图片的问题…...
【JAVA程序设计】【C00110】基于SSM(非maven)的车辆维修管理系统
基于SSM(非maven)的车辆维修管理系统项目简介项目获取开发环境项目技术运行截图项目简介 基于ssm框架非maven开发的车辆维修管理系统共分为三个角色:管理员、用户 管理员角色包含以下功能: 查看用户、添加用户、查看车辆信息、故…...
【中学里的解题技巧】)
微积分小课堂:用动态的眼光去找问题的最优解(最大值/最小值)【中学里的解题技巧】
文章目录 引言I 最优化问题1.1 不同形式的最优化1.2 用动态的眼光去找问题的最优解引言 把比较数大小的问题,变成了寻找函数变化拐点的问题,将这两个问题等同起来,需要发明一种工具,叫做导数。有了导数这个工具,求最大值问题就变成了解方程的问题。 用变化的眼光找到最优…...

网络爬虫和相关工具
在理想的状态下,所有ICP(Internet Content Provider)都应该为自己的网站提供API接口来共享它们允许其他程序获取的数据,在这种情况下爬虫就不是必需品,国内比较有名的电商平台(如淘宝、京东等)、…...

OSSFs挂载工具简介
OSSFs挂载工具 OSSFs挂载工具简介 ossfs允许您在Linux系统中将对象存储OSS的存储空间(Bucket)挂载到本地文件系统。挂载完成后,您能够像操作本地文件一样操作OSS的对象(Object),从而实现数据共享。 …...
Spring 容器创建初始化,获取bean流程分析
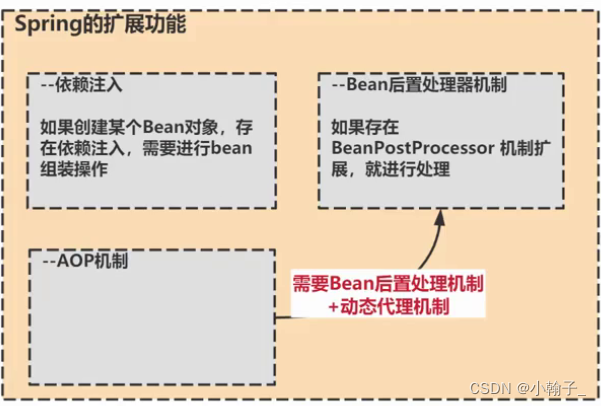
Spring 容器创建初始化,获取bean流程分析 Spring 容器创建初始化 流程分析 1、首先读取bean.xml 文件 2、扫描指定的包 com.hspedu.spring.component 2.1、扫描包,得到bean的class对象,排除包下不是bean的 2.2、扫描将bean信息封装BeanDef…...
无聊小知识.03 Springboot starter配置自动提示
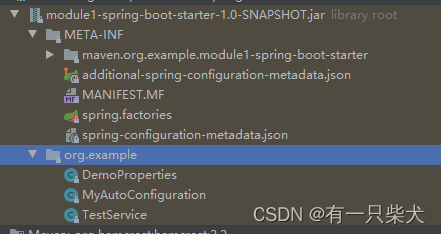
1、前言Springboot项目配置properties或yaml文件时候,会有很多spring相关的配置提示。这个是如何实现的?如果我们自己的配置属性,能否也自动提示?2、Springboot配置自动提示其实IDE是通过读取配置信息的元数据而实现自动提示的。S…...

2023-03-03 mysql-join类别-分析
目录 摘要: mysql版本: DDL: 表结构: 插入数据: JOIN: 一. SELECT 二. INNER JOIN...

Saleen 系列来袭!
由 Ghostopunch 创作👻🥊 Ghostpunch 将 Saleen Automotive 带入 The Sandbox 元宇宙! 是 Saleen Automotive 于 1984 年由汽车界的梦想家 Steve Saleen 创立,目标是将经过比赛验证的性能带入大街小巷和元宇宙……😉 5…...

如何优雅地处理Java中的null值?使用Optional类来实现!
当我们在Java编程时,经常会遇到处理null值的问题。在Java 8中,引入了一个Optional类来解决这个问题。Optional类可以看作是一个容器,用于包装一个可能为null的值。它提供了一些方便的方法,以优雅地处理null值的情况。 下面我将详…...

巾帼绽芬芳 一起向未来(中篇)
编者按:为了隆重纪念纪念“三八”国际妇女节113周年,快来与你全方位、多层次分享交流“三八”国际妇女节的前世今生。分上篇(节日简介、节日发展和节日意义)、中篇(节日活动宗旨和世界各国庆祝方式)和下篇&…...

espnet training
from:ESPnet2 — ESPnet 202301 documentation from :Change the configuration for training — ESPnet 202301 documentation 训练完之后微调的命令: ./run.sh --stage 11 --ngpu 1 --asr_args "--max_epoch 205 --optim_conf lr=0.1 --resume true" --asr_exp…...

qsort函数的应用以及模拟实现
前言 🎈个人主页:🎈 :✨✨✨初阶牛✨✨✨ 🐻推荐专栏: 🍔🍟🌯 c语言进阶 🔑个人信条: 🌵知行合一 🍉本篇简介:>:介绍库函数qsort函数的模拟实现和应用 金句分享: ✨追…...

【iobit 软件】家族系列 - 正版激活码
装机必备iobit系列软件 - 激活码获取看最后 第一款、Advanced SystemCare 16 您需要的人工智能驱动的PC优化器,以释放磁盘空间,加速PC并保护在线隐私。 功能特点: 1. 系统清理与优化:通过清除系统垃圾文件、注册表信息、无用文…...
ACM-大一训练第三周(Floyd算法+并查集算法专题训练)
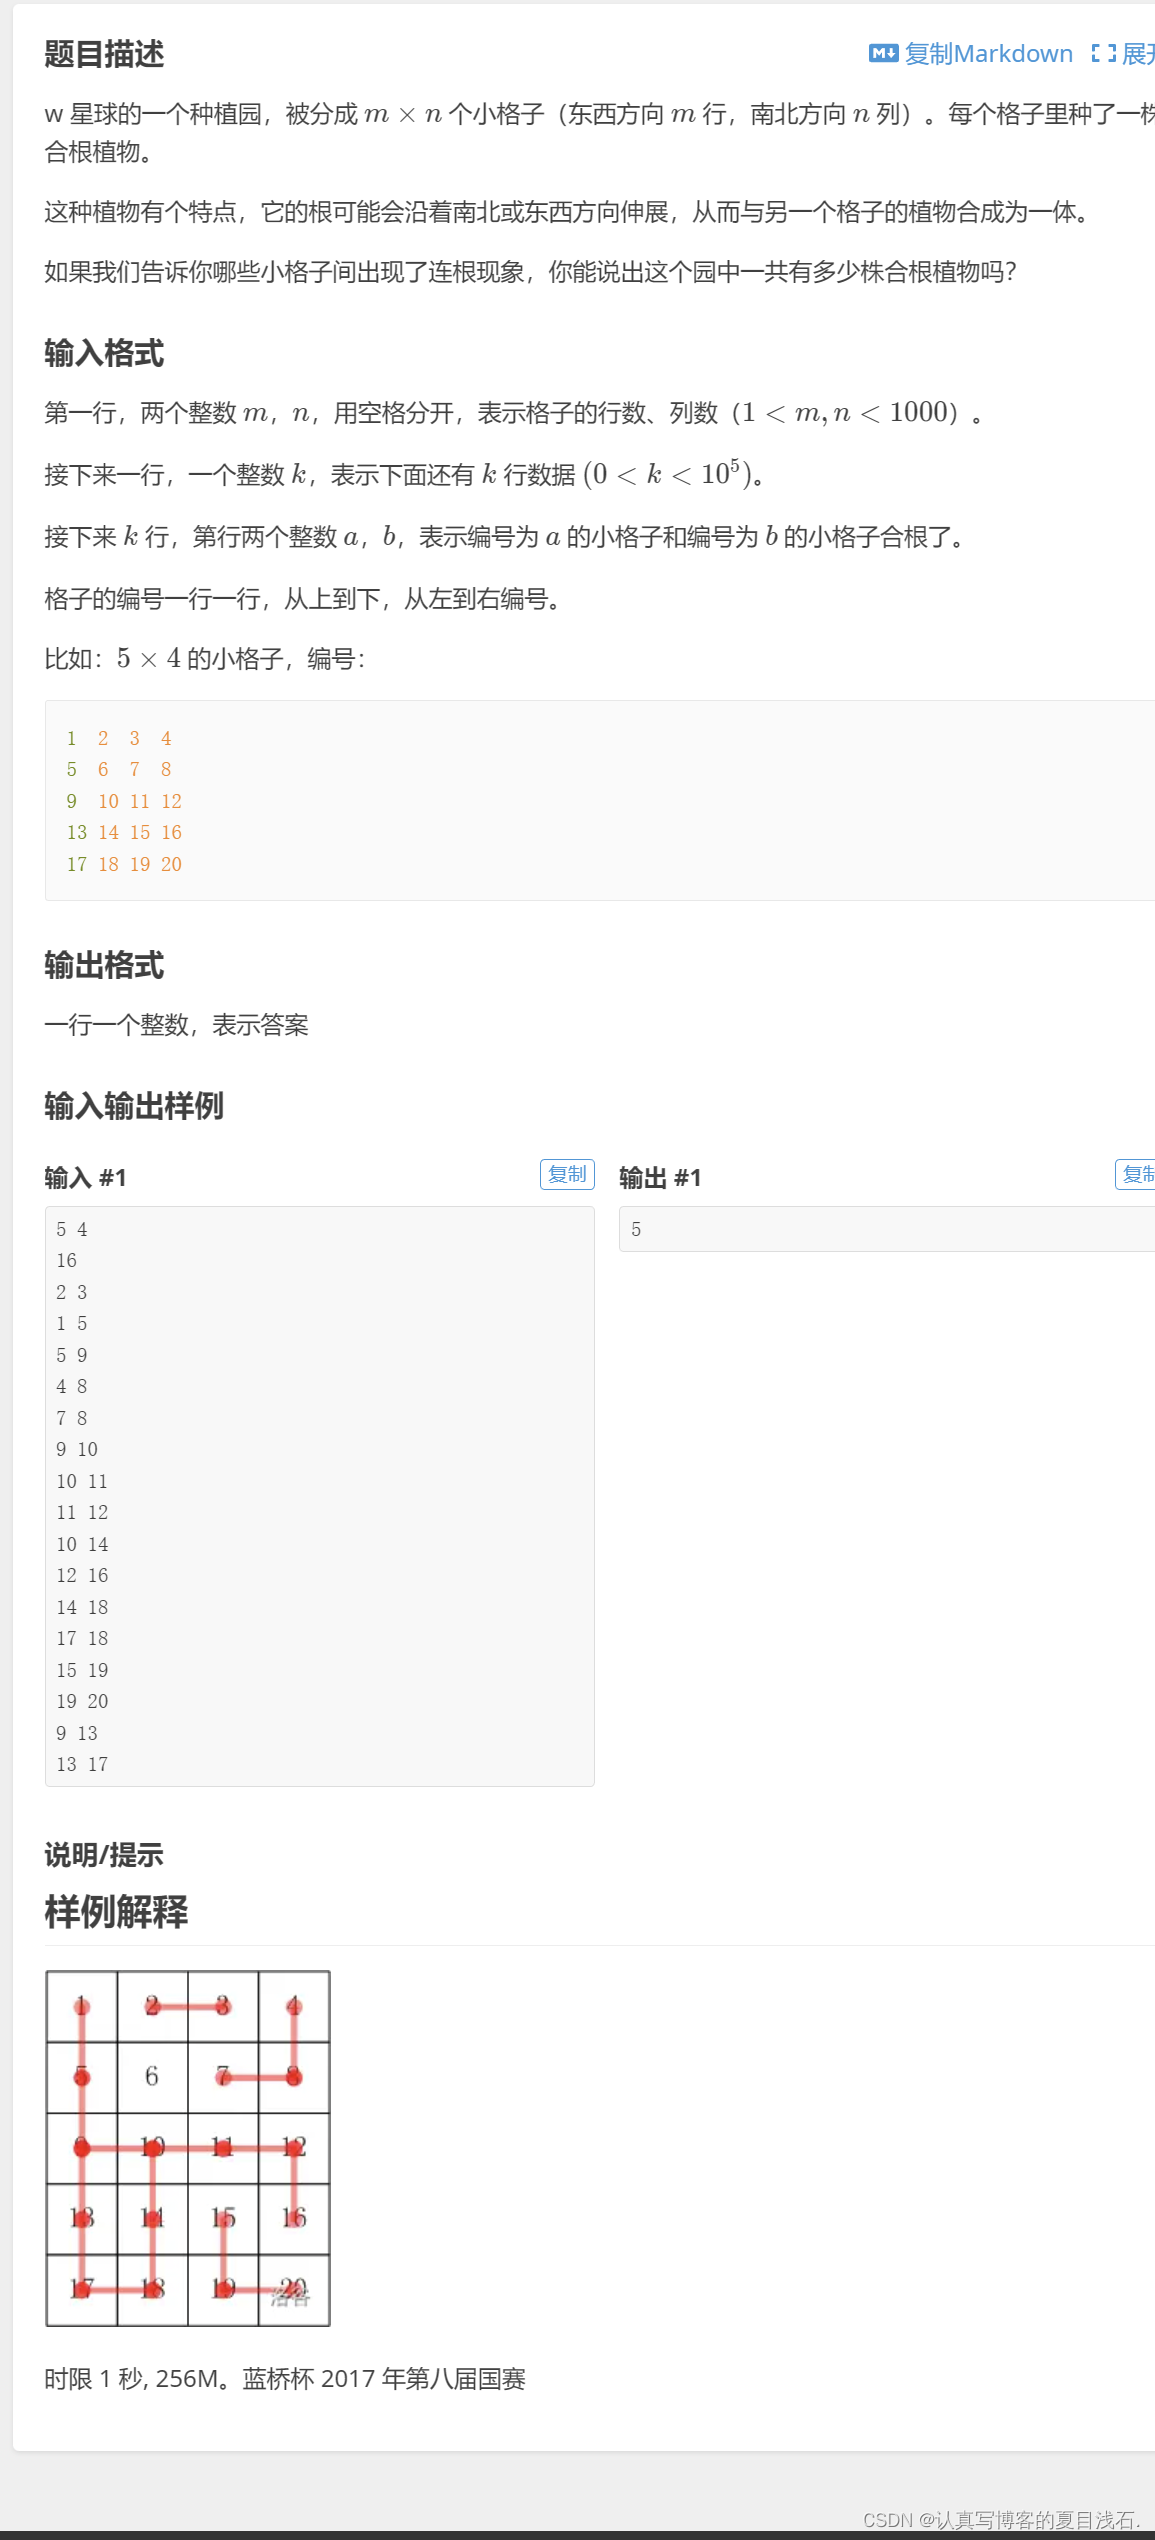
🚀write in front🚀 📝个人主页:认真写博客的夏目浅石.CSDN 🎁欢迎各位→点赞👍 收藏⭐️ 留言📝 📣系列专栏:ACM周训练题目合集.CSDN 💬总结:…...

taobao.item.sku.update( 更新SKU信息 )
¥开放平台免费API必须用户授权 *更新一个sku的数据 *需要更新的sku通过属性properties进行匹配查找 *商品的数量和价格必须大于等于0 *sku记录会更新到指定的num_iid对应的商品中 *num_iid对应的商品必须属于当前的会话用户 公共参数 请求地址: HTTP地址 http://gw.…...
ros2创建一个工程
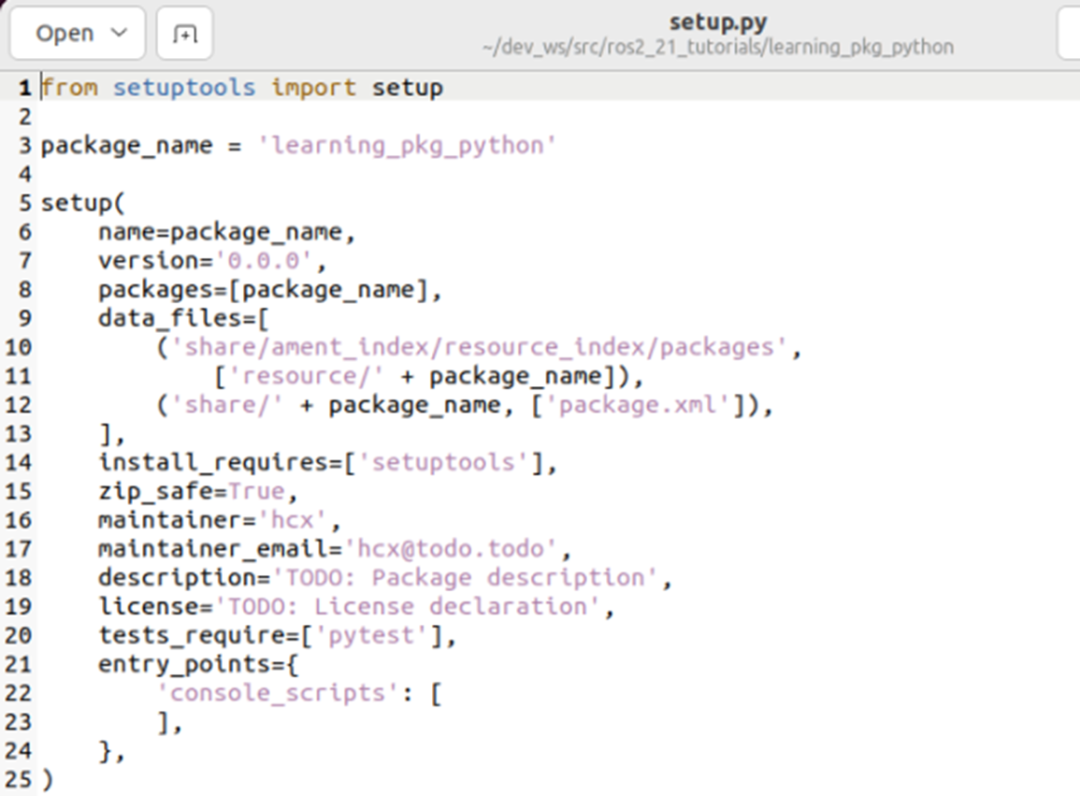
第一步:创建src目录 $ mkdir ros2-demo $ cd ros2-demo/ $ mkdir src $ cd src/第二步:创建功能包cd src$ ros2 pkg create --build-type ament_cmake ros2_demo --dependencies rclcpp std_msgsros2 pkg create --build-type ament_python learning_pkg…...

【力扣】stack容器的探索之有效的括号
作者:狮子也疯狂 专栏:《算法详解》 愿你生如夏花之绚烂,幸运永远与你相伴,疯狂常在。 目录一. 🦁 Stack容器的来历1.1 操作栈的方法二. 🦁 Stack的使用2.1 题目2.2 分析2.3 详细算法实现2.4 力扣AC截图三…...

【Elsevier出版社】中科院2区,SCIEEI 双检,已有发表案例,3个月左右录用
1区智能传感器类SCIE&EI 【期刊简介】IF:5.0-6.0,JCR1区,中科院2区,SCI&EI 双检,正刊 【参考周期】3个月左右录用 【截稿日期】2023.5.30 【征稿领域】有关人工智能与传感器的相关研究均可 包括但不限于&#…...
:OpenBCI_GUI:从环境搭建到数据可视化(下))
脑机新手指南(八):OpenBCI_GUI:从环境搭建到数据可视化(下)
一、数据处理与分析实战 (一)实时滤波与参数调整 基础滤波操作 60Hz 工频滤波:勾选界面右侧 “60Hz” 复选框,可有效抑制电网干扰(适用于北美地区,欧洲用户可调整为 50Hz)。 平滑处理&…...

模型参数、模型存储精度、参数与显存
模型参数量衡量单位 M:百万(Million) B:十亿(Billion) 1 B 1000 M 1B 1000M 1B1000M 参数存储精度 模型参数是固定的,但是一个参数所表示多少字节不一定,需要看这个参数以什么…...
centos 7 部署awstats 网站访问检测
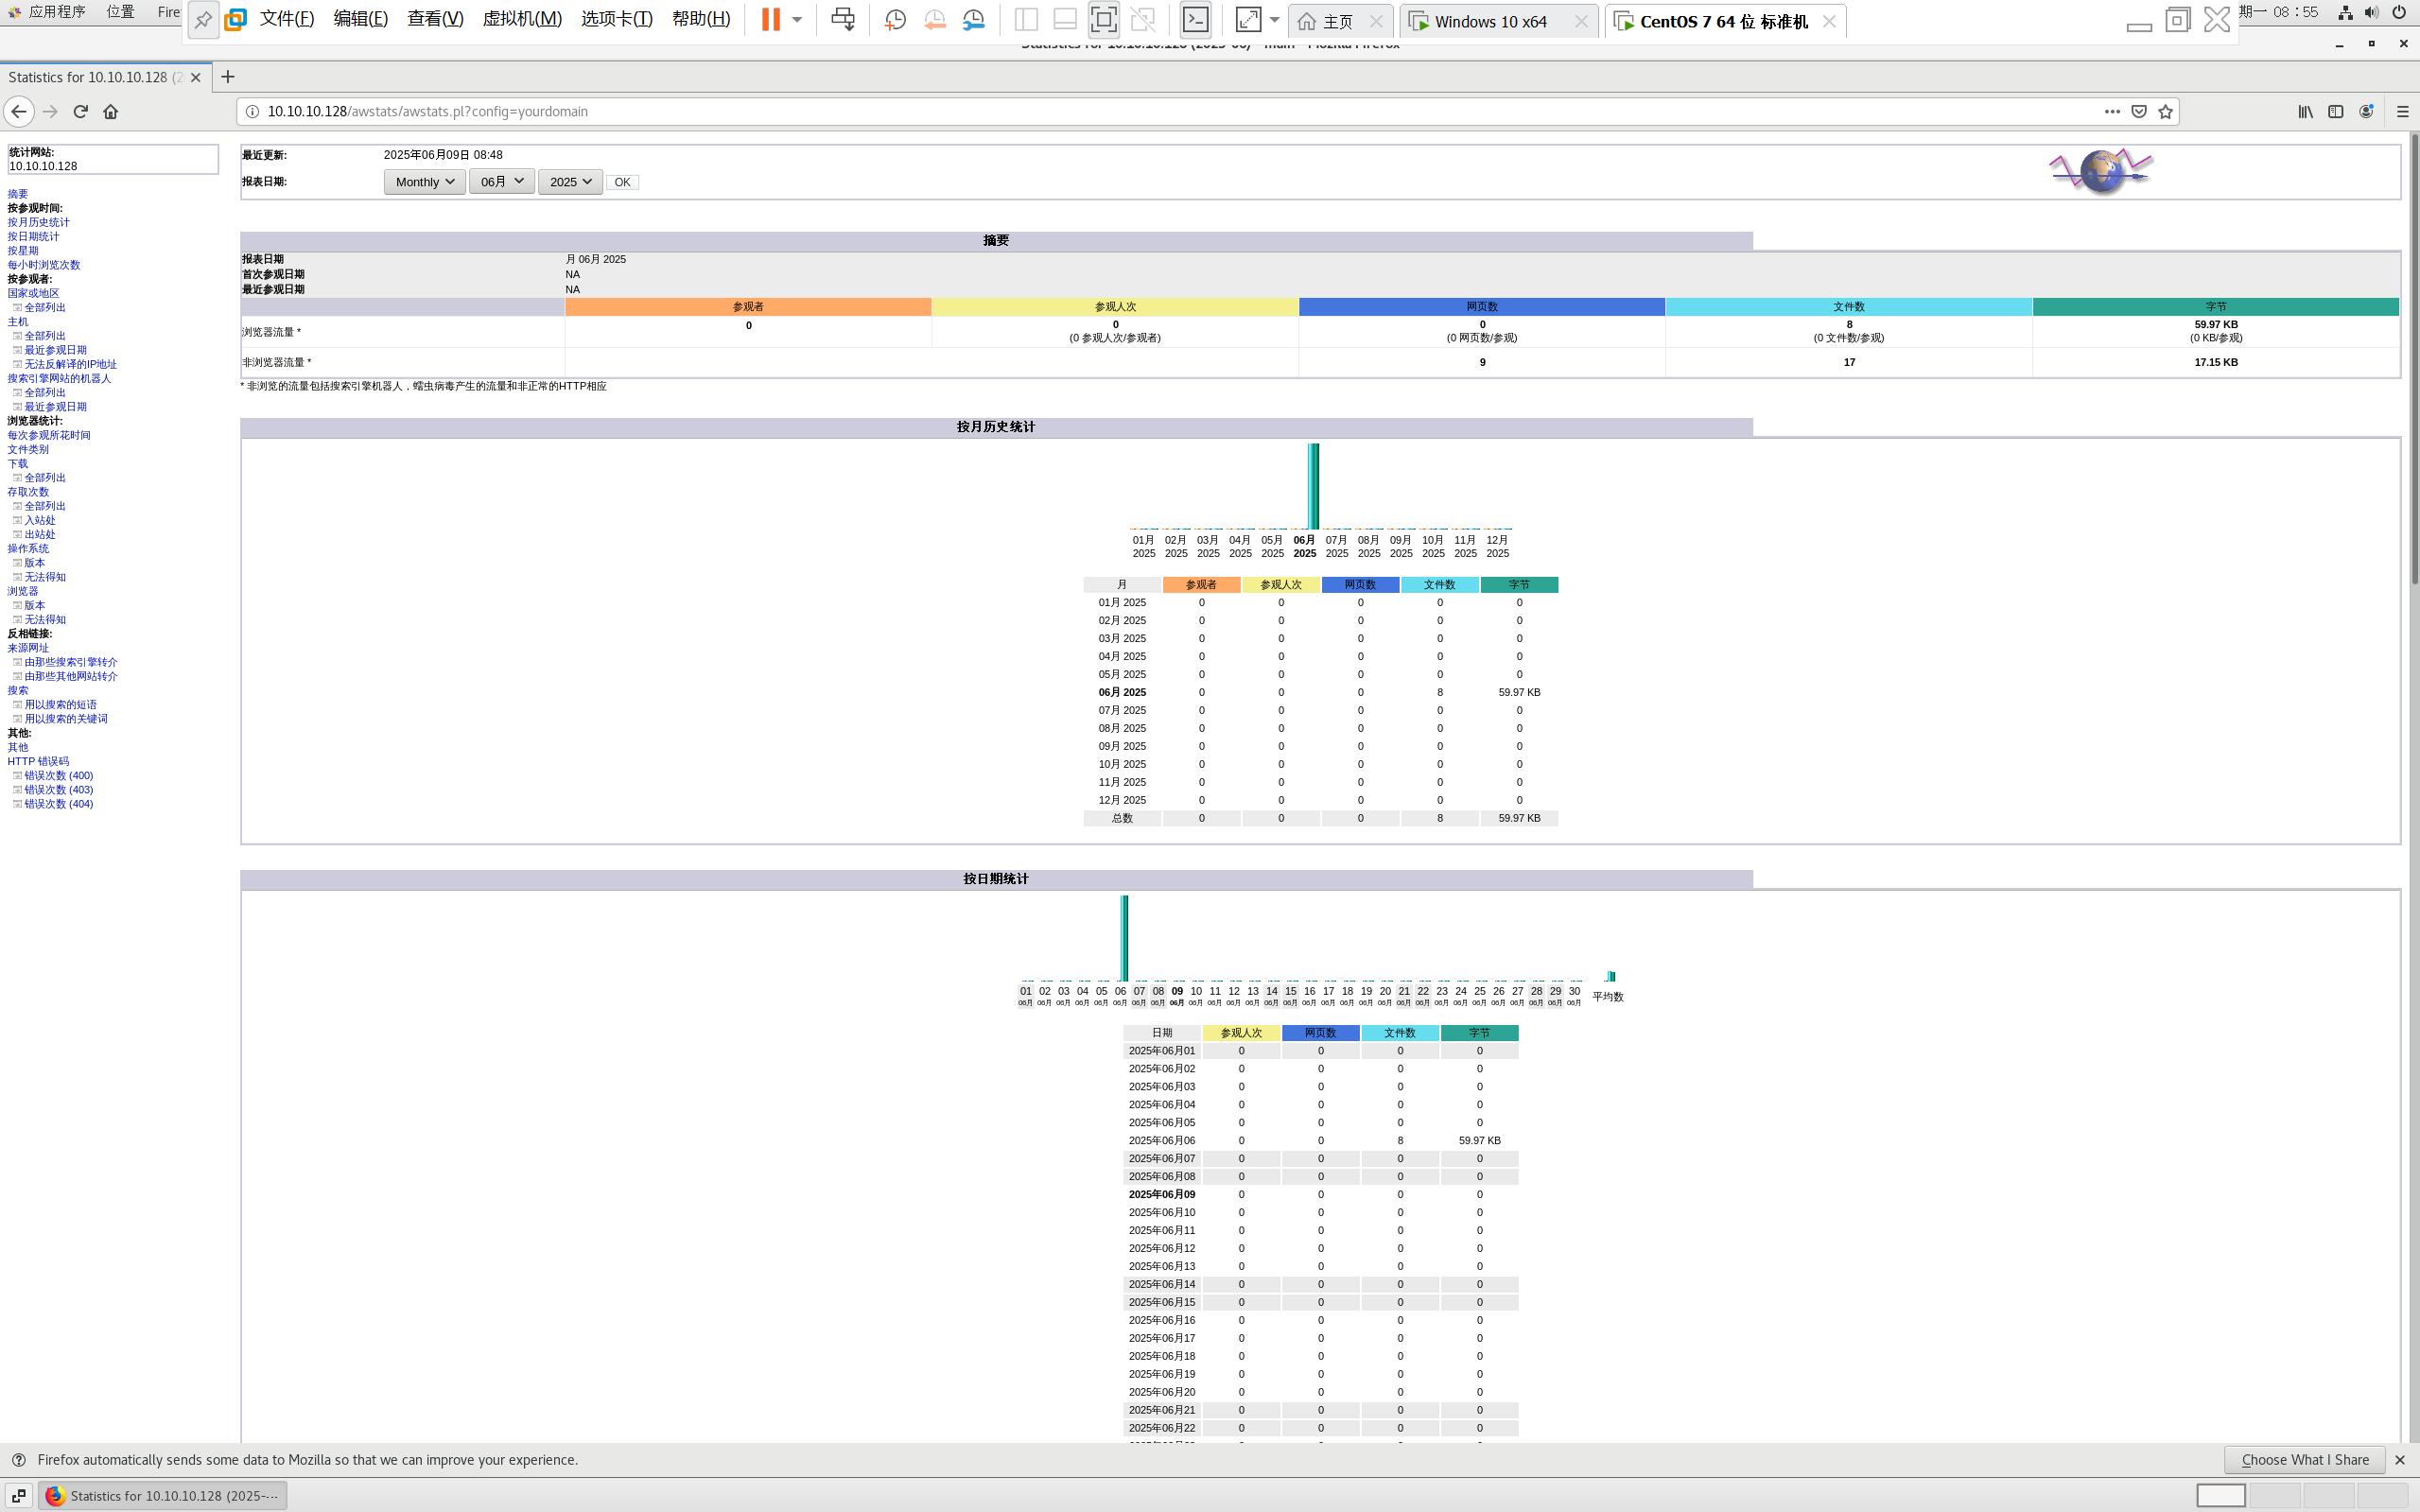
一、基础环境准备(两种安装方式都要做) bash # 安装必要依赖 yum install -y httpd perl mod_perl perl-Time-HiRes perl-DateTime systemctl enable httpd # 设置 Apache 开机自启 systemctl start httpd # 启动 Apache二、安装 AWStats࿰…...
` 方法)
深入浅出:JavaScript 中的 `window.crypto.getRandomValues()` 方法
深入浅出:JavaScript 中的 window.crypto.getRandomValues() 方法 在现代 Web 开发中,随机数的生成看似简单,却隐藏着许多玄机。无论是生成密码、加密密钥,还是创建安全令牌,随机数的质量直接关系到系统的安全性。Jav…...
CentOS下的分布式内存计算Spark环境部署
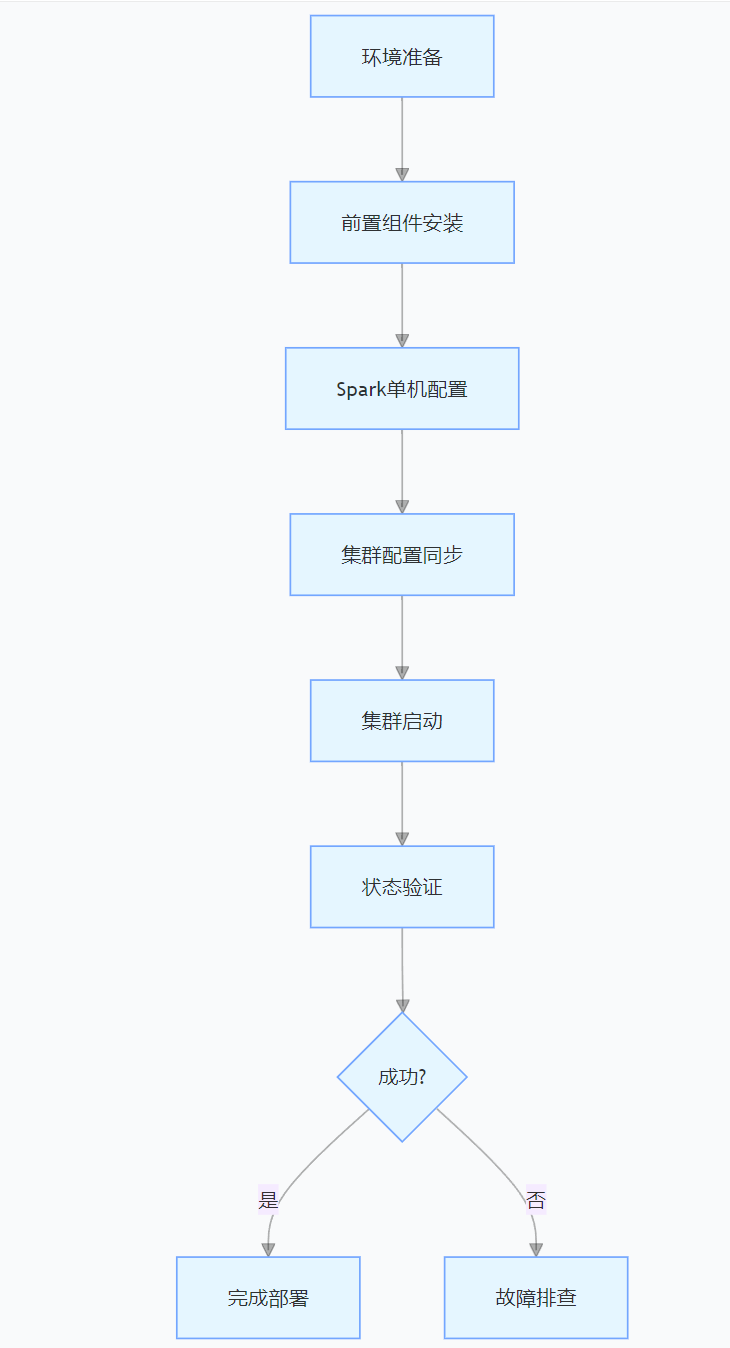
一、Spark 核心架构与应用场景 1.1 分布式计算引擎的核心优势 Spark 是基于内存的分布式计算框架,相比 MapReduce 具有以下核心优势: 内存计算:数据可常驻内存,迭代计算性能提升 10-100 倍(文档段落:3-79…...
cf2117E
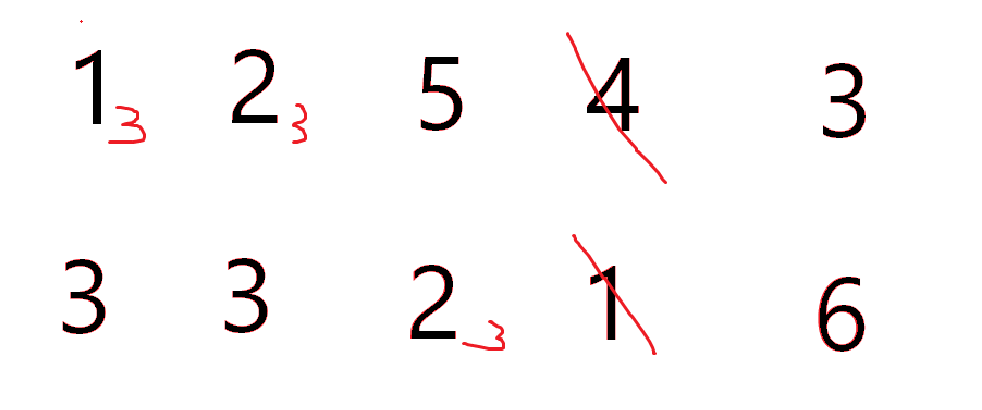
原题链接:https://codeforces.com/contest/2117/problem/E 题目背景: 给定两个数组a,b,可以执行多次以下操作:选择 i (1 < i < n - 1),并设置 或,也可以在执行上述操作前执行一次删除任意 和 。求…...

均衡后的SNRSINR
本文主要摘自参考文献中的前两篇,相关文献中经常会出现MIMO检测后的SINR不过一直没有找到相关数学推到过程,其中文献[1]中给出了相关原理在此仅做记录。 1. 系统模型 复信道模型 n t n_t nt 根发送天线, n r n_r nr 根接收天线的 MIMO 系…...

Mysql8 忘记密码重置,以及问题解决
1.使用免密登录 找到配置MySQL文件,我的文件路径是/etc/mysql/my.cnf,有的人的是/etc/mysql/mysql.cnf 在里最后加入 skip-grant-tables重启MySQL服务 service mysql restartShutting down MySQL… SUCCESS! Starting MySQL… SUCCESS! 重启成功 2.登…...

4. TypeScript 类型推断与类型组合
一、类型推断 (一) 什么是类型推断 TypeScript 的类型推断会根据变量、函数返回值、对象和数组的赋值和使用方式,自动确定它们的类型。 这一特性减少了显式类型注解的需要,在保持类型安全的同时简化了代码。通过分析上下文和初始值,TypeSc…...

关于uniapp展示PDF的解决方案
在 UniApp 的 H5 环境中使用 pdf-vue3 组件可以实现完整的 PDF 预览功能。以下是详细实现步骤和注意事项: 一、安装依赖 安装 pdf-vue3 和 PDF.js 核心库: npm install pdf-vue3 pdfjs-dist二、基本使用示例 <template><view class"con…...
