Android简单控件
1.文本显示
设置文本内容的两种方式:
-
在XML文件中通过属性 android:text 设置文本
<resources><string name="app_name">chapter03</string><string name="hello">你好,世界</string> </resources><TextViewandroid:id="@+id/tv_hello"android:layout_width="wrap_content"android:layout_height="wrap_content"android:text="@string/hello"/> -
在Java代码中调用文本视图对象的 setText 方法设置文本
@Overrideprotected void onCreate(@Nullable Bundle savedInstanceState) {super.onCreate(savedInstanceState);setContentView(R.layout.activity_text_view);TextView tv_hello = findViewById(R.id.tv_hello);//tv_hello.setText("你好,世界");tv_hello.setText(R.string.hello);}
设置文本的大小:
-
在Java代码中调用setTextSize方法,即可指定文本的大小
@Overrideprotected void onCreate(Bundle savedInstanceState) {super.onCreate(savedInstanceState);setContentView(R.layout.activity_text_size);TextView tv_px = findViewById(R.id.tv_px);tv_px.setText(30);} -
在XML文件中则通过属性android:textSize指定文本大小,此时需要指定字号的单位
- px:它是手机屏幕的最小显示单位,与设备的显示屏有关
- dp:它是与设备无关的显示单位,只与屏幕的尺寸有关
- sp:它专门用来设置字体的大小,在系统设置中可以调整字体的大小
<TextViewandroid:id="@+id/tv_px"android:layout_width="wrap_content"android:layout_height="wrap_content"android:text="@string/hello"android:textSize="30px"/><TextViewandroid:id="@+id/tv_dp"android:layout_width="wrap_content"android:layout_height="wrap_content"android:text="@string/hello"android:textSize="30dp"/><TextViewandroid:id="@+id/tv_sp"android:layout_width="wrap_content"android:layout_height="wrap_content"android:text="@string/hello"android:textSize="30sp"/>
设置文本的颜色:
@Overrideprotected void onCreate(Bundle savedInstanceState) {super.onCreate(savedInstanceState);setContentView(R.layout.activity_text_color);//从布局文件中获取名叫tv_code_system的文本视图TextView tv_code_system = findViewById(R.id.tv_code_system);//将tv_code_system的文字颜色设置系统自带的绿色tv_code_system.setTextColor(Color.GREEN);}
<TextViewandroid:id="@+id/tv_code_system"android:layout_width="wrap_content"android:layout_height="wrap_content"android:text="代码设置系统自带的颜色"android:textSize="17sp"/>
2.视图基础
视图宽度通过属性android:layout_width表达,视图高度通过属性android:layout_height表达,宽高的取值主要有下列三种:
- match_parent:表示与上级视图保持一致
- wrap_content:表示与内容自适应
- 以dp为单位的具体尺寸
<TextViewandroid:layout_width="wrap_content"android:layout_height="wrap_content"android:layout_marginTop="5dp"android:background="#00ffff"android:text="视图宽度采用wrap_content定义"android:textColor="#000000"android:textSize="17sp" /><TextViewandroid:layout_width="match_parent"android:layout_height="wrap_content"android:layout_marginTop="5dp"android:background="#00ffff"android:text="视图宽度采用match_parent定义"android:textColor="#000000"android:textSize="17sp" /><TextViewandroid:layout_width="300dp"android:layout_height="wrap_content"android:layout_marginTop="5dp"android:background="#00ffff"android:text="视图宽度采用固定大小"android:textColor="#000000"android:textSize="17sp" />
在代码中设置视图的宽高
首先确保XML中宽高的属性值为wrap_content,接着打开该页面对应的Java代码,依序执行下面的步骤:
- 调用控件对象的getLayoutParams方法,获取该控件的布局参数
- 布局参数的width属性表示宽度,height属性表示高度,修改这两个属性值
- 调用控件对象的setLayoutParams方法,填入修改后的布局参数即可
<TextViewandroid:id="@+id/tv_code"android:layout_width="wrap_content"android:layout_height="wrap_content"android:layout_marginTop="5dp"android:background="#00ffff"android:text="通过代码来指定视图的宽度"android:textColor="#000000"android:textSize="17sp" />
public class ViewBorderActivity extends AppCompatActivity {@Overrideprotected void onCreate(Bundle savedInstanceState) {super.onCreate(savedInstanceState);setContentView(R.layout.activity_view_border);TextView tv_code = findViewById(R.id.tv_code);//获取tv_code的布局参数ViewGroup.LayoutParams params = tv_code.getLayoutParams();//修改布局参数中的宽度数值,注意默认px单位,需要把dp数值转成px数值params.width = Utils.dip2px(this,300);//设置tv_code布局参数tv_code.setLayoutParams(params);}
}
设置视图的间距的两种方式:
- 采用layout_margin属性,它指定了当前视图与周围平级视图之间的距离。包括layout_margin、layout_marginLeft、layout_marginTop、layout_marginRight、layout_marginBottom
- 采用padding属性,它指定了当前视图与内部下级视图之间的距离。包括padding、paddingLeft、paddingTop、paddingRight、paddingBottom
<LinearLayout xmlns:android="http://schemas.android.com/apk/res/android"xmlns:app="http://schemas.android.com/apk/res-auto"xmlns:tools="http://schemas.android.com/tools"android:layout_width="match_parent"android:layout_height="300dp"android:orientation="vertical"android:background="#00AAFF"><!-- 中间的布局背景为黄色  --><LinearLayoutandroid:layout_width="match_parent"android:layout_height="match_parent"android:background="#FFFF99"android:layout_margin="20dp"android:padding="60dp"><!-- 最内层的视图背景为红色 --><Viewandroid:layout_width="match_parent"android:layout_height="match_parent"android:background="#F31414"/>/>
</LinearLayout>
设置视图的对齐的两种途径:
- 采用layout_gravity属性,它指定了当前视图相对于上级视图的对齐方式
- 采用gravity属性,它指定了下级视图相对于当前视图的对齐方式
layout_gravity与gravity的取值包括:left、top、right、bottom,还可以用竖线连接各取值,例如left|top表示靠左又靠上
<?xml version="1.0" encoding="utf-8"?>
<LinearLayout xmlns:android="http://schemas.android.com/apk/res/android"xmlns:app="http://schemas.android.com/apk/res-auto"xmlns:tools="http://schemas.android.com/tools"android:layout_width="match_parent"android:layout_height="300dp"android:background="#ffff99"android:orientation="horizontal"><!-- 第一个子布局背景为红色 它在上级视图中朝下对齐,它的下级视图在则靠左对齐--><LinearLayoutandroid:layout_width="0dp"android:layout_height="200dp"android:layout_weight="1"android:layout_margin="10dp"android:background="#ff0000"android:padding="10dp"android:layout_gravity="bottom"android:gravity="left"><!-- 内部视图宽度和高度都是100dp 且背景为青色--><Viewandroid:layout_width="100dp"android:layout_height="100dp"android:background="#00ffff"/></LinearLayout><!-- 第二个子布局背景为红色 它在上级视图中朝上对齐,它的下级视图在则靠左对齐--><LinearLayoutandroid:layout_width="0dp"android:layout_height="200dp"android:layout_weight="1"android:layout_margin="10dp"android:background="#ff0000"android:padding="10dp"android:layout_gravity="top"android:gravity="right"><!-- 内部视图宽度和高度都是100dp 且背景为青色--><Viewandroid:layout_width="100dp"android:layout_height="100dp"android:background="#00ffff" /></LinearLayout>
</LinearLayout>
3.常用布局
1.LinearLayout
线性布局内部的各视图的各种排列方式:
- orientation属性值为horizontal时,内部视图是水平方向从左往右排列的
- orientation属性值为vertical时,内部视图是垂直方向从上往下排列的
如果不指定orientation的值,则LinearLayout默认水平方向排列。
线性布局的权重:指的是线性布局的下级视图各自拥有多大比例的宽高
权重的属性名叫:layout_weight,但该属性不咋哎LinearLayout结点设置,而在线性布局的直接下级视图设置,表示该下级视图占据的宽高比例。
- layout_width填0dp时,layout_weight表示水平方向的宽度比例
- layout_height填0dp时,layout_weight表示垂直方向的宽高比例
<?xml version="1.0" encoding="utf-8"?>
<LinearLayout xmlns:android="http://schemas.android.com/apk/res/android"xmlns:app="http://schemas.android.com/apk/res-auto"xmlns:tools="http://schemas.android.com/tools"android:layout_width="match_parent"android:layout_height="match_parent"android:orientation="vertical">
<!--<LinearLayoutandroid:layout_width="match_parent"android:layout_height="wrap_content"android:orientation="horizontal"><TextViewandroid:layout_width="wrap_content"android:layout_height="wrap_content"android:text="横排第一个"android:textSize="17sp"android:textColor="#000000"/><TextViewandroid:layout_width="wrap_content"android:layout_height="wrap_content"android:text="横排第二个"android:textSize="17sp"android:textColor="#000000"/></LinearLayout><LinearLayoutandroid:layout_width="wrap_content"android:layout_height="wrap_content"android:orientation="vertical"><TextViewandroid:layout_width="wrap_content"android:layout_height="wrap_content"android:text="竖排第一个"android:textSize="17sp"android:textColor="#000000"/><TextViewandroid:layout_width="wrap_content"android:layout_height="wrap_content"android:text="竖排第二个"android:textSize="17sp"android:textColor="#000000"/></LinearLayout>--><LinearLayoutandroid:layout_width="match_parent"android:layout_height="wrap_content"android:orientation="horizontal"><TextViewandroid:layout_width="0dp"android:layout_height="wrap_content"android:layout_weight="1"android:text="横排第一个"android:textSize="17sp"android:textColor="#000000"/><TextViewandroid:layout_width="0dp"android:layout_height="wrap_content"android:layout_weight="1"android:text="横排第二个"android:textSize="17sp"android:textColor="#000000"/></LinearLayout><LinearLayoutandroid:layout_width="wrap_content"android:layout_height="wrap_content"android:orientation="vertical"><TextViewandroid:layout_width="wrap_content"android:layout_height="0dp"android:layout_weight="1"android:text="竖排第一个"android:textSize="17sp"android:textColor="#000000"/><TextViewandroid:layout_width="wrap_content"android:layout_height="0dp"android:layout_weight="1"android:text="竖排第二个"android:textSize="17sp"android:textColor="#000000"/></LinearLayout>
</LinearLayout>
2.RelativeLayout
相对布局的下级视图位置由其他视图决定,用于确定下级视图的位置的参照物分为两种:
- 与该视图自身平级的视图
- 该视图的上级视图
如果不设定下级视图的参照物,那么下级视图默认显示在RelativeLayout内部的左上角
<?xml version="1.0" encoding="utf-8"?>
<RelativeLayout xmlns:android="http://schemas.android.com/apk/res/android"xmlns:app="http://schemas.android.com/apk/res-auto"xmlns:tools="http://schemas.android.com/tools"android:layout_width="match_parent"android:layout_height="150dp"><TextViewandroid:id="@+id/tv_center"android:layout_width="wrap_content"android:layout_height="wrap_content"android:background="#ffffff"android:layout_centerInParent="true"android:text="我在中间"android:textSize="11sp"android:textColor="#000000"></TextView><TextViewandroid:id="@+id/tv_horizontal"android:layout_width="wrap_content"android:layout_height="wrap_content"android:background="#ffffff"android:layout_centerHorizontal="true"android:text="我在水平中间"android:textSize="11sp"android:textColor="#000000"></TextView><TextViewandroid:id="@+id/tv_center_vertical"android:layout_width="wrap_content"android:layout_height="wrap_content"android:background="#ffffff"android:layout_centerVertical="true"android:text="我在水平中间"android:textSize="11sp"android:textColor="#000000"></TextView><TextViewandroid:id="@+id/tv_parent_left"android:layout_width="wrap_content"android:layout_height="wrap_content"android:background="#ffffff"android:layout_alignParentLeft="true"android:text="我跟上级左边对齐"android:textSize="11sp"android:textColor="#000000"></TextView><TextViewandroid:id="@+id/tv_parent_right"android:layout_width="wrap_content"android:layout_height="wrap_content"android:background="#ffffff"android:layout_alignParentRight="true"android:text="我跟上级右边对齐"android:textSize="11sp"android:textColor="#000000"></TextView><TextViewandroid:id="@+id/tv_parent_top"android:layout_width="wrap_content"android:layout_height="wrap_content"android:background="#ffffff"android:layout_alignParentTop="true"android:text="我跟上级顶部对齐"android:textSize="11sp"android:textColor="#000000"></TextView><TextViewandroid:id="@+id/tv_parent_bottom"android:layout_width="wrap_content"android:layout_height="wrap_content"android:background="#ffffff"android:layout_alignParentBottom="true"android:text="我跟上级底部对齐"android:textSize="11sp"android:textColor="#000000"></TextView><TextViewandroid:id="@+id/tv_left_center"android:layout_width="wrap_content"android:layout_height="wrap_content"android:background="#ffffff"android:layout_toLeftOf="@+id/tv_center"android:layout_alignTop="@+id/tv_center"android:text="我在中间左边"android:textSize="11sp"android:textColor="#000000"></TextView><TextViewandroid:id="@+id/tv_right_center"android:layout_width="wrap_content"android:layout_height="wrap_content"android:background="#ffffff"android:layout_toRightOf="@+id/tv_center"android:layout_alignTop="@+id/tv_center"android:text="我在中间右边"android:textSize="11sp"android:textColor="#000000"></TextView><TextViewandroid:id="@+id/tv_above_center"android:layout_width="wrap_content"android:layout_height="wrap_content"android:background="#ffffff"android:layout_above="@+id/tv_center"android:layout_alignLeft="@+id/tv_center"android:text="我在中间上边"android:textSize="11sp"android:textColor="#000000"></TextView><TextViewandroid:id="@+id/tv_below_center"android:layout_width="wrap_content"android:layout_height="wrap_content"android:background="#ffffff"android:layout_below="@+id/tv_center"android:layout_alignLeft="@+id/tv_center"android:text="我在中间下边"android:textSize="11sp"android:textColor="#000000"></TextView>
</RelativeLayout>
3.GridLayout
网格布局支持多行多列的表格排列
网格布局默认从左到右、从上到下排列,它新增了两个属性:
- columnCount:它指定了网格的列数,即每行能放多少个视图
- rowCount:它指定了网格的行数,即每列能放多少个视图
<?xml version="1.0" encoding="utf-8"?>
<GridLayout xmlns:android="http://schemas.android.com/apk/res/android"xmlns:app="http://schemas.android.com/apk/res-auto"xmlns:tools="http://schemas.android.com/tools"android:layout_width="match_parent"android:layout_height="match_parent"android:columnCount="2"android:rowCount="2"><TextViewandroid:layout_width="0dp"android:layout_columnWeight="1"android:layout_height="60dp"android:background="#ffcccc"android:text="浅红色"android:gravity="center"android:textColor="#000000"android:textSize="17sp"></TextView><TextViewandroid:layout_width="0dp"android:layout_columnWeight="1"android:layout_height="60dp"android:background="#ffaa00"android:gravity="center"android:text="橙色"android:textColor="#000000"android:textSize="17sp"></TextView><TextViewandroid:layout_width="0dp"android:layout_columnWeight="1"android:layout_height="60dp"android:background="#00ff00"android:text="绿色"android:gravity="center"android:textColor="#000000"android:textSize="17sp"></TextView><TextViewandroid:layout_width="0dp"android:layout_columnWeight="1"android:layout_height="60dp"android:background="#660066"android:text="深紫色"android:gravity="center"android:textColor="#000000"android:textSize="17sp"></TextView></GridLayout>
4.ScrollView
滚动视图有两种:
- ScrollView:它是垂直方向的滚动视图;垂直方向滚动时,layout_width属性值设置为match_parent,layout_height属性值设置为wrap_content
- HorizontalScrollView:它是水平方向的滚动视图;水平方向滚动时,layout_width属性值设置为wrap_content,layout_height属性值设置为match_parent
<?xml version="1.0" encoding="utf-8"?>
<LinearLayout xmlns:android="http://schemas.android.com/apk/res/android"xmlns:app="http://schemas.android.com/apk/res-auto"xmlns:tools="http://schemas.android.com/tools"android:layout_width="match_parent"android:layout_height="match_parent"android:orientation="vertical"><HorizontalScrollViewandroid:layout_width="wrap_content"android:layout_height="200dp"><!-- 水平方向的线性布局,两个子视图的颜色分别为青色和黄色--><LinearLayoutandroid:layout_width="wrap_content"android:layout_height="match_parent"android:orientation="horizontal"><Viewandroid:layout_width="300dp"android:layout_height="match_parent"android:background="#aaffff"></View><Viewandroid:layout_width="300dp"android:layout_height="match_parent"android:background="#ffff00"></View></LinearLayout></HorizontalScrollView><ScrollViewandroid:layout_width="match_parent"android:layout_height="wrap_content"><LinearLayoutandroid:layout_width="wrap_content"android:layout_height="match_parent"android:orientation="vertical"><Viewandroid:layout_width="match_parent"android:layout_height="400dp"android:background="#aaffff"></View><Viewandroid:layout_width="match_parent"android:layout_height="400dp"android:background="#ffff00"></View></LinearLayout></ScrollView>
</LinearLayout>
4.按钮触控
1.按钮控件
按钮空间Button由TextView派生而来,它们之间的区别有:
- Button拥有默认的按钮背景,而TextView默认无背景
- Button的内部文本默认居中对齐,而TextView的内部文本默认靠左对齐
- Button会默认将英文字母转为大写,而TextView保持原始的英文大小写
与TextView相比,Button新增了两个新属性:
- textAllCaps:它只当是否将英文字母转为大写,为true是表示自动转为大写,为false表示不做大写转换
- conClick:它用来接管用户的点击动作,指定了点击按钮时要触发哪个方法
<?xml version="1.0" encoding="utf-8"?>
<LinearLayout xmlns:android="http://schemas.android.com/apk/res/android"xmlns:app="http://schemas.android.com/apk/res-auto"xmlns:tools="http://schemas.android.com/tools"android:layout_width="match_parent"android:layout_height="match_parent"android:orientation="vertical"android:padding="5dp"><TextViewandroid:layout_width="match_parent"android:layout_height="wrap_content"android:text="下面按钮英文默认大写"android:gravity="center"android:textColor="@color/black"android:textSize="17sp"></TextView><Buttonandroid:layout_width="match_parent"android:layout_height="wrap_content"android:text="Hello World"android:textColor="@color/black"android:textSize="17sp"/><TextViewandroid:layout_width="match_parent"android:layout_height="wrap_content"android:text="下面按钮英文保持原状"android:gravity="center"android:textColor="@color/black"android:textSize="17sp"/><Buttonandroid:layout_width="match_parent"android:layout_height="wrap_content"android:text="Hello World"android:textAllCaps="false"android:textColor="@color/black"android:textSize="17sp"/><Buttonandroid:layout_width="match_parent"android:layout_height="wrap_content"android:text="直接指定点击方法"android:textAllCaps="false"android:textColor="@color/black"android:textSize="17sp"android:onClick="doClick"/><TextViewandroid:id="@+id/tv_result"android:layout_width="match_parent"android:layout_height="wrap_content"android:text="这里查看按钮点击结果"android:textColor="@color/black"android:textSize="17sp"/>
</LinearLayout>
public class ButtonStyleActivity extends AppCompatActivity {private TextView tv_result;@Overrideprotected void onCreate(Bundle savedInstanceState) {super.onCreate(savedInstanceState);setContentView(R.layout.activity_button_style);tv_result = findViewById(R.id.tv_result);}public void doClick(View view){String desc = String.format("%s 您点击了按钮: %s", DataUtil.getNowTime(),((Button)view).getText());tv_result.setText(desc);}
}
2.点击事件和长按事件
-
监听器,意思是专门监听控件的动作行为。只有控件发生了指定的动作,监听器才会触发开关去执行对应的代码逻辑。
-
按钮控件有两种常用的监听器:
- 点击监听器,通过setOnClickListener方法设置。按钮被按住的事件少于500毫秒时,会触发点击事件。
- 长按监听事件,通过setOnLongClickLIstener方法设置。按钮被按住的事件超过500毫秒时,会触发长按事件。
<?xml version="1.0" encoding="utf-8"?>
<LinearLayout xmlns:android="http://schemas.android.com/apk/res/android"xmlns:app="http://schemas.android.com/apk/res-auto"xmlns:tools="http://schemas.android.com/tools"android:layout_width="match_parent"android:layout_height="match_parent"android:orientation="vertical"><Buttonandroid:id="@+id/btn_click_single"android:layout_width="match_parent"android:layout_height="wrap_content"android:text="指定单独的点击监听器"android:textColor="#000000"android:textSize="15sp"/><TextViewandroid:id="@+id/tv_result"android:layout_width="match_parent"android:layout_height="wrap_content"android:padding="5dp"android:gravity="center"android:text="查看按钮点击的结果"android:textColor="#000000"android:textSize="15sp"/></LinearLayout>
public class ButtonClickActivity extends AppCompatActivity {private TextView tv_result;@Overrideprotected void onCreate(Bundle savedInstanceState) {super.onCreate(savedInstanceState);setContentView(R.layout.activity_button_click);tv_result = findViewById(R.id.tv_result);Button btn_click_single = findViewById(R.id.btn_click_single);btn_click_single.setOnClickListener(new MyOnClickListener(tv_result));}static class MyOnClickListener implements View.OnClickListener{private final TextView tv_result;public MyOnClickListener(TextView tv_result){this.tv_result = tv_result;}@Overridepublic void onClick(View view) {String desc = String.format("%s 您点击了按钮: %s", DataUtil.getNowTime(),((Button)view).getText());tv_result.setText(desc);}} }<?xml version="1.0" encoding="utf-8"?> <LinearLayout xmlns:android="http://schemas.android.com/apk/res/android"xmlns:app="http://schemas.android.com/apk/res-auto"xmlns:tools="http://schemas.android.com/tools"android:layout_width="match_parent"android:layout_height="match_parent"android:orientation="vertical"><Buttonandroid:id="@+id/btn_long_click"android:layout_width="match_parent"android:layout_height="wrap_content"android:text="指定长按的点击监听器"android:textColor="#000000"android:textSize="15sp"/><TextViewandroid:id="@+id/tv_result"android:layout_width="match_parent"android:layout_height="wrap_content"android:padding="5dp"android:gravity="center"android:text="查看按钮点击的结果"android:textColor="#000000"android:textSize="15sp"/></LinearLayout>public class ButtonLongActivity extends AppCompatActivity {@Overrideprotected void onCreate(Bundle savedInstanceState) {super.onCreate(savedInstanceState);setContentView(R.layout.activity_button_long);TextView tv_result = findViewById(R.id.tv_result);Button btn_long_click = findViewById(R.id.btn_long_click);btn_long_click.setOnLongClickListener(view -> {String desc = String.format("%s 您点击了按钮: %s", DataUtil.getNowTime(),((Button)view).getText());tv_result.setText(desc);return true;});} }
3.禁用和恢复
在实际业务中,按钮拥有两种状态,即不可用状态和可用状态,它们在外观和功能上的区别如下:
- 不可用按钮:按钮不允许点击,即使点击也没反应,同时按钮文字为灰色
- 可用按钮:按钮允许点击,点击按钮会触发点击事件,同时按钮文字为正常的黑色
是否允许点击由enabled属性控制,属性值为true时表示允许点击,为false时表示不允许点击
<?xml version="1.0" encoding="utf-8"?>
<LinearLayout xmlns:android="http://schemas.android.com/apk/res/android"xmlns:app="http://schemas.android.com/apk/res-auto"xmlns:tools="http://schemas.android.com/tools"android:layout_width="match_parent"android:layout_height="match_parent"android:orientation="vertical"><LinearLayoutandroid:layout_width="match_parent"android:layout_height="wrap_content"android:orientation="horizontal"><Buttonandroid:id="@+id/btn_enable"android:layout_width="0dp"android:layout_height="wrap_content"android:layout_weight="1"android:text="启用测试按钮"android:textColor="#000000"android:textSize="17sp"></Button><Buttonandroid:id="@+id/btn_disable"android:layout_width="0dp"android:layout_height="wrap_content"android:layout_weight="1"android:text="禁用测试按钮"android:textColor="#000000"android:textSize="17sp"></Button></LinearLayout><Buttonandroid:id="@+id/btn_test"android:layout_width="match_parent"android:layout_height="wrap_content"android:text="测试按钮"android:textColor="#888888"android:textSize="17sp"android:enabled="false"></Button><TextViewandroid:id="@+id/tv_result"android:layout_width="match_parent"android:layout_height="wrap_content"android:text="这里查看测试按钮的点击结果"android:textColor="#000000"android:textSize="17sp"/></LinearLayout>
public class ButtonEnableActivity extends AppCompatActivity implements View.OnClickListener {private Button btn_test;private TextView tv_result;@Overrideprotected void onCreate(Bundle savedInstanceState) {super.onCreate(savedInstanceState);setContentView(R.layout.activity_button_enable);Button btn_enable = findViewById(R.id.btn_enable);Button btn_disable = findViewById(R.id.btn_disable);btn_test = findViewById(R.id.btn_test);tv_result = findViewById(R.id.tv_result);btn_enable.setOnClickListener(this);btn_disable.setOnClickListener(this);btn_test.setOnClickListener(this);}@Overridepublic void onClick(View view) {switch (view.getId()){case R.id.btn_enable://启用当前控件btn_test.setEnabled(true);btn_test.setTextColor(Color.BLACK);break;case R.id.btn_disable://禁用当前控件btn_test.setEnabled(false);btn_test.setTextColor(Color.GRAY);break;case R.id.btn_test:String desc = String.format("%s 您点击了按钮: %s", DataUtil.getNowTime(),((Button)view).getText());tv_result.setText(desc);break;}}
}
5.图像显示
1.ImageView
图像视图展示图片通常位于res/drawable***目录,设置图像视图的显示图片有两种方式:
- 在XML文件中,通过属性android:src设置图片的资源,属性值格式形如@drawable/不含扩展名的图片名称
- 在Java代码中,调用setImageResource方法设置图片的资源,方法参数格式形如R.drawable.不含扩展名的图片名称
ImageView本身默认图片是居中显示,若要改变图片的显示方式,可通过scaleType属性设置:
- fitXY:拉伸图片使其正好填满视图
- fitStart:保持宽高比例,拉伸图片使其位于视图上方或左侧
- fitCenter:保持宽高比例,拉伸图片使其位于视图中间
- fitEnd:保持宽高比例,拉伸图片使其位于视图下方或右侧
- center:保持图片原尺寸,并使其位于视图中间
- centerCrop:拉伸图片使其充满视图,并位于视图中间
- centerInside:保持宽高比例,缩小图片使之位于视图中间
<?xml version="1.0" encoding="utf-8"?>
<LinearLayout xmlns:android="http://schemas.android.com/apk/res/android"xmlns:app="http://schemas.android.com/apk/res-auto"xmlns:tools="http://schemas.android.com/tools"android:layout_width="match_parent"android:layout_height="match_parent"android:orientation="vertical"><ImageViewandroid:id="@+id/iv_scale"android:layout_width="match_parent"android:layout_height="220dp"android:layout_marginTop="5dp"android:src="@drawable/apple"android:scaleType="fitStart"/></LinearLayout>
public class ImageScaleActivity extends AppCompatActivity {@Overrideprotected void onCreate(Bundle savedInstanceState) {super.onCreate(savedInstanceState);setContentView(R.layout.activity_image_scale);ImageView iv_scale = findViewById(R.id.iv_scale);iv_scale.setImageResource(R.drawable.apple);}
}
2.ImageButton
ImageButton是显示图片的按钮,但它继承自ImageView,而非继承Button
ImageButton和Button之间的区别有:
- Button既可显示文本也可显示图片,ImageButton只能显示图片不能显示文本
- ImageButton上的图像可按比例缩放,而Button通过背景设置的图像会拉伸图像
- Button只能靠背景显示一张图片,而ImageButton可分别在前景和背景显示图片,从而实现两张图片添加的效果
3.同时展示文本与图像
同时展示文本与图像的可能途径:
-
利用LinearLayout对ImageView和TextView组合布局
-
通过按钮控件Button的drawable***属性设置文本周围图标
- drawableTop:指定文字上方的图片
- drawableBottom:指定文字下方的图片
- drawableLeft:指定文字左边的图片
- drawableRight:指定文字右边的图片
- drawablePadding:指定图片与文字的间距
<Buttonandroid:layout_width="wrap_content"android:layout_height="wrap_content"android:text="图标在左"android:drawableLeft="@drawable/apple"android:drawablePadding="5dp"/>
tActivity {
@Override
protected void onCreate(Bundle savedInstanceState) {super.onCreate(savedInstanceState);setContentView(R.layout.activity_image_scale);ImageView iv_scale = findViewById(R.id.iv_scale);iv_scale.setImageResource(R.drawable.apple);
}
}
#### 2.ImageButtonImageButton是显示图片的按钮,但它继承自ImageView,而非继承ButtonImageButton和Button之间的区别有:- Button既可显示文本也可显示图片,ImageButton只能显示图片不能显示文本
- ImageButton上的图像可按比例缩放,而Button通过背景设置的图像会拉伸图像
- Button只能靠背景显示一张图片,而ImageButton可分别在前景和背景显示图片,从而实现两张图片添加的效果#### 3.同时展示文本与图像同时展示文本与图像的可能途径:- 利用LinearLayout对ImageView和TextView组合布局- 通过按钮控件Button的drawable***属性设置文本周围图标- drawableTop:指定文字上方的图片- drawableBottom:指定文字下方的图片- drawableLeft:指定文字左边的图片- drawableRight:指定文字右边的图片- drawablePadding:指定图片与文字的间距```xml<Buttonandroid:layout_width="wrap_content"android:layout_height="wrap_content"android:text="图标在左"android:drawableLeft="@drawable/apple"android:drawablePadding="5dp"/>
相关文章:

Android简单控件
1.文本显示 设置文本内容的两种方式: 在XML文件中通过属性 android:text 设置文本 <resources><string name"app_name">chapter03</string><string name"hello">你好,世界</string> </resources&…...
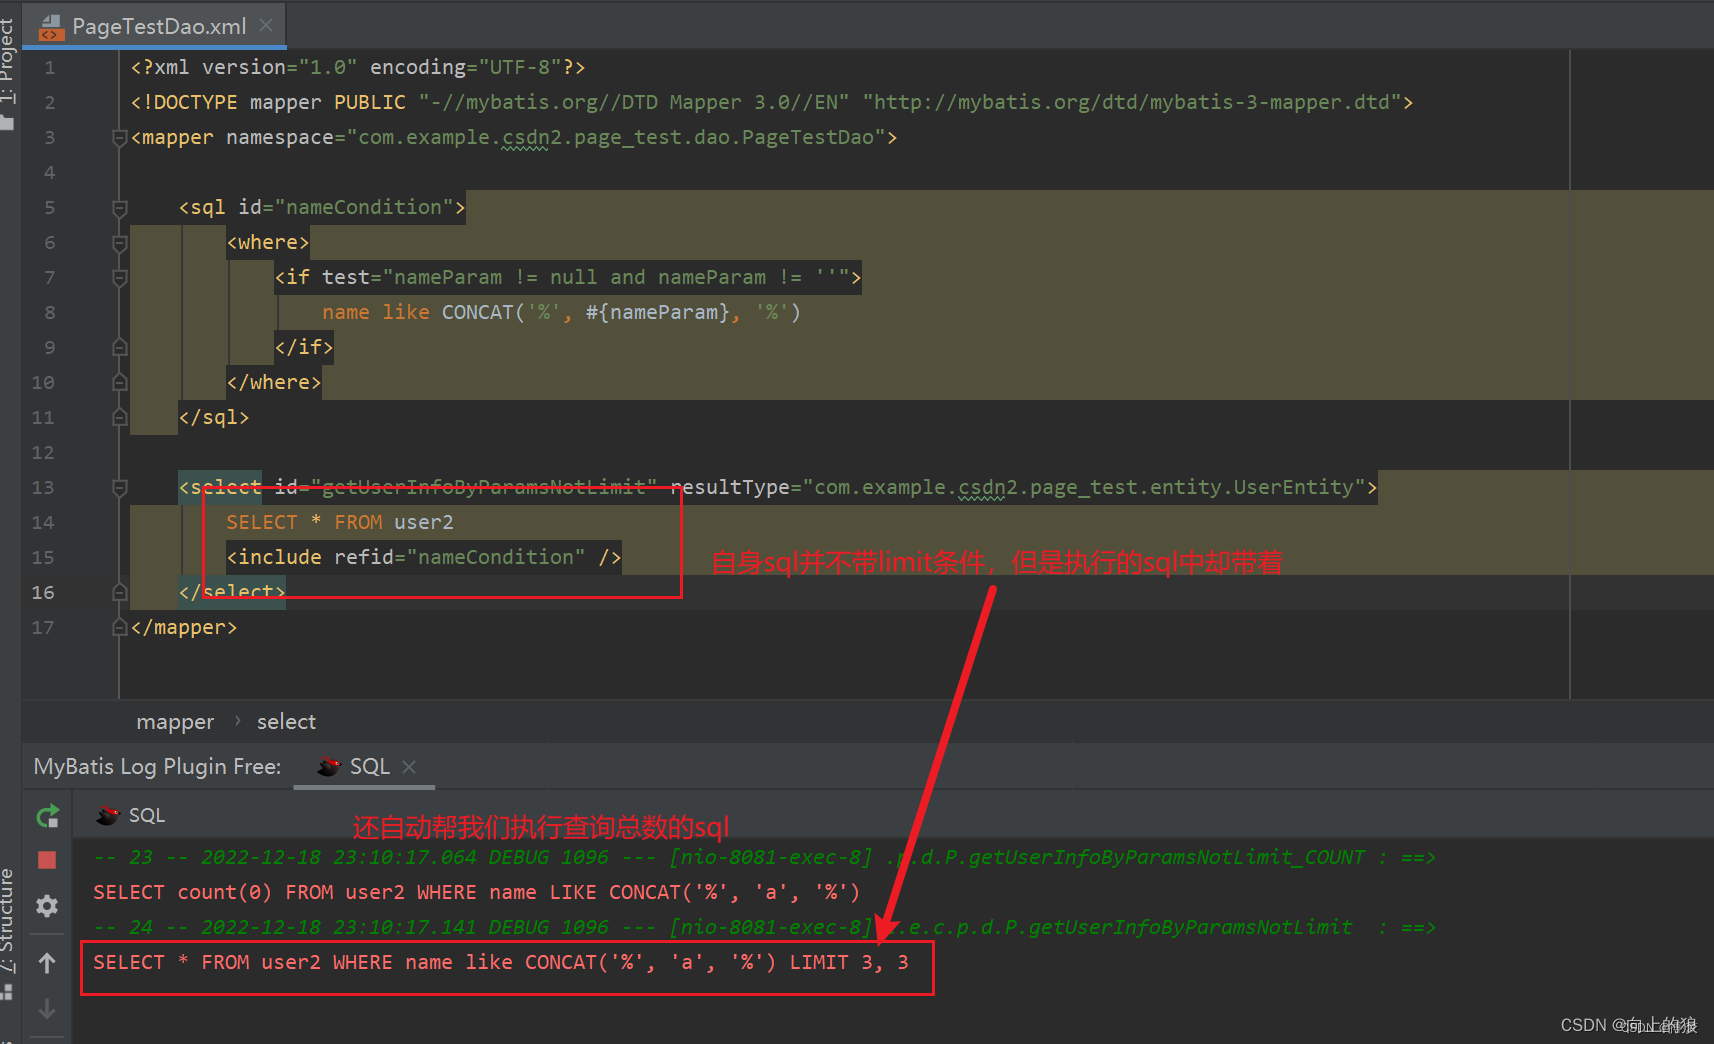
【Java 干货教程】Java实现分页的几种方式详解
一、前言 无论是自我学习中,还是在工作中,固然会遇到与前端搭配实现分页的功能,发现有几种方式,特此记录一下。 二、实现方式 2.1、分页功能直接交给前端实现 这种情况也是有的,(根据业务场景且仅仅只能用于数据量…...
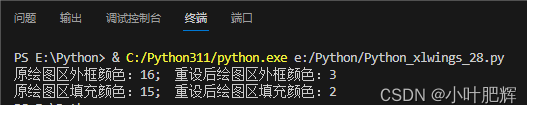
关于Python里xlwings库对Excel表格的操作(三十一)
这篇小笔记主要记录如何【如何使用“Chart类”、“Api类"和“Axes函数”设置绘图区外框线型、颜色、粗细及填充颜色】。前面的小笔记已整理成目录,可点链接去目录寻找所需更方便。 【目录部分内容如下】【点击此处可进入目录】 (1)如何安…...

QML使用QCustomPlot笔记
这里在QML中使用QCustomPlot是定义一个继承自QQuickPaintedItem的类,它包含一个QCustomPlot对象,在paint函数中将这个对象转化为pixmap绘制到布局中显示。 在QML中使用QT的Widget控件也可以借鉴这个思路实现 顺便记录一下QCustomPlot的简单设置与使用。…...
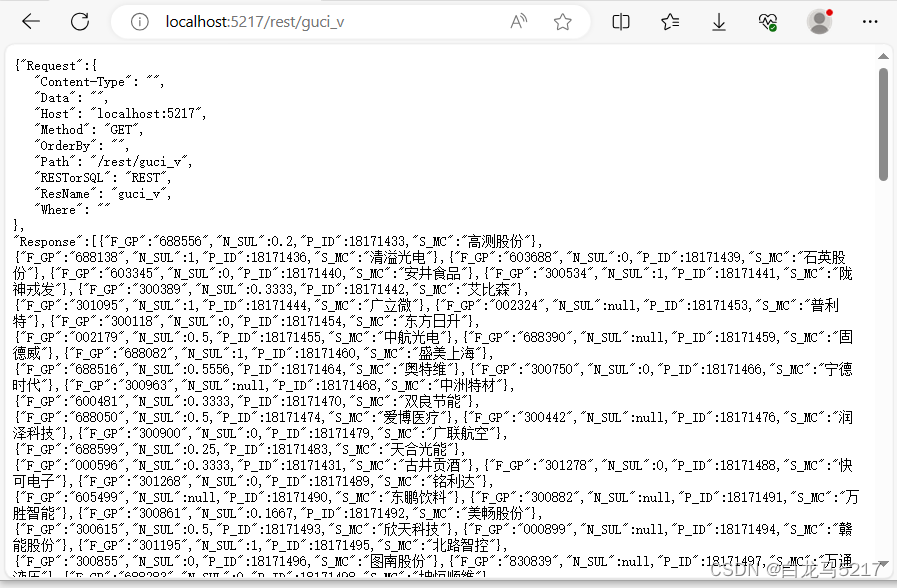
【REST2SQL】06 GO 跨包接口重构代码
【REST2SQL】01RDB关系型数据库REST初设计 【REST2SQL】02 GO连接Oracle数据库 【REST2SQL】03 GO读取JSON文件 【REST2SQL】04 REST2SQL第一版Oracle版实现 【REST2SQL】05 GO 操作 达梦 数据库 对所有关系数据的操作都只有CRUD,采用Go 的接口interface{}重构代码…...
《NLP入门到精通》栏目导读
一、说明 栏目《NLP入门到精通》本着从简到难得台阶式学习过度。将自然语言处理得知识贯穿过来。本栏目得前导栏目是《深度学习》、《pytorch实践》,因此,读者需要一定得深度学习基础,才能过度到此栏目内容。 二、博客建设理念 本博客基地&am…...

C++学习笔记——类继承
目录 一、一个简单的基类 1.1封装性 1.2继承性 1.3虚函数 1.4多态性 二、基类 2.1一个简单的C基类的示例 2.2 Animal是一个基类。 三、继承 3.1概念 3.2is-a关系 3.3多态公有继承 3.4静态联编和动态联编 3.5访问控制 3.6ABC理念 一、一个简单的基类 C中的基类是一…...

ARCGIS PRO SDK 使用条件管理 Pro UI
ARCGIS PRO UI简单介绍以下: 第一步:在Config.daml中在</AddInfo>标签下加上条件<conditions>标签(必须添加的) <conditions><!-- 定义条件 ,此处定义了两个--Tab 另一个为 group><insert…...

Halcon经典的边缘检测算子Sobel/Laplace/Canny
Halcon经典的边缘检测算子 文章目录 Halcon经典的边缘检测算子1. Sobel算子2. Laplace 算子3. Canny 算子4. 总结 关于边缘检测,有许多经典的算子,各大图形处理库都有各自的边缘检测算子,这里简要介绍几种。 1. Sobel算子 Sobel算子结合了高…...
用单片机设计PLC电路图
自记: 见另一篇文章,MOS驱动差了一个充电电容,栅极电容充电会有问题; 光耦用的直插,但板子用的贴片,此文档仅供参考 基本列出了PCB板情况,基础元器件,部分连接,原理等…...

【设计模式-6】建造者模式的实现与框架中的应用
建造者模式又被成为生成器模式,是一种使用频率比较低,相对复杂的创建型模式,在很多源码框架中可以看到建造者的使用场景,稍后我们会在本文末尾展示几个框架的使用案例。 建造者模式所构造的对象通常是比较复杂而且庞大的&#x…...
PositiveSSL和Sectigo的多域名证书
首先,我们要知道PositiveSSL是Sectigo旗下的子品牌,提供多种类型的SSL数字证书,包括DV基础型的多域名SSL证书。Sectigo的SSL证书产品同样比较丰富,不仅有DV基础型多域名SSL证书,还有OV企业型以及EV增强型的多域名SSL证…...

Docker:docker exec命令简介
介绍 docker exec [OPTIONS] 容器名称 COMMAND [ARG...] OPTIONS说明: -d,以后台方式执行命令; -e,设置环境变量 -i,交互模式 -t,设置TTY -u,用户名或UID,例如myuser:myu…...
【大数据进阶第三阶段之Hive学习笔记】Hive的数据类型与数据操作
目录 1、Hive数据类型 1.1、基本数据类型 1.2、集合数据类型 1.3、类型转化 2、DDL数据定义 2.1、创建数据库 2.2、查询数据库 2.3删除数据库 2.4、创建表 2.4.1、内部表 2.4.2、外部表 2.4.3管理表与外部表的互相转换 2.5、分区表(partitionÿ…...
GPT2:Language Models are Unsupervised Multitask Learners
目录 一、背景与动机 二、卖点与创新 三、几个问题 四、具体是如何做的 1、更多、优质的数据,更大的模型 2、大数据量,大模型使得zero-shot成为可能 3、使用prompt做下游任务 五、一些资料 一、背景与动机 基于 Transformer 解码器的 GPT-1 证明…...
微创新与稳定性的权衡
之前做过一个项目,业务最高峰CPU使用率也才50%,是一个IO密集型的应用。里面涉及一些业务编排,所以为了提高CPU使用率,我有两个方案:一个是简单的梳理将任务可并行的采用并行流、额外线程池等方式做并行;另外…...
对回调函数的各种讲解说明
有没有跟我师弟一样的童靴~,学习和使用ROS节点时,对其中的callback函数一直摸不着头脑的,以下这么多回调函数的讲解,挨个看,你总会懂的O.o 回调函数怎么调用,如何定义回调函数: 回调函数怎么调用,如何定义…...

Java多线程:创建多线程的三种方式
在Java中,有三种方式创建多线程,继承类Thread,继承接口Runnable,继承接口Callable。其中Thread和Runnable需要重写方法run,方法run没有返回值;Callable需要重写方法call,方法call可以返回值。 …...

Unity中打印信息的两种方式
不继承MonoBehaviour的普通C#类中打印信息: 使用Debug类的方法: Unity提供了Debug类,其中包含了一些用于打印信息的静态方法。以下是常用的几种方法: Debug.Log(message):打印普通信息。Debug.LogWarning(message)&a…...
给定n个字符串s[1...n], 求有多少个数对(i, j), 满足i < j 且 s[i] + s[j] == s[j] + s[i]?
题目 思路: 对于字符串a,b, (a.size() < b.size()), 考虑对字符串b满足什么条件: 由1、3可知a是b的前后缀,由2知b有一个周期是3,即a.size(),所以b是用多个a拼接而成的,有因为a是b的前后缀&…...

【Echarts】Y轴标签优化:动态调整与智能截断的实战技巧
1. Y轴标签显示问题的根源分析 当使用Echarts绘制图表时,Y轴标签过长导致显示不全是个常见痛点。这个问题通常发生在两种场景:一是数据来自后端接口,标签长度不可控;二是图表容器宽度有限,无法容纳完整标签。 我遇到过…...

阿里云百炼Coding Plan 的GLM-5等模型是全参数满血版的吗?显示售罄怎么回事?
模型是满血版,无需担心 阿里云百炼 Coding Plan 中包含的 GLM-5、Qwen3.5-Plus、Kimi K2.5 等模型,均为100%的完整版模型,并非量化阉割版本。 它与按量付费模式的区别仅在于计费方式(固定月费 vs 按 Token 扣费)&…...

IDEA使用maven打包Java项目,跳过test的3种方法
文章目录第一种:命令行第二种:pom.xml设置第三种:IDEA工具操作第一种:命令行 命令行的方式,在哪输入命令都行。 mvn install -Dmaven.test.skiptrue第二种:pom.xml设置 修改pom.xml文件 <build>&…...

Captain AI vs DeepSeek:Ozon 卖家专属 AI,垂直深耕更懂俄语区
做Ozon跨境,选 AI 工具别只看 “全能”,更要看 “专业”和“精通”。DeepSeek 是通用型跨境AI,覆盖多平台、多场景;而Captain AI是Ozon垂直定制 AI,聚焦俄语区与Ozon规则,四大核心功能精准解决卖家从新品到…...
)
npm新手必看:如何用package.json一键运行本地JS文件(附常见错误排查)
npm新手必看:如何用package.json一键运行本地JS文件(附常见错误排查) 刚接触Node.js生态的开发者,往往会被各种工具和配置文件搞得晕头转向。其中package.json作为项目的"身份证"和"说明书",掌握它…...

从FasterRCNN到自定义检测器:SimpleDet扩展开发完全手册
从FasterRCNN到自定义检测器:SimpleDet扩展开发完全手册 【免费下载链接】simpledet A Simple and Versatile Framework for Object Detection and Instance Recognition 项目地址: https://gitcode.com/gh_mirrors/si/simpledet SimpleDet是一个简单且多功能…...

音乐标签编辑器:让本地音乐元数据管理效率提升90%的开源工具
音乐标签编辑器:让本地音乐元数据管理效率提升90%的开源工具 【免费下载链接】music-tag-web 音乐标签编辑器,可编辑本地音乐文件的元数据(Editable local music file metadata.) 项目地址: https://gitcode.com/gh_mirrors/mu/…...

一张照片秒变3D模型!用Splatter Image和3D高斯溅射快速上手单视图重建
从单张照片到3D模型:Splatter Image技术实战指南 想象一下,你刚在二手市场淘到一个绝版手办,想为它创建数字档案;或是设计师客户临时需要将一张产品照片转为3D模型。传统流程需要专业设备扫描或手工建模,耗时数小时甚…...

缠论量化工程化:从痛点突破到智能交易系统构建
缠论量化工程化:从痛点突破到智能交易系统构建 【免费下载链接】chan.py 开放式的缠论python实现框架,支持形态学/动力学买卖点分析计算,多级别K线联立,区间套策略,可视化绘图,多种数据接入,策略…...
)
Hunyuan-MT-7B开源镜像免配置部署:像素语言传送门一键启动教程(含GPU适配)
Hunyuan-MT-7B开源镜像免配置部署:像素语言传送门一键启动教程(含GPU适配) 1. 项目介绍 像素语言跨维传送门是一款基于Tencent Hunyuan-MT-7B大模型构建的创新翻译工具。它将传统翻译体验重构为16-bit像素冒险风格,让语言转换变…...