IaC基础设施即代码:使用Terraform 连接 alicloud阿里云
目录
一、实验
1.环境
2.alicloud阿里云创建用户
3.Linux使用Terraform 连接 alicloud
4.Windows使用Terraform 连接 alicloud
二、问题
1.Windows如何申明RAM 相关变量
2.Linux如何申明RAM 相关变量
3. Linux terraform 初始化失败
4.Linux terraform 计划与预览失败
5. Windows terraform 初始化失败
6. Windows terraform plan命令有哪些参数
一、实验
1.环境
(1)主机
表1-1 主机
| 主机 | 系统 | 软件 | 工具 | 备注 |
| jia | Windows | Terraform 1.6.6 | VS Code、 PowerShell | |
| pipepoint | Linux | Terraform 1.6.6 | Chocolatey |
2.alicloud阿里云创建用户
(1)登录
RAM 访问控制 (aliyun.com)
(2)查看
RAM访问控制-用户
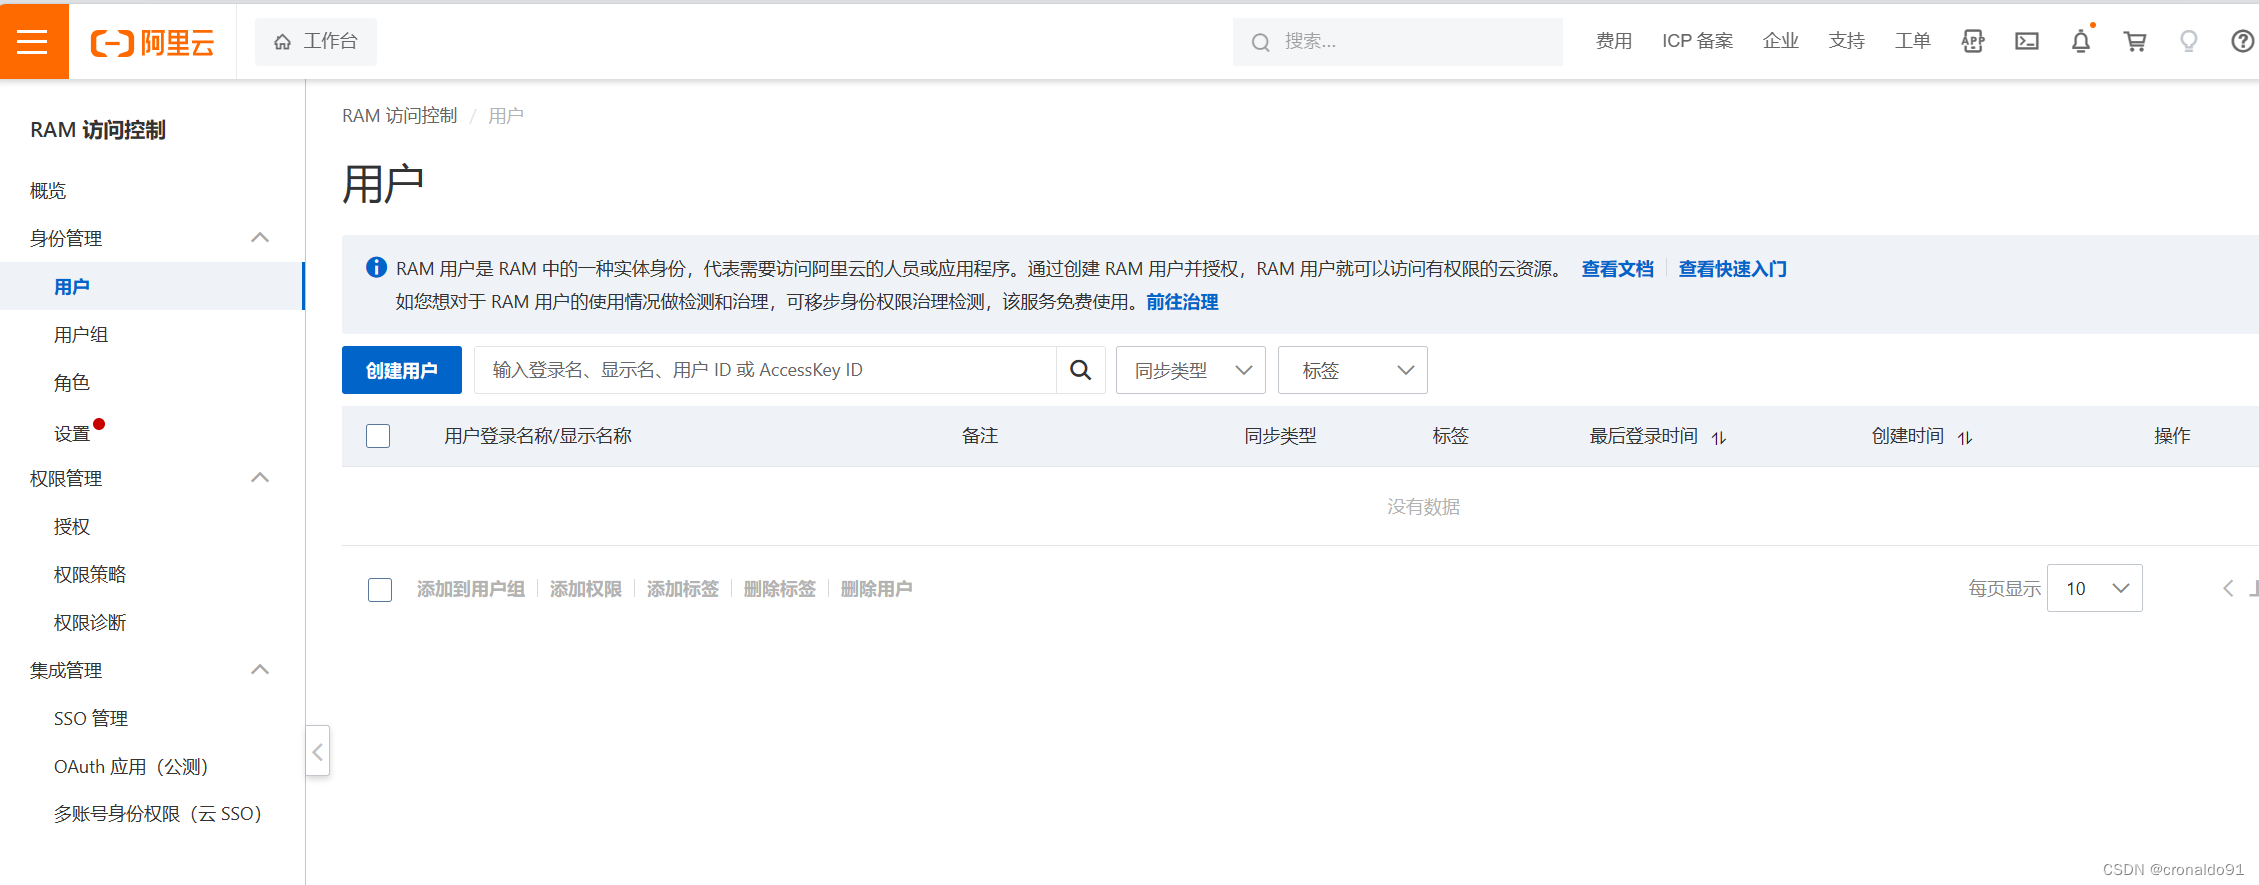
(3)创建用户
选中“OpenAPI调用访问”
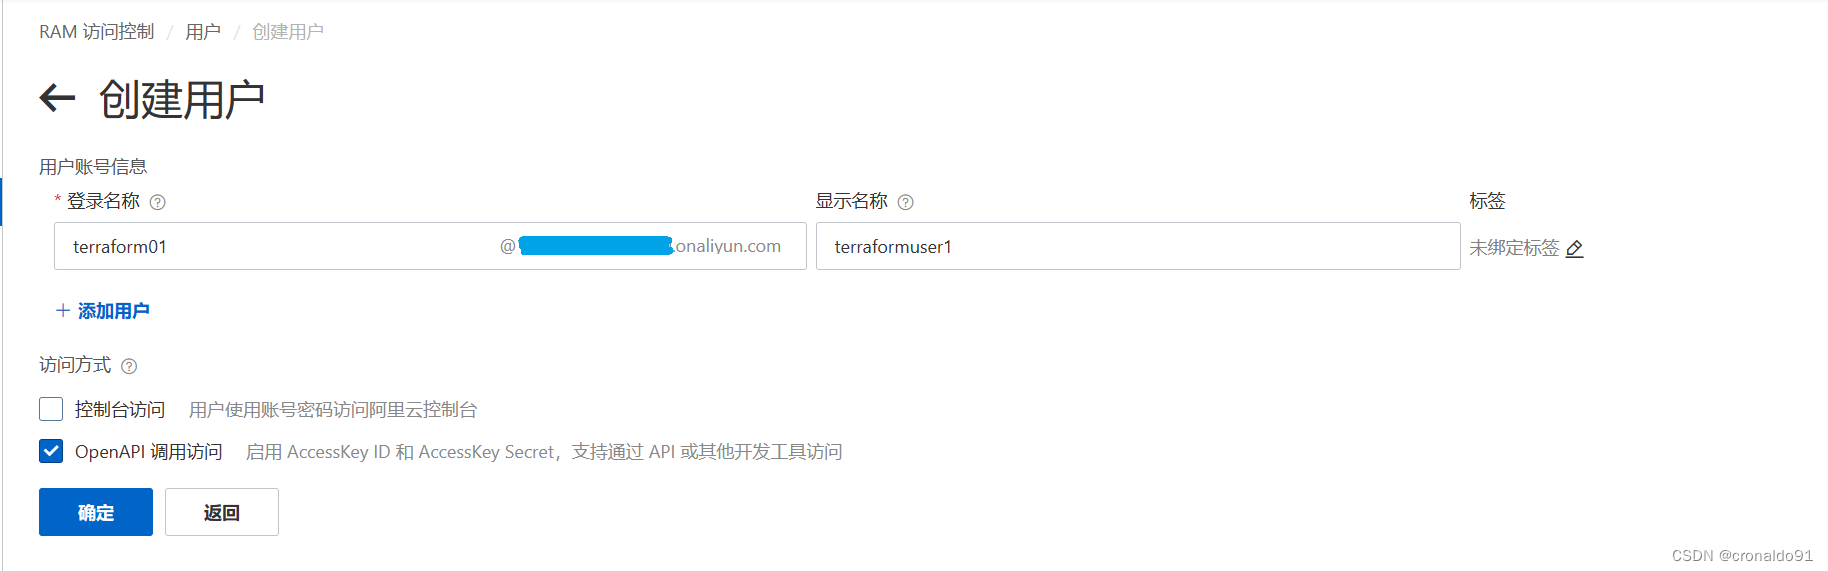
(4)安全验证

(5)完成创建

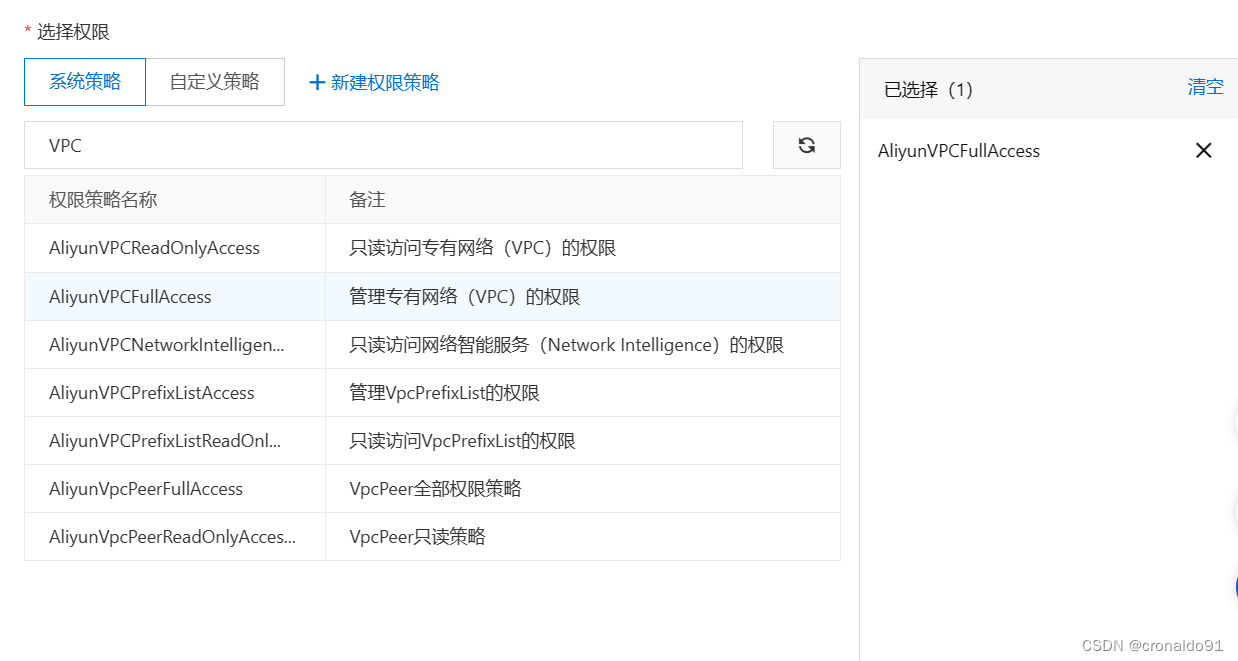
(6)添加权限

(7)选择权限,搜索“VPC”
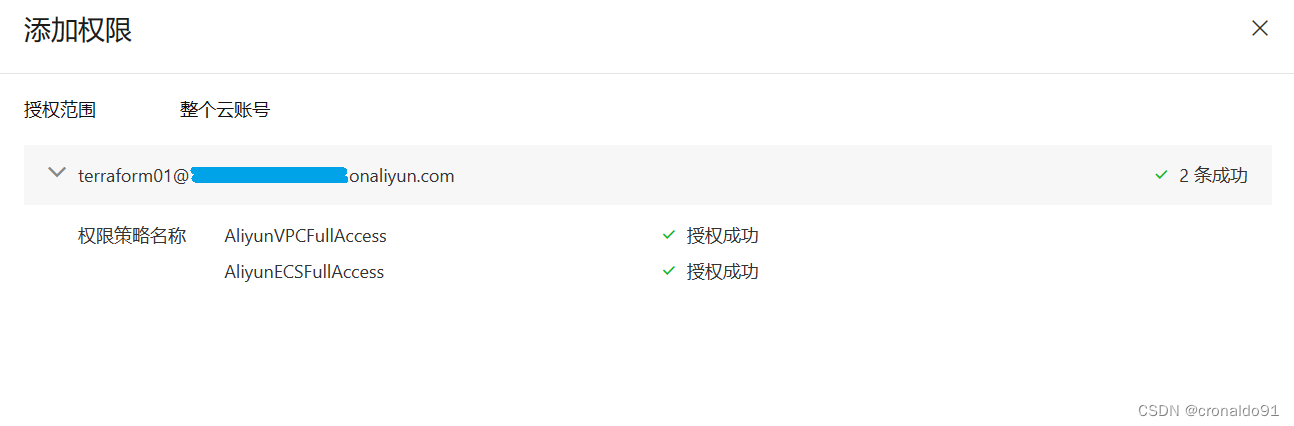
(8)选择权限,搜索“ECS”

(9)授权成功
(10)查看alicloud provider 示例
Terraform Registry

USE PROVIDER 示例
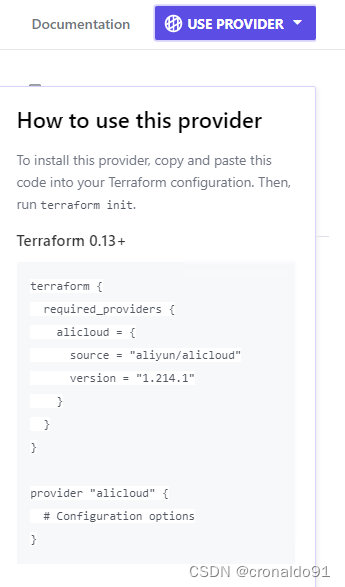
terraform {required_providers {alicloud = {source = "aliyun/alicloud"version = "1.214.1"}}
}provider "alicloud" {# Configuration options
}
Example Usage 示例

# Configure the Alicloud Provider
provider "alicloud" {access_key = "${var.access_key}"secret_key = "${var.secret_key}"region     = "${var.region}"
}data "alicloud_instance_types" "c2g4" {cpu_core_count = 2memory_size    = 4
}data "alicloud_images" "default" {name_regex  = "^ubuntu"most_recent = trueowners      = "system"
}# Create a web server
resource "alicloud_instance" "web" {image_id             = "${data.alicloud_images.default.images.0.id}"internet_charge_type = "PayByBandwidth"instance_type        = "${data.alicloud_instance_types.c2g4.instance_types.0.id}"system_disk_category = "cloud_efficiency"security_groups      = ["${alicloud_security_group.default.id}"]instance_name        = "web"vswitch_id           = "vsw-abc12345"
}# Create security group
resource "alicloud_security_group" "default" {name        = "default"description = "default"vpc_id      = "vpc-abc12345"
}
3.Linux使用Terraform 连接 alicloud
(1)安装
sudo yum install -y yum-utilssudo yum-config-manager --add-repo https://rpm.releases.hashicorp.com/RHEL/hashicorp.reposudo yum -y install terraform
安装yum-utils

添加REPO

安装Terraform


(2)验证版本
terraform version

(3)开启命令行补全
terraform -install-autocomplete![]()
(4)创建项目
mkdir terraformcd terraform/![]()
![]()
(5)创建主配置文件
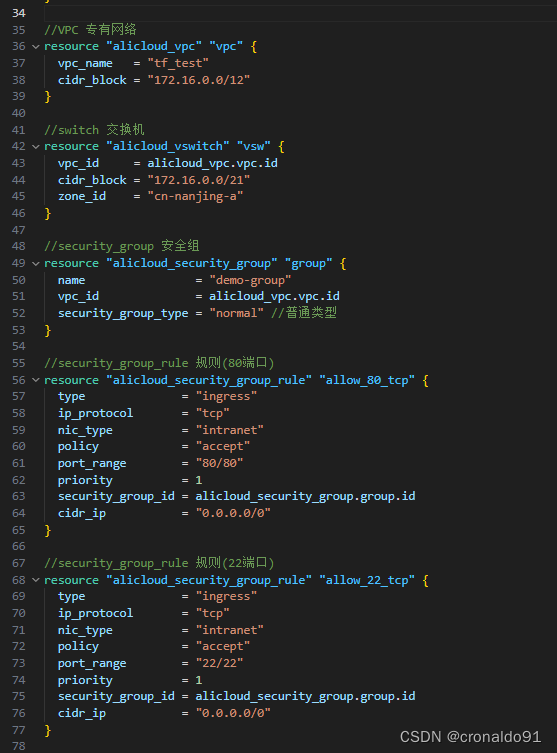
vim main.tf![]()
1 provider "alicloud" {2 access_key = var.access_key3 secret_key = var.secret_key4 region = var.region5 }6 7 //VPC 专有网络8 resource "alicloud_vpc" "vpc" {9 vpc_name = "tf_test"10 cidr_block = "172.16.0.0/12"11 }12 13 //switch 交换机14 resource "alicloud_vswitch" "vsw" {15 vpc_id = alicloud_vpc.vpc.id16 cidr_block = "172.16.0.0/21"17 zone_id = "cn-nanjing-a"18 }19 20 //security_group 安全组21 resource "alicloud_security_group" "group" {22 name = "demo-group"23 vpc_id = alicloud_vpc.vpc.id24 security_group_type = "normal" //普通类型25 }26 27 //security_group_rule 规则(80端口)28 resource "alicloud_security_group_rule" "allow_80_tcp" {29 type = "ingress"30 ip_protocol = "tcp"31 nic_type = "intranet"32 policy = "accept"33 port_range = "80/80"34 priority = 135 security_group_id = alicloud_security_group.group.id36 cidr_ip = "0.0.0.0/0"37 }38 39 //security_group_rule 规则(22端口)40 resource "alicloud_security_group_rule" "allow_22_tcp" {41 type = "ingress"42 ip_protocol = "tcp"43 nic_type = "intranet"44 policy = "accept"45 port_range = "22/22"46 priority = 147 security_group_id = alicloud_security_group.group.id48 cidr_ip = "0.0.0.0/0"49 }

(6)创建变量配置文件
vim variables.tf![]()
1 variable "access_key" { type = string }2 3 variable "secret_key" { type = string }4 5 variable "region" { type = string }

(7)创建版本配置文件
vim versions.tf
1 terraform {2 required_version = "1.6.6"3 required_providers {4 alicloud = {5 source = "aliyun/alicloud"6 version = "1.214.1"7 }8 }9 }10

(8)初始化
terraform init

(9)申明RAM相关变量
export TF_VAR_access_key="XXXXX"
export TF_VAR_secret_key="XXXXX"
export TF_VAR_region="cn-nanjing"
![]()
(9)格式化代码
terraform fmt

(10)验证代码
terraform validate -json
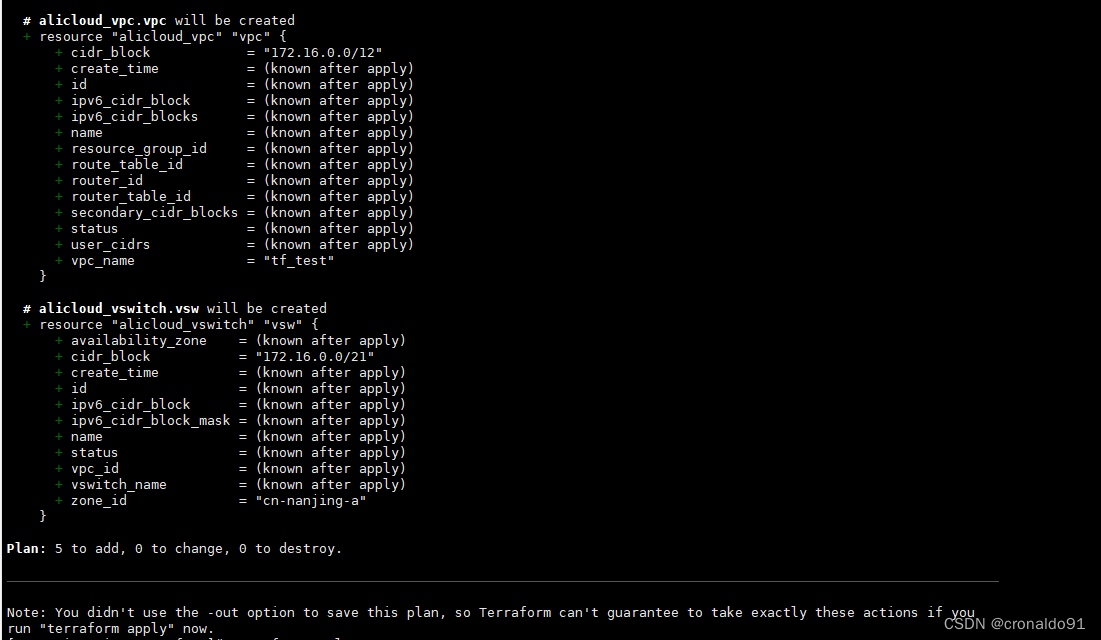
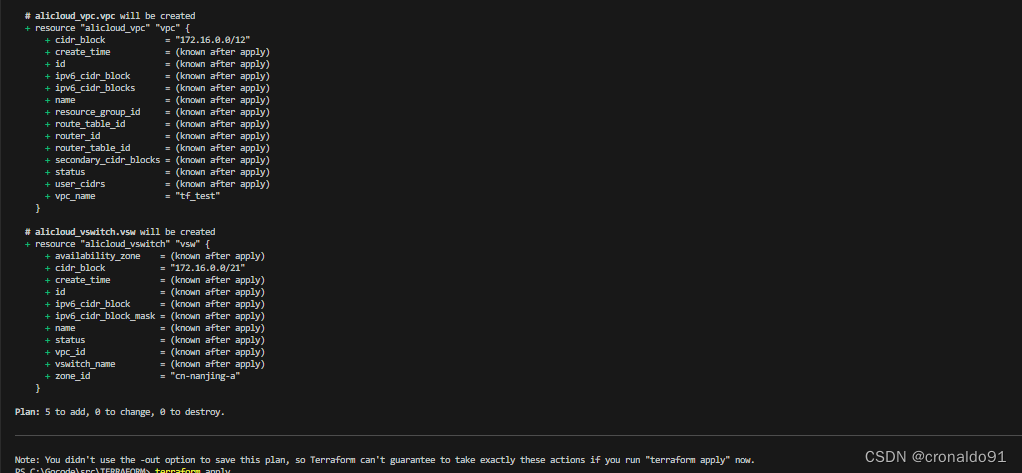
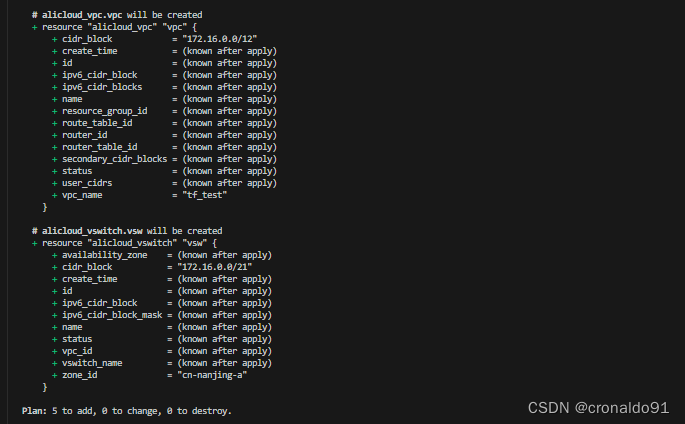
(11)计划与预览
terraform plan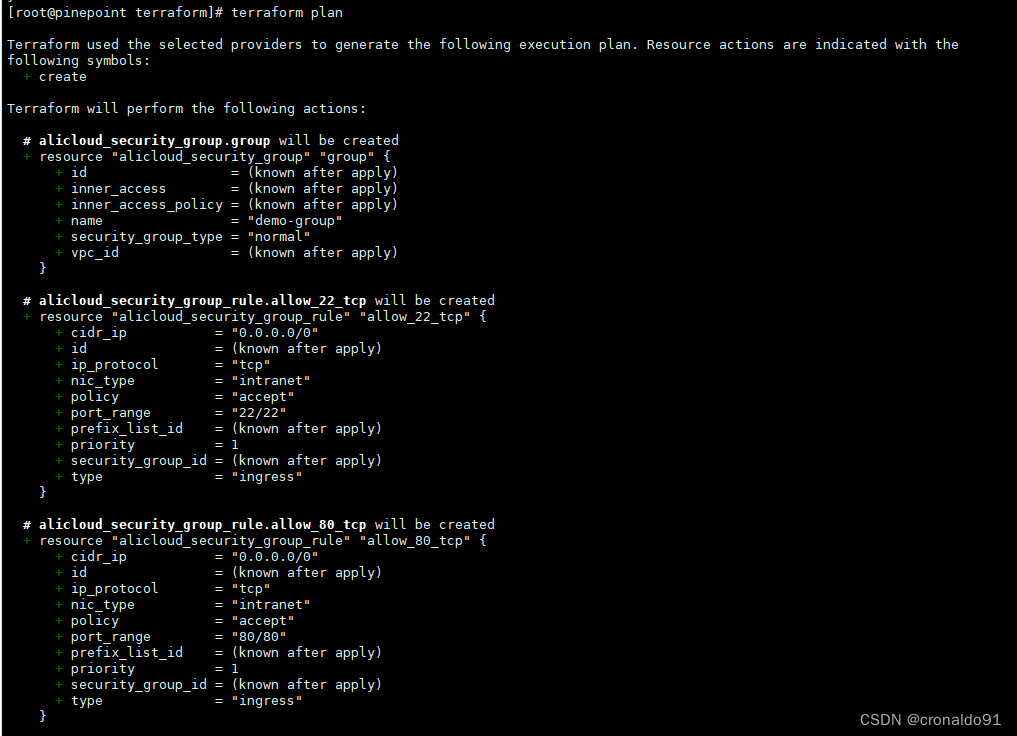
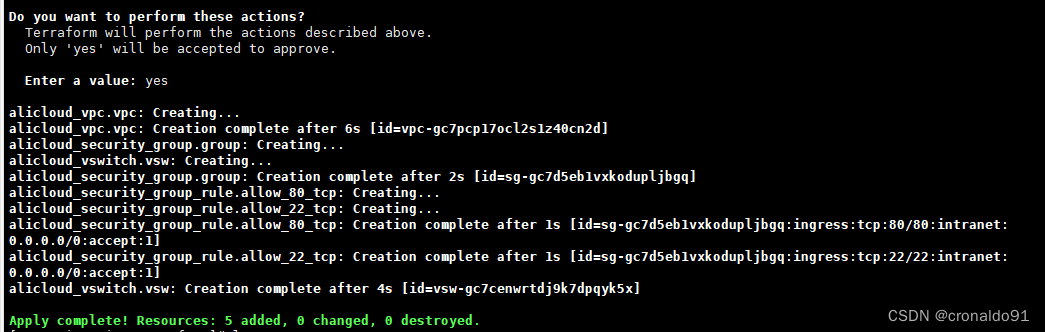
(12)申请资源
terraform apply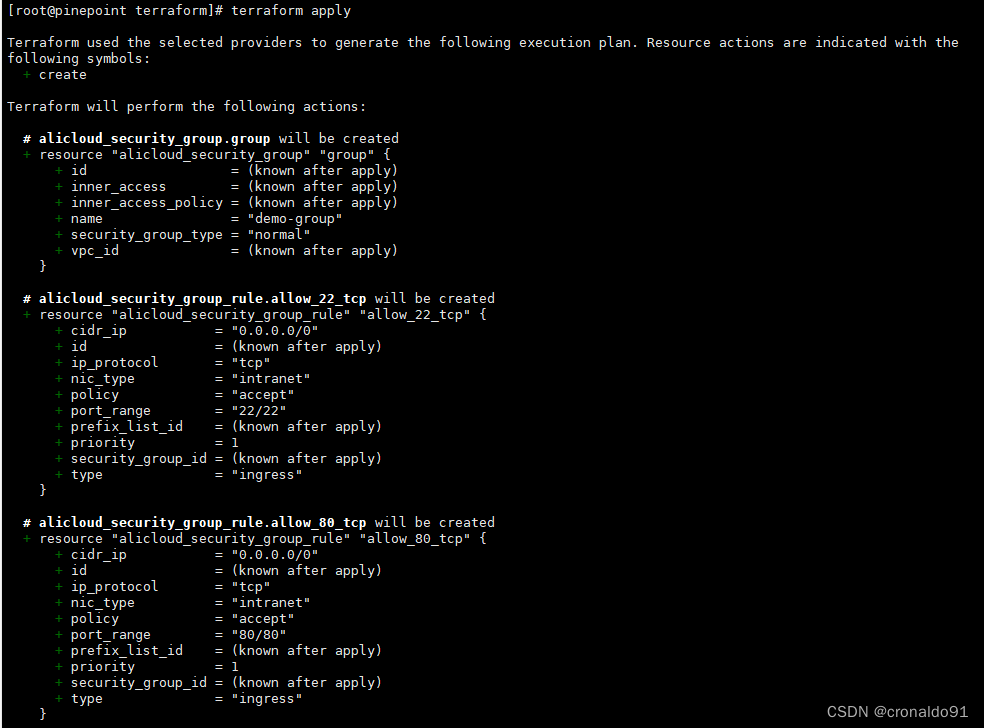

输入yes
查看目录
lstree![]()

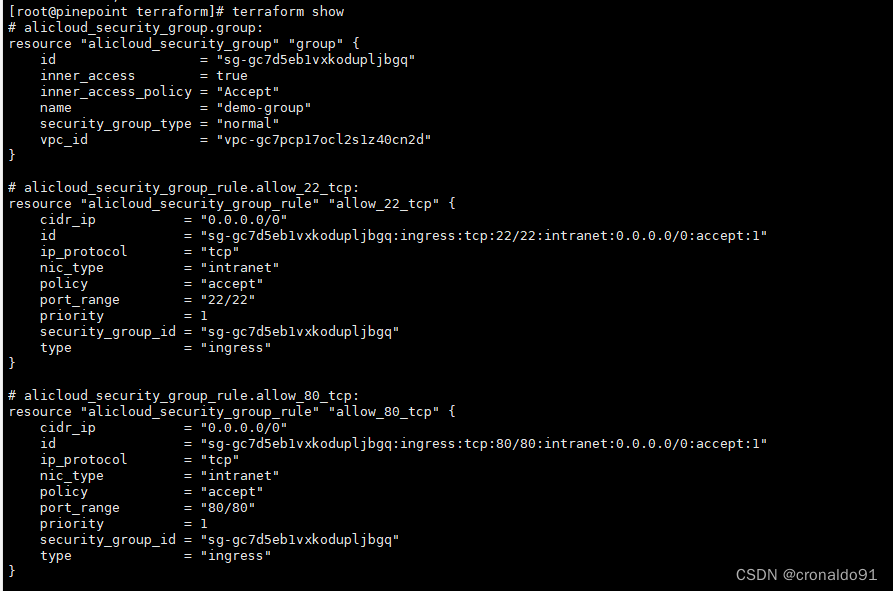
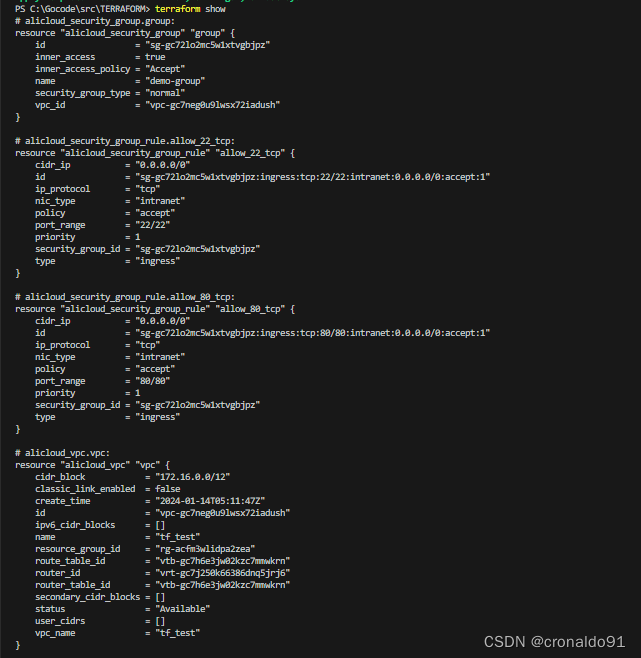
(13)展示资源
terraform show

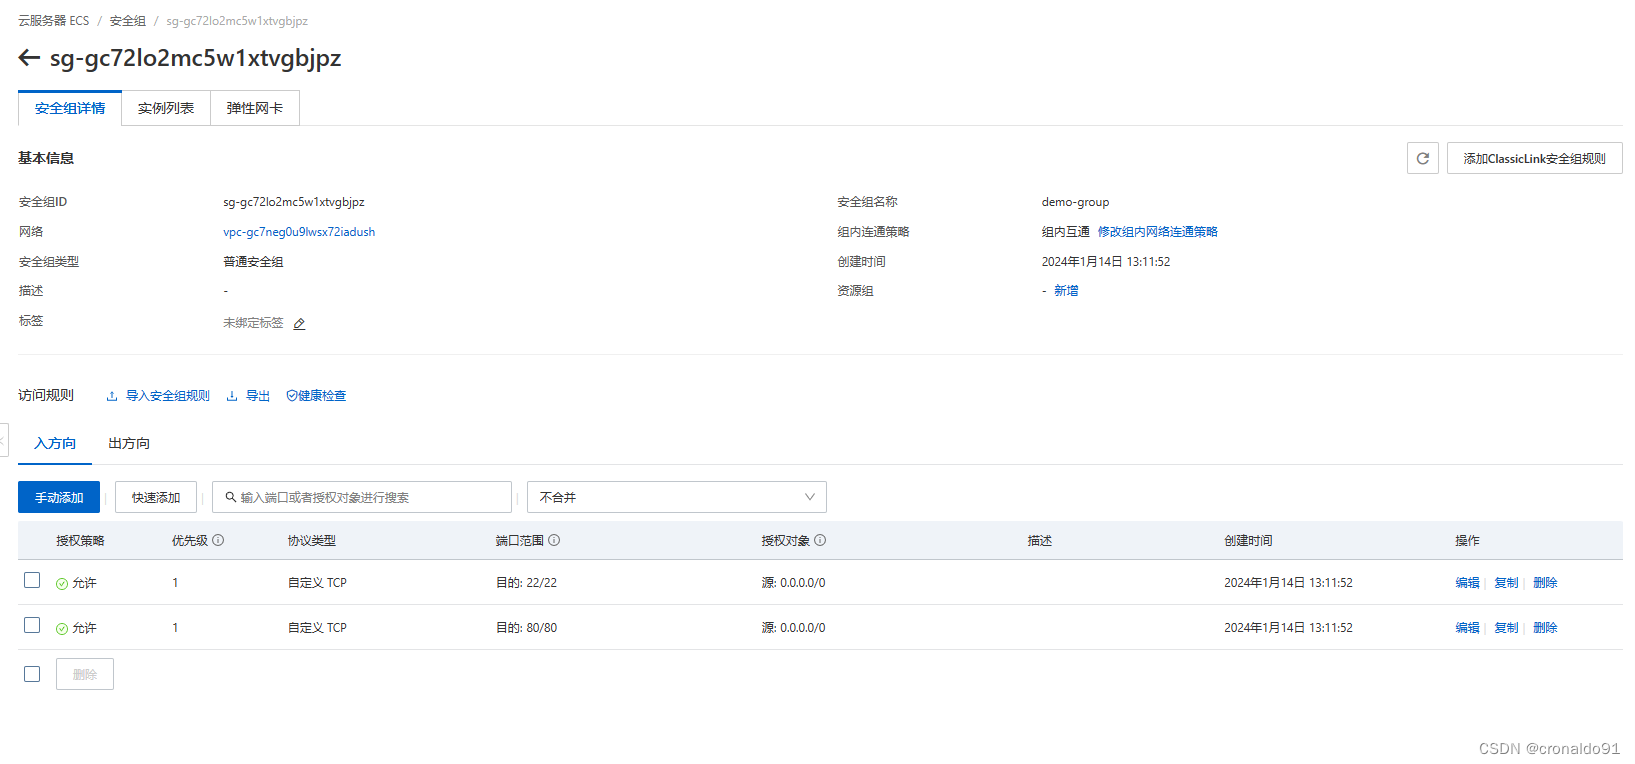
(14)登录阿里云系统查看
VPC

安全组

入方向规则

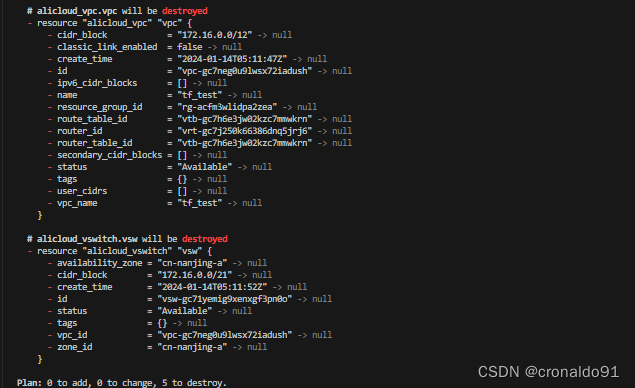
(15)销毁资源
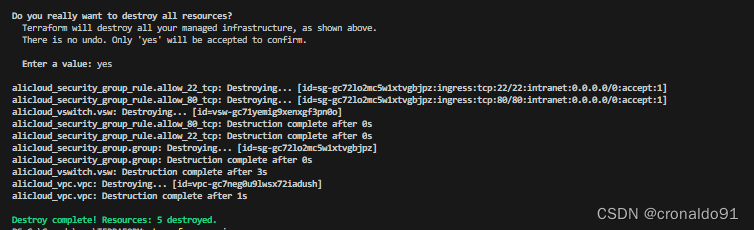
terraform destroy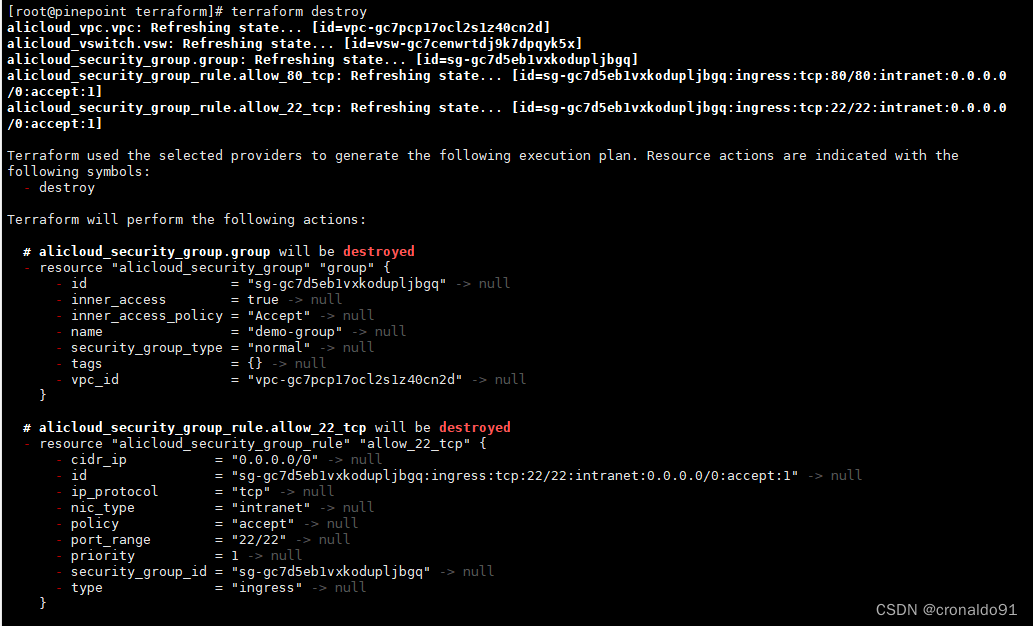
ls输入yes

查看目录
4.Windows使用Terraform 连接 alicloud
(1)验证版本
terraform -v 或 terraform --version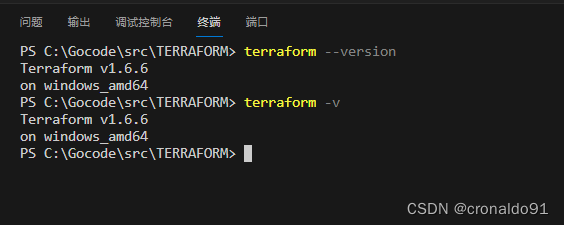
(2)创建主配置文件
main.tf
terraform {required_version = "1.6.6"required_providers {alicloud = {source  = "aliyun/alicloud"version = "1.214.1"}}
}variable "access_key" {description = "access_key"}variable "secret_key" {description = "secret_key"
}variable "region" {description = "阿里云地域"type        = stringdefault     = "cn-nanjing"
}# Configure the Alicloud Provider
provider "alicloud" {access_key = var.access_keysecret_key = var.secret_keyregion     = var.region
}//VPC 专有网络
resource "alicloud_vpc" "vpc" {vpc_name   = "tf_test"cidr_block = "172.16.0.0/12"
}//switch 交换机
resource "alicloud_vswitch" "vsw" {vpc_id     = alicloud_vpc.vpc.idcidr_block = "172.16.0.0/21"zone_id    = "cn-nanjing-a"
}//security_group 安全组
resource "alicloud_security_group" "group" {name                = "demo-group"vpc_id              = alicloud_vpc.vpc.idsecurity_group_type = "normal" //普通类型
}//security_group_rule 规则(80端口)
resource "alicloud_security_group_rule" "allow_80_tcp" {type              = "ingress"ip_protocol       = "tcp"nic_type          = "intranet"policy            = "accept"port_range        = "80/80"priority          = 1security_group_id = alicloud_security_group.group.idcidr_ip           = "0.0.0.0/0"
}//security_group_rule 规则(22端口)
resource "alicloud_security_group_rule" "allow_22_tcp" {type              = "ingress"ip_protocol       = "tcp"nic_type          = "intranet"policy            = "accept"port_range        = "22/22"priority          = 1security_group_id = alicloud_security_group.group.idcidr_ip           = "0.0.0.0/0"
}
(3) 创建变量配置文件
terraform.tfvars
access_key = "XXXXX"
secret_key = "XXXXX"

(4)初始化
terraform init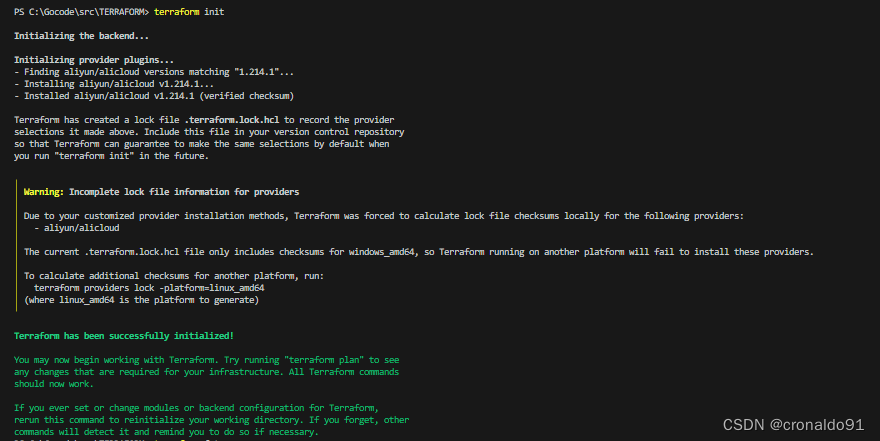
(5)格式化代码
terraform fmt
![]()
(6)验证代码
terraform validate -jsonterraform validate 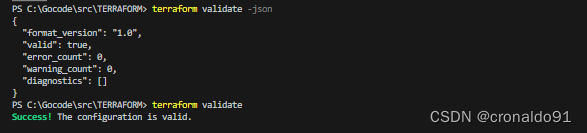
(7)计划与预览
terraform plan
(8)申请资源
terraform apply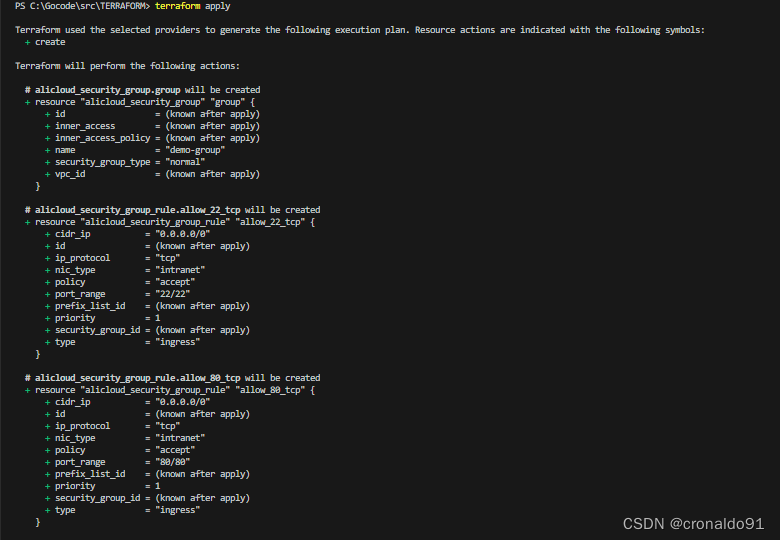
输入yes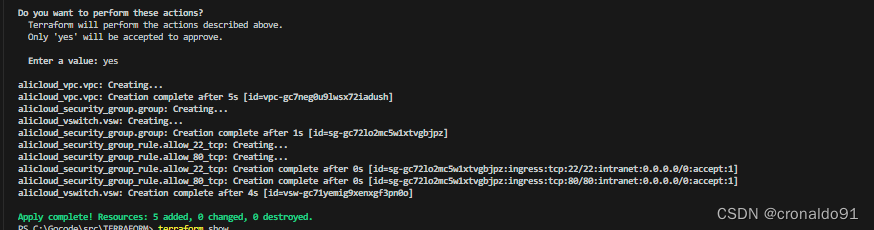
(9)展示资源
terraform show

(10)登录阿里云系统查看
VPC
安全组
入方向规则
(11)销毁资源
terraform destroy
输入yes
(12)查看版本
多了provider的仓库地址
terraform versionterraform -v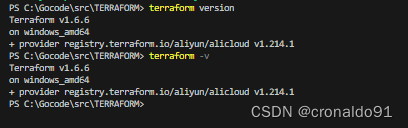
二、问题
1.Windows如何申明RAM 相关变量
(1)申明 (仅测试)
setx  TF_VAR_access_key  XXXXX
setx  TF_VAR_secret_key  XXXXX
setx  TF_VAR_region  cn-nanjing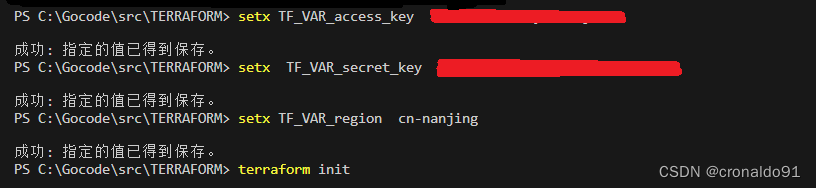
(2)查看
regedit用户变量:
计算机\HKEY_CURRENT_USER\Environment系统变量:
计算机\HKEY_LOCAL_MACHINE\SYSTEM\ControlSet001\Control\Session Manager\Environment
注册应用表:

用户变量:
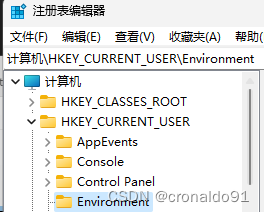
系统变量:

2.Linux如何申明RAM 相关变量
(1)申明
export TF_VAR_access_key="XXXXX"
export TF_VAR_secret_key="XXXXX"
export TF_VAR_region="cn-nanjing"
![]()
3. Linux terraform 初始化失败
(1)报错
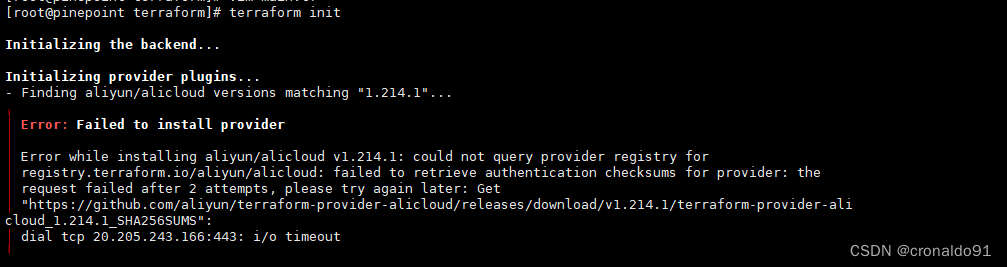
(2)原因分析
国内用户在下载 Provider 时会遇到下载缓慢甚至下载失败的问题
(3)解决方法
Terraform CLI 自 0.13.2 版本起提供了设置网络镜像的功能。为解决以上问题,阿里云 Provider 提供了镜像服务以帮助国内用户快速下载。
①配置方案
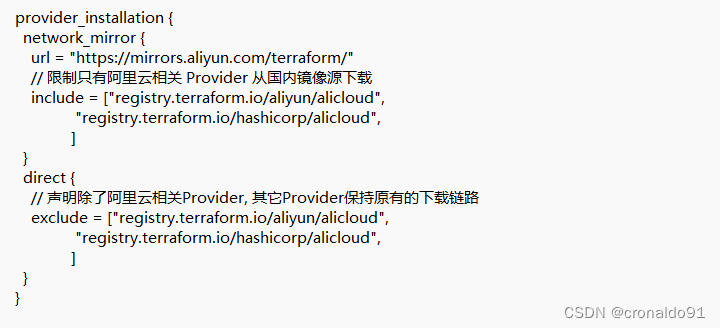
创建.terraformrc 或terraform.rc配置文件,文件位置取决于主机的操作系统。在 Windows 环境上,文件必须命名为terraform.rc,并放置在相关用户的%APPDATA%目录中。这个目录的物理位置取决于Windows 版本和系统配置;在 PowerShell 中使用 $env:APPDATA 可以找到其在系统上的位置。在所有其他系统上,必须将该文件命名为.terraformrc,并直接放在相关用户的主目录中。也可以使用TF_CLI_CONFIG_FILE环境变量指定 Terraform CLI 配置文件的位置,任何此类文件都应遵循命名模式*.tfrc。② 在home目录下创建.terraformrc文件,内容如下
provider_installation {network_mirror {url = "https://mirrors.aliyun.com/terraform/"// 限制只有阿里云相关 Provider 从国内镜像源下载include = ["registry.terraform.io/aliyun/alicloud", "registry.terraform.io/hashicorp/alicloud",]   }direct {// 声明除了阿里云相关Provider, 其它Provider保持原有的下载链路exclude = ["registry.terraform.io/aliyun/alicloud", "registry.terraform.io/hashicorp/alicloud",]  }
}
③ 新增配置文件
vim .terraformrc
cd terraform/
![]()

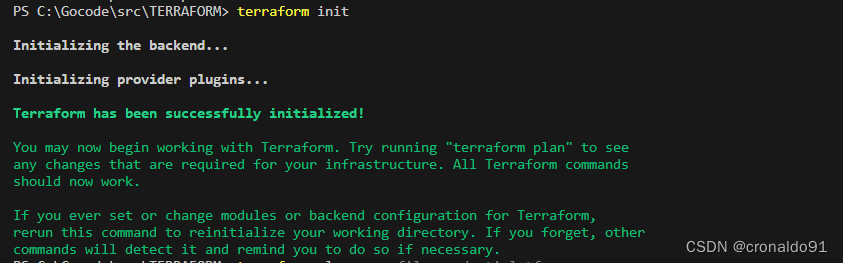
④ 成功
4.Linux terraform 计划与预览失败
(1)报错


(2)原因分析
环境变量引用失败
(3)解决方法
重新申明变量
export TF_VAR_access_key="XXXXX"
export TF_VAR_secret_key="XXXXX"
export TF_VAR_region="cn-nanjing"
![]()
成功:
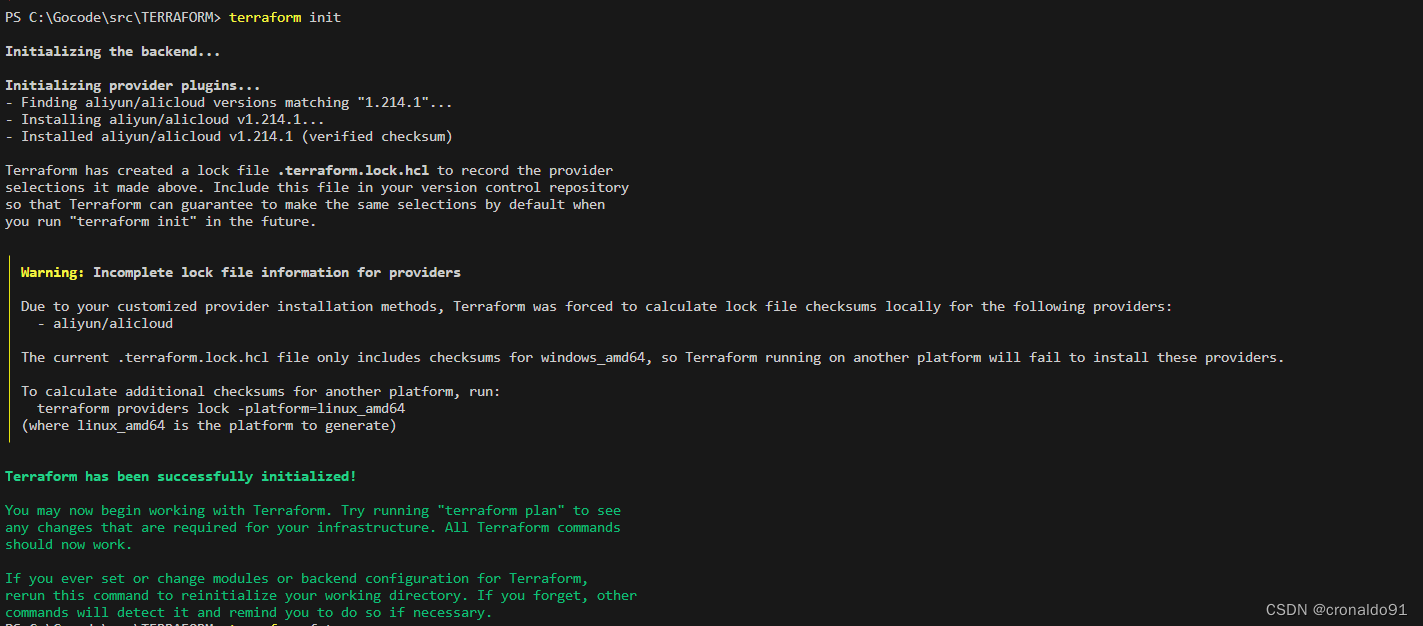
5. Windows terraform 初始化失败
(1)报错
显示成功,实际未加载插件
(2)原因分析
国内用户在下载 Provider 时会遇到下载缓慢甚至下载失败的问题
(3)解决方法
Terraform CLI 自 0.13.2 版本起提供了设置网络镜像的功能。为解决以上问题,阿里云 Provider 提供了镜像服务以帮助国内用户快速下载。
① 配置方案
创建.terraformrc 或terraform.rc配置文件,文件位置取决于主机的操作系统。在 Windows 环境上,文件必须命名为terraform.rc,并放置在相关用户的%APPDATA%目录中。这个目录的物理位置取决于Windows 版本和系统配置;在 PowerShell 中使用 $env:APPDATA 可以找到其在系统上的位置。在所有其他系统上,必须将该文件命名为.terraformrc,并直接放在相关用户的主目录中。也可以使用TF_CLI_CONFIG_FILE环境变量指定 Terraform CLI 配置文件的位置,任何此类文件都应遵循命名模式*.tfrc。② 查看目录
echo $env:APPDATA
③ 进入目录
![]()
④在相关目录下创建terraform.rc文件
![]()
内容如下:
provider_installation {network_mirror {url = "https://mirrors.aliyun.com/terraform/"// 限制只有阿里云相关 Provider 从国内镜像源下载include = ["registry.terraform.io/aliyun/alicloud", "registry.terraform.io/hashicorp/alicloud",]   }direct {// 声明除了阿里云相关Provider, 其它Provider保持原有的下载链路exclude = ["registry.terraform.io/aliyun/alicloud", "registry.terraform.io/hashicorp/alicloud",]  }
}
⑤ 成功
6. Windows terraform plan命令有哪些参数
(1)语法
![]()
PS C:\Gocode\src\TERRAFORM> terraform plan -help
Usage: terraform [global options] plan [options]Generates a speculative execution plan, showing what actions Terraformwould take to apply the current configuration. This command will notactually perform the planned actions.You can optionally save the plan to a file, which you can then pass tothe "apply" command to perform exactly the actions described in the plan.Plan Customization Options:The following options customize how Terraform will produce its plan. Youcan also use these options when you run "terraform apply" without passingit a saved plan, in order to plan and apply in a single command.-destroy            Select the "destroy" planning mode, which creates a planto destroy all objects currently managed by thisTerraform configuration instead of the usual behavior.-refresh-only       Select the "refresh only" planning mode, which checkswhether remote objects still match the outcome of themost recent Terraform apply but does not propose anyactions to undo any changes made outside of Terraform.-refresh=false      Skip checking for external changes to remote objectswhile creating the plan. This can potentially makeplanning faster, but at the expense of possibly planningagainst a stale record of the remote system state.-replace=resource   Force replacement of a particular resource instance usingits resource address. If the plan would've normallyproduced an update or no-op action for this instance,Terraform will plan to replace it instead. You can usethis option multiple times to replace more than one object.-target=resource    Limit the planning operation to only the given module,resource, or resource instance and all of itsdependencies. You can use this option multiple times toinclude more than one object. This is for exceptionaluse only.-var 'foo=bar'      Set a value for one of the input variables in the rootmodule of the configuration. Use this option more thanonce to set more than one variable.-var-file=filename  Load variable values from the given file, in additionto the default files terraform.tfvars and *.auto.tfvars.Use this option more than once to include more than onevariables file.Other Options:-compact-warnings          If Terraform produces any warnings that are notaccompanied by errors, shows them in a more compactform that includes only the summary messages.-detailed-exitcode         Return detailed exit codes when the command exits.This will change the meaning of exit codes to:0 - Succeeded, diff is empty (no changes)1 - Errored2 - Succeeded, there is a diff-generate-config-out=path  (Experimental) If import blocks are present inconfiguration, instructs Terraform to generate HCLfor any imported resources not already present. Theconfiguration is written to a new file at PATH,which must not already exist. Terraform may stillattempt to write configuration if the plan errors.-input=true                Ask for input for variables if not directly set.-lock=false                Don't hold a state lock during the operation. Thisis dangerous if others might concurrently runcommands against the same workspace.-lock-timeout=0s           Duration to retry a state lock.-no-color                  If specified, output won't contain any color.-out=path                  Write a plan file to the given path. This can beused as input to the "apply" command.-parallelism=n             Limit the number of concurrent operations. Defaultsto 10.-state=statefile           A legacy option used for the local backend only.See the local backend's documentation for moreinformation.
相关文章:

IaC基础设施即代码:使用Terraform 连接 alicloud阿里云
目录 一、实验 1.环境 2.alicloud阿里云创建用户 3.Linux使用Terraform 连接 alicloud 4.Windows使用Terraform 连接 alicloud 二、问题 1.Windows如何申明RAM 相关变量 2.Linux如何申明RAM 相关变量 3. Linux terraform 初始化失败 4.Linux terraform 计划与预览失败…...

Vue3 如何使用移动端调试工具vConsole
1、安装 pnpm i vconsole2、在src/utils下新建vconsole.ts,写入以下代码 // 这是移动端控制台调试工具,需要调试就打开,不用就注释 import vConsole from vconsole const vconsole new vConsole()3、src/main.ts 引入,需要调试就打开,&…...

【物流管理系统-Python简易版】
前端设计-后端开发(DJango项目Demo) 参考资料:【一文到底】【0基础】【快速上手】Django基本使用 创建项目 Pycharm专业版新建DJango项目 项目文件介绍: django_study_demo │─ manage.py 【项目管理的脚本,不要修…...
Vue学习笔记六--Vue3学习
1、Vue3的优势 2、创建Vue3工程 前提:node -v 查看node版本,需要在16.0及以上 创建命令 npm init vuelatest,先安装create-vue然后创建项目 然后执行npm run dev 提示 sh: vite: command not found,需要执行npm i重新安装依赖,之后再执行np…...

21.在线与离线MC强化学习简介
文章目录 1. 什么是在线MC强化学习2. 什么是离线MC强化学习3. 在线MC强化学习有何缺点 1. 什么是在线MC强化学习 在线强化学习(on-policy MC RL),是指:智能体在策略评估时为获取完整轨迹所采用的采样策略 π s a m p l e ( a ∣ …...

控制网页的灰度显示
1.代码: 普通网页 <style>html {filter: grayscale(100%);}</style> 或是:webkit内核浏览器写法 <style>html {-webkit-filter: grayscale(100%)}</style> 2.说明: grayscale(amount) :进行灰度转换。 amount转换值的大小&…...

科研绘图(四)火山图
火山图是生物信息学中常用的一种图表,用来显示基因表达数据的变化。它通常将每个点表示为一个基因,x轴显示对数比率(log ratio),表示基因表达的变化大小;y轴显示-log10(p-value),表示变化的统计…...
超强站群系统v9.0:最新蜘蛛池优化技术,一键安装,内容无缓存刷新,高效安全
安全、高效,化的优化利用php性能,使得运行流畅稳定 独创内容无缓存刷新不变,节省硬盘。防止搜索引擎识别蜘蛛池 蜘蛛池算法,轻松构建站点(电影、资讯、图片、论坛等等) 可以个性化每个网站的风格、内容、…...

torch.fx的极简通用量化教程模板
现在比较流行的方式,是使用 torch.fx来做量化,比如地平线J3/J5的oe开发包中内嵌的ptq/qat量化方式,就是基于torch.fix进行开发的。本文将使用100行代码教你入门比较标准的量化步骤。,这些问题需要解答。本文100行代码,麻雀虽小五脏俱全,包括怎么用,用在哪里,哪里不能用…...
rpc的正确打开方式|读懂Go原生net/rpc包
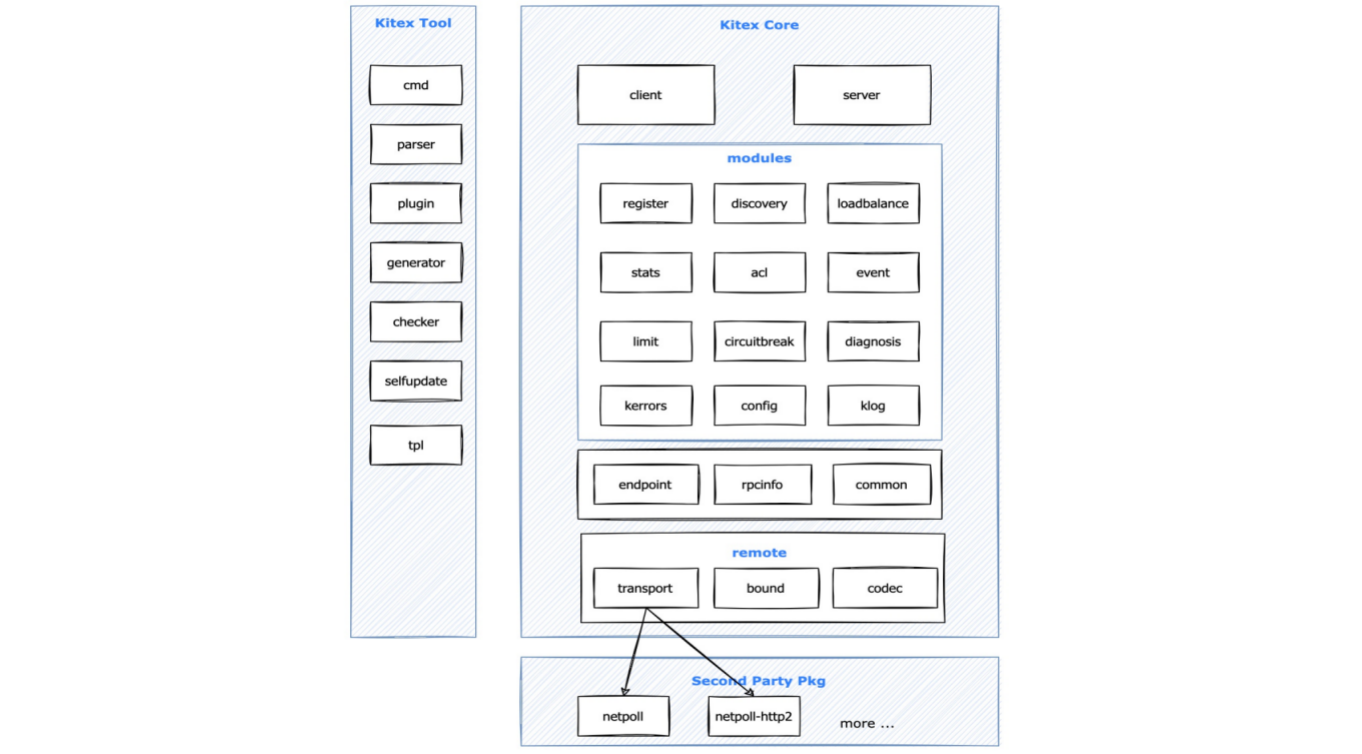
前言 大家好,这里是白泽,之前最近在阅读字节跳动开源RPC框架Kitex的源码,分析了如何借助命令行,由一个IDL文件,生成client和server的脚手架代码,也分析了Kitex的日志组件klog。当然Kitex还有许多其他组件&…...
【信号与系统】【北京航空航天大学】实验二、连续时间系统的时域分析【MATLAB】
一、实验目的 1、掌握连续时间信号的卷积运算以及其对应的 MATLAB 实现方法; 2、掌握连续系统的冲激响应、阶跃响应 以及其对应的 MATLAB 实现方法; 3、掌握利用 MATLAB 求 LTI (Linear Time-Invariant, 线性时不变)系统响应的方…...
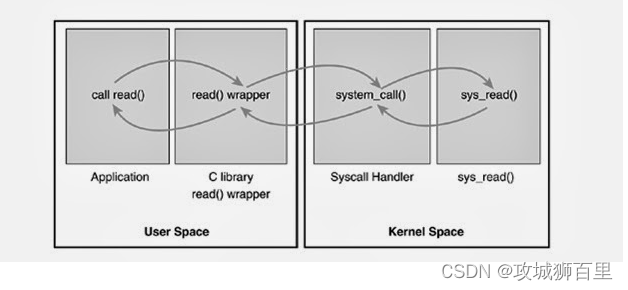
【Linux 内核源码分析笔记】系统调用
在Linux内核中,系统调用是用户空间程序与内核之间的接口,它允许用户空间程序请求内核执行特权操作或访问受保护的内核资源。系统调用提供了一种安全可控的方式,使用户程序能够利用内核功能而不直接访问底层硬件。 系统调用: 通过…...
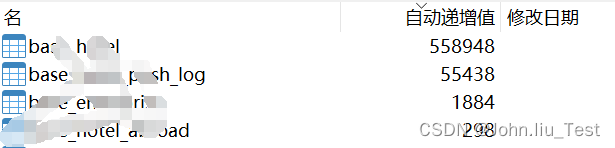
mysql清空并重置自动递增初始值
需求:当上新项目时,测试环境数据库导出来的表id字段一般都有很大的初始递增值了,需要重置一下 先上代码: -- 查看当前自动递增值 SHOW CREATE TABLE table_name; -- 重建自动递增索引(可选) ALTER TABLE t…...

计算机算法之二分算法
文章目录 前言核心问题遍历查找思路遍历查找代码实现遍历查找缺点二分查找思路二分查找代码实现二分查找优点二分查找的变种问题一解题思路代码实现问题二解题思路代码实现 前言 大家好,我是醉墨居士,今天聊一下计算机中的经典算法 - 二分算法 核心问题…...

获取当前设备的IP
背景: 在本地使用自带webUI的项目时,需要制定webUI的访问地址。 一般本地访问使用:127.0.0.1,配置为可以从其他设备访问时,需要指定当前设备的IP,或者指定为0.0.0.0。 例如:使用locust的时候&a…...

koa2文件的上传下载功能
const Router require(“koa-router”); const upload new Router(); const bodyParser require(“koa-bodyparser”); const multer require("koa/multer"); const path require(“path”); const article require("…/utils/sql"); const { getCur…...

test-02-test case generate 测试用例生成 EvoSuite 介绍
拓展阅读 junit5 系列 基于 junit5 实现 junitperf 源码分析 Auto generate mock data for java test.(便于 Java 测试自动生成对象信息) Junit performance rely on junit5 and jdk8.(java 性能测试框架。性能测试。压测。测试报告生成。) 拓展阅读 自动生成测试用例 什么…...
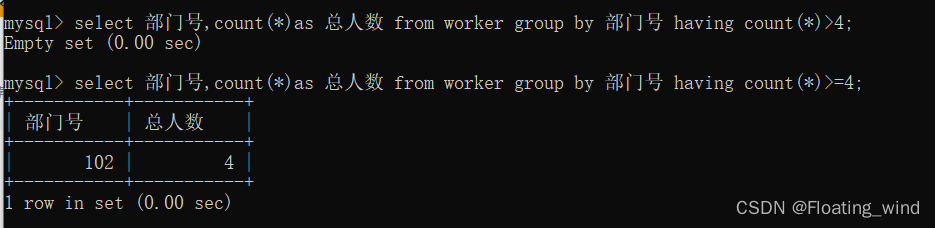
1.单表查询
作业要求 素材: 表名:worker-- 表中字段均为中文,比如 部门号 工资 职工号 参加工作 等 CREATE TABLE worker ( 部门号 int(11) NOT NULL, 职工号 int(11) NOT NULL, 工作时间 date NOT NULL, 工资 float(8,2) NOT NULL, 政治面貌 varc…...

FFmpeg 的使用与Docker安装流媒体服务器
本文阐述的均为命令行的使用方式,并不牵扯FFmpeg 的 C音视频开发内容,补充一句,C的资料真的少,能把C学好的人,我真的是觉得巨佬。 我主要是使用FFmpeg 推流方面的知识,案例大都是靠近这方面。 一、FFmpeg…...

Qt QListWidget列表框控件
文章目录 1 属性和方法1.1 外观1.2 添加条目1.3 删除条目1.4 信号和槽 2 实例2.1 布局2.2 代码实现 Qt中的列表框控件,对应的类是QListWidget 它用于显示多个列表项,列表项对应的类是QListWidgetitem 1 属性和方法 QListWidget有很多属性和方法…...

OpenClaw学习路径:从Qwen3-32B镜像体验到复杂自动化任务设计
OpenClaw学习路径:从Qwen3-32B镜像体验到复杂自动化任务设计 1. 为什么需要分阶段学习OpenClaw? 第一次接触OpenClaw时,我被它"无所不能"的自动化能力震撼了——这个开源框架能让AI像人类一样操作我的电脑,完成文件整…...

中关村论坛重磅发布十五项脑机接口成果
当前,脑机接口技术正处于从实验室走向临床应用、从技术突破迈向产业转化的关键时期。中关村论坛重磅发布十五项脑机接口创新成果,聚焦学术创新性、产品合规性、临床突破性与生态共建性四大核心维度,集中呈现我国在该领域的前沿进展。本次发布…...

差点被这套AI工具搞离职...搞懂MCP和Skill后,我发现宇宙的尽头是“写小作文”
剥开神秘面纱前两天,隔壁组的新人小王差点被开除。这小子为了赶进度,搞了个瞎折腾的操作:把公司一个十几万行的老旧核心项目,一股脑全扔进 Cursor 里,连哄带骗地让 AI 帮他重构。结果呢?跑出来的代码简直是…...

RC滤波器设计原理与工程实践指南
1. RC滤波器设计原理与工程实践1.1 滤波器在嵌入式系统中的作用在嵌入式系统设计中,传感器信号普遍存在噪声干扰问题。典型场景中,5kHz有效信号常伴随500kHz高频噪声,此时RC无源滤波器凭借低成本、易实现等优势成为首选方案。其硬件设计可直接…...

HIL测试入门避坑指南:从CANoe配置到故障注入的完整踩坑实录
HIL测试实战避坑手册:从零搭建车窗ECU测试台架的12个关键陷阱 第一次接触HIL测试时,我盯着实验室里那些闪烁的指示灯和缠绕的线缆,仿佛面对着一个未知的宇宙。作为车载测试领域最具挑战性的环节之一,HIL测试既是验证ECU可靠性的终…...

SurfaceView视觉优化实战:圆角与渐变蒙层的完美结合
1. SurfaceView视觉优化的核心价值 在Android开发中,SurfaceView因其独特的双缓冲机制和独立的绘图线程,成为视频播放、游戏渲染等高性能场景的首选组件。但原生SurfaceView的直角边框和单调的呈现方式,常常与现代化UI设计语言格格不入。我在…...

Paimon数据湖实战:Merge Engines深度解析与应用场景
1. Paimon数据湖中的Merge Engines核心机制 第一次接触Paimon的Merge Engines时,我完全被它强大的数据合并能力震撼到了。这就像是一个智能的数据管家,能够根据不同的业务需求,自动帮你处理各种复杂的数据合并场景。在实际项目中,…...
)
别再死磕点云了!用DeepSDF和PyTorch实现高质量3D模型补全(附代码)
突破传统3D补全瓶颈:基于DeepSDF的智能修复实战指南 当你面对残缺的3D扫描数据时,是否厌倦了传统点云方法带来的锯齿状表面和模糊细节?在文物数字化修复或游戏资产重建中,我们常常遇到这样的困境:珍贵的雕塑缺失了关键…...

Termux:X11的10个核心功能解析:触摸手势、键盘切换与多显示器支持
Termux:X11的10个核心功能解析:触摸手势、键盘切换与多显示器支持 【免费下载链接】termux-x11 Termux X11 add-on application. Still in early development. 项目地址: https://gitcode.com/gh_mirrors/te/termux-x11 Termux:X11是一个专为Android设备优化…...

从‘饱和度’到‘肤色正常’:深入理解CCM色彩校正矩阵的调试逻辑与参数关系
从‘饱和度’到‘肤色正常’:深入理解CCM色彩校正矩阵的调试逻辑与参数关系 在数字图像处理领域,色彩校正矩阵(Color Correction Matrix,CCM)的调试一直是工程师们面临的技术难点之一。不同于简单的参数调整࿰…...