Spring Boot - Application Events 的发布顺序_ApplicationContextInitializedEvent
文章目录
- Pre
- 概述
- Code
- 源码分析
Pre
Spring Boot - Application Events 的发布顺序_ApplicationEnvironmentPreparedEvent
Spring Boot - Application Events 的发布顺序_ApplicationEnvironmentPreparedEvent
概述
Spring Boot 的广播机制是基于观察者模式实现的,它允许在 Spring 应用程序中发布和监听事件。这种机制的主要目的是为了实现解耦,使得应用程序中的不同组件可以独立地改变和复用逻辑,而无需直接进行通信。
在 Spring Boot 中,事件发布和监听的机制是通过 ApplicationEvent、ApplicationListener 以及事件发布者(ApplicationEventPublisher)来实现的。其中,ApplicationEvent 是所有自定义事件的基础,自定义事件需要继承自它。
ApplicationListener 是监听特定事件并做出响应的接口,开发者可以通过实现该接口来定义自己的监听器。事件发布者(通常由 Spring 的 ApplicationContext 担任)负责发布事件。
ApplicationContextInitializedEvent 是Spring框架中的一个事件,它在Spring应用上下文(ApplicationContext)初始化完成,但还未启动时触发。这个事件是在Spring框架初始化过程中,ApplicationContext对象创建完成,但还未开始加载 beans 和 配置之前发布的。
在Spring框架中,ApplicationContext是核心接口,负责实例化、配置和组装Bean。ApplicationContextInitializedEvent事件可以被用于执行一些需要在Spring应用上下文完全初始化,但是Bean尚未加载时的初始化代码。
使用场景举例:
-
自定义初始化逻辑:
当需要在Spring应用上下文初始化后,但Bean加载之前执行特定逻辑时,比如设置共享资源、初始化配置信息等。 -
监听应用上下文初始化完成:
用于在Spring应用上下文完全初始化后立即执行某些操作,比如日志记录、系统参数配置等。 -
插件或扩展点:
对于需要扩展Spring框架功能的第三方插件,可以在监听到这个事件时,进行一些自定义操作,如添加额外的Bean定义,或者修改已有的Bean定义。 -
资源加载与配置:
如果需要在Spring上下文初始化后,但Bean创建之前加载某些资源(如数据库连接、外部配置文件等),这个事件可以提供这样的机会。
在实际使用中,可以通过实现ApplicationListener接口来监听ApplicationContextInitializedEvent事件。
import org.springframework.context.ApplicationEvent;
import org.springframework.context.ApplicationListener;
import org.springframework.context.event.ApplicationContextInitializedEvent;
public class CustomInitializationListener implements ApplicationListener<ApplicationContextInitializedEvent> {@Overridepublic void onApplicationEvent(ApplicationContextInitializedEvent event) {// 执行初始化逻辑}
}
然后,需要在Spring配置文件中注册这个监听器,或者使用注解@Component进行自动注册。
需要注意的是,在Spring Boot项目中,事件监听通常更加自动化,并且通常不需要手动注册监听器。Spring Boot会自动配置并注册事件监听器,开发者只需关注事件的处理逻辑即可。
Code
package com.artisan.event;import org.springframework.context.ApplicationContextInitializer;
import org.springframework.context.ConfigurableApplicationContext;
import org.springframework.context.annotation.Configuration;/*** @author 小工匠* @version 1.0* @mark: show me the code , change the world*/
@Configuration
public class ApplicationContextNewInitializer implements ApplicationContextInitializer<ConfigurableApplicationContext> {/*** ApplicationContextInitializedEvent 在准备应用程序上下文期间,但在将 Bean 定义加载到 Spring 容器之前。* <p>* 此事件提供了在初始化 Bean 之前执行任务的机会,例如注册属性源和基于上下文环境激活 Bean 等。* <p>* <p>* 为了处理该 ApplicationContextInitializedEvent 事件,* 我们可以通过实现 ApplicationContextInitializer ConfigurableApplicationContext 作为泛型类型的接口来为应用程序创建一个额外的初始值设定项。* 可以在主应用程序类中手动添加此初始值设定项。* <p>* <p>* 当我们运行 Spring Boot 应用程序时, ApplicationContextNewInitializer 将调用 这将允许我们在加载任何 Bean 定义之前根据需要执行任务* new SpringApplicationBuilder(EventsApplication.class).initializers(new ApplicationContextNewInitializer()).run(args);** @param applicationContext the application to configure*/@Overridepublic void initialize(ConfigurableApplicationContext applicationContext) {System.out.println("--------------------> Handling ApplicationContextInitializedEvent here!");}
}
如何使用呢?
方式一:
@SpringBootApplication
public class LifeCycleApplication {/*** 除了手工add , 在 META-INF下面 的 spring.factories 里增加* org.springframework.context.ApplicationListener=自定义的listener 也可以** @param args*/public static void main(String[] args) {new SpringApplicationBuilder(LifeCycleApplication.class).initializers(new ApplicationContextNewInitializer()).run(args)}}
方式二: 通过spring.factories 配置

org.springframework.context.ApplicationContextInitializer=\
com.artisan.event.ApplicationContextNewInitializer
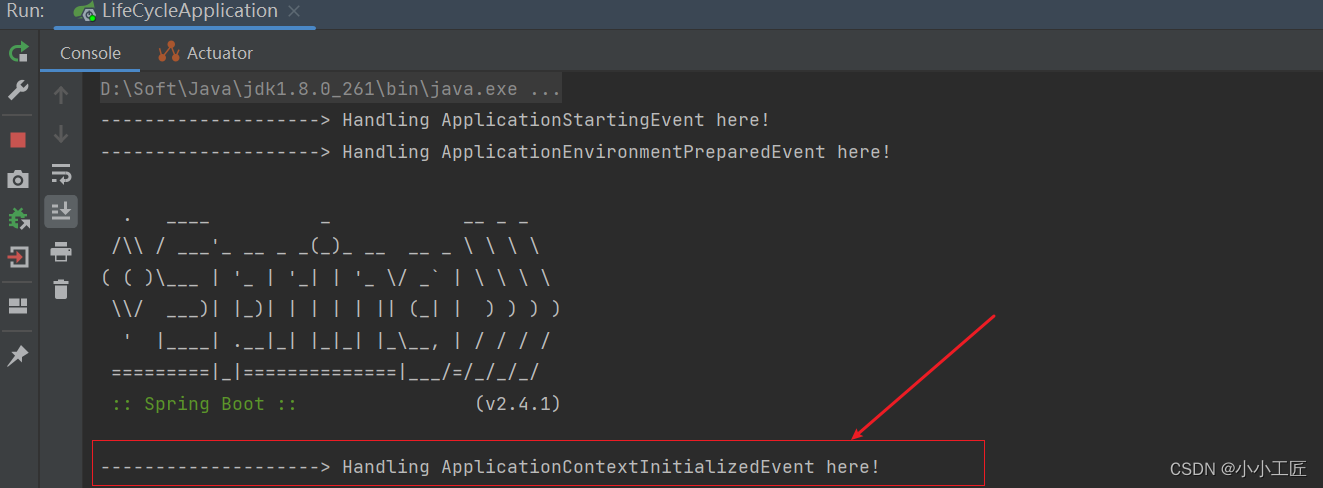
运行日志
源码分析
首先main方法启动入口
SpringApplication.run(LifeCycleApplication.class, args);
跟进去
public static ConfigurableApplicationContext run(Class<?> primarySource, String... args) {return run(new Class<?>[] { primarySource }, args);}
继续
public static ConfigurableApplicationContext run(Class<?>[] primarySources, String[] args) {return new SpringApplication(primarySources).run(args);}
这里首先关注 new SpringApplication(primarySources)
new SpringApplication(primarySources)
/*** Create a new {@link SpringApplication} instance. The application context will load* beans from the specified primary sources (see {@link SpringApplication class-level}* documentation for details. The instance can be customized before calling* {@link #run(String...)}.* @param resourceLoader the resource loader to use* @param primarySources the primary bean sources* @see #run(Class, String[])* @see #setSources(Set)*/@SuppressWarnings({ "unchecked", "rawtypes" })public SpringApplication(ResourceLoader resourceLoader, Class<?>... primarySources) {this.resourceLoader = resourceLoader;Assert.notNull(primarySources, "PrimarySources must not be null");this.primarySources = new LinkedHashSet<>(Arrays.asList(primarySources));this.webApplicationType = WebApplicationType.deduceFromClasspath();this.bootstrappers = new ArrayList<>(getSpringFactoriesInstances(Bootstrapper.class));setInitializers((Collection) getSpringFactoriesInstances(ApplicationContextInitializer.class));setListeners((Collection) getSpringFactoriesInstances(ApplicationListener.class));this.mainApplicationClass = deduceMainApplicationClass();}
聚焦 setListeners((Collection) getSpringFactoriesInstances(ApplicationListener.class));
run
继续run
// 开始启动Spring应用程序
public ConfigurableApplicationContext run(String... args) {StopWatch stopWatch = new StopWatch(); // 创建一个计时器stopWatch.start(); // 开始计时DefaultBootstrapContext bootstrapContext = createBootstrapContext(); // 创建引导上下文ConfigurableApplicationContext context = null; // Spring应用上下文,初始化为nullconfigureHeadlessProperty(); // 配置无头属性(如:是否在浏览器中运行)SpringApplicationRunListeners listeners = getRunListeners(args); // 获取运行监听器listeners.starting(bootstrapContext, this.mainApplicationClass); // 通知监听器启动过程开始try {ApplicationArguments applicationArguments = new DefaultApplicationArguments(args); // 创建应用参数ConfigurableEnvironment environment = prepareEnvironment(listeners, bootstrapContext, applicationArguments); // 预备环境configureIgnoreBeanInfo(environment); // 配置忽略BeanInfoBanner printedBanner = printBanner(environment); // 打印Bannercontext = createApplicationContext(); // 创建应用上下文context.setApplicationStartup(this.applicationStartup); // 设置应用启动状态prepareContext(bootstrapContext, context, environment, listeners, applicationArguments, printedBanner); // 准备上下文refreshContext(context); // 刷新上下文,执行Bean的生命周期afterRefresh(context, applicationArguments); // 刷新后的操作stopWatch.stop(); // 停止计时if (this.logStartupInfo) { // 如果需要记录启动信息new StartupInfoLogger(this.mainApplicationClass).logStarted(getApplicationLog(), stopWatch); // 记录启动信息}listeners.started(context); // 通知监听器启动完成callRunners(context, applicationArguments); // 调用Runner}catch (Throwable ex) {handleRunFailure(context, ex, listeners); // 处理运行失败throw new IllegalStateException(ex); // 抛出异常}try {listeners.running(context); // 通知监听器运行中}catch (Throwable ex) {handleRunFailure(context, ex, null); // 处理运行失败throw new IllegalStateException(ex); // 抛出异常}return context; // 返回应用上下文
}
我们重点看
prepareContext(bootstrapContext, context, environment, listeners, applicationArguments, printedBanner);
继续
private void prepareContext(DefaultBootstrapContext bootstrapContext, ConfigurableApplicationContext context,ConfigurableEnvironment environment, SpringApplicationRunListeners listeners,ApplicationArguments applicationArguments, Banner printedBanner) {// 将环境变量设置到Spring上下文context.setEnvironment(environment);// 对Spring上下文进行后处理postProcessApplicationContext(context);// 应用初始izers,这些是对Spring上下文进行额外配置的组件applyInitializers(context);// 通知监听器,上下文已准备好listeners.contextPrepared(context);// 关闭bootstrap上下文bootstrapContext.close(context);// 如果需要记录启动信息if (this.logStartupInfo) {// 记录启动信息,并判断是否为根上下文logStartupInfo(context.getParent() == null);// 记录Spring Boot的配置信息logStartupProfileInfo(context);}// 注册Spring Boot特定的单例beanConfigurableListableBeanFactory beanFactory = context.getBeanFactory();// 注册应用启动参数为单例bean,键为'springApplicationArguments'beanFactory.registerSingleton("springApplicationArguments", applicationArguments);// 如果有打印的Banner,将其注册为单例bean,键为'springBootBanner'if (printedBanner != null) {beanFactory.registerSingleton("springBootBanner", printedBanner);}// 如果bean工厂是DefaultListableBeanFactory的实例,设置是否允许Bean定义覆盖if (beanFactory instanceof DefaultListableBeanFactory) {((DefaultListableBeanFactory) beanFactory).setAllowBeanDefinitionOverriding(this.allowBeanDefinitionOverriding);}// 如果设置了懒惰初始化,添加一个后处理器if (this.lazyInitialization) {context.addBeanFactoryPostProcessor(new LazyInitializationBeanFactoryPostProcessor());}// 加载所有源,通常是Bean定义的来源Set<Object> sources = getAllSources();// 断言源集合不为空,这些源将被加载到Spring上下文中Assert.notEmpty(sources, "Sources must not be empty");// 使用源数组加载Spring上下文load(context, sources.toArray(new Object[0]));// 通知监听器,上下文已加载listeners.contextLoaded(context);
}
【applyInitializers】
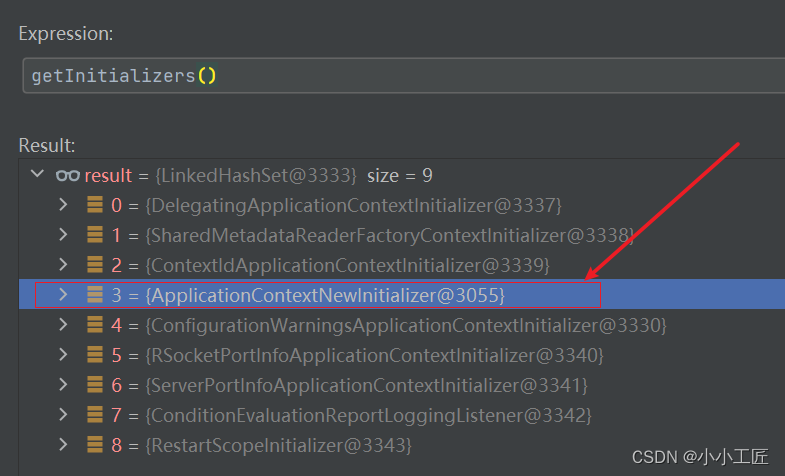
protected void applyInitializers(ConfigurableApplicationContext context) {for (ApplicationContextInitializer initializer : getInitializers()) {Class<?> requiredType = GenericTypeResolver.resolveTypeArgument(initializer.getClass(),ApplicationContextInitializer.class);Assert.isInstanceOf(requiredType, context, "Unable to call initializer.");initializer.initialize(context);}}
就到了我们自定义实现的代码逻辑中了。
@Overridepublic void initialize(ConfigurableApplicationContext applicationContext) {System.out.println("--------------------> Handling ApplicationContextInitializedEvent here!");}
继续
listeners.contextPrepared(context);
又看了熟悉的
@Overridepublic void contextPrepared(ConfigurableApplicationContext context) {this.initialMulticaster.multicastEvent(new ApplicationContextInitializedEvent(this.application, this.args, context));}
继续
@Overridepublic void multicastEvent(ApplicationEvent event) {multicastEvent(event, resolveDefaultEventType(event));}
@Override
public void multicastEvent(final ApplicationEvent event, @Nullable ResolvableType eventType) {// 如果eventType不为null,则直接使用它;否则,使用resolveDefaultEventType方法来解析事件的默认类型。ResolvableType type = (eventType != null ? eventType : resolveDefaultEventType(event));// 获取一个线程池执行器,它用于异步执行监听器调用。Executor executor = getTaskExecutor();// 获取所有对应该事件类型的监听器。for (ApplicationListener<?> listener : getApplicationListeners(event, type)) {// 如果执行器不为null,则使用它来异步执行监听器调用;// 否则,直接同步调用监听器。if (executor != null) {executor.execute(() -> invokeListener(listener, event));}else {invokeListener(listener, event);}}
}
继续
private void doInvokeListener(ApplicationListener listener, ApplicationEvent event) {try {listener.onApplicationEvent(event);}catch (ClassCastException ex) {......}}

相关文章:
Spring Boot - Application Events 的发布顺序_ApplicationContextInitializedEvent
文章目录 Pre概述Code源码分析 Pre Spring Boot - Application Events 的发布顺序_ApplicationEnvironmentPreparedEvent Spring Boot - Application Events 的发布顺序_ApplicationEnvironmentPreparedEvent 概述 Spring Boot 的广播机制是基于观察者模式实现的,…...

由jar包冲突导致的logback日志不输出
最近接手一个厂商移交的项目,发现后管子系统不打印日志。 项目使用的logback 本地断点调试发现logback-classic jar冲突导致 打出的war中没有 相关的jar 解决方法: 去除pom 文件中多余的 logback-classic 应用,只保留最新版本的。 重新打…...

app开发——安卓native开发思路记录
我们知道app开发目前有三种方式,第一种是webapp,第二种是hybird app,第三种是native app。 而native-app就是安卓原生app,这里记录一下安卓原生开发的基本思路。 首先,安卓原生开发虽然在当今时代不是那么常见了&…...
黑马程序员JavaWeb开发|案例:tlias智能学习辅助系统(1)准备工作、部门管理
一、准备工作 1.明确需求 根据产品经理绘制的页面原型,对部门和员工进行相应的增删改查操作。 2.环境搭建 将使用相同配置的不同项目作为Module放入同一Project,以提高相同配置的复用性。 准备数据库表(dept, emp) 资料中包含…...

C# .NET SQL sugar中 IsAny进行根据条件判断数据是否存在 IsAny的使用
SQL sugar 中控制器直接判断数据是否存在 首先确保你的Service层继承的表名 控制器中使用IsAny进行根据条件判断数据是否存在...

《Git学习笔记:Git入门 常用命令》
1. Git概述 1.1 什么是Git? Git是一个分布式版本控制工具,主要用于管理开发过程中的源代码文件(Java类、xml文件、html页面等),在软件开发过程中被广泛使用。 其它的版本控制工具 SVNCVSVSS 1.2 学完Git之后能做…...

小程序跳转安卓会跳转两次 iOS不会的解决方案
原因:元素点击事件在子元素上有绑定,父元素上也有绑定会形成冒泡事件; 原生小程序: bind:tap:会冒泡; <view bind:tap"gotoDetail"><image :src"{{ item2.img }}" mode&qu…...

vue3+ts 中实现压缩图片、blob 转 base64
压缩图片 1.npm 安装 image-compressor.js 2.引入 import ImageCompressor from image-compressor.js 3.使用 const compressImage async (file: any) > {var imageCompressor new ImageCompressor()return new Promise((resolve, reject) > {imageCompressor.comp…...
 boost 库)
(框架设计-基础库建设) boost 库
“框架”这个词所有的开发都听过,但是有多少人能理解框架的作用?为什么要花那么大精力去弄一个框架?大家应该都听过各个大厂稍微大点的项目都会有一个“框架组”/“架构组”等。 费这么大人力组建一个组来 做框架/架构 到底值不值呢ÿ…...

将ResultSet转实体类
将ResultSet转实体类 sqlExecutor.executeQuery的执行结果的返回值是ResultSet:package java.sql; 一般在程序中我们需要把查询结果转为实体类返回给前端,此处可以使用的方法: ResultSet转实体类方法1 2 1:resultSet.getXXX(columnIndex)…...

Web后端开发
一、Maven 1.1 简介 1.2 作用 1.3 流程 通过各种插件实现项目的标准化构建。 1.4 安装 1.5 配置环境 1.5.1 当前工程环境 1.5.2 全局环境 1.6 创建 Maven项目 1.7 导入项目 1.8 依赖管理 1.8.1 依赖配置 1.8.2 依赖传递 pom.xml——右键——Diagrams——show dependen…...
CAN201 计网概念收集
Lecture 1 the theoretical basis for networking Network edge and core 地理覆盖范围:广WAN,城MAN,局LAN,个PAN 交换方式,电路,报文,分组 电路交换vs报文vs分组 Network performance pr…...
【占用网络】FlashOcc:快速、易部署的占用预测模型
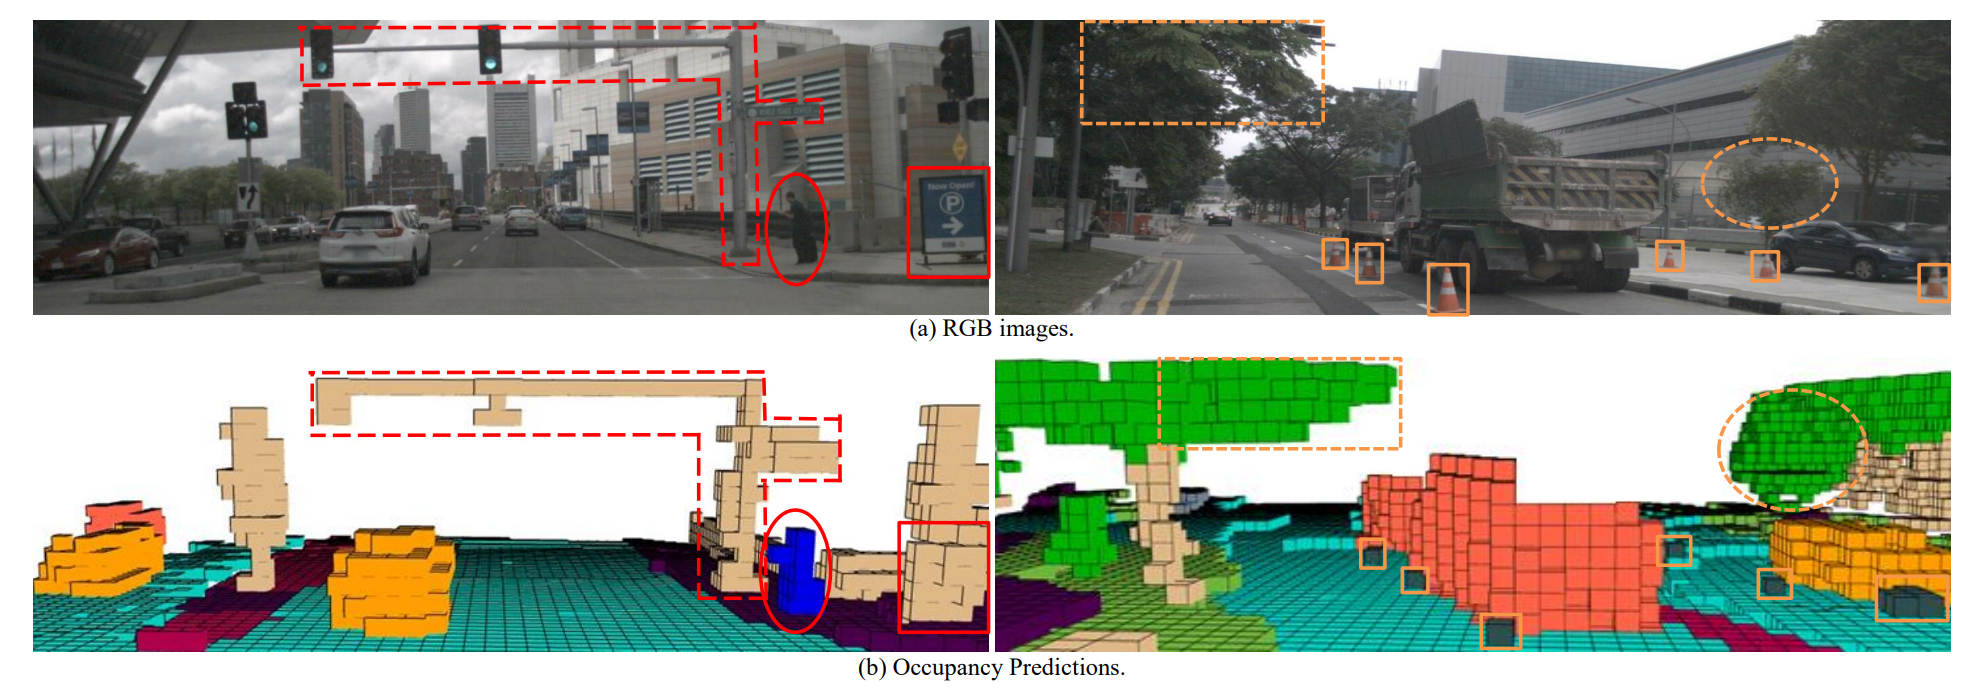
前言 FlashOcc是一个它只需2D卷积就能实现“占用预测模型”,具有快速、节约内存、易部署的特点。 它首先采用2D卷积提取图形信息,生成BEV特征。然后通过通道到高度变换,将BEV特征提升到3D空间特征。 对于常规的占用预测模型,将…...
】求幸存者之和(模拟跳数-JavaPythonC++JS实现))
239.【2023年华为OD机试真题(C卷)】求幸存者之和(模拟跳数-JavaPythonC++JS实现)
🚀点击这里可直接跳转到本专栏,可查阅顶置最新的华为OD机试宝典~ 本专栏所有题目均包含优质解题思路,高质量解题代码(Java&Python&C++&JS分别实现),详细代码讲解,助你深入学习,深度掌握! 文章目录 一. 题目-求幸存数之和二.解题思路三.题解代码Python题解…...

Pytorch中的标准维度顺序
在PyTorch中,如果一个张量包括通道数(C)、宽度(W)、高度(H)和批量大小(N),那么它的标准维度顺序是 [N, C, H, W],即: 第一个维度 N 是…...
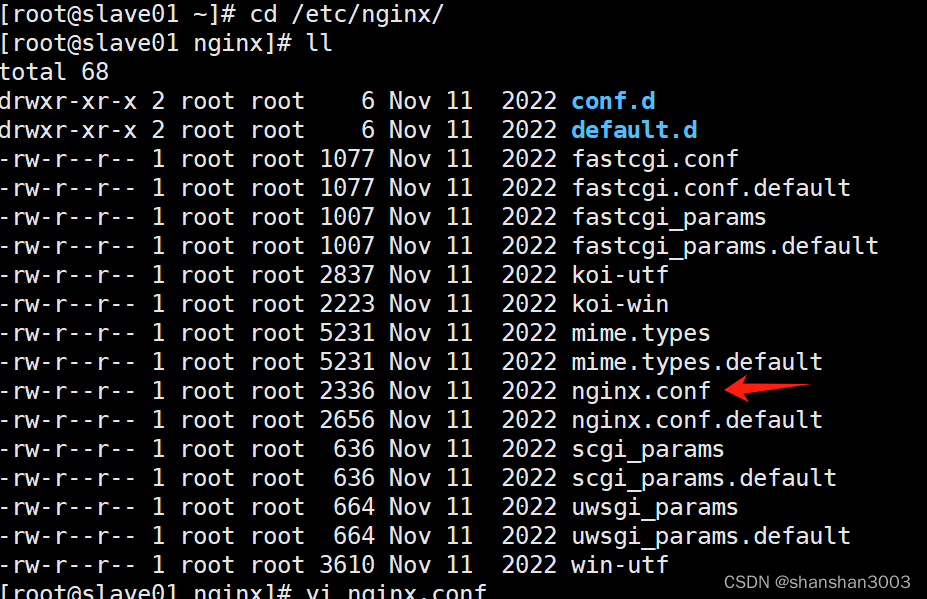
Nginx的安装配置和使用
最近有好几个地方用到了nginx,但是一直还没时间记录下nginx的安装、配置和使用,这篇文章可以将这块内容整理出来,方便大家一起学习~ 安装 安装是相对简单一些的,直接使用yum即可。 yum install -y nginx 默认安装位置在/usr/sb…...

P1643 完美数 题解
完美数 首先,介绍一下这篇题解的特邀嘉宾:ChatGPT4.0 传送门 题目描述 考古队员小星在一次考察中意外跌入深渊,穿越到了一个神秘的荒漠。这里有许多超越他认识的事物存在,例如许多漂浮在空中的建筑,例如各种奇怪的…...
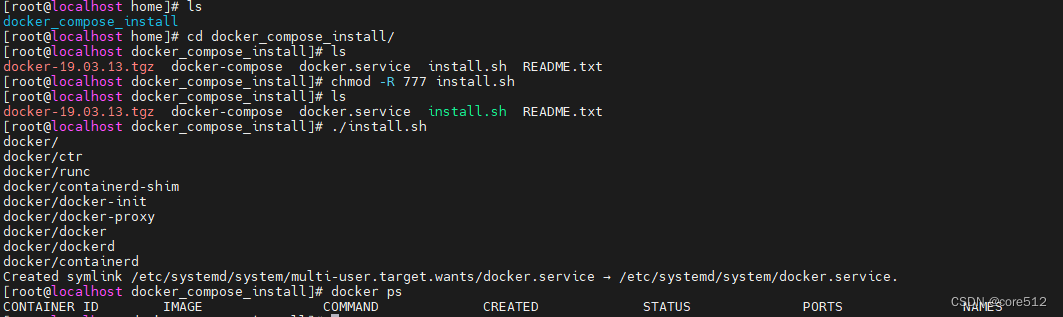
docker一键安装
1.把docker_compose_install文件夹放在任意路径; 2.chmod -R 777 install.sh 3.执行./install.sh 兼容:CentOS7.6、麒麟V10服务器版、统信UOS等操作系统。 下载地址(本人上传,免积分下载):https://downlo…...

模板管理支持批量操作,DataEase开源数据可视化分析平台v2.2.0发布
2024年1月8日,DataEase开源数据可视化分析平台正式发布v2.2.0版本。 这一版本的功能升级包括:在“模板管理”页面中,用户可以通过模板管理的批量操作功能,对已有模板进行快速重新分类、删除等维护操作;数据大屏中&…...

阿里云实时计算企业级状态存储引擎 Gemini 技术解读
本文整理自阿里云 Flink 存储引擎团队李晋忠,兰兆千,梅源关于阿里云实时计算企业级状态存储引擎 Gemini 的研究,内容主要分为以下五部分: 流计算状态访问的痛点企业级状态存储引擎GeminiGemini 性能评测&线上表现结语参考 一、…...
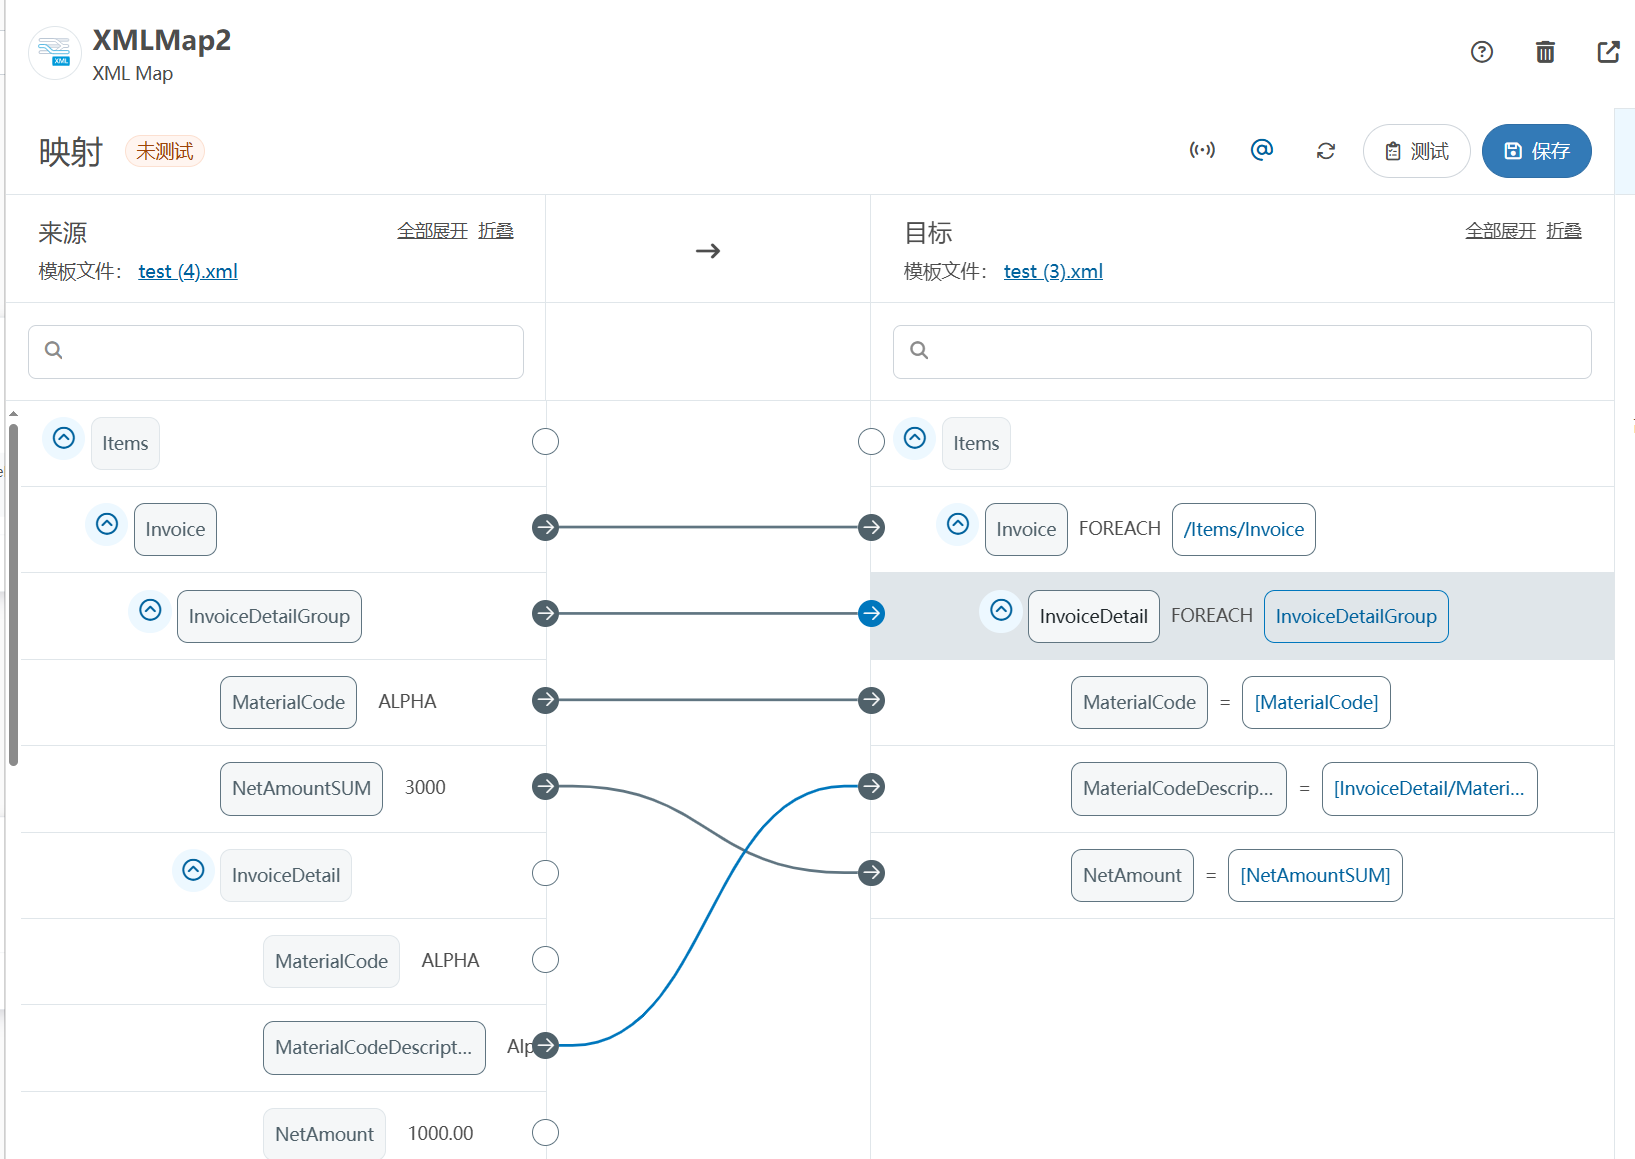
XML Group端口详解
在XML数据映射过程中,经常需要对数据进行分组聚合操作。例如,当处理包含多个物料明细的XML文件时,可能需要将相同物料号的明细归为一组,或对相同物料号的数量进行求和计算。传统实现方式通常需要编写脚本代码,增加了开…...

Go 语言接口详解
Go 语言接口详解 核心概念 接口定义 在 Go 语言中,接口是一种抽象类型,它定义了一组方法的集合: // 定义接口 type Shape interface {Area() float64Perimeter() float64 } 接口实现 Go 接口的实现是隐式的: // 矩形结构体…...

江苏艾立泰跨国资源接力:废料变黄金的绿色供应链革命
在华东塑料包装行业面临限塑令深度调整的背景下,江苏艾立泰以一场跨国资源接力的创新实践,重新定义了绿色供应链的边界。 跨国回收网络:废料变黄金的全球棋局 艾立泰在欧洲、东南亚建立再生塑料回收点,将海外废弃包装箱通过标准…...
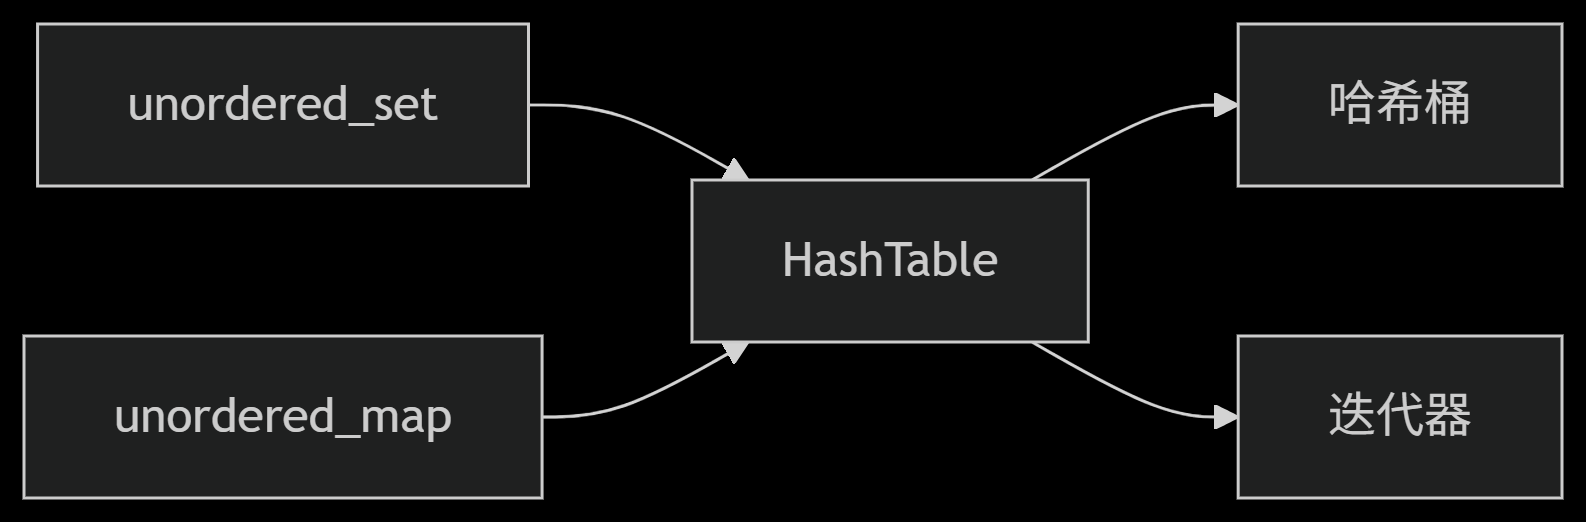
从零实现STL哈希容器:unordered_map/unordered_set封装详解
本篇文章是对C学习的STL哈希容器自主实现部分的学习分享 希望也能为你带来些帮助~ 那咱们废话不多说,直接开始吧! 一、源码结构分析 1. SGISTL30实现剖析 // hash_set核心结构 template <class Value, class HashFcn, ...> class hash_set {ty…...

如何在最短时间内提升打ctf(web)的水平?
刚刚刷完2遍 bugku 的 web 题,前来答题。 每个人对刷题理解是不同,有的人是看了writeup就等于刷了,有的人是收藏了writeup就等于刷了,有的人是跟着writeup做了一遍就等于刷了,还有的人是独立思考做了一遍就等于刷了。…...

代理篇12|深入理解 Vite中的Proxy接口代理配置
在前端开发中,常常会遇到 跨域请求接口 的情况。为了解决这个问题,Vite 和 Webpack 都提供了 proxy 代理功能,用于将本地开发请求转发到后端服务器。 什么是代理(proxy)? 代理是在开发过程中,前端项目通过开发服务器,将指定的请求“转发”到真实的后端服务器,从而绕…...

力扣-35.搜索插入位置
题目描述 给定一个排序数组和一个目标值,在数组中找到目标值,并返回其索引。如果目标值不存在于数组中,返回它将会被按顺序插入的位置。 请必须使用时间复杂度为 O(log n) 的算法。 class Solution {public int searchInsert(int[] nums, …...

rnn判断string中第一次出现a的下标
# coding:utf8 import torch import torch.nn as nn import numpy as np import random import json""" 基于pytorch的网络编写 实现一个RNN网络完成多分类任务 判断字符 a 第一次出现在字符串中的位置 """class TorchModel(nn.Module):def __in…...

无人机侦测与反制技术的进展与应用
国家电网无人机侦测与反制技术的进展与应用 引言 随着无人机(无人驾驶飞行器,UAV)技术的快速发展,其在商业、娱乐和军事领域的广泛应用带来了新的安全挑战。特别是对于关键基础设施如电力系统,无人机的“黑飞”&…...

Linux系统部署KES
1、安装准备 1.版本说明V008R006C009B0014 V008:是version产品的大版本。 R006:是release产品特性版本。 C009:是通用版 B0014:是build开发过程中的构建版本2.硬件要求 #安全版和企业版 内存:1GB 以上 硬盘…...