CPP项目:Boost搜索引擎
1.项目背景
对于Boost库来说,它是没有搜索功能的,所以我们可以实现一个Boost搜索引擎来实现一个简单的搜索功能,可以更快速的实现Boost库的查找,在这里,我们实现的是站内搜索,而不是全网搜索。
2.对于搜索引擎的相关宏观理解

3.搜索引擎技术栈及项目环境
技术栈:c/c++,c++11,STL,Boost准标准库,Jsoncpp,cppjieba,cpp-httplib,html5,css,js,
Ajax,jQuery,不使用爬虫。
项目环境:Centos 7云服务器,vim/gcc(g++)/Makefile , vs code
4.正排索引、倒排索引
正排索引:通过文档ID寻找文档内容:
比如:文档1:西游记有一只猴子
文档2:西游记有一只六耳猕猴
| 文档1 | 西游记有一只猴子 |
| 文档2 | 西游记有一只六耳猕猴 |
目标文档进行分词(目的:方便建立倒排索引和查找):
文档1:西游记/有/一只/猴子/
文档2:西游记/有/一只/六耳/猕猴/
注:停止词:了,的,吗,a,the,一般我们在分词的时候可以不考虑
倒排索引:根据文档内容,分词,整理不重复的各个关键字,对应联系到文档ID的方案。
| 关键字: | 文档ID, weight(权重) |
| 西游记 | 文档1.文档2 |
| 有 | 文档1,文档2 |
| 一只 | 文档1.文档2 |
| 猴子 | 文档1 |
| 六耳 | 文档2 |
| 猕猴 | 文档2 |
模拟一次查找的过程:
用户输入:西游记->倒排索引中查找->提取出文档id->根据正排索引->找到文档内容,通过文档标题,内容,URL,对文档内容进行摘要->构建响应结果。
5.编写数据去标签与数据清洗的模块 Parser
5.1 什么是标签:
我们既然要去标签,那么就要知道什么是标签,比如:
//原始数据 -> 去标签之后的数据
<!DOCTYPE html PUBLIC "-//W3C//DTD HTML 4.01 Transitional//EN"
"http://www.w3.org/TR/html4/loose.dtd">
<html> <!--这是一个标签-->
<head>
<meta http-equiv="Content-Type" content="text/html; charset=UTF-8">
<title>Chapter 30. Boost.Process</title>
<link rel="stylesheet" href="../../doc/src/boostbook.css" type="text/css">
<meta name="generator" content="DocBook XSL Stylesheets V1.79.1">
<link rel="home" href="index.html" title="The Boost C++ Libraries BoostBook Documentation
Subset">
<link rel="up" href="libraries.html" title="Part I. The Boost C++ Libraries (BoostBook
Subset)">
<link rel="prev" href="poly_collection/acknowledgments.html" title="Acknowledgments">
<link rel="next" href="boost_process/concepts.html" title="Concepts">
上述代码中,<!--这是一个标签-->,这就是一个标签,<>这些标签对于我们的搜索来说是没有意义的,所以我们需要去掉这些标签。标签分为两类,一类是只有一个的<>,一类是有两个的<>,</>,这些都是我们需要去掉的。
5.2 搜索内容
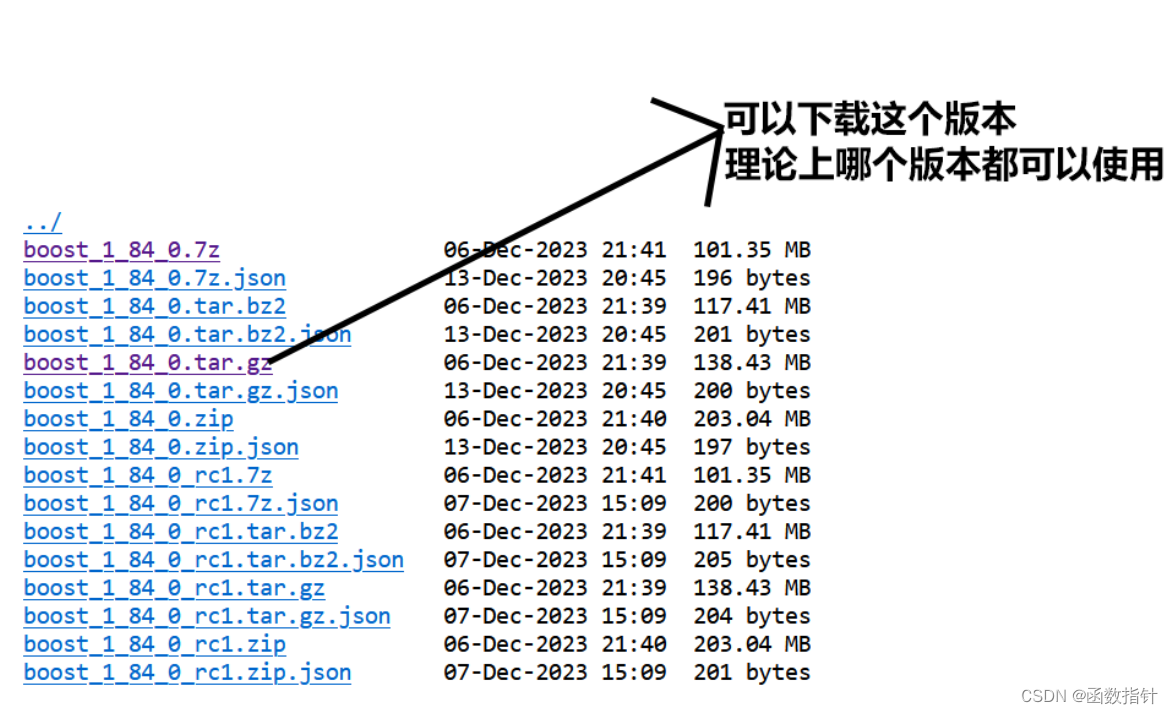
由于我们使用的是本地搜索,即将Boost库下载下来,通过本地搜索,然后再通过建立网站,实现站内搜索。所以第一步,下载Boost库:
Boost库官网:Boost C++ Libraries
Boost库下载:Index of main/release/1.84.0/source
目前只需要boost库/doc/html目录下的html文件,用它来进行建立索引,不需要使用其他的
下载完成之后,我们把他上传到云服务器上。之后建立一个保存*.html文件的文件夹,我们之后需要使用它,然后再创建一个保存去标签之后的*.html文件的文档,方便我们搜索。
5.3 具体逻辑实现
const std::string src_path = "/home/SSS/data/input";//搜索路径
const std::string output = "/home/SSS/data/raw_html/raw.txt";//保存文档typedef struct DocInfo
{std::string title;   // 文档标题std::string content; // 文档标题std::string url;     // 文档url
} DocInfo_t;// &: 输入
//*: 输出
//&:输入输出
bool EnumFile(const std::string &src_path, std::vector<std::string> *files_list);
bool ParseHtml(const std::vector<std::string> &files_list, std::vector<DocInfo_t> *results);
bool SaveHtml(const std::vector<DocInfo_t> &results,const std::string& output);int main()
{std::vector<std::string> files_list; //保存文件路径//递归式的把每个html文件名带路径,保存到files_list中,方便后期进行一个一个的文件进行读取if (!EnumFile(src_path, &files_list)){std::cerr << "enum file name error1" << std::endl;return 1;}// 按照files_list读取每个文件的内容,并进行解析std::vector<DocInfo_t> results;if (!ParseHtml(files_list, &results)){//std::cout<<"1"<<std::endl;std::cerr << "enum file name error2" << std::endl;return 2;}std::cout<<results.size()<<std::endl;//把解析完毕的各个文件内容,写入到output,按照\3作为每个文档的分割符 if (!SaveHtml(results,output)){std::cerr << "enum file name error3" << std::endl;return 3;}return 0;
}
第一个函数通过对文件路径的处理,将我们所需要的html文件保存到vector中,方便我们后续查找。第二个函数进行对html文件的处理,将html文件的标题,内容,url进行提取,保存到数组中。第三个函数将处理好的内容放入到文件中,方便后续进行建立索引。
三个函数的具体实现过程:
第一步:
bool EnumFile(const std::string &src_path, std::vector<std::string> *files_list)
{namespace fs = boost::filesystem;fs::path root_path(src_path);if (!fs::exists(root_path)) // 判断文件路径是否存在,在这里我们使用Boost库中的函数,判断文件路径是否存在{std::cerr << "root_path not exits" << std::endl;return false;}fs::recursive_directory_iterator end; // 递归的判断文件for (fs::recursive_directory_iterator iter(root_path); iter != end; iter++){if (!fs::is_regular_file(*iter)) // 文件是否为普通文件,Boost库中判断文件是否为普通文件。{continue;}if (iter->path().extension() != ".html") // 文件是否为html文件,Boost库函数{continue;}files_list->push_back(iter->path().string());//将所有带路径的html保存在files_list,方便后续进行文本分析}return true;
}
第二步:
namespace ns_util
{class FileUtil{   public:static bool ReadFile(const std::string &file_path, std::string *out){std::ifstream in(file_path,std::ios::in);if(!in.is_open())//c++中文件处理函数{std::cerr <<"open in error"<<std::endl;return false;}std::string line;while(std::getline(in,line))//将文件内容写入到(string)out中{*out += line;//std::cout<<line<<std::endl;}in.close();//关闭文件!!!return true;}};
}// 文档标题
static bool ParseTitle(const std::string &file, std::string *title)
{std::size_t begin = file.find("<title>");//对文档标题进行处理,由于网页的标题保存在<title>标//签中,以</title>结尾,所以中间的内容就是我们所要的标题//std::cout<<begin<<std::endl;if (begin == std::string::npos){//std::cout<<"1:"<<begin<<std::endl;return false;}std::size_t end = file.find("</title>");if (end == std::string::npos){return false;}begin += std::string("<title>").size();if (begin > end){return false;}*title = file.substr(begin, end - begin);//标题//std::cout<<*title<<std::endl;return true;
}
// 对内容进行解析
static bool ParseContent(const std::string &file, std::string *content)
{//去标签,基于一个简易的状态机enum status{LABLE,CONTENT};enum status s = LABLE;for (char c : file){switch (s){case LABLE:if (c == '>')s = CONTENT;break;case CONTENT :if (c == '<')s = LABLE;else {// 不想保留原始文件中的\n,用\n作为html解析之后文本的分隔符if (c == '\n') c = ' ';content->push_back(c);} break;default:break;}}return true;
}
static bool ParseUrl(const std::string &file_path, std::string *url)
{std::string url_head = "https://www.boost.org/doc/libs/1_78_0/doc/html";std::string url_tail = file_path.substr(src_path.size());*url = url_head + url_tail;//文档的urlreturn true;
}
// 对内容进行解析
bool ParseHtml(const std::vector<std::string> &files_list, std::vector<DocInfo_t>* results)
{for (const std::string &file : files_list){std::string result; // 读取文件if (!ns_util::FileUtil::ReadFile(file, &result)){continue;}DocInfo_t doc;// 解析文件,提取titleif (!ParseTitle(result, &doc.title)){//std::cout<<"1"<<std::endl;continue;}// 解析文件内容,去标签if (!ParseContent(result, &doc.content)){continue;}// 解析内容,获得urlif (!ParseUrl(file, &doc.url)){continue;}results->push_back(std::move(doc)); // 减少拷贝次数,提高效率//std::cout<<results->back()->title<<std::endl;}return true;
}
ParseHtml()这个函数内部包含四个函数,其中包括读取文件,将文件标题,内容,url分别提取出来,放入到数组中。
网站处理:
官网URL样例: https /www.boost.org/doc/libs/1_79_0/doc/html/accumulators.html
我们下载下来的url样例:boost_1_79_0 / doc / html / accumulators.html
我们拷贝到我们项目中的样例:data / input / accumulators.html
url_head = “https://www.boost.org/doc/libs/1_79_0/doc/html”;
url_tail = (data / input)(删除) / accumulators.html->url_tail = / accumulators.html
url = url_head + url_tail; 相当于形成了一个官网链接。
5.4建立索引
实现原理:
建立索引我们需要建立正排索引和倒排索引,这需要我们建立一个struct,用来保存文档的title,content,url,id。因为正排索引是通过文档id来寻找文档内容的,所以我们可以通过一个数组来实现id的编号,倒排索引是通过关键字来锁定在哪一个文档id里面的,所以我们可以通过建立一个哈希映射来完成,通过关键字来寻找文档id。由于我们只需要建立一次索引,所以我们可以通过创建一个单例模式来实现所以得初始化。
由于我们通过关键字可以映射到多个文档内容中,所以我们可以通过建立相关性的方式来排序我们所查找得的文档内容。
相关性的建立:由于相关性的问题涉及到的范围十分的大,可能有相近词,同义词,不连续的关键词,字符拆分的不确定性等等,在这里我们使用关键字在文档中出现的频次来决定。由于关键字可以出现在标题中,也可以出现在文档内容中,所以我们通过简单粗暴的方式来解决,即在标题中出现的关键在是10倍与在内容中出现的关键字。当然,相关性的处理方式可以自己设定。
建立索引对象:
//文档属性struct DocInfo{std::string _title;//文档标题std::string _contant;//文档内容std::string _url;//文档urluint64_t _id;//文档id};//倒排索引struct InvertedElem{std::string _word;//关键字uint64_t _id;//idint _weight;//权重InvertedElem():_weight(0){}};//倒排拉链typedef std::vector<InvertedElem> InvertedList;建立索引类:
class index{private:index(){};index(const index&)=delete;index operator=(const index&)=delete;public:static index* GetIndex()//初始化单例模式,在这里我们使用懒汉模式来建立索引{if(nullptr==instance){mtx.lock();//多线程问题if(nullptr==instance){instance=new index();}mtx.nulock();}return instance;}public://正排索引DocInfo *GetForwardIndex(uint64_t _id)//根据文档id找文档内容{if(_id>=_forward_list.size())//数组下标从0开始{std::cerr << "doc_id out range, error!" << std::endl;return nullptr;}return &_forward_list[_id];}//根据关键字,获得文档倒排拉链,倒排索引InvertedList *GetInvertedList(const std::string &word){auto iter = _inverted_index.find(word);//寻找关键字if(iter==_inverted_index.end())//没找到{std::cerr << "_inverted_index out range, error!" << std::endl;return nullptr;}return &(iter->second);}//根据去标签,格式化之后的文档,构建正排和倒排索引bool BuildIndex(const std::string &input){std::ifstream in(input,std::ios::in|std::ios::binary);if(!in.is_open()){std::cerr<<" open file error"<<std::endl;}std::string line;int count=0;while (std::getline(in, line))//读取内容{DocInfo *doc = BuildForwardIndex(line);if (nullptr == doc){std::cerr << "build " << line << " error" << std::endl; // for deubgcontinue;}BuildInvertedIndex(*doc);count++;}return true;}private:DocInfo* BuildForwardIndex(const std::string &line){//进行字符串切分std::vector<std::string> results;const std::string sep = "\3"; //行内分隔符ns_util::StringUtil::Split(line, &results, sep);//分词if(results.size()!=3){std::cout<<"split error"std::endl;return nullptr;}//2. 字符串进行填充到DocIinfoDocInfo doc;doc._title = results[0];//titledoc._content = results[1];// contentdoc._url = results[2];/// urldoc._id = forward_index.size(); // 先进行保存id,在插入,对应的id就是当前doc在vector中的下标!// 3. 插入到正排索引的vector_forward_index.push_back(std::move(doc)); // doc,html文件内容return &forward_index.back();}bool BuildInvertedIndex(const DocInfo &doc){// DocInfo{title, content, url, doc_id}// word -> 倒排拉链struct word_cnt{int _title_cnt;int _content_cnt;word_cnt() : _title_cnt(0), _content_cnt(0) {}};std::unordered_map<std::string, word_cnt> word_map; // 用来暂存词频的映射表// 对标题进行分词std::vector<std::string> title_words;ns_util::JiebaUtil::CutString(doc._title, &title_words);//分词//计算权重for(auto e:title_words){boost::to_lower(s); // 需要统一转化成为小写word_map[s].title_cnt++; // 如果存在就获取,如果不存在就新建}//内容分词std::vector<std::string> contant_words;ns_util::JiebaUtil::CutString(doc._contant, &contant_words);//分词for (std::string s : content_words){boost::to_lower(s);word_map[s].content_cnt++;}//权重计算#define X 10#define Y 1for(auto e:word_map){InvertedElem item;item._id = doc._id;item.word = e.first;item.weight = X * e.second.title_cnt + Y * e.second.content_cnt; // 相关性InvertedList &inverted_list = inverted_index[e.first];_inverted_list.push_back(std::move(item));}}private:std::vector<DocInfo> _forward_list;//正排//倒排索引一定是一个关键字和一组(个)InvertedElem对应[关键字和倒排拉链的映射关系]std::unordered_map<std::string, InvertedList> _inverted_index;static Index* instance;static std::mutex mtx;};index* index::instance = nullptr;std::mutex index::mtx;在创建索引的过程中,我们需要对我们搜索的关键字进行分词,而分词需要我们使用cppjieba分词工具,通过使用分词工具来进行分词(当然,有能力的同学可以自己实现一个分词程序)。
由于我们需要使用cppjieba分词工具,我们就需要下载
cppjiaba下载地址:git clone https://gitcode.com/yanyiwu/cppjieba-server.git
下载完成之后,我们只需要使用 这个目录下的文件即可:cppjieba/include/cppjieba
使用细节:使用cppjieba需要注意,我们需要自己执行:cd cppjieba; cp -rf deps/limonp include/cppjieba/, 不然会编译报错。
我们可以建立软链接来使用cppjieba库。
对于cppjieba的使用来说,我们可以到这个路径下查看使用情况:cppjieba/test.
对于使用cppjieba来说,在这个项目中这需要掌握CutString()这个函数的使用,其他的不用我们掌握太多,当然如果你想要学习的更多,可以学习其他函数的使用。
切分函数的实现
#pragma once
#include <iostream>
#include <string>
#include <fstream>
#include <vector>
#include <mutex>
#include <unordered_map>
#include <boost/algorithm/string.hpp>
#include "cppjieba/Jieba.hpp"namespace ns_util
{class FileUtil{   public:static bool ReadFile(const std::string &file_path, std::string *out){std::ifstream in(file_path,std::ios::in);if(!in.is_open())//c++中文件处理函数{std::cerr <<"open in error2"<<std::endl;return false;}std::string line;while(std::getline(in,line))//将文件内容写入到(string)out中{*out += line;//std::cout<<line<<std::endl;}in.close();//关闭文件!!!return true;}};class StringUtil//切割字符串{public:static void Split(const std::string &target, std::vector<std::string> *out, const std::string &sep){//boost splitboost::split(*out, target, boost::is_any_of(sep), boost::token_compress_on);}};const char* const DICT_PATH = "/home/SSS/cppjieba/dict/jieba.dict.utf8";const char* const HMM_PATH = "/home/SSS/cppjieba/dict/hmm_model.utf8";const char* const USER_DICT_PATH = "/home/SSS/cppjieba/dict/user.dict.utf8";const char* const IDF_PATH = "/home/SSS/cppjieba/dict/idf.utf8";const char* const STOP_WORD_PATH = "/home/SSS/cppjieba/dict/stop_words.utf8";class JiebaUtil{private:static cppjieba::Jieba _jieba;//不去暂停词private://去暂停词//cppjieba::Jieba _jieba;//创建对象//std::unordered_map<std::string, bool> _stop_words;//哈希映射//static JiebaUtil* _instance;private://JiebaUtil():_jieba(DICT_PATH, HMM_PATH, USER_DICT_PATH, IDF_PATH, STOP_WORD_PATH) {}//JiebaUtil(const JiebaUtil &) = delete;//ns_util::JiebaUtil operaror=(const JiebaUtil& x)=delete;public://去暂停词// static JiebaUtil* GetInstance()//初始化// {//     static std::mutex _mtx;//     if(nullptr==_instance)//     {//         _mtx.lock();//         if(nullptr==_instance)//         {//             _instance=new JiebaUtil();//             _instance->InitJiebaUtil();//加载文件//         }//         _mtx.unlock();//     }//     return _instance;//     //return nullptr;// }// void InitJiebaUtil()// {//     std::ifstream in(STOP_WORD_PATH);//     if(!in.is_open()) //     {//         std::cerr<<"open file error"<<std::endl;//         return;//     }//     std::string line;//     while(std::getline(in,line))//     {//         _stop_words.insert({line, true});//     }//     in.close();// }// void CutStringHelper(const std::string &src, std::vector<std::string> *out)//去暂停词// {//     _jieba.CutForSearch(src, *out);//切分//     for(auto iter = out->begin(); iter != out->end();)//     {//         auto it=_stop_words.find(*iter);//         if(it!=_stop_words.end())//         {//             iter = out->erase(iter);//去暂停词//         }//         else iter++;//     }// }public:static void CutString(const std::string &src, std::vector<std::string> *out){//去暂停词,如果云服务器配置高的情况下可以使用,性能不高可能导致出现不必要的错误//ns_util::JiebaUtil::GetInstance()->CutStringHelper(src, out);//低配版,不去暂停词_jieba.CutForSearch(src, *out);}};//不去暂停词cppjieba::Jieba JiebaUtil::_jieba(DICT_PATH, HMM_PATH, USER_DICT_PATH, IDF_PATH, STOP_WORD_PATH);//去暂停词//JiebaUtil* _instance=nullptr;
}
由于我们使用的是cppjieba分词工具,所以我们需要在使用的时建立分词路径,防止出现错误,在建立cppjieba类的时候,我们也是创建的单例模式,只需要建立一个对象即可,不需要创建多个对象,这和建立索引时候的功能是一样的。
对于切分字符来说,也就是CutStringHelper()函数来说,我们有两种方法实现它,可以直接调用jieba分词工具直接使用,生成关键字分词,这样做的情况下可能会生成较多的暂停词,搜索结果可能又不太准确的情况,所以我们可以去掉暂停词,这样可以减小关键词的数量,减小查找次数,二区掉暂停词依然需要调用Jieba分词库当中的函数。
对于去暂停词来说,如果服务器配置不高的情况下,不要去暂停词,可能程序运行直接报错!!
5.5建立搜索
索引建议好之后,我们进行搜索模块的建立,对于搜索模块来说,我们需要使用到的工具为Jsoncpp和cpp-httplib这两个工具,使用这两个工具我们先下载下来。
Jsoncpp下载方式:sudo yum install -y jsoncpp-devel
json的功能是实现序列化和反序列化,当然如果你可以使用其他序列化和反序列化的工具,你也可是使用和其他的,比如ProtoBuf,XML等。
cpp-httplib下载方式:GitHub - yhirose/cpp-httplib: A C++ header-only HTTP/HTTPS server and client library
注意:如果使用 centOS 环境,yum源带的 g++ 最新版本是4.8.5,发布于2015年,年代久远。编译该项目会出现异常。将 gcc/g++ 升级为更高版本可解决问题。
# 升级参考:https://juejin.cn/post/6844903873111392263
# 安装gcc 8版本
yum install -y devtoolset-8-gcc devtoolset-8-gcc-c++
# 启用版本
source /opt/rh/devtoolset-8/enable
# 查看版本已经变成gcc 8.3.1
gcc -v# 启动: 细节,命令行启动只能在本会话有效
source /opt/rh/devtoolset-8/enable
#可选:如果想每次登陆的时候,都是较新的gcc
cat ~/.bash_profile
# .bash_profile
# Get the aliases and functions
if [ -f ~/.bashrc ]; then
. ~/.bashrc
fi
# User specific environment and startup programs
PATH=$PATH:$HOME/.local/bin:$HOME/bin
export PATH
#每次启动的时候,都会执行这个命令source /opt/rh/devtoolset-8/enable
httplib使用·:
测试代码:
#include "cpp-httplib/httplib.h"
int main()
{httplib::Server svr;svr.Get("/hi", [](const httplib::Request &req, httplib::Response &rsp){rsp.set_content("你好,世界!", "text/plain; charset=utf-8");});svr.listen("0.0.0.0", 8081);return 0;
}
搜索代码实现:
建立搜索代码之前,我们需要先建立索引,这样才可以快速查找目标。所以我们先实现一个类,包含我们所需要的内容,因为我们是通过关键字找文档id,再通过文档id寻找文档内容,在这期间我们需要通过权重,来找到不同文档的先后顺序,这样我们的类里面应该包含文档id,权重,关键字等。
struct InvertedElemPrint{uint64_t _id;int _weight;std::vector<std::string> _words;InvertedElemPrint() : _id(0), _weight(0) {}};对于建立搜索得类:
    class Searcher{private:ns_index::index *_index=nullptr; // 建立索引,进行查找public:Searcher() {}~Searcher() {}public:void InitSearch(const std::string &input){// 获取index对象index = ns_index::index::GetInstance();//根据index对象建立索引index->BulidIndex();}// query: 搜索关键字// json_string: 返回给用户浏览器的搜索结果void search(const std::string &query, std::string *json_string){std::vector<std::string> words;ns_util::JiebaUtil::CutString(query, &words);//2.[触发]:就是根据分词的各个"词",进行index查找,建立index是忽略大小写,所以搜索,关键字也需要//ns_index::InvertedList inverted_list_all; //内部InvertedElemstd::vector<InvertedElemPrint> inverted_list_all;std::unordered_map<uint64_t, InvertedElemPrint> tokens_map;for(auto word:words){boost::to_lower(word);ns_index::InvertedList *inverted_list = index->GetInvertedList(word);if(inverted==nullptr) continue;for(const auto &elem:*inverted_list){auto &item = tokens_map[elem._id]; //[]:如果存在直接获取,如果不存在新建// item一定是doc_id相同的print节点item._id = elem._id;item._weight += elem._weight;item.words.push_back(elem._words);}}for (const auto &item : tokens_map){inverted_list_all.push_back(std::move(item.second));}//3.[合并排序]:汇总查找结果,按照相关性(weight)降序排序std::sort(inverted_list_all.begin(), inverted_list_all.end(),[](const InvertedElemPrint &e1, const InvertedElemPrint &e2){return e1._weight > e2._weight;});//序列化和反序列化Json::Value root;for(auto &item : inverted_list_all){ns_index::DocInfo * doc = index->GetForwardIndex(item._id);if(doc==nullptr) continue;Json::Value elem;elem["title"]=doc->_title;elem["desc"] = GetDesc(doc->content, item.words[0]); //content是文档的去标签的结果,但是不是我们想要的,我们要的是一部分 TODOelem["url"]=doc->url;elem["id"] = (int)item._id;elem["weight"] = item._weight; // int->stringroot.append(elem);}Json::FastWriter writer;*json_string = writer.write(root);}//得到contantstd::string GetDesc(const std::string &html_content, const std::string &word){//找到word在html_content中的首次出现,然后往前找50字节(如果没有,从begin开始),往后找100字节(如果没有,到end就可以的)//截取出这部分内容const int prev_step=50;const int next_step=150;//找到关键字auto iter = std::search(html_content.begin(), html_content.end(), word.begin(), word.end(), [](int x, int y){ return (std::tolower(x) == std::tolower(y)); });if(iter==html.content.end()) return "NONE1";int pos = std::distance(html_content.begin(), iter);int start=0;int end=html_content.size()-1;if(pos > start + prev_step) start = pos - prev_step;if(pos < end - next_step) end = pos + next_step;if(start>end) return "NONE2";std::string desc = html_content.substr(start, end - start);desc += "...";return desc;}};
}
对于搜索类来讲。我们通过实现三个函数来解决,第一个函数为InitSearch(),实现初始化函数
完成获取对象和建立对象索引。
search()函数需要我们通过搜索关键字来返回给用户浏览器的搜索结果。这就需要通过序列化和反序列化来实现,通过查找到的内容,合并文档信息,按照权重来进行排序。
GetDesc()函数,通过对得到的信息进行打印,具体实现看代码细节。
至此,后端代码全部实现完成,开始实现前端代码,前端代码的实现需要html,css,js三种编程语言。
5.6 前端代码实现
html: 是网页的骨骼 -- 负责网页结构
css:网页的皮肉 -- 负责网页美观的
js(javascript):网页的灵魂---负责动态效果,和前后端交互前端教程:w3school 在线教程
前端代码的编写
<!DOCTYPE html>
<html lang="en">
<head><meta charset="UTF-8"><meta http-equiv="X-UA-Compatible" content="IE=edge"><meta name="viewport" content="width=device-width, initial-scale=1.0"><script src="http://code.jquery.com/jquery-2.1.1.min.js"></script><title>boost 搜索引擎</title><style>/* 去掉网页中的所有的默认内外边距,html的盒子模型 */* {/* 设置外边距 */margin: 0;/* 设置内边距 */padding: 0;}/* 将我们的body内的内容100%和html的呈现吻合 */html,body {height: 100%;}/* 类选择器.container */.container {/* 设置div的宽度 */width: 800px;/* 通过设置外边距达到居中对齐的目的 */margin: 0px auto;/* 设置外边距的上边距,保持元素和网页的上部距离 */margin-top: 15px;}/* 复合选择器,选中container 下的 search */.container .search {/* 宽度与父标签保持一致 */width: 100%;/* 高度设置为52px */height: 52px;}/* 先选中input标签, 直接设置标签的属性,先要选中, input:标签选择器*//* input在进行高度设置的时候,没有考虑边框的问题 */.container .search input {/* 设置left浮动 */float: left;width: 600px;height: 50px;/* 设置边框属性:边框的宽度,样式,颜色 */border: 1px solid black;/* 去掉input输入框的有边框 */border-right: none;/* 设置内边距,默认文字不要和左侧边框紧挨着 */padding-left: 10px;/* 设置input内部的字体的颜色和样式 */color: #CCC;font-size: 14px;}/* 先选中button标签, 直接设置标签的属性,先要选中, button:标签选择器*/.container .search button {/* 设置left浮动 */float: left;width: 150px;height: 52px;/* 设置button的背景颜色,#4e6ef2 */background-color: #4e6ef2;/* 设置button中的字体颜色 */color: #FFF;/* 设置字体的大小 */font-size: 19px;font-family:Georgia, 'Times New Roman', Times, serif;}.container .result {width: 100%;}.container .result .item {margin-top: 15px;}.container .result .item a {/* 设置为块级元素,单独站一行 */display: block;/* a标签的下划线去掉 */text-decoration: none;/* 设置a标签中的文字的字体大小 */font-size: 20px;/* 设置字体的颜色 */color: #4e6ef2;}.container .result .item a:hover {text-decoration: underline;}.container .result .item p {margin-top: 5px;font-size: 16px;font-family:'Lucida Sans', 'Lucida Sans Regular', 'Lucida Grande', 'Lucida Sans Unicode', Geneva, Verdana, sans-serif;}.container .result .item i{/* 设置为块级元素,单独站一行 */display: block;/* 取消斜体风格 */font-style: normal;color: green;}</style>
</head>
<body><div class="container"><div class="search"><input type="text" value="请输入搜索关键字"><button onclick="Search()">搜索一下</button></div><div class="result"><!-- 动态生成网页内容 --><!-- <div class="item"><a href="#">这是标题</a><p>这是摘要这是摘要这是摘要这是摘要这是摘要这是摘要这是摘要这是摘要这是摘要这是摘要这是摘要这是摘要这是摘要这是摘要这是摘要</p><i>https://search.gitee.com/?skin=rec&type=repository&q=cpp-httplib</i></div><div class="item"><a href="#">这是标题</a><p>这是摘要这是摘要这是摘要这是摘要这是摘要这是摘要这是摘要这是摘要这是摘要这是摘要这是摘要这是摘要这是摘要这是摘要这是摘要</p><i>https://search.gitee.com/?skin=rec&type=repository&q=cpp-httplib</i></div><div class="item"><a href="#">这是标题</a><p>这是摘要这是摘要这是摘要这是摘要这是摘要这是摘要这是摘要这是摘要这是摘要这是摘要这是摘要这是摘要这是摘要这是摘要这是摘要</p><i>https://search.gitee.com/?skin=rec&type=repository&q=cpp-httplib</i></div><div class="item"><a href="#">这是标题</a><p>这是摘要这是摘要这是摘要这是摘要这是摘要这是摘要这是摘要这是摘要这是摘要这是摘要这是摘要这是摘要这是摘要这是摘要这是摘要</p><i>https://search.gitee.com/?skin=rec&type=repository&q=cpp-httplib</i></div><div class="item"><a href="#">这是标题</a><p>这是摘要这是摘要这是摘要这是摘要这是摘要这是摘要这是摘要这是摘要这是摘要这是摘要这是摘要这是摘要这是摘要这是摘要这是摘要</p><i>https://search.gitee.com/?skin=rec&type=repository&q=cpp-httplib</i></div> --></div></div><script>function Search(){// 是浏览器的一个弹出框// alert("hello js!");// 1. 提取数据, $可以理解成就是JQuery的别称let query = $(".container .search input").val();console.log("query = " + query); //console是浏览器的对话框,可以用来进行查看js数据//2. 发起http请求,ajax: 属于一个和后端进行数据交互的函数,JQuery中的$.ajax({type: "GET",url: "/s?word=" + query,success: function(data){console.log(data);BuildHtml(data);}});}function BuildHtml(data){// 获取html中的result标签let result_lable = $(".container .result");// 清空历史搜索结果result_lable.empty();for( let elem of data){// console.log(elem.title);// console.log(elem.url);let a_lable = $("<a>", {text: elem.title,href: elem.url,// 跳转到新的页面target: "_blank"});let p_lable = $("<p>", {text: elem.desc});let i_lable = $("<i>", {text: elem.url});let div_lable = $("<div>", {class: "item"});a_lable.appendTo(div_lable);p_lable.appendTo(div_lable);i_lable.appendTo(div_lable);div_lable.appendTo(result_lable);}}</script>
</body>
</html>
5.7 添加日志
#pragma once
#include <iostream>
#include <string>
#include <cstdio>
#include <cstdarg>
#include <ctime>#define DEBUG 0
#define NORMAL 1
#define WARING 2
#define ERROR 3
#define FATAL 4
#define LOGFILE "./calculator.log"const char* gLevelMap[]={"DEBUG","NORMAL","WARING","ERROR","FATAL"};//完整的日志功能,至少: 日志等级 时间 支持用户自定义(日志内容, 文件行,文件名),可以将其写到文件中
void logMessage(int level,const char* format,...)
{//if(level==0) printf("正确");char stdBuff[10024];time_t timestamp = time(nullptr);//时间snprintf(stdBuff,sizeof(stdBuff),"[%s] [%ld] ", gLevelMap[level], timestamp);char logBuff[1024]; //自定义部分// va_list args;// va_start(args, format);// // vprintf(format, args);// vsnprintf(logBuffer, sizeof logBuffer, format, args);// va_end(args);snprintf(logBuff,sizeof(logBuff),"[%s] [%ld] ", gLevelMap[level], timestamp);FILE *fp = fopen(LOGFILE, "a");// printf("%s%s\n", stdBuffer, logBuffer);fprintf(fp, "%s %s\n", stdBuff, logBuff);fclose(fp);
}
日志分为5个等级,每个等级对应不同的内容,不同的等级需要不同的数字来对应。可以将其写到文件中将其保存。当然,对于不同的级别,日志可能会有不同的表现,具体情况视情况而定。
5.8 结尾
最后需要将写好的程序部署到linux服务器上,完成最后网站的建立。
nohup ./http_server > log/log.txt 2>&1 &[1] 26890
项目扩展方向
1. 建立整站搜索
2. 设计一个在线更新的方案,信号,爬虫,完成整个服务器的设计
3. 不使用组件,而是自己设计一下对应的各种方案(有时间,有精力)
4. 在我们的搜索引擎中,添加竞价排名(强烈推荐)
5. 热次统计,智能显示搜索关键词(字典树,优先级队列)(比较推荐)
6. 设置登陆注册,引入对mysql的使用(比较推荐的)有兴趣的可以尝试做下。
项目完整代码网址:
C-C++项目: C/C++项目 - Gitee.com
相关文章:
CPP项目:Boost搜索引擎
1.项目背景 对于Boost库来说,它是没有搜索功能的,所以我们可以实现一个Boost搜索引擎来实现一个简单的搜索功能,可以更快速的实现Boost库的查找,在这里,我们实现的是站内搜索,而不是全网搜索。 2.对于搜索…...
)
【洛谷 P1616】疯狂的采药 题解(动态规划+完全背包)
疯狂的采药 题目背景 此题为纪念 LiYuxiang 而生。 题目描述 LiYuxiang 是个天资聪颖的孩子,他的梦想是成为世界上最伟大的医师。为此,他想拜附近最有威望的医师为师。医师为了判断他的资质,给他出了一个难题。医师把他带到一个到处都是草…...
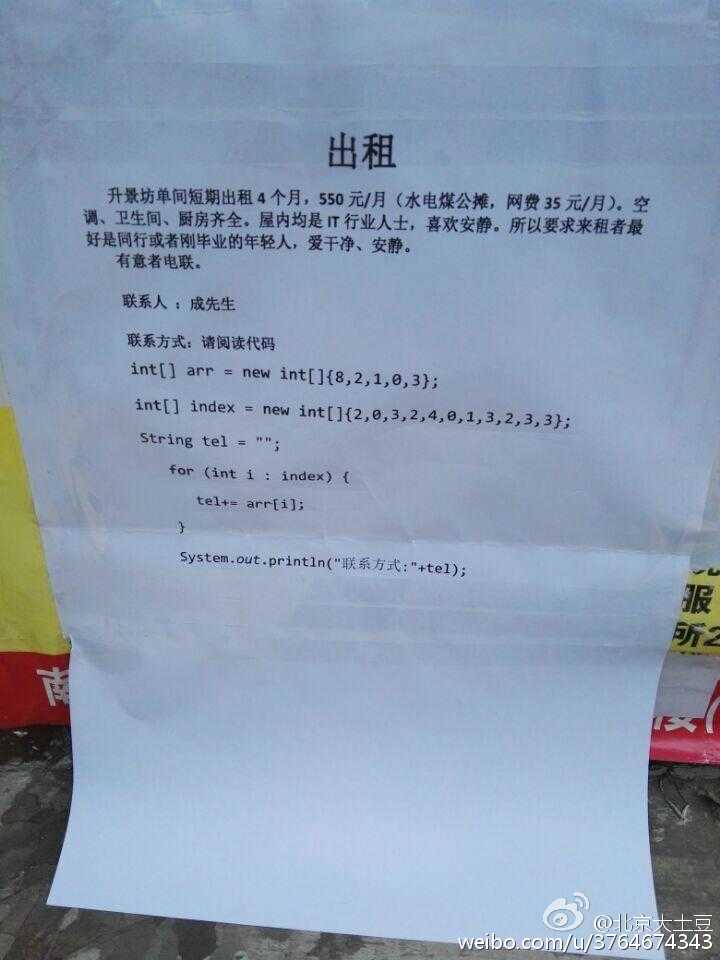
L1-027 出租分数 20
下面是新浪微博上曾经很火的一张图: 一时间网上一片求救声,急问这个怎么破。其实这段代码很简单,index数组就是arr数组的下标,index[0]2 对应 arr[2]1,index[1]0 对应 arr[0]8,index[2]3 对应 arr[3]0&…...

51单片机精进之路-1点亮led灯
本例中led灯使用共阳极连接在电路中,共阳极即将led的正极接在一起,通过上拉电阻接到电源正极,通过单片机io与Led的负极相连,io输出低电平,有电流从led流过,此时led点亮,当io输出高电平时&#x…...
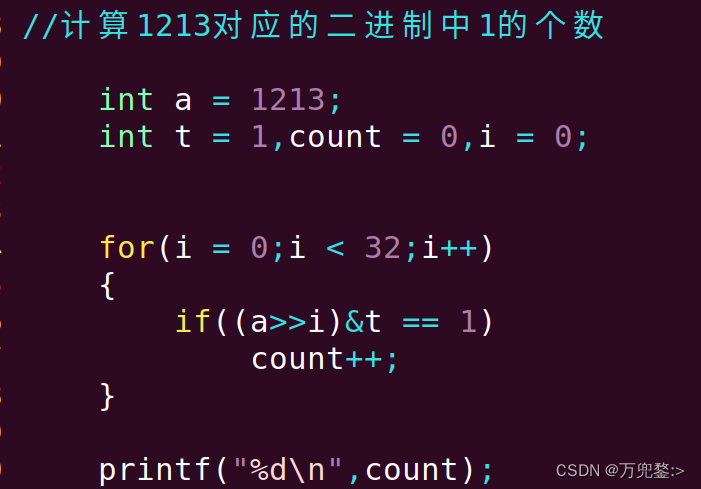
嵌入式学习Day14 C语言 --- 位运算
位运算 注意:符号位也遵循这个规则 一、按位与(&) 运算规则:一假则假 int a 0x33;a & 0x55;0011 00110101 0101 &----------0001 0001 //0x11 二、按位或(|) 运算规则:一真则真 int a 0x33;a |0x55;0011 00110101 0101 |…...
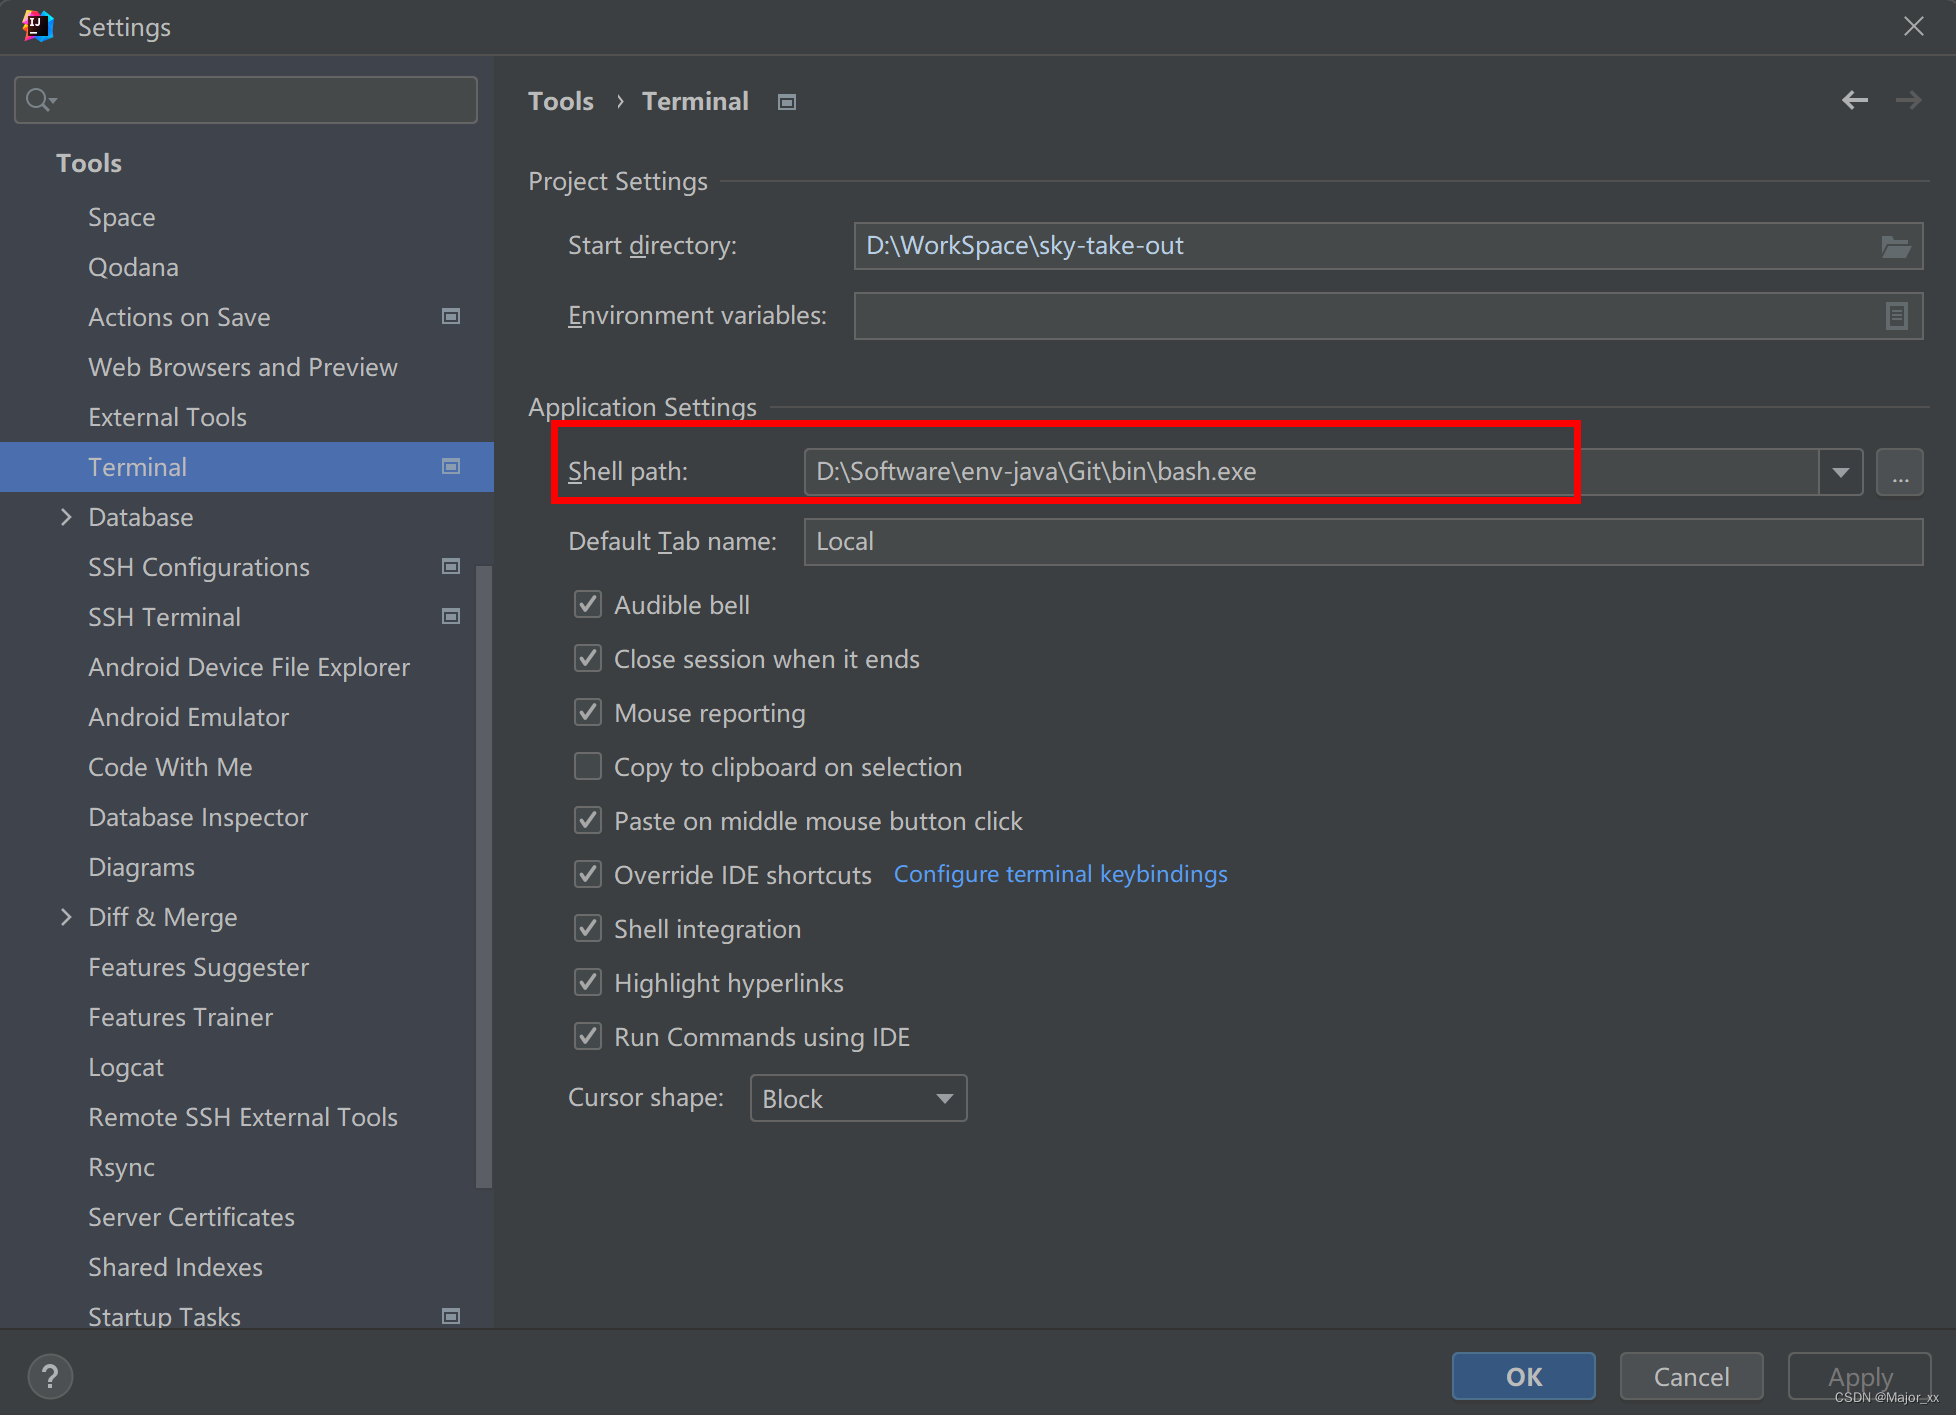
idea设置terminal为git
要在IntelliJ IDEA中设置终端为Git Bash,请按照以下步骤操作: 打开 Settings(设置)。点击 Tools(工具)选项卡。进入 Terminal(终端)界面。在 Shell Path 下选择 Browse(…...

《MySQL 简易速速上手小册》第3章:性能优化策略(2024 最新版)
文章目录 3.1 查询优化技巧3.1.1 基础知识3.1.2 重点案例3.1.3 拓展案例 3.2 索引和查询性能3.2.1 基础知识3.2.2 重点案例3.2.3 拓展案例 3.3 优化数据库结构和存储引擎3.3.1 基础知识3.3.2 重点案例3.3.3 拓展案例 3.1 查询优化技巧 让我们来聊聊如何让你的 MySQL 查询跑得像…...
【golang】23、gorilla websocket 源码:examples、数据结构、流程
文章目录 一、examples1.1 echo1.1.1 server.go1.1.2 client.go 1.2 command1.2.1 功能和启动方式1.2.2 home.html1.2.3 main.go 1.3 filewatch1.3.1 html1.3.2 serveHome 渲染模板1.3.3 serveWs1.3.4 writer() 1.4 buffer pool1.4.1 server1.4.2 client 1.5 chat1.5.1 server1…...
SpringCloud+RabbitMQ+Docker+Redis+搜索+分布式 基础(持续更新~)
具体操作: day2: 作用: 出现跨域问题 配相对应进行配置即可解决: IDEA连接的,在url最后加参数?useSSLfalse注意链接密码是123(docker中mysql密码) 注意,虚拟机中设置的密码和ip要和主机上…...
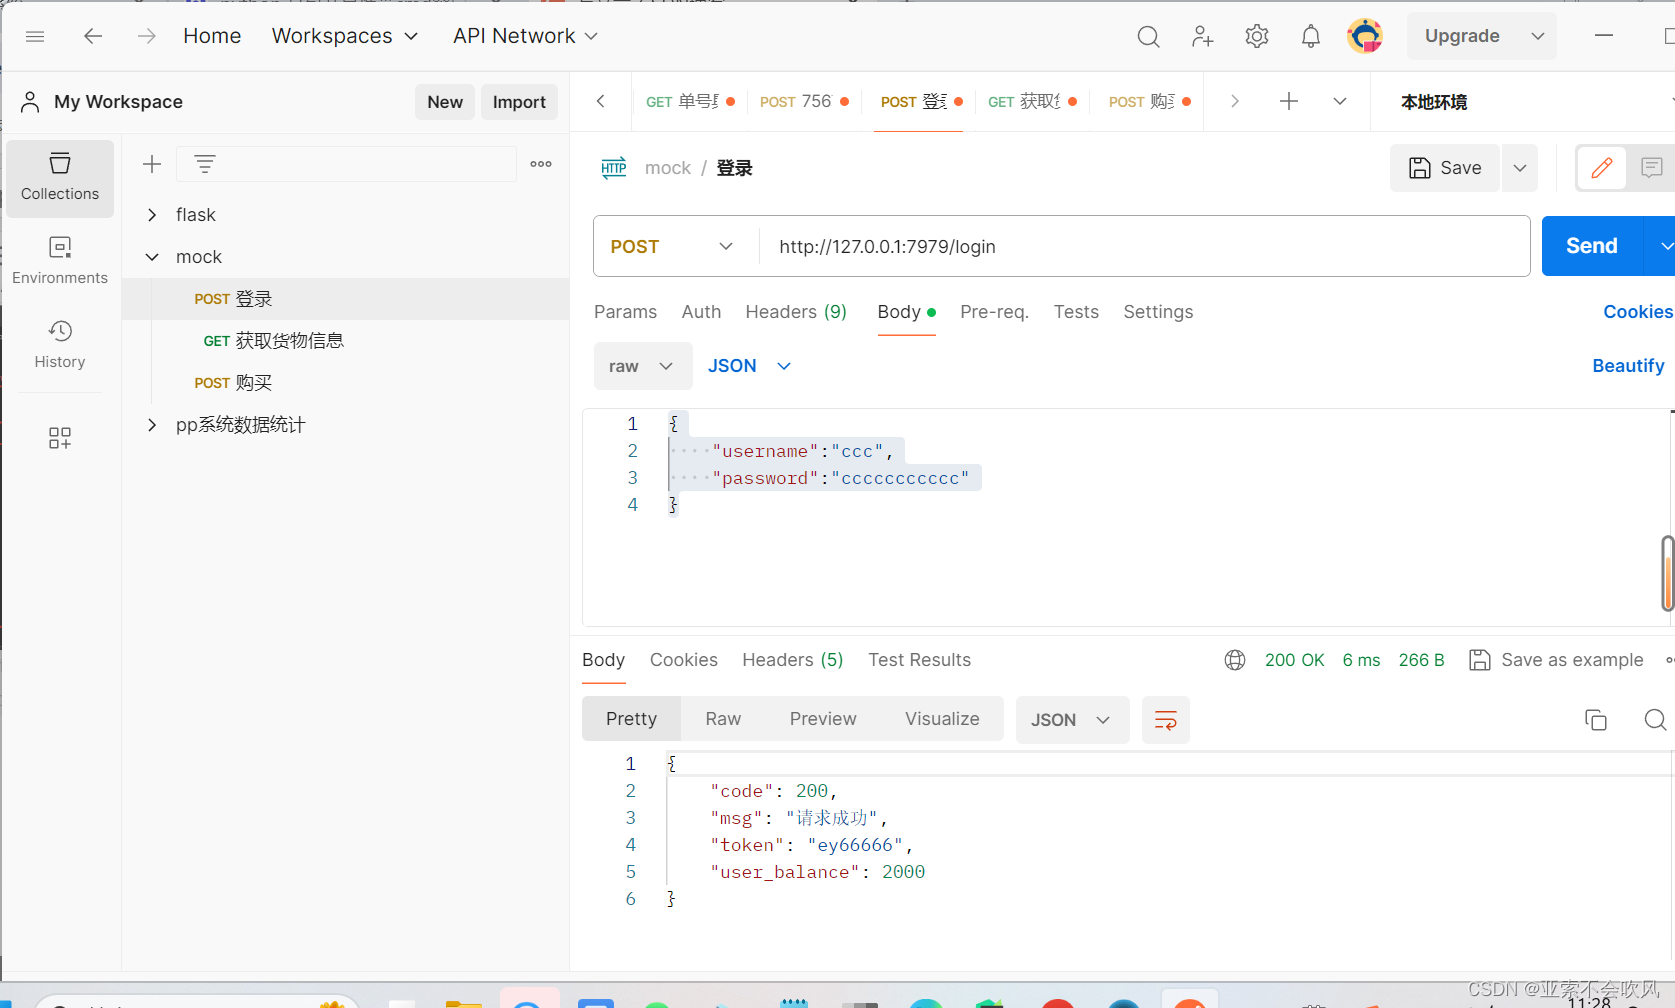
flask+pyinstaller实现mock接口,并打包到exe运行使用postman验证
flask代码 from flask import Flask, request, jsonifyapp Flask(__name__)app.route("/login", methods[POST]) def login():username request.json.get("username").strip() # 用户名password request.json.get("password").strip() # 密…...

【Spring Boot】第一篇 创建简单的Spring Boot项目
导航 一. 简介二. 创建简单的Spring Boot项目1. 工具选择和版本确定2. 创建步骤 三. 部署项目四. 测试验证 一. 简介 Spring Boot是一个用于构建独立的、生产级别的Spring应用程序的框架。它简化了Spring应用程序的创建和配置过程,同时提供了很多开箱即用的功能&am…...

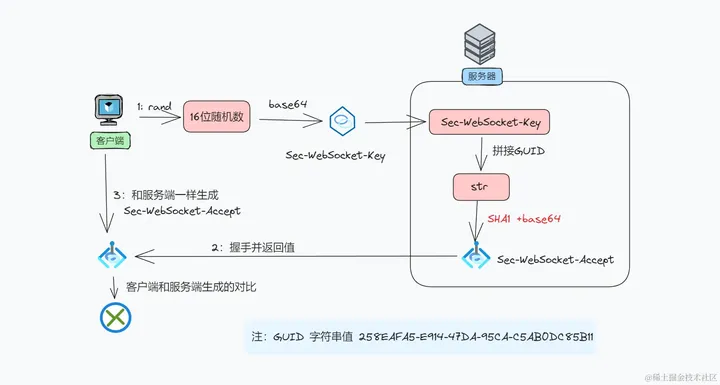
SSL协议是什么?关于SSL和TLS的常见问题解答
SSL(安全套接字层)及其后继者TLS(传输层安全)是用于在联网计算机之间建立经过身份验证和加密的链接的协议。尽管SSL协议在 1999年已经随着TLS 1.0的发布而被弃用,但我们仍将这些相关技术称为“SSL”或“SSL/TLS”。那么…...

第十五个知识:JQuery
初识JQuery: <head><meta charset"UTF-8"><title>Title</title><script src"lib/jquery-3.7.1.js"></script>//引入jquery </head> <body><a href"https://www.baidu.com" id"baidu&q…...

用Matlab 2015a svmtrain函数训练的SVM model在2021b无法使用的解决方法
背景 与r2015a版本的Matlab相比,r2021b版本中包含更多集成好的算法模块(尤其是深度学习的模块),想把原来r2015a版本的代码升级到r2021b高版本的Matlab已经采用fitcsvm函数和predict函数替代了旧版本中svmtrain函数和svmclassify函…...

umount:/home/tuners/windows files:目标忙。
您提到的错误信息 "umount: /home/tuners/windows files: 目标忙。" 是在尝试卸载(umount)一个文件系统时常见的错误。这个错误表明有一些进程仍然在使用挂载点(/home/tuners/windows files)下的文件或目录,…...
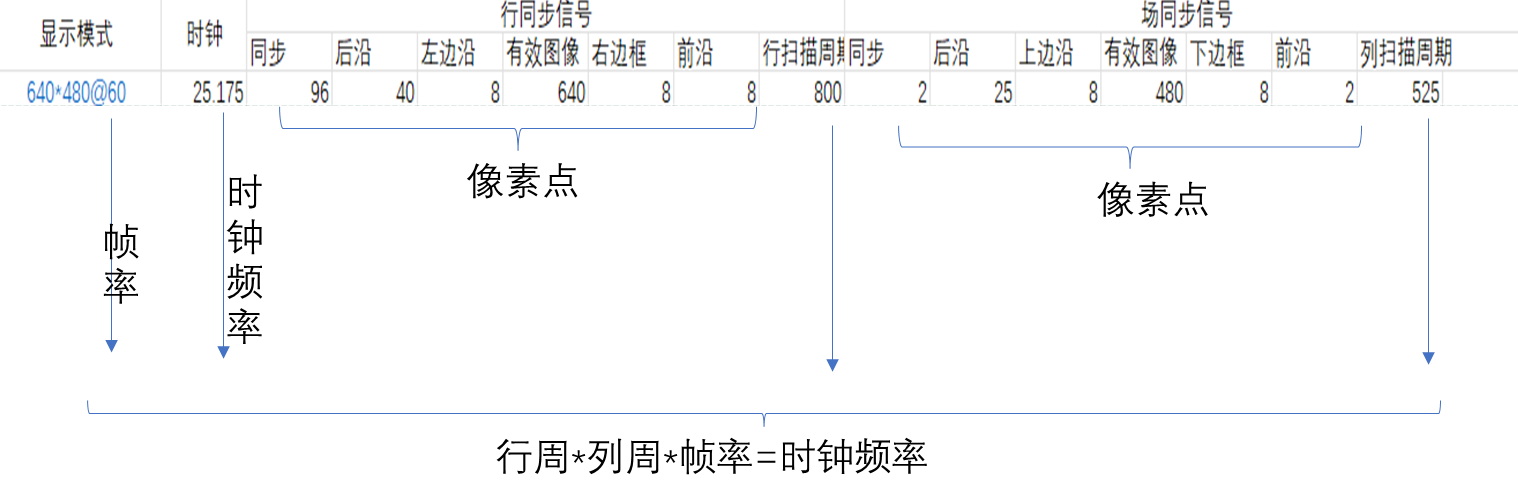
FPGA_vga显示
一 VGA 1.1 VGA VGA是视频图像阵列,是一种使用模拟信号进行视频传输的标准协议。 1.2 VGA接引脚定义 VGA分公母两种,RGB显示标准。 1.3 VGA显示器 VGA显示器采用图像扫描的方式进行图像显示,将构成图像的像素点,在行同步信号…...

sklearn模型指标和特征贡献度查看
文章目录 算法介绍r2_scoretrain_test_splitDecisionTreeRegressor参考文献支持快速查看traget和特征之间的关系 # -*- coding: utf-8 -*- import pandas as pd pd.set_option(display.max_columns, None) pd.set_option...
2024.2.6日总结(小程序开发3)
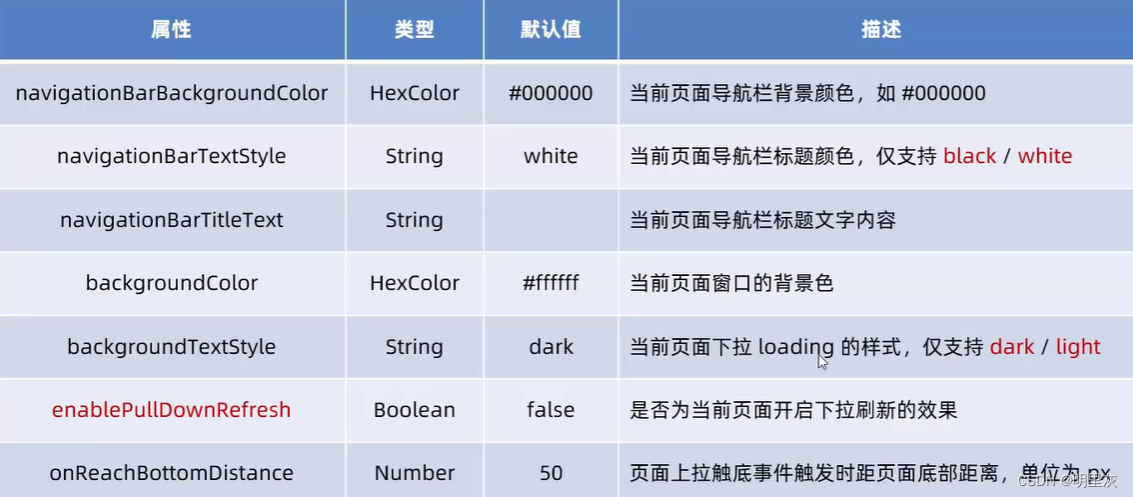
页面配置 页面配置和全局配置的关系: 小程序中,app.json中的window节点,可以全局配置小程序中每个页面的窗口表现 如果某些小程序想要有特殊的窗口表现,可以用页面级别的.json配置文件实现这个需求 页面配置和全局配置冲突时&…...
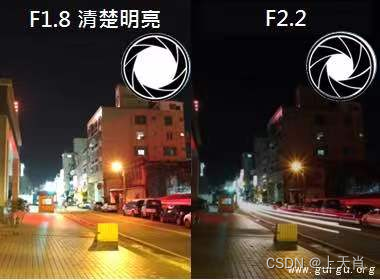
相机图像质量研究(10)常见问题总结:光学结构对成像的影响--光圈
系列文章目录 相机图像质量研究(1)Camera成像流程介绍 相机图像质量研究(2)ISP专用平台调优介绍 相机图像质量研究(3)图像质量测试介绍 相机图像质量研究(4)常见问题总结:光学结构对成像的影响--焦距 相机图像质量研究(5)常见问题总结:光学结构对成…...
(3)——3.HTTP基于TCP还是UDP?)
TCP和UDP相关问题(重点)(3)——3.HTTP基于TCP还是UDP?
HTTP/3.0 之前是基于 TCP 协议的,而 HTTP/3.0 将弃用 TCP,改用 基于 UDP 的 QUIC 协议 。具体见HTTP相关问题-CSDN博客...
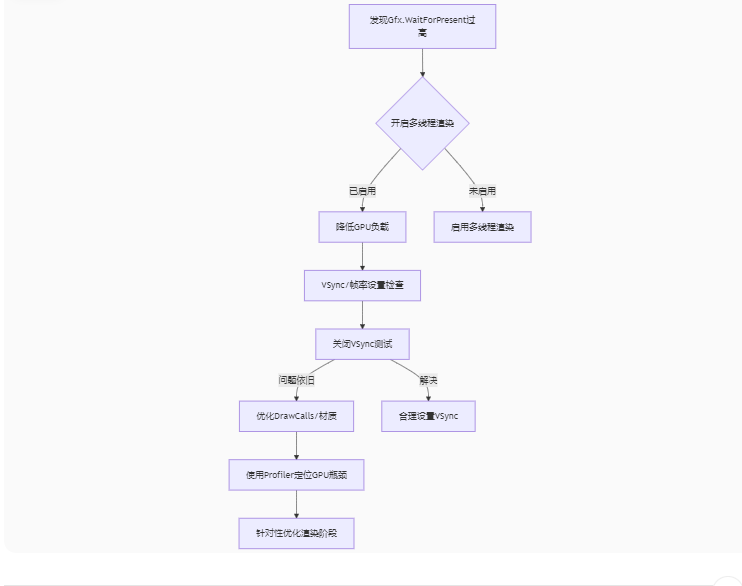
Unity3D中Gfx.WaitForPresent优化方案
前言 在Unity中,Gfx.WaitForPresent占用CPU过高通常表示主线程在等待GPU完成渲染(即CPU被阻塞),这表明存在GPU瓶颈或垂直同步/帧率设置问题。以下是系统的优化方案: 对惹,这里有一个游戏开发交流小组&…...

前端倒计时误差!
提示:记录工作中遇到的需求及解决办法 文章目录 前言一、误差从何而来?二、五大解决方案1. 动态校准法(基础版)2. Web Worker 计时3. 服务器时间同步4. Performance API 高精度计时5. 页面可见性API优化三、生产环境最佳实践四、终极解决方案架构前言 前几天听说公司某个项…...

laravel8+vue3.0+element-plus搭建方法
创建 laravel8 项目 composer create-project --prefer-dist laravel/laravel laravel8 8.* 安装 laravel/ui composer require laravel/ui 修改 package.json 文件 "devDependencies": {"vue/compiler-sfc": "^3.0.7","axios": …...

力扣-35.搜索插入位置
题目描述 给定一个排序数组和一个目标值,在数组中找到目标值,并返回其索引。如果目标值不存在于数组中,返回它将会被按顺序插入的位置。 请必须使用时间复杂度为 O(log n) 的算法。 class Solution {public int searchInsert(int[] nums, …...
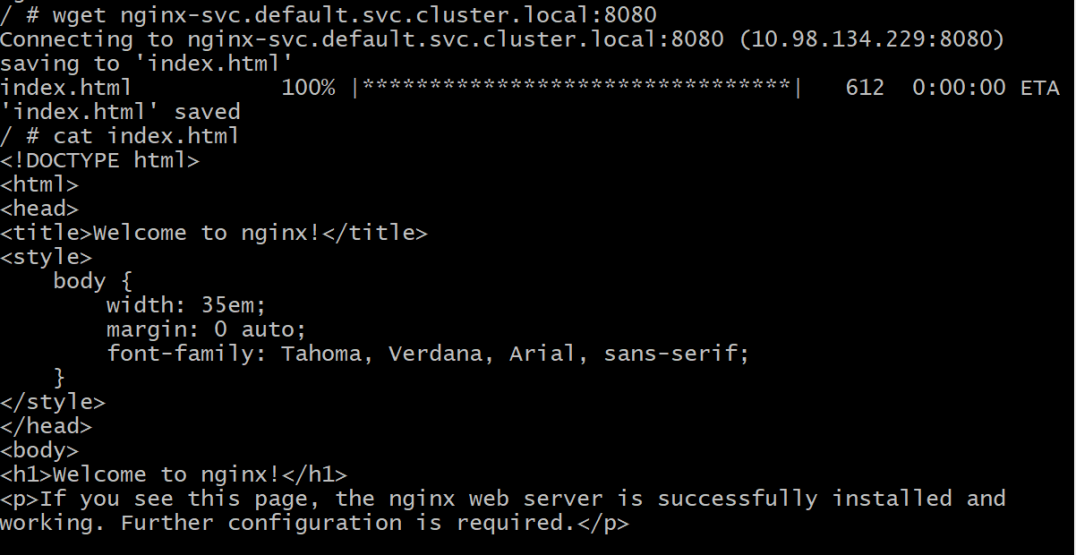
初探Service服务发现机制
1.Service简介 Service是将运行在一组Pod上的应用程序发布为网络服务的抽象方法。 主要功能:服务发现和负载均衡。 Service类型的包括ClusterIP类型、NodePort类型、LoadBalancer类型、ExternalName类型 2.Endpoints简介 Endpoints是一种Kubernetes资源…...

MinIO Docker 部署:仅开放一个端口
MinIO Docker 部署:仅开放一个端口 在实际的服务器部署中,出于安全和管理的考虑,我们可能只能开放一个端口。MinIO 是一个高性能的对象存储服务,支持 Docker 部署,但默认情况下它需要两个端口:一个是 API 端口(用于存储和访问数据),另一个是控制台端口(用于管理界面…...

作为测试我们应该关注redis哪些方面
1、功能测试 数据结构操作:验证字符串、列表、哈希、集合和有序的基本操作是否正确 持久化:测试aof和aof持久化机制,确保数据在开启后正确恢复。 事务:检查事务的原子性和回滚机制。 发布订阅:确保消息正确传递。 2、性…...
【Linux系统】Linux环境变量:系统配置的隐形指挥官
。# Linux系列 文章目录 前言一、环境变量的概念二、常见的环境变量三、环境变量特点及其相关指令3.1 环境变量的全局性3.2、环境变量的生命周期 四、环境变量的组织方式五、C语言对环境变量的操作5.1 设置环境变量:setenv5.2 删除环境变量:unsetenv5.3 遍历所有环境…...
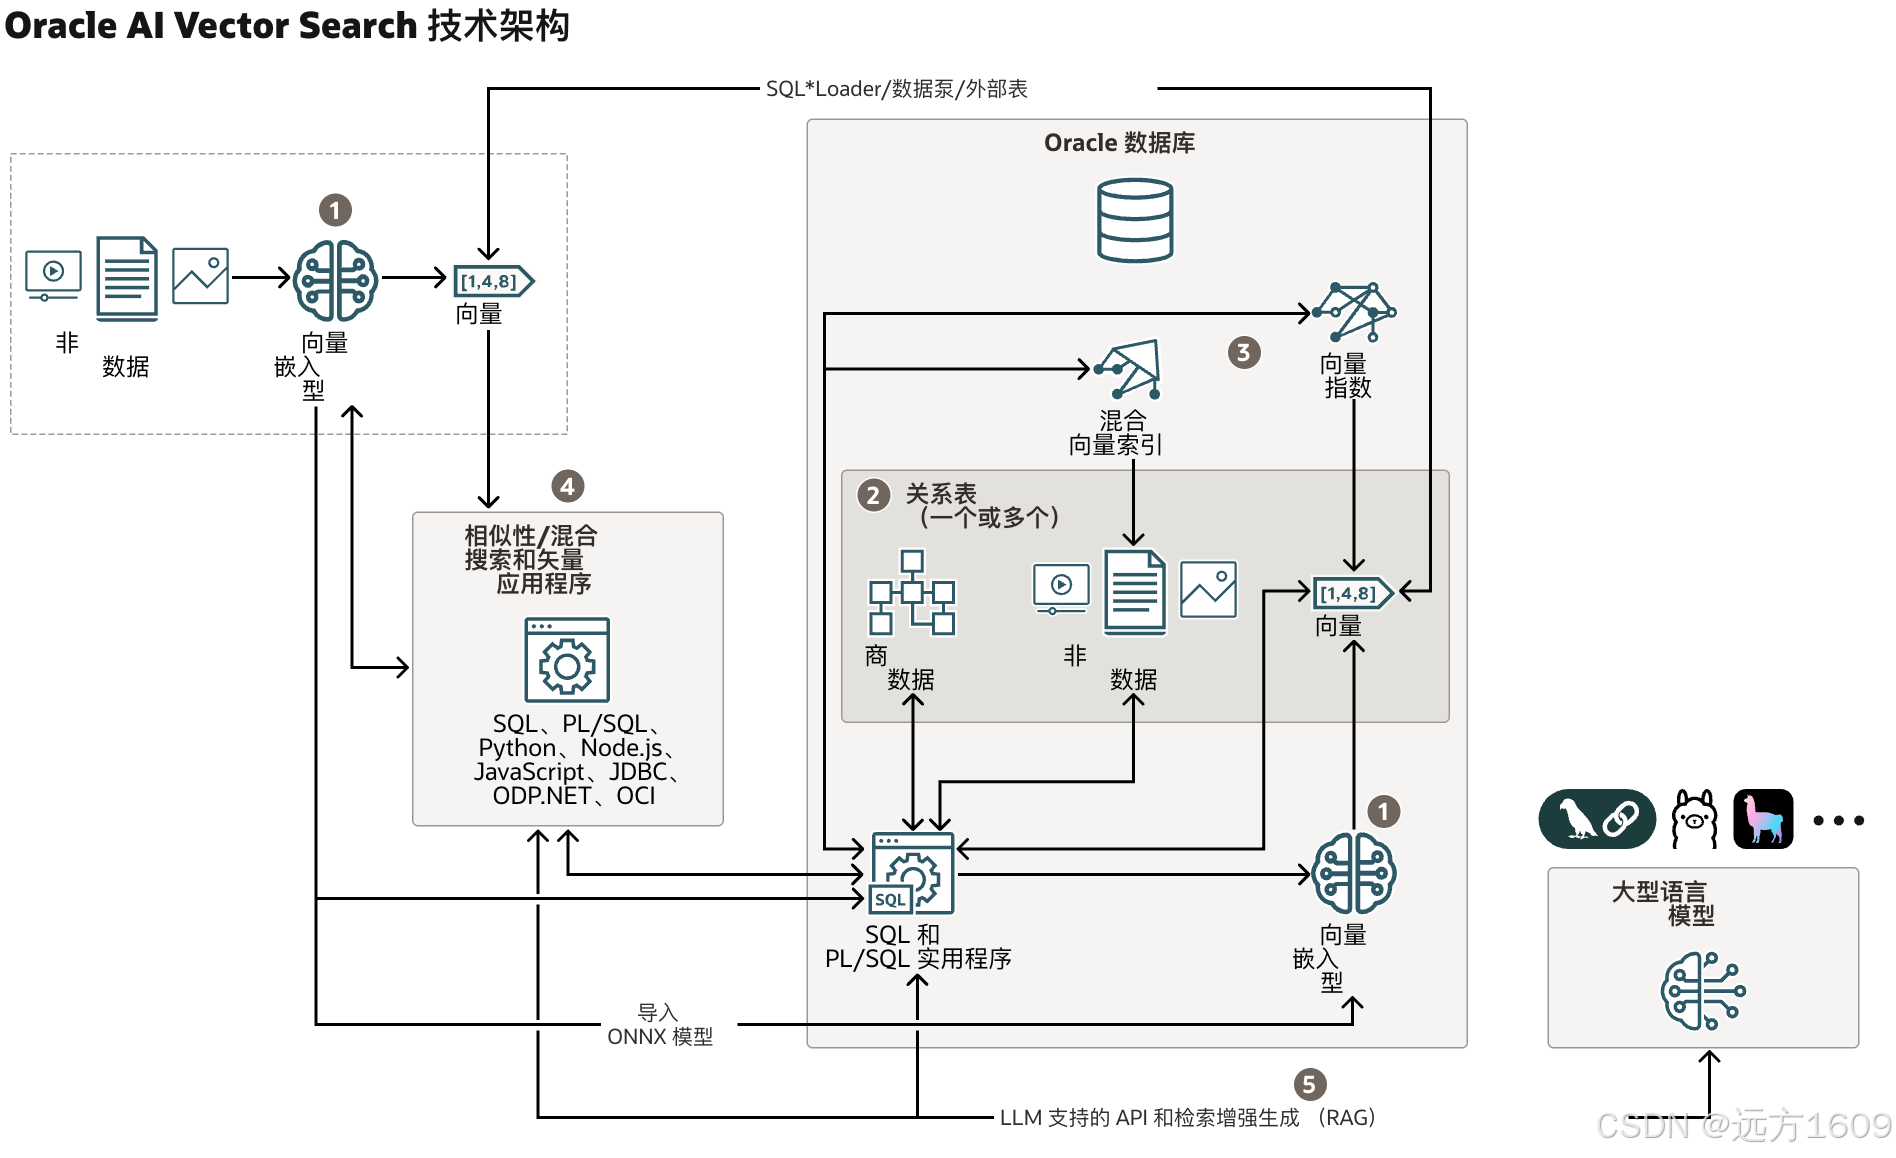
9-Oracle 23 ai Vector Search 特性 知识准备
很多小伙伴是不是参加了 免费认证课程(限时至2025/5/15) Oracle AI Vector Search 1Z0-184-25考试,都顺利拿到certified了没。 各行各业的AI 大模型的到来,传统的数据库中的SQL还能不能打,结构化和非结构的话数据如何和…...
2025年- H71-Lc179--39.组合总和(回溯,组合)--Java版
1.题目描述 2.思路 当前的元素可以重复使用。 (1)确定回溯算法函数的参数和返回值(一般是void类型) (2)因为是用递归实现的,所以我们要确定终止条件 (3)单层搜索逻辑 二…...