09 AB 10串口通信发送原理
通用异步收发传输器( Universal Asynchronous Receiver/Transmitter, UART)是一种异步收发传输器,其在数据发送时将并行数据转换成串行数据来传输, 在数据接收时将接收到的串行数据转换成并行数据, 可以实现全双工传输和接收。它包括了 RS232、 RS449、 RS423、RS422 和 RS485 等接口标准规范和总线标准规范。 换句话说, UART 是异步串行通信的总称。而 RS232、 RS449、 RS423、 RS422 和 RS485 等,是对应各种异步串行通信口的接口标准和总线标准,它们规定了通信口的电气特性、传输速率、连接特性和接口的机械特性等内容。
1. 09AB 基于FPGA的串口(UART)发送实验
- 串口通信模块设计的目的是用来发送数据的,因此需要有一个数据输入端口。
- 串口通信,支持不同的波特率,所以需要有一个波特率设置端口。
- 串口通信的本质就是将8位的并行数据,在不同的时刻传输并行数据的不同位,通过一根信号线将八位并行数据全部传出。
- 串口通信以1位的低电平标志串行传输的开始,待8位数据传输完成之后,再以1位的高电平标志传输的结束。
- 控制信号,控制并转串模块什么时候开始工作,什么时候一个数据发送完成?所以需要一个发送开始信号,以及一个发送完成信号


设计代码
- bps_cnt在空闲状态下保持为0,而bps_cnt为0会使得uart_tx为0,为了解决该问题,我们避开空闲状态下的bps_cnt=0,使bps_cnt从1开始判定。
- 但是这又会导致bps_cnt从0到1存在空闲,发送起始位时会延后一段数据位,于是我们将基础计数时间改为1时counter1开始加一。
- 为了出现bps_clk脉冲信号,当(div_cnt == (bps_dr - 1)成立时会输出1,我们利用该特性作为我们的脉冲信号。
- 我们要输入八位数据以及起始位和终止位共十位数据,为了保证十位数据完整输出,我们需要设置到第十一位停止,发送tx_done信号。
- 输入信号不能是reg类型,否则综合设计代码时报错:Non-net port key_in cannot be of mode input,写代码时遇到的问题。
module uart_byte_tx(clk,rstn,blaud_set,data,send_en,uart_tx,tx_done
);input clk;input rstn;input [2:0]blaud_set;input [7:0]data;input send_en;output reg uart_tx;output tx_done;//Blaud_set = 0时,波特率 = 9600;//Blaud_set = 1时,波特率 = 19200;//Blaud_set = 2时,波特率 = 38400;//Blaud_set = 3时,波特率 = 57600;//Blaud_set = 4时,波特率 = 115200;reg[17:0] bps_dr;always@(*)case(blaud_set)0: bps_dr = 1000000000/9600/20;1: bps_dr = 1000000000/19200/20;2: bps_dr = 1000000000/38400/20;3: bps_dr = 1000000000/57600/20;4: bps_dr = 1000000000/115200/20;endcasewire bps_clk;assign bps_clk = (div_cnt == (bps_dr - 1)); //3.为了出现bps_clk脉冲信号reg[17:0] div_cnt;always@(posedge clk or negedge rstn)if(!rstn)div_cnt <= 0;else if(send_en)beginif(bps_clk)div_cnt <= 0;elsediv_cnt <= div_cnt + 1'd1;endelsediv_cnt <= 0;    reg[3:0] bps_cnt;    always@(posedge clk or negedge rstn)if(!rstn)bps_cnt <= 0;else if(send_en)beginif(bps_cnt == 11)bps_cnt <= 0;else if(div_cnt == 1) //注意2bps_cnt <= bps_cnt + 4'd1;endelsebps_cnt <= 0;reg tx_done;always@(posedge clk or negedge rstn)if(!rstn)uart_tx <= 1'd1;else case(bps_cnt)1: begin uart_tx <= 1'd0; tx_done <= 0; end //注意12: uart_tx <= data[0];3: uart_tx <= data[1];4: uart_tx <= data[2];5: uart_tx <= data[3];6: uart_tx <= data[4];7: uart_tx <= data[5];8: uart_tx <= data[6];9: uart_tx <= data[7];10: uart_tx <= 1'd1;11: begin uart_tx <= 1'd1; tx_done <= 1; end //注意4default: uart_tx <= 1'd1;endcaseendmodule
仿真代码:
`timescale 1ns/1nsmodule uart_byte_tx_tb();reg clk;reg rstn;reg [2:0] blaud_set;reg [7:0] data;reg send_en;wire uart_tx;wire tx_done; uart_byte_tx uart_byte_tx_inst(.clk(clk),.rstn(rstn),.blaud_set(blaud_set),.data(data),.send_en(send_en),.uart_tx(uart_tx),.tx_done(tx_done));initial clk = 1;always #10 clk = ~clk;initial beginrstn = 0;data = 0;send_en = 0;blaud_set = 4;#201;rstn = 1;#100data = 8'h57;send_en = 1;#20;@(posedge tx_done);send_en = 0;#20000;data = 8'h75;send_en = 1;#20;@(posedge tx_done);#20000;send_en = 0;$stop;endendmodule仿真波形

2. 10 串口发送应用之发送数据
使用上一节课设计的串口发送模块,设计一个数据发送器,每10ms以115200的波特率发送一个数据,每次发送的数据比前一个数据大一(计数器)。
在实际应用的时候,我们不能通过counter去控制data,只能通过控制信号去控制。要求就是通过tx_done和send_en这两个控制信号,控制我要发送的数据内容。
思路:通过顶层模块调用uart_byte_tx发送模块来发送数据,将顶层模块命名为uart_tx_test。

设计代码(第一版,不完善)
2.1 直接使用上一节的uart_byte_tx模块:
module uart_tx_test(clk,rstn,uart_tx
);input clk;input rstn;output uart_tx;reg [7:0] data;reg send_en;uart_byte_tx uart_byte_tx_inst(.clk(clk),.rstn(rstn),.blaud_set(3'd4),.data(data),.send_en(send_en),.uart_tx(uart_tx),.tx_done(tx_done));//10ms周期计数器reg [18:0] counter;always@(posedge clk or negedge rstn)if(!rstn)counter <= 0;else if(counter == 499999)counter <= 0;elsecounter <= counter + 1'd1;always@(posedge clk or negedge rstn)if(!rstn)send_en <= 0;else if(counter == 0)send_en <= 1;else if(tx_done)send_en <= 0;always@(posedge clk or negedge rstn)if(!rstn)data <= 8'b0000_0000;else if(tx_done)data <= data + 1'd1;endmodule
module uart_byte_tx(clk,rstn,blaud_set,data,send_en,uart_tx,tx_done
);input clk;input rstn;input [2:0]blaud_set;input [7:0]data;input send_en;output reg uart_tx;output tx_done;//Blaud_set = 0时,波特率 = 9600;//Blaud_set = 1时,波特率 = 19200;//Blaud_set = 2时,波特率 = 38400;//Blaud_set = 3时,波特率 = 57600;//Blaud_set = 4时,波特率 = 115200;reg[17:0] bps_dr;always@(*)case(blaud_set)0: bps_dr = 1000000000/9600/20;1: bps_dr = 1000000000/19200/20;2: bps_dr = 1000000000/38400/20;3: bps_dr = 1000000000/57600/20;4: bps_dr = 1000000000/115200/20;endcasewire bps_clk;assign bps_clk = (div_cnt == (bps_dr - 1)); reg[17:0] div_cnt;always@(posedge clk or negedge rstn)if(!rstn)div_cnt <= 0;else if(send_en)beginif(bps_clk)div_cnt <= 0;elsediv_cnt <= div_cnt + 1'd1;endelsediv_cnt <= 0;    reg[3:0] bps_cnt;    always@(posedge clk or negedge rstn)if(!rstn)bps_cnt <= 0;else if(send_en)beginif(bps_cnt == 11)bps_cnt <= 0;else if(div_cnt == 1) bps_cnt <= bps_cnt + 4'd1;endelsebps_cnt <= 0;reg tx_done;always@(posedge clk or negedge rstn)if(!rstn)uart_tx <= 1'd1;else case(bps_cnt) //不完善1: begin uart_tx <= 1'd0; tx_done <= 0; end 2: uart_tx <= data[0];3: uart_tx <= data[1];4: uart_tx <= data[2];5: uart_tx <= data[3];6: uart_tx <= data[4];7: uart_tx <= data[5];8: uart_tx <= data[6];9: uart_tx <= data[7];10: uart_tx <= 1'd1;11: begin uart_tx <= 1'd1; tx_done <= 1; enddefault: uart_tx <= 1'd1;endcaseendmodule
仿真代码
`timescale 1ns / 1psmodule uart_tx_test_tb();reg clk;reg rstn;wire uart_tx;uart_tx_test uart_tx_test_inst(.clk(clk),.rstn(rstn),.uart_tx(uart_tx));initial clk = 1;always #10 clk = ~clk;initial beginrstn = 0;#201;rstn = 1;#200000000$stop;endendmodule
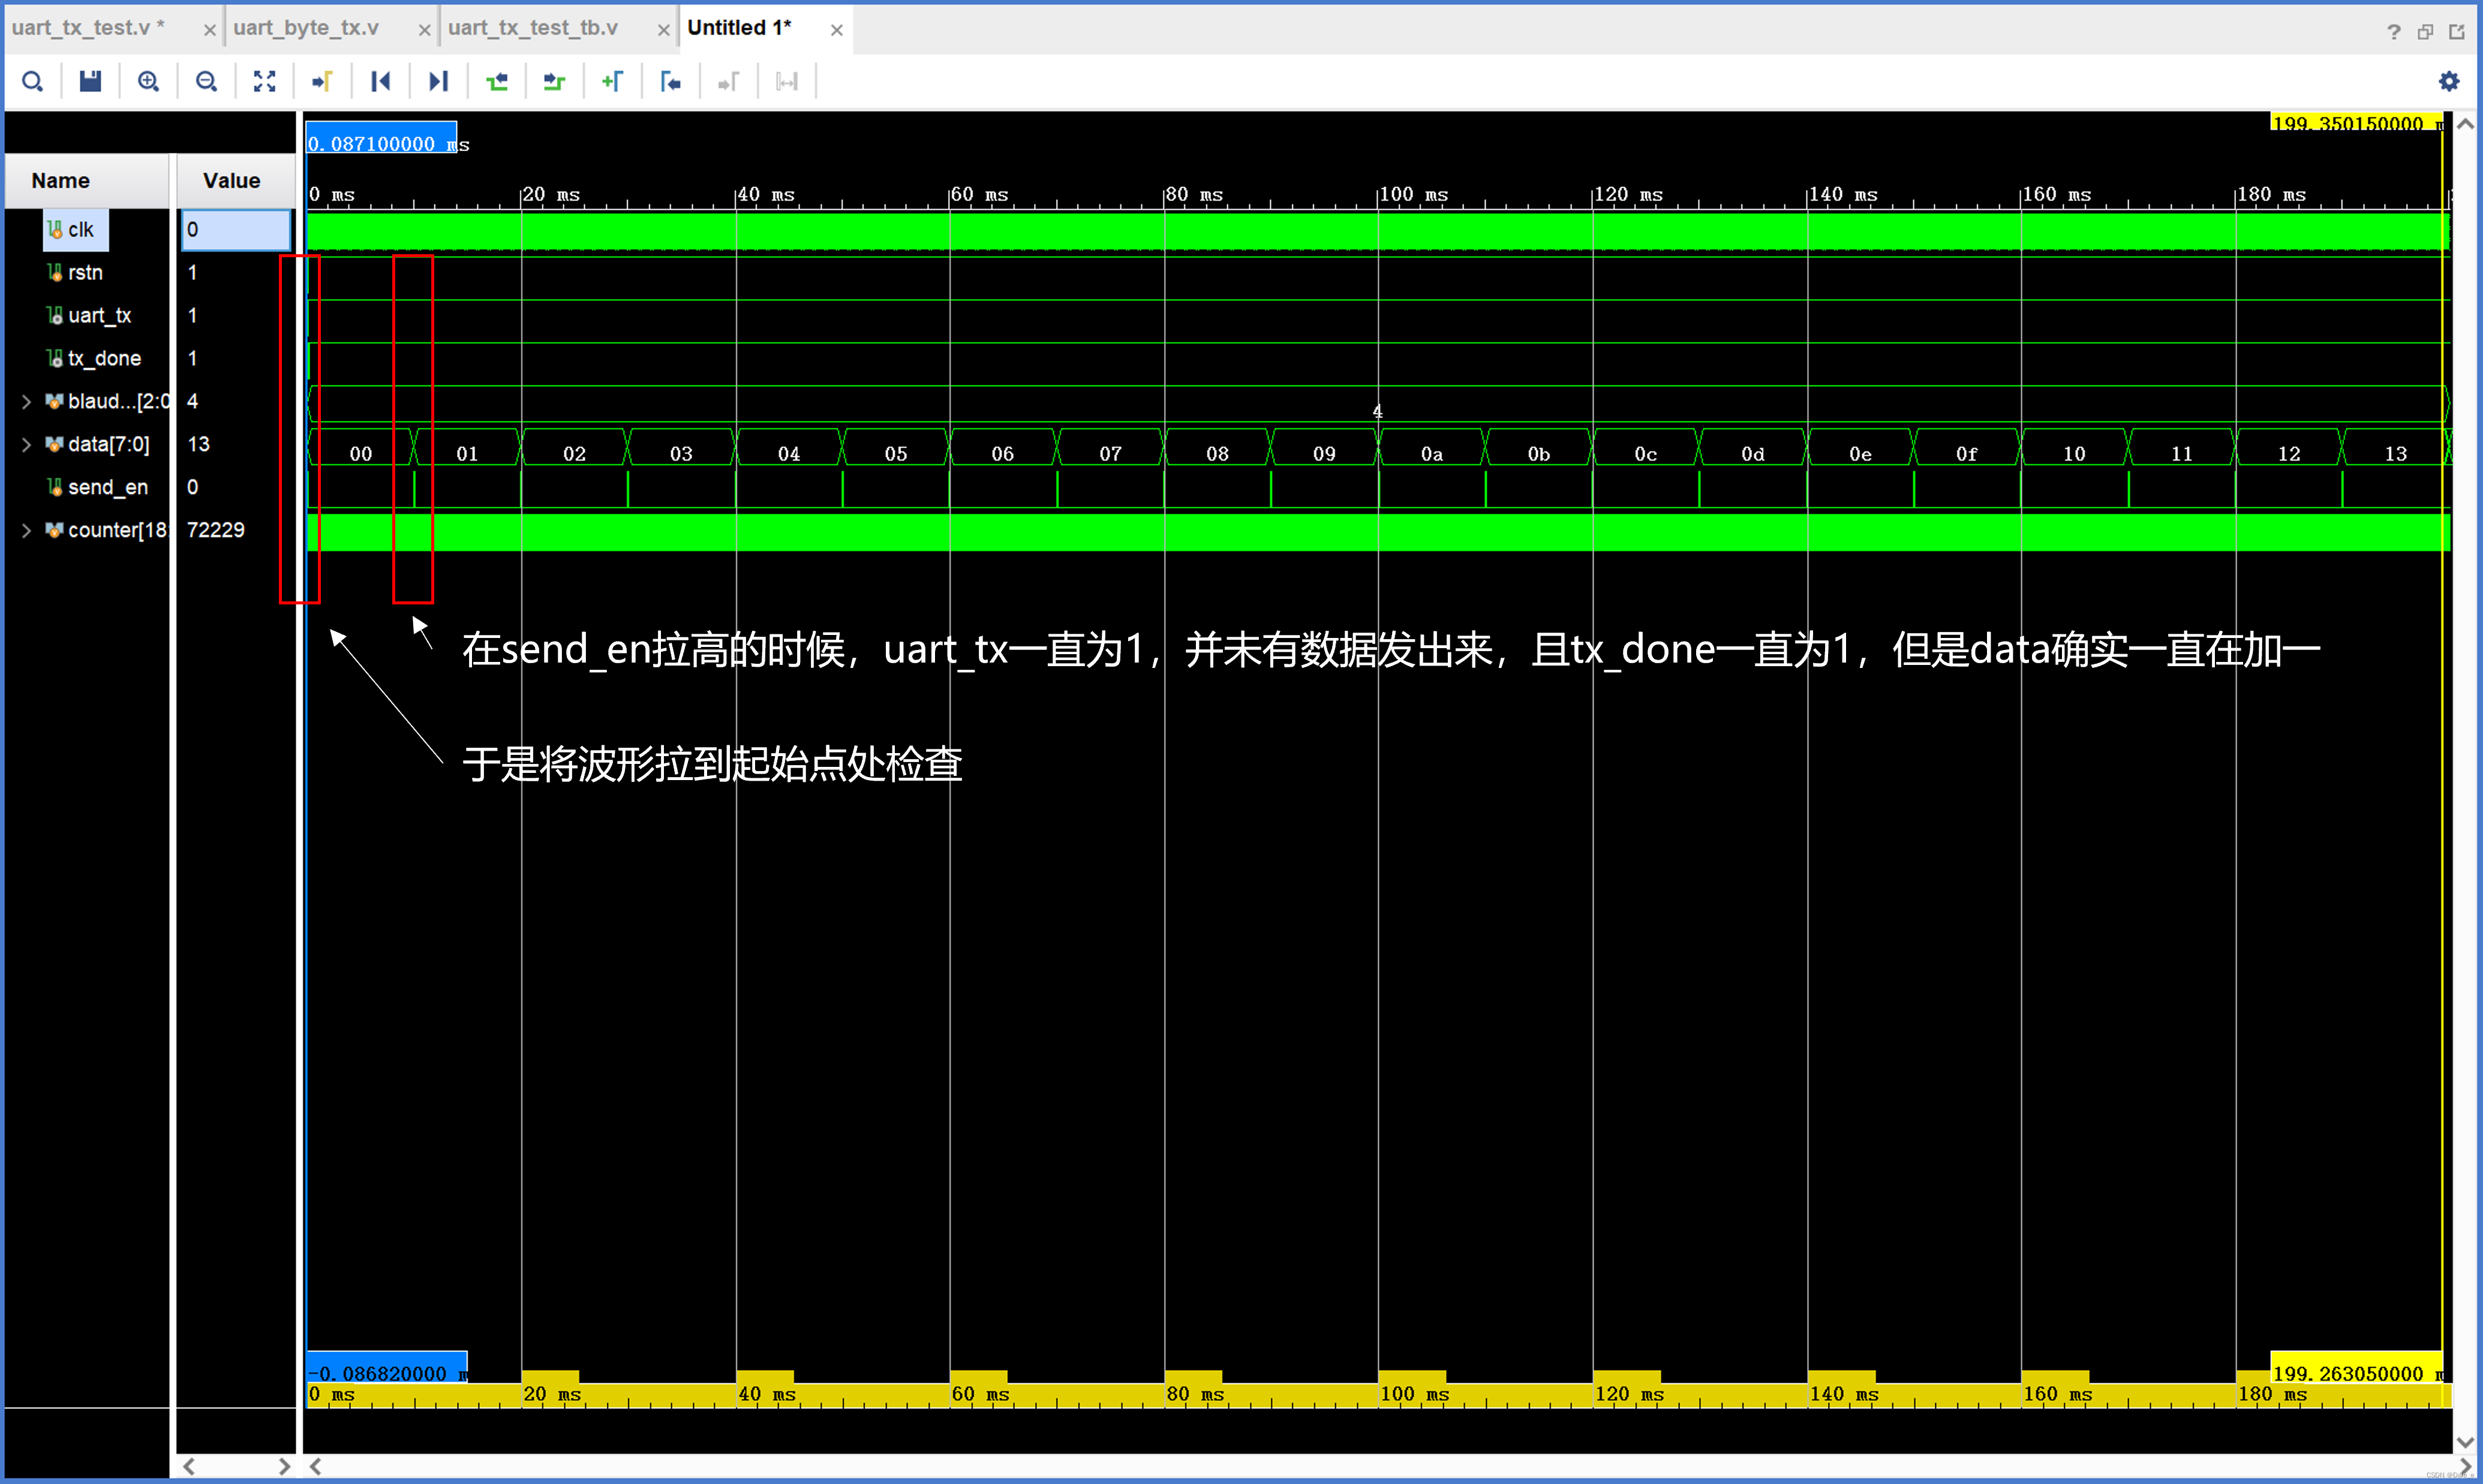
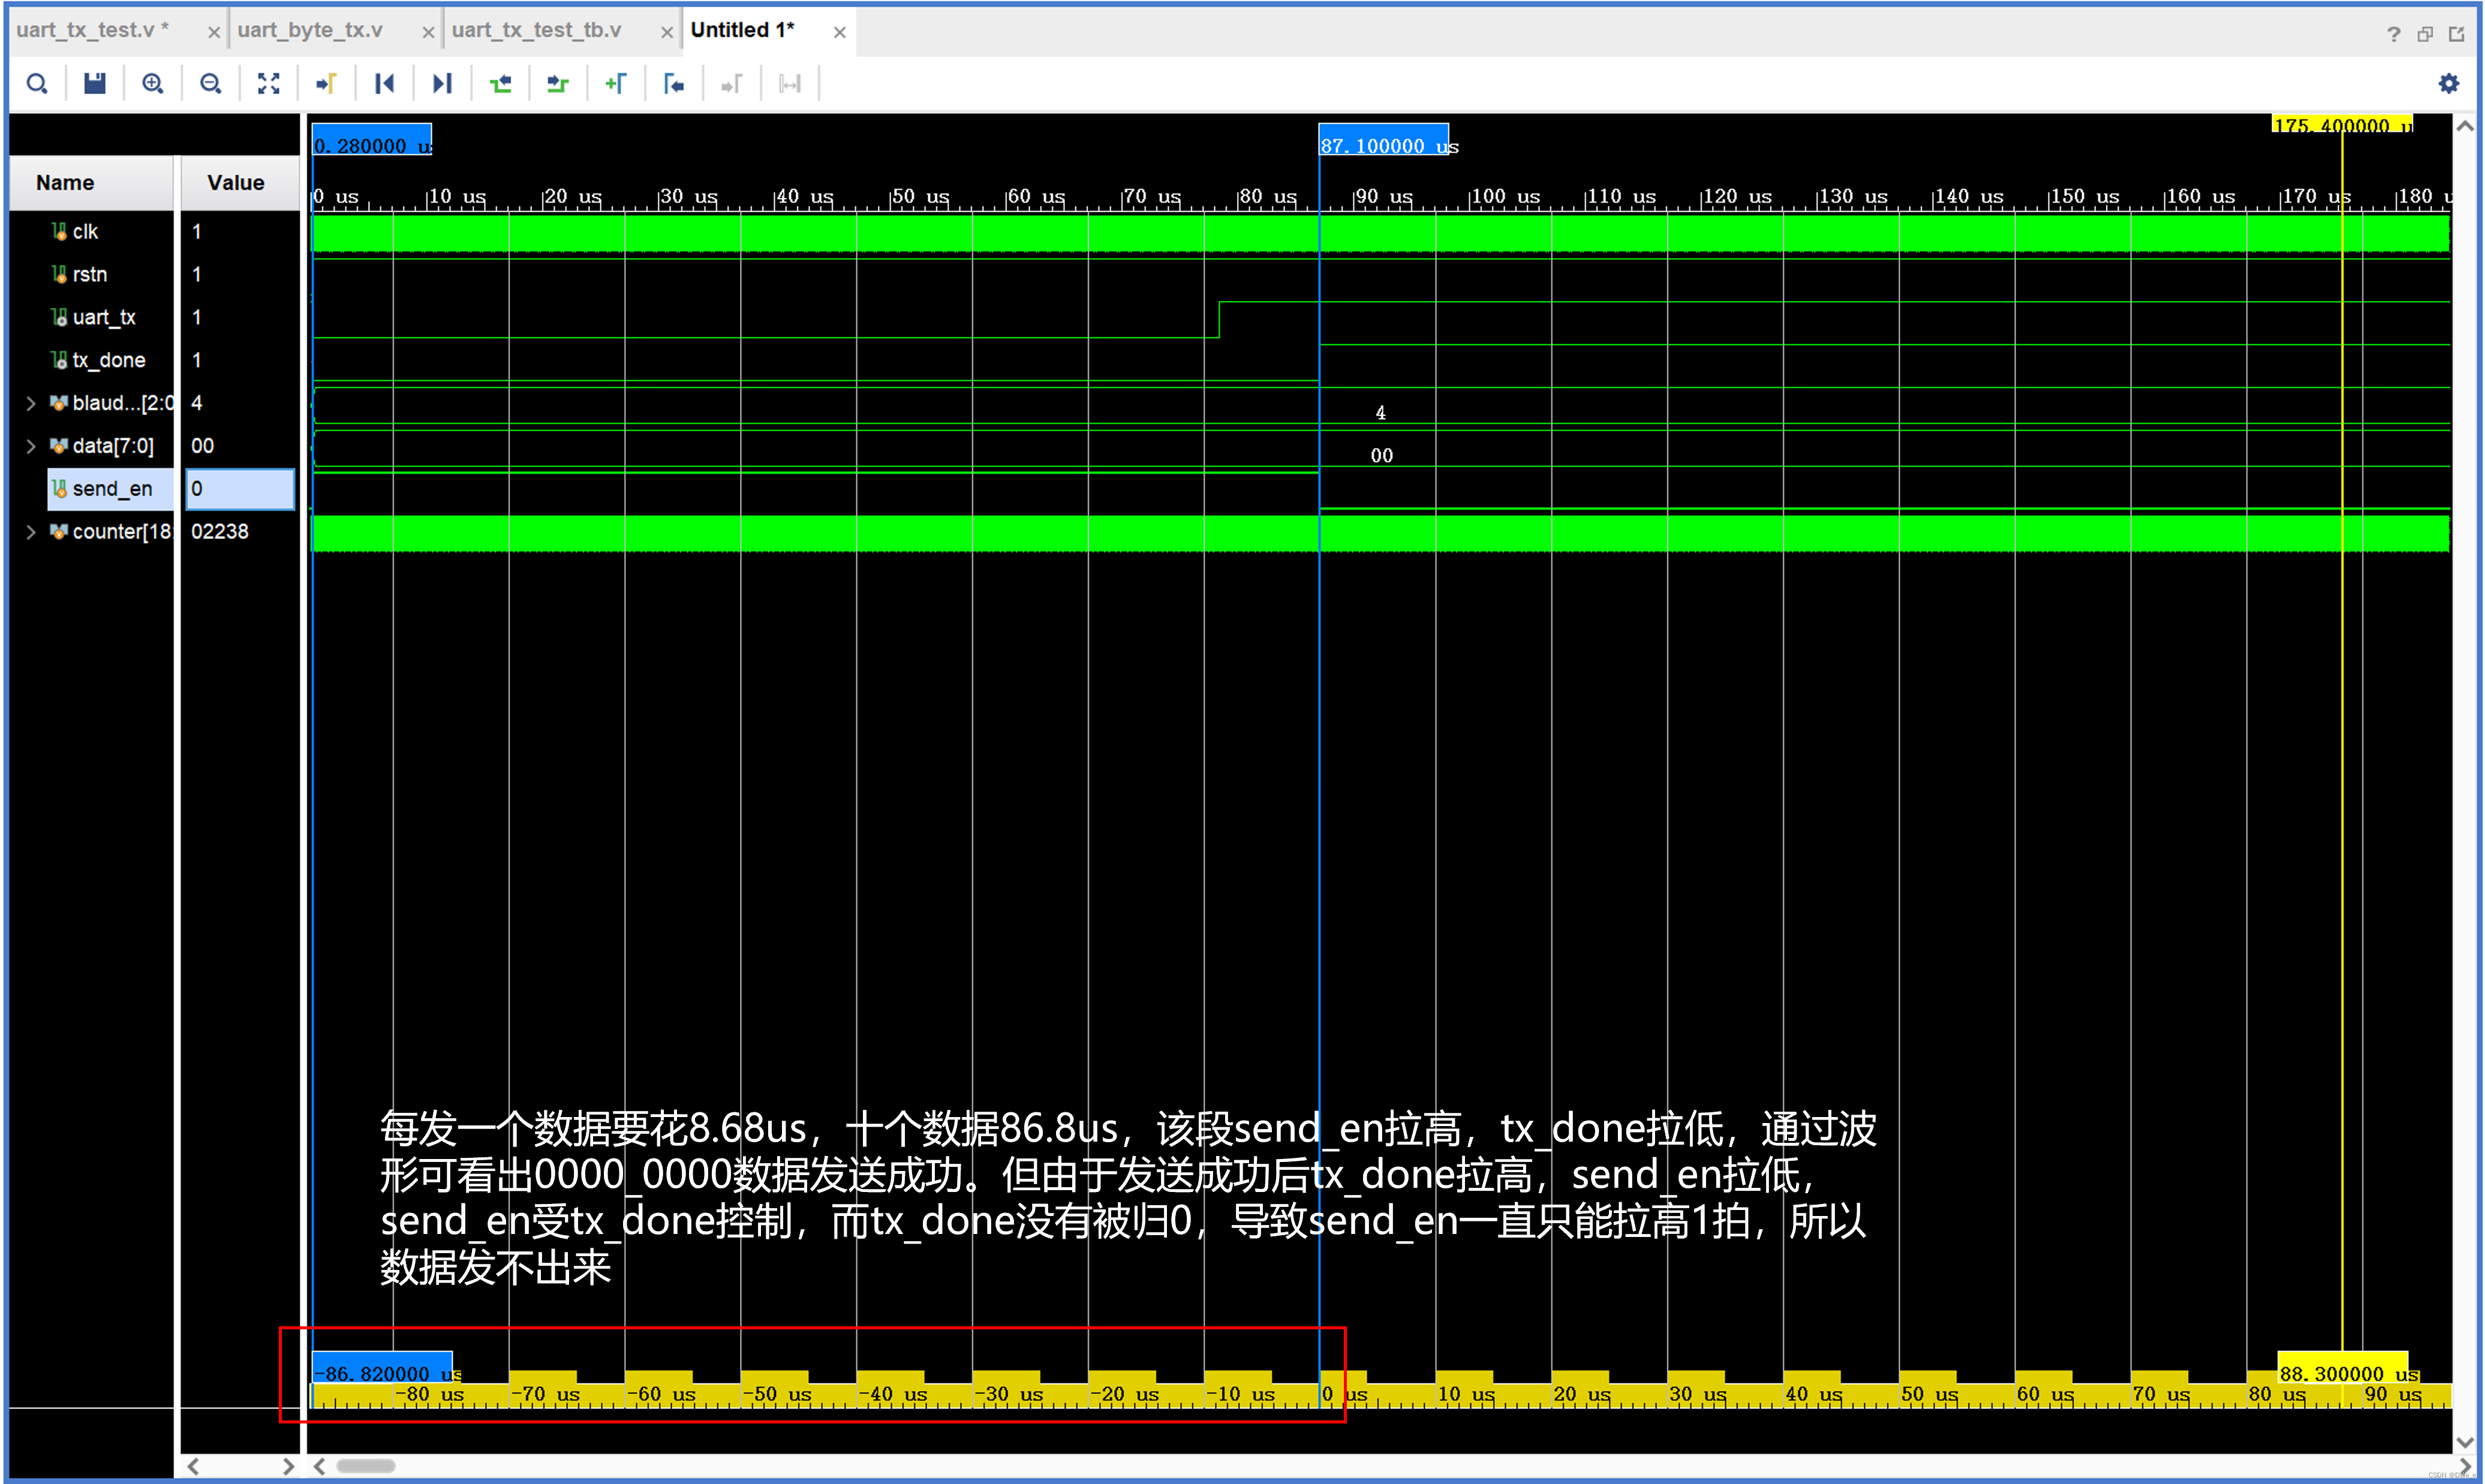
仿真波形
data确实在一直加一,但是data并未发出(uart_tx一直保持为1)
2.2 修改tx_done逻辑后(能运行)
设计代码
module uart_tx_test(clk,rstn,uart_tx
);input clk;input rstn;output uart_tx;reg [7:0] data;reg send_en;uart_byte_tx uart_byte_tx_inst(.clk(clk),.rstn(rstn),.blaud_set(3'd4),.data(data),.send_en(send_en),.uart_tx(uart_tx),.tx_done(tx_done));//10ms周期计数器reg [18:0] counter;always@(posedge clk or negedge rstn)if(!rstn)counter <= 0;else if(counter == 499999)counter <= 0;elsecounter <= counter + 1'd1;always@(posedge clk or negedge rstn)if(!rstn)send_en <= 0;else if(counter == 0)send_en <= 1;else if(tx_done)send_en <= 0;always@(posedge clk or negedge rstn)if(!rstn)data <= 8'b0000_0000;else if(tx_done)data <= data + 1'd1;endmodule
module uart_byte_tx(clk,rstn,blaud_set,data,send_en,uart_tx,tx_done
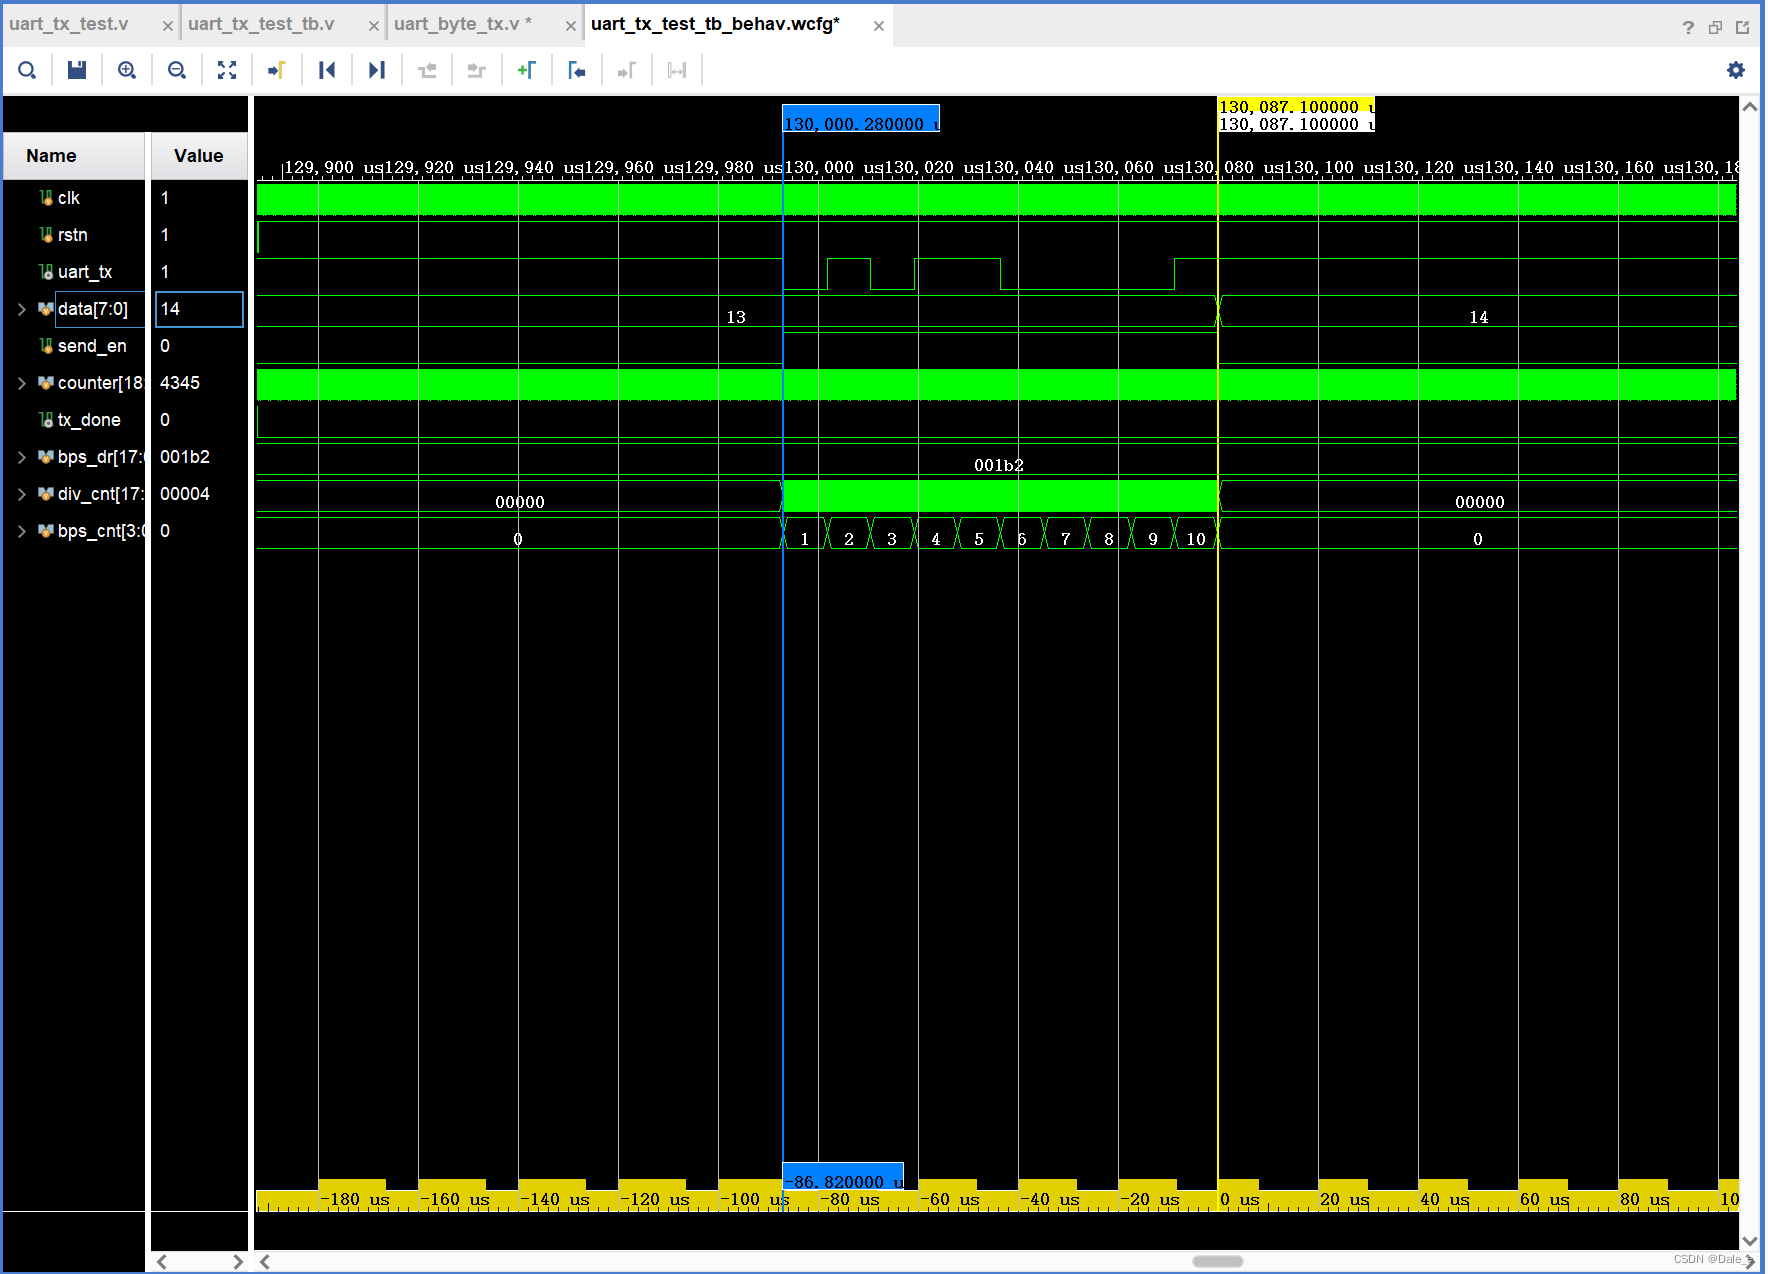
);input clk;input rstn;input [2:0]blaud_set;input [7:0]data;input send_en;output reg uart_tx;output tx_done;//Blaud_set = 0时,波特率 = 9600;//Blaud_set = 1时,波特率 = 19200;//Blaud_set = 2时,波特率 = 38400;//Blaud_set = 3时,波特率 = 57600;//Blaud_set = 4时,波特率 = 115200;reg[17:0] bps_dr;always@(*)case(blaud_set)0: bps_dr = 1000000000/9600/20;1: bps_dr = 1000000000/19200/20;2: bps_dr = 1000000000/38400/20;3: bps_dr = 1000000000/57600/20;4: bps_dr = 1000000000/115200/20;endcasewire bps_clk;assign bps_clk = (div_cnt == 1);reg[17:0] div_cnt;always@(posedge clk or negedge rstn)if(!rstn)div_cnt <= 0;else if(send_en)beginif(div_cnt == (bps_dr - 1))div_cnt <= 0;elsediv_cnt <= div_cnt + 1'd1;endelsediv_cnt <= 0; reg[3:0] bps_cnt; always@(posedge clk or negedge rstn)if(!rstn)bps_cnt <= 0;else if(send_en)beginif(bps_cnt == 11)bps_cnt <= 0;else if(div_cnt == 1)bps_cnt <= bps_cnt + 4'd1;endelsebps_cnt <= 0;reg tx_done;always@(posedge clk or negedge rstn)if(!rstn)uart_tx <= 1'd1;else case(bps_cnt)0: tx_done <= 0;1: uart_tx <= 1'd0;2: uart_tx <= data[0];3: uart_tx <= data[1];4: uart_tx <= data[2];5: uart_tx <= data[3];6: uart_tx <= data[4];7: uart_tx <= data[5];8: uart_tx <= data[6];9: uart_tx <= data[7];10: uart_tx <= 1'd1;11: begin uart_tx <= 1'd1; tx_done <= 1; enddefault: uart_tx <= 1'd1;endcaseendmodule仿真波形

2.3 完善串口模块,使其能接入数据采集模块
- 数据采集模块data_gen,每采集到一个数据data result[7:0],会产生一个data_done的脉冲信号,uart串口在就接收到data_done的脉冲信号后会将data result[7:0]发送出去。
- 思路:我们可以利用脉冲信号data_done来使能我们的send_en信号,然后将接收到的data result[7:0]通过串口发送
- 为了模拟这个过程,我们让顶层uart_tx_test每隔10ms产生一个data[7:0]和一个send_go的单脉冲信号发送给uart_byte_tx模块。让uart_byte_tx模块根据send_go脉冲信号去发数据即可。
- 为了防止数据发送途中data发生变化,我们在接收到send_go信号后,先将data存储起来,即声明一个r_data[7:0],使将data[7:0]的值赋值给r_data[7:0]。

设计代码
module uart_tx_test1(clk,rstn,uart_tx
);input clk;input rstn;output uart_tx;reg [7:0] data;reg send_go;uart_byte_tx uart_byte_tx_inst(.clk(clk),.rstn(rstn),.blaud_set(3'd4),.data(data),.send_go(send_go),.uart_tx(uart_tx),.tx_done(tx_done));//10ms周期计数器reg [18:0] counter;always@(posedge clk or negedge rstn)if(!rstn)counter <= 0;else if(counter == 499999)counter <= 0;elsecounter <= counter + 1'd1;always@(posedge clk or negedge rstn)if(!rstn)send_go <= 0;else if(counter == 0)send_go <= 1;elsesend_go <= 0;always@(posedge clk or negedge rstn)if(!rstn)data <= 8'b0000_0000;else if(tx_done)data <= data + 1'd1;endmodule
module uart_byte_tx(clk,rstn,blaud_set,data,send_go,uart_tx,tx_done
);input clk;input rstn;input [2:0]blaud_set;input [7:0]data;input send_go;output reg uart_tx;output tx_done;//Blaud_set = 0时,波特率 = 9600;//Blaud_set = 1时,波特率 = 19200;//Blaud_set = 2时,波特率 = 38400;//Blaud_set = 3时,波特率 = 57600;//Blaud_set = 4时,波特率 = 115200;reg[17:0] bps_dr;always@(*)case(blaud_set)0: bps_dr = 1000000000/9600/20;1: bps_dr = 1000000000/19200/20;2: bps_dr = 1000000000/38400/20;3: bps_dr = 1000000000/57600/20;4: bps_dr = 1000000000/115200/20;endcasereg [7:0] r_data;always@(posedge clk)if(send_go)r_data <= data;elser_data <= r_data;reg send_en;  always@(posedge clk or negedge rstn)if(!rstn)send_en <= 0;else if(send_go)send_en <= 1;else if(tx_done)send_en <= 0;wire bps_clk;assign bps_clk = (div_cnt == 1);reg[17:0] div_cnt;always@(posedge clk or negedge rstn)if(!rstn)div_cnt <= 0;else if(send_en)beginif(div_cnt == (bps_dr - 1))div_cnt <= 0;elsediv_cnt <= div_cnt + 1'd1;endelsediv_cnt <= 0;    reg[3:0] bps_cnt;    always@(posedge clk or negedge rstn)if(!rstn)bps_cnt <= 0;else if(send_en)beginif(bps_cnt == 11)bps_cnt <= 0;else if(div_cnt == 1)bps_cnt <= bps_cnt + 4'd1;endelsebps_cnt <= 0;reg tx_done;always@(posedge clk or negedge rstn)if(!rstn)uart_tx <= 1'd1;else case(bps_cnt)0: tx_done <= 0;1: uart_tx <= 1'd0;2: uart_tx <= r_data[0];3: uart_tx <= r_data[1];4: uart_tx <= r_data[2];5: uart_tx <= r_data[3];6: uart_tx <= r_data[4];7: uart_tx <= r_data[5];8: uart_tx <= r_data[6];9: uart_tx <= r_data[7];10: uart_tx <= 1'd1;11: begin uart_tx <= 1'd1; tx_done <= 1; enddefault: uart_tx <= 1'd1;endcaseendmodule
仿真代码
`timescale 1ns / 1psmodule uart_tx_test_tb();reg clk;reg rstn;wire uart_tx;uart_tx_test1 uart_tx_test_inst(.clk(clk),.rstn(rstn),.uart_tx(uart_tx));initial clk = 1;always #10 clk = ~clk;initial beginrstn = 0;#201;rstn = 1;#200000000$stop;endendmodule
仿真波形

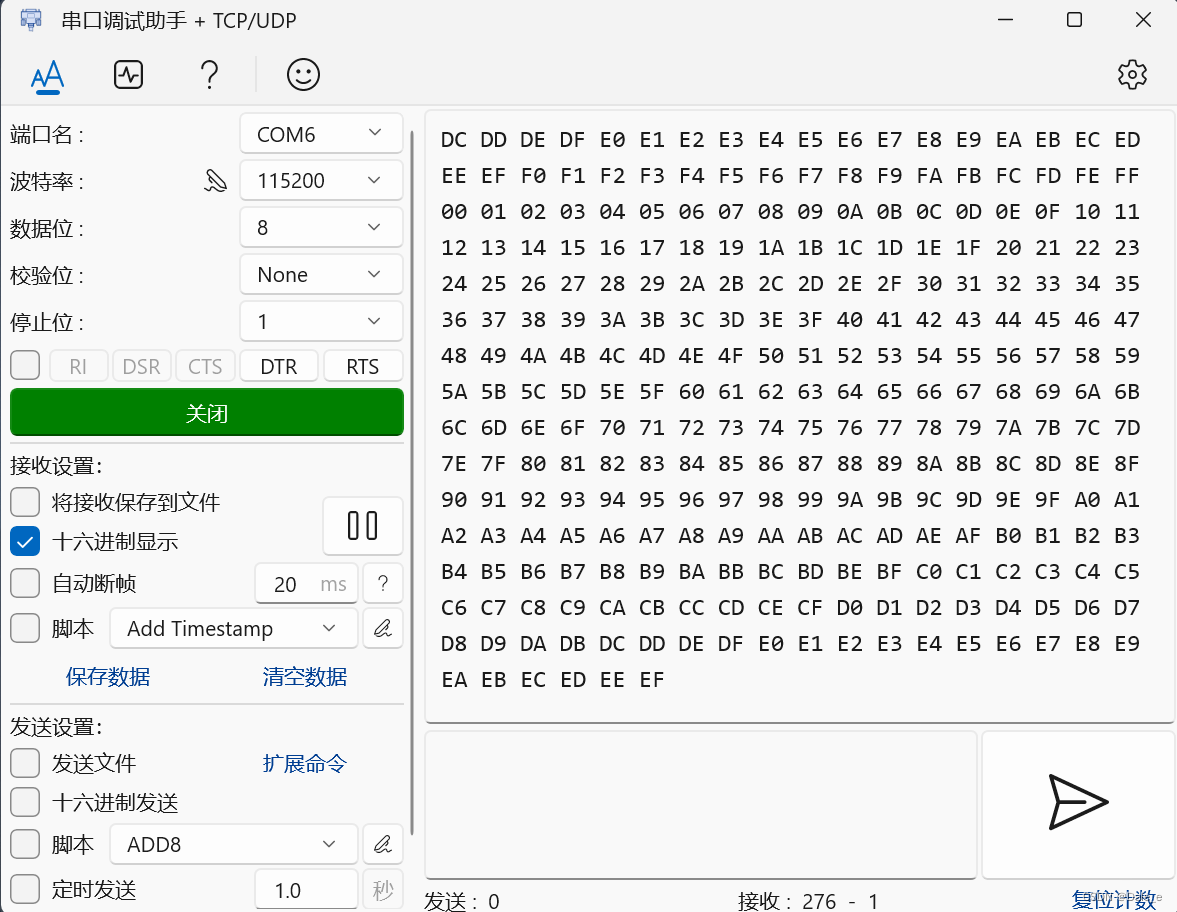
在开发板上跑程序
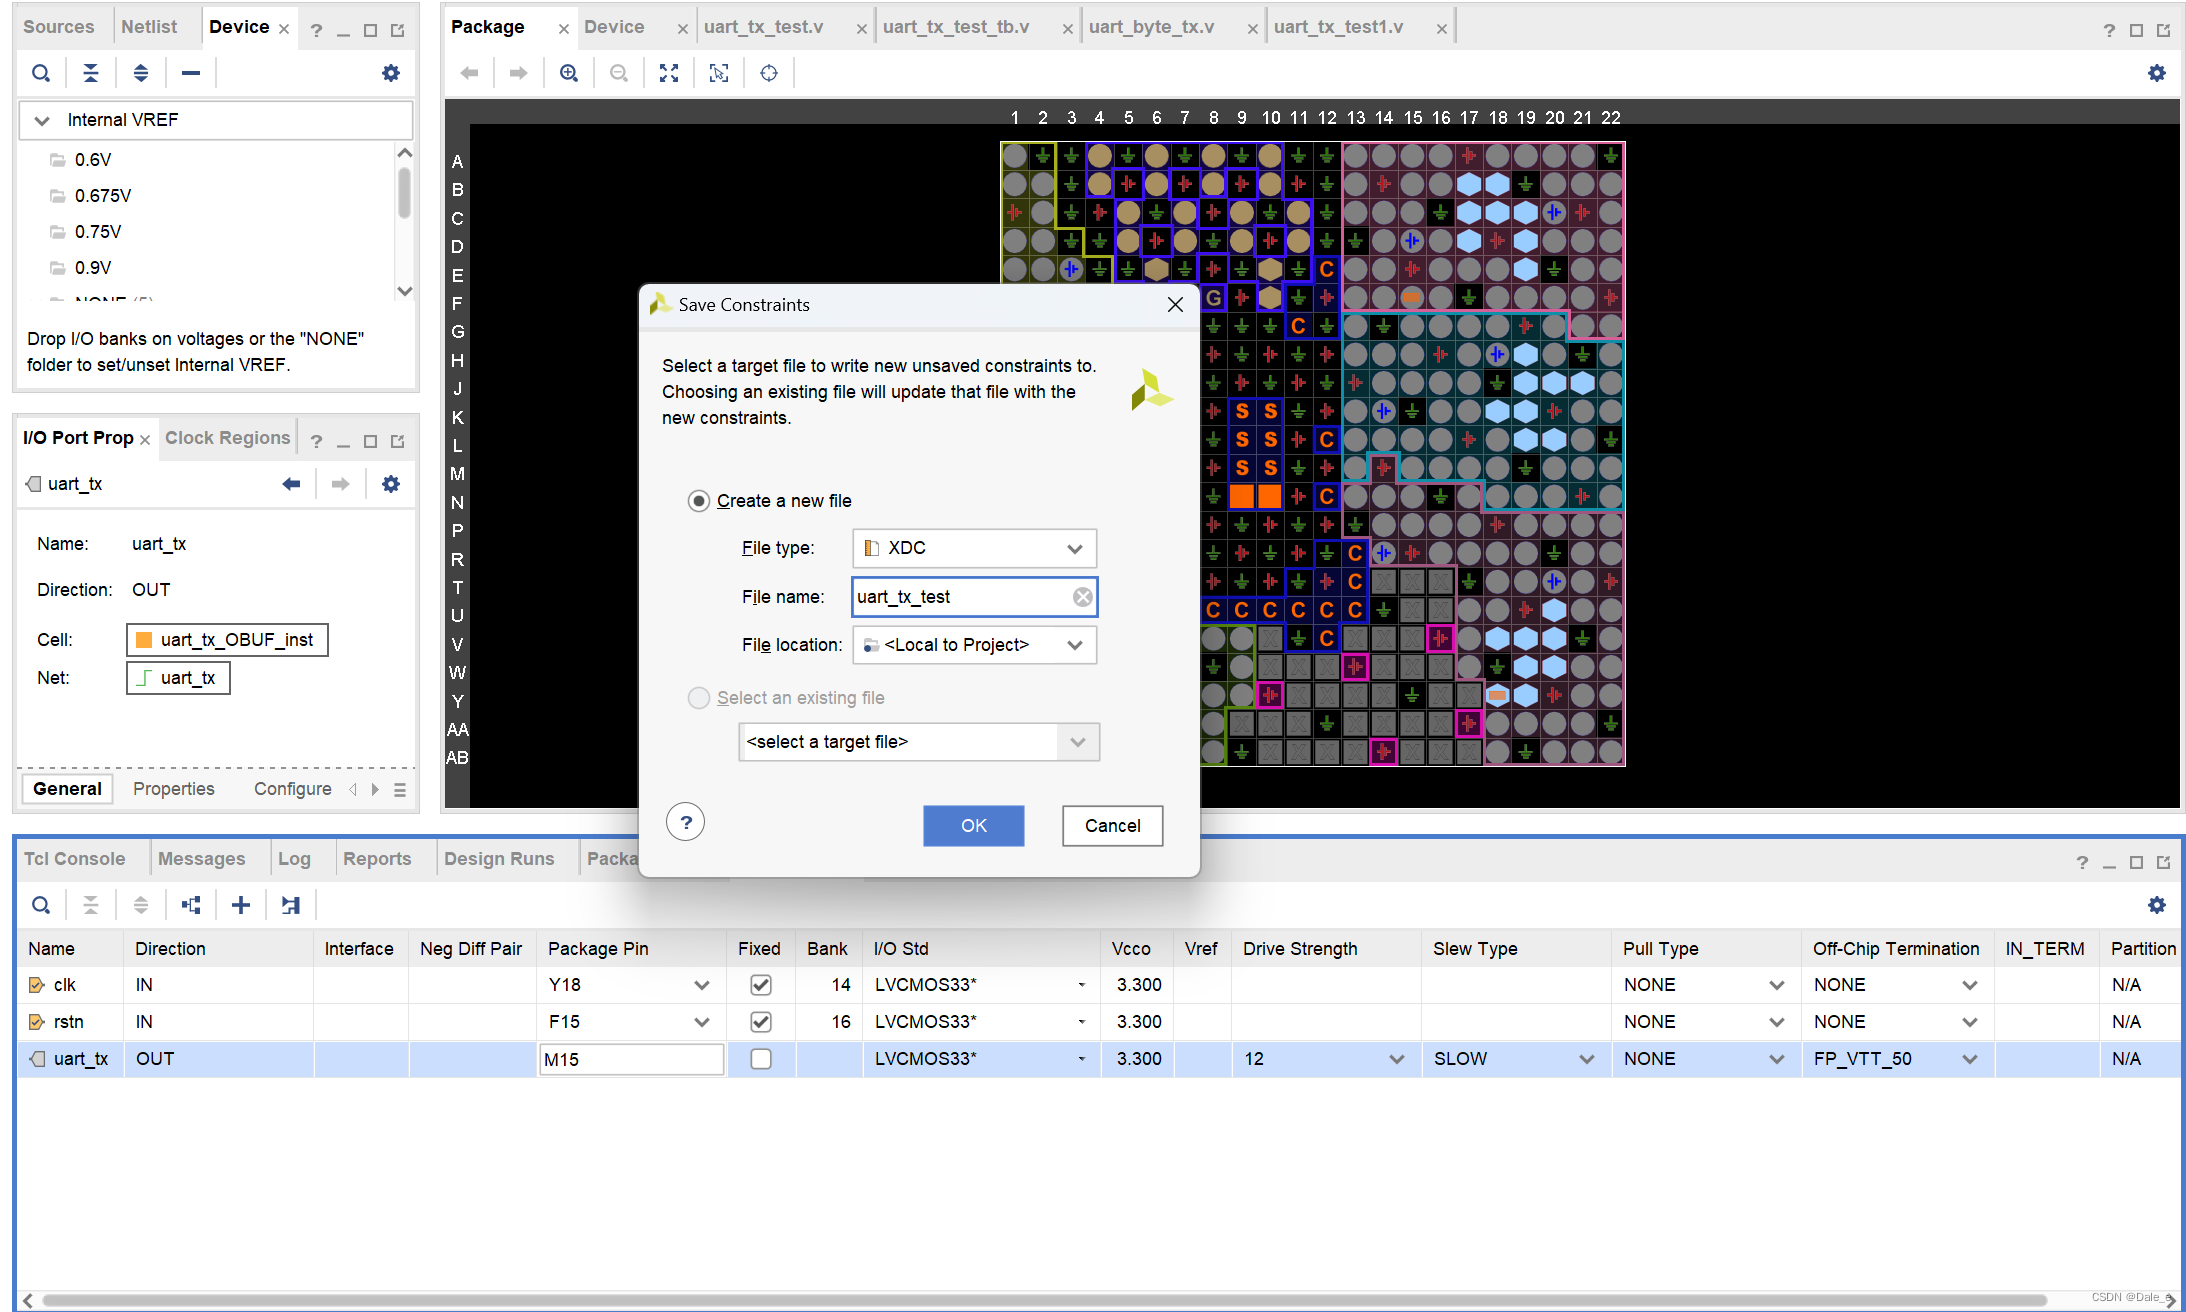
调试结果:确实按照每100ms法发一个数据
相关文章:
09 AB 10串口通信发送原理
通用异步收发传输器( Universal Asynchronous Receiver/Transmitter, UART)是一种异步收发传输器,其在数据发送时将并行数据转换成串行数据来传输, 在数据接收时将接收到的串行数据转换成并行数据, 可以实现…...

[145] 二叉树的后序遍历 js
题目描述:给你一棵二叉树的根节点 root ,返回其节点值的 后序遍历 解题思路: 迭代法: 后序(左右根) 先序是根左右 后序是左右根 后序翻转一下就是 根右左 所以后序的结果实际就是 先序的方法࿰…...
)
开源模型应用落地-业务优化篇(四)
一、前言 经过线程池优化、请求排队和服务实例水平扩容等措施,整个AI服务链路的性能得到了显著地提升。但是,作为追求卓越的大家,绝不会止步于此。我们的目标是在降低成本和提高效率方面不断努力,追求最佳结果。如果你们在实施AI项目方面有经验,那一定会对GPU服务器的高昂…...

MySQL的MVCC机制
MVCC机制 使用MVCC(Multi-Version Concurrency Control,多版本的并发控制协议)机制来实现可重复读(REPEATABLE READ)的隔离级别 MVCC最大的优点是读不加锁,因此读写不冲突,并发性能好。InnoDB实现MVCC,是通过保存数据在某个时间点…...
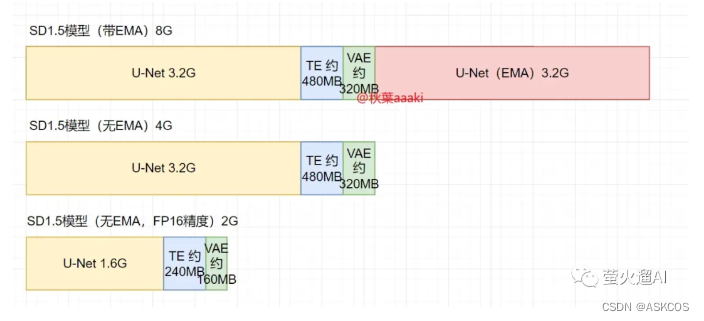
stable-diffusion | v1-5-pruned.ckpt和v1-5-pruned-emaonly.ckpt的区别
https://github.com/runwayml/stable-diffusion?tabreadme-ov-file#reference-sampling-script 对于 1.5 模型,其中可能包括四部分:标准模型、文本编码器、VAE模型、EMA模型。 标准模型:生成图片的核心模块,潜空间中的前向扩散和…...
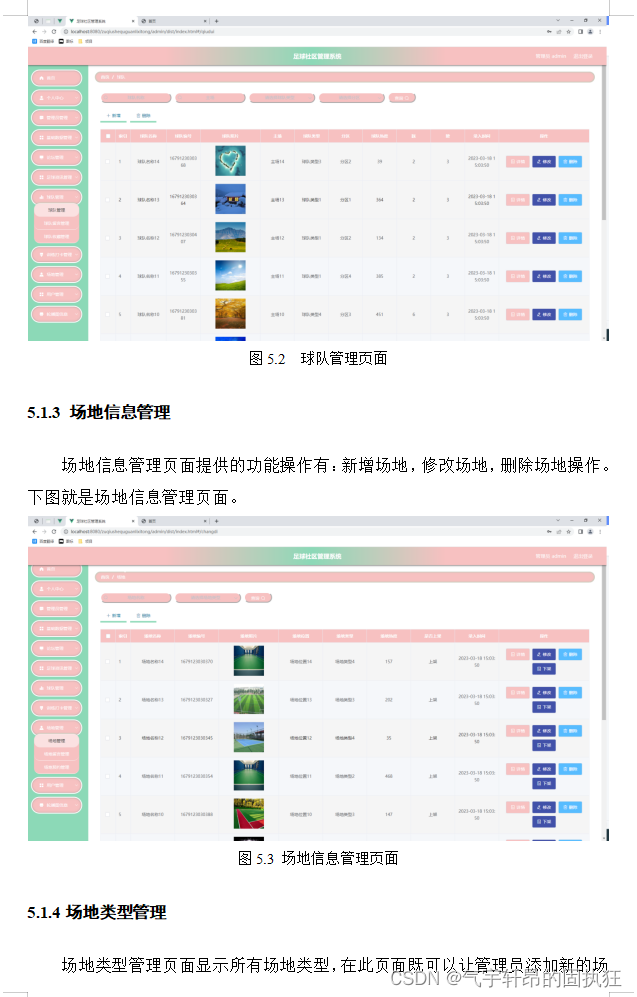
基于Springboot的足球社区管理系统(有报告)。Javaee项目,springboot项目。
演示视频: 基于Springboot的足球社区管理系统(有报告)。Javaee项目,springboot项目。 项目介绍: 采用M(model)V(view)C(controller)三层体系结构…...
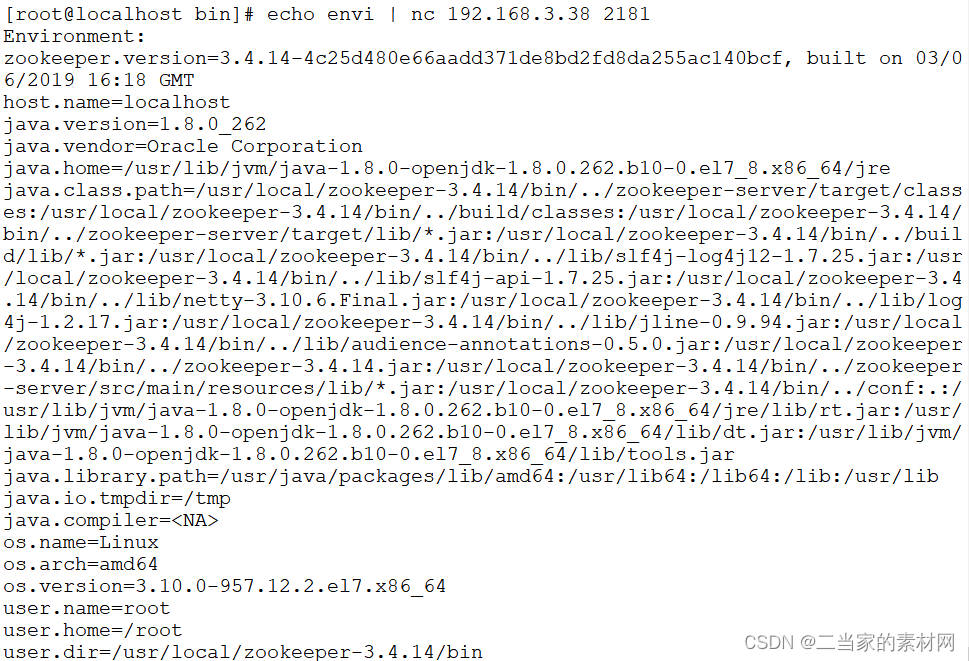
8.0 Zookeeper 四字命令教程详解
zookeeper 支持某些特定的四字命令与其交互,用户获取 zookeeper 服务的当前状态及相关信息,用户在客户端可以通过 telenet 或者 nc(netcat) 向 zookeeper 提交相应的命令。 安装 nc 命令: $ yum install nc …...

【MySQL】学习和总结DCL的权限控制
🌈个人主页: Aileen_0v0 🔥热门专栏: 华为鸿蒙系统学习|计算机网络|数据结构与算法 💫个人格言:“没有罗马,那就自己创造罗马~” #mermaid-svg-Bl9kYeLf8GfpdQgL {font-family:"trebuchet ms",verdana,arial,sans-serif;font-siz…...
React+Antd实现表格自动向上滚动
1、效果 2、环境 1、react18 2、antd 4 3、代码实现 原理:创建一个定时器,修改表格ant-table-body的scrollTop属性实现滚动,监听表层的元素div的鼠标移入和移出实现实现鼠标进入元素滚动暂停,移出元素的时候表格滚动继续。 一…...

网络安全产品之认识准入控制系统
文章目录 一、什么是准入控制系统二、准入控制系统的主要功能1. 接入设备的身份认证2. 接入设备的安全性检查 三、准入控制系统的工作原理四、准入控制系统的特点五、准入控制系统的部署方式1. 网关模式2. 控制旁路模式 六、准入控制系统的应用场景七、企业如何利用准入控制系统…...

Text2SQL研究-Chat2DB体验与剖析
文章目录 概要业务数据库配置Chat2DB安装设置原理剖析 小结 概要 近期笔者在做Text2SQL的研究,于是调研了下Chat2DB,基于车辆订单业务做了一些SQL生成验证,有了一点心得,和大家分享一下.: 业务数据库设置 基于车辆订…...
——闭包)
JavaScript相关(二)——闭包
了解闭包的前提必须得了解什么是作用域链。也就是(一)的内容。 参考: 浏览器工作原理与实践 破解前端面试:从闭包说起 闭包 闭包是一个可以访问外部作用域中变量的内部函数,因为内部函数引用了外部函数的变量&#…...

MySQL的DDL语言
DDL:Data Definition Language(数据定义语言) DDL语言用来定义数据库对象(数据库,表,字段) ps:MySQL中关键字不区分大小写,但是库名、表名等是区分大小写的 一、对数据库操作的DDL 1、查询相关语句&…...

<网络安全>《21 工业安全审计系统》
1 工业安全审计系统 工业审计系统,支持多种工控协议的深度解析,对工控网络中的异常流量进行实时监测和告警,详实记录一切网络通信行为,为工业控制网络安全事件调查提供依据;产品聚焦工业生产安全事件分析,…...
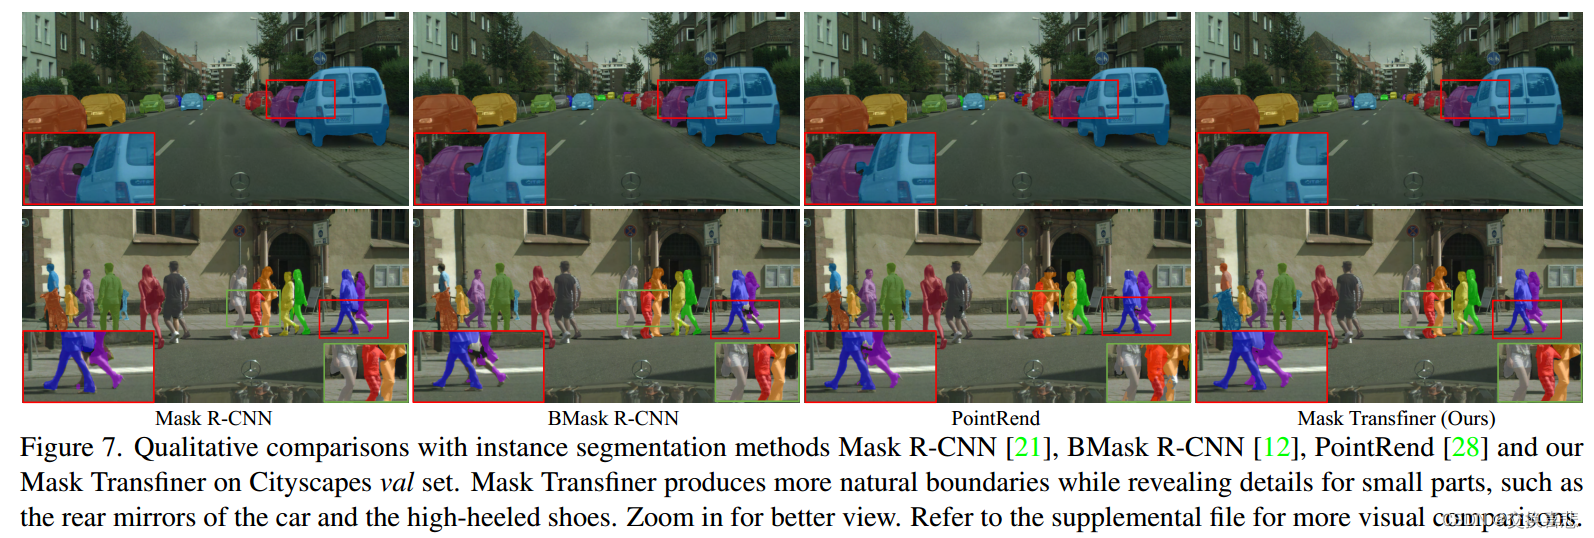
实例分割论文阅读之:《Mask Transfiner for High-Quality Instance Segmentation》
1.摘要 两阶段和基于查询的实例分割方法取得了显著的效果。然而,它们的分段掩模仍然非常粗糙。在本文中,我们提出了一种高质量和高效的实例分割Mask Transfiner。我们的Mask Transfiner不是在规则的密集张量上操作,而是将图像区域分解并表示…...

阿里 EasyExcel 表头国际化
实体类字段使用EasyExcel提供的注解ExcelProperty,value 值写成占位符形式 ,匹配 i18n 文件里面的编码。 如: /*** 仓库名称*/ ExcelProperty("{warehouse.record.warehouseName}") private String warehouseName;占位符解析器 A…...
跨境电商新风潮:充分发挥海外云手机的威力
在互联网行业迅速发展的大环境下,跨境电商、海外社交媒体营销以及游戏产业等重要领域都越来越需要借助海外云手机的协助。 特别是在蓬勃发展的跨境电商领域,像亚马逊、速卖通、eBay等平台,结合社交电商营销和短视频内容成为最有效的流量来源。…...
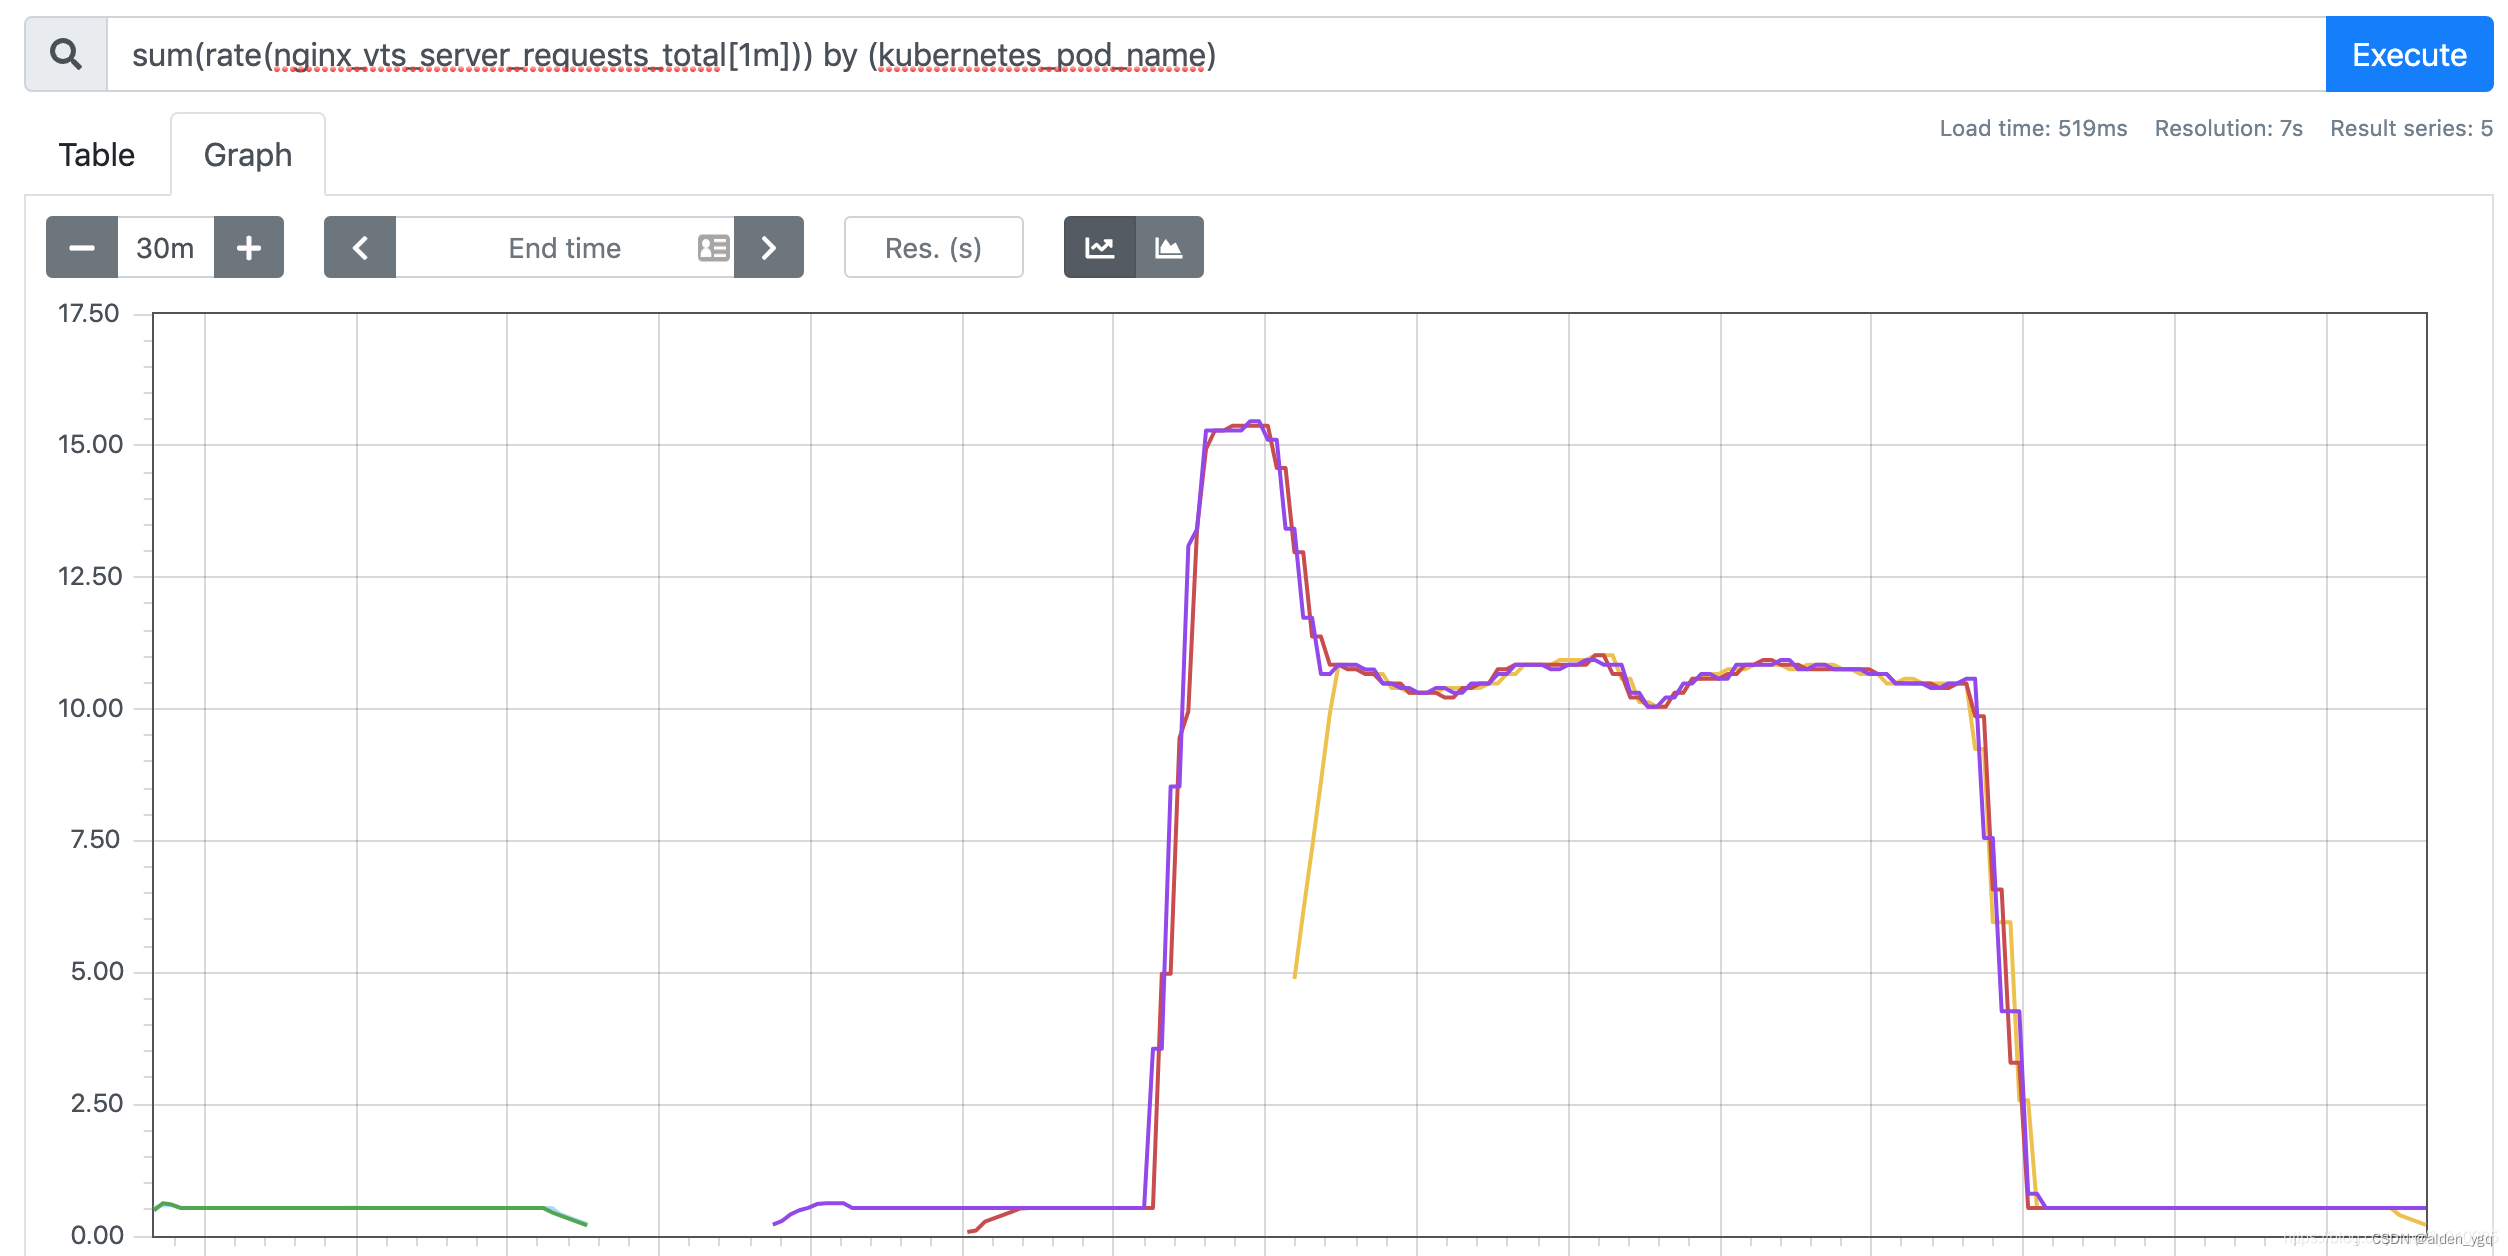
Kubernetes实战(二十七)-HPA实战
1 HPA简介 HPA 全称是 Horizontal Pod Autoscaler,用于POD 水平自动伸缩, HPA 可以 基于 POD CPU 利用率对 deployment 中的 pod 数量进行自动扩缩容(除了 CPU 也可以基于自定义的指标进行自动扩缩容)。pod 自动缩放不适用于无法…...
IDEA 配置以及一些技巧
1. IDEA设置 1.1 设置主题 1.2 设置字体和字体大小 1.3 编辑区的字体用ctrl鼠标滚轮可以控制大小 1.4 自动导包和优化多余的包 1.5 设置编码方式 1.6 配置 maven 1.7 设置方法形参参数提示 1.8 设置控制台的字体和大小 注意:设置控制台字体和大小后需要重启IDEA才会…...

Android 11 访问 Android/data/或者getExternalCacheDir() 非root方式
前言: 需求要求安装三方应用ExternalCacheDir()下载下来的apk文件。 getExternalCacheDir() : /storage/emulated/0/Android/data/com../cache/ 获取访问权限 如果手机安卓版本为Android10的时候,可以在AndroidManifest.xml中添加下列代码 android:requestLegacyExt…...

基于COMSOL仿真的静电梳状谐振器与MEMS加速度传感器性能研究
comsol静电梳状谐振器 MEMS加速度传感器仿真 梳齿结构在MEMS加速度计里就像精密钟表的齿轮,微小位移就能引发电容变化。最近在COMSOL里复现静电驱动谐振器时,发现梳齿间距的设置直接能让仿真结果"翻车"——不信邪的可以试试把初始间隙设成5μ…...

3步搞定Linux麦克风降噪:NoiseTorch-ng让你的语音通话更清晰
3步搞定Linux麦克风降噪:NoiseTorch-ng让你的语音通话更清晰 【免费下载链接】NoiseTorch Real-time microphone noise suppression on Linux. 项目地址: https://gitcode.com/gh_mirrors/no/NoiseTorch 还在为远程会议中的键盘声、空调噪音烦恼吗࿱…...

CLIP ViT-H/14模型架构深度解析:从20亿数据到零样本视觉语言理解
CLIP ViT-H/14模型架构深度解析:从20亿数据到零样本视觉语言理解 【免费下载链接】CLIP-ViT-H-14-laion2B-s32B-b79K 项目地址: https://ai.gitcode.com/hf_mirrors/laion/CLIP-ViT-H-14-laion2B-s32B-b79K CLIP ViT-H/14-laion2B-s32B-b79K是一个基于Visio…...

NaViL-9B实战手册:从CSDN GPU平台开通到Web界面可用的5步流程
NaViL-9B实战手册:从CSDN GPU平台开通到Web界面可用的5步流程 1. 平台与模型介绍 NaViL-9B是上海人工智能实验室发布的一款原生多模态大语言模型,它同时支持纯文本问答和图片理解功能。这意味着你可以像和朋友聊天一样,用文字提问ÿ…...
)
MATLAB/Simulink实战:手把手教你搭建模糊PID直流电机控制模型(附完整代码)
MATLAB/Simulink实战:从零构建模糊PID直流电机控制系统 在工业自动化领域,直流电机控制一直是工程师们面临的经典挑战。传统PID控制器虽然结构简单,但在面对非线性、时变系统时往往力不从心。而模糊PID控制这种融合了智能算法与传统控制理论的…...

ChatGPT Conversation Not Found 问题分析与AI辅助开发解决方案
在集成ChatGPT这类大模型API构建应用时,我们常常会追求流畅、智能的多轮对话体验。然而,一个令人头疼的报错 Conversation Not Found 或类似提示,却可能让精心维护的对话上下文瞬间“失忆”,用户体验直线下降。今天,我…...

解锁音乐自由:MusicFreeDesktop插件系统完全指南
解锁音乐自由:MusicFreeDesktop插件系统完全指南 【免费下载链接】MusicFreeDesktop 插件化、定制化、无广告的免费音乐播放器 项目地址: https://gitcode.com/gh_mirrors/mu/MusicFreeDesktop MusicFreeDesktop作为一款插件化、定制化的免费音乐播放器&…...
)
GBase 8a数据库之「穿云箭」:图形化工具GDS解析(上)
一支穿云箭,千军万马来相见。在数据库管理的江湖里,南大通用GBase(gbase database)数据库的GBase Data Studio(简称:GDS)工具正是这样一支“穿云箭”——信号一出,数据响应,集群听令…...

别再乱用OpenCV的resize了!INTER_LINEAR和INTER_AREA到底怎么选?附实战对比图
OpenCV图像缩放算法深度解析:如何精准选择INTER_LINEAR与INTER_AREA 当我们需要在计算机视觉项目中处理不同分辨率的图像时,cv2.resize()函数几乎无处不在。但你是否真正理解不同插值算法背后的数学原理?是否曾在项目中发现,同样的…...
)
Ozone调试ELF文件时路径映射问题的终极解决方案(附STM32实例)
Ozone调试ELF文件时路径映射问题的终极解决方案(附STM32实例) 在嵌入式开发领域,跨平台调试一直是开发者面临的棘手问题。特别是当你在Linux环境下编译生成ELF文件,却需要在Windows平台使用Ozone进行调试时,路径映射问…...