Halcon 频域缺陷检测
文章目录
- 傅里叶变换频谱
- 矩形
- 圆
- 菱形
- 黑白相间的亮带
- 去除图纹(反傅里叶变换)
- 去除图纹滤波器处理
- Halcon 频域+空间域检测缺陷
- Halcon 频域+差分+空间域 缺陷检测(lines_gauss 提取线)
- Halcon 频域+差分+空间域(blob+特征)案例
- Halcon Blob+特征处理缺陷
- Halcon 频域+空间域检测划痕
- Halcon 傅里叶变换转换为功率图(频域+blob+差分)
- Halcon 训练学习缺陷检测(以神经网络mlp为例)
傅里叶变换频谱
傅里叶去除纹理
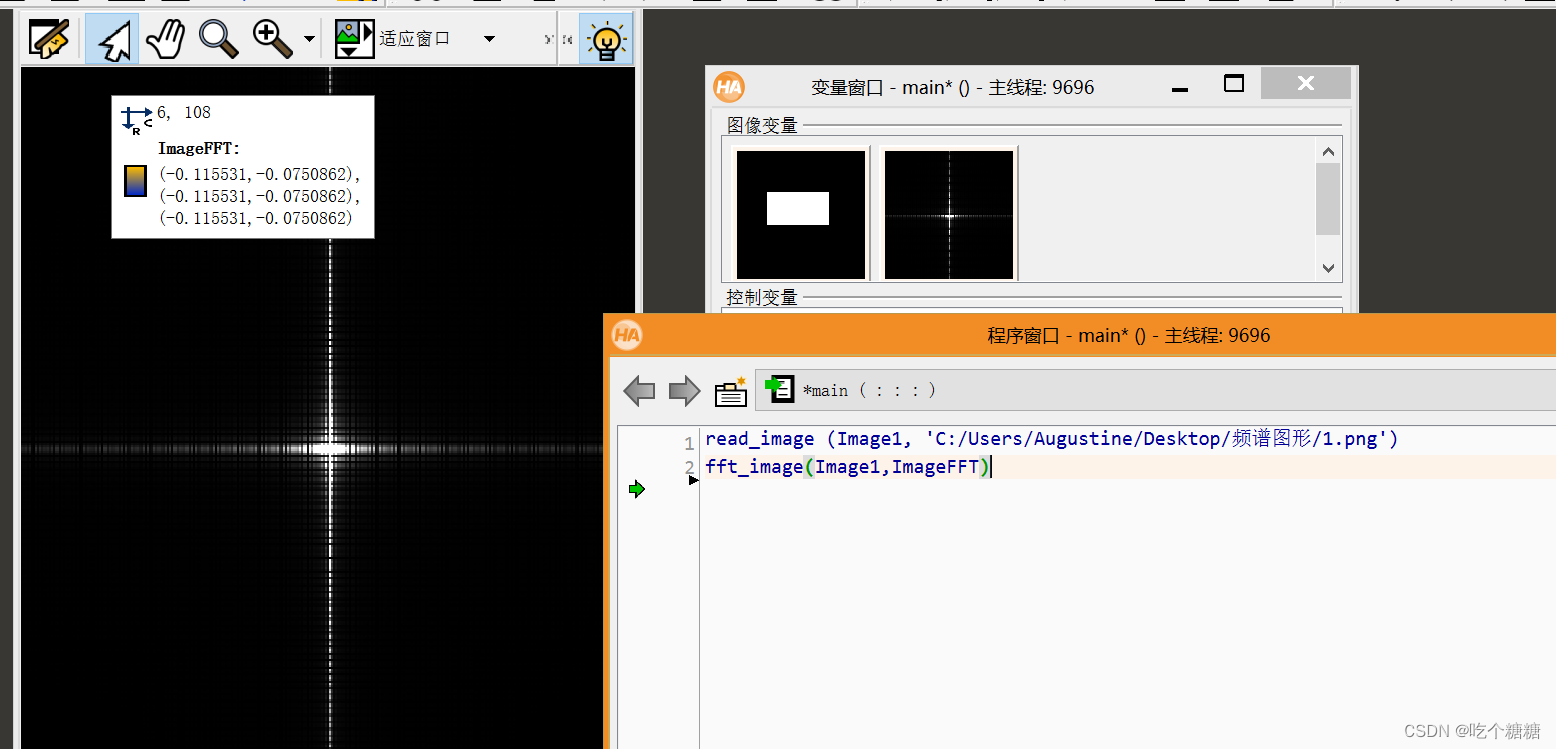
矩形
read_image (Image1, 'C:/Users/Augustine/Desktop/频谱图形/1.png')
fft_image(Image1,ImageFFT)
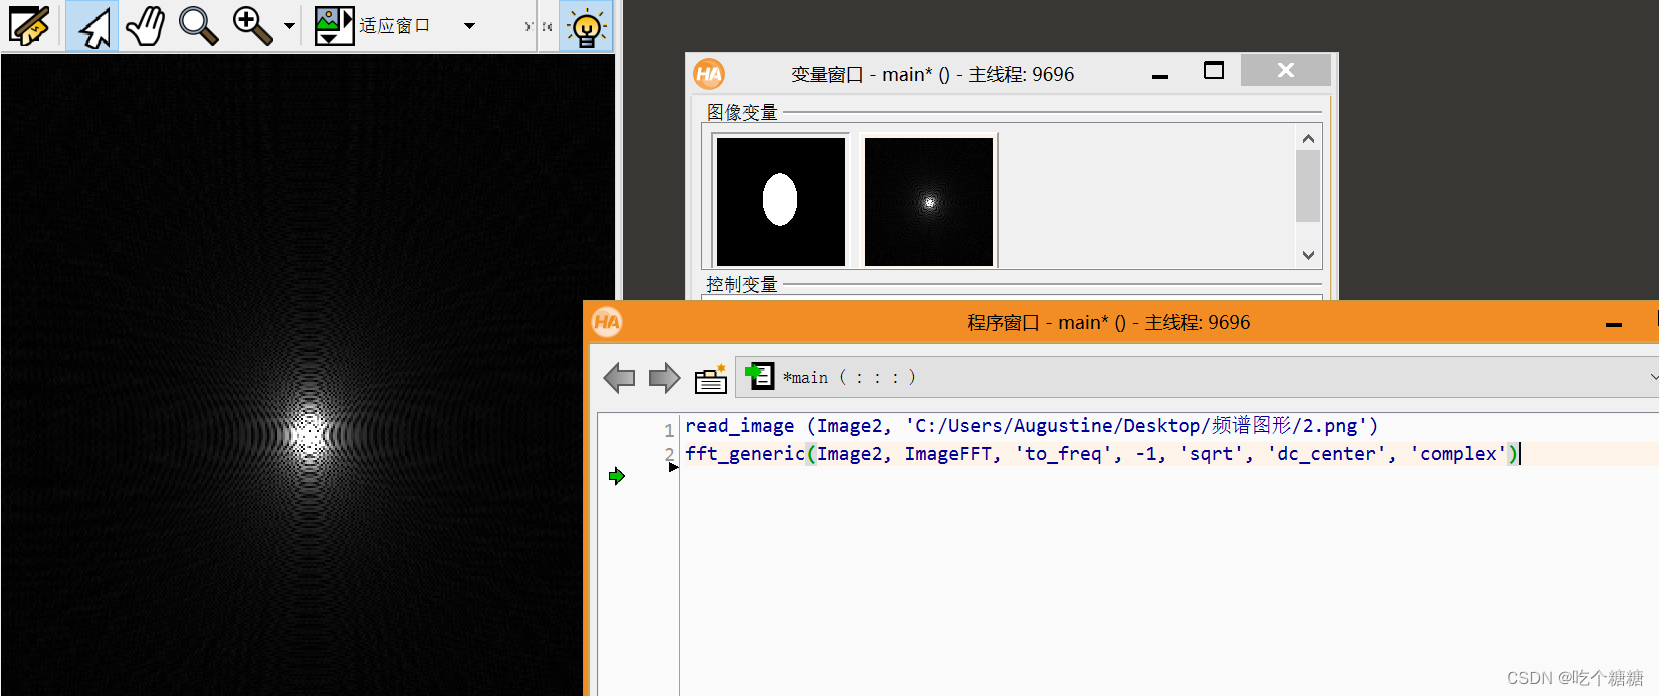
圆
read_image (Image2, 'C:/Users/Augustine/Desktop/频谱图形/2.png')
fft_generic(Image2, ImageFFT, 'to_freq', -1, 'sqrt', 'dc_center', 'complex')
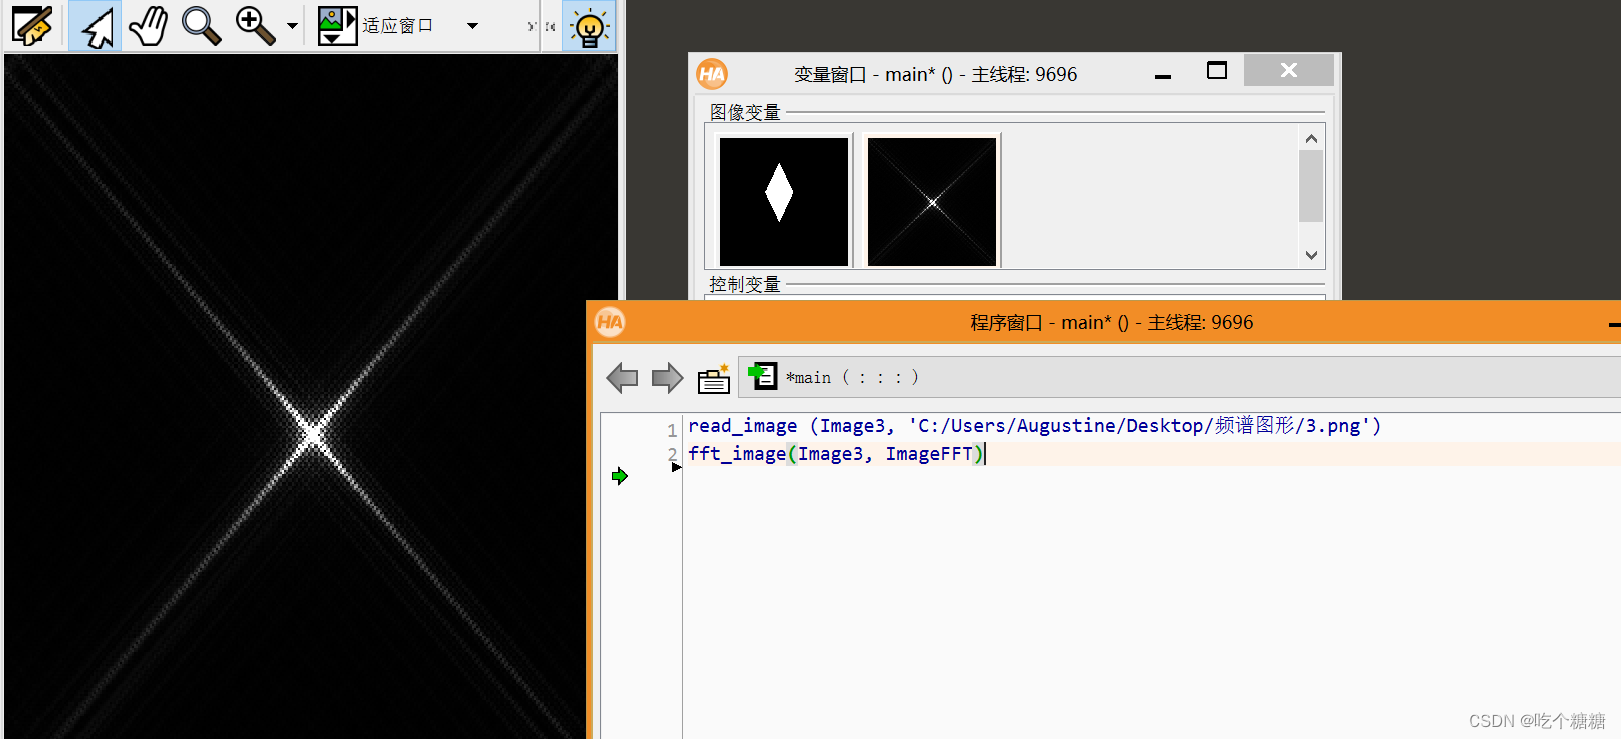
菱形
read_image (Image3, 'C:/Users/Augustine/Desktop/频谱图形/3.png')
fft_image(Image3, ImageFFT)
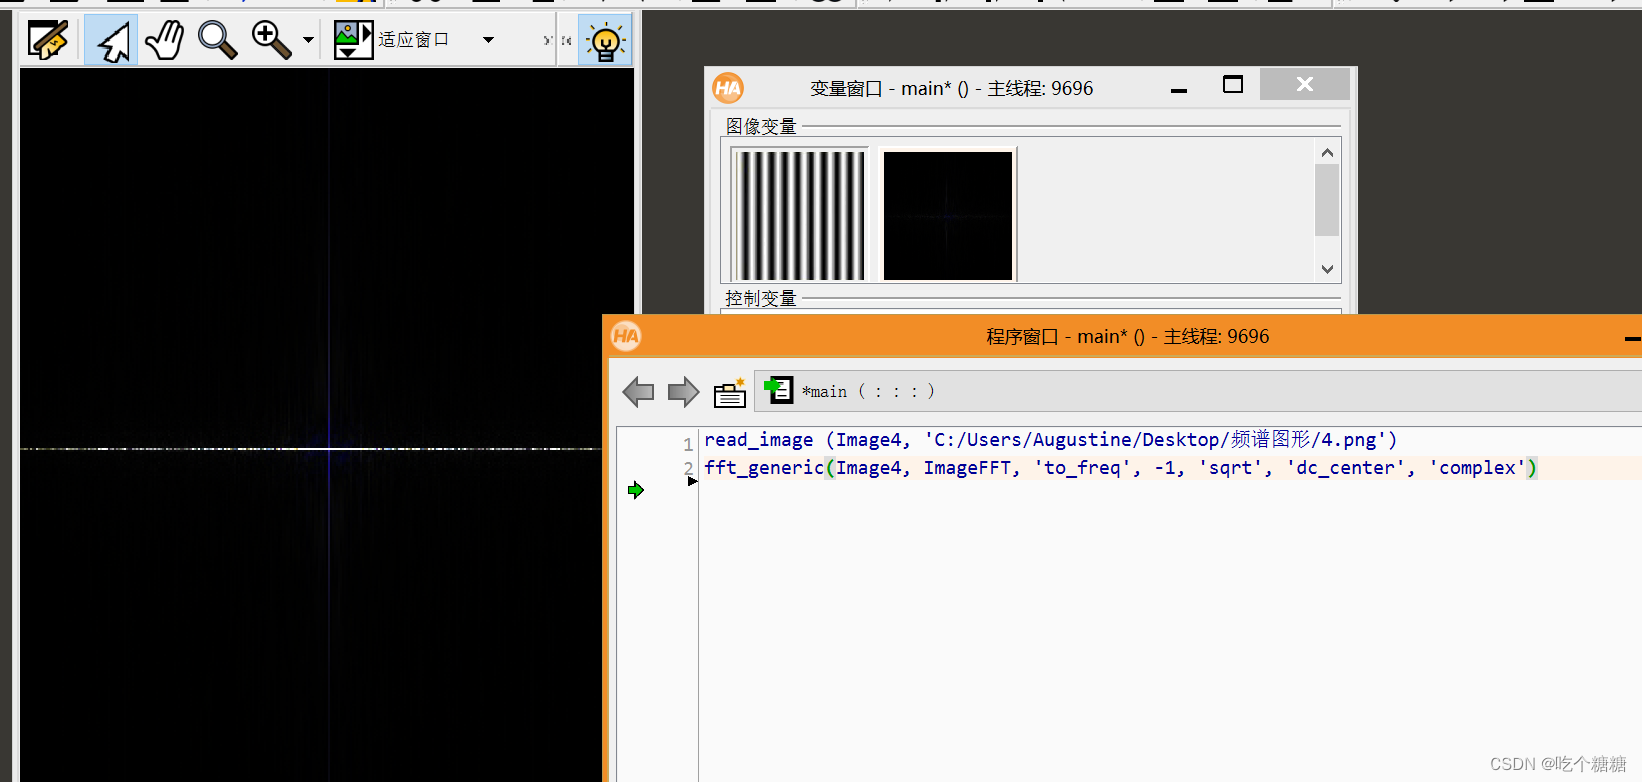
黑白相间的亮带
read_image (Image4, 'C:/Users/Augustine/Desktop/频谱图形/4.png')
fft_generic(Image4, ImageFFT, 'to_freq', -1, 'sqrt', 'dc_center', 'complex')
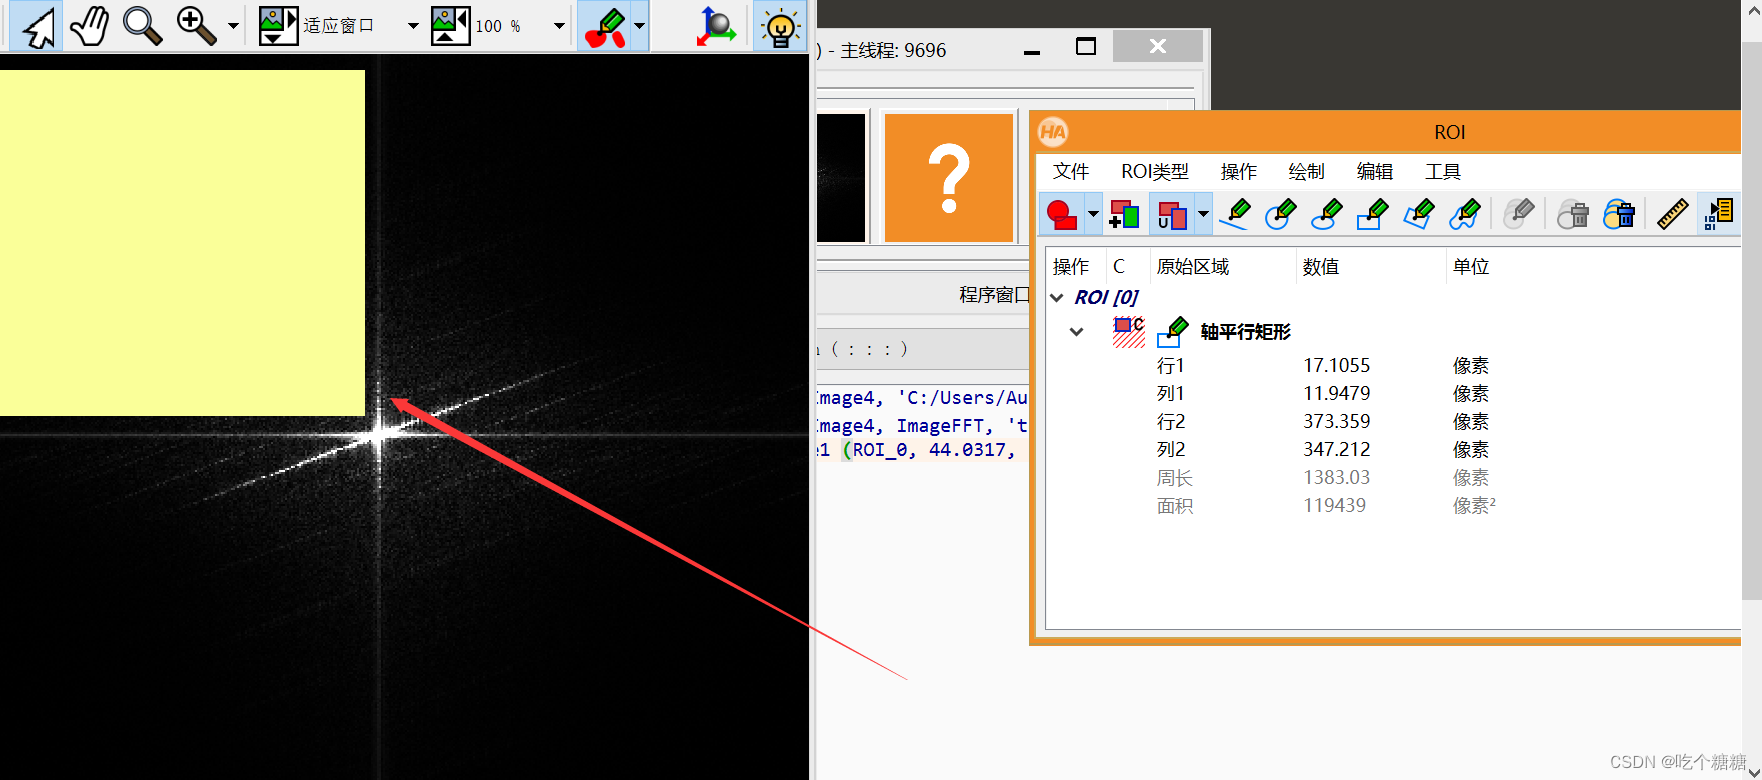
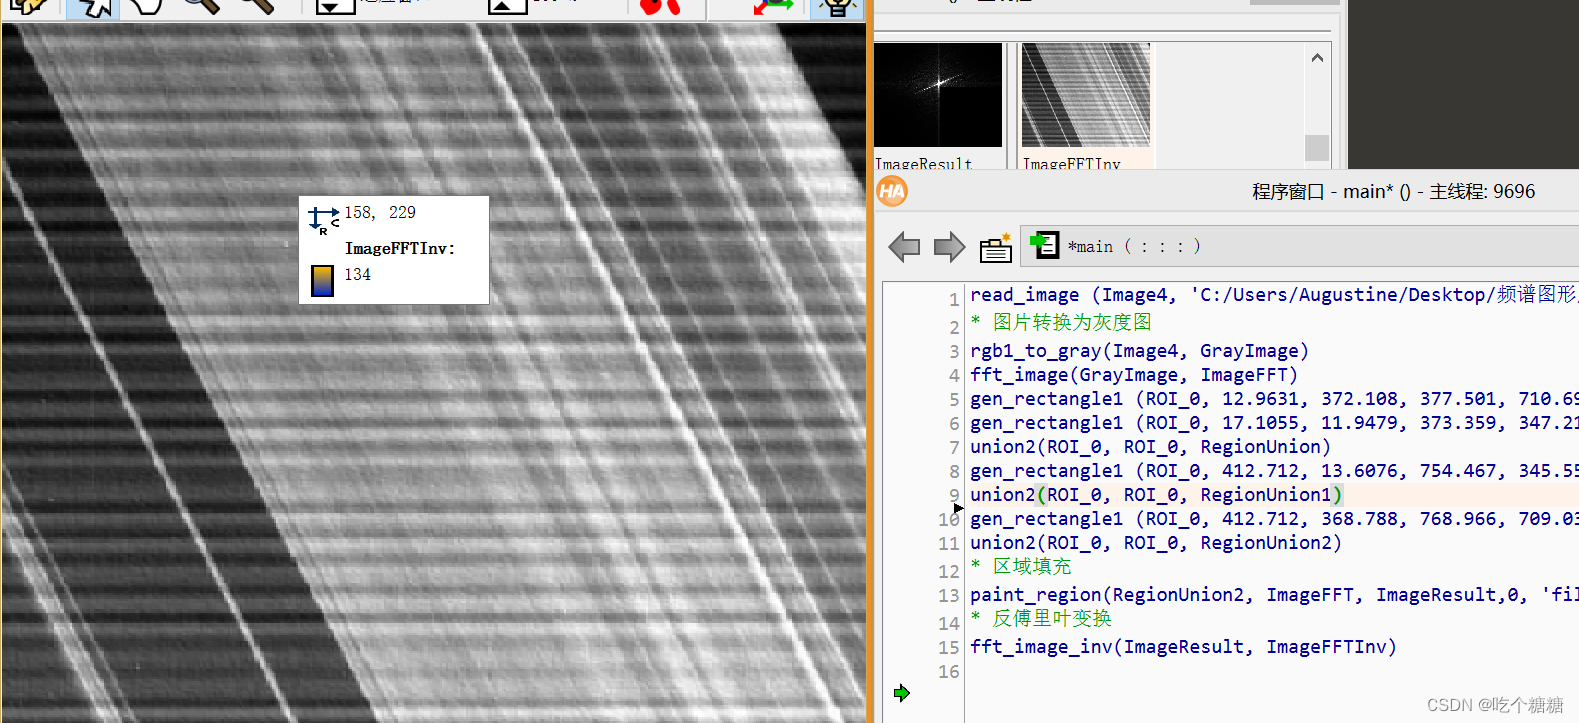
去除图纹(反傅里叶变换)
read_image (Image4, 'C:/Users/Augustine/Desktop/频谱图形/4.png')
* 图片转换为灰度图
rgb1_to_gray(Image4, GrayImage)
fft_image(GrayImage, ImageFFT)
gen_rectangle1 (ROI_0, 12.9631, 372.108, 377.501, 710.691)
gen_rectangle1 (ROI_0, 17.1055, 11.9479, 373.359, 347.212)
union2(ROI_0, ROI_0, RegionUnion)
gen_rectangle1 (ROI_0, 412.712, 13.6076, 754.467, 345.552)
union2(ROI_0, ROI_0, RegionUnion1)
gen_rectangle1 (ROI_0, 412.712, 368.788, 768.966, 709.031)
union2(ROI_0, ROI_0, RegionUnion2)
* 区域填充
paint_region(RegionUnion2, ImageFFT, ImageResult,0, 'fill')
* 反傅里叶变换
fft_image_inv(ImageResult, ImageFFTInv)
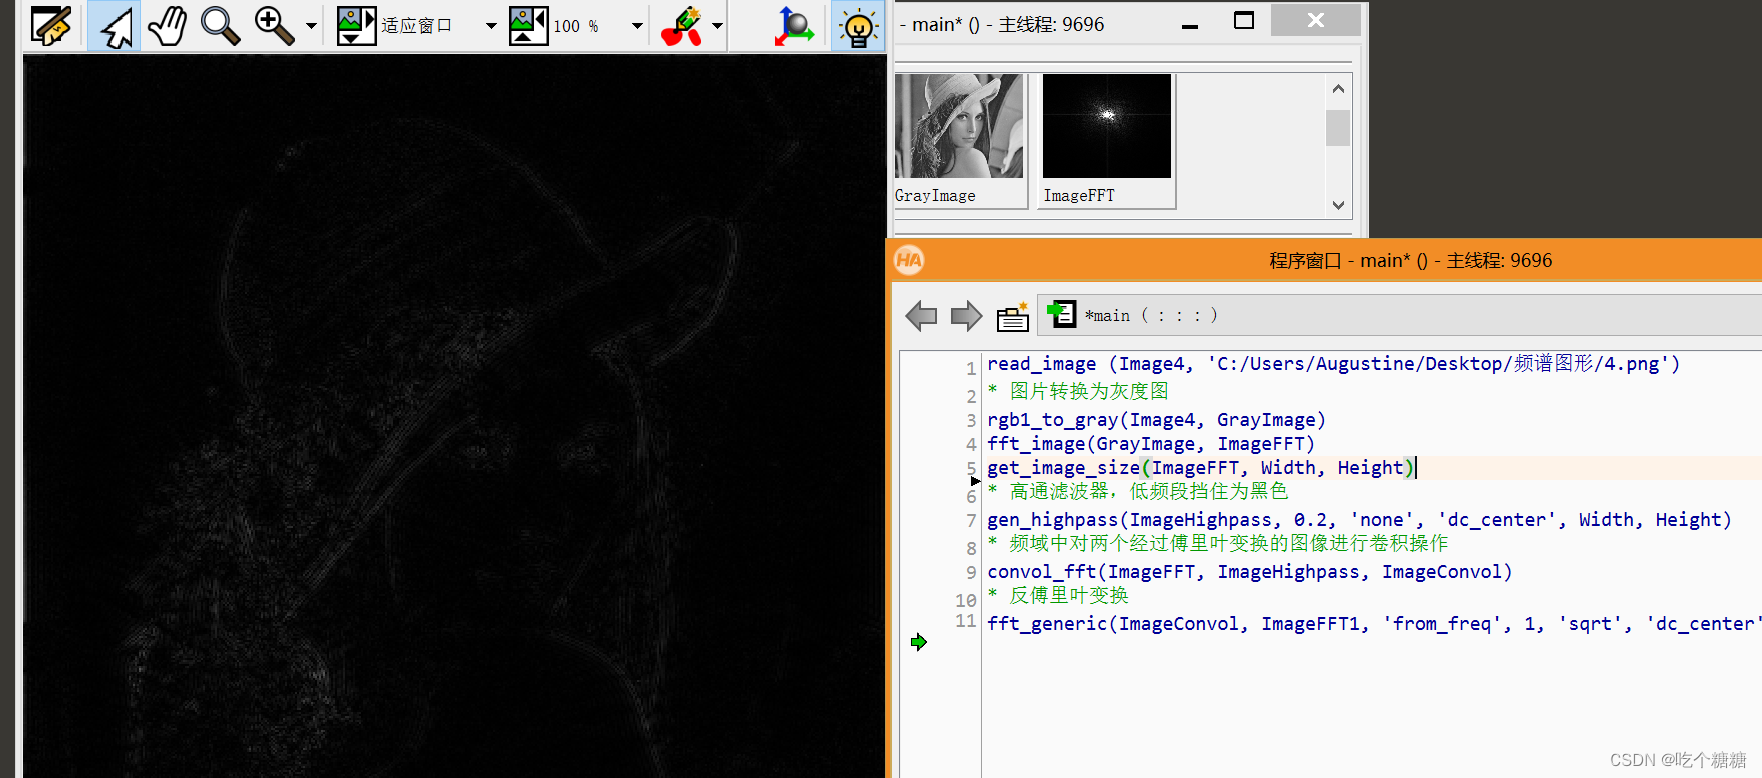
去除图纹滤波器处理
低通滤波器、高通滤波器和中通滤波器都是数字图像处理中常用的滤波器,它们的作用是将输入图像信号进行滤波处理,以达到去除噪声、增强图像特征等目的。低通滤波器(Low-Pass Filter):低通滤波器可以去除图像中高频部分的信息,保留低频部分的信息。在频域上看,低通滤波器会将图像高频成分的能量减弱,从而产生模糊的效果。低通滤波器一般用于平滑图像、去除噪声等应用场景。高通滤波器(High-Pass Filter):高通滤波器可以去除图像中低频部分的信息,保留高频部分的信息。在频域上看,高通滤波器会将图像低频成分的能量减弱,从而使高频细节更加突出。高通滤波器一般用于图像增强、边缘检测等应用场景。中通滤波器(Band-Pass Filter):中通滤波器可以去除图像中低频和高频部分的信息,保留中频部分的信息。中通滤波器一般用于分离出图像中特定频率范围内的信息,例如检测特定大小的物体。
read_image (Image4, 'C:/Users/Augustine/Desktop/频谱图形/4.png')
* 图片转换为灰度图
rgb1_to_gray(Image4, GrayImage)
*fft_image(GrayImage, ImageFFT)
fft_generic(ImageConvol, ImageFFT1, 'to_freq', -1, 'sqrt', 'dc_center', 'complex'))
get_image_size(ImageFFT, Width, Height)
* 高通滤波器,低频段挡住为黑色
gen_highpass(ImageHighpass, 0.2, 'none', 'dc_center', Width, Height)
* 频域中对两个经过傅里叶变换的图像进行卷积操作
convol_fft(ImageFFT, ImageHighpass, ImageConvol)
* 反傅里叶变换  第三 参数改成'from_freq',1和-1要反着来
fft_generic(ImageConvol, ImageFFT1, 'from_freq', 1, 'sqrt', 'dc_center', 'complex'))
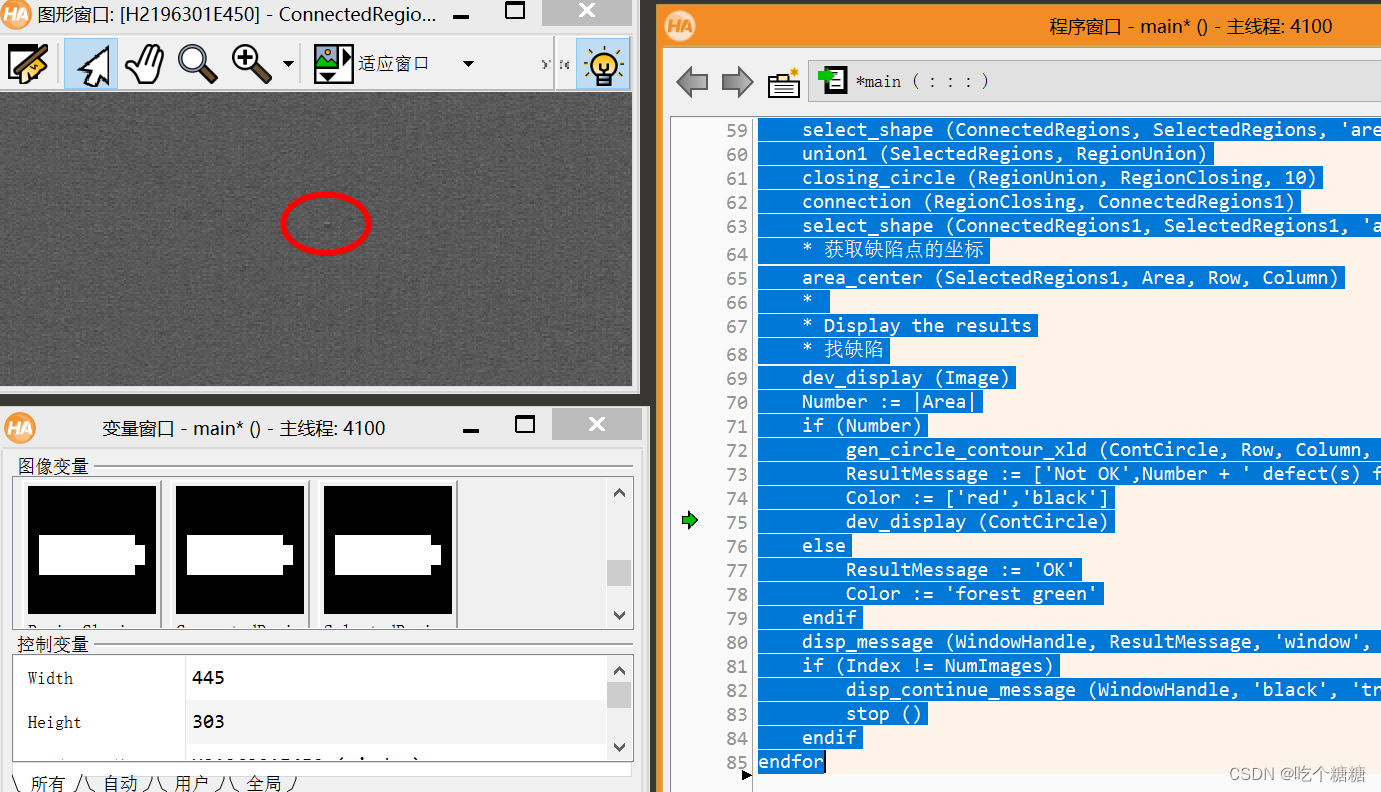
Halcon 频域+空间域检测缺陷
高斯滤波主要用于祛除图像中的高频成分(低通滤波器),也就是去除图像中的细节和噪声。通过在图像上应用高斯核进行卷积操作,高频部分会被削弱,从而使图像变得更加平滑。
由于高斯核的特性,其在中心位置具有最大值,并且随着离中心的距离逐渐减小。这意味着高斯滤波会更强调图像中的低频信息,即图像中相对较平均和较大尺度的变化。而高频信息,例如细节和噪声,由于高斯核的衰减作用,会在滤波过程中被抑制或消除。
因此,高斯滤波的主要效果是减少图像中的高频成分,实现图像的平滑和模糊化。这种平滑可以有效地去除图像中的噪声,并在某些情况下有助于提高图像处理的结果。
* This program demonstrates how to detect small texture
* defects on the surface of plastic items by using the fast
* fourier transform (FFT).
* First, we construct a suitable filter using Gaussian
* filters. Then, the images and the filter are convolved
* by using fast fourier transforms. Finally, the defects
* are detected in the filtered images by using
* morphology operators.
*
* Initializations
* 1.采集图像
dev_update_off ()
dev_close_window ()
read_image (Image, 'plastics/plastics_01')
get_image_size (Image, Width, Height)
dev_open_window (0, 0, Width, Height, 'black', WindowHandle)
set_display_font (WindowHandle, 14, 'mono', 'true', 'false')
dev_set_draw ('margin')
dev_set_line_width (3)
dev_set_color ('red')
* 针对图像大小进行优化
* Optimize the fft speed for the specific image size
optimize_rft_speed (Width, Height, 'standard')
*
* Construct a suitable filter by combining two gaussian
* filters
* 产生两个滤波器
Sigma1 := 10.0
Sigma2 := 3.0
* 2.产生滤波器(产生高斯滤波)
gen_gauss_filter (GaussFilter1, Sigma1, Sigma1, 0.0, 'none', 'rft', Width, Height)
gen_gauss_filter (GaussFilter2, Sigma2, Sigma2, 0.0, 'none', 'rft', Width, Height)
* 滤波器进行差分,形成一个新的滤波器
sub_image (GaussFilter1, GaussFilter2, Filter, 1, 0)
*
* Process the images iteratively
NumImages := 11
for Index := 1 to NumImages by 1* * Read an image and convert it to gray valuesread_image (Image, 'plastics/plastics_' + Index$'02')rgb1_to_gray (Image, Image)* 3.傅里叶变换(频域变换)* Perform the convolution in the frequency domain* 空间域转换为频域rft_generic (Image, ImageFFT, 'to_freq', 'none', 'complex', Width)* 频域中对两个经过傅里叶变换的图像进行卷积操作convol_fft (ImageFFT, Filter, ImageConvol)* 将频域转换为空间域rft_generic (ImageConvol, ImageFiltered, 'from_freq', 'n', 'real', Width)* * Process the filtered image* 4.空间域blob 分析* 灰度范围变化(把图像亮的地方更亮,暗的地方更暗)gray_range_rect (ImageFiltered, ImageResult, 10, 10)min_max_gray (ImageResult, ImageResult, 0, Min, Max, Range)threshold (ImageResult, RegionDynThresh, max([5.55,Max * 0.8]), 255)connection (RegionDynThresh, ConnectedRegions)select_shape (ConnectedRegions, SelectedRegions, 'area', 'and', 4, 99999)union1 (SelectedRegions, RegionUnion)closing_circle (RegionUnion, RegionClosing, 10)connection (RegionClosing, ConnectedRegions1)select_shape (ConnectedRegions1, SelectedRegions1, 'area', 'and', 10, 99999)* 获取缺陷点的坐标area_center (SelectedRegions1, Area, Row, Column)* * Display the results* 找缺陷dev_display (Image)Number := |Area|if (Number)gen_circle_contour_xld (ContCircle, Row, Column, gen_tuple_const(Number,30), gen_tuple_const(Number,0), gen_tuple_const(Number,rad(360)), 'positive', 1)ResultMessage := ['Not OK',Number + ' defect(s) found']Color := ['red','black']dev_display (ContCircle)elseResultMessage := 'OK'Color := 'forest green'endifdisp_message (WindowHandle, ResultMessage, 'window', 12, 12, Color, 'true')if (Index != NumImages)disp_continue_message (WindowHandle, 'black', 'true')stop ()endif
endfor
Halcon 频域+差分+空间域 缺陷检测(lines_gauss 提取线)
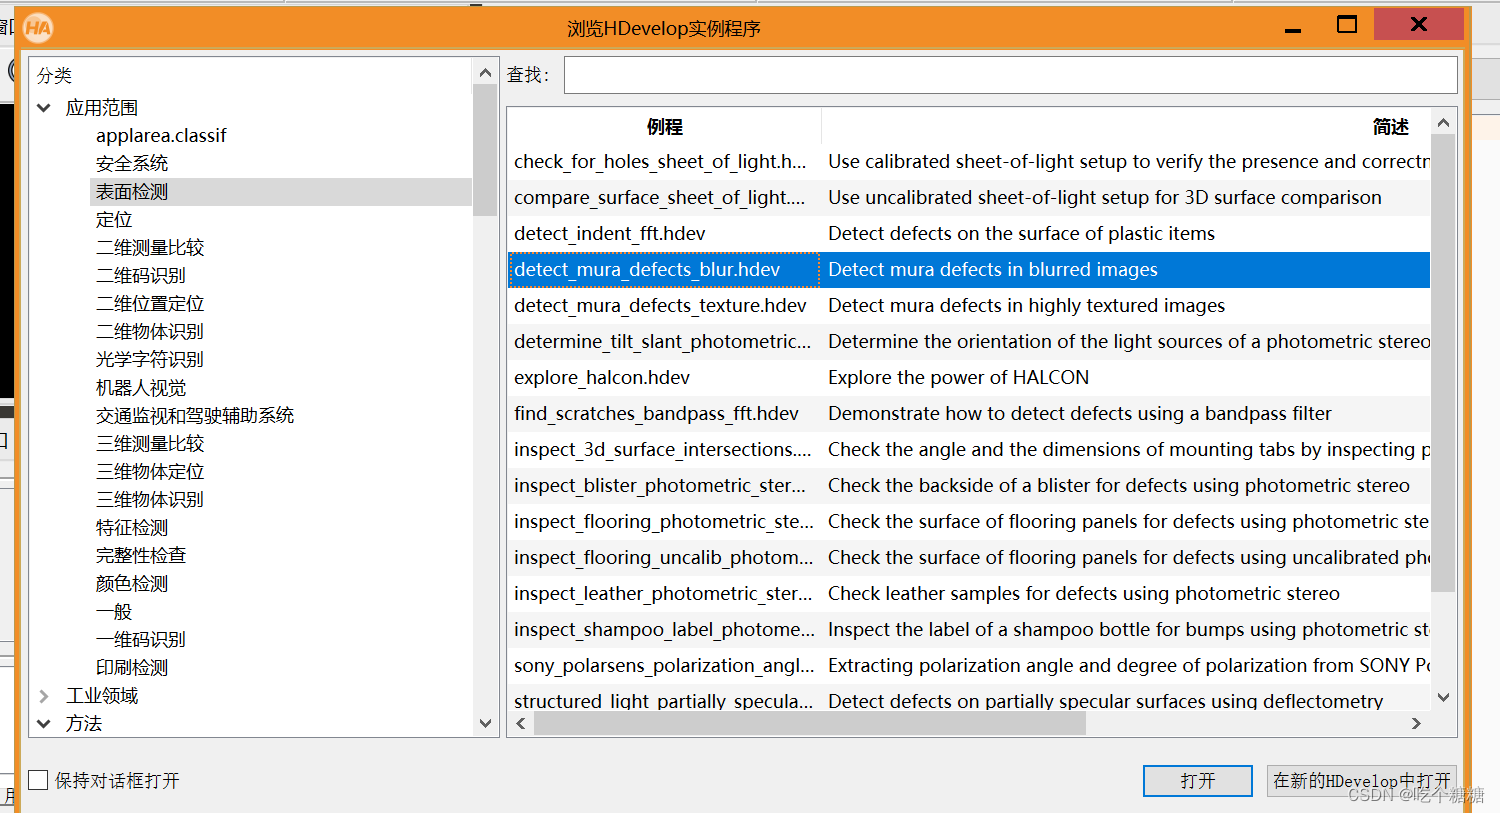
* this example shows how to detect mura defects
* in blurred images
*
dev_close_window ()
dev_update_off ()
Path := 'lcd/mura_defects_blur_'
read_image (Image, Path + '01')
get_image_size (Image, Width, Height)
dev_open_window_fit_size (0, 0, Width, Height, 640, 480, WindowHandle)
set_display_font (WindowHandle, 14, 'mono', 'true', 'false')
dev_set_draw ('margin')
dev_set_line_width (3)
dev_set_color ('red')
* 设置缩放因子
ScaleFactor := 0.4
* 计算高斯线性参数
calculate_lines_gauss_parameters (17, [25,3], Sigma, Low, High)
for f := 1 to 3 by 1read_image (Image, Path + f$'.2i')* 获取rgb 通道decompose3 (Image, R, G, B)* correct side illumination* 频域处理fft_generic(B, ImageFFT, 'to_freq', -1, 'none', 'dc_center', 'complex')*rft_generic (B, ImageFFT, 'to_freq', 'none', 'complex', Width)* 产生高斯过滤*gen_gauss_filter (ImageGauss, 100, 100, 0, 'n', 'rft', Width, Height)gen_gauss_filter(ImageGauss, 100, 100, 0, 'n', 'dc_center', Width, Height)* 频域中对两个经过傅里叶变换的图像进行卷积操作convol_fft (ImageFFT, ImageGauss, ImageConvol)*从频域转换为空间域fft_generic(ImageConvol, ImageFFT1, 'from_freq', -1, 'none', 'dc_center', 'byte')*rft_generic (ImageConvol, ImageFFT1, 'from_freq', 'none', 'byte', Width)* 图片相减 mageSub=(B-ImageFFT1)*2+100sub_image (B, ImageFFT1, ImageSub, 2, 100)* perform the actual inspection* 按照比例因子缩放zoom_image_factor (ImageSub, ImageZoomed, ScaleFactor, ScaleFactor, 'constant')* avoid border effects when using lines_gauss()* 由图像转换为区域,获取区域get_domain (ImageZoomed, Domain)* 腐蚀运算erosion_rectangle1 (Domain, RegionErosion, 7, 7)* 裁剪区域reduce_domain (ImageZoomed, RegionErosion, ImageReduced)* 空间域检测线条lines_gauss (ImageReduced, Lines, Sigma, Low, High, 'dark', 'true', 'gaussian', 'true')* 仿射变换hom_mat2d_identity (HomMat2DIdentity)hom_mat2d_scale_local (HomMat2DIdentity, 1 / ScaleFactor, 1 / ScaleFactor, HomMat2DScale)affine_trans_contour_xld (Lines, Defects, HomMat2DScale)* 显示dev_display (Image)dev_display (Defects)if (f < 3)disp_continue_message (WindowHandle, 'black', 'true')stop ()endif
endfor

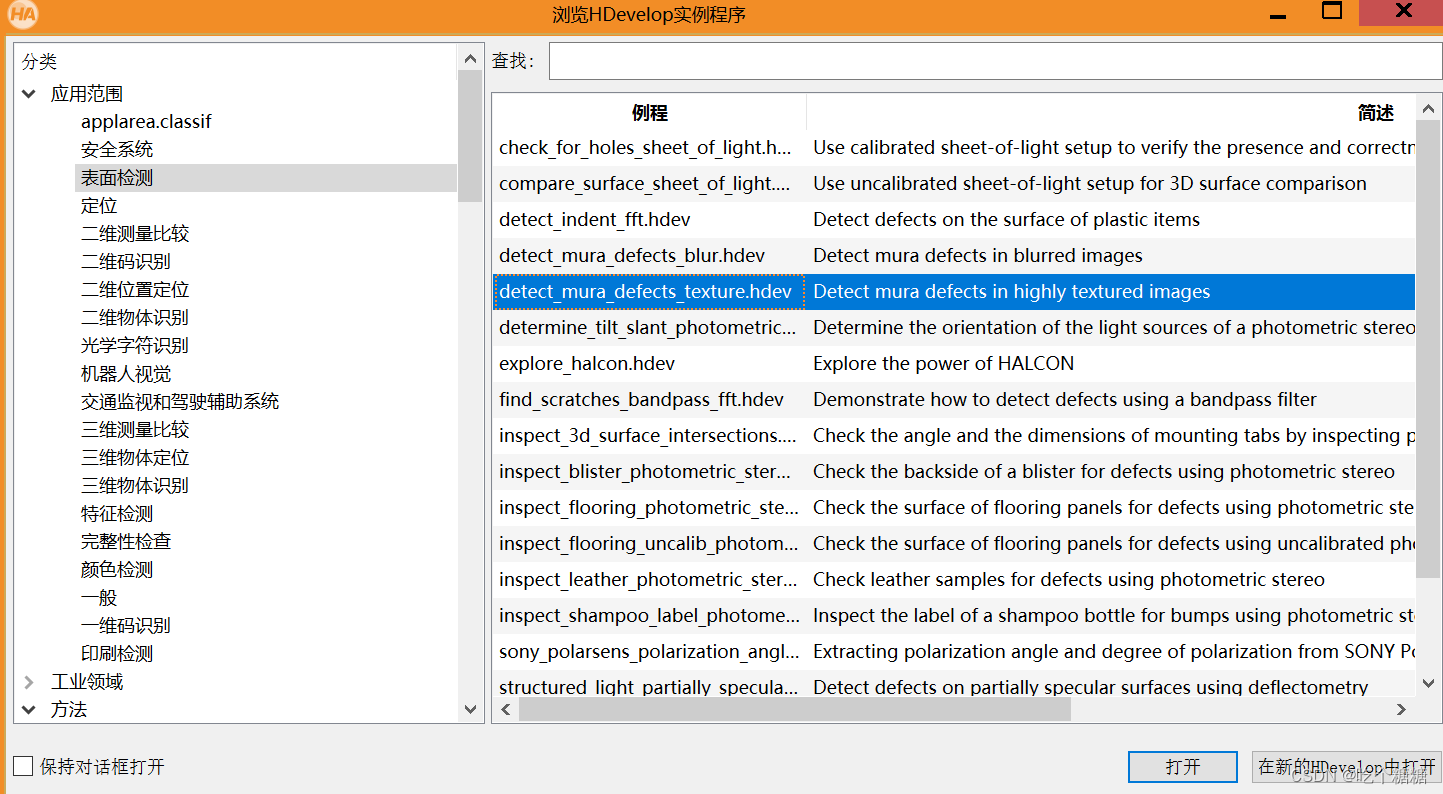
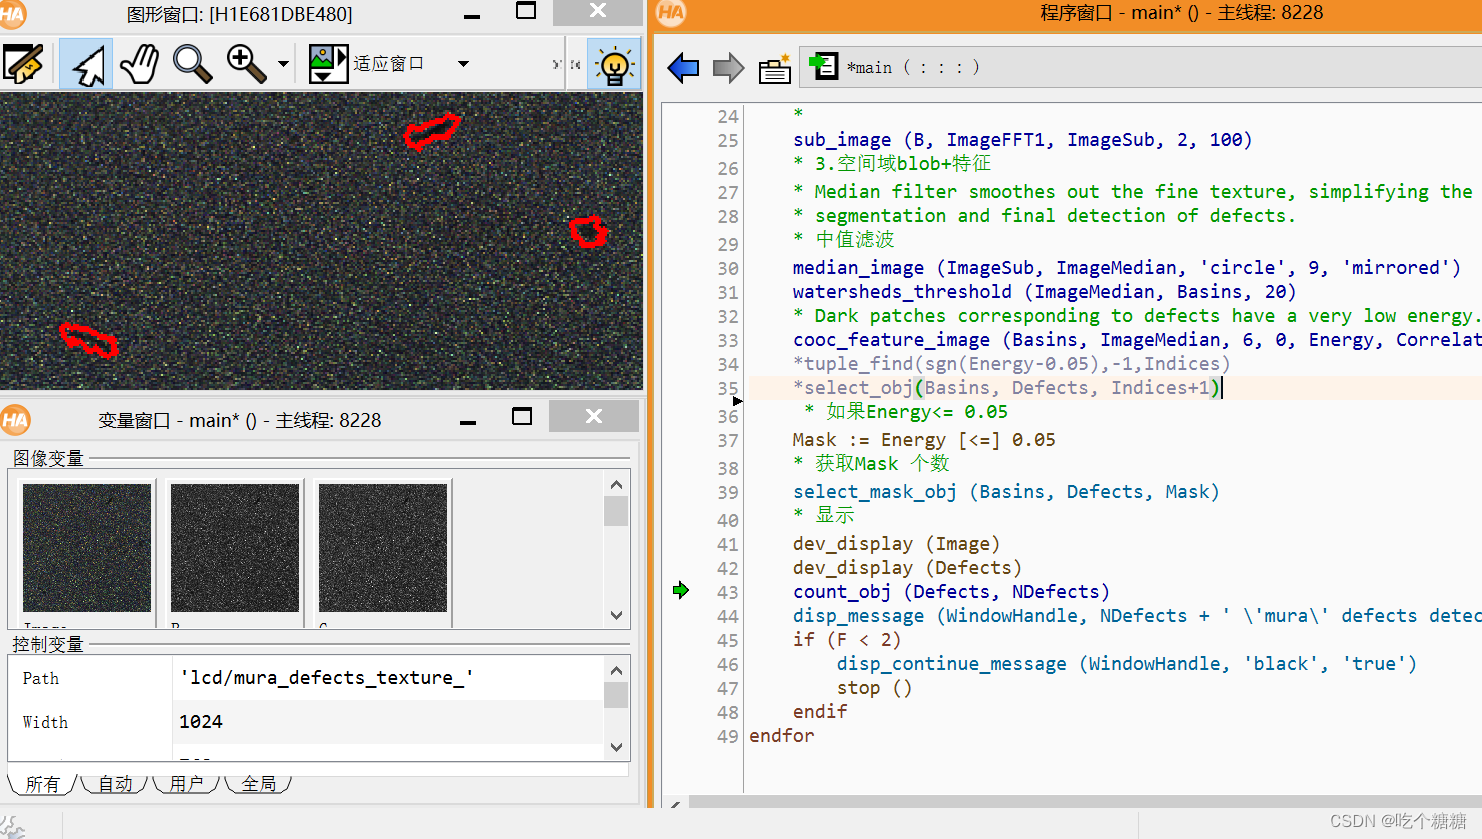
Halcon 频域+差分+空间域(blob+特征)案例
estimate_background_illumination (B, ImageFFT1)
get_image_size (Image, Width, Height)
* 空间域转换为频域
fft_generic(Image, ImageFFT, 'to_freq', -1, 'none', 'dc_center', 'complex')
*rft_generic (Image, ImageFFT, 'to_freq', 'none', 'complex', Width)
* 产生高斯滤波
*gen_gauss_filter (ImageGauss, 50, 50, 0, 'n', 'rft', Width, Height)
gen_gauss_filter(ImageGauss, 50, 50, 0, 'n', 'dc_center', Width, Height)
* 卷积
convol_fft (ImageFFT, ImageGauss, ImageConvol)
* 频域转换为空间域
fft_generic(ImageConvol, IlluminationImage, 'from_freq', 1, 'sqrt', 'dc_center', 'byte')
*rft_generic (ImageConvol, IlluminationImage, 'from_freq', 'none', 'byte', Width)
return ()
* This example shows how to detect mura defects
* in highly textured images
*
* 图片预处理
dev_close_window ()
dev_update_off ()
Path := 'lcd/mura_defects_texture_'
read_image (Image, Path + '01')
get_image_size (Image, Width, Height)
dev_open_window (0, 0, 640, 480, 'black', WindowHandle)
set_display_font (WindowHandle, 14, 'mono', 'true', 'false')
dev_set_draw ('margin')
dev_set_line_width (3)
dev_set_color ('red')
for F := 1 to 2 by 1*1.采集图像read_image (Image, Path + F$'.2i')decompose3 (Image, R, G, B)* Defects are characterized by dark patches. Hence, by substracting the* estimated background illumination from the original image the* defects become more apparent.* 2.频域处理+差分estimate_background_illumination (B, ImageFFT1)* sub_image (B, ImageFFT1, ImageSub, 2, 100)* 3.空间域blob+特征* Median filter smoothes out the fine texture, simplifying the following* segmentation and final detection of defects.* 中值滤波median_image (ImageSub, ImageMedian, 'circle', 9, 'mirrored')watersheds_threshold (ImageMedian, Basins, 20)* Dark patches corresponding to defects have a very low energy.cooc_feature_image (Basins, ImageMedian, 6, 0, Energy, Correlation, Homogeneity, Contrast)*tuple_find(sgn(Energy-0.05),-1,Indices)*select_obj(Basins, Defects, Indices+1)* 如果Energy<= 0.05Mask := Energy [<=] 0.05* 获取Mask 个数select_mask_obj (Basins, Defects, Mask)* 显示dev_display (Image)dev_display (Defects)count_obj (Defects, NDefects)disp_message (WindowHandle, NDefects + ' \'mura\' defects detected', 'window', 12, 12, 'red', 'true')if (F < 2)disp_continue_message (WindowHandle, 'black', 'true')stop ()endif
endfor
Halcon Blob+特征处理缺陷
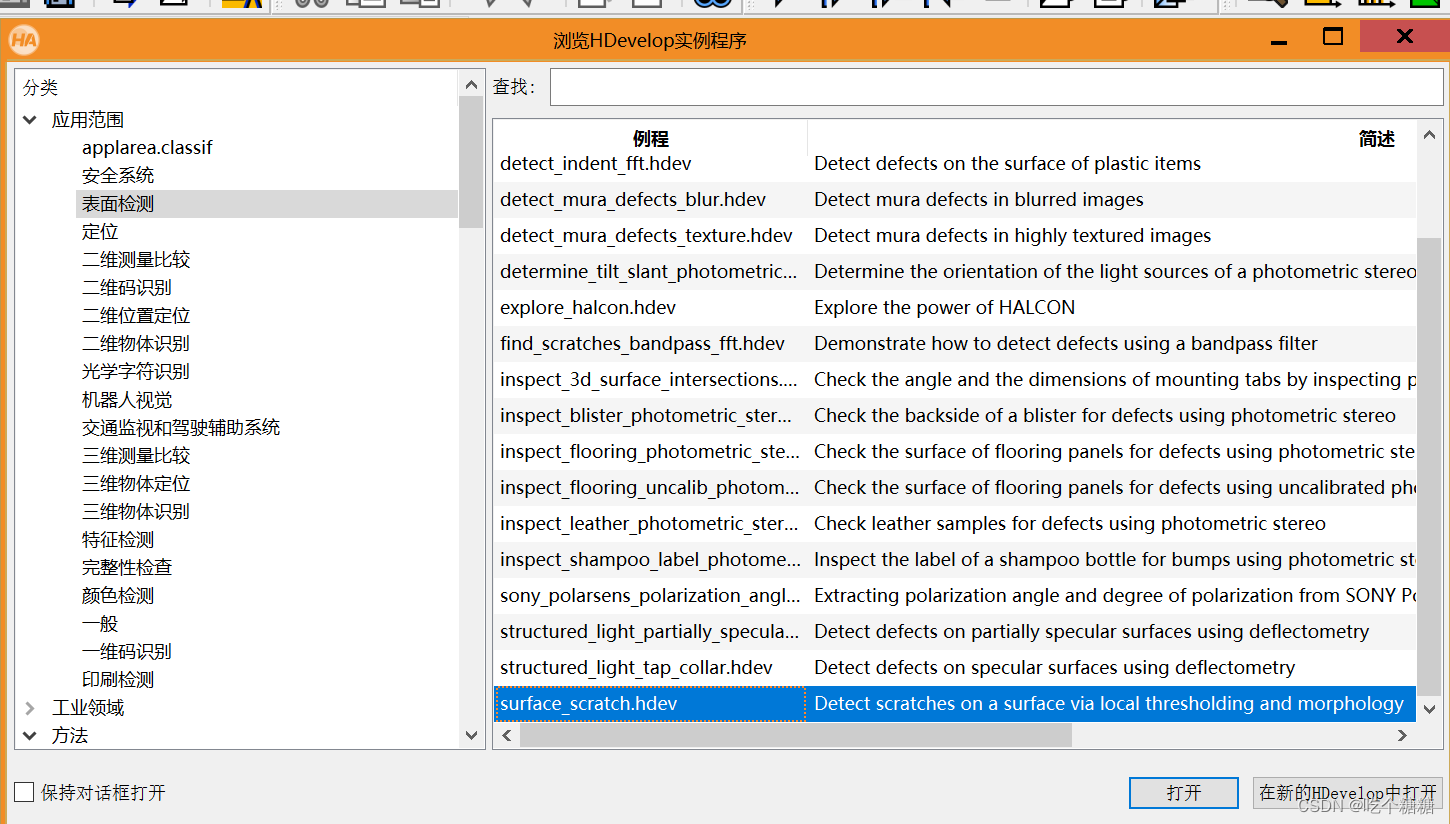
* This programm shows the extraction of surface scratches via
* local thresholding and morphological post-processing
*
dev_update_off ()
dev_close_window ()
*
* Step 1: Acquire image
* 1.采集图片
read_image (Image, 'surface_scratch')
get_image_size (Image, Width, Height)
dev_open_window_fit_image (Image, 0, 0, Width, Width, WindowID)
set_display_font (WindowID, 16, 'mono', 'true', 'false')
dev_set_draw ('margin')
dev_set_line_width (4)
dev_display (Image)
Message := 'This program shows the extraction of'
Message[1] := 'surface scratches via local thresholding'
Message[2] := 'and morphological post-processing'
disp_message (WindowID, Message, 'window', 12, 12, 'black', 'true')
disp_continue_message (WindowID, 'black', 'true')
stop ()
*
* Step 2: Segment image
* 2.图像分割
* Using a local threshold
* 均值滤波
mean_image (Image, ImageMean, 7, 7)
* 动态二值化
dyn_threshold (Image, ImageMean, DarkPixels, 5, 'dark')
*
* Extract connected components
* 形成单独的连通域
connection (DarkPixels, ConnectedRegions)
dev_set_colored (12)
dev_display (Image)
dev_display (ConnectedRegions)
Message := 'Connected components after image segmentation'
Message[1] := 'using a local threshold.'
disp_message (WindowID, Message, 'window', 12, 12, 'black', 'true')
disp_continue_message (WindowID, 'black', 'true')
stop ()
*
* Step 3: Process regions
*
* Select large regions
* 筛选面积大小
select_shape (ConnectedRegions, SelectedRegions, 'area', 'and', 10, 1000)
dev_display (Image)
dev_display (SelectedRegions)
disp_message (WindowID, 'Large Regions', 'window', 12, 12, 'black', 'true')
disp_continue_message (WindowID, 'black', 'true')
stop ()
*
* Visualize fractioned scratch
* 在新的窗口打开
open_zoom_window (0, round(Width / 2), 2, 303, 137, 496, 3, WindowHandleZoom)
dev_set_color ('blue')
dev_display (Image)
dev_display (SelectedRegions)
set_display_font (WindowHandleZoom, 16, 'mono', 'true', 'false')
disp_message (WindowHandleZoom, 'Fractioned scratches', 'window', 12, 12, 'black', 'true')
disp_continue_message (WindowHandleZoom, 'black', 'true')
stop ()
*
* Merge fractioned scratches via morphology
* 联合
union1 (SelectedRegions, RegionUnion)
* 膨胀
dilation_circle (RegionUnion, RegionDilation, 3.5)
dev_display (Image)
dev_display (RegionDilation)
Message := 'Region of the scratches after dilation'
disp_message (WindowHandleZoom, Message, 'window', 12, 12, 'black', 'true')
disp_continue_message (WindowHandleZoom, 'black', 'true')
stop ()
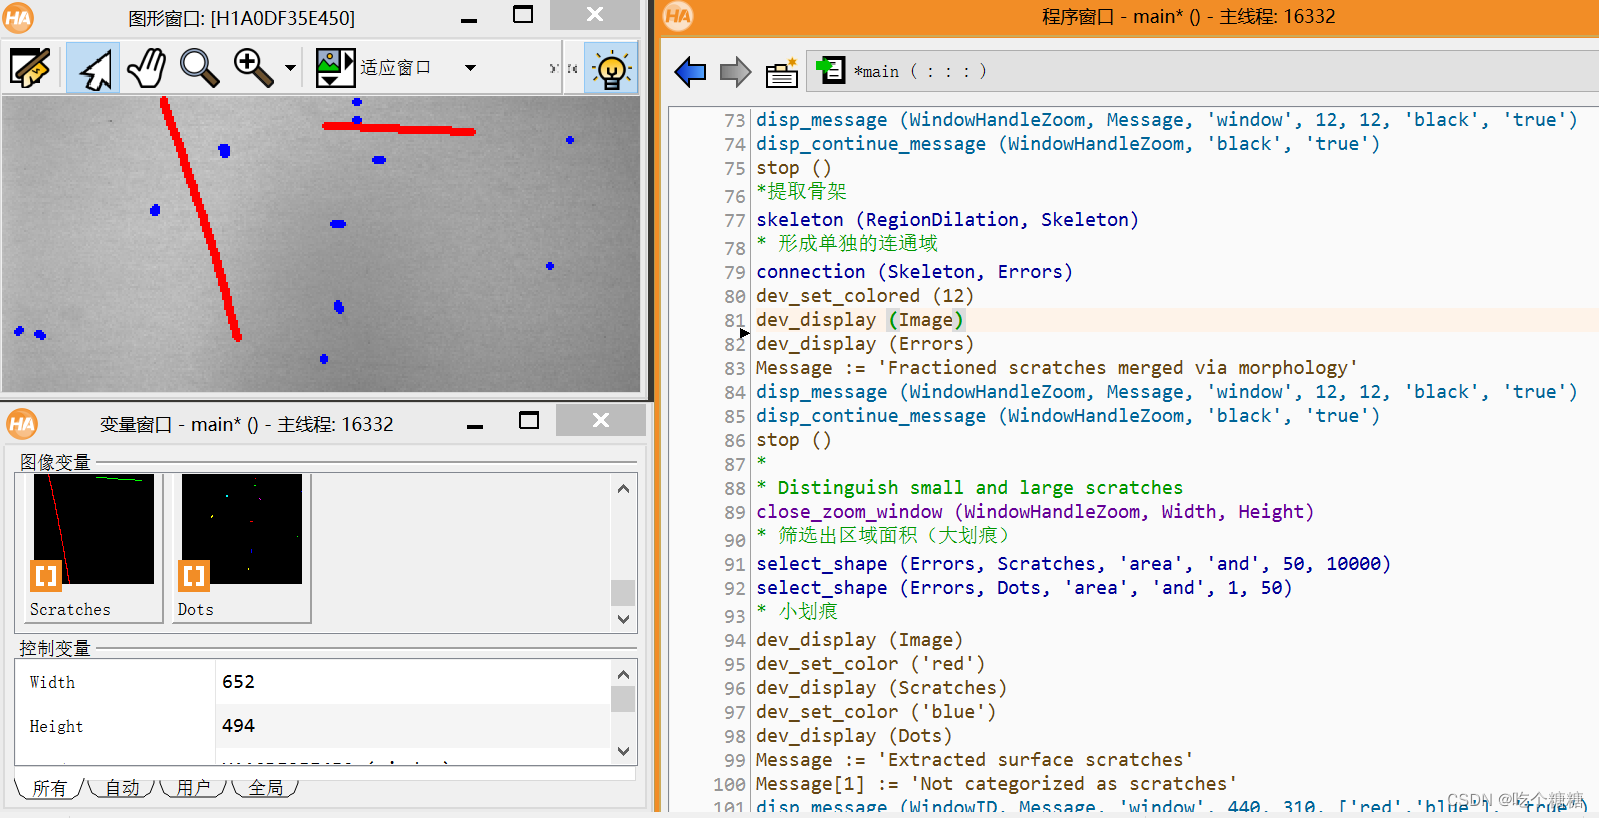
*提取骨架
skeleton (RegionDilation, Skeleton)
* 形成单独的连通域
connection (Skeleton, Errors)
dev_set_colored (12)
dev_display (Image)
dev_display (Errors)
Message := 'Fractioned scratches merged via morphology'
disp_message (WindowHandleZoom, Message, 'window', 12, 12, 'black', 'true')
disp_continue_message (WindowHandleZoom, 'black', 'true')
stop ()
*
* Distinguish small and large scratches
close_zoom_window (WindowHandleZoom, Width, Height)
* 筛选出区域面积(大划痕)
select_shape (Errors, Scratches, 'area', 'and', 50, 10000)
select_shape (Errors, Dots, 'area', 'and', 1, 50)
* 小划痕
dev_display (Image)
dev_set_color ('red')
dev_display (Scratches)
dev_set_color ('blue')
dev_display (Dots)
Message := 'Extracted surface scratches'
Message[1] := 'Not categorized as scratches'
disp_message (WindowID, Message, 'window', 440, 310, ['red','blue'], 'true')
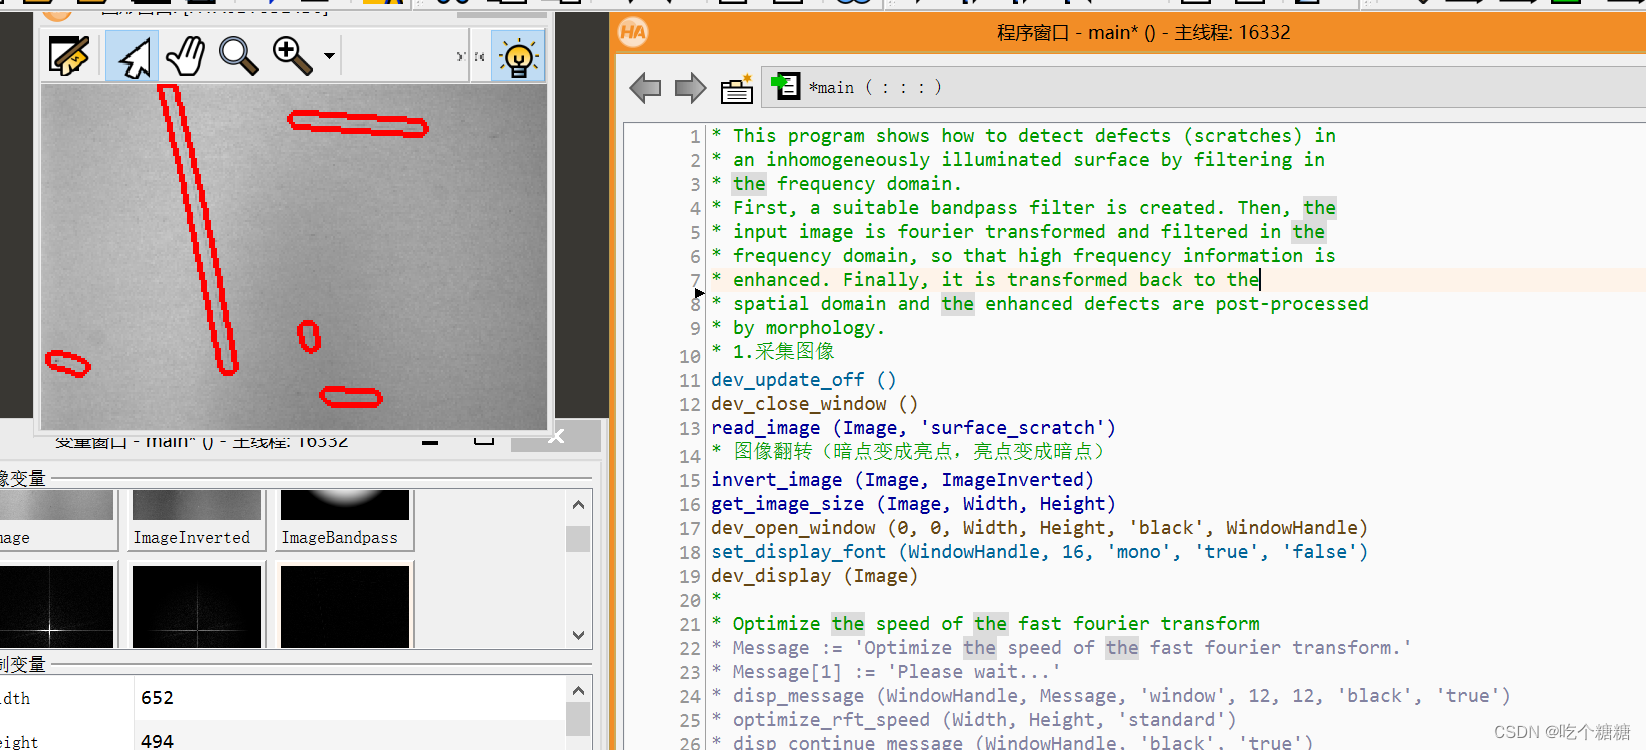
Halcon 频域+空间域检测划痕
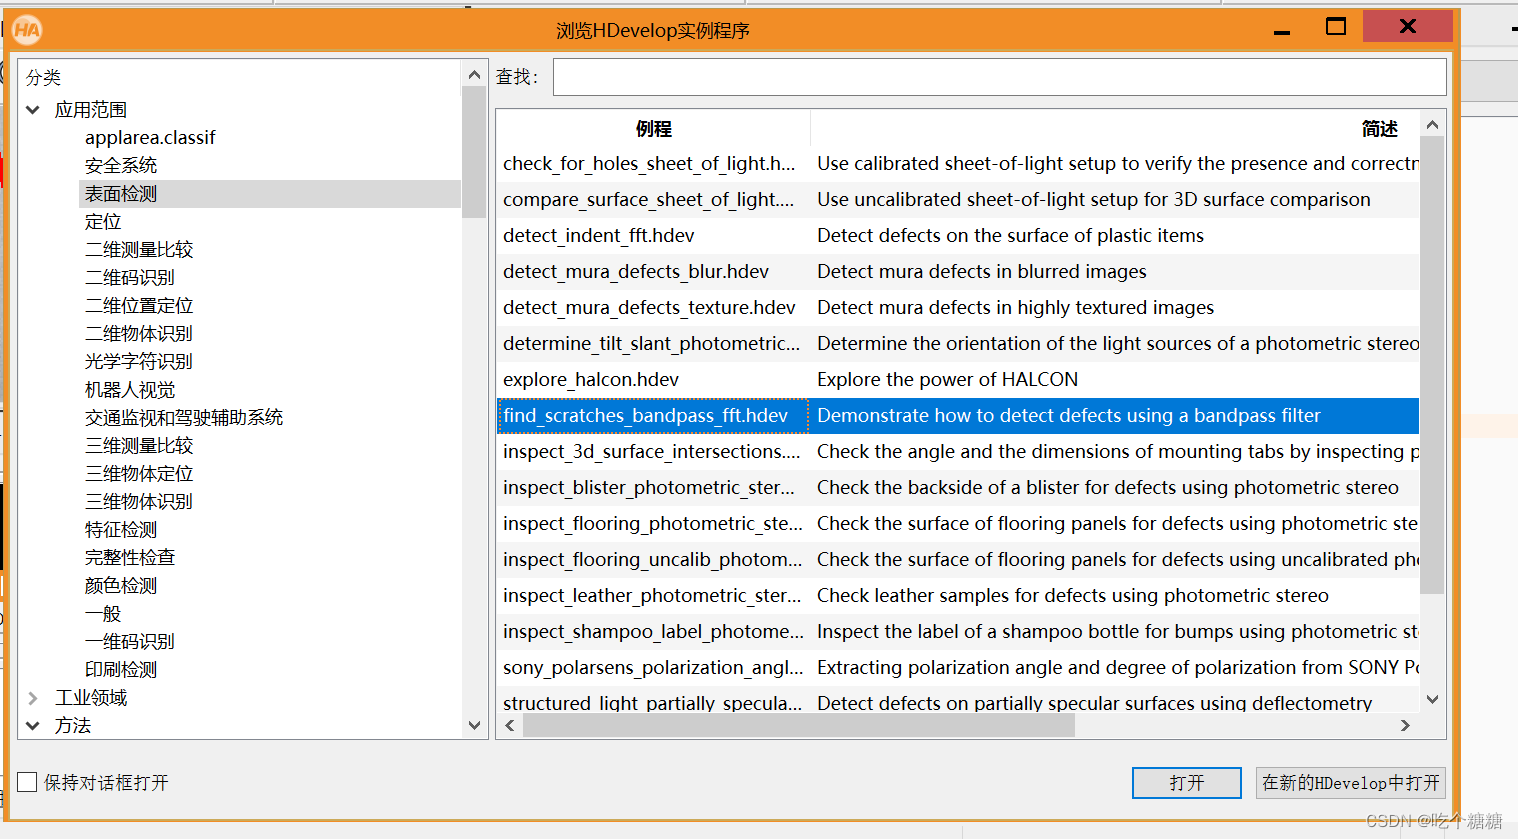
* This program shows how to detect defects (scratches) in
* an inhomogeneously illuminated surface by filtering in
* the frequency domain.
* First, a suitable bandpass filter is created. Then, the
* input image is fourier transformed and filtered in the
* frequency domain, so that high frequency information is
* enhanced. Finally, it is transformed back to the
* spatial domain and the enhanced defects are post-processed
* by morphology.
* 1.采集图像
dev_update_off ()
dev_close_window ()
read_image (Image, 'surface_scratch')
* 图像翻转(暗点变成亮点,亮点变成暗点)
invert_image (Image, ImageInverted)
get_image_size (Image, Width, Height)
dev_open_window (0, 0, Width, Height, 'black', WindowHandle)
set_display_font (WindowHandle, 16, 'mono', 'true', 'false')
dev_display (Image)
*
* Optimize the speed of the fast fourier transform
* Message := 'Optimize the speed of the fast fourier transform.'
* Message[1] := 'Please wait...'
* disp_message (WindowHandle, Message, 'window', 12, 12, 'black', 'true')
* optimize_rft_speed (Width, Height, 'standard')
* disp_continue_message (WindowHandle, 'black', 'true')
* stop ()
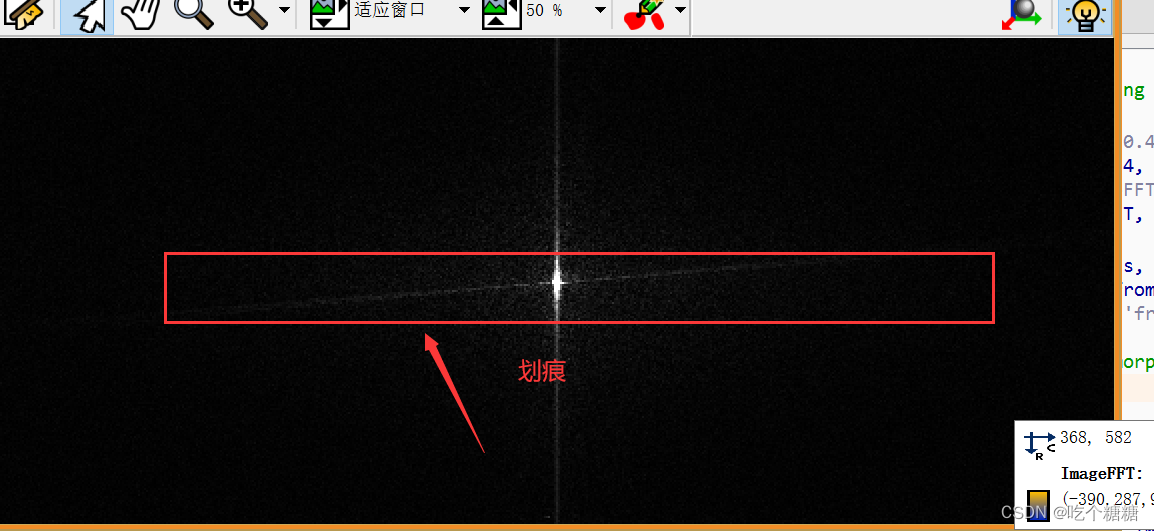
* 2.频域变换
* Enhance the scratches by filtering in the frequency domain
* 形成一个正弦滤波器 (可以移到中间)
*gen_sin_bandpass (ImageBandpass, 0.4, 'none', 'rft', Width, Height)
gen_sin_bandpass(ImageBandpass, 0.4, 'none', 'dc_center', Width, Height)
*rft_generic (ImageInverted, ImageFFT, 'to_freq', 'none', 'complex', Width)
fft_generic(ImageInverted, ImageFFT, 'to_freq', -1, 'none', 'dc_center', 'complex')
* 卷积
convol_fft (ImageFFT, ImageBandpass, ImageConvol)
fft_generic(ImageConvol, Lines, 'from_freq', 1, 'n', 'dc_center', 'byte')
*rft_generic (ImageConvol, Lines, 'from_freq', 'n', 'byte', Width)
*
* Segment the scratches by using morphology
* blob 分析
threshold (Lines, Region, 5, 255)
connection (Region, ConnectedRegions)
select_shape (ConnectedRegions, SelectedRegions, 'area', 'and', 5, 5000)
dilation_circle (SelectedRegions, RegionDilation, 5.5)
union1 (RegionDilation, RegionUnion)
reduce_domain (Image, RegionUnion, ImageReduced)
* 获取线
lines_gauss (ImageReduced, LinesXLD, 0.8, 3, 5, 'dark', 'false', 'bar-shaped', 'false')
* 共线联合
union_collinear_contours_xld (LinesXLD, UnionContours, 40, 3, 3, 0.2, 'attr_keep')
select_shape_xld (UnionContours, SelectedXLD, 'contlength', 'and', 15, 1000)
* xld 转区域
gen_region_contour_xld (SelectedXLD, RegionXLD, 'filled')
union1 (RegionXLD, RegionUnion)
dilation_circle (RegionUnion, RegionScratches, 10.5)
*
* Display the results
dev_set_draw ('margin')
dev_set_line_width (3)
dev_set_colored (12)
dev_display (Image)
dev_display (RegionScratches)
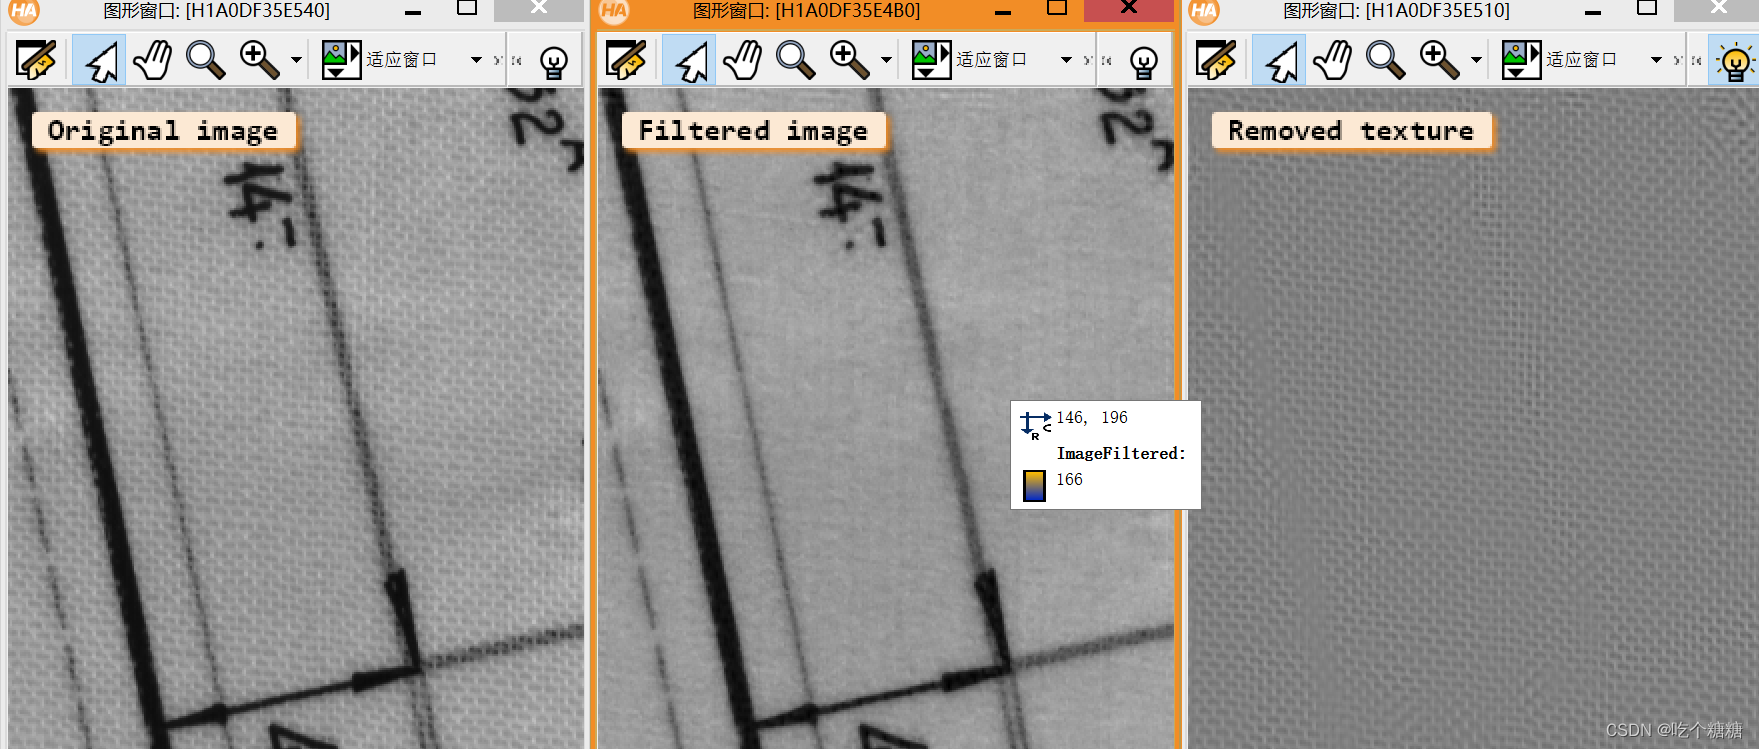
Halcon 傅里叶变换转换为功率图(频域+blob+差分)
* This program shows how to separate foreground information
* from a disturbing background texture by filtering in the
* frequency domain.
* First, the image is fourier transformed in order to obtain
* its frequency spectrum. Then, we detect the frequency peaks
* corresponding to the disturbing background texture in the
* frequency spectrum. Afterwards, a filter which eliminates those
* frequencies is built and applied to the spectrum. By applying
* the inverse fourier transform to the filtered spectrum, we
* obtain a filtered image from which the disturbing background
* texture was removed.
*
dev_update_off ()
dev_close_window ()
Scale := [1.0,.65]
MinGray := [50,100]
for Index := 0 to 1 by 1* * Read and display the imageread_image (Image, 'plan_' + (Index + 1)$'02')get_image_size (Image, Width, Height)dev_open_window (0, 0, Width * Scale[Index], Height * Scale[Index], 'black', WindowHandle)set_display_font (WindowHandle, 14, 'mono', 'true', 'false')dev_set_part (0, 0, Height - 1, Width - 1)dev_display (Image)disp_message (WindowHandle, 'Original image', 'window', 12, 12, 'black', 'true')* * Perform fft and display spectrum  * 优化速度optimize_fft_speed (Width, Height, 'standard')* * We used 'fft_generic' 'sqrt' and 'dc_center' mainly* for visualization purposes.* To speed up the program, rft_generic should be used;* but of course, the peak detection algorithm has to be* adjusted in this case.fft_generic (Image, ImageFFT, 'to_freq', -1, 'sqrt', 'dc_center', 'complex')dev_open_window (0, Width * Scale[Index] + 7, Width * Scale[Index], Height * Scale[Index], 'black', WindowHandle1)dev_set_color ('red')dev_set_draw ('margin')set_display_font (WindowHandle1, 14, 'mono', 'true', 'false')dev_set_part (0, 0, Height - 1, Width - 1)dev_display (ImageFFT)disp_message (WindowHandle1, 'Fourier spectrum', 'window', 12, 12, 'black', 'true')disp_cont_message (WindowHandle1, 'black', 'true')stop ()* * Detect the eight most significant peaks in the spectrum* 转换为功率图power_real (ImageFFT, PowerSpectrum)* 低通滤波binomial_filter (PowerSpectrum, ImageSmooth, 9, 9)* 二值化threshold (ImageSmooth, Region, MinGray[Index], 100000)* 形成单个连通域connection (Region, ConnectedRegions)select_shape (ConnectedRegions, SelectedRegions, 'area', 'and', 5, 200)union1 (SelectedRegions, RegionUnion)reduce_domain (ImageSmooth, RegionUnion, ImageReduced)* 获取局部最大值local_max (ImageReduced, LocalMaxima)* * Next, detect peaks one octave higher, i.e., at twice* the frequency of the most significant peaks* 形成一个包凸shape_trans (LocalMaxima, RegionTrans, 'convex')* Construct ROI band at twice the frequency* 形成一个缩放矩阵的仿射变换hom_mat2d_identity (HomMat2DIdentity)hom_mat2d_scale (HomMat2DIdentity, 2.1, 2.1, Height / 2, Width / 2, HomMat2DScale)affine_trans_region (RegionTrans, RegionTrans1, HomMat2DScale, 'nearest_neighbor')hom_mat2d_scale (HomMat2DIdentity, 1.9, 1.9, Height / 2, Width / 2, HomMat2DScale)affine_trans_region (RegionTrans, RegionTrans2, HomMat2DScale, 'nearest_neighbor')* 进行差分difference (RegionTrans1, RegionTrans2, RegionDifference)* Extract the peaks at twice the frequency* 差分区域进行裁剪reduce_domain (ImageSmooth, RegionDifference, ImageReduced)threshold (ImageReduced, Region, 15, 100000)reduce_domain (ImageSmooth, Region, ImageReduced)* 获取局部最大值local_max (ImageReduced, LocalMaxima2)* * Merge the peaks of both octaves and enlarge them to* integrate the relevant frequencies into the filter* 将之前的到的区域和后面的区域进行联合union2 (LocalMaxima, LocalMaxima2, RegionUnion)* 膨胀处理dilation_circle (RegionUnion, RegionDilation, 15.5)* 将获取的区域得到填充paint_region (RegionDilation, ImageFFT, ImageFFTFiltered, 0, 'fill')dev_display (ImageFFT)dev_display (RegionDilation)disp_message (WindowHandle1, 'Frequencies of the\nbackground texture', 'window', 12, 12, 'black', 'true')disp_cont_message (WindowHandle1, 'black', 'true')stop ()* * Apply the filter and display the results* 反傅里叶变换fft_generic (ImageFFTFiltered, ImageFiltered, 'from_freq', 1, 'sqrt', 'dc_center', 'byte')dev_display (ImageFiltered)disp_message (WindowHandle1, 'Filtered image', 'window', 12, 12, 'black', 'true')* dev_open_window (0, 2 * (Width * Scale[Index]) + 14, Width * Scale[Index], Height * Scale[Index], 'black', WindowHandle2)set_display_font (WindowHandle2, 14, 'mono', 'true', 'false')dev_set_part (0, 0, Height - 1, Width - 1)sub_image (Image, ImageFiltered, ImageTexture, 1, 128)dev_display (ImageTexture)disp_message (WindowHandle2, 'Removed texture', 'window', 12, 12, 'black', 'true')if (Index < 1)disp_cont_message (WindowHandle2, 'black', 'true')stop ()dev_close_window ()dev_close_window ()dev_close_window ()endif
endfor
Halcon 训练学习缺陷检测(以神经网络mlp为例)
create_class_mlp 创建
add_samples_image_class_mlp添加样本
set_rejection_params_class_mlp 设置拒绝参数
train_class_mlp 训练
write_class_mlp 保存
classify_image_class_mlp 识别
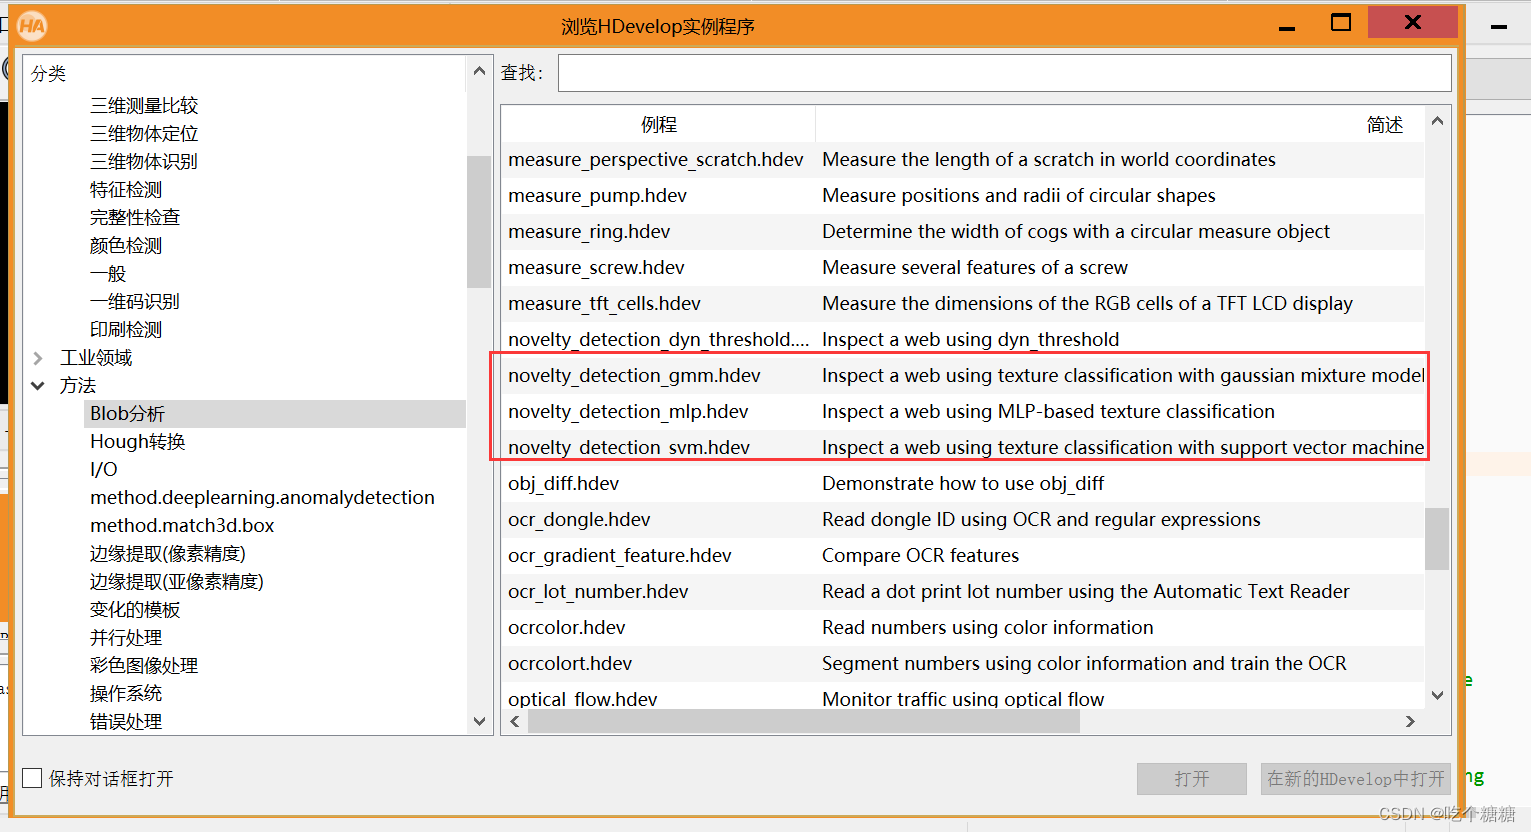
* This example program shows how to use the MLP classifier for novelty
* detection to perform a web inspection task.  To perform the novelty detection,
* a rejection class is trained internally.
* For the web inspection task, the MLP can subsequently be used to detect
* textures that do not correspond to the texture of the trained good objects.
* 1.采集图像
dev_update_off ()
*
ReadPretrainedClassifier := false
* Uncomment the following line to read the pretrained classifier from
* disk. The training may last up to half a minute.
* ReadPretrainedClassifier := true
SaveClassifier := false
* Uncomment the following line to write the MLP classifier to disk after training.
* SaveClassifier := true
*
read_image (Image, 'plastic_mesh/plastic_mesh_01')
get_image_size (Image, Width, Height)
dev_close_window ()
dev_open_window (0, 0, Width, Height, 'black', WindowHandle)
dev_set_color ('red')
set_display_font (WindowHandle, 16, 'mono', 'true', 'false')
* 获取系统信息
get_system ('example_dir', HalconExamples)
* The texture filters used for the classification will return artifacts at the image
* borders because the images of the plastic mesh to be inspected do not
* contain an integer number of mesh cells.  Because this would lead to wrongly
* detected errors at the image borders, we must exclude the area close to the
* image border from the training and classification.  This is done with the following
* rectangle.  Note that the image is later scaled down by a factor of two.
* 产生矩形窗口
gen_rectangle1 (Rectangle, 10, 10, Height / 2 - 11, Width / 2 - 11)
* 如果没有分类器则创建分类器
if (ReadPretrainedClassifier)* Read the pretrained classifier from disk.dev_display (Image)disp_message (WindowHandle, 'Reading classifier from disk...', 'window', 10, 10, 'black', 'true')read_class_mlp (HalconExamples + '/hdevelop/Segmentation/Classification/novelty_detection.gmc', MLPHandle)wait_seconds (1.5)
else* Create the MLP classifier.* 创建分类器* 第一个参数为特征变量的数量(和通道数对应->  gen_texture_image (ImageZoomed, ImageTexture))create_class_mlp (5, 9, 2, 'softmax', 'principal_components', 3, 42, MLPHandle)* The training is based on five images that contain no errors.* 形成一个空的区域gen_empty_region (EmptyRegion)* 将Rectangle和EmptyRegion 放入到 ObjectsConcat 中concat_obj (Rectangle, EmptyRegion, ObjectsConcat)for J := 1 to 5 by 1read_image (Image, 'plastic_mesh/plastic_mesh_' + J$'02')* The images are zoomed down because the resolution of the mesh is very* high.  This saves a large amount of processing time.* 等比例缩放图片zoom_image_factor (Image, ImageZoomed, 0.5, 0.5, 'constant')dev_display (ImageZoomed)disp_message (WindowHandle, 'Adding training samples...', 'window', 10, 10, 'black', 'true')* Generate the texture image.* 形成一个纹理图像gen_texture_image (ImageZoomed, ImageTexture)* Add the samples to the classifier.* 添加样本add_samples_image_class_mlp (ImageTexture, ObjectsConcat, MLPHandle)endfordev_display (ImageZoomed)* Now configure the MLP that a rejection class will be added during training.* 设置不符合要求的参数(必须要设置)set_rejection_params_class_mlp (MLPHandle, 'sampling_strategy', 'hyperbox_ring_around_each_class')set_rejection_params_class_mlp (MLPHandle, 'rejection_sample_factor', .3)* Train the MLP.disp_message (WindowHandle, 'Training MLP...', 'window', 10, 10, 'black', 'true')* 训练train_class_mlp (MLPHandle, 200, 1, 0.01, Error, ErrorLog)if (SaveClassifier)*保存分类器write_class_mlp (MLPHandle, HalconExamples + '/hdevelop/Segmentation/Classification/novelty_detection.gmc')endif
endif
* Now detect errors in the plastic meshes.
dev_set_draw ('margin')
dev_set_line_width (3)
for J := 1 to 14 by 1read_image (Image, 'plastic_mesh/plastic_mesh_' + J$'02')zoom_image_factor (Image, ImageZoomed, 0.5, 0.5, 'constant')dev_display (ImageZoomed)dev_set_color ('white')dev_display (Rectangle)gen_texture_image (ImageZoomed, ImageTexture)reduce_domain (ImageTexture, Rectangle, ImageTextureReduced)* Classify samples belonging to the trained class with the MLP.* 识别classify_image_class_mlp (ImageTextureReduced, ClassRegions, MLPHandle, 0.5)* Post process the returned raw errors to remove insignificant parts of the* detected errors.select_obj (ClassRegions, Correct, 1)select_obj (ClassRegions, Errors, 2)opening_circle (Errors, ErrorsOpening, 2.5)closing_circle (ErrorsOpening, ErrorsClosing, 12.5)connection (ErrorsClosing, ErrorsConnected)* 筛选出缺陷select_shape (ErrorsConnected, FinalErrors, 'area', 'and', 20, 1000000)* 缺陷放入容器count_obj (FinalErrors, NumErrors)dev_set_color ('red')dev_display (FinalErrors)if (NumErrors > 0)disp_message (WindowHandle, 'Mesh not OK', 'window', 10, 10, 'red', 'true')elsedisp_message (WindowHandle, 'Mesh OK', 'window', 10, 10, 'forest green', 'true')endifif (J < 14)disp_continue_message (WindowHandle, 'black', 'true')endifstop ()
endfor
产生滤波算子
gen_texture_image
* The texture image is a five-channel image that contains the result of applying
* five different Laws filters, which basically correspond to first and second
* derivatives, and smoothing them sufficiently.
* 纹理滤波
texture_laws (Image, ImageEL, 'el', 5, 5)
texture_laws (Image, ImageLE, 'le', 5, 5)
texture_laws (Image, ImageES, 'es', 1, 5)
texture_laws (Image, ImageSE, 'se', 1, 5)
texture_laws (Image, ImageEE, 'ee', 2, 5)
* 合成一个通道
compose5 (ImageEL, ImageLE, ImageES, ImageSE, ImageEE, ImageLaws)
smooth_image (ImageLaws, ImageTexture, 'gauss', 3)
return ()

相关文章:
Halcon 频域缺陷检测
文章目录 傅里叶变换频谱矩形圆菱形黑白相间的亮带去除图纹(反傅里叶变换)去除图纹滤波器处理 Halcon 频域空间域检测缺陷Halcon 频域差分空间域 缺陷检测(lines_gauss 提取线)Halcon 频域差分空间域(blob特征…...
架构整洁之道-软件架构-测试边界、整洁的嵌入式架构、实现细节
6 软件架构 6.14 测试边界 和程序代码一样,测试代码也是系统的一部分。甚至,测试代码有时在系统架构中的地位还要比其他部分更独特一些。 测试也是一种系统组件。 从架构的角度来讲,所有的测试都是一样的。不论它们是小型的TDD测试ÿ…...
nodejs学习计划--(十)会话控制及https补充
一、会话控制 1.介绍 所谓会话控制就是 对会话进行控制 HTTP 是一种无状态的协议,它没有办法区分多次的请求是否来自于同一个客户端, 无法区分用户 而产品中又大量存在的这样的需求,所以我们需要通过 会话控制 来解决该问题 常见的会话控制…...

fast.ai 机器学习笔记(四)
机器学习 1:第 11 课 原文:medium.com/hiromi_suenaga/machine-learning-1-lesson-11-7564c3c18bbb 译者:飞龙 协议:CC BY-NC-SA 4.0 来自机器学习课程的个人笔记。随着我继续复习课程以“真正”理解它,这些笔记将继续…...
LLM大模型常见问题解答(2)
对大模型基本原理和架构的理解 大型语言模型如GPT(Generative Pre-trained Transformer)系列是基于自注意力机制的深度学习模型,主要用于处理和生成人类语言。 基本原理 自然语言理解:模型通过对大量文本数据的预训练ÿ…...
这种学习单片机的顺序是否合理?
这种学习单片机的顺序是否合理? 在开始前我有一些资料,是我根据网友给的问题精心整理了一份「单片机的资料从专业入门到高级教程」, 点个关注在评论区回复“888”之后私信回复“888”,全部无偿共享给大家!!…...

13 年后,我如何用 Go 编写 HTTP 服务(译)
原文:Mat Ryer - 2024.02.09 大约六年前,我写了一篇博客文章,概述了我是如何用 Go 编写 HTTP 服务的,现在我再次告诉你,我是如何写 HTTP 服务的。 那篇原始的文章引发了一些热烈的讨论,这些讨论影响了我今…...
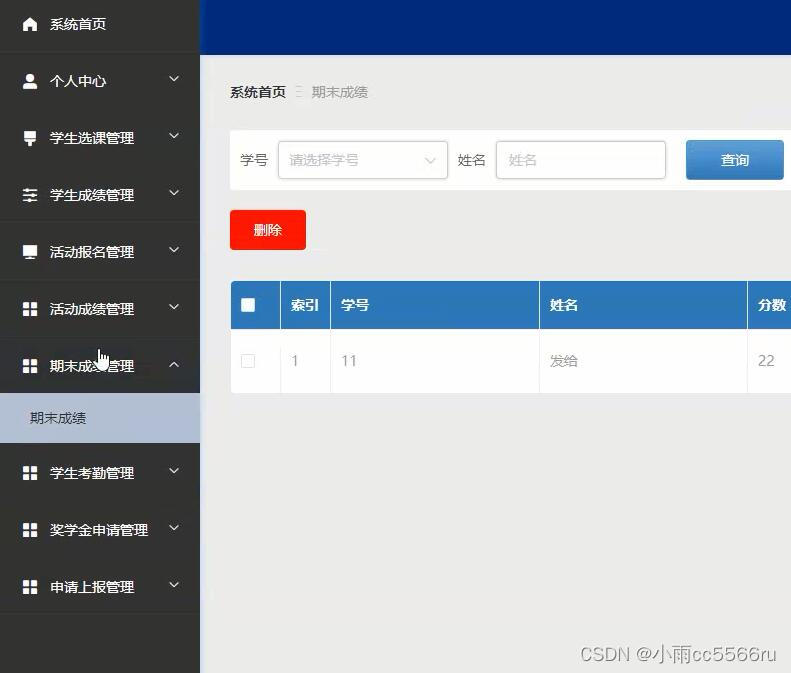
flask+python高校学生综合测评管理系统 phl8b
系统包括管理员、教师和学生三个角色; 。通过研究,以MySQL为后端数据库,以python为前端技术,以pycharm为开发平台,采用vue架构,建立一个提供个人中心、学生管理、教师管理、课程类型管理、课程信息管理、学…...
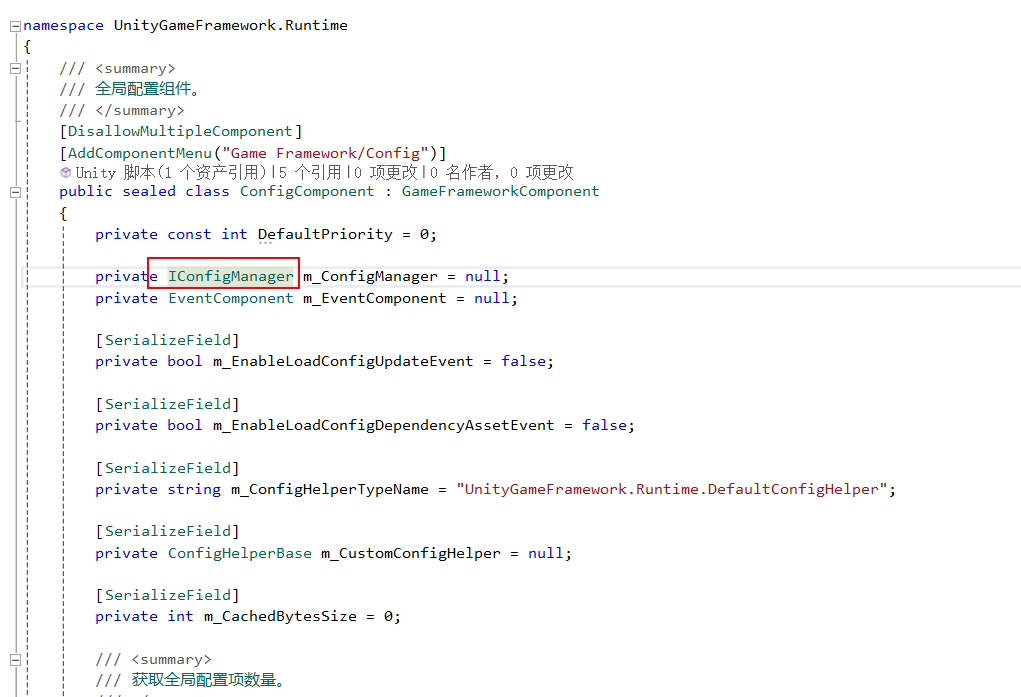
【GameFramework框架内置模块】1、全局配置(Config)
推荐阅读 CSDN主页GitHub开源地址Unity3D插件分享简书地址 大家好,我是佛系工程师☆恬静的小魔龙☆,不定时更新Unity开发技巧,觉得有用记得一键三连哦。 一、前言 【GameFramework框架】系列教程目录: https://blog.csdn.net/q7…...
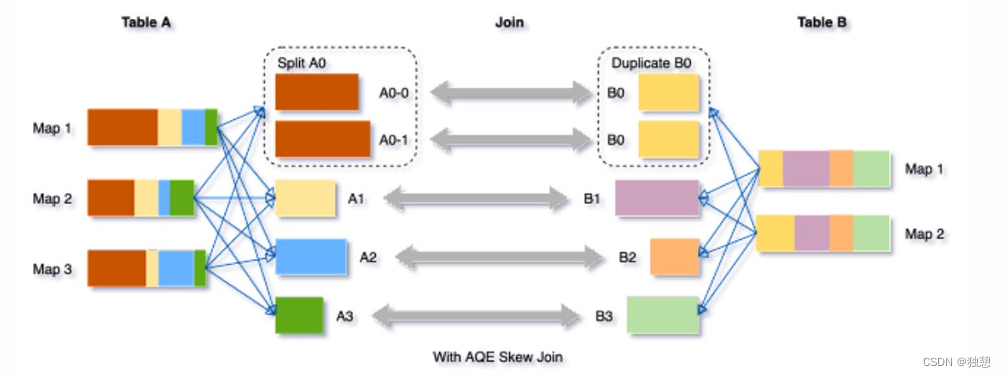
PySpark(四)PySpark SQL、Catalyst优化器、Spark SQL的执行流程、Spark新特性
目录 PySpark SQL 基础 SparkSession对象 DataFrame入门 DataFrame构建 DataFrame代码风格 DSL SQL SparkSQL Shuffle 分区数目 DataFrame数据写出 Spark UDF Catalyst优化器 Spark SQL的执行流程 Spark新特性 自适应查询(SparkSQL) 动态合并 动态调整Join策略 …...

2024第六届中国济南国际福祉及残疾人用品展览会/失能护理展
龘龘龙年-第六届山东福祉展会-将于5月27-29日在济南黄河国际会展中心举办; 一、引言 2024年,中国龙年,龙象征着力量、繁荣与希望。在这个特殊的年份,一场备受瞩目的盛会即将拉开帷幕。2024年第六届中国(济南…...
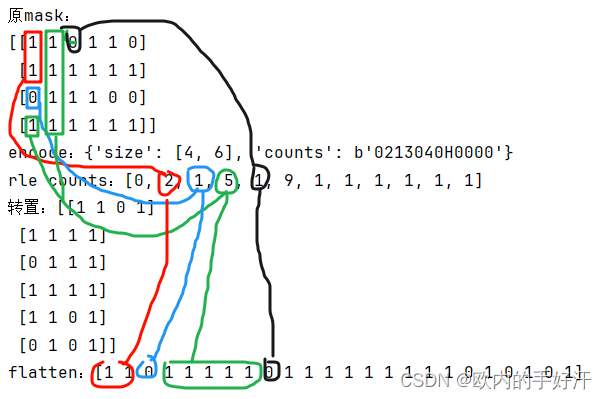
SegmentAnything官网demo使用vue+python实现
一、效果&准备工作 1.效果 没啥好说的,低质量复刻SAM官网 https://segment-anything.com/ 需要提一点:所有生成embedding和mask的操作都是python后端做的,计算mask不是onnxruntime-web实现的,前端只负责了把rle编码的mask解…...

Java:字符集、IO流 --黑马笔记
一、字符集 1.1 字符集的来历 我们知道计算机是美国人发明的,由于计算机能够处理的数据只能是0和1组成的二进制数据,为了让计算机能够处理字符,于是美国人就把他们会用到的每一个字符进行了编码(所谓编码,就是为一个…...

RabbitMQ之五种消息模型
1、 环境准备 创建Virtual Hosts 虚拟主机:类似于mysql中的database。他们都是以“/”开头 设置权限 2. 五种消息模型 RabbitMQ提供了6种消息模型,但是第6种其实是RPC,并不是MQ,因此不予学习。那么也就剩下5种。 但是其实3、4…...
项目02《游戏-14-开发》Unity3D
基于 项目02《游戏-13-开发》Unity3D , 任务:战斗系统之击败怪物与怪物UI血条信息 using UnityEngine; public abstract class Living : MonoBehaviour{ protected float hp; protected float attack; protected float define; …...
【Java数据结构】单向 不带头 非循环 链表实现
模拟实现LinkedList:下一篇文章 LinkedList底层是双向、不带头结点、非循环的链表 /*** LinkedList的模拟实现*单向 不带头 非循环链表实现*/ class SingleLinkedList {class ListNode {public int val;public ListNode next;public ListNode(int val) {this.val …...
【ES6】模块化
nodejs遵循了CommonJs的模块化规范 导入 require() 导出 module.exports 模块化的好处: 模块化可以避免命名冲突的问题大家都遵循同样的模块化写代码,降低了沟通的成本,极大方便了各个模块之间的相互调用需要啥模块,调用就行 …...
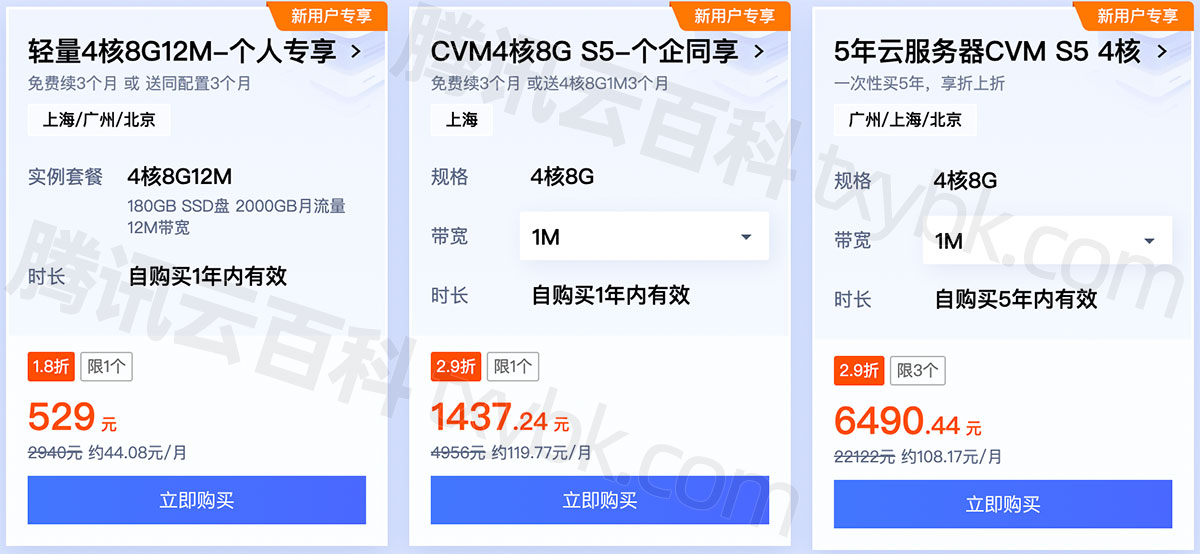
腾讯云4核8G服务器可以用来干嘛?怎么收费?
腾讯云4核8G服务器适合做什么?搭建网站博客、企业官网、小程序、小游戏后端服务器、电商应用、云盘和图床等均可以,腾讯云4核8G服务器可以选择轻量应用服务器4核8G12M或云服务器CVM,轻量服务器和标准型CVM服务器性能是差不多的,轻…...

怎么在bash shell中操作复杂json对象
怎么在bash shell中操作复杂json对象 在bash shell中操作复杂JSON对象,jq可以帮助我们在bash环境下轻松地处理这类数据,本文将详细介绍如何使用jq在bash中操作复杂的JSON对象。 jq是一个轻量级且灵活的命令行JSON处理器,它允许你以非常高效的…...

11.div函数
文章目录 函数简介1.函数原型2.div_t结构体3.引用头文件 代码运行 函数简介 1.函数原型 div_t div(int numerator, int denominator);div函数把numerator除以denominator,产生商和余数,用一个div_t的结构体返回。 2.div_t结构体 typedef struct _div…...

从零部署YOLOv8:一份面向新手的超详细环境配置与首次推理指南
1. 环境准备:从零搭建YOLOv8开发环境 第一次接触YOLOv8可能会觉得有点懵,别担心,跟着我一步步来。我去年第一次部署YOLOv7时踩了不少坑,这次YOLOv8的部署过程就顺畅多了。咱们先从最基础的环境搭建开始,确保你的Window…...

李慕婉-仙逆-造相Z-Turbo 互联网产品创新思维:用AI重新定义用户交互体验
李慕婉-仙逆-造相Z-Turbo 互联网产品创新思维:用AI重新定义用户交互体验 不知道你有没有过这样的感觉:现在的很多互联网产品,用起来总觉得有点“隔阂”。你想找一件衣服,得在搜索框里输入关键词,然后在几十页结果里翻…...

Panfrost驱动架构解析:从Mali-GPU硬件到Linux开源实现
1. Mali GPU架构演进与Panfrost的诞生背景 第一次接触Mali GPU是在调试一块开发板时发现的——明明硬件参数写着支持OpenGL ES 3.0,运行3D应用却频繁崩溃。后来才明白,这块板子用的Mali-T860 GPU虽然硬件达标,但厂商提供的闭源驱动只支持到O…...

多因素方差分析在金融信贷评估中的应用实践
1. 为什么金融信贷需要多因素方差分析 想象一下你是一位银行信贷审批员,每天要处理上百份贷款申请。有的客户提供房产抵押,有的找担保公司作保,还有的只凭个人信用。他们的信用记录也各不相同,有的按时还款从无逾期,有…...

Claude HUD完全指南:如何快速掌握Claude Code的实时状态监控神器
Claude HUD完全指南:如何快速掌握Claude Code的实时状态监控神器 【免费下载链接】claude-hud A Claude Code plugin that shows whats happening - context usage, active tools, running agents, and todo progress 项目地址: https://gitcode.com/GitHub_Trend…...

从“一通电就响”到“编程奏乐”:深入解析有源与无源蜂鸣器的核心差异与选型实战
1. 蜂鸣器基础:从"滴滴声"到"交响乐"的硬件选择 第一次接触蜂鸣器是在大学电子设计课上,当时我用单片机控制一个黑色小元件发出"滴滴"声,兴奋得像是发现了新大陆。后来才知道,那个黑色小元件就是最…...

VR消防安全学习机|沉浸式体验守护生命安全的新方式
在现代社会,消防安全教育已经成为全民必修课。从校园到社区,从企业到公共场所,火灾防范和应急自救的知识普及显得尤为重要。传统的宣讲、板报、视频虽然能传递知识,但缺乏真实感和参与度。而随着虚拟现实技术(VR&#…...

SUNFLOWER MATCH LAB实战:利用爬虫与模型自动化批改植物学作业
SUNFLOWER MATCH LAB实战:利用爬虫与模型自动化批改植物学作业 1. 引言 如果你是植物学老师,面对几十份甚至上百份学生提交的植物观察报告,每份报告都包含一张植物照片和一段文字描述,你会怎么做?一张张点开图片&…...

DeepAnalyze从零开始教程:不装CUDA、不配环境,纯容器化文本分析系统搭建
DeepAnalyze从零开始教程:不装CUDA、不配环境,纯容器化文本分析系统搭建 1. 这不是另一个“跑通就行”的AI工具,而是一个能真正读懂文字的分析助手 你有没有过这样的经历:手头有一份30页的行业报告,老板说“下午三点…...

美财政部发布金融业AI风险管理框架指南
美国财政部为金融服务业发布了多份文件,建议采取结构化方法来管理运营和政策中的人工智能风险。这份由关键基础设施伙伴关系(Critical Infrastructure Partnership)金融服务业人工智能风险管理框架(FS AI RMF)附带了一份指南,详细介绍了该框架的细节。该…...