超详细||YOLOv8基础教程(环境搭建,训练,测试,部署看一篇就够)(在推理视频中添加FPS信息)
一、YOLOv8环境搭建
这篇文章将跳过基础的深度学习环境的搭建,如果没有完成的可以看我的这篇博客:超详细||深度学习环境搭建记录cuda+anaconda+pytorch+pycharm-CSDN博客
1. 在github上下载源码:
GitHub - ultralytics/ultralytics: NEW - YOLOv8 🚀 in PyTorch > ONNX > OpenVINO > CoreML > TFLite
2. 安装ultralytics(YOLOv8改名为ultralytics)
这里有两种方式安装ultralytics
- 直接使用CLI
pip install ultralytics
- 使用requirements.txt安装,这种方法是在上面下载的源码处安装,方便对yolov8进行改进
cd ultralytics
pip install -r requirements.txt
3. 安装wandb
pip install wandb登录自己的wandb账号
wandb login二、开始训练
1. 构建数据集
数据集要严格按照下面的目录格式,image的格式为jpg,label的格式为txt,对应的image和label的名字要一致
Dataset└─images└─train└─val└─labels└─train└─val2. 创建一个dataset.yaml文件
更换自己的image train和image val的地址,labels地址不用,它会自动索引
将classes改为自己的类别,从0开始
path: ../datasets/coco128  # dataset root dir
train: images/train2017  # train images (relative to 'path') 128 images
val: images/train2017  # val images (relative to 'path') 128 images
test:  # test images (optional)# Classes
names:0: person1: bicycle2: car3: motorcycle4: airplane5: bus6: train7: truck8: boat
3. 新建一个train.py,修改相关参数,运行即可开始训练
from ultralytics import YOLOif __name__ == '__main__':# Load a modelmodel = YOLO(r'\ultralytics\detection\yolov8n\yolov8n.yaml') # 不使用预训练权重训练# model = YOLO(r'yolov8p.yaml').load("yolov8n.pt") # 使用预训练权重训练# Trainparameters ----------------------------------------------------------------------------------------------model.train(data=r'\ultralytics\detection\dataset\appledata.yaml',epochs= 30 , # (int) number of epochs to train forpatience= 50 , # (int) epochs to wait for no observable improvement for early stopping of trainingbatch= 8 , # (int) number of images per batch (-1 for AutoBatch)imgsz= 320 , # (int) size of input images as integer or w,hsave= True , # (bool) save train checkpoints and predict resultssave_period= -1, # (int) Save checkpoint every x epochs (disabled if < 1)cache= False , # (bool) True/ram, disk or False. Use cache for data loadingdevice= 0 , # (int | str | list, optional) device to run on, i.e. cuda device=0 or device=0,1,2,3 or device=cpuworkers= 16 , # (int) number of worker threads for data loading (per RANK if DDP)project= 'result', # (str, optional) project namename= 'yolov8n' ,# (str, optional) experiment name, results saved to 'project/name' directoryexist_ok= False , # (bool) whether to overwrite existing experimentpretrained= False , # (bool | str) whether to use a pretrained model (bool) or a model to load weights from (str)optimizer= 'SGD', # (str) optimizer to use, choices=[SGD, Adam, Adamax, AdamW, NAdam, RAdam, RMSProp, auto]verbose= True ,# (bool) whether to print verbose outputseed= 0 , # (int) random seed for reproducibilitydeterministic= True , # (bool) whether to enable deterministic modesingle_cls= True , # (bool) train multi-class data as single-classrect= False ,# (bool) rectangular training if mode='train' or rectangular validation if mode='val'cos_lr= False , # (bool) use cosine learning rate schedulerclose_mosaic= 0, # (int) disable mosaic augmentation for final epochsresume= False , # (bool) resume training from last checkpointamp= False, # (bool) Automatic Mixed Precision (AMP) training, choices=[True, False], True runs AMP checkfraction= 1.0 , # (float) dataset fraction to train on (default is 1.0, all images in train set)profile= False, # (bool) profile ONNX and TensorRT speeds during training for loggers# Segmentationoverlap_mask= True , # (bool) masks should overlap during training (segment train only)mask_ratio= 4, # (int) mask downsample ratio (segment train only)# Classificationdropout= 0.0, # (float) use dropout regularization (classify train only)# Hyperparameters ----------------------------------------------------------------------------------------------lr0=0.01, # (float) initial learning rate (i.e. SGD=1E-2, Adam=1E-3)lrf=0.01, # (float) final learning rate (lr0 * lrf)momentum=0.937, # (float) SGD momentum/Adam beta1weight_decay=0.0005, # (float) optimizer weight decay 5e-4warmup_epochs=3.0, # (float) warmup epochs (fractions ok)warmup_momentum=0.8, # (float) warmup initial momentumwarmup_bias_lr=0.1, # (float) warmup initial bias lrbox=7.5, # (float) box loss gaincls=0.5, # (float) cls loss gain (scale with pixels)dfl=1.5, # (float) dfl loss gainpose=12.0, # (float) pose loss gainkobj=1.0, # (float) keypoint obj loss gainlabel_smoothing=0.0, # (float) label smoothing (fraction)nbs=64, # (int) nominal batch sizehsv_h=0.015, # (float) image HSV-Hue augmentation (fraction)hsv_s=0.7, # (float) image HSV-Saturation augmentation (fraction)hsv_v=0.4, # (float) image HSV-Value augmentation (fraction)degrees=0.0, # (float) image rotation (+/- deg)translate=0.1, # (float) image translation (+/- fraction)scale=0.5, # (float) image scale (+/- gain)shear=0.0, # (float) image shear (+/- deg)perspective=0.0, # (float) image perspective (+/- fraction), range 0-0.001flipud=0.0, # (float) image flip up-down (probability)fliplr=0.5, # (float) image flip left-right (probability)mosaic=1.0, # (float) image mosaic (probability)mixup=0.0, # (float) image mixup (probability)copy_paste=0.0, # (float) segment copy-paste (probability))三、测试与验证
1. 新建一个test.py, 这个可以打印网路信息,参数量以及FLOPs,还有每一层网络的信息
from ultralytics import YOLOif __name__ == '__main__':# Load a modelmodel = YOLO(r'\ultralytics\detection\yolov8n\yolov8n.yaml') # build a new model from YAMLmodel.info()2. 新建一个val.py,这个可以打印模型在验证集上的结果,如mAP,推理速度等
from ultralytics import YOLOif __name__ == '__main__':# Load a modelmodel = YOLO(r'\ultralytics\detection\yolov8n\result\yolov8n4\weights\best.pt') # build a new model from YAML# Validate the modelmodel.val(val=True, # (bool) validate/test during trainingdata=r'\ultralytics\detection\dataset\appledata.yaml',split='val', # (str) dataset split to use for validation, i.e. 'val', 'test' or 'train'batch=1, # 测试速度时一般设置为 1 ,设置越大速度越快。 (int) number of images per batch (-1 for AutoBatch)imgsz=320, # (int) size of input images as integer or w,hdevice=0, # (int | str | list, optional) device to run on, i.e. cuda device=0 or device=0,1,2,3 or device=cpuworkers=8, # (int) number of worker threads for data loading (per RANK if DDP)save_json=False, # (bool) save results to JSON filesave_hybrid=False, # (bool) save hybrid version of labels (labels + additional predictions)conf=0.001, # (float, optional) object confidence threshold for detection (default 0.25 predict, 0.001 val)iou=0.7, # (float) intersection over union (IoU) threshold for NMSproject='val', # (str, optional) project namename='', # (str, optional) experiment name, results saved to 'project/name' directorymax_det=300, # (int) maximum number of detections per imagehalf=True, # (bool) use half precision (FP16)dnn=False, # (bool) use OpenCV DNN for ONNX inferenceplots=True, # (bool) save plots during train/val)3. 新建一个predict.py,这个可以根据训练好的权重文件进行推理,权重文件格式支持pt,onnx等,支持图片,视频,摄像头等进行推理
from ultralytics import YOLOif __name__ == '__main__':# Load a modelmodel = YOLO(r'\deploy\yolov8n.pt') # pretrained YOLOv8n modelmodel.predict(source=r'\deploy\output_video.mp4',save=False, # save predict resultsimgsz=320, # (int) size of input images as integer or w,hconf=0.25, # object confidence threshold for detection (default 0.25 predict, 0.001 val)iou=0.7, # # intersection over union (IoU) threshold for NMSshow=True, # show results if possibleproject='', # (str, optional) project namename='', # (str, optional) experiment name, results saved to 'project/name' directorysave_txt=False, # save results as .txt filesave_conf=True, # save results with confidence scoressave_crop=False, # save cropped images with resultsshow_labels=True, # show object labels in plotsshow_conf=True, # show object confidence scores in plotsvid_stride=1, # video frame-rate strideline_width=1, # bounding box thickness (pixels)visualize=False, # visualize model featuresaugment=False, # apply image augmentation to prediction sourcesagnostic_nms=False, # class-agnostic NMSretina_masks=False, # use high-resolution segmentation masksboxes=True, # Show boxes in segmentation predictions)四、onnx模型部署
1. 新建一个export.py,将pt文件转化为onnx文件
from ultralytics import YOLO# Load a model
model = YOLO('/ultralytics/weight file/yolov8n.pt')  # load a custom trained model# Export the model
model.export(format='onnx')
2. 将onnx文件添加到之前提到的predict.py中,进行推理。
3. 如果想在推理的视频中添加FPS信息,请把ultralytics/engine/predictor.py替换为下面的代码。
# Ultralytics YOLO 🚀, AGPL-3.0 license
"""
Run prediction on images, videos, directories, globs, YouTube, webcam, streams, etc.Usage - sources:$ yolo mode=predict model=yolov8n.pt source=0                               # webcamimg.jpg                         # imagevid.mp4                         # videoscreen                          # screenshotpath/                           # directorylist.txt                        # list of imageslist.streams                    # list of streams'path/*.jpg'                    # glob'https://youtu.be/Zgi9g1ksQHc'  # YouTube'rtsp://example.com/media.mp4'  # RTSP, RTMP, HTTP streamUsage - formats:$ yolo mode=predict model=yolov8n.pt                 # PyTorchyolov8n.torchscript        # TorchScriptyolov8n.onnx               # ONNX Runtime or OpenCV DNN with dnn=Trueyolov8n_openvino_model     # OpenVINOyolov8n.engine             # TensorRTyolov8n.mlmodel            # CoreML (macOS-only)yolov8n_saved_model        # TensorFlow SavedModelyolov8n.pb                 # TensorFlow GraphDefyolov8n.tflite             # TensorFlow Liteyolov8n_edgetpu.tflite     # TensorFlow Edge TPUyolov8n_paddle_model       # PaddlePaddle
"""
import platform
from pathlib import Pathimport cv2
import numpy as np
import torchfrom ultralytics.cfg import get_cfg
from ultralytics.data import load_inference_source
from ultralytics.data.augment import LetterBox, classify_transforms
from ultralytics.nn.autobackend import AutoBackend
from ultralytics.utils import DEFAULT_CFG, LOGGER, MACOS, SETTINGS, WINDOWS, callbacks, colorstr, ops
from ultralytics.utils.checks import check_imgsz, check_imshow
from ultralytics.utils.files import increment_path
from ultralytics.utils.torch_utils import select_device, smart_inference_modeSTREAM_WARNING = """WARNING ⚠️ stream/video/webcam/dir predict source will accumulate results in RAM unless `stream=True` is passed,causing potential out-of-memory errors for large sources or long-running streams/videos.Usage:results = model(source=..., stream=True)  # generator of Results objectsfor r in results:boxes = r.boxes  # Boxes object for bbox outputsmasks = r.masks  # Masks object for segment masks outputsprobs = r.probs  # Class probabilities for classification outputs
"""class BasePredictor:"""BasePredictorA base class for creating predictors.Attributes:args (SimpleNamespace): Configuration for the predictor.save_dir (Path): Directory to save results.done_warmup (bool): Whether the predictor has finished setup.model (nn.Module): Model used for prediction.data (dict): Data configuration.device (torch.device): Device used for prediction.dataset (Dataset): Dataset used for prediction.vid_path (str): Path to video file.vid_writer (cv2.VideoWriter): Video writer for saving video output.data_path (str): Path to data."""def __init__(self, cfg=DEFAULT_CFG, overrides=None, _callbacks=None):"""Initializes the BasePredictor class.Args:cfg (str, optional): Path to a configuration file. Defaults to DEFAULT_CFG.overrides (dict, optional): Configuration overrides. Defaults to None."""self.args = get_cfg(cfg, overrides)self.save_dir = self.get_save_dir()if self.args.conf is None:self.args.conf = 0.25  # default conf=0.25self.done_warmup = Falseif self.args.show:self.args.show = check_imshow(warn=True)# Usable if setup is doneself.model = Noneself.data = self.args.data  # data_dictself.imgsz = Noneself.device = Noneself.dataset = Noneself.vid_path, self.vid_writer = None, Noneself.plotted_img = Noneself.data_path = Noneself.source_type = Noneself.batch = Noneself.results = Noneself.transforms = Noneself.callbacks = _callbacks or callbacks.get_default_callbacks()self.txt_path = Nonecallbacks.add_integration_callbacks(self)def get_save_dir(self):project = self.args.project or Path(SETTINGS['runs_dir']) / self.args.taskname = self.args.name or f'{self.args.mode}'return increment_path(Path(project) / name, exist_ok=self.args.exist_ok)def preprocess(self, im):"""Prepares input image before inference.Args:im (torch.Tensor | List(np.ndarray)): BCHW for tensor, [(HWC) x B] for list."""not_tensor = not isinstance(im, torch.Tensor)if not_tensor:im = np.stack(self.pre_transform(im))im = im[..., ::-1].transpose((0, 3, 1, 2))  # BGR to RGB, BHWC to BCHW, (n, 3, h, w)im = np.ascontiguousarray(im)  # contiguousim = torch.from_numpy(im)img = im.to(self.device)img = img.half() if self.model.fp16 else img.float()  # uint8 to fp16/32if not_tensor:img /= 255  # 0 - 255 to 0.0 - 1.0return imgdef inference(self, im, *args, **kwargs):visualize = increment_path(self.save_dir / Path(self.batch[0][0]).stem,mkdir=True) if self.args.visualize and (not self.source_type.tensor) else Falsereturn self.model(im, augment=self.args.augment, visualize=visualize)def pre_transform(self, im):"""Pre-transform input image before inference.Args:im (List(np.ndarray)): (N, 3, h, w) for tensor, [(h, w, 3) x N] for list.Return: A list of transformed imgs."""same_shapes = all(x.shape == im[0].shape for x in im)auto = same_shapes and self.model.ptreturn [LetterBox(self.imgsz, auto=auto, stride=self.model.stride)(image=x) for x in im]def write_results(self, idx, results, batch):"""Write inference results to a file or directory."""p, im, _ = batchlog_string = ''if len(im.shape) == 3:im = im[None]  # expand for batch dimif self.source_type.webcam or self.source_type.from_img or self.source_type.tensor:  # batch_size >= 1log_string += f'{idx}: 'frame = self.dataset.countelse:frame = getattr(self.dataset, 'frame', 0)self.data_path = pself.txt_path = str(self.save_dir / 'labels' / p.stem) + ('' if self.dataset.mode == 'image' else f'_{frame}')log_string += '%gx%g ' % im.shape[2:]  # print stringresult = results[idx]log_string += result.verbose()if self.args.save or self.args.show:  # Add bbox to imageplot_args = {'line_width': self.args.line_width,'boxes': self.args.boxes,'conf': self.args.show_conf,'labels': self.args.show_labels}if not self.args.retina_masks:plot_args['im_gpu'] = im[idx]self.plotted_img = result.plot(**plot_args)# Writeif self.args.save_txt:result.save_txt(f'{self.txt_path}.txt', save_conf=self.args.save_conf)if self.args.save_crop:result.save_crop(save_dir=self.save_dir / 'crops',file_name=self.data_path.stem + ('' if self.dataset.mode == 'image' else f'_{frame}'))return log_stringdef postprocess(self, preds, img, orig_imgs):"""Post-processes predictions for an image and returns them."""return predsdef __call__(self, source=None, model=None, stream=False, *args, **kwargs):"""Performs inference on an image or stream."""self.stream = streamif stream:return self.stream_inference(source, model, *args, **kwargs)else:return list(self.stream_inference(source, model, *args, **kwargs))  # merge list of Result into onedef predict_cli(self, source=None, model=None):"""Method used for CLI prediction. It uses always generator as outputs as not required by CLI mode."""gen = self.stream_inference(source, model)for _ in gen:  # running CLI inference without accumulating any outputs (do not modify)passdef setup_source(self, source):"""Sets up source and inference mode."""self.imgsz = check_imgsz(self.args.imgsz, stride=self.model.stride, min_dim=2)  # check image sizeself.transforms = getattr(self.model.model, 'transforms', classify_transforms(self.imgsz[0])) if self.args.task == 'classify' else Noneself.dataset = load_inference_source(source=source, imgsz=self.imgsz, vid_stride=self.args.vid_stride)self.source_type = self.dataset.source_typeif not getattr(self, 'stream', True) and (self.dataset.mode == 'stream' or  # streamslen(self.dataset) > 1000 or  # imagesany(getattr(self.dataset, 'video_flag', [False]))):  # videosLOGGER.warning(STREAM_WARNING)self.vid_path, self.vid_writer = [None] * self.dataset.bs, [None] * self.dataset.bs@smart_inference_mode()def stream_inference(self, source=None, model=None, *args, **kwargs):"""Streams real-time inference on camera feed and saves results to file."""if self.args.verbose:LOGGER.info('')# Setup modelif not self.model:self.setup_model(model)# Setup source every time predict is calledself.setup_source(source if source is not None else self.args.source)# Check if save_dir/ label file existsif self.args.save or self.args.save_txt:(self.save_dir / 'labels' if self.args.save_txt else self.save_dir).mkdir(parents=True, exist_ok=True)# Warmup modelif not self.done_warmup:self.model.warmup(imgsz=(1 if self.model.pt or self.model.triton else self.dataset.bs, 3, *self.imgsz))self.done_warmup = Trueself.seen, self.windows, self.batch, self.profilers = 0, [], None, (ops.Profile(), ops.Profile(), ops.Profile())self.run_callbacks('on_predict_start')for batch in self.dataset:self.run_callbacks('on_predict_batch_start')self.batch = batchpath, im0s, vid_cap, s = batch# Preprocesswith self.profilers[0]:im = self.preprocess(im0s)# Inferencewith self.profilers[1]:preds = self.inference(im, *args, **kwargs)# Postprocesswith self.profilers[2]:self.results = self.postprocess(preds, im, im0s)self.run_callbacks('on_predict_postprocess_end')# Visualize, save, write resultsn = len(im0s)for i in range(n):self.seen += 1self.results[i].speed = {'preprocess': self.profilers[0].dt * 1E3 / n,'inference': self.profilers[1].dt * 1E3 / n,'postprocess': self.profilers[2].dt * 1E3 / n}p, im0 = path[i], None if self.source_type.tensor else im0s[i].copy()p = Path(p)if self.args.verbose or self.args.save or self.args.save_txt or self.args.show:s += self.write_results(i, self.results, (p, im, im0))if self.args.save or self.args.save_txt:self.results[i].save_dir = self.save_dir.__str__()if self.args.show and self.plotted_img is not None:self.show(p)if self.args.save and self.plotted_img is not None:self.save_preds(vid_cap, i, str(self.save_dir / p.name))self.run_callbacks('on_predict_batch_end')yield from self.results# Print time (inference-not only)if self.args.verbose:LOGGER.info(f'{s}{(self.profilers[0].dt+self.profilers[1].dt+self.profilers[2].dt) * 1E3:.2f}ms')# Release assetsif isinstance(self.vid_writer[-1], cv2.VideoWriter):self.vid_writer[-1].release()  # release final video writer# Print resultsif self.args.verbose and self.seen:t = tuple(x.t / self.seen * 1E3 for x in self.profilers)  # speeds per imageLOGGER.info(f'Speed: %.2fms preprocess, %.2fms inference, %.2fms postprocess per image at shape 'f'{(1, 3, *im.shape[2:])}' % t)if self.args.save or self.args.save_txt or self.args.save_crop:nl = len(list(self.save_dir.glob('labels/*.txt')))  # number of labelss = f"\n{nl} label{'s' * (nl > 1)} saved to {self.save_dir / 'labels'}" if self.args.save_txt else ''LOGGER.info(f"Results saved to {colorstr('bold', self.save_dir)}{s}")self.run_callbacks('on_predict_end')def setup_model(self, model, verbose=True):"""Initialize YOLO model with given parameters and set it to evaluation mode."""self.model = AutoBackend(model or self.args.model,device=select_device(self.args.device, verbose=verbose),dnn=self.args.dnn,data=self.args.data,fp16=self.args.half,fuse=True,verbose=verbose)self.device = self.model.device  # update deviceself.args.half = self.model.fp16  # update halfself.model.eval()def show(self, p):"""Display an image in a window using OpenCV imshow()."""im0 = self.plotted_img#--------------------后添加-----------------------------str_FPS = "FPS: %.2f" % (1. / (self.profilers[0].dt + self.profilers[1].dt + self.profilers[2].dt))cv2.putText(im0, str_FPS, (50, 50), cv2.FONT_HERSHEY_COMPLEX, 1, (0, 255, 0), 3)# --------------------后添加-----------------------------if platform.system() == 'Linux' and p not in self.windows:self.windows.append(p)cv2.namedWindow(str(p), cv2.WINDOW_NORMAL | cv2.WINDOW_KEEPRATIO)  # allow window resize (Linux)cv2.resizeWindow(str(p), im0.shape[1], im0.shape[0])cv2.imshow(str(p), im0)cv2.waitKey(500 if self.batch[3].startswith('image') else 1)  # 1 milliseconddef save_preds(self, vid_cap, idx, save_path):"""Save video predictions as mp4 at specified path."""im0 = self.plotted_img# Save imgsif self.dataset.mode == 'image':cv2.imwrite(save_path, im0)else:  # 'video' or 'stream'if self.vid_path[idx] != save_path:  # new videoself.vid_path[idx] = save_pathif isinstance(self.vid_writer[idx], cv2.VideoWriter):self.vid_writer[idx].release()  # release previous video writerif vid_cap:  # videofps = int(vid_cap.get(cv2.CAP_PROP_FPS))  # integer required, floats produce error in MP4 codecw = int(vid_cap.get(cv2.CAP_PROP_FRAME_WIDTH))h = int(vid_cap.get(cv2.CAP_PROP_FRAME_HEIGHT))else:  # streamfps, w, h = 30, im0.shape[1], im0.shape[0]suffix = '.mp4' if MACOS else '.avi' if WINDOWS else '.avi'fourcc = 'avc1' if MACOS else 'WMV2' if WINDOWS else 'MJPG'save_path = str(Path(save_path).with_suffix(suffix))self.vid_writer[idx] = cv2.VideoWriter(save_path, cv2.VideoWriter_fourcc(*fourcc), fps, (w, h))self.vid_writer[idx].write(im0)def run_callbacks(self, event: str):"""Runs all registered callbacks for a specific event."""for callback in self.callbacks.get(event, []):callback(self)def add_callback(self, event: str, func):"""Add callback"""self.callbacks[event].append(func)
相关文章:
超详细||YOLOv8基础教程(环境搭建,训练,测试,部署看一篇就够)(在推理视频中添加FPS信息)
一、YOLOv8环境搭建 这篇文章将跳过基础的深度学习环境的搭建,如果没有完成的可以看我的这篇博客:超详细||深度学习环境搭建记录cudaanacondapytorchpycharm-CSDN博客 1. 在github上下载源码: GitHub - ultralytics/ultralytics: NEW - YO…...

LeetCode171. Excel Sheet Column Number
文章目录 一、题目二、题解 一、题目 Given a string columnTitle that represents the column title as appears in an Excel sheet, return its corresponding column number. For example: A -> 1 B -> 2 C -> 3 … Z -> 26 AA -> 27 AB -> 28 … Exa…...
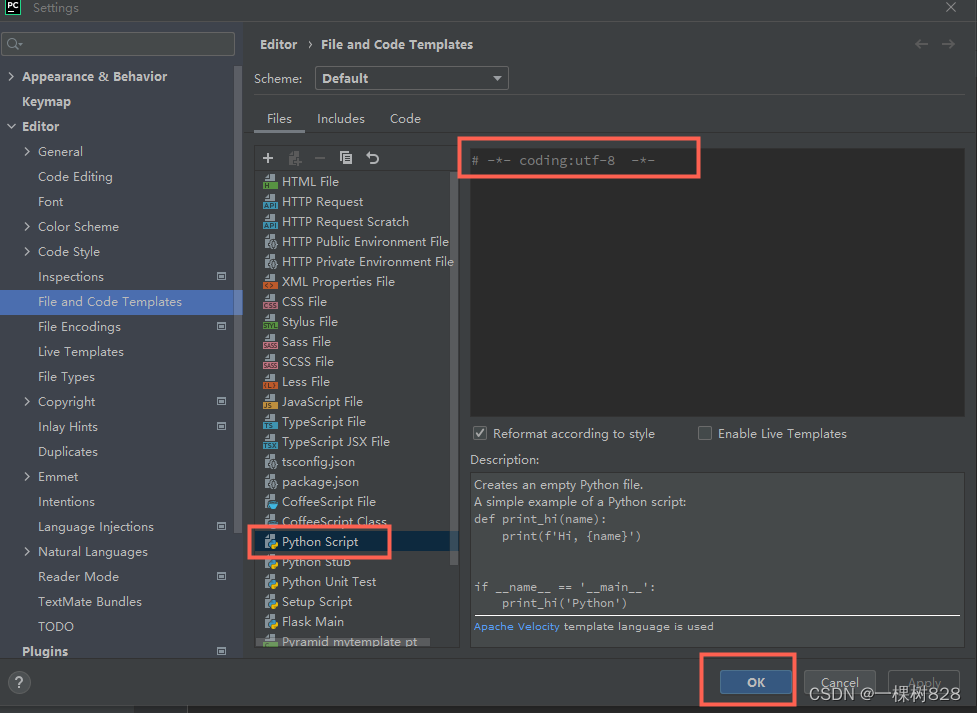
pycharm创建py文件,自动带# -*- coding:utf-8 -*-
File–Settings...

希捷与索尼集团合作生产HAMR写头激光二极管
最近有报道指出,希捷(Seagate)在生产其采用热辅助磁记录(HAMR)技术的大容量硬盘时,并非所有组件都在内部制造。根据日经新闻的一份新报告,希捷已与索尼集团合作,由索尼为其HAMR写头生…...
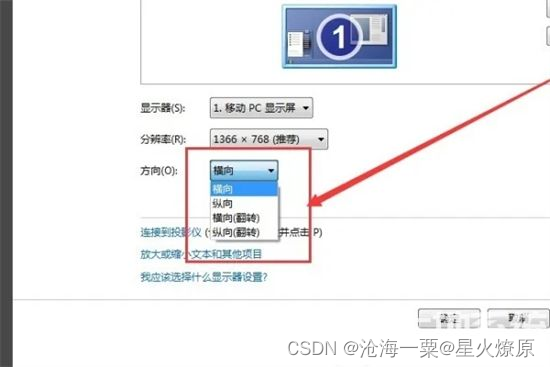
电脑竖屏显示了怎么回复原状
电脑屏幕变成这样 怎么恢复原状? 1、登录系统 2、在桌面上空白点击鼠标右键 3、在右键菜单中选择“屏幕分辨率”,左键点击打开 4、在窗口中“方向”位置选择“横向” 5、保存设置win7桌面即可恢复到正常状态...

Elasticsearch从入门到精通
目录 🧂1.简单介绍 🥓2.安装与下载 🌭3.安装启动es 🍿4.安装启动kibana 🥞5.初步检索 🧈6.进阶检索 🫓7.Elasticsearch整合 1.简单介绍🚗🚗🚗 Elat…...
Halcon 相机标定
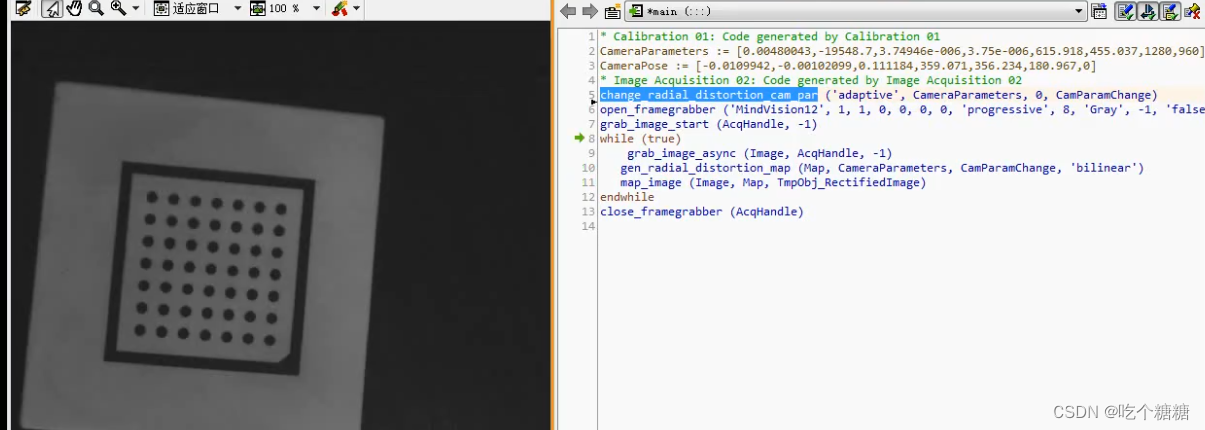
文章目录 算子单相机标定单相机标定畸变的矫正 算子 gen_caltab 生成标定文件 gen_caltab(::XNum,YNum,MarkDist,DiameterRatio,CalTabDescrFile,CalTabPSFile :) 算子来制作一个标定板XNum 每行黑色标志圆点的数量。YNum 每列黑色标志圆点的数…...

【JavaScript】深浅拷贝
JavaScript中复制对象有深拷贝和浅拷贝两种方式 浅拷贝:浅拷贝只复制对象的第一层属性,而不复制嵌套对象的引用。这意味着如果原始对象包含嵌套对象,浅拷贝后的对象仍然会共享这些嵌套对象的引用。可以使用`Object.assign()`或展开运算符(`...`)来进行浅拷贝。 // 浅拷贝示…...

CH32V3xx RT-Thread RS485实现modbus rtu master
目录 1、串口配置1.1 串口初始化1.2 uart DMA 初始化1.1.3 发送函数2、agile modbus3、应用测试4、遇到的问题本文通过ch32v3xx的串口 + RS485收发器实现modbus rtu master设备。此工程中移植的RT-Thread Nano系统,详情可参看本专栏前几篇文章。 1、串口配置 串口使用重映射后…...

当网站遭到DDOS攻击怎么办?
一般网站进行上线后会经常遭到攻击,有一些攻击不怎么容易被发现,当大规模的攻击来临时,会给企业造成巨大的损失,使网站的业务下线并且访问异常,出现很多的问题。 其中DDOS攻击是最高频的一种网络攻击方式,那…...

ES6中的数组解构赋值【详解】
文章目录 1.数组的解构赋值1.1 基本用法1.2 默认值1.3更多对象解构赋值 1.数组的解构赋值 1.1 基本用法 ES6允许按照一定的模式,从数组和对象中提取值,对变量进行赋值,这被称为结构。 let [a, b, c] [1, 2, 3];如果解构不成功,…...

error An unexpected error occurred: “https://registry.npm.taobao.org
背景: 想使用yarn命令结果报错 问题原因: 原来证书到期了 http://registry.npm.taobao.org/ 把这个放到浏览器搜索的时候自动换成https://registry.npmmirror.com/ 方案: npm cache clean --forcenpm config set registry https://registry…...

react中commit工作流程
整个React工作流程可以分为两大阶段: Render阶段 Schecule Reconcile Commit阶段 注意,Render阶段是在内存中运行的,这意味者可以被打断,而commit阶段一旦开始同步执行直到完成。 Renderer工作的阶段被称为commit阶段。commit阶…...

C++类和对象-多态->多态的基本语法、多态的原理剖析、纯虚函数和抽象类、虚析构和纯虚析构
#include<iostream> using namespace std; //多态 //动物类 class Animal { public: //Speak函数就是虚函数 //函数前面加上virtual关键字,变成虚函数,那么编译器在编译的时候就不能确定函数调用了。 virtual void speak() { …...

QShortcut
一、QShortcut简介 QShortcut是Qt框架中提供的一个类,用于创建和管理键盘快捷键。它允许开发者为应用程序定义一组快捷键组合,当用户按下这些组合键时,可以触发相应的动作或事件。QShortcut的使用使得用户能够更加方便、快捷地操作应用程序&…...
浅谈语义分割、图像分类与目标检测中的TP、TN、FP、FN
语义分割 TP:正确地预测出了正类,即原本是正类,识别的也是正类 TN:正确地预测出了负类,即原本是负类,识别的也是负类 FP:错误地预测为了正类,即原本是负类,识别的是正类…...

Python基础教程:解构
嗨喽~大家好呀,这里是魔王呐 ❤ ~! python更多源码/资料/解答/教程等 点击此处跳转文末名片免费获取 我们提到了字典的.items()方法会返回键值对元组的键值对元组列表: dic {key: 1, dsb: alex} print(dic.items())输出的内容为: dict_it…...

Java 学习和实践笔记(12)
这个就比较有意思了!所有的事情,拆分完之后,都有且只有这三种状态流程! //TIP To <b>Run</b> code, press <shortcut actionId"Run"/> or // click the <icon src"AllIcons.Actions.Execute&…...
学习数据结构和算法的第9天
题目讲解 移除元素 给你一个数组nums和一个值 val,你需要 原地 移除所有数值等于 val的元素,并返回移除后数组的新长度。 不要使用额外的数组空间,你必须仅使用0(1)额外空间并 原地 修改输入数组。 元素的顺序可以改变。你不需要…...

大龙谈智能内容 - 开工大吉
今天是2024年2月18日,开工第一天。 祝关注“大龙谈智能内容”的朋友龙年如龙飞天,事业步步高升!...

vscode里如何用git
打开vs终端执行如下: 1 初始化 Git 仓库(如果尚未初始化) git init 2 添加文件到 Git 仓库 git add . 3 使用 git commit 命令来提交你的更改。确保在提交时加上一个有用的消息。 git commit -m "备注信息" 4 …...

day52 ResNet18 CBAM
在深度学习的旅程中,我们不断探索如何提升模型的性能。今天,我将分享我在 ResNet18 模型中插入 CBAM(Convolutional Block Attention Module)模块,并采用分阶段微调策略的实践过程。通过这个过程,我不仅提升…...

【SpringBoot】100、SpringBoot中使用自定义注解+AOP实现参数自动解密
在实际项目中,用户注册、登录、修改密码等操作,都涉及到参数传输安全问题。所以我们需要在前端对账户、密码等敏感信息加密传输,在后端接收到数据后能自动解密。 1、引入依赖 <dependency><groupId>org.springframework.boot</groupId><artifactId...

Python爬虫实战:研究feedparser库相关技术
1. 引言 1.1 研究背景与意义 在当今信息爆炸的时代,互联网上存在着海量的信息资源。RSS(Really Simple Syndication)作为一种标准化的信息聚合技术,被广泛用于网站内容的发布和订阅。通过 RSS,用户可以方便地获取网站更新的内容,而无需频繁访问各个网站。 然而,互联网…...

前端导出带有合并单元格的列表
// 导出async function exportExcel(fileName "共识调整.xlsx") {// 所有数据const exportData await getAllMainData();// 表头内容let fitstTitleList [];const secondTitleList [];allColumns.value.forEach(column > {if (!column.children) {fitstTitleL…...
OPENCV形态学基础之二腐蚀
一.腐蚀的原理 (图1) 数学表达式:dst(x,y) erode(src(x,y)) min(x,y)src(xx,yy) 腐蚀也是图像形态学的基本功能之一,腐蚀跟膨胀属于反向操作,膨胀是把图像图像变大,而腐蚀就是把图像变小。腐蚀后的图像变小变暗淡。 腐蚀…...

Java线上CPU飙高问题排查全指南
一、引言 在Java应用的线上运行环境中,CPU飙高是一个常见且棘手的性能问题。当系统出现CPU飙高时,通常会导致应用响应缓慢,甚至服务不可用,严重影响用户体验和业务运行。因此,掌握一套科学有效的CPU飙高问题排查方法&…...
以光量子为例,详解量子获取方式
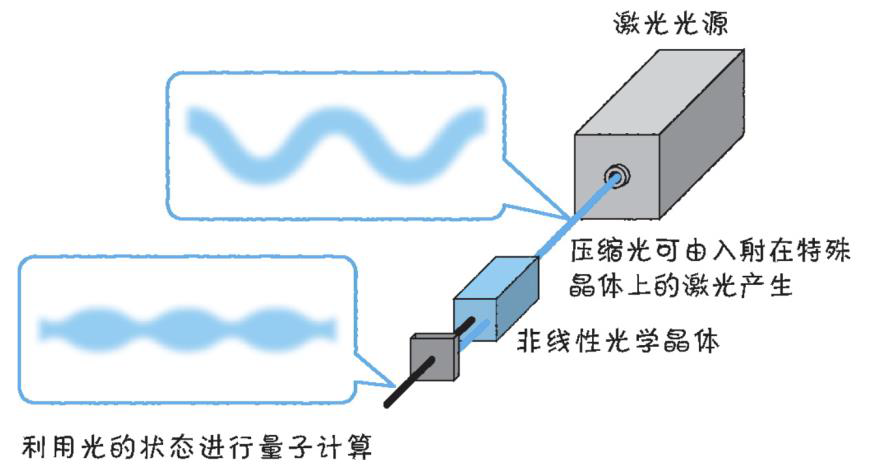
光量子技术获取量子比特可在室温下进行。该方式有望通过与名为硅光子学(silicon photonics)的光波导(optical waveguide)芯片制造技术和光纤等光通信技术相结合来实现量子计算机。量子力学中,光既是波又是粒子。光子本…...
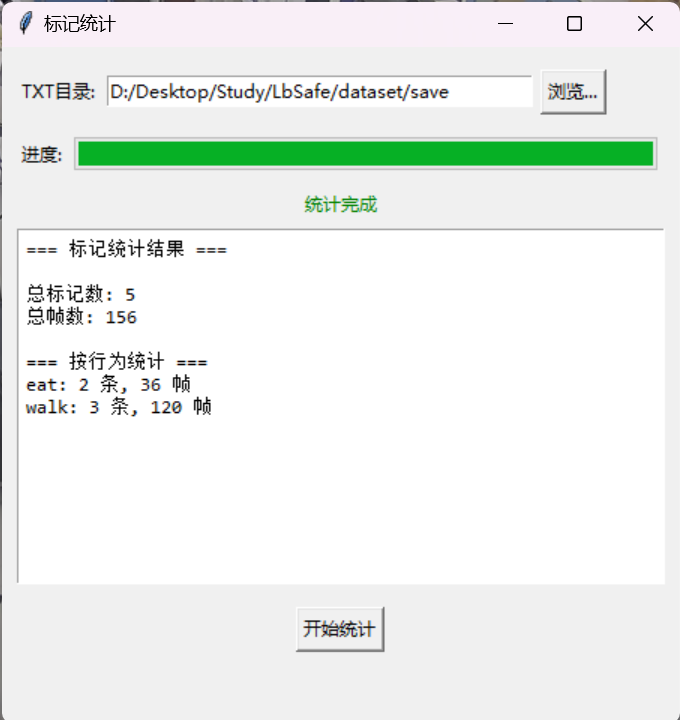
视频行为标注工具BehaviLabel(源码+使用介绍+Windows.Exe版本)
前言: 最近在做行为检测相关的模型,用的是时空图卷积网络(STGCN),但原有kinetic-400数据集数据质量较低,需要进行细粒度的标注,同时粗略搜了下已有开源工具基本都集中于图像分割这块,…...

wpf在image控件上快速显示内存图像
wpf在image控件上快速显示内存图像https://www.cnblogs.com/haodafeng/p/10431387.html 如果你在寻找能够快速在image控件刷新大图像(比如分辨率3000*3000的图像)的办法,尤其是想把内存中的裸数据(只有图像的数据,不包…...