Linux系统——防火墙拓展及重点理解
目录
一、iptables
1.基本语法
2.四表五链——重点记忆
2.1四表
2.2五链
2.3总结
3.iptables选项示例
3.1 -Z 清空流量计数
3.2 -P 修改默认规则
3.3 -D 删除规则
3.4 -R 指定编号替换规则
5.白名单
6.通用匹配
7.示例
7.1添加回环网卡
7.2可以访问端口
7.3 主机1可以访问主机2 主机2不可以访问主机1
8.扩展模块
8.1string字符串
8.2time
8.3connlimit 最大连接数
8.4limit——限制流量
8.5state状态
8.6总结
8.6.1多端口匹配
8.6.2IP范围匹配
8.6.3MAC地址匹配
8.6.4状态匹配
9.规则保存
9.1iptables-save 打印当前所有规则
9.2规则保存/恢复方法一
9.3规则保存的第二种方法
9.4如果想将规则开机自启
9.5总结
9.5.1持久保存规则——save
9.5.2加载规则——restore
iptables-restore选项
9.5.3开机自动重载规则
10.自定义链
10.1添加自定义链
10.2调用自定义链
10.3删除自定义链
11.规则优化、实践
12.NAT
12.1SNAT
12.1.1SNAT原理与应用
12.1.2SNAT应用环境
12.1.3SNAT原理
12.1.4SNAT转换前提条件
12.1.5SNAT原理图
12.1.6SNAT实验
内网客户端
路由转发服务器(企业连接外网的服务器)
外网服务器
12.2DNAT
12.2.1DNAT应用环境
12.2.2DNAT原理
12.2.3DNAT转换前提条件
12.2.3DNAT原理图
12.2.4DNAT实验
内网客户端
路由转发服务器
外网服务器
我们一般接触到的防火墙都是做主机防火墙,按实现方式划分重要的是绿盟、深信服
认识单机防火墙
一般把防火墙规则放在INPUT和OUTPUT链都可以做,但是一般都做在INPUT链中
一、iptables
1.基本语法

-t filter -A INPUT:指定表和指定链(指定filter表,可以不写,默认指定filter表;指定INPUT链 -A是追加 append)
-s 192.168.0.1 -j DROP:指定规则(是我们手动添加的规则)
2.四表五链——重点记忆
2.1四表
raw、mange、nat、filter、security(五表,但是实际上一般只用四表,security是指安全表,一般不会使用);其中最常用的是filter表(放行和拒绝流量)和nat表(地址转换)
四表优先级:raw>mange>nat>filter
2.2五链
INPUT、 OUTPUT、 FORWARD、 PREROUTING、 POSTROUTING
2.3总结
- 规则表的作用:容纳各种规则链; 表的划分依据:防火墙规则的作用相似
- 规则链的作用:容纳各种防火墙规则;规则的作用:对数据包进行过滤或处理 ;链的分类依据:处理数据包的不同时机
- 表里有链,链里有规则
3.iptables选项示例
3.1 -Z 清空流量计数
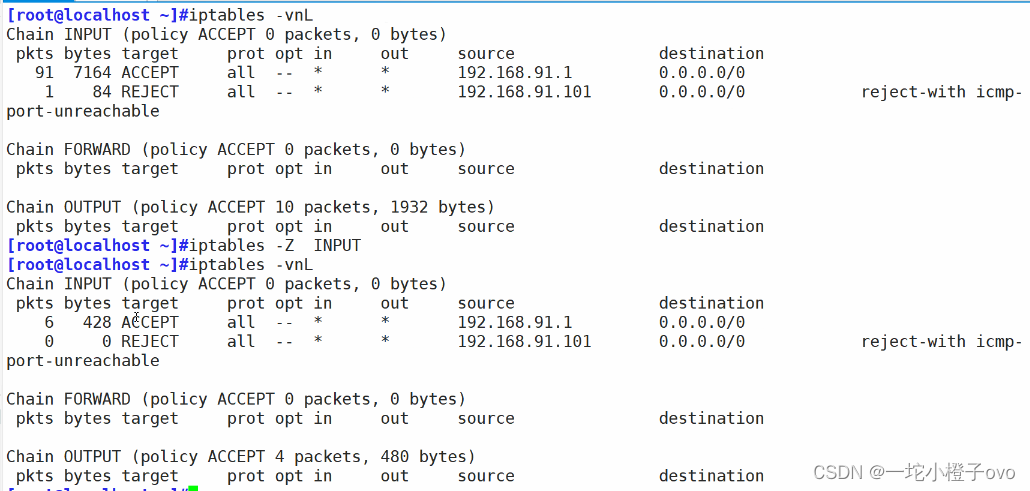
3.2 -P 修改默认规则
iptables 的各条链中,默认策略是规则匹配的最后一个环节——当找不到任何一条能够匹配数据包的规则时,则执行默认策略,默认策略的控制类型为ACCEPT(允许)、DROP(丢弃)两种,不支持REJECT
3.3 -D 删除规则

删除规则可以按照编号删除,也可以按照规则删除
3.4 -R 指定编号替换规则
[root@localhost ~]#iptables -R INPUT 1 -s 192.168.241.0/24 -j ACCEPT
[root@localhost ~]#iptables -vnL
Chain INPUT (policy ACCEPT 0 packets, 0 bytes)pkts bytes target     prot opt in     out     source               destination         6   364 ACCEPT     all  --  *      *       192.168.241.0/24     0.0.0.0/0           1    76 REJECT     all  --  *      *       0.0.0.0/0            0.0.0.0/0            reject-with icmp-port-unreachableChain FORWARD (policy ACCEPT 0 packets, 0 bytes)pkts bytes target     prot opt in     out     source               destination         Chain OUTPUT (policy ACCEPT 4 packets, 504 bytes)pkts bytes target     prot opt in     out     source               destination
5.白名单
[root@localhost ~]#iptables -A INPUT -s 192.168.241.1 -j ACCEPT
#设置只有192.168.241.1的主机可以访问我
[root@localhost ~]#iptables -A INPUT -j REJECT
#拒绝所有
[root@localhost ~]#iptables -vnL
Chain INPUT (policy ACCEPT 0 packets, 0 bytes)pkts bytes target     prot opt in     out     source               destination         66  4228 ACCEPT     all  --  *      *       192.168.241.1        0.0.0.0/0           0     0 REJECT     all  --  *      *       0.0.0.0/0            0.0.0.0/0            reject-with icmp-port-unreachableChain FORWARD (policy ACCEPT 0 packets, 0 bytes)pkts bytes target     prot opt in     out     source               destination         Chain OUTPUT (policy ACCEPT 8 packets, 776 bytes)pkts bytes target     prot opt in     out     source               destination
6.通用匹配
基本匹配条件:无需加载模块,由iptables/netfilter自行提供
| 选项 | 含义 |
|---|---|
| [ ! ] -s, --source address [/mask] [....] | 源IP地址或者不连续的IP地址 |
| [ ! ] -d, --destination address [/mask] [....] | 目标IP地址或者不连续的IP地址 |
| [ ! ] -p, --protocol protocol | 指定协议,可使用数字如,0(all) |
| [ ! ] -i, --in-interface name | 报文流入的接口;只能应用于数据报文流入的环节,只应用INPUT、FORWARD、PREROUTING链 |
| [ ! ] -o, --out-interface name | 报文流出的接口;只能应用于数据报文流出的环节,只应用FORWARD、OUPUT、POSTROUTING链 |
protocol:tcp,udp,icmp,icmpv6,udplite,esp,ah,sctp,mh or "all" 参看/etc/protocols
- 协议匹配:-p 协议名(一般使用的是tcp udp icmp)
- 地址匹配:-s 源地址;-d 目的地址 (可以是IP、网段、域名、空;空代表任意地址)
- 接口匹配:-i 入站网卡;-o 出站网卡
7.示例
7.1添加回环网卡
[root@localhost ~]#ping 10.0.0.10
PING 10.0.0.10 (10.0.0.10) 56(84) bytes of data.
^C
--- 10.0.0.10 ping statistics ---
2 packets transmitted, 0 received, 100% packet loss, time 999ms[root@localhost ~]#ping 127.0.0.1
PING 127.0.0.1 (127.0.0.1) 56(84) bytes of data.
64 bytes from 127.0.0.1: icmp_seq=1 ttl=64 time=0.083 ms
^C
--- 127.0.0.1 ping statistics ---
1 packets transmitted, 1 received, 0% packet loss, time 0ms
rtt min/avg/max/mdev = 0.083/0.083/0.083/0.000 ms
[root@localhost ~]#iptables -I INPUT -i lo -j ACCEPT
[root@localhost ~]#
[root@localhost ~]#iptables -vnL
Chain INPUT (policy ACCEPT 18 packets, 1100 bytes)pkts bytes target     prot opt in     out     source               destination         0     0 ACCEPT     all  --  lo     *       0.0.0.0/0            0.0.0.0/0           Chain FORWARD (policy ACCEPT 0 packets, 0 bytes)pkts bytes target     prot opt in     out     source               destination         Chain OUTPUT (policy ACCEPT 10 packets, 1056 bytes)pkts bytes target     prot opt in     out     source               destination
[root@localhost ~]#ping 127.0.0.1
PING 127.0.0.1 (127.0.0.1) 56(84) bytes of data.
64 bytes from 127.0.0.1: icmp_seq=1 ttl=64 time=0.055 ms
^C
--- 127.0.0.1 ping statistics ---
1 packets transmitted, 1 received, 0% packet loss, time 0ms
rtt min/avg/max/mdev = 0.055/0.055/0.055/0.000 ms
[root@localhost ~]#ping 10.0.0.10
PING 10.0.0.10 (10.0.0.10) 56(84) bytes of data.
64 bytes from 10.0.0.10: icmp_seq=1 ttl=128 time=0.467 ms
64 bytes from 10.0.0.10: icmp_seq=2 ttl=128 time=4.90 ms
^C
--- 10.0.0.10 ping statistics ---
2 packets transmitted, 2 received, 0% packet loss, time 1000ms
rtt min/avg/max/mdev = 0.467/2.686/4.906/2.220 ms
[root@localhost ~]#ping 20.0.0.1
PING 20.0.0.1 (20.0.0.1) 56(84) bytes of data.
64 bytes from 20.0.0.1: icmp_seq=1 ttl=128 time=1.05 ms
64 bytes from 20.0.0.1: icmp_seq=2 ttl=128 time=6.04 ms
^C
--- 20.0.0.1 ping statistics ---
2 packets transmitted, 2 received, 0% packet loss, time 1001ms
rtt min/avg/max/mdev = 1.053/3.547/6.041/2.494 ms
7.2可以访问端口
[root@localhost ~]#rpm -q httpd
httpd-2.4.6-99.el7.centos.1.x86_64
#要先安装httpd服务
[root@localhost ~]#iptables -I INPUT -s 192.168.241.22 -p tcp --dport 80 -j ACCEPT
#添加规则  让192.168.241.22主机可以通过tcp协议 访问80端口
[root@localhost ~]#iptables -vnL
Chain INPUT (policy ACCEPT 6 packets, 364 bytes)pkts bytes target     prot opt in     out     source               destination         0     0 ACCEPT     tcp  --  *      *       192.168.241.22       0.0.0.0/0            tcp dpt:80Chain FORWARD (policy ACCEPT 0 packets, 0 bytes)pkts bytes target     prot opt in     out     source               destination         Chain OUTPUT (policy ACCEPT 4 packets, 600 bytes)pkts bytes target     prot opt in     out     source               destination  [root@node2 ~]#curl 192.168.241.11
<!DOCTYPE html PUBLIC "-//W3C//DTD XHTML 1.1//EN" "http://www.w3.org/TR/xhtml11/DTD/xhtml11.dtd"><html><head>
<meta http-equiv="content-type" content="text/html; charset=UTF-8"><title>Apache HTTP Server Test Page powered by CentOS</title><meta http-equiv="Content-Type" content="text/html; charset=UTF-8"><!-- Bootstrap --><link href="/noindex/css/bootstrap.min.css" rel="stylesheet"><link rel="stylesheet" href="noindex/css/open-sans.css" type="text/css" /><style type="text/css"><!--		 body {font-family: "Open Sans", Helvetica, sans-serif;font-weight: 100;color: #ccc;background: rgba(10, 24, 55, 1);font-size: 16px;
}h2, h3, h4 {font-weight: 200;
}h2 {font-size: 28px;
}.jumbotron {margin-bottom: 0;color: #333;background: rgb(212,212,221); /* Old browsers */background: radial-gradient(ellipse at center top, rgba(255,255,255,1) 0%,rgba(174,174,183,1) 100%); /* W3C */
}.jumbotron h1 {font-size: 128px;font-weight: 700;color: white;text-shadow: 0px 2px 0px #abc,0px 4px 10px rgba(0,0,0,0.15),0px 5px 2px rgba(0,0,0,0.1),0px 6px 30px rgba(0,0,0,0.1);
}.jumbotron p {font-size: 28px;font-weight: 100;
}.main {background: white;color: #234;border-top: 1px solid rgba(0,0,0,0.12);padding-top: 30px;padding-bottom: 40px;
}.footer {border-top: 1px solid rgba(255,255,255,0.2);padding-top: 30px;
}--></style>
</head>
<body><div class="jumbotron text-center"><div class="container"><h1>Testing 123..</h1><p class="lead">This page is used to test the proper operation of the <a href="http://apache.org">Apache HTTP server</a> after it has been installed. If you can read this page it means that this site is working properly. This server is powered by <a href="http://centos.org">CentOS</a>.</p></div></div><div class="main"><div class="container"><div class="row"><div class="col-sm-6"><h2>Just visiting?</h2><p class="lead">The website you just visited is either experiencing problems or is undergoing routine maintenance.</p><p>If you would like to let the administrators of this website know that you've seen this page instead of the page you expected, you should send them e-mail. In general, mail sent to the name "webmaster" and directed to the website's domain should reach the appropriate person.</p><p>For example, if you experienced problems while visiting www.example.com, you should send e-mail to "webmaster@example.com".</p></div><div class="col-sm-6"><h2>Are you the Administrator?</h2><p>You should add your website content to the directory <tt>/var/www/html/</tt>.</p><p>To prevent this page from ever being used, follow the instructions in the file <tt>/etc/httpd/conf.d/welcome.conf</tt>.</p><h2>Promoting Apache and CentOS</h2><p>You are free to use the images below on Apache and CentOS Linux powered HTTP servers.  Thanks for using Apache and CentOS!</p><p><a href="http://httpd.apache.org/"><img src="images/apache_pb.gif" alt="[ Powered by Apache ]"></a> <a href="http://www.centos.org/"><img src="images/poweredby.png" alt="[ Powered by CentOS Linux ]" height="31" width="88"></a></p></div></div></div></div></div><div class="footer"><div class="container"><div class="row"><div class="col-sm-6">          <h2>Important note:</h2><p class="lead">The CentOS Project has nothing to do with this website or its content,it just provides the software that makes the website run.</p><p>If you have issues with the content of this site, contact the owner of the domain, not the CentOS project. Unless you intended to visit CentOS.org, the CentOS Project does not have anything to do with this website,the content or the lack of it.</p><p>For example, if this website is www.example.com, you would find the owner of the example.com domain at the following WHOIS server:</p><p><a href="http://www.internic.net/whois.html">http://www.internic.net/whois.html</a></p></div><div class="col-sm-6"><h2>The CentOS Project</h2><p>The CentOS Linux distribution is a stable, predictable, manageable and reproduceable platform derived from the sources of Red Hat Enterprise Linux (RHEL).<p><p>Additionally to being a popular choice for web hosting, CentOS also provides a rich platform for open source communities to build upon. For more informationplease visit the <a href="http://www.centos.org/">CentOS website</a>.</p></div></div></div></div></div>
</body></html>
7.3 主机1可以访问主机2 主机2不可以访问主机1
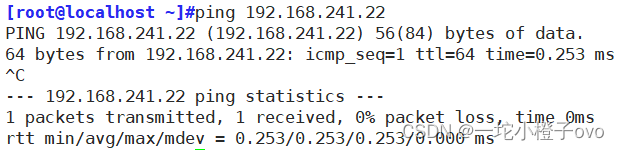
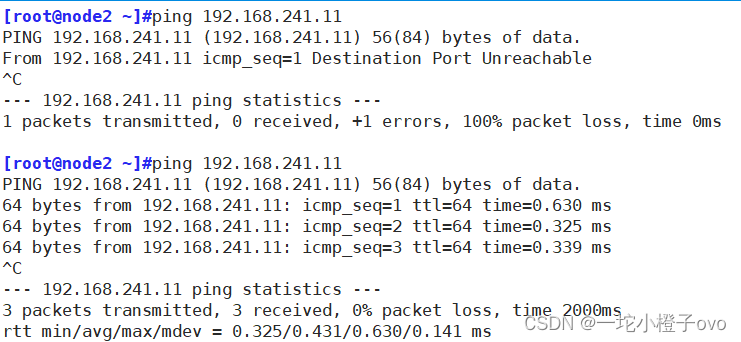
前期测试,双方可以互ping

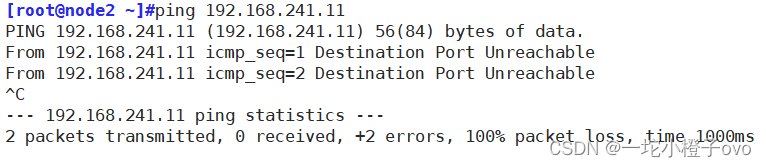
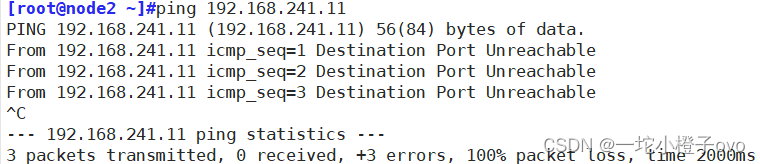
[root@localhost ~]#iptables -I INPUT -s 192.168.241.22 -p icmp --icmp-type 8 -j REJECT
[root@localhost ~]#iptables -vnL
Chain INPUT (policy ACCEPT 10 packets, 612 bytes)pkts bytes target     prot opt in     out     source               destination         0     0 REJECT     icmp --  *      *       192.168.241.22       0.0.0.0/0            icmptype 8 reject-with icmp-port-unreachableChain FORWARD (policy ACCEPT 0 packets, 0 bytes)pkts bytes target     prot opt in     out     source               destination         Chain OUTPUT (policy ACCEPT 6 packets, 1032 bytes)pkts bytes target     prot opt in     out     source               destination
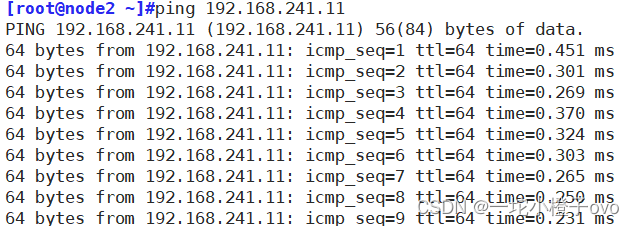
[root@localhost ~]#iptables -F
[root@localhost ~]#iptables -I INPUT -s 192.168.241.22 -p icmp --icmp-type 8 -j DROP
[root@localhost ~]#iptables -vnL
Chain INPUT (policy ACCEPT 8 packets, 488 bytes)pkts bytes target     prot opt in     out     source               destination         0     0 DROP       icmp --  *      *       192.168.241.22       0.0.0.0/0            icmptype 8Chain FORWARD (policy ACCEPT 0 packets, 0 bytes)pkts bytes target     prot opt in     out     source               destination         Chain OUTPUT (policy ACCEPT 5 packets, 684 bytes)pkts bytes target     prot opt in     out     source               destination

DROP和REJECT的区别是,REJECT会回复Unreachable,但是DROP 不会回复
8.扩展模块
8.1string字符串
要先安装httpd
[root@localhost ~]#echo "wyb" > /var/www/html/index.html
#自建网页   使得其他主机访问httpd服务 是访问  wyb[root@localhost ~]#iptables -A OUTPUT -p tcp --sport 80 -m string --algo bm --from 62 --string "wyb" -j REJECT
[root@localhost ~]#iptables -vnL
Chain INPUT (policy ACCEPT 14 packets, 852 bytes)pkts bytes target     prot opt in     out     source               destination         Chain FORWARD (policy ACCEPT 0 packets, 0 bytes)pkts bytes target     prot opt in     out     source               destination         Chain OUTPUT (policy ACCEPT 9 packets, 1268 bytes)pkts bytes target     prot opt in     out     source               destination         0     0 REJECT     tcp  --  *      *       0.0.0.0/0            0.0.0.0/0            tcp spt:80 STRING match  "wyb" ALGO name bm FROM 62 TO 65535 reject-with icmp-port-unreachable
[root@node2 ~]#curl 192.168.241.11
wyb
[root@node2 ~]#curl 192.168.241.11#不会跳转相关信息出来
8.2time


此时还可以ping通,不要急,因为date使用的是utc时间
此时的utc时间
![]()
我们修改一下时间

此时再ping

8.3connlimit 最大连接数
根据客户端IP做并发连接数数量匹配 可防止Dos(Denial of Service 拒绝服务)攻击
--connlimit-upto N #连接的数量小于等于N时匹配
--connlimit-above N #连接的数量大于N时匹配
[root@localhost ~]# gcc flood_connect.c -o flood
#编译安装 黑客文件
[root@localhost ~]# ./flood 192.168.91.100
#运行黑客脚本[root@localhost ~]#ss [root@localhost ~]#iptables -A INPUT -p tcp --dport 80 -m connlimit --connlimit-above 2 -j REJECT
#只允许两个流量来访问http 其他的拒绝 限制连接数
8.4limit——限制流量
测试,目前ping192.168.241.11 无任何问题
此时通过制作一条防火墙规则来限制192.168.241.22主机的流量
[root@localhost ~]#iptables -vnL
Chain INPUT (policy ACCEPT 13 packets, 806 bytes)pkts bytes target     prot opt in     out     source               destination         Chain FORWARD (policy ACCEPT 0 packets, 0 bytes)pkts bytes target     prot opt in     out     source               destination         Chain OUTPUT (policy ACCEPT 7 packets, 692 bytes)pkts bytes target     prot opt in     out     source               destination
[root@localhost ~]#iptables -I INPUT -p icmp --icmp-type 8 -m limit --limit 10/minute --limit-burst 5 -j ACCEPT
#通过限制icmp协议的8包请求包  流量 每分钟  限制最大流量为5个包
[root@localhost ~]#iptables -vnL
Chain INPUT (policy ACCEPT 6 packets, 364 bytes)pkts bytes target     prot opt in     out     source               destination         0     0 ACCEPT     icmp --  *      *       0.0.0.0/0            0.0.0.0/0            icmptype 8 limit: avg 10/min burst 5Chain FORWARD (policy ACCEPT 0 packets, 0 bytes)pkts bytes target     prot opt in     out     source               destination         Chain OUTPUT (policy ACCEPT 4 packets, 576 bytes)pkts bytes target     prot opt in     out     source               destination
[root@localhost ~]#iptables -A INPUT -p icmp -j REJECT
[root@localhost ~]#iptables -vnL
Chain INPUT (policy ACCEPT 6 packets, 364 bytes)pkts bytes target     prot opt in     out     source               destination         7   588 ACCEPT     icmp --  *      *       0.0.0.0/0            0.0.0.0/0            icmptype 8 limit: avg 10/min burst 50     0 REJECT     icmp --  *      *       0.0.0.0/0            0.0.0.0/0            reject-with icmp-port-unreachableChain FORWARD (policy ACCEPT 0 packets, 0 bytes)pkts bytes target     prot opt in     out     source               destination         Chain OUTPUT (policy ACCEPT 4 packets, 432 bytes)pkts bytes target     prot opt in     out     source               destination
此时再通过192.168.241.22主机来ping192.168.241.11主机

8.5state状态
- NEW:新发出请求;连接追踪信息库中不存在此连接的相关信息条目,因此,将其识别为第一次发出的请求
- ESTABLISHED:NEW状态之后,连接追踪信息库中为其建立的条目失效之前期间内所进行的通信状态
- RELATED:新发起的但与已有连接相关联的连接,如:ftp协议中的数据连接与命令连接之间的关系
- INVALID:无效的连接,如flag标记不正确
- UNTRACKED:未进行追踪的连接,如:raw表中关闭追踪
一般只用NEW、ESTABLISHED
制作规则之前通过192.168.241.22主机ping192.168.241.11主机

添加一条规则 对于新流量设置拒绝
[root@localhost ~]#iptables -A INPUT -m state --state NEW -j REJECT此时通过192.168.241.23主机ping192.168.241.11;使用192.168.241.22主机还可以继续ping192.168.241.11


8.6总结
8.6.1多端口匹配
| -m multiport --sport | 源端口列表 |
| -m multiport --dport | 目的端口列表 |
iptables -A INPUT -p tcp -m multiport --dport 80,22,21,20,53 -j ACCEPT
iptables -A INPUT -p udp -m multiport --dport 53 -j ACCEPT
8.6.2IP范围匹配
-m iprange --src-range IP范围iptables -A FORWARD -p udp -m iprange --src-range 192.168.80.100-192.168.80.200 -j DROP
#禁止转发源地址位于192.168.80.100-192.168.80.200的udp数据包
8.6.3MAC地址匹配
-m mac --mac-source MAC地址iptables -A FORWARD -m mac --mac-source xx:xx:xx:xx:xx:xx -j DROP
#禁止来自某MAC地址的数据包通过本机转发
8.6.4状态匹配
常见的连接状态
- NEW :与任何连接无关的,还没开始连接
- ESTABLISHED :响应请求或者已建立连接的,连接态
- RELATED :与已有连接有相关性的(如FTP主被动模式的数据连接),衍生态,一般与ESTABLISHED 配合使用
- INVALID:不能被识别属于哪个连接或没有任何状态
状态匹配: -m state --state 连接状态iptables -A FORWARD -m state --state NEW -P tcp ! --syn -j DROP
#禁止转发与正常TCP连接无关的非--syn请求数据包(如伪造的网络攻击数据包)
9.规则保存
使用iptables命令定义的规则,手动删除之前,其生效期限为kernel存活期限
| save | 保存 |
| restore | 恢复 |
9.1iptables-save 打印当前所有规则
[root@localhost ~]#iptables-save
# Generated by iptables-save v1.4.21 on Sun Feb 18 16:09:28 2024
*mangle
:PREROUTING ACCEPT [494:50032]
:INPUT ACCEPT [494:50032]
:FORWARD ACCEPT [0:0]
:OUTPUT ACCEPT [422:64901]
:POSTROUTING ACCEPT [475:74138]
-A POSTROUTING -o virbr0 -p udp -m udp --dport 68 -j CHECKSUM --checksum-fill
COMMIT
# Completed on Sun Feb 18 16:09:28 2024
# Generated by iptables-save v1.4.21 on Sun Feb 18 16:09:28 2024
*nat
:PREROUTING ACCEPT [9:872]
:INPUT ACCEPT [9:872]
:OUTPUT ACCEPT [96:7438]
:POSTROUTING ACCEPT [96:7438]
-A POSTROUTING -s 192.168.122.0/24 -d 224.0.0.0/24 -j RETURN
-A POSTROUTING -s 192.168.122.0/24 -d 255.255.255.255/32 -j RETURN
-A POSTROUTING -s 192.168.122.0/24 ! -d 192.168.122.0/24 -p tcp -j MASQUERADE --to-ports 1024-65535
-A POSTROUTING -s 192.168.122.0/24 ! -d 192.168.122.0/24 -p udp -j MASQUERADE --to-ports 1024-65535
-A POSTROUTING -s 192.168.122.0/24 ! -d 192.168.122.0/24 -j MASQUERADE
COMMIT
# Completed on Sun Feb 18 16:09:28 2024
# Generated by iptables-save v1.4.21 on Sun Feb 18 16:09:28 2024
*filter
:INPUT ACCEPT [495:50209]
:FORWARD ACCEPT [0:0]
:OUTPUT ACCEPT [423:65078]
-A INPUT -i virbr0 -p udp -m udp --dport 53 -j ACCEPT
-A INPUT -i virbr0 -p tcp -m tcp --dport 53 -j ACCEPT
-A INPUT -i virbr0 -p udp -m udp --dport 67 -j ACCEPT
-A INPUT -i virbr0 -p tcp -m tcp --dport 67 -j ACCEPT
-A FORWARD -d 192.168.122.0/24 -o virbr0 -m conntrack --ctstate RELATED,ESTABLISHED -j ACCEPT
-A FORWARD -s 192.168.122.0/24 -i virbr0 -j ACCEPT
-A FORWARD -i virbr0 -o virbr0 -j ACCEPT
-A FORWARD -o virbr0 -j REJECT --reject-with icmp-port-unreachable
-A FORWARD -i virbr0 -j REJECT --reject-with icmp-port-unreachable
-A OUTPUT -o virbr0 -p udp -m udp --dport 68 -j ACCEPT
COMMIT
# Completed on Sun Feb 18 16:09:28 2024
9.2规则保存/恢复方法一
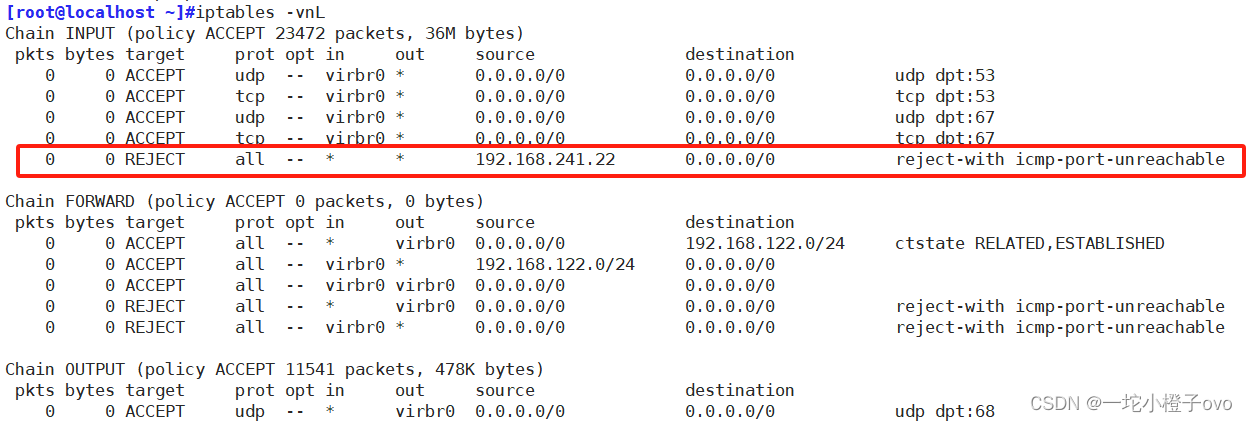
[root@localhost ~]#iptables -I INPUT -s 192.168.241.22 -j REJECT
#设置拒绝192.168.241.22主机访问的规则
[root@localhost ~]#iptables -vnL
Chain INPUT (policy ACCEPT 6 packets, 364 bytes)pkts bytes target     prot opt in     out     source               destination         0     0 REJECT     all  --  *      *       192.168.241.22       0.0.0.0/0            reject-with icmp-port-unreachableChain FORWARD (policy ACCEPT 0 packets, 0 bytes)pkts bytes target     prot opt in     out     source               destination         Chain OUTPUT (policy ACCEPT 4 packets, 504 bytes)pkts bytes target     prot opt in     out     source               destination
[root@localhost ~]#iptables-save  > /opt/123
#将规则保存在/opt/123
[root@localhost ~]#iptables -F
[root@localhost ~]#iptables -vnL
Chain INPUT (policy ACCEPT 12 packets, 704 bytes)pkts bytes target     prot opt in     out     source               destination         Chain FORWARD (policy ACCEPT 0 packets, 0 bytes)pkts bytes target     prot opt in     out     source               destination         Chain OUTPUT (policy ACCEPT 7 packets, 612 bytes)pkts bytes target     prot opt in     out     source               destination
此时的192.168.241.22主机从开始可以ping192.168.241.11主机,添加规则后不能ping,将规则保存在文件中,再清空规则,可以ping
[root@localhost ~]#iptables-restore < /opt/123
#将保存的规则通过/opt/123 重新加载到规则中
[root@localhost ~]#iptables -vnL
Chain INPUT (policy ACCEPT 6 packets, 364 bytes)pkts bytes target     prot opt in     out     source               destination         0     0 REJECT     all  --  *      *       192.168.241.22       0.0.0.0/0            reject-with icmp-port-unreachableChain FORWARD (policy ACCEPT 0 packets, 0 bytes)pkts bytes target     prot opt in     out     source               destination         Chain OUTPUT (policy ACCEPT 4 packets, 424 bytes)pkts bytes ta
此时192.168.241.22主机无妨再ping192.168.241.11主机
9.3规则保存的第二种方法
[root@localhost ~]#yum install iptables-services.x86_64 -y

cp {,.}bak

[root@localhost ~]#iptables -I INPUT -s 192.168.241.0/24 -j ACCEPT
[root@localhost ~]#iptables-save > /etc/sysconfig/iptables
#保存规则
[root@localhost ~]#iptables -vnL
Chain INPUT (policy ACCEPT 0 packets, 0 bytes)pkts bytes target     prot opt in     out     source               destination         6   364 ACCEPT     all  --  *      *       192.168.241.0/24     0.0.0.0/0           Chain FORWARD (policy ACCEPT 0 packets, 0 bytes)pkts bytes target     prot opt in     out     source               destination         Chain OUTPUT (policy ACCEPT 4 packets, 504 bytes)pkts bytes target     prot opt in     out     source               destination
[root@localhost ~]#vim /etc/sysconfig/iptables
#规则将被保存在这个配置文件中,并在这个配置文件中读取
[root@localhost ~]#systemctl enable iptables.service
#开机自启
Created symlink from /etc/systemd/system/basic.target.wants/iptables.service to /usr/lib/systemd/system/iptables.service.
[root@localhost ~]#iptables -vnL
Chain INPUT (policy ACCEPT 5 packets, 380 bytes)pkts bytes target     prot opt in     out     source               destination         247 15804 ACCEPT     all  --  *      *       192.168.241.0/24     0.0.0.0/0           Chain FORWARD (policy ACCEPT 0 packets, 0 bytes)pkts bytes target     prot opt in     out     source               destination         Chain OUTPUT (policy ACCEPT 175 packets, 18648 bytes)pkts bytes target     prot opt in     out     source               destination
[root@localhost ~]#iptables -F
[root@localhost ~]#iptables -vnL
Chain INPUT (policy ACCEPT 6 packets, 364 bytes)pkts bytes target     prot opt in     out     source               destination         Chain FORWARD (policy ACCEPT 0 packets, 0 bytes)pkts bytes target     prot opt in     out     source               destination         Chain OUTPUT (policy ACCEPT 4 packets, 384 bytes)pkts bytes target     prot opt in     out     source               destination         #目前规则还在,清空规则后重启
9.4如果想将规则开机自启
vim /etc/rc.d/rc.local

如果想开机自启需要给该配置文件加执行权限

将所有规则清空后重启
![]()
9.5总结
9.5.1持久保存规则——save
| CentOS 7,8 | iptables-save > /PATH/TO/SOME_RULES_FILE |
| CentOS 6 | 将规则覆盖保存至/etc/sysconfig/iptables文件中 service iptables save |
9.5.2加载规则——restore
| CentOS 7,8 | iptables-restore < /PATH/FROM/SOME_RULES_FILE |
| CentOS 6 | 会自动从/etc/sysconfig/iptables 重新载入规则 service iptables restart |
iptables-restore选项
| -n | --noflush | 不清除原有规则 |
| -t | --test | 仅分析生成规则集,但不提交 |
9.5.3开机自动重载规则
在/etc/rc.d/rc.local文件添加
iptables-save > /opt/iptables
vim ~/.basrc
iptables-restore < /opt/iptables
10.自定义链
10.1添加自定义链
[root@localhost ~]#iptables -N web
#增加自定义链 取名为web
[root@localhost ~]#iptables -F
[root@localhost ~]#iptables -vnL
Chain INPUT (policy ACCEPT 6 packets, 364 bytes)pkts bytes target     prot opt in     out     source               destination         Chain FORWARD (policy ACCEPT 0 packets, 0 bytes)pkts bytes target     prot opt in     out     source               destination         Chain OUTPUT (policy ACCEPT 4 packets, 384 bytes)pkts bytes target     prot opt in     out     source               destination         Chain web (0 references)pkts bytes target     prot opt in     out     source               destination
[root@localhost ~]#iptables -E web WEB
#修改web自定义链为WEB
[root@localhost ~]#iptables -vnL
Chain INPUT (policy ACCEPT 6 packets, 364 bytes)pkts bytes target     prot opt in     out     source               destination         Chain FORWARD (policy ACCEPT 0 packets, 0 bytes)pkts bytes target     prot opt in     out     source               destination         Chain OUTPUT (policy ACCEPT 4 packets, 400 bytes)pkts bytes target     prot opt in     out     source               destination         Chain WEB (0 references)pkts bytes target     prot opt in     out     source               destination
[root@localhost ~]#iptables -A WEB -p tcp -m multiport --dport 80,443 -j ACCEPT
[root@localhost ~]#iptables -vnL
Chain INPUT (policy ACCEPT 6 packets, 364 bytes)pkts bytes target     prot opt in     out     source               destination         Chain FORWARD (policy ACCEPT 0 packets, 0 bytes)pkts bytes target     prot opt in     out     source               destination         Chain OUTPUT (policy ACCEPT 4 packets, 600 bytes)pkts bytes target     prot opt in     out     source               destination         Chain WEB (0 references)pkts bytes target     prot opt in     out     source               destination         0     0 ACCEPT     tcp  --  *      *       0.0.0.0/0            0.0.0.0/0            multiport dports 80,443
[root@localhost ~]#iptables -I WEB -s 192.168.241.22 -p tcp --dport 80 -j DROP
[root@localhost ~]#iptables -vnL
Chain INPUT (policy ACCEPT 6 packets, 364 bytes)pkts bytes target     prot opt in     out     source               destination         Chain FORWARD (policy ACCEPT 0 packets, 0 bytes)pkts bytes target     prot opt in     out     source               destination         Chain OUTPUT (policy ACCEPT 4 packets, 600 bytes)pkts bytes target     prot opt in     out     source               destination         Chain WEB (0 references)pkts bytes target     prot opt in     out     source               destination         0     0 DROP       tcp  --  *      *       192.168.241.22       0.0.0.0/0            tcp dpt:800     0 ACCEPT     tcp  --  *      *       0.0.0.0/0            0.0.0.0/0            multiport dports 80,443
自定义链是将相同连接的规则放在一起方便调用
10.2调用自定义链
[root@localhost ~]#iptables -A INPUT -s 192.168.241.22 -j WEB
[root@localhost ~]#iptables -vnL
Chain INPUT (policy ACCEPT 14 packets, 1004 bytes)pkts bytes target     prot opt in     out     source               destination         4   336 WEB        all  --  *      *       192.168.241.22       0.0.0.0/0           Chain FORWARD (policy ACCEPT 0 packets, 0 bytes)pkts bytes target     prot opt in     out     source               destination         Chain OUTPUT (policy ACCEPT 12 packets, 1136 bytes)pkts bytes target     prot opt in     out     source               destination         Chain WEB (1 references)pkts bytes target     prot opt in     out     source               destination         0     0 DROP       tcp  --  *      *       192.168.241.22       0.0.0.0/0            tcp dpt:800     0 ACCEPT     tcp  --  *      *       0.0.0.0/0            0.0.0.0/0            multiport dports 80,443
10.3删除自定义链
[root@localhost ~]#iptables -F INPUT
[root@localhost ~]#iptables -vnL
Chain INPUT (policy ACCEPT 6 packets, 364 bytes)pkts bytes target     prot opt in     out     source               destination         Chain FORWARD (policy ACCEPT 0 packets, 0 bytes)pkts bytes target     prot opt in     out     source               destination         Chain OUTPUT (policy ACCEPT 4 packets, 392 bytes)pkts bytes target     prot opt in     out     source               destination         Chain WEB (0 references)pkts bytes target     prot opt in     out     source               destination         0     0 DROP       tcp  --  *      *       192.168.241.22       0.0.0.0/0            tcp dpt:800     0 ACCEPT     tcp  --  *      *       0.0.0.0/0            0.0.0.0/0            multiport dports 80,443
[root@localhost ~]#iptables -F WEB
[root@localhost ~]#iptables -vnL
Chain INPUT (policy ACCEPT 6 packets, 364 bytes)pkts bytes target     prot opt in     out     source               destination         Chain FORWARD (policy ACCEPT 0 packets, 0 bytes)pkts bytes target     prot opt in     out     source               destination         Chain OUTPUT (policy ACCEPT 4 packets, 392 bytes)pkts bytes target     prot opt in     out     source               destination         Chain WEB (0 references)pkts bytes target     prot opt in     out     source               destination
[root@localhost ~]#iptables -X WEB
[root@localhost ~]#iptables -vnL
Chain INPUT (policy ACCEPT 6 packets, 364 bytes)pkts bytes target     prot opt in     out     source               destination         Chain FORWARD (policy ACCEPT 0 packets, 0 bytes)pkts bytes target     prot opt in     out     source               destination         Chain OUTPUT (policy ACCEPT 4 packets, 392 bytes)pkts bytes target     prot opt in     out     source               destination
删除自定义链要注意: 要先删除WEB规则 再删INPUT调用WEB的规则 最后删WEB链
11.规则优化、实践
-
安全放行所有入站和出站的状态为ESTABLISHED状态连接,建议放在第一条,效率更高
-
谨慎放行入站的新请求
-
有特殊目的限制访问功能,要在放行规则之前加以拒绝
-
同类规则(访问同一应用,比如:http ),匹配范围小的放在前面,用于特殊处理
-
不同类的规则(访问不同应用,一个是http,另一个是mysql ),匹配范围大的放在前面,效率更高
-
应该将那些可由一条规则能够描述的多个规则合并为一条,减少规则数量,提高检查效率
-
设置默认策略,建议白名单(只放行特定连接)
A:iptables -P,不建议,容易出现“自杀现象”
B:规则的最后定义规则做为默认策略,推荐使用,放在最后一条
12.NAT
NAT: network address translation,支持PREROUTING,INPUT,OUTPUT,POSTROUTING四个链
请求报文:修改源/目标IP,
响应报文:修改源/目标IP,根据跟踪机制自动实现
NAT的实现分为下面类型:
SNAT:source NAT ,支持POSTROUTING, INPUT,让本地网络中的主机通过某一特定地址访问外部网络,实现地址伪装,请求报文:修改源IP
DNAT:destination NAT 支持PREROUTING , OUTPUT,把本地网络中的主机上的某服务开放给外部网络访问(发布服务和端口映射),但隐藏真实IP,请求报文:修改目标IP
PNAT: port nat,端口和IP都进行修改
12.1SNAT
基于nat表的target,适用于固定的公网IP
12.1.1SNAT原理与应用
12.1.2SNAT应用环境
局域网主机共享单个公网IP地址接入Internet(私有IP不能在Internet中正常路由)
12.1.3SNAT原理
源地址转换,根据指定条件修改数据包的源IP地址,通常被叫做源映射
12.1.4SNAT转换前提条件
1.局域网各主机已正确设置IP地址、子网掩码、默认网关地址
2.Linux网关开启IP路由转发
Linux系统本身是没有转发功能,只有路由发送数据
12.1.5SNAT原理图
| 源IP地址 | 目的IP地址 |
|---|---|
| 192.168.241.11 | 12.0.0.10 |
| 12.0.0.1 | 12.0.0.10 |
12.1.6SNAT实验
内网客户端
[root@localhost ~]#systemctl stop firewalld
[root@localhost ~]#setenforce 0
setenforce: SELinux is disabled
[root@localhost ~]#yum install httpd -y
[root@localhost ~]#route -n
Kernel IP routing table
Destination     Gateway         Genmask         Flags Metric Ref    Use Iface
0.0.0.0         192.168.241.2   0.0.0.0         UG    100    0        0 ens33
192.168.122.0   0.0.0.0         255.255.255.0   U     0      0        0 virbr0
192.168.241.0   0.0.0.0         255.255.255.0   U     100    0        0 ens33
[root@localhost ~]#vim /etc/sysconfig/network-scripts/ifcfg-ens33
[root@localhost ~]#ping 12.0.0.254
PING 12.0.0.254 (12.0.0.254) 56(84) bytes of data.
64 bytes from 12.0.0.254: icmp_seq=1 ttl=128 time=0.918 ms
^C
--- 12.0.0.254 ping statistics ---
1 packets transmitted, 1 received, 0% packet loss, time 0ms
rtt min/avg/max/mdev = 0.918/0.918/0.918/0.000 ms
[root@localhost ~]#ping 192.168.241.22
PING 192.168.241.22 (192.168.241.22) 56(84) bytes of data.
64 bytes from 192.168.241.22: icmp_seq=1 ttl=64 time=0.740 ms
^C
--- 192.168.241.22 ping statistics ---
1 packets transmitted, 1 received, 0% packet loss, time 0ms
rtt min/avg/max/mdev = 0.740/0.740/0.740/0.000 ms
[root@localhost ~]#vim /etc/sysconfig/network-scripts/ifcfg-ens33
[root@localhost ~]#systemctl restart network
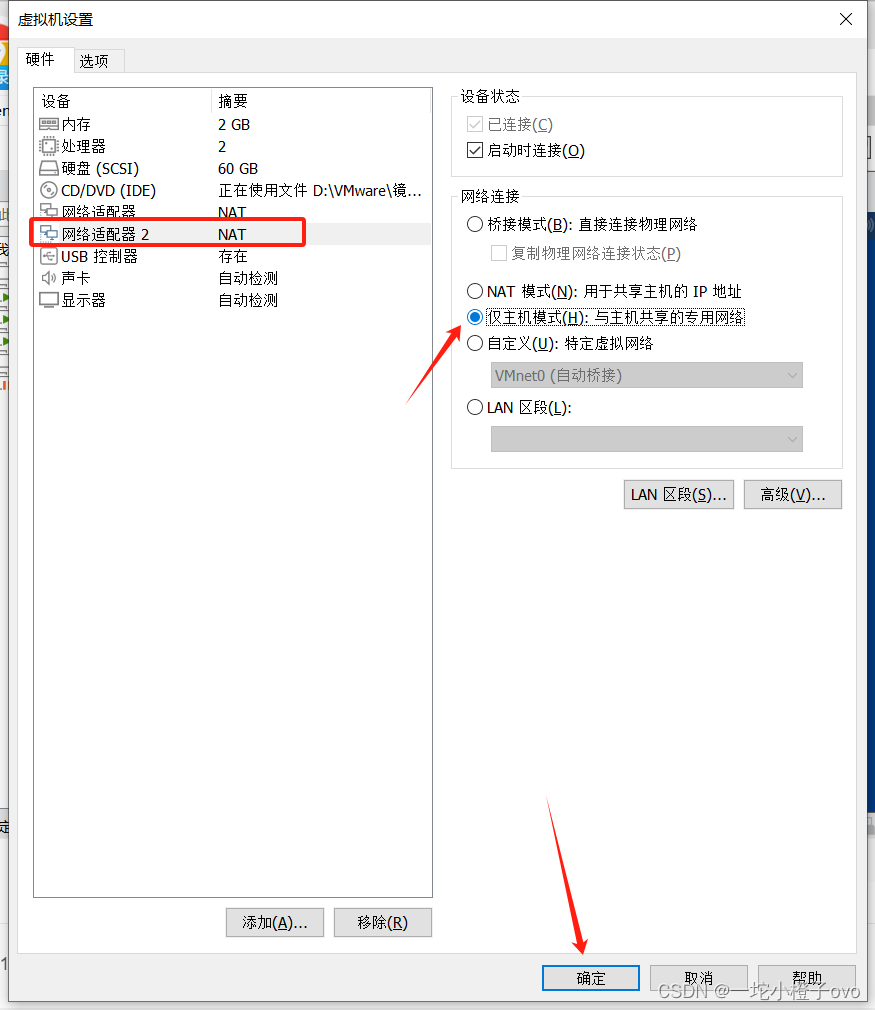
路由转发服务器(企业连接外网的服务器)
[root@node2 ~]#systemctl stop firewalld
[root@node2 ~]#setenforce 0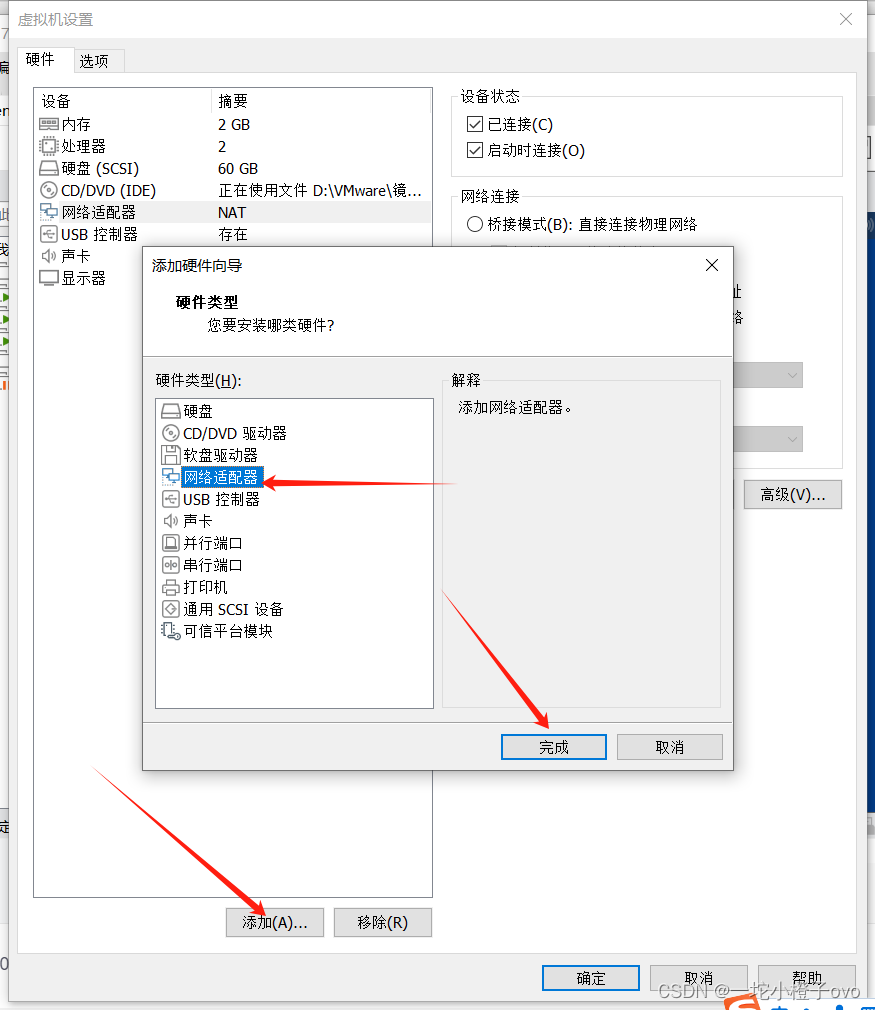
[root@node2 ~]#cd /etc/sysconfig/network-scripts/
[root@node2 network-scripts]#ls
ifcfg-ens33 ifdown-ppp ifup-ib ifup-Team
ifcfg-lo ifdown-routes ifup-ippp ifup-TeamPort
ifdown ifdown-sit ifup-ipv6 ifup-tunnel
ifdown-bnep ifdown-Team ifup-isdn ifup-wireless
ifdown-eth ifdown-TeamPort ifup-plip init.ipv6-global
ifdown-ib ifdown-tunnel ifup-plusb network-functions
ifdown-ippp ifup ifup-post network-functions-ipv6
ifdown-ipv6 ifup-aliases ifup-ppp
ifdown-isdn ifup-bnep ifup-routes
ifdown-post ifup-eth ifup-sit
[root@node2 network-scripts]#cp ifcfg-ens33 ifcfg-ens36
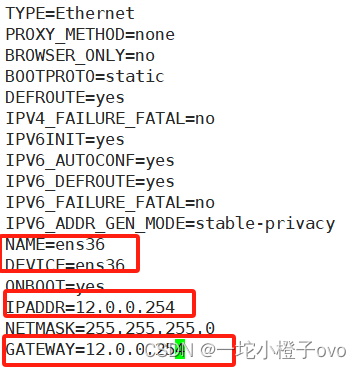
[root@node2 network-scripts]#vim ifcfg-ens36
[root@node2 network-scripts]#systemctl restart network
[root@node2 network-scripts]#sysctl -a|grep ip_forward
net.ipv4.ip_forward = 0
net.ipv4.ip_forward_use_pmtu = 0
sysctl: reading key "net.ipv6.conf.all.stable_secret"
sysctl: reading key "net.ipv6.conf.default.stable_secret"
sysctl: reading key "net.ipv6.conf.ens33.stable_secret"
sysctl: reading key "net.ipv6.conf.ens36.stable_secret"
sysctl: reading key "net.ipv6.conf.lo.stable_secret"
sysctl: reading key "net.ipv6.conf.virbr0.stable_secret"
sysctl: reading key "net.ipv6.conf.virbr0-nic.stable_secret"
[root@node2 network-scripts]#vim /etc/sysctl.conf
[root@node2 network-scripts]#sysctl -p
net.ipv4.ip_forward = 1
[root@node2 network-scripts]#ifconfig
ens33: flags=4163<UP,BROADCAST,RUNNING,MULTICAST> mtu 1500inet 192.168.241.22 netmask 255.255.255.0 broadcast 192.168.241.255inet6 fe80::d9cd:6857:3bdc:7454 prefixlen 64 scopeid 0x20<link>ether 00:0c:29:3e:a0:08 txqueuelen 1000 (Ethernet)RX packets 1875 bytes 154348 (150.7 KiB)RX errors 0 dropped 0 overruns 0 frame 0TX packets 1092 bytes 135160 (131.9 KiB)TX errors 0 dropped 0 overruns 0 carrier 0 collisions 0ens36: flags=4163<UP,BROADCAST,RUNNING,MULTICAST> mtu 1500inet 12.0.0.254 netmask 255.255.255.0 broadcast 12.0.0.255inet6 fe80::e94c:605b:4800:5850 prefixlen 64 scopeid 0x20<link>ether 00:0c:29:3e:a0:12 txqueuelen 1000 (Ethernet)RX packets 40 bytes 7659 (7.4 KiB)RX errors 0 dropped 0 overruns 0 frame 0TX packets 120 bytes 19942 (19.4 KiB)TX errors 0 dropped 0 overruns 0 carrier 0 collisions 0lo: flags=73<UP,LOOPBACK,RUNNING> mtu 65536inet 127.0.0.1 netmask 255.0.0.0inet6 ::1 prefixlen 128 scopeid 0x10<host>loop txqueuelen 1 (Local Loopback)RX packets 64 bytes 5568 (5.4 KiB)RX errors 0 dropped 0 overruns 0 frame 0TX packets 64 bytes 5568 (5.4 KiB)TX errors 0 dropped 0 overruns 0 carrier 0 collisions 0virbr0: flags=4099<UP,BROADCAST,MULTICAST> mtu 1500inet 192.168.122.1 netmask 255.255.255.0 broadcast 192.168.122.255ether 52:54:00:fe:22:f2 txqueuelen 1000 (Ethernet)RX packets 0 bytes 0 (0.0 B)RX errors 0 dropped 0 overruns 0 frame 0TX packets 0 bytes 0 (0.0 B)TX errors 0 dropped 0 overruns 0 carrier 0 collisions 0
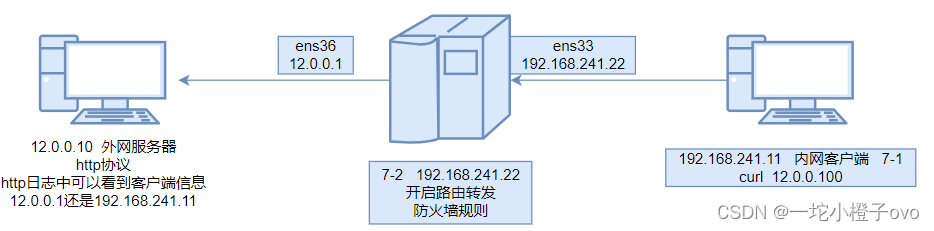
[root@node2 ~]#iptables -t nat -A POSTROUTING -o ens36 -s 192.168.241.0/24 -p tcp --dport 80 -j SNAT --to 12.0.0.254

外网服务器
[root@localhost ~]#systemctl stop firewalld
[root@localhost ~]#setenforce 0
[root@localhost ~]#yum install httpd -y
[root@localhost ~]#vim /etc/sysconfig/network-scripts/ifcfg-ens33
[root@localhost ~]#systemctl restart network
[root@node3 ~]#ping 12.0.0.254
PING 12.0.0.254 (12.0.0.254) 56(84) bytes of data.
64 bytes from 12.0.0.254: icmp_seq=1 ttl=64 time=0.404 ms
64 bytes from 12.0.0.254: icmp_seq=2 ttl=64 time=3.43 ms
^C
--- 12.0.0.254 ping statistics ---
2 packets transmitted, 2 received, 0% packet loss, time 1001ms
rtt min/avg/max/mdev = 0.404/1.918/3.433/1.515 ms
[root@node3 ~]#ping 192.168.241.22
PING 192.168.241.22 (192.168.241.22) 56(84) bytes of data.
64 bytes from 192.168.241.22: icmp_seq=1 ttl=64 time=0.480 ms
^C
--- 192.168.241.22 ping statistics ---
1 packets transmitted, 1 received, 0% packet loss, time 0ms
rtt min/avg/max/mdev = 0.480/0.480/0.480/0.000 ms
[root@node3 ~]#systemctl start httpd

此时的地址应该是公网地址访问httpd服务

给路由转发服务器添加规则后

12.2DNAT
nat表的target,适用于端口映射,即可重定向到本机,也可以支持重定向至不同主机的不同端
口,但不支持多目标,即不支持负载均衡功能
12.2.1DNAT应用环境
在Internet中发布位于局域网内的服务器
12.2.2DNAT原理
目的地址转换,根据指定条件修改数据包的目的IP地址,保证了内网服务器的安全,通常被叫做目的映射
12.2.3DNAT转换前提条件
1.局域网的服务器能够访问Internet
2.网关的外网地址有正确的DNS解析记录
3.Linux网关开启IP路由转发
12.2.3DNAT原理图
| 源IP地址 | 目的IP地址 |
|---|---|
| 12.0.0.10 | 12.0.0.1 |
| 12.0.0.10 | 192.168.241.11 |
12.2.4DNAT实验
内网客户端
[root@localhost ~]#systemctl start httpd
[root@localhost ~]#systemctl status httpd
● httpd.service - The Apache HTTP ServerLoaded: loaded (/usr/lib/systemd/system/httpd.service; disabled; vendor preset: disabled)Active: active (running) since 日 2024-02-18 19:51:16 CST; 10s agoDocs: man:httpd(8)man:apachectl(8)Main PID: 3932 (httpd)Status: "Total requests: 0; Current requests/sec: 0; Current traffic:   0 B/sec"CGroup: /system.slice/httpd.service├─3932 /usr/sbin/httpd -DFOREGROUND├─3935 /usr/sbin/httpd -DFOREGROUND├─3936 /usr/sbin/httpd -DFOREGROUND├─3937 /usr/sbin/httpd -DFOREGROUND├─3938 /usr/sbin/httpd -DFOREGROUND└─3939 /usr/sbin/httpd -DFOREGROUND2月 18 19:51:16 localhost.localdomain systemd[1]: Starting The Apache HT...
2月 18 19:51:16 localhost.localdomain httpd[3932]: AH00558: httpd: Could...
2月 18 19:51:16 localhost.localdomain systemd[1]: Started The Apache HTT...
Hint: Some lines were ellipsized, use -l to show in full.
路由转发服务器
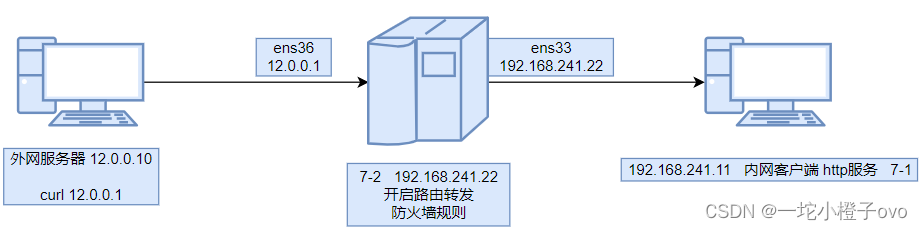
[root@node2 ~]#iptables -t nat -A PREROUTING -i ens36 -d 12.0.0.254 -p tcp --dport 80 -j DNAT --to 192.168.241.11外网服务器
![]()
想让外网服务器访问12.0.0.254相当于访问192.168.241.11的httpd ,要在路由转发服务器做规则
[root@node3 ~]#curl 12.0.0.254
<!DOCTYPE html PUBLIC "-//W3C//DTD XHTML 1.1//EN" "http://www.w3.org/TR/xhtml11/DTD/xhtml11.dtd"><html><head>
<meta http-equiv="content-type" content="text/html; charset=UTF-8"><title>Apache HTTP Server Test Page powered by CentOS</title><meta http-equiv="Content-Type" content="text/html; charset=UTF-8"><!-- Bootstrap --><link href="/noindex/css/bootstrap.min.css" rel="stylesheet"><link rel="stylesheet" href="noindex/css/open-sans.css" type="text/css" /><style type="text/css"><!--		 body {font-family: "Open Sans", Helvetica, sans-serif;font-weight: 100;color: #ccc;background: rgba(10, 24, 55, 1);font-size: 16px;
}h2, h3, h4 {font-weight: 200;
}h2 {font-size: 28px;
}.jumbotron {margin-bottom: 0;color: #333;background: rgb(212,212,221); /* Old browsers */background: radial-gradient(ellipse at center top, rgba(255,255,255,1) 0%,rgba(174,174,183,1) 100%); /* W3C */
}.jumbotron h1 {font-size: 128px;font-weight: 700;color: white;text-shadow: 0px 2px 0px #abc,0px 4px 10px rgba(0,0,0,0.15),0px 5px 2px rgba(0,0,0,0.1),0px 6px 30px rgba(0,0,0,0.1);
}.jumbotron p {font-size: 28px;font-weight: 100;
}.main {background: white;color: #234;border-top: 1px solid rgba(0,0,0,0.12);padding-top: 30px;padding-bottom: 40px;
}.footer {border-top: 1px solid rgba(255,255,255,0.2);padding-top: 30px;
}--></style>
</head>
<body><div class="jumbotron text-center"><div class="container"><h1>Testing 123..</h1><p class="lead">This page is used to test the proper operation of the <a href="http://apache.org">Apache HTTP server</a> after it has been installed. If you can read this page it means that this site is working properly. This server is powered by <a href="http://centos.org">CentOS</a>.</p></div></div><div class="main"><div class="container"><div class="row"><div class="col-sm-6"><h2>Just visiting?</h2><p class="lead">The website you just visited is either experiencing problems or is undergoing routine maintenance.</p><p>If you would like to let the administrators of this website know that you've seen this page instead of the page you expected, you should send them e-mail. In general, mail sent to the name "webmaster" and directed to the website's domain should reach the appropriate person.</p><p>For example, if you experienced problems while visiting www.example.com, you should send e-mail to "webmaster@example.com".</p></div><div class="col-sm-6"><h2>Are you the Administrator?</h2><p>You should add your website content to the directory <tt>/var/www/html/</tt>.</p><p>To prevent this page from ever being used, follow the instructions in the file <tt>/etc/httpd/conf.d/welcome.conf</tt>.</p><h2>Promoting Apache and CentOS</h2><p>You are free to use the images below on Apache and CentOS Linux powered HTTP servers.  Thanks for using Apache and CentOS!</p><p><a href="http://httpd.apache.org/"><img src="images/apache_pb.gif" alt="[ Powered by Apache ]"></a> <a href="http://www.centos.org/"><img src="images/poweredby.png" alt="[ Powered by CentOS Linux ]" height="31" width="88"></a></p></div></div></div></div></div><div class="footer"><div class="container"><div class="row"><div class="col-sm-6">          <h2>Important note:</h2><p class="lead">The CentOS Project has nothing to do with this website or its content,it just provides the software that makes the website run.</p><p>If you have issues with the content of this site, contact the owner of the domain, not the CentOS project. Unless you intended to visit CentOS.org, the CentOS Project does not have anything to do with this website,the content or the lack of it.</p><p>For example, if this website is www.example.com, you would find the owner of the example.com domain at the following WHOIS server:</p><p><a href="http://www.internic.net/whois.html">http://www.internic.net/whois.html</a></p></div><div class="col-sm-6"><h2>The CentOS Project</h2><p>The CentOS Linux distribution is a stable, predictable, manageable and reproduceable platform derived from the sources of Red Hat Enterprise Linux (RHEL).<p><p>Additionally to being a popular choice for web hosting, CentOS also provides a rich platform for open source communities to build upon. For more informationplease visit the <a href="http://www.centos.org/">CentOS website</a>.</p></div></div></div></div></div>
</body></html>
13.延伸——故障案例
启用了的iptables staste模块,用户访问的问题,经过研究发现,有一个内核选项的默认值过低,netfilter/nf_conntrack max 默认为65536(一般建议把这个值调大一点)
[root@localhost ~]#cat /proc/net/nf_conntrack
#启用后会写在这个文件中
ipv4     2 tcp      6 299 ESTABLISHED src=192.168.241.1 dst=192.168.241.11 sport=53186 dport=22 src=192.168.241.11 dst=192.168.241.1 sport=22 dport=53186 [ASSURED] mark=0 zone=0 use=2
ipv4     2 udp      17 12 src=192.168.241.11 dst=84.16.73.33 sport=54501 dport=123 [UNREPLIED] src=84.16.73.33 dst=192.168.241.11 sport=123 dport=54501 mark=0 zone=0 use=2
[root@localhost ~]#lsmod|grep conn
#内核模块可以看到,调用state状态时可以看到
xt_conntrack           12760  0
nf_conntrack_ipv4      15053  1
nf_defrag_ipv4         12729  1 nf_conntrack_ipv4
nf_conntrack          133387  5 nf_nat,nf_nat_ipv4,xt_conntrack,nf_nat_masquerade_ipv4,nf_conntrack_ipv4
libcrc32c              12644  3 xfs,nf_nat,nf_conntrack
[root@localhost ~]#cat /proc/sys/net/netfilter/nf_conntrack_max
#记录的用户数为65536
65536
[root@localhost ~]#echo 1 > /proc/sys/net/netfilter/nf_conntrack_max
#修改最大记录数为1
[root@localhost ~]#cat /proc/sys/net/netfilter/nf_conntrack_max
1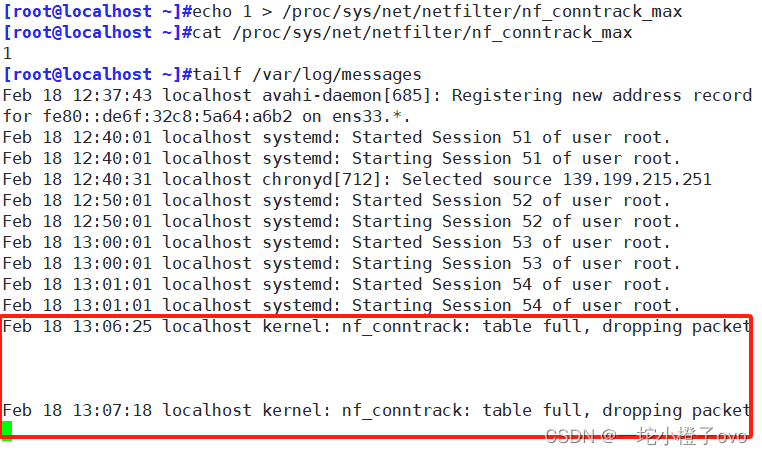
注意:如果是Centos6版本,请不要轻易使用iptables -vnL 因为iptables -vnL在Centos6版本是开启state模块,可能会造成重大的连接事故
相关文章:
Linux系统——防火墙拓展及重点理解
目录 一、iptables 1.基本语法 2.四表五链——重点记忆 2.1四表 2.2五链 2.3总结 3.iptables选项示例 3.1 -Z 清空流量计数 3.2 -P 修改默认规则 3.3 -D 删除规则 3.4 -R 指定编号替换规则 5.白名单 6.通用匹配 7.示例 7.1添加回环网卡 7.2可以访问端口 7.3 主…...

阿里云短信验证码的两个坑
其它都参照官网即可,其中有两个坑需要注意: 1、除去官网pom引用的包之外,还需要引用以下包: <dependency><groupId>org.apache.httpcomponents.client5</groupId><artifactId>httpclient5</artifact…...
)
c入门第十五篇——学而时习之(阶段性总结)
古人说:“学而时习之。”古人又说:“温故而知新。”古人还说:“读书百遍,其义自见。” 总结一个道理那就是好书要反反复复的读,学习过的知识要时常去复习它,才有可能常读常新。 我:“师弟&…...

抽象的前端
问题背景:vue3,axios 直接导致问题:路由渲染失败 问题报错:Uncaught SyntaxError: The requested module /node_modules/.vite/deps/axios.js?v7bee3286 does not provide an export named post (at LoginIn.vue:16:9) 引入组…...

UPC训练赛二十/20240217
A:无穷力量 题目描述 2022年重庆突发山火让世界看到了中国一个又一个的感人事迹:战士们第一时间奔赴火场,志愿者们自发组成团队,为救火提供一切的可能的服务,人们自发输送物资,有的志愿者甚至几天几夜没有睡觉。每个…...
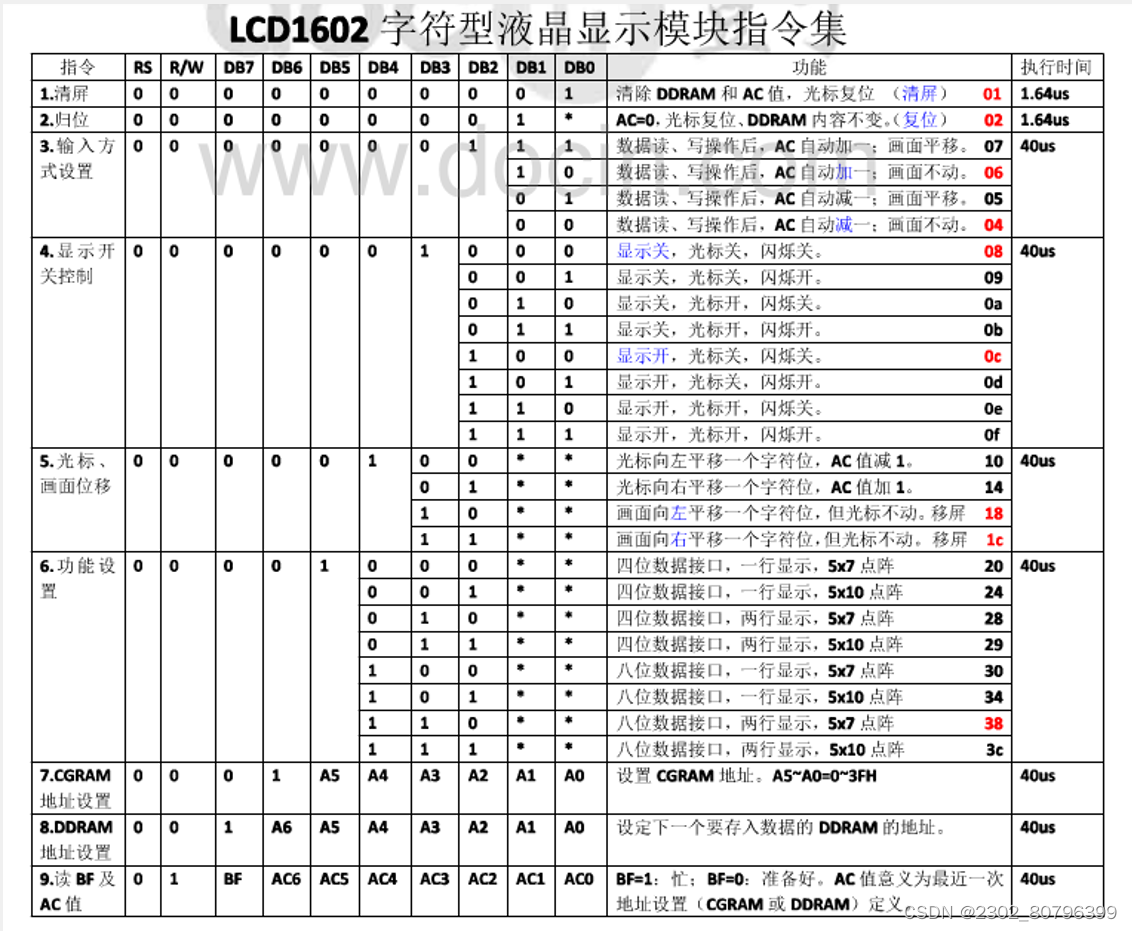
【51单片机】LCD1602(江科大)
1.LCD1602介绍 LCD1602(Liquid Crystal Display)液晶显示屏是一种字符型液晶显示模块,可以显示ASCII码的标准字符和其它的一些内置特殊字符,还可以有8个自定义字符 显示容量:162个字符,每个字符为5*7点阵 2.引脚及应用电路 3.内部结构框图 屏幕: 字模库:类似于数码管的数…...

conda与pip的常用命令
conda的常用命令 1.查看conda版本 $ conda --version conda 23.11.02.查看conda的配置信息 $ conda infoactive environment : baseactive env location : /home/myPc/miniconda3shell level : 1user config file : /home/myPc/.condarcpopulated config files : conda vers…...

你知道什么是物联网MQTT么?
目录 你知道什么是物联网MQTT么?MQTT的基本概念MQTT的工作原理MQTT的应用场景MQTT的实例案例智能家居场景工业监控场景 你知道什么是物联网MQTT么? MQTT(Message Queuing Telemetry Transport)是一种轻量级的、基于发布/订阅模式…...

P8 pair vector
pair是一个模板类,用于表示一对值的组合,用<utility>中 pair模板有两个模板参数,t1 t2,分别表示第一个值和第二个值类型 pair类有两个成员变量,frist和 cond,分别表示第一个值与第二个值 还有一些成员函数和…...

奇异值分解(SVD)的应用——图像压缩
SVD方法是模型降阶的一类重要方法,本征正交分解(POD)和平衡截断(BT)都属于SVD类方法。 要想深入了解模型降阶技术,我们可以先从SVD的应用入手,做一个直观的了解。 1. SVD的定义和分类 我们想寻找…...

RTDETR改进系列指南
基于Ultralytics的RT-DETR改进项目.(89.9) 为了感谢各位对RTDETR项目的支持,本项目的赠品是yolov5-PAGCP通道剪枝算法.具体使用教程 自带的一些文件说明 train.py 训练模型的脚本main_profile.py 输出模型和模型每一层的参数,计算量的脚本(rtdetr-l和rtdetr-x因为thop库的问…...

类和结构体的区别
类(class)和结构体(struct)是面向对象编程(Object-Oriented Programming,OOP)中常见的两种数据类型,它们在不同的编程语言中有一些共同之处,但也存在一些区别。以下是它们…...

利用Excel模拟投币试验
文章目录 试验前对Excel要进行的设置试验步骤计算正面频率结果图试验前对Excel要进行的设置 进入Excel依次点击如下选项,最后将分析工具库勾选 #mermaid-svg-bIvrxZGI9buCMW6U {font-family:"trebuchet ms",verdana,arial,sans-serif;font-size:16px;fill:#333;}#m…...

WebService接口测试
WebService的理解 WebService就是Web服务的意思,对应的应用层协议为SOAP(相当于HTTP协议),可理解为远程调用技术。 特点: 客户端发送的请求主体内容(请求报文)的格式为XML格式 接口返回的响…...
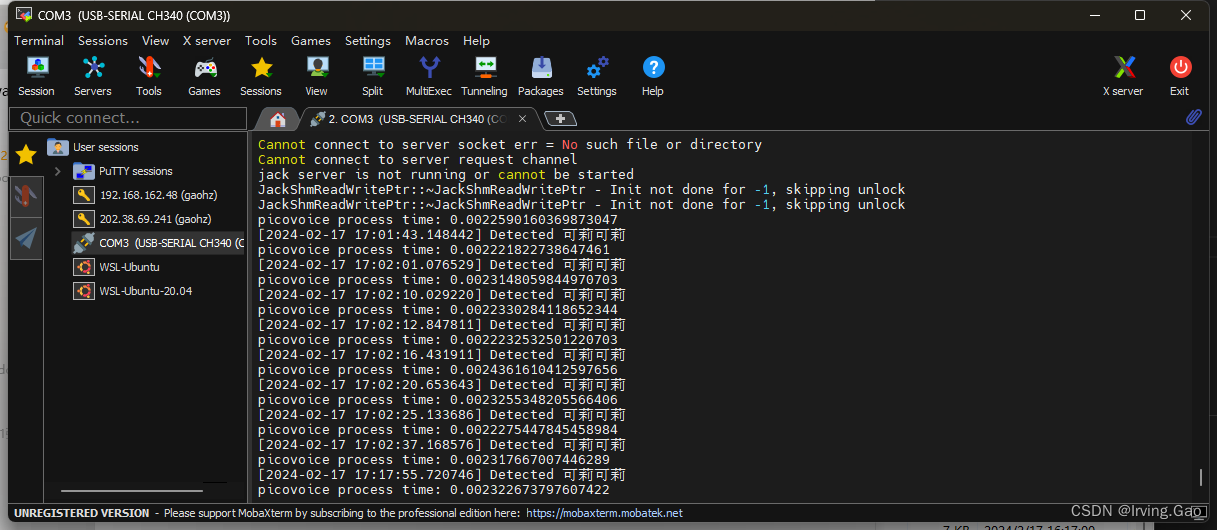
语音唤醒——
文章目录 配置主代码 参考文档:https://picovoice.ai/docs/quick-start/porcupine-python/ 配置 pip install pvporcupine主代码 ACCESS_KEY:需要将该参数填入即可 # # Copyright 2018-2023 Picovoice Inc. # # You may not use this file except in …...
typeScript 类型推论
什么是类型推论? 类型推论是 TypeScript 中的一个特性,它允许开发人员不必显式地指定变量的类型。相反,开发人员可以根据变量的使用情况让 TypeScript 编译器自动推断出类型。例如,如果开发人员将一个字符串赋值给一个变量&#…...

JavaScript 设计模式之代理模式
代理模式 其实这种模式在现在很多地方也都有使用到,如 Vue3 中的数据相应原理就是使用的 es6 中的 Proxy 代理及 Reflect 反射的方式来处理数据响应式 我们日常在使用数据请求时,也会用到一些代理的方式,比如在请求不同的域名,端…...

JavaScript 对象判断
如何判断一个对象是否是Set、Map、Array、Object 参考链接: https://blog.csdn.net/yunchong_zhao/article/details/115915624 let set new Set() let map new Map() let arr [] let obj {}console.log(Object.prototype.toString.call(obj)); // [object Obje…...

Android下SF合成流程重学习之onMessageInvalidate
Android下SF合成流程重学习之onMessageInvalidate 引言 虽然看了很多关于Android Graphics图形栈的文章和博客,但是都没有形成自己的知识点。每次学习了,仅仅是学习了而已,没有形成自己的知识体系,这次趁着有时间,这次…...
基于SpringBoot+WebSocket+Spring Task的前后端分离外卖项目-订单管理(十七)
订单管理 1. Spring Task1.1 介绍1.2 cron表达式1.3 入门案例1.3.1 Spring Task使用步骤1.3.2 代码开发1.3.3 功能测试 2.订单状态定时处理2.1 需求分析2.2 代码开发2.3 功能测试 3. WebSocket3.1 介绍3.2 入门案例3.2.1 案例分析3.2.2 代码开发3.2.3 功能测试 4. 来单提醒4.1 …...

yolo系列演进分析
YOLO(You Only Look Once)作为计算机视觉领域最具影响力的目标检测算法系列之一,自2016年首次提出以来经历了持续的技术革新与架构演进。从最初的YOLOv1到2026年最新发布的YOLO26,这一系列不仅实现了从"单阶段检测"到"端到端推理"的范式转变,更在速度…...
)
Xilinx UltraScale的CLB黑科技:1个LUT当2个用的5种实战技巧(Vivado2023验证)
Xilinx UltraScale架构的CLB深度优化实战:5种高阶LUT拆分技巧 在FPGA设计领域,资源利用率与性能优化始终是工程师面临的核心挑战。Xilinx UltraScale架构通过创新的SliceM/SliceL结构设计,为硬件优化提供了前所未有的灵活性。本文将聚焦CLB中…...

STM32WU55蓝牙开发避坑指南:从官方例程到8通道肌电信号传输实战
STM32WU55蓝牙开发避坑指南:从官方例程到8通道肌电信号传输实战 当肌电信号采集遇上低功耗蓝牙,工程师们往往面临一个尴尬的平衡:既要满足医疗级数据精度,又要兼顾穿戴设备的续航需求。STM32WU55系列以其双核架构和集成射频模块&a…...

门户网站被入侵了怎么办?从紧急止损到重建免疫的完整作战手册
当监控警报响起,发现服务器存在异常进程、网站首页或核心栏目内容被恶意篡改、或数据库出现不明查询时,一个可怕的现实摆在眼前:您的门户网站已经被入侵了。门户网站作为企业或机构的官方形象窗口,一旦被入侵,不仅直接…...

当几何优化遇上时空建模:玩转TTAO-SE-CNN-LSTM黑科技
基于三角形拓扑结构优化算法优化卷积神经网络-长短时记忆网络结合SE注意力机制的数据分类预测(TTAO-SE-CNN-LSTM) 三角形拓扑结构优化算法TTAO优化长短时记忆网络隐藏层神经元数目、初始学习率和L2正则化参数 基于MATLAB环境 替换自己的数据即可 首先通过卷积神经网络提取数据…...

nli-distilroberta-base企业实操:政务问答系统中立性与矛盾识别模块
nli-distilroberta-base企业实操:政务问答系统中立性与矛盾识别模块 1. 项目概述 在政务问答系统开发中,准确判断用户提问与政策条文之间的关系至关重要。nli-distilroberta-base是基于DistilRoBERTa模型的自然语言推理(NLI)服务,专门用于分…...

智能家居中枢:OpenClaw+GLM-4.7-Flash语音指令转Home Assistant API调用
智能家居中枢:OpenClawGLM-4.7-Flash语音指令转Home Assistant API调用 1. 为什么需要本地化的智能家居控制? 去年冬天的一个深夜,我被空调突然启动的噪音惊醒。查看日志才发现,某个云端语音助手的误识别触发了设备开关。这次经…...

如何高效将LocalSend打包为MSIX:完整Windows商店发布实战指南
如何高效将LocalSend打包为MSIX:完整Windows商店发布实战指南 【免费下载链接】localsend localsend - 一个开源应用程序,允许用户在本地网络中安全地共享文件和消息,无需互联网连接,适合需要离线文件传输和通信的开发人员。 项…...
)
基于springboot岳麓山景区预约系统设计与开发(源码+精品论文+答辩PPT等资料)
博主介绍:CSDN毕设辅导第一人、靠谱第一人、全网粉丝50W,csdn特邀作者、博客专家、腾讯云社区合作讲师、CSDN新星计划导师、Java领域优质创作者,博客之星、掘金/华为云/阿里云/InfoQ等平台优质作者、专注于Java技术领域和学生毕业项目实战,高校老师/讲师/同行前辈交…...

Python智能体内存管理实战:3步完成GC调优,90%开发者忽略的关键参数配置
第一章:Python智能体内存管理实战:3步完成GC调优,90%开发者忽略的关键参数配置Python的垃圾回收(GC)机制虽默认可靠,但在高吞吐、低延迟的智能体(Agent)场景中,频繁的代际…...