第一个 Angular 项目 - 添加服务
第一个 Angular 项目 - 添加服务
这里主要用到的内容就是 [Angular 基础] - service 服务 提到的
前置项目在 第一个 Angular 项目 - 动态页面 这里查看
想要实现的功能是简化 shopping-list 和 recipe 之间的跨组件交流
回顾一下项目的结构:
❯ tree src/app/
src/app/
├── directives
├── header
├── recipes
│   ├── recipe-detail
│   ├── recipe-list
│   │   ├── recipe-item
│   ├── recipe.model.ts
├── shared
│   └── ingredient.model.ts
└── shopping-list├── shopping-edit11 directories, 31 files
层级结构相对来说还是有一点点复杂的,所以如果在 app 层构建一个对应的变量和事件再一层层往下传,无疑是一件非常麻烦的事情(尤其 V 层和 VM 层都要进行事件传输的对应变化),而使用 service 就能相对而言比较简单的解决这个问题
创建新的 service
这里主要会创建两个 services:
src/app/
├── services
│   ├── ingredient.service.ts
│   └── recipe.service.ts
一个用来管理所有的 ingredients——这部分是放在 shopping-list 中进行展示的,另一个就是管理所有的 recipes
ingredient service
实现代码如下:
@Injectable({providedIn: 'root',
})
export class IngredientService {ingredientChanged = new EventEmitter<Ingredient[]>();private ingredientList: Ingredient[] = [new Ingredient('Apples', 5),new Ingredient('Tomatoes', 10),];constructor() {}get ingredients() {return this.ingredientList.slice();}addIngredient(Ingredient: Ingredient) {this.ingredientList.push(Ingredient);this.ingredientChanged.emit(this.ingredients);}addIngredients(ingredients: Ingredient[]) {this.ingredientList.push(...ingredients);this.ingredientChanged.emit(this.ingredients);}
}
代码分析如下:
-
Injectable这里使用
providedIn: 'root'是因为我想让所有的组件共享一个 service,这样可以满足当 ingredient 页面修改对应的食材,并且将其发送到shopping-list的时候,数据可以进行同步渲染 -
ingredientChanged这是一个 event emitter,主要的目的就是让其他的组件可以 subscribe 到事件的变更
subscribe 是之前的 service 笔记中没提到的内容,这里暂时不会细舅,不过会放一下用法
-
get ingredients()一个语法糖,这里的
slice会创造一个 shallow copy,防止意外对数组进行修改也可以用 lodash 的
cloneDeep,或者单独创建一个函数去进行深拷贝 -
add 函数
向数组中添加元素,并向外发送数据变更的信号
recipe service
@Injectable()
export class RecipeService {private recipeList: Recipe[] = [new Recipe('Recipe 1', 'Description 1', 'http://picsum.photos/200/200', [new Ingredient('Bread', 5),new Ingredient('Ginger', 10),]),new Recipe('Recipe 2', 'Description 2', 'http://picsum.photos/200/200', [new Ingredient('Chicken', 10),new Ingredient('Bacon', 5),]),];private currRecipe: Recipe;recipeSelected = new EventEmitter<Recipe>();get recipes() {return this.recipeList.slice();}get selectedRecipe() {return this.currRecipe;}
}
这里主要讲一下 Injectable,因为 recipe service 的部分应该被限制在 recipe 这个组件下,所以这里不会采用 singleton 的方式实现
其余的实现基本和上面一样
修改 recipe
这里依旧是具体业务具体分析:
-
recipe
这里需要获取
activeRecipe+ngIf去渲染recipe-detail部分的内容,如:没有选中 recipe 选中了 recipe 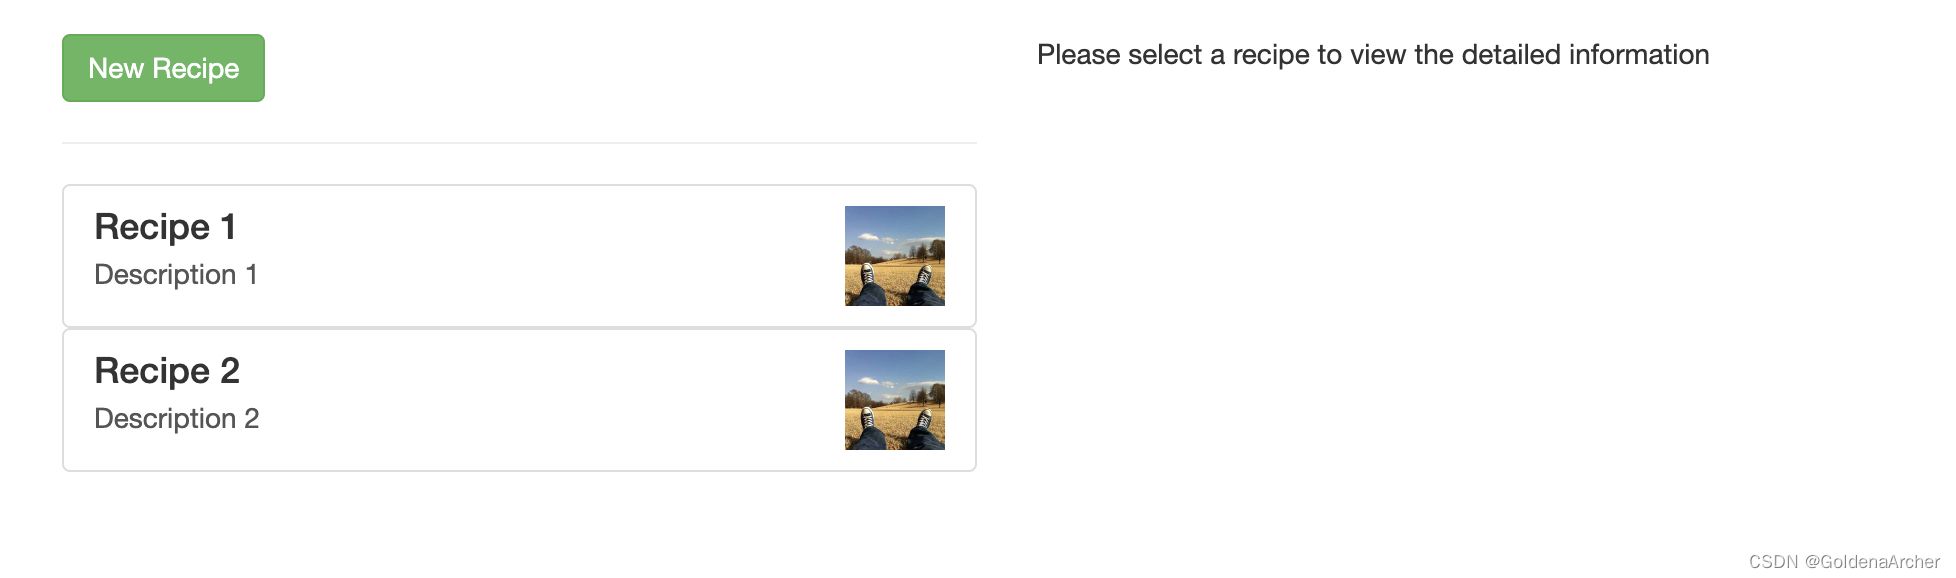
-
recipe-detail
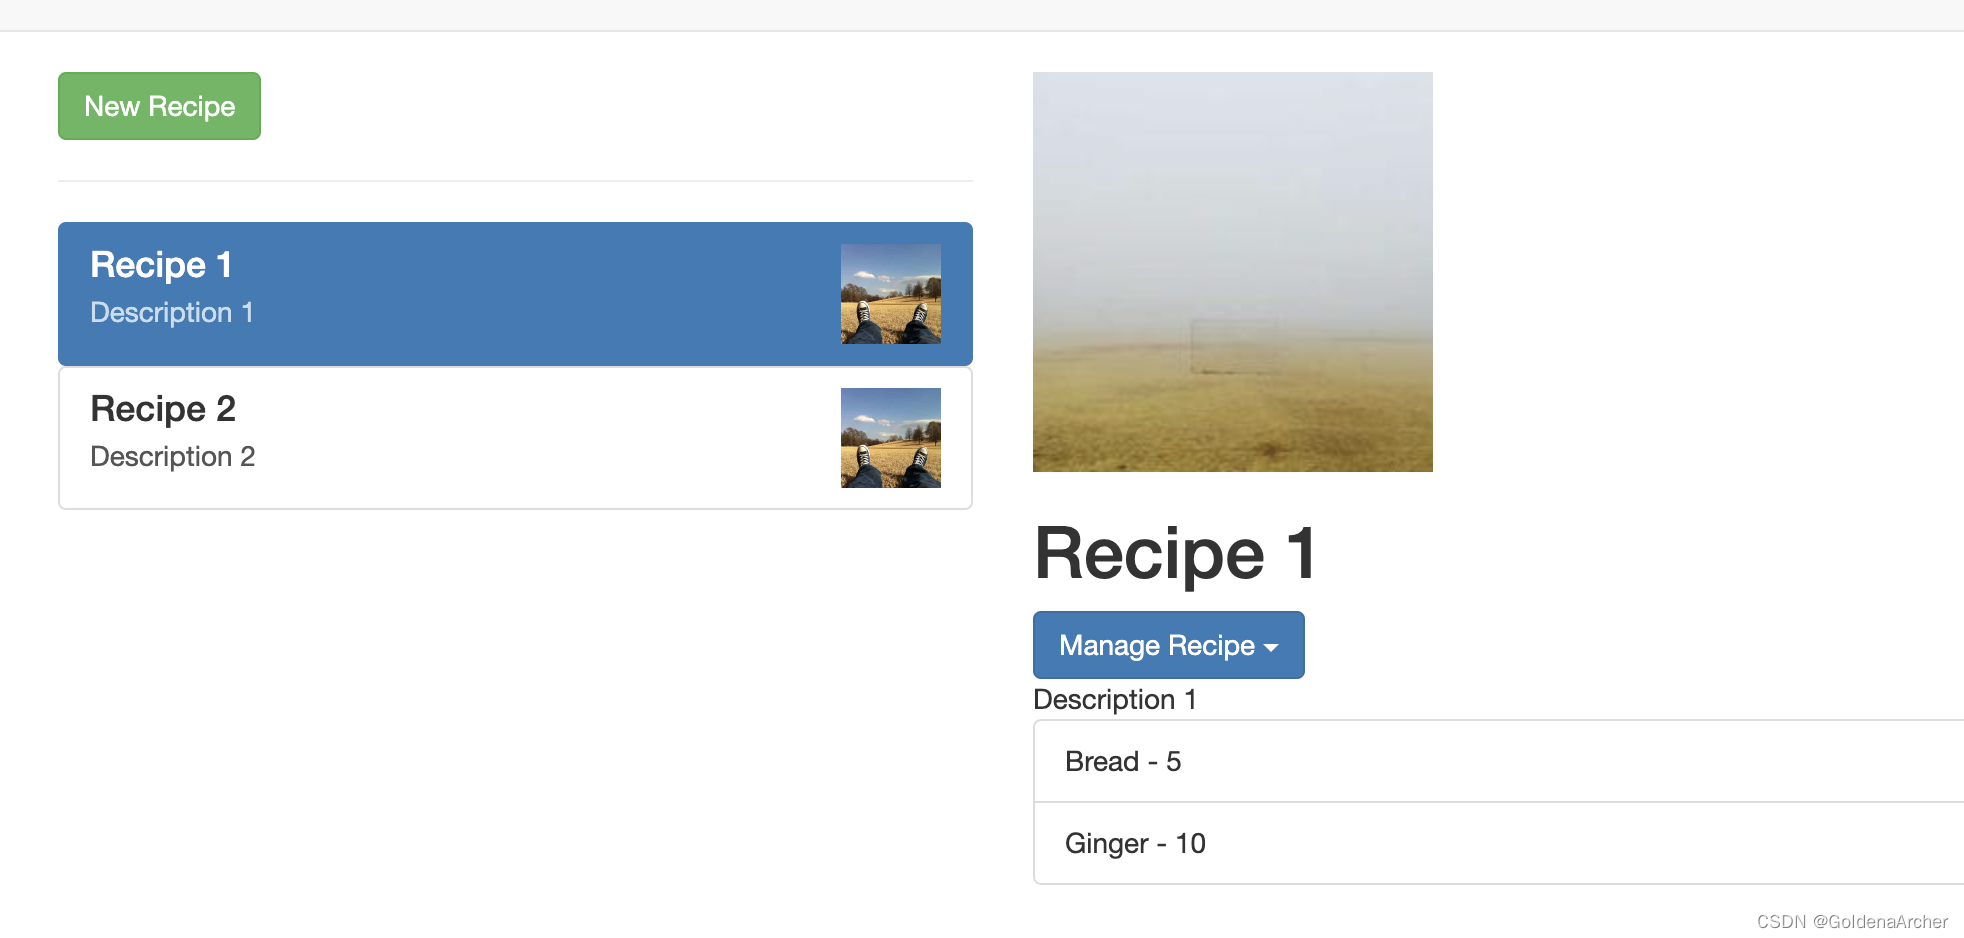
这里需要
activeRecipe去渲染对应的数据,如上图 -
recipe-list
这里需要
recipes去完成循环,渲染对应的recipe-item -
recipe-item
这里需要
activeRecipe完成对active这个 class 的添加
recipe 组件的修改
-
V 层修改:
<div class="row"><div class="col-md-5"><app-recipe-list></app-recipe-list></div><div class="col-md-7"><app-recipe-detail[activeRecipe]="activeRecipe"*ngIf="activeRecipe; else noActiveRecipe"></app-recipe-detail><ng-template #noActiveRecipe><p>Please select a recipe to view the detailed information</p></ng-template></div> </div> -
VM 层修改
@Component({selector: 'app-recipes',templateUrl: './recipes.component.html',providers: [RecipeService],
})
export class RecipesComponent implements OnInit, OnDestroy {activeRecipe: Recipe;constructor(private recipeService: RecipeService) {}ngOnInit() {this.recipeService.recipeSelected.subscribe((recipe: Recipe) => {this.activeRecipe = recipe;});}ngOnDestroy(): void {this.recipeService.recipeSelected.unsubscribe();}
}
这里主要是对 V 层进行了一些修改,减少了一些数据绑定。大多数的用法这里都是之前在 service 的笔记中提到的,除了这个 subscribe 的使用
简单的说,在 subscribe 之后,每一次 event 触发后,在这个 subscription 里,它都可以获取 event 中传来的信息,并进行对应的更新操作
recipe-list 组件的修改
-
V 层修改如下
<div class="row"><div class="col-xs-12"><button class="btn btn-success">New Recipe</button></div> </div> <hr /> <div class="row"><div class="col-xs-12"><app-recipe-item*ngFor="let recipe of recipes"[recipe]="recipe"></app-recipe-item></div> </div> -
VM 层修改如下
@Component({selector: 'app-recipe-list',templateUrl: './recipe-list.component.html',styleUrl: './recipe-list.component.css',
})
export class RecipeListComponent implements OnInit {recipes: Recipe[];constructor(private recipeService: RecipeService) {}ngOnInit() {this.recipes = this.recipeService.recipes;}
}
这里主要就是获取数据的方式变了,也不需要向下传递 @Input,向上触发 @Output 了
reccipe-item 组件的修改
-
V 层
<ahref="#"class="list-group-item clearfix"(click)="onSelectedRecipe()"[ngClass]="{ active: isActiveRecipe }"
><div class="pull-left"><h4 class="list-group-item-heading">{{ recipe.name }}</h4><p class="list-group-item-text">{{ recipe.description }}</p></div><span class="pull-right"><img[src]="recipe.imagePath"[alt]="recipe.name"class="image-responsive"style="max-height: 50px"/></span>
</a>
这里做的另外一个修改就是把
a标签移到了 list-item 去处理,这样语义化相对更好一些 -
VM 层
@Component({selector: 'app-recipe-item',templateUrl: './recipe-item.component.html',styleUrl: './recipe-item.component.css',
})
export class RecipeItemComponent implements OnInit, OnDestroy {@Input() recipe: Recipe;isActiveRecipe = false;constructor(private recipeService: RecipeService) {}ngOnInit() {this.recipeService.recipeSelected.subscribe((recipe: Recipe) => {this.isActiveRecipe = recipe.isEqual(this.recipe);});}onSelectedRecipe() {this.recipeService.recipeSelected.emit(this.recipe);}ngOnDestroy(): void {this.recipeService.recipeSelected.unsubscribe();}
}
这里变化稍微有一点多,主要也是针对
activeRecipe和onSelectedRecipe的修改。前者的判断我在 model 写了一个
isEqual的方法用来判断名字、数量、图片等是否一样,当然只用这个方法的话还是有可能会出现数据碰撞的,因此写案例的时候我尽量不会用同一个名字去命名 ingredient。基于这个前提下,那么就可以判断当前的 recipe 是不是被选中的 recipe,同时添加active这一类名做更好的提示使用
subscribe也是基于同样的理由,需要捕获 recipe 的变动onSelectedRecipe的变化倒是没有太多,同样会触发一个事件,不过这个事件现在保存在 recipeService 中目前的实现是整个 recipe 都共享一个 service,因此这里 emit 的事件,在整个 recipe 组件下,只要 subscribe 了,就只会是同一个事件
recipe-detail 组件的修改
-
V 层
<div class="row"><div class="col-xs-12"><imgsrc="{{ activeRecipe.imagePath }}"alt=" {{ activeRecipe.name }} "class="img-responsive"/></div> </div> <div class="row"><div class="col-xs-12"><h1>{{ activeRecipe.name }}</h1></div> </div> <div class="row"><div class="col-xs-12"><div class="btn-group" appDropdown><button type="button" class="btn btn-primary dropdown-toggle">Manage Recipe <span class="caret"></span></button><ul class="dropdown-menu"><li><a href="#" (click)="onAddToShoppingList()">To Shopping List</a></li><li><a href="#">Edit Recipe</a></li><li><a href="#">Delete Recipe</a></li></ul></div></div> </div> <div class="row"><div class="col-xs-12">{{ activeRecipe.description }}</div> </div> <div class="row"><div class="col-xs-12"><ul class="list-group"><liclass="list-group-item"*ngFor="let ingredient of activeRecipe.ingredients">{{ ingredient.name }} - {{ ingredient.amount }}</li></ul></div> </div> -
VM 层
@Component({selector: 'app-recipe-detail',templateUrl: './recipe-detail.component.html',styleUrl: './recipe-detail.component.css',
})
export class RecipeDetailComponent {@Input() activeRecipe: Recipe;constructor(private ingredientService: IngredientService) {}onAddToShoppingList() {this.ingredientService.addIngredients(this.activeRecipe.ingredients);}
}
这里通过调用 ingredient service 将当前 recipe 中的 ingredient 送到 shopping-list 的 view 下,效果如下:
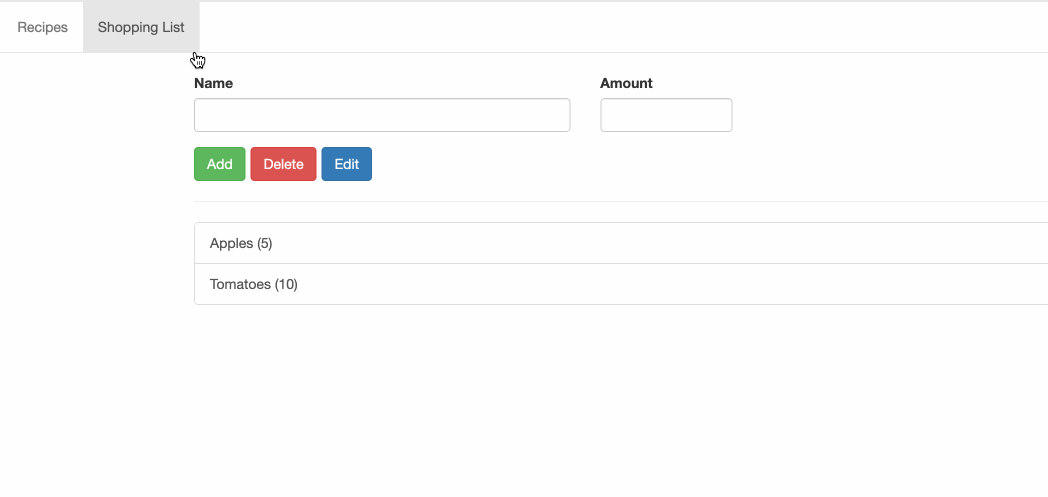
这里没有做 unique key 的检查,而且实现是通过 Array.push 去做的,因此只会无限增加,而不是更新已有的元素。不过大致可以看到这个跨组件的交流是怎么实现的
修改 shopping-list
这里的实现和 recipe 差不多,就只贴代码了
shopping-list 组件的修改
-
V 层
<div class="row"><div class="col-xs-10"><app-shopping-edit></app-shopping-edit><hr /><ul class="list-group"><aclass="list-group-item"style="cursor: pointer"*ngFor="let ingredient of ingredients">{{ ingredient.name }} ({{ ingredient.amount }})</a></ul></div> </div> -
VM 层
@Component({selector: 'app-shopping-list',templateUrl: './shopping-list.component.html',styleUrl: './shopping-list.component.css',
})
export class ShoppingListComponent implements OnInit, OnDestroy {ingredients: Ingredient[] = [];constructor(private ingredientService: IngredientService) {}ngOnInit(): void {this.ingredients = this.ingredientService.ingredients;this.ingredientService.ingredientChanged.subscribe((ingredients: Ingredient[]) => {this.ingredients = ingredients;});}ngOnDestroy(): void {this.ingredientService.ingredientChanged.unsubscribe();}
}
同样也是一个 subscription 的实现去动态监听 ingredients 的变化
shopping-edit 组件的修改
-
V 层
<div class="row"><div class="col-xs-12"><form><div class="row"><div class="col-sm-5 form-group"><label for="name">Name</label><input type="text" id="name" class="form-control" #nameInput /></div><div class="col-sm-2 form-group"><label for="amount">Amount</label><inputtype="number"id="amount"class="form-control"#amountInput/></div></div><div class="row"><div class="col-xs-12"><div class="btn-toolbar"><buttonclass="btn btn-success mr-2"type="submit"(click)="onAddIngredient(nameInput)">Add</button><button class="btn btn-danger mr-2" type="button">Delete</button><button class="btn btn-primary" type="button">Edit</button></div></div></div></form></div>
</div>
这里添加了一个按钮的功能,实现添加 ingredient
-
VM 层
@Component({selector: 'app-shopping-edit',templateUrl: './shopping-edit.component.html',styleUrl: './shopping-edit.component.css',
})
export class ShoppingEditComponent {@ViewChild('amountInput', { static: true })amountInput: ElementRef;constructor(private ingredientService: IngredientService) {}onAddIngredient(nameInput: HTMLInputElement) {this.ingredientService.addIngredient(new Ingredient(nameInput.value, this.amountInput.nativeElement.value));}
}
这里的
onAddIngredient实现方式和添加整个 list 基本一致,也就不多赘述了
相关文章:
第一个 Angular 项目 - 添加服务
第一个 Angular 项目 - 添加服务 这里主要用到的内容就是 [Angular 基础] - service 服务 提到的 前置项目在 第一个 Angular 项目 - 动态页面 这里查看 想要实现的功能是简化 shopping-list 和 recipe 之间的跨组件交流 回顾一下项目的结构: ❯ tree src/app/…...
红日靶场3
靶场链接:漏洞详情 在虚拟机的网络编辑器中添加两个仅主机网卡 信息搜集 端口扫描 外网机处于网端192.168.1.0/24中,扫描外网IP端口,开放了80 22 3306端口 80端口http服务,可以尝试登录网页 3306端口mysql服务,可…...
B树的介绍
R-B Tree 简介特性B树特性m阶B树的性质(这些性质是B树规定的) B树的搜索B树的添加B树的删除——非叶子结点 简介 R-B Tree又称为Red-Black Tree,红黑树。是一种特殊的二叉查找树,红黑树的每个节点上都有存储为表示结点的颜色&…...
)
《The Art of InnoDB》第二部分|第4章:深入结构-磁盘结构-撕裂的页面(doublewrite buffer)
4.5 撕裂的页面 目录 4.5 撕裂的页面 4.5.1 双写缓冲区的作用 4.5.2 双写缓冲区的结构 4.5.3 双写缓冲区与Redolog的协同工作流程 4.5.2 双写缓冲区写入时机 4.5.3 禁用双写缓冲区 4.5.4 小结 未完待续... 上文我们学习了redo log的结构和其工作原理,它是一个…...
提示工程(Prompt Engineering)、微调(Fine-tuning) 和 嵌入(Embedding)
主要参考资料: 还没搞懂嵌入(Embedding)、微调(Fine-tuning)和提示工程(Prompt Engineering)?: https://blog.csdn.net/DynmicResource/article/details/133638079 B站Up主Nenly同学…...
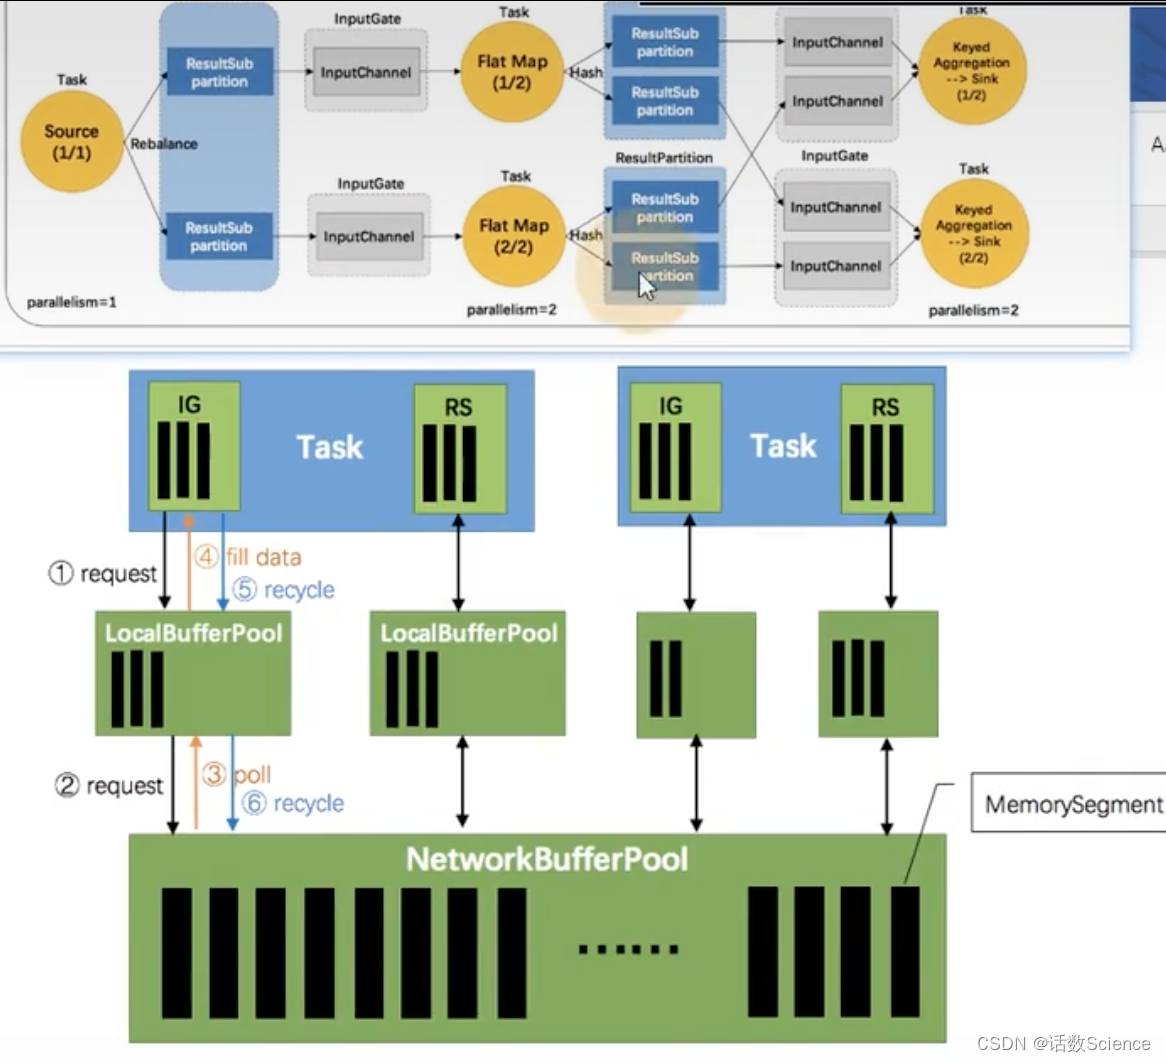
【Flink精讲】Flink 内存管理
面临的问题 目前, 大数据计算引擎主要用 Java 或是基于 JVM 的编程语言实现的,例如 Apache Hadoop、 Apache Spark、 Apache Drill、 Apache Flink 等。 Java 语言的好处在于程序员不需要太关注底层内存资源的管理,但同样会面临一个问题&…...

正则化概念及使用
正则化概念及使用 正则化概念正则化原理常用的两种正则化方法1. L1 正则化(Lasso)2. L2 正则化(Ridge) 正则化参数 正则化概念 在机器学习中,我们致力于通过从训练数据中学习模式或规律来构建模型。为了找到最佳的模型…...
让程序员设计B端界面,好比武大郎招聘:向我看齐。不忍直视!
hello,我是大美B端工场,B端系统的要求越来越高了,很多公司还让程序员负责页面,页面搞的没法看,也怪不得程序员。程序员来搞页面,那还不是武大郎招聘——向我看齐,以我的标准为标准吗?…...
使用python构建Android,探索跨平台应用开发Kivy框架
使用python构建Android,探索跨平台应用开发Kivy框架 1. 介绍Kivy框架 Kivy是什么? Kivy是一个开源的Python跨平台应用程序开发框架,旨在帮助开发者快速构建创新的、可扩展的移动应用和多点触控应用。Kivy采用MIT许可证,允许开发…...
08 Redis之集群的搭建和复制原理+哨兵机制+CAP定理+Raft算法
5 Redis 集群 2.8版本之前, Redis采用主从集群模式. 实现了数据备份和读写分离 2.8版本之后, Redis采用Sentinel哨兵集群模式 , 实现了集群的高可用 5.1 主从集群搭建 首先, 基本所有系统 , “读” 的压力都大于 “写” 的压力 Redis 的主从集群是一个“一主多从”的读写分…...
*MYSQL--索引--内部原理
MYSQL的索引根据功能,主要有三大类型: 1.HASH索引 2.二叉树 3.BTREE索引 一:HASH索引 1.内部原理: 在设置了某列为索引列之后,并且开始或者将要在相应索引列创建数据的时候,系统通过某种算法 F(X) 自动计算出来一个十六进制的哈希值,这个哈希值能够对应相应的字段值 所以…...

docker安装kafka和kafka-console-ui
3、安装kafka https://blog.csdn.net/m0_64210833/article/details/134199061 kafka依赖Zookeeper,当然也可以用内置的kraft。 安装前提条件 1.安装Zookeeper 1.1运行ZooKeeper容器 2.运行Kafka容器 2.1启动Kafka容器 3.验证 3.1进入Kafka容器 3.2查看容器状态 3.3查…...
Linux:gitlab创建组,创建用户,创建项目
创建组和项目 让后可以在组里创建一个个仓库 创建成员 我创建个成员再把他分配进这个组里 进入管理员 密码等会我们创建完用户再去配置密码 Regular是普通的用户,只可以正常去访问指定规则的项目 而下面的administrator就是管理员,可以随便进项目&…...
相机选型介绍
摄影测量中,相机是非常重要的角色,合适的相机产出合适的图像,得到合适的重建精度,这是相机的重要性。 您也许第一反应是,摄影测量所需的理想相机,是有着超高分辨率的相机,但事实可能并非如此&a…...

SQL创建数据库
SQL,全称结构化查询语言(Structured Query Language),是一种用于管理关系型数据库的标准语言。通过 SQL,我们可以创建、查询、更新和删除数据库中的数据。今天,我们将学习使用SQL创建数据库。本文的目标是让读者了解如何使用SQL创…...
读书笔记-增强型分析:AI驱动的数据分析、业务决策与案例实践
目录 前言 运用人工智能技术,可以使人类社会变得更美好。人们总是期待产品更适合、服务更贴心、生活更便利。在实践中,技术给企业赋能,企业通过优质的产品和服务满足社会,提升人类福祉。很多金融企业已经开始尝试向潜在客户推送…...

NXP实战笔记(十):S32K3xx基于RTD-SDK在S32DS上配置CAN通信
目录 1、概述 2、SDK配置 2.1、配置目标 2.2、CAN配置 3、代码实现 4、测试结果 1、概述 S32K3xx的FlexCan与之前的S32K1xx很相似,Can的中断掩码寄存器(IMASK3)与中断标志位寄存器(IFLAG3)依赖于邮箱数。 FlexCan配置实例如下 FlexCan的整体图示如下 Protocol Engine…...

纳斯达克大屏-投放需要知道的几个条件-大舍传媒
引言 随着移动互联网的快速发展,数字广告媒体广告越来越受到企业的关注。纳斯达克大屏作为全球最大的数字媒体广告投放平台之一,拥有广泛的受众和优质的媒体资源,吸引了众多企业的眼球。要想在纳斯达克大屏上投放广告,企业需要了…...
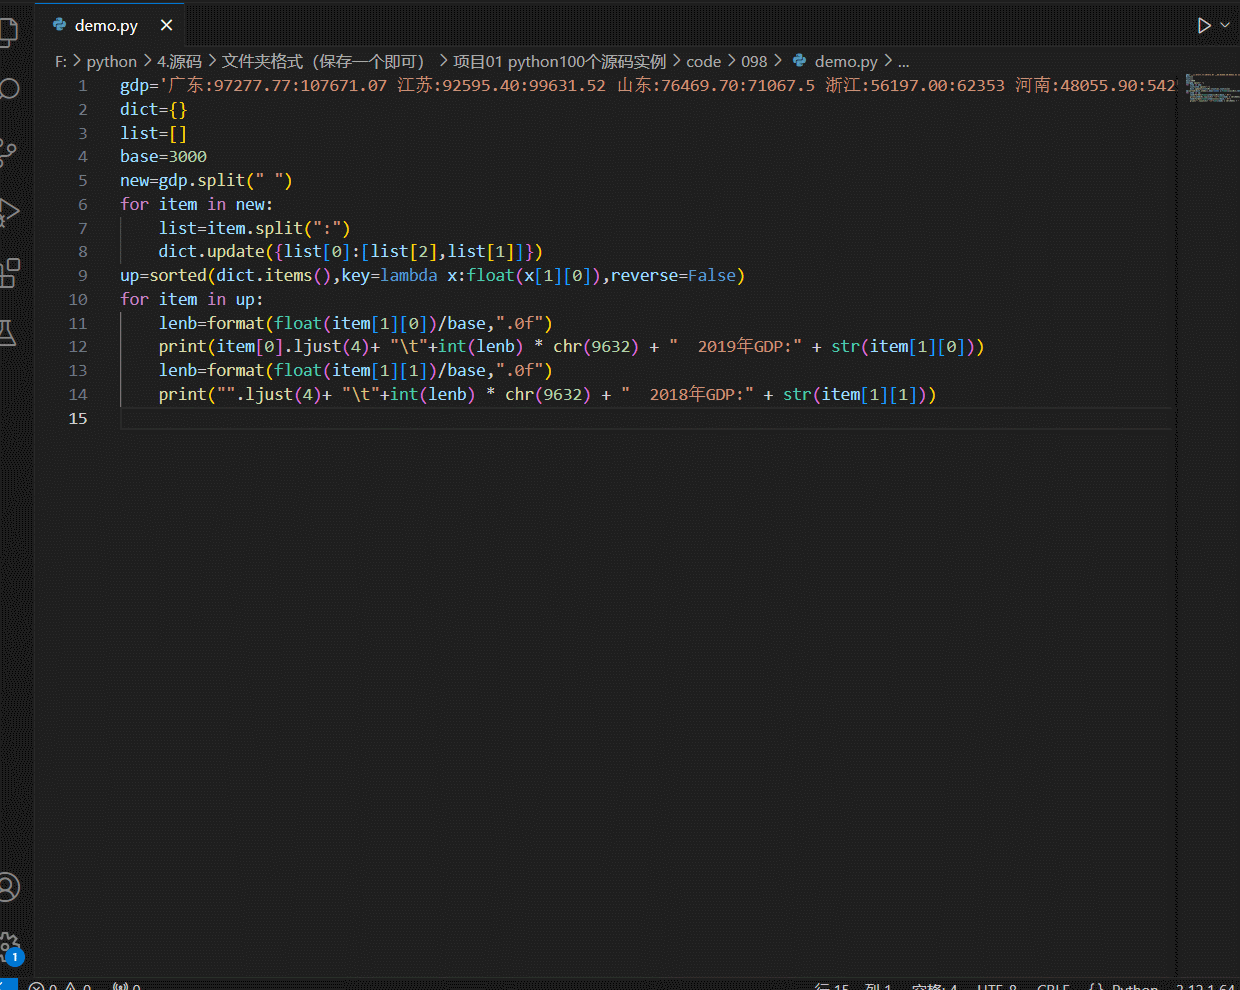
python-可视化篇-简单-条形图输出主要省份GDP排名情况
条形图输出主要省份GDP排名情况 代码 gdp广东:97277.77:107671.07 江苏:92595.40:99631.52 山东:76469.70:71067.5 浙江:56197.00:62353 河南:48055.90:54259.2 四川:40678.10:46615.82 湖北:39366.60:45828.31 湖南:36425.78:39752.12 河北:36010.30:35104.5 福建:35804.04:…...

Sora - 探索AI视频模型的无限可能-官方报告解读与思考
一、引言 最近SORA火爆刷屏,我也忍不住找来官方报告分析了一下,本文将深入探讨OpenAI最新发布的Sora模型。Sora模型不仅仅是一个视频生成器,它代表了一种全新的数据驱动物理引擎,能够在虚拟世界中模拟现实世界的复杂现象。本文将重…...

MusicFree:如何通过插件化架构打造终极免费音乐播放器体验
MusicFree:如何通过插件化架构打造终极免费音乐播放器体验 【免费下载链接】MusicFree 插件化、定制化、无广告的免费音乐播放器 项目地址: https://gitcode.com/GitHub_Trending/mu/MusicFree 你是否厌倦了广告满天飞的音乐应用?是否受够了VIP歌…...

量子纠错技术:虚拟量子重复码的创新与应用
1. 量子纠错基础与核心挑战 量子纠错(QEC)是量子计算得以实现的关键技术支柱。与传统经典比特不同,量子比特(qubit)面临着更为复杂的错误模式:除了比特翻转(bit-flip)这类经典错误外…...

机器学习算法清单:从入门到精通的实用指南
1. 为什么需要创建机器学习算法清单作为一名从业多年的数据科学家,我深刻理解初学者面对海量机器学习算法时的困惑。教科书和开源库中充斥着数百种算法,光是记住名称就让人头疼。更糟糕的是,这种信息过载会导致两种典型问题:第一种…...

nli-MiniLM2-L6-H768入门必看:无需训练、纯本地的零样本文本分类工具
nli-MiniLM2-L6-H768入门必看:无需训练、纯本地的零样本文本分类工具 1. 工具概述 nli-MiniLM2-L6-H768是一款基于cross-encoder/nli-MiniLM2-L6-H768轻量级NLI模型开发的本地零样本文本分类工具。它彻底改变了传统文本分类需要大量标注数据和训练过程的繁琐流程&…...

哪些降重软件可以同时降低查重率和AIGC疑似率?2026年5款顶流工具深度黑盒实测
引言:在2026年的盲审里,你的论文正面临一场“被猎杀”的灾难 几天前,我的一个直博学弟在实验室崩溃大哭。他苦熬大半年、查重率仅有3.2%的完美终稿,在学院第一波预审中被无情“斩立决”。退回的理由极其刺眼:系统判定…...

终极指南:用Easy-Scraper在3分钟内掌握Rust网页数据提取
终极指南:用Easy-Scraper在3分钟内掌握Rust网页数据提取 【免费下载链接】easy-scraper Easy scraping library 项目地址: https://gitcode.com/gh_mirrors/ea/easy-scraper 想象一下,你正在构建一个新闻聚合应用,需要从几十个不同的网…...

从PRACH前导码规划到5G NR:聊聊ZC序列那些“坑”与网络优化实战经验
从PRACH前导码规划到5G NR:聊聊ZC序列那些“坑”与网络优化实战经验 在4G/5G网络优化中,PRACH前导码规划就像给小区分配独特的"门牌号"——如果设计不当,用户设备连敲门都找不到正确的入口。我曾亲眼见过某省会城市CBD区域因ZC序列…...

架构实战:基于 GB28181/RTSP 多协议兼容的 AI 视频中台——支持源码交付与边缘异构部署
1. 引言:安防集成开发中的“协议围城” 作为一名深耕安防领域十余年的架构师,我见过太多集成商陷于协议对接的泥潭。在面对海康、大华、宇视等跨品牌设备接入时,开发者往往需要处理复杂的 GB/T28181 级联、不稳定的 RTSP 轮询以及异构硬件下…...

TOPSIS vs 熵权法:选哪个?一个真实业务数据分析案例带你搞懂区别
TOPSIS与熵权法实战指南:如何根据业务场景选择最优评价模型 当数据分析师面对水质评估、员工绩效考核或投资组合优化等多指标决策问题时,常会陷入方法选择的困境。我曾在一个省级环境监测项目中,分别用TOPSIS和熵权法对12个湖泊的水质进行评价…...

QrazyBox终极指南:3分钟快速修复损坏二维码的完整教程
QrazyBox终极指南:3分钟快速修复损坏二维码的完整教程 【免费下载链接】qrazybox QR Code Analysis and Recovery Toolkit 项目地址: https://gitcode.com/gh_mirrors/qr/qrazybox 你是否遇到过打印模糊的二维码无法扫描?或者手机拍摄的付款码因为…...