R3F(React Three Fiber)基础篇
之前一直在做ThreeJS方向,整理了两篇R3F(React Three Fiber)的文档,这是基础篇,如果您的业务场景需要使用R3F,您又对R3F不太了解,或者不想使用R3F全英文文档,您可以参考一下这篇,作为学习R3F的基础教程使用。
经验篇:⬇️
R3F(React Three Fiber)经验篇
一、R3F基础
文章目录
- 一、R3F基础
- 一、React Three Fiber基础
- 1. 基础场景搭建
- 2. 自定义Geometry
- 3. useFrame
- 4. toneMapping (色调映射)
- 二、@react-three/drei
- 1. OrbitControls
- 2. TransformControls
- 3. PivotControls
- 4. Html
- 5. Text
- 6. Float
- 7. 镜面反射材质
- 三、Debugger
- 1. leva
- 2. r3f-perf
- 3. useHelper
- 三、Environment
- 1. 设置背景颜色
- 2. 配置阴影
- 3. 天空盒
- 4. 场景HDR文件
- 四、Load Models
- 1. useLoader
- 2. Suspense
- 3. useGLTF
- 4. GLTF Clone(模型克隆)
- 5. GLTF Animation
- 6. Text3D
- 7. useMatcapTexture
- 8. Multiple model processing
- 五、Mouse Event
- 1. EventHandler
- 2. Event Kind
- 六、Post Processing
- 1. Install
- 2. multisampling 多重采样
- 3. vignette 晕映
- 4. Glitch 失灵
- 5. Noise 噪点
- 6. Bloom
- 7. DepthOfField 景深
- 七、Physics
- 1. Installation
- **2. RigidBody:刚体**
- 3. Controll rigidbody movement
- 4. grvity 重力
- 5. gravityScale,restitution,friction
- 6. RigidBody mass 刚体重力
一、React Three Fiber基础
1. 基础场景搭建
function App() {const cameraSettings = {fov: 1,zoom: 100,near: 0.1,far: 200,position: new Vector3(3, 2, 6)}return (<><Canvasorthographic={true}camera={{ ...cameraSettings }}><Experience /></Canvas></>)
}
相机场景配置
const cameraSettings = {// fov: 1,// zoom: 100,near: 0.1,far: 200,position: new Vector3(3, 2, 6)
}<Canvasgl={ {antialias: true,toneMapping: ACESFilmicToneMapping,outputEncoding: LinearEncoding} }// orthographic={true}  // orthographic 会影响Environment组件camera={{ ...cameraSettings }}shadows={true}onCreated={created}
><Experience />
</Canvas>
Experience.tsx
import "@react-three/fiber";
import { useRef } from "react";
import { Group } from "three";
import {extend, useFrame, useThree} from "@react-three/fiber";
import { OrbitControls } from 'three/examples/jsm/controls/OrbitControls.js';
import CustomObject from "./CustomObject.tsx";extend({ OrbitControls })export default function Experience() {const { camera, gl } = useThree();const cubeRef = useRef<any>(null!);const groupRef = useRef<Group>(null!);useFrame(() => {cubeRef.current.rotation.y += 0.01;})return <>{/* eslint-disable-next-line @typescript-eslint/ban-ts-comment */}{/* @ts-ignore */}<orbitControls args={ [camera, gl.domElement] } /><directionalLight position={ [ 1, 2, 3 ] } intensity={ 1.5 } /><ambientLight intensity={ 0.5 } /><group ref={groupRef}><mesh><sphereGeometry/><meshStandardMaterial color={'orange'}/></mesh><mesh ref={cubeRef} rotation-y={Math.PI * 0.25} position-x={2} scale={1.5}><boxGeometry/><meshStandardMaterial color={"mediumpurple"} wireframe={false}/></mesh><mesh position-y={-1} rotation-x={-Math.PI * 0.5} scale={10}><planeGeometry/><meshStandardMaterial color={"greenyellow"}/></mesh></group></>
}
2. 自定义Geometry
import { DoubleSide, BufferGeometry } from "three";
import {useEffect, useMemo, useRef} from "react";export default function CustomObject() {const geometryRef = useRef<BufferGeometry>(null!);const verticesCount = 10 * 3;const positions = useMemo(() => {const positions = new Float32Array(verticesCount * 3);for (let i = 0; i < verticesCount; i++) {positions[i] = (Math.random() - 0.5) * 3;}return positions;}, [verticesCount]);useEffect(() => {geometryRef.current.computeVertexNormals();}, []);return <mesh><bufferGeometry ref={geometryRef}><bufferAttributeattach={"attributes-position"}count={verticesCount}itemSize={3}array={positions}/></bufferGeometry><meshBasicMaterial color={"red"} side={ DoubleSide } /></mesh>
}
3. useFrame
useFrame((state, delta) => {// delta 一直是 1.33console.log(delta);// 开始渲染时间console.log(state.clock.getElapsedTime());console.log(state.clock.elapsedTime);cubeRef.current.rotation.y += delta;
})
摄像机周期运动
useFrame((state, delta) => {const angle = state.clock.elapsedTime;state.camera.position.x = Math.sin(angle);state.camera.position.z = Math.cos(angle);state.camera.lookAt(0, 0, 0);
})
让Canvas绘制得更好的一些效果
<Canvasgl={ {antialias: true // 抗锯齿} }orthographic={true} // 效果不详camera={{ ...cameraSettings }}
>
4. toneMapping (色调映射)
https://threejs.org/docs/#api/en/constants/Renderer
CineonToneMapping,ACESFilmicToneMapping(HDR)
<Canvasgl={ {antialias: true,toneMapping: ACESFilmicToneMapping} }orthographic={true}camera={{ ...cameraSettings }}
>
二、@react-three/drei
1. OrbitControls
自由旋转镜头组件
import {extend, useFrame, useThree} from "@react-three/fiber";
import { OrbitControls } from 'three/examples/jsm/controls/OrbitControls.js';extend({ OrbitControls })const { camera, gl } = useThree();
<orbitControls args={ [camera, gl.domElement] } />
↓
import {OrbitControls} from "@react-three/drei";
<OrbitControls />
2. TransformControls
物体Transform组件(会在物体中心多出一个坐标系)
import { TransformControls } from "@react-three/drei";
<TransformControls><mesh ref={cubeRef} rotation-y={Math.PI * 0.25} position-x={2} scale={1.5}><boxGeometry/><meshStandardMaterial color={"mediumpurple"} wireframe={false}/></mesh>
</TransformControls>
另一种写法:
<TransformControls object={ cubeRef } />
注意
同时使用OrbitControls和TransformControls,OrbitControls要给makeDefault属性。
<OrbitControls makeDefault={true}/>
Props
TransformControlsProps:mode?: 'translate' | 'rotate' | 'scale';
3. PivotControls
效果类似TransformControls,但是好像比它好用。
<PivotControls anchor={[2, 0, 0]} depthTest={false}>
Props
PivotControlsPropsscale?: number;lineWidth?: number;rotation?: [number, number, number];axisColors?: [string | number, string | number, string | number];anchor?: [number, number, number];depthTest?: boolean;
4. Html
创建3D字体(HTML标签)
<mesh position-x={-2}><sphereGeometry/><meshStandardMaterial color={'orange'}/><HtmlwrapperClass={ 'label' } // label > div { color: white }position={ [1, 1, 0] }centerdistanceFactor={ 0.01 } // 越大,字体越大occlude={ [ cubeRef ] } // 文字遮挡效果>This is sphere.</Html>
</mesh>
Generating a 3D text geometry has its limits
- We can notice the polygons
- Takes a lot of CPU resources
- Some fonts won’t look very good
- Doesn’t support line breaks
5. Text
一个更好的,性能开销更少的文字组件,但是不支持occlude。
<Textfont={ '' }fontSize={ 1 }color={'salmon'}position-y={ 2 }maxWidth={ 3 }textAlign={ 'center' }
>I Love R3F
</Text>
6. Float
让一个物体 飘来飘去
<Float speed={4}><Textfont={''}fontSize={ 1 }color={'salmon'}position-y={ 2 }maxWidth={ 3 }textAlign={ 'center' }>I Love R3F</Text>
</Float>
7. 镜面反射材质
注意:仅可用于平面
<mesh rotation={[-Math.PI / 2, 0, 0]} position={[-10, 0, 25]}><planeGeometry args={[250, 250]} /><MeshReflectorMaterialblur={[300, 100]}resolution={2048}mixBlur={1}mixStrength={80}roughness={1}depthScale={1.2}minDepthThreshold={0.4}maxDepthThreshold={1.4}color="#050505"metalness={0.5}mirror={0}/>
</mesh>
三、Debugger
1. leva
useControls
import { useControls, button } from 'leva';
const {position: ct_position,color: ct_color,visible: ct_visible,
} = useControls('sphere', {position: {value: { x: -2, y: 0 },step: 0.01,joystick: 'invertY'},color: '#ff0000',visible: true,myInterval: {min: 0,max: 10,value: [ 4, 5 ]},choice: { options: ['a', 'b', 'c'] },clickMe: button(() => console.log('ok'))
})
2. r3f-perf
import { Perf } from "r3f-perf";
<Perf position={'top-left'}/>
3. useHelper
可以展示光线的路径
import { useHelper, } from "@react-three/drei";
import { DirectionalLightHelper, DirectionalLight } from "three";const directionalLight = useRef<DirectionalLight>(null!);
useHelper(directionalLight, DirectionalLightHelper);
三、Environment
1. 设置背景颜色
- 通过 color 标签
<Canvasgl={ {antialias: true,toneMapping: ACESFilmicToneMapping,outputEncoding: LinearEncoding} }orthographic={true}camera={{ ...cameraSettings }}shadows={true}
><color args={ ['#ff0000'] } attach={"background"} /><Experience />
</Canvas>
- 通过 onCreated 钩子函数
const created = (state: RootState) => {console.log('canvas created! ');const { gl, scene } = state;gl.setClearColor('#ff0000', 1);scene.background = new Color('red');
}<Canvasgl={ {antialias: true,toneMapping: ACESFilmicToneMapping,outputEncoding: LinearEncoding} }orthographic={true}camera={{ ...cameraSettings }}shadows={true}onCreated={created}
><Experience />
</Canvas>
- 通过CSS样式
*, html, body {padding: 0;margin: 0;
}html,
body,
#root {position: fixed;top: 0;left: 0;width: 100%;height: 100%;overflow: hidden;
}
2. 配置阴影
- 阴影参数
{/*shadow-mapSize:阴影精度,越大精度越高*/}
{/*shadow-camera-top,right,bottom,left 阴影是否柔和,越大阴影越柔和*/}
<directionalLightref={ directionalLight }position={ [ 1, 2, 3 ] }intensity={ 1.5 }castShadow={ true }shadow-mapSize={ [1024 * 4, 1024 * 4] }shadow-camera-near={ 1 }shadow-camera-far={ 10 }shadow-camera-top={ 200 }shadow-camera-right={ 200 }shadow-camera-bottom={ - 200 }shadow-camera-left={ - 200 }
/>
- 阴影烘焙,在适当的场景下 添加BakeShadows组件
<BakeShadows />
- 柔和阴影
SoftShadows
<SoftShadowssize={100}focus={0}samples={10}
/>
- 累积阴影
AccumulativeShadows
<AccumulativeShadowsposition={ [ 0, - 0.99, 0 ] }scale={ 10 }color={ '#316d39' }opacity={ 0.8 }// frames={ Infinity }// temporal={ true }// blend={ 100 }
><RandomizedLightamount={ 8 }radius={ 1 }ambient={ 0.5 }intensity={ 1 }position={ [ 1, 2, 3 ] }bias={ 0.001 }/>
</AccumulativeShadows>
- 接触阴影
ContactShadows
const {position: cs_position,color: cs_color,opacity: cs_opacity,blur: cs_blur,
} = useControls('ContactShadows', {position: { value: { x: 0, y: - 0.99 }, step: 0.01, joystick: 'invertY' },color: '#000000',opacity: { value: 0.5, min: 0, max: 1 },blur: { value: 1, min: 0, max: 10 },clickMe: button(() => console.log('ok'))
})<ContactShadowsposition={ [cs_position.x, cs_position.y, 0] }scale={ 10 }resolution={ 128 }far={ 5 }color={ cs_color }blur={ cs_blur }opacity={ cs_opacity }
/>
3. 天空盒
<Sky distance={20} />
4. 场景HDR文件
HDR文件下载:https://polyhaven.com/
<Environmentbackgroundfiles={ '/industrial.hdr' }// ground={{//   radius: 1,//   scale: 100,//   height: 0// }}// preset="apartment" 预设场景
/>
通过suspend-react,可将Environment转为异步组件,支持Suspense的方式调用
import { suspend } from 'suspend-react'
const city = import('@pmndrs/assets/hdri/city.exr').then((module) => module.default)<Environment files={suspend(city)} />
四、Load Models
1. useLoader
import {GLTFLoader} from "three/examples/jsm/loaders/GLTFLoader.js";const modelCyberpunk = useLoader(GLTFLoader, './cyberpunk.glb');
自定义加载器
https://threejs.org/docs/#examples/en/loaders/DRACOLoader
Draco是一个用于压缩和解压缩 3D 网格和点云的开源库。压缩后的几何图形可以明显更小,但代价是客户端设备上需要额外的解码时间。
const modelCyberpunk = useLoader(GLTFLoader, './cyberpunk.glb', loader => {const dracoLoader = new DRACOLoader()dracoLoader.setDecoderPath('./draco/')loader.setDRACOLoader(dracoLoader);
});
2. Suspense
<Suspense fallback={<PlaceHolder scale={5}/>}><ModelCyberpunk />
</Suspense>
PlaceHolder.tsx
const PlaceHolder = (props: MeshProps) => {return <mesh {...props}><boxGeometry /><meshStandardMaterial wireframe={true} color={ 'red' } /></mesh>
}export default PlaceHolder;
3. useGLTF
Secondary Encapsulation of useLoadler(useLoadler的二次封装)
export declare function useGLTF<T extends string | string[]>(path: T, useDraco?: boolean | string, useMeshOpt?: boolean, extendLoader?: (loader: GLTFLoader) => void): T extends any[] ? import("three-stdlib").GLTF[] : import("three-stdlib").GLTF;
可选配置:useDraco,useMeshOpt,extendLoader
Extend the useGLTF return value type(对useGLTF 的返回值类型进行拓展)
declare type GLTFEnhance = import('three-stdlib').GLTF & {nodes: Record<string, import("three").Mesh>;materials: Record<string, import("three").MeshStandardMaterial>;
};const { nodes, materials } = useGLTF('/cyberpunk.glb', true) as C_GLTF;
GLTF 预加载(preload)
// Remember to write outside the component.
useGLTF.preload('/cyberpunk.glb')
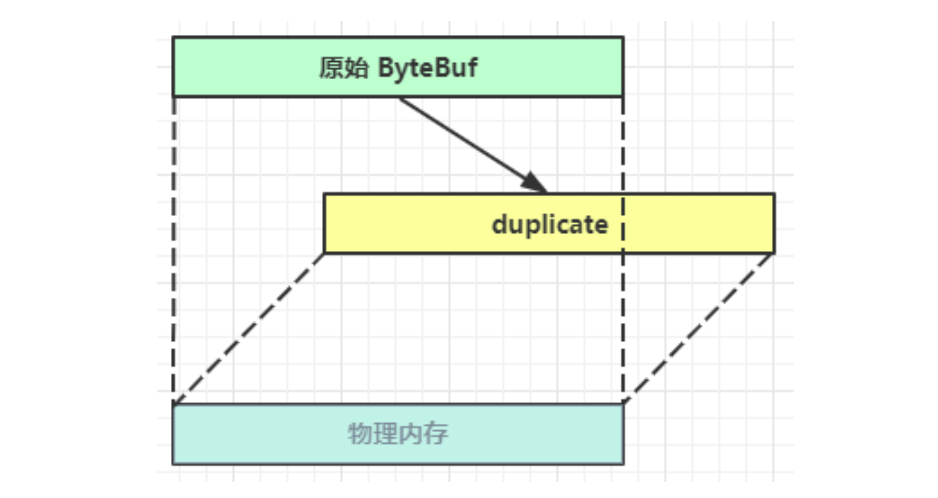
4. GLTF Clone(模型克隆)
Object3D.clone()
/*** Returns a clone of `this` object and optionally all descendants.* @param recursive If true, descendants of the object are also cloned. Default `true`** clone(recursive?: boolean): this;*/
<primitive object={scene.clone()}></primitive>
Clone Component
https://github.com/pmndrs/drei#clone
Declarative abstraction around THREE.Object3D.clone. This is useful when you want to create a shallow copy of an existing fragment (and Object3D, Groups, etc) into your scene, for instance a group from a loaded GLTF. This clone is now re-usable, but it will still refer to the original geometries and materials.
import {Clone} from "@react-three/drei";<group {...props} dispose={null}><Clone object={scene.clone()} position-x={ -10 }></Clone><Clone object={scene.clone()} position-x={ 0 }></Clone><Clone object={scene.clone()} position-x={ 10 }></Clone>
</group>
5. GLTF Animation
const { animations: gAnimations, scene} = useGLTF('./dog.glb', true) as GLTFEnhance;
const { actions } = useAnimations(gAnimations, scene);useEffect(() => {const play_dead =  actions["0|play_dead_0"]!const rollover =  actions["0|rollover_0"]!const shake =  actions["0|shake_0"]!const sitting =  actions["0|sitting_0"]!const standing =  actions["0|standing_0"]!shake.play();window.setTimeout(() => {rollover.play();rollover.crossFadeFrom(shake, 1, false)}, 10000)}, []);
useController
const { animations: gAnimations, scene
} = useGLTF('./dog.glb', true) as GLTFEnhance;const { actions, names } = useAnimations(gAnimations, scene);
const { animationName } = useControls({ animationName: { options: names } })useEffect(() => {const action = actions[animationName]!action.fadeIn(0.5).play()return () => { action.fadeOut(0.5) }
}, [animationName]);
6. Text3D
Documentation:https://github.com/pmndrs/drei#text3d
Example:
const [ matcapTexture ] = useMatcapTexture('3E2335_D36A1B_8E4A2E_2842A5', 256);<Text3Dfont={'./Regular.json'}size={ 0.75 }height={ 0.2 }curveSegments={ 12 }bevelEnabled={ true }bevelThickness={ 0.02 }bevelSize={ 0.02 }bevelOffset={ 0 }bevelSegments={ 5 }
>
The purpose of bevel-ralated properties is to make the font smoother.
bevel 的作用是让字体变得更加圆滑。
font属性需要填写一个被称作 typeface.json的字体文件,可在这个网站 https://gero3.github.io/facetype.js/ 将原始的ttf文件经过转化后得到。
The font props requires filling in a font file called typeface.json,which can be obtained by converting the orignal ttf file on https://gero3.github.io/facetype.js website.
7. useMatcapTexture
https://github.com/pmndrs/drei#usematcaptexture
The built in Texture can use in testing, not in the production environment.
内置的Texture,可用于测试,别使用在生产环境。
/*** The name of seconds parameters is format, we can choose between 64, 128, 256, 512, 1024* In our case, 256 is more than enough and you should try to use the smallest possible size   for performance reasons.*/
const [ matcapTexture ] = useMatcapTexture('3E2335_D36A1B_8E4A2E_2842A5', 256);
8. Multiple model processing
You shoud write the geometry, materal in mesh property when repeatedly rendering a model of the same geometry with the same materal. It performance better this way.
{[...Array(100)].map((_, index) =><meshkey={new Date().toString() + index}position={[(Math.random() - 0.5) * 10,(Math.random() - 0.5) * 10,(Math.random() - 0.5) * 10,]}scale={0.2 + Math.random() * 0.2}rotation={[Math.random() + Math.PI,Math.random() + Math.PI,Math.random() + Math.PI,]}geometry={torusGeometry}material={material}><torusGeometry args={[1, 0.6, 16, 32]} /><meshMatcapMaterial matcap={matcapTexture}/></mesh>)
}
↓↓↓
const Text3DHello: FC = memo(() => {const [matcapTexture] = useMatcapTexture('3E2335_D36A1B_8E4A2E_2842A5', 256);const [torusGeometry, setTorusGeometry] = useState<TorusGeometry>();const [material, setMaterial] = useState<MeshMatcapMaterial>();return <><torusGeometry ref={(torusGeometry) => setTorusGeometry(torusGeometry!)} args={[1, 0.6, 16, 32]} /><meshMatcapMaterial ref={(material) => setMaterial(material!) } matcap={matcapTexture}/><Center><Text3Dfont={'./Regular.json'}size={0.75}height={0.2}curveSegments={12}bevelEnabled={true}bevelThickness={0.02}bevelSize={0.02}bevelOffset={0}bevelSegments={5}>你好,React Three Fiber !<meshMatcapMaterial matcap={matcapTexture}/></Text3D></Center>{[...Array(100)].map((_, index) =><meshkey={new Date().toString() + index}position={[(Math.random() - 0.5) * 10,(Math.random() - 0.5) * 10,(Math.random() - 0.5) * 10,]}scale={0.2 + Math.random() * 0.2}rotation={[Math.random() + Math.PI,Math.random() + Math.PI,Math.random() + Math.PI,]}geometry={torusGeometry}material={material}/>)}</>
});
The better approach is to use OOP.
import {FC, memo, useEffect} from "react";
import {Center, Text3D, useMatcapTexture} from "@react-three/drei";
import {MeshMatcapMaterial, TorusGeometry} from "three";const torusGeometry = new TorusGeometry(1, 0.6, 16, 32);
const material = new MeshMatcapMaterial();const Text3DHello: FC = memo(() => {const [matcapTexture] = useMatcapTexture('3E2335_D36A1B_8E4A2E_2842A5', 256);useEffect(() => {matcapTexture.needsUpdate = true;material.matcap = matcapTexture;material.needsUpdate = true;}, [matcapTexture]);return <><Center><Text3Dfont={'./Regular.json'}size={0.75}height={0.2}curveSegments={12}bevelEnabled={true}bevelThickness={0.02}bevelSize={0.02}bevelOffset={0}bevelSegments={5}>你好,React Three Fiber !<meshMatcapMaterial matcap={matcapTexture}/></Text3D></Center>{[...Array(100)].map((_, index) =><meshkey={new Date().toString() + index}position={[(Math.random() - 0.5) * 10,(Math.random() - 0.5) * 10,(Math.random() - 0.5) * 10,]}scale={0.2 + Math.random() * 0.2}rotation={[Math.random() + Math.PI,Math.random() + Math.PI,Math.random() + Math.PI,]}geometry={torusGeometry}material={material}/>)}</>
});export default Text3DHello;
Use useFrame and useRef to add animation.
const donuts = useRef<Mesh[]>([]);useFrame((_, delta) => {for (const donut of donuts.current) donut.rotation.y += delta * 0.5
})// ...
<mesh ref={(mesh) => { donuts.current[index] = mesh! }}
// ...
or use group tag**(not recommanded)**
const donutsGroup = useRef<Group>(null!);useFrame((_, delta) => {for (const donut of donutsGroup.current.children) donut.rotation.y += delta * 0.1
}<group ref={ donutsGroup }>{ [...Array(100)].map((_, index) => <mesh // ... }
五、Mouse Event
1. EventHandler
const eventHandler = (event: ThreeEvent<MouseEvent>) => {console.log('event.uv', event.distance) // distance between camera and hit point.console.log('event.uv', event.uv)console.log('event.point', event.point) // Hit point coordinates (坐标).console.log('event.object', event.object)console.log('event.eventObject', event.eventObject) // Usually, eventObject is the same as objectconsole.log('event.x', event.x) // 2D Screen coordinates of the pointerconsole.log('event.y', event.y)console.log('event.shiftKey', event.shiftKey)console.log('event.ctrlKey', event.ctrlKey)console.log('event.metaKey', event.metaKey) // Click while holding down command / win key.
}
2. Event Kind
-
onClick
- CLICK or CLICK with CTRL、SHIFT、COMMAND(WIN)、ALT
shiftKey,ctrlKey,metaKey,altKey
-
onContextMenu
- RIGHT CLICK or CTRL + LEFT CLICK.
- On a mobile, by pressing down for some time.
-
onDoubleClick
- It works bisically the same as onClick.
- The delay between the first and second click/tap is defined by the OS
-
onPointerUp
-
onPointerDown
-
onPointerOver and onPointerEnter
- When the cursor or finger just went above the object
-
onPointerMove
-
onPointerMissed
- When the user clicks outside of the object. ( Cannot get the event.object parameter ).
六、Post Processing
1. Install
We need tow dependencies,@react-three/postprocessing,postprocesssing, But for now, the only we neeed to install is @react-three/postprocessing since the dependency will also install postprocesssing.
"@react-three/drei": "^9.85.1",
"@react-three/fiber": "^8.14.2",
"@react-three/postprocessing": "2.6",
"postprocessing": "~6.31.2",
"r3f-perf": "^7.1.2",
"three": "~0.151.0",
"three-stdlib": "^2.27.0"
2. multisampling 多重采样
The default value is 8.
<EffectComposer multisampling={16} />
3. vignette 晕映
The default effect is add a black mask around the sceen.
<Vignette offset={0.3} darkness={0.9} />
You can specify the blending(混合、交融) method.
import { BlendFunction } from "postprocessing";
<Vignetteoffset={0.3}darkness={0.9}blendFunction={ BlendFunction.ALPHA }
/>
4. Glitch 失灵
Create snowflake(雪花) glitch effect like an old-fashioned TV.
<Glitch delay={ new Vector2(1, 1) } mode={ GlitchMode.SPORADIC } />
Delay attribute reviews a value of type Vector2.It represents the delay time for the horizontal and vertical axes.
The same effect to other attributes.
delay?: import("three").Vector2;
duration?: import("three").Vector2;
strength?: import("three").Vector2;
Effect Mode
mode: typeof GlitchMode[keyof typeof GlitchMode];export enum GlitchMode {DISABLED,SPORADIC,CONSTANT_MILD,CONSTANT_WILD,
}
5. Noise 噪点
<Noise blendFunction={ BlendFunction.SOFT_LIGHT } premultiply  // effect overlay
/>
BlendFunction
BlendFunction.OVERLAY // 叠加
BlendFunction.SCREEN  // It doesn't work well in bright scenes
BlendFunction.SOFT_LIGHT
BlendFunction.AVERAGE
6. Bloom
Bloom can be used to build an object glow(发光,同luminescence)effect
1、Set material attriblue.
Set larger value for color attriblue.
<meshStandardMaterial color={ [ 1.5 * 30, 1 * 30, 4 * 30 ] } toneMapped={ false }
/>
Or set standard color, and set emissive attriblue and emissiveIntensity attibute.
<meshStandardMaterial color={ 'white' } emissive={ 'yellow' } emissiveIntensity={ 10 } toneMapped={ false }
/>
2、Set Bloom effect component attriblue.
<BloommipmapBlur={ true } // always trueintensity={ 1 }luminanceSmoothing={ 2 } // 滤波luminanceThreshold={ 10 } // 阈值
/>
7. DepthOfField 景深
<DepthOfFieldfocusDistance={ 0.025 }focalLength={ 0.025 }bokehScale={ 6 }
/>
七、Physics
1. Installation
pnpm install @react-three/rapier
2. RigidBody:刚体
-
colliders:对撞机,设置刚体碰撞形状,ball 球,cuboid 矩形,hull Mesh的船体形状,trimesh Mesh网线形状
export declare type RigidBodyAutoCollider = "ball" | "cuboid" | "hull" | "trimesh" | false;
Scene Example:
<Physics debug={true}><RigidBody colliders={'ball'} type={"dynamic"}><mesh castShadow={true} position={[0, 10, 0]}><sphereGeometry /><meshStandardMaterial color={'orange'} /></mesh></RigidBody><RigidBody colliders={'trimesh'}><mesh castShadow={true} position={[0, 1, 0]} rotation={[Math.PI * 0.5, 0, 0]}><torusGeometry args={[1, 0.5, 16, 32]} /><meshStandardMaterial color={'mediumpurple'} /></mesh></RigidBody><RigidBody type={"fixed"}><mesh receiveShadow={true} position={[0, 0, 0]} scale={1}><boxGeometry args={[10, 0.5, 10]}/><meshStandardMaterial color={"greenyellow"}/></mesh></RigidBody></Physics>
You can use CuboidCollider Component to add rigid body shape manually.
<RigidBody colliders={false} position={[0, 1, 0]} rotation={[Math.PI / 2, 0, 0]}><CuboidCollider args={[1.5, 1.5, 0.5]} /><CuboidCollider args={[1, 1, 1]} /><mesh castShadow={true}><torusGeometry args={[1, 0.5, 16, 32]} /><meshStandardMaterial color={'mediumpurple'} /></mesh>
</RigidBody>
BallCollider, the ball shape of rigid bidy.
<RigidBody colliders={false} position={[0, 1, 0]} rotation={[Math.PI / 2, 0, 0]}><BallCollider args={[1.5]} /><mesh castShadow={true}>n<torusGeometry args={[1, 0.5, 16, 32]} /><meshStandardMaterial color={'mediumpurple'} /></mesh>
</RigidBody>
3. Controll rigidbody movement
const cubeRigid = useRef<RapierRigidBody>(null!);const { camera } = useThree();const cubeJump = (event: ThreeEvent<MouseEvent>) => {cubeRigid.current.applyImpulse({ x: 0, y: 2, z: 0 }, false)cubeRigid.current.applyTorqueImpulse({ x: 0, y: 1, z: 0 }, false)const { eventObject } = event;// console.log(eventObject.position)const [epx,epy,epz] = eventObject.positioncamera.position.set(epx, epy - 4, epz + 4);camera.rotation.set(0, 0, 0);
}<Physics debug={true}><RigidBodycolliders={'cuboid'}type={"dynamic"}ref={cubeRigid}><meshcastShadow={true}position={[0, 10, 0]}onClick={cubeJump}><boxGeometry/><meshStandardMaterial color={'orange'} /></mesh></RigidBody><RigidBody type={"fixed"}><mesh receiveShadow={true} position={[0, 0, 0]} scale={1}><boxGeometry args={[10, 0.5, 10]}/><meshStandardMaterial color={"greenyellow"}/></mesh></RigidBody></Physics>
4. grvity 重力
You can set the gravity size and direction.
<Physicsdebug={true}gravity={[0, -1.6, 0]}
>
5. gravityScale,restitution,friction
- gravityScale 重力倍率
- restitution 恢复原状
- friction 摩擦力(摩擦力是两个对象作用)
<RigidBodycolliders={'cuboid'}type={"dynamic"}ref={cubeRigid}gravityScale={ 1 }restitution={ 1 }
>
6. RigidBody mass 刚体重力
const cubeRigid = useRef<RapierRigidBody>(null!);
const cubeMesh = useRef<Mesh>(null!);
const cubeJump = (_: ThreeEvent<MouseEvent>) => {const mass = cubeRigid.current.mass();cubeRigid.current.applyImpulse({ x: 0, y: 5 * mass, z: 0 }, false)cubeRigid.current.applyTorqueImpulse({ x: 0, y: 1 * mass, z: 0 }, false)
}
return <Physicsdebug={true}gravity={[0, -8, 0]}
><RigidBodycolliders={false}type={"dynamic"}ref={cubeRigid}gravityScale={ 1 }restitution={ 1 }friction={1}><CuboidColliderargs={[0.5, 0.5, 0.5]}position={[0, 10, 0]}mass={10}/><meshref={cubeMesh}castShadow={true}position={[0, 10, 0]}onClick={cubeJump}><boxGeometry/><meshStandardMaterial color={'orange'} /></mesh></RigidBody>
</Physics>
相关文章:
基础篇)
R3F(React Three Fiber)基础篇
之前一直在做ThreeJS方向,整理了两篇R3F(React Three Fiber)的文档,这是基础篇,如果您的业务场景需要使用R3F,您又对R3F不太了解,或者不想使用R3F全英文文档,您可以参考一下这篇&…...

torch\tensorflow在大语言模型LLM中的作用
文章目录 torch\tensorflow在大语言模型LLM中的作用 torch\tensorflow在大语言模型LLM中的作用 在大型语言模型(LLM)中,PyTorch和TensorFlow这两个深度学习框架起着至关重要的作用。它们为构建、训练和部署LLM提供了必要的工具和基础设施。 …...

设计模式-创建型模式-单例模式
0 引言 创建型模式(Creational Pattern)关注对象的创建过程,是一类最常用的设计模式,每个创建型模式都通过采用不同的解决方案来回答3个问题:创建什么(What),由谁创建(W…...
备战蓝桥杯—— 双指针技巧巧答链表1
对于单链表相关的问题,双指针技巧是一种非常广泛且有效的解决方法。以下是一些常见问题以及使用双指针技巧解决: 合并两个有序链表: 使用两个指针分别指向两个链表的头部,逐一比较节点的值,将较小的节点链接到结果链表…...

微信小程序返回上一级页面并自动刷新数据
文章目录 前言一、获取小程序栈二、生命周期触发总结 前言 界面由A到B,在由B返回A,触发刷新动作 一、获取小程序栈 界面A代码 shuaxin(){//此处可进行接口请求从而实现更新数据的效果console.log("刷新本页面数据啦")},界面B代码 // 返回触…...

Spring⼯⼚创建复杂对象
文章目录 5. Spring⼯⼚创建复杂对象5.1 什么是复杂对象5.2 Spring⼯⼚创建复杂对象的3种⽅式5.2.1 FactoryBean 接口5.2.2 实例⼯⼚5.2.3 静态工厂 5.3 Spring 工厂的总结 6. 控制Spring⼯⼚创建对象的次数6.1 如何控制简单对象的创建次数6.2 如何控制复杂对象的创建次数6.3 为…...

Top-N 泛型工具类
一、代码实现 通过封装 PriorityQueue 实现,PriorityQueue 本质上是完全二叉树实现的小根堆(相对来说,如果比较器反向比较则是大根堆)。 public class TopNUtil<E extends Comparable<E>> {private final PriorityQ…...

Java 后端面试指南
面试指南 TMD,一个后端为什么要了解那么多的知识,真是服了。啥啥都得了解 MySQL MySQL索引可能在以下几种情况下失效: 不遵循最左匹配原则:在联合索引中,如果没有使用索引的最左前缀,即查询条件中没有包含…...

142.环形链表 ||
给定一个链表的头节点 head ,返回链表开始入环的第一个节点。 如果链表无环,则返回 null。 如果链表中有某个节点,可以通过连续跟踪 next 指针再次到达,则链表中存在环。 为了表示给定链表中的环,评测系统内部使用整…...

Nacos、Eureka、Zookeeper注册中心的区别
Nacos、Eureka和Zookeeper都是常用的注册中心,它们在功能和实现方式上存在一些不同。 Nacos除了作为注册中心外,还提供了配置管理、服务发现和事件通知等功能。Nacos默认情况下采用AP架构保证服务可用性,CP架构底层采用Raft协议保证数据的一…...
CSS重点知识整理1
目录 1 平面位移 1.1 基本使用 1.2 单独方向的位移 1.3 使用平面位移实现绝对位置居中 2 平面旋转 2.1 基本使用 2.2 圆点转换 2.3 多重转换 3 平面缩放 3.1 基本使用 3.2 渐变的使用 4 空间转换 4.1 空间位移 4.1.1 基本使用 4.1.2 透视 4.2 空间旋转 4.3 立…...
【Langchain多Agent实践】一个有推销功能的旅游聊天机器人
【LangchainStreamlit】旅游聊天机器人_langchain streamlit-CSDN博客 视频讲解地址:【Langchain Agent】带推销功能的旅游聊天机器人_哔哩哔哩_bilibili 体验地址: http://101.33.225.241:8503/ github地址:GitHub - jerry1900/langcha…...
算法学习(十二)并查集
并查集 1. 概念 并查集主要用于解决一些 元素分组 问题,通过以下操作管理一系列不相交的集合: 合并(Union):把两个不相交的集合合并成一个集合 查询(Find):查询两个元素是否在同一…...
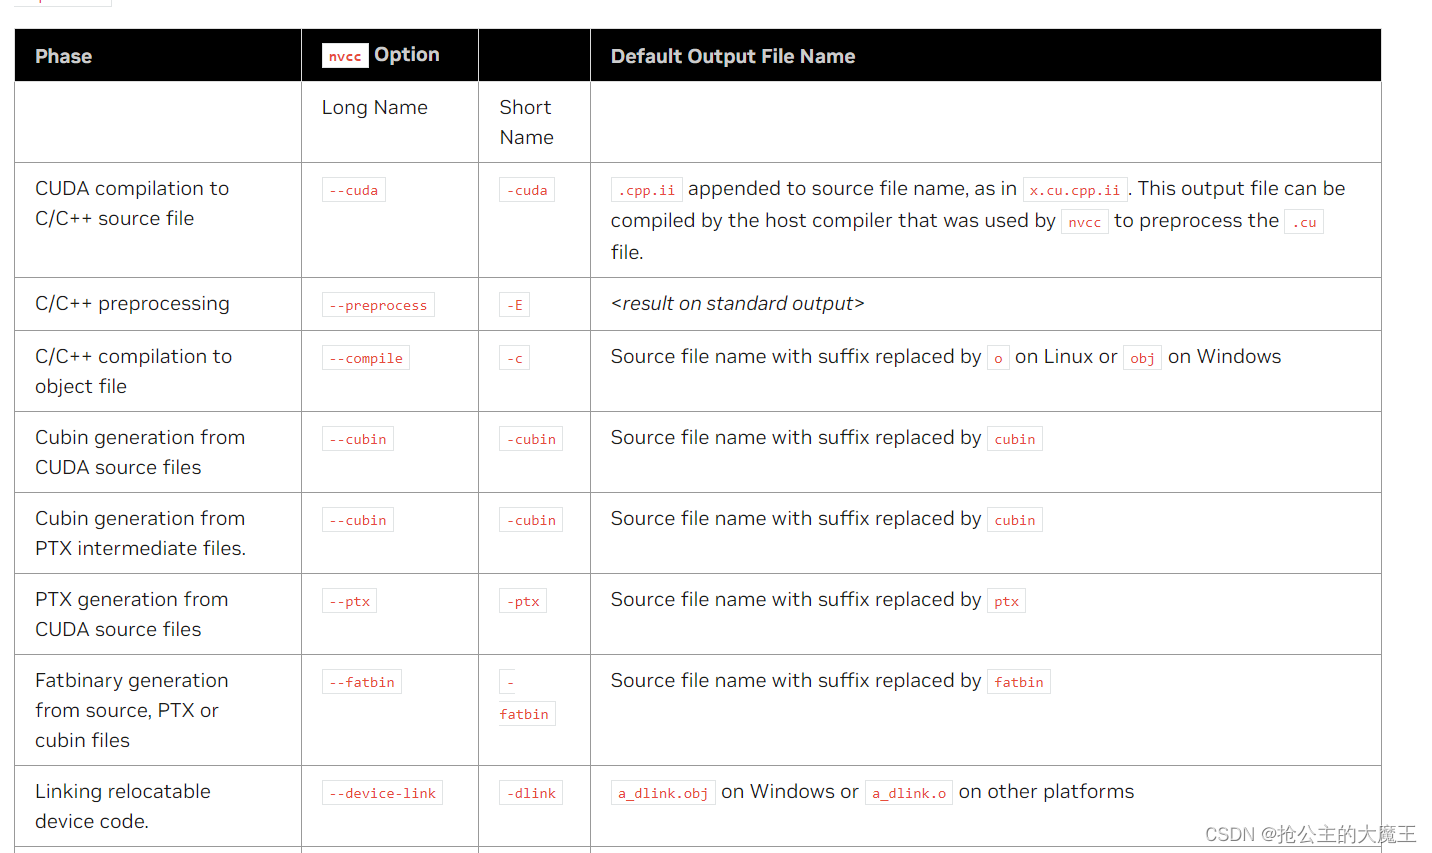
TensorRT及CUDA自学笔记003 NVCC及其命令行参数
TensorRT及CUDA自学笔记003 NVCC及其命令行参数 各位大佬,这是我的自学笔记,如有错误请指正,也欢迎在评论区学习交流,谢谢! NVCC是一种编译器,基于一些命令行参数可以将使用PTX或C语言编写的代码编译成可…...

数据库管理-第154期 Oracle Vector DB AI-06(20240223)
数据库管理154期 2024-02-23 数据库管理-第154期 Oracle Vector DB & AI-06(20240223)1 环境准备创建表空间及用户TNSNAME配置 2 Oracle Vector的DML操作创建示例表插入基础数据DML操作UPDATE操作DELETE操作 3 多Vector列表4 固定维度的向量操作5 不…...

解决uni-app vue3 nvue中使用pinia页面空白问题
main.js中,最关键的就是Pinia要return出去的问题,至于原因嘛! 很忙啊,先用着吧 import App from ./App import * as Pinia from pinia import { createSSRApp } from vue export function createApp() {const app createSSRApp(App);app.us…...

不用加减乘除做加法
1.题目: 写一个函数,求两个整数之和,要求在函数体内不得使用、-、*、/四则运算符号。 数据范围:两个数都满足 −10≤�≤1000−10≤n≤1000 进阶:空间复杂度 �(1)O(1),时间复杂度 &am…...

旅游组团自驾游拼团系统 微信小程序python+java+node.js+php
随着社会的发展,旅游业已成为全球经济中发展势头最强劲和规模最大的产业之一。为方便驴友出行,寻找旅游伙伴,更好的规划旅游计划,开发一款自驾游拼团小程序,通过微信小程序发起自驾游拼团,吸收有车或无车驴…...

LeetCode 第41天 | 背包问题 二维数组 一维数组 416.分割等和子集 动态规划
46. 携带研究材料(第六期模拟笔试) 题目描述 小明是一位科学家,他需要参加一场重要的国际科学大会,以展示自己的最新研究成果。他需要带一些研究材料,但是他的行李箱空间有限。这些研究材料包括实验设备、文献资料和实…...
Ubuntu20.04和Windows11下配置StarCraft II环境
1.Ubuntu20.04 根据下面这篇博客就可以顺利安装: 强化学习实战(九) Linux下配置星际争霸Ⅱ环境https://blog.csdn.net/weixin_39059031/article/details/117247635?spm1001.2014.3001.5506 Ubuntu下显示游戏界面目前还没有解决掉。 大家可以根据以下链接看看能…...

Golang 面试经典题:map 的 key 可以是什么类型?哪些不可以?
Golang 面试经典题:map 的 key 可以是什么类型?哪些不可以? 在 Golang 的面试中,map 类型的使用是一个常见的考点,其中对 key 类型的合法性 是一道常被提及的基础却很容易被忽视的问题。本文将带你深入理解 Golang 中…...

Swift 协议扩展精进之路:解决 CoreData 托管实体子类的类型不匹配问题(下)
概述 在 Swift 开发语言中,各位秃头小码农们可以充分利用语法本身所带来的便利去劈荆斩棘。我们还可以恣意利用泛型、协议关联类型和协议扩展来进一步简化和优化我们复杂的代码需求。 不过,在涉及到多个子类派生于基类进行多态模拟的场景下,…...

系统设计 --- MongoDB亿级数据查询优化策略
系统设计 --- MongoDB亿级数据查询分表策略 背景Solution --- 分表 背景 使用audit log实现Audi Trail功能 Audit Trail范围: 六个月数据量: 每秒5-7条audi log,共计7千万 – 1亿条数据需要实现全文检索按照时间倒序因为license问题,不能使用ELK只能使用…...
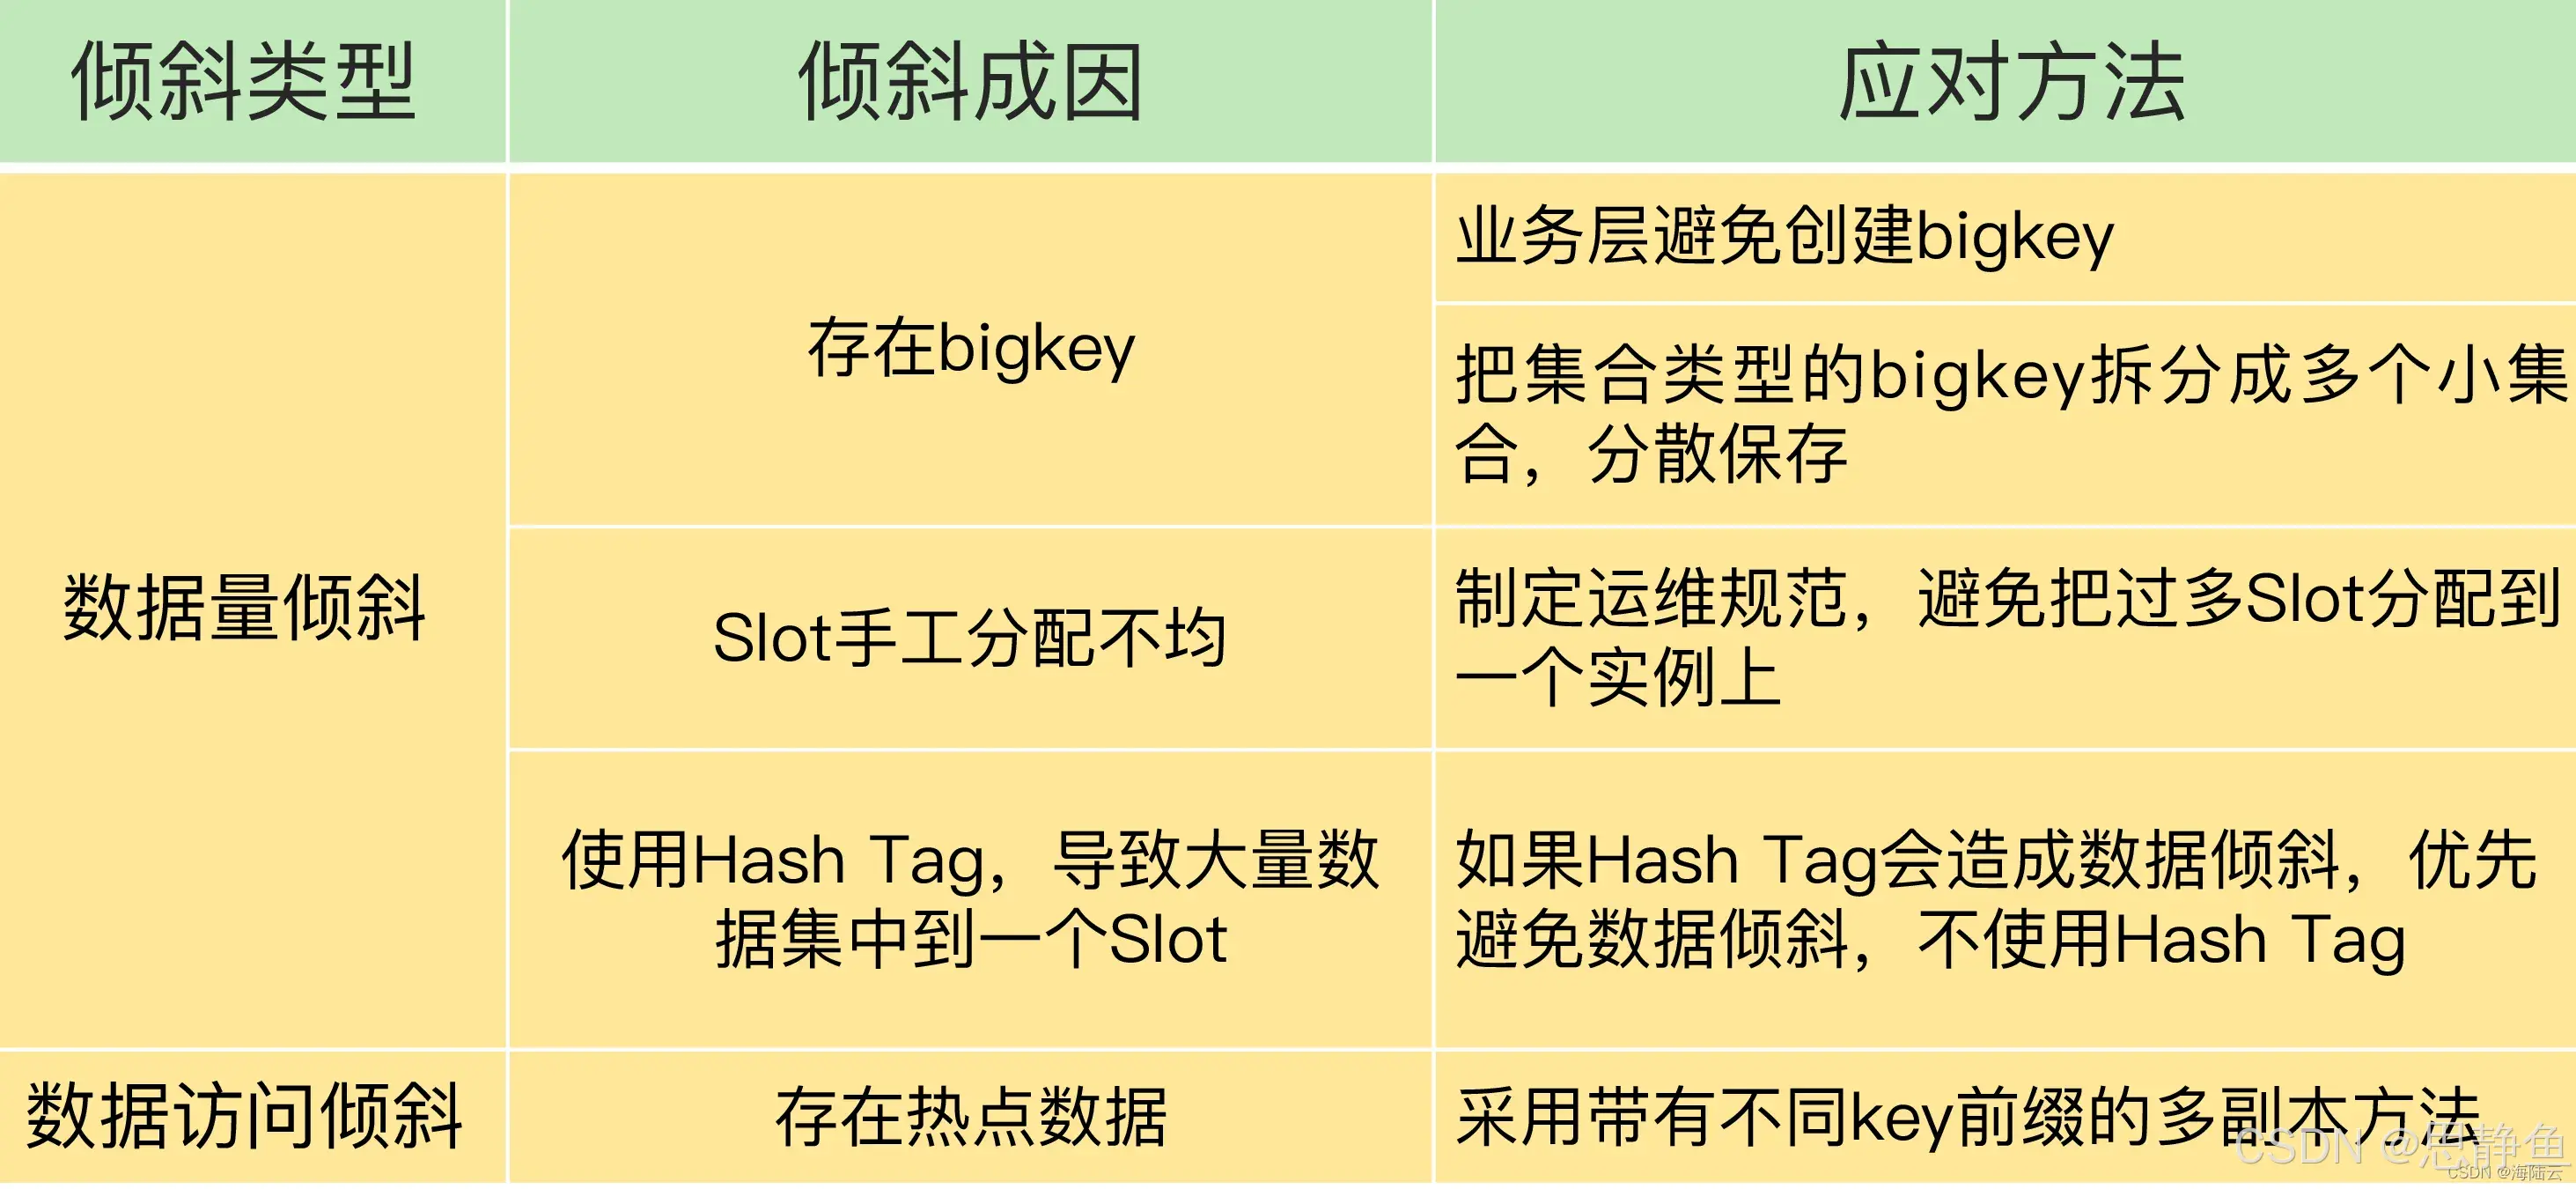
Redis数据倾斜问题解决
Redis 数据倾斜问题解析与解决方案 什么是 Redis 数据倾斜 Redis 数据倾斜指的是在 Redis 集群中,部分节点存储的数据量或访问量远高于其他节点,导致这些节点负载过高,影响整体性能。 数据倾斜的主要表现 部分节点内存使用率远高于其他节…...
如何在最短时间内提升打ctf(web)的水平?
刚刚刷完2遍 bugku 的 web 题,前来答题。 每个人对刷题理解是不同,有的人是看了writeup就等于刷了,有的人是收藏了writeup就等于刷了,有的人是跟着writeup做了一遍就等于刷了,还有的人是独立思考做了一遍就等于刷了。…...
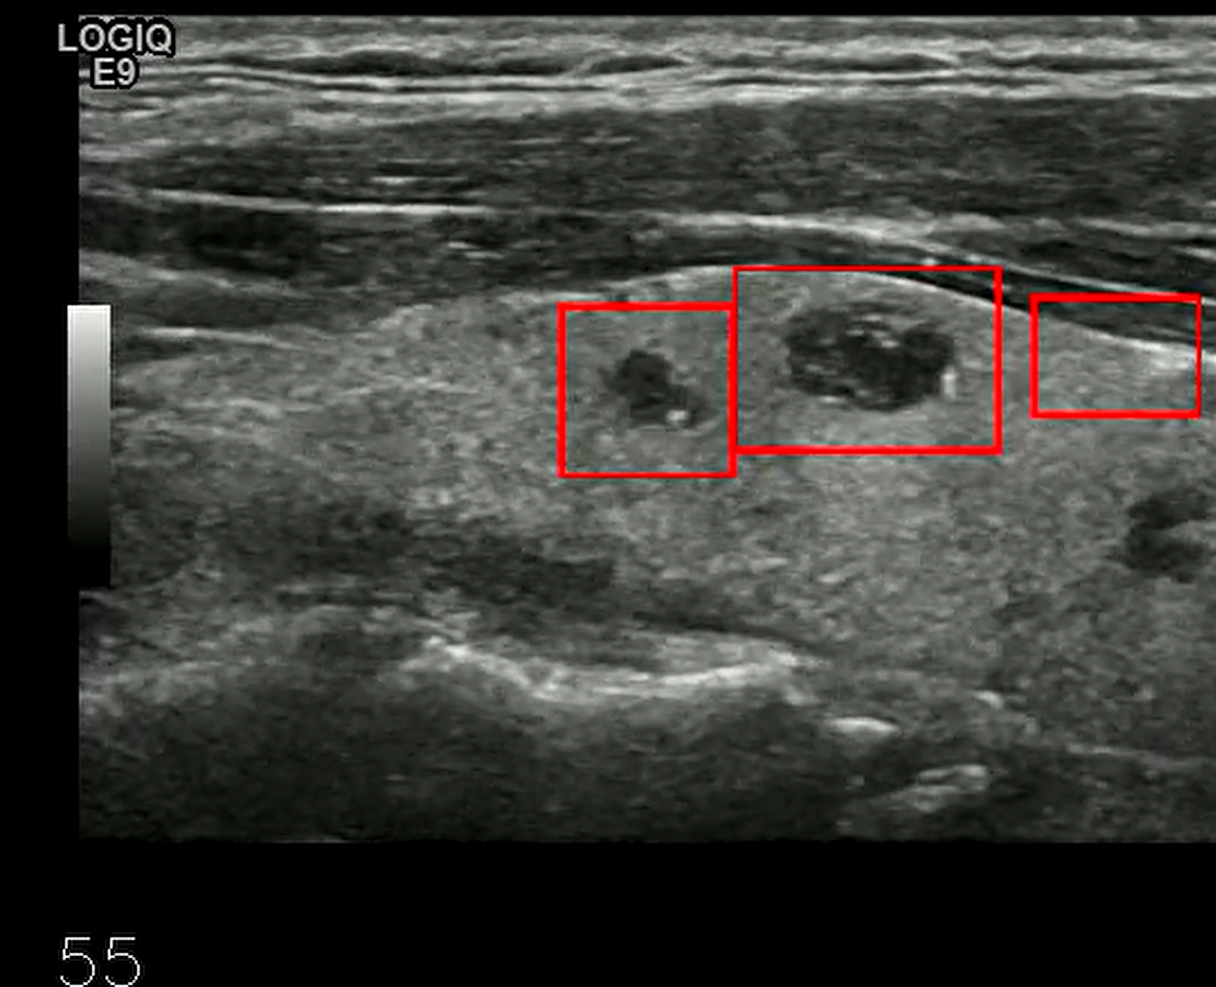
【开发技术】.Net使用FFmpeg视频特定帧上绘制内容
目录 一、目的 二、解决方案 2.1 什么是FFmpeg 2.2 FFmpeg主要功能 2.3 使用Xabe.FFmpeg调用FFmpeg功能 2.4 使用 FFmpeg 的 drawbox 滤镜来绘制 ROI 三、总结 一、目的 当前市场上有很多目标检测智能识别的相关算法,当前调用一个医疗行业的AI识别算法后返回…...
)
Android第十三次面试总结(四大 组件基础)
Activity生命周期和四大启动模式详解 一、Activity 生命周期 Activity 的生命周期由一系列回调方法组成,用于管理其创建、可见性、焦点和销毁过程。以下是核心方法及其调用时机: onCreate() 调用时机:Activity 首次创建时调用。…...
九天毕昇深度学习平台 | 如何安装库?
pip install 库名 -i https://pypi.tuna.tsinghua.edu.cn/simple --user 举个例子: 报错 ModuleNotFoundError: No module named torch 那么我需要安装 torch pip install torch -i https://pypi.tuna.tsinghua.edu.cn/simple --user pip install 库名&#x…...
Netty从入门到进阶(二)
二、Netty入门 1. 概述 1.1 Netty是什么 Netty is an asynchronous event-driven network application framework for rapid development of maintainable high performance protocol servers & clients. Netty是一个异步的、基于事件驱动的网络应用框架,用于…...

并发编程 - go版
1.并发编程基础概念 进程和线程 A. 进程是程序在操作系统中的一次执行过程,系统进行资源分配和调度的一个独立单位。B. 线程是进程的一个执行实体,是CPU调度和分派的基本单位,它是比进程更小的能独立运行的基本单位。C.一个进程可以创建和撤销多个线程;同一个进程中…...