【k8s配置与存储--配置管理】

1、ConfigMap的配置
1.1 ConfigMap介绍
-
ConfigMap 是一种 API 对象,用来将非机密性的数据保存到键值对中。使用时, Pod 可以将其用作环境变量、命令行参数或者存储卷中的配置文件。
-
ConfigMap 将你的环境配置信息和容器镜像解耦,便于应用配置的修改。
-
注意:
ConfigMap 并不提供保密或者加密功能。 如果你想存储的数据是机密的,请使用 Secret, 或者使用其他第三方工具来保证你的数据的私密性,而不是用 ConfigMap。
1.2 ConfigMap 创建
- 使用 kubectl create configmap -h 查看演示例子
Examples:# Create a new config map named my-config based on folder barkubectl create configmap my-config --from-file=path/to/bar# Create a new config map named my-config with specified keys instead of file basenames on diskkubectl create configmap my-config --from-file=key1=/path/to/bar/file1.txt --from-file=key2=/path/to/bar/file2.txt# Create a new config map named my-config with key1=config1 and key2=config2kubectl create configmap my-config --from-literal=key1=config1 --from-literal=key2=config2# Create a new config map named my-config from the key=value pairs in the filekubectl create configmap my-config --from-file=path/to/bar# Create a new config map named my-config from an env filekubectl create configmap my-config --from-env-file=path/to/foo.env --from-env-file=path/to/bar.env
1.2.1 查看下k8s已经创建好的configmap
可以看到这个信息是存储的一个key信息
[root@k8s-master configmap]# kubectl get configmaps
NAME               DATA   AGE
kube-root-ca.crt   1      6d1h[root@k8s-master configmap]# kubectl describe configmaps kube-root-ca.crt
Name:         kube-root-ca.crt
Namespace:    default
Labels:       <none>
Annotations:  kubernetes.io/description:Contains a CA bundle that can be used to verify the kube-apiserver when using internal endpoints such as the internal service IP or kubern...Data
====
ca.crt:
----
-----BEGIN CERTIFICATE-----
MIIC/jCCAeagAwIBAgIBADANBgkqhkiG9w0BAQsFADAVMRMwEQYDVQQDEwprdWJl
cm5ldGVzMB4XDTI0MDIxOTE0MDQyNloXDTM0MDIxNjE0MDQyNlowFTETMBEGA1UE
AxMKa3ViZXJuZXRlczCCASIwDQYJKoZIhvcNAQEBBQADggEPADCCAQoCggEBAL31
nYOmoFp9g1nfaVmuIIRJzwlCU9EGevBi/HnpSpdaW56cGuF1MqVJWhHCUcvN6sA/
9rlXOM7JS1SxN+gdO7e3WlW1e5iMTTj+63riA5tDcOv8kOPI72vgz026fK75tueW
IxD0VT1SM5fcY0H1bKvlxdr8Wxp57vxqtWX5lkJ71Xgf7Ur0L+cXwn7CiADiYAuK
nOMkc+JSYAuTeRN1eVfnjB9EvHZ3CFpSBYk2wvjqQwFwECwfoagIY9LvRzAK+P6+
NOuFXoreLgJ1kOhjGvJJ8G8vDq7483Foy90F/NqVTfy455ii4RMEZz32q5/1il0l
E4n9f2pfsaAUXMU5R+UCAwEAAaNZMFcwDgYDVR0PAQH/BAQDAgKkMA8GA1UdEwEB
/wQFMAMBAf8wHQYDVR0OBBYEFPsTxB9wcuNswaTSxefPqK83boaXMBUGA1UdEQQO
MAyCCmt1YmVybmV0ZXMwDQYJKoZIhvcNAQELBQADggEBAEnbP3FV6/jGmSdR2s9B
CsEGHDAb9rCzE8kwodx2+N4jI/upFq0QSg+rYDXWpCX/pas3Y2Dp9CGt5b854Vmy
o3wI8FzDMHzeUsaeJlo99tWG2XeJ7tQ4uc+gWp11guPHHsCF+FtAfwTbWucwjvWh
MAfFXRx+H67d0patTpWoC0f4hMNsjCHv4WDrjzLWIh0WIJT41+st4YxAwJGeXxah
4ODzXuomahvh36NFkjCPy1VHzYLi3PjQ+YwggCL2OMrwLe/EdzzA3eZVNDkcsqOi
WEjR2HGj+QWdE7nMLRUzlTtxz6AIjBfugyV3a/XSiXaCt5CRSKeLiCCCY58INtMa
JDU=
-----END CERTIFICATE-----BinaryData
====Events:  <none>
1.2.2 指定目录进行创建:kubectl create configmap my-config --from-file=path/to/bar
[root@k8s-master configmap]# cat db.properties
user: root
passwd: 123456
host: 127.0.0.1[root@k8s-master configmap]# cat host.properties
k8s-master: 10.10.10.100
k8s-node-01: 10.10.10.177
k8s-node-02: 10.10.10.113[root@k8s-master configmap]# kubectl create configmap my-config-test1 --from-file=/root/configmap/
configmap/my-config-test1 created[root@k8s-master configmap]# kubectl describe configmaps my-config-test1
Name:         my-config-test1
Namespace:    default
Labels:       <none>
Annotations:  <none>Data
====
db.properties:
----
user: root
passwd: 123456
host: 127.0.0.1host.properties:
----
k8s-master: 10.10.10.100
k8s-node-01: 10.10.10.177
k8s-node-02: 10.10.10.113BinaryData
====Events:  <none>
1.2.3 指定文件进行创建:kubectl create configmap my-config --from-file=key1=/path/to/bar/file1.txt
–from-file=key1=/path/to/bar/file1.txt
这里的key1相当于是给指定的这个文件进行改名
[root@k8s-master configmap]# kubectl create configmap my-config-test2  --from-file=mykey=db.properties
configmap/my-config-test2 created
[root@k8s-master configmap]# kubectl describe configmaps my-config-test2
Name:         my-config-test2
Namespace:    default
Labels:       <none>
Annotations:  <none>Data
====
mykey:
----
user: root
passwd: 123456
host: 127.0.0.1BinaryData
====Events:  <none>
1.2.4 通过命令行创建:kubectl create configmap my-config --from-literal=key1=config1 --from-literal=key2=config2
[root@k8s-master configmap]# kubectl create  configmap my-config-test3  --from-literal=name=school  --from-literal=id=bj
configmap/my-config-test3 created
[root@k8s-master configmap]# kubectl describe configmaps my-config-test3
Name:         my-config-test3
Namespace:    default
Labels:       <none>
Annotations:  <none>Data
====
id:
----
bj
name:
----
schoolBinaryData
====Events:  <none>
[root@k8s-master configmap]#
1.3 ConfigMap的使用
创建一个configmap的资源,在创建一个pod,把这个configmap的资源加载到pod里。
1.3.1 创建configmap
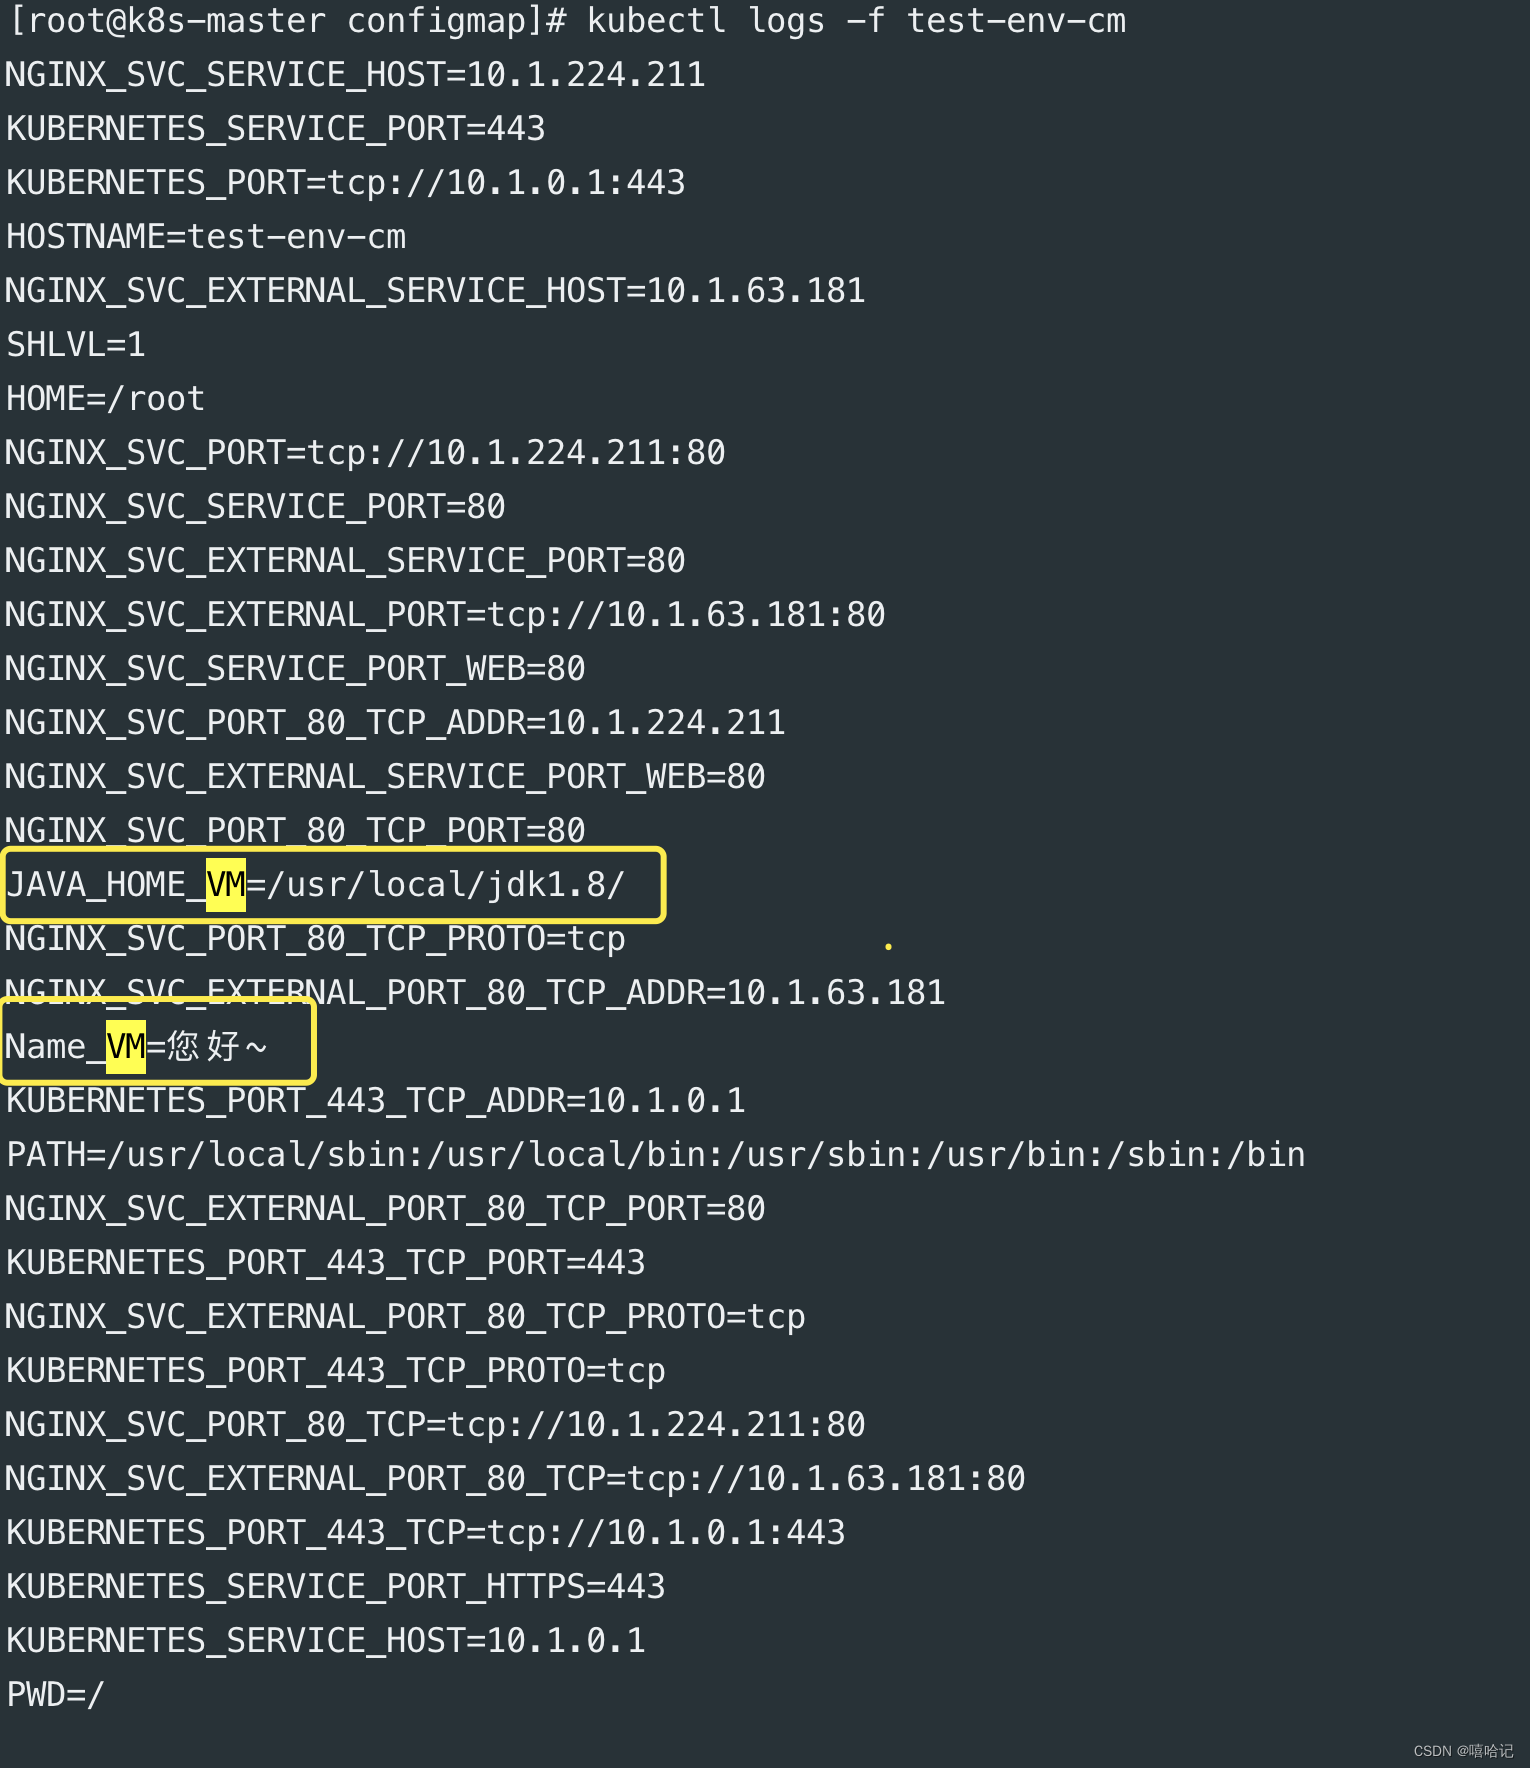
root@k8s-master configmap]# kubectl create configmap env-test  --from-literal=JAVA_HOME='/usr/local/jdk1.8/'  --from-literal=Name='您好~'
configmap/env-test created
[root@k8s-master configmap]# kubectl describe configmaps env-test
Name:         env-test
Namespace:    default
Labels:       <none>
Annotations:  <none>Data
====
JAVA_HOME:
----
/usr/local/jdk1.8/
Name:
----
您好~BinaryData
====Events:  <none>
1.3.2 创建pod资源
apiVersion: v1
kind: Pod
metadata:name: test-env-cm
spec:containers:- name: env-testimage: alpineimagePullPolicy: IfNotPresentcommand: ["/bin/sh","-c","env  ; sleep 3600"]env:- name: JAVA_HOME_VMvalueFrom:configMapKeyRef:name: env-test  # configmap的名字key: JAVA_HOME  # 表示从name的configmap种获取名字为key的value,将其赋值给本地环境变量 JAVA_HOME_VM- name: Name_VMvalueFrom:configMapKeyRef:name: env-testkey: NamerestartPolicy: Never
[root@k8s-master configmap]# kubectl create -f env-test.yaml
pod/test-env-cm created[root@k8s-master configmap]# kubectl get po
NAME                           READY   STATUS    RESTARTS      AGE
dns-test                       1/1     Running   1 (45h ago)   45h
fluentd-59k8k                  1/1     Running   0             27h
fluentd-hhtls                  1/1     Running   0             27h
nginx-deploy-fdd948cf4-69b85   1/1     Running   0             23h
nginx-deploy-fdd948cf4-r8ktj   1/1     Running   0             27h
test-env-cm                    1/1     Running   0             21s
1.3.3 通过日志查看刚才的configmap信息是否在env中
1.3.4 通过volumes 加载configmap
apiVersion: v1
kind: Pod
metadata:name: test-configfile-po
spec:containers:- name: env-testimage: alpineimagePullPolicy: IfNotPresentcommand: ["/bin/sh","-c","env  ; sleep 3600"]env:- name: JAVA_HOME_VMvalueFrom:configMapKeyRef:name: env-test  # configmap的名字key: JAVA_HOME  # 表示从name的configmap种获取名字为key的value,将其赋值给本地环境变量 JAVA_HOME_VM- name: Name_VMvalueFrom:configMapKeyRef:name: env-testkey: NamevolumeMounts:  #  加载数据卷- name: db-config  # 加载数据卷的名字mountPath: "/opt/test/"   #将数据卷加载到什么目录readOnly: true  #  是否只读volumes: # 数据卷挂载configmap、secret- name: db-config #数据卷的名字,随意设置configMap: # 数据卷类型为ConfigMapname: my-config-test1  #configMap的名字,必须跟想要加载的configmap相同items: #对configmap中的key进行映射,如果不指定,默认会讲configmap中所有  key全部转换为一个个同名的文件- key: "db.properties" # configMap中的keypath: "db,properties"#将该key的值转换为文件restartPolicy: Never
通过以下容器内的文件信息可以看到,上文创建的yaml文件中对my-config-test1这个configmap种的iterm进行了定义,但是我们的这个configmap配置文件中包含了两个文件,iterms中只加载了db,并没有加载hosts。容器中的文件只有db,没有hosts。
如果不定义iterms,name就会加载全部信息。

[root@k8s-master configmap]# kubectl create -f test-file-po.yaml
pod/test-configfile-po created[root@k8s-master configmap]# kubectl get po
NAME                           READY   STATUS    RESTARTS      AGE
dns-test                       1/1     Running   1 (45h ago)   45h
fluentd-59k8k                  1/1     Running   0             28h
fluentd-hhtls                  1/1     Running   0             28h
nginx-deploy-fdd948cf4-69b85   1/1     Running   0             23h
nginx-deploy-fdd948cf4-r8ktj   1/1     Running   0             27h
test-configfile-po             1/1     Running   0             7s
[root@k8s-master configmap]# kubectl exec -it test-configfile-po  -- sh
/ # cd /opt/test/
/opt/test # ll
sh: ll: not found
/opt/test # ls
db,properties
/opt/test # cat db,properties
user: root
passwd: 123456
host: 127.0.0.1
/opt/test # echo $JAVA_HOME_VM
/usr/local/jdk1.8/
/opt/test # echo $Name_Vm/opt/test # echo $Name_VM
您好~
2、 加密数据配置Secret
2.1 Secret 介绍
- 与ConfigMap类似,用于存储配置信息,但是主要用于存储敏感信息、需要加密的信息,Secret可以提供数据加密、解密功能。
- 在创建Secret时,要注意如果要加密的字符中,包含了有特殊字符,需耍使用转义符转移。eg: $ 转移后为"转移符号\加上$",
- 也可以对特殊字符使用单引号描述,这样就不需要转义。
- eg:1$289*-! 转换为 "1$289*-! "
- 场景使用:多用于docker镜像私有仓库的使用。
- 加密方式为base64,可以通过 “echo “xxxx”| base64 --decode” 解密
2.2 Secret的创建
可以通过查询kubectl create secret -h命令查询secret的创建
[root@k8s-master ~]#   kubectl create secret -h
Create a secret using specified subcommand.Available Commands:docker-registry   创建一个给 Docker registry 使用的 Secretgeneric           Create a secret from a local file, directory, or literal valuetls               创建一个 TLS secretUsage:kubectl create secret [flags] [options]Use "kubectl <command> --help" for more information about a given command.
Use "kubectl options" for a list of global command-line options (applies to all commands).
2.2.1 创建secret资源
通过下面的命令就可以创建secret了。
[root@k8s-master ~]#   kubectl create secret -h
Create a secret using specified subcommand.Available Commands:docker-registry   创建一个给 Docker registry 使用的 Secretgeneric           Create a secret from a local file, directory, or literal valuetls               创建一个 TLS secretUsage:kubectl create secret [flags] [options]Use "kubectl <command> --help" for more information about a given command.
Use "kubectl options" for a list of global command-line options (applies to all commands).[root@k8s-master ~]# kubectl create secret generic  test-secrete   --from-literal=username=admin --from-literal=password='12123421'
secret/test-secrete created
2.2.2 通过describe查看secret的描述
[root@k8s-master ~]# kubectl describe secrets test-secrete
Name:         test-secrete
Namespace:    default
Labels:       <none>
Annotations:  <none>Type:  OpaqueData
====
password:  8 bytes
username:  5 bytes
2.2.3 通过edit 查看secret的信息
k8s-master    Ready    control-plane   6d14h   v1.25.0
# Please edit the object below. Lines beginning with a '#' will be ignored,
# and an empty file will abort the edit. If an error occurs while saving this file will be
# reopened with the relevant failures.
#
apiVersion: v1
data:password: MTIxMjM0MjE=username: YWRtaW4=
kind: Secret
metadata:creationTimestamp: "2024-02-26T04:28:18Z"name: test-secretenamespace: defaultresourceVersion: "519877"uid: 8c981ce2-7cb2-4030-8fdd-b496ae72a4fa
type: Opaque
2.2.4 通过base64反编译这个信息
通过base64 反编译出原信息,可以看到这种加密方式不是很安全
[root@k8s-master ~]# echo "MTIxMjM0MjE="  | base64 --decode
12123421[root@k8s-master ~]# echo "YWRtaW4="  | base64 --decode
admin
2.3 secret的使用
2.3.1 创建一个docke-registry的secret
[root@k8s-master ~]#   kubectl create secret docker-registry   docker-test-secret --docker-username='lianhetiyu@1949945210135676'   --docker-password='Lanhe@123456'  --docker-email='admin@test.com'  --docker-server='registry.cn-hangzhou.aliyuncs.com'
secret/docker-test-secret created
[root@k8s-master ~]# kubectl describe sercet docker-test-secret
error: the server doesn't have a resource type "sercet"
[root@k8s-master ~]# kubectl describe secret docker-test-secret
Name:         docker-test-secret
Namespace:    default
Labels:       <none>
Annotations:  <none>Type:  kubernetes.io/dockerconfigjsonData
====
.dockerconfigjson:  215 bytes[root@k8s-master ~]# kubectl edit secrets test-secrete
Edit cancelled, no changes made.
[root@k8s-master ~]#
# Please edit the object below. Lines beginning with a '#' will be ignored,
# and an empty file will abort the edit. If an error occurs while saving this file will be
# reopened with the relevant failures.
#
apiVersion: v1
data:.dockerconfigjson: ey89JhdXRocyI6eyJyZWdpc3RyeS5jbi1oYW5nemhvdS5hbGl5dW5jcy5jb20iOnsidXNlcm5hbWUiOiJsaWFuaGV0aXl1X3doZEAxOTQ5OTQ1MjEwMTM1Njc2IiwicGFzc3dvcmQiOiJMYW5oZUAxMjM0NTYiLCJlbWFpbCI6ImFkbWluQHRlc3QuY29tIiwiYXV0aCI6ImJHbGhibWhsZEdsNWRWOTNhR1JBTVRrME9UazBOVEl4TURFek5UWTNOanBNWVc1b1pVQXhNak0wTlRZPSJ9fX0=
kind: Secret
metadata:creationTimestamp: "2024-02-26T06:28:49Z"name: docker-test-secretnamespace: defaultresourceVersion: "530968"uid: d31bb3f3-6111-4848-ab51-a894df2f1be1
type: kubernetes.io/dockerconfigjson
2.3.2 创建一个拉取镜像的新pod
apiVersion: v1
kind: Pod
metadata:name: test-configfile-po
spec:imagePullSecrets:  # 配置docke仓库:docker registry 的 secret- name: docker-test-secretcontainers:- name: env-testimage: alpineimagePullPolicy: IfNotPresentcommand: ["/bin/sh","-c","env  ; sleep 3600"]env:- name: JAVA_HOME_VMvalueFrom:configMapKeyRef:name: env-test  # configmap的名字key: JAVA_HOME  # 表示从name的configmap种获取名字为key的value,将其赋值给本地环境变量 JAVA_HOME_VM- name: Name_VMvalueFrom:configMapKeyRef:name: env-testkey: NamerestartPolicy: Never
2.3.3 可以通过容器的描述引用了secret资源下载镜像
[root@k8s-master configmap]# kubectl create  -f   test-docker-po.yaml
pod/test-configfile-po created[root@k8s-master configmap]# kubectl get  po  test-configfile-po
NAME                 READY   STATUS    RESTARTS   AGE
test-configfile-po   1/1     Running   0          2m57s[root@k8s-master configmap]# kubectl describe po  test-configfile-po
Name:             test-configfile-po
Namespace:        default
Priority:         0
Service Account:  default
Node:             k8s-node-02/10.10.10.113
Start Time:       Mon, 26 Feb 2024 16:28:01 +0800
Labels:           <none>
Annotations:      <none>
Status:           Running
IP:               10.2.1.64
IPs:IP:  10.2.1.64
Containers:env-test:Container ID:  docker://cbcb9ece8da46b593a766c8d0d0247e3a02a0316ba24164e3ce3d5d8bf823829Image:         registry.cn-hangzhou.aliyuncs.com/lhty/controller:2.1Image ID:      docker-pullable://registry.cn-hangzhou.aliyuncs.com/lhty/controller@sha256:96f3490f6b7693caad23f2ce143d0e23516527edcd3448589cb9498011ba19c3Port:          <none>Host Port:     <none>Command:/bin/sh-cenv  ; sleep 3600State:          RunningStarted:      Mon, 26 Feb 2024 16:29:12 +0800Ready:          TrueRestart Count:  0Environment:JAVA_HOME_VM:  <set to the key 'JAVA_HOME' of config map 'env-test'>  Optional: falseName_VM:       <set to the key 'Name' of config map 'env-test'>       Optional: falseMounts:/opt/test/ from db-config (ro)/var/run/secrets/kubernetes.io/serviceaccount from kube-api-access-nwsh6 (ro)
Conditions:Type              StatusInitialized       TrueReady             TrueContainersReady   TruePodScheduled      True
Volumes:db-config:Type:      ConfigMap (a volume populated by a ConfigMap)Name:      my-config-test1Optional:  falsekube-api-access-nwsh6:Type:                    Projected (a volume that contains injected data from multiple sources)TokenExpirationSeconds:  3607ConfigMapName:           kube-root-ca.crtConfigMapOptional:       <nil>DownwardAPI:             true
QoS Class:                   BestEffort
Node-Selectors:              <none>
Tolerations:                 node.kubernetes.io/not-ready:NoExecute op=Exists for 300snode.kubernetes.io/unreachable:NoExecute op=Exists for 300s
Events:Type    Reason     Age   From               Message----    ------     ----  ----               -------Normal  Scheduled  75s   default-scheduler  Successfully assigned default/test-configfile-po to k8s-node-02Normal  Pulling    75s   kubelet            Pulling image "registry.cn-hangzhou.aliyuncs.com/lhty/controller:2.1"Normal  Pulled     6s    kubelet            Successfully pulled image "registry.cn-hangzhou.aliyuncs.com/lhty/controller:2.1" in 1m8.912792712sNormal  Created    5s    kubelet            Created container env-testNormal  Started    5s    kubelet            Started container env-test
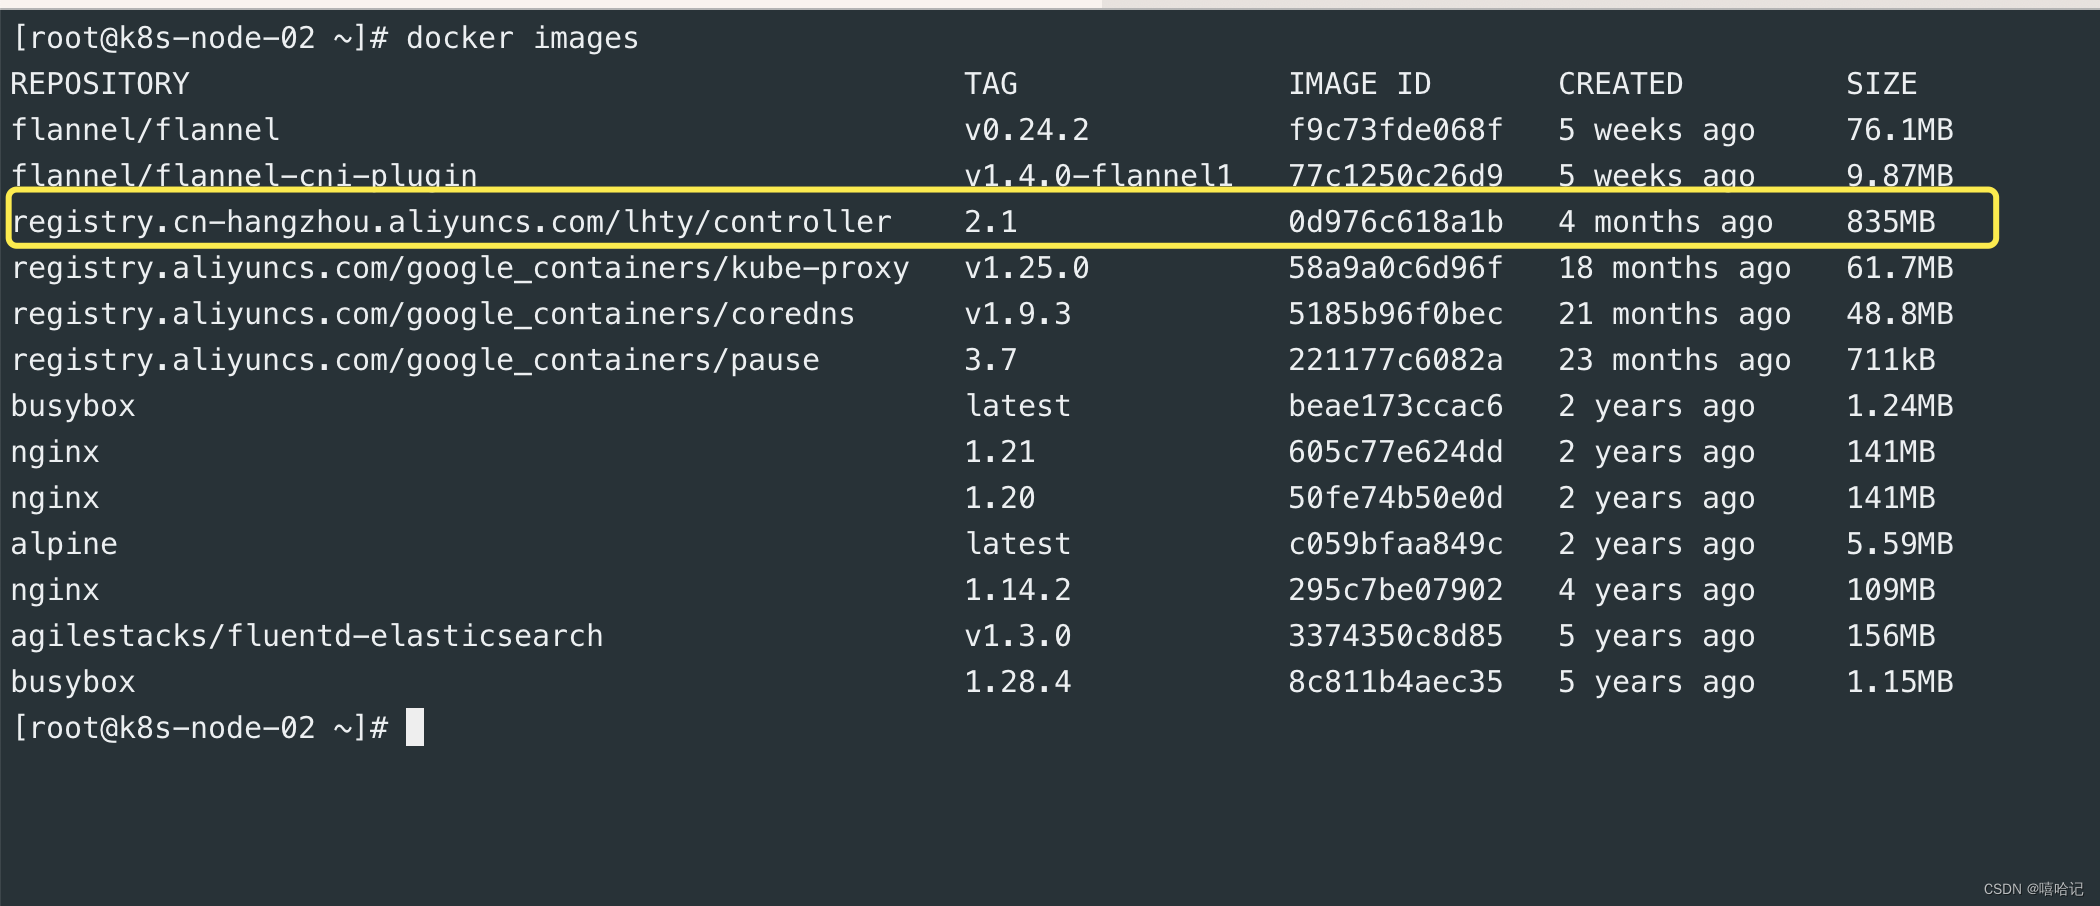
通过docker images,可以看到有刚才通过阿里云仓库拉取的镜像
3、SubPath的使用
场景需求:把nginx中的conf文件制作为一个configmap,后续想改动nginx的配置文件,我们只需要更新这个configmap即可,不需要重新登录进nginx容器内修改conf文件。但是
3.1 为什么需要使用SubPath?
使用configmap加载的文件到容器内目录后,如果原先有这个目录,会直接覆盖原先的目录,原先目录中的内容会丢失。
3.1.1 创建一个nginx配置文件的configmap
# 拿到容器中的nginx配置文件
root@k8s-master configmap]# kubectl exec nginx-deploy-fdd948cf4-69b85 -it -- sh -c "cat /etc/nginx/nginx.conf"  > nginx-conf-cm.conf## 创建这个configmap
[root@k8s-master configmap]# kubectl create cm nginx-conf-cm  --from-file nginx-conf-cm.conf
configmap/nginx-conf-cm created
[root@k8s-master configmap]# kubectl describe cm nginx-conf-cm
Name:         nginx-conf-cm
Namespace:    default
Labels:       <none>
Annotations:  <none>Data
====
nginx-conf-cm.conf:
----user  nginx;
worker_processes  auto;error_log  /var/log/nginx/error.log notice;
pid        /var/run/nginx.pid;events {worker_connections  1024;
}http {include       /etc/nginx/mime.types;default_type  application/octet-stream;log_format  main  '$remote_addr - $remote_user [$time_local] "$request" ''$status $body_bytes_sent "$http_referer" ''"$http_user_agent" "$http_x_forwarded_for"';access_log  /var/log/nginx/access.log  main;sendfile        on;#tcp_nopush     on;keepalive_timeout  65;#gzip  on;include /etc/nginx/conf.d/*.conf;
}BinaryData
====Events:  <none>
3.1.2 修改deploy信息
nginx的pod是通过deployment创建的,所以只需要修改deployment信息就可以更新nginx了。
[root@k8s-master configmap]# kubectl get deployments.apps
NAME           READY   UP-TO-DATE   AVAILABLE   AGE
nginx-deploy   2/2     2            2           43h
[root@k8s-master configmap]# kubectl get po
NAME                           READY   STATUS    RESTARTS        AGE
dns-test                       1/1     Running   2 (5h14m ago)   2d14h
fluentd-59k8k                  1/1     Running   1 (5h14m ago)   44h
fluentd-hhtls                  1/1     Running   1 (5h14m ago)   44h
nginx-deploy-fdd948cf4-69b85   1/1     Running   1 (5h14m ago)   40h
nginx-deploy-fdd948cf4-r8ktj   1/1     Running   1 (5h14m ago)   43h
test-configfile-po             1/1     Running   0               18m
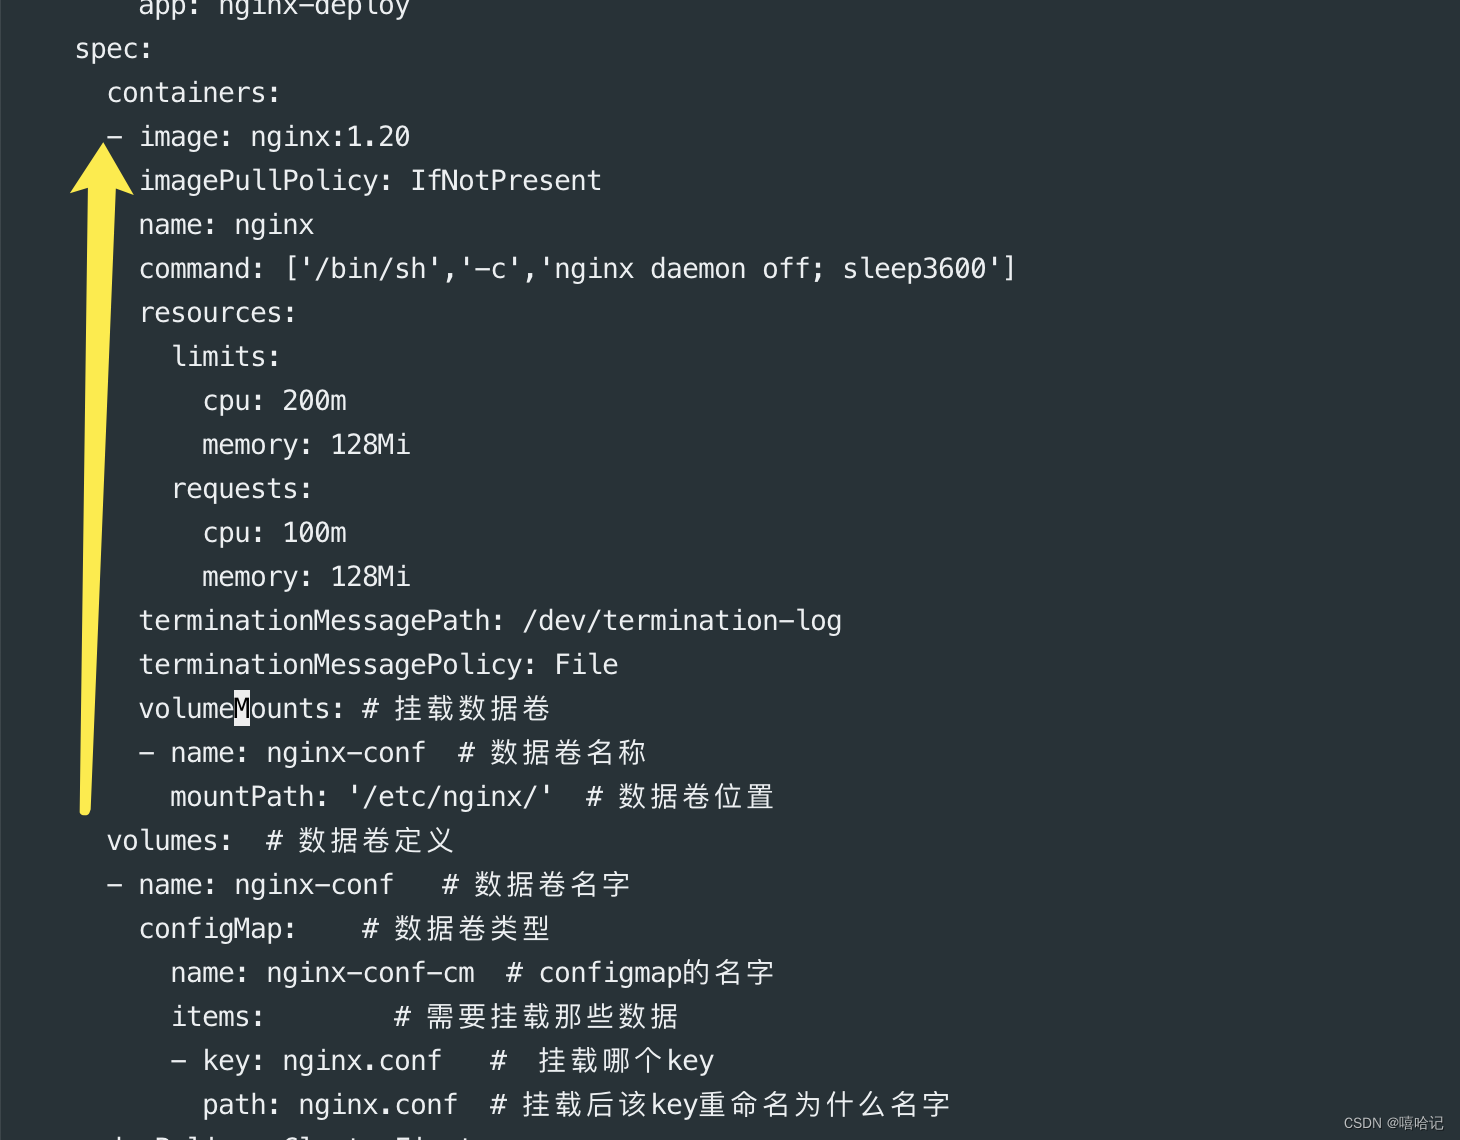
## 通过edit deploy nginx-deploy文件添加如下内容,如下内容需要和 containers 同一级别。
containerscommand: ['/bin/sh','-c','nginx daemon off; sleep 3600']  # 为了防止容器启动失败。volumesMounts:- name: nginx-confmountPath: '/etc/nginx'
volumes:
- name: nginx-confconfigMap:- name: nginx-conf-cm   # configmap的名字items:- key: nginx-conf-cm.conf  # configmap种文件的名字path: nginx.conf
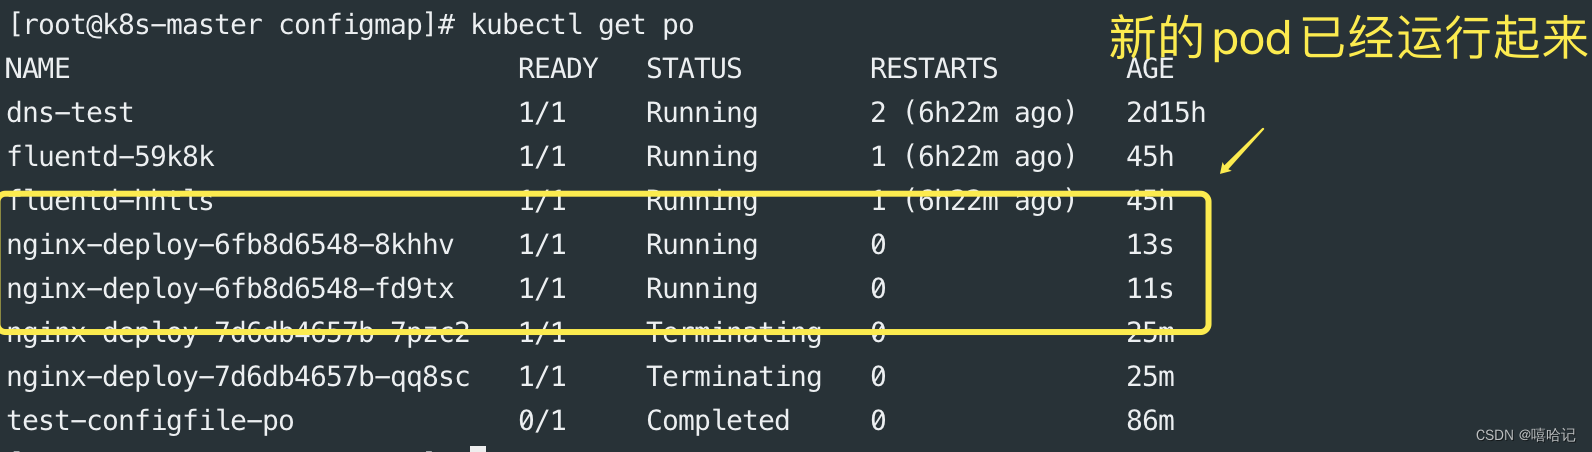
3.1.3 查看更新后过的nginx pod
[root@k8s-master configmap]# kubectl get po
NAME                            READY   STATUS      RESTARTS        AGE
dns-test                        1/1     Running     2 (5h57m ago)   2d14h
fluentd-59k8k                   1/1     Running     1 (5h58m ago)   45h
fluentd-hhtls                   1/1     Running     1 (5h57m ago)   45h
nginx-deploy-7d6db4657b-7pzc2   1/1     Running     0               38s
nginx-deploy-7d6db4657b-qq8sc   1/1     Running     0               40s
test-configfile-po              0/1     Completed   0               62m
[root@k8s-master configmap]# kubectl describe po nginx-deploy-7d6db4657b-7pzc2
Name:             nginx-deploy-7d6db4657b-7pzc2
Namespace:        default
Priority:         0
Service Account:  default
Node:             k8s-node-01/10.10.10.177
Start Time:       Mon, 26 Feb 2024 17:29:41 +0800
Labels:           app=nginx-deploypod-template-hash=7d6db4657b
Annotations:      <none>
Status:           Running
IP:               10.2.2.39
IPs:IP:           10.2.2.39
Controlled By:  ReplicaSet/nginx-deploy-7d6db4657b
Containers:nginx:Container ID:  docker://6b349ede9bb23d51add64c24b28bab4a5df2804ea7bbe0e5efdcc97ba405a005Image:         nginx:1.20Image ID:      docker-pullable://nginx@sha256:03f3cb0afb7bd5c76e01bfec0ce08803c495348dccce37bcb82c347b4853c00bPort:          <none>Host Port:     <none>Command:/bin/sh-cnginx daemon off; sleep 3600State:          RunningStarted:      Mon, 26 Feb 2024 17:29:42 +0800Ready:          TrueRestart Count:  0Limits:cpu:     200mmemory:  128MiRequests:cpu:        100mmemory:     128MiEnvironment:  <none>Mounts:/etc/nginx/ from nginx-conf (rw)/var/run/secrets/kubernetes.io/serviceaccount from kube-api-access-9xskq (ro)
Conditions:Type              StatusInitialized       TrueReady             TrueContainersReady   TruePodScheduled      True
Volumes:nginx-conf:Type:      ConfigMap (a volume populated by a ConfigMap)Name:      nginx-conf-cmOptional:  falsekube-api-access-9xskq:Type:                    Projected (a volume that contains injected data from multiple sources)TokenExpirationSeconds:  3607ConfigMapName:           kube-root-ca.crtConfigMapOptional:       <nil>DownwardAPI:             true
QoS Class:                   Burstable
Node-Selectors:              <none>
Tolerations:                 node.kubernetes.io/not-ready:NoExecute op=Exists for 300snode.kubernetes.io/unreachable:NoExecute op=Exists for 300s
Events:Type    Reason     Age   From               Message----    ------     ----  ----               -------Normal  Scheduled  85s   default-scheduler  Successfully assigned default/nginx-deploy-7d6db4657b-7pzc2 to k8s-node-01Normal  Pulled     85s   kubelet            Container image "nginx:1.20" already present on machineNormal  Created    85s   kubelet            Created container nginxNormal  Started    85s   kubelet            Started container nginx
3.1.4 /etc/nginx/ 这个路径下只有一个nginx的配置文件,其他文件全部没了
[root@k8s-master configmap]# kubectl exec -it  nginx-deploy-7d6db4657b-7pzc2  -- sh  -c  'ls /etc/nginx/'
nginx.conf
[root@k8s-master configmap]# kubectl exec -it  nginx-deploy-7d6db4657b-7pzc2  -- sh  -c  'cat  /etc/nginx/nginx.conf'user  nginx;
worker_processes  auto;error_log  /var/log/nginx/error.log notice;
pid        /var/run/nginx.pid;events {worker_connections  1024;
}http {include       /etc/nginx/mime.types;default_type  application/octet-stream;log_format  main  '$remote_addr - $remote_user [$time_local] "$request" ''$status $body_bytes_sent "$http_referer" ''"$http_user_agent" "$http_x_forwarded_for"';access_log  /var/log/nginx/access.log  main;sendfile        on;#tcp_nopush     on;keepalive_timeout  65;#gzip  on;include /etc/nginx/conf.d/*.conf;
}
3.2 如何使用SubPath?
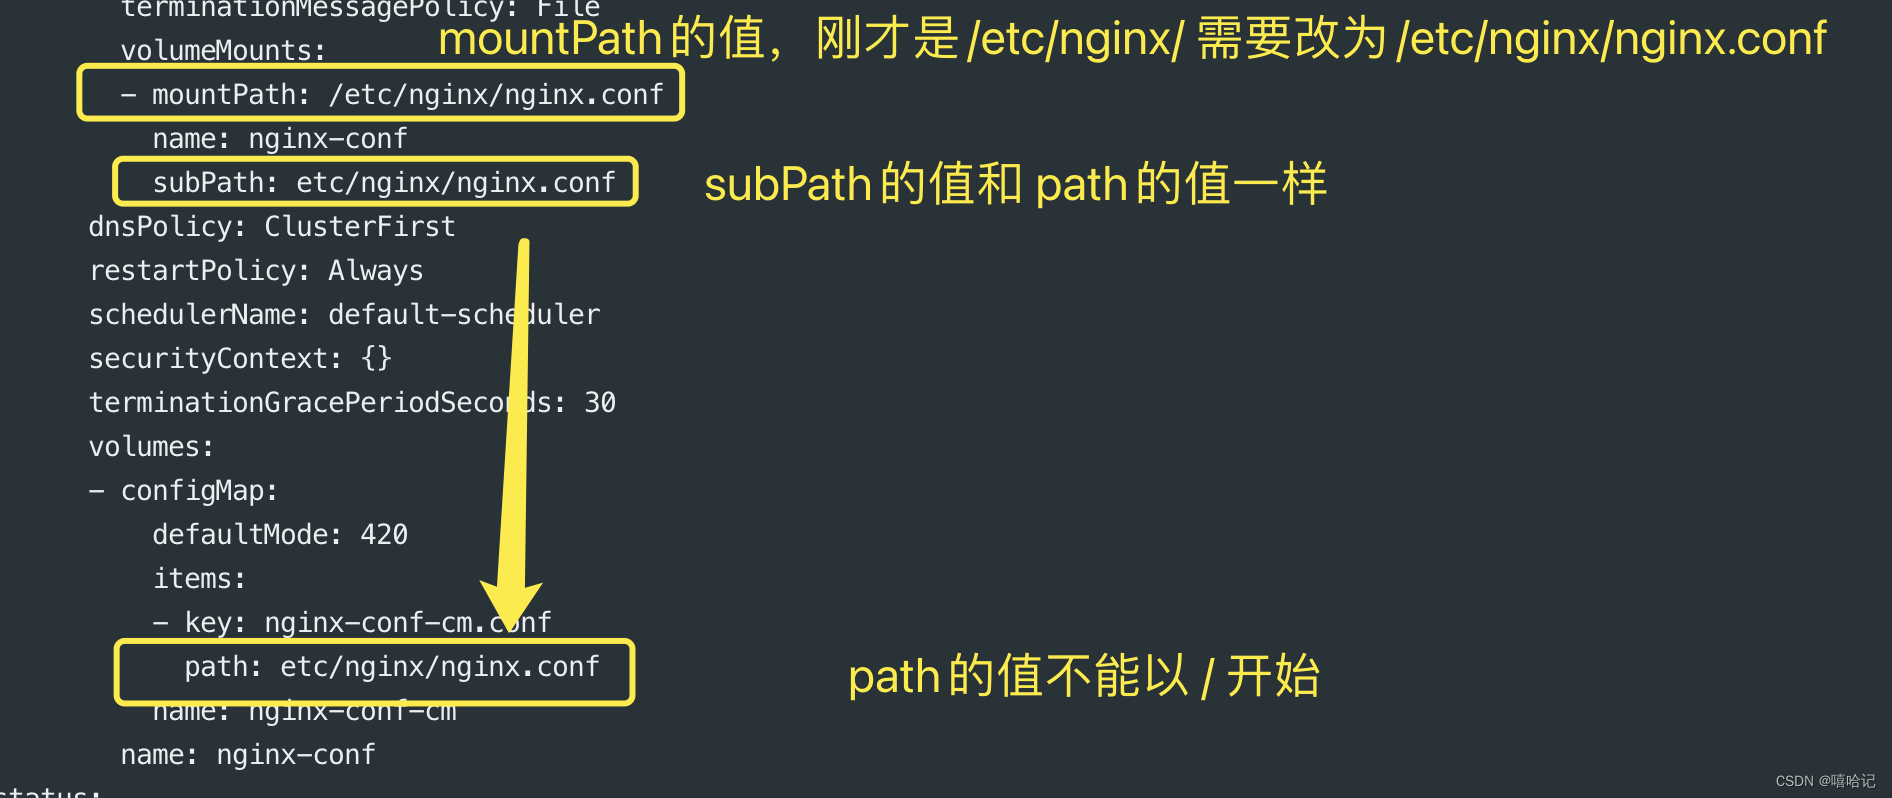
- 1、定义volumes时需要增加items属性,配置key和path,且path的值不能从/开始
- 2、在容器内的volumeMounts中增加subPath黑性,该值与volumes中tems.path的值相同。
3.2.1 修改deploy,添加subPath
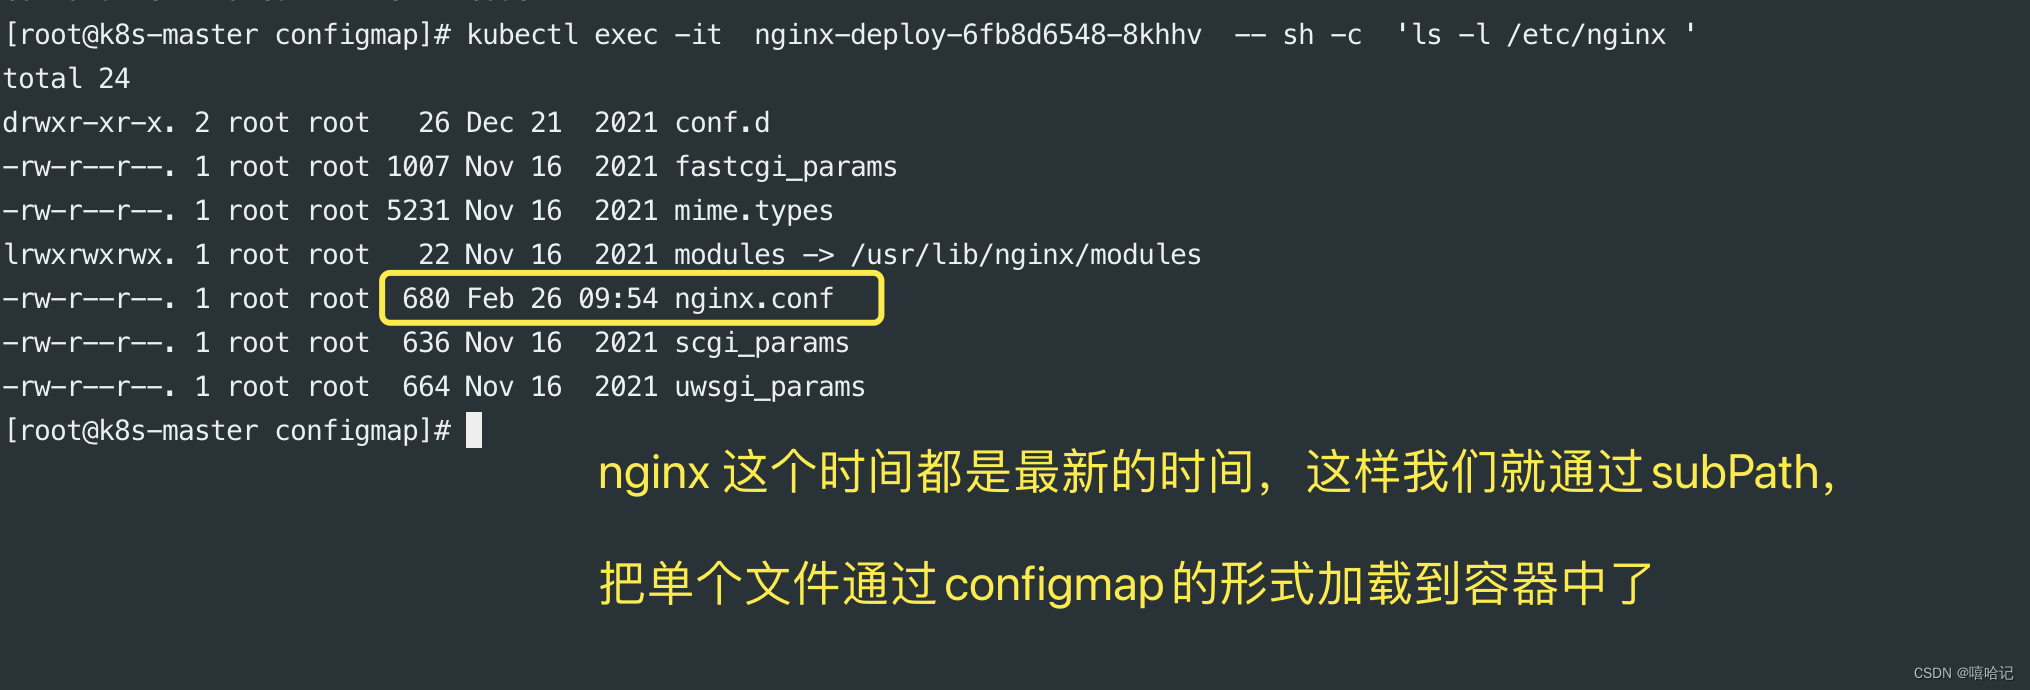
3.2.2 在进容器查看下/etc/nginx目录内容
4、配置的热更新
我们通常会将项目的配置文件作为configmap然后挂载到pod,那么如果更新configmap中的配置,会不会更新到pod中呢?
这得分成几种情况:
默认方式:会更新,更新同期是更新间+缓存时间
subPath:不会更新
变量形式:如果pod中的一个变量是从configmap或secret中得到,同样也是不会更新的。
对于subPath的方式,我们可以取消subPath的使用,将配置文件挂载到一个不存在的目录,避免目录的夏盖,然后再利用软连接的形式,将该文件链接到目标位置。
4.1 通过edit 命令直接修改configmap
4.1.1 创建一个pod
apiVersion: v1
kind: Pod
metadata:name: configfile-po
spec:containers:- name: configmap-poimage: alpineimagePullPolicy: IfNotPresentcommand: ["/bin/sh","-c","env  ; sleep 3600"]volumeMounts:  #  加载数据卷- name: db-config  # 加载数据卷的名字mountPath: "/opt/test/"   #将数据卷加载到什么目录readOnly: true  #  是否只读volumes: # 数据卷挂载configmap、secret- name: db-config #数据卷的名字,随意设置configMap: # 数据卷类型为ConfigMapname: my-config-test1  #configMap的名字,必须跟想要加载的configmap相同items: #对configmap中的key进行映射,如果不指定,默认会讲configmap中所有  key全部转换为一个个同名的文件- key: "db.properties" # configMap中的keypath: "db.txt" # 将该key的值转换为文件restartPolicy: Never
[root@k8s-master configmap]# kubectl get cm
NAME               DATA   AGE
env-test           2      18h
kube-root-ca.crt   1      6d20h
my-config-test1    2      18h
my-config-test3    2      18h
nginx-conf-cm      1      102m[root@k8s-master configmap]# kubectl create -f configfile-po.yaml
pod/configfile-po created[root@k8s-master configmap]# kubectl get po
NAME                           READY   STATUS    RESTARTS        AGE
configfile-po                  1/1     Running   0               20s
dns-test                       1/1     Running   2 (6h53m ago)   2d15h
fluentd-59k8k                  1/1     Running   1 (6h53m ago)   46h
fluentd-hhtls                  1/1     Running   1 (6h53m ago)   46h
nginx-deploy-6fb8d6548-8khhv   1/1     Running   0               31m
nginx-deploy-6fb8d6548-fd9tx   1/1     Running   0               31m
[root@k8s-master configmap]# kubectl  exec -it configfile-po  -- sh -c 'cat /opt/test/db.txt '
user: root
passwd: 123456
host: 127.0.0.1
4.1.2 通过edit编辑my-config-test1,给configmap中添加一条信息
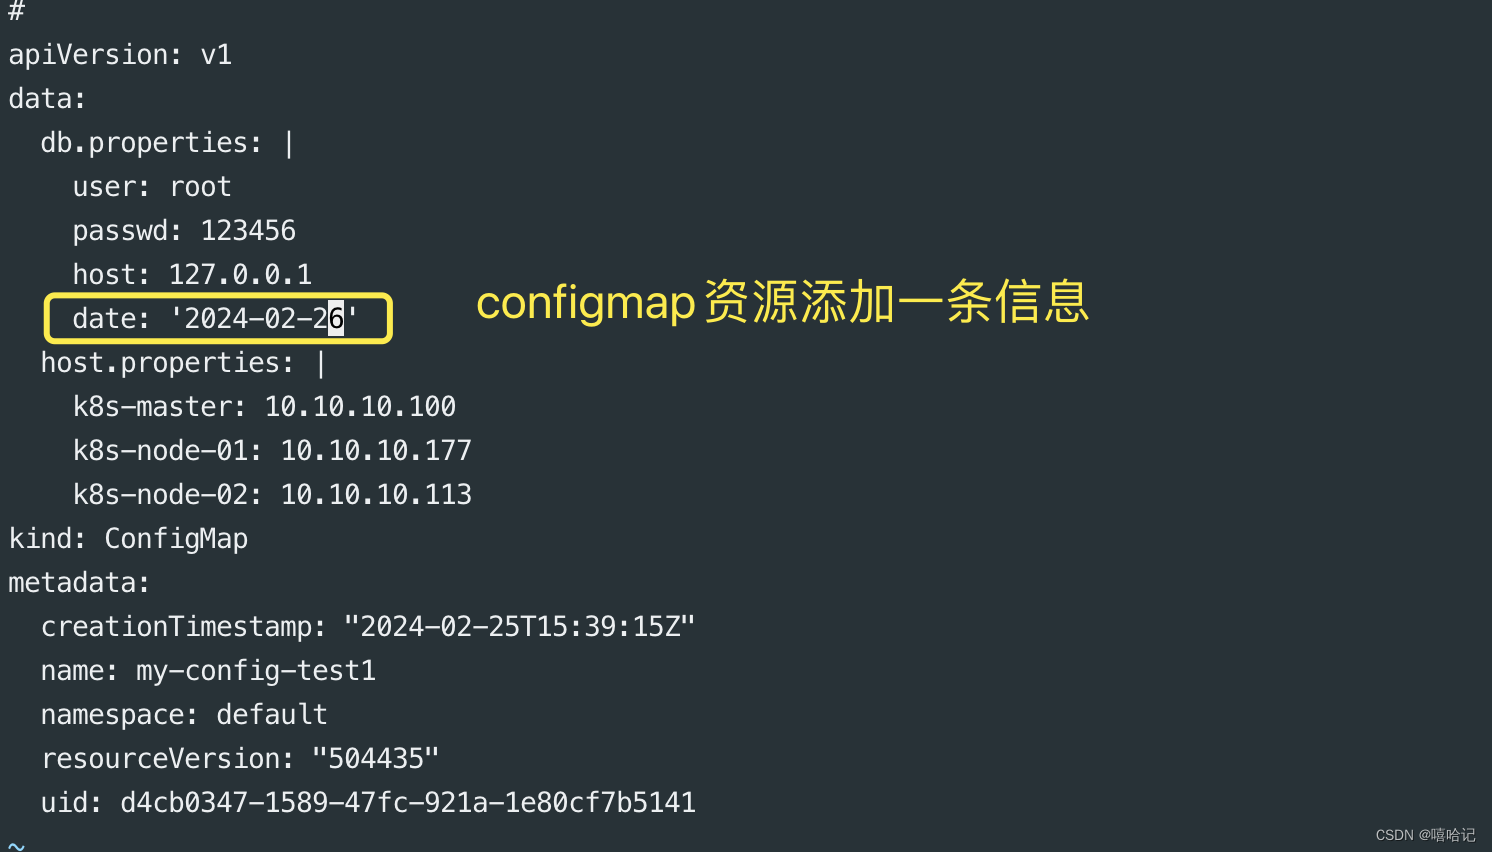
4.1.3 查看容器中的内容更新情况(需要等一段时间才会更新)
[root@k8s-master configmap]# kubectl  exec -it configfile-po  -- sh -c 'cat /opt/test/db.txt '
user: root
passwd: 123456
host: 127.0.0.1
date: '2024-02-26'
4.2 通过replace进行更新
由于conigmap我们创建通常都是基于文件创建,并不会编写yaml配置文件,因比修改时我们也是直接修改配置文件,而replace是没有 --from-file 参数的,因此无法实现基于源配置文件的替换,此时我们可以利用下方的命令实现
该命令的重点在于 --dry-run 参数,该参数的意思打印yaml文件,但不会将该文件发送给api-server,再结合 -o yaml输出yaml文件就可以得到一个配置好但是没有发给api-server的文件,然后再结合replace监听控制台得到yaml数据即可实现替换。
kubectl create cm --from-file=nginx.conf --dry-run -o yaml | kubectl replace-f-
4.2.1 更新需要添加到configmap的文件
[root@k8s-master configmap]# echo 'service: test' >> ./file/db.properties
4.2.2 通过 kubectl create cm --from-file=nginx.conf --dry-run -o yaml | kubectl replace-f- 更新configmap
[root@k8s-master configmap]# kubectl create cm   my-config-test1  --from-file=./file/   --dry-run -o yaml
W0226 21:19:22.889508   89629 helpers.go:639] --dry-run is deprecated and can be replaced with --dry-run=client.
apiVersion: v1
data:db.properties: |user: rootpasswd: 123456host: 127.0.0.1service: testhost.properties: |k8s-master: 10.10.10.100k8s-node-01: 10.10.10.177k8s-node-02: 10.10.10.113
kind: ConfigMap
metadata:creationTimestamp: nullname: my-config-test1[root@k8s-master configmap]# kubectl create cm   my-config-test1  --from-file=./file/   --dry-run -o yaml | kubectl replace -f-
W0226 21:21:09.680288   90368 helpers.go:639] --dry-run is deprecated and can be replaced with --dry-run=client.
configmap/my-config-test1 replaced
[root@k8s-master configmap]#
4.2.3 查看configmap
[root@k8s-master configmap]# kubectl describe  cm my-config-test1
Name:         my-config-test1
Namespace:    default
Labels:       <none>
Annotations:  <none>Data
====
db.properties:
----
user: root
passwd: 123456
host: 127.0.0.1
service: testhost.properties:
----
k8s-master: 10.10.10.100
k8s-node-01: 10.10.10.177
k8s-node-02: 10.10.10.113BinaryData
====Events:  <none>
4.2.4 查看容器内文件,已经更新
[root@k8s-master configmap]# kubectl exec -it  configfile-po   -- sh -c 'cat /opt/test/db.txt'
user: root
passwd: 123456
host: 127.0.0.1
service: test
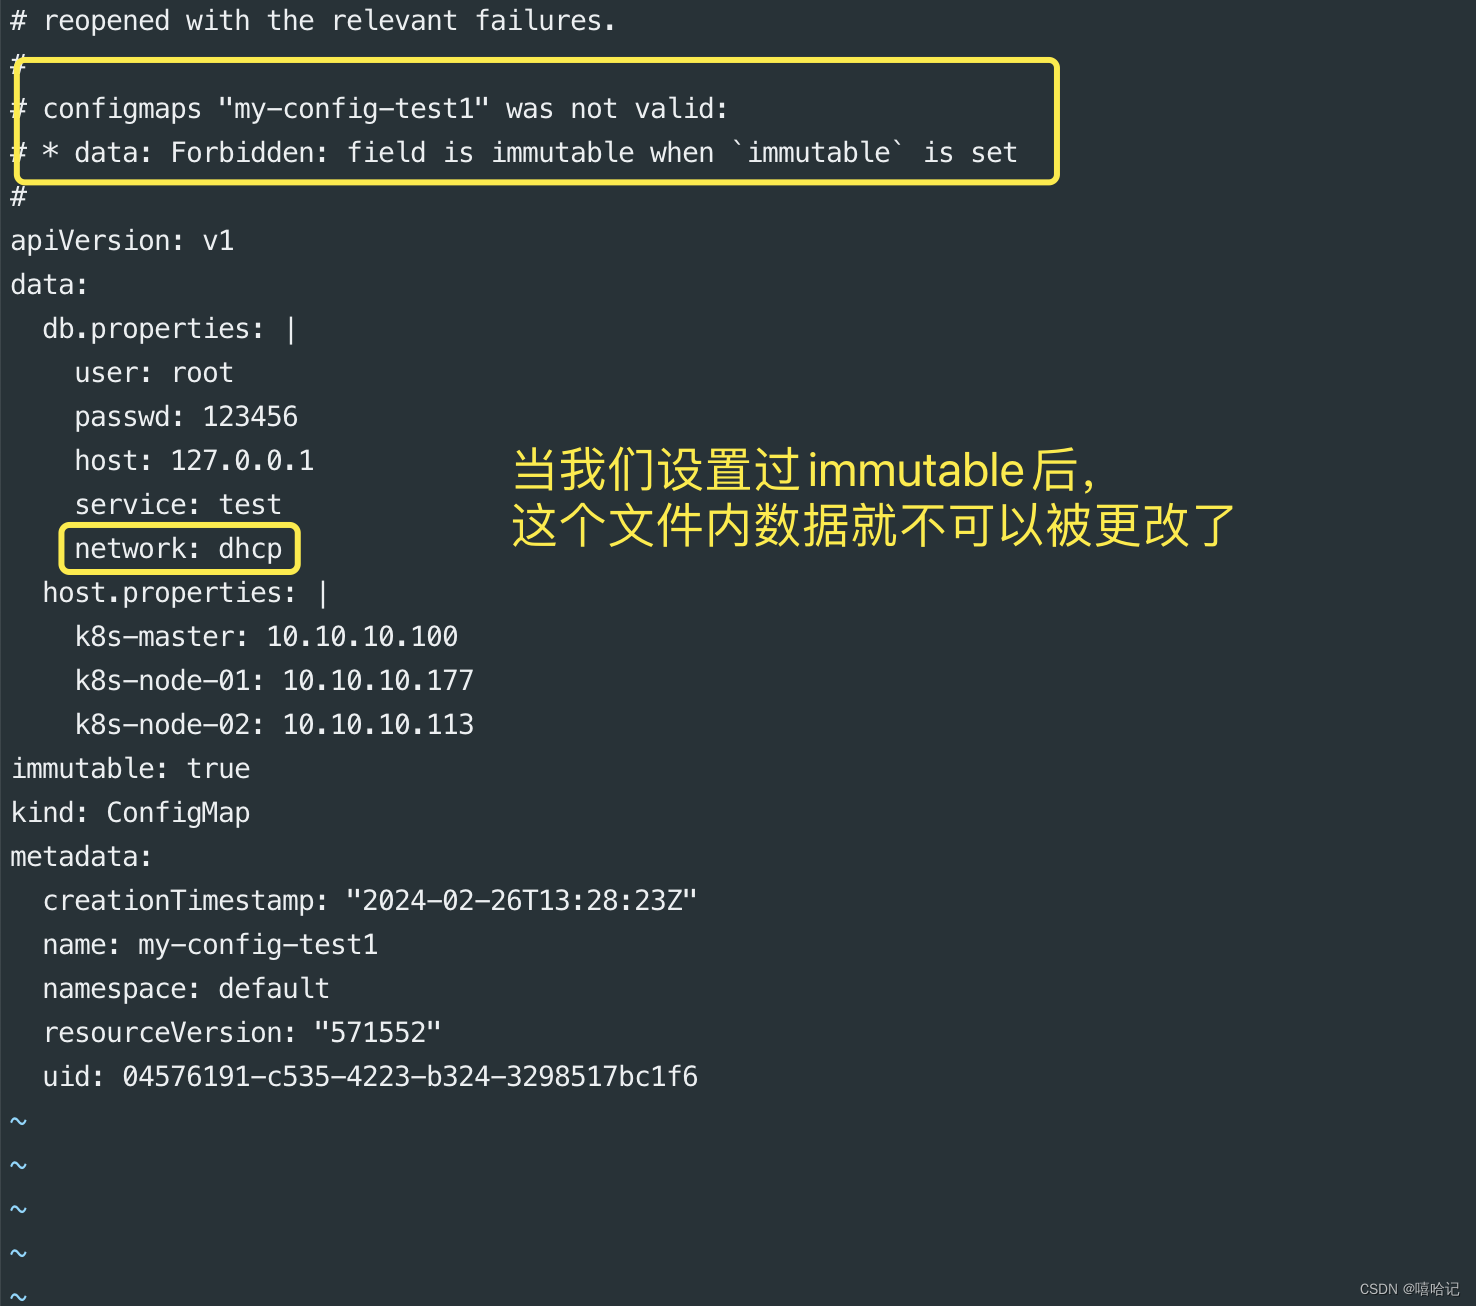
5、不可变的configmap和secret
- 对于一些敏感服务的配置文件,在线上有时是不允许修改的,此时在配置configmap时可以设置 immutable:true 来禁止修改
5.1 查看之前创建的my-confgi-test1这个configmap配置
[root@k8s-master configmap]# kubectl describe cm my-config-test1
Name:         my-config-test1
Namespace:    default
Labels:       <none>
Annotations:  <none>Data
====
db.properties:
----
user: root
passwd: 123456
host: 127.0.0.1
service: testhost.properties:
----
k8s-master: 10.10.10.100
k8s-node-01: 10.10.10.177
k8s-node-02: 10.10.10.113BinaryData
====Events:  <none>
5.2 通过kubectl edit cm my-config-test1 添加 immutable: true
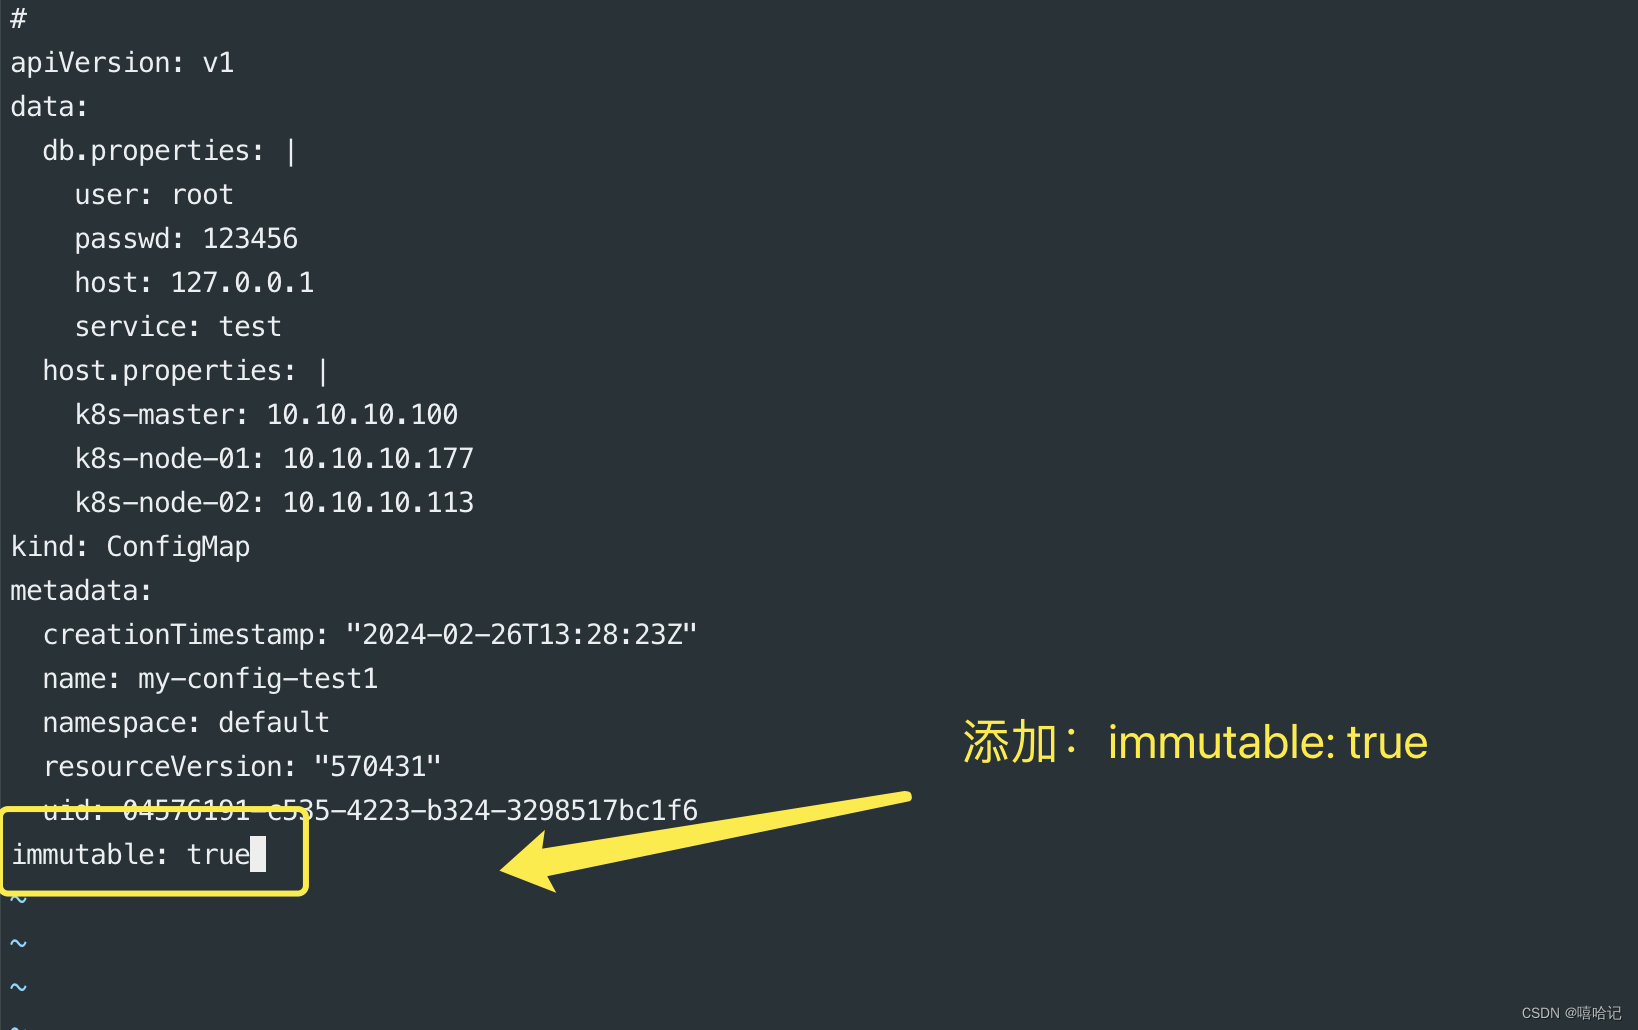
5.3 再次通过edit修改文件,发现已经无法更改文件了
相关文章:
【k8s配置与存储--配置管理】
1、ConfigMap的配置 1.1 ConfigMap介绍 ConfigMap 是一种 API 对象,用来将非机密性的数据保存到键值对中。使用时, Pod 可以将其用作环境变量、命令行参数或者存储卷中的配置文件。 ConfigMap 将你的环境配置信息和容器镜像解耦,便于应用配…...

如何在C++中嵌入SQL语句?解释一下什么是ODBC、JDBC以及它们在C++数据库编程中的作用。
如何在C中嵌入SQL语句? 在C中嵌入SQL语句通常涉及使用数据库连接库或ORM(对象关系映射)框架,这些工具提供了与特定数据库管理系统(DBMS)交互的接口。以下是几种在C中嵌入SQL语句的常见方法: 使…...
【Simulink系列】——动态系统仿真 之 混合系统
声明:本系列博客参考有关专业书籍,截图均为自己实操,仅供交流学习! 一、混合系统概述 由不同类型系统共同构成的系统称为混合系统!仿真时必须考虑连续信号和离散信号的采样匹配问题,一般使用变步长连续求…...

PHP中的飞碟运算符、取反运算符、对比非ASCII字符串、对比浮点数操作
对比浮点数 在电脑里存储的浮点数可能会和输入的值有些许差异,比如输入的是10.0,但存储的是10.00001. 在比较两个浮点数是否相等时可以计算下两个数的差值,然后查看下两数之差是否小于可以接受的阈值,如果要求精度在小数点后5位的…...
0.5.0)
unity-unity2d基础操作笔记(二)0.5.0
unity2d基础操作笔记 五十一、canvas中的必须熟悉的属性五十二、如何调整canvas与游戏人物大小近似大小五十三、canvas中的canvas scaler介绍【概念】五十四、ui scale mode介绍【概念】五十五、为什么创建image后,canvas的范围要要远远大于游戏世界?五十六、图片常用操作【技…...
Feign远程调用(学习笔记)
先来看我们以前利用RestTemplate发起远程调用的代码: 存在下面的问题: ●代码可读性差,编程体验不统一 ●参数复杂URL难以维护 Feign是一个声明式的http客户端,官方地址:https://github.com/OpenFeign/feign 其作用…...

pytorch建模的三种方式
# 可以使用以下3种方式构建模型: # # 1,继承nn.Module基类构建自定义模型。 # # 2,使用nn.Sequential按层顺序构建模型。 # # 3,继承nn.Module基类构建模型并辅助应用模型容器进行封装(nn.Sequential,nn.ModuleList,nn.ModuleDict…...
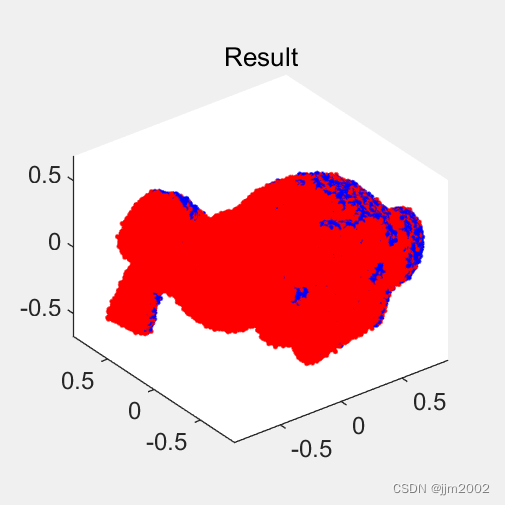
GO-ICP的使用(一)
一、代码下载以、修改以及使用 下载: 链接:yangjiaolong/Go-ICP: Implementation of the Go-ICP algorithm for globally optimal 3D pointset registration (github.com) 解压之后 : 首先visual studio项目,配置好PCL环境&…...
强制进行垃圾回收)
FPS游戏漫谈System.GC.Collect()强制进行垃圾回收
在Unity中,System.GC.Collect()用于强制进行垃圾回收,但是它是一个相当耗时的操作,可能会导致游戏的帧率下降,甚至出现卡顿。因此,你应该尽量避免在游戏的主循环中频繁调用它。以下是一些关于在Unity中使用System.GC.C…...
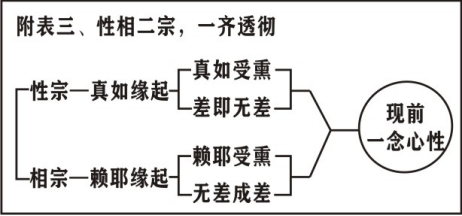
第3集《灵峰宗论导读》
《灵峰宗论》导读。诸位法师,诸位同学,阿弥陀佛!(阿弥陀佛!) 请大家打开讲义第5面,悟道。 这一科我们是说明论主略史,在这一科当中,我们根据弘一大师所编的《蕅益大师年…...

java面试设计模式篇
面试专题-设计模式 前言 在平时的开发中,涉及到设计模式的有两块内容,第一个是我们平时使用的框架(比如spring、mybatis等),第二个是我们自己开发业务使用的设计模式。 面试官一般比较关心的是你在开发过程中&#…...

桥接模式:解耦抽象与实现,实现灵活多变的扩展结构
文章目录 一、引言二、应用场景与技术背景三、模式定义与实现四、实例详解五、优缺点分析总结: 一、引言 桥接模式是一种结构型设计模式,它将抽象部分与它的实现部分分离,使它们可以独立变化。这种模式通过创建一个抽象层和实现层的结构&…...
HUAWEI Programming Contest 2024(AtCoder Beginner Contest 342)
D - Square Pair 题目大意 给一长为的数组,问有多少对,两者相乘为非负整数完全平方数 解题思路 一个数除以其能整除的最大的完全平方数,看前面有多少个与其余数相同的数,两者乘积满足条件(已经是完全平方数的部分无…...

Heap sorting
堆排序比较特殊,采用数组表示堆。 先将数组表示成大根堆或者小根堆。然后从堆中依次取根,最后形成有序序列。 #include<bits/stdc.h> using namespace std;const int N 1e5 10; int a[N];void bigheap(int* a, int start, int len) {if(start …...
)
开源模型应用落地-qwen2模型小试-入门篇(六)
一、前言 经过前五篇“qwen模型小试”文章的学习,我们已经熟练掌握qwen大模型的使用。然而,就在前几天开源社区又发布了qwen1.5版本,它是qwen2模型的测试版本。在基于transformers的使用方式上有较大的调整,现在,我们赶紧跟上脚步,去体验一下新版本模型的推理质量。 二、…...
c#程序,oracle使用Devart驱动解决第第三方库是us7ascii,数据乱码的问题
最近做项目,要跟对方系统的库进行读写,结果发现对方采用的是oracle的us7ascii编码,我们系统默认采用的是ZHS16GBK,导致我们客户端读取和写入对方库的数据都是乱码,搜索网上,发现需要采用独立的oracle驱动去…...
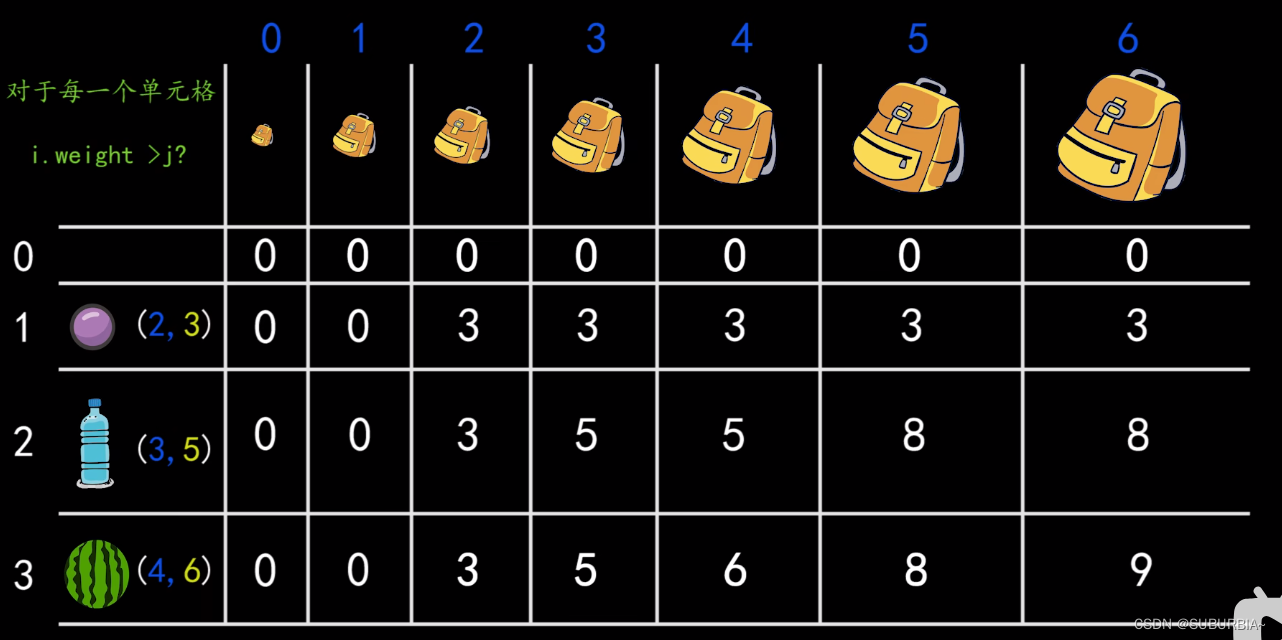
代码随想录算法训练营第四一天 | 背包问题
目录 背包问题01背包二维dp数组01背包一维 dp 数组(滚动数组)分割等和子集 LeetCode 背包问题 01背包 有n件物品和一个最多能背重量为 w 的背包,第i件物品的重量是weight[i],得到的价值是value[i] 。每件物品只能用一次&#x…...
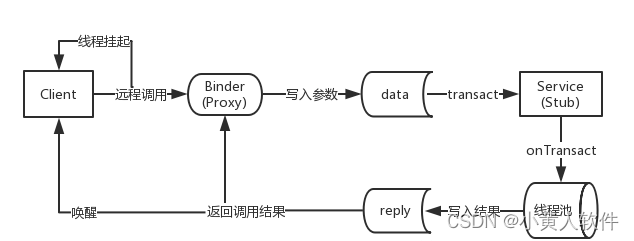
AIDL的工作原理与使用示例 跨进程通信 远程方法调用RPC
AIDL的介绍与使用 AIDL(Android Interface Definition Language)是Android中用于定义客户端和服务端之间通信接口的一种接口定义语言。它允许你定义客户端和服务的通信协议,用于在不同的进程间或同一进程的不同组件间进行数据传递。AIDL通过…...

K8S部署Java项目 pod报错 logs日志内容:no main manifest attribute, in app.jar
天行健,君子以自强不息;地势坤,君子以厚德载物。 每个人都有惰性,但不断学习是好好生活的根本,共勉! 文章均为学习整理笔记,分享记录为主,如有错误请指正,共同学习进步。…...

SQL实现模糊查询的四种方法总结
目录 一、一般模糊查询 二、利用通配符查询 1. _ 表示任意的单个字符 2. % 表示匹配任意多个任意字符 3. [ ]表示筛选范围 4. 查询包含通配符的字符串 一、一般模糊查询 1. 单条件查询 //查询所有姓名包含“张”的记录select * from student where name like 张 2. 多条…...

反射获取方法和属性
Java反射获取方法 在Java中,反射(Reflection)是一种强大的机制,允许程序在运行时访问和操作类的内部属性和方法。通过反射,可以动态地创建对象、调用方法、改变属性值,这在很多Java框架中如Spring和Hiberna…...

tomcat指定使用的jdk版本
说明 有时候需要对tomcat配置指定的jdk版本号,此时,我们可以通过以下方式进行配置 设置方式 找到tomcat的bin目录中的setclasspath.bat。如果是linux系统则是setclasspath.sh set JAVA_HOMEC:\Program Files\Java\jdk8 set JRE_HOMEC:\Program Files…...

十九、【用户管理与权限 - 篇一】后端基础:用户列表与角色模型的初步构建
【用户管理与权限 - 篇一】后端基础:用户列表与角色模型的初步构建 前言准备工作第一部分:回顾 Django 内置的 `User` 模型第二部分:设计并创建 `Role` 和 `UserProfile` 模型第三部分:创建 Serializers第四部分:创建 ViewSets第五部分:注册 API 路由第六部分:后端初步测…...

RushDB开源程序 是现代应用程序和 AI 的即时数据库。建立在 Neo4j 之上
一、软件介绍 文末提供程序和源码下载 RushDB 改变了您处理图形数据的方式 — 不需要 Schema,不需要复杂的查询,只需推送数据即可。 二、Key Features ✨ 主要特点 Instant Setup: Be productive in seconds, not days 即时设置 :在几秒钟…...

JavaScript 标签加载
目录 JavaScript 标签加载script 标签的 async 和 defer 属性,分别代表什么,有什么区别1. 普通 script 标签2. async 属性3. defer 属性4. type"module"5. 各种加载方式的对比6. 使用建议 JavaScript 标签加载 script 标签的 async 和 defer …...
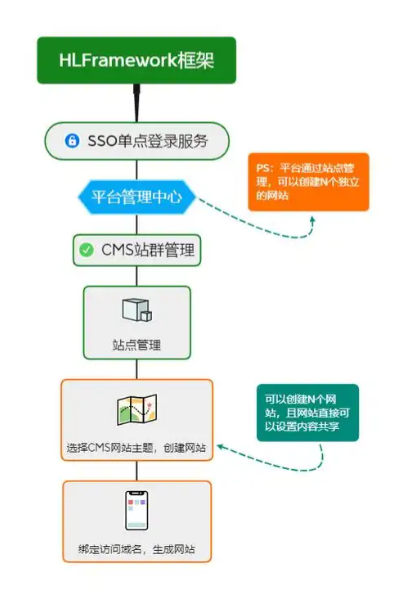
CMS内容管理系统的设计与实现:多站点模式的实现
在一套内容管理系统中,其实有很多站点,比如企业门户网站,产品手册,知识帮助手册等,因此会需要多个站点,甚至PC、mobile、ipad各有一个站点。 每个站点关联的有站点所在目录及所属的域名。 一、站点表设计…...

标注工具核心架构分析——主窗口的图像显示
🏗️ 标注工具核心架构分析 📋 系统概述 主要有两个核心类,采用经典的 Scene-View 架构模式: 🎯 核心类结构 1. AnnotationScene (QGraphicsScene子类) 主要负责标注场景的管理和交互 🔧 关键函数&…...

第14节 Node.js 全局对象
JavaScript 中有一个特殊的对象,称为全局对象(Global Object),它及其所有属性都可以在程序的任何地方访问,即全局变量。 在浏览器 JavaScript 中,通常 window 是全局对象, 而 Node.js 中的全局…...

可视化预警系统:如何实现生产风险的实时监控?
在生产环境中,风险无处不在,而传统的监控方式往往只能事后补救,难以做到提前预警。但如今,可视化预警系统正在改变这一切!它能够实时收集和分析生产数据,通过直观的图表和警报,让管理者第一时间…...

前端异步编程全场景解读
前端异步编程是现代Web开发的核心,它解决了浏览器单线程执行带来的UI阻塞问题。以下从多个维度进行深度解析: 一、异步编程的核心概念 JavaScript的执行环境是单线程的,这意味着在同一时间只能执行一个任务。为了不阻塞主线程,J…...