iOS(一):Swift纯代码模式iOS开发入门教程
Swift纯代码模式iOS开发入门教程
- 项目初始化(修改为纯代码项目)
- 安装第三方库(以`SnapKit`库为例)
- 桥接OC库(QMUIKit)
- 封装视图并进行导航跳转
- 示例:使用 `TangramKit` 第三方UI布局库
- 应用国际化
- 添加 `R.swift` 框架
- 颜色统一管理(图片相同)
- 网络请求 `Moya`
- 网络请求 `Moya/RxSwift`
- 解析 `json`
项目初始化(修改为纯代码项目)
1.修改 AppDelegate.swift 和 ViewController.swift 文件

2.删除 SceneDelegate.swift 和 Main.storyboard 文件
3.修改如图所示项


安装第三方库(以SnapKit库为例)
安装CocoaPods
$ gem install cocoapods
初始化项目(添加Podfile配置文件)
$ pod init
修改Podfile文件
# Uncomment the next line to define a global platform for your project
# platform :ios, '9.0'target 'ExDemoApp' do# Comment the next line if you don't want to use dynamic frameworksuse_frameworks!# Pods for ExDemoApppod 'SnapKit'end
安装
$ pod install
打开ExDemoApp.xcworkspace项目并向ViewController.swift添加示例代码
//
//  ViewController.swift
//  ExDemoApp
//
//  Created by ProsperLee on 2023/2/20.
//import UIKit
import SnapKitclass ViewController: UIViewController {override func viewDidLoad() {super.viewDidLoad()view.backgroundColor = .whitelet label: UILabel = UILabel()view.addSubview(label)label.text = "Hello"label.textColor = .redlabel.snp.makeConstraints { make inmake.centerX.equalToSuperview()make.centerY.equalToSuperview()}}}
运行效果

桥接OC库(QMUIKit)
安装QMUIKit
# Podfile 文件# Uncomment the next line to define a global platform for your project
# platform :ios, '9.0'target 'ExDemoApp' do# Comment the next line if you don't want to use dynamic frameworksuse_frameworks!# Pods for ExDemoApppod 'SnapKit'pod 'QMUIKit'end
$ pod install
方式一:触发xcode自动创建桥接文件机制

方式二:手动创建xcode桥接文件


测试桥接是否成功

//
//  ViewController.swift
//  ExDemoApp
//
//  Created by ProsperLee on 2023/2/20.
//import UIKit
import SnapKitclass ViewController: UIViewController {override func viewDidLoad() {super.viewDidLoad()view.backgroundColor = .whitelet button = QMUIButton()button.adjustsButtonWhenHighlighted = truebutton.setTitle("按钮", for: .normal)button.setTitleColor(.white, for: .normal)button.backgroundColor = UIColor.tintColor;button.highlightedBackgroundColor = UIColor.tintColor;button.layer.cornerRadius = 4view.addSubview(button)button.snp.makeConstraints { make inmake.width.equalTo(200)make.height.equalTo(40)make.centerX.equalToSuperview()make.centerY.equalToSuperview()}button.addTarget(self, action: #selector(buttonClick), for: UIControl.Event.touchUpInside)}@objc func buttonClick(){print("点击了")}}
封装视图并进行导航跳转
效果

项目目录结构

配置导航跳转
//
//  AppDelegate.swift
//  ExDemoApp
//import UIKit@main
class AppDelegate: UIResponder, UIApplicationDelegate {var window: UIWindow?func application(_ application: UIApplication, didFinishLaunchingWithOptions launchOptions: [UIApplication.LaunchOptionsKey: Any]?) -> Bool {let controller = ViewController()window = UIWindow(frame: UIScreen.main.bounds)// 包装一层导航控制器用于在视图间跳转window!.rootViewController = UINavigationController(rootViewController: controller)window?.makeKeyAndVisible()return true}}
创建要跳转到的Controller
//
//  SettingController.swift
//  设置界面
//import UIKitclass SettingController: UIViewController {override func viewDidLoad() {super.viewDidLoad()title = "设置界面"view.backgroundColor = UIColor(red: 250 / 255, green:  250 / 255, blue:  250 / 255, alpha: 1)}
}
进行跳转
//
//  ViewController.swift
//  ExDemoApp
//import UIKit
import SnapKitclass ViewController: UIViewController {override func viewDidLoad() {super.viewDidLoad()let button = QMUIButton()button.setTitle("进入设置页面", for: .normal)view.addSubview(button)button.addTarget(self, action: #selector(goto(_:)), for: .touchUpInside)button.snp.makeConstraints{make inmake.center.equalToSuperview()}}@objc func goto(_ sender: QMUIButton){print(sender.titleLabel!.text!)let target = SettingController()navigationController?.pushViewController(target, animated: true)}
}
封装视图组件
//
//  CellView.swift
//  ExDemoApp
//import UIKit
import SnapKitclass CellView: UIView {/// 左侧图标lazy var leftIcon: UIImageView = {let v = UIImageView();v.image = UIImage(named: "Setting")return v;}()/// 单元格标题lazy var title: UILabel = {let v = UILabel();v.text = "Setting"return v;}()/// 右侧图标lazy var rightIcon: UIImageView = {let v = UIImageView();v.image = UIImage(named: "More")return v;}()// 初始化组件init() {super.init(frame: CGRect.zero)innerInit()}// 从数据中初始化一个视图(必需)required init?(coder: NSCoder) {super.init(coder: coder)innerInit()}// 组件UIView初始化func innerInit(){backgroundColor = .whiteaddSubview(leftIcon)addSubview(title)addSubview(rightIcon)}// 当view被首次添加进父级视图的时候调用override func didMoveToSuperview() {super.didMoveToSuperview()leftIcon.snp.makeConstraints{make inmake.width.equalTo(32)make.height.equalTo(32)make.centerY.equalToSuperview()make.left.equalToSuperview().offset(16)}title.snp.makeConstraints{make inmake.centerY.equalToSuperview()make.left.equalTo(leftIcon.snp.right).offset(10)}rightIcon.snp.makeConstraints{make inmake.width.equalTo(20)make.height.equalTo(20)make.centerY.equalToSuperview()make.right.equalToSuperview().offset(-16)}}}
使用组件并配置点击事件
//
//  SettingController.swift
//  设置界面
//import UIKitclass SettingController: UIViewController {// 懒加载单元格并配置相关属性lazy var cellView: CellView = {let v = CellView();v.leftIcon.image = UIImage(named: "Setting")v.title.text = "设置"// 单元格整体添加点击事件v.addGestureRecognizer(UITapGestureRecognizer(target: self, action: #selector(onSettingClick(recognizer:))))return v;}()override func viewDidLoad() {super.viewDidLoad()title = "设置界面"view.backgroundColor = UIColor(red: 250 / 255, green:  250 / 255, blue:  250 / 255, alpha: 1)view.addSubview(cellView)cellView.snp.makeConstraints{make inmake.height.equalTo(40)make.top.equalTo(view.safeAreaLayoutGuide.snp.top);make.left.equalToSuperview()make.right.equalToSuperview()}}// 点击事件@objc func onSettingClick (recognizer:UITapGestureRecognizer){print(recognizer)cellView.title.text = "点击了!"}}
示例:使用 TangramKit 第三方UI布局库

pod 'TangramKit'
let horzLayout = TGLinearLayout(.horz)
horzLayout.tg_gravity = TGGravity.horz.fill  // 所有子视图水平宽度充满布局,这样就不需要分别设置每个子视图的宽度了。
horzLayout.backgroundColor = UIColor.white
horzLayout.tg_width.equal(.fill)   // 高度填充父布局的所有剩余空间。
horzLayout.tg_height.equal(60)
horzLayout.tg_bottom.equal(TGLayoutPos.tg_safeAreaMargin)
view.addSubview(horzLayout)let v1 = QMUIButton();
v1.setTitle("v1", for: .normal)
v1.backgroundColor = .red
v1.tg_height.equal(.fill)
horzLayout.addSubview(v1)let v2 = QMUIButton();
v2.setTitle("v2", for: .normal)
v2.backgroundColor = .green
v2.tg_height.equal(.fill)
horzLayout.addSubview(v2)let v3 = QMUIButton();
v3.setTitle("v3", for: .normal)
v3.backgroundColor = .blue
v3.tg_height.equal(.fill)
horzLayout.addSubview(v3)
应用国际化
引用公共字符串


/* Localizable.stringsExDemoApp
*/HomeMenuText = "首页";
//
//  ViewController.swift
//  ExDemoApp
//import UIKit
import TangramKitclass ViewController: UIViewController {override func viewDidLoad() {super.viewDidLoad()view.backgroundColor = UIColor(red: 250 / 255, green: 250 / 255, blue: 250 / 255, alpha: 1)let horzLayout = TGLinearLayout(.horz)horzLayout.tg_gravity = TGGravity.horz.fillhorzLayout.backgroundColor = UIColor.orangehorzLayout.tg_width.equal(.fill)horzLayout.tg_height.equal(60)horzLayout.tg_bottom.equal(TGLayoutPos.tg_safeAreaMargin)view.addSubview(horzLayout)let v1 = QMUILabel();v1.text = NSLocalizedString("HomeMenuText", comment: "") // 引用公共字符串v1.backgroundColor = .redv1.textAlignment = .center;v1.tg_width.equal(.fill)v1.tg_height.equal(.fill)horzLayout.addSubview(v1)let v2 = QMUILabel();v2.text = "v2"v2.backgroundColor = .greenv2.textAlignment = .center;v2.tg_width.equal(.fill)v2.tg_height.equal(.fill)horzLayout.addSubview(v2)let v3 = QMUILabel();v3.text = "v3"v3.backgroundColor = .bluev3.textAlignment = .center;v3.tg_width.equal(.fill)v3.tg_height.equal(.fill)horzLayout.addSubview(v3)}}
启用国际化(修改系统语言查看效果)


应用名称国际化(修改系统语言查看效果)


添加 R.swift 框架
用于优化资源获取访问的方式,如图像、字体等
1.添加依赖
pod 'R.swift'
2.创建运行脚本


"$PODS_ROOT/R.swift/rswift" generate "$SRCROOT/R.generated.swift"
$SRCROOT/R.generated.swift

3.执行编译生成 R.generated.swift 文件,并将其添加到项目根目录

4.使用
/* Localizable.stringsExDemoApp
*/HomeMenuText = "%@, 首页";
//
//  ViewController.swift
//  ExDemoApp
//let v1 = QMUILabel();
v1.text = NSLocalizedString(R.string.localizable.homeMenuText("你好"), comment: "")
v1.backgroundColor = .red
v1.textAlignment = .center;
v1.tg_width.equal(.fill)
v1.tg_height.equal(.fill)
horzLayout.addSubview(v1)

颜色统一管理(图片相同)

引入动态颜色生成库
pod 'DynamicColor'
实现
//
//  SuperUIColorExtension.swift
//  ExDemoApp
//
//  扩展系统颜色
//import Foundation
import DynamicColorextension UIColor {/// 背景颜色 (浅色)static var bgLightColor: UIColor{return DynamicColor(hex: 0xfafafa)}/// 背景颜色 (深色)static var bgDarkColor: UIColor{return DynamicColor(hex: 0x000000)}/// 背景颜色static var bgColor: UIColor{return .initColor(normal: bgLightColor, dark: bgDarkColor)}/// 红色static var red: UIColor{return DynamicColor(hex: 0xff0000)}/// 绿色static var green: UIColor{return DynamicColor(hex: 0x00ff00)}/// 蓝色static var blue: UIColor{return DynamicColor(hex: 0x00ffff)}/// 深浅颜色随系统切换static func initColor(normal: UIColor, dark: UIColor) -> UIColor{if #available(iOS 13.0, *) {return UIColor{ traitCollection -> UIColor inreturn traitCollection.userInterfaceStyle == .dark ? dark : normal}}else{return normal}}}
//
//  ViewController.swift
//  ExDemoApp
//import UIKit
import TangramKit
import DynamicColorclass ViewController: UIViewController {override func viewDidLoad() {super.viewDidLoad()view.backgroundColor = .bgColorlet horzLayout = TGLinearLayout(.horz)horzLayout.tg_gravity = TGGravity.horz.fillhorzLayout.backgroundColor = .grayhorzLayout.tg_width.equal(.fill)horzLayout.tg_height.equal(60)horzLayout.tg_bottom.equal(TGLayoutPos.tg_safeAreaMargin)view.addSubview(horzLayout)let v1 = QMUIButton()v1.setTitle("v1", for: .normal)v1.setTitleColor(.red, for: .normal)v1.tg_width.equal(.fill)v1.tg_height.equal(.fill)horzLayout.addSubview(v1)let v2 = QMUIButton()v2.setTitle("v2", for: .normal)v2.setTitleColor(.green, for: .normal)v2.tg_width.equal(.fill)v2.tg_height.equal(.fill)horzLayout.addSubview(v2)let v3 = QMUIButton()v3.setTitle("v3", for: .normal)v3.setTitleColor(.blue, for: .normal)v3.tg_width.equal(.fill)v3.tg_height.equal(.fill)horzLayout.addSubview(v3)}}
网络请求 Moya
允许http请求

<?xml version="1.0" encoding="UTF-8"?>
<!DOCTYPE plist PUBLIC "-//Apple//DTD PLIST 1.0//EN" "http://www.apple.com/DTDs/PropertyList-1.0.dtd">
<plist version="1.0">
<dict><key>NSAppTransportSecurity</key><dict><key>NSAllowsArbitraryLoads</key><true/></dict>
</dict>
</plist>
配置请求地址
//
//  Config.swift
//  ExDemoApp
//import Foundationclass Config{/// 接口地址static let API_URL = "http://127.0.0.1:8080/";
}
引入网络请求框架
pod 'Moya'
使用请求

// 服务端
let http = require('http');http.createServer((req, res) => {res.writeHead(200, { 'Content-type': 'application/json' });if (req.url === '/api/getUserInfo' && req.method === 'POST') {let data = '';req.on('data', (chunk) => {data += chunk;});req.on('end', () => {console.log(JSON.stringify({code: 200, id: Math.random(), ...JSON.parse(data)}));res.end(JSON.stringify({code: 200, id: Math.random(), ...JSON.parse(data)}));});}
}).listen(8080);console.log('http://127.0.0.1:8080/');
//
//  ViewController.swift
//  ExDemoApp
//import UIKit
import TangramKit
import DynamicColor
import Moyaclass ViewController: UIViewController {var label: QMUILabel = QMUILabel()override func viewDidLoad() {super.viewDidLoad()view = TGRelativeLayout()view.backgroundColor = .bgColorlet button = QMUIButton()button.setTitle("请求", for: .normal)button.tg_width.equal(.wrap)button.tg_height.equal(.wrap)button.tg_centerX.equal(0)button.tg_centerY.equal(0)button.addTarget(self, action: #selector(handleClick(_ :)), for: .touchUpInside)view.addSubview(button)label.text = "暂无数据!"label.tg_width.equal(.wrap)label.tg_height.equal(.wrap)label.tg_centerX.equal(0)label.tg_centerY.equal(30)view.addSubview(label)}@objc func handleClick (_ sender: QMUIButton){let provider = MoyaProvider<DefaultService>()provider.request(.getUserInfo(firstName: "Lee", lastName: "Prosper")) { result inswitch result {case let .success(moyaResponse):if moyaResponse.statusCode == 200 {let data: String = String(data: moyaResponse.data, encoding: .utf8)!self.label.text = dataprint(data)}case let .failure(error):print(error)}}}}/// 默认服务
enum DefaultService {case getUserInfo(firstName: String, lastName: String)
}extension DefaultService: TargetType {/// 请求地址var baseURL: URL { return URL(string: Config.API_URL)! }/// 接口地址var path: String {switch self {case .getUserInfo:return "/api/getUserInfo"}}/// 请求方式var method: Moya.Method {switch self {case .getUserInfo:return .post}}/// 请求参数var task: Task {switch self {case let .getUserInfo(firstName, lastName):return .requestParameters(parameters: ["first_name": firstName, "last_name": lastName], encoding: JSONEncoding.default)}}/// 请求头var headers: [String: String]? {let headers: Dictionary<String, String> = [:]return headers}
}
网络请求 Moya/RxSwift
Moya/RxSwift响应式编程,可以对数据在请求前做一些处理,如:provider.rx.request(.xxx()).filter{... in ...}.subscribe { ... }
引入RxSwift
# pod 'Moya'
pod 'Moya/RxSwift'pod 'NSObject+Rx'
使用
//  ViewController.swiftimport RxSwift
import NSObject_Rx@objc func handleClick (_ sender: QMUIButton){let provider = MoyaProvider<DefaultService>()provider.rx.request(.getUserInfo(firstName: "Lee", lastName: "Prosper")).subscribe { event inswitch event {case let .success(response):if response.statusCode == 200 {let data: String = String(data: response.data, encoding: .utf8)!self.label.text = dataprint(data)}case let .failure(error):print(error)}}.disposed(by: rx.disposeBag) // 用于释放subscribe资源}
解析 json

pod 'HandyJSON'
//  ViewController.swiftimport Moya
import RxSwift
import NSObject_Rx
import HandyJSONclass UserInfo: HandyJSON {var code: Int!              // 不允许空var id: Double!             // 不允许空var first_name: String?     // 允许空var last_name: String?      // 允许空required init() {}
}let provider = MoyaProvider<DefaultService>()
provider.rx.request(.getUserInfo(firstName: "Lee", lastName: "Prosper")).subscribe { event inswitch event {case let .success(response):if response.statusCode == 200 {let data: String = String(data: response.data, encoding: .utf8)!if let object = UserInfo.deserialize(from: data) {self.label.text = "\(object.code!) \n \(object.id!) \n \(object.first_name!) \n \(object.last_name!)"print(object.toJSONString(prettyPrint: true)!) // 转json字符串 - {"id":0.86519265844265569,"last_name":"Prosper","code":200,"first_name":"Lee"}}}case let .failure(error):print(error)}}.disposed(by: rx.disposeBag) // 用于释放subscribe资源
相关文章:
iOS(一):Swift纯代码模式iOS开发入门教程
Swift纯代码模式iOS开发入门教程项目初始化(修改为纯代码项目)安装第三方库(以SnapKit库为例)桥接OC库(QMUIKit)封装视图并进行导航跳转示例:使用 TangramKit 第三方UI布局库应用国际化添加 R.s…...

IDEA+Python+Selenium+360浏览器自动化测试
环境配置前提,见文章https://mp.csdn.net/mp_blog/creation/editor/new?spm1001.2101.3001.4503下载360浏览器,并下载对应版本的chromedriver.exe,下载地址http://chromedriver.storage.googleapis.com/index.html下载好360浏览器࿰…...
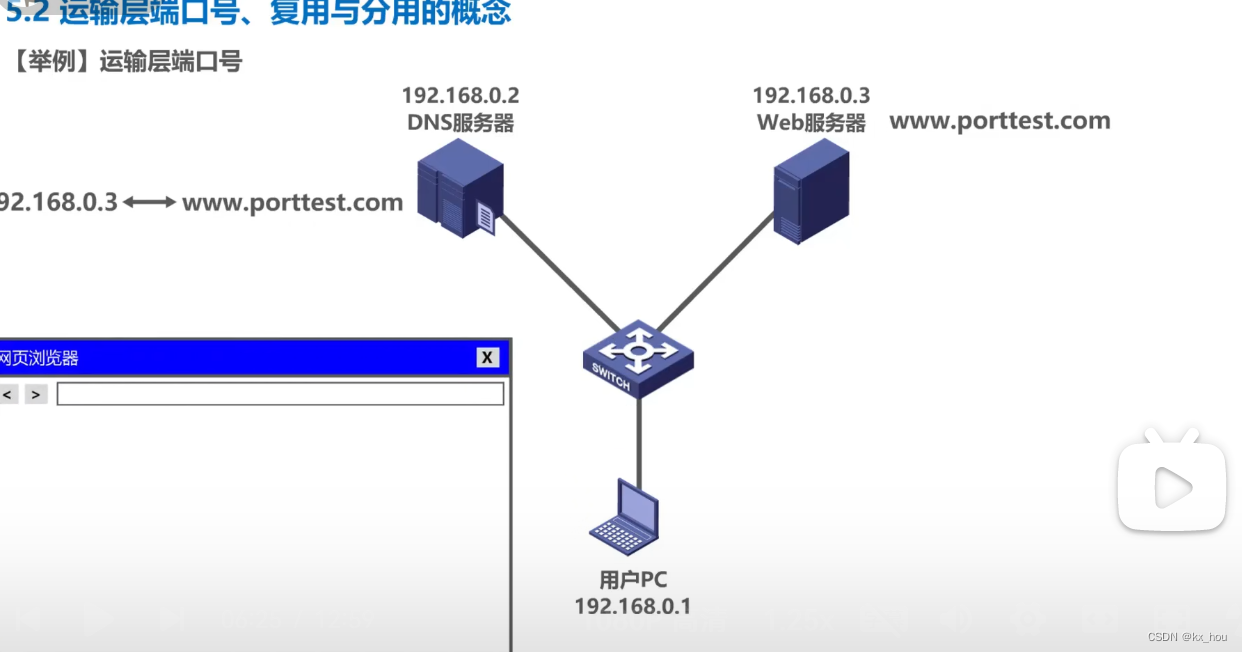
运输层概述及web请求
运输层 运输层概述 运输层向高层用户屏蔽了下面网络核心的细节(如网络拓扑、所采用的路由选择协议等)它使应用进程看见的就好像是在两个运输层实体之间有一条端到端的逻辑通信信道; 根据需求不同,运输层提供两种运输协议 面向连…...
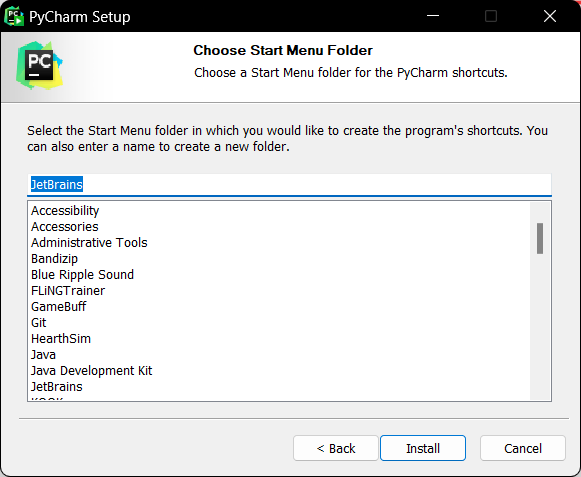
python与pycharm从零安装
python(解释器)下载地址:Welcome to Python.orgpycharm(编译器)下载地址:PyCharm: the Python IDE for Professional Developers by JetBrains一、python的下载与安装到官网后根据步骤下载安装包后…...

叠氮试剂943858-70-6,Azidobutyric acid NHS ester,叠氮-C3-活性酯
1、试剂基团反应特点(Reagent group reaction characteristics):Azidobutyric acid NHS ester具有叠氮化物和NHS酯端基。西安凯新生物科技有限公司供应的叠氮化物可以与炔烃、DBCO和BCN进行铜催化的点击化学反应。NHS酯可以与胺基反应&#x…...
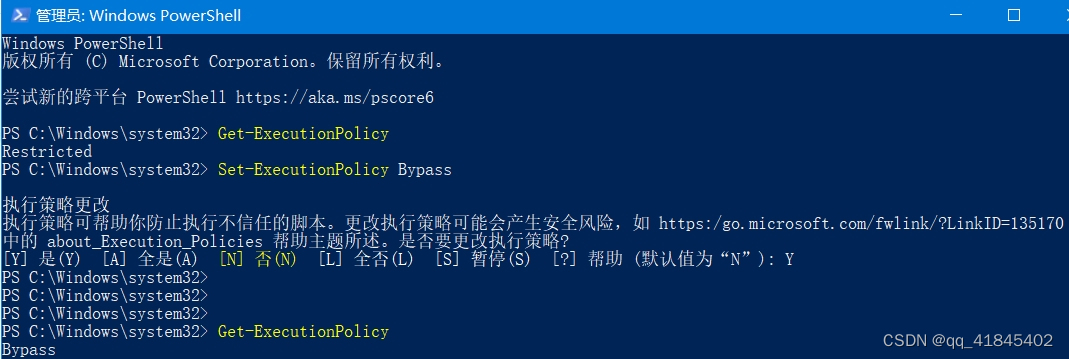
pycharm激活虚拟环境时报错:无法加载文件activate.ps1,因为在此系统上禁止运行脚本,Windows10系统
问题: ii_env\Scripts\activate : 无法加载文件 F:\gitlab\AutoFrame\ii_env\Scripts\Activate.ps1,因为在此系统上禁止运行脚本。 有关详细信息,请参阅 https:/go.microsoft.com/fwlink/?LinkID135170 中的 about_Execution_Policies。 所在…...
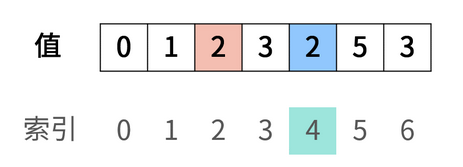
刷题小抄4-数组
在Python中数组的功能由列表来实现,本文主要介绍一些力扣上关于数组的题目解法 寻找数组中重复的数字 题目链接 题目大意: 给出一个数组,数组长度为n,数组里的数字在[0,n-1]范围以内,数字可以重复,寻找出数组中任意一个重复的数字,返回结果 解法一 该题最基础的思路是使用字…...

Hbase安装
目录 上传压缩包 解压 改名 修改 Hbase 配置文件 修改base-env.sh 修改hbase-site.xml 配置环境变量 修改zookeeper配置文件 复制配置文件 修改zoo.cfg配置文件 修改myid 配置环境变量 刷新配置文件 启动Hbase 进入Hbase 查看版本号 查看命名空间 查看命名空…...
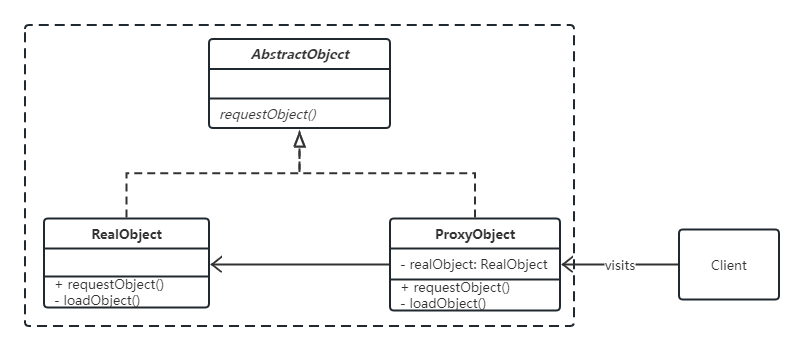
面向对象设计模式:结构型模式之代理模式
一、引入 访问 FB:代理服务器 二、代理模式 aka Surrogate 2.1 Intent 意图 Provide a surrogate (代理) or placeholder for another object to control access to it. 为另一个对象提供一个代理或占位符,以控制对它的访问。代理模式给某一个对象提…...

CCF大数据专家委员会十周年纪念庆典纪实:拥抱数字时代,展望科技未来
山河远阔,奋进十年,作为国内大数据领域最权威的学术组织,CCF大数据专家委员会(以下简称“大专委”)不忘初心,凝心聚力,见证并推动了过去10年来大数据技术生态在中国的建立、发展和成熟。 2023年…...
)
Qt学习3-Qt Creator四则运算计算器(哔站视频学习记录)
计算器中的“”按钮这部分的代码解释 目录 制作计算器中的“”按钮这部分的代码解释 一、代码部分 二、解释 三、思路 四、死循环! 一、代码部分 void Widget::on_equalButton_clicked() {QStack<int> s_num,s_opt; //声明两个int类型变量char opt[128…...

学习 Python 之 Pygame 开发魂斗罗(九)
学习 Python 之 Pygame 开发魂斗罗(九)继续编写魂斗罗1. 在子弹类中修改敌人发射子弹的位置2. 创建显示敌人子弹的函数3. 解决敌人不会向下掉落的问题4. 给敌人碰撞体组增加碰撞体5. 解决敌人叠加在一起的问题继续编写魂斗罗 在上次的博客学习 Python 之…...

最简单的SpringBoot+MyBatis多数据源实现
最简单的SpringBootMyBatis多数据源实现1.数据库准备2.环境准备3.代码部分3.1多数据源配置2.测试随着应用用户数量的增加,相应的并发请求的数量也会跟着不断增加,慢慢地,单个数据库已经没有办法满足频繁的数据库操作请求了,在某些…...

Spring Boot 3.0系列【8】核心特性篇之SpringApplication
有道无术,术尚可求,有术无道,止于术。 本系列Spring Boot版本3.0.3 源码地址:https://gitee.com/pearl-organization/study-spring-boot3 文章目录 前言1. 启动应用2. 自定义 Banner3. 应用参数传递参数获取参数4. ApplicationRunner、CommandLineRunner5. 事件发布和监听…...

Nginx的搭建与核心配置
目录 一.Nginx是什么? 1.Nginx概述 2.Nginx模块与作用 3.Nginx三大作用:反向代理、负载均衡、动静分离 二.Nginx和Apache的差异 三.安装Nginx 1.编译安装 2.yum安装 四.Nginx的信号使用 五.Nginx的核心配置指令 1.访问状态统计配置 2.基于授…...
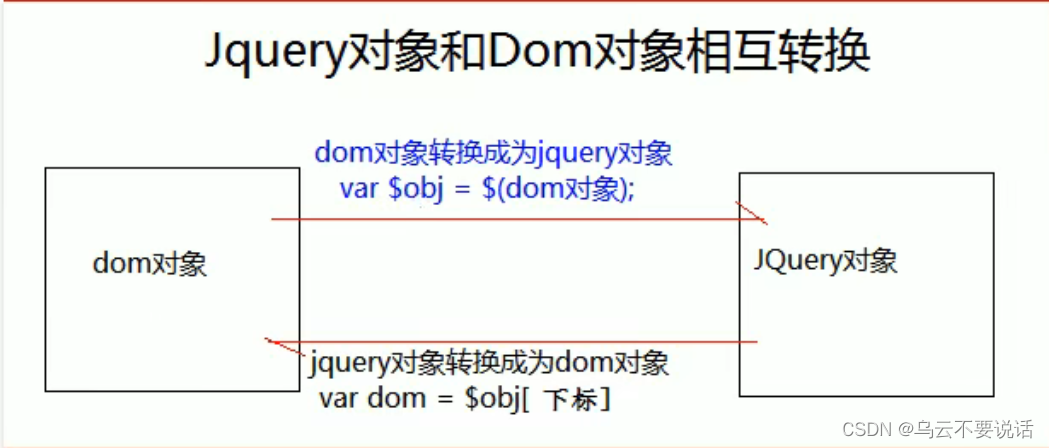
Java学习笔记 --- jQuery
一、jQuery介绍 jQuery,顾名思义,也就是JavaScript和查询(Query),它就是辅助JavaScript开发的js类库。它的核心思想是write less,do more(写得更少,做得更多),…...

华为OD机试题,用 Java 解【字符串加密】问题
华为Od必看系列 华为OD机试 全流程解析+经验分享,题型分享,防作弊指南)华为od机试,独家整理 已参加机试人员的实战技巧华为od 2023 | 什么是华为od,od 薪资待遇,od机试题清单华为OD机试真题大全,用 Python 解华为机试题 | 机试宝典使用说明 参加华为od机试,一定要注意不…...
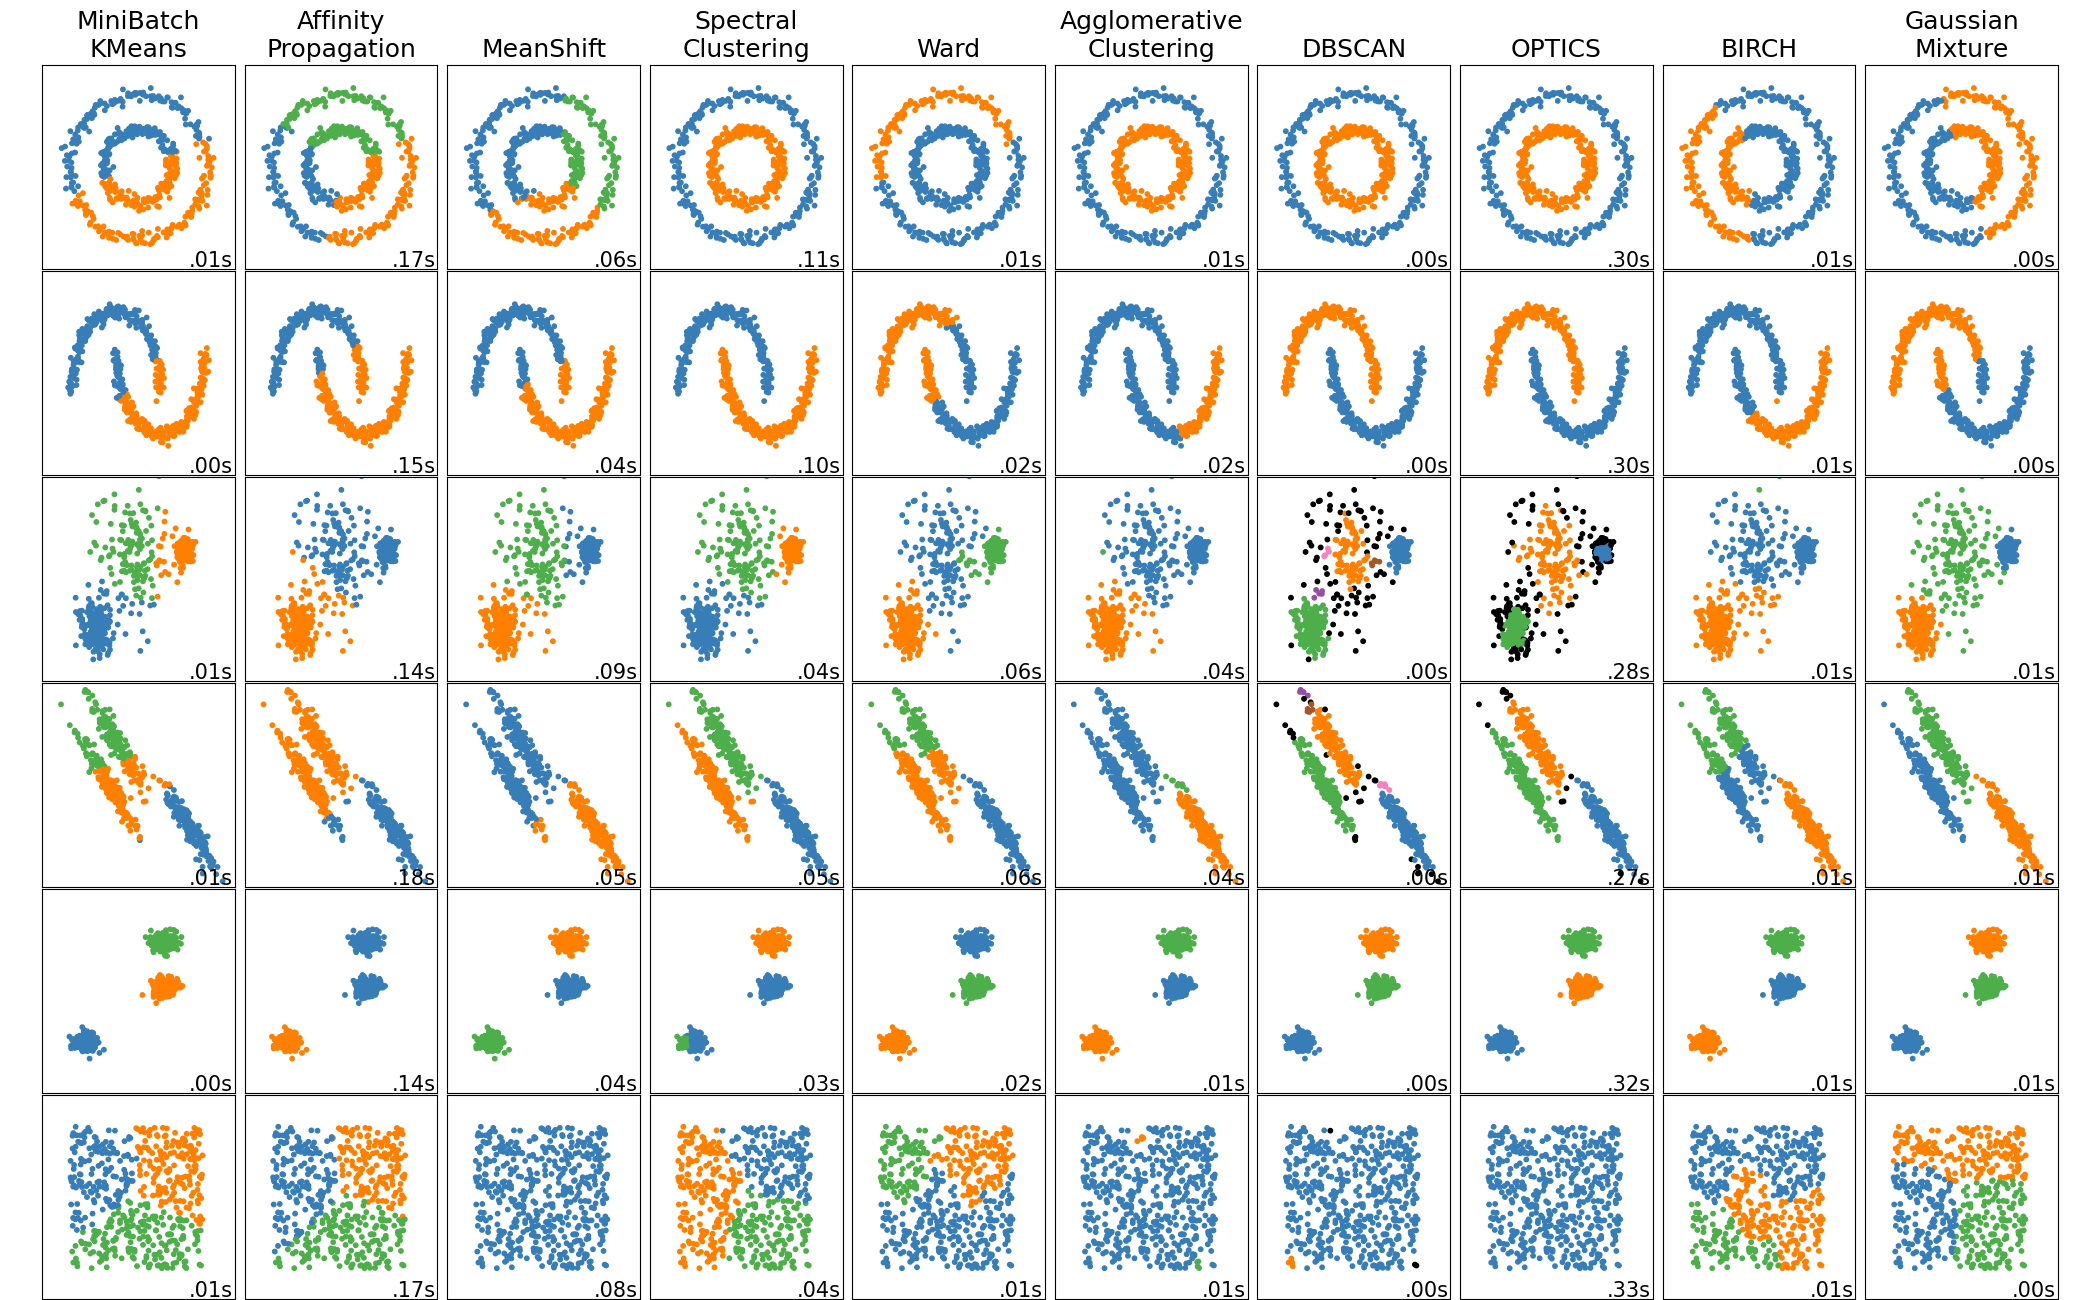
软聚类算法:模糊聚类 (Fuzzy Clustering)
前言 如果你对这篇文章感兴趣,可以点击「【访客必读 - 指引页】一文囊括主页内所有高质量博客」,查看完整博客分类与对应链接。 在介绍模糊聚类之前,我们先简单地列举一下聚类算法的常见分类: 硬聚类 (Hard Clustering) Connec…...

Java Web 实战 02 - 多线程基础篇(1)
Java Web 实战 02 - 多线程基础篇 - 1一 . 认识线程1.1 概念1.1.1 什么是线程?1.1.2 为什么要有多个线程?1.1.3 进程和线程的区别(面试题)1.2 第一个多线程程序1.3 创建线程1.3.1 继承Thread类1.3.2 实现Runnable接口1.3.3 继承 Thread 类 , 使用匿名内部类1.3.4 实现 Runnab…...
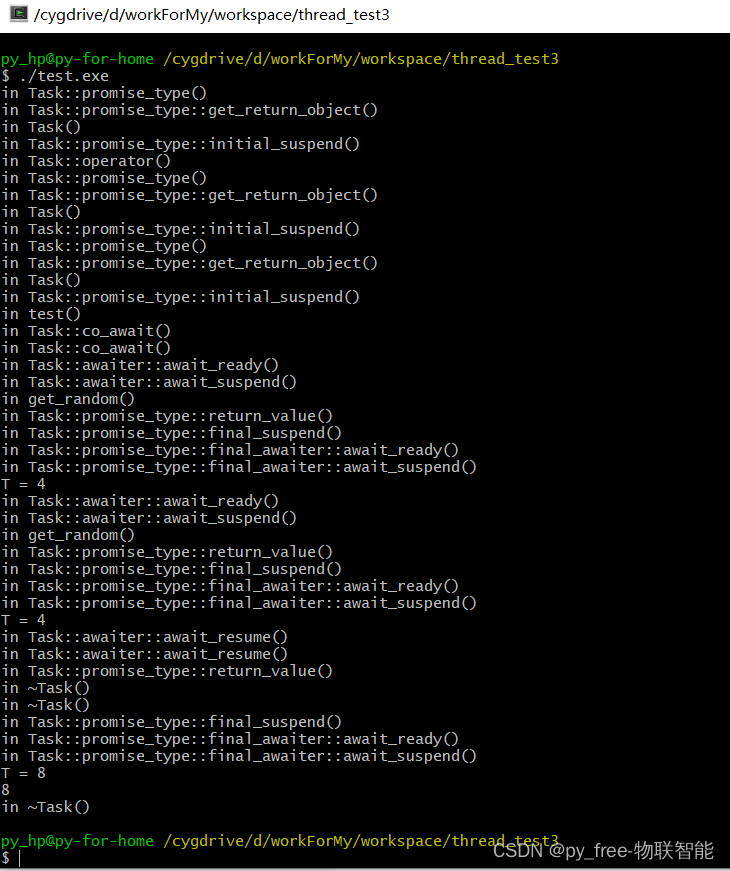
C/C++开发,无可避免的多线程(篇三).协程及其支持库
一、c20的协程概念 在c20标准后,在一些函数中看到co_await、co_yield、co_return这些关键词,这是c20为协程实现设计的运算符。 协程是能暂停执行以在之后恢复的函数。原来我们调用一个功能函数时,只要调用了以后,就要完整执行完该…...
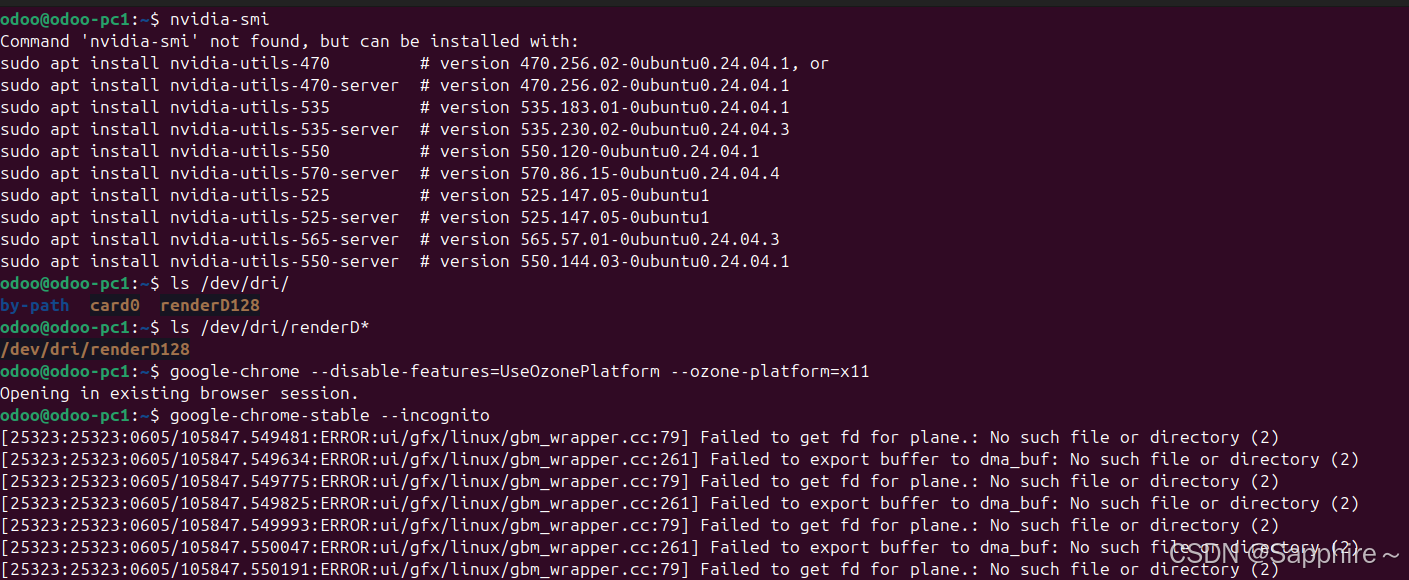
Linux-07 ubuntu 的 chrome 启动不了
文章目录 问题原因解决步骤一、卸载旧版chrome二、重新安装chorme三、启动不了,报错如下四、启动不了,解决如下 总结 问题原因 在应用中可以看到chrome,但是打不开(说明:原来的ubuntu系统出问题了,这个是备用的硬盘&a…...

涂鸦T5AI手搓语音、emoji、otto机器人从入门到实战
“🤖手搓TuyaAI语音指令 😍秒变表情包大师,让萌系Otto机器人🔥玩出智能新花样!开整!” 🤖 Otto机器人 → 直接点明主体 手搓TuyaAI语音 → 强调 自主编程/自定义 语音控制(TuyaAI…...

3403. 从盒子中找出字典序最大的字符串 I
3403. 从盒子中找出字典序最大的字符串 I 题目链接:3403. 从盒子中找出字典序最大的字符串 I 代码如下: class Solution { public:string answerString(string word, int numFriends) {if (numFriends 1) {return word;}string res;for (int i 0;i &…...
可以参考以下方法:)
根据万维钢·精英日课6的内容,使用AI(2025)可以参考以下方法:
根据万维钢精英日课6的内容,使用AI(2025)可以参考以下方法: 四个洞见 模型已经比人聪明:以ChatGPT o3为代表的AI非常强大,能运用高级理论解释道理、引用最新学术论文,生成对顶尖科学家都有用的…...

【碎碎念】宝可梦 Mesh GO : 基于MESH网络的口袋妖怪 宝可梦GO游戏自组网系统
目录 游戏说明《宝可梦 Mesh GO》 —— 局域宝可梦探索Pokmon GO 类游戏核心理念应用场景Mesh 特性 宝可梦玩法融合设计游戏构想要素1. 地图探索(基于物理空间 广播范围)2. 野生宝可梦生成与广播3. 对战系统4. 道具与通信5. 延伸玩法 安全性设计 技术选…...

Spring Cloud Gateway 中自定义验证码接口返回 404 的排查与解决
Spring Cloud Gateway 中自定义验证码接口返回 404 的排查与解决 问题背景 在一个基于 Spring Cloud Gateway WebFlux 构建的微服务项目中,新增了一个本地验证码接口 /code,使用函数式路由(RouterFunction)和 Hutool 的 Circle…...
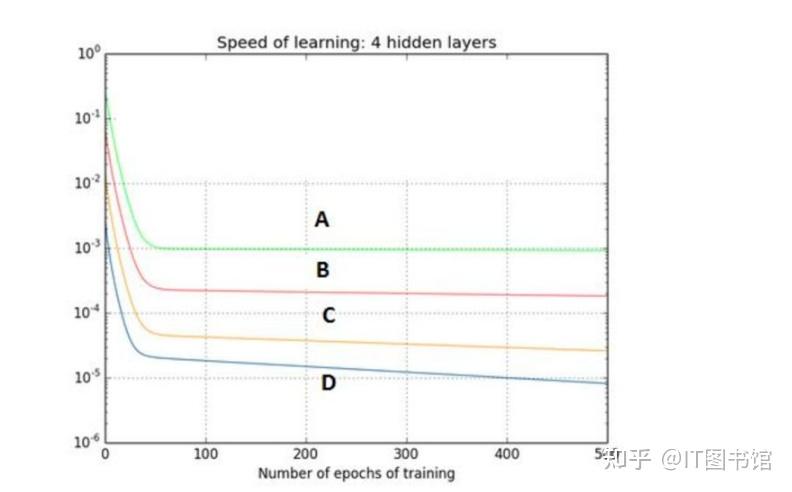
深度学习习题2
1.如果增加神经网络的宽度,精确度会增加到一个特定阈值后,便开始降低。造成这一现象的可能原因是什么? A、即使增加卷积核的数量,只有少部分的核会被用作预测 B、当卷积核数量增加时,神经网络的预测能力会降低 C、当卷…...
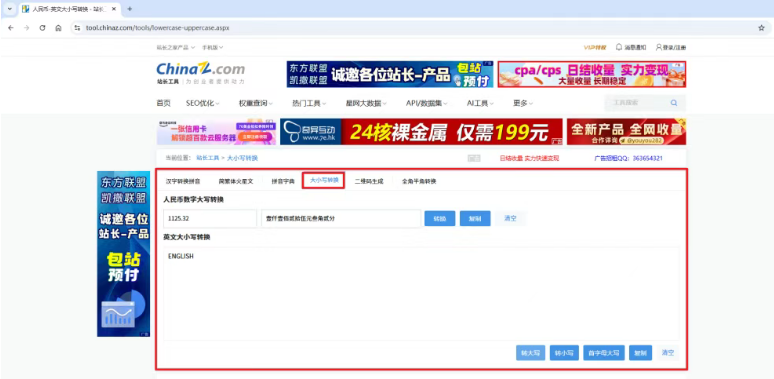
【分享】推荐一些办公小工具
1、PDF 在线转换 https://smallpdf.com/cn/pdf-tools 推荐理由:大部分的转换软件需要收费,要么功能不齐全,而开会员又用不了几次浪费钱,借用别人的又不安全。 这个网站它不需要登录或下载安装。而且提供的免费功能就能满足日常…...
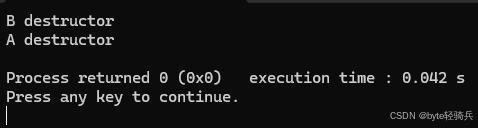
【C++特殊工具与技术】优化内存分配(一):C++中的内存分配
目录 一、C 内存的基本概念 1.1 内存的物理与逻辑结构 1.2 C 程序的内存区域划分 二、栈内存分配 2.1 栈内存的特点 2.2 栈内存分配示例 三、堆内存分配 3.1 new和delete操作符 4.2 内存泄漏与悬空指针问题 4.3 new和delete的重载 四、智能指针…...
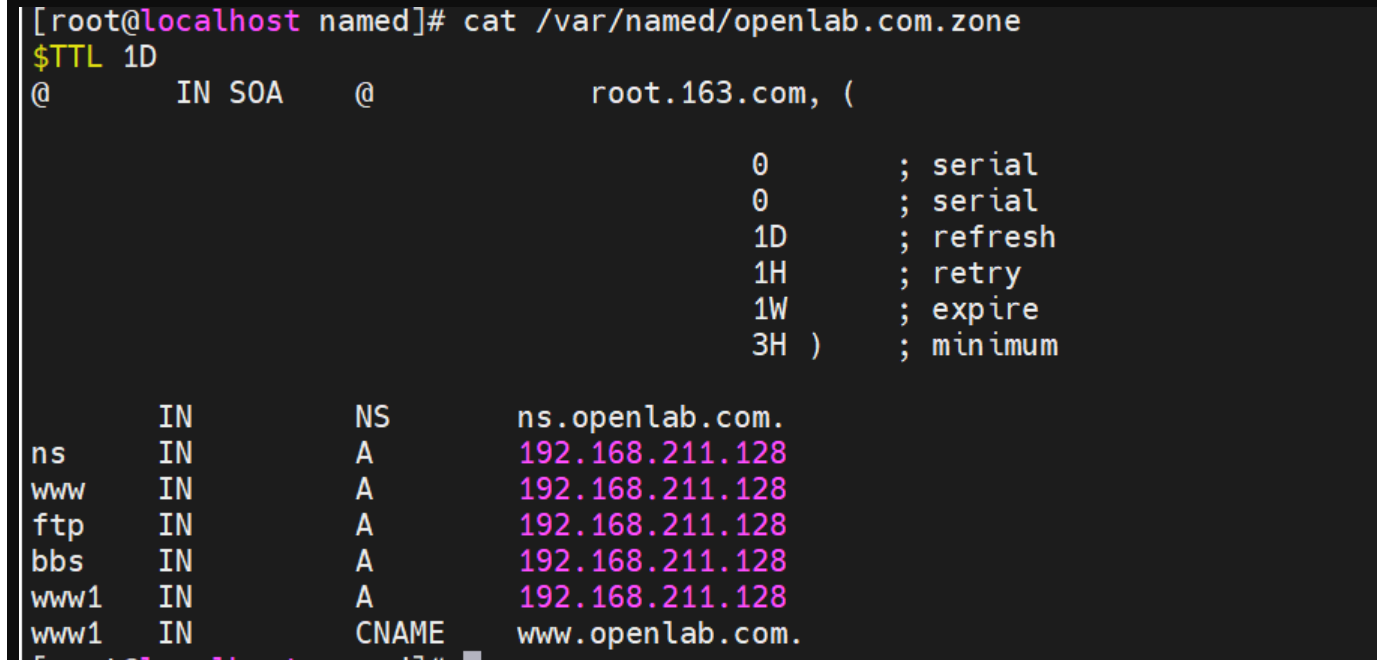
搭建DNS域名解析服务器(正向解析资源文件)
正向解析资源文件 1)准备工作 服务端及客户端都关闭安全软件 [rootlocalhost ~]# systemctl stop firewalld [rootlocalhost ~]# setenforce 0 2)服务端安装软件:bind 1.配置yum源 [rootlocalhost ~]# cat /etc/yum.repos.d/base.repo [Base…...