Activty启动到显示的过程[二]
Activity的显示从handleResumeActivity()方法开始。
//ActivityThread.java@Overridepublic void handleResumeActivity(IBinder token, boolean finalStateRequest, boolean isForward,String reason) {final ActivityClientRecord r = performResumeActivity(token, finalStateRequest, reason);...if (r.window == null && !a.mFinished && willBeVisible) {r.window = r.activity.getWindow();View decor = r.window.getDecorView();decor.setVisibility(View.INVISIBLE);ViewManager wm = a.getWindowManager();...if (a.mVisibleFromClient) {if (!a.mWindowAdded) {a.mWindowAdded = true;android.util.Log.d(TAG, "linzh handleResumeActivity: l.token = " + l.token);wm.addView(decor, l);} }}...}
拿到对应Activity的的DecorView对象后,通过ViewManager接口的addView()方法开始显示界面的过程。
WindowManagerImpl是ViewManager的实现类,WindowManagerImpl调用WindowManagerGlobal类addView()方法。
addView
// WindowManagerGlobal.java    public void addView(View view, ViewGroup.LayoutParams params,Display display, Window parentWindow, int userId) {
参考:https://blog.csdn.net/luoshengyang/article/details/46281499,https://androidperformance.com/2015/08/12/AndroidL-hwui-RenderThread-workflow/#/2-4-swapBuffers        ViewRootImpl root;...root = new ViewRootImpl(view.getContext(), display);view.setLayoutParams(wparams);mViews.add(view);mRoots.add(root);mParams.add(wparams);// do this last because it fires off messages to start doing thingstry {root.setView(view, wparams, panelParentView, userId);} catch (RuntimeException e) {// BadTokenException or InvalidDisplayException, clean up.if (index >= 0) {removeViewLocked(index, true);}throw e;}}
ViewRootImpl构造方法中通过WindowManagerGlobal.getWindowSession()方法获取IWindowSession对象,IWindowSession是app进程和WMS(system_server进程)沟通的桥梁。
IWindowSession
// ViewRootImpl.java
public final class ViewRootImpl implements ViewParent,View.AttachInfo.Callbacks, ThreadedRenderer.DrawCallbacks {// These can be accessed by any thread, must be protected with a lock.// Surface can never be reassigned or cleared (use Surface.clear()).@UnsupportedAppUsagepublic final Surface mSurface = new Surface();public ViewRootImpl(Context context, Display display) {this(context, display, WindowManagerGlobal.getWindowSession(),false /* useSfChoreographer */);}public ViewRootImpl(Context context, Display display, IWindowSession session) {this(context, display, session, false /* useSfChoreographer */);}public ViewRootImpl(Context context, Display display, IWindowSession session,boolean useSfChoreographer) {mContext = context;mWindowSession = session;mDisplay = display;mBasePackageName = context.getBasePackageName();mThread = Thread.currentThread();mChoreographer = useSfChoreographer? Choreographer.getSfInstance() : Choreographer.getInstance();...}
}
类变量mSurface在声明时就被实例化了,但是此时的mSurface 还没有与底层的surface 关联起来,后面会通过copyFrom 进行关联。
ViewRootImpl构造方法中,初始化mWindowSession(app和WMS建立连接),mThread(确认在主线程更新UI),mChoreographer(与Vsync机制配合,实现统一调度界面绘图)。
sWindowSession是WindowManagerGlobal类的静态变量,使用单例模式初始化,确保一个进程中只存在一个IWindowSession实例。
// WindowManagerGlobal.java
public final class WindowManagerGlobal {@UnsupportedAppUsageprivate static IWindowSession sWindowSession;@UnsupportedAppUsagepublic static IWindowSession getWindowSession() {synchronized (WindowManagerGlobal.class) {if (sWindowSession == null) {try {InputMethodManager.ensureDefaultInstanceForDefaultDisplayIfNecessary();IWindowManager windowManager = getWindowManagerService();sWindowSession = windowManager.openSession(new IWindowSessionCallback.Stub() {@Overridepublic void onAnimatorScaleChanged(float scale) {ValueAnimator.setDurationScale(scale);}});} catch (RemoteException e) {throw e.rethrowFromSystemServer();}}return sWindowSession;}}
}
// WindowManagerService.java    @Overridepublic IWindowSession openSession(IWindowSessionCallback callback) {return new Session(this, callback);}// Session.java
class Session extends IWindowSession.Stub implements IBinder.DeathRecipient{final WindowManagerService mService;SurfaceSession mSurfaceSession;...public Session(WindowManagerService service, IWindowSessionCallback callback) {mService = service;...}
}
WMS构建新的IWindowSession实例,Session类实现了IWindowSession.aidl接口,定义了app和WMS交互的接口方法,在构造方法中初始化WindowManagerService对象。还持有SurfaceSession 对象变量mSurfaceSession,mSurfaceSession并不在Session的构造方法中初始化,而是在调用IWindowSession定义的addToDisplayAsUser()方法时,由WMS(system_server进程)初始化。
setView
IWindowSession实例在ViewRootImpl构造方法中初始化好了, 终于开始要构建View了。
在方法开始会调用requestLayout(),然后通过mWindowSession.addToDisplayAsUser()方法初始化IWindowSession实例中的SurfaceSession对象。
后续setFrame()会继续调用requestLayout()方法。
requestLayout()在检查是主线程后(判断当前线程与实例化时是否同一线程),scheduleTraversals()方法中先在当前线程looper中postSyncBarrier()发送同步消息屏障,同步消息将被拖延执行,队列里的异步消息优先执行,通过 postCallback 提交一个任务,mTraversalRunnable是要执行的回调,有了同步消息屏障mTraversalRunnable就会被优先执行。
在安卓4.1之后,为了优化UI效果,安卓引入了Choreographer机制,配置底层上报的VSYNC信号,在收到信号后立即开始下一帧的渲染,保证mTraversalRunnable不被looper中的普通消息阻塞,立即执行渲染动作。
// ViewRootImpl.java
public final class ViewRootImpl implements ViewParent,View.AttachInfo.Callbacks, ThreadedRenderer.DrawCallbacks {public void setView(View view, WindowManager.LayoutParams attrs, View panelParentView, int userId) {synchronized (this) {...// Schedule the first layout -before- adding to the window// manager, to make sure we do the relayout before receiving// any other events from the system.requestLayout();...try {mOrigWindowType = mWindowAttributes.type;mAttachInfo.mRecomputeGlobalAttributes = true;collectViewAttributes();adjustLayoutParamsForCompatibility(mWindowAttributes);res = mWindowSession.addToDisplayAsUser(mWindow, mSeq, mWindowAttributes,getHostVisibility(), mDisplay.getDisplayId(), userId, mTmpFrame,mAttachInfo.mContentInsets, mAttachInfo.mStableInsets,mAttachInfo.mDisplayCutout, inputChannel,mTempInsets, mTempControls);setFrame(mTmpFrame);} catch (RemoteException e) {mAdded = false;mView = null;mAttachInfo.mRootView = null;inputChannel = null;mFallbackEventHandler.setView(null);unscheduleTraversals();setAccessibilityFocus(null, null);throw new RuntimeException("Adding window failed", e);} finally {if (restore) {attrs.restore();}}}}@Overridepublic void requestLayout() {if (!mHandlingLayoutInLayoutRequest) {checkThread();mLayoutRequested = true;scheduleTraversals();}}@UnsupportedAppUsagevoid scheduleTraversals() {if (!mTraversalScheduled) {mTraversalScheduled = true;mTraversalBarrier = mHandler.getLooper().getQueue().postSyncBarrier();mChoreographer.postCallback(Choreographer.CALLBACK_TRAVERSAL, mTraversalRunnable, null);notifyRendererOfFramePending();pokeDrawLockIfNeeded();}}
SurfaceSession
mWindowSession.addToDisplayAsUser()通过WMS的addWindow()方法,实例化WindowState对象,记录到mWindowMap变量中,WindowState是WMS用来管理window而设计的一个类。
// WindowManagerService.java
public class WindowManagerService extends IWindowManager.Stubimplements Watchdog.Monitor, WindowManagerPolicy.WindowManagerFuncs {/** Mapping from an IWindow IBinder to the server's Window object. */final HashMap<IBinder, WindowState> mWindowMap = new HashMap<>();public int addWindow(Session session, IWindow client, int seq,LayoutParams attrs, int viewVisibility, int displayId, Rect outFrame,Rect outContentInsets, Rect outStableInsets,DisplayCutout.ParcelableWrapper outDisplayCutout, InputChannel outInputChannel,InsetsState outInsetsState, InsetsSourceControl[] outActiveControls,int requestUserId) {// 校验token等操作...final WindowState win = new WindowState(this, session, client, token, parentWindow,appOp[0], seq, attrs, viewVisibility, session.mUid, userId,session.mCanAddInternalSystemWindow);...win.attach();mWindowMap.put(client.asBinder(), win);win.initAppOpsState();...}
}
Session类中的mSurfaceSession对象在这里被实例化。
win.attach();调用windowAddedLocked()方法,传入mAttrs.packageName作为参数。
// Session.java
class Session extends IWindowSession.Stub implements IBinder.DeathRecipient {SurfaceSession mSurfaceSession;void windowAddedLocked(String packageName) {mPackageName = packageName;mRelayoutTag = "relayoutWindow: " + mPackageName;if (mSurfaceSession == null) {mSurfaceSession = new SurfaceSession();mService.mSessions.add(this);if (mLastReportedAnimatorScale != mService.getCurrentAnimatorScale()) {mService.dispatchNewAnimatorScaleLocked(this);}}mNumWindow++;}
}
SurfaceSession构造方法中通过jni调用nativeCreate(),返回SurfaceComposerClient对象的地址,赋值给mNativeClient变量。
// SurfaceSession.java
public final class SurfaceSession {@UnsupportedAppUsageprivate long mNativeClient; // SurfaceComposerClient*@UnsupportedAppUsagepublic SurfaceSession() {mNativeClient = nativeCreate();}
}// android_view_SufaceSession.cpp
static jlong nativeCreate(JNIEnv* env, jclass clazz) {SurfaceComposerClient* client = new SurfaceComposerClient();client->incStrong((void*)nativeCreate);jlong t = reinterpret_cast<jlong>(client);return reinterpret_cast<jlong>(client);
}
实例化一个SurfaceSession对象,nativeCreate()实例化SurfaceComposerClient对象,代表和surfaceflinger服务建立连接了。
到这里准备工作都做好了,就等Choreographer接受VSYNC信号执行mTraversalRunnable。
mTraversalRunnable
mTraversalRunnable被执行后,removeSyncBarrier()先移除looper中的同步屏障,普通的同步消息不再被拖延,performTraversals()先通过relayoutWindow()通知surfaceflinger创建一个surface,ViewRootImpl类的mSurface变量也在relayoutWindow()方法中通过copyFrom()方法和底层的surface对象关联起来。
performMeasure(), performLayout(), performDraw()分别会调用View的onMeasure(), onSizeChanaged(), onLayout(), onDraw()方法,开始画面绘制渲染。
void doTraversal() {if (mTraversalScheduled) {mTraversalScheduled = false;mHandler.getLooper().getQueue().removeSyncBarrier(mTraversalBarrier);performTraversals();}}private void performTraversals() {...relayoutResult = relayoutWindow(params, viewVisibility, insetsPending);performMeasure(childWidthMeasureSpec, childHeightMeasureSpec);performLayout(lp, mWidth, mHeight);performDraw();...}
SurfaceControl / Surface
SurfaceControl是surface和如何处理surface的元数据(name, width, height, format)的组合。
SurfaceControl类在Java(frameworks/base/core/java/android/view/SurfaceControl.java)和cpp(frameworks/native/libs/gui/SurfaceControl.cpp)中都有实现。
Java层的SurfaceControl主要是对cpp层的SurfaceControl对象的封装,其类变量mNativeObject指向cpp层SurfaceControl对象的引用,mNativeHandle指向cpp层Layer类的内部类Handle,Handle继承了BBinder和LayerCleaner,LayerCleaner在handle被销毁时确保mFlinger->onLayerDestroyed()方法被调用。
// SurfaceControl.java
public final class SurfaceControl implements Parcelable {public long mNativeObject;private long mNativeHandle;private SurfaceControl(SurfaceSession session, String name, int w, int h, int format, int flags,SurfaceControl parent, SparseIntArray metadata, WeakReference<View> localOwnerView,String callsite){...mNativeObject = nativeCreate(session, name, w, h, format, flags,parent != null ? parent.mNativeObject : 0, metaParcel);mNativeHandle = nativeGetHandle(mNativeObject);}
}
cpp层的SurfaceControl保存了SurfaceComposerClient,Surface,Handle,IGraphicBufferProducer等和surface控制相关的数据。
// SurfaceControl.cpp
class SurfaceControl : public RefBase
{private:sp<SurfaceComposerClient>   mClient;sp<IBinder>                 mHandle;sp<IGraphicBufferProducer>  mGraphicBufferProducer;mutable Mutex               mLock;mutable sp<Surface>         mSurfaceData;SurfaceControl::SurfaceControl(const sp<SurfaceComposerClient>& client, const sp<IBinder>& handle,const sp<IGraphicBufferProducer>& gbp,uint32_t transform): mClient(client),mHandle(handle),mGraphicBufferProducer(gbp),mTransformHint(transform) {}sp<Surface> SurfaceControl::generateSurfaceLocked() const{// This surface is always consumed by SurfaceFlinger, so the// producerControlledByApp value doesn't matter; using false.mSurfaceData = new Surface(mGraphicBufferProducer, false);return mSurfaceData;}sp<Surface> SurfaceControl::getSurface() const{Mutex::Autolock _l(mLock);if (mSurfaceData == nullptr) {ALOGD("mSurfaceData == nullptr");return generateSurfaceLocked();}return mSurfaceData;}
}
SurfaceControl在ViewRootImpl类的relayoutWindow()方法被初始化后,之前提到的ViewRootImpl类的mSurface变量也通过copyFrom()方法关联到cpp层的Surface对象。
通过SurfaceControl.mNativeObject获取到cpp层的SurfaceControl对象,SurfaceControl.getSurface()返回cpp层的Surface对象。至此Surface对象也准备好了。
// Surface.java
public class Surface implements Parcelable {long mNativeObject; // package scope only for SurfaceControl accesspublic void copyFrom(SurfaceControl other) {long surfaceControlPtr = other.mNativeObject;long newNativeObject = nativeGetFromSurfaceControl(mNativeObject, surfaceControlPtr);synchronized (mLock) {if (newNativeObject == mNativeObject) {return;}if (mNativeObject != 0) {nativeRelease(mNativeObject);}setNativeObjectLocked(newNativeObject);}}private void setNativeObjectLocked(long ptr) {if (mNativeObject != ptr) {mNativeObject = ptr;mGenerationId += 1;if (mHwuiContext != null) {mHwuiContext.updateSurface();}}}
}
Layer/Producer/Consumer
SurfaceControl构造方法中nativeCreate()不仅仅创建了native层的SurfaceControl对象,还调用了surfaceflinger的createLayer()方法创建Layer对象。
A Layer is the most important unit of composition. A layer is a combination of a surface and an instance of
SurfaceControl. Each layer has a set of properties that define how it interacts with other layers. Layer properties are described in the table below.
BufferQueueLayer在onFirstRef()方法中初始化生产者和消费者,消费者设置内容监听ContentsChangedListener。
// frameworks/native/services/surfaceflinger/BufferQueueLayer.cpp
/** A new BufferQueue and a new BufferLayerConsumer are created when the* BufferLayer is first referenced.** This also implements onFrameAvailable(), which notifies SurfaceFlinger* that new data has arrived.*/
void BufferQueueLayer::onFirstRef() {BufferLayer::onFirstRef();// Creates a custom BufferQueue for SurfaceFlingerConsumer to usesp<IGraphicBufferProducer> producer;sp<IGraphicBufferConsumer> consumer;mFlinger->getFactory().createBufferQueue(&producer, &consumer, true);mProducer = mFlinger->getFactory().createMonitoredProducer(producer, mFlinger, this);mConsumer =mFlinger->getFactory().createBufferLayerConsumer(consumer, mFlinger->getRenderEngine(),mTextureName, this);mConsumer->setConsumerUsageBits(getEffectiveUsage(0));mContentsChangedListener = new ContentsChangedListener(this);mConsumer->setContentsChangedListener(mContentsChangedListener);mConsumer->setName(String8(mName.data(), mName.size()));// BufferQueueCore::mMaxDequeuedBufferCount is default to 1if (!mFlinger->isLayerTripleBufferingDisabled()) {mProducer->setMaxDequeuedBufferCount(2);}
}void BufferQueueLayer::ContentsChangedListener::onFrameAvailable(const BufferItem& item) {Mutex::Autolock lock(mMutex);if (mBufferQueueLayer != nullptr) {mBufferQueueLayer->onFrameAvailable(item);}
}
RenderThread
mTraversalRunnable在调用relayoutWindow()方法完成surface对象的初始化后,开始performMeasure(),performLayout()计算View的位置信息,performDraw()开始渲染过程,在硬件加速渲染环境中,Android应用程序窗口的UI渲染是分两步进行的。第一步是构建Display List,发生在应用程序进程的Main Thread中;第二步是渲染Display List,发生在应用程序进程的Render Thread中。
// HardwareRenderer.java
public class HardwareRenderer {private final long mNativeProxy;/** @hide */protected RenderNode mRootNode;public HardwareRenderer() {mRootNode = RenderNode.adopt(nCreateRootRenderNode());mRootNode.setClipToBounds(false);mNativeProxy = nCreateProxy(!mOpaque, mIsWideGamut, mRootNode.mNativeRenderNode);if (mNativeProxy == 0) {throw new OutOfMemoryError("Unable to create hardware renderer");}Cleaner.create(this, new DestroyContextRunnable(mNativeProxy));ProcessInitializer.sInstance.init(mNativeProxy);}
}
ThreadedRenderer继承HardwareRenderer,构造方法中先分配唯一的RenderNode,nCreateProxy()初始化RenderProxy对象,RenderProxy负责native层的渲染RenderNode工作。
先看下RenderProxy的构造函数,一开始创建的RenderNode对象作为参数传递给了mContext(CanvasContext)和mDrawFrameTask。
//frameworks/base/libs/hwui/renderthread/RenderProxy.cpp
RenderProxy::RenderProxy(bool translucent, RenderNode* rootRenderNode,IContextFactory* contextFactory): mRenderThread(RenderThread::getInstance()), mContext(nullptr) {mContext = mRenderThread.queue().runSync([&]() -> CanvasContext* {return CanvasContext::create(mRenderThread, translucent, rootRenderNode, contextFactory);});mDrawFrameTask.setContext(&mRenderThread, mContext, rootRenderNode);
}
CanvasContext判断渲染类型选择SkiaOpenGLPipeline或是SkiaVulkanPipeline
//frameworks/base/libs/hwui/renderthread/CanvasContext.cpp
CanvasContext* CanvasContext::create(RenderThread& thread, bool translucent,RenderNode* rootRenderNode, IContextFactory* contextFactory) {auto renderType = Properties::getRenderPipelineType();switch (renderType) {case RenderPipelineType::SkiaGL:return new CanvasContext(thread, translucent, rootRenderNode, contextFactory,std::make_unique<skiapipeline::SkiaOpenGLPipeline>(thread));case RenderPipelineType::SkiaVulkan:return new CanvasContext(thread, translucent, rootRenderNode, contextFactory,std::make_unique<skiapipeline::SkiaVulkanPipeline>(thread));default:LOG_ALWAYS_FATAL("canvas context type %d not supported", (int32_t)renderType);break;}return nullptr;
}CanvasContext::CanvasContext(RenderThread& thread, bool translucent, RenderNode* rootRenderNode,IContextFactory* contextFactory,std::unique_ptr<IRenderPipeline> renderPipeline): mRenderThread(thread), mGenerationID(0), mOpaque(!translucent), mAnimationContext(contextFactory->createAnimationContext(mRenderThread.timeLord())), mJankTracker(&thread.globalProfileData()), mProfiler(mJankTracker.frames(), thread.timeLord().frameIntervalNanos()), mContentDrawBounds(0, 0, 0, 0), mRenderPipeline(std::move(renderPipeline)) {rootRenderNode->makeRoot();mRenderNodes.emplace_back(rootRenderNode);mProfiler.setDensity(DeviceInfo::getDensity());setRenderAheadDepth(Properties::defaultRenderAhead);
}
到这里native层的RenderNode,RenderProxy,CanvasContext,IRenderPipeline等对象都初始化完成。
ThreadedRenderer开始调用draw()方法开始RenderNode的渲染工作。
// ThreadedRenderer.java
public final class ThreadedRenderer extends HardwareRenderer {void draw(View view, AttachInfo attachInfo, DrawCallbacks callbacks) {final Choreographer choreographer = attachInfo.mViewRootImpl.mChoreographer;choreographer.mFrameInfo.markDrawStart();updateRootDisplayList(view, callbacks);int syncResult = syncAndDrawFrame(choreographer.mFrameInfo);...}
}
updateRootDisplayList()构建参数view描述的视图的Display List,即DecorView的DisplayList。构建好的这个DisplayList可以通过调用参数view描述的视图的成员函数getDisplayList()获得的一个RenderNode来描述。
syncAndDrawFrame()调用的是native方法nSyncAndDrawFrame(),主要逻辑操作在DrawFrameTask::run()方法,DrawFrameTask运行在RenderThread(下图1927)上,而不是UIThread(下图1905)。
[外链图片转存失败,源站可能有防盗链机制,建议将图片保存下来直接上传(img-ZaPy8juV-1678103236257)(/home/lin/Nutstore Files/我的坚果云/notes/activity/2022-07-27 16-42-23屏幕截图.png)]
//frameworks/base/libs/hwui/renderthread/DrawFrameTask.cpp
void DrawFrameTask::run() {ATRACE_NAME("DrawFrame");bool canUnblockUiThread;bool canDrawThisFrame;{TreeInfo info(TreeInfo::MODE_FULL, *mContext);canUnblockUiThread = syncFrameState(info);canDrawThisFrame = info.out.canDrawThisFrame;if (mFrameCompleteCallback) {mContext->addFrameCompleteListener(std::move(mFrameCompleteCallback));mFrameCompleteCallback = nullptr;}}// Grab a copy of everything we needCanvasContext* context = mContext;std::function<void(int64_t)> callback = std::move(mFrameCallback);mFrameCallback = nullptr;// From this point on anything in "this" is *UNSAFE TO ACCESS*if (canUnblockUiThread) {unblockUiThread();}// Even if we aren't drawing this vsync pulse the next frame number will still be accurateif (CC_UNLIKELY(callback)) {context->enqueueFrameWork([callback, frameNr = context->getFrameNumber()]() { callback(frameNr); });}if (CC_LIKELY(canDrawThisFrame)) {context->draw();} else {// wait on fences so tasks don't overlap next framecontext->waitOnFences();}if (!canUnblockUiThread) {unblockUiThread();}
}
syncFrameState()通过DecorView的RenderNode对象(HardwareRenderer.mRootNode)将应用程序窗口的DisplayList、RenderProperty以及DisplayList引用的Bitmap等信息从MainThread同步到RenderThread中。注意,在这个同步过程中,MainThread是处于等待状态的。
如果成员函数syncFrameState能顺利地完成信息同步,那么它的返回值canUnblockUiThread就会等于true,表示在Render Thread渲染应用程序窗口的下一帧之前,就可以唤醒Main Thread了。否则的话,就要等到Render Thread渲染应用程序窗口的下一帧之后,才能唤醒Main Thread。唤醒Render Thread是通过调用成员函数unblockUiThread来完成的。
context->draw(),调用成员变量mContext描述的一个CanvasContext对象的成员函数draw()渲染应用程序窗口的DisplayList。
//frameworks/base/libs/hwui/renderthread/CanvasContext.cppvoid CanvasContext::draw() {SkRect dirty;mDamageAccumulator.finish(&dirty);SkRect windowDirty = computeDirtyRect(frame, &dirty);bool drew = mRenderPipeline->draw(frame, windowDirty, dirty, mLightGeometry, &mLayerUpdateQueue,mContentDrawBounds, mOpaque, mLightInfo, mRenderNodes,&(profiler()));waitOnFences();bool didSwap =mRenderPipeline->swapBuffers(frame, drew, windowDirty, mCurrentFrameInfo, &requireSwap);mIsDirty = false;if (requireSwap) {...}...mRenderThread.cacheManager().onFrameCompleted();
}
computeDirtyRect()计算脏区,mRenderPipeline->draw()开始渲染工作,mRenderPipeline->swapBuffers()后面会通过EglManager等处理,queueBuffer() 入队列这个buffer,将前面已经绘制好的图形缓冲区提交给SurfaceFlinger合成和显示,SurfaceFlinger在消费者onFrameAvailable()后开始接手工作。
参考:
https://blog.csdn.net/luoshengyang/article/details/46281499,
https://androidperformance.com/2015/08/12/AndroidL-hwui-RenderThread-workflow/#/2-4-swapBuffers
SurfaceView/TextureView
-
SurfaceView
-
具有独立的surface对象,对应WMS和SurfaceFlinger而言它就如同是一个DecorView,在WMS中有一个对应的WindowState,在SurfaceFlinger中有一个对应的Layer。
-
用来描述SurfaceView的Layer或者LayerBuffer的Z轴位置是小于用来其宿主Activity窗口的Layer的Z轴位置的,SurfaceView的onAttachedToWindow()方法中会请求宿主DecorView一块透明区域以显示SurfaceView画面。
public class SurfaceView extends View implements ViewRootImpl.SurfaceChangedCallback {final Surface mSurface = new Surface(); // Current surface in use@Overrideprotected void onAttachedToWindow() {super.onAttachedToWindow();getViewRootImpl().addSurfaceChangedCallback(this);mWindowStopped = false;mViewVisibility = getVisibility() == VISIBLE;updateRequestedVisibility();mAttachedToWindow = true;mParent.requestTransparentRegion(SurfaceView.this); //请求透明区域if (!mGlobalListenersAdded) {ViewTreeObserver observer = getViewTreeObserver();observer.addOnScrollChangedListener(mScrollChangedListener);observer.addOnPreDrawListener(mDrawListener);mGlobalListenersAdded = true;}} } -
SurfaceView的UI绘制可以在独立的线程中进行,这样就可以进行复杂的UI绘制,并且不会影响应用程序的主线程响应用户输入。
-
-
TextureView
TextureView是对SurfaceTexture的包装,SurfaceTexture构造方法中通过nativeInit()实例化native层的SurfaceTexture对象和生产者Producer,消费者Consumer。
//SurfaceTexture.cpp
static void SurfaceTexture_init(JNIEnv* env, jobject thiz, jboolean isDetached,jint texName, jboolean singleBufferMode, jobject weakThiz)
{sp<IGraphicBufferProducer> producer;sp<IGraphicBufferConsumer> consumer;BufferQueue::createBufferQueue(&producer, &consumer);if (singleBufferMode) {consumer->setMaxBufferCount(1);}sp<SurfaceTexture> surfaceTexture;if (isDetached) {surfaceTexture = new SurfaceTexture(consumer, GL_TEXTURE_EXTERNAL_OES,true, !singleBufferMode);} else {surfaceTexture = new SurfaceTexture(consumer, texName,GL_TEXTURE_EXTERNAL_OES, true, !singleBufferMode);}SurfaceTexture_setSurfaceTexture(env, thiz, surfaceTexture);SurfaceTexture_setProducer(env, thiz, producer);surfaceTexture->setFrameAvailableListener(ctx);SurfaceTexture_setFrameAvailableListener(env, thiz, ctx);
}
SurfaceTexture对图像流的处理并不直接显示,而是转为GL外部纹理,用于图像流数据的二次处理。
TextureView就是对SurfaceTexture的二次处理,将纹理数据输出为View显示出来,TextureView覆盖了View的 draw() 方法。
//TextureView.java @Overridepublic final void draw(Canvas canvas) {// NOTE: Maintain this carefully (see View#draw)mPrivateFlags = (mPrivateFlags & ~PFLAG_DIRTY_MASK) | PFLAG_DRAWN;/* Simplify drawing to guarantee the layer is the only thing drawn - so e.g. no background,scrolling, or fading edges. This guarantees all drawing is in the layer, so drawingproperties (alpha, layer paint) affect all of the content of a TextureView. */if (canvas.isHardwareAccelerated()) {RecordingCanvas recordingCanvas = (RecordingCanvas) canvas;TextureLayer layer = getTextureLayer();if (layer != null) {applyUpdate();applyTransformMatrix();mLayer.setLayerPaint(mLayerPaint); // ensure layer paint is up to daterecordingCanvas.drawTextureLayer(layer);}}}
可以看到TextureView必须工作在硬件加速的环境,通过 hwui 中的RenderThread渲染绘制图像,或者什么也不会做。
流程图:

相关文章:
Activty启动到显示的过程[二]
Activity的显示从handleResumeActivity()方法开始。 //ActivityThread.javaOverridepublic void handleResumeActivity(IBinder token, boolean finalStateRequest, boolean isForward,String reason) {final ActivityClientRecord r performResumeActivity(token, finalStat…...
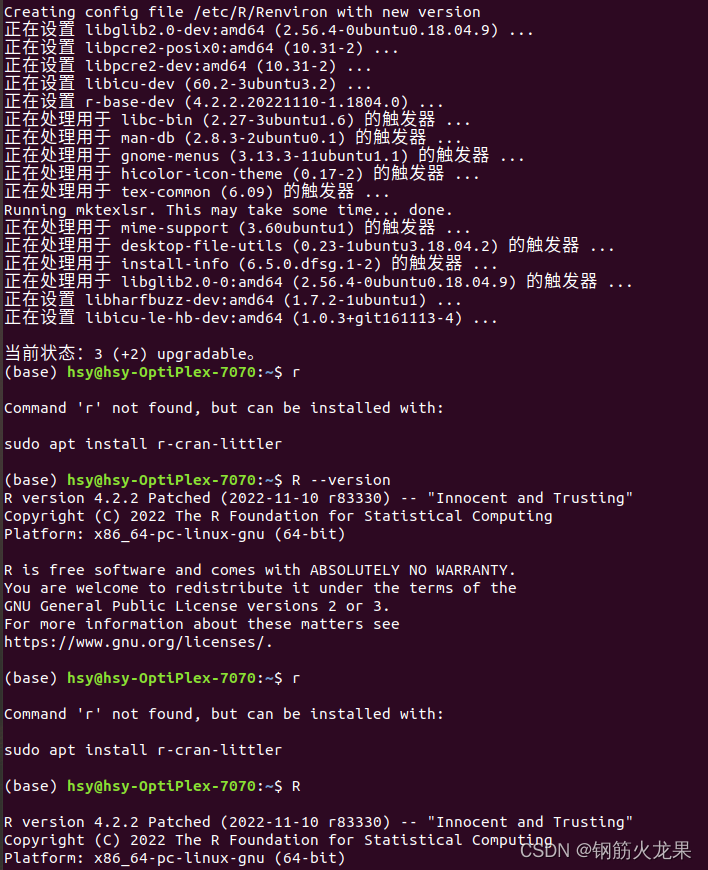
ubuntu 18.04.06LST安装R4.0+版本报错及解决过程
1. sudo apt-get update无法正常使用 错误:13 http://ppa.launchpad.net/webupd8team/sublime-text-3/ubuntu bionic Release 404 Not Found [IP: 2620:2d:4000:1::3e 80] 解决措施:删除 webupd8team/sublime-text-3这个ppa文件。 sudo add-apt-repository --…...

数据湖架构Hudi(五)Hudi集成Flink案例详解
五、Hudi集成Flink案例详解 5.1 hudi集成flink flink的下载地址: https://archive.apache.org/dist/flink/ HudiSupported Flink version0.12.x1.15.x、1.14.x、1.13.x0.11.x1.14.x、1.13.x0.10.x1.13.x0.9.01.12.2 将上述编译好的安装包拷贝到flink下的jars目录…...

【Java学习笔记】9.Java 循环结构 - for, while 及 do...while
Java 循环结构 - for, while 及 do…while 顺序结构的程序语句只能被执行一次。 如果您想要同样的操作执行多次,就需要使用循环结构。 Java中有三种主要的循环结构: while 循环do…while 循环for 循环 在 Java5 中引入了一种主要用于数组的增强型 f…...

【面向对象初步】之面向对象VS面向过程
面向对象(ObjectorientedProgramming,OOP)编程的思想主要是针对大型软件设计而来的。面向对象编程使程序的扩展性更强、可读性更好,使的编程可以像搭积木一样简单。 面向对象编程将数据和操作数据相关的方法封装到对象中,组织代码和数据的方式更加接近人的思维,从而大大提…...
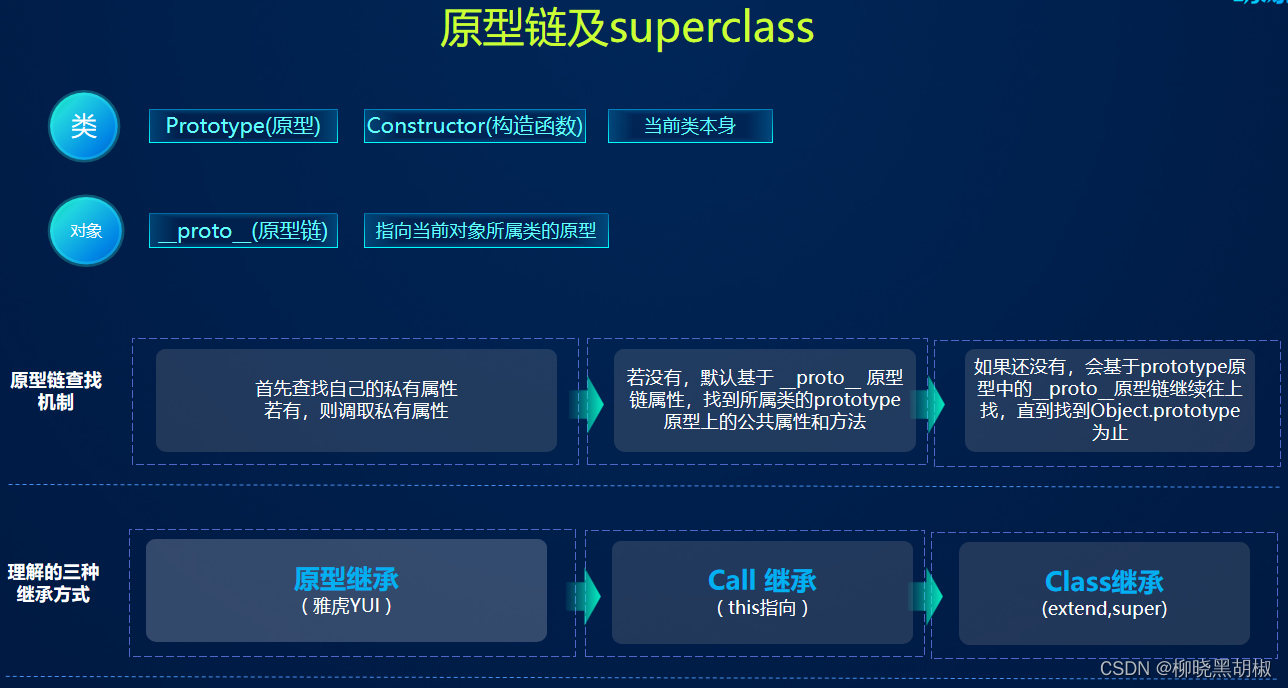
原型链(回顾)
概念prototype__proto__原型链查找机制万物皆对象判断私有/共有属性方法Object.prototype.prototype nullObject.create(proto, [propertiesObject])给类的原型上扩展属性方法的4种方法Fn.prototype.xxx xxxObject.prototype.xxx xxxf1.proto.xxx xxx原型重定向 概念 原型…...

DS内排—2-路归并排序
目录 题目描述 AC代码 题目描述 输入一组字符串,用2-路归并排序按字典顺序进行降序排序。 输入 测试次数t 每组测试数据:数据个数n,后跟n个字符串,字符串不含空格。 输出 对每组测试数据,输出2-路归并排序的每…...
第 3 部分:Wallet创建)
深度账户抽象(Account Abstraction)第 3 部分:Wallet创建
Wallet创建 我们还没有解决的是每个用户的钱包合约最初是如何在区块链上结束的。部署合约的“传统”方式是使用 EOA 发送包含合约部署代码的且没有收件人的交易。这在这里会非常令人不满意,因为我们刚刚做了很多工作来实现它,所以有人可以在没有 EOA 的情况下与链交互。如果用…...

代码分享:面波数据快速成图
代码分享:面波数据快速成图 前言 目前,物探数据主要用surfer软件成图,surfer软件具有强大的插值和绘图功能,成图比较美观。但是,生产过程中大量的物探数据,依靠excel和surfer来成图耗费人力时间成本。本博…...
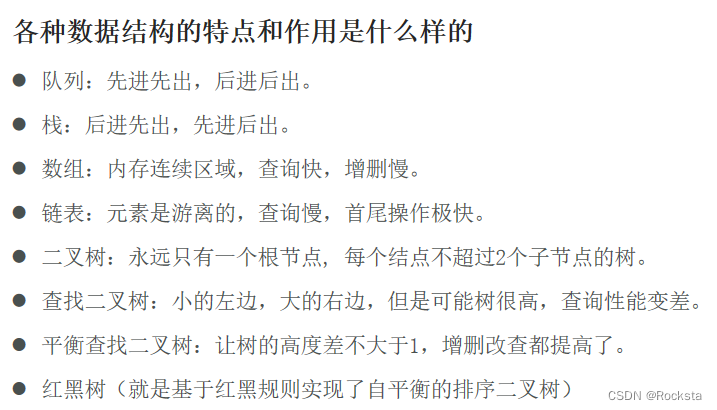
常见数据结构
一. 数据结构概述、栈、队列 1. 数据结构概述 2. 栈数据结构的执行特点 3. 常见数据结构之队列 二. 常见数据结构之数组 数组它就是内存中的一块儿连续区域。数组变量存的是数组在堆内存当中的起始地址。数组查询任意索引位置的值耗时相同,数组根据索引查询速度快。…...
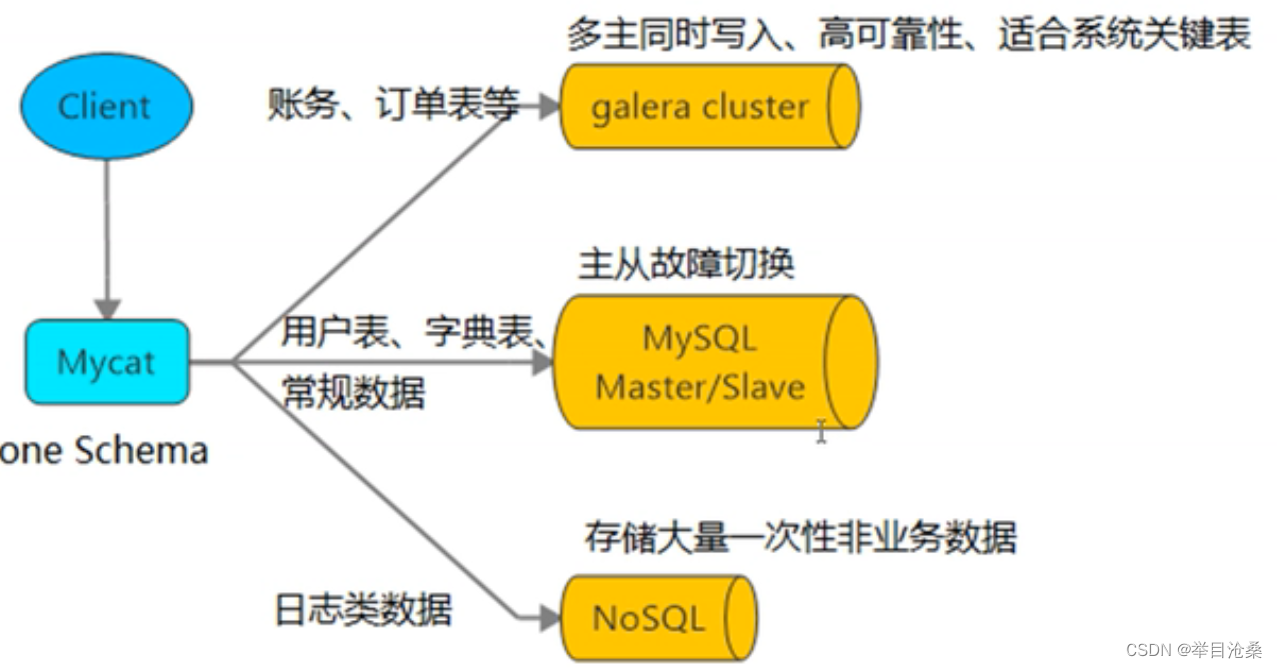
Mycat
Mycat 1.概述 1.Mycat是数据中间件2.中间件:连接软件组件和应用的计算机软件,便于软件和各部件的交互3.数据中间件:连接Java应用程序与数据库的软件2.适用场景 1.Java与数据库紧耦合(直接连接)2.高访问量高并发对数据库压力(集群)3.读写请求数据不一致(读写分离+主从复制)3.…...
Java 编写Vue组件(VueGWT的初尝试)
在之前,我曾写过这样的文章《不会前端没事,用GWT Boot和Spring Boot构建Web程序》,这篇文字使用的Domino UI来做前端页面,由于现在更流行VUE,并且VUE的页面更具现代化,所以我尝试了一下VueGWT。 VueGWT 有…...

【第二章 @RequestMapping注解(value,method,params属性),springMVC支持ant风格的路径,支持路径中的占位符】
第二章 RequestMapping注解(value,method,params属性),springMVC支持ant风格的路径,支持路径中的占位符 1. RequestMapping注解: (1) RequestMapping注解的作用就是将请…...
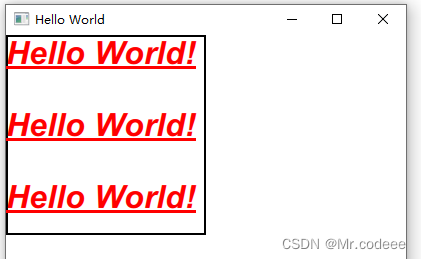
QML Text详解
1.简介 文本项可以显示普通文本和富文本。 2.示例 示例1:一个简单的text,可以设置字体颜色、大小等。 Window {visible: truewidth: 400height: 400title: qsTr("Hello World")Rectangle{width: 200height: 200border.width: 2Text {text: …...
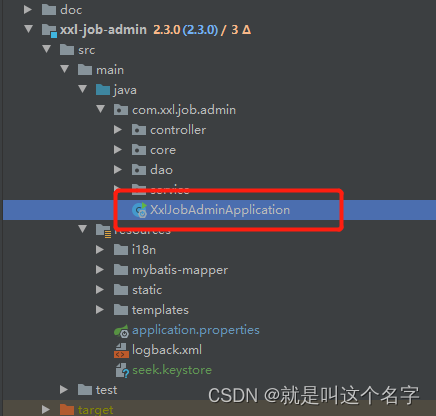
xxl-job启用https访问
一、准备证书 1.进入想要生成证书的目录 2.在路径中输入cmd,点击回车 (1) (2) 3.输入命令keytool -genkeypair -alias "boot" -keyalg "RSA" -keystore "seek.keystore" 4.输入信息,…...

2023FL Studio最新中文版电子音乐、混音和母带制作DAW
水果具有独特的底层逻辑,其开创了编曲“块”的思维。用FL Studio编曲的流程是在把一个样式编辑好,然后将编辑好的样式当做音频块,在播放列表中像“搭积木”一样任意编排,形成一首歌,这种模式非常利于电子音乐编曲。 2…...
)
pytorch 35 yolov5_obb项目解读+使用技巧+调优经验(提升map)
yolov5_obb是一个用于旋转框预测的开源项目,项目地址为https://github.com/hukaixuan19970627/yolov5_obb。在使用yolov5_obb进行训练时,可能存在训练后精度不达标。使用yolov5_obb项目一定要对yolov5_obb的基本实现和关键部分要有所了解,同时对于使用过程中的参数设置,数据…...

OpenMv H7 口罩识别--毕业设计学习记录
刚开始都不知道自己的摄像头是OpenMv H7的还是OpenMv H7 Plus来的(白嫖实训室的,其实大概率猜到是H7来的,主要是不死心),后面问了一下ChatGPT。 总结大概就是: 1、都是STM32H743 主控,但是频率的MCU(480MHz…...
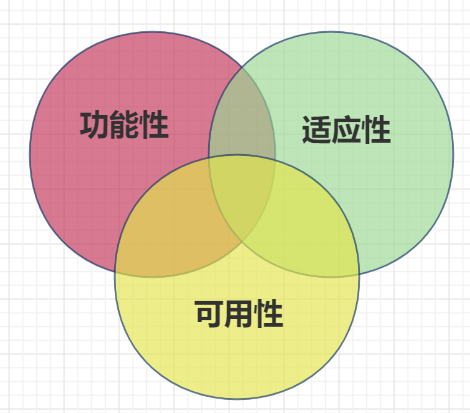
有什么比较好的bug管理工具?5款热门工具推荐
工具再优秀,适合自己才最重要。 为尽量讲透这个问题,本文的行文结构我先整理如下: 1、为什么需要bug管理工具? 2、好的bug管理工具的标准是什么? 3、好的bug管理工具推荐(5款) 4、如何挑选适合…...

第五章 opengl之摄像机
OpenGL摄像机摄像机/观察空间Look At矩阵自由移动移动速度视角移动欧拉角鼠标输入缩放补充:摄像机类摄像机 OpenGL本身没有摄像机(Camera)的概念,但我们可以通过把场景中的所有物体往相反方向移动的方式来模拟出摄像机,产生一种我们在移动的…...

[特殊字符] 智能合约中的数据是如何在区块链中保持一致的?
🧠 智能合约中的数据是如何在区块链中保持一致的? 为什么所有区块链节点都能得出相同结果?合约调用这么复杂,状态真能保持一致吗?本篇带你从底层视角理解“状态一致性”的真相。 一、智能合约的数据存储在哪里…...

19c补丁后oracle属主变化,导致不能识别磁盘组
补丁后服务器重启,数据库再次无法启动 ORA01017: invalid username/password; logon denied Oracle 19c 在打上 19.23 或以上补丁版本后,存在与用户组权限相关的问题。具体表现为,Oracle 实例的运行用户(oracle)和集…...

Vue记事本应用实现教程
文章目录 1. 项目介绍2. 开发环境准备3. 设计应用界面4. 创建Vue实例和数据模型5. 实现记事本功能5.1 添加新记事项5.2 删除记事项5.3 清空所有记事 6. 添加样式7. 功能扩展:显示创建时间8. 功能扩展:记事项搜索9. 完整代码10. Vue知识点解析10.1 数据绑…...

C++:std::is_convertible
C++标志库中提供is_convertible,可以测试一种类型是否可以转换为另一只类型: template <class From, class To> struct is_convertible; 使用举例: #include <iostream> #include <string>using namespace std;struct A { }; struct B : A { };int main…...
多种风格导航菜单 HTML 实现(附源码)
下面我将为您展示 6 种不同风格的导航菜单实现,每种都包含完整 HTML、CSS 和 JavaScript 代码。 1. 简约水平导航栏 <!DOCTYPE html> <html lang"zh-CN"> <head><meta charset"UTF-8"><meta name"viewport&qu…...

Hive 存储格式深度解析:从 TextFile 到 ORC,如何选对数据存储方案?
在大数据处理领域,Hive 作为 Hadoop 生态中重要的数据仓库工具,其存储格式的选择直接影响数据存储成本、查询效率和计算资源消耗。面对 TextFile、SequenceFile、Parquet、RCFile、ORC 等多种存储格式,很多开发者常常陷入选择困境。本文将从底…...
宇树科技,改名了!
提到国内具身智能和机器人领域的代表企业,那宇树科技(Unitree)必须名列其榜。 最近,宇树科技的一项新变动消息在业界引发了不少关注和讨论,即: 宇树向其合作伙伴发布了一封公司名称变更函称,因…...
PHP 8.5 即将发布:管道操作符、强力调试
前不久,PHP宣布了即将在 2025 年 11 月 20 日 正式发布的 PHP 8.5!作为 PHP 语言的又一次重要迭代,PHP 8.5 承诺带来一系列旨在提升代码可读性、健壮性以及开发者效率的改进。而更令人兴奋的是,借助强大的本地开发环境 ServBay&am…...

苹果AI眼镜:从“工具”到“社交姿态”的范式革命——重新定义AI交互入口的未来机会
在2025年的AI硬件浪潮中,苹果AI眼镜(Apple Glasses)正在引发一场关于“人机交互形态”的深度思考。它并非简单地替代AirPods或Apple Watch,而是开辟了一个全新的、日常可接受的AI入口。其核心价值不在于功能的堆叠,而在于如何通过形态设计打破社交壁垒,成为用户“全天佩戴…...
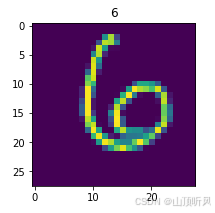
MLP实战二:MLP 实现图像数字多分类
任务 实战(二):MLP 实现图像多分类 基于 mnist 数据集,建立 mlp 模型,实现 0-9 数字的十分类 task: 1、实现 mnist 数据载入,可视化图形数字; 2、完成数据预处理:图像数据维度转换与…...