神经网络代码实现(用手写数字识别数据集实验)
目录
一、前言
二、神经网络架构
三、算法实现
1、导入包
2、实现类
3、训练函数
4、权重参数矩阵初始化
5、参数矩阵变换向量
6、向量变换权重参数矩阵
7、进行梯度下降
7.1、损失函数
7.1.1、前向传播
7.2、反向传播
8、预测函数
四、完整代码
五、手写数字识别
一、前言
读者需要了解神经网络的基础知识,可以参考神经网络(深度学习,计算机视觉,得分函数,损失函数,前向传播,反向传播,激活函数)
本文为大家详细的描述了,实现神经网络的逻辑,代码。并且用手写识别来实验,结果基本实现了神经网络的要求。
二、神经网络架构

想一想:
1.输入数据:特征值(手写数字识别是像素点,784个特征)
2.W1,W2,W3矩阵的形状
3.前向传播
4.激活函数(用Sigmoid)
5.反向传播
6.偏置项
7.损失()
8.得出W1,W2,W3对损失有多大影响,公式如下:
算法流程(简便版):
三、算法实现
1、导入包
import  numpy as np
from Neural_Network_Lab.utils.features import prepare_for_training
from Neural_Network_Lab.utils.hypothesis import sigmoid,sigmoid_gradient
这里utils包用来封装数据预处理,和Sigmoid函数
"""Add polynomial features to the features set"""import numpy as np
from .normalize import normalizedef generate_polynomials(dataset, polynomial_degree, normalize_data=False):"""变换方法:x1, x2, x1^2, x2^2, x1*x2, x1*x2^2, etc."""features_split = np.array_split(dataset, 2, axis=1)dataset_1 = features_split[0]dataset_2 = features_split[1](num_examples_1, num_features_1) = dataset_1.shape(num_examples_2, num_features_2) = dataset_2.shapeif num_examples_1 != num_examples_2:raise ValueError('Can not generate polynomials for two sets with different number of rows')if num_features_1 == 0 and num_features_2 == 0:raise ValueError('Can not generate polynomials for two sets with no columns')if num_features_1 == 0:dataset_1 = dataset_2elif num_features_2 == 0:dataset_2 = dataset_1num_features = num_features_1 if num_features_1 < num_examples_2 else num_features_2dataset_1 = dataset_1[:, :num_features]dataset_2 = dataset_2[:, :num_features]polynomials = np.empty((num_examples_1, 0))for i in range(1, polynomial_degree + 1):for j in range(i + 1):polynomial_feature = (dataset_1 ** (i - j)) * (dataset_2 ** j)polynomials = np.concatenate((polynomials, polynomial_feature), axis=1)if normalize_data:polynomials = normalize(polynomials)[0]return polynomials
import numpy as npdef generate_sinusoids(dataset, sinusoid_degree):"""sin(x)."""num_examples = dataset.shape[0]sinusoids = np.empty((num_examples, 0))for degree in range(1, sinusoid_degree + 1):sinusoid_features = np.sin(degree * dataset)sinusoids = np.concatenate((sinusoids, sinusoid_features), axis=1)return sinusoids
"""Normalize features"""import numpy as npdef normalize(features):features_normalized = np.copy(features).astype(float)# 计算均值features_mean = np.mean(features, 0)# 计算标准差features_deviation = np.std(features, 0)# 标准化操作if features.shape[0] > 1:features_normalized -= features_mean# 防止除以0features_deviation[features_deviation == 0] = 1features_normalized /= features_deviationreturn features_normalized, features_mean, features_deviation
数据预处理:
"""Prepares the dataset for training"""import numpy as np
from .normalize import normalize
from .generate_sinusoids import generate_sinusoids
from .generate_polynomials import generate_polynomialsdef prepare_for_training(data, polynomial_degree=0, sinusoid_degree=0, normalize_data=True):# 计算样本总数num_examples = data.shape[0]data_processed = np.copy(data)# 预处理features_mean = 0features_deviation = 0data_normalized = data_processedif normalize_data:(data_normalized,features_mean,features_deviation) = normalize(data_processed)data_processed = data_normalized# 特征变换sinusoidalif sinusoid_degree > 0:sinusoids = generate_sinusoids(data_normalized, sinusoid_degree)data_processed = np.concatenate((data_processed, sinusoids), axis=1)# 特征变换polynomialif polynomial_degree > 0:polynomials = generate_polynomials(data_normalized, polynomial_degree, normalize_data)data_processed = np.concatenate((data_processed, polynomials), axis=1)# 加一列1data_processed = np.hstack((np.ones((num_examples, 1)), data_processed))return data_processed, features_mean, features_deviation
Sigmoid函数:
import numpy as npdef sigmoid(matrix):"""Applies sigmoid function to NumPy matrix"""return 1 / (1 + np.exp(-matrix))2、实现类
多层感知机 初始化:数据,标签,网络层次(用列表表示如三层[784,25,10]表示输入层784个神经元,25个隐藏层神经元,10个输出层神经元),数据是否标准化处理。
class MultilayerPerceptron:def __init__(self,data,labels,layers,normalize_data=False):data_processed = prepare_for_training(data,normalize_data=normalize_data)[0]self.data = data_processedself.labels = labelsself.layers = layers # [ 784 ,25 ,10]self.normalize_data = normalize_dataself.thetas = MultilayerPerceptron.thetas_init(layers)
3、训练函数
输入迭代次数,学习率,进行梯度下降算法,更新权重参数矩阵,得到最终的权重参数矩阵,和损失值。矩阵不好进行更新操作,可以把它拉成向量。
def train(self,max_ietrations = 1000,alpha = 0.1):#方便矩阵更新 拉长 把矩阵拉成向量unrolled_theta = MultilayerPerceptron.thetas_unroll(self.thetas)(optimized_theta, cost_history) = MultilayerPerceptron.gradient_descent(self.data,self.labels,unrolled_theta,self.layers,max_ietrations,alpha)self.thetas = MultilayerPerceptron.thetas_roll(optimized_theta,self.layers)return self.thetas,cost_history4、权重参数矩阵初始化
根据网络层次可以确定,矩阵的大小,用字典存储。
@staticmethoddef thetas_init(layers):num_layers = len(layers)thetas = {} #用字典形式 key:表示第几层 vlues:权重参数矩阵for layer_index in range(num_layers-1):'''会执行两次: 得到两组参数矩阵 25 * 785 , 10 * 26'''in_count = layers[layer_index]out_count = layers[layer_index+1]#初始化 初始值小#这里需要考虑偏置项,偏置的个数与输出的个数一样thetas[layer_index]=np.random.rand(out_count,in_count+1) * 0.05 #加一列输入特征return thetas5、参数矩阵变换向量
将权重参数矩阵变换成向量
@staticmethoddef thetas_unroll(thetas):#拼接成一个向量num_theta_layers = len(thetas)unrolled_theta = np.array([])for theta_layer_index in range(num_theta_layers):unrolled_theta = np.hstack((unrolled_theta,thetas[theta_layer_index].flatten()))return unrolled_theta6、向量变换权重参数矩阵
后边前向传播时需要进行矩阵乘法,需要变换回来
@staticmethoddef thetas_roll(unrolled_theta,layers):num_layers = len(layers)thetas = {}unrolled_shift = 0for layer_index in range(num_layers - 1):in_count = layers[layer_index]out_count = layers[layer_index + 1]thetas_width = in_count + 1thetas_height = out_countthetas_volume = thetas_width * thetas_heightstart_index = unrolled_shiftend_index =unrolled_shift + thetas_volumelayer_theta_unrolled = unrolled_theta[start_index:end_index]thetas[layer_index] = layer_theta_unrolled.reshape((thetas_height,thetas_width))unrolled_shift = unrolled_shift + thetas_volumereturn thetas7、进行梯度下降
1. 损失函数,计算损失值
2. 计算梯度值
3. 更新参数
那么得先要实现损失函数,计算损失值。
7.1、损失函数
实现损失函数,得到损失值得要实现前向传播走一次
7.1.1、前向传播
@staticmethoddef feedforword_propagation(data,thetas,layers):num_layers = len(layers)num_examples = data.shape[0]in_layer_activation = data #输入层#逐层计算 隐藏层for layer_index in range(num_layers - 1):theta = thetas[layer_index]out_layer_activation = sigmoid(np.dot(in_layer_activation,theta.T)) #输出层# 正常计算之后是num_examples * 25 ,但是要考虑偏置项 变成num_examples * 26out_layer_activation = np.hstack((np.ones((num_examples,1)),out_layer_activation))in_layer_activation = out_layer_activation#返回输出层结果,不要偏置项return in_layer_activation[:,1:]损失函数:
@staticmethoddef cost_function(data,labels,thetas,layers):num_layers = len(layers)num_examples = data.shape[0]num_labels = layers[-1]#前向传播走一次predictions = MultilayerPerceptron.feedforword_propagation(data,thetas,layers)#制作标签,每一个样本的标签都是one-dotbitwise_labels = np.zeros((num_examples,num_labels))for example_index in range(num_examples):bitwise_labels[example_index][labels[example_index][0]] = 1#咱们的预测值是概率值y= 7 [0,0,0,0,0,0,1,0,0,0] 在正确值的位置上概率越大越好 在错误值的位置上概率越小越好bit_set_cost = np.sum(np.log(predictions[bitwise_labels == 1]))bit_not_set_cost = np.sum(np.log(1 - predictions[bitwise_labels == 0]))cost = (-1/num_examples) * (bit_set_cost+bit_not_set_cost)return cost7.2、反向传播
在梯度下降的过程中,要实现参数矩阵的更新,必须要实现反向传播。利用上述的公式,进行运算即可得到。
@staticmethoddef back_propagation(data,labels,thetas,layers):num_layers = len(layers)(num_examples,num_features) = data.shapenum_label_types = layers[-1]deltas = {} # 算出每一层对结果的影响#初始化for layer_index in range(num_layers - 1):in_count = layers[layer_index]out_count = layers[layer_index + 1]deltas[layer_index] = np.zeros((out_count,in_count+1)) #25 * 785 10 *26for example_index in range(num_examples):layers_inputs = {}layers_activations = {}layers_activation = data[example_index,:].reshape((num_features,1))layers_activations[0] = layers_activation#逐层计算for layer_index in range(num_layers - 1):layer_theta = thetas[layer_index] #得到当前的权重参数值 : 25 *785 10 *26layer_input = np.dot(layer_theta,layers_activation) # 第一次 得到 25 * 1 第二次: 10 * 1layers_activation = np.vstack((np.array([[1]]),sigmoid(layer_input))) #完成激活函数,加上一个偏置参数layers_inputs[layer_index+1] = layer_input # 后一层计算结果layers_activations[layer_index +1] = layers_activation # 后一层完成激活的结果output_layer_activation = layers_activation[1:,:]#计算输出层和结果的差异delta = {}#标签处理bitwise_label = np.zeros((num_label_types,1))bitwise_label[labels[example_index][0]] = 1#计算输出结果和真实值之间的差异delta[num_layers-1] = output_layer_activation - bitwise_label #输出层#遍历 L,L-1,L-2...2for layer_index in range(num_layers - 2,0,-1):layer_theta = thetas[layer_index]next_delta = delta[layer_index+1]layer_input = layers_inputs[layer_index]layer_input = np.vstack((np.array((1)),layer_input))#按照公式计算delta[layer_index] = np.dot(layer_theta.T,next_delta)*sigmoid(layer_input)#过滤掉偏置参数delta[layer_index] = delta[layer_index][1:,:]#计算梯度值for layer_index in range(num_layers-1):layer_delta = np.dot(delta[layer_index+1],layers_activations[layer_index].T) #微调矩阵deltas[layer_index] = deltas[layer_index] + layer_delta #第一次25 * 785 第二次 10 * 26for layer_index in range(num_layers-1):deltas[layer_index] = deltas[layer_index] * (1/num_examples) #公式return deltas实现一次梯度下降:
@staticmethoddef gradient_step(data,labels,optimized_theta,layers):theta = MultilayerPerceptron.thetas_roll(optimized_theta,layers)#反向传播BPthetas_rolled_gradinets = MultilayerPerceptron.back_propagation(data,labels,theta,layers)thetas_unrolled_gradinets = MultilayerPerceptron.thetas_unroll(thetas_rolled_gradinets)return thetas_unrolled_gradinets实现梯度下降:
@staticmethoddef gradient_descent(data,labels,unrolled_theta,layers,max_ietrations,alpha):#1. 计算损失值#2. 计算梯度值#3. 更新参数optimized_theta = unrolled_theta #最好的theta值cost_history = [] #损失值的记录for i in range(max_ietrations):if i % 10 == 0 :print("当前迭代次数:",i)cost = MultilayerPerceptron.cost_function(data,labels,MultilayerPerceptron.thetas_roll(optimized_theta,layers),layers)cost_history.append(cost)theta_gradient = MultilayerPerceptron.gradient_step(data,labels,optimized_theta,layers)optimized_theta = optimized_theta - alpha * theta_gradientreturn optimized_theta,cost_history8、预测函数
输入测试数据,前向传播走一次,得到预测值
def predict(self,data):data_processed = prepare_for_training(data,normalize_data = self.normalize_data)[0]num_examples = data_processed.shape[0]predictions = MultilayerPerceptron.feedforword_propagation(data_processed,self.thetas,self.layers)return np.argmax(predictions,axis=1).reshape((num_examples,1))四、完整代码
import  numpy as np
from Neural_Network_Lab.utils.features import prepare_for_training
from Neural_Network_Lab.utils.hypothesis import sigmoid,sigmoid_gradientclass MultilayerPerceptron:def __init__(self,data,labels,layers,normalize_data=False):data_processed = prepare_for_training(data,normalize_data=normalize_data)[0]self.data = data_processedself.labels = labelsself.layers = layers #  [  784 ,25 ,10]self.normalize_data = normalize_dataself.thetas = MultilayerPerceptron.thetas_init(layers)def predict(self,data):data_processed = prepare_for_training(data,normalize_data = self.normalize_data)[0]num_examples = data_processed.shape[0]predictions = MultilayerPerceptron.feedforword_propagation(data_processed,self.thetas,self.layers)return np.argmax(predictions,axis=1).reshape((num_examples,1))def train(self,max_ietrations = 1000,alpha = 0.1):#方便矩阵更新 拉长  把矩阵拉成向量unrolled_theta = MultilayerPerceptron.thetas_unroll(self.thetas)(optimized_theta, cost_history) = MultilayerPerceptron.gradient_descent(self.data,self.labels,unrolled_theta,self.layers,max_ietrations,alpha)self.thetas = MultilayerPerceptron.thetas_roll(optimized_theta,self.layers)return self.thetas,cost_history@staticmethoddef gradient_descent(data,labels,unrolled_theta,layers,max_ietrations,alpha):#1. 计算损失值#2. 计算梯度值#3. 更新参数optimized_theta = unrolled_theta #最好的theta值cost_history = []  #损失值的记录for i in range(max_ietrations):if i % 10 == 0 :print("当前迭代次数:",i)cost  = MultilayerPerceptron.cost_function(data,labels,MultilayerPerceptron.thetas_roll(optimized_theta,layers),layers)cost_history.append(cost)theta_gradient = MultilayerPerceptron.gradient_step(data,labels,optimized_theta,layers)optimized_theta = optimized_theta - alpha * theta_gradientreturn optimized_theta,cost_history@staticmethoddef gradient_step(data,labels,optimized_theta,layers):theta = MultilayerPerceptron.thetas_roll(optimized_theta,layers)#反向传播BPthetas_rolled_gradinets = MultilayerPerceptron.back_propagation(data,labels,theta,layers)thetas_unrolled_gradinets = MultilayerPerceptron.thetas_unroll(thetas_rolled_gradinets)return thetas_unrolled_gradinets@staticmethoddef back_propagation(data,labels,thetas,layers):num_layers = len(layers)(num_examples,num_features) = data.shapenum_label_types = layers[-1]deltas = {} # 算出每一层对结果的影响#初始化for layer_index in  range(num_layers - 1):in_count = layers[layer_index]out_count = layers[layer_index + 1]deltas[layer_index] = np.zeros((out_count,in_count+1)) #25 * 785 10 *26for example_index in range(num_examples):layers_inputs = {}layers_activations = {}layers_activation = data[example_index,:].reshape((num_features,1))layers_activations[0] = layers_activation#逐层计算for layer_index in range(num_layers - 1):layer_theta = thetas[layer_index]  #得到当前的权重参数值 : 25 *785 10 *26layer_input = np.dot(layer_theta,layers_activation) # 第一次 得到 25 * 1 第二次: 10 * 1layers_activation = np.vstack((np.array([[1]]),sigmoid(layer_input))) #完成激活函数,加上一个偏置参数layers_inputs[layer_index+1] = layer_input # 后一层计算结果layers_activations[layer_index +1] = layers_activation # 后一层完成激活的结果output_layer_activation = layers_activation[1:,:]#计算输出层和结果的差异delta = {}#标签处理bitwise_label = np.zeros((num_label_types,1))bitwise_label[labels[example_index][0]] = 1#计算输出结果和真实值之间的差异delta[num_layers-1] = output_layer_activation - bitwise_label #输出层#遍历 L,L-1,L-2...2for layer_index in range(num_layers - 2,0,-1):layer_theta = thetas[layer_index]next_delta = delta[layer_index+1]layer_input = layers_inputs[layer_index]layer_input = np.vstack((np.array((1)),layer_input))#按照公式计算delta[layer_index] = np.dot(layer_theta.T,next_delta)*sigmoid(layer_input)#过滤掉偏置参数delta[layer_index] = delta[layer_index][1:,:]#计算梯度值for layer_index in  range(num_layers-1):layer_delta = np.dot(delta[layer_index+1],layers_activations[layer_index].T)  #微调矩阵deltas[layer_index] = deltas[layer_index] + layer_delta #第一次25 * 785 第二次 10 * 26for layer_index in range(num_layers-1):deltas[layer_index] = deltas[layer_index] * (1/num_examples)return deltas@staticmethoddef cost_function(data,labels,thetas,layers):num_layers = len(layers)num_examples = data.shape[0]num_labels = layers[-1]#前向传播走一次predictions = MultilayerPerceptron.feedforword_propagation(data,thetas,layers)#制作标签,每一个样本的标签都是one-dotbitwise_labels = np.zeros((num_examples,num_labels))for example_index in range(num_examples):bitwise_labels[example_index][labels[example_index][0]] = 1#咱们的预测值是概率值y= 7 [0,0,0,0,0,0,1,0,0,0]    在正确值的位置上概率越大越好 在错误值的位置上概率越小越好bit_set_cost = np.sum(np.log(predictions[bitwise_labels == 1]))bit_not_set_cost = np.sum(np.log(1 - predictions[bitwise_labels == 0]))cost = (-1/num_examples) * (bit_set_cost+bit_not_set_cost)return cost@staticmethoddef feedforword_propagation(data,thetas,layers):num_layers = len(layers)num_examples = data.shape[0]in_layer_activation = data #输入层#逐层计算 隐藏层for layer_index in range(num_layers - 1):theta = thetas[layer_index]out_layer_activation = sigmoid(np.dot(in_layer_activation,theta.T)) #输出层# 正常计算之后是num_examples * 25 ,但是要考虑偏置项 变成num_examples * 26out_layer_activation = np.hstack((np.ones((num_examples,1)),out_layer_activation))in_layer_activation = out_layer_activation#返回输出层结果,不要偏置项return in_layer_activation[:,1:]@staticmethoddef thetas_roll(unrolled_theta,layers):num_layers = len(layers)thetas = {}unrolled_shift = 0for layer_index in range(num_layers - 1):in_count = layers[layer_index]out_count = layers[layer_index + 1]thetas_width = in_count + 1thetas_height = out_countthetas_volume = thetas_width * thetas_heightstart_index = unrolled_shiftend_index =unrolled_shift + thetas_volumelayer_theta_unrolled = unrolled_theta[start_index:end_index]thetas[layer_index] = layer_theta_unrolled.reshape((thetas_height,thetas_width))unrolled_shift = unrolled_shift + thetas_volumereturn thetas@staticmethoddef thetas_unroll(thetas):#拼接成一个向量num_theta_layers = len(thetas)unrolled_theta = np.array([])for theta_layer_index in range(num_theta_layers):unrolled_theta = np.hstack((unrolled_theta,thetas[theta_layer_index].flatten()))return unrolled_theta@staticmethoddef thetas_init(layers):num_layers = len(layers)thetas = {} #用字典形式 key:表示第几层 vlues:权重参数矩阵for layer_index in range(num_layers-1):'''会执行两次: 得到两组参数矩阵 25 * 785 , 10 * 26'''in_count = layers[layer_index]out_count = layers[layer_index+1]#初始化 初始值小#这里需要考虑偏置项,偏置的个数与输出的个数一样thetas[layer_index]=np.random.rand(out_count,in_count+1) * 0.05 #加一列输入特征return thetas
五、手写数字识别
数据集(读者可以找找下载,我就不放链接了>_<): 


共一万个样本,第一列为标签值,一列表示像素点的值共28*28共784个像素点。
import numpy as np
import pandas as pd
import matplotlib.pyplot as plt
import matplotlib.image as mping
import math
from Neural_Network_Lab.Multilayer_Perceptron import MultilayerPerceptrondata = pd.read_csv('../Neural_Network_Lab/data/mnist-demo.csv')
#展示数据
numbers_to_display = 25
num_cells = math.ceil(math.sqrt(numbers_to_display))
plt.figure(figsize=(10,10))
for plot_index in range(numbers_to_display):digit = data[plot_index:plot_index+1].valuesdigit_label = digit[0][0]digit_pixels = digit[0][1:]image_size = int(math.sqrt(digit_pixels.shape[0]))frame = digit_pixels.reshape((image_size,image_size))plt.subplot(num_cells,num_cells,plot_index+1)plt.imshow(frame,cmap = 'Greys')plt.title(digit_label)
plt.subplots_adjust(wspace=0.5,hspace=0.5)
plt.show()train_data = data.sample(frac= 0.8)
test_data = data.drop(train_data.index)train_data = train_data.values
test_data = test_data.valuesnum_training_examples = 8000X_train = train_data[:num_training_examples,1:]
y_train = train_data[:num_training_examples,[0]]X_test = test_data[:,1:]
y_test = test_data[:,[0]]layers = [784,25,10]
normalize_data = True
max_iteration = 500
alpha = 0.1multilayerperceptron = MultilayerPerceptron(X_train,y_train,layers,normalize_data)
(thetas,cost_history) = multilayerperceptron.train(max_iteration,alpha)
plt.plot(range(len(cost_history)),cost_history)
plt.xlabel('Grident steps')
plt.ylabel('cost')
plt.show()y_train_predictions = multilayerperceptron.predict(X_train)
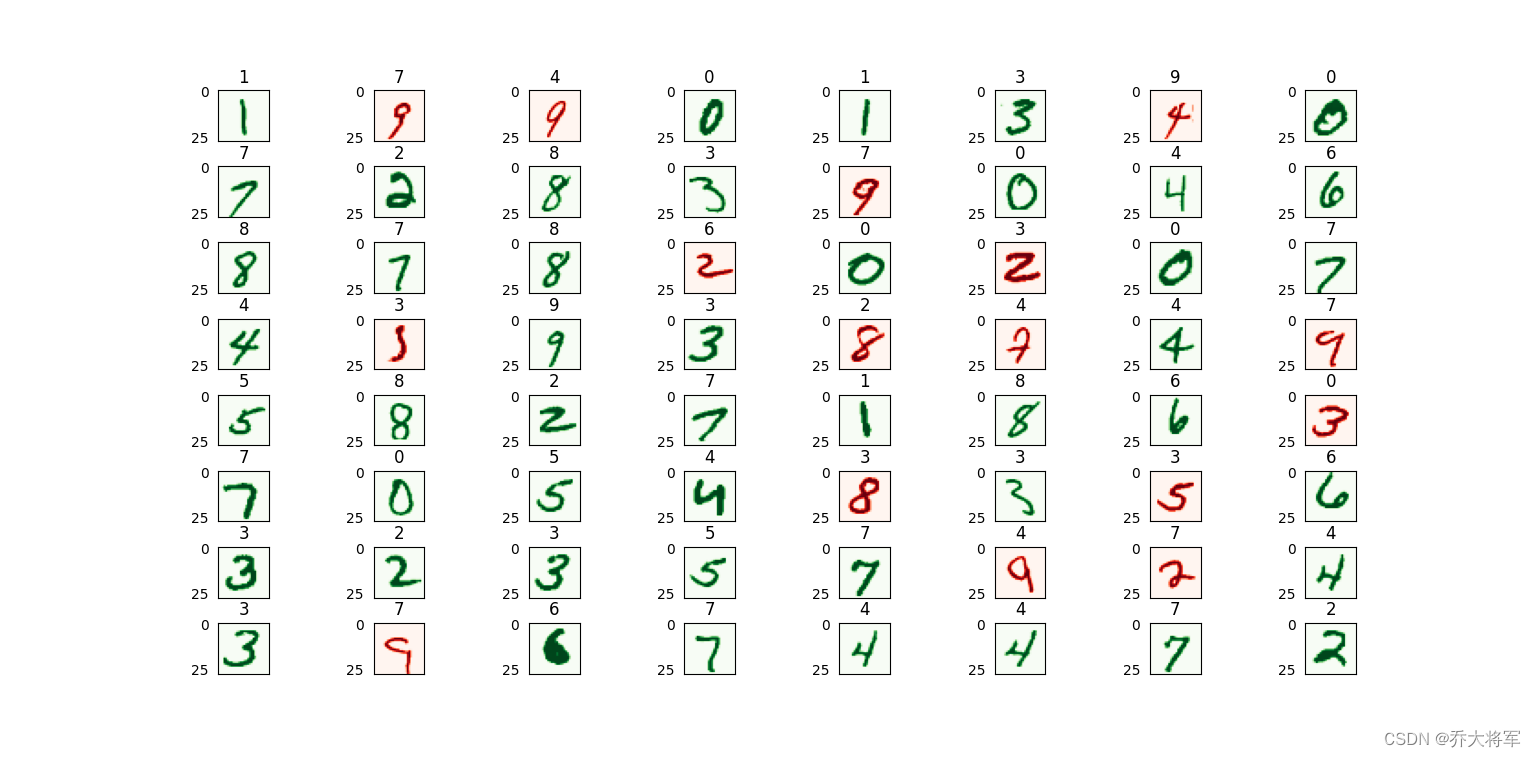
y_test_predictions = multilayerperceptron.predict(X_test)train_p = np.sum((y_train_predictions == y_train) / y_train.shape[0] * 100)
test_p = np.sum((y_test_predictions == y_test) / y_test.shape[0] * 100)print("训练集准确率:",train_p)
print("测试集准确率:",test_p)numbers_to_display = 64
num_cells = math.ceil(math.sqrt(numbers_to_display))
plt.figure(figsize=(15,15))
for plot_index in range(numbers_to_display):digit_label = y_test[plot_index,0]digit_pixels = X_test[plot_index,:]predicted_label = y_test_predictions[plot_index][0]image_size = int(math.sqrt(digit_pixels.shape[0]))frame = digit_pixels.reshape((image_size,image_size))plt.subplot(num_cells,num_cells,plot_index+1)color_map = 'Greens' if predicted_label == digit_label else 'Reds'plt.imshow(frame,cmap = color_map)plt.title(predicted_label)plt.tick_params(axis='both',which='both',bottom=False,left=False,labelbottom=False)plt.subplots_adjust(wspace=0.5,hspace=0.5)
plt.show()训练集8000个,测试集2000个,迭代次数500次


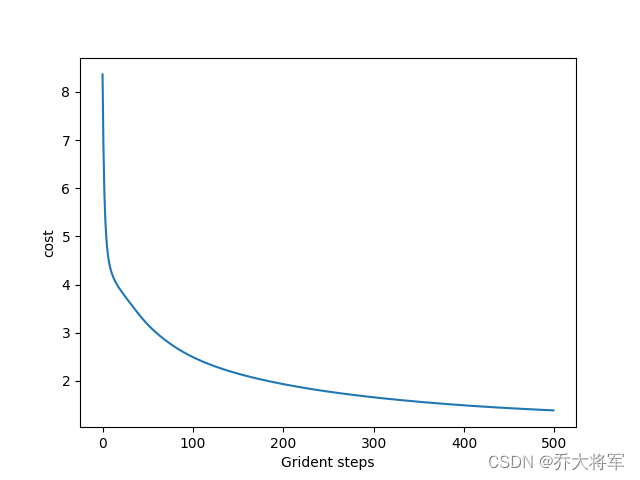
这里准确率不高,读者可以自行调整参数,改变迭代次数,网络层次都可以哦。
相关文章:
神经网络代码实现(用手写数字识别数据集实验)
目录 一、前言 二、神经网络架构 三、算法实现 1、导入包 2、实现类 3、训练函数 4、权重参数矩阵初始化 5、参数矩阵变换向量 6、向量变换权重参数矩阵 7、进行梯度下降 7.1、损失函数 7.1.1、前向传播 7.2、反向传播 8、预测函数 四、完整代码 五、手写数字识别 一、前言 …...

菜鸟笔记-Python函数-linspace
linspace 是 NumPy 库中的一个函数,用于生成具有指定数量的等间距样本的数组。它的名字来源于“linear space”(线性空间),因为它在指定的范围内均匀地生成数值。 linspace 函数的基本语法如下: numpy.linspace(star…...

为什么我们应该使用QGIS
QGIS地理信息系统是免费的开源软件,已成为创建地图和分析空间数据的强大工具。在本文中,我们将探讨 QGIS 为地图公司带来的诸多好处,以及为什么使用它可以促进您的业务成功。使用QGIS的好处: 1. 免费开源软件,但从长远…...
用Python实现办公自动化(自动化处理Excel工作簿)
自动化处理Excel工作簿 (一)批量生产产品出货清单 以“出货统计表”为例, 需求:将出货记录按照出货日期分类整理成多张出货清单 “出货统计表数据案例” “产品出货清单模板” 1.提取出货统计表的数据 “Python程序代码” # 使用…...

BaseDao入门使用
目录 一、什么是BaseDao?BaseDao的优点:BaseDao用来做什么操作? 二、BaseDao封装增删改查 案例演示:1、java与数据库进行连接2、连接后可对其进行操作(增、删、改)返回影响行数3、查询 查询一个字段(返回一…...

计算机毕业设计Python+Spark知识图谱高考志愿推荐系统 高考数据分析 高考可视化 高考大数据 大数据毕业设计 机器学习 深度学习 人工智能
学院(全称): 专业(全称): 姓名 学号 年级 班级 设计(论文) 题目 基于Spark的高考志愿推荐系统设计与实现 指导教师姓名 职称 拟…...

基于java+springboot+vue实现的电商个性化推荐系统(文末源码+Lw+ppt)23-389
摘 要 伴随着我国社会的发展,人民生活质量日益提高。于是对电商个性化推荐进行规范而严格是十分有必要的,所以许许多多的信息管理系统应运而生。此时单靠人力应对这些事务就显得有些力不从心了。所以本论文将设计一套电商个性化推荐系统,帮…...
(1))
论文阅读,The Lattice Boltzmann Method: Principles and Practice(六)(1)
目录 一、流体模拟方法概述 二、传统的Navier-Stokes求解器 2.1 有限差分 2.2 有限体积法 2.3 有限元法 三、基于粒子的求解器 3.1 动力学理论 3.2 分子动力学 3.3 格子气体模型 3.4 耗散粒子动力学 3.5 多粒子碰撞动力学 3.6 直接模拟蒙特卡罗方法 3.7 平滑粒子流…...

新能源充电桩站场视频汇聚系统建设方案及技术特点分析
随着新能源汽车的普及,充电桩作为新能源汽车的基础设施,其安全性和可靠性越来越受到人们的关注。为了更好地保障充电桩的安全运行与站场管理,TSINGSEE青犀&触角云推出了一套新能源汽车充电桩视频汇聚管理与视频监控方案。 方案采用高清摄…...
三、音频隐写[Audacity、deepsound、dtmf2num、MMSSTV、虚拟声卡、MP3Stego]
工具 1.Audacity 下载:https://www.audacityteam.org/download/windows/ 使用: 删除:先用左键长按拖着选中内容,然后选择软件最上方菜单栏的编辑,然后选择“删除”,最后点击文件的导出音频就能成功导出…...

二、Web3 学习(区块链)
区块链基础知识 一、基础知识1. 区块链可以做什么?2. 区块链的三个特点 二、区块链的类型概括1. PoW2. PoS3. 私有链和联盟链 三、智能合约1. 什么是智能合约2. 如何使用智能合约 四、困境1. 三难选择的基本要素2. 这真的是一个三难选择吗? 五、比特币1. 什么是比特…...

Linux内网提权
一、SUID提权 前提条件: (1)SUID仅对二进制有效(2)执行者对于该程序需要有x的可执行权限(3)本权限仅在程序的执行过程中有效 1、设置SUID权限:(root权限) …...

聚观早报 | 抖音独立商城App上线;阿里云联发科合作
聚观早报每日整理最值得关注的行业重点事件,帮助大家及时了解最新行业动态,每日读报,就读聚观365资讯简报。 整理丨Cutie 3月29日消息 抖音独立商城App上线 阿里云联发科合作 苹果WWDC24官宣 恒大汽车2023年营收财报 亚马逊投资Anthro…...

第十四届蓝桥杯省赛C++ B组所有题目以及题解(C++)【编程题均通过100%测试数据】
第一题《日期统计》【枚举】 【问题描述】 小蓝现在有一个长度为100的数组,数组中的每个元素的值都在0到9的范围之内。数组中的元素从左至右如下所示: 5 6 8 6 9 1 6 1 2 4 9 1 9 8 2 3 6 4 7 7 5 9 5 0 3 8 7 5 8 1 5 8 6 1 8 3 0 3 7 9 2 7 0 5 8 8 …...

【御控物联】 IOT异构数据JSON转化(场景案例一)
文章目录 前言技术资料 前言 随着物联网、大数据、智能制造技术的不断发展,越来越多的企业正在进行工厂的智能化转型升级。转型升级第一步往往是设备的智能化改造,助力设备数据快速上云,实现设备数据共享和场景互联。然而,在生产…...

Kubernetes-running app on kube
Docker 安装Docker 首先,您需要在Linux机器上安装Docker。如果您不使用Linux,则需要启动一个Linux虚拟机(VM)并在该虚拟机中运行Docker。如果你使用的是Mac或Windows系统,并按照指令安装Docker, Docker将为你建立一个虚拟机,并在…...

简述如何系统地学习Python
随着人工智能、大数据和云计算等技术的快速发展,编程已经成为了当今社会中不可或缺的一项技能。Python作为一种高级编程语言,因其简洁明了的语法、强大的功能和广泛的应用领域,成为了许多初学者和专业人士的首选。那么,如何系统地…...
bsd猜想 Murmuration of Eliptic Curves(笔记)
BSD Alexey Pozdnyakov (University of Connecticut) YUTUBE视频, B站搬运地址新生代女数学家Nina Zubrilina得到椭圆曲线椋鸟群飞模式精确公式与证明 Arithmetic Geometry算术几何 希尔伯特第十问题 希尔伯特第十问题(Hilbert’s Tenth Problem&#…...

小米汽车正式发布:开启智能电动新篇章
随着科技的不断进步,汽车产业正经历着前所未有的变革。智能电动汽车作为这一变革的重要方向,正吸引着越来越多的目光。在这个充满机遇和挑战的时代,小米汽车凭借其卓越的技术实力和深厚的市场底蕴,终于迈出了坚实的一步。今天&…...

线性代数笔记25--复数矩阵、快速傅里叶变换
1. 复数矩阵 复向量 Z [ z 1 z 2 z 3 z 4 ⋯ ] Z\begin{bmatrix} z_1\\z_2\\z_3\\z_4\\ \cdots \end{bmatrix} Z z1z2z3z4⋯ 复向量的模长 ∣ z ∣ z ‾ ⊤ z [ z ‾ 1 z ‾ 2 z ‾ 3 ] [ z 1 z 2 z 3 ] \lvert z\rvert\overline z^{\top}z \begin{bmatrix…...

从厨房定时器到操作系统:用Arduino和FreeRTOS理解多任务调度的前世今生
从厨房定时器到操作系统:用Arduino和FreeRTOS理解多任务调度的前世今生 1. 厨房里的时间管理艺术 清晨6点,烤箱里的面包正在烘烤,咖啡机发出咕噜声,电磁炉上的煎蛋滋滋作响。家庭主厨需要同时监控多个烹饪任务——这像极了嵌入式系…...
与SaDE在CEC2017测试集上的性能对比...)
基于成功历史的参数自适应差分进化算法(SHADE)与SaDE在CEC2017测试集上的性能对比...
SHADE和SaDE跑CEC2017测试集对比图,并分别连续运行30次并且输出最优值,最差值,平均值,标准差 基于成功历史的参数自适应差分进化算法(SHADE)是经典的差分进化变体,该论文发表于2013年,性能非常有参考价值&a…...
)
手把手教你用Cesium+Three.js搭建一个数字孪生城市demo(含完整源码)
从零构建数字孪生城市:Cesium与Three.js融合实战指南 数字孪生技术正在重塑城市规划与管理方式。想象一下,在虚拟空间中精确复刻一座城市的每一条街道、每一栋建筑,甚至实时反映交通流量与能源消耗——这正是数字孪生城市带来的变革。本文将带…...

李宏毅OpenClaw技术全面解析:System Promp → Context Compression压缩策略
本文以OpenClaw为案例,系统拆解AI Agent的完整运作机制,从LLM文字接龙本质、System Prompt身份构建、Tool Call工具链执行,到Sub-agent层级外包、双层记忆体系和Context压缩策略。核心观点是:OpenClaw是"Agent中不是AI的部分…...

动态协同平衡理论在AI领域的创新应用:构建稳健、自适应与可信赖的智能系统
动态协同平衡理论在AI领域的创新应用:构建稳健、自适应与可信赖的智能系统一、核心思想:以动态协同平衡重塑AI系统本质 动态协同平衡理论的核心思想——“系统的稳定性本质不在于消除变化,而在于通过结构冗余与动态调控的协同,主动…...
:OpenSpec如何为AI Agent注入项目记忆【SDD实践篇】)
AI开发新范式——规范驱动开发(SDD):OpenSpec如何为AI Agent注入项目记忆【SDD实践篇】
1. 为什么AI开发需要"项目记忆"? 想象一下你刚加入一个新项目,面对几十万行代码和一堆文档时的茫然感——这就是AI助手在增量开发时的日常困境。我去年用Cursor开发一个电商推荐系统时就深有体会:每次让AI添加功能,它都…...

使用mPLUG-Owl3-2B构建智能Mathtype公式编辑器:自然语言转数学表达式
使用mPLUG-Owl3-2B构建智能Mathtype公式编辑器:自然语言转数学表达式 让数学公式编辑像说话一样简单 还记得上次写论文时,被复杂的数学公式折磨得焦头烂额的情景吗?一个个符号手动输入,稍有不慎就格式错乱,检查起来更是…...

JBoltAI智教小工坊:AI赋能教育的技术落地与价值体现
在AI技术向各行业深度渗透的当下,教育领域的数字化转型亟需技术与场景的深度融合,Java生态作为企业级开发的核心支撑,为教育AI应用落地筑牢了技术底座。JBoltAI以企业级Java AI应用开发框架为核心,构建起AIGS(人工智能…...

一款提升工作效率的Claude HUD插件
介绍 Claude HUD 在进行编程和开发工作时,能够实时监控工作环境和项目状态是至关重要的。Claude HUD 是一个专为 Claude Code 平台设计的插件,能够传达当前上下文的使用情况、活跃工具、正在运行的代理以及待办事项的进度。它始终显示在输入框下方&#…...

YouTube视频翻译全攻略:自动字幕、手动翻译到AI配音实战指南
YouTube 作为全球领先的视频平台,月活跃用户已超过 27 亿(2025 年数据)。这一庞大的受众群体为内容创作者提供了触达世界各地观众的绝佳机遇。然而,语言障碍往往限制了内容的传播潜力,使得优质内容难以被更广泛的观众访…...