34. UE5 RPG实现鼠标点击移动
在前面,我们实现过使用键盘按键wasd去实现控制角色的移动,现在,我们实现了InputAction按键触发,后面,实现一下通过鼠标点击地面实现角色移动。
我们将实现两种效果的切换,如果你点击地面快速松开,角色将自动寻路到目标为止。如果你按住鼠标不放,角色将自动朝向鼠标所指向的位置移动。接下来,我们实现它吧!
首先在PlayerController(玩家控制器类)里面增加一些参数,用来记录一些信息,主要对应的是查询鼠标悬停的目标是否有敌人,按下的时间,以及自动寻路的参数。
FVector CachedDestination = FVector::ZeroVector; //存储鼠标点击的位置float FollowTime = 0.f; // 用于查看按住了多久bool bAutoRunning = false; //当前是否自动移动bool bTargeting = false; //当前鼠标是否选中敌人UPROPERTY(EditDefaultsOnly)float ShortPressThreshold = 0.3f; //定义鼠标悬停多长时间内算点击事件UPROPERTY(EditDefaultsOnly)float AutoRunAcceptanceRadius = 50.f; //当角色和目标距离在此半径内时,将关闭自动寻路UPROPERTY(VisibleAnywhere)TObjectPtr<USplineComponent> Spline; //自动寻路时生成的样条线
在PlayerController构造函数,将Spline初始化
Spline = CreateDefaultSubobject<USplineComponent>("Spline");
我们之前在鼠标事件里面追踪鼠标悬停并给敌人描边的效果,能够获取到敌人

接下来就是在鼠标按下,悬停,抬起三个事件中去实现逻辑,我们之前在里面实现了对技能的触发
后面,我们将点击移动的功能融入进去。
实现长按角色跟随鼠标移动
首先,在鼠标按下事件中,判断传入的Tag是否为鼠标左键事件,在内部判断点击的是否为敌人,如果不是敌人,那就是地面,如果ThisActor有值,那就是点击到了敌人。
bTargeting为记录当前按下时,是否选中了敌人。
bAutoRunning 为是否自动寻路中,在鼠标按下,将自动关闭此项,在鼠标抬起时再重新计算是否需要自动移动。
FollowTime用于统计按下时间,来去顶当前操作为点击还是长按。
void APlayerControllerBase::AbilityInputTagPressed(const FGameplayTag InputTag)
{if(InputTag.MatchesTagExact(FMyGameplayTags::Get().InputTag_LMB)){bTargeting = ThisActor != nullptr; //ThisActor为鼠标悬停在敌人身上才会有值bAutoRunning = false;FollowTime = 0.f; //重置统计的时间}
}
接下来在鼠标悬停事件中,我们将实现角色跟随鼠标移动逻辑。
我们先实现之前的触发技能的逻辑,这里只需要判断一下是否鼠标左键的事件,如果是,将执行内部逻辑,不再运行后面的逻辑。
void APlayerControllerBase::AbilityInputTagHold(const FGameplayTag InputTag)
{if(!InputTag.MatchesTagExact(FMyGameplayTags::Get().InputTag_LMB)){if(GetASC()){GetASC()->AbilityInputTagHold(InputTag);}return;}
后面逻辑,我们先对bTargeting 进行布尔判断,如果它的值为true,证明点中了敌人,要执行攻击敌人逻辑,这个我们后面再实现
在另外的分支就是没有选中敌人,我们可以执行鼠标悬停角色跟随逻辑。
首先对悬停时间进行统计,如果悬停时间过短,我们后面将在鼠标抬起事件中去实现角色自动寻路功能。
FollowTime += GetWorld()->GetDeltaSeconds(); //统计悬停时间来判断是否为点击
接着,我们通过GetHitResultUnderCursor函数去获取鼠标拾取的位置
参数说明
-
ECollisionChannel TraceChannel:这个参数决定了射线将与哪些类型的物体碰撞。例如,你可以设置射线只与静态网格体(ECC_StaticMesh)或角色(ECC_Pawn)等碰撞。
-
bool bTraceComplex:这个布尔值决定了射线是否应该与复杂碰撞体(比如带有多边形碰撞体的网格体)进行碰撞检测。如果设置为 true,射线将与复杂碰撞体碰撞;如果设置为 false,则只会与简单的碰撞体(比如球体或盒体)碰撞。
-
FHitResult& HitResult:这是一个引用参数,用于返回射线与场景中的物体碰撞的结果。如果射线没有碰撞到任何物体,这个参数将不会被修改。
将拾取到的位置缓存到变量内
FHitResult Hit;if(GetHitResultUnderCursor(ECC_Visibility, false, Hit)){CachedDestination = Hit.ImpactPoint;}
有了目标位置后,我们通过目标位置减去角色所在位置,就可以得到一个朝向,GetSafeNormal()为归一化向量,然后使用AddMovementInput去移动角色
if(APawn* ControlledPawn = GetPawn()){const FVector WorldDirection = (CachedDestination - ControlledPawn->GetActorLocation()).GetSafeNormal();ControlledPawn->AddMovementInput(WorldDirection);}
实现自动寻路
如果鼠标按下抬起的时间间隔比较小,我们将其定义为鼠标点击事件,并将执行自动寻路逻辑。这些内容我们将在鼠标抬起时的函数中进行实现。
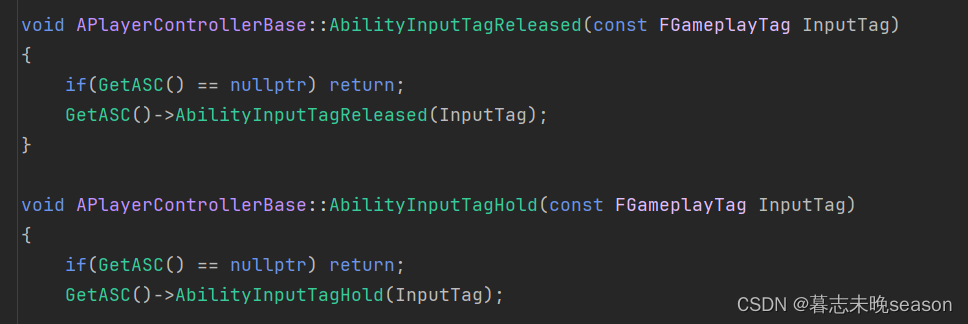
在实现此逻辑之前,我们先将之前实现的技能函数实现,之前实现主要是一个触发技能鼠标抬起的回调,现在还未实现内容。
我们先判断传入的tag如果不是鼠标左键的tag,将执行此逻辑。
void APlayerControllerBase::AbilityInputTagReleased(const FGameplayTag InputTag)
{if(!InputTag.MatchesTagExact(FMyGameplayTags::Get().InputTag_LMB)){if(GetASC()){GetASC()->AbilityInputTagReleased(InputTag);}return;}
}
接着还要判断是否选中了敌人,选中敌人的话执行技能逻辑。
if(bTargeting){if(GetASC()){GetASC()->AbilityInputTagReleased(InputTag);}}else...
在else里面,我们就可以正式去实现自动寻路的功能了
首先判断一下,当前抬起时是否能够触发点击事件,ShortPressThreshold的值是我们可以自定义的,比如按下到抬起如果小于0.3s,我们将其定义为点击,那它的值我们就定义为0.3,FollowTime是在按下后,在Hold状态的间隔时间持续添加,来实现对按
if(FollowTime <= ShortPressThreshold)
接着我们去通过内置的插件去拾取自动寻路的路线,这个使用的UE引擎的方法,它需要三个值,当前世界上下文中的对象(传入自身即可),起始点,结束点,查询的到将返回一个UNavigationPath
if(UNavigationPath* NavPath = UNavigationSystemV1::FindPathToLocationSynchronously(this, ControlledPawn->GetActorLocation(), CachedDestination))
要使用寻路函数需要对应的模块,我们在官网看到它需要NavigationSystem模块
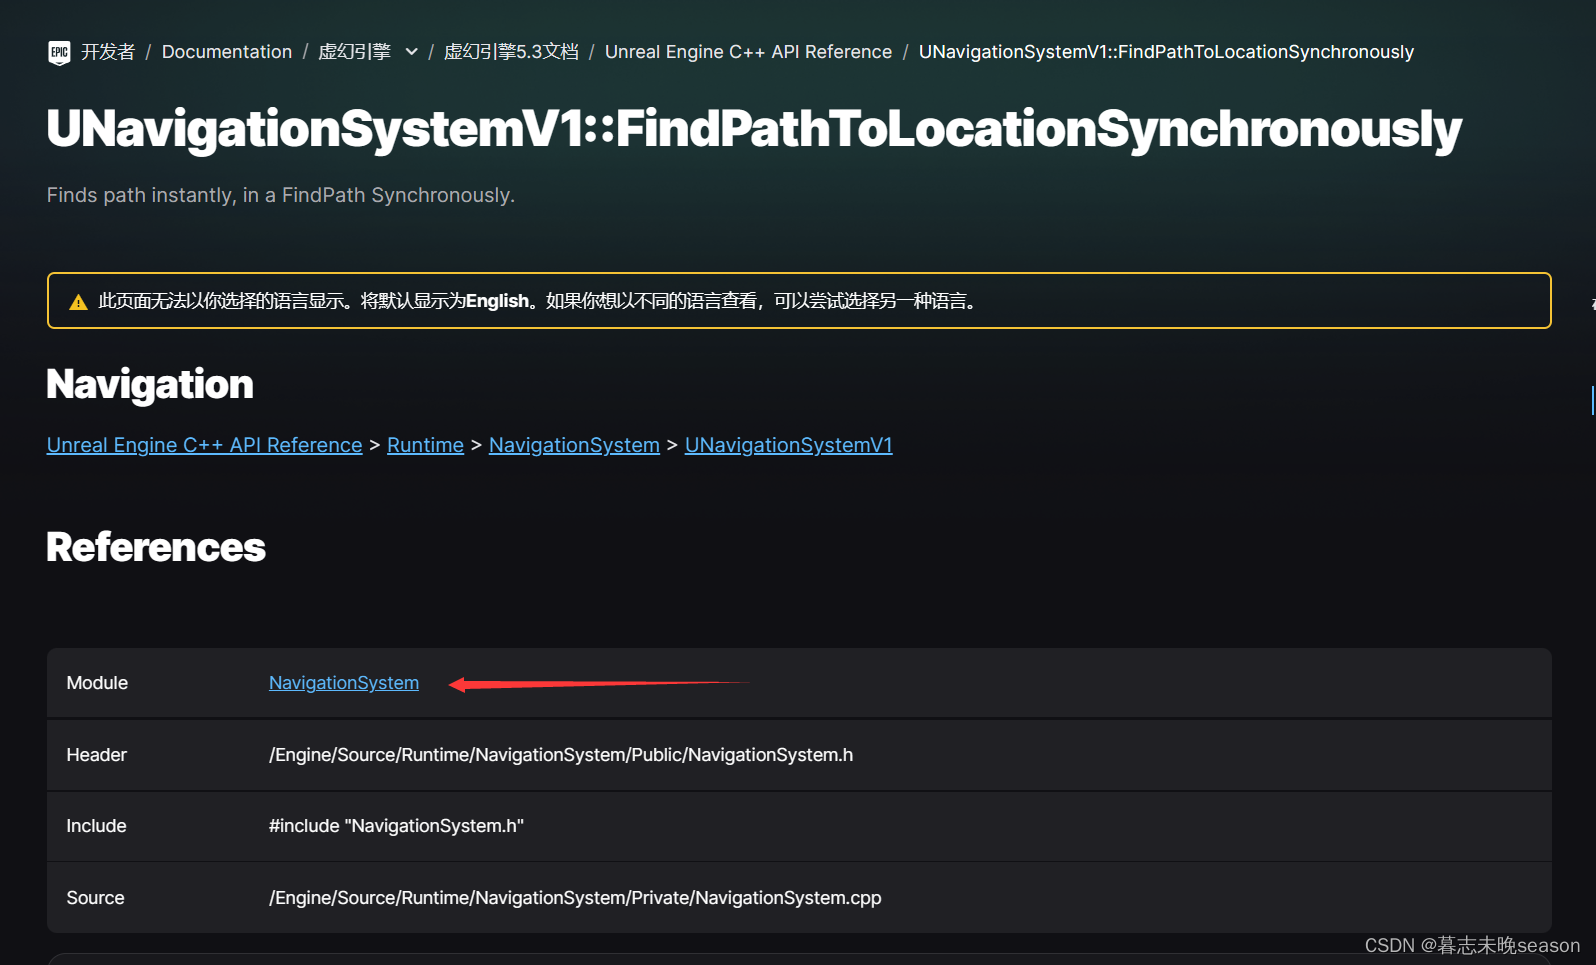
要使用此模块,我们需要在Build.cs里面将NavigationSystem加入,然后编译的时候将会将此模块自动编入
PrivateDependencyModuleNames.AddRange(new string[] { "GameplayTags", "GameplayTasks", "NavigationSystem" });
如果能够查询的到,我们首先将样条属性内的内容先清除
Spline->ClearSplinePoints(); //清除样条内现有的点
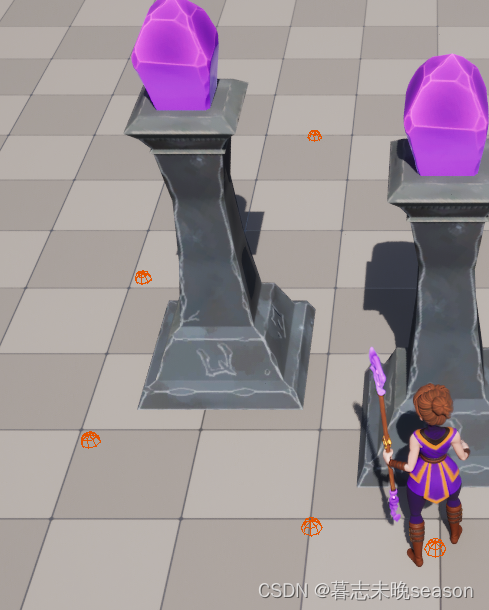
然后for循环找到路径里面的点,添加到样条中,为了防止错误,我们使用DrawDebugSphere函数在场景中debug测试。
for(const FVector& PointLoc : NavPath->PathPoints)
{Spline->AddSplinePoint(PointLoc, ESplineCoordinateSpace::World); //将新的位置添加到样条曲线中DrawDebugSphere(GetWorld(), PointLoc, 8.f, 8, FColor::Orange, false, 5.f); //点击后debug调试
}
添加完成后,我们还需要将记录在自动寻路状态的变量设置为true,在帧更新中,我们将通过这个变量进行角色移动
bAutoRunning = true; //设置当前正常自动寻路状态,将在tick中更新位置
接着可以编译测试是否能够实现在场景获取到路径点,我们要测试导航功能,需要在场景里面设置导航体积,只有在导航体积内,才能够触发此功能,先在场景添加一个此体积。
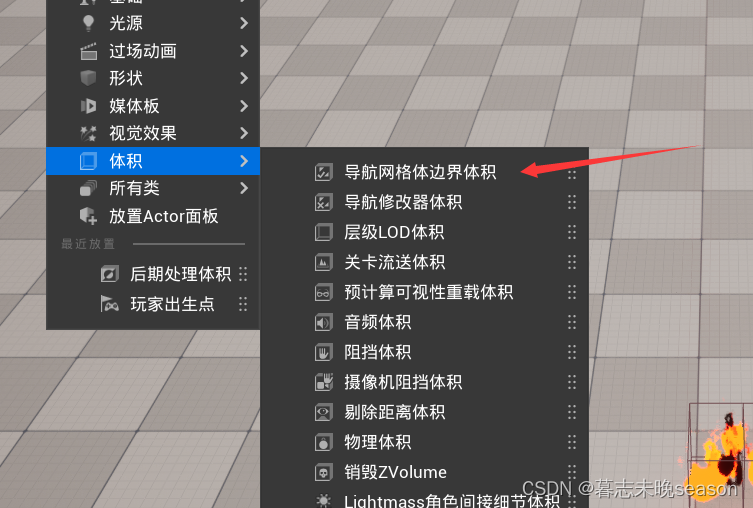
按快捷键P,可以显示可导航区域,我们可以调整体积范围来实现可导航范围。
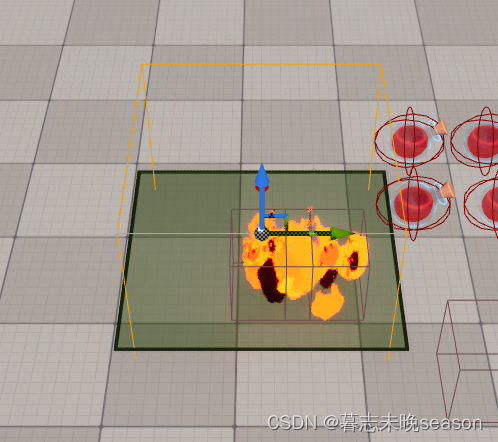
顺便加几个遮挡物,导航体积会自动计算,将其可移动范围剔除掉。
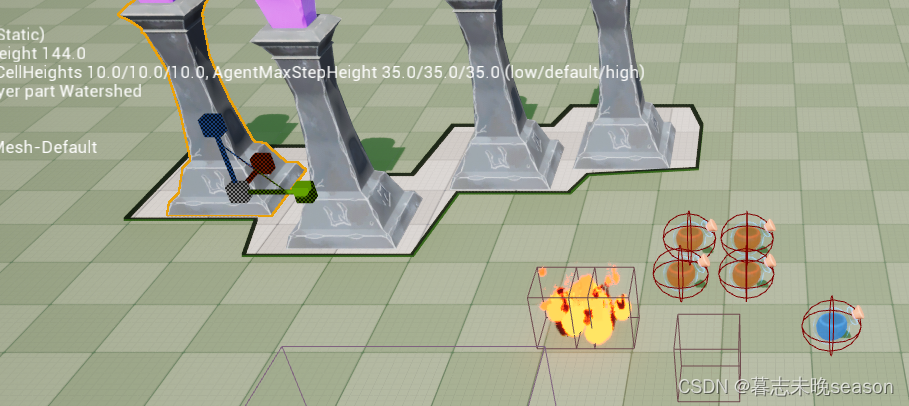
然后测试点击地面,会发现生成了对应的点的位置
在帧循环实现自动移动
现在自动寻路的路径有了,我们要实现角色的自动移动,那么,需要在帧循环里面实现。
//帧更新
void APlayerControllerBase::PlayerTick(float DeltaTime)
{Super::PlayerTick(DeltaTime);//鼠标位置追踪是否悬停在敌人身上CursorTrace();}
首先我们获取并判断一下Pawn是否存在
if(APawn* ControlledPawn = GetPawn())
由于无法确保角色位置和样条曲线百分之百重合在一块,所以我们先获取一下角色距离样条最近的位置
const FVector LocationOnSpline = Spline->FindLocationClosestToWorldLocation(ControlledPawn->GetActorLocation(), ESplineCoordinateSpace::World);
然后通过此位置去获取在样条上的方向
const FVector Direction = Spline->FindDirectionClosestToWorldLocation(LocationOnSpline, ESplineCoordinateSpace::World);
让角色通过此方向去移动
ControlledPawn->AddMovementInput(Direction);
我们还需要在角色移动到终点时,设置它停止寻路,所以,我们还需要查询当前角色所在位置和终点位置的距离,如果小于我们设置的AutoRunAcceptanceRadius距离内,我们将停止自动寻路。
const float DistanceToDestination = (LocationOnSpline - CachedDestination).Length();
if(DistanceToDestination <= AutoRunAcceptanceRadius)
{bAutoRunning = false;
}
ps:这里还有一个问题,就是如果你点击位置为自动寻路无法到达的位置,导航还是会生成一条路径,但是我们无法达到最终点,这样无法停止自动寻路。所以,我们需要在鼠标抬起时,将路径的终点设置给CachedDestination,这也是自动寻路的最终点。
我们获取数组中的最后一个点,按照索引来算,就是数组的长度-1
CachedDestination = NavPath->PathPoints[NavPath->PathPoints.Num() - 1];
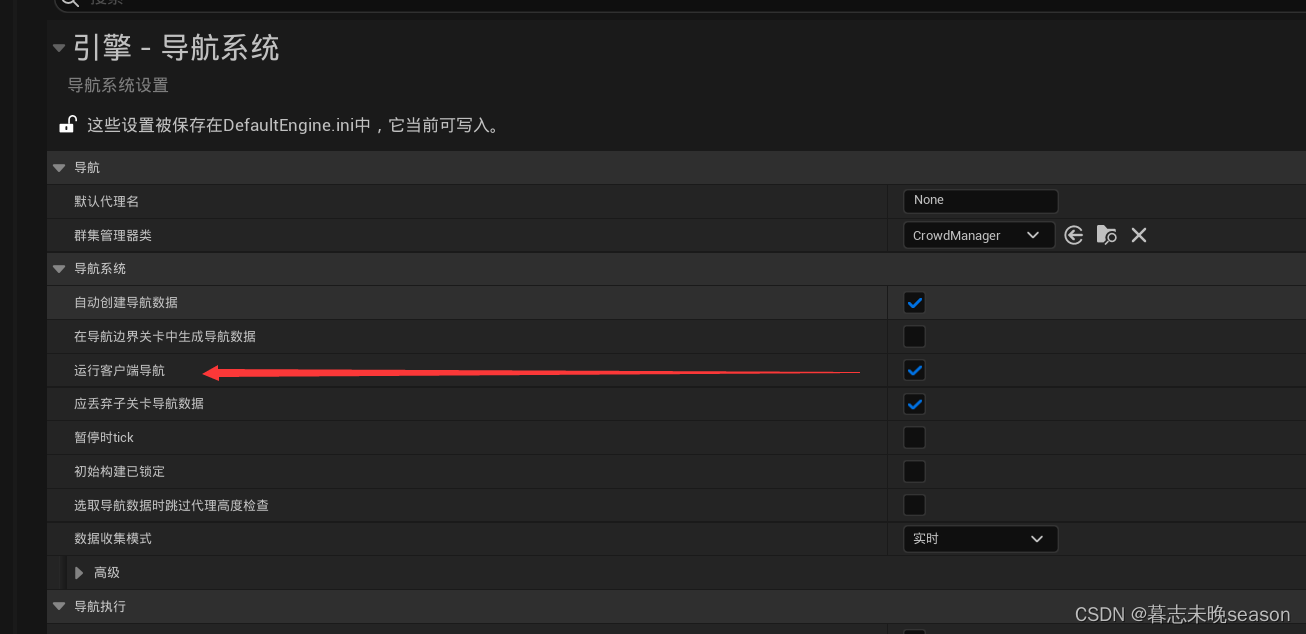
如果需要服务器,我们需要在导航系统设置运行客户端导航,这样,会在所有的客户端生成导航体积。
如果我们需要点击到柱子后面的地面,而不是忘柱子那里移动,我们需要修改柱子的碰撞预设为自定义

我们鼠标拾取地面位置是通过Visibility去拾取的,那么,将此相应通道关闭。

接下来,我们就可以测试了,查看是否有bug。
下面列出来PlayerController的完整代码
// 版权归暮志未晚所有。#pragma once#include "CoreMinimal.h"
#include "GameFramework/PlayerController.h"
#include "GameplayTagContainer.h"
#include "PlayerControllerBase.generated.h"class USplineComponent;
class UInputConfig;
class UInputMappingContext;
class UInputAction;
struct FInputActionValue;
class IEnemyInterface;
class UAbilitySystemComponentBase;/*** 玩家控制器*/
UCLASS()
class AURA_API APlayerControllerBase : public APlayerController
{GENERATED_BODY()public:APlayerControllerBase();virtual void PlayerTick(float DeltaTime) override;protected:virtual void BeginPlay() override; //游戏开始时触发virtual void SetupInputComponent() override; //在生成输入组件时触发private:UPROPERTY(EditAnywhere, Category="Input")TObjectPtr<UInputMappingContext> CharacterContext;UPROPERTY(EditAnywhere, Category="Input")TObjectPtr<UInputAction> MoveAction;void Move(const struct FInputActionValue& InputActionValue);void CursorTrace(); //鼠标位置追踪拾取IEnemyInterface* LastActor; //上一帧拾取到的接口指针IEnemyInterface* ThisActor; //这一帧拾取到的接口指针void AbilityInputTagPressed(FGameplayTag InputTag);void AbilityInputTagReleased(FGameplayTag InputTag);void AbilityInputTagHold(FGameplayTag InputTag);UPROPERTY(EditDefaultsOnly, Category="Input")TObjectPtr<UInputConfig> InputConfig;UPROPERTY()TObjectPtr<UAbilitySystemComponentBase> AbilitySystemComponentBase;UAbilitySystemComponentBase* GetASC();FVector CachedDestination = FVector::ZeroVector; //存储鼠标点击的位置float FollowTime = 0.f; // 用于查看按住了多久bool bAutoRunning = false; //当前是否自动移动bool bTargeting = false; //当前鼠标是否选中敌人UPROPERTY(EditDefaultsOnly)float ShortPressThreshold = 0.3f; //定义鼠标悬停多长时间内算点击事件UPROPERTY(EditDefaultsOnly)float AutoRunAcceptanceRadius = 50.f; //当角色和目标距离在此半径内时,将关闭自动寻路UPROPERTY(VisibleAnywhere)TObjectPtr<USplineComponent> Spline; //自动寻路时生成的样条线void AutoRun();
};
// 版权归暮志未晚所有。#include "Player/PlayerControllerBase.h"#include "AbilitySystemBlueprintLibrary.h"
#include "EnhancedInputSubsystems.h"
#include "MyGameplayTags.h"
#include "NavigationPath.h"
#include "NavigationSystem.h"
#include "AbilitySystem/AbilitySystemComponentBase.h"
#include "Components/SplineComponent.h"
#include "Input/InputComponentBase.h"
#include "Interaction/EnemyInterface.h"APlayerControllerBase::APlayerControllerBase()
{bReplicates = true; //是否将数据传送服务器更新LastActor = nullptr;ThisActor = nullptr;Spline = CreateDefaultSubobject<USplineComponent>("Spline");
}//帧更新
void APlayerControllerBase::PlayerTick(float DeltaTime)
{Super::PlayerTick(DeltaTime);//鼠标位置追踪是否悬停在敌人身上CursorTrace();//自动寻路AutoRun();
}void APlayerControllerBase::AutoRun()
{if(!bAutoRunning) return;if(APawn* ControlledPawn = GetPawn()){//找到距离样条最近的位置const FVector LocationOnSpline = Spline->FindLocationClosestToWorldLocation(ControlledPawn->GetActorLocation(), ESplineCoordinateSpace::World);//获取这个位置在样条上的方向const FVector Direction = Spline->FindDirectionClosestToWorldLocation(LocationOnSpline, ESplineCoordinateSpace::World);ControlledPawn->AddMovementInput(Direction);const float DistanceToDestination = (LocationOnSpline - CachedDestination).Length();if(DistanceToDestination <= AutoRunAcceptanceRadius){bAutoRunning = false;}}
}//鼠标位置追踪
void APlayerControllerBase::CursorTrace()
{FHitResult CursorHit;GetHitResultUnderCursor(ECC_Visibility, false, CursorHit); //获取可视的鼠标命中结果if(!CursorHit.bBlockingHit) return; //如果未命中直接返回LastActor = ThisActor;ThisActor = Cast<IEnemyInterface>(CursorHit.GetActor());/*** 射线拾取后,会出现的几种情况* 1. LastActor is null ThisActor is null 不需要任何操作* 2. LastActor is null ThisActor is valid 高亮ThisActor* 3. LastActor is valid ThisActor is null 取消高亮LastActor* 4. LastActor is valid ThisActor is valid LastActor != ThisActor 取消高亮LastActor 高亮ThisActor* 5. LastActor is valid ThisActor is valid LastActor == ThisActor 不需要任何操作*/if(LastActor == nullptr){if(ThisActor != nullptr){//case 2ThisActor->HighlightActor();} // else case 1}else{if(ThisActor == nullptr){//case 3LastActor->UnHighlightActor();}else{if(LastActor != ThisActor){//case 4LastActor->UnHighlightActor();ThisActor->HighlightActor();} //else case 5}}}void APlayerControllerBase::AbilityInputTagPressed(const FGameplayTag InputTag)
{if(InputTag.MatchesTagExact(FMyGameplayTags::Get().InputTag_LMB)){bTargeting = ThisActor != nullptr; //ThisActor为鼠标悬停在敌人身上才会有值bAutoRunning = false;FollowTime = 0.f; //重置统计的时间}
}void APlayerControllerBase::AbilityInputTagReleased(const FGameplayTag InputTag)
{if(!InputTag.MatchesTagExact(FMyGameplayTags::Get().InputTag_LMB)){if(GetASC()){GetASC()->AbilityInputTagReleased(InputTag);}return;}if(bTargeting){if(GetASC()){GetASC()->AbilityInputTagReleased(InputTag);}}else{const APawn* ControlledPawn = GetPawn();if(FollowTime <= ShortPressThreshold && ControlledPawn){if(UNavigationPath* NavPath = UNavigationSystemV1::FindPathToLocationSynchronously(this, ControlledPawn->GetActorLocation(), CachedDestination)){Spline->ClearSplinePoints(); //清除样条内现有的点for(const FVector& PointLoc : NavPath->PathPoints){Spline->AddSplinePoint(PointLoc, ESplineCoordinateSpace::World); //将新的位置添加到样条曲线中// DrawDebugSphere(GetWorld(), PointLoc, 8.f, 8, FColor::Orange, false, 5.f); //点击后debug调试}//自动寻路将最终目的地设置为导航的终点,方便停止导航CachedDestination = NavPath->PathPoints[NavPath->PathPoints.Num() - 1];bAutoRunning = true; //设置当前正常自动寻路状态,将在tick中更新位置}}}
}void APlayerControllerBase::AbilityInputTagHold(const FGameplayTag InputTag)
{if(!InputTag.MatchesTagExact(FMyGameplayTags::Get().InputTag_LMB)){if(GetASC()){GetASC()->AbilityInputTagHold(InputTag);}return;}if(bTargeting){if(GetASC()){//点击敌人目标,将攻击敌人GetASC()->AbilityInputTagHold(InputTag);}}else{FollowTime += GetWorld()->GetDeltaSeconds(); //统计悬停时间来判断是否为点击FHitResult Hit;if(GetHitResultUnderCursor(ECC_Visibility, false, Hit)){CachedDestination = Hit.ImpactPoint;}if(APawn* ControlledPawn = GetPawn()){const FVector WorldDirection = (CachedDestination - ControlledPawn->GetActorLocation()).GetSafeNormal();ControlledPawn->AddMovementInput(WorldDirection);}}
}UAbilitySystemComponentBase* APlayerControllerBase::GetASC()
{if(AbilitySystemComponentBase == nullptr){AbilitySystemComponentBase = Cast<UAbilitySystemComponentBase>(UAbilitySystemBlueprintLibrary::GetAbilitySystemComponent(GetPawn()));}return AbilitySystemComponentBase;
}void APlayerControllerBase::BeginPlay()
{Super::BeginPlay();check(CharacterContext); //判断是否存在//从本地角色身上获取到它的子系统UEnhancedInputLocalPlayerSubsystem* Subsystem = ULocalPlayer::GetSubsystem<UEnhancedInputLocalPlayerSubsystem>(GetLocalPlayer());// check(Subsystem); //检查子系统是否存在 不存在会打断if(Subsystem){//将自定义的操作映射上下文添加到子系统中Subsystem->AddMappingContext(CharacterContext, 0); //可以存在多个操作映射,根据优先级触发}bShowMouseCursor = true; //游戏中是否显示鼠标光标DefaultMouseCursor = EMouseCursor::Default; //鼠标光标的样式FInputModeGameAndUI InputModeData;InputModeData.SetLockMouseToViewportBehavior(EMouseLockMode::DoNotLock); //将鼠标锁定在视口内InputModeData.SetHideCursorDuringCapture(false); //鼠标被捕获时是否隐藏SetInputMode(InputModeData); //设置给控制器
}void APlayerControllerBase::SetupInputComponent()
{Super::SetupInputComponent();UInputComponentBase* EnhancedInputComponent = CastChecked<UInputComponentBase>(InputComponent); //获取到增强输入组件EnhancedInputComponent->BindAction(MoveAction, ETriggerEvent::Triggered, this, &APlayerControllerBase::Move); //绑定移动事件EnhancedInputComponent->BindAbilityAction(InputConfig, this, &ThisClass::AbilityInputTagPressed,&ThisClass::AbilityInputTagReleased, &ThisClass::AbilityInputTagHold);
}void APlayerControllerBase::Move(const FInputActionValue& InputActionValue)
{const FVector2D InputAxisVector = InputActionValue.Get<FVector2D>(); //获取输入操作的2维向量值const FRotator Rotation = GetControlRotation(); //获取控制器旋转const FRotator YawRotation(0.f, Rotation.Yaw, 0.f); //通过控制器的垂直朝向创建一个旋转值,忽略上下朝向和左右朝向const FVector ForwardDirection = FRotationMatrix(YawRotation).GetUnitAxis(EAxis::X); //获取世界坐标系下向前的值,-1到1const FVector RightDirection = FRotationMatrix(YawRotation).GetUnitAxis(EAxis::Y); //获取世界坐标系下向右的值,-1到1if(APawn* ControlledPawn = GetPawn<APawn>()){ControlledPawn->AddMovementInput(ForwardDirection, InputAxisVector.Y);ControlledPawn->AddMovementInput(RightDirection, InputAxisVector.X);}
}代码整理
上面的代码有很多可以优化的点,我们一步一步优化,让代码看起来更清晰,能节省性能的也将性能节省下来。
首先能优化的点就是鼠标位置拾取,这个是比较耗性能的点,需要在鼠标位置发射一条射线,然后和场景内可交互的模型进行碰撞检测,我们在代码里面使用两次,一次是实现悬停让敌人高亮的效果。另一次是鼠标悬停,角色跟随鼠标拾取位置移动时。这两个拾取,我们其实只需要拾取一次,增加一个类的成员变量,悬停里面去判断结果。
添加一个成员变量
FHitResult CursorHit; //鼠标拾取结果,可以复用
直接在CursorTrace函数里面获取,把局部的变量删除。
GetHitResultUnderCursor(ECC_Visibility, false, CursorHit); //获取可视的鼠标命中结果
在鼠标悬停事件中,直接使用它的结果即可
if(CursorHit.bBlockingHit)
{CachedDestination = CursorHit.ImpactPoint;
}
优化第二项,鼠标位置追踪函数里面,我们写了很长的逻辑,而且重复的判断很多,接下来,我们将优化这里。
//鼠标位置追踪
void APlayerControllerBase::CursorTrace()
{GetHitResultUnderCursor(ECC_Visibility, false, CursorHit); //获取可视的鼠标命中结果if(!CursorHit.bBlockingHit) return; //如果未命中直接返回LastActor = ThisActor;ThisActor = Cast<IEnemyInterface>(CursorHit.GetActor());/*** 射线拾取后,会出现的几种情况* 1. LastActor is null   ThisActor is null 不需要任何操作* 2. LastActor is null   ThisActor is valid 高亮ThisActor* 3. LastActor is valid   ThisActor is null 取消高亮LastActor* 4. LastActor is valid   ThisActor is valid LastActor != ThisActor 取消高亮LastActor 高亮ThisActor* 5. LastActor is valid   ThisActor is valid LastActor == ThisActor 不需要任何操作*/if(LastActor == nullptr){if(ThisActor != nullptr){//case 2ThisActor->HighlightActor();} // else case 1}else{if(ThisActor == nullptr){//case 3LastActor->UnHighlightActor();}else{if(LastActor != ThisActor){//case 4LastActor->UnHighlightActor();ThisActor->HighlightActor();} //else case 5}}}
修改完成后,如下,我们只需要在两个指针不同的时候,进行处理即可,然后判断当前变量指针是否存在,存在再调用对应的函数即可。
//鼠标位置追踪
void APlayerControllerBase::CursorTrace()
{GetHitResultUnderCursor(ECC_Visibility, false, CursorHit); //获取可视的鼠标命中结果if(!CursorHit.bBlockingHit) return; //如果未命中直接返回LastActor = ThisActor;ThisActor = Cast<IEnemyInterface>(CursorHit.GetActor());if(ThisActor != LastActor){if(ThisActor) ThisActor->HighlightActor();if(LastActor) LastActor->UnHighlightActor();}}
修改完成后的代码:
// 版权归暮志未晚所有。#pragma once#include "CoreMinimal.h"
#include "GameFramework/PlayerController.h"
#include "GameplayTagContainer.h"
#include "PlayerControllerBase.generated.h"class USplineComponent;
class UInputConfig;
class UInputMappingContext;
class UInputAction;
struct FInputActionValue;
class IEnemyInterface;
class UAbilitySystemComponentBase;/*** 玩家控制器*/
UCLASS()
class AURA_API APlayerControllerBase : public APlayerController
{GENERATED_BODY()public:APlayerControllerBase();virtual void PlayerTick(float DeltaTime) override;protected:virtual void BeginPlay() override; //游戏开始时触发virtual void SetupInputComponent() override; //在生成输入组件时触发private:UPROPERTY(EditAnywhere, Category="Input")TObjectPtr<UInputMappingContext> CharacterContext;UPROPERTY(EditAnywhere, Category="Input")TObjectPtr<UInputAction> MoveAction;void Move(const struct FInputActionValue& InputActionValue);void CursorTrace(); //鼠标位置追踪拾取IEnemyInterface* LastActor; //上一帧拾取到的接口指针IEnemyInterface* ThisActor; //这一帧拾取到的接口指针FHitResult CursorHit; //鼠标拾取结果,可以复用void AbilityInputTagPressed(FGameplayTag InputTag);void AbilityInputTagReleased(FGameplayTag InputTag);void AbilityInputTagHold(FGameplayTag InputTag);UPROPERTY(EditDefaultsOnly, Category="Input")TObjectPtr<UInputConfig> InputConfig;UPROPERTY()TObjectPtr<UAbilitySystemComponentBase> AbilitySystemComponentBase;UAbilitySystemComponentBase* GetASC();FVector CachedDestination = FVector::ZeroVector; //存储鼠标点击的位置float FollowTime = 0.f; // 用于查看按住了多久bool bAutoRunning = false; //当前是否自动移动bool bTargeting = false; //当前鼠标是否选中敌人UPROPERTY(EditDefaultsOnly)float ShortPressThreshold = 0.3f; //定义鼠标悬停多长时间内算点击事件UPROPERTY(EditDefaultsOnly)float AutoRunAcceptanceRadius = 50.f; //当角色和目标距离在此半径内时,将关闭自动寻路UPROPERTY(VisibleAnywhere)TObjectPtr<USplineComponent> Spline; //自动寻路时生成的样条线void AutoRun();
};
// 版权归暮志未晚所有。#include "Player/PlayerControllerBase.h"#include "AbilitySystemBlueprintLibrary.h"
#include "EnhancedInputSubsystems.h"
#include "MyGameplayTags.h"
#include "NavigationPath.h"
#include "NavigationSystem.h"
#include "AbilitySystem/AbilitySystemComponentBase.h"
#include "Components/SplineComponent.h"
#include "Input/InputComponentBase.h"
#include "Interaction/EnemyInterface.h"APlayerControllerBase::APlayerControllerBase()
{bReplicates = true; //是否将数据传送服务器更新LastActor = nullptr;ThisActor = nullptr;Spline = CreateDefaultSubobject<USplineComponent>("Spline");
}//帧更新
void APlayerControllerBase::PlayerTick(float DeltaTime)
{Super::PlayerTick(DeltaTime);//鼠标位置追踪是否悬停在敌人身上CursorTrace();//自动寻路AutoRun();
}void APlayerControllerBase::AutoRun()
{if(!bAutoRunning) return;if(APawn* ControlledPawn = GetPawn()){//找到距离样条最近的位置const FVector LocationOnSpline = Spline->FindLocationClosestToWorldLocation(ControlledPawn->GetActorLocation(), ESplineCoordinateSpace::World);//获取这个位置在样条上的方向const FVector Direction = Spline->FindDirectionClosestToWorldLocation(LocationOnSpline, ESplineCoordinateSpace::World);ControlledPawn->AddMovementInput(Direction);const float DistanceToDestination = (LocationOnSpline - CachedDestination).Length();if(DistanceToDestination <= AutoRunAcceptanceRadius){bAutoRunning = false;}}
}//鼠标位置追踪
void APlayerControllerBase::CursorTrace()
{GetHitResultUnderCursor(ECC_Visibility, false, CursorHit); //获取可视的鼠标命中结果if(!CursorHit.bBlockingHit) return; //如果未命中直接返回LastActor = ThisActor;ThisActor = Cast<IEnemyInterface>(CursorHit.GetActor());if(ThisActor != LastActor){if(ThisActor) ThisActor->HighlightActor();if(LastActor) LastActor->UnHighlightActor();}}void APlayerControllerBase::AbilityInputTagPressed(const FGameplayTag InputTag)
{if(InputTag.MatchesTagExact(FMyGameplayTags::Get().InputTag_LMB)){bTargeting = ThisActor != nullptr; //ThisActor为鼠标悬停在敌人身上才会有值bAutoRunning = false;FollowTime = 0.f; //重置统计的时间}
}void APlayerControllerBase::AbilityInputTagReleased(const FGameplayTag InputTag)
{if(!InputTag.MatchesTagExact(FMyGameplayTags::Get().InputTag_LMB)){if(GetASC()) GetASC()->AbilityInputTagReleased(InputTag);return;}if(bTargeting){if(GetASC()) GetASC()->AbilityInputTagReleased(InputTag);}else{const APawn* ControlledPawn = GetPawn();if(FollowTime <= ShortPressThreshold && ControlledPawn){if(UNavigationPath* NavPath = UNavigationSystemV1::FindPathToLocationSynchronously(this, ControlledPawn->GetActorLocation(), CachedDestination)){Spline->ClearSplinePoints(); //清除样条内现有的点for(const FVector& PointLoc : NavPath->PathPoints){Spline->AddSplinePoint(PointLoc, ESplineCoordinateSpace::World); //将新的位置添加到样条曲线中// DrawDebugSphere(GetWorld(), PointLoc, 8.f, 8, FColor::Orange, false, 5.f); //点击后debug调试}//自动寻路将最终目的地设置为导航的终点,方便停止导航CachedDestination = NavPath->PathPoints[NavPath->PathPoints.Num() - 1];bAutoRunning = true; //设置当前正常自动寻路状态,将在tick中更新位置}}}
}void APlayerControllerBase::AbilityInputTagHold(const FGameplayTag InputTag)
{if(!InputTag.MatchesTagExact(FMyGameplayTags::Get().InputTag_LMB)){if(GetASC()) GetASC()->AbilityInputTagHold(InputTag);return;}if(bTargeting){if(GetASC()) GetASC()->AbilityInputTagHold(InputTag);}else{FollowTime += GetWorld()->GetDeltaSeconds(); //统计悬停时间来判断是否为点击if(CursorHit.bBlockingHit) CachedDestination = CursorHit.ImpactPoint; //获取鼠标拾取位置if(APawn* ControlledPawn = GetPawn()){const FVector WorldDirection = (CachedDestination - ControlledPawn->GetActorLocation()).GetSafeNormal();ControlledPawn->AddMovementInput(WorldDirection);}}
}UAbilitySystemComponentBase* APlayerControllerBase::GetASC()
{if(AbilitySystemComponentBase == nullptr){AbilitySystemComponentBase = Cast<UAbilitySystemComponentBase>(UAbilitySystemBlueprintLibrary::GetAbilitySystemComponent(GetPawn()));}return AbilitySystemComponentBase;
}void APlayerControllerBase::BeginPlay()
{Super::BeginPlay();check(CharacterContext); //判断是否存在//从本地角色身上获取到它的子系统UEnhancedInputLocalPlayerSubsystem* Subsystem = ULocalPlayer::GetSubsystem<UEnhancedInputLocalPlayerSubsystem>(GetLocalPlayer());// check(Subsystem); //检查子系统是否存在 不存在会打断if(Subsystem){//将自定义的操作映射上下文添加到子系统中Subsystem->AddMappingContext(CharacterContext, 0); //可以存在多个操作映射,根据优先级触发}bShowMouseCursor = true; //游戏中是否显示鼠标光标DefaultMouseCursor = EMouseCursor::Default; //鼠标光标的样式FInputModeGameAndUI InputModeData;InputModeData.SetLockMouseToViewportBehavior(EMouseLockMode::DoNotLock); //将鼠标锁定在视口内InputModeData.SetHideCursorDuringCapture(false); //鼠标被捕获时是否隐藏SetInputMode(InputModeData); //设置给控制器
}void APlayerControllerBase::SetupInputComponent()
{Super::SetupInputComponent();UInputComponentBase* EnhancedInputComponent = CastChecked<UInputComponentBase>(InputComponent); //获取到增强输入组件EnhancedInputComponent->BindAction(MoveAction, ETriggerEvent::Triggered, this, &APlayerControllerBase::Move); //绑定移动事件EnhancedInputComponent->BindAbilityAction(InputConfig, this, &ThisClass::AbilityInputTagPressed,&ThisClass::AbilityInputTagReleased, &ThisClass::AbilityInputTagHold);
}void APlayerControllerBase::Move(const FInputActionValue& InputActionValue)
{const FVector2D InputAxisVector = InputActionValue.Get<FVector2D>(); //获取输入操作的2维向量值const FRotator Rotation = GetControlRotation(); //获取控制器旋转const FRotator YawRotation(0.f, Rotation.Yaw, 0.f); //通过控制器的垂直朝向创建一个旋转值,忽略上下朝向和左右朝向const FVector ForwardDirection = FRotationMatrix(YawRotation).GetUnitAxis(EAxis::X); //获取世界坐标系下向前的值,-1到1const FVector RightDirection = FRotationMatrix(YawRotation).GetUnitAxis(EAxis::Y); //获取世界坐标系下向右的值,-1到1if(APawn* ControlledPawn = GetPawn<APawn>()){ControlledPawn->AddMovementInput(ForwardDirection, InputAxisVector.Y);ControlledPawn->AddMovementInput(RightDirection, InputAxisVector.X);}
}处理bug
在ASC里面我们实现了一个EffectApplied的函数,在GE被应用的时候,会触发此函数回调,用于显示被使用的是什么物品。然后在EffectApplied函数中使用自定义委托广播出去,在WidgetController中监听自定义委托。但是,现在OnGameplayEffectAppliedDelegateToSelf无法在客户端运行。
void UAbilitySystemComponentBase::AbilityActorInfoSet()
{OnGameplayEffectAppliedDelegateToSelf.AddUObject(this, &UAbilitySystemComponentBase::EffectApplied);
}
查看源码,这个注释明确告诉我们在服务器运行的
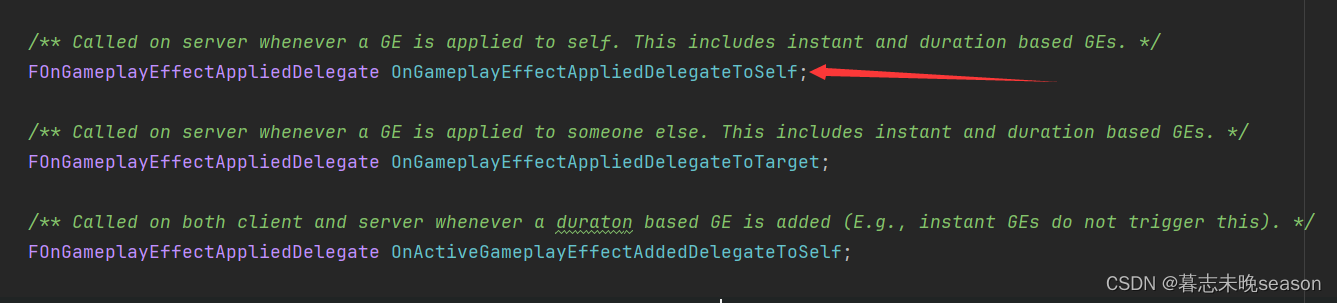
我们现在的解决逻辑是,OnGameplayEffectAppliedDelegateToSelf只在服务器上面运行,在服务器上面触发了EffectApplied,那EffectApplied回调能不能实现在客户端也能运行。方法是可行的
首先,我们需要给EffectApplied函数增加标记,告诉UE它是一个在客户端运行的成员函数,这样,在服务器调用它后,它会被复制到客户端去运行。作为规范,我们需要在客户端运行函数前面加上Client,这样可以明白是一个客户端运行的函数。
//标记Client告诉UE这个函数应该只在客户端运行,设置Reliable表示这个函数调用是可靠的,即它确保数据能够到达客户端UFUNCTION(Client, Reliable)void ClientEffectApplied(UAbilitySystemComponent* AbilitySystemComponent, const FGameplayEffectSpec& EffectSpec, FActiveGameplayEffectHandle ActiveGameplayEffectHandle) const;
接着将回调绑定的名称改掉。
void UAbilitySystemComponentBase::AbilityActorInfoSet()
{OnGameplayEffectAppliedDelegateToSelf.AddUObject(this, &UAbilitySystemComponentBase::ClientEffectApplied);
}
最重要的是,客户端函数的实现需要加上_Implementation后缀,这样就实现了在客户端调用。
void UAbilitySystemComponentBase::ClientEffectApplied_Implementation(UAbilitySystemComponent* AbilitySystemComponent,const FGameplayEffectSpec& EffectSpec, FActiveGameplayEffectHandle ActiveGameplayEffectHandle) const
{// GEngine->AddOnScreenDebugMessage(1, 8.f, FColor::Blue, FString("Effect Applied!"));FGameplayTagContainer TagContainer;EffectSpec.GetAllAssetTags(TagContainer);EffectAssetTags.Broadcast(TagContainer);
}
相关文章:
34. UE5 RPG实现鼠标点击移动
在前面,我们实现过使用键盘按键wasd去实现控制角色的移动,现在,我们实现了InputAction按键触发,后面,实现一下通过鼠标点击地面实现角色移动。 我们将实现两种效果的切换,如果你点击地面快速松开࿰…...
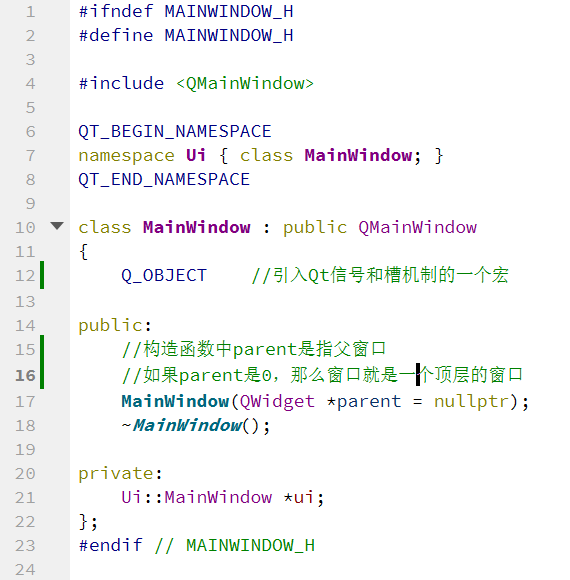
《二》Qt Creator工具介绍与使用
一、关于界面 点击文件--->新建文件或项目会出现如下图: 我们选择第一个 点击下一步下一步: 继续下一步直到结束: 二,具体文件介绍 我们点击pro查看以下 QT core gui第1行 表示使用qt的core和gui库,如果以后…...

20240415金融读报:市场信贷不能过于宽松声音碳领域新增文件
1、市场普遍认为,在经济转型背景下,当前的社会融资规模和信贷增长有助于经济高质量发展,过于宽松并不利于经济发展。(已经有这个声音了,是不是说明我们已经脱离了U型曲线的最低点,在或快接近其后半段的1/2处…...
)
2024年第十五届蓝桥杯研究生组题目总结(Java、Python、C++)
2024年十五届蓝桥杯研究生组 今年的题较去年难度降低了很多,题量也少了2道。 Q1 劲舞团 读文件,找到最长的满足条件的子数组的长度 答案是:9 BufferedReader,fopen,open Q2 召唤数学精灵 找规律,周期…...
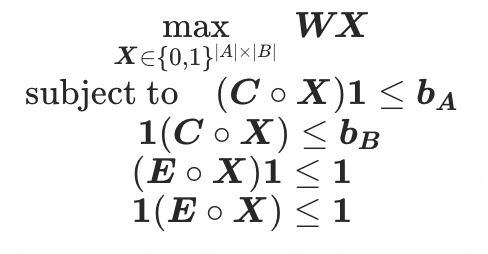
MindOpt APL向量化建模语法的介绍与应用(2)
前言 在数据科学、工程优化和其他科学计算领域中,向量和矩阵的运算是核心组成部分。MAPL作为一种数学规划语言,为这些领域的专业人员提供了强大的工具,通过向量式和矩阵式变量声明以及丰富的内置数学运算支持,大大简化了数学建模…...

深入理解图形处理器(GPU):加速人工智能和大数据计算的引擎
文章目录 1. 什么是GPU?2. GPU的工作原理3. GPU的应用领域4. GPU与CPU的比较参考与推荐 前言: 图形处理器(GPU)不再仅仅是用于图形渲染的硬件设备。如今,GPU已经成为加速人工智能、大数据计算和科学研究的关键引擎。本…...

【Java探索之旅】数组使用 初探JVM内存布局
🎥 屿小夏 : 个人主页 🔥个人专栏 : Java编程秘籍 🌄 莫道桑榆晚,为霞尚满天! 文章目录 📑前言一、数组的使用1.1 元素访问1.2 数组遍历 二、JVM的内存布局🌤️全篇总结 …...
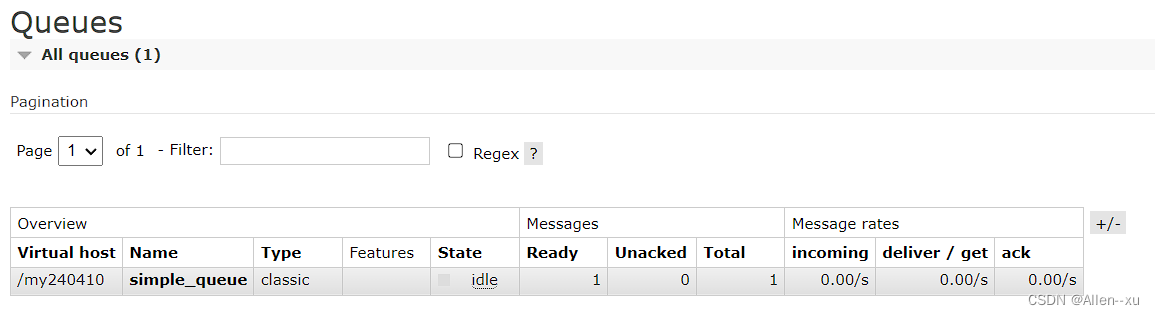
RabbitMQ消息模型之Simple消息模型
simple消息模型 生产者 package com.example.demo02.mq.simple;import com.example.demo02.mq.util.ConnectionUtils; import com.rabbitmq.client.Channel; import com.rabbitmq.client.Connection;import java.io.IOException;/*** author Allen* 4/10/2024 8:07 PM* versi…...
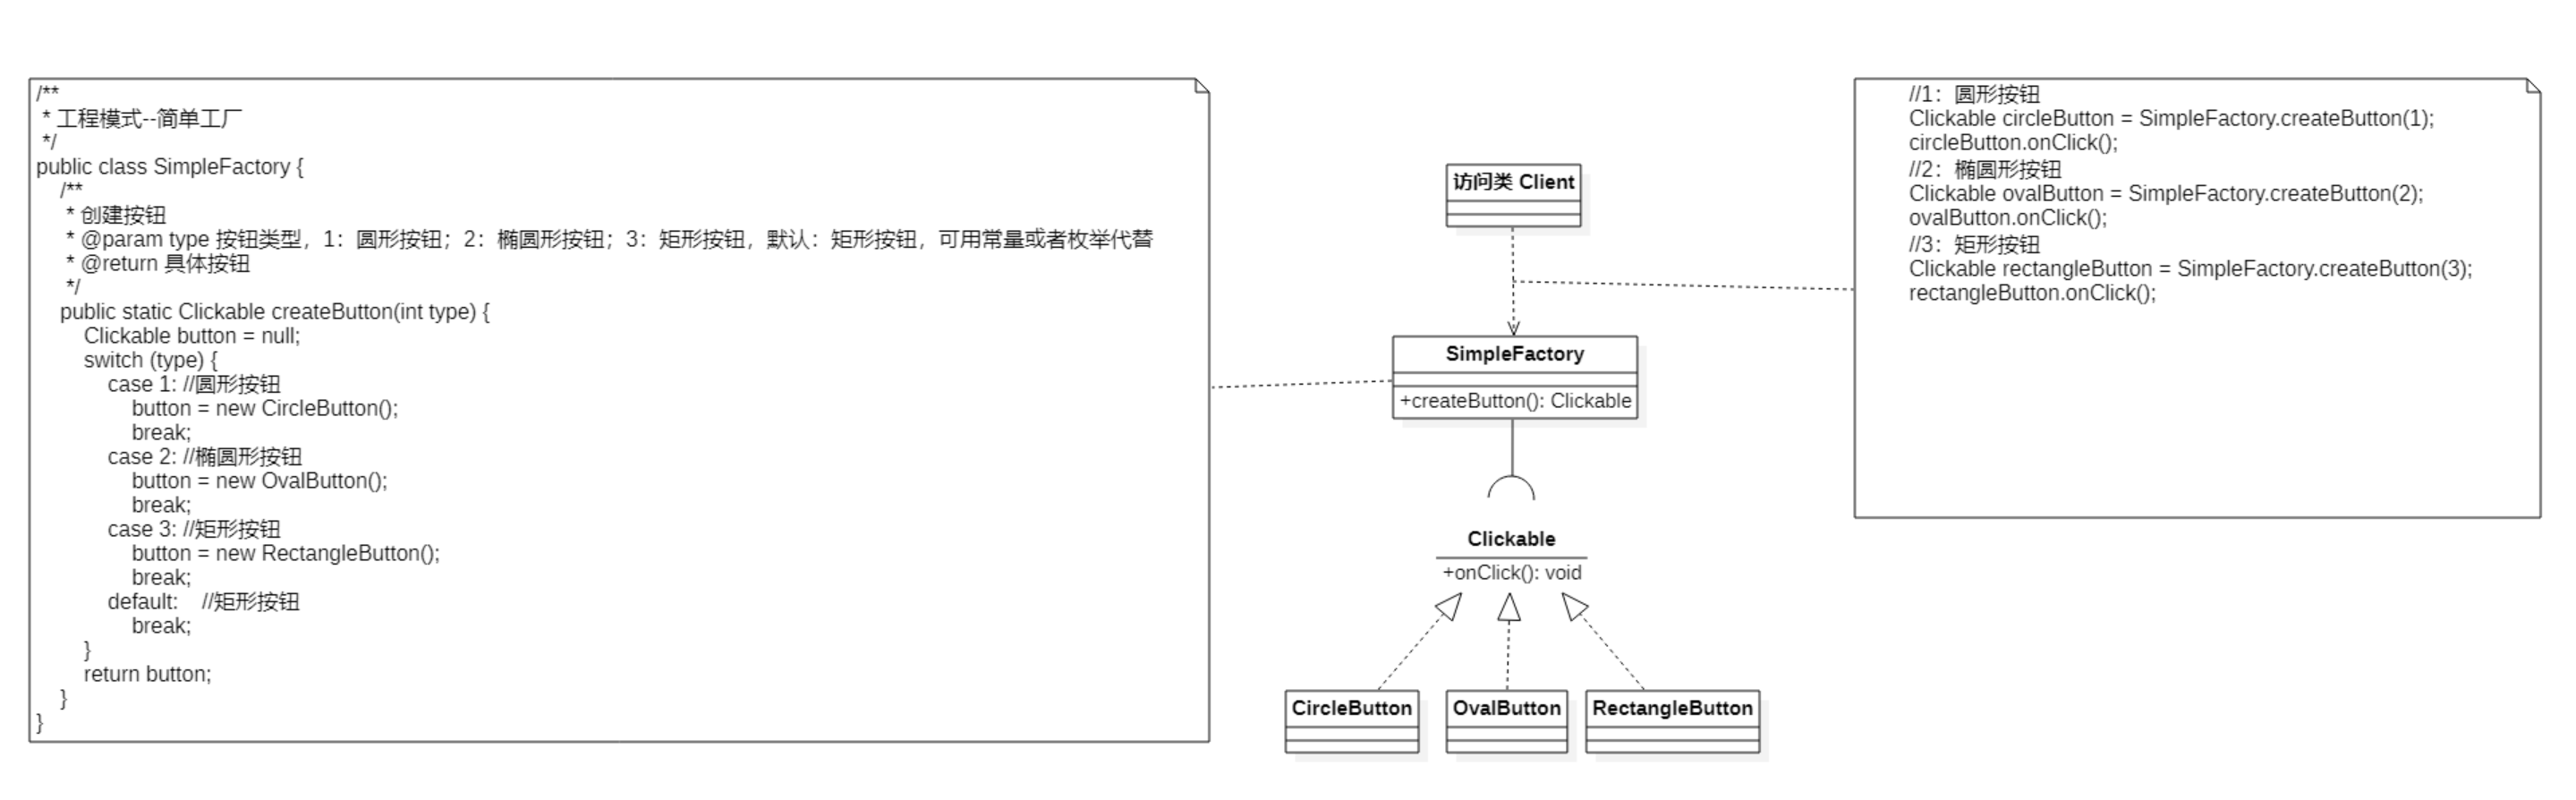
设计模式系列:简单工厂模式
作者持续关注 WPS二次开发专题系列,持续为大家带来更多有价值的WPS二次开发技术细节,如果能够帮助到您,请帮忙来个一键三连,更多问题请联系我(QQ:250325397) 目录 定义 特点 使用场景 优缺点 (1) 优点…...

解决 windows+Ubuntu 时间不同步问题
本文所使用的 Ubuntu 系统版本是 Ubuntu 22.04 ! 如果你的电脑装了 Windows Ubuntu 系统,肯定会遇到时间不同步的问题。那么如何解决呢?参考步骤如下: # 步骤一:进入到 Ubuntu 系统# 步骤二:执行如下三条命令即可 sud…...
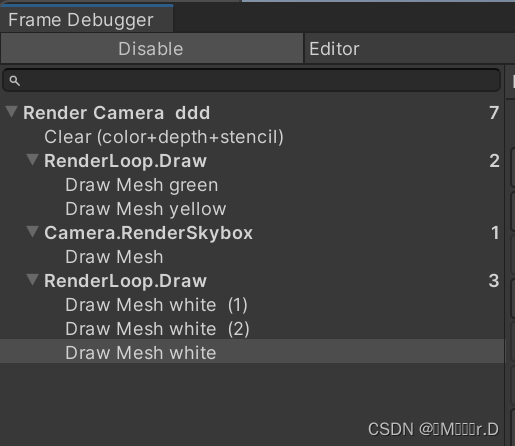
Learn SRP 01
学习链接:Custom Render Pipeline (catlikecoding.com) 使用Unity版本:Unity 2022.3.5f1 1.A new Render Pipeline 1.1Project Setup 创建一个默认的3D项目,项目打开后可以到默认的包管理器删掉所有不需要的包,我们只使用Unit…...
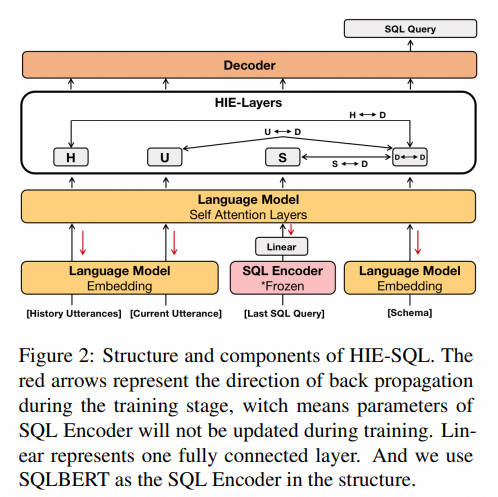
NL2SQL进阶系列(4):ConvAI、DIN-SQL、C3-浙大、DAIL-SQL-阿里等16个业界开源应用实践详解[Text2SQL]
NL2SQL进阶系列(4):ConvAI、DIN-SQL等16个业界开源应用实践详解[Text2SQL] NL2SQL基础系列(1):业界顶尖排行榜、权威测评数据集及LLM大模型(Spider vs BIRD)全面对比优劣分析[Text2SQL、Text2DSL] NL2SQL基础系列(2):…...
Python统计分析库之statsmodels使用详解
概要 Python statsmodels是一个强大的统计分析库,提供了丰富的统计模型和数据处理功能,可用于数据分析、预测建模等多个领域。本文将介绍statsmodels库的安装、特性、基本功能、高级功能、实际应用场景等方面。 安装 安装statsmodels库非常简单,可以使用pip命令进行安装:…...
A Learning-Based Approach for IP Geolocation(2010年)
下载地址:Towards IP geolocation using delay and topology measurements | Proceedings of the 6th ACM SIGCOMM conference on Internet measurement 被引次数:185 Eriksson B, Barford P, Sommers J, et al. A learning-based approach for IP geolocation[C]//Passive …...
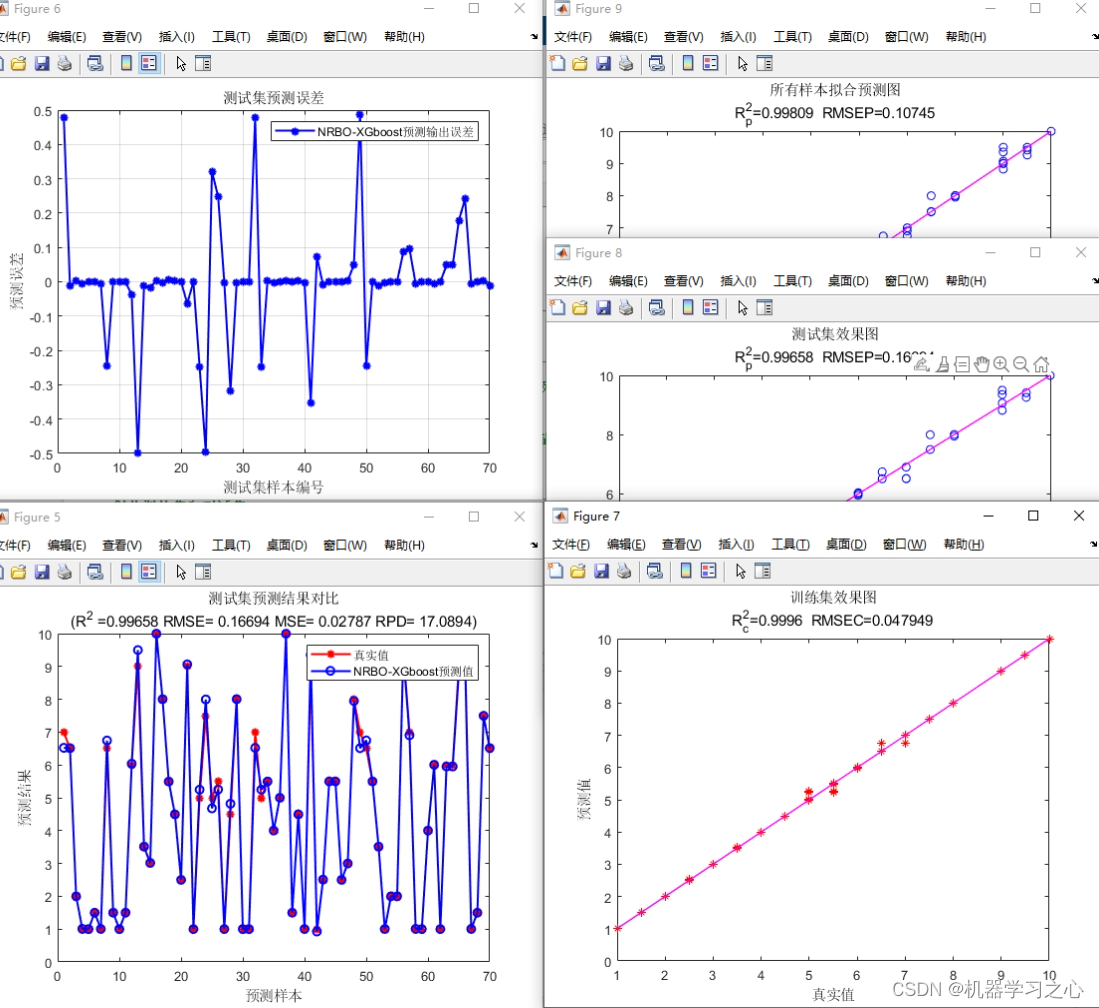
高创新 | [24年新算法]NRBO-XGBoost回归+交叉验证基于牛顿拉夫逊优化算法-XGBoost多变量回归预测
高创新 | [24年新算法]NRBO-XGBoost回归交叉验证基于牛顿拉夫逊优化算法-XGBoost多变量回归预测 目录 高创新 | [24年新算法]NRBO-XGBoost回归交叉验证基于牛顿拉夫逊优化算法-XGBoost多变量回归预测预测效果基本介绍程序设计参考资料 预测效果 基本介绍 1.Matlab实现 [24年新算…...

Web APP设计:将多个相近的机器学习模型融合到一个Web APP中
将多个相近的机器学习模型融合到一个Web APP中 FUSE-ML是一个用于预测腰椎融合术后效果的APP,它可以做出三个不同的结论,分别评价术后的腰痛、腿痛和日常功能是否提高。 这估计是部署了三个机器学习模型在这个APP中,因为一个机器学习模型仅…...

网络爬虫:定义、应用及法律道德考量
网络爬虫技术在当今数据驱动的世界中发挥着重要作用。本文将从网络爬虫的定义和主要功能,其在业界的应用实例,以及涉及的法律和道德问题三个方面进行深入探讨。 1. 爬虫的定义和主要功能 网络爬虫,也称为网页爬虫或蜘蛛,是一种…...
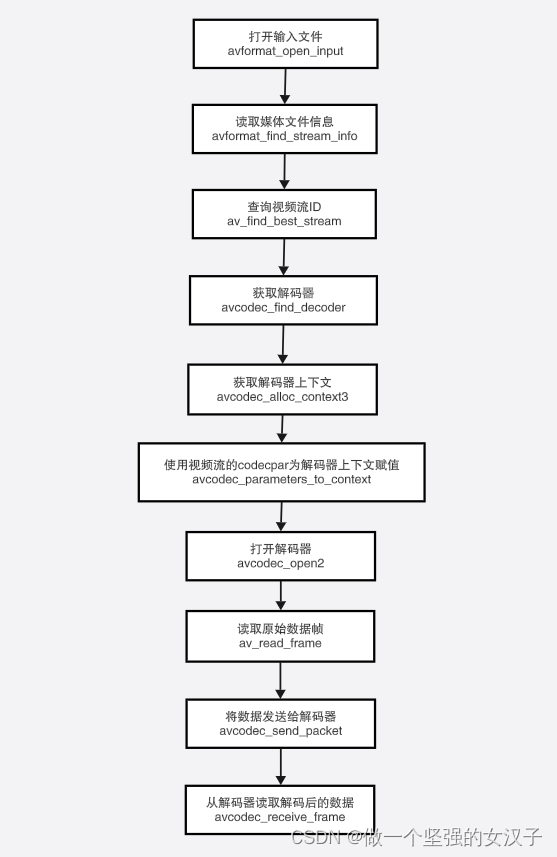
(三)ffmpeg 解码流程以及函数介绍
一、视频解码流程 二、函数介绍 1.avformat_network_init 函数作用: 执行网络库的全局初始化。这是可选的,不再推荐。 此函数仅用于解决旧GnuTLS或OpenSSL库的线程安全问题。如果libavformat链接到这些库的较新版本,或者不使用它们&#…...
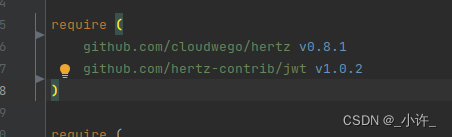
go work模块与go mod包管理是的注意事项
如下图所示目录结构 cmd中是服务的包,显然auth,dbtables,pkg都是为cmd服务的。 首先需要需要将auth,dbtables,pkg定义到go.work中,如下: 在这样在各个单独的go mod管理的模块就可以互相调用了。一般情况下这些都是IDE自动进行的,…...
[100分])
华为OD-C卷-最长子字符串的长度(一)[100分]
题目描述 给你一个字符串 s,首尾相连成一个环形,请你在环中找出 o 字符出现了偶数次最长子字符串的长度。 输入描述 输入是一个小写字母组成的字符串 输出描述 输出是一个整数 备注 1 ≤ s.length ≤ 500000s 只包含小写英文字母用例1 输入 alolobo输出 6说明 最长子字…...

SpringBoot WebSocket 客户端断线重连:从心跳检测到优雅恢复
1. WebSocket与实时通信的挑战 想象一下你正在玩一款多人在线游戏,突然网络卡顿导致角色掉线,重新登录后发现之前的战斗进度全部丢失——这种糟糕体验正是WebSocket重连机制要解决的问题。WebSocket作为HTTP的"升级版",确实解决了服…...

从ChatGPT到机器翻译:GRPO算法如何优化大语言模型的生成效果?
GRPO算法:大语言模型生成效果优化的新范式 在自然语言处理领域,序列生成任务的质量优化一直是研究热点。从ChatGPT的对话流畅度到机器翻译的准确性,生成效果直接影响用户体验。传统优化方法如PPO虽然有效,但在处理复杂语言任务时存…...

SAM3图片分割模型入门:无需训练,输入提示词即可提取物体掩码
SAM3图片分割模型入门:无需训练,输入提示词即可提取物体掩码 1. 什么是SAM3图片分割模型 SAM3(Segment Anything Model 3)是2025年发布的一款革命性图像分割模型,它彻底改变了传统需要大量标注数据训练的模式。这个模…...

Wan2.2-I2V-A14B高性能实践:10核CPU+120GB内存协同优化视频推理稳定性
Wan2.2-I2V-A14B高性能实践:10核CPU120GB内存协同优化视频推理稳定性 1. 镜像概述与核心优势 Wan2.2-I2V-A14B是一款专为高性能文生视频任务优化的私有部署镜像,针对RTX 4090D 24GB显存显卡和10核CPU120GB内存配置进行了深度优化。这个镜像解决了视频生…...

从零开始掌握30+种路径规划算法:可视化学习与实战指南
从零开始掌握30种路径规划算法:可视化学习与实战指南 【免费下载链接】PathPlanning Common used path planning algorithms with animations. 项目地址: https://gitcode.com/gh_mirrors/pa/PathPlanning 你是一个文章写手,你负责为开源项目写专…...

1999-2025.4汽车之家、懂车帝汽车配置信息数据库
汽车配置信息数据是连接汽车生产、销售、使用及后市场服务的核心纽带,对不同主体均具有不可替代的价值。对消费者可辅助决策,规避风险,对车企可指导研发,优化生产,对经销商可精准销售,提升转化,…...
)
别光重启!Ping域名失败但nslookup能通?一个注册表键值引发的血案(附排查脚本)
当Ping域名失败但nslookup正常:深入解析Windows注册表键值缺失的连锁反应 那天凌晨三点,运维工程师李明在机房盯着屏幕,额头渗出细密的汗珠。客户的核心业务系统刚刚完成迁移,却在最后验收阶段出现诡异现象——所有服务器都能通过…...

3大增强型功能体系:重新定义设计师工作方式
3大增强型功能体系:重新定义设计师工作方式 【免费下载链接】illustrator-scripts Adobe Illustrator scripts 项目地址: https://gitcode.com/gh_mirrors/il/illustrator-scripts 在当今快节奏的设计行业中,效率就是竞争力。这款开源Illustrator…...

DeepSeek-R1-Distill-Llama-8B部署全攻略:一条命令搞定推理模型
DeepSeek-R1-Distill-Llama-8B部署全攻略:一条命令搞定推理模型 1. 模型简介 1.1 什么是DeepSeek-R1系列? DeepSeek-R1是专为推理任务优化的语言模型系列,包含两个核心版本: DeepSeek-R1-Zero:完全通过强化学习训练…...

消费级GPU福音:OpenClaw+百川2-13B量化版显存占用实测
消费级GPU福音:OpenClaw百川2-13B量化版显存占用实测 1. 为什么关注显存占用? 去年折腾大模型本地部署时,最头疼的就是显存问题。我的RTX3060显卡只有12GB显存,跑Llama2-13B原版模型时,加载阶段就直接爆显存。直到发…...