3DGS渐进式渲染 - 离线生成渲染视频
总览
输入:环绕Object拍摄的RGB视频
输出:自定义相机路径的渲染视频(包含渐变效果)
实现过程
首先,编译3DGS的C++代码,并跑通convert.py、train.py和render.py。教程如下:
- github网址:https://github.com/graphdeco-inria/gaussian-splatting
- 新手教程:https://www.youtube.com/watch?v=UXtuigy_wYc
- 训练自己的视频数据-教程:https://www.youtube.com/watch?v=wuKhEGCt6ks
在掌握训练自己的视频后,可以生成一组input图像对应的render图像,但点云和参数都是固定的,如:
- 渲染的scaling_modifier参数固定为1.0。
- 渲染时使用的点云 始终是train得到的完整点云。
因此,我们为了得到上面视频中的渐变效果,需要调整这两个地方(scaling_modifier参数和点云采样)。
1 调整scaling_modifier参数
- 修改render.py中的调用的render函数,向里面传入scaling_modifier参数。
# 对每一帧进行渲染
for idx, view in enumerate(tqdm(views, desc="Rendering progress")):rendering = render(view, gaussians, pipeline, background, scaling_modifier=scaling_modifier)["render"]
- 进入该render函数,将scaling_modifier传入GaussianRasterizationSettings方法中。
def render(viewpoint_camera, pc : GaussianModel, pipe, bg_color : torch.Tensor, scaling_modifier = 1.0, override_color = None):# Create zero tensor. We will use it to make pytorch return gradients of the 2D (screen-space) meansscreenspace_points = torch.zeros_like(pc.get_xyz, dtype=pc.get_xyz.dtype, requires_grad=True, device="cuda") + 0try:screenspace_points.retain_grad()except:pass# Set up rasterization configurationtanfovx = math.tan(viewpoint_camera.FoVx * 0.5)tanfovy = math.tan(viewpoint_camera.FoVy * 0.5)raster_settings = GaussianRasterizationSettings(image_height=int(viewpoint_camera.image_height),image_width=int(viewpoint_camera.image_width),tanfovx=tanfovx,tanfovy=tanfovy,bg=bg_color,scale_modifier=scaling_modifier,viewmatrix=viewpoint_camera.world_view_transform,projmatrix=viewpoint_camera.full_proj_transform,sh_degree=pc.active_sh_degree,campos=viewpoint_camera.camera_center,prefiltered=False,debug=pipe.debug)
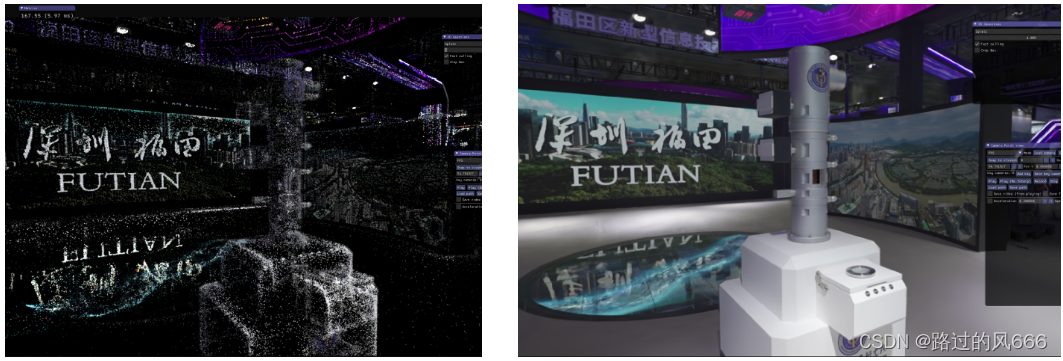
通过上面的方式,即可对每一帧在不同的scaling_modifier下进行渲染,该参数在SIBR Viewer中也可以修改,修改位置如下:

如下左图为scaling_modifier=0.01、右图为scaling_modifier=1.0
2 点云采样
为了实现视频一开始由中心物体向四周扩散的渐变效果,我们需要通过点云采样的方式,实现点云数量渐变式增多
具体步骤如下:
- 计算原始点云中所有点的密度大小。
- 以密度最大的点作为中心点,计算每个点到该点的距离,得到升序排序后的索引。
- 根据该索引生成渐变式的点云。
对应在render.py中添加如下代码:
def get_indices(model_path, iteration):path = os.path.join(model_path, "point_cloud", "iteration_" + str(iteration), "point_cloud.ply")plydata = PlyData.read(path)xyz = np.stack((np.asarray(plydata['vertex']['x']),np.asarray(plydata['vertex']['y']),np.asarray(plydata['vertex']['z'])), axis=1)# 定义邻域半径neighbor_radius = 0.1 # 例如,这里假设邻域半径为0.1# 使用最近邻算法查找每个点的邻域内的点的数量nbrs = NearestNeighbors(radius=neighbor_radius, algorithm='auto').fit(xyz)densities = nbrs.radius_neighbors(xyz, return_distance=False)# 使用最近邻算法查找每个点的邻域内的点的数量nbrs = NearestNeighbors(radius=neighbor_radius, algorithm='auto').fit(xyz)densities = nbrs.radius_neighbors(xyz, return_distance=False)# 计算每个点的密度point_cloud_density = np.array([len(density) for density in densities])# 确定渲染顺序start_idx = np.argmax(point_cloud_density)start_point = xyz[start_idx]# 根据与起始点的距离对点云进行排序distances = np.linalg.norm(xyz - start_point, axis=1)sorted_indices = np.argsort(distances)return sorted_indices在render_set函数中调用get_indices函数:
def render_set(model_path, name, iteration, views, gaussians, pipeline, background, scene):render_path = os.path.join(model_path, name, "ours_{}".format(iteration), "renders")gts_path = os.path.join(model_path, name, "ours_{}".format(iteration), "gt")makedirs(render_path, exist_ok=True)# makedirs(gts_path, exist_ok=True)### 计算点的渲染顺序sorted_indices = get_indices(model_path, iteration)# 对给定的images.bin(相机外参)一帧帧图片进行渲染for idx, view in enumerate(tqdm(views, desc="Rendering progress")):# 修改点云切片if idx<120:indices = sorted_indices[:(len(sorted_indices)//120 * idx)]scene.change_pc_indice(indices=indices)scaling_modifier = 0.01elif scaling_modifier<1:scaling_modifier += 0.01else:scaling_modifier = 1rendering = render(view, gaussians, pipeline, background, scaling_modifier=scaling_modifier)["render"]torchvision.utils.save_image(rendering, os.path.join(render_path, '{0:05d}'.format(idx) + ".png"))
最后,运行render.py即可得到最后的渲染视频(包含渐变效果)。
3 自定义环绕Object的相机路径
render.py使用的相机外参和内参分别存储在images.bin和cameras.bin中。
cameras.bin(内参)
该文件解析(read_intrinsics_binary函数)后,得到如下key-value(int-Camera对象)组成的字典。
{...,
1: Camera(id=1, model='PINHOLE', width=1332, height=876, params=array([1035.49659905, 1034.97186374,  666.  , 438.])),...}
images.bin(外参)
该文件解析(read_extrinsics_binary函数)后,得到如下key-value(int-Image对象)组成的字典
{...,
263: Image(id=263, qvec=array([-0.15935236, -0.46899572,  0.35922958,  0.79095129]), tvec=array([-0.68604342, -0.24766367,  1.17531395]), camera_id=1, name='IMG_6597.jpg', xys=array([[ 826.85421273,    3.56521302],[ 791.22610197,    6.24990826],[1318.28015465,    6.96729477],...,[1041.33873779,  316.22219915],[ 737.99930832,  487.77142606],[ 649.78058365,   72.14452395]]), point3D_ids=array([   -1,    -1, 75770, ...,    -1,    -1,   -1]))
,...}
在不考虑测试集的时候,我们不会使用该字典的xys和point3D_ids,相机外参仅由qvec和tvec构成。
修改images.bin(外参)
为了生成自定义的相机路径,我们仅需修改images.bin中每一帧的qvec和tvec。核心代码如下:
# 读取相机内外参
images = read_extrinsics_binary('../C4879_4/sparse/0/images_original.bin')
qvecs, tvecs = get_qvec_tvec('../C4879_4/sparse/0/images_original.bin')  # 获取qvecs, tvecsqvecs = np.array(qvecs)
tvecs = np.array(tvecs)
mean_x = tvecs[:,0].sum() / len(tvecs)
mean_y = tvecs[:,1].sum() / len(tvecs)
mean_z = tvecs[:,2].sum() / len(tvecs)
print(mean_x,mean_y,mean_z)
#################################以二维平面中的一个圆的轨迹为例############################
# 定义圆形轨迹的参数
radius = 1.0  # 圆的半径
num_poses = len(qvecs)  # 生成的外参数量
center = np.array([mean_x,mean_y,mean_z])  # 圆心坐标# 生成沿着圆形轨迹的外参
poses = []
for i in range(num_poses):angle = 2 * np.pi * i / num_poses  # 在圆上均匀分布的角度position = center + np.array([radius * np.cos(angle), radius * np.sin(angle), 0])  # 根据角度计算位置q = R.from_euler('xyz', [0, angle, 0]).as_quat()  # 根据角度计算旋转四元数tvec = position  # 平移向量即为位置poses.append((q, tvec))new_images = {}
for i in range(len(images)):new_images[i+1] = Image(id=images[i+1].id, qvec=np.array(poses[i][0]), tvec=np.array(poses[i][1]),camera_id=images[i+1].camera_id, name='{:03d}'.format(i), xys=images[i+1].xys, point3D_ids=images[i+1].point3D_ids)# 写入相机内外参
write_images_binary(new_images, '../C4879_4/sparse/0/images.bin')
使用到的依赖库和函数:
import numpy as np
import struct
import collections
from PIL import Image
from scipy.spatial.transform import Rotation
import pandas as pd
from scipy.spatial.transform import Rotation as RCameraModel = collections.namedtuple("CameraModel", ["model_id", "model_name", "num_params"])
Camera = collections.namedtuple("Camera", ["id", "model", "width", "height", "params"])
BaseImage = collections.namedtuple("Image", ["id", "qvec", "tvec", "camera_id", "name", "xys", "point3D_ids"])
Point3D = collections.namedtuple("Point3D", ["id", "xyz", "rgb", "error", "image_ids", "point2D_idxs"])
CAMERA_MODELS = {CameraModel(model_id=0, model_name="SIMPLE_PINHOLE", num_params=3),CameraModel(model_id=1, model_name="PINHOLE", num_params=4),CameraModel(model_id=2, model_name="SIMPLE_RADIAL", num_params=4),CameraModel(model_id=3, model_name="RADIAL", num_params=5),CameraModel(model_id=4, model_name="OPENCV", num_params=8),CameraModel(model_id=5, model_name="OPENCV_FISHEYE", num_params=8),CameraModel(model_id=6, model_name="FULL_OPENCV", num_params=12),CameraModel(model_id=7, model_name="FOV", num_params=5),CameraModel(model_id=8, model_name="SIMPLE_RADIAL_FISHEYE", num_params=4),CameraModel(model_id=9, model_name="RADIAL_FISHEYE", num_params=5),CameraModel(model_id=10, model_name="THIN_PRISM_FISHEYE", num_params=12)
}
CAMERA_MODEL_IDS = dict([(camera_model.model_id, camera_model)for camera_model in CAMERA_MODELS])def qvec2rotmat(qvec):return np.array([[1 - 2 * qvec[2]**2 - 2 * qvec[3]**2,2 * qvec[1] * qvec[2] - 2 * qvec[0] * qvec[3],2 * qvec[3] * qvec[1] + 2 * qvec[0] * qvec[2]],[2 * qvec[1] * qvec[2] + 2 * qvec[0] * qvec[3],1 - 2 * qvec[1]**2 - 2 * qvec[3]**2,2 * qvec[2] * qvec[3] - 2 * qvec[0] * qvec[1]],[2 * qvec[3] * qvec[1] - 2 * qvec[0] * qvec[2],2 * qvec[2] * qvec[3] + 2 * qvec[0] * qvec[1],1 - 2 * qvec[1]**2 - 2 * qvec[2]**2]])def rotmat2qvec(R):Rxx, Ryx, Rzx, Rxy, Ryy, Rzy, Rxz, Ryz, Rzz = R.flatK = np.array([[Rxx - Ryy - Rzz, 0, 0, 0],[Ryx + Rxy, Ryy - Rxx - Rzz, 0, 0],[Rzx + Rxz, Rzy + Ryz, Rzz - Rxx - Ryy, 0],[Ryz - Rzy, Rzx - Rxz, Rxy - Ryx, Rxx + Ryy + Rzz]]) / 3.0eigvals, eigvecs = np.linalg.eigh(K)qvec = eigvecs[[3, 0, 1, 2], np.argmax(eigvals)]if qvec[0] < 0:qvec *= -1return qvecclass Image(BaseImage):def qvec2rotmat(self):return qvec2rotmat(self.qvec)def read_next_bytes(fid, num_bytes, format_char_sequence, endian_character="<"):"""Read and unpack the next bytes from a binary file.:param fid::param num_bytes: Sum of combination of {2, 4, 8}, e.g. 2, 6, 16, 30, etc.:param format_char_sequence: List of {c, e, f, d, h, H, i, I, l, L, q, Q}.:param endian_character: Any of {@, =, <, >, !}:return: Tuple of read and unpacked values."""data = fid.read(num_bytes)return struct.unpack(endian_character + format_char_sequence, data)def read_extrinsics_binary(path_to_model_file):"""see: src/base/reconstruction.ccvoid Reconstruction::ReadImagesBinary(const std::string& path)void Reconstruction::WriteImagesBinary(const std::string& path)"""images = {}with open(path_to_model_file, "rb") as fid:num_reg_images = read_next_bytes(fid, 8, "Q")[0]for i in range(num_reg_images):binary_image_properties = read_next_bytes(fid, num_bytes=64, format_char_sequence="idddddddi")image_id = binary_image_properties[0]qvec = np.array(binary_image_properties[1:5])tvec = np.array(binary_image_properties[5:8])camera_id = binary_image_properties[8]image_name = ""current_char = read_next_bytes(fid, 1, "c")[0]while current_char != b"\x00":   # look for the ASCII 0 entryimage_name += current_char.decode("utf-8")current_char = read_next_bytes(fid, 1, "c")[0]num_points2D = read_next_bytes(fid, num_bytes=8,format_char_sequence="Q")[0]x_y_id_s = read_next_bytes(fid, num_bytes=24*num_points2D,format_char_sequence="ddq"*num_points2D)xys = np.column_stack([tuple(map(float, x_y_id_s[0::3])),tuple(map(float, x_y_id_s[1::3]))])point3D_ids = np.array(tuple(map(int, x_y_id_s[2::3])))images[image_id] = Image(id=image_id, qvec=qvec, tvec=tvec,camera_id=camera_id, name=image_name,xys=xys, point3D_ids=point3D_ids)# if i>3:#     breakreturn imagesdef write_next_bytes(fid, data, format_char_sequence, endian_character="<"):"""pack and write to a binary file.:param fid::param data: data to send, if multiple elements are sent at the same time,they should be encapsuled either in a list or a tuple:param format_char_sequence: List of {c, e, f, d, h, H, i, I, l, L, q, Q}.should be the same length as the data list or tuple:param endian_character: Any of {@, =, <, >, !}"""if isinstance(data, (list, tuple)):bytes = struct.pack(endian_character + format_char_sequence, *data)else:bytes = struct.pack(endian_character + format_char_sequence, data)fid.write(bytes)def write_images_binary(images, path_to_model_file):"""see: src/colmap/scene/reconstruction.ccvoid Reconstruction::ReadImagesBinary(const std::string& path)void Reconstruction::WriteImagesBinary(const std::string& path)"""with open(path_to_model_file, "wb") as fid:write_next_bytes(fid, len(images), "Q")for i, img in images.items():write_next_bytes(fid, img.id, "i")tmp_qvec = [q*1.01 for q in img.qvec.tolist()]write_next_bytes(fid, tmp_qvec, "dddd")tmp_tvec = [v*1.02 for v in img.tvec.tolist()]write_next_bytes(fid, tmp_tvec, "ddd")write_next_bytes(fid, img.camera_id, "i")for char in img.name:write_next_bytes(fid, char.encode("utf-8"), "c")write_next_bytes(fid, b"\x00", "c")write_next_bytes(fid, len(img.point3D_ids), "Q")for xy, p3d_id in zip(np.zeros_like(img.xys), np.zeros_like(img.point3D_ids)):write_next_bytes(fid, [*xy, p3d_id], "ddq")def get_qvec_tvec(path_to_model_file):qvecs = []tvecs = []with open(path_to_model_file, "rb") as fid:num_reg_images = read_next_bytes(fid, 8, "Q")[0]for i in range(num_reg_images):binary_image_properties = read_next_bytes(fid, num_bytes=64, format_char_sequence="idddddddi")image_id = binary_image_properties[0]qvec = np.array(binary_image_properties[1:5])qvecs.append(qvec)tvec = np.array(binary_image_properties[5:8])tvecs.append(tvec)camera_id = binary_image_properties[8]image_name = ""current_char = read_next_bytes(fid, 1, "c")[0]while current_char != b"\x00":   # look for the ASCII 0 entryimage_name += current_char.decode("utf-8")current_char = read_next_bytes(fid, 1, "c")[0]num_points2D = read_next_bytes(fid, num_bytes=8,format_char_sequence="Q")[0]x_y_id_s = read_next_bytes(fid, num_bytes=24*num_points2D,format_char_sequence="ddq"*num_points2D)xys = np.column_stack([tuple(map(float, x_y_id_s[0::3])),tuple(map(float, x_y_id_s[1::3]))])point3D_ids = np.array(tuple(map(int, x_y_id_s[2::3])))return qvecs, tvecs
相关文章:
3DGS渐进式渲染 - 离线生成渲染视频
总览 输入:环绕Object拍摄的RGB视频 输出:自定义相机路径的渲染视频(包含渐变效果) 实现过程 首先,编译3DGS的C代码,并跑通convert.py、train.py和render.py。教程如下: github网址…...
chromium 协议栈 cronet ios 踩坑案例
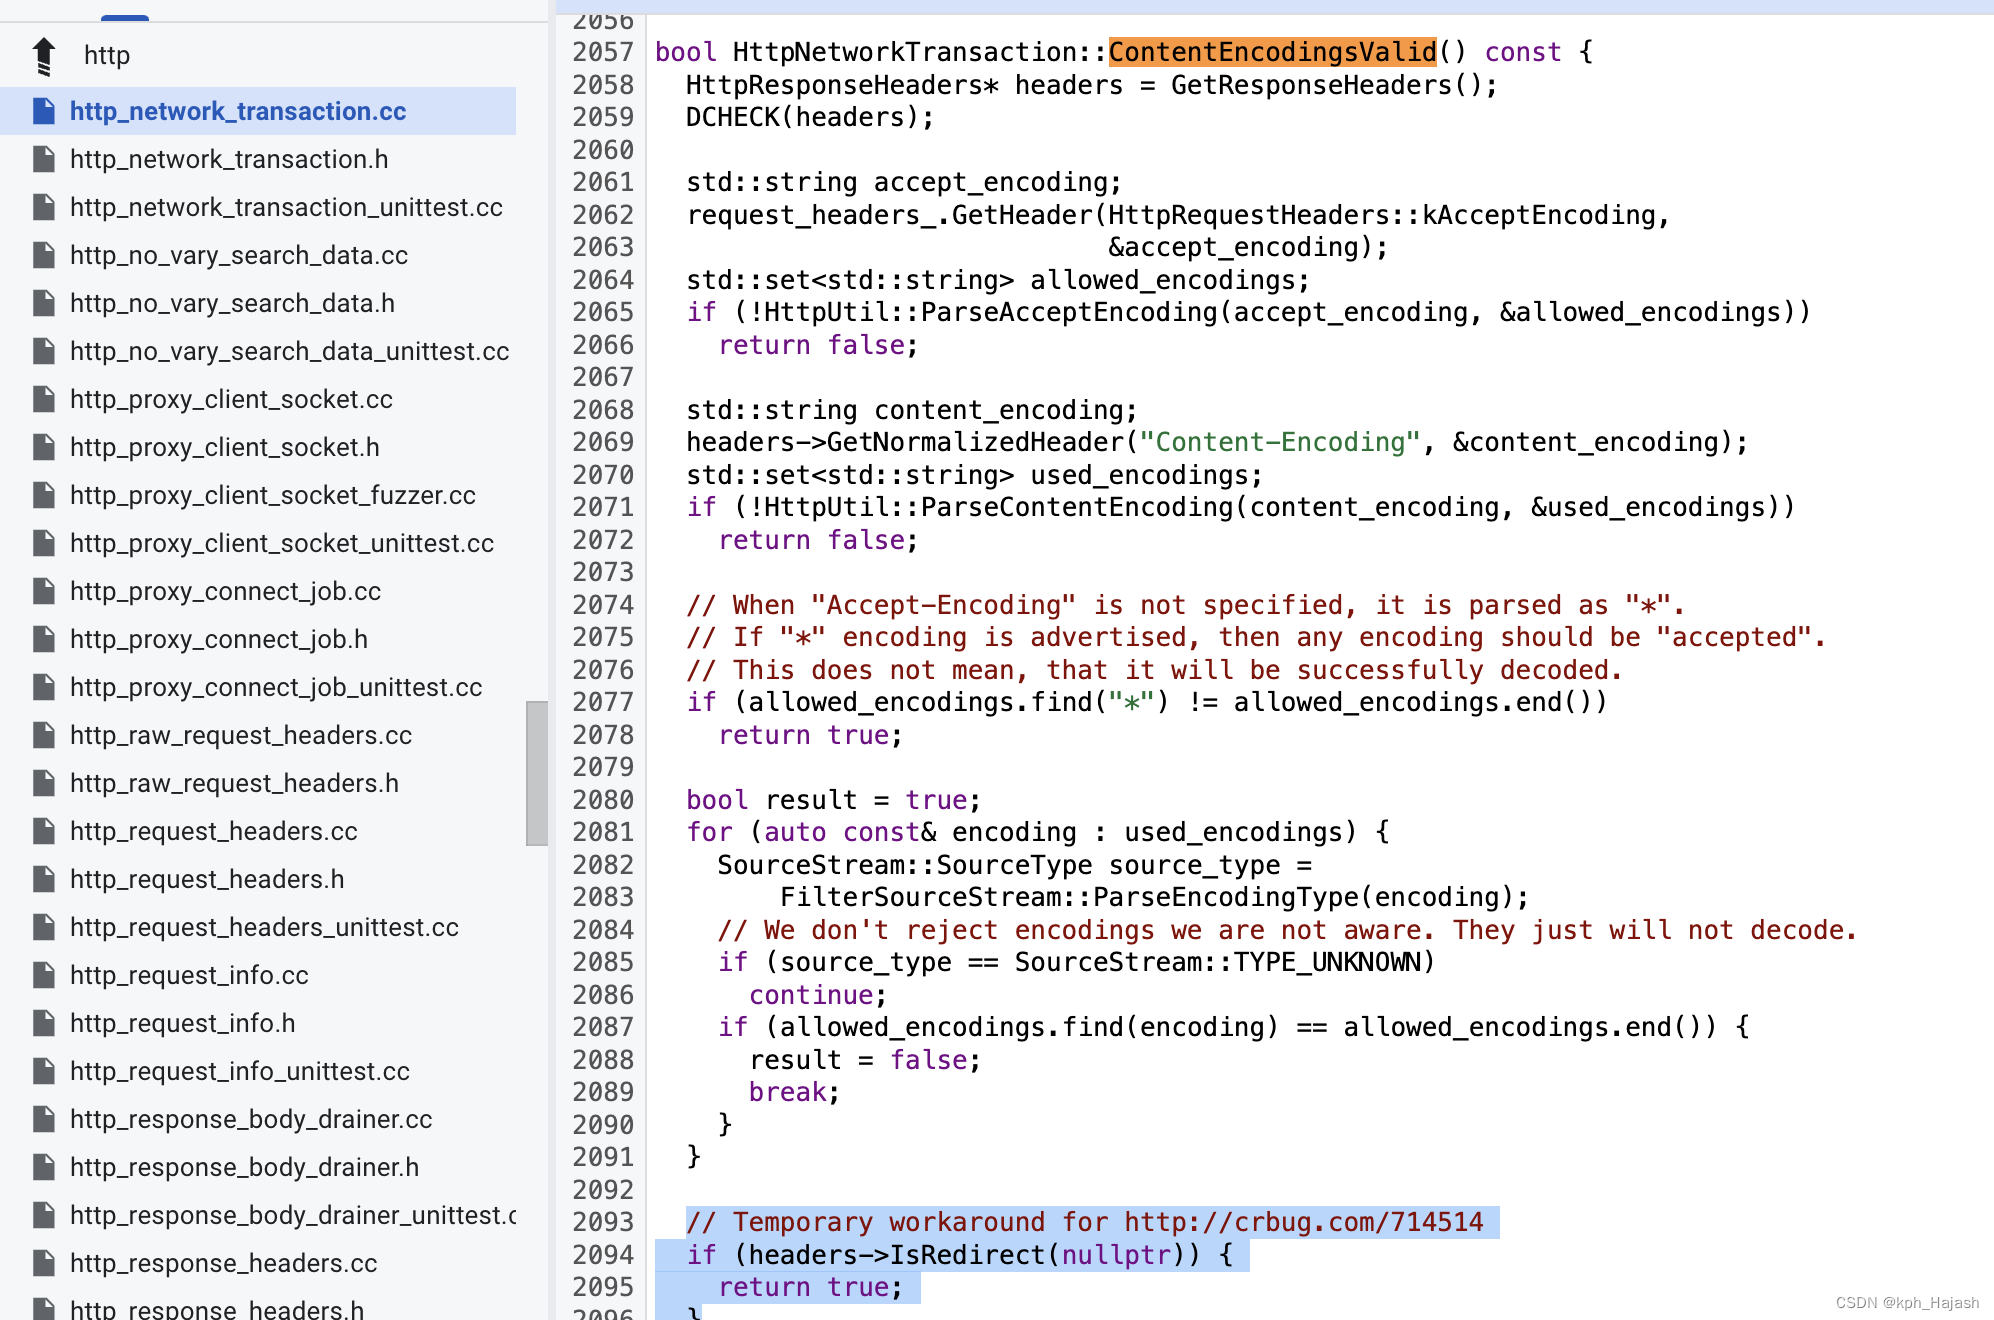
1、请求未携带 Accept-Language http header 出现图片加载失败 现象: 访问 https://www.huawei.com/cn/?ic_mediumdirect&ic_sourcesurlent 时出现图片加载失败的问题 预期结果: 原因: 网络库删除了添加 Accept-Language header 的逻…...
)
Java快速排序知识点(含面试大厂题和源码)
快速排序(Quick Sort)是一种高效的排序算法,采用分治法(Divide and Conquer)的策略来对一个数组进行排序。快速排序的平均时间复杂度为 O(n log n),在最坏的情况下为 O(n^2),但这种情况很少发生…...

SpringBoot整合Swagger2
SpringBoot整合Swagger2 1.什么是Swagger2?(应用场景)2.项目中如何使用2.1 导入依赖2.2 编写配置类2.3 注解使用2.3.1 controller注解:2.3.2 方法注解2.3.3 实体类注解2.3.4 方法返回值注解2.3.5 忽略的方法 3.UI界面 1.什么是Swa…...

C++算法题 - 矩阵
目录 36. 有效的数独54. 螺旋矩阵48. 旋转图像73. 矩阵置零289. 生命游戏 36. 有效的数独 LeetCode_link 请你判断一个 9 x 9 的数独是否有效。只需要 根据以下规则 ,验证已经填入的数字是否有效即可。 数字 1-9 在每一行只能出现一次。 数字 1-9 在每一列只能出现…...

记录一个没测出来,有点严重的Bug
前提: 人物:若干个 部门:若干个 部门有一个人物选择框,可以选择所有的人物,且为非必填字段 bug现象: 部门中 的人物选择框每次都少一个人物 代码分析: F12接口后端没问题,定位为前端的问题。 前…...

科学突破可能开创6G通信新时代
格拉斯哥大学开发的火柴盒大小的天线可以为全息通话、改进自动驾驶和更好的医疗保健的世界铺平道路。 格拉斯哥大学表示,这种创新的无线通信天线将超材料的独特特性与复杂的信号处理相结合,有助于构建未来的 6G 网络。 数字编码动态超表面天线…...
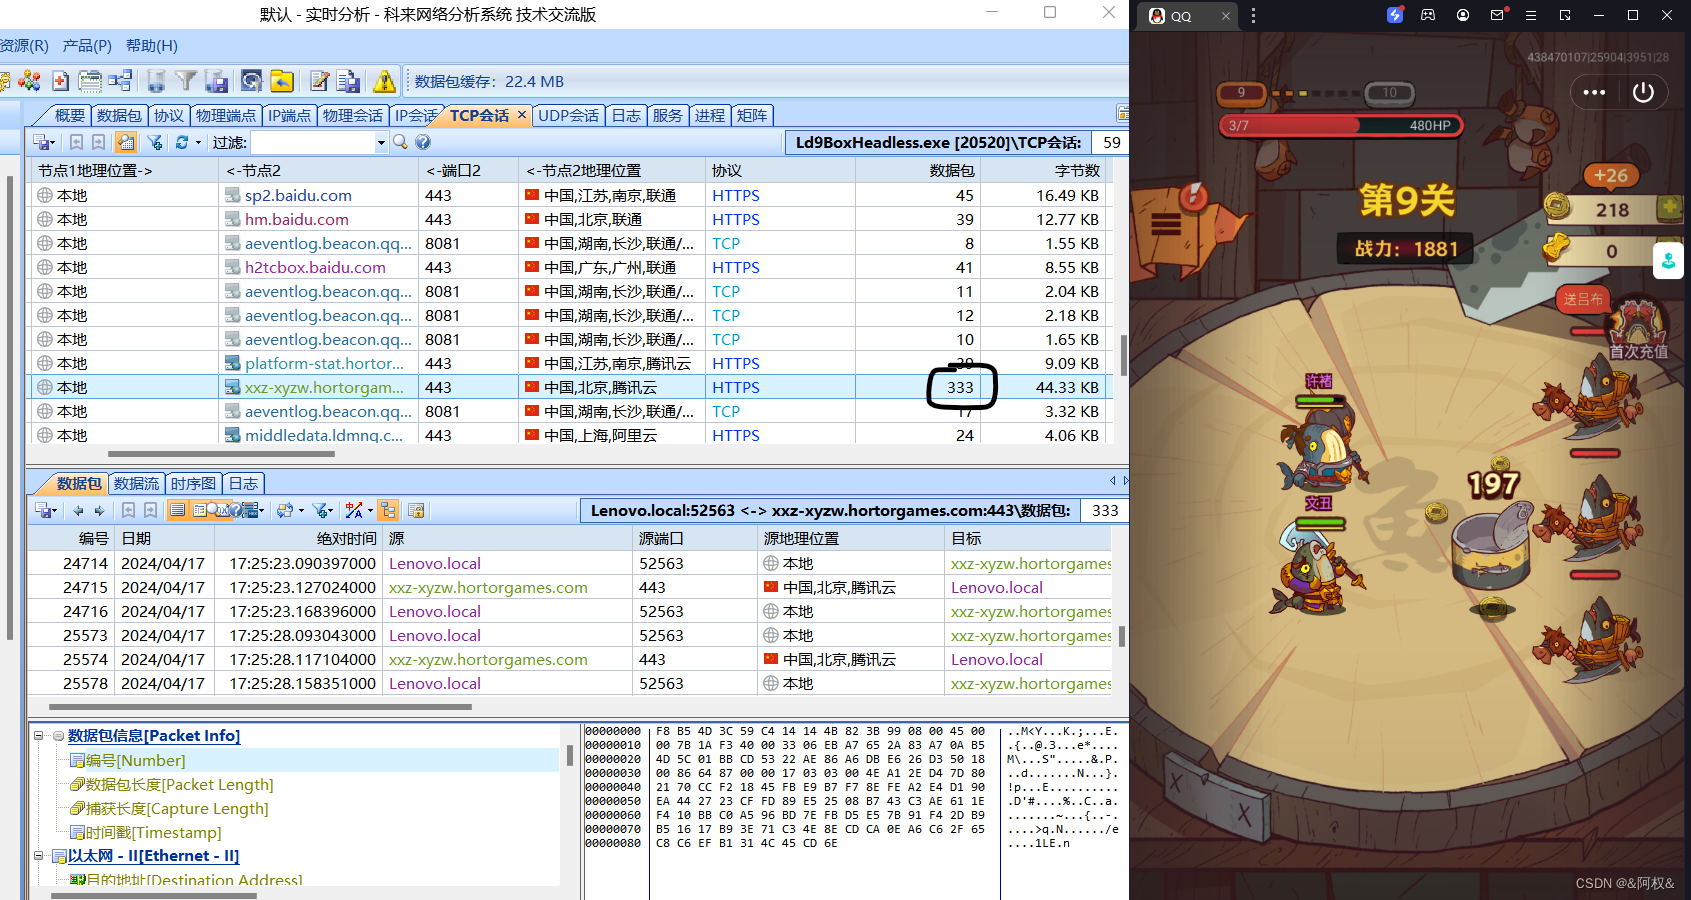
游戏、app抓包
文章目录 协议app抓包游戏抓包 协议 在抓包之前,首先我们要对每个程序使用什么协议有个大致的了解,比如网页这种就是走的http协议。 在一些app中我们通过发送一个请求,然后服务器接受,响应,返回一个数据包,…...
PACNet CellNet(代码开源)|bulk数据作细胞分类,评估细胞命运性能的一大利器
文章目录 1.前言2.CellNet2.1CellNet简介2.2CellNet结果 3.PACNet3.1安装R包与加载R包3.2加载数据3.3开始训练和分类3.4可视化分类过程3.5可视化分类结果 4.细胞命运分类和免疫浸润比较 1.前言 今天冲浪看到一个细胞分类性能评估的R包——PACNet,它与转录组分析方法…...
 Object Pascal 学习笔记---第10章第1节(定义属性))
(delphi11最新学习资料) Object Pascal 学习笔记---第10章第1节(定义属性)
第10章 属性和事件 在过去的三章中,我已经介绍了Object Pascal中面向对象编程(OOP)的基础知识,解释了这些概念并展示了大多数面向对象编程语言中通用特性是如何具体实现的。自Delphi的早期,Object Pascal语言就是一…...
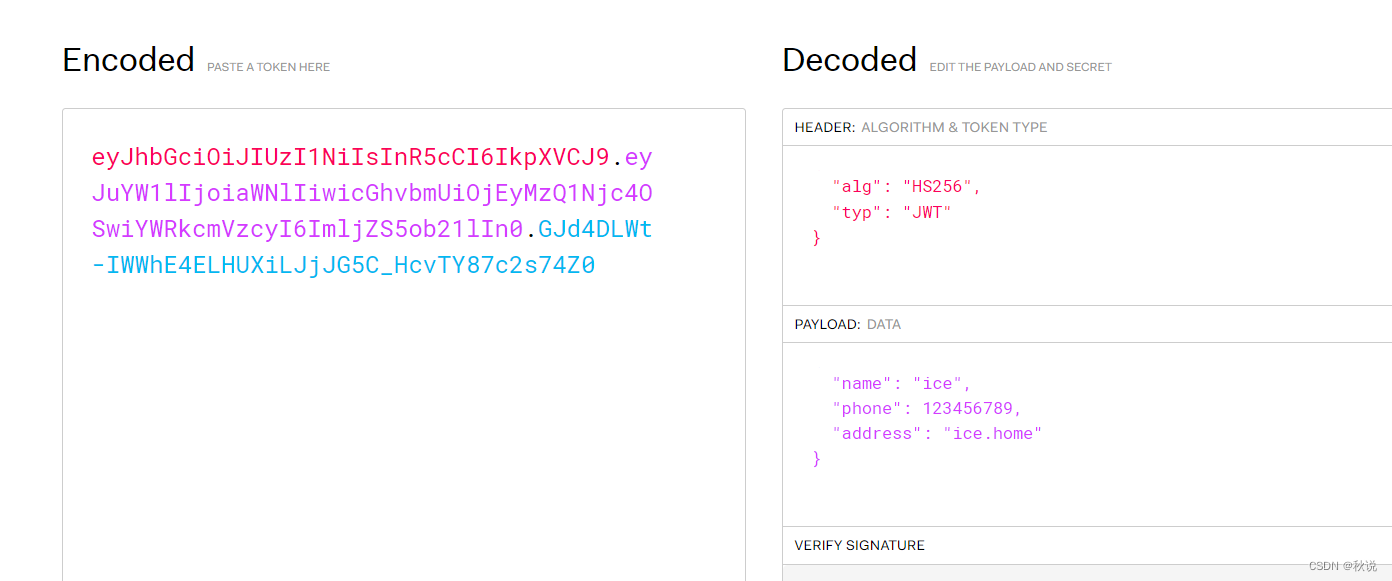
【网络安全 | 密码学】JWT基础知识及攻击方式详析
前言 JWT(Json Web Token)是一种用于在网络应用之间安全地传输信息的开放标准。它通过将用户信息以JSON格式加密并封装在一个token中,然后将该token发送给服务端进行验证,从而实现身份验证和授权。 流程 JWT的加密和解密过程如…...
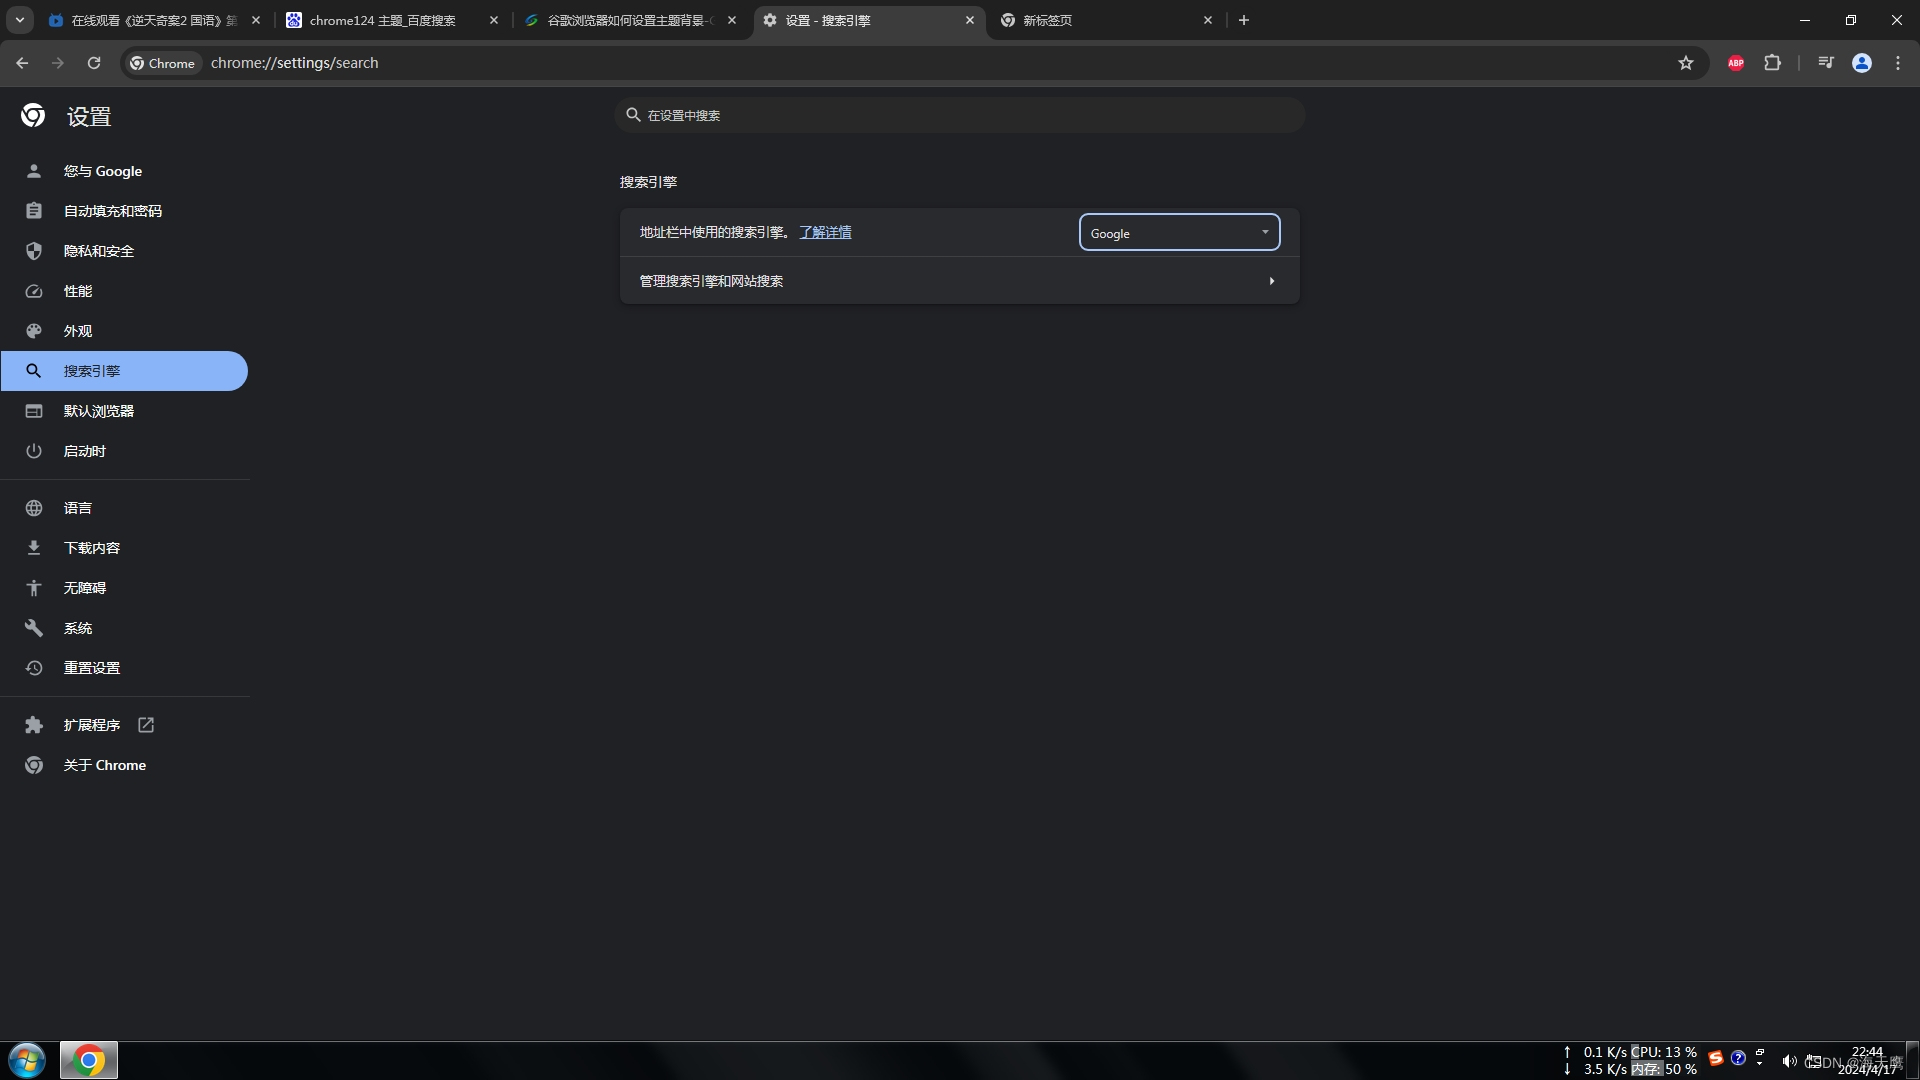
Chrome修改主题颜色
注意:自定义Chrome按钮只在搜索引擎为Google的时候出现。...

大数据:【学习笔记系列】Flink基础架构
Apache Flink 是一个开源的流处理框架,用于处理有界和无界的数据流。Flink 设计用于运行在所有常见的集群环境中,并且能够以高性能和可扩展的方式进行实时数据处理和分析。下面将详细介绍 Flink 的基础架构组件和其工作原理。 1. Flink 架构概览 Flink…...

Debezium系列之:部署Debezium采集Oracle数据库的详细步骤
Debezium系列之:部署Debezium采集Oracle数据库的详细步骤 一、部署Debezium Oracle连接器二、Debezium Oracle 连接器配置三、添加连接器配置四、可插拔数据库与不可插拔数据库一、部署Debezium Oracle连接器 部署的详细步骤可以参考博主这篇技术文章: Debezium系列之:安装…...

C语言通过键盘输入给结构体内嵌的结构体赋值——指针法
1 需求 以录入学生信息(姓名、学号、性别、出生日期)为例,首先通过键盘输入需要录入的学生的数量,再依次输入这些学生的信息,输入完成后输出所有信息。 2 代码 #include<stdio.h> #include<stdlib.h>//…...

AWS Key disabler:AWS IAM用户访问密钥安全保护工具
关于AWS Key disabler AWS Key disabler是一款功能强大的AWS IAM用户访问密钥安全保护工具,该工具可以通过设置一个时间定量来禁用AWS IAM用户访问密钥,以此来降低旧访问密钥所带来的安全风险。 工具运行流程 AWS Key disabler本质上是一个Lambda函数&…...

【第1节】书生·浦语大模型全链路开源开放体系
目录 1 简介2 内容(1)书生浦语大模型发展历程(2)体系(3)亮点(4)全链路体系构建a.数据b 预训练c 微调d 评测e.模型部署f.agent 智能体 3 相关论文解读4 ref 1 简介 书生浦语 InternLM…...

代码随想录-链表 | 707设计链表
代码随想录-数组 | 707设计链表 LeetCode 707-设计链表解题思路代码复杂度难点总结 LeetCode 707-设计链表 题目链接 题目描述 你可以选择使用单链表或者双链表,设计并实现自己的链表。 单链表中的节点应该具备两个属性:val 和 next 。val 是当前节点…...
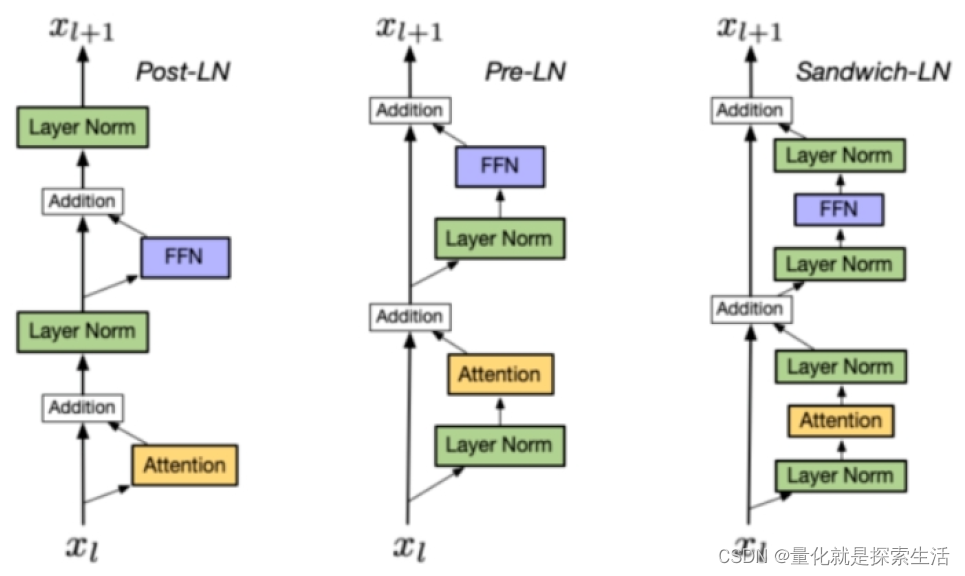
AIGC算法1:Layer normalization
1. Layer Normalization μ E ( X ) ← 1 H ∑ i 1 n x i σ ← Var ( x ) 1 H ∑ i 1 H ( x i − μ ) 2 ϵ y x − E ( x ) Var ( X ) ϵ ⋅ γ β \begin{gathered}\muE(X) \leftarrow \frac{1}{H} \sum_{i1}^n x_i \\ \sigma \leftarrow \operatorname{Var}(…...

【C语言】——字符串函数的使用与模拟实现(下)
【C语言】——字符串函数的使用与模拟实现(下) 前言五、长度受限类字符串函数5.1、 s t r n c p y strncpy strncpy 函数5.2、 s t r n c a t strncat strncat 函数5.3、 s t r n c m p strncmp strncmp 函数 六、 s t r s t r strstr strstr 函数6.1、函…...

超越regress:用MATLAB轻松搞定带二次项和交互项的多元回归模型
超越regress:用MATLAB轻松搞定带二次项和交互项的多元回归模型 在数据分析的实际应用中,我们常常会遇到变量间关系并非简单线性的情况。比如在市场营销分析中,广告投入对销售额的影响可能呈现边际效应递减;在工程优化中࿰…...

Vue 3项目实战:i18n国际化从单文件到多文件管理的完整升级指南
Vue 3项目国际化架构升级:从单文件到模块化管理的工程化实践 当Vue 3项目发展到一定规模后,国际化方案往往会面临新的挑战。初期简单的单文件语言包结构逐渐暴露出维护困难、协作效率低等问题。本文将分享如何将现有单文件国际化方案升级为模块化管理体系…...

SDMatte镜像审计日志:用户操作记录+模型调用追踪+输出结果水印嵌入
SDMatte镜像审计日志:用户操作记录模型调用追踪输出结果水印嵌入 1. 审计日志系统概述 SDMatte镜像内置了完整的审计日志系统,能够记录用户操作、追踪模型调用过程,并在输出结果中嵌入水印信息。这套系统为管理员提供了全面的使用监控能力&…...

深入理解Sentinel: 02 为什么需要服务降级以及常见的几种降级方式
为什么需要服务降级,常见的降级方式有哪些?上一篇跟大家分享了一个真实的服务雪崩的故事,也分析了造成服务雪崩的真正原因,那么,如何才能避免服务雪崩的出现呢?我知道你会说:增加硬件࿰…...

SenseVoice-small-onnx企业落地实操:REST API集成语音转写服务完整方案
SenseVoice-small-onnx企业落地实操:REST API集成语音转写服务完整方案 语音转写技术正成为企业数字化转型的关键工具,从会议记录到客服质检,从多媒体内容处理到实时语音分析,高效准确的语音识别能力正在各个行业创造着实际价值。…...

CVPR2023图像处理前沿技术精选:63篇论文亮点解析
1. CVPR2023图像处理技术全景概览 CVPR作为计算机视觉领域的顶级会议,每年都会涌现大量突破性研究成果。2023年的会议论文在图像处理领域呈现出几个明显趋势:自监督学习从理论走向成熟应用、跨模态生成技术实现质的飞跃、低光照增强进入实用化阶段。不同…...

10分钟精通:XHS-Downloader小红书内容高效采集全攻略
10分钟精通:XHS-Downloader小红书内容高效采集全攻略 【免费下载链接】XHS-Downloader 免费;轻量;开源,基于 AIOHTTP 模块实现的小红书图文/视频作品采集工具 项目地址: https://gitcode.com/gh_mirrors/xh/XHS-Downloader …...

Qwen3-TTS-Tokenizer-12Hz在播客制作中的应用:自动化内容生成方案
Qwen3-TTS-Tokenizer-12Hz在播客制作中的应用:自动化内容生成方案 如果你正在制作播客,或者对内容创作感兴趣,那你一定知道最耗时的环节是什么——不是选题,不是策划,而是后期制作。录制、剪辑、配乐、合成࿰…...

深入解析@DateTimeFormat与@JsonFormat:Java日期处理的实战指南
1. 为什么需要日期格式化注解 刚入行Java开发时,我最头疼的就是处理日期时间问题。前端传过来的日期字符串五花八门,后端接收时总报400错误;数据库查出来的时间显示也不对劲,返回给前端又变成了一串看不懂的UTC格式。直到我发现了…...
Pixel Dimension Fissioner 数据库集成:MySQL存储用户生成内容与模型参数
Pixel Dimension Fissioner 数据库集成:MySQL存储用户生成内容与模型参数 1. 场景需求与技术选型 在构建基于Pixel Dimension Fissioner的UGC平台时,我们需要处理三类核心数据:用户信息、生成任务记录和模型参数配置。MySQL因其成熟稳定、社…...