win10 mingw 调用python
ubuntu调用pythonhttps://blog.csdn.net/qq_39942341/article/details/129333969
我这里mingw是用msys2的
opencv也是msys2装的
安装msys2和opencv可以参考这个https://blog.csdn.net/qq_39942341/article/details/129380197?spm=1001.2014.3001.5502
环境变量里加入python路径,例如D:\Miniconda3\envs\DL
D:\Miniconda3\envs\DL\libs里,python37.lib复制一份改成python37_d.lib

有个玄学的问题,我用不了imgaug这个库
opencv+numpy+pytorch
main.cpp
load_model
加载模型
get_predict_xy
用C++的opencv读图片,转numpy传入python
python再用pytorch预测,返回一个numpy
simple_test
用C++的opencv读图片,转numpy传入python
python直接传回来给C++,转opencv
顺带提一下,import_array()一定要写
#include <Python.h>
#include <iostream>
#include <string>
#include <numpy/arrayobject.h>
#include <opencv2/opencv.hpp>void load_model(PyObject* pModule, const std::string& model_path){PyObject* init_model = PyObject_GetAttrString(pModule, "init_model");if (NULL == init_model || 0 == PyCallable_Check(init_model)) {std::cout << "not found function init_model" << std::endl;exit(-1);}PyObject *pArgs = PyTuple_New(1);PyTuple_SetItem(pArgs, 0, Py_BuildValue("s", model_path.c_str()));PyObject* result = PyObject_CallObject(init_model, pArgs);if(NULL == result){std::cout << "init_model failed" << std::endl;exit(-1);}int return_value = -1;PyArg_Parse(result, "i", &return_value);std::cout<<"returned "<<return_value<<std::endl;
}void get_predict_xy(PyObject* pModule, const std::string& img_path){cv::Mat img = cv::imread(img_path, 0);PyObject* predict = PyObject_GetAttrString(pModule, "get_predict_xy");if (NULL == predict || 0 == PyCallable_Check(predict)) {std::cout << "not found function get_predict_xy" << std::endl;exit(-1);}npy_intp dims[] = {img.rows, img.cols};PyObject* pValue = PyArray_SimpleNewFromData(2, dims, NPY_UINT8, img.data);PyObject *pArgs = PyTuple_New(1);// PyTuple_SetItem(pArgs, 0, Py_BuildValue("s", img_path.c_str()));PyTuple_SetItem(pArgs, 0, pValue);PyObject* result = PyEval_CallObject(predict, pArgs);if(NULL == result){std::cout << "get_predict_xy failed" << std::endl;exit(-1);}if(!PyArray_Check(result)){//Nonestd::cout << "didn't return numpy" << std::endl;exit(-1);}PyArrayObject* ret_array;PyArray_OutputConverter(result, &ret_array);if(2 != PyArray_NDIM(ret_array)){exit(-1);}npy_intp* shape = PyArray_SHAPE(ret_array);int n = shape[0];int m = shape[1];cv::Mat return_key_points(n,m,CV_32F,PyArray_DATA(ret_array));for(int i = 0; i < n; ++i){for(int j = 0; j < m; ++j){int* cur = reinterpret_cast<int*>(PyArray_GETPTR2(ret_array, i, j));std::cout<<*cur<<' ';}std::cout<<std::endl;}//PyArray_GETPTR2
}void simple_test(PyObject* pModule, const std::string& img_path){cv::Mat img = cv::imread(img_path, 0);PyObject* predict = PyObject_GetAttrString(pModule, "simple_test");if (NULL == predict || 0 == PyCallable_Check(predict)) {std::cout << "not found function simple_test" << std::endl;exit(-1);}npy_intp dims[] = {img.rows, img.cols};PyObject* pValue = PyArray_SimpleNewFromData(2, dims, NPY_UINT8, img.data);PyObject *pArgs = PyTuple_New(1);// PyTuple_SetItem(pArgs, 0, Py_BuildValue("s", img_path.c_str()));PyTuple_SetItem(pArgs, 0, pValue);PyObject* result = PyEval_CallObject(predict, pArgs);if(NULL == result){std::cout << "simple_test failed" << std::endl;exit(-1);}if(!PyArray_Check(result)){//Nonestd::cout << "didn't return numpy" << std::endl;exit(-1);}PyArrayObject* ret_array;PyArray_OutputConverter(result, &ret_array);if(2 != PyArray_NDIM(ret_array)){exit(-1);}npy_intp* shape = PyArray_SHAPE(ret_array);int n = shape[0];int m = shape[1];cv::Mat return_img(n,m,CV_8UC1,PyArray_DATA(ret_array));// cv::imshow("test", return_img);// cv::waitKey(0);// cv::destroyAllWindows();for(int i = 0; i < n; ++i){uchar* data1 = img.ptr<uchar>(i);uchar* data2 = return_img.ptr<uchar>(i);for(int j = 0; j < m; ++j){if(data1[j] != data2[j]){std::cout<<"not equal"<<std::endl;return;}}}std::cout<<"equal"<<std::endl;
}int main() {Py_SetPythonHome(L"D:\\Miniconda3\\envs\\DL");Py_Initialize();if (0 == Py_IsInitialized()) {std::cout << "python init fail" << std::endl;return -1;}import_array();PyRun_SimpleString("import sys");PyRun_SimpleString("import os");PyRun_SimpleString("print(os.path.abspath('.'))");PyRun_SimpleString("sys.path.append('../python_script')");//相当于importPyObject* pModule = PyImport_ImportModule("predict");if (NULL == pModule) {std::cout << "module not found" << std::endl;return -1;}simple_test(pModule, "../python_script/001.bmp");load_model(pModule, "../python_script/best.pth");get_predict_xy(pModule, "../python_script/001.bmp");get_predict_xy(pModule, "../python_script/001.bmp");Py_Finalize();return 0;
}
predict.py
UNet我没放出来
#!/usr/bin/env python
# _*_ coding:utf-8 _*_
import os
import numpy as npfrom model.u2net import UNet
import torch
from cv2 import cv2#import imgaug.augmenters as iaamodel = UNet(in_channels=1, out_channels=19)
device = torch.device('cuda:0')# augmentation = iaa.Sequential([
#     iaa.Resize({"width": 416, "height": 512})
# ])def init_model(path):global model, deviceif not os.path.exists(path):print(f'not found {os.path.abspath(path)}')return -1model_state_dict = torch.load(path)model.load_state_dict(model_state_dict)model = model.to(device)return 0def get_img_aug(img):# global augmentationprint('----get_img_aug------')print(img.shape)print('------------------')# img = cv2.imread(path, 0)  # 2490*1935# img_aug = augmentation(image=img)img_aug = cv2.resize(img, (416, 512), interpolation=cv2.INTER_LINEAR)img_aug = (img_aug - img_aug.min()) / (img_aug.max() - img_aug.min())img_aug = torch.FloatTensor(img_aug).unsqueeze(0).unsqueeze(0)  # torch.Size([1, 1, 512, 416])return img_augdef get_heatmap_coordination_batch_numpy(heatmap):"""get heatmap coordination by batch:param heatmap: (B,C,H,W) or (B,C,H,W,D) (C is the num of landmark):return: coordination (B,C,2) or (B,C,3)"""origin_shape = heatmap.shapeheatmap = heatmap.reshape(*origin_shape[:2], -1)temp = np.argmax(heatmap, axis=-1)[..., np.newaxis]# unravel_indexout = []for dim in reversed(origin_shape[2:]):out.append(temp % dim)temp = np.floor_divide(temp, dim)out = np.concatenate(out[::-1], axis=-1)return outdef get_predict_xy(img):global model# if not os.path.exists(path):#     return Noneimg = get_img_aug(img).to(device)  # 1 * 1 * 512 * 416output = model(img)['output'].to('cpu').detach().numpy()  # 1 * 1 * 19 * 2predict_xy = get_heatmap_coordination_batch_numpy(output).squeeze(0)  # 19 * 2print(predict_xy)return predict_xydef simple_test(img):return imgif __name__ == '__main__':path = r'E:\PyCharmProject\pythonProject3\001.bmp'img = cv2.imread(path, 0)init_model('best.pth')print('finish_init')print(get_predict_xy(img).shape)print(get_predict_xy(img).dtype)
CMakeLists.txt
cmake_minimum_required(VERSION 3.24)
project(C_PLUS_PLUS VERSION 0.1.0)IF(NOT CMAKE_BUILD_TYPE)SET(CMAKE_BUILD_TYPE Release)
ENDIF()set(CMAKE_CXX_STANDARD 17)
set(PYTHON_INCLUDE_DIRS "D:/Miniconda3/envs/DL/include/")
set(NUMPY_INCLUDE_DIR "D:/Miniconda3/envs/DL/Lib/site-packages/numpy/core/include")
INCLUDE_DIRECTORIES(${PYTHON_INCLUDE_DIRS} ${NUMPY_INCLUDE_DIR})
link_directories("D:/Miniconda3/envs/DL/libs")
set(PYTHON_LIBRARIES "D:/Miniconda3/envs/DL/libs/python37.lib")
add_executable(${PROJECT_NAME} main.cpp)
target_link_libraries(${PROJECT_NAME} ${PYTHON_LIBRARIES})# Where to find CMake modules and OpenCV
# set(OpenCV_DIR "D:\\opencv-4.5.5\\opencv-4.5.5\\build")
find_package(OpenCV REQUIRED)
message(STATUS "OpenCV Include: ${OpenCV_INCLUDE_DIRS}")
message(STATUS "OpenCV LIBRARIES: ${OpenCV_LIBRARIES}")
message(STATUS "OpenCV Libs: ${OpenCV_LIBS}")INCLUDE_DIRECTORIES(${OpenCV_INCLUDE_DIRS})
target_link_libraries(${PROJECT_NAME}  ${OpenCV_LIBS})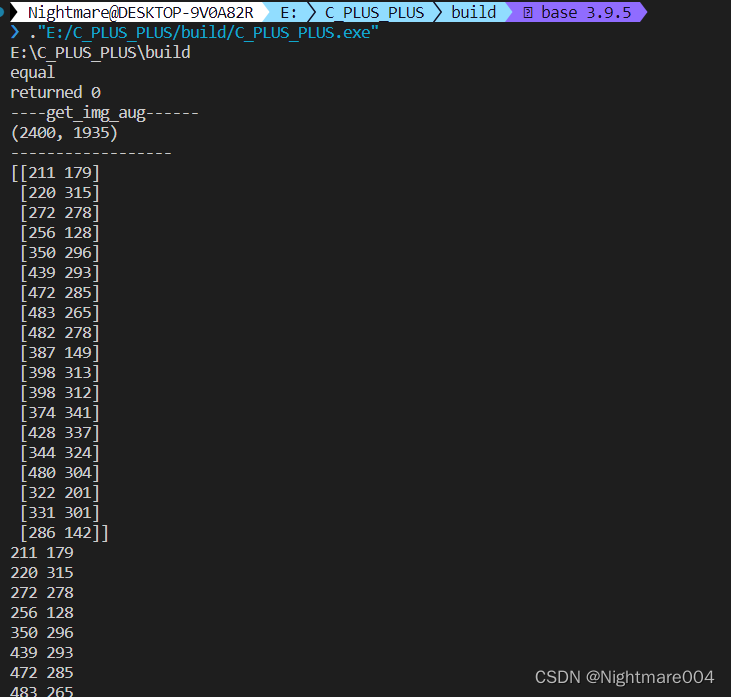
相关文章:
win10 mingw 调用python
ubuntu调用pythonhttps://blog.csdn.net/qq_39942341/article/details/129333969 我这里mingw是用msys2的 opencv也是msys2装的 安装msys2和opencv可以参考这个https://blog.csdn.net/qq_39942341/article/details/129380197?spm1001.2014.3001.5502 环境变量里加入python路…...

教你使用三种方式写一个最基本的spark程序
当需要处理大规模数据并且需要进行复杂的数据处理时,通常会使用Hadoop生态系统中的Hive和Spark来完成任务。在下面的例子中,我将说明如何使用Spark编写一个程序来处理Hive中的数据,以满足某个特定需求。假设我们有一个Hive表,其中…...

软件设计师错题集
软件设计师错题集一、计算机组成与体系结构1.1 浮点数1.2 Flynn分类法1.3 指令流水线1.4 层次化存储体系1.4.1 程序的局限性1.5 Cache1.6 输入输出技术1.7 总线系统1.8 CRC循环冗余校验码二、数据结构与算法基础2.1 队列与栈2.2 树与二叉树的特殊性2.3 最优二叉树(哈…...
【华为机试真题详解 Python实现】静态扫描最优成本【2023 Q1 | 100分】
文章目录前言题目描述输入描述输出描述示例 1输入:输出:示例 2输入:输出:题目解析参考代码前言 《华为机试真题详解》专栏含牛客网华为专栏、华为面经试题、华为OD机试真题。 如果您在准备华为的面试,期间有想了解的…...
算法刷题总结 (四) 动态规划
算法总结4 动态规划一、动态规划1.1、基础问题11.1.1、509. 斐波那契数列1.1.2、70. 爬楼梯1.1.3、746. 使用最小花费爬楼梯1.2、基础问题21.2.1、62. 不同路径1.2.2、63. 不同路径Ⅱ1.2.3、343. 整数拆分1.2.4、96. 不同的二叉搜索树1.3、背包问题1.3.1、01背包1.3.1.1、单次选…...

Grafana 转换数据的工具介绍
转换数据 Grafana 可以在数据显示到面板前对数据进行处理 1、点击Transform选项卡 2、选择要使用的转换类型,不同的转换类型配置不同 3、要新增转换类型,点击Add transformation 4、使用右上角调式按钮可以调式转换 支持的转换类型: Add f…...

Linux 学习笔记
一、 概述 1. 操作系统 ① 计算机由硬件和软件组成 ② 操作系统属于软件范畴,主要作用是协助用户调度硬件工作,充当用户和计算机硬件之间的桥梁 ③ 常见的操作系统 🤠 PC端:Windows、Linux、MacOS🤠 移动端&#…...

HTML注入专精整理
目录 HTML注入介绍 抽象解释 HTML注入的影响 HTML注入与XSS的区别 HTML元素流程图...

看完这篇我不信你不会二叉树的层序遍历【C语言】
目录 实现思路 代码实现 之前介绍了二叉树的前、中、后序三种遍历,采用的是递归的方式。今天我们来学习另外一种遍历方式——层序遍历。层序遍历不容小觑,虽然实现方法并不难,但是它所采取的思路是很值得学习的,与前三者不同&am…...
案例17-环境混用带来的影响
目录一、背景介绍背景事故二、思路&方案三、过程四、总结nginx做转发fastdfs(文件上传下载)五、升华一、背景介绍 本篇博客主要介绍开发中项目使用依赖项环境闭一只带来的恶劣影响,在错误中成长进步。 背景 本公司另外一个产品开发God…...

知识蒸馏论文阅读:DKD算法笔记
标题:Decoupled Knowledge Distillation 会议:CVPR2022 论文地址:https://ieeexplore.ieee.org/document/9879819/ 官方代码:https://github.com/megvii-research/mdistiller 作者单位:旷视科技、早稻田大学、清华大学…...
Sentinel架构篇 - 熔断降级
熔断降级 概念 除了流量控制以外,对调用链路中不稳定的资源进行熔断降级也是保障高可用的重要措施之一。一个服务常常会调用其它模块,可能是一个远程服务、数据库、或者第三方 API 等。然而,被依赖的服务的稳定性是不能保证的。如果依赖的服…...

shell脚本的一些记录 与jenkins的介绍
shell 脚本的执行 sh ***.sh shell脚本里面的命令 其实就是终端执行一些命令 shell 连接服务器 可以直接ssh连接 但是这样最好是无密码的 不然后面的命令就不好写了 换而言之有密码得 不好写脚本 需要下载一些expect的插件之类的才可以 判断语句 的示例 需要注意的是…...

JVM的了解与学习
一:jvm是什么 jvm是java虚拟机java Virtual Machine的缩写 jdk包含jre和java DevelopmentTools 二:什么是java虚拟机 虚拟机是一种抽象化的计算机,通过在实际的计算机上仿真模拟各种计算机功能来实现的。java虚拟机有自己完善的硬体结构,如处理器、堆栈、寄存器等,还有…...

提升数字品牌的5个技巧
“品牌”或“品牌推广”的概念通常用于营销。因为建立您的企业品牌对于产品来说极其重要,品牌代表了您与客户互动的身份和声音。今天,让我们来看看在数字领域提升品牌的一些有用的技巧。如何在数字领域提升您的品牌?在了解这些技巧之前&#…...

java通过反射获取加了某个注解的所有的类
有时候我们会碰到这样的情况:有n个场景,每个场景都有自己的逻辑,即n个处理逻辑,这时候我们就需要通过某个参数的值代表这n个场景,然后去加载每个场景不同的bean对象,即不同的类,这些类中都有一个…...

Warshall算法
🚀write in front🚀 📜所属专栏:> 算法 🛰️博客主页:睿睿的博客主页 🛰️代码仓库:🎉VS2022_C语言仓库 🎡您的点赞、关注、收藏、评论,是对我…...
vector中迭代器失效的问题及解决办法
目录 vector常用接口 vector 迭代器失效问题 vector中深浅拷贝问题 vector的数据安排以及操作方式,与array非常相似。两者的唯一差别在于空间的运用的灵活性。array 是静态空间,一旦配置了就不能改变;要换个大(或小) 一点的房子&#x…...
【蓝桥杯刷题训练营】day05
1 数的分解 拆分成3个数相加得到该数 然后采用了一种巨愚蠢的办法: int main() {int count 0;int a 2;int b 0;int c 1;int d 9;int a1, a2, a3;int c1, c2, c3;int d1, d2, d3;for (a1 0; a1 < 2; a1){for (a2 0; a2 < 2; a2){for (a3 0; a3 <…...

线程中断interrupt导致sleep产生的InterruptedException异常
强制当前正在执行的线程休眠(暂停执行),以“减慢线程”。 Thread.sleep(long millis)和Thread.sleep(long millis, int nanos)静态方法当线程睡眠时,它睡在某个地方,在苏醒之前不会返回到可运行状态。 当睡眠时间到期…...

深度强化学习在用户中心型智能体中的应用实践
1. 项目概述在人工智能领域,强化学习正逐渐从实验室走向实际应用场景。不同于传统的监督学习范式,强化学习通过与环境交互来学习最优策略,这种特性使其特别适合开发以用户为中心的智能体系统。我最近完成了一个基于深度强化学习的用户中心型智…...

基于OpenAI API构建命令行AI助手:从设计到实现
1. 项目概述:当终端遇上GPT,一个命令行AI助手的诞生 如果你和我一样,每天有大量时间泡在终端里,那么你肯定也经历过这样的场景:敲错了一个复杂的命令,得去翻历史记录或者查手册;想写个脚本处理日…...

告别MicroPython!用Arduino IDE玩转树莓派Pico,从环境配置到第一个LED闪烁程序
告别MicroPython!用Arduino IDE玩转树莓派Pico:从环境配置到第一个LED闪烁程序 当树莓派Pico首次亮相时,MicroPython作为官方推荐开发方式确实吸引了不少开发者。但如果你和我一样,早已习惯了Arduino生态的丰富资源和成熟工具链&…...

多模态大模型评估新基准WEAVE解析与应用
1. 项目背景与核心价值去年在NLP领域最让我震撼的突破,莫过于多模态大模型展现出的跨模态理解能力。当看到GPT-4V能准确描述图像中的物理现象,或者LLaVA可以基于医学影像给出诊断建议时,我突然意识到:单模态时代的评估体系已经跟不…...

EasyML自定义算法开发:如何扩展平台支持新的机器学习算法
EasyML自定义算法开发:如何扩展平台支持新的机器学习算法 【免费下载链接】EasyML Easy Machine Learning is a general-purpose dataflow-based system for easing the process of applying machine learning algorithms to real world tasks. 项目地址: https:/…...

轻量级塔防游戏评估LLM规划决策能力
1. 项目背景与核心价值TowerMind这个项目名称本身就很有意思——"塔"指向塔防游戏(Tower Defense),"Mind"则暗示了AI的决策思维。简单来说,这是一个用轻量级塔防游戏环境来评估大语言模型(LLM&…...
网络安全实战教程分享)
手把手教你CNVD漏洞挖掘 + 资产收集(看完你也可以轻松做到!)网络安全实战教程分享
文章目录前言2、信息收集——github自动化工具——GitDorker3、资产收集4 漏洞猎杀漏洞一:弱口令漏洞漏洞二:垂直越权漏洞5 垂直越权漏洞通杀6 总结前言 挖掘CNVD漏洞有时候其实比一般的edusrc还好挖,但是一般要挖证书的话,还是需…...

SBP预训练技术:提升NLP模型效率的创新方法
1. 项目背景与核心价值SBP(Synthetic-Boosted Pretraining)预训练技术是当前NLP领域的一项突破性进展,它通过创新的文档合成方法显著提升了模型训练效率。我在参与某金融知识图谱项目时首次接触这项技术,当时我们面临标注数据不足…...

基于电流+功率2种MPC模型预测控制三相并网逆变器闭环仿真【电流预测+功率预测】
✅作者简介:热爱科研的Matlab仿真开发者,擅长毕业设计辅导、数学建模、数据处理、程序设计科研仿真。🍎完整代码获取 定制创新 论文复现点击:Matlab科研工作室👇 关注我领取海量matlab电子书和数学建模资料 dz…...

从Hyperopt迁移到Optuna:一个老用户的实战体验与避坑指南
从Hyperopt迁移到Optuna:一个老用户的实战体验与避坑指南 如果你已经在机器学习领域摸爬滚打了一段时间,很可能对超参数优化工具Hyperopt并不陌生。这个老牌工具以其简洁的API和高效的TPE算法赢得了不少开发者的青睐。但当我第一次接触到Optuna时&#x…...