OAK相机如何将 YOLOv10 模型转换成 blob 格式?
编辑:OAK中国
首发:oakchina.cn
喜欢的话,请多多👍⭐️✍
内容可能会不定期更新,官网内容都是最新的,请查看首发地址链接。
Hello,大家好,这里是OAK中国,我是Ashely。
专注科技,专注分享。
这可能是我给大家发的最后一篇博客了,马上就要离开这里,追逐我的梦想了!Anyway,来看教程正文吧!
1.其他Yolo转换及使用教程请参考
2.检测类的yolo模型建议使用在线转换(地址),如果在线转换不成功,你再根据本教程来做本地转换。
▌.pt 转换为 .onnx
使用下列脚本(将脚本放到 YOLOv10 根目录中)将 pytorch 模型转换为 onnx 模型
若安装了blobconverter可直接转换成 blob
示例用法(默认使用 one2one ):
python export_onnx.py -w <path_to_model>.pt -imgsz 640
export_onnx.py :
usage: export_onnx.py [-h] -m INPUT_MODEL [-imgsz IMG_SIZE [IMG_SIZE ...]] [-op OPSET] [--max_det MAX_DET] [-n NAME] [-o OUTPUT_DIR] [-b] [-s] [-sh SHAVES] [-t {docker,blobconverter,local}]Tool for converting Yolov8 models to the blob format used by OAKoptional arguments:-h, --help show this help message and exit-m INPUT_MODEL, -i INPUT_MODEL, -w INPUT_MODEL, --input_model INPUT_MODELweights path (default: None)-imgsz IMG_SIZE [IMG_SIZE ...], --img-size IMG_SIZE [IMG_SIZE ...]image size (default: [640, 640])-op OPSET, --opset OPSETopset version (default: 12)--max_det MAX_DET maximum number of detections per image (default: 300)--one2many Use the 'one2many' branch as the 'head' output, otherwise 'one2one' (default: False)-n NAME, --name NAME The name of the model to be saved, none means using the same name as the input model (default: None)-o OUTPUT_DIR, --output_dir OUTPUT_DIRDirectory for saving files, none means using the same path as the input model (default: None)-b, --blob OAK Blob export (default: False)-s, --spatial_detectionInference with depth information (default: False)-sh SHAVES, --shaves SHAVESInference with depth information (default: None)-t {docker,blobconverter,local}, --convert_tool {docker,blobconverter,local}Which tool is used to convert, docker: should already have docker (https://docs.docker.com/get-docker/) and docker-py (pip install docker) installed; blobconverter: uses an onlineserver to convert the model and should already have blobconverter (pip install blobconverter); local: use openvino-dev (pip install openvino-dev) and openvino 2022.1 (https://docs.oakchina.cn/en/latest /pages/Advanced/Neural_networks/local_convert_openvino.html#id2) to convert (default: blobconverter)
#!/usr/bin/env python3
# -*- coding:utf-8 -*-
import argparse
import json
import logging
import math
import sys
import time
import warnings
from io import BytesIO
from pathlib import Path
from zipfile import ZipFile, ZIP_LZMAimport torch
from torch import nnwarnings.filterwarnings("ignore")FILE = Path(__file__).resolve()
ROOT = FILE.parents[0]
if str(ROOT) not in sys.path:sys.path.append(str(ROOT))  # add ROOT to PATHfrom ultralytics.nn.modules import v10Detect, Detect
from ultralytics.nn.tasks import attempt_load_weights
from ultralytics.utils.tal import dist2bbox, make_anchors
from ultralytics.utils import ops
from ultralytics.utils.torch_utils import select_devicetry:from rich import printfrom rich.logging import RichHandlerlogging.basicConfig(level="INFO",format="%(message)s",datefmt="[%X]",handlers=[RichHandler(rich_tracebacks=False,show_path=False,)],)
except ImportError:logging.basicConfig(level="INFO",format="%(asctime)s\t%(levelname)s\t%(message)s",datefmt="[%X]",)def v10postprocess(preds, max_det, nc=80):"""对模型预测结果进行后处理。Args:preds (torch.Tensor): 模型的预测结果,形状为 (batch_size, num_boxes, 4 + num_classes)。max_det (int): 需要保留的最大检测框数量。nc (int): 类别数。Returns:boxes (torch.Tensor): 保留的检测框的坐标,形状为 (batch_size, max_det, 4)。scores (torch.Tensor): 保留的检测框的置信度,形状为 (batch_size, max_det)。labels (torch.Tensor): 保留的检测框的类别标签,形状为 (batch_size, max_det)。Notes:这个函数假设输入的 `preds` 张量的最后一个维度表示每个检测框的坐标和置信度。"""assert 4 + nc == preds.shape[-1]# 分割预测结果为边界框坐标和置信度boxes, scores = preds.split([4, nc], dim=-1)# 选取每个预测结果中置信度最高的几个预测框max_scores = scores.amax(dim=-1)max_scores, index = torch.topk(max_scores, max_det, dim=-1)index = index.unsqueeze(-1)# 根据置信度最高的预测框的索引,获取对应的边界框和置信度boxes = torch.gather(boxes, dim=1, index=torch.cat([index for i in range(boxes.shape[-1])], dim=-1))scores = torch.gather(scores, dim=1, index=torch.cat([index for i in range(scores.shape[-1])], dim=-1))# 在所有预测结果中选取置信度最高的几个预测框scores, index = torch.topk(scores.flatten(1), max_det, dim=-1)# 计算类别标签labels = index - (index // nc) * ncindex = (index // nc).unsqueeze(-1)# 根据索引获取保留的边界框boxes = boxes.gather(dim=1, index=torch.cat([index for i in range(boxes.shape[-1])], dim=-1))return boxes, scores, labelsclass DetectV10(nn.Module):"""YOLOv10 Detect head for detection models"""dynamic = False  # force grid reconstructionexport = False  # export modeshape = Noneanchors = torch.empty(0)  # initstrides = torch.empty(0)  # initmax_det = -1def __init__(self, old_detect):super().__init__()self.nc = old_detect.nc  # number of classesself.nl = old_detect.nl  # number of detection layersself.reg_max = old_detect.reg_max  # DFL channels (ch[0] // 16 to scale 4/8/12/16/20 for n/s/m/l/x)self.no = old_detect.no  # number of outputs per anchorself.stride = old_detect.stride  # strides computed during buildself.cv2 = old_detect.cv2self.cv3 = old_detect.cv3self.dfl = old_detect.dflself.f = old_detect.fself.i = old_detect.iself.one2one_cv2 = old_detect.one2one_cv2self.one2one_cv3 = old_detect.one2one_cv3def decode_bboxes(self, bboxes, anchors):"""Decode bounding boxes."""return dist2bbox(bboxes, anchors, xywh=False, dim=1)def inference(self, x):# Inference pathshape = x[0].shape  # BCHWx_cat = torch.cat([xi.view(shape[0], self.no, -1) for xi in x], 2)if self.dynamic or self.shape != shape:self.anchors, self.strides = (x.transpose(0, 1) for x in make_anchors(x, self.stride, 0.5))self.shape = shapebox, cls = x_cat.split((self.reg_max * 4, self.nc), 1)# dbox = dist2bbox(self.dfl(box), self.anchors.unsqueeze(0), xywh=False, dim=1) * self.stridesdbox = self.decode_bboxes(self.dfl(box), self.anchors.unsqueeze(0)) * self.stridesy = torch.cat((dbox, cls.sigmoid()), 1)return ydef forward_feat(self, x, cv2, cv3):y = []for i in range(self.nl):y.append(torch.cat((cv2[i](x[i]), cv3[i](x[i])), 1))return ydef forward(self, x):one2one = self.forward_feat([xi.detach() for xi in x], self.one2one_cv2, self.one2one_cv3)one2one = self.inference(one2one)assert self.max_det != -1boxes, scores, labels = v10postprocess(one2one.permute(0, 2, 1), self.max_det, self.nc)boxes /= torch.Tensor([x[0].shape[2] * 2**3, x[0].shape[3] * 2**3, x[0].shape[2] * 2**3, x[0].shape[3] * 2**3])return torch.cat([labels.unsqueeze(-1), labels.unsqueeze(-1), scores.unsqueeze(-1), boxes], dim=-1)# return torch.cat([boxes, scores.unsqueeze(-1), labels.unsqueeze(-1)], dim=-1)def bias_init(self):# Initialize Detect() biases, WARNING: requires stride availabilitym = self  # self.model[-1]  # Detect() modulefor a, b, s in zip(m.one2one_cv2, m.one2one_cv3, m.stride):  # froma[-1].bias.data[:] = 1.0  # boxb[-1].bias.data[: m.nc] = math.log(5 / m.nc / (640 / s) ** 2)  # cls (.01 objects, 80 classes, 640 img)class DetectV8(nn.Module):"""YOLOv8 Detect head for detection models"""dynamic = False  # force grid reconstructionexport = False  # export modeshape = Noneanchors = torch.empty(0)  # initstrides = torch.empty(0)  # initdef __init__(self, old_detect):super().__init__()self.nc = old_detect.nc  # number of classesself.nl = old_detect.nl  # number of detection layersself.reg_max = (old_detect.reg_max)  # DFL channels (ch[0] // 16 to scale 4/8/12/16/20 for n/s/m/l/x)self.no = old_detect.no  # number of outputs per anchorself.stride = old_detect.stride  # strides computed during buildself.cv2 = old_detect.cv2self.cv3 = old_detect.cv3self.dfl = old_detect.dflself.f = old_detect.fself.i = old_detect.idef forward(self, x):shape = x[0].shape  # BCHWfor i in range(self.nl):x[i] = torch.cat((self.cv2[i](x[i]), self.cv3[i](x[i])), 1)box, cls = torch.cat([xi.view(shape[0], self.no, -1) for xi in x], 2).split((self.reg_max * 4, self.nc), 1)box = self.dfl(box)cls_output = cls.sigmoid()# Get the maxconf, _ = cls_output.max(1, keepdim=True)# Concaty = torch.cat([box, conf, cls_output], dim=1)# Split to 3 channelsoutputs = []start, end = 0, 0for i, xi in enumerate(x):end += xi.shape[-2] * xi.shape[-1]outputs.append(y[:, :, start:end].view(xi.shape[0], -1, xi.shape[-2], xi.shape[-1]))start += xi.shape[-2] * xi.shape[-1]return outputsdef bias_init(self):# Initialize Detect() biases, WARNING: requires stride availabilitym = self  # self.model[-1]  # Detect() modulefor a, b, s in zip(m.cv2, m.cv3, m.stride):  # froma[-1].bias.data[:] = 1.0  # boxb[-1].bias.data[: m.nc] = math.log(5 / m.nc / (640 / s) ** 2)  # cls (.01 objects, 80 classes, 640 img)def parse_args():parser = argparse.ArgumentParser(description="Tool for converting Yolov8 models to the blob format used by OAK",formatter_class=argparse.ArgumentDefaultsHelpFormatter,)parser.add_argument("-m","-i","-w","--input_model",type=Path,required=True,help="weights path",)parser.add_argument("-imgsz","--img-size",nargs="+",type=int,default=[640, 640],help="image size",)  # height, widthparser.add_argument("-op", "--opset", type=int, default=12, help="opset version")parser.add_argument("--max_det", default=300, help="maximum number of detections per image")parser.add_argument("--one2many",action="store_true",help="Use the 'one2many' branch as the 'head' output, otherwise 'one2one'",)parser.add_argument("-n","--name",type=str,help="The name of the model to be saved, none means using the same name as the input model",)parser.add_argument("-o","--output_dir",type=Path,help="Directory for saving files, none means using the same path as the input model",)parser.add_argument("-b","--blob",action="store_true",help="OAK Blob export",)parser.add_argument("-s","--spatial_detection",action="store_true",help="Inference with depth information",)parser.add_argument("-sh","--shaves",type=int,help="Inference with depth information",)parser.add_argument("-t","--convert_tool",type=str,help="Which tool is used to convert, docker: should already have docker (https://docs.docker.com/get-docker/) and docker-py (pip install docker) installed; blobconverter: uses an online server to convert the model and should already have blobconverter (pip install blobconverter); local: use openvino-dev (pip install openvino-dev) and openvino 2022.1 ( https://docs.oakchina.cn/en/latest /pages/Advanced/Neural_networks/local_convert_openvino.html#id2) to convert",default="blobconverter",choices=["docker", "blobconverter", "local"],)args = parser.parse_args()args.input_model = args.input_model.resolve().absolute()if args.name is None:args.name = args.input_model.stemif args.output_dir is None:args.output_dir = args.input_model.parentargs.img_size *= 2 if len(args.img_size) == 1 else 1  # expandif args.shaves is None:args.shaves = 5 if args.spatial_detection else 6return argsdef export(input_model, img_size, output_model, opset, **kwargs):t = time.time()# Load PyTorch modeldevice = select_device("cpu")# load FP32 modelmodel = attempt_load_weights(input_model, device=device, inplace=True, fuse=True)labels = model.module.names if hasattr(model, "module") else model.names  # get class nameslabels = labels if isinstance(labels, list) else list(labels.values())nc = model.nc if hasattr(model, "nc") else model.model[-1].nc# check num classes and labelsassert nc == len(labels), f"Model class count {nc} != len(names) {len(labels)}"# Replace with the custom Detection Headif kwargs.get("one2many", False):if isinstance(model.model[-1], (Detect)):model.model[-1] = DetectV8(model.model[-1])model.model[-1].export = Trueelse:if isinstance(model.model[-1], (v10Detect)):print("Replacing model.model[-1] with DetectV10")model.model[-1] = DetectV10(model.model[-1])model.model[-1].export = Truemodel.model[-1].max_det = kwargs.get("max_det", 300)num_branches = model.model[-1].nl# Inputimg = torch.zeros(1, 3, *img_size).to(device)  # image size(1,3,320,320) iDetectionmodel.eval()model.float()model = model.fuse()model(img)  # dry runs# ONNX exporttry:import onnxprint()logging.info("Starting ONNX export with onnx %s..." % onnx.__version__)output_list = ["output%s_yolov6r2" % (i + 1) for i in range(num_branches)] if kwargs.get("one2many", False) else ["output_yolov10"]with BytesIO() as f:torch.onnx.export(model,img,f,verbose=False,opset_version=opset,input_names=["images"],output_names=output_list,)# Checksonnx_model = onnx.load_from_string(f.getvalue())  # load onnx modelonnx.checker.check_model(onnx_model)  # check onnx modeltry:import onnxsimlogging.info("Starting to simplify ONNX...")onnx_model, check = onnxsim.simplify(onnx_model)assert check, "assert check failed"except ImportError:logging.warning("onnxsim is not found, if you want to simplify the onnx, "+ "you should install it:\n\t"+ "pip install -U onnxsim onnxruntime\n"+ "then use:\n\t"+ f'python -m onnxsim "{output_model}" "{output_model}"')except Exception:logging.exception("Simplifier failure")onnx.save(onnx_model, output_model)logging.info("ONNX export success, saved as:\n\t%s" % output_model)except Exception:logging.exception("ONNX export failure")if kwargs.get("one2many", False):# generate anchors and sidesanchors = []# generate masksmasks = dict()logging.info("anchors:\n\t%s" % anchors)logging.info("anchor_masks:\n\t%s" % masks)jsondata = {"nn_config": {"output_format": "detection","NN_family": "YOLO","input_size": f"{img_size[0]}x{img_size[1]}","NN_specific_metadata": {"classes": nc,"coordinates": 4,"anchors": anchors,"anchor_masks": masks,"iou_threshold": 0.3,"confidence_threshold": 0.5,},},"mappings": {"labels": labels},}else:jsondata = {"nn_config": {"output_format": "detection","NN_family": "mobilenet","input_size": f"{img_size[0]}x{img_size[1]}","confidence_threshold": 0.5,},"mappings": {"labels": labels},}export_json = output_model.with_suffix(".json")export_json.write_text(json.dumps(jsondata,indent=4,))logging.info("Model data export success, saved as:\n\t%s" % export_json)# Finishlogging.info("Export complete (%.2fs).\n" % (time.time() - t))def convert(convert_tool, output_model, shaves, output_dir, name, **kwargs):t = time.time()export_dir: Path = output_dir.joinpath(name + "_openvino")export_dir.mkdir(parents=True, exist_ok=True)export_xml = export_dir.joinpath(name + ".xml")export_blob = export_dir.joinpath(name + ".blob")if convert_tool == "blobconverter":import blobconverterblob_path = blobconverter.from_onnx(model=str(output_model),data_type="FP16",shaves=shaves,use_cache=False,# version="2021.4",version="2022.1",output_dir=export_dir,optimizer_params=["--scale=255","--reverse_input_channel","--use_new_frontend",],download_ir=True,)with ZipFile(blob_path, "r", ZIP_LZMA) as zip_obj:for name in zip_obj.namelist():zip_obj.extract(name,export_dir,)blob_path.unlink()elif convert_tool == "docker":import dockerexport_dir = Path("/io").joinpath(export_dir.name)export_xml = export_dir.joinpath(name + ".xml")export_blob = export_dir.joinpath(name + ".blob")client = docker.from_env()image = client.images.pull("openvino/ubuntu20_dev", tag="2022.3.1")docker_output = client.containers.run(image=image.tags[0],command=f"bash -c \"mo -m {name}.onnx -n {name} -o {export_dir} --static_shape --reverse_input_channels --scale=255 --use_new_frontend && echo 'MYRIAD_ENABLE_MX_BOOT NO' | tee /tmp/myriad.conf >> /dev/null && /opt/intel/openvino/tools/compile_tool/compile_tool -m {export_xml} -o {export_blob} -ip U8 -VPU_NUMBER_OF_SHAVES {shaves} -VPU_NUMBER_OF_CMX_SLICES {shaves} -d MYRIAD -c /tmp/myriad.conf\"",remove=True,volumes=[f"{output_dir}:/io",],working_dir="/io",)logging.info(docker_output.decode("utf8"))else:import subprocess as sp# OpenVINO exportlogging.info("Starting to export OpenVINO...")OpenVINO_cmd = "mo --input_model %s --output_dir %s --data_type FP16 --scale 255 --reverse_input_channel" % (output_model,export_dir,)try:sp.check_output(OpenVINO_cmd, shell=True)logging.info("OpenVINO export success, saved as %s" % export_dir)except sp.CalledProcessError:logging.exception("")logging.warning("OpenVINO export failure!")logging.warning("By the way, you can try to export OpenVINO use:\n\t%s" % OpenVINO_cmd)# OAK Blob exportlogging.info("Then you can try to export blob use:")blob_cmd = ("echo 'MYRIAD_ENABLE_MX_BOOT ON' | tee /tmp/myriad.conf"+ "compile_tool -m %s -o %s -ip U8 -d MYRIAD -VPU_NUMBER_OF_SHAVES %s -VPU_NUMBER_OF_CMX_SLICES %s -c /tmp/myriad.conf"% (export_xml, export_blob, shaves, shaves))logging.info("%s" % blob_cmd)logging.info("compile_tool maybe in the path: /opt/intel/openvino/tools/compile_tool/compile_tool, if you install openvino 2022.1 with apt")logging.info("Convert complete (%.2fs).\n" % (time.time() - t))if __name__ == "__main__":args = parse_args()logging.info(args)print()output_model = args.output_dir / (args.name + ".onnx")export(output_model=output_model, **vars(args))if args.blob:convert(output_model=output_model, **vars(args))
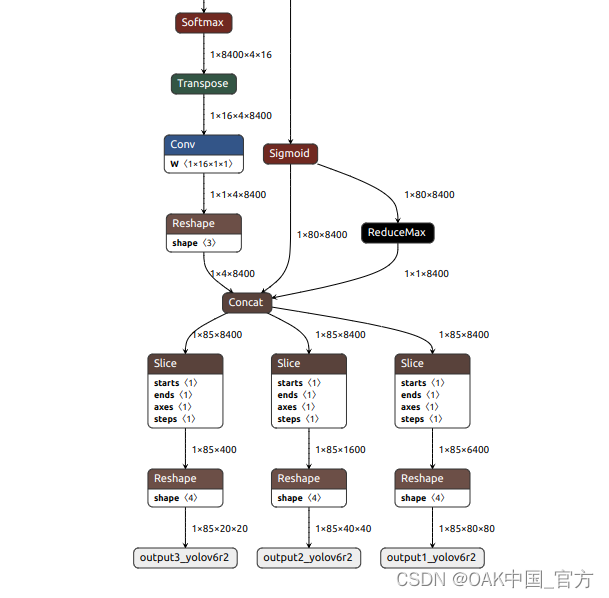
可以使用 Netron 查看模型结构:
one2one:

one2many:
▌转换
openvino 本地转换
onnx -> openvino
mo 是 openvino_dev 2022.1 中脚本,安装命令为
pip install openvino-dev
mo --input_model yolov10n.onnx --scale=255 --reverse_input_channel
openvino -> blob
compile_tool 是 OpenVINO Runtime 中脚本
<path>/compile_tool -m yolov10n.xml
-ip U8 -d MYRIAD
-VPU_NUMBER_OF_SHAVES 6
-VPU_NUMBER_OF_CMX_SLICES 6
在线转换
blobconvert 网页:http://blobconverter.luxonis.com/
- 进入网页,按下图指示操作:
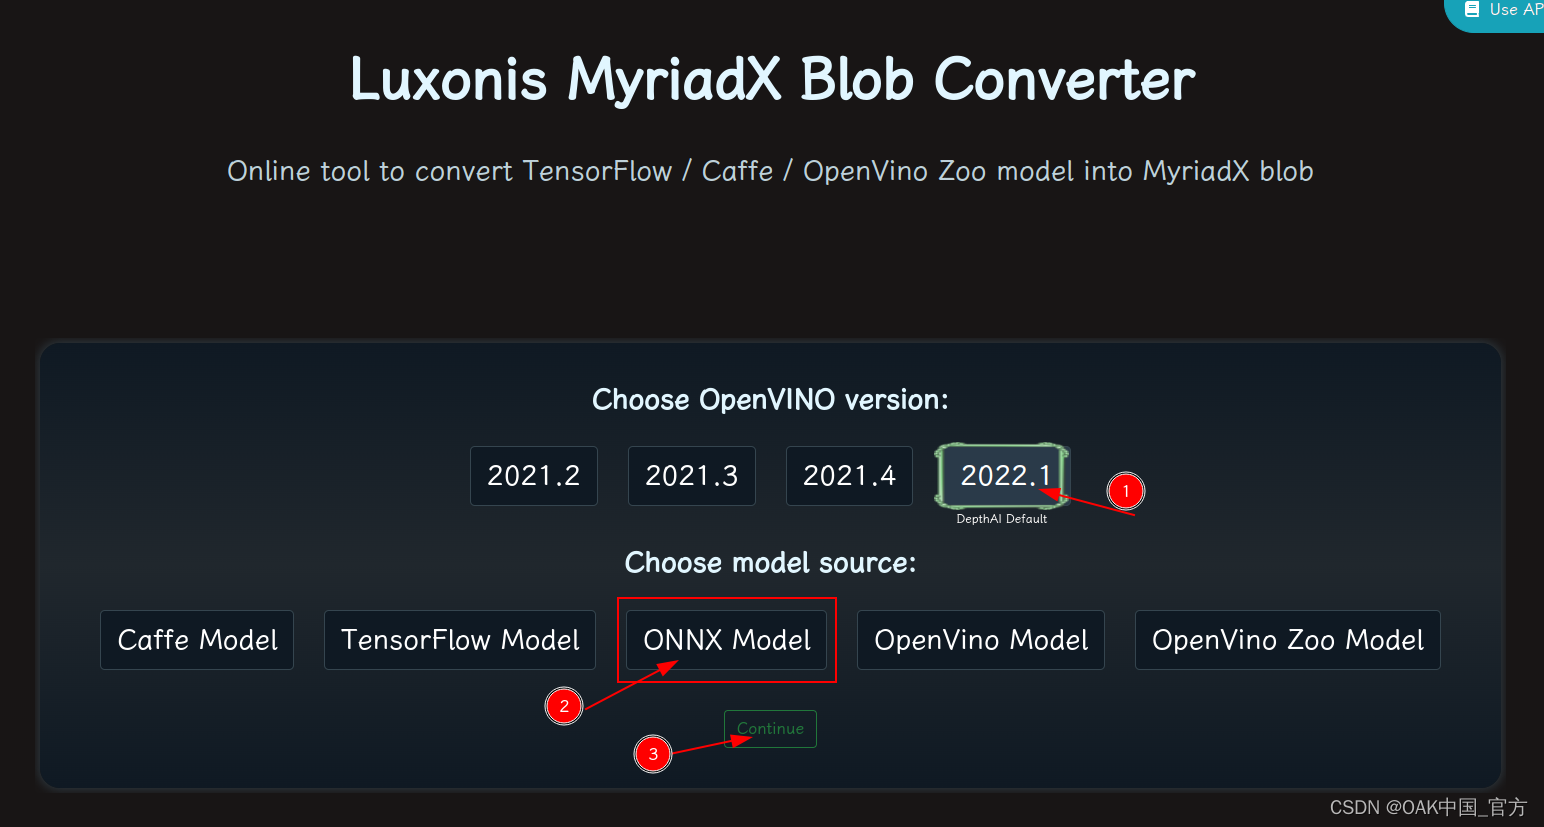
- 修改参数,转换模型:
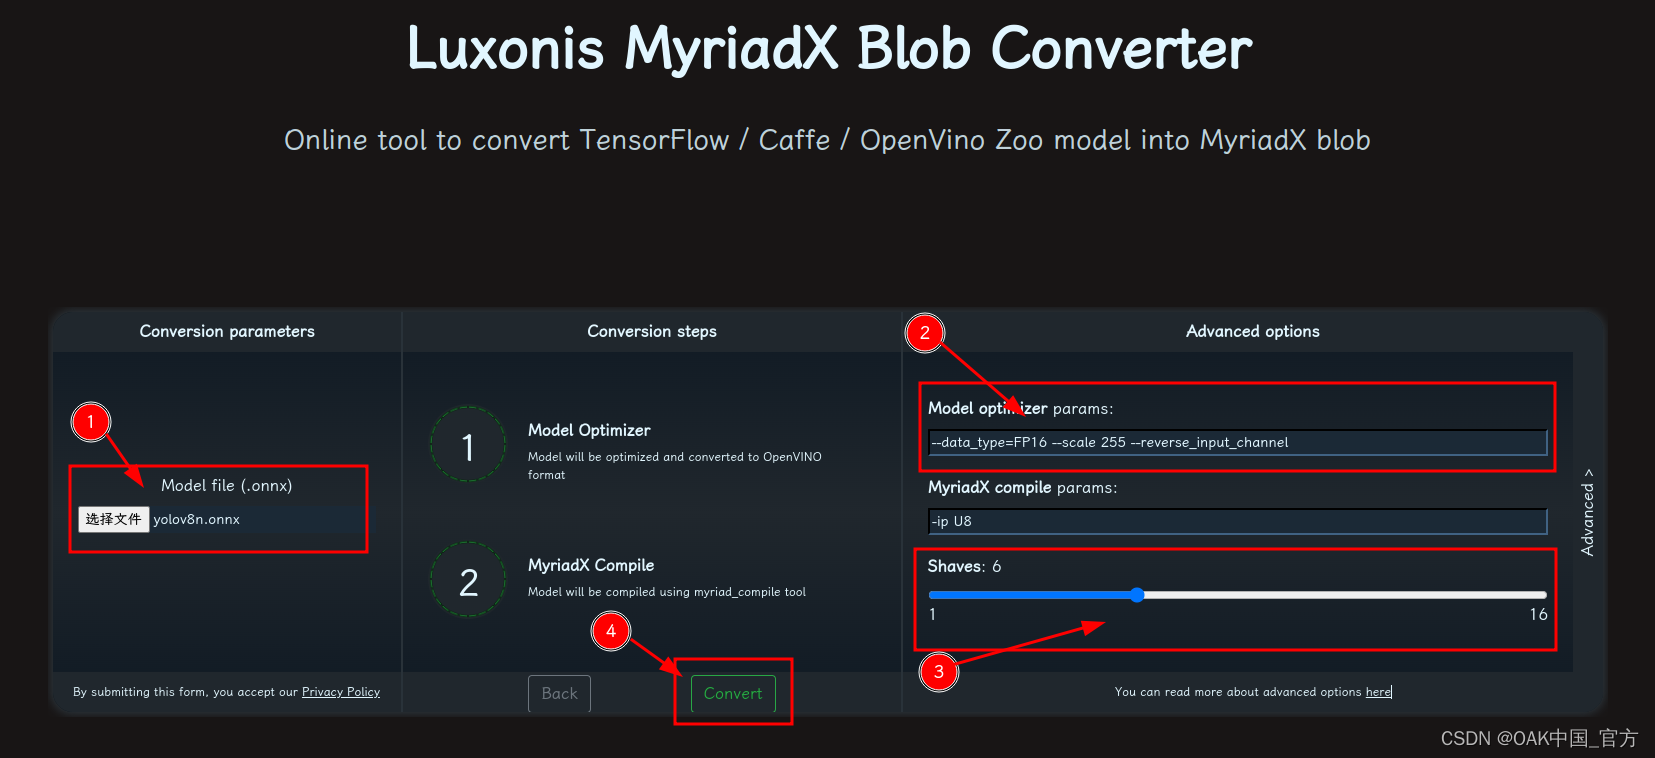
- 选择 onnx 模型
- 修改 optimizer_params 为 --data_type=FP16 --scale=255 --reverse_input_channel
- 修改 shaves 为 6
- 转换
blobconverter python 代码
blobconverter.from_onnx("yolov10n.onnx", optimizer_params=["--scale=255","--reverse_input_channel",],shaves=6,)
blobconvert cli
blobconverter --onnx yolov10n.onnx -sh 6 -o . --optimizer-params "scale=255 --reverse_input_channel"
▌DepthAI 示例
one2one
正确解码需要可配置的网络相关参数:
- setConfidenceThreshold – 置信度阈值,低于该阈值的对象将被过滤掉
# coding=utf-8
import cv2
import depthai as dai
import numpy as npnumClasses = 80
model = dai.OpenVINO.Blob("yolov10n.blob")
dim = next(iter(model.networkInputs.values())).dims
W, H = dim[:2]labelMap = [# "class_1","class_2","...""class_%s" % ifor i in range(numClasses)
]# Create pipeline
pipeline = dai.Pipeline()# Define sources and outputs
camRgb = pipeline.create(dai.node.ColorCamera)
detectionNetwork = pipeline.create(dai.node.MobileNetDetectionNetwork)
xoutRgb = pipeline.create(dai.node.XLinkOut)
xoutNN = pipeline.create(dai.node.XLinkOut)xoutRgb.setStreamName("image")
xoutNN.setStreamName("nn")# Properties
camRgb.setPreviewSize(W, H)
camRgb.setResolution(dai.ColorCameraProperties.SensorResolution.THE_1080_P)
camRgb.setInterleaved(False)
camRgb.setColorOrder(dai.ColorCameraProperties.ColorOrder.BGR)# Network specific settings
detectionNetwork.setBlob(model)
detectionNetwork.setConfidenceThreshold(0.5)# Linking
camRgb.preview.link(detectionNetwork.input)
camRgb.preview.link(xoutRgb.input)
detectionNetwork.out.link(xoutNN.input)# Connect to device and start pipeline
with dai.Device(pipeline) as device:# Output queues will be used to get the rgb frames and nn data from the outputs defined aboveimageQueue = device.getOutputQueue(name="image", maxSize=4, blocking=False)detectQueue = device.getOutputQueue(name="nn", maxSize=4, blocking=False)frame = Nonedetections = []# nn data, being the bounding box locations, are in <0..1> range - they need to be normalized with frame width/heightdef frameNorm(frame, bbox):normVals = np.full(len(bbox), frame.shape[0])normVals[::2] = frame.shape[1]return (np.clip(np.array(bbox), 0, 1) * normVals).astype(int)def drawText(frame, text, org, color=(255, 255, 255), thickness=1):cv2.putText(frame, text, org, cv2.FONT_HERSHEY_SIMPLEX, 0.5, (0, 0, 0), thickness + 3, cv2.LINE_AA)cv2.putText(frame, text, org, cv2.FONT_HERSHEY_SIMPLEX, 0.5, color, thickness, cv2.LINE_AA)def drawRect(frame, topLeft, bottomRight, color=(255, 255, 255), thickness=1):cv2.rectangle(frame, topLeft, bottomRight, (0, 0, 0), thickness + 3)cv2.rectangle(frame, topLeft, bottomRight, color, thickness)def displayFrame(name, frame):color = (128, 128, 128)for detection in detections:bbox = frameNorm(frame, (detection.xmin, detection.ymin, detection.xmax, detection.ymax))drawText(frame=frame,text=labelMap[detection.label],org=(bbox[0] + 10, bbox[1] + 20),)drawText(frame=frame,text=f"{detection.confidence:.2%}",org=(bbox[0] + 10, bbox[1] + 35),)drawRect(frame=frame,topLeft=(bbox[0], bbox[1]),bottomRight=(bbox[2], bbox[3]),color=color,)# Show the framecv2.imshow(name, frame)while True:imageQueueData = imageQueue.tryGet()detectQueueData = detectQueue.tryGet()if imageQueueData is not None:frame = imageQueueData.getCvFrame()if detectQueueData is not None:detections = detectQueueData.detectionsif frame is not None:displayFrame("rgb", frame)if cv2.waitKey(1) == ord("q"):break
one2many
正确解码需要可配置的网络相关参数:
- setNumClasses – YOLO 检测类别的数量
- setIouThreshold – iou 阈值
- setConfidenceThreshold – 置信度阈值,低于该阈值的对象将被过滤掉
- 对象将被过滤掉
# coding=utf-8
import cv2
import depthai as dai
import numpy as npnumClasses = 80
model = dai.OpenVINO.Blob("yolov10n.blob")
dim = next(iter(model.networkInputs.values())).dims
W, H = dim[:2]output_name, output_tenser = next(iter(model.networkOutputs.items()))
if "yolov6" in output_name:numClasses = output_tenser.dims[2] - 5
else:numClasses = output_tenser.dims[2] // 3 - 5labelMap = [# "class_1","class_2","...""class_%s" % ifor i in range(numClasses)
]# Create pipeline
pipeline = dai.Pipeline()# Define sources and outputs
camRgb = pipeline.create(dai.node.ColorCamera)
detectionNetwork = pipeline.create(dai.node.YoloDetectionNetwork)
xoutRgb = pipeline.create(dai.node.XLinkOut)
xoutNN = pipeline.create(dai.node.XLinkOut)xoutRgb.setStreamName("image")
xoutNN.setStreamName("nn")# Properties
camRgb.setPreviewSize(W, H)
camRgb.setResolution(dai.ColorCameraProperties.SensorResolution.THE_1080_P)
camRgb.setInterleaved(False)
camRgb.setColorOrder(dai.ColorCameraProperties.ColorOrder.BGR)# Network specific settings
detectionNetwork.setBlob(model)
detectionNetwork.setConfidenceThreshold(0.5)# Yolo specific parameters
detectionNetwork.setNumClasses(numClasses)
detectionNetwork.setCoordinateSize(4)
detectionNetwork.setAnchors([])
detectionNetwork.setAnchorMasks({})
detectionNetwork.setIouThreshold(0.5)# Linking
camRgb.preview.link(detectionNetwork.input)
camRgb.preview.link(xoutRgb.input)
detectionNetwork.out.link(xoutNN.input)# Connect to device and start pipeline
with dai.Device(pipeline) as device:# Output queues will be used to get the rgb frames and nn data from the outputs defined aboveimageQueue = device.getOutputQueue(name="image", maxSize=4, blocking=False)detectQueue = device.getOutputQueue(name="nn", maxSize=4, blocking=False)frame = Nonedetections = []# nn data, being the bounding box locations, are in <0..1> range - they need to be normalized with frame width/heightdef frameNorm(frame, bbox):normVals = np.full(len(bbox), frame.shape[0])normVals[::2] = frame.shape[1]return (np.clip(np.array(bbox), 0, 1) * normVals).astype(int)def drawText(frame, text, org, color=(255, 255, 255), thickness=1):cv2.putText(frame, text, org, cv2.FONT_HERSHEY_SIMPLEX, 0.5, (0, 0, 0), thickness + 3, cv2.LINE_AA)cv2.putText(frame, text, org, cv2.FONT_HERSHEY_SIMPLEX, 0.5, color, thickness, cv2.LINE_AA)def drawRect(frame, topLeft, bottomRight, color=(255, 255, 255), thickness=1):cv2.rectangle(frame, topLeft, bottomRight, (0, 0, 0), thickness + 3)cv2.rectangle(frame, topLeft, bottomRight, color, thickness)def displayFrame(name, frame):color = (128, 128, 128)for detection in detections:bbox = frameNorm(frame, (detection.xmin, detection.ymin, detection.xmax, detection.ymax))drawText(frame=frame,text=labelMap[detection.label],org=(bbox[0] + 10, bbox[1] + 20),)drawText(frame=frame,text=f"{detection.confidence:.2%}",org=(bbox[0] + 10, bbox[1] + 35),)drawRect(frame=frame,topLeft=(bbox[0], bbox[1]),bottomRight=(bbox[2], bbox[3]),color=color,)# Show the framecv2.imshow(name, frame)while True:imageQueueData = imageQueue.tryGet()detectQueueData = detectQueue.tryGet()if imageQueueData is not None:frame = imageQueueData.getCvFrame()if detectQueueData is not None:detections = detectQueueData.detectionsif frame is not None:displayFrame("rgb", frame)if cv2.waitKey(1) == ord("q"):break
▌参考资料
https://docs.oakchina.cn/en/latest/
https://www.oakchina.cn/selection-guide/
OAK中国
| OpenCV AI Kit在中国区的官方代理商和技术服务商
| 追踪AI技术和产品新动态
戳「+关注」获取最新资讯↗↗
相关文章:
OAK相机如何将 YOLOv10 模型转换成 blob 格式?
编辑:OAK中国 首发:oakchina.cn 喜欢的话,请多多👍⭐️✍ 内容可能会不定期更新,官网内容都是最新的,请查看首发地址链接。 Hello,大家好,这里是OAK中国,我是Ashely。 专…...

【Python】解决Python报错:AttributeError: ‘class‘ object has no attribute ‘xxx‘
🧑 博主简介:阿里巴巴嵌入式技术专家,深耕嵌入式人工智能领域,具备多年的嵌入式硬件产品研发管理经验。 📒 博客介绍:分享嵌入式开发领域的相关知识、经验、思考和感悟,欢迎关注。提供嵌入式方向…...
反思 GTC 和 OFC 2024:没有一刀切的方法,但上市时间是关键!
在GTC 2024期间,英伟达宣布了最新的Blackwell B200张量核心GPU,旨在为万亿参数的AI大型语言模型提供支持。Blackwell B200需要先进的800Gbps网络,完全符合在AI工作负载的AI网络报告中概述的预测。随着人工智能工作负载的流量预计每两年增长10…...

速盾:bgp 静态 cdn
BGP(边界网关协议)是一种用于在互联网中交换路由信息的协议,它允许不同自治系统(AS)之间的路由器进行通信和交换路由信息。CDN(内容分发网络)是一种通过将内容分散放置在全球各地的服务器上&…...
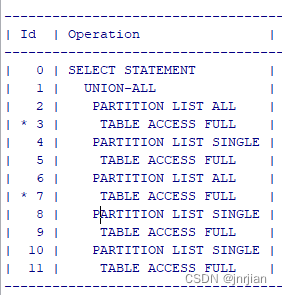
union all 以及标量子查询执行计划
SELECT 1, (SELECT ID1 FROM TE WHERE IDA.ID2) FROM .TA A WHERE COLA X UNION ALL SELECT 1, (SELECT ID2 FROM TD WHERE IDA.ID1) FROM .TB A WHERE COLA X UNION ALL SELECT 1,COL2 AS PARENT_UUID FROM .TC a WHERE COLA X 三个union all 看着像是5个table joi…...
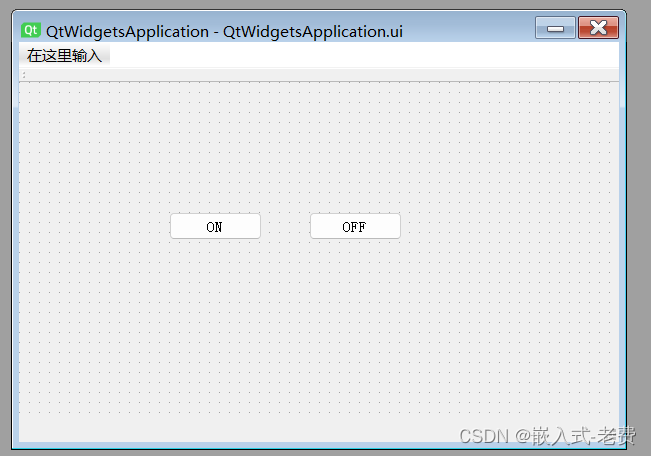
上位机图像处理和嵌入式模块部署(f103 mcu和Qt上位机联动)
【 声明:版权所有,欢迎转载,请勿用于商业用途。 联系信箱:feixiaoxing 163.com】 之前我们写过一篇文章,上面说的是如何利用串口对mcu进行控制,即如果利用串口实现mcu led灯的点亮和熄灭。输入1的时候&…...

TiKV学习5:TiDB SQL执行流程
目录 1. DML语句读流程概要 2. DML语句写流程概要 3. DDL 流程概要 4. SQL的Parse和Compile 5. 读取的执行 6. 写入的执行 7. DDL的执行 8. 小结 1. DML语句读流程概要 TiDB Server接收sql并处理,TiKV负责持久化数据,PD提供TSO和Region的数据字典…...

Unity 自定义编辑器根据枚举值显示变量
public class Test : MonoBehaviour {[HideInInspector][Header("数量")][SerializeField]public int num;[Header("分布类型")][SerializeField]public DistributionType distType;[HideInInspector][Header("位置")][SerializeField]public Li…...

linux下 搭建Llama3
安装软件: Ollama,官方网站:https://ollama.com/ 可以再下载win、mac和linux版本 linux安装命令为:curl -fsSL https://ollama.com/install.sh | sh 由于我的机器是linux不联网机器,网上没找到下载离线方式,…...
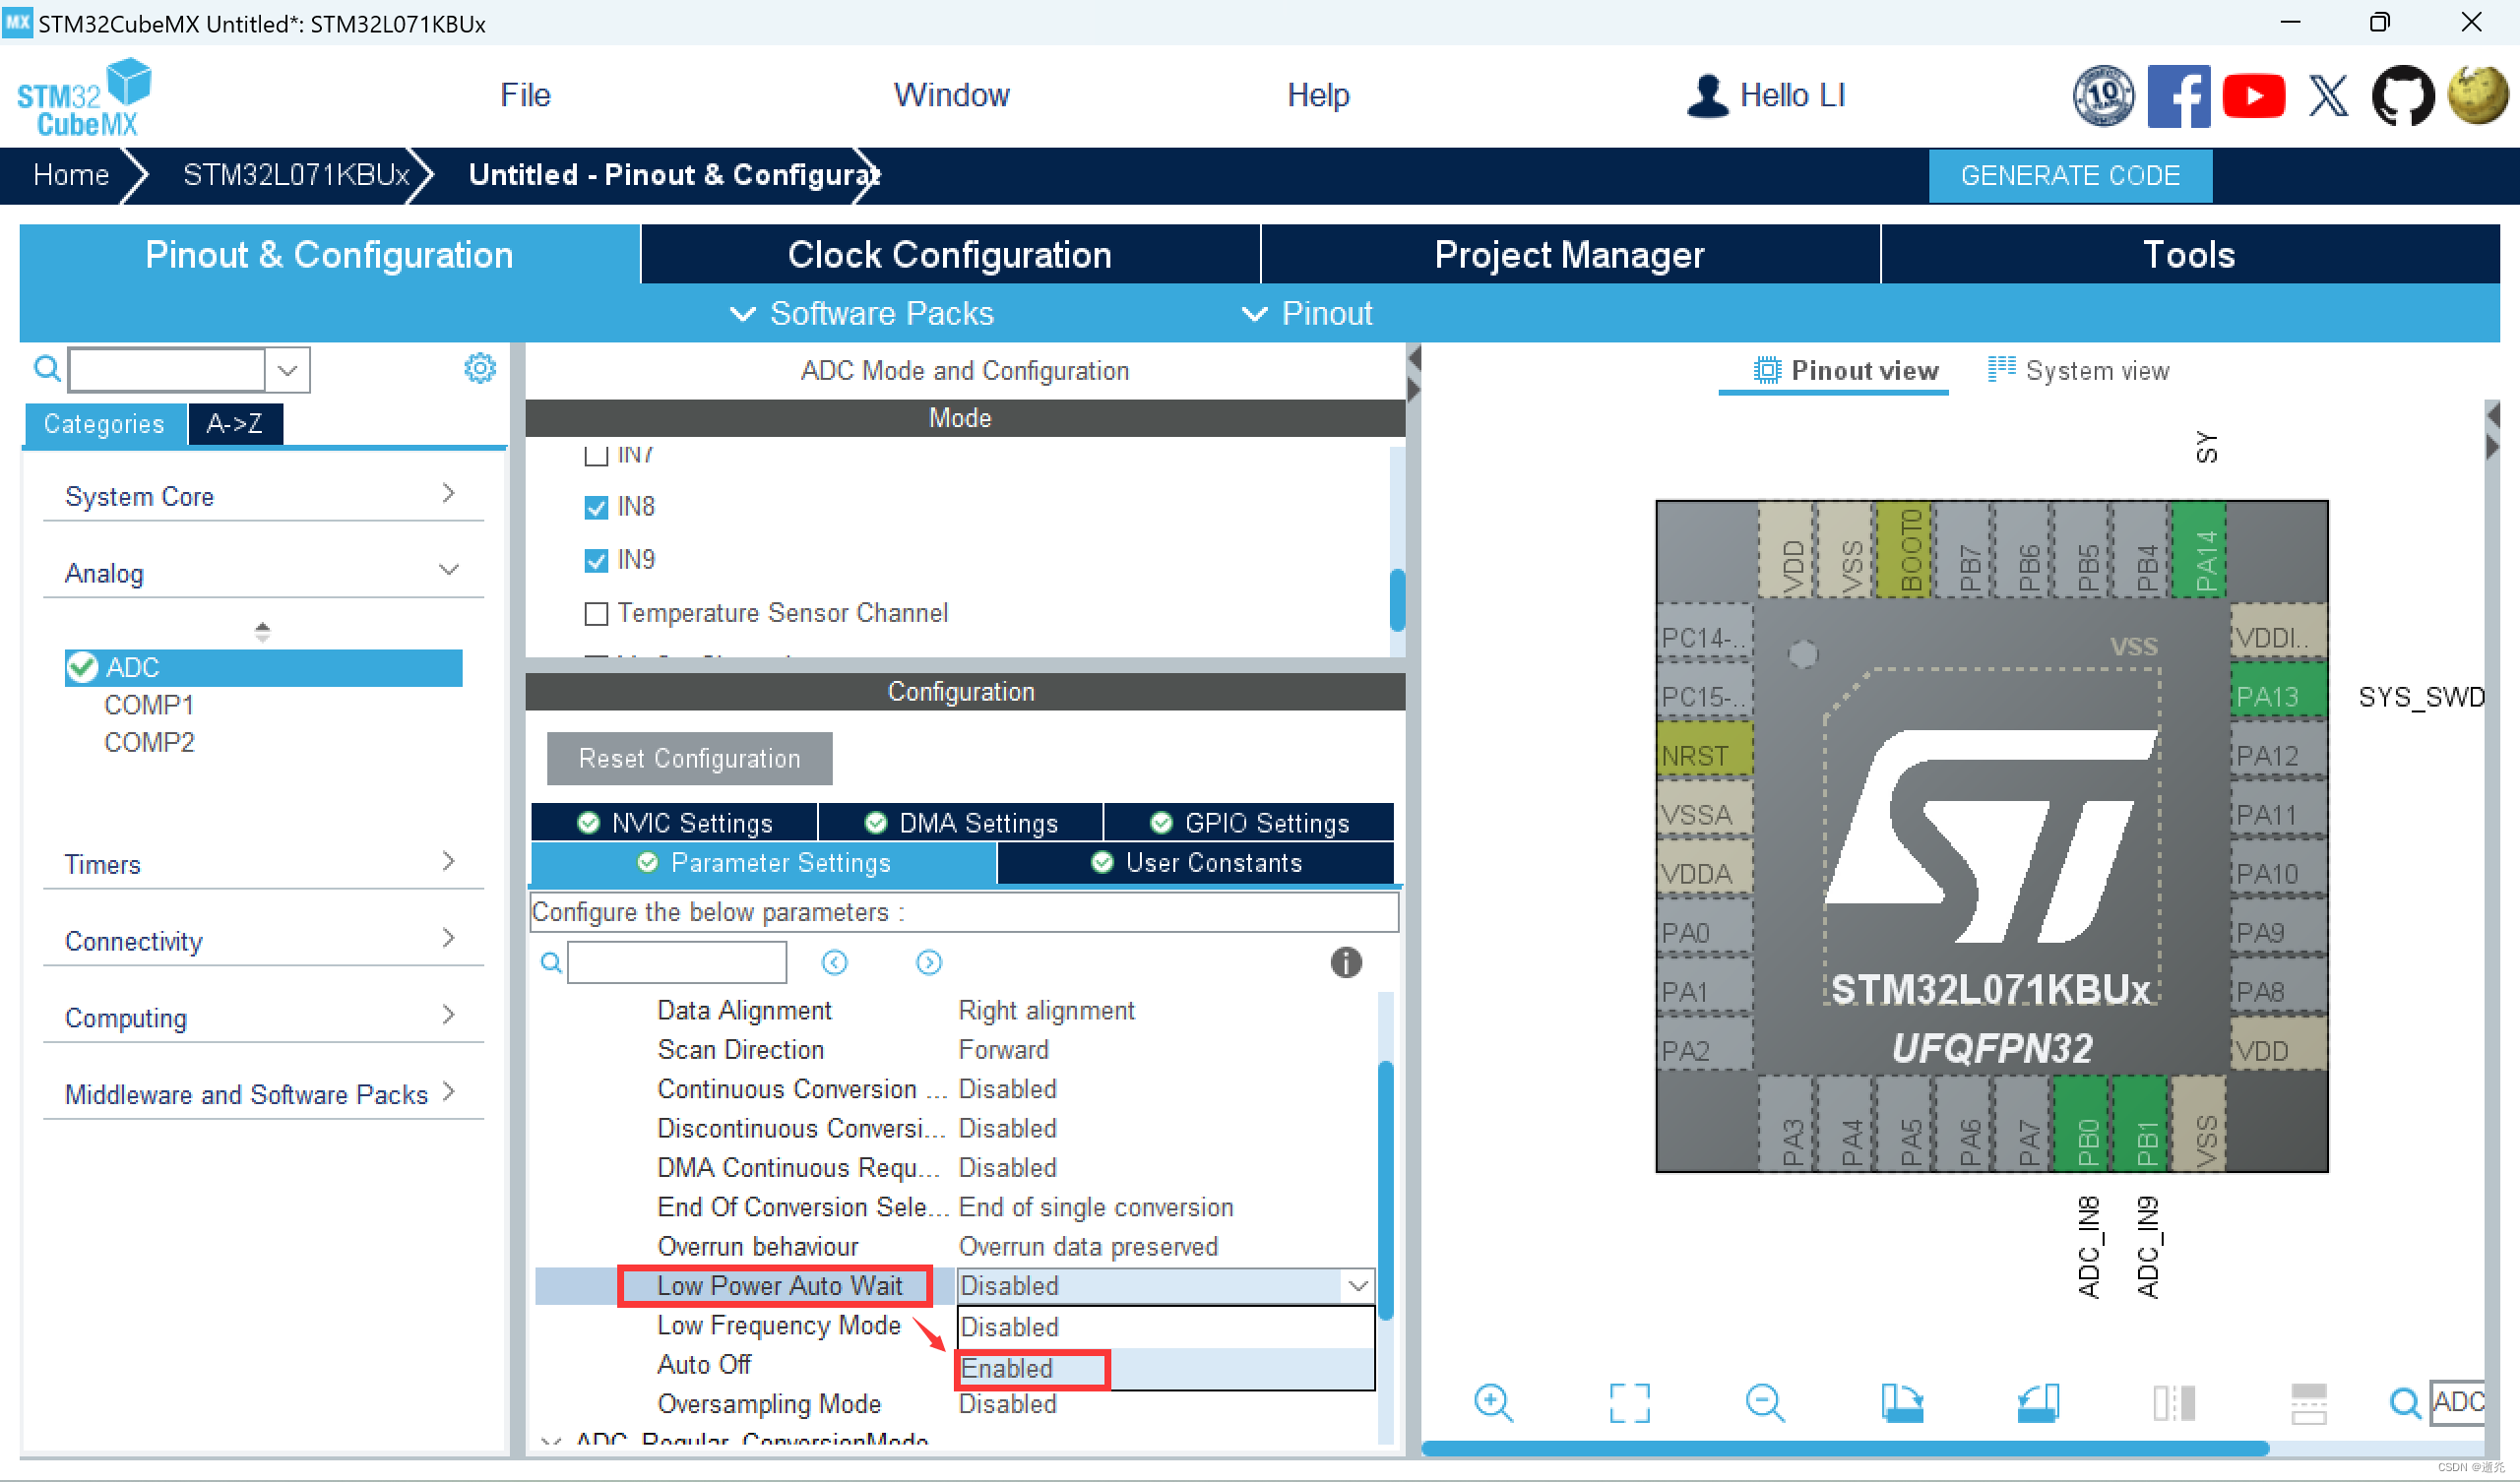
【蓝桥杯——物联网设计与开发】拓展模块2 - 电位器模块
一、电位器模块 (1)资源介绍 🔅原理图 蓝桥杯物联网竞赛实训平台提供了一个拓展接口 CN2,所有拓展模块均可直接安装在 Lora 终端上使用; 图1 拓展接口 电位器模块电路原理图如下所示: 图2 …...

Jtti:租用的php服务器运行异常是什么原因导致的?
PHP服务器运行异常可能由多种原因引起。以下是一些常见问题及其相应的解决方案: 1. 服务器资源不足 原因: CPU、内存或磁盘空间不足,导致服务器性能下降。 解决方案: 检查系统资源:使用以下命令检查CPU、内存和磁盘使用…...

恒创科技:无法与服务器建立安全连接怎么解决?
在使用互联网服务时,有时会出现无法与服务器建立安全连接的问题,此错误消息通常出现在尝试访问需要安全连接的网站(例如使用 HTTPS 的网站)时,这可能是由于多种原因造成的,以下是一些常见的解决方法,帮助你解决问题。 …...

【面试】介绍一下HotSpot虚拟机
目录 1. 说明2. 起源与发展3. 技术特点3.1 热点代码探测技术3.2 内存管理3.3 垃圾收集器3.4 并发和多线程支持3.5 指令重排优化 4. 执行模式与性能 1. 说明 1.HotSpot虚拟机是一款由Oracle JDK和OpenJDK广泛使用的Java虚拟机(JVM)。2.HotSpot虚拟机凭借…...
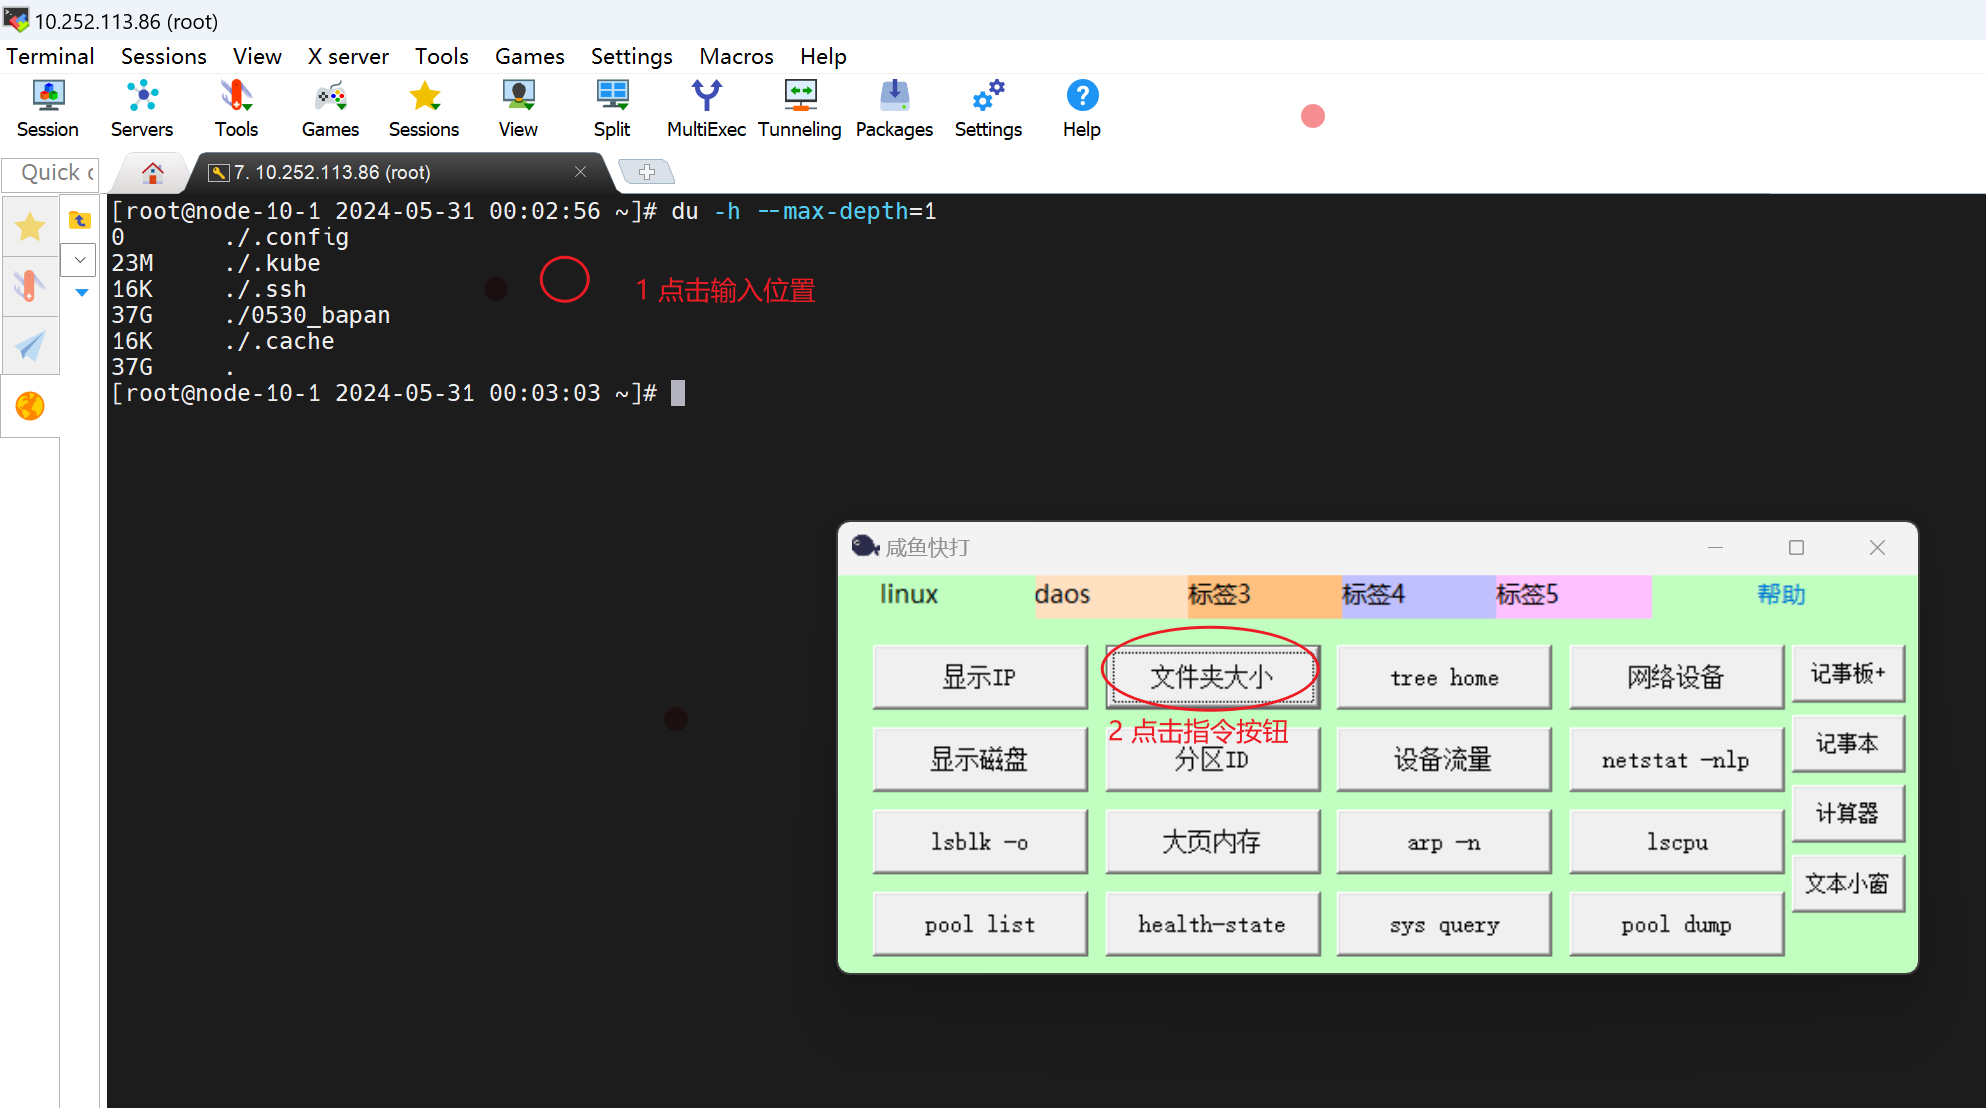
【测试】linux快捷指令工具cxtool
简介 登录linux时,我们经常需要重复输入一些指令. 这个工具可以把这些指令预置,需要的时候鼠标一点,会自动按预置的字符敲击键盘,敲击出指令. 下载地址 https://download.csdn.net/download/bandaoyu/89379371 使用方法 1,编辑配置文件,自定义自己的快捷指令。 2…...

css属性值的计算过程
1.首先抛出一个问题,为什么最终’a’标签渲染的颜色是蓝色。 <div><a>click</a> </div>div {color: red }为什么a标签没有继承父元素的color属性? 2.先抛出一个结论:每一个元素必须拥有全部css属性并且有值浏览器才…...
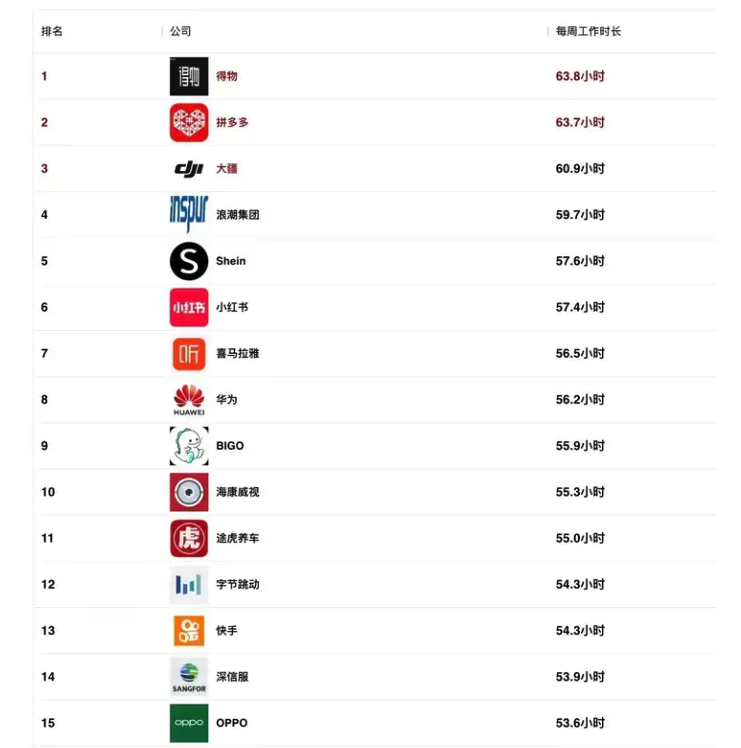
看到大厂工时爆料,我沉默了。。
大厂工时爆料 今天逛脉脉的时候,看到一篇名为「一人一句,大厂工时爆料」的帖子: 点开之后,我沉默了 ... 出来爆料的基本上都是 10 小时。 好奇心之下,我搜索了一下去年很热的排行榜: 2023 年最新互联网公司…...
最大回撤概念与计算
一、最大回撤,是指的最大下跌的值: 1、即所有下跌趋势中,净值最低的点,与历史净值最高点直接的差值。 2、最大回撤取绝对值显示 二、如果有时间限制,则计算对应时间段内的最大回撤。 示意图如下: 三、举…...
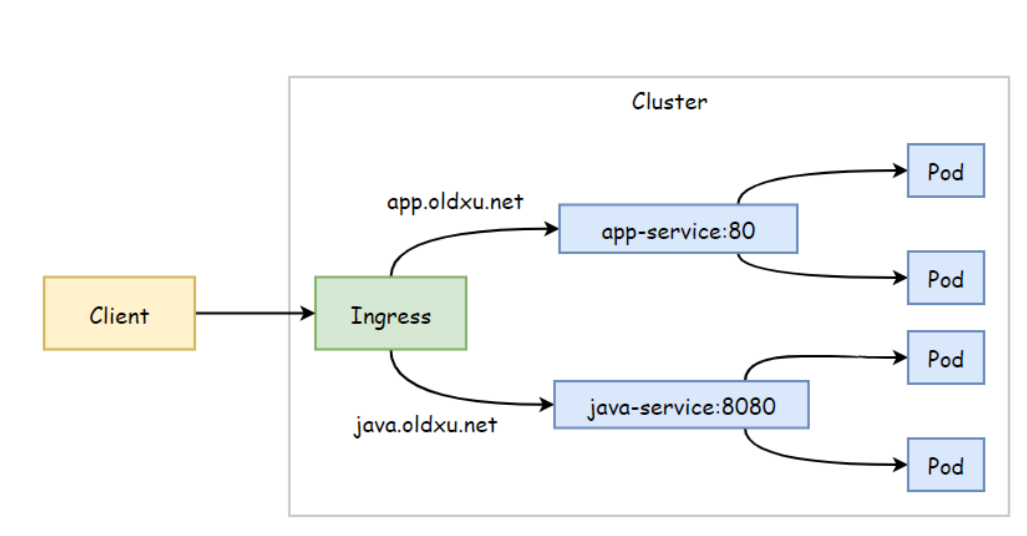
K8s Ingress 详解
文章目录 K8s Ingress 详解Ingress 资源清单Ingress 基于URL 实现路由Ingress 基于名称虚拟主机Ingress 实现HTTPS创建TLS 证书创建Secrets配置ingress Ingress RewriteIngress 灰度发布Ingress 配置认证 K8s Ingress 详解 Ingress 资源清单 apiVersion: networking.k8s.io/v…...

大模型的崛起与未来展望
人工智能技术的飞速发展,令人不得不感叹科技的进步究竟有多么惊人。近年来兴起的大模型,在多个领域都展现出了令人瞩目的能力,引发了业界和大众的广泛关注。从自然语言处理到计算机视觉,从医疗诊断到金融分析,大模型都在不断刷新人类的认知边界。 但我们同时也要看到,大模型目…...
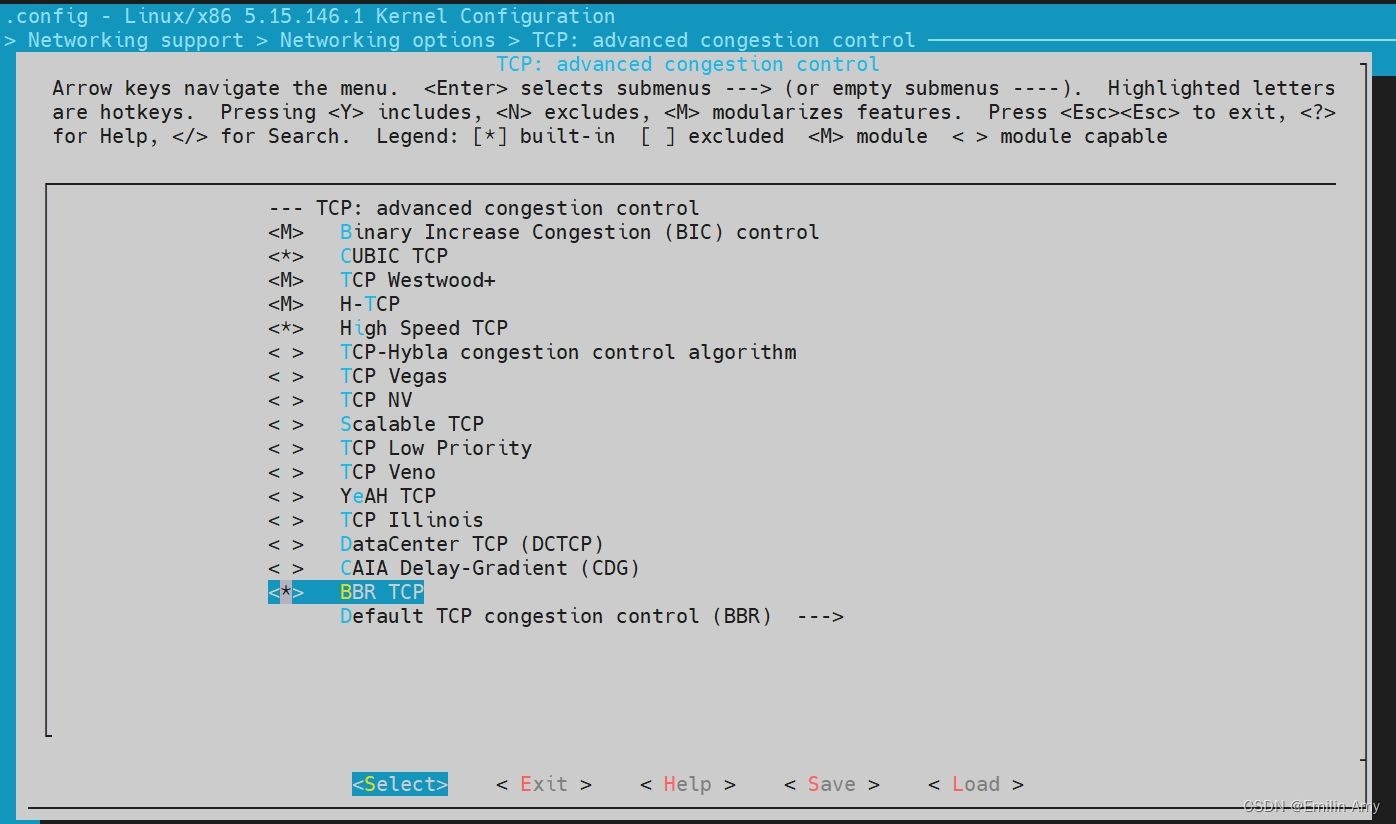
让WSL内核使用BBR拥塞控制算法
使用git命令从Linux内核的Git仓库中获取源代码,$ git clone --depth 1 https://github.com/microsoft/WSL2-Linux-Kernel.git,找到对应的内核版本$ git log --grep="5.15.146.1-microsoft-standard-WSL2",回退到本机安装的内核版本$ git checkout <commit-id&…...

制造业设计团队文档管理选型实战
制造业设计团队文档管理选型实战 某中型机械制造企业,研发团队47人,日常需要管理CAD图纸、BOM表、工艺文件、技术规范等超过120万份文件。过去三年,这支团队换了两次文档管理系统,第二套系统上线8个月后被迫重建——原因是设计部门…...

glogg终极指南:如何通过智能架构设计实现高性能日志分析
glogg终极指南:如何通过智能架构设计实现高性能日志分析 【免费下载链接】glogg A fast, advanced log explorer. 项目地址: https://gitcode.com/gh_mirrors/gl/glogg glogg是一款专为开发者和系统管理员设计的跨平台日志查看器,它巧妙地将grep的…...

终极指南:5步掌握UE5专业角色动画系统ALS-Community
终极指南:5步掌握UE5专业角色动画系统ALS-Community 【免费下载链接】ALS-Community Replicated and optimized community version of Advanced Locomotion System V4 for Unreal Engine 5.4 with additional features & bug fixes 项目地址: https://gitcode…...

打破感知边界:办公多模态的技术演进、实践挑战与终极形态:
引言:第四次办公革命的核心引擎 人类办公史的每一次重大飞跃,都源于交互方式的根本性变革。从纸笔时代的手工记录,到PC时代的键盘鼠标,再到互联网时代的云端协作,每一次变革都将生产力提升了一个数量级。今天ÿ…...

CMake构建类型全解析:Debug、Release、RelWithDebInfo、MinSizeRel到底怎么选?
CMake构建类型全解析:Debug、Release、RelWithDebInfo、MinSizeRel到底怎么选? 在软件开发的世界里,构建类型的选择往往决定了最终产品的表现形态。就像摄影师会根据不同场景选择光圈大小一样,开发者也需要根据项目阶段和需求选择…...

终极电路设计解决方案:如何用Draw.io ECE库高效绘制专业电路图
终极电路设计解决方案:如何用Draw.io ECE库高效绘制专业电路图 【免费下载链接】Draw-io-ECE Custom-made draw.io-shapes - in the form of an importable library - for drawing circuits and conceptual drawings in draw.io. 项目地址: https://gitcode.com/g…...

2026年AI应用开发完整路线:Java后端+Python大模型,少走2年弯路
文章强调AI应用开发需Java后端与Python并重,78%企业招聘要求Java后端知识。提供三条学习路线:Java后端基础、Java AI进阶、Python大模型实战。针对不同人群给出精准建议,指出跳过后端直接学Python是最大误区。掌握JavaPython的复合型工程师薪…...

OpenCode快速上手:3步配置本地AI编程环境,告别复杂安装
OpenCode快速上手:3步配置本地AI编程环境,告别复杂安装 1. 引言:为什么选择OpenCode? 在AI编程助手领域,OpenCode以其独特的终端优先设计和隐私安全特性脱颖而出。作为一个2024年开源的Go语言框架,它能够…...

零基础玩转Stable Diffusion v1.5:手把手教你搭建实时图片生成进度条
零基础玩转Stable Diffusion v1.5:手把手教你搭建实时图片生成进度条 1. 为什么需要实时生成进度条? 当你第一次使用Stable Diffusion生成图片时,可能会遇到这样的困惑:点击生成按钮后,界面就像被冻住了一样…...
)
Hive视图实战:从创建到删除,一个完整的学生信息视图案例(附避坑点)
Hive视图实战:从创建到删除,一个完整的学生信息视图案例(附避坑点) 在数据分析的日常工作中,我们常常需要处理结构复杂的数据表。想象一下这样的场景:你手头有一张包含学生详细信息的大表,每次查…...