第十三章 opengl之模型(导入3D模型)
OpenGL
- 模型
- 导入3D模型
- 优化
- 使用3D模型
模型
使用Assimp并创建实际的加载和转换代码。Model类结构如下:
class Model
{public:/*  函数   */Model(char *path){loadModel(path);}void Draw(Shader shader);   private:/*  模型数据  */vector<Mesh> meshes;string directory;/*  函数   */void loadModel(string path);void processNode(aiNode *node, const aiScene *scene);Mesh processMesh(aiMesh *mesh, const aiScene *scene);vector<Texture> loadMaterialTextures(aiMaterial *mat, aiTextureType type, string typeName);
};
Model类包含一个Mesh对象的vector,构造器参数需要一个文件路径。
构造器通过loadModel来加载文件。私有函数将会处理Assimp导入过程中的一部分,私有函数还存储了 文件路径的目录,加载纹理时会用到。
Draw函数的作用:遍历所有网格,调用网格 各自的Draw函数:
void Draw(Shader shader)
{for(unsigned int i = 0; i < meshes.size(); i++)meshes[i].Draw(shader);
}
导入3D模型
导入一个模型,并将其转换到自己的数据结构中。则首先需要包含Assimp对应的头文件:
#include <assimp/Importer.hpp>
#include <assimp/scene.h>
#include <assimp/postprocess.h>
首先调用函数loadModel,直接从构造器中调用。在该函数汇总,使用Assimp加载模型到Assimp的一个叫做scene的数据结构中。这个是场景对象,通过它可以访问到加载后的模型中所有需要的数据。
Assimp抽象了加载不同文件格式的所有技术细节,只需要一行代码即可:
Assimp::Importer importer;
const aiScene *scene = importer.ReadFile(path, aiProcess_Triangulate | aiProcess_FlipUVs);
代码解读:声明了Assimp命名空间内的一个Importer,之后调用ReadFile函数。该函数需要一个文件路径,第二个参数是后期处理的选项。除了加载文件外,Assimp允许设定一些选项来强制它对导入的数据做一些额外的计算。
通过设定aiProcess_Triangulate ,能告诉Assimp,如果模型不是全部由三角形组成,那么需要将模型的所有图元转换成三角形。
aiProcess_FlipUVs,将在处理的时候翻转y轴的纹理坐标,因为在OpenGL中大部分的图像的y轴都是反的,所系这个后期处理选项可以修复该问题。
其他有用的选项还有:(https://assimp.sourceforge.net/lib_html/postprocess_8h.html)
- aiProcess_GenNormals:如果模型不包含法向量的话,就为每个顶点创建法线。
- aiProcess_SplitLargeMeshes:将比较大的网格分割成更小的子网格,如果你的渲染有最大顶点数限制,只能渲染较小的网格,那么它会非常有用。
- aiProcess_OptimizeMeshes:和上个选项相反,它会将多个小网格拼接为一个大的网格,减少绘制调用从而进行优化。
可以看出使用Assimp加载模型是非常容易的。难的是之后使用返回的场景对象将加载的数据转换到一个Mesh对象的数组。
完整的loadModel函数如下:
void loadModel(string path)
{Assimp::Importer import;const aiScene *scene = import.ReadFile(path, aiProcess_Triangulate | aiProcess_FlipUVs);    if(!scene || scene->mFlags & AI_SCENE_FLAGS_INCOMPLETE || !scene->mRootNode) {cout << "ERROR::ASSIMP::" << import.GetErrorString() << endl;return;}directory = path.substr(0, path.find_last_of('/'));processNode(scene->mRootNode, scene);
}
在我们加载了模型之后,我们会检查场景和其根节点不为null,并且检查了它的一个标记(Flag),来查看返回的数据是不是不完整的。如果遇到了任何错误,我们都会通过导入器的GetErrorString函数来报告错误并返回。我们也获取了文件路径的目录路径。
如果什么错误都没有发生,我们希望处理场景中的所有节点,所以我们将第一个节点(根节点)传入了递归的processNode函数。因为每个节点(可能)包含有多个子节点,我们希望首先处理参数中的节点,再继续处理该节点所有的子节点,以此类推。这正符合一个递归结构,所以我们将定义一个递归函数。递归函数在做一些处理之后,使用不同的参数递归调用这个函数自身,直到某个条件被满足停止递归。在我们的例子中退出条件(Exit Condition)是所有的节点都被处理完毕。
Assimp结构中,每个节点包含一系列网格索引,每个索引指向场景对象中的那个特定网格。接下来需要去获取这些网格索引,获取每个网格,处理每个网格,接着对每个节点的子节点重复这个过程,则processNode函数如下:
void processNode(aiNode *node, const aiScene *scene)
{// 处理节点所有的网格(如果有的话)for(unsigned int i = 0; i < node->mNumMeshes; i++){aiMesh *mesh = scene->mMeshes[node->mMeshes[i]]; meshes.push_back(processMesh(mesh, scene));         }// 接下来对它的子节点重复这一过程for(unsigned int i = 0; i < node->mNumChildren; i++){processNode(node->mChildren[i], scene);}
}
我们首先检查每个节点的网格索引,并索引场景的mMeshes数组来获取对应的网格。返回的网格将会传递到processMesh函数中,它会返回一个Mesh对象,我们可以将它存储在meshes列表/vector。
所有网格都被处理之后,我们会遍历节点的所有子节点,并对它们调用相同的processMesh函数。当一个节点不再有任何子节点之后,这个函数将会停止执行。
下一步是将Assimp的数据解析到Mesh类中。就是将一根aiMesh对象转化为自己的网格对象。只需要访问网格的相关属性并将它们存储到自己的对象中。processMesh函数如下:
Mesh processMesh(aiMesh *mesh, const aiScene *scene)
{vector<Vertex> vertices;vector<unsigned int> indices;vector<Texture> textures;for(unsigned int i = 0; i < mesh->mNumVertices; i++){Vertex vertex;// 处理顶点位置、法线和纹理坐标...vertices.push_back(vertex);}// 处理索引...// 处理材质if(mesh->mMaterialIndex >= 0){...}return Mesh(vertices, indices, textures);
}
处理网格的过程主要有三部分:获取所有的顶点数据,获取它们的网格索引,并获取相关的材质数据。处理后的数据将会储存在三个vector当中,我们会利用它们构建一个Mesh对象,并返回它到函数的调用者那里。
1。获取顶点数据:定义了一个Vertex结构体,将在每个迭代之后将它加入到vertices数组中。会遍历网格中的所有顶点——使用mesh->mNumVertices来获取。每个迭代中,使用所有的相关数据填充这个结构体,顶点的位置如下:
glm::vec3 vector;
vector.x = mesh->mVertices[i].x;
vector.y = mesh->mVertices[i].y;
vector.z = mesh->mVertices[i].z;
vertex.Position = vector;
使用了vec3的临时变量,是因为Assimp对向量,矩阵,字符串等都有自己的一套数据类型,并不能完美地转换到GLM的数据类型中。
处理法线的过程类似:
vector.x = mesh->mNormals[i].x;
vector.y = mesh->mNormals[i].y;
vector.z = mesh->mNormals[i].z;
vertex.Normal = vector;
纹理坐标的处理也大体相似,但Assimp允许一个模型在一个顶点上有最多8个不同的纹理坐标,我们不会用到那么多,我们只关心第一组纹理坐标。我们同样也想检查网格是否真的包含了纹理坐标:
if(mesh->mTextureCoords[0]) // 网格是否有纹理坐标?
{glm::vec2 vec;vec.x = mesh->mTextureCoords[0][i].x; vec.y = mesh->mTextureCoords[0][i].y;vertex.TexCoords = vec;
}
elsevertex.TexCoords = glm::vec2(0.0f, 0.0f);
vertex结构体现在已经填充好了需要的顶点属性,我们会在迭代的最后将它压入vertices这个vector的尾部。这个过程会对每个网格的顶点都重复一遍。
Assimp的接口定义了每个网格都有一个面(Face)数组,每个面代表了一个图元,在例子中(由于使用了aiProcess_Triangulate选项)它总是三角形。一个面包含了多个索引,它们定义了在每个图元中,我们应该绘制哪个顶点,并以什么顺序绘制,所以如果我们遍历了所有的面,并储存了面的索引到indices这个vector中就可以了。
for(unsigned int i = 0; i < mesh->mNumFaces; i++)
{aiFace face = mesh->mFaces[i];for(unsigned int j = 0; j < face.mNumIndices; j++)indices.push_back(face.mIndices[j]);
}
到目前为止,有了一系列的顶点和索引数据,可以通过glDrawElements函数来绘制网格。为了提供一些细节,还需要处理网格的材质。
一个网格只包含了一个指向材质对象的索引。如果要获取网格真正的材质,还需要索引场景的mMaterials数组。网格材质索引位于其mMaterialIndex属性,同样可以用它来检测一个网格是否包含有材质:
if(mesh->mMaterialIndex >= 0)
{aiMaterial *material = scene->mMaterials[mesh->mMaterialIndex];vector<Texture> diffuseMaps = loadMaterialTextures(material, aiTextureType_DIFFUSE, "texture_diffuse");textures.insert(textures.end(), diffuseMaps.begin(), diffuseMaps.end());vector<Texture> specularMaps = loadMaterialTextures(material, aiTextureType_SPECULAR, "texture_specular");textures.insert(textures.end(), specularMaps.begin(), specularMaps.end());
}
我们首先从场景的mMaterials数组中获取aiMaterial对象。接下来我们希望加载网格的漫反射和/或镜面光贴图。一个材质对象的内部对每种纹理类型都存储了一个纹理位置数组。不同的纹理类型都以aiTextureType_为前缀。我们使用一个叫做loadMaterialTextures的工具函数来从材质中获取纹理。这个函数将会返回一个Texture结构体的vector,我们将在模型的textures的尾部之后存储它。
loadMaterialTextures函数遍历了给定纹理类型的所有纹理位置,获取了纹理的文件位置,并加载并和生成了纹理,将信息储存在了一个Vertex结构体中。loadMaterialTextures函数它看起来会像这样:
vector<Texture> loadMaterialTextures(aiMaterial *mat, aiTextureType type, string typeName)
{vector<Texture> textures;for(unsigned int i = 0; i < mat->GetTextureCount(type); i++){aiString str;mat->GetTexture(type, i, &str);Texture texture;texture.id = TextureFromFile(str.C_Str(), directory);texture.type = typeName;texture.path = str;textures.push_back(texture);}return textures;
}
我们首先通过GetTextureCount函数检查储存在材质中纹理的数量,这个函数需要一个纹理类型。我们会使用GetTexture获取每个纹理的文件位置,它会将结果储存在一个aiString中。我们接下来使用另外一个叫做TextureFromFile的工具函数,它将会(用stb_image.h)加载一个纹理并返回该纹理的ID。第二个参数是模型的文件路径。
注意:我们假设了模型文件中纹理文件的路径是相对于模型文件的本地(Local)路径,比如说与模型文件处于同一目录下。我们可以将纹理位置字符串拼接到之前获取的目录字符串上(TextureFromFile),来获取完整的纹理路径(这也是为什么GetTexture函数也需要一个目录字符串)。
在网络上找到的某些模型会对纹理位置使用绝对(Absolute)路径,这就不能在每台机器上都工作了。在这种情况下,你可能会需要手动修改这个文件,来让它对纹理使用本地路径(如果可能的话)。
综上,是使用Assimp导入模型的全部。
优化
优化不是必须的,但是可以提高加载过程。
大多数场景都会在多个网络中 重用部分纹理。比如:一个纹理不仅可以用到人身上,也能用到物体身上。当然就是用同一个纹理进行加载。但是同样的纹理已经被加载过了很多遍,对每个网格仍会加载并生成一个新的纹理。很快就会变成模型加载实现的性能瓶颈。
可以被模型的代码进行调整,将所有加载过的纹理全局存储。每当要加载一个纹理的时候,首先去检查是否被加载过,如果有的话,直接使用那个纹理,并跳过整个加载流程。为了能够比较纹理,还需要存储它们的路径:
struct Texture {unsigned int id;string type;aiString path;  // 我们储存纹理的路径用于与其它纹理进行比较
};
接下来我们将所有加载过的纹理储存在另一个vector中,在模型类的顶部声明为一个私有变量:
vector<Texture> textures_loaded;在loadMaterialTextures函数中,我们希望将纹理的路径与储存在textures_loaded这个vector中的所有纹理进行比较,看看当前纹理的路径是否与其中的一个相同。如果是的话,则跳过纹理加载/生成的部分,直接使用定位到的纹理结构体为网格的纹理。更新后的函数如下:
vector<Texture> loadMaterialTextures(aiMaterial *mat, aiTextureType type, string typeName)
{vector<Texture> textures;for(unsigned int i = 0; i < mat->GetTextureCount(type); i++){aiString str;mat->GetTexture(type, i, &str);bool skip = false;for(unsigned int j = 0; j < textures_loaded.size(); j++){if(std::strcmp(textures_loaded[j].path.data(), str.C_Str()) == 0){textures.push_back(textures_loaded[j]);skip = true; break;}}if(!skip){   // 如果纹理还没有被加载,则加载它Texture texture;texture.id = TextureFromFile(str.C_Str(), directory);texture.type = typeName;texture.path = str.C_Str();textures.push_back(texture);textures_loaded.push_back(texture); // 添加到已加载的纹理中}}return textures;
}
所以现在我们不仅有了个灵活的模型加载系统,我们也获得了一个加载对象很快的优化版本。
综上,完整代码如下:
#ifndef MODEL_H
#define MODEL_H#include <glad/glad.h> #include <glm/glm.hpp>
#include <glm/gtc/matrix_transform.hpp>
#include <stb_image.h>
#include <assimp/Importer.hpp>
#include <assimp/scene.h>
#include <assimp/postprocess.h>#include <learnopengl/mesh.h>
#include <learnopengl/shader.h>#include <string>
#include <fstream>
#include <sstream>
#include <iostream>
#include <map>
#include <vector>
using namespace std;unsigned int TextureFromFile(const char *path, const string &directory, bool gamma = false);class Model
{
public:// model data vector<Texture> textures_loaded;	// stores all the textures loaded so far, optimization to make sure textures aren't loaded more than once.vector<Mesh>    meshes;string directory;bool gammaCorrection;// constructor, expects a filepath to a 3D model.Model(string const &path, bool gamma = false) : gammaCorrection(gamma){loadModel(path);}// draws the model, and thus all its meshesvoid Draw(Shader &shader){for(unsigned int i = 0; i < meshes.size(); i++)meshes[i].Draw(shader);}private:// loads a model with supported ASSIMP extensions from file and stores the resulting meshes in the meshes vector.void loadModel(string const &path){// read file via ASSIMPAssimp::Importer importer;const aiScene* scene = importer.ReadFile(path, aiProcess_Triangulate | aiProcess_GenSmoothNormals | aiProcess_FlipUVs | aiProcess_CalcTangentSpace);// check for errorsif(!scene || scene->mFlags & AI_SCENE_FLAGS_INCOMPLETE || !scene->mRootNode) // if is Not Zero{cout << "ERROR::ASSIMP:: " << importer.GetErrorString() << endl;return;}// retrieve the directory path of the filepathdirectory = path.substr(0, path.find_last_of('/'));// process ASSIMP's root node recursivelyprocessNode(scene->mRootNode, scene);}// processes a node in a recursive fashion. Processes each individual mesh located at the node and repeats this process on its children nodes (if any).void processNode(aiNode *node, const aiScene *scene){// process each mesh located at the current nodefor(unsigned int i = 0; i < node->mNumMeshes; i++){// the node object only contains indices to index the actual objects in the scene. // the scene contains all the data, node is just to keep stuff organized (like relations between nodes).aiMesh* mesh = scene->mMeshes[node->mMeshes[i]];meshes.push_back(processMesh(mesh, scene));}// after we've processed all of the meshes (if any) we then recursively process each of the children nodesfor(unsigned int i = 0; i < node->mNumChildren; i++){processNode(node->mChildren[i], scene);}}Mesh processMesh(aiMesh *mesh, const aiScene *scene){// data to fillvector<Vertex> vertices;vector<unsigned int> indices;vector<Texture> textures;// walk through each of the mesh's verticesfor(unsigned int i = 0; i < mesh->mNumVertices; i++){Vertex vertex;glm::vec3 vector; // we declare a placeholder vector since assimp uses its own vector class that doesn't directly convert to glm's vec3 class so we transfer the data to this placeholder glm::vec3 first.// positionsvector.x = mesh->mVertices[i].x;vector.y = mesh->mVertices[i].y;vector.z = mesh->mVertices[i].z;vertex.Position = vector;// normalsif (mesh->HasNormals()){vector.x = mesh->mNormals[i].x;vector.y = mesh->mNormals[i].y;vector.z = mesh->mNormals[i].z;vertex.Normal = vector;}// texture coordinatesif(mesh->mTextureCoords[0]) // does the mesh contain texture coordinates?{glm::vec2 vec;// a vertex can contain up to 8 different texture coordinates. We thus make the assumption that we won't // use models where a vertex can have multiple texture coordinates so we always take the first set (0).vec.x = mesh->mTextureCoords[0][i].x; vec.y = mesh->mTextureCoords[0][i].y;vertex.TexCoords = vec;// tangentvector.x = mesh->mTangents[i].x;vector.y = mesh->mTangents[i].y;vector.z = mesh->mTangents[i].z;vertex.Tangent = vector;// bitangentvector.x = mesh->mBitangents[i].x;vector.y = mesh->mBitangents[i].y;vector.z = mesh->mBitangents[i].z;vertex.Bitangent = vector;}elsevertex.TexCoords = glm::vec2(0.0f, 0.0f);vertices.push_back(vertex);}// now wak through each of the mesh's faces (a face is a mesh its triangle) and retrieve the corresponding vertex indices.for(unsigned int i = 0; i < mesh->mNumFaces; i++){aiFace face = mesh->mFaces[i];// retrieve all indices of the face and store them in the indices vectorfor(unsigned int j = 0; j < face.mNumIndices; j++)indices.push_back(face.mIndices[j]);        }// process materialsaiMaterial* material = scene->mMaterials[mesh->mMaterialIndex];    // we assume a convention for sampler names in the shaders. Each diffuse texture should be named// as 'texture_diffuseN' where N is a sequential number ranging from 1 to MAX_SAMPLER_NUMBER. // Same applies to other texture as the following list summarizes:// diffuse: texture_diffuseN// specular: texture_specularN// normal: texture_normalN// 1. diffuse mapsvector<Texture> diffuseMaps = loadMaterialTextures(material, aiTextureType_DIFFUSE, "texture_diffuse");textures.insert(textures.end(), diffuseMaps.begin(), diffuseMaps.end());// 2. specular mapsvector<Texture> specularMaps = loadMaterialTextures(material, aiTextureType_SPECULAR, "texture_specular");textures.insert(textures.end(), specularMaps.begin(), specularMaps.end());// 3. normal mapsstd::vector<Texture> normalMaps = loadMaterialTextures(material, aiTextureType_HEIGHT, "texture_normal");textures.insert(textures.end(), normalMaps.begin(), normalMaps.end());// 4. height mapsstd::vector<Texture> heightMaps = loadMaterialTextures(material, aiTextureType_AMBIENT, "texture_height");textures.insert(textures.end(), heightMaps.begin(), heightMaps.end());// return a mesh object created from the extracted mesh datareturn Mesh(vertices, indices, textures);}// checks all material textures of a given type and loads the textures if they're not loaded yet.// the required info is returned as a Texture struct.vector<Texture> loadMaterialTextures(aiMaterial *mat, aiTextureType type, string typeName){vector<Texture> textures;for(unsigned int i = 0; i < mat->GetTextureCount(type); i++){aiString str;mat->GetTexture(type, i, &str);// check if texture was loaded before and if so, continue to next iteration: skip loading a new texturebool skip = false;for(unsigned int j = 0; j < textures_loaded.size(); j++){if(std::strcmp(textures_loaded[j].path.data(), str.C_Str()) == 0){textures.push_back(textures_loaded[j]);skip = true; // a texture with the same filepath has already been loaded, continue to next one. (optimization)break;}}if(!skip){   // if texture hasn't been loaded already, load itTexture texture;texture.id = TextureFromFile(str.C_Str(), this->directory);texture.type = typeName;texture.path = str.C_Str();textures.push_back(texture);textures_loaded.push_back(texture);  // store it as texture loaded for entire model, to ensure we won't unnecessary load duplicate textures.}}return textures;}
};unsigned int TextureFromFile(const char *path, const string &directory, bool gamma)
{string filename = string(path);filename = directory + '/' + filename;unsigned int textureID;glGenTextures(1, &textureID);int width, height, nrComponents;unsigned char *data = stbi_load(filename.c_str(), &width, &height, &nrComponents, 0);if (data){GLenum format;if (nrComponents == 1)format = GL_RED;else if (nrComponents == 3)format = GL_RGB;else if (nrComponents == 4)format = GL_RGBA;glBindTexture(GL_TEXTURE_2D, textureID);glTexImage2D(GL_TEXTURE_2D, 0, format, width, height, 0, format, GL_UNSIGNED_BYTE, data);glGenerateMipmap(GL_TEXTURE_2D);glTexParameteri(GL_TEXTURE_2D, GL_TEXTURE_WRAP_S, GL_REPEAT);glTexParameteri(GL_TEXTURE_2D, GL_TEXTURE_WRAP_T, GL_REPEAT);glTexParameteri(GL_TEXTURE_2D, GL_TEXTURE_MIN_FILTER, GL_LINEAR_MIPMAP_LINEAR);glTexParameteri(GL_TEXTURE_2D, GL_TEXTURE_MAG_FILTER, GL_LINEAR);stbi_image_free(data);}else{std::cout << "Texture failed to load at path: " << path << std::endl;stbi_image_free(data);}return textureID;
}
#endif
使用3D模型
加载一个3D模型,这个模型被输出为一个.obj文件和一个.mtl文件,.mtl文件包含了模型的漫反射,镜面光,法线贴图。
注意:所有的纹理和模型文件应该位于同一个目录下,以供加载纹理。
在代码中,声明一个Model对象,将模型的文件位置传入。接下来模型会自动加载并在渲染循环中使用它的Draw函数来绘制物体。不再需要缓冲分配、属性指针和渲染指令,只需要一行代码就可以了。
相关文章:
)
第十三章 opengl之模型(导入3D模型)
OpenGL模型导入3D模型优化使用3D模型模型 使用Assimp并创建实际的加载和转换代码。Model类结构如下: class Model {public:/* 函数 */Model(char *path){loadModel(path);}void Draw(Shader shader); private:/* 模型数据 */vector<Mesh> meshes;st…...

html标签表示!
html是什么?HTML全称为超文本标记语言,是一种标记语言。包括一系列标签,通过这些标签可以将网络上的文档格式统一,使分散的Internet资源连接为一个逻辑整体。HTML文本是由HTML命令组成的描述性文本,HTML命令可以说明文…...
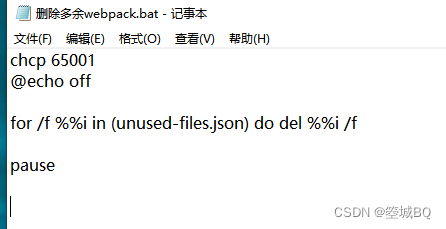
前端优化,webpack打包删除无用文件,并附上批量删除文件脚本!非常好用
前言 大家可能在webpack打包项目过程中,常遇见一些无用的图片,js文件,怎样能够自动检测哪些是无用的文件呢?本文中介绍使用插件useless-files-webpack-plugin查找无用文件,在terminal中删除,附加bat批量删…...

SpringCloud之 LoadBalancer负载均衡
文章目录LoadBalancer 负载均衡一、LoadBalanced 负载均衡🌽①观察负载均衡现象🌽②LoadBalanced 源码剖析二、自定义负载均衡三、OpenFeign 实现负载均衡🍆①添加依赖🍆②启动类添加 EnableFeignClients🍆③创建客户端…...

idm如何下载种子文件和磁力链接 idm如何下载torrent
采用分段式下载技术并支持断点续传的idm下载加速器,几乎可以胜任所有的下载任务。由于该软件强大的下载能力和仅为10MB的小巧体积,idm被来自全球的用户亲切地称为天花板级的下载软件。那么有关idm如何下载种子文件和磁力链接,idm如何下载torr…...
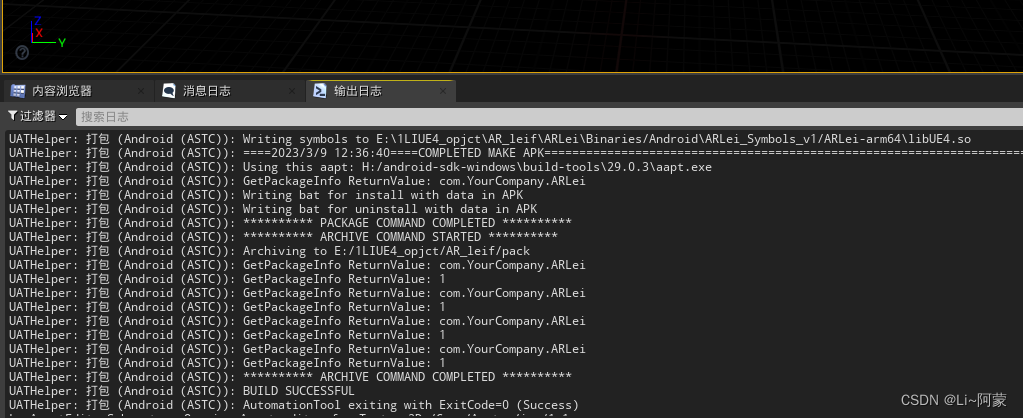
UE4 安卓AR 识别图片
UE4 安卓AR 识别图片 开启一个插件 准备一个只有玩家出生点的场景,这个场景用来做识别图片的 新建一个游戏模式,设置好默认的pawn类: 一个摄像机就行了,代表手机开启AR会话后的那个相机 然后gamemode 事件开始运行࿰…...

数字化服务环境下高校成人教育图书馆服务工作的发展方向
1.利用高校成人教育图书馆的整体化优势进行图书馆网络的优化组织与协调,使数字化信息服务功能在图书馆数字化服务中得以充分实现,促使数字电子信息资源成为图书馆信息服务的有机组成部分。2.高校成人教育应该从宏观上有计划有组织地协调高校成人教育图书…...

以创作之名致敬女性开发者
作者简介:一名云计算网络运维人员、每天分享网络与运维的技术与干货。 座右铭:低头赶路,敬事如仪 个人主页:网络豆的主页 前言 在昨天的2023年3月8日,是咱们女性朋友的节日妇女节,本章将会…...

【ArcGIS学习记录03】--利用DEM数据提取河网溪流--加入大型河流数据及裁剪美化
【ArcGIS学习记录03】–利用DEM数据提取河网溪流–加入大型河流数据及裁剪美化 注:本文仅作为自己的学习记录以备以后复习查阅 一 添加大型河流数据 数据是我自己找的,如果有需要的可以私信我发: 二 裁剪 使用这个相交的工具可以对矢量…...

VOC2012数据集取需要的几个类别
Visual Object Classes Challenge 2012 一、VOC2012二、保留 people ,移除其他类三、画一张图片3.1 新开窗口显示3.2 在jupyter notebook 里面显示一、VOC2012 这项挑战的主要目标是从许多视觉对象中识别对象 现实场景中的对象类(即不是预先分割的对象)。是的 从根本上说,…...

主成分分析(PCA)原理
主成分分析(PCA)原理 在高维数据处理中,为了简化计算量以及储存空间,需要对这些高维数据进行一定程度上的降维,并尽量保证数据的不失真。PCA和ICA是两种常用的降维方法。 PCA:principal component analysi…...

Git:合并一个仓库的某个分支到另一个仓库的某个分支
ps:(同名分支或不同名分支均可) 1.操作: 当前仓库A的一个指定分支1 推给 另一个仓库B的另一个指定分支2 仓库A:repo1 分支1:develop1 仓库B:repo2 分支2:develop2 2.操作命令: 1、git pull # 在当前仓…...
工作记录:bi重构
2023.3.8,我在组内进行工作汇报。内容记录如下: 本次重构的特点 改动大影响后续开发 所以有必要进行工作汇报,让组内同事了解代码的改动与现状。 为什么要重构代码? 正在开发的数据报告模块包含大量 widget 功能,…...
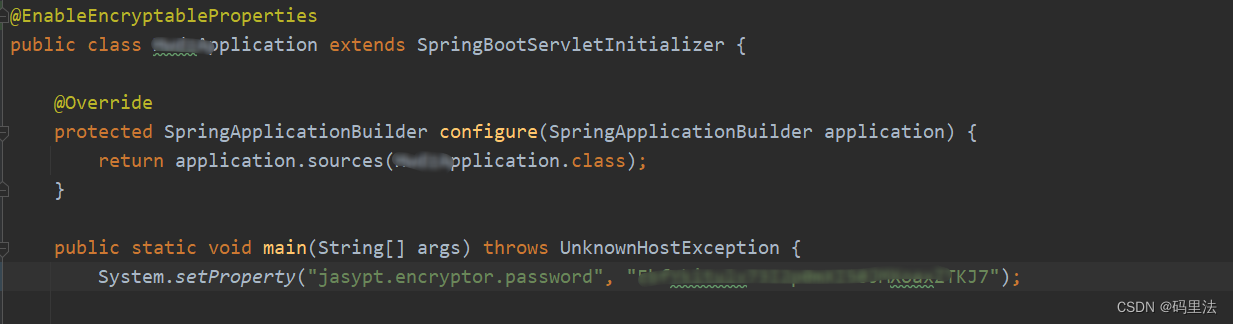
java明文数据加密、脱敏方法总结
前言 在一些安全性要求比较高的项目里,避免不了要对敏感信息进行加解密,比如配置文件中的敏感信息。 第一种方法(自定义加解密) 加解密工具类: public class SecurityTools {public static final String ALGORITHM…...

4N65-ASEMI高压MOS管4N65
编辑-Z 4N65在TO-220封装里的静态漏极源导通电阻(RDS(ON))为2.5Ω,是一款N沟道高压MOS管。4N65的最大脉冲正向电流ISM为16A,零栅极电压漏极电流(IDSS)为10uA,其工作时耐温度范围为-55~150摄氏度。4N65功耗(…...
)
天梯赛训练L1-018 (大笨钟)
目录 1、L1-018 大笨钟 2、 如果到帮助大家,希望大家一键三连!!! 1、L1-018 大笨钟 分数 10 题目通道 微博上有个自称“大笨钟V”的家伙,每天敲钟催促码农们爱惜身体早点睡觉。不过由于笨钟自己作息也不是很规律&a…...

GCC编译器编译C/C++程序(一步完成、分步完成)
以下内容源于C语言中文网的学习与整理,非原创,如有侵权请告知删除。 参考内容 (1)GCC 预处理器选项_dllbl的博客-CSDN博客 (2)Preprocessor Options (Using the GNU Compiler Collection (GCC)) 一、编译的…...

Java8中那些方便又实用的Map函数
简介 java8之后,常用的Map接口中添加了一些非常实用的函数,可以大大简化一些特定场景的代码编写,提升代码可读性,一起来看看吧。 computeIfAbsent函数 比如,很多时候我们需要对数据进行分组,变成Map<…...

如何修复dxgi.dll文件错误?修复方法推荐
如果您使用Windows操作系统,在使用某些应用程序时,可能会遇到dxgi.dll文件错误。这可能会导致应用程序崩溃或无法正常运行。在本文中,我们将探讨如何修复dxgi.dll文件错误。 一.什么是dxgi.dll文件 dxgi.dll文件是Microsoft DirectX图形接口…...

数字化时代,你应该知道的BI
我曾经看到有人在讨论过商业智能BI的部署对于企业是否有实际意义,现在市场的数据已经证明商业智能BI在商业世界中,在企业的实践中证明了自己的价值,得到了广泛的认可。 一、什么是BI 有一点可能很多人没有想到,实际上商业智能BI…...

Maccy剪贴板管理器:彻底改变你的macOS复制粘贴体验
Maccy剪贴板管理器:彻底改变你的macOS复制粘贴体验 【免费下载链接】Maccy Lightweight clipboard manager for macOS 项目地址: https://gitcode.com/gh_mirrors/ma/Maccy Maccy是一款专为macOS设计的轻量级剪贴板管理器,它彻底改变了你的复制粘…...

FTDI FT2232H USB转JTAG实战指南:MPSSE配置与多设备调试
1. FT2232H与JTAG基础入门 第一次接触FT2232H这块芯片时,我完全被它的多功能性震惊了。这块小小的USB转接芯片不仅能处理UART通信,还能通过MPSSE引擎模拟JTAG、SPI、I2C等多种协议。对于嵌入式开发者来说,这简直就是调试神器。 FT2232H最吸引…...

CPU工作原理:从二进制加法器到计算系统
CPU工作原理:从二进制加法器到计算系统的演进 1. 计算需求与二进制表示 在数字计算领域,加法是最基础也是最重要的运算之一。让我们从一个简单的数学问题开始:6324 244675 ?这个看似简单的加法问题,揭示了计算系统的…...

C++ 模板与泛型编程入门
C 模板与泛型编程入门 模板把类型(及非类型参数)作为参数,在编译期由编译器按用法生成具体函数或类,是 C 泛型编程与 STL 的基础。下文以 Max、简单类模板、选择排序及可定制比较器为例说明常见写法;排序复杂度为 (O(…...

OpenClaw备份策略:GLM-4.7-Flash智能管理本地与云端存储
OpenClaw备份策略:GLM-4.7-Flash智能管理本地与云端存储 1. 为什么需要智能备份方案 上周我的移动硬盘突然罢工,导致三个月的项目文档全部丢失。这次惨痛经历让我意识到:传统备份方式已经无法满足现代工作需求。手动备份不仅耗时耗力&#…...

STS4x温度传感器I²C驱动库深度解析与跨平台移植
1. STS4x温湿度传感器驱动库技术解析1.1 项目定位与工程价值Sensirion STS4x系列是瑞士Sensirion公司推出的高精度数字温度传感器,采用CMOSens技术,具备0.1C典型精度、0.01C分辨率、低功耗(典型待机电流仅0.5μA)及快速响应&#…...

C12832 LCD嵌入式驱动库详解:mbed平台128×32点阵显示开发指南
1. C12832 LCD驱动库概述C12832_lcd 是专为 mbed 应用开发板(Application Board)板载液晶显示屏设计的嵌入式驱动库。该显示屏型号为 C12832,是一款 12832 点阵、单色、COG(Chip-on-Glass)结构的 STN 液晶模块…...

springboot网络小说在线阅读网站的设计与实现
目录需求分析技术选型数据库设计核心功能实现性能优化安全防护测试部署项目技术支持源码获取详细视频演示 :文章底部获取博主联系方式!同行可合作需求分析 明确网站的核心功能和用户需求。网络小说在线阅读网站通常需要包含以下功能模块:用户…...

CssToInlineStyles终极调试指南:解决10个常见错误与性能优化技巧 [特殊字符]
CssToInlineStyles终极调试指南:解决10个常见错误与性能优化技巧 🚀 【免费下载链接】CssToInlineStyles CssToInlineStyles is a class that enables you to convert HTML-pages/files into HTML-pages/files with inline styles. This is very usefull…...

关于腾讯广告算法大赛2025项目分析1 - dataset.py
把原始 jsonl 用户行为序列,转成模型能直接吃的张量tensor和特征字典 一、整体定位 MyDataset 读取训练数据,产出: 用户序列 seq正样本 pos负样本 negtoken 类型各类特征时间特征相关原始时间戳 MyTestDataset 读取测试/推理数据,产出 用户序…...