【学习笔记】Windows GDI绘图(十)Graphics详解(中)
文章目录
- Graphics的方法
- AddMetafileComment添加注释
- BeginContainer和EndContainer新建、还原图形容器
- 不指定指定源与目标矩形
- 指定源与目标矩形
- Clear清空并填充指定颜色
- CopyFromScreen
- 截图
- CopyPixelOperation
- DrawImage绘制图像
- DrawImage的Graphics+DrawImageAbort回调
- ExcludeClip排除裁切区域
Graphics的方法
AddMetafileComment添加注释
原型:
public void AddMetafileComment (byte[] data);
作用:向当前图元(Metafile)文件添加注释。只对图元文件有效。
// 创建新的Graphics对象并获取其句柄
Graphics newGraphics = this.CreateGraphics();
IntPtr hdc = newGraphics.GetHdc();// 创建新的图元文件
Metafile metaFile1 = new Metafile("SampMeta.emf", hdc);// 从图元文件创建Graphics对象
Graphics metaGraphics = Graphics.FromImage(metaFile1);// 绘制一个矩形
metaGraphics.DrawRectangle(new Pen(Color.Black, 5), 0, 0, 100, 100);// 添加注释
byte[] metaComment = { (byte)'T', (byte)'e', (byte)'s', (byte)'t' };
metaGraphics.AddMetafileComment(metaComment);metaGraphics.Dispose();metaFile1.Dispose();newGraphics.ReleaseHdc(hdc);newGraphics.Dispose();// 打开一个图元文件
Metafile metaFile2 = new Metafile("SampMeta.emf");// 将图元文件内容绘制到当前Graphics上
e.Graphics.DrawImage(metaFile2, new Point(0, 0));metaFile2.Dispose();
创建一个新的图元件,保存后,打开并绘制。目前没看出有啥作用,在图像文件中嵌入一些信息?可还没找到读取的方法。
BeginContainer和EndContainer新建、还原图形容器
原型:
public System.Drawing.Drawing2D.GraphicsContainer BeginContainer ();
public System.Drawing.Drawing2D.GraphicsContainer BeginContainer (System.Drawing.Rectangle dstrect, System.Drawing.Rectangle srcrect, System.Drawing.GraphicsUnit unit);
public System.Drawing.Drawing2D.GraphicsContainer BeginContainer (System.Drawing.RectangleF dstrect, System.Drawing.RectangleF srcrect, System.Drawing.GraphicsUnit unit);
public void EndContainer (System.Drawing.Drawing2D.GraphicsContainer container);
作用:保存图形容器及其当前状态,再打开并使用新的图形容器。
可定义源矩形与目标矩形来生成新的图形容器,实现坐标变换。
关闭当前图形容器并改得到通过调用BeginContainer()方法保存的状态。
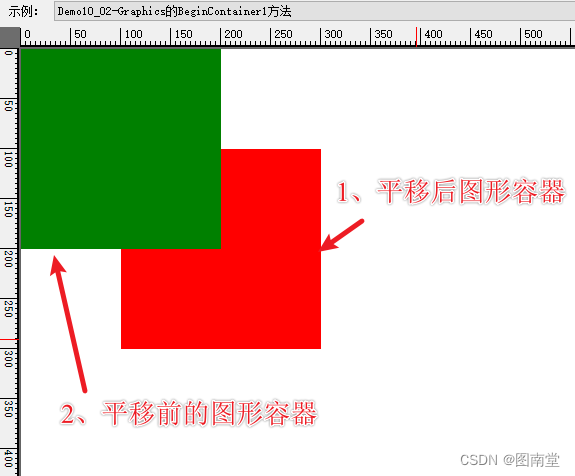
不指定指定源与目标矩形
//将当前状态保存到containerState,并打开一个新的图形容器
GraphicsContainer containerState = e.Graphics.BeginContainer();// 在新图形容器来执行平移
e.Graphics.TranslateTransform(100.0F, 100.0F);// 填充一个红色矩形
e.Graphics.FillRectangle(new SolidBrush(Color.Red), 0, 0, 200, 200);// 还原图形容器状态(还原到未平移前的状态)
e.Graphics.EndContainer(containerState);// Fill untransformed rectangle with green.
e.Graphics.FillRectangle(new SolidBrush(Color.Green), 0, 0, 200, 200);
1、保存原图形容器
2、在新的图形容器内到平移变换
3、绘制一个矩形
4、还原图形容器
5、再绘制一个与前面坐标一致(世界坐标)的矩形
注意结果位置的不同
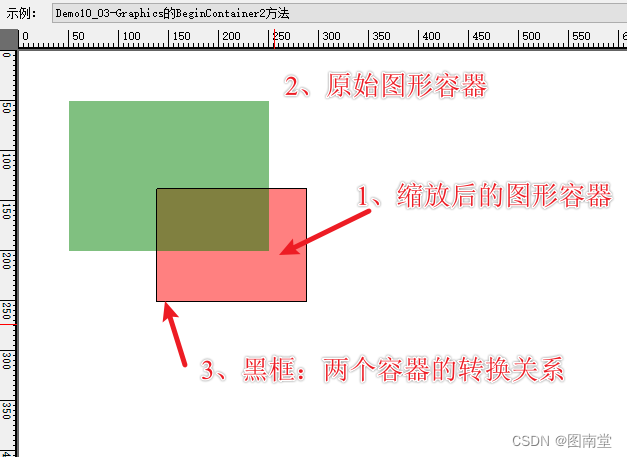
指定源与目标矩形
// 定义源矩形和目标矩形,
RectangleF srcRect = new RectangleF(0, 0, 200, 200);
RectangleF destRect = new RectangleF(100, 100, 150, 150);// 保存,并打开一个变换后图形容器
GraphicsContainer containerState = e.Graphics.BeginContainer(destRect, srcRect,GraphicsUnit.Pixel);//定义一个矩形,注意两个图形容器绘制时的区别
var rect = new RectangleF(50, 50, 200, 150);
//在变换后的容器内填充矩形
e.Graphics.FillRectangle(new SolidBrush(Color.FromArgb(127, Color.Red)), rect.X, rect.Y, rect.Width, rect.Height);e.Graphics.EndContainer(containerState);// 在未变换的容器内填充矩形
e.Graphics.FillRectangle(new SolidBrush(Color.FromArgb(127, Color.Green)), rect.X, rect.Y, rect.Width, rect.Height);var wScale = destRect.Width / srcRect.Width;
var hScale = destRect.Height / srcRect.Height;
//在未变换的容器内绘制一个矩形,使其与变换的填充矩形重叠,注意计算方法
e.Graphics.DrawRectangle(Pens.Black, destRect.X + (rect.X - srcRect.X) * wScale,destRect.Y + (rect.Y - srcRect.Y) * hScale,rect.Width * wScale,rect.Height * hScale);
1、定义两个矩形用于新图形容器的目标与源矩形
2、使用上面两个矩形,打开一个新的图形容器
3、填充一个矩形
4、还原图形容器
5、使用世界坐标相同的矩形,在原图形容器里填充一个矩形
6、在原图形里计算一个与变换后图形容器中一样大小的矩形(注意计算方法)
Clear清空并填充指定颜色
原型:
public void Clear (System.Drawing.Color color);
作用:清空整个绘图表面并用指定颜色填充为背景色。
CopyFromScreen
原型:
public void CopyFromScreen (System.Drawing.Point upperLeftSource, System.Drawing.Point upperLeftDestination, System.Drawing.Size blockRegionSize);
public void CopyFromScreen (System.Drawing.Point upperLeftSource, System.Drawing.Point upperLeftDestination, System.Drawing.Size blockRegionSize, System.Drawing.CopyPixelOperation copyPixelOperation);
public void CopyFromScreen (int sourceX, int sourceY, int destinationX, int destinationY, System.Drawing.Size blockRegionSize);
作用:从屏幕复制(截图)
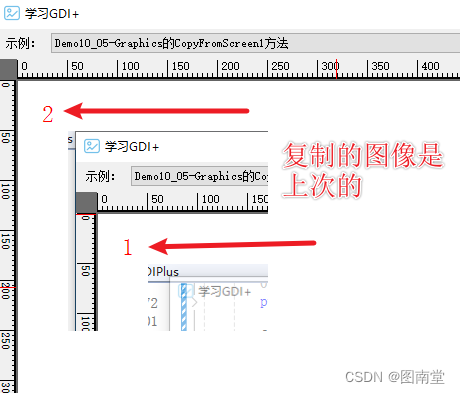
截图
int drawCount = 1;
[System.ComponentModel.Description("Graphics的CopyFromScreen1方法")]
public void Demo10_05(PaintEventArgs e)
{var srcPt = this.Location;e.Graphics.DrawString($"{drawCount}", new Font("宋体", 18), Brushes.Red, new Point(20, 20));//桌面左上角(100,100)位置开始,复制(截图一个200 x 200)的图像,绘制在(50,50)的起点位置e.Graphics.CopyFromScreen(srcPt, new Point(50, 50),new Size(200, 200));drawCount++;
}
截图然后绘制到当前Graphics中,注意,如果开启DoubleBuffer复制的图像是上一次的。如果没有开启,则复制的图像是当前绘制的。
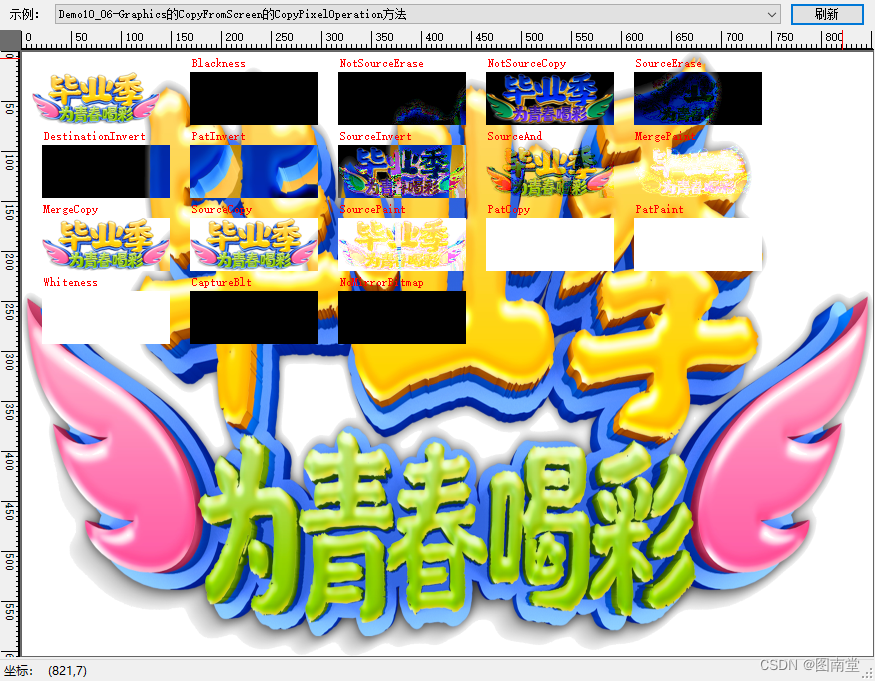
CopyPixelOperation
确定复制像素操作中的源颜色如何与目标颜色组合以产生最终颜色。
private Image TransparentBmp;[System.ComponentModel.Description("Graphics的CopyFromScreen的CopyPixelOperation方法")]
public void Demo10_06(PaintEventArgs e)
{var srcX = this.Location.X + 40;//var srcY = this.Location.Y + 103;//var values = Enum.GetValues(typeof(CopyPixelOperation)) as CopyPixelOperation[];if (TransparentBmp == null){TransparentBmp = new Bitmap("transparent.png");}var dstSize = new Size(128, (int)(128f * TransparentBmp.Height / TransparentBmp.Width));e.Graphics.DrawImage(TransparentBmp, e.Graphics.ClipBounds);e.Graphics.DrawImage(TransparentBmp, 10, 20, dstSize.Width, dstSize.Height);var colCount = 5;for (int i = 0; i < values.Length; i++){var val = values[i];e.Graphics.DrawString($"{val}", Font, Brushes.Red, new Point(20 + ((i + 1) % colCount) * (dstSize.Width + 20), 5 + ((i + 1) / colCount) * (dstSize.Height + 20)));var dstX = 20 + ((i + 1) % colCount) * (dstSize.Width + 20);var dstY = 20 + ((i + 1) / colCount) * (dstSize.Height + 20);//e.Graphics.DrawImage(TransparentBmp, dstX, dstY , dstSize.Width, dstSize.Height);e.Graphics.CopyFromScreen(srcX, srcY, dstX, dstY, dstSize, val);}
}
绘制一个背景再左上角绘制一个透明图,用CopyFromScreen截取透明图位置,用不的CopyPixelOperation值绘制结果。
DrawImage绘制图像
原型:
//截取源图绘制到指定点
public void DrawImage (System.Drawing.Image image, float x, float y, System.Drawing.RectangleF srcRect, System.Drawing.GraphicsUnit srcUnit);//截取源图,以指定大小矩形绘制
public void DrawImage (System.Drawing.Image image, System.Drawing.RectangleF destRect, System.Drawing.RectangleF srcRect, System.Drawing.GraphicsUnit srcUnit);//截取源图,绘制到指定位置平行四边形,并应用图像属性
public void DrawImage (System.Drawing.Image image, System.Drawing.PointF[] destPoints, System.Drawing.RectangleF srcRect, System.Drawing.GraphicsUnit srcUnit, System.Drawing.Imaging.ImageAttributes imageAttr);
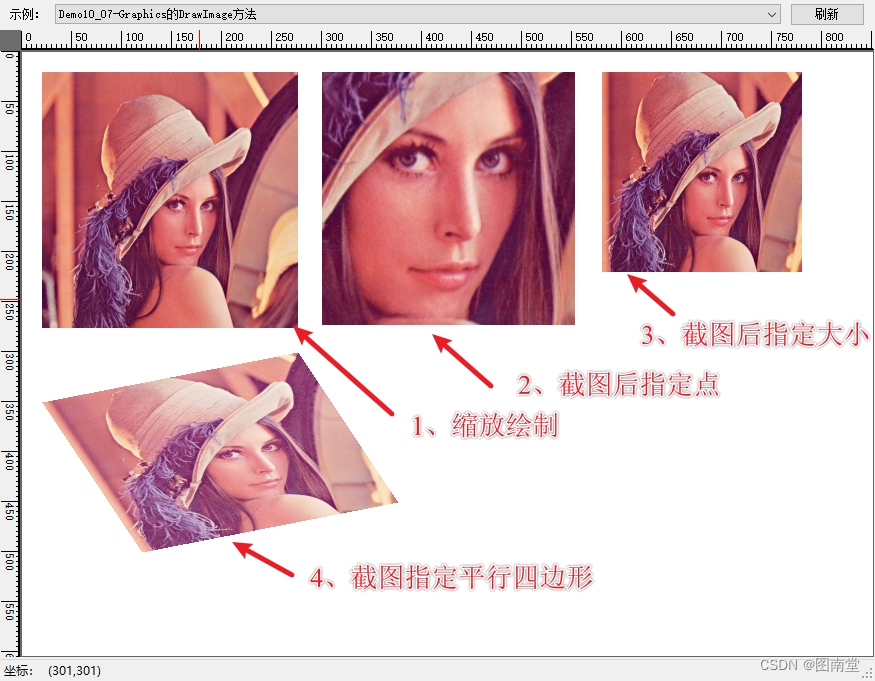
private Image LenaBmp;[System.ComponentModel.Description("Graphics的DrawImage方法")]public void Demo10_07(PaintEventArgs e){if (LenaBmp == null){LenaBmp = new Bitmap("lena.jpg");}var dstSize = new Size(256, 256);var space = 20;//缩小后绘制原图e.Graphics.DrawImage(LenaBmp, space, space, dstSize.Width, dstSize.Height);//注意,这里截取的原图是192X192,但绘制的是256*256 退即 192/72*96e.Graphics.DrawImage(LenaBmp, 300, space, new Rectangle(200, 200, 192, 192), GraphicsUnit.Pixel);var srcRect = new RectangleF(50, 50, LenaBmp.Width - 100, LenaBmp.Height - 100);var dstRect = new RectangleF(580, space, 200, 200);//截取部分源图像,绘制到目标矩形上(大小可缩放)e.Graphics.DrawImage(LenaBmp, dstRect,srcRect , GraphicsUnit.Pixel);//目标平行四边形的左上、右上、左下三个顶点var dstPts = new PointF[] { new PointF(20, 350), new PointF(276, 300), new PointF(120, 500)};// Create image attributes and set large gamma.ImageAttributes imageAttr = new ImageAttributes();imageAttr.SetGamma(0.6f);//调整Gamma值//截取原图,绘制成指定平行四边形e.Graphics.DrawImage(LenaBmp, dstPts, srcRect, GraphicsUnit.Pixel, imageAttr);}
1、绘制缩小后的图像
2、截取原图像绘制到指定点(注意绘制的大小与截取图像的大小不一致问题)
3、截取原图后,换指定大小绘制
4、截取原图后,绘制成平行四边形
DrawImage的Graphics+DrawImageAbort回调
原型:
public void DrawImage (System.Drawing.Image image, System.Drawing.Rectangle destRect, int srcX, int srcY, int srcWidth, int srcHeight, System.Drawing.GraphicsUnit srcUnit, System.Drawing.Imaging.ImageAttributes imageAttrs, System.Drawing.Graphics.DrawImageAbort callback, IntPtr callbackData);
作用:指定绘制目标矩形,源图像矩形,图像属性(可为Null),绘制回调函数,回调参数。
该方法支持中途取消绘制图像(如超出绘制区域,可不绘制)。
//是否要中途取消绘制
private bool canCancel = false;
[System.ComponentModel.Description("Graphics的DrawImage方法DrawImageAbort")]
public void Demo10_08(PaintEventArgs e)
{if (LenaBmp == null){LenaBmp = new Bitmap("lena.jpg");}var sw = Stopwatch.StartNew();canCancel = !canCancel;//如果canCancel为false,则绘制501次,否则,只绘制最后一次for (int index= 500;index>=0;index--){// 定义回调函数Graphics.DrawImageAbort callback = new Graphics.DrawImageAbort(DrawImageCallback);// 创建回调数据结构var callbackData = new CallbackData { Index = index,Cancel = canCancel};IntPtr callbackDataPtr = Marshal.AllocHGlobal(Marshal.SizeOf(callbackData));// 将结构复制到非托管内存Marshal.StructureToPtr(callbackData, callbackDataPtr, false);try{// 绘制图像,使用回调函数和回调参数e.Graphics.DrawImage(LenaBmp, new Rectangle(10, 50, LenaBmp.Width, LenaBmp.Height), 0, 0, LenaBmp.Width, LenaBmp.Height, GraphicsUnit.Pixel, null, callback, callbackDataPtr);}catch { }finally{//gcHandle.Free(); // 释放 GCHandle// 释放非托管内存Marshal.FreeHGlobal(callbackDataPtr);}}sw.Stop();e.Graphics.DrawString($"是否取消:{canCancel},耗时:{sw.ElapsedMilliseconds}ms", Font, Brushes.Red, new PointF(20, 20));
}
// 回调函数定义
private bool DrawImageCallback(IntPtr callbackDataPtr)
{var callbackData = Marshal.PtrToStructure(callbackDataPtr, typeof(CallbackData)) as CallbackData;if (callbackData == null) return false;//继续绘制if (callbackData.Index != 0){return callbackData.Cancel;//取消绘制}return false;
}// 定义回调数据结构
[StructLayout(LayoutKind.Sequential)]
public class CallbackData
{public int Index;public bool Cancel=true;
}
模拟中途取消与不取消绘制时的耗时差异。

ExcludeClip排除裁切区域
原型:
public void ExcludeClip (System.Drawing.Region region);
public void ExcludeClip (System.Drawing.Rectangle rect);
作用:定义一个区域不属于裁切区域
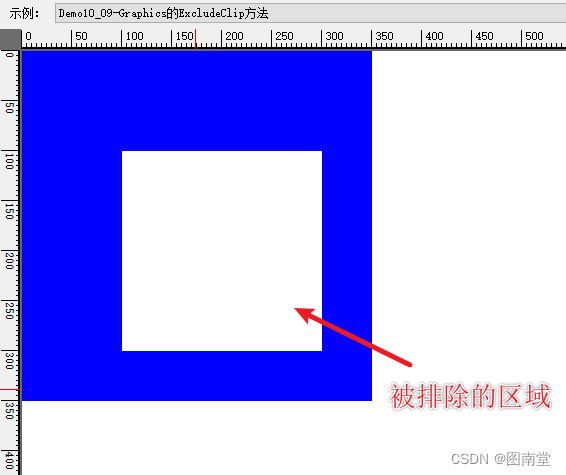
//创建一个矩形区域
Rectangle excludeRect = new Rectangle(100, 100, 200, 200);// 创建一个裁切排除区域
Region excludeRegion = new Region(excludeRect);// 设置排除区域
e.Graphics.ExcludeClip(excludeRegion);// 填充一个大矩形,以观察排除区域
e.Graphics.FillRectangle(new SolidBrush(Color.Blue), 0, 0, 350, 350);
定义排除区域,再填充一个大矩形,以观察效果。
相关文章:
【学习笔记】Windows GDI绘图(十)Graphics详解(中)
文章目录 Graphics的方法AddMetafileComment添加注释BeginContainer和EndContainer新建、还原图形容器不指定指定源与目标矩形指定源与目标矩形 Clear清空并填充指定颜色CopyFromScreen截图CopyPixelOperation DrawImage绘制图像DrawImage的GraphicsDrawImageAbort回调ExcludeC…...

web学习笔记(六十二)
目录 1.键盘事件 2.KeepAlive 3.组件传值 3.1 兄弟组件传值 3.2 组件树传值 3.3 发布订阅者传值 1.键盘事件 keydown表示键盘事件,在不加修饰符的情况下,点击键盘上的任意位置都可以触发键盘事件, <template><div><!--…...

每天CTF小练一点--ctfshow年CTF
初一 题目: 2023是兔年,密码也是。聪明的小伙伴们,你能破解出下面的密码吗? 感谢大菜鸡师傅出题 flag格式是ctfshow{xxxxxx}.或许密码也有密码。 密文是: U2FsdGVkX1M7duRffUvQgJlESPfOTV2i4TJpc9YybgZ9ONmPk/RJje …...

Java Set接口 - TreeSet类
TreeSet 是 Java 集合框架中的一个类,它实现了 NavigableSet 接口,而 NavigableSet 是 SortedSet 接口的一个子接口。TreeSet 基于红黑树(一种自平衡的二叉搜索树)实现,因此它可以保证集合中的元素以升序排列。 以下是…...

css 理解了原理,绘制三角形就简单了
1.border-位置 注意:border-bottom/up/right/left 主要是以三角形的结构搭建而成,而border也是如此。而且从边框的外围开始计算像素尺寸。在理解了这一点之后,绘制三角形就简单多了。 1.transparent 注意:该属性主要是颜色透明…...

【JavaEE进阶】——MyBatis操作数据库 (#{}与${} 以及 动态SQL)
目录 🚩#{}和${} 🎈#{} 和 ${}区别 🎈${}使用场景 📝排序功能 📝like 查询 🚩数据库连接池 🎈数据库连接池使⽤ 🚩MySQL开发企业规范 🚩动态sql 🎈…...
电阻应变片的结构
电阻应变片的结构 常用的电阻应变片有金属应变片和半导体应变片两种。金属应变片分为体型和薄膜型。半导体应变片常见的有体型、薄膜型、扩散型、外延型、PN结及其他形式。图2—2所示为工程常见的应变片实物。 电阻应变片的典型结构如图2—3所示。它由敏感栅、基底、覆盖层和引…...

云原生时代:从 Jenkins 到 Argo Workflows,构建高效 CI Pipeline
作者:蔡靖 Argo Workflows Argo Workflows [ 1] 是用于在 Kubernetes 上编排 Job 的开源的云原生工作流引擎。可以轻松自动化和管理 Kubernetes 上的复杂工作流程。适用于各种场景,包括定时任务、机器学习、ETL 和数据分析、模型训练、数据流 pipline、…...

【数据库系统概论】事务
概述 在数据库系统中,事务(Transaction)是指一组作为单个逻辑工作单元执行的操作。这些操作要么全部成功(提交),要么全部失败(回滚)。事务的主要目的是确保数据库的完整性和一致性&…...
C++-排序算法详解
目录 一. 冒泡排序: 二. 插入排序: 三. 快速排序: 四. 选择排序 五, 归并排序 六, 堆排序. 排序算法是一种将一组数据按照特定顺序(如升序或降序)进行排列的算法。 其主要目的是对一组无序的数据进行整理&#…...
)
Kotlin 引用(双冒号::)
文章目录 双冒号::引用函数普通函数成员函数类构造函数 引用变量(很少用)普通变量成员变量 双冒号:: Kotlin 中可以使用双冒号::对某一变量、函数进行引用。 Note:MyClass::class可用于获取KClass<MyClass>,此时的双冒号::…...
C++ day3练习
设计一个Per类,类中包含私有成员:姓名、年龄、指针成员身高、体重,再设计一个Stu类,类中包含私有成员:成绩、Per类对象p1,设计这两个类的构造函数、析构函数。 #include <iostream>using namespace std;class Per{private:…...
命令模式(行为型)
目录 一、前言 二、命令模式 三、总结 一、前言 命令模式(Command Pattern)是一种行为型设计模式,命令模式将一个请求封装为一个对象,从而可以用不同的请求对客户进行参数化;对请求排队或记录请求日志,以…...

韩雪医生针药结合效果好 患者赠送锦旗表感谢
任先生长年献血身体出现不适,身上多处发黑发冷,伴随疼痛,而且还有慢性腹泻的症状。他曾前往苏州各大医馆做过检查,均查不出异常,但身体确实不舒服,面色晦暗。 后来他来到李良济,求诊于韩雪医生。…...

【队列、堆、栈 解释与区分】
文章目录 概要队列(Queue)定义特性应用场景 堆(Heap)定义特性应用场景 栈(Stack)定义特性应用场景 总结 概要 队列、堆和栈是三种常见的数据结构,它们各自具有不同的特性和应用场景。下面是对这…...

NTP网络时间服务器_安徽京准电钟
NTP网络时间服务器_安徽京准电钟 NTP网络时间服务器_安徽京准电钟 概述 NTP网络时间服务器是一款支持NTP和SNTP网络时间同步协议,高精度、大容量、高品质的高科技时钟产品。 NTP网络时间服务器设备采用冗余架构设计,高精度时钟直接来源于北斗、GPS系统中…...

Java:爬虫框架
一、Apache Nutch2 【参考地址】 Nutch 是一个开源Java 实现的搜索引擎。它提供了我们运行自己的搜索引擎所需的全部工具。包括全文搜索和Web爬虫。 Nutch 致力于让每个人能很容易, 同时花费很少就可以配置世界一流的Web搜索引擎. 为了完成这一宏伟的目标, Nutch必须能够做到…...

ChatGPT基本原理详细解说
ChatGPT基本原理详细解说 引言 在人工智能领域,自然语言处理(NLP)一直是研究的热点之一。随着技术的发展,我们见证了从简单的聊天机器人到复杂的语言模型的演变。其中,ChatGPT作为一项突破性技术,以其强大…...

Java日期时间处理深度解析:从Date、Calendar到SimpleDateFormat
粉丝福利:微信搜索「万猫学社」,关注后回复「电子书」,免费获取12本Java必读技术书籍。 Java中的日期和时间处理 在Java中,日期和时间的处理一直是一个复杂而繁琐的任务。那么,为什么会这样呢?让我们先来看…...

Flutter 中的 CupertinoUserInterfaceLevel 小部件:全面指南
Flutter 中的 CupertinoUserInterfaceLevel 小部件:全面指南 Flutter 是一个功能强大的 UI 框架,由 Google 开发,允许开发者使用 Dart 语言构建跨平台的移动、Web 和桌面应用。在 Flutter 的 Cupertino(iOS 风格)组件…...
LBE-LEX系列工业语音播放器|预警播报器|喇叭蜂鸣器的上位机配置操作说明
LBE-LEX系列工业语音播放器|预警播报器|喇叭蜂鸣器专为工业环境精心打造,完美适配AGV和无人叉车。同时,集成以太网与语音合成技术,为各类高级系统(如MES、调度系统、库位管理、立库等)提供高效便捷的语音交互体验。 L…...
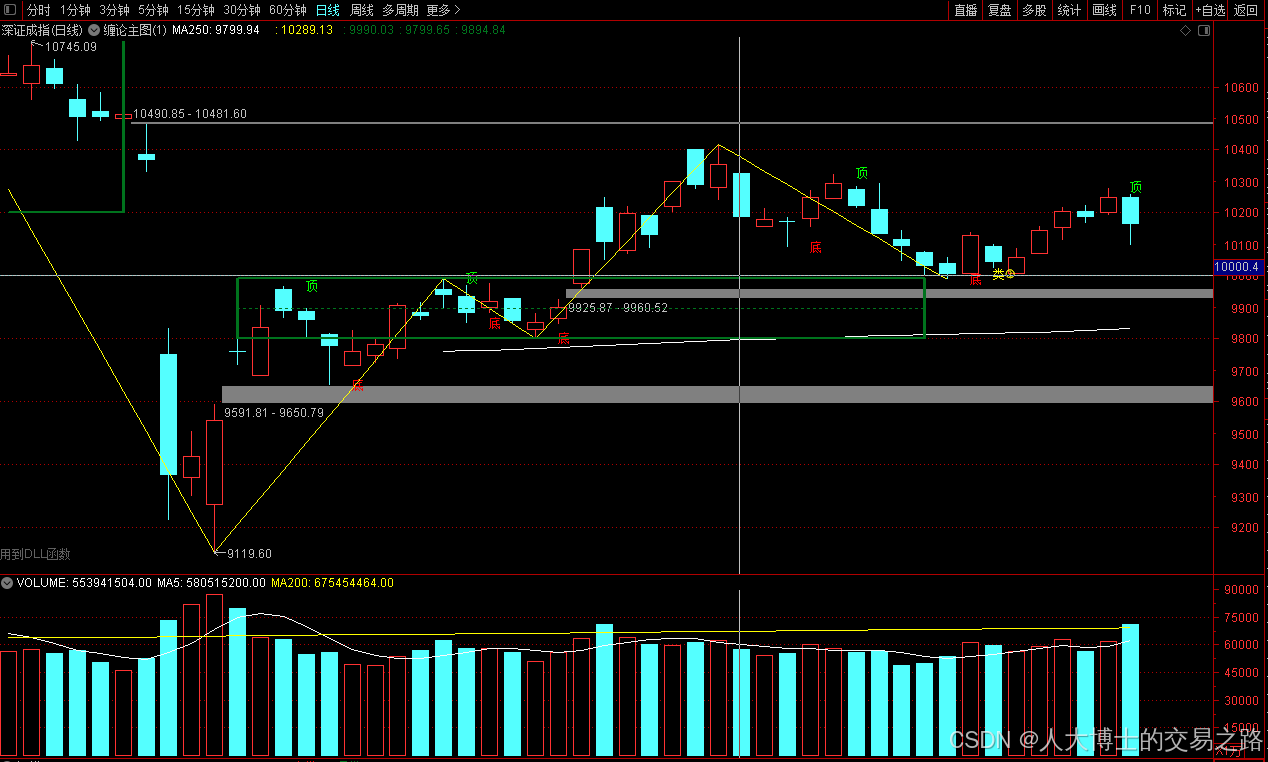
龙虎榜——20250610
上证指数放量收阴线,个股多数下跌,盘中受消息影响大幅波动。 深证指数放量收阴线形成顶分型,指数短线有调整的需求,大概需要一两天。 2025年6月10日龙虎榜行业方向分析 1. 金融科技 代表标的:御银股份、雄帝科技 驱动…...

shell脚本--常见案例
1、自动备份文件或目录 2、批量重命名文件 3、查找并删除指定名称的文件: 4、批量删除文件 5、查找并替换文件内容 6、批量创建文件 7、创建文件夹并移动文件 8、在文件夹中查找文件...
Vue3 + Element Plus + TypeScript中el-transfer穿梭框组件使用详解及示例
使用详解 Element Plus 的 el-transfer 组件是一个强大的穿梭框组件,常用于在两个集合之间进行数据转移,如权限分配、数据选择等场景。下面我将详细介绍其用法并提供一个完整示例。 核心特性与用法 基本属性 v-model:绑定右侧列表的值&…...

【JavaSE】绘图与事件入门学习笔记
-Java绘图坐标体系 坐标体系-介绍 坐标原点位于左上角,以像素为单位。 在Java坐标系中,第一个是x坐标,表示当前位置为水平方向,距离坐标原点x个像素;第二个是y坐标,表示当前位置为垂直方向,距离坐标原点y个像素。 坐标体系-像素 …...

企业如何增强终端安全?
在数字化转型加速的今天,企业的业务运行越来越依赖于终端设备。从员工的笔记本电脑、智能手机,到工厂里的物联网设备、智能传感器,这些终端构成了企业与外部世界连接的 “神经末梢”。然而,随着远程办公的常态化和设备接入的爆炸式…...

4. TypeScript 类型推断与类型组合
一、类型推断 (一) 什么是类型推断 TypeScript 的类型推断会根据变量、函数返回值、对象和数组的赋值和使用方式,自动确定它们的类型。 这一特性减少了显式类型注解的需要,在保持类型安全的同时简化了代码。通过分析上下文和初始值,TypeSc…...

【Ftrace 专栏】Ftrace 参考博文
ftrace、perf、bcc、bpftrace、ply、simple_perf的使用Ftrace 基本用法Linux 利用 ftrace 分析内核调用如何利用ftrace精确跟踪特定进程调度信息使用 ftrace 进行追踪延迟Linux-培训笔记-ftracehttps://www.kernel.org/doc/html/v4.18/trace/events.htmlhttps://blog.csdn.net/…...
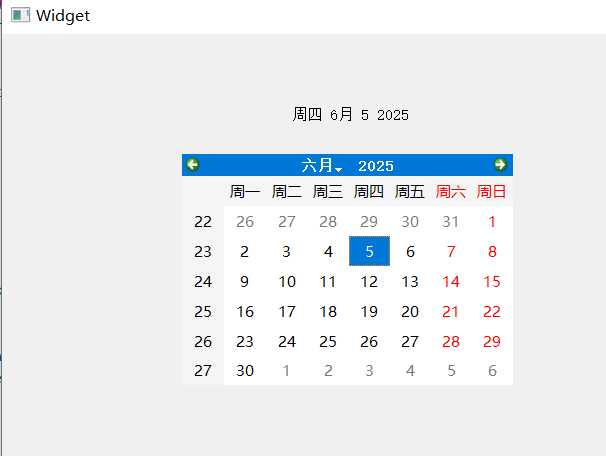
【QT控件】显示类控件
目录 一、Label 二、LCD Number 三、ProgressBar 四、Calendar Widget QT专栏:QT_uyeonashi的博客-CSDN博客 一、Label QLabel 可以用来显示文本和图片. 核心属性如下 代码示例: 显示不同格式的文本 1) 在界面上创建三个 QLabel 尺寸放大一些. objectName 分别…...

前端打包工具简单介绍
前端打包工具简单介绍 一、Webpack 架构与插件机制 1. Webpack 架构核心组成 Entry(入口) 指定应用的起点文件,比如 src/index.js。 Module(模块) Webpack 把项目当作模块图,模块可以是 JS、CSS、图片等…...