opencv dnn模块 示例(26) 目标检测 object_detection 之 yolov10
文章目录
- 1、yolov10简要介绍
- 1.1、双标签分配策略
- 1.2、架构改进
- 1.3、性能
- 1.4、预训练模型
- 1.5、网络有关层说明
- 2、测试
- 2.1、官方测试
- 2.2、opencv dnn
- 2.2.1、仅运行到内部"NMS"步骤之前的层
- 2.2.2、完整代码
- 2.2.2、完整实现所有层
- 2.3、onnxruntime测试
- 2.4、tensorrt
1、yolov10简要介绍
从源码测试中,可以看出清华大学研究团队最新提出的 YOLOv10 是在 ultralytics yolov8 上发展来的。摘要如下:
在过去的几年里,由于其在计算成本和检测性能之间的有效平衡,YOLOS已经成为实时目标检测领域的主导范例。研究人员已经探索了YOLOS的架构设计、优化目标、数据增强策略等,并取得了显著进展。然而,对用于后处理的非最大抑制(NMS)的依赖妨碍了YOLOS的端到端部署,并且影响了推理延迟。此外,YOLOS中各部件的设计缺乏全面和彻底的检查,导致明显的计算冗余,限制了模型的性能。这导致次优的效率,以及相当大的性能改进潜力。在这项工作中,我们的目标是从后处理和模型架构两个方面进一步推进YOLOS的性能-效率边界。为此,我们首先提出了用于YOLOs无NMS训练的持续双重分配,该方法带来了有竞争力的性能和低推理延迟。此外,我们还介绍了YOLOS的整体效率-精度驱动模型设计策略。我们从效率和精度两个角度对YOLOS的各个组件进行了全面优化,大大降低了计算开销,增强了性能。我们努力的成果是用于实时端到端对象检测的新一代YOLO系列,称为YOLOV10。广泛的实验表明,YOLOV10在各种模型规模上实现了最先进的性能和效率。例如,在COCO上的类似AP下,我们的YOLOV10-S比RT-DETR-R18快1.8倍,同时具有2.8倍更少的参数和FLOPS。与YOLOV9-C相比,YOLOV10-B在性能相同的情况下,延迟减少了46%,参数减少了25%。code链接:https://github.com/THU-MIG/yolov10
1.1、双标签分配策略
之前的标签分配策略是围绕着正负样本定义,通常认为与GT框IoU大于阈值作为正样本。
经典的 YOLO 架构,标签分配策略是 anchor-base,其通过网格化的方式预定义数千个锚框(anchor),然后基于这些锚框进一步执行回归和分类任务。为解决实际场景差异,提出的如kmeans聚类获得先验信息也是次优结果。后来基于anchor-free的策略被简化成了从网格点到目标框中心或者角点的距离,但是与前者同样存在多对一的问题,即对于一个GT框来说,会存在多个样本与之对应。
因此,NMS是必不可少的手段,以避免产生冗余的检测框。但是引入NMS一方面会增加耗时、也会由于IoU阈值设置不当导致高置信度的正确目标被过滤的问题。
当然,针对这个问题提出很多方案。最容易想到的是两阶段模型中一对一分配策略强制将一个GT框分配给一个正样本,这样避免引入NMS但是效率和准确率就是劣势了;One Net中最小代价分配,仅将最小代价样本匹配为正样本,其他为负样本;DETR 系列直接利用 Transformer 将目标检测看成是一个集合预测的问题。
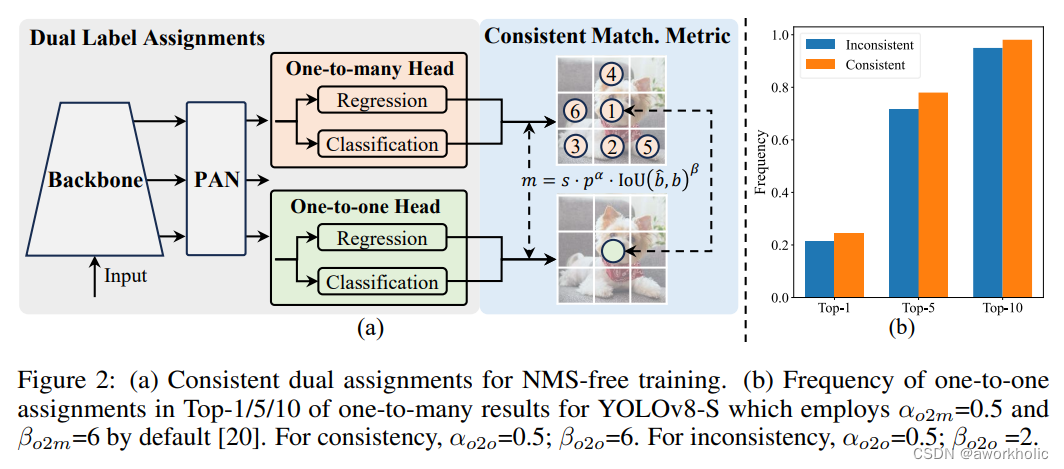
yolov10的最大创新点是引入了一种双重标签分配策略,核心思想是在训练阶段使用一对多的检测头提供更多的正样本来丰富模型的训练;而在推理阶段则通过梯度截断的方式,切换为一对一的检测头,如此一来便不在需要 NMS 后处理,在保持性能的同时减少了推理开销。
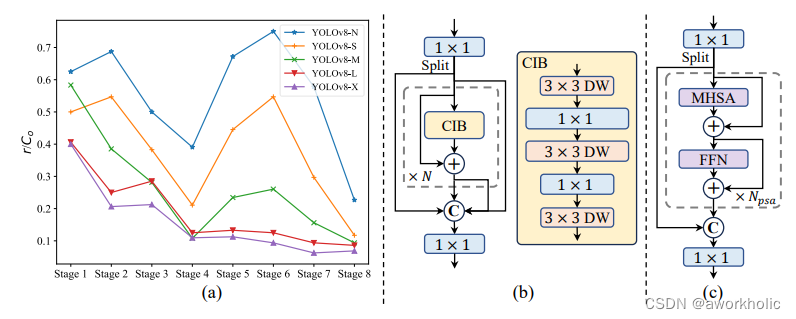
1.2、架构改进
- Backbone & Neck:使用了先进的结构如 CSPNet 作为骨干网络,和 PAN 作为颈部网络,优化了特征提取和多尺度特征融合。
- 大卷积核与分区自注意力:这些技术用于增强模型从大范围上下文中学习的能力,提高检测准确性而不显著增加计算成本。
- 整体效率:引入空间-通道解耦下采样和基于秩引导的模块设计,减少计算冗余,提高整体模型效率。
1.3、性能
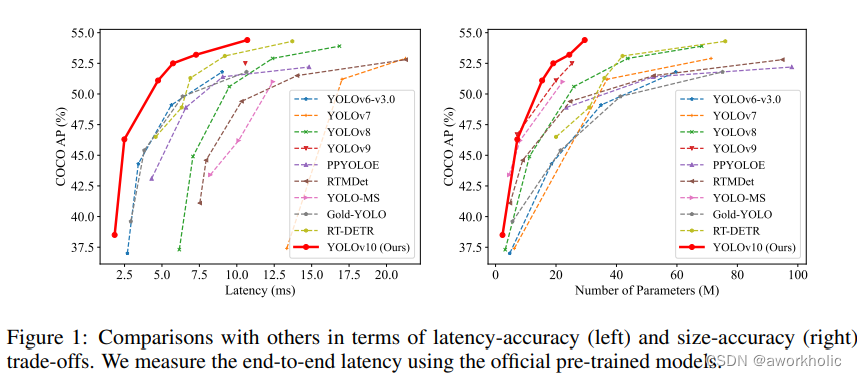
YOLOv10 在各种模型规模上显示了显著的性能和效率改进。关键比较包括:
- YOLOv10-S vs. RT-DETR-R18:YOLOv10-S 的速度提高了 1.8 倍,同时在 COCO 数据集上保持类似的平均精度(AP),参数和 FLOPs 分别减少了 2.8 倍。
- YOLOv10-B vs. YOLOv9-C:YOLOv10-B 的延迟减少了 46%,参数减少了 25%,而性能相当。
1.4、预训练模型
YOLOv10 提供了多个模型规模(N、S、M、B、L、X),允许用户根据性能和资源约束选择最适合的模型。这种可扩展性确保了 YOLOv10 能够有效应用于各种实时检测任务,从移动设备上的轻量级应用到需要高精度的复杂任务。
| Model | Test Size | #Params | FLOPs | APval | Latency |
|---|---|---|---|---|---|
| YOLOv10-N | 640 | 2.3M | 6.7G | 38.5% | 1.84ms |
| YOLOv10-S | 640 | 7.2M | 21.6G | 46.3% | 2.49ms |
| YOLOv10-M | 640 | 15.4M | 59.1G | 51.1% | 4.74ms |
| YOLOv10-B | 640 | 19.1M | 92.0G | 52.5% | 5.74ms |
| YOLOv10-L | 640 | 24.4M | 120.3G | 53.2% | 7.28ms |
| YOLOv10-X | 640 | 29.5M | 160.4G | 54.4% | 10.70ms |
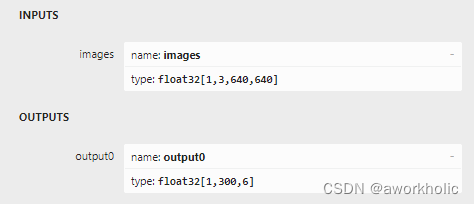
1.5、网络有关层说明
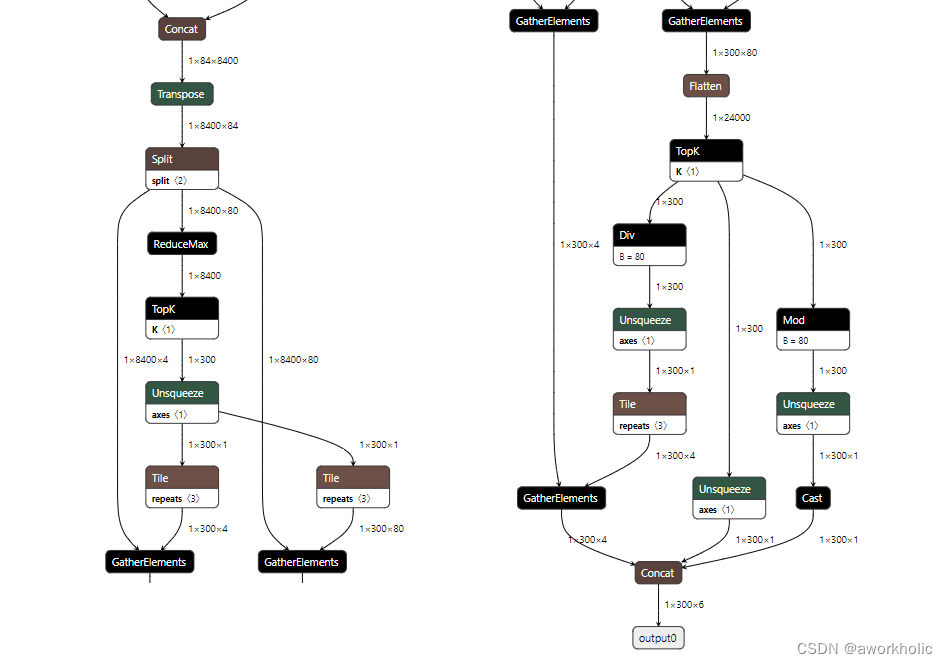
首先是输入输出,输入尺寸仍然是640*640大小。由于yolov10中移除了NMS,输出的尺寸为 [1,300,6]:
- 300:检测目标个数
- 6:目标框信息 [left, top, right, bottom, confidence, class_id]。
之前的yolo系列默认在最后才Concat后输出 1x84x8400 为网络输出,后面可能增加NMS的 end-to-end结构。这里后面处理新增了 GatherElements 、TopK 和 Mod 三个层。
2、测试
2.1、官方测试
直接使用之前 yolov8的环境即可。(python版本3.9,torch使用2.0以上)
pip install -r requirements.txt
pip install -e .wget https://github.com/THU-MIG/yolov10/releases/download/v1.1/yolov10b.pt
测试如下:
(yolo_pytorch) E:\DeepLearning\yolov10>yolo predict model=yolov10b.pt source='https://ultralytics.com/images/bus.jpg'
Ultralytics YOLOv8.1.34 🚀 Python-3.9.16 torch-1.13.1+cu117 CUDA:0 (NVIDIA GeForce GTX 1080 Ti, 11264MiB)
YOLOv10b summary (fused): 383 layers, 20534512 parameters, 148320 gradients, 98.6 GFLOPsDownloading https://ultralytics.com/images/bus.jpg to 'bus.jpg'...  100%|| 476k/476k [00:28<00:00, 17.4kB/s]
image 1/1 E:\DeepLearning\yolov10\bus.jpg: 640x480 4 persons, 1 bus, 53.5ms
Speed: 3.0ms preprocess, 53.5ms inference, 2.0ms postprocess per image at shape (1, 3, 640, 480)
Results saved to runs\detect\predict1
上面结果仅作为演示。 使用GPU要考虑第一次warmup。我们多复制几张bus.jpg到文件夹再进行测试,仍以 yolov10b.pt进行测试。
GPU Speed: 1.9ms preprocess, 18.9ms inference, 1.2ms postprocess per image
CPU Speed: 3.4ms preprocess, 738.2ms inference, 1.7ms postprocess per image
导出onnx模型测试
由于onnxruntime 仅安装了cpu版本测试
yolo export model=yolov10b.pt format=onnx opset=13 simplifyyolo predict model=yolov10b.onnx source=assets device=cpu
测试时间如下:
CPU Speed: 4.0ms preprocess, 476.3ms inference, 0.5ms postprocess per image
2.2、opencv dnn
2.2.1、仅运行到内部"NMS"步骤之前的层
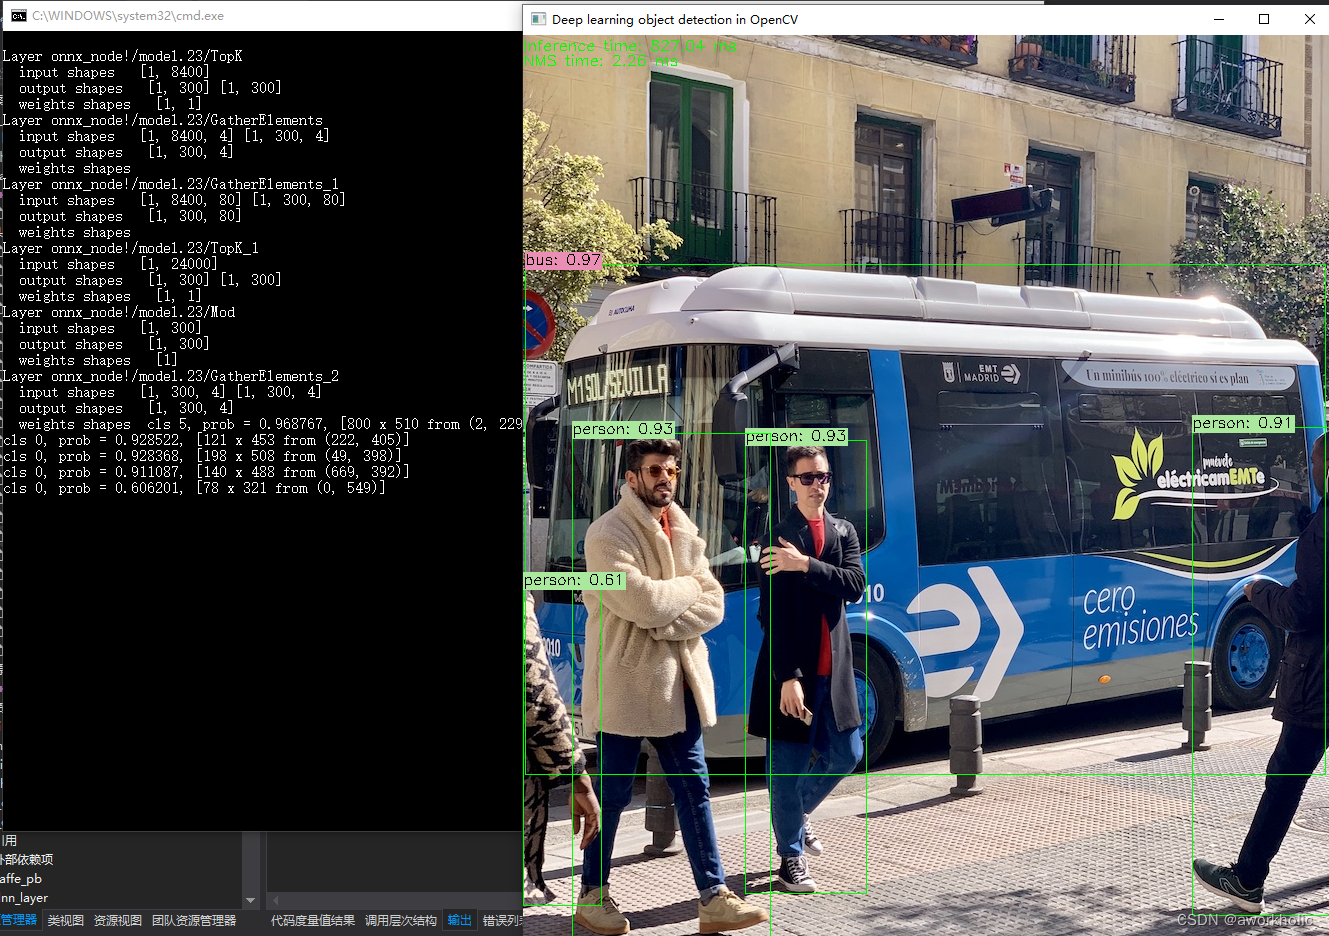
直接使用yolov8的代码进行测试,不做postprocess处理。发现导出的onnx模型,在 opencv 4.8.0 中 不能识别的 GatherElements 、TopK 和 Mod 三个层。大概率是因为opencv 依赖的onnx版本较低,还未实现这三个层。
先简单的使用dnn模块实现这三个层的基本函数,不做推理操作,先尝试仅推理到最后的 Concat层,

CV_DNN_REGISTER_LAYER_CLASS(TopK, TopKLayer);
CV_DNN_REGISTER_LAYER_CLASS(GatherElements, GatherElementsLayer);
CV_DNN_REGISTER_LAYER_CLASS(Mod, ModLayer);std::vector<String> outNames = net.getUnconnectedOutLayersNames();
outNames = {"/model.23/Concat_5"};
dnn模块能够加载模型,但是在forward时会出现报错
Layer onnx_node!/model.23/TopKinput shapes   [1, 8400]output shapes   [1, 300] [1, 300]weights shapes   [1, 1]
Layer onnx_node!/model.23/GatherElementsinput shapes   [1, 8400, 4] [1, 300, 4]output shapes   [1, 300, 4]weights shapes
Layer onnx_node!/model.23/GatherElements_1input shapes   [1, 8400, 80] [1, 300, 80]output shapes   [1, 300, 80]weights shapes
Layer onnx_node!/model.23/TopK_1input shapes   [1, 24000]output shapes   [1, 300] [1, 300]weights shapes   [1, 1]
Layer onnx_node!/model.23/Modinput shapes   [1, 300]output shapes   [1, 300]weights shapes   [1]
Layer onnx_node!/model.23/GatherElements_2input shapes   [1, 300, 4] [1, 300, 4]output shapes   [1, 300, 4]weights shapes  OpenCV: terminate handler is called! The last OpenCV error is:
OpenCV(4.8.0) Error: Assertion failed (biasLayerData->outputBlobsWrappers.size() == 1) in cv::dnn::dnn4_v20230620::Net::Impl::fuseLayers, file D:\opencv\opencv4.8.0\sources\modules\dnn\src\net_impl_fuse.cpp, line 608
目前暂为调试,不清楚是哪些层在fuse是报错。此时,调整为target为 CPU时,fuse不再报错,但是报错提示找不到层
OpenCV(4.8.0) Error: Requested object was not found (Layer with requested id=-1 not found) in cv::dnn::dnn4_v20230620::Net::Impl::getLayerData, file D:\opencv\opencv4.8.0\sources\modules\dnn\src\net_impl.cpp, line 279
OpenCV: terminate handler is called! The last OpenCV error is:
OpenCV(4.8.0) Error: Requested object was not found (Layer with requested id=-1 not found) in cv::dnn::dnn4_v20230620::Net::Impl::getLayerData, file D:\opencv\opencv4.8.0\sources\modules\dnn\src\net_impl.cpp, line 279
继续调试,发现是因为dnn模块加载时,会修改层的名字,我们使用的 outNames = {“/model.23/Concat_5”}; 应该修改为 outNames = {"onnx_node!/model.23/Concat_5"};,之后可以进行forward,但是结果输出有问题。
后处理的解码,84维 前四维 并不是前面系列目标框 中心点、宽高,而是 两个顶点,因此解压应该修改为
if(max_class_score > scoreThreshold) {confidences.push_back(max_class_score);class_ids.push_back(class_id.x);float x = data[0];float y = data[1];float w = data[2];float h = data[3];//int left = int((x - 0.5 * w) * x_factor);//int top = int((y - 0.5 * h) * y_factor);//int width = int(w * x_factor);//int height = int(h * y_factor);//boxes.push_back(cv::Rect(left, top, width, height));boxes.push_back(cv::Rect(x* x_factor, y* y_factor, (w - x)* x_factor, (h - y)* y_factor));}
再次运行,结果正常。
2.2.2、完整代码
#pragma once#include "opencv2/opencv.hpp"#include "opencv2/dnn.hpp"
#include "opencv2/dnn/layer.hpp"
#include <opencv2/dnn/layer.details.hpp> #include <fstream>
#include <sstream>#include <random>namespace YOLOv10{float inpWidth;
float inpHeight;
float confThreshold, scoreThreshold, nmsThreshold;
std::vector<std::string> classes;
std::vector<cv::Scalar> colors;bool letterBoxForSquare = true;cv::Mat formatToSquare(const cv::Mat &source);void postprocess(Mat& frame, cv::Size inputSz, const std::vector<Mat>& out, Net& net);void drawPred(int classId, float conf, int left, int top, int right, int bottom, Mat& frame);std::random_device rd;
std::mt19937 gen(rd());
std::uniform_int_distribution<int> dis(100, 255);class TopKLayer : public cv::dnn::Layer{
public:TopKLayer(const cv::dnn::LayerParams ¶ms) : cv::dnn::Layer(params){axis = params.get<int64_t>("axis");largest = params.get<int64_t>("largest");sorted = params.get<int64_t>("sorted");}static cv::Ptr<cv::dnn::Layer> create(cv::dnn::LayerParams& params){return cv::Ptr<cv::dnn::Layer>(new TopKLayer(params));}virtual bool getMemoryShapes(const std::vector<std::vector<int> > &inputs,const int requiredOutputs,std::vector<std::vector<int> > &outputs,std::vector<std::vector<int> > &internals) const CV_OVERRIDE{CV_UNUSED(requiredOutputs); CV_UNUSED(internals);outputs.assign({{1,300},{1,300}});return false;}virtual void finalize(InputArrayOfArrays inputs_arr, OutputArrayOfArrays outputs_arr){std::vector<cv::Mat> inputs, outputs;inputs_arr.getMatVector(inputs);outputs_arr.getMatVector(outputs);auto os_shape = [](cv::MatSize& ms) {std::stringstream out;out << " [";for(int i = 0; i < ms.dims() - 1; i++)out << ms[i] << ", ";out << ms[ms.dims() - 1] << "]";return out.str();};std::cout << "\nLayer " << name;std::cout << "\n input shapes ";for(auto& input : inputs) std::cout << os_shape(input.size);std::cout << "\n output shapes ";for(auto& output : outputs) std::cout << os_shape(output.size);std::cout << "\n weights shapes ";for(auto& blob : blobs) std::cout << os_shape(blob.size);}virtual void forward(cv::InputArrayOfArrays inputs_arr,cv::OutputArrayOfArrays outputs_arr,cv::OutputArrayOfArrays internals_arr) CV_OVERRIDE{std::vector<cv::Mat> inputs, outputs, internals;inputs_arr.getMatVector(inputs);outputs_arr.getMatVector(outputs);cv::Mat& inp = inputs[0];cv::Mat& out = outputs[0];}virtual bool tryFuse(Ptr<Layer>& top){return false;}private:int64_t axis;int64_t largest;int64_t sorted;
};class GatherElementsLayer : public cv::dnn::Layer {
public:GatherElementsLayer(const cv::dnn::LayerParams ¶ms) : cv::dnn::Layer(params){axis = params.get<int64_t>("axis");}static cv::Ptr<cv::dnn::Layer> create(cv::dnn::LayerParams& params){return cv::Ptr<cv::dnn::Layer>(new GatherElementsLayer(params));}virtual bool getMemoryShapes(const std::vector<std::vector<int> > &inputs,const int requiredOutputs,std::vector<std::vector<int> > &outputs,std::vector<std::vector<int> > &internals) const CV_OVERRIDE{CV_UNUSED(requiredOutputs); CV_UNUSED(internals);auto shape1 = inputs[0];auto shape2 = inputs[1];outputs.assign(1, {1, std::min(shape1[1], shape2[1]) ,std::min(shape1[2], shape2[2])});return false;}virtual void finalize(InputArrayOfArrays inputs_arr, OutputArrayOfArrays outputs_arr){std::vector<cv::Mat> inputs, outputs;inputs_arr.getMatVector(inputs);outputs_arr.getMatVector(outputs);auto os_shape = [](cv::MatSize& ms) {std::stringstream out;out << " [";for(int i = 0; i < ms.dims() - 1; i++)out << ms[i] << ", ";out << ms[ms.dims() - 1] << "]";return out.str();};std::cout << "\nLayer " << name;std::cout << "\n input shapes ";for(auto& input : inputs) std::cout << os_shape(input.size);std::cout << "\n output shapes ";for(auto& output : outputs) std::cout << os_shape(output.size);std::cout << "\n weights shapes ";for(auto& blob : blobs) std::cout << os_shape(blob.size);}virtual void forward(cv::InputArrayOfArrays inputs_arr,cv::OutputArrayOfArrays outputs_arr,cv::OutputArrayOfArrays internals_arr) CV_OVERRIDE{std::vector<cv::Mat> inputs, outputs, internals;inputs_arr.getMatVector(inputs);outputs_arr.getMatVector(outputs);cv::Mat& inp = inputs[0];cv::Mat& out = outputs[0];}virtual bool tryFuse(Ptr<Layer>& top){return false;}private:int64_t axis;
};class ModLayer : public cv::dnn::Layer {
public:ModLayer(const cv::dnn::LayerParams ¶ms) : cv::dnn::Layer(params){fmod = params.get<int64_t>("fmod");}static cv::Ptr<cv::dnn::Layer> create(cv::dnn::LayerParams& params){return cv::Ptr<cv::dnn::Layer>(new ModLayer(params));}virtual bool getMemoryShapes(const std::vector<std::vector<int> > &inputs,const int requiredOutputs,std::vector<std::vector<int> > &outputs,std::vector<std::vector<int> > &internals) const CV_OVERRIDE{CV_UNUSED(requiredOutputs); CV_UNUSED(internals);outputs.assign(1, {1, 300});return false;}virtual void finalize(InputArrayOfArrays inputs_arr, OutputArrayOfArrays outputs_arr){std::vector<cv::Mat> inputs, outputs;inputs_arr.getMatVector(inputs);outputs_arr.getMatVector(outputs);auto os_shape = [](cv::MatSize& ms) {std::stringstream out;out << " [";for(int i = 0; i < ms.dims() - 1; i++)out << ms[i] << ", ";out << ms[ms.dims() - 1] << "]";return out.str();};std::cout << "\nLayer " << name;std::cout << "\n input shapes ";for(auto& input : inputs) std::cout << os_shape(input.size);std::cout << "\n output shapes ";for(auto& output : outputs) std::cout << os_shape(output.size);std::cout << "\n weights shapes ";for(auto& blob : blobs) std::cout << os_shape(blob.size);}virtual void forward(cv::InputArrayOfArrays inputs_arr,cv::OutputArrayOfArrays outputs_arr,cv::OutputArrayOfArrays internals_arr) CV_OVERRIDE{std::vector<cv::Mat> inputs, outputs, internals;inputs_arr.getMatVector(inputs);outputs_arr.getMatVector(outputs);cv::Mat& inp = inputs[0];cv::Mat& out = outputs[0];}virtual bool tryFuse(Ptr<Layer>& top){return false;}private:int64_t fmod;
};int test()
{CV_DNN_REGISTER_LAYER_CLASS(TopK, TopKLayer);CV_DNN_REGISTER_LAYER_CLASS(GatherElements, GatherElementsLayer);CV_DNN_REGISTER_LAYER_CLASS(Mod, ModLayer);// 根据选择的检测模型文件进行配置 confThreshold = 0.25;scoreThreshold = 0.45;nmsThreshold = 0.5;float scale = 1 / 255.0; //0.00392Scalar mean = {0,0,0};bool swapRB = true;inpWidth = 640;inpHeight = 640;//String modelPath = R"(E:\DeepLearning\yolov9\yolov9-c-converted.onnx)";cv::String modelPath = R"(E:\DeepLearning\yolov10\yolov10b.onnx)";cv::String configPath;cv::String framework = ""; //String classesFile = R"(model\object_detection_classes_yolov3.txt)";//String classesFile = model_dir + R"(\data\coco.names)";String classesFile = R"(E:\DeepLearning\darknet-alexab_master\build——ori\darknet\x64)" + std::string(R"(\data\coco.names)");//cv::String classesFile = R"(E:\DeepLearning\yolov9\custom-data\vehicle\cls.txt)";int backendId = cv::dnn::DNN_BACKEND_OPENCV;int targetId = cv::dnn::DNN_TARGET_CPU; //int backendId = cv::dnn::DNN_BACKEND_OPENCV;//int targetId = cv::dnn::DNN_TARGET_OPENCL; //int backendId = cv::dnn::DNN_BACKEND_CUDA;//int targetId = cv::dnn::DNN_TARGET_CUDA;// Open file with classes names.if(!classesFile.empty()) {const std::string& file = classesFile;std::ifstream ifs(file.c_str());if(!ifs.is_open())CV_Error(Error::StsError, "File " + file + " not found");std::string line;while(std::getline(ifs, line)) {classes.push_back(line);colors.push_back(cv::Scalar(dis(gen), dis(gen), dis(gen)));}}// Load a model.Net net = cv::dnn::readNet(modelPath, configPath, framework);net.setPreferableBackend(backendId);net.setPreferableTarget(targetId);std::vector<String> outNames = net.getUnconnectedOutLayersNames();//outNames = {"/model.23/Concat_5"};outNames = {"onnx_node!/model.23/Concat_5"};if(backendId == cv::dnn::DNN_BACKEND_CUDA) {int dims[] = {1,3,inpHeight,inpWidth};cv::Mat tmp = cv::Mat::zeros(4, dims, CV_32F);std::vector<cv::Mat> outs;net.setInput(tmp);for(int i = 0; i < 10; i++)net.forward(outs, outNames); // warmup}// Create a windowstatic const std::string kWinName = "Deep learning object detection in OpenCV";//cv::namedWindow(kWinName, 0);// Open a video file or an image file or a camera stream.VideoCapture cap;//cap.open(0);//cap.open(R"(E:\DeepLearning\darknet-yolo3-master\build\darknet\x64\dog.jpg)");//cap.open("http://live.cooltv.top/tv/aishang.php?id=cctv1hd");//cap.open(R"(F:\测试视频\路口俯拍\snap1.mkv)");cap.open(R"(E:\DeepLearning\yolov9\bus.jpg)");//cap.open(R"(E:\DeepLearning\yolov9\custom-data\vehicle\images\11.jpg)");cv::TickMeter tk;// Process frames.Mat frame, blob;while(waitKey(1) < 0) {//tk.reset();//tk.start();cap >> frame;if(frame.empty()) {waitKey();break;}// Create a 4D blob from a frame.cv::Mat modelInput = frame;if(letterBoxForSquare && inpWidth == inpHeight)modelInput = formatToSquare(modelInput);blobFromImage(modelInput, blob, scale, cv::Size2f(inpWidth, inpHeight), mean, swapRB, false);// Run a model.net.setInput(blob);std::vector<Mat> outs;//tk.reset();//tk.start();auto tt1 = cv::getTickCount();net.forward(outs, outNames);auto tt2 = cv::getTickCount();tk.stop();postprocess(frame, modelInput.size(), outs, net);//tk.stop(); Put efficiency information.//std::vector<double> layersTimes;//double freq = getTickFrequency() / 1000;//double t = net.getPerfProfile(layersTimes) / freq;//std::string label = format("Inference time: %.2f ms (%.2f ms)", t, /*tk.getTimeMilli()*/ (tt2 - tt1) / cv::getTickFrequency() * 1000);std::string label = format("Inference time: %.2f ms", (tt2 - tt1) / cv::getTickFrequency() * 1000);cv::putText(frame, label, Point(0, 15), FONT_HERSHEY_SIMPLEX, 0.5, Scalar(0, 255, 0));//printf("\r%s\t", label.c_str());cv::imshow(kWinName, frame);}return 0;
}cv::Mat formatToSquare(const cv::Mat &source)
{int col = source.cols;int row = source.rows;int _max = MAX(col, row);cv::Mat result = cv::Mat::zeros(_max, _max, CV_8UC3);source.copyTo(result(cv::Rect(0, 0, col, row)));return result;
}void postprocess(Mat& frame, cv::Size inputSz, const std::vector<Mat>& outs, Net& net)
{// yolov8 has an output of shape (batchSize, 84, 8400) (Num classes + box[x,y,w,h] + confidence[c])auto tt1 = cv::getTickCount();float x_factor = inputSz.width / inpWidth;float y_factor = inputSz.height / inpHeight;std::vector<int> class_ids;std::vector<float> confidences;std::vector<cv::Rect> boxes;//int rows = outs[0].size[1];//int dimensions = outs[0].size[2];// [1, 84, 8400] -> [8400,84]int rows = outs[0].size[2];int dimensions = outs[0].size[1];auto tmp = outs[0].reshape(1, dimensions);cv::transpose(tmp, tmp);float *data = (float *)tmp.data;for(int i = 0; i < rows; ++i) {//float confidence = data[4];//if(confidence >= confThreshold) {float *classes_scores = data + 4;cv::Mat scores(1, classes.size(), CV_32FC1, classes_scores);cv::Point class_id;double max_class_score;minMaxLoc(scores, 0, &max_class_score, 0, &class_id);if(max_class_score > scoreThreshold) {confidences.push_back(max_class_score);class_ids.push_back(class_id.x);float x = data[0];float y = data[1];float w = data[2];float h = data[3];//int left = int((x - 0.5 * w) * x_factor);//int top = int((y - 0.5 * h) * y_factor);//int width = int(w * x_factor);//int height = int(h * y_factor);//boxes.push_back(cv::Rect(left, top, width, height));boxes.push_back(cv::Rect(x* x_factor, y* y_factor, (w - x)* x_factor, (h - y)* y_factor));}//}data += dimensions;}std::vector<int> indices;NMSBoxes(boxes, confidences, scoreThreshold, nmsThreshold, indices);auto tt2 = cv::getTickCount();std::string label = format("NMS time: %.2f ms", (tt2 - tt1) / cv::getTickFrequency() * 1000);cv::putText(frame, label, Point(0, 30), FONT_HERSHEY_SIMPLEX, 0.5, Scalar(0, 255, 0));for(size_t i = 0; i < indices.size(); ++i) {int idx = indices[i];Rect box = boxes[idx];drawPred(class_ids[idx], confidences[idx], box.x, box.y,box.x + box.width, box.y + box.height, frame);//printf("cls = %d, prob = %.2f\n", class_ids[idx], confidences[idx]);std::cout << "cls " << class_ids[idx] << ", prob = " << confidences[idx] << ", " << box << "\n";}}void drawPred(int classId, float conf, int left, int top, int right, int bottom, Mat& frame)
{rectangle(frame, Point(left, top), Point(right, bottom), Scalar(0, 255, 0));std::string label = format("%.2f", conf);Scalar color = Scalar::all(255);if(!classes.empty()) {CV_Assert(classId < (int)classes.size());label = classes[classId] + ": " + label;color = colors[classId];}int baseLine;Size labelSize = getTextSize(label, FONT_HERSHEY_SIMPLEX, 0.5, 1, &baseLine);top = max(top, labelSize.height);rectangle(frame, Point(left, top - labelSize.height),Point(left + labelSize.width, top + baseLine), color, FILLED);cv::putText(frame, label, Point(left, top), FONT_HERSHEY_SIMPLEX, 0.5, Scalar());
}
} // namespace
2.2.2、完整实现所有层
这里留个尾巴把,对照python的源码实现当前dnn未识别的三个层。
opencv 4.10 于 20240603 发布,支持前面旧版中不能识别的 GatherElements 和 Mod层,但是还不支持TopK层。
2.3、onnxruntime测试
仅测试前向推理的时间 CPU 1s, GPU 20ms。 cpu上测试和python的onnxruntime测试有出入。
直接给出代码如下:
#include <onnxruntime_cxx_api.h>#include "opencv2/opencv.hpp"
#include "opencv2/dnn.hpp"  // cv::blobFromImage#include <iostream>
#include <vector>
#include <algorithm>
#include <fstream>#include <opencv2/core/version.hpp>
#define CV_VERSION   CVAUX_STR(CV_VERSION_MAJOR) "" CVAUX_STR(CV_VERSION_MINOR) "" CVAUX_STR(CV_VERSION_REVISION) "" CV_VERSION_STATUS#ifndef NDEBUG
#pragma comment(lib,"opencv_core" CV_VERSION "d.lib")
#pragma comment(lib,"opencv_videoio" CV_VERSION "d.lib")
#pragma comment(lib,"opencv_imgproc" CV_VERSION "d.lib")
#pragma comment(lib,"opencv_imgcodecs" CV_VERSION "d.lib")
#pragma comment(lib,"opencv_highgui" CV_VERSION "d.lib")
#pragma comment(lib,"opencv_dnn" CV_VERSION "d.lib")		// cv::blobFromImage
#else
//#pragma comment(lib,"opencv_world" CV_VERSION ".lib")
#pragma comment(lib,"opencv_core" CV_VERSION ".lib")
#pragma comment(lib,"opencv_videoio" CV_VERSION ".lib")
#pragma comment(lib,"opencv_imgproc" CV_VERSION ".lib")
#pragma comment(lib,"opencv_imgcodecs" CV_VERSION ".lib")
#pragma comment(lib,"opencv_highgui" CV_VERSION ".lib")
#pragma comment(lib,"opencv_dnn" CV_VERSION ".lib")			// cv::blobFromImage
#endif#pragma comment(lib,"onnxruntime.lib")
#pragma comment(lib,"onnxruntime_providers_shared.lib")
#pragma comment(lib,"onnxruntime_providers_cuda.lib")using namespace cv;const std::vector<std::string> CLASS_NAMES = {"person", "bicycle", "car", "motorcycle", "airplane", "bus", "train", "truck", "boat", "traffic light","fire hydrant", "stop sign", "parking meter", "bench", "bird", "cat", "dog", "horse", "sheep", "cow","elephant", "bear", "zebra", "giraffe", "backpack", "umbrella", "handbag", "tie", "suitcase", "frisbee","skis", "snowboard", "sports ball", "kite", "baseball bat", "baseball glove", "skateboard", "surfboard","tennis racket", "bottle", "wine glass", "cup", "fork", "knife", "spoon", "bowl", "banana", "apple","sandwich", "orange", "broccoli", "carrot", "hot dog", "pizza", "donut", "cake", "chair", "couch","potted plant", "bed", "dining table", "toilet", "tv", "laptop", "mouse", "remote", "keyboard","cell phone", "microwave", "oven", "toaster", "sink", "refrigerator", "book", "clock", "vase","scissors", "teddy bear", "hair drier", "toothbrush"};// Function to load and preprocess the image
std::vector<float> preprocessImage(const std::string& image_path, const std::vector<int64_t>& input_shape, int& orig_width, int& orig_height)
{cv::Mat image = cv::imread(image_path);if(image.empty()) {throw std::runtime_error("Could not read the image: " + image_path);}// Save the original dimensionsorig_width = image.cols;orig_height = image.rows;cv::Mat blob;cv::dnn::blobFromImage(image, blob, 1. / 255, cv::Size(input_shape[2], input_shape[3]));auto input_tensor_values = std::vector<float>((float*)blob.data, (float*)blob.dataend);return input_tensor_values;
}// Function to load the ONNX model and create a session
Ort::Session loadModel(Ort::Env& env, const std::string& model_path, Ort::SessionOptions& session_options)
{std::ifstream ifs(model_path, std::ios::binary);ifs.seekg(0, ifs.end);size_t length = ifs.tellg();ifs.seekg(0, ifs.beg);std::vector<char> buffer(length);ifs.read(&buffer[0], length);return Ort::Session(env, buffer.data(), length, session_options);
}// Function to get the input name of the model
std::string getInputName(Ort::Session& session, Ort::AllocatorWithDefaultOptions& allocator)
{Ort::AllocatedStringPtr name_allocator = session.GetInputNameAllocated(0, allocator);return std::string(name_allocator.get());
}// Function to get the output name of the model
std::string getOutputName(Ort::Session& session, Ort::AllocatorWithDefaultOptions& allocator)
{Ort::AllocatedStringPtr name_allocator = session.GetOutputNameAllocated(0, allocator);return std::string(name_allocator.get());
}// Struct to hold detection results
struct Detection
{float confidence;cv::Rect bbox;int class_id;std::string class_name;
};// Function to filter and post-process the results based on a confidence threshold
std::vector<Detection> filterDetections(const std::vector<float>& results, float confidence_threshold, int img_width, int img_height, int orig_width, int orig_height)
{std::vector<Detection> detections;const int num_detections = results.size() / 6;for(int i = 0; i < num_detections; ++i) {float left = results[i * 6 + 0];float top = results[i * 6 + 1];float right = results[i * 6 + 2];float bottom = results[i * 6 + 3];float confidence = results[i * 6 + 4];int class_id = results[i * 6 + 5];if(confidence >= confidence_threshold) {int x = static_cast<int>(left * orig_width / img_width);int y = static_cast<int>(top * orig_height / img_height);int width = static_cast<int>((right - left) * orig_width / img_width);int height = static_cast<int>((bottom - top) * orig_height / img_height);detections.push_back({confidence,cv::Rect(x, y, width, height),class_id,CLASS_NAMES[class_id]});}}return detections;
}// Function to run inference on the model
std::vector<float> runInference(Ort::Session& session, const std::vector<float>& input_tensor_values, const std::vector<int64_t>& input_shape)
{Ort::AllocatorWithDefaultOptions allocator;std::string input_name = getInputName(session, allocator);std::string output_name = getOutputName(session, allocator);const char* input_name_ptr = input_name.c_str();const char* output_name_ptr = output_name.c_str();Ort::MemoryInfo memory_info = Ort::MemoryInfo::CreateCpu(OrtArenaAllocator, OrtMemTypeDefault);Ort::Value input_tensor = Ort::Value::CreateTensor<float>(memory_info, const_cast<float*>(input_tensor_values.data()), input_tensor_values.size(), input_shape.data(), input_shape.size());auto output_tensors = session.Run(Ort::RunOptions{nullptr}, &input_name_ptr, &input_tensor, 1, &output_name_ptr, 1);for(int i =0;i<5;i++)auto output_tensors = session.Run(Ort::RunOptions{nullptr}, &input_name_ptr, &input_tensor, 1, &output_name_ptr, 1);auto t1 = cv::getTickCount();output_tensors = session.Run(Ort::RunOptions{nullptr}, &input_name_ptr, &input_tensor, 1, &output_name_ptr, 1);auto t2 = cv::getTickCount();std::cout << "=========== " << (t2-t1)/cv::getTickFrequency() << std::endl;float* floatarr = output_tensors[0].GetTensorMutableData<float>();size_t output_tensor_size = output_tensors[0].GetTensorTypeAndShapeInfo().GetElementCount();return std::vector<float>(floatarr, floatarr + output_tensor_size);
}int main()
{std::string model_path = R"(E:\DeepLearning\yolov10\yolov10b.onnx)";std::string image_path = R"(E:\DeepLearning\yolov9\bus.jpg)";// Initialize ONNX Runtime environmentOrt::Env env(ORT_LOGGING_LEVEL_WARNING, "ONNXRuntime");// Create session optionsOrt::SessionOptions session_options;OrtCUDAProviderOptions cuda_option;cuda_option.device_id = 0;cuda_option.arena_extend_strategy = 0;cuda_option.cudnn_conv_algo_search = OrtCudnnConvAlgoSearchExhaustive;cuda_option.gpu_mem_limit = SIZE_MAX;cuda_option.do_copy_in_default_stream = 1;session_options.AppendExecutionProvider_CUDA(cuda_option);session_options.SetIntraOpNumThreads(1);session_options.SetGraphOptimizationLevel(GraphOptimizationLevel::ORT_ENABLE_BASIC);try {// Load modelOrt::Session session = loadModel(env, model_path, session_options);// Define input shape (e.g., {1, 3, 640, 640})std::vector<int64_t> input_shape = {1, 3, 640, 640};// Save original image dimensionsint orig_width, orig_height;// Preprocess imagestd::vector<float> input_tensor_values = preprocessImage(image_path, input_shape, orig_width, orig_height);// Run inferencestd::vector<float> results = runInference(session, input_tensor_values, input_shape);// Define confidence thresholdfloat confidence_threshold = 0.5;// Load the image to get its dimensionscv::Mat image = cv::imread(image_path);int img_width = image.cols;int img_height = image.rows;// Filter resultsstd::vector<Detection> detections = filterDetections(results, confidence_threshold, input_shape[2], input_shape[3], orig_width, orig_height);// Print detections and draw bounding boxesfor(const auto& detection : detections) {std::cout << "Class ID: " << detection.class_id << " Confidence: " << detection.confidence<< " BBox: [" << detection.bbox.x << ", " << detection.bbox.y << ", "<< detection.bbox.width << ", " << detection.bbox.height << "]"<< " Class Name: " << detection.class_name << std::endl;// Draw the bounding box on the imagecv::rectangle(image, detection.bbox, cv::Scalar(0, 255, 0), 2);// Put the class name and confidence on the imagestd::string label = detection.class_name + ": " + std::to_string(detection.confidence);int baseLine;cv::Size labelSize = cv::getTextSize(label, cv::FONT_HERSHEY_SIMPLEX, 0.5, 1, &baseLine);cv::rectangle(image, cv::Point(detection.bbox.x, detection.bbox.y - labelSize.height),cv::Point(detection.bbox.x + labelSize.width, detection.bbox.y + baseLine),cv::Scalar(255, 255, 255), cv::FILLED);cv::putText(image, label, cv::Point(detection.bbox.x, detection.bbox.y),cv::FONT_HERSHEY_SIMPLEX, 0.5, cv::Scalar(0, 0, 0), 1);}// Save the resulting imagecv::imwrite("result.jpg", image);}catch(const std::exception& e) {std::cerr << "Error: " << e.what() << std::endl;return 1;}return 0;
}
2.4、tensorrt
运行脚本
trtexec.exe --onnx E:\DeepLearning\yolov10\yolov10b.onnx
报错,不支持Mod层。
[05/31/2024-17:44:24] [I] [TRT] No importer registered for op: Mod. Attempting to import as plugin.
[05/31/2024-17:44:24] [I] [TRT] Searching for plugin: Mod, plugin_version: 1, plugin_namespace:
[05/31/2024-17:44:24] [E] [TRT] ModelImporter.cpp:773: While parsing node number 433 [Mod -> "/model.23/Mod_output_0"]:
[05/31/2024-17:44:24] [E] [TRT] ModelImporter.cpp:774: --- Begin node ---
[05/31/2024-17:44:24] [E] [TRT] ModelImporter.cpp:775: input: "/model.23/TopK_1_output_1"
input: "/model.23/Constant_13_output_0"
output: "/model.23/Mod_output_0"
name: "/model.23/Mod"
op_type: "Mod"
attribute {name: "fmod"i: 0type: INT
}[05/31/2024-17:44:24] [E] [TRT] ModelImporter.cpp:776: --- End node ---
相关文章:
opencv dnn模块 示例(26) 目标检测 object_detection 之 yolov10
文章目录 1、yolov10简要介绍1.1、双标签分配策略1.2、架构改进1.3、性能1.4、预训练模型1.5、网络有关层说明 2、测试2.1、官方测试2.2、opencv dnn2.2.1、仅运行到内部"NMS"步骤之前的层2.2.2、完整代码2.2.2、完整实现所有层 2.3、onnxruntime测试2.4、tensorrt 1…...
【python进阶】python图形化编程之美--tkinter模块初探
✨✨ 欢迎大家来到景天科技苑✨✨ 🎈🎈 养成好习惯,先赞后看哦~🎈🎈 🏆 作者简介:景天科技苑 🏆《头衔》:大厂架构师,华为云开发者社区专家博主,…...

discuz点微同城源码34.7+全套插件+小程序前端
discuz点微同城源码34.7全套插件小程序前后端 模板挺好看的 带全套插件 自己耐心点配置一下插件 可以H5可以小程序...

ActiveMQ 介绍、下载、安装和控制台
ActiveMQ 介绍 Apache ActiveMQ 是一款非常成熟且功能全面的开源消息中间件,由Apache软件基金会维护。它遵循 Java Message Service (JMS) 规范,这意味着它提供了一组标准的 API,允许 Java 应用程序以一种标准化的方式发送和接收消息。 以下…...
MacOS M系列芯片一键配置多个不同版本的JDK
第一步:下载JDK。 官网下载地址:Java Archive | Oracle 选择自己想要下载的版本,一般来说下载一个jdk8和一个jdk11就够用了。 M系列芯片选择这两个,第一个是压缩包,第二个是dmg可以安装的。 第二步:编辑…...

源码文章上传无忧,论坛小程序支持
前言 在数字化时代,知识的分享与传播显得愈发重要。为了满足广大创作者和求知者的需求,我们推出了全新的论坛小程序,不仅支持文章、源码、链接等多样化内容的上传,还实现了付费观看功能,为创作者们提供了一个展示才华…...

Docker面试整理-如何优化Docker容器的性能?
优化Docker容器的性能可以从多个方面入手,以下是一些建议: 选择合适的基础镜像:使用轻量级的基础镜像,如基于Alpine Linux的镜像,可以减少镜像的大小和启动时间。避免使用过于庞大的操作系统镜像。优化Dockerfile:减少Dockerfile中的不必要指令和层,以最小化镜像的大小。…...

list(二)和_stack_queue
嗨喽大家好,时隔许久阿鑫又给大家带来了新的博客,list的模拟实现(二)以及_stack_queue,下面让我们开始今天的学习吧! list(二)和_stack_queue 1.list的构造函数 2.设计模式之适配器和迭代器 3.新容器de…...
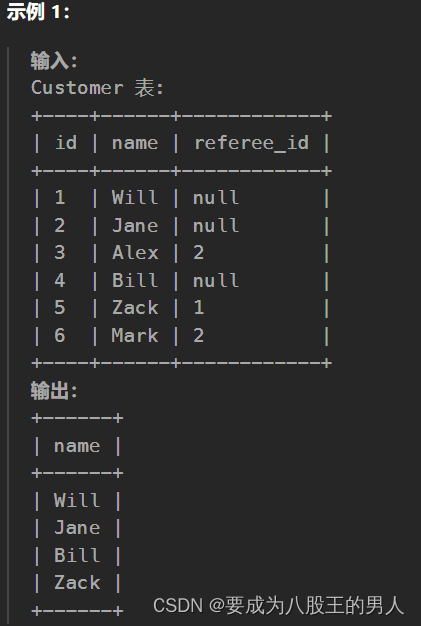
查询SQL02:寻找用户推荐人
问题描述 找出那些 没有被 id 2 的客户 推荐 的客户的姓名。 以 任意顺序 返回结果表。 结果格式如下所示。 题目分析: 这题主要是要看这null值会不会用,如果说Java玩多了,你去写SQL时就会有问题。在SQL中判断是不是null值用的是is null或…...
2、Tomcat 线程模型详解
2、Tomcat 线程模型详解 Tomcat I/O模型详解Linux I/O模型详解I/O要解决什么问题Linux的I/O模型分类 Tomcat支持的 I/O 模型Tomcat I/O 模型如何选型 网络编程模型Reactor线程模型单 Reactor 单线程单 Reactor 多线程主从 Reactor 多线程 Tomcat NIO实现Tomcat 异步IO实现 Tomc…...

对硬盘的设想:纸存、执行存
固态硬盘出现后,发现它的擦写次数受限,越是便宜的固态硬盘,擦写次数越少。于是,有了“纸存”的设想,即硬盘上的单元只能改写一次,就像拿钢笔在纸上写字一样。这时,文件系统、数据库该怎么设计&a…...

最新付会进群多群同时变现社群系统V3.5.3版本 详细教程+源码下载
市面1888最新付费进群多群同时变现系统V3.5.3版本 详细教程源码下载介绍: 续男粉变现,相亲群变现后 演化出来的最新多群同时变现系统 可同时进行40个群同时变现 可设置地域群,相亲,男粉变现等多种群 购买后包括详细的 域名服…...
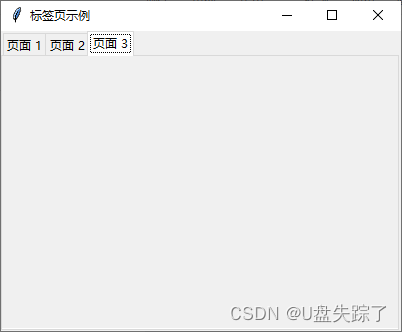
python tk实现标签切换页面
import tkinter as tk from tkinter import ttk# 初始化主窗口 root tk.Tk() root.title("标签页示例")# 设置窗口大小 root.geometry("400x300")# 创建 Notebook 小部件 notebook ttk.Notebook(root) notebook.pack(expandTrue, fill"both")#…...
引擎:UI
一、控件介绍 Button 按钮 创建一个按钮 按钮禁用 精灵模式 颜色模式 缩放模式 绑定点击事件 EditBox 输入框 Layout 布局 支持水平排列、垂直排列、背包排列 PageView 页面视图 ProgressBar 进度条 RichText 富文本 绑定点击事件 事件可以被其它标签包裹 图文混排 Scroll…...

Redis常见异常及优化方案
Redis常见异常及优化方案 Redis集群(redis-cluster)中的三主三从或者哨兵(sentinel)模式配置是一种常见的高可用架构,用于解决单点故障和提高数据可靠性。然而,即使在这样的配置下,仍然可能会遇…...
YOLOV5 图像分割:利用yolov5进行图像分割
1、介绍 本章将介绍yolov5的分割部分,其他的yolov5分类、检测项目参考之前的博文 分类:YOLOV5 分类:利用yolov5进行图像分类_yolov5 图像分类-CSDN博客 检测:YOLOV5 初体验:简单猫和老鼠数据集模型训练-CSDN博客 yolov5的分割和常规的分割项目有所区别,这里分割的结果…...

如何在Linux中使用Screen管理后台进程
如何在Linux中使用Screen管理后台进程 在Linux系统中,screen是一个非常有用的工具,它允许用户在一个终端窗口中创建多个虚拟终端,并且可以在这些终端之间切换,甚至可以在断开连接后重新连接到这些会话。这对于需要在后台运行长时…...
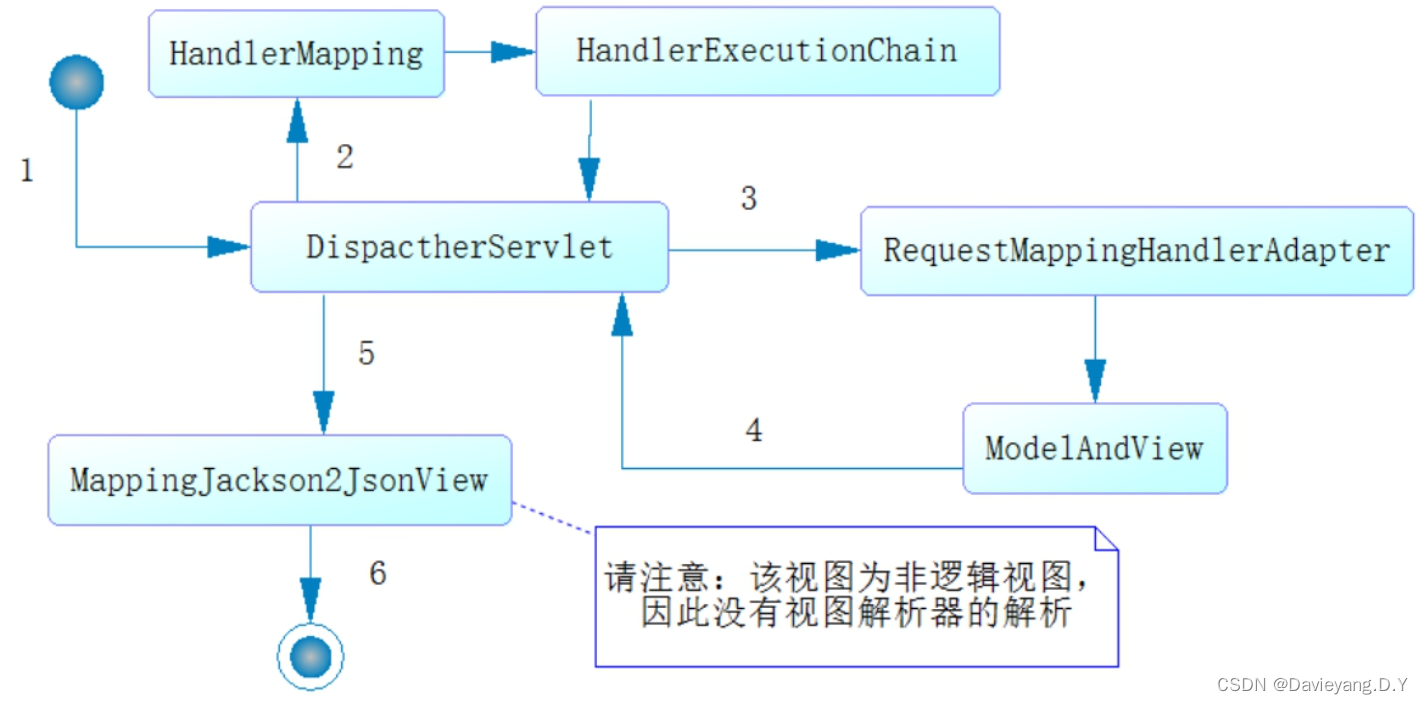
互联网轻量级框架整合之SpringMVC初始化及各组件工作原理
Spring MVC的初始化和流程 MVC理念的发展 SpringMVC是Spring提供给Web应用领域的框架设计,MVC分别是Model-View-Controller的缩写,它是一个设计理念,不仅仅存在于Java中,各类语言及开发均可用,其运转流程和各组件的应…...

【Android面试八股文】finally中的代码一定会执行吗?try里有return,finally还执行么?
文章目录 finally中的代码一定会执行吗?try里有return,finally还执行么?这道题想考察什么?考察的知识点考生应该如何回答验证特殊情况线程是守护线程遇到System.exit()finally中的代码一定会执行吗?try里有return,finally还执行么? 这道题想考察什么? 对Java语言的深…...
微服务第一轮
课程文档 目录 一、业务流程 1、登录 Controller中的接口: Service中的实现impl: Service中的实现impl所继承的接口IService(各种方法): VO: DTO: 2、搜索商品 Controller中的接口&a…...

1688图搜接口有复购率对于选品的你们有帮助吗
1688 图搜接口的复购率数据,对选品非常有帮助,是判断商品长期生命力与供应链稳定性的核心指标。一、复购率在图搜选品中的核心价值验证商品质量与用户粘性高复购率(B 端通常 > 20%,优秀 > 30%)直接证明商品质量稳…...

QuickBMS技术探索者指南:游戏资源解析与逆向工程实战
QuickBMS技术探索者指南:游戏资源解析与逆向工程实战 【免费下载链接】QuickBMS QuickBMS by aluigi - Github Mirror 项目地址: https://gitcode.com/gh_mirrors/qui/QuickBMS 在数字内容创作与逆向工程领域,文件格式的多样性与加密机制的复杂性…...

M2LOrder模型Python爬虫实战:应对动态渲染与数据加密网站
M2LOrder模型Python爬虫实战:应对动态渲染与数据加密网站 最近有个朋友找我帮忙,说他们公司需要从某个网站上抓取一些商品数据,但试了好几个爬虫工具都搞不定。我一看,好家伙,这网站不仅数据是页面加载完才动态生成的…...
)
FRP内网穿透实战:5分钟搞定Linux服务器+Docker部署(含HTTPS配置)
FRP内网穿透实战:Linux服务器与Docker部署全指南 引言 在当今分布式开发和远程办公的浪潮中,内网穿透技术已成为开发者工具箱中不可或缺的一部分。想象一下这样的场景:你正在本地开发一个Web应用,需要让远方的同事实时预览效果&am…...

你的聊天记忆,应该由你掌控:WeChatMsg数据主权完全指南
你的聊天记忆,应该由你掌控:WeChatMsg数据主权完全指南 【免费下载链接】WeChatMsg 提取微信聊天记录,将其导出成HTML、Word、CSV文档永久保存,对聊天记录进行分析生成年度聊天报告 项目地址: https://gitcode.com/GitHub_Trend…...

IDM开源工具免费使用指南:从安装到高级配置的完整实践
IDM开源工具免费使用指南:从安装到高级配置的完整实践 【免费下载链接】IDM-Activation-Script IDM Activation & Trail Reset Script 项目地址: https://gitcode.com/gh_mirrors/id/IDM-Activation-Script Internet Download Manager(IDM&am…...

BGE Reranker-v2-m3在VSCode插件开发中的应用
BGE Reranker-v2-m3在VSCode插件开发中的应用 1. 引言 作为一名长期使用VSCode进行开发的程序员,我经常遇到这样的困扰:在庞大的代码库中搜索特定功能或文档时,传统的文本搜索往往返回大量不相关的结果,需要花费大量时间手动筛选…...

HC-SR501人体红外传感器:从参数解析到树莓派实战应用
1. HC-SR501人体红外传感器核心参数解析 第一次接触HC-SR501时,我被它简单的三针脚设计迷惑了——这么小的模块真能检测人体移动?实测后发现这简直是智能家居项目的"火眼金睛"。让我们拆解它的关键参数,你会发现每个调节旋钮背后都…...

2.1 task_struct 进程描述符详解
1. 进程描述符概述 在 Linux 内核中,每个进程都有一个 task_struct 结构体来描述其所有信息。这个结构体是内核中最复杂的结构之一,包含了进程管理的方方面面。 // include/linux/sched.h struct task_struct {volatile long state; // 进程状态…...

如何用Reset Windows Update Tool一键解决Windows更新故障的终极指南
如何用Reset Windows Update Tool一键解决Windows更新故障的终极指南 【免费下载链接】Reset-Windows-Update-Tool Troubleshooting Tool with Windows Updates (Developed in Dev-C). 项目地址: https://gitcode.com/gh_mirrors/re/Reset-Windows-Update-Tool 你是否曾…...