2023-03-09 CMU15445-Query Execution
摘要:
CMU15445, Project #3 - Query Execution
参考:
Project #3 - Query Execution | CMU 15-445/645 :: Intro to Database Systems (Fall 2022)
https://github.com/cmu-db/bustub
要求:
OVERVIEW
At this point in the semester, you have implemented the internal components of a database management system. In Project #1, you implemented a buffer pool manager. In Project #2, you implemented a B+tree index. In this project, you will implement the components that allow BusTub to execute queries. You will create the operator executors that execute SQL queries and implement optimizer rules to transform query plans.
This project is composed of following tasks in which you will implement each of the individual executors according to the specifications provided below.
- Task #1: Access Method Executors
- Task #2: Aggregation and Join Executors
- Task #3: Sort + Limit Executors and Top-N Optimization
- Leaderboard Task (Optional)
This is a single-person project that will be completed individually (i.e., no groups).
Remember to pull latest code from the bustub repository before starting this project.
You can do this with the following command if you followed the setup instruction in BusTub:
git pull public master
- Release Date: Oct 25, 2022
- Due Date: Nov 16, 2022 @ 11:59pm
BACKGROUND
We begin with discussing the basics of query processing. Please read this section carefully as you will need to construct SQL queries by yourselves in this project to test your executor implementation.
The below image is an overview of BusTub's archictecture:
In the public BusTub repository, we already provide you a full query processing layer. You can use the BusTub shell to execute SQL queries, like what you have done in homework 1. Use the following command to compile and build BusTub shell:
cd build && make -j$(nproc) shell
./bin/bustub-shell
You can also use BusTub Web Shell to run the examples below. It is a complete reference solution of the system running in your browser!
Within the shell, you can use \dt to view all tables. By default, the BusTub shell will automatically create three tables that are pre-populated with data. This is provided as a convience for you so that you do not have to load fake data every time you rebuild your code. Any changes to these tables will not be persisted when you restart the DBMS.
bustub> \dt
+-----+----------------+------------------------------+
| oid | name           | cols                         |
+-----+----------------+------------------------------+
| 0   | __mock_table_1 | (colA:INTEGER, colB:INTEGER) |
| 1   | __mock_table_2 | (colC:VARCHAR, colD:VARCHAR) |
| 2   | __mock_table_3 | (colE:INTEGER, colF:VARCHAR) |
| ... | ...            | ...                          |
+-----+----------------+------------------------------+
You can view all data from a table by using the SELECT statement:
bustub> SELECT * FROM __mock_table_1;
+---------------------+---------------------+
| __mock_table_1.colA | __mock_table_1.colB |
+---------------------+---------------------+
| 0                   | 0                   |
| 1                   | 100                 |
| 2                   | 200                 |
| 3                   | 300                 |
| 4                   | 400                 |
| 5                   | 500                 |
| ...                 | ...                 |
+---------------------+---------------------+
Important things to note:
- BusTub only supports a small subset of SQL syntax. Don't be surprised if it does not work with some SQL queries. For all SQL queries supported in BusTub, refer to the SQLLogicTest files in
tests/sql. - If you are using CLion to run the BusTub shell, please add a
--disable-ttyparameter to the shell, so that it works correctly in the CLion terminal. - Always end your statement with
;(except internal commands). - BusTub only supports
INTandVARCHAR(n)type. Also you should use single quotes for strings, e.g.,INSERT INTO table VALUES ('a').
Explain SQL Queries
We next need to discuss how the BusTub shell “knows” that SELECT * FROM __mock_table_1; should read everything from __mock_table_1 when given that input. BusTub also supports the EXPLAIN command for printing a query's execution plan. You can add EXPLAIN in front of any query to see this information:
bustub> EXPLAIN SELECT * FROM __mock_table_1;
=== BINDER ===
BoundSelect {table=BoundBaseTableRef { table=__mock_table_1, oid=0 },columns=[__mock_table_1.colA, __mock_table_1.colB],groupBy=[],having=,where=,limit=,offset=,order_by=[],is_distinct=false,
}
=== PLANNER ===
Projection { exprs=[#0.0, #0.1] } | (__mock_table_1.colA:INTEGER, __mock_table_1.colB:INTEGER)
MockScan { table=__mock_table_1 } | (__mock_table_1.colA:INTEGER, __mock_table_1.colB:INTEGER)
=== OPTIMIZER ===
MockScan { table=__mock_table_1 } | (__mock_table_1.colA:INTEGER, __mock_table_1.colB:INTEGER)
The result of EXPLAIN provides an overview of the transformation process within the query processing layer. The statement first goes into the parser and the binder, which produces an AST (abstract syntax tree). This is how BusTub understands what the query wants to do. In this example, the query wants to perform a BoundSelect on __mock_table_1 and retrieve two columns (i.e., colA and colB). Note that the binder automatically expands the * character in the original SQL query into the actual columns in the table.
Next, the binder AST goes into the planner, and the planner will produce a query plan corresponding to the query. The query is planned as a tree of two nodes. The data flows from the leaves of the tree to the root.
After that, the optimizer will optimize the query plan. In this case, it removes the projection plan node because it is redundant.
Let us consider a more complex example:
bustub> EXPLAIN (o) SELECT colA, MAX(colB) FROM(SELECT * FROM __mock_table_1, __mock_table_3 WHERE colA = colE) GROUP BY colA;
=== OPTIMIZER ===
Agg { types=[max], aggregates=[#0.1], group_by=[#0.0] }NestedLoopJoin { type=Inner, predicate=(#0.0=#1.0) }MockScan { table=__mock_table_1 }MockScan { table=__mock_table_3 }
In BusTub, the optimizer output is always a tree. For this example query, the tree is as follows:
In this project, you will need to construct SQL queries to test each of your executor's implementations. EXPLAIN is extremely important for you to know if a SQL query is using a specific executor.
If you are running this example in the web shell, you might see HashJoin instead of NestedLoopJoin. You do not need to implement HashJoin this semester.
Sample Executors
In the BusTub public repository, we already provide the implementation of several executors. Let's see when the planner will plan SQL queries as these plan nodes.
Projection
A projection plan node is used to do computation over an input. It will always have exactly one child. Try running the following example queries in the BusTub shell and examine their output:
EXPLAIN SELECT 1 + 2;
EXPLAIN SELECT colA FROM __mock_table_1;
EXPLAIN SELECT colA + colB AS a, 1 + 2 AS b FROM __mock_table_1;
A projection plan node contains several expressions for computation. It can be ColumnValueExpression (displayed as #0.0 when explained), which indicates directly placing a column of the child executor to this output column; or a ConstantExpression, which is a constant value (e.g., 1). Expressions are also represented as a tree. For example, 1 + 2 is an ArithmeticExpression with two ConstantExpression (1 and 2) as children.
Please note that the syntax #0.0 means that the first column in the first child. You will see something like #0.0 = #1.0 when planning joins.
Filter
A filter plan node is used to filter the output of a child using a given predicate. For example,
EXPLAIN SELECT * FROM __mock_table_1 WHERE colA > 1;
A filter plan node has exactly one child and contains a predicate.
Values
A values plan node is used to directly produce values.
EXPLAIN values (1, 2, 'a'), (3, 4, 'b');
CREATE TABLE table1(v1 INT, v2 INT, v3 VARCHAR(128));
EXPLAIN INSERT INTO table1 VALUES (1, 2, 'a'), (3, 4, 'b');
Values plan nodes are useful when inserting into a table with values supplied by the user.
Schema
As you might have noticed, when explaining, there is a long string of column descriptions after each plan node. It's the expected output schema of this plan node. Consider this example:
Projection { exprs=[#0.0, #0.1] } | (__mock_table_1.colA:INTEGER, __mock_table_1.colB:INTEGER)
This indicates that the executor representing this plan node will produce two columns. Both of them are of integer types. The output schema is inferred within the planner. For this project, your executor implementations must produce tuples with schema exactly as specified in the plan node, otherwise it will fail tests that check the output.
PROJECT SPECIFICATION
For this project, you will need to implement additional operator executors in BusTub. We will use the iterator query processing model (i.e., the Volcano model). Recall that in this model, every query plan executor implements a Next function. When the DBMS invokes an executor's Next function, the executor returns either (1) a single tuple or (2) an indicator that there are no more tuples. With this approach, each executor implements a loop that continues calling Next on its children to retrieve tuples and process them one-by-one.
In BusTub's implementation of the iterator model, the Next function for each executor returns a record identifier (RID) in addition to a tuple. A record identifier serves as a unique identifier for the tuple.
The executors are created from an execution plan in executor_factory.cpp.
All the test cases in this project are written in a special file format called SQLLogicTest (derived from SQLite). You can find how to use it at the end of this page.
Task #1 - Access Method Executors
In the background section, we saw that the BusTub is already able to retrieve data from mock tables in SELECT queries. This is because these are special tables that do not actually store real tuples. Instead they are "virtual" tables that use the MockScan executor to always generate the same tuples using a predefined algorithm. This is why you cannot update these tables.
In this task, you will need to implement executors that read from and write to the tables in the storage. You will complete your implementation in the following files:
- src/include/execution/seq_scan_executor.h
- src/execution/seq_scan_executor.cpp
- src/include/execution/insert_executor.h
- src/execution/insert_executor.cpp
- src/include/execution/delete_executor.h
- src/execution/delete_executor.cpp
- src/include/execution/index_scan_executor.h
- src/execution/index_scan_executor.cpp
SeqScan
The SeqScanPlanNode can be planned with a SELECT * from table statement.
bustub> CREATE TABLE t1(v1 INT, v2 VARCHAR(100));
Table created with id = 15
bustub> EXPLAIN (o,s) SELECT * FROM t1;
=== OPTIMIZER ===
SeqScan { table=t1 } | (t1.v1:INTEGER, t1.v2:VARCHAR)
The SeqScanExecutor iterates over a table and returns its tuples, one-at-a-time.
Hint: Be careful when using the TableIterator object. Make sure that you understand the difference between the pre-increment and post-increment operators. You may find yourself getting strange output by switching between ++iter and iter++.
Hint: The output of sequential scan is a copy of each matched tuple and its original record identifier (RID).
Note: BusTub does not support DROP TABLE or DROP INDEX for now. You can reset your database by simply restarting the shell.
Insert
The InsertPlanNode can be planned with a INSERT statement. Note that you will need to use a single quote to specify a VARCHAR value.
bustub> EXPLAIN (o,s) INSERT INTO t1 VALUES (1, 'a'), (2, 'b');
=== OPTIMIZER ===
Insert { table_oid=15 } | (__bustub_internal.insert_rows:INTEGER)Values { rows=2 } | (__values#0.0:INTEGER, __values#0.1:VARCHAR)
The InsertExecutor inserts tuples into a table and updates indexes. It has exactly one child producing values to be inserted into the table. The planner will ensure values have the same schema as the table. The executor will produce a single tuple of an integer number as the output, indicating how many rows have been inserted into the table, after all rows are inserted. Remember to update the index when inserting into the table, if it has an index associated with it.
Hint: You will need to lookup table information for the target of the insert during executor initialization. See the System Catalog section below for additional information on accessing the catalog.
Hint: You will need to update all indexes for the table into which tuples are inserted. See the Index Updates section below for further details.
Hint: You will need to use the TableHeap class to perform table modifications.
Delete
The DeletePlanNode can be planned with a DELETE statement. It has exactly one child with the records to be deleted from the table. Your delete executor should produce an integer output that represents the number of rows that it deleted from the table. It will also need to update the index.
bustub> EXPLAIN (o,s) DELETE FROM t1;
=== OPTIMIZER ===
Delete { table_oid=15 } | (__bustub_internal.delete_rows:INTEGER)Filter { predicate=true } | (t1.v1:INTEGER, t1.v2:VARCHAR)SeqScan { table=t1 } | (t1.v1:INTEGER, t1.v2:VARCHAR)bustub> EXPLAIN (o,s) DELETE FROM t1 where v1 = 1;
=== OPTIMIZER ===
Delete { table_oid=15 } | (__bustub_internal.delete_rows:INTEGER)Filter { predicate=#0.0=1 } | (t1.v1:INTEGER, t1.v2:VARCHAR)SeqScan { table=t1 } | (t1.v1:INTEGER, t1.v2:VARCHAR)
You may assume that the DeleteExecutor is always at the root of the query plan in which it appears. The DeleteExecutor should not modify its result set.
Hint: You only need to get a RID from the child executor and call TableHeap::MarkDelete() to effectively delete the tuple. All deletes will be applied upon transaction commit.
Hint: You will need to update all indexes for the table from which tuples are deleted. See the Index Updates section below for further details.
IndexScan
The IndexScanExecutor iterates over an index to retrieve RIDs for tuples. The operator then uses these RIDs to retrieve their tuples in the corresponding table. It then emits these tuples one-at-a-time.
You can test your index scan executor by SELECT FROM <table> ORDER BY <index column>. We will explain why ORDER BY can be transformed into IndexScan in Task #3.
bustub> CREATE TABLE t2(v3 int, v4 int);
Table created with id = 16bustub> CREATE INDEX t2v3 ON t2(v3);
Index created with id = 0bustub> EXPLAIN (o,s) SELECT * FROM t2 ORDER BY v3;
=== OPTIMIZER ===
IndexScan { index_oid=0 } | (t2.v3:INTEGER, t2.v4:INTEGER)
The type of the index object in the plan will always be BPlusTreeIndexForOneIntegerColumn in this project. You can safely cast it and store it in the executor object:
tree_ = dynamic_cast<BPlusTreeIndexForOneIntegerColumn *>(index_info_->index_.get())
You can then construct index iterator from the index object, scan through all the keys and tuple IDs, lookup the tuple from the table heap, and emit all tuples in the index key's order as the output of the executor. BusTub only supports indexes with a single, unique integer column. There will not be duplicate keys in the test cases.
Hint: Now that you have implemented all storage related executors. In the following tasks, you can create tables and insert some values by yourself to test your own executor implementation! At this point, you should also have passed SQLLogicTests #1 to #5.
Task #2 - Aggregation & Join Executors
You will complete your implementation in the following files:
- src/include/execution/aggregation_executor.h
- src/execution/aggregation_executor.cpp
- src/include/execution/nested_loop_join_executor.h
- src/execution/nested_loop_join_executor.cpp
- src/include/execution/nested_index_join_executor.h
- src/execution/nested_index_join_executor.cpp
Aggregation
The AggregationPlanNode is used to support the following queries:
EXPLAIN SELECT colA, MIN(colB) FROM __mock_table_1 GROUP BY colA;
EXPLAIN SELECT COUNT(colA), min(colB) FROM __mock_table_1;
EXPLAIN SELECT colA, MIN(colB) FROM __mock_table_1 GROUP BY colA HAVING MAX(colB) > 10;
EXPLAIN SELECT DISTINCT colA, colB FROM __mock_table_1;
Note that the aggregation executor itself won't need to handle the having predicate. The planner will plan having as a FilterPlanNode. Aggregation executor only needs to do aggregation for each group of input. It has exactly one child.
The schema of aggregation is group-by columns, followed by aggregation columns.
As discussed in Lecture 10, a common strategy for implementing aggregation is to use a hash table. This is the method that you will use in this project, however, we make the simplifying assumption that the aggregation hash table fits entirely in memory. This means that you do not need to worry about implementing the two-stage (Partition, Rehash) strategy for hash aggregations. You can also assume that all of your aggregation results can reside in an in-memory hash table (i.e, the hash table does not need to be backed by buffer pool pages).
We provide you with the SimpleAggregationHashTable data structure that exposes an in-memory hash table (std::unordered_map) but with an interface designed for computing aggregations. This class also exposes the SimpleAggregationHashTable::Iterator type that can be used to iterate through the hash table. You will need to fill out the CombineAggregateValues function for this class.
Hint: Recall that, in the context of a query plan, aggregations are pipeline breakers. This may influence the way that you use the AggregationExecutor::Init() and AggregationExecutor::Next() functions in your implementation. In particular, think about whether the Build phase of the aggregation should be performed in AggregationExecutor::Init() or AggregationExecutor::Next().
Hint: You must consider how to handle NULLs in the input of the aggregation functions (i.e., a tuple may have a NULL value for the attribute used in the aggregation function). See test cases for expected behavior. Group-by columns will never be NULL.
Hint: When performing aggregation on an empty table, CountStarAggregate should return zero and all other aggregate types should return integer_null. This is why GenerateInitialAggregateValue initializes most aggregate values as NULL.
NestedLoopJoin
The DBMS will use NestedLoopJoinPlanNode for all join operations by default. Consider the following example queries:
EXPLAIN SELECT * FROM __mock_table_1, __mock_table_3 WHERE colA = colE;
EXPLAIN SELECT * FROM __mock_table_1 INNER JOIN __mock_table_3 ON colA = colE;
EXPLAIN SELECT * FROM __mock_table_1 LEFT OUTER JOIN __mock_table_3 ON colA = colE;
You will need to implement inner join and left join for NestedLoopJoinExecutor by using the basic nested loop join algorithm mentioned in the lecture. The output schema of this operator is all columns from the left table followed by all the columns from the right table.
This executor should implement the simple nested loop join algorithm presented in Lecture 11. That is, for each tuple in the join's outer table, you should consider each tuple in the join's inner table, and emit an output tuple if the join predicate is satisfied.
Hint: You will want to make use of the predicate in the NestedLoopJoinPlanNode. In particular, take a look at AbstractExpression::EvaluateJoin, which handles the left tuple and right tuple and their respective schemas. Note that this returns a Value, which could be false, true, or NULL. See FilterExecutor on how to apply predicates on tuples.
NestedIndexJoin
The DBMS will use NestedIndexJoinPlanNode if the query contains a join with an equi-condition and the right side of the join has an index over the condition.
Consider the following example:
CREATE TABLE t1(v1 int, v2 int);
CREATE TABLE t2(v3 int, v4 int);
CREATE INDEX t2v3 on t2(v3);
EXPLAIN SELECT * FROM t1 INNER JOIN t2 ON v1 = v3;
=== PLANNER ===
Projection { exprs=[#0.0, #0.1, #0.2, #0.3] } | (t1.v1:INTEGER, t1.v2:INTEGER, t2.v3:INTEGER, t2.v4:INTEGER)NestedLoopJoin { predicate=#0.0=#1.0 } | (t1.v1:INTEGER, t1.v2:INTEGER, t2.v3:INTEGER, t2.v4:INTEGER)SeqScan { table=t1 } | (t1.v1:INTEGER, t1.v2:INTEGER)SeqScan { table=t2 } | (t2.v3:INTEGER, t2.v4:INTEGER)
=== OPTIMIZER ===
NestedIndexJoin { key_predicate=#0.0, index=t2v3, index_table=t2 }SeqScan { table=t1 }
In the plan phase, the query is planned as a NestedLoopJoin of two tables. The optimizer identifies that the right side of the join (SeqScan t2) has an index on column v3, and the join condition is an equi-condition v1 = v3. This means that for all tuples from the left side, the system can use the key v1 to query the index t2v3 to produce the join result.
The schema of NestedIndexJoin is all columns from the left table (child, outer) and then from the right table (index, inner). This executor will have only one child that propagates tuples corresponding to the outer table of the join. For each of these tuples, you will need to find the corresponding tuple in the inner table that matches the index key given by utilizing the index in the catalog.
Hint: You will want to fetch the tuple from the outer table, construct the index probe key by using key_predicate, and then look up the RID in the index to retrieve the corresponding tuple for the inner table.
Note: We will never insert duplicate rows into tables with indexes.
Note: We will provide all test cases on Gradescope AS-IS. You only need to pass the tests. Do not think of strange edge cases of NULLs (e.g., NULLs in group by and in indices)
Hint: At this point, you should have passed SQLLogicTests - #6 to #12.
Task #3 - Sort + Limit Executors and Top-N Optimization
You will complete your implementation in the following files:
- src/include/execution/sort_executor.h
- src/execution/sort_executor.cpp
- src/include/execution/limit_executor.h
- src/execution/limit_executor.cpp
- src/include/execution/topn_executor.h
- src/execution/topn_executor.cpp
- src/optimizer/sort_limit_as_topn.cpp
You need to implement IndexScanExecutor in Task #1 before starting this task. If there is an index over a table, the query processing layer will automatically pick it for sorting. In other cases, you will need a special sort executor to do this.
For all order by clauses, we assume every sort key will only appear once. You do not need to worry about ties in sorting.
Sort
Except in the case that the ORDER BY attributes matches the keys of an index, BusTub will use a SortPlanNode for all ORDER BY operators.
EXPLAIN SELECT * FROM __mock_table_1 ORDER BY colA ASC, colB DESC;
This plan node does not change schema (i.e., the output schema is the same as the input schema). You can extract sort keys from order_bys, and then use std::sort with a custom comparator to sort all tuples from the child. You can assume that all entries in a table can fit in memory.
If the query does not include a sort direction in the ORDER BY clause (i.e., ASC, DESC), then the sort mode will be default (which is ASC).
Limit
The LimitPlanNode specifies the number of tuples that query will generate. Consider the following example:
EXPLAIN SELECT * FROM __mock_table_1 LIMIT 10;
The LimitExecutor constrains the number of output tuples from its child executorr. If the number of tuples produced by its child executor is less than the limit specified in the plan node, this executor has no effect and yields all of the tuples that it receives.
This plan node does not change schema (i.e., the output schema is the same as the input schema). You do not need to support offsets.
Top-N Optimization Rule
For this last task, you are going to modify BusTub's optimizer to support converting top-N queries. Consider the following query:
EXPLAIN SELECT * FROM __mock_table_1 ORDER BY colA LIMIT 10;
By default, BusTub will execute this query by (1) sort all data from the table (2) get the first 10 elements. This is obviously inefficient, since the query only needs the smallest values. A smarter way of doing this is to dynamically keep track of the smallest 10 elements so far. This is what the BusTub's TopNExecutor does.
You will need to modify the optimizer to support converting a query with ORDER BY + LIMIT clauses to use the TopNExecutor. See OptimizeSortLimitAsTopN for more information.
An example of the optimized plan of this query:
TopN { n=10, order_bys=[(Default, #0.0)]} | (__mock_table_1.colA:INTEGER, __mock_table_1.colB:INTEGER)MockScan { table=__mock_table_1 } | (__mock_table_1.colA:INTEGER, __mock_table_1.colB:INTEGER)
Note: Think of what data structure can be used to track the top n elements (Andy mentioned it in the lecture). The struct should hold at most k elements (where k is the number specified in LIMIT clause).
Note: Though we did not say it explicitly, the BusTub optimizer is a rule-based optimizer. Most optimizer rules construct optimized plans in a bottom-up way.
Hint: At this point, your implementation should be able to pass SQLLogicTests #13 to #16. Integration-test-2 requires you to use release mode to run.
Leaderboard Task (Optional)
For this project's leaderboard challenge, we are giving you the SQL queries ahead of time. It is up to you to implement new executors and optimizer rules to make the system execute these queries as fast possible.
The leaderboard is optional (i.e., you do not need to do this to get a perfect score on the project).
It is possible that your implementation will produce different optimization results for existing queries after implementing the optimizations in the leaderboard test. We require you to pass all tests after implementing new optimization rules. Meanwhile, we will also force using starter rules for some test cases. For example, in order to ensure your index scan executor works, we force the starter rule in this sqllogictest file with set force_optimizer_starter_rule=yes.
Query 1: Where's the Index?
Consider the following sample database:
CREATE TABLE t1(x INT, y INT);
CREATE TABLE t2(x INT, y INT);
CREATE TABLE t3(x INT, y INT);
CREATE INDEX t1x ON t1(x);
Now a user comes along and executes the following query. Note that this query is not the same as the leaderboard query; please refer to the test file.
SELECT * FROM (t1 INNER JOIN t2 ON t1.x = t2.x) INNER JOIN t3 ON t2.y = t3.y;
Even though there is an index on t1.x, BusTub does not pick it for the join! What a 💩 database system! Furthermore, there are two nested loop joins, which is extremely inefficient! Oops!
Recommended Optimizations: Use hash join to handle equi-condition; join reordering to pick the index for t1; join t2 and t3 first based on the cardinality (use EstimatedCardinality function). Note that hash join is NOT required for a full score in this project. We also have an existing rule for converting NLJ into HashJoin and you will need to manually enable it. See optimizer_custom_rules.cpp for more information.
Query 2: Too Many Joins!
Consider the following sample database:
CREATE TABLE t4(x int, y int);
CREATE TABLE t5(x int, y int);
CREATE TABLE t6(x int, y int);
The user is not from CMU and they are writing terrible SQL. They forgot how write queries with joins so they puts all predicates in the WHERE clause.
SELECT * FROM t4, t5, t6WHERE (t4.x = t5.x) AND (t5.y = t6.y) AND (t4.y >= 1000000)AND (t4.y < 1500000) AND (t6.x >= 100000) AND (t6.x < 150000);
(Not the same as the actual leaderboard query, refer to the test file. We've already pushed one filter down in the actual leaderboard query.)
Recommended Optimizations: Decompose filter condition to extract hash join keys, push down filter below hash join to reduce data from the table scan.
Query 3: The Mad Data Scientist
There is a data scientist invested all their money in NFTs. After realizing their terrible mistake, they go crazy and starts writing some weird SQL queries. Consider the following example:
SELECT v, d1, d2 FROM (SELECT v,MAX(v1) AS d1, MIN(v1), MAX(v2), MIN(v2),MAX(v1) + MIN(v1), MAX(v2) + MIN(v2),MAX(v1) + MAX(v1) + MAX(v2) AS d2FROM t7 LEFT JOIN (SELECT v4 FROM t8 WHERE 1 == 2) ON v < v4GROUP BY v
)
(Not the same as the actual leaderboard query, refer to the test file.)
Recommended Optimizations: Column Pruning – you only need to compute v, d1, d2 from the left table in aggregation, common expression elimination, transform always false filter to dummy scan (values plan node of zero rows).
Hint: You do not need to implement a complete rule for optimizing these queries. (1) a complete predicate pushdown requires you to handle all plan nodes – limit, order by, etc. But to optimize for Q2, you only need to implement push down predicates over hash join / nested loop joins. (2) a complete join reordering requires you to handle predicates correctly (and maybe absorb filters in-between back to the join predicate), and you do not need to do that. Just make your optimizer work with those queries is enough.
ADDITIONAL INFORMATION
This section provides some additional information on other system components in BusTub that you will need to interact in order to complete this project.
System Catalog
A database maintains an internal catalog to keep track of meta-data about the database. In this project, you will interact with the system catalog to query information regarding tables, indexes, and their schemas.
The entirety of the catalog implementation is in src/include/catalog/catalog.h. You should pay particular attention to the member functions Catalog::GetTable() and Catalog::GetIndex(). You will use these functions in the implementation of your executors to query the catalog for tables and indexes.
Index Updates
For the table modification executors (InsertExecutor and DeleteExecutor) you must modify all indexes for the table targeted by the operation. You may find the Catalog::GetTableIndexes() function useful for querying all of the indexes defined for a particular table. Once you have the IndexInfo instance for each of the table's indexes, you can invoke index modification operations on the underlying index structure.
In this project, we use your implementation of B+ Tree Index from Project 2 as the underlying data structure for all index operations. Therefore, successful completion of this project relies on a working implementation of the B+ Tree Index.
INSTRUCTIONS
See the Project #0 instructions on how to create your private repository and setup your development environment.
You must pull the latest changes from the upstream BusTub repository for test files and other supplementary files we provide in this project.
Testing
We will use SQLLogicTest to perform testing and benchmarking. To use it,
make -j$(nproc) sqllogictest
./bin/bustub-sqllogictest ../test/sql/p3.00-primer.slt --verbose
You can use the bustub-sqllogictest program to run slt files. Remember to recompile sqllogictest before doing any testing. In this project, we provide ALL test cases to you. There are no hidden tests. The test cases are located at test/sql/.
Development Hints
Instead of using printf statements for debugging, use the LOG_* macros for logging information like this:
LOG_DEBUG("Fetching page %d", page_id);
To enable logging in your project, you will need to configure it in Debug mode:
cd build
cmake -DCMAKE_BUILD_TYPE=Debug ..
make -j$(nproc)
The different logging levels are defined in src/include/common/logger.h. After enabling logging, the logging level defaults to LOG_LEVEL_INFO. Any logging method with a level that is equal to or higher than LOG_LEVEL_INFO (e.g., LOG_INFO, LOG_WARN, LOG_ERROR) will emit logging information.
We also recommend using assertions to check preconditions, postconditions, and invariants in your implementation. The macros header defines the BUSTUB_ASSERT and UNREACHABLE macros that may be helpful in this capacity.
Post all of your questions about this project on Piazza. Do not email the TAs directly with questions.
GRADING RUBRIC
Each project submission will be graded based on the following criteria:
- Does the submission successfully execute all of the test cases and produce the correct answer?
- Does the submission execute without any memory leaks?
LATE POLICY
See the late policy in the syllabus.
SUBMISSION
After completing the assignment, you can submit your implementation to Gradescope for evaluation.
- https://www.gradescope.com/courses/424375/
Running make submit-p3 in your build/ directory will generate a zip archive called project3-submission.zip under your project root directory that you can submit to Gradescope.
Remember to resolve all style issues before submitting:
make format
make check-lint
make check-clang-tidy-p3
COLLABORATION POLICY
The collaboration policy for this assignment is as follows:
- Every student has to work individually on this assignment.
- Students are allowed to discuss high-level details about the project with others.
- Students are not allowed to copy the contents of a white-board after a group meeting with other students.
- Students are not allowed to copy the solutions from other students.
相关文章:

2023-03-09 CMU15445-Query Execution
摘要: CMU15445, Project #3 - Query Execution 参考: Project #3 - Query Execution | CMU 15-445/645 :: Intro to Database Systems (Fall 2022) https://github.com/cmu-db/bustub 要求: OVERVIEW At this point in the semester, you have implemented the internal co…...
vuedraggable的使用
Draggable为基于Sortable.js的vue组件,用以实现拖拽功能。 特性 支持触摸设备 支持拖拽和选择文本 支持智能滚动 支持不同列表之间的拖拽 不以jQuery为基础 和视图模型同步刷新 和vue2的国度动画兼容 支持撤销操作 当需要完全控制时,可以抛出所有变化 可…...

双馈风力发电机-900V直流混合储能并网系统MATLAB仿真
MATLAB2016b主体模型:双馈感应风机模块、采用真实风速数据。混合储能模块、逆变器模块、转子过电流保护模块、整流器控制模块、逆变器控制模块。直流母线电压:有功、无功输出(此处忘记乘负一信号输出),所以是负的。蓄电…...

leader选举过程
启动electionTimer,进行leader选举。 一段时间没有leader和follower通信,就会超时,开始选举leader过程。有个超时时间,如果到了这个时间,就会触发一个回调函数。具体如下: private void handleElectionTimeout() {boo…...

建造者模式
介绍 Java中的建造者模式是一种创建型设计模式,它的主要目的是为了通过一系列简单的步骤构建复杂的对象,允许创建复杂对象的不同表示形式,同时隐藏构造细节.它能够逐步构建对象,即先创建基本对象,然后逐步添加更多属性或部件,直到最终构建出完整的对象. 该模式的主要思想是将…...

IO与NIO区别
一、概念 NIO即New IO,这个库是在JDK1.4中才引入的。NIO和IO有相同的作用和目的,但实现方式不同,NIO主要用到的是块,所以NIO的效率要比IO高很多。在Java API中提供了两套NIO,一套是针对标准输入输出NIO,另一套就是网络编程NIO。 二、NIO和IO的主要区别 下表总结了Java I…...
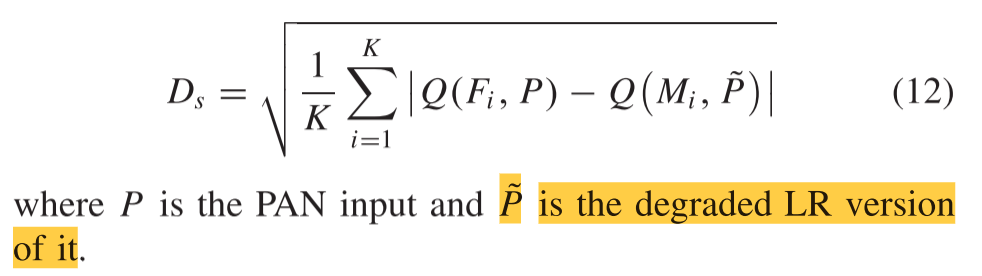
无监督循环一致生成式对抗网络:PAN-Sharpening
Unsupervised Cycle-Consistent Generative Adversarial Networks for Pan Sharpening (基于无监督循环一致生成式对抗网络的全色锐化) 基于深度学习的全色锐化近年来受到了广泛的关注。现有方法大多属于监督学习框架,即对多光谱࿰…...
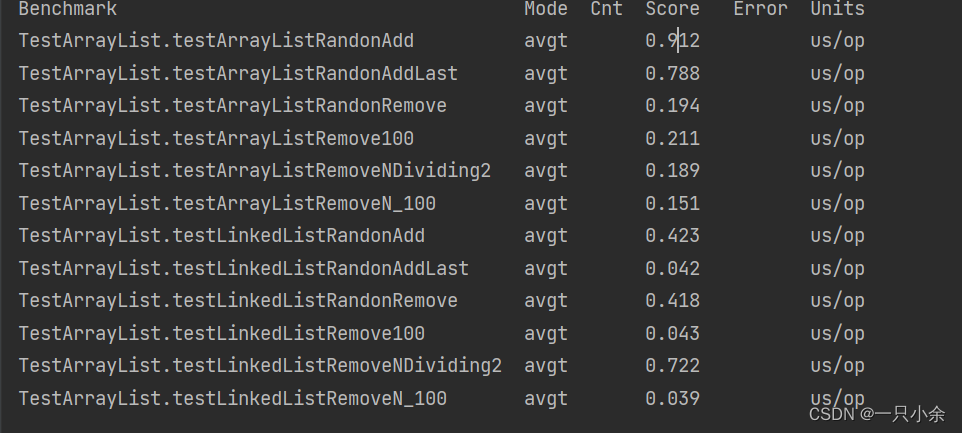
ArrayList源码分析(JDK17)
ArrayList类简介类层次结构构造无参构造有参构造添加元素add:添加/插入一个元素addAll:添加集合中的元素扩容mount与迭代器其他常见方法不常见方法不常见方法的源码和小介绍常见方法的源码和小介绍积累面试题ArrayList是什么?可以用来干嘛?Ar…...
)
数字IC/FPGA面试笔试准备(自用待填坑)
文章目录 前言常见的IC问题数字电路基础问题Verilog & SV跨时钟域信号处理类综合与时序分析类低功耗方法STA(静态时序分析)RTL设计(包含手撕代码)总线问题AXIAPBAHB体系结构的问题RISCV的问题一些笔试选择题前言 这是实验室师兄面试过程中整理的面试和笔试题目,目前只有题…...

基于多任务融合的圣女果采摘识别算法研究
基于多任务融合的圣女果采摘识别算法研究 1、简介 本文主要解决圣女果生产销售环节中,现有的流程是采摘成熟的圣女果,再对采摘下的果实进行单独的品质分级,不仅费时费力,而且多增加一个环节,也增加了对果实的二次伤害…...
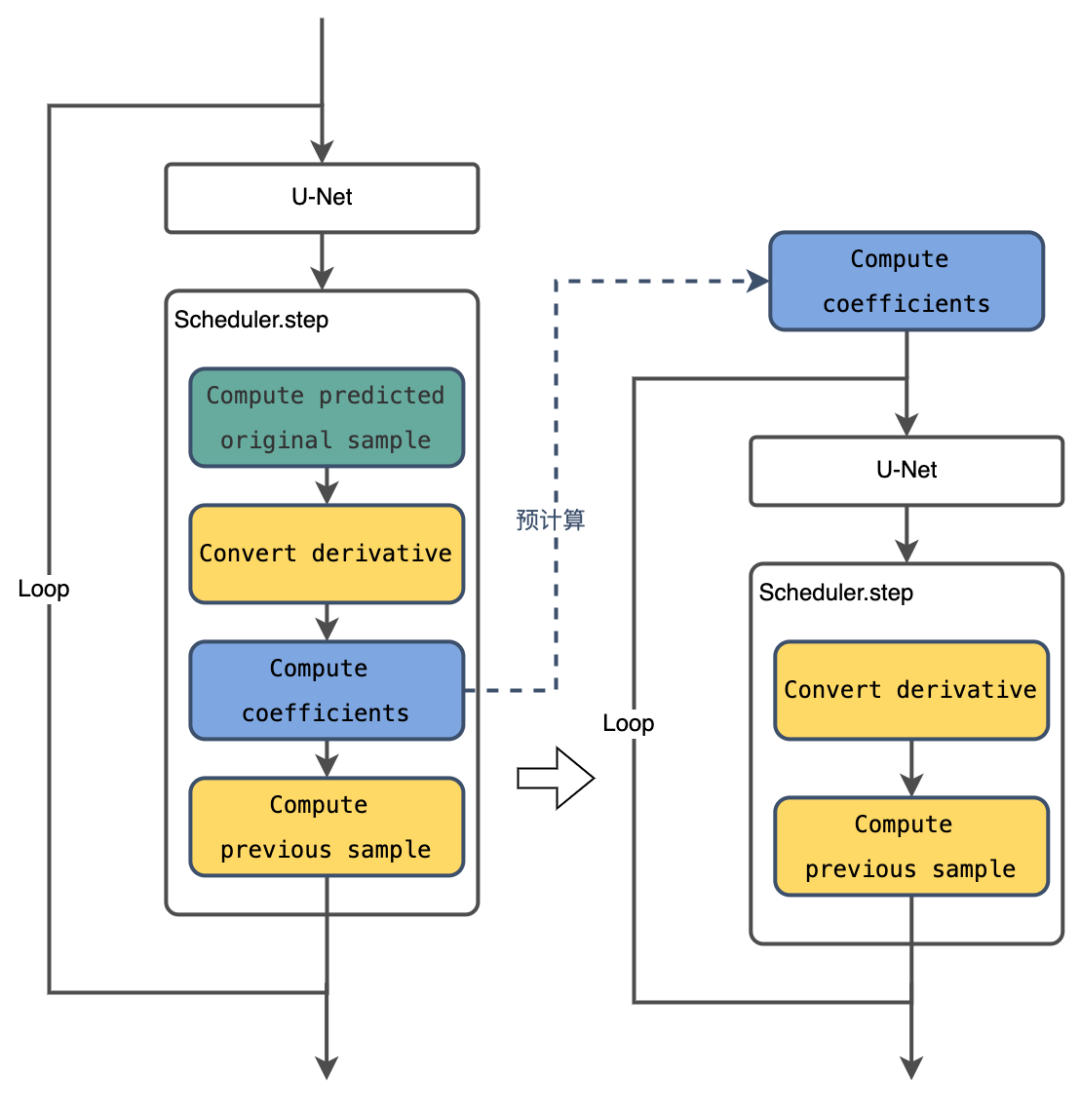
又一个开源第一!飞桨联合百舸,Stable Diffusion推理速度遥遥领先
AIGC(AI Generated Content),即通过人工智能方法生成内容,是当前深度学习最热门的方向之一。其在绘画、写作等场景的应用也一直层出不穷,其中,AI绘画是大家关注和体验较多的方向。 Diffusion系列文生图模型可以实现AI绘画应用&…...
数据链路层及交换机工作原理
目录 一,帧格式 1.1 帧头类型字段的作用 1.2 MAC地址 1.3 MTU值 二,交换机工作原理 2.1 交换机的端口 2.2 端口状态 三,交换机基本工作模式及命令 3.1 交换机的工作模式: 3.2 命令 一,帧格式 其中类型是指&am…...
VSCode 开发配置,一文搞定(持续更新中...)
一、快速生成页面骨架 文件 > 首选项 > 配置用户代码片段 选择需要的代码片段或者创建一个新的,这里以 vue.json 举例: 下面为我配置的代码片段,仅供参考: {"Print to console": {"prefix": "…...
全网最详细的(CentOS7)MySQL安装
一、环境介绍 操作系统:CentOS 7 MySQL:5.7 二、MySQL卸载 查看软件 rpm -qa|grep mysql 卸载MySQL yum remove -y mysql mysql-libs mysql-common rm -rf /var/lib/mysql rm /etc/my.cnf 查看是否还有 MySQL 软件,有的话继续删除。 软件卸…...
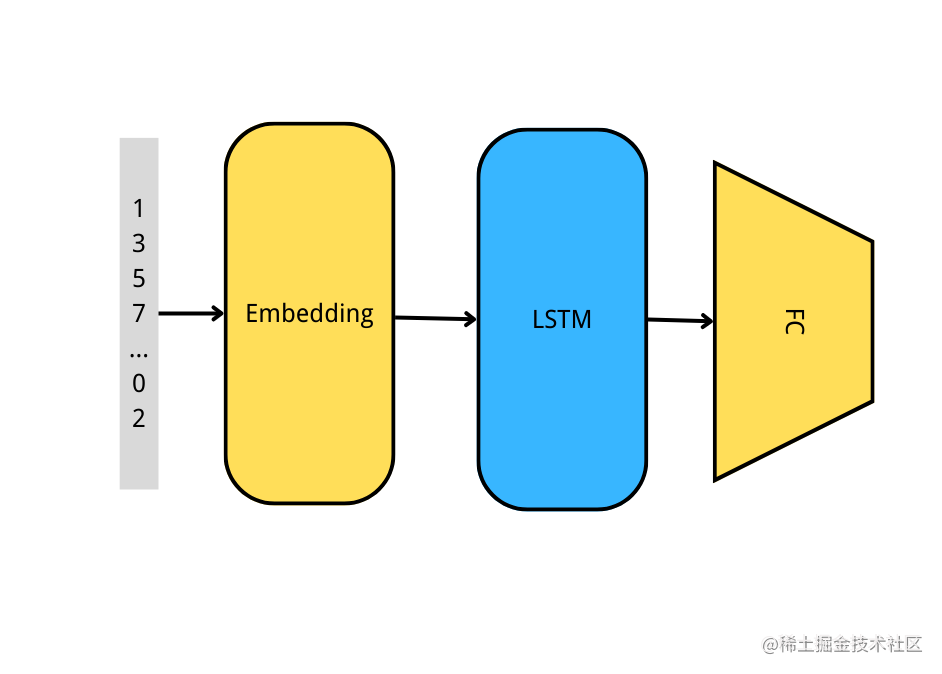
基于LSTM的文本情感分析(Keras版)
一、前言 文本情感分析是自然语言处理中非常基本的任务,我们生活中有很多都是属于这一任务。比如购物网站的好评、差评,垃圾邮件过滤、垃圾短信过滤等。文本情感分析的实现方法也是多种多样的,可以使用传统的朴素贝叶斯、决策树,…...

2023年全国最新机动车签字授权人精选真题及答案17
百分百题库提供机动车签字授权人考试试题、机动车签字授权人考试预测题、机动车签字授权人考试真题、机动车签字授权人证考试题库等,提供在线做题刷题,在线模拟考试,助你考试轻松过关。 三、多选题 1.注册登记安全检验时,送检乘用…...
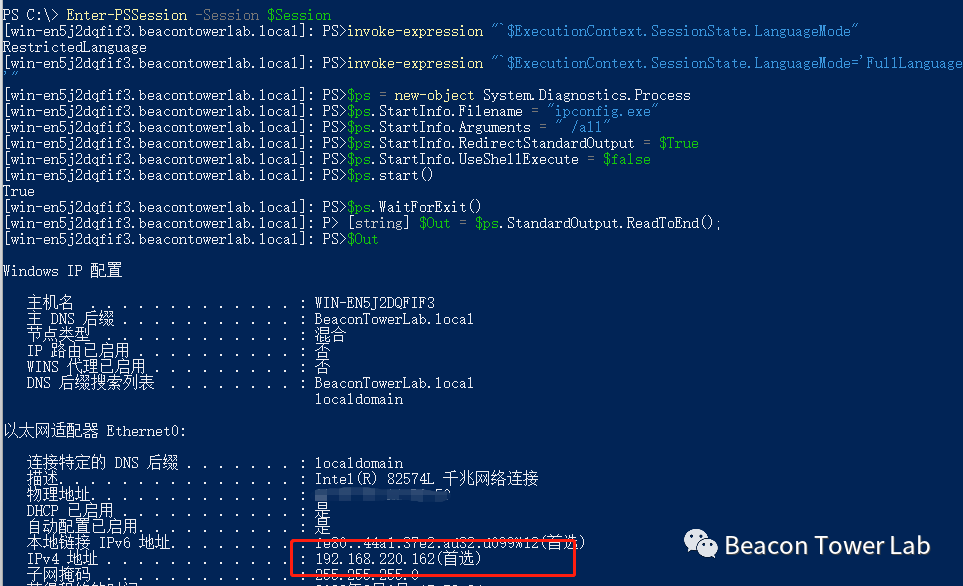
PowerShell远程代码执行漏洞(CVE-2022-41076)分析与复现
漏洞概述PowerShell(包括Windows PowerShell和PowerShell Core)是微软公司开发的任务自动化和配置管理程序,最初只是一个 Windows 组件,由命令行 shell 和相关的脚本语言组成。后于2016年8月18日开源并提供跨平台支持。PowerShell…...

Mybatis中的一级缓存和二级缓存
Mybatis作为一款强大的ORM框架,其中也用到了缓存来加速查询,今天我们一起来探讨下。 Mybatis可以使用懒加载来提高查询的效率,并且可以通过缓存来提高查询的效率。其中包括有一级缓存和二级缓存。 一级缓存是sqlSession级别的缓存,…...
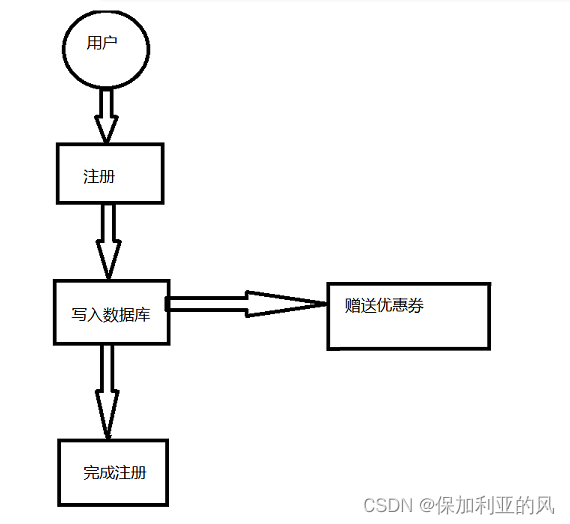
【Java】SpringBoot中实现异步编程
前言 首先我们来看看在Spring中为什么要使用异步编程,它能解决什么问题? 什么是异步? 首先我们先来看看一个同步的用户注册例子,流程如下: 异步的方式如下: 在用户注册后将成功结果返回,…...
(2023/03/09))
ASCII 文件与 TIFF 文件互转(Python 实现)(2023/03/09)
ASCII 文件与 TIFF 文件互转(Python 实现) 文章目录ASCII 文件与 TIFF 文件互转(Python 实现)1. 环境1.1 Linux1.2 Windows2. 代码1. 环境 1.1 Linux $ pip3 install --index-url https://mirrors.aliyun.com/pypi/simple --tru…...
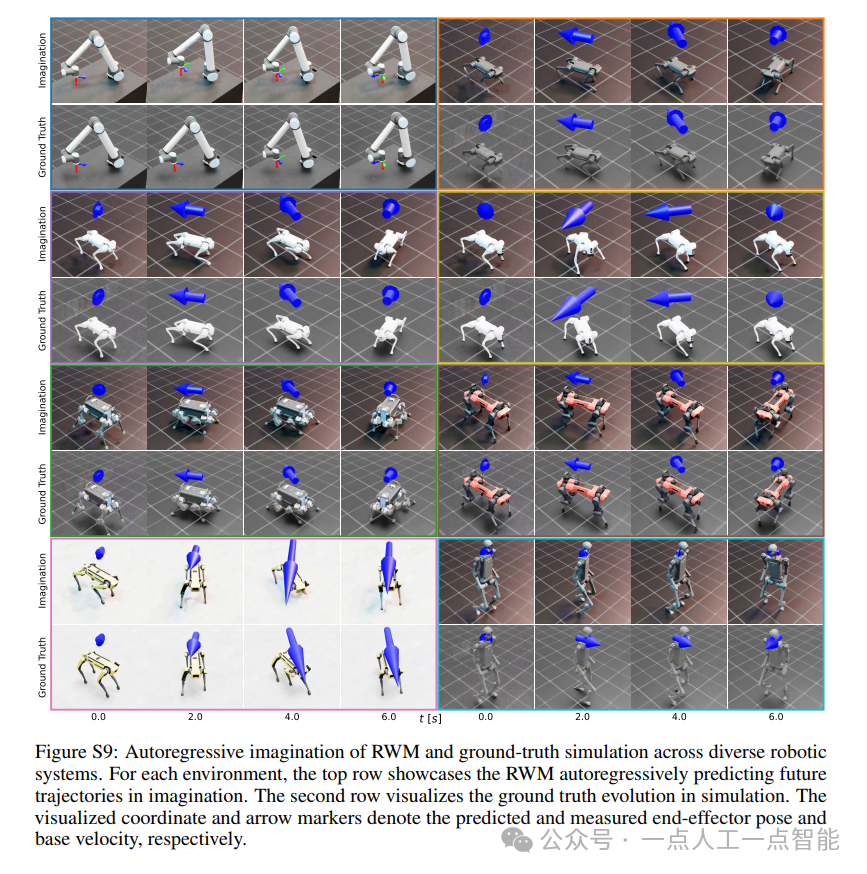
未来机器人的大脑:如何用神经网络模拟器实现更智能的决策?
编辑:陈萍萍的公主一点人工一点智能 未来机器人的大脑:如何用神经网络模拟器实现更智能的决策?RWM通过双自回归机制有效解决了复合误差、部分可观测性和随机动力学等关键挑战,在不依赖领域特定归纳偏见的条件下实现了卓越的预测准…...

51c自动驾驶~合集58
我自己的原文哦~ https://blog.51cto.com/whaosoft/13967107 #CCA-Attention 全局池化局部保留,CCA-Attention为LLM长文本建模带来突破性进展 琶洲实验室、华南理工大学联合推出关键上下文感知注意力机制(CCA-Attention),…...
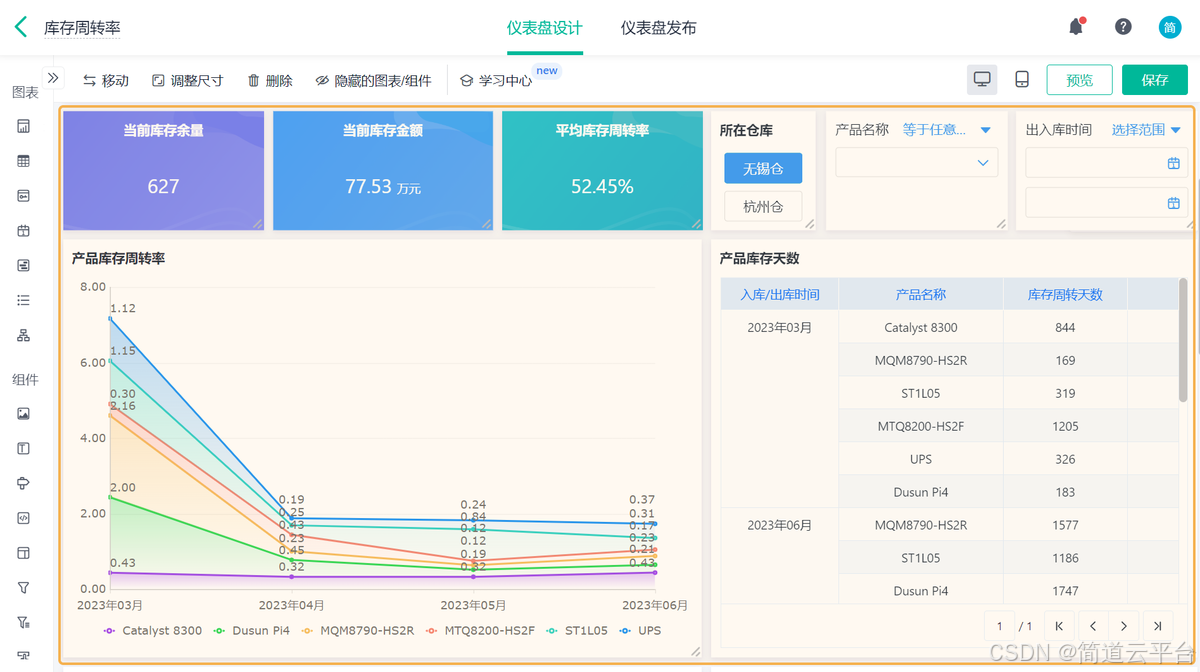
什么是库存周转?如何用进销存系统提高库存周转率?
你可能听说过这样一句话: “利润不是赚出来的,是管出来的。” 尤其是在制造业、批发零售、电商这类“货堆成山”的行业,很多企业看着销售不错,账上却没钱、利润也不见了,一翻库存才发现: 一堆卖不动的旧货…...

linux 下常用变更-8
1、删除普通用户 查询用户初始UID和GIDls -l /home/ ###家目录中查看UID cat /etc/group ###此文件查看GID删除用户1.编辑文件 /etc/passwd 找到对应的行,YW343:x:0:0::/home/YW343:/bin/bash 2.将标红的位置修改为用户对应初始UID和GID: YW3…...
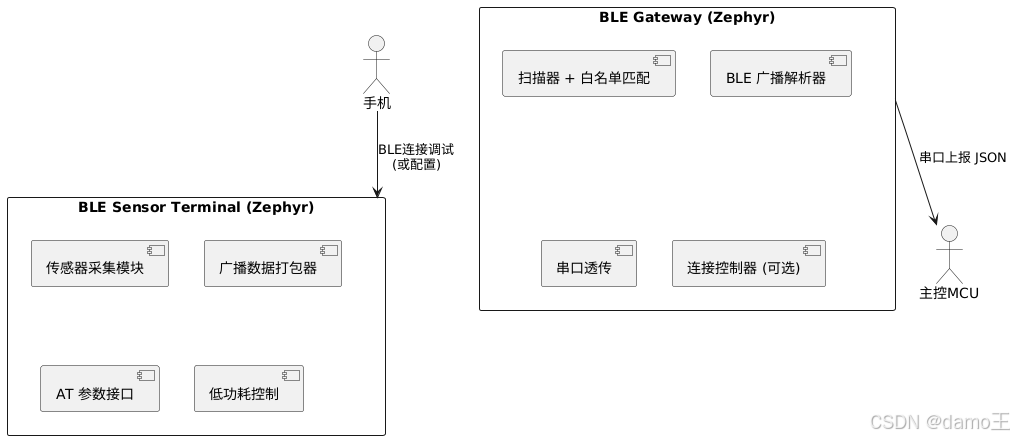
【Zephyr 系列 10】实战项目:打造一个蓝牙传感器终端 + 网关系统(完整架构与全栈实现)
🧠关键词:Zephyr、BLE、终端、网关、广播、连接、传感器、数据采集、低功耗、系统集成 📌目标读者:希望基于 Zephyr 构建 BLE 系统架构、实现终端与网关协作、具备产品交付能力的开发者 📊篇幅字数:约 5200 字 ✨ 项目总览 在物联网实际项目中,**“终端 + 网关”**是…...

BCS 2025|百度副总裁陈洋:智能体在安全领域的应用实践
6月5日,2025全球数字经济大会数字安全主论坛暨北京网络安全大会在国家会议中心隆重开幕。百度副总裁陈洋受邀出席,并作《智能体在安全领域的应用实践》主题演讲,分享了在智能体在安全领域的突破性实践。他指出,百度通过将安全能力…...

拉力测试cuda pytorch 把 4070显卡拉满
import torch import timedef stress_test_gpu(matrix_size16384, duration300):"""对GPU进行压力测试,通过持续的矩阵乘法来最大化GPU利用率参数:matrix_size: 矩阵维度大小,增大可提高计算复杂度duration: 测试持续时间(秒&…...

在鸿蒙HarmonyOS 5中使用DevEco Studio实现录音机应用
1. 项目配置与权限设置 1.1 配置module.json5 {"module": {"requestPermissions": [{"name": "ohos.permission.MICROPHONE","reason": "录音需要麦克风权限"},{"name": "ohos.permission.WRITE…...
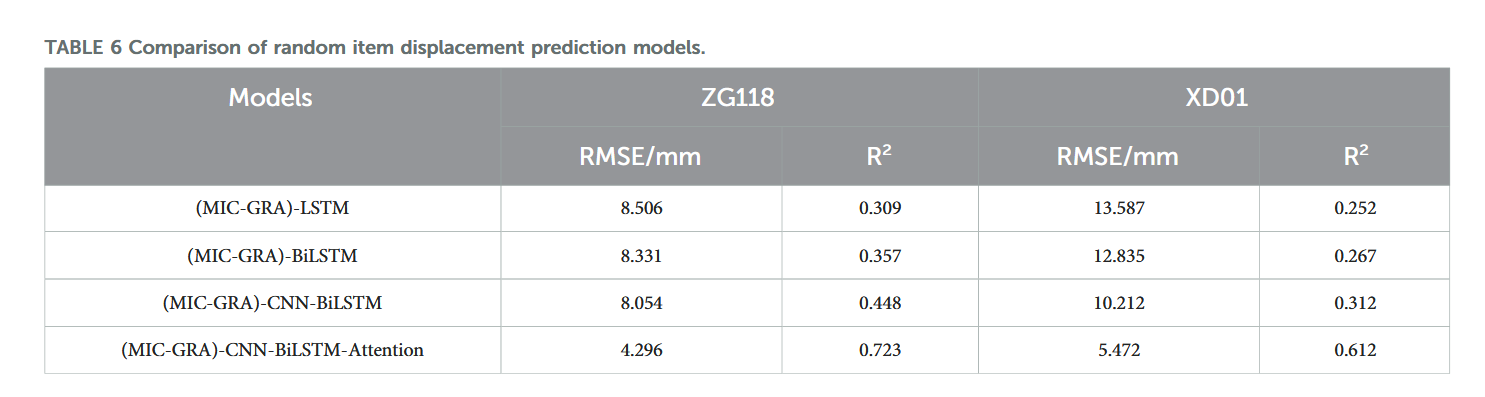
【论文阅读28】-CNN-BiLSTM-Attention-(2024)
本文把滑坡位移序列拆开、筛优质因子,再用 CNN-BiLSTM-Attention 来动态预测每个子序列,最后重构出总位移,预测效果超越传统模型。 文章目录 1 引言2 方法2.1 位移时间序列加性模型2.2 变分模态分解 (VMD) 具体步骤2.3.1 样本熵(S…...

Mac下Android Studio扫描根目录卡死问题记录
环境信息 操作系统: macOS 15.5 (Apple M2芯片)Android Studio版本: Meerkat Feature Drop | 2024.3.2 Patch 1 (Build #AI-243.26053.27.2432.13536105, 2025年5月22日构建) 问题现象 在项目开发过程中,提示一个依赖外部头文件的cpp源文件需要同步,点…...