Flutter(五)容器类组件
布局类组件包含多个子组件,而容器类组件只包含一个子组件
目录
- 填充(Padding)
- 装饰容器(DecoratedBox)
- 变换(Transform)
- Transform.translate 平移
- Transform.rotate 旋转
- Transform.scale 缩放
- RotatedBox
- 容器组件(Container)
- 实例
- 剪裁(Clip)
- 自定义裁剪(CustomClipper)
- 空间适配(FittedBox)
- 页面骨架(Scaffold)
- AppBar 一个导航栏骨架
- Drawer 抽屉菜单
- BottomNavigationBar 底部导航栏
- FloatingActionButton 漂浮按钮
填充(Padding)
Padding({...EdgeInsetsGeometry padding,Widget child,
})
我们看看EdgeInsets提供的便捷方法:
fromLTRB(double left, double top, double right, double bottom)://分别指定四个方向的填充。
all(double value) : //所有方向均使用相同数值的填充。
only({left, top, right ,bottom })://可以设置具体某个方向的填充(可以同时指定多个方向)。
symmetric({ vertical, horizontal })://用于设置对称方向的填充,vertical指top和bottom,horizontal指left和right
示例:
class PaddingTestRoute extends StatelessWidget {const PaddingTestRoute({Key? key}) : super(key: key);@overrideWidget build(BuildContext context) {return Padding(//上下左右各添加16像素补白padding: const EdgeInsets.all(16),child: Column(//显式指定对齐方式为左对齐,排除对齐干扰crossAxisAlignment: CrossAxisAlignment.start,mainAxisSize: MainAxisSize.min,children: const <Widget>[Padding(//左边添加8像素补白padding: EdgeInsets.only(left: 8),child: Text("Hello world"),),Padding(//上下各添加8像素补白padding: EdgeInsets.symmetric(vertical: 8),child: Text("I am Jack"),),Padding(// 分别指定四个方向的补白padding: EdgeInsets.fromLTRB(20, 0, 20, 20),child: Text("Your friend"),)],),);}
}
装饰容器(DecoratedBox)
DecoratedBox可以在其子组件绘制前(或后)绘制一些装饰(Decoration),如背景、边框、渐变
const DecoratedBox({Decoration decoration,//绘制的装饰//在哪儿绘制,background:在子组件之后绘制,即背景装饰。
//foreground:在子组件之上绘制,即前景。DecorationPosition positionWidget? child
})
我们通常会直接使用BoxDecoration类,它是一个Decoration的子类,实现了常用的装饰元素的绘制
BoxDecoration({Color color, //颜色DecorationImage image,//图片BoxBorder border, //边框BorderRadiusGeometry borderRadius, //圆角List<BoxShadow> boxShadow, //阴影,可以指定多个Gradient gradient, //渐变BlendMode backgroundBlendMode, //背景混合模式BoxShape shape = BoxShape.rectangle, //形状
})
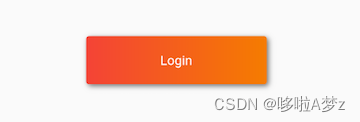
下面我们实现一个带阴影的背景色渐变的按钮:
DecoratedBox(decoration: BoxDecoration(gradient: LinearGradient(colors:[Colors.red,Colors.orange.shade700]), //背景渐变borderRadius: BorderRadius.circular(3.0), //3像素圆角boxShadow: [ //阴影BoxShadow(color:Colors.black54,offset: Offset(2.0,2.0),blurRadius: 4.0)]),child: Padding(padding: EdgeInsets.symmetric(horizontal: 80.0, vertical: 18.0),child: Text("Login", style: TextStyle(color: Colors.white),),)
)
变换(Transform)
Transform.translate 平移
DecoratedBox(decoration:BoxDecoration(color: Colors.red),//默认原点为左上角,左移20像素,向上平移5像素  child: Transform.translate(offset: Offset(-20.0, -5.0),child: Text("Hello world"),),
)
Transform.rotate 旋转
DecoratedBox(decoration:BoxDecoration(color: Colors.red),child: Transform.rotate(//旋转90度angle:math.pi/2 ,child: Text("Hello world"),),
)
Transform.scale 缩放
DecoratedBox(decoration:BoxDecoration(color: Colors.red),child: Transform.scale(scale: 1.5, //放大到1.5倍child: Text("Hello world"))
);
Transform的变换是应用在绘制阶段,而并不是应用在布局(layout)阶段,所以无论对子组件应用何种变化,其占用空间的大小和在屏幕上的位置都是固定不变的,因为这些是在布局阶段就确定的
由于矩阵变化只会作用在绘制阶段,所以在某些场景下,在UI需要变化时,可以直接通过矩阵变化来达到视觉上的UI改变,而不需要去重新触发build流程,这样会节省layout的开销,所以性能会比较
RotatedBox
RotatedBox和Transform.rotate功能相似,它们都可以对子组件进行旋转变换,但是有一点不同:RotatedBox的变换是在layout阶段,会影响在子组件的位置和大小
容器组件(Container)
Container是一个组合类容器,它本身不对应具体的RenderObject,它是DecoratedBox、ConstrainedBox、Transform、Padding、Align等组件组合的一个多功能容器,所以我们只需通过一个Container组件可以实现同时需要装饰、变换、限制的场景
Container({this.alignment,this.padding, //容器内补白,属于decoration的装饰范围Color color, // 背景色Decoration decoration, // 背景装饰Decoration foregroundDecoration, //前景装饰double width,//容器的宽度double height, //容器的高度BoxConstraints constraints, //容器大小的限制条件this.margin,//容器外补白,不属于decoration的装饰范围this.transform, //变换this.child,...
})
实例
Container(margin: EdgeInsets.only(top: 50.0, left: 120.0),constraints: BoxConstraints.tightFor(width: 200.0, height: 150.0),//卡片大小decoration: BoxDecoration( //背景装饰gradient: RadialGradient( //背景径向渐变colors: [Colors.red, Colors.orange],center: Alignment.topLeft,radius: .98,),boxShadow: [//卡片阴影BoxShadow(color: Colors.black54,offset: Offset(2.0, 2.0),blurRadius: 4.0,)],),transform: Matrix4.rotationZ(.2),//卡片倾斜变换alignment: Alignment.center, //卡片内文字居中child: Text(//卡片文字"5.20", style: TextStyle(color: Colors.white, fontSize: 40.0),),)

Container组件margin和padding属性的区别:
Container(margin: EdgeInsets.all(20.0), //容器外补白color: Colors.orange,child: Text("Hello world!"),
),
Container(padding: EdgeInsets.all(20.0), //容器内补白color: Colors.orange,child: Text("Hello world!"),
),
事实上,Container内margin和padding都是通过Padding 组件来实现的,上面的示例代码实际上等价于:
Padding(padding: EdgeInsets.all(20.0),child: DecoratedBox(decoration: BoxDecoration(color: Colors.orange),child: Text("Hello world!"),),
),
DecoratedBox(decoration: BoxDecoration(color: Colors.orange),child: Padding(padding: const EdgeInsets.all(20.0),child: Text("Hello world!"),),
),
剪裁(Clip)
ClipOval 子组件为正方形时剪裁成内贴圆形;为矩形时,剪裁成内贴椭圆
ClipRRect 将子组件剪裁为圆角矩形
ClipRect 默认剪裁掉子组件布局空间之外的绘制内容(溢出部分剪裁)
ClipPath 按照自定义的路径剪裁
import 'package:flutter/material.dart';class ClipTestRoute extends StatelessWidget {@overrideWidget build(BuildContext context) {// 头像  Widget avatar = Image.asset("imgs/avatar.png", width: 60.0);return Center(child: Column(children: <Widget>[avatar, //不剪裁ClipOval(child: avatar), //剪裁为圆形ClipRRect( //剪裁为圆角矩形borderRadius: BorderRadius.circular(5.0),child: avatar,), Row(mainAxisAlignment: MainAxisAlignment.center,children: <Widget>[Align(alignment: Alignment.topLeft,widthFactor: .5,//宽度设为原来宽度一半,另一半会溢出child: avatar,),Text("你好世界", style: TextStyle(color: Colors.green),)],),Row(mainAxisAlignment: MainAxisAlignment.center,children: <Widget>[ClipRect(//将溢出部分剪裁child: Align(alignment: Alignment.topLeft,widthFactor: .5,//宽度设为原来宽度一半child: avatar,),),Text("你好世界",style: TextStyle(color: Colors.green))],),],),);}
}

自定义裁剪(CustomClipper)
如果我们只想截取图片中部40×30像素的范围应该怎么做?这时我们可以使用CustomClipper来自定义剪裁区域
1.自定义一个CustomClipper
class MyClipper extends CustomClipper<Rect> {
//getClip()是用于获取剪裁区域的接口,由于图片大小是60×60,我们返回剪裁区域为Rect.fromLTWH(10.0, 15.0, 40.0, 30.0),即图片中部40×30像素的范围@overrideRect getClip(Size size) => Rect.fromLTWH(10.0, 15.0, 40.0, 30.0);
//shouldReclip决定是否重新剪裁。
//剪裁区域始终不变化时应该返回false,这样就不会触发重新剪裁,避免不必要的性能开销。
//剪裁区域发生变化(比如在对剪裁区域执行一个动画),那么变化后应该返回true来重新执行剪裁。@overridebool shouldReclip(CustomClipper<Rect> oldClipper) => false;
}
2.通过ClipRect来执行剪裁
DecoratedBox(decoration: BoxDecoration(color: Colors.red),child: ClipRect(clipper: MyClipper(), //使用自定义的clipperchild: avatar),
)
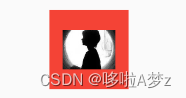
可以看到我们的剪裁成功了,但是图片所占用的空间大小仍然是60×60(红色区域),这是因为组件大小是是在layout阶段确定的,而剪裁是在之后的绘制阶段进行的,所以不会影响组件的大小,这和Transform原理是相似的。
空间适配(FittedBox)
子组件大小超出了父组件大小时,如果不经过处理的话 Flutter 中就会显示一个溢出警告并在控制台打印错误日志
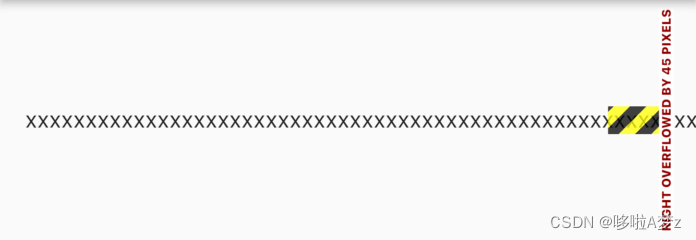
可以看到右边溢出了 45 像素。
如果让 Text 文本在超过父组件的宽度时不要换行而是字体缩小,
还有比如父组件的宽高固定,而 Text 文本较少,这时候我们想让文本放大以填充整个父组件空间该怎么做呢?
上面这两个问题的本质就是:子组件如何适配父组件空间,Flutter 提供了一个 FittedBox 组件
const FittedBox({Key? key,this.fit = BoxFit.contain, // 适配方式this.alignment = Alignment.center, //对齐方式this.clipBehavior = Clip.none, //是否剪裁Widget? child,
})
1.FittedBox 在布局子组件时会忽略其父组件传递的约束,可以允许子组件无限大
2.FittedBox 对子组件布局结束后就可以获得子组件真实的大小
3.FittedBox 知道子组件的真实大小和父组件的约束就可以通过指定的适配方式(BoxFit 枚举中指定)适配显示。
实例:一行不够显示缩放布局
class SingleLineFittedBox extends StatelessWidget {const SingleLineFittedBox({Key? key,this.child}) : super(key: key);final Widget? child;@overrideWidget build(BuildContext context) {return LayoutBuilder(builder: (_, constraints) {return FittedBox(child: ConstrainedBox(constraints: constraints.copyWith(minWidth: constraints.maxWidth,maxWidth: double.infinity,//maxWidth: constraints.maxWidth),child: child,),);},);}
}
我们将最小宽度(minWidth)约束指定为屏幕宽度,因为Row必须得遵守父组件的约束,所以 Row 的宽度至少等于屏幕宽度,所以就不会出现缩在一起的情况;
同时我们将 maxWidth 指定为无限大,则就可以处理数字总长度超出屏幕宽度的情况
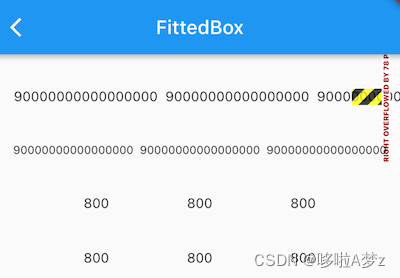
无论长数字还是短数字,我们的SingleLineFittedBox 都可以正常工作,大功告成
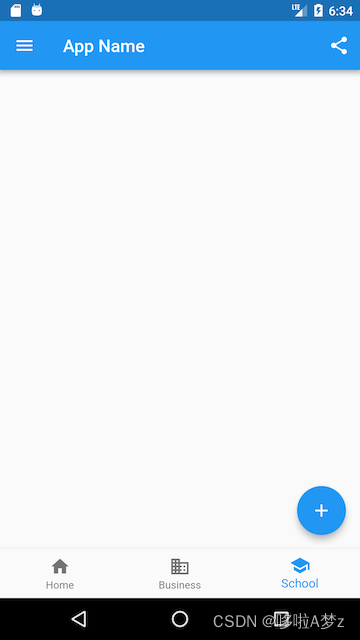
页面骨架(Scaffold)
我们实现一个页面,它包含:
- 一个导航栏
- 导航栏右边有一个分享按钮
- 有一个抽屉菜单
- 有一个底部导航
- 右下角有一个悬浮的动作按钮
class ScaffoldRoute extends StatefulWidget {@override_ScaffoldRouteState createState() => _ScaffoldRouteState();
}class _ScaffoldRouteState extends State<ScaffoldRoute> {int _selectedIndex = 1;@overrideWidget build(BuildContext context) {return Scaffold(appBar: AppBar( //导航栏title: Text("App Name"), actions: <Widget>[ //导航栏右侧菜单IconButton(icon: Icon(Icons.share), onPressed: () {}),],),drawer: MyDrawer(), //抽屉bottomNavigationBar: BottomNavigationBar( // 底部导航items: <BottomNavigationBarItem>[BottomNavigationBarItem(icon: Icon(Icons.home), title: Text('Home')),BottomNavigationBarItem(icon: Icon(Icons.business), title: Text('Business')),BottomNavigationBarItem(icon: Icon(Icons.school), title: Text('School')),],currentIndex: _selectedIndex,fixedColor: Colors.blue,onTap: _onItemTapped,),floatingActionButton: FloatingActionButton( //悬浮按钮child: Icon(Icons.add),onPressed:_onAdd),);}void _onItemTapped(int index) {setState(() {_selectedIndex = index;});}void _onAdd(){}
}
效果图
AppBar 一个导航栏骨架
AppBar({Key? key,this.leading, //导航栏最左侧Widget,常见为抽屉菜单按钮或返回按钮。this.automaticallyImplyLeading = true, //如果leading为null,是否自动实现默认的leading按钮this.title,// 页面标题this.actions, // 导航栏右侧菜单this.bottom, // 导航栏底部菜单,通常为Tab按钮组this.elevation = 4.0, // 导航栏阴影this.centerTitle, //标题是否居中 this.backgroundColor,...   //其他属性见源码注释
})
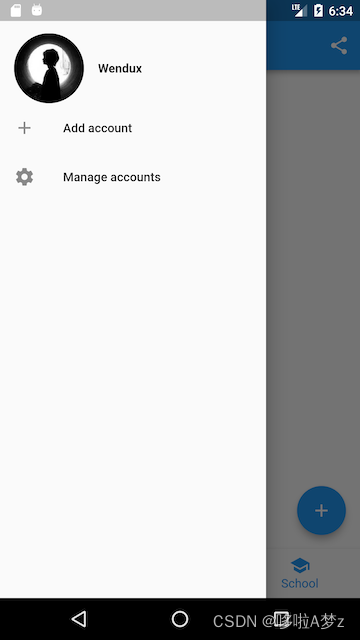
Drawer 抽屉菜单
Scaffold的drawer和endDrawer属性可以分别接受一个Widget来作为页面的左、右抽屉菜单
class MyDrawer extends StatelessWidget {const MyDrawer({Key? key,}) : super(key: key);@overrideWidget build(BuildContext context) {return Drawer(child: MediaQuery.removePadding(context: context,//移除抽屉菜单顶部默认留白removeTop: true,child: Column(crossAxisAlignment: CrossAxisAlignment.start,children: <Widget>[Padding(padding: const EdgeInsets.only(top: 38.0),child: Row(children: <Widget>[Padding(padding: const EdgeInsets.symmetric(horizontal: 16.0),child: ClipOval(child: Image.asset("imgs/avatar.png",width: 80,),),),Text("Wendux",style: TextStyle(fontWeight: FontWeight.bold),)],),),Expanded(child: ListView(children: <Widget>[ListTile(leading: const Icon(Icons.add),title: const Text('Add account'),),ListTile(leading: const Icon(Icons.settings),title: const Text('Manage accounts'),),],),),],),),);}
}
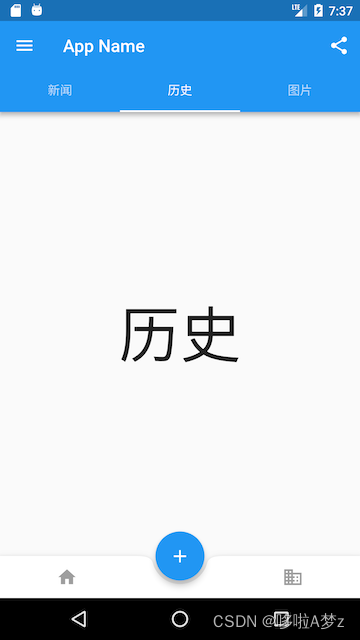
BottomNavigationBar 底部导航栏
BottomNavigationBar和BottomNavigationBarItem两种组件来实现
bottomNavigationBar: BottomAppBar(color: Colors.white,shape: CircularNotchedRectangle(), // 底部导航栏打一个圆形的洞child: Row(children: [IconButton(icon: Icon(Icons.home)),SizedBox(), //中间位置空出IconButton(icon: Icon(Icons.business)),],mainAxisAlignment: MainAxisAlignment.spaceAround, //均分底部导航栏横向空间),
)
效果图
FloatingActionButton 漂浮按钮
floatingActionButton属性来设置一个FloatingActionButton,同时通过floatingActionButtonLocation属性来指定其在页面中悬浮的位置
完。
相关文章:
Flutter(五)容器类组件
布局类组件包含多个子组件,而容器类组件只包含一个子组件 目录填充(Padding)装饰容器(DecoratedBox)变换(Transform)Transform.translate 平移Transform.rotate 旋转Transform.scale 缩放Rotate…...

实现满屏品字布局
html, body {width: 100%;height: 100%;}.first {width: 50%;height: 50%;margin: auto;background-color: pink;}.second {width: 50%;height: 50%;float: left;background-color: greenyellow;}.third {width: 50%;height: 50%;float: left;background-color: yellow;}...

软件测试-性能测试-基础知识
文章目录 1.性能测试理论1.1 相关概念1.2 性能测试指标2.性能测试策略2.1 基准测试2.2 负载测试2.3 稳定性测试2.4 其他测试策略3.性能测试的流程3.1 需求分析3.2 编写性能测试计划和方案3.3 编写性能测试用例3.4 性能测试执行3.5 性能测试报告4.性能测试工具4.1 Loadrunner4.2…...

java多线程与线程池-02线程池与锁
线程池与锁 第4章 线程池入门 4.1 ThreadPoolExecutor ThreadPoolExecutor是应用最广的底层线程池类,它实现了Executor和ExecutorService接口。 4.1.1 创建线程池 下面创建一个线程池,通过调整线程池构造函数的参数来了解线程池的运行特性。把核心线程数设置为3,最大…...

AB测试——流程介绍(设计实验)
前言: 作为AB测试的学习记录,接上文内容, 本文继续介绍假设建立和实验设计部分,包括实验对象、样本量计算(显著性水平、统计功效及最小可检测效应)、实验周期。 相关文章: AB测试——原理介绍 A…...

C++中的智能指针有哪些?分别解决的问题以及区别?
1.C中的智能指针有4种,分别为:shared_ptr、unique_ptr、weak_ptr、auto_ptr,其中auto_ptr被C11弃用。 2.使用智能指针的原因 申请的空间(即new出来的空间),在使用结束时,需要delete掉࿰…...
通达信捉妖改良CCI指标公式,简洁巧妙
高端的食材,往往只需要简单的烹饪方式。好的指标也是一样,只需要简单处理,就可以实现不错的效果。捉妖改良CCI指标公式属于意外之喜,编写指标时写错了,研究后发现结果比原想法更好。 捉妖改良CCI指标公式利用了CCI&am…...

「Python 基础」面向对象编程
文章目录1. 面向对象编程类和实例访问限制继承和多态type()isinstance()dir()实例属性和类属性2. 面向对象高级编程\_\_slots\_\_property多重继承定制类枚举类元类1. 面向对象编程 Object Oriented Programming 简称 OOP,一种程序设计思想,以对象为程…...

【K3s】第23篇 一篇文章带你学习k3s私有镜像仓库配置
目录 1、私有镜像仓库配置 2、registries.yaml Mirrors Configs 1、私有镜像仓库配置 可以配置 Containerd 连接到私有镜像仓库,并使用它们在节点上拉取私有镜像。 启动时,K3s 会检查/etc/rancher/k3s/中是否存在registries.yaml文件,并指示 containerd 使...
Redis学习【12】之Redis 缓存
文章目录前言一 Jedis 简介二 使用 Jedis2.1 测试代码2.2 使用 JedisPool2.3 使用 JedisPooled2.4 连接 Sentinel 高可用集群2.5 连接分布式系统2.6 操作事务三 Spring Boot整合Redis3.1 创建工程3.2 定义 pom 文件3.3 完整代码3.4 总结四 高并发问题4.1 缓存穿透4.2 缓存击穿4…...

Bootargs 参数
bootargs 的参数有很多,而且随着 kernel 的发展会出现一些新的参数,使得设置会更加灵活多样1。除了我之前介绍的 root、console、earlyprintk 和 loglevel 之外,还有以下一些常用的参数:init: 用来指定内核启动后执行的第一个程序…...
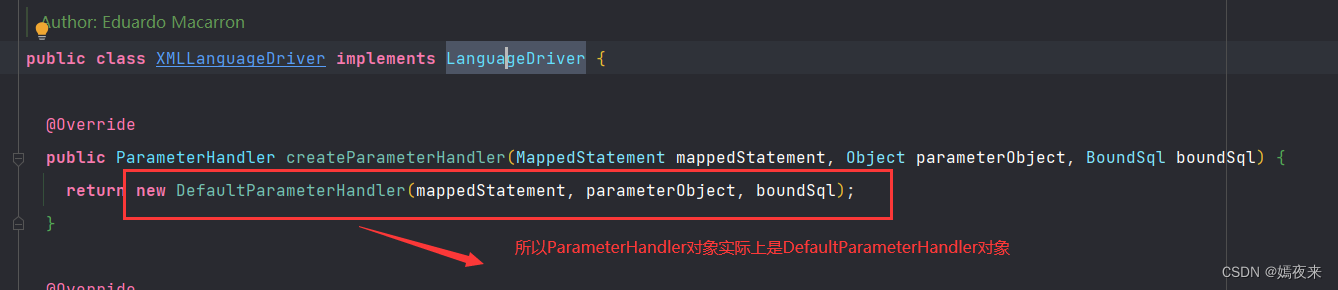
Mybatis框架源码笔记(七)之Mybatis中类型转换模块(TypeHandler)解析
1、JDBC的基本操作回顾 这里使用伪代码概括一下流程: 对应数据库版本的驱动包自行下载加载驱动类 (Class.forName("com.mysql.cj.jdbc.Driver"))创建Connection连接: conn DriverManager.getConnection("jdbc:mysql://数据库IP:port/数据库名称?useUnico…...

论文阅读《Block-NeRF: Scalable Large Scene Neural View Synthesis》
论文地址:https://arxiv.org/pdf/2202.05263.pdf 复现源码:https://github.com/dvlab-research/BlockNeRFPytorch 概述 Block-NeRF是一种能够表示大规模环境的神经辐射场(Neural Radiance Fields)的变体,将 NeRF 扩展到…...
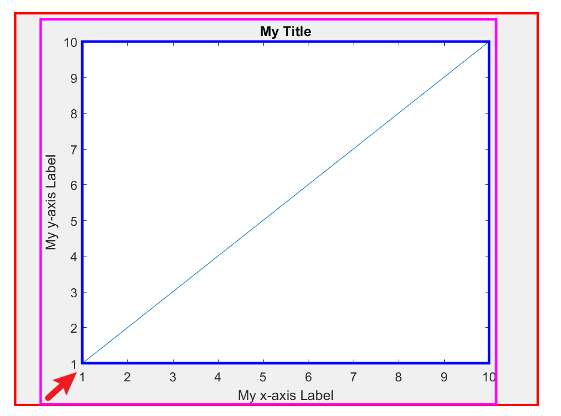
【Matlab】如何设置多个y轴
MTALAB提供了创建具有两个y轴的图,通过help yyaxis就能看到详细的使用方式。 但是如果要实现3个及以上y轴的图,就没有现成的公式使用了,如下图所示。 具体代码 % 数据准备 x10:0.01:10; y1sin(x1); x20:0.01:10; y2cos(x2); x30:0.01:10;…...

圆桌(满足客人空座需求,合理安排客人入座圆桌,准备最少的椅子)
CSDN周赛第30期第四题算法解析。 (本文获得CSDN质量评分【91】)【学习的细节是欢悦的历程】Python 官网:https://www.python.org/ Free:大咖免费“圣经”教程《 python 完全自学教程》,不仅仅是基础那么简单…… 地址:https://lq…...

如何入门大数据?
我们首先了解一下大数据到底是什么~ 大数据开发做什么? 大数据开发分两类,编写Hadoop、Spark的应用程序和对大数据处理系统本身进行开发。 大数据开发工程师主要负责公司大数据平台的开发和维护、相关工具平台的架构设计与产品开发、网络日志大数据分…...

如何在Vite项目中使用Lint保证代码质量
通常,大型前端项目都是多人参与的,由于开发者的编码习惯和喜好都不尽相同,为了降低维护成本,提高代码质量,所以需要专门的工具来进行约束,并且可以配合一些自动化工具进行检查,这种专门的工具称为Lint,可能大家接触得最多就是ESLint。 对于实现自动化代码规范检查及修…...
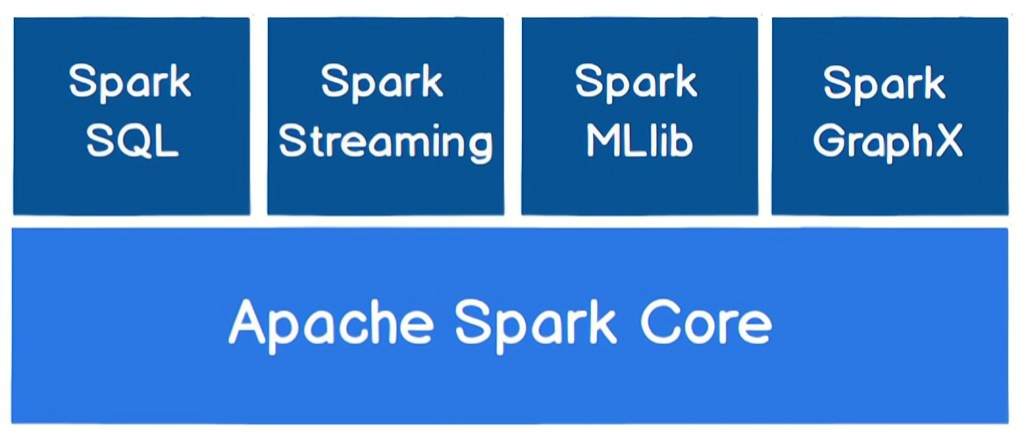
Spark高手之路1—Spark简介
文章目录Spark 概述1. Spark 是什么2. Spark与Hadoop比较2.1 从时间节点上来看2.2 从功能上来看3. Spark Or Hadoop4. Spark4.1 速度快4.2 易用4.3 通用4.4 兼容5. Spark 核心模块5.1 Spark-Core 和 弹性分布式数据集(RDDs)5.2 Spark SQL5.3 Spark Streaming5.4 Spark MLlib5.5…...

社科院与杜兰大学金融管理硕士项目——人生没有太晚的开始,不要过早的放弃
经常听到有人问,“我都快40了,现在学车晚不晚呢”“现在考研晚不晚?”“学画画晚不晚?”提出这些疑问的人,往往存在拖延,想法只停留在想的阶段,从来不去行动。当看到周边行动起来的人开始享受成…...

Spatial-Temporal Graph ODE Networks for Traffic Flow Forecasting
Spatial-Temporal Graph ODE Networks for Traffic Flow Forecasting 摘要 交通流量的复杂性和长范围时空相关性是难点 经典现存的工作: 1.利用浅图神经网络(shallow graph convolution networks)和 时间提取模块去分别建模空间和时间依赖…...

如何打造专属漫画体验?Venera主题定制全攻略
如何打造专属漫画体验?Venera主题定制全攻略 【免费下载链接】venera A comic app 项目地址: https://gitcode.com/gh_mirrors/ve/venera 核心价值:为什么要定制Venera主题? 在数字阅读时代,个性化体验已成为提升用户满意…...

实战分享:WAN2.2文生视频结合SDXL风格,用Python打造自动化视频生产线
实战分享:WAN2.2文生视频结合SDXL风格,用Python打造自动化视频生产线 1. 为什么选择WAN2.2SDXL组合进行视频创作 在数字内容爆炸式增长的今天,视频创作已经成为各行各业的基本需求。但传统视频制作流程复杂、成本高昂,让许多创作…...

AI 赋能下新型网络钓鱼攻击演进与多维度防御技术研究
摘要 生成式人工智能的普及使网络钓鱼攻击进入智能化、隐蔽化新阶段,攻击周期大幅缩短、伪装精度显著提升,传统基于规则与特征库的防御机制失效。本文结合 ESET 安全研究与企业实测数据,剖析 AI 驱动钓鱼攻击的技术机理、混淆手段与传播路径&…...

ImageToSTL:让图片秒变3D模型的开源工具
ImageToSTL:让图片秒变3D模型的开源工具 【免费下载链接】ImageToSTL This tool allows you to easily convert any image into a 3D print-ready STL model. The surface of the model will display the image when illuminated from the left side. 项目地址: h…...

终端智能编程助手Claude Code:让自然语言驱动你的开发工作流
终端智能编程助手Claude Code:让自然语言驱动你的开发工作流 【免费下载链接】claude-code Claude Code is an agentic coding tool that lives in your terminal, understands your codebase, and helps you code faster by executing routine tasks, explaining c…...

Navicat重置工具终极指南:macOS用户免费解锁专业功能的完整方案
Navicat重置工具终极指南:macOS用户免费解锁专业功能的完整方案 【免费下载链接】navicat_reset_mac navicat mac版无限重置试用期脚本 Navicat Mac Version Unlimited Trial Reset Script 项目地址: https://gitcode.com/gh_mirrors/na/navicat_reset_mac 还…...

反向传播:责任追溯大法——梯度如何“回流“
反向传播:责任追溯大法——梯度如何"回流"(Version B) 📚 《从零到一造大脑:AI架构入门之旅》专栏 专栏定位:面向中学生、大学生和 AI 初学者的科普专栏,用大白话和生活化比喻带你从零理解人工智能 本系列共 42 篇,分为八大模块: 📖 模块一【AI 基础概念…...

Vin象棋:基于Yolov5的中国象棋智能视觉辅助系统,重新定义数字化对弈体验
Vin象棋:基于Yolov5的中国象棋智能视觉辅助系统,重新定义数字化对弈体验 【免费下载链接】VinXiangQi Xiangqi syncing tool based on Yolov5 / 基于Yolov5的中国象棋连线工具 项目地址: https://gitcode.com/gh_mirrors/vi/VinXiangQi 在数字化对…...

珠海内有哪些做专精特新,创新型中小企业。企业性价比高。
在珠海,中小企业要走好专精特新发展之路,选择一家性价比高的服务机构至关重要。下面我就为你介绍一家值得关注的企业——珠海飞拓知识产权代理事务。企业痛点催生专业服务众多专精特新、创新型中小企业在发展过程中面临着诸多痛点。行业报告显示…...

三步快速配置:极简二维码插件让你的浏览器变身智能跨设备助手
三步快速配置:极简二维码插件让你的浏览器变身智能跨设备助手 【免费下载链接】chrome-qrcode chrome-qrcode - 一个 Chrome 浏览器插件,可以生成当前 URL 或选中文本的二维码,或解码网页上的二维码。 项目地址: https://gitcode.com/gh_mi…...