【C++】和【预训练模型】实现【机器学习】【图像分类】的终极指南
目录
💗1. 准备工作和环境配置💕
💖安装OpenCV💕
💖安装Dlib💕
下载并编译TensorFlow C++ API💕
💗2. 下载和配置预训练模型💕
💖2.1 下载预训练的ResNet-50模型💕
💖2.2 配置TensorFlow C++ API💕
💖2.3 加载和使用模型💕
💗3.编写代码进行图像分类💕
💖CMakeLists.txt💕
💖main.cpp💕
💗4. 代码分析和推导💕
💖初始化TensorFlow会话💕
💖读取和导入模型💕
💖读取输入图像💕
💖创建输入Tensor💕
💖运行会话并处理输出💕
💗5. 进阶优化与性能提升💕
💖多线程处理💕
💖GPU加速💕
💖模型优化💕
💗6. 问题与解决方案💕
💖问题1:内存不足💕
💖问题2:推理速度慢💕
💖问题3:模型兼容性问题💕
在现代机器学习和人工智能应用中,图像分类是一个非常常见且重要的任务。通过使用预训练模型,我们可以显著减少训练时间并提高准确性。C++作为一种高效的编程语言,特别适用于需要高性能计算的任务。
💗1. 准备工作和环境配置💕
首先,我们需要配置开发环境。这里我们将使用以下工具和库:
- C++ 编译器 (如GCC)
- CMake 构建系统
- OpenCV 库
- Dlib 库
- 下载并编译C++版本的TensorFlow
💖安装OpenCV💕
在Linux系统上,可以通过以下命令安装OpenCV:
sudo apt-get update
sudo apt-get install libopencv-dev
💖安装Dlib💕
Dlib是一个现代C++工具包,包含了机器学习算法和工具。可以通过以下命令安装:
git clone https://github.com/davisking/dlib.git
cd dlib
mkdir build
cd build
cmake ..
cmake --build .
sudo make install
下载并编译TensorFlow C++ API💕
下载TensorFlow的C++库并编译,可以参考TensorFlow官方文档进行详细的步骤。确保下载的版本与您当前的环境兼容。
💗2. 下载和配置预训练模型💕
使用ResNet-50模型,这是一个用于图像分类的深度卷积神经网络。在TensorFlow中,可以轻松地获取预训练的ResNet-50模型。以下是下载和配置ResNet-50模型的详细步骤:
💖2.1 下载预训练的ResNet-50模型💕
首先,我们需要下载预训练的ResNet-50模型。TensorFlow提供了很多预训练模型,您可以从TensorFlow的模型库中获取ResNet-50。
1.访问TensorFlow模型库: 打开浏览器,访问TensorFlow模型库的GitHub页面:TensorFlow Model Garden
2.选择预训练模型: 在模型库中找到ResNet-50模型。通常在tensorflow/models/official/vision/image_classification目录下可以找到相关的预训练模型。
3.下载模型文件: 下载模型文件,模型文件通常是一个.pb文件(TensorFlow模型的protobuf格式)。如果直接下载预训练模型文件不方便,可以使用TensorFlow的tf.keras.applications模块直接加载ResNet-50,并保存为.pb文件。
使用Python脚本下载并保存ResNet-50模型:
import tensorflow as tfmodel = tf.keras.applications.ResNet50(weights='imagenet')
model.save('resnet50_saved_model', save_format='tf')
-
运行此脚本将会在当前目录生成一个名为
resnet50_saved_model的文件夹,其中包含了模型的.pb文件。
💖2.2 配置TensorFlow C++ API💕
在下载模型文件后,我们需要配置TensorFlow的C++ API来加载和使用该模型。以下是配置步骤:
1.安装TensorFlow C++库: 从TensorFlow的官方网站下载适用于您的平台的TensorFlow C++库。如果没有现成的二进制包,可以从源代码编译TensorFlow C++库。
git clone https://github.com/tensorflow/tensorflow.git
cd tensorflow
./configure
bazel build //tensorflow:libtensorflow_cc.so
编译完成后,库文件位于bazel-bin/tensorflow目录下。
2.设置环境变量: 将TensorFlow C++库的包含路径和库文件路径添加到环境变量中。
export TF_CPP_INCLUDE_DIR=/path/to/tensorflow/include
export TF_CPP_LIB_DIR=/path/to/tensorflow/lib
3.配置CMakeLists.txt: 更新项目的CMakeLists.txt文件,包含TensorFlow C++库的路径。
cmake_minimum_required(VERSION 3.10)
project(ImageClassification)set(CMAKE_CXX_STANDARD 14)find_package(OpenCV REQUIRED)
find_package(Dlib REQUIRED)include_directories(${OpenCV_INCLUDE_DIRS})
include_directories(${Dlib_INCLUDE_DIRS})
include_directories(${TF_CPP_INCLUDE_DIR})
link_directories(${TF_CPP_LIB_DIR})add_executable(ImageClassification main.cpp)
target_link_libraries(ImageClassification ${OpenCV_LIBS} dlib::dlib tensorflow_cc)
💖2.3 加载和使用模型💕
在完成上述配置后,可以在C++代码中加载和使用ResNet-50模型。下面是示例代码,演示如何加载和使用该模型进行图像分类:
#include <iostream>
#include <opencv2/opencv.hpp>
#include <dlib/dnn.h>
#include <tensorflow/core/public/session.h>
#include <tensorflow/core/protobuf/meta_graph.pb.h>using namespace std;
using namespace cv;
using namespace tensorflow;// 定义图像分类函数
void classifyImage(const std::string& model_path, const std::string& image_path) {// 初始化TensorFlow会话Session* session;Status status = NewSession(SessionOptions(), &session);if (!status.ok()) {std::cerr << "Error creating TensorFlow session: " << status.ToString() << std::endl;return;}// 读取模型GraphDef graph_def;status = ReadBinaryProto(Env::Default(), model_path, &graph_def);if (!status.ok()) {std::cerr << "Error reading graph definition from " << model_path << ": " << status.ToString() << std::endl;return;}// 将模型导入会话status = session->Create(graph_def);if (!status.ok()) {std::cerr << "Error creating graph: " << status.ToString() << std::endl;return;}// 读取输入图像Mat img = imread(image_path);if (img.empty()) {std::cerr << "Error reading image: " << image_path << std::endl;return;}// 预处理图像Mat img_resized;resize(img, img_resized, Size(224, 224));img_resized.convertTo(img_resized, CV_32FC3);img_resized = img_resized / 255.0;// 创建输入TensorTensor input_tensor(DT_FLOAT, TensorShape({1, 224, 224, 3}));auto input_tensor_mapped = input_tensor.tensor<float, 4>();// 将图像数据复制到输入Tensorfor (int y = 0; y < 224; ++y) {for (int x = 0; x < 224; ++x) {for (int c = 0; c < 3; ++c) {input_tensor_mapped(0, y, x, c) = img_resized.at<Vec3f>(y, x)[c];}}}// 运行会话std::vector<Tensor> outputs;status = session->Run({{"input_tensor", input_tensor}}, {"output_tensor"}, {}, &outputs);if (!status.ok()) {std::cerr << "Error during inference: " << status.ToString() << std::endl;return;}// 处理输出auto output_tensor = outputs[0].tensor<float, 2>();int best_label = std::distance(output_tensor(0).data(), std::max_element(output_tensor(0).data(), output_tensor(0).data() + output_tensor.dim_size(1)));std::cout << "Predicted label: " << best_label << std::endl;// 清理session->Close();delete session;
}int main(int argc, char** argv) {if (argc != 3) {std::cerr << "Usage: " << argv[0] << " <model_path> <image_path>" << std::endl;return 1;}const std::string model_path = argv[1];const std::string image_path = argv[2];classifyImage(model_path, image_path);return 0;
}
💗3.编写代码进行图像分类💕
使用预训练的ResNet-50模型进行图像分类。
💖CMakeLists.txt💕
cmake_minimum_required(VERSION 3.10)
project(ImageClassification)set(CMAKE_CXX_STANDARD 14)find_package(OpenCV REQUIRED)
find_package(Dlib REQUIRED)include_directories(${OpenCV_INCLUDE_DIRS})
include_directories(${Dlib_INCLUDE_DIRS})
include_directories(/path/to/tensorflow/include)
link_directories(/path/to/tensorflow/lib)add_executable(ImageClassification main.cpp)
target_link_libraries(ImageClassification ${OpenCV_LIBS} dlib::dlib tensorflow)
💖main.cpp💕
#include <iostream>
#include <opencv2/opencv.hpp>
#include <dlib/dnn.h>
#include <tensorflow/core/public/session.h>
#include <tensorflow/core/protobuf/meta_graph.pb.h>using namespace std;
using namespace cv;
using namespace tensorflow;// 定义图像分类函数
void classifyImage(const std::string& model_path, const std::string& image_path) {// 初始化TensorFlow会话Session* session;Status status = NewSession(SessionOptions(), &session);if (!status.ok()) {std::cerr << "Error creating TensorFlow session: " << status.ToString() << std::endl;return;}// 读取模型GraphDef graph_def;status = ReadBinaryProto(Env::Default(), model_path, &graph_def);if (!status.ok()) {std::cerr << "Error reading graph definition from " << model_path << ": " << status.ToString() << std::endl;return;}// 将模型导入会话status = session->Create(graph_def);if (!status.ok()) {std::cerr << "Error creating graph: " << status.ToString() << std::endl;return;}// 读取输入图像Mat img = imread(image_path);if (img.empty()) {std::cerr << "Error reading image: " << image_path << std::endl;return;}// 预处理图像Mat img_resized;resize(img, img_resized, Size(224, 224));img_resized.convertTo(img_resized, CV_32FC3);img_resized = img_resized / 255.0;// 创建输入TensorTensor input_tensor(DT_FLOAT, TensorShape({1, 224, 224, 3}));auto input_tensor_mapped = input_tensor.tensor<float, 4>();// 将图像数据复制到输入Tensorfor (int y = 0; y < 224; ++y) {for (int x = 0; x < 224; ++x) {for (int c = 0; c < 3; ++c) {input_tensor_mapped(0, y, x, c) = img_resized.at<Vec3f>(y, x)[c];}}}// 运行会话std::vector<Tensor> outputs;status = session->Run({{"input_tensor", input_tensor}}, {"output_tensor"}, {}, &outputs);if (!status.ok()) {std::cerr << "Error during inference: " << status.ToString() << std::endl;return;}// 处理输出auto output_tensor = outputs[0].tensor<float, 2>();int best_label = std::distance(output_tensor(0).data(), std::max_element(output_tensor(0).data(), output_tensor(0).data() + output_tensor.dim_size(1)));std::cout << "Predicted label: " << best_label << std::endl;// 清理session->Close();delete session;
}int main(int argc, char** argv) {if (argc != 3) {std::cerr << "Usage: " << argv[0] << " <model_path> <image_path>" << std::endl;return 1;}const std::string model_path = argv[1];const std::string image_path = argv[2];classifyImage(model_path, image_path);return 0;
}
💗4. 代码分析和推导💕
💖初始化TensorFlow会话💕
首先,我们初始化一个TensorFlow会话。这个会话将用于执行图中的操作。
Session* session;
Status status = NewSession(SessionOptions(), &session);
if (!status.ok()) {std::cerr << "Error creating TensorFlow session: " << status.ToString() << std::endl;return;
}
💖读取和导入模型💕
使用ReadBinaryProto函数读取二进制格式的模型文件,并将其导入会话。
GraphDef graph_def;
status = ReadBinaryProto(Env::Default(), model_path, &graph_def);
if (!status.ok()) {std::cerr << "Error reading graph definition from " << model_path << ": " << status.ToString() << std::endl;return;
}status = session->Create(graph_def);
if (!status.ok()) {std::cerr << "Error creating graph: " << status.ToString() << std::endl;return;
}
💖读取输入图像💕
我们使用OpenCV读取图像,并将其大小调整为224x224,这是ResNet-50模型所需的输入尺寸。
Mat img = imread(image_path);
if (img.empty()) {std::cerr << "Error reading image: " << image_path << std::endl;return;
}Mat img_resized;
resize(img, img_resized, Size(224, 224));
img_resized.convertTo(img_resized, CV_32FC3);
img_resized = img_resized / 255.0;
💖创建输入Tensor💕
接下来,创建一个TensorFlow的Tensor,并将图像数据复制到该Tensor中。
Tensor input_tensor(DT_FLOAT, TensorShape({1, 224, 224, 3}));
auto input_tensor_mapped = input_tensor.tensor<float, 4>();for (int y = 0; y < 224; ++y) {for (int x = 0; x < 224; ++x) {for (int c = 0; c < 3; ++c) {input_tensor_mapped(0, y, x, c) = img_resized.at<Vec3f>(y, x)[c];}}
}
💖运行会话并处理输出💕
使用会话运行模型,并获取输出结果。
std::vector<Tensor> outputs;
status = session->Run({{"input_tensor", input_tensor}}, {"output_tensor"}, {}, &outputs);
if (!status.ok()) {std::cerr << "Error during inference: " << status.ToString() << std::endl;return;
}auto output_tensor = outputs[0].tensor<float, 2>();
int best_label = std::distance(output_tensor(0).data(), std::max_element(output_tensor(0).data(), output_tensor(0).data() + output_tensor.dim_size(1)));std::cout << "Predicted label: " << best_label << std::endl;
💗5. 进阶优化与性能提升💕
在这部分中,我们将探讨如何进一步优化代码以提高性能和效率。这些技巧和方法包括多线程处理、GPU加速、模型优化等。
💖多线程处理💕
在处理大量图像时,利用多线程可以显著提高处理速度。C++中的std::thread库使得多线程编程更加方便。多线程处理:
#include <thread>
#include <vector>// 定义一个处理图像的函数
void processImage(const std::string& model_path, const std::string& image_path) {classifyImage(model_path, image_path);
}int main(int argc, char** argv) {if (argc < 3) {std::cerr << "Usage: " << argv[0] << " <model_path> <image_paths...>" << std::endl;return 1;}const std::string model_path = argv[1];std::vector<std::string> image_paths;for (int i = 2; i < argc; ++i) {image_paths.push_back(argv[i]);}std::vector<std::thread> threads;for (const auto& image_path : image_paths) {threads.emplace_back(processImage, model_path, image_path);}for (auto& t : threads) {if (t.joinable()) {t.join();}}return 0;
}
通过这种方式,我们可以同时处理多个图像,从而提高整体处理效率。
💖GPU加速💕
GPU在处理大规模并行计算任务时具有显著优势。TensorFlow的C++ API支持GPU加速,只需在创建会话时指定GPU设备即可:
SessionOptions options;
options.config.mutable_gpu_options()->set_allow_growth(true);
Session* session;
Status status = NewSession(options, &session);
if (!status.ok()) {std::cerr << "Error creating TensorFlow session: " << status.ToString() << std::endl;return;
}
在配置好CUDA和cuDNN后,TensorFlow会自动利用GPU进行计算,从而显著提高计算速度。
💖模型优化💕
模型优化是提升推理速度和减少内存占用的重要手段。常用的方法包括模型量化和裁剪。可以使用TensorFlow的模型优化工具进行这些优化。
使用TensorFlow的模型优化API进行量化:
import tensorflow as tf
from tensorflow_model_optimization.quantization.keras import vitis_quantizemodel = tf.keras.models.load_model('model.h5')
quantized_model = vitis_quantize.quantize_model(model)
quantized_model.save('quantized_model.h5')
将量化后的模型加载到C++项目中,可以显著减少模型的计算量,从而提高推理速度。
💗6. 问题与解决方案💕
在实际应用中,可能会遇到各种问题。以下是一些常见问题及其解决方案,具体分析每种问题的可能原因和详细的解决步骤。
💖问题1:内存不足💕
解决方案:
1.减少批处理大小: 批处理大小(batch size)是指一次性送入模型进行处理的数据样本数。如果批处理大小过大,可能会导致内存溢出。可以通过减小批处理大小来减少内存使用。例如,将批处理大小从32减小到16甚至更小。
// 将批处理大小设置为1
Tensor input_tensor(DT_FLOAT, TensorShape({1, 224, 224, 3}));
2.使用模型量化技术: 模型量化通过将浮点数转换为低精度整数来减少模型大小和内存占用。TensorFlow提供了量化工具,可以在训练后对模型进行量化。
import tensorflow as tf
from tensorflow_model_optimization.quantization.keras import vitis_quantizemodel = tf.keras.models.load_model('model.h5')
quantized_model = vitis_quantize.quantize_model(model)
quantized_model.save('quantized_model.h5')
3.更高效的数据预处理方法: 使用OpenCV或其他图像处理库进行高效的数据预处理,尽量减少在内存中的图像副本。在读取图像后立即进行缩放和归一化处理。
Mat img = imread(image_path);
resize(img, img_resized, Size(224, 224));
img_resized.convertTo(img_resized, CV_32FC3);
img_resized = img_resized / 255.0;
💖问题2:推理速度慢💕
解决方案:
1.使用GPU加速: GPU在处理大规模并行计算任务时具有显著优势。在TensorFlow中可以通过指定GPU设备来加速推理。
SessionOptions options;
options.config.mutable_gpu_options()->set_allow_growth(true);
Session* session;
Status status = NewSession(options, &session);
if (!status.ok()) {std::cerr << "Error creating TensorFlow session: " << status.ToString() << std::endl;return;
}
2.利用多线程并行处理: 使用C++的多线程库(如std::thread)来并行处理多个图像,充分利用多核CPU的计算能力。
#include <thread>
#include <vector>void processImage(const std::string& model_path, const std::string& image_path) {classifyImage(model_path, image_path);
}int main(int argc, char** argv) {if (argc < 3) {std::cerr << "Usage: " << argv[0] << " <model_path> <image_paths...>" << std::endl;return 1;}const std::string model_path = argv[1];std::vector<std::string> image_paths;for (int i = 2; i < argc; ++i) {image_paths.push_back(argv[i]);}std::vector<std::thread> threads;for (const auto& image_path : image_paths) {threads.emplace_back(processImage, model_path, image_path);}for (auto& t : threads) {if (t.joinable()) {t.join();}}return 0;
}
3.优化模型结构: 优化模型结构,例如减少模型层数、使用更小的卷积核等,可以提高推理速度。具体方法包括剪枝、合并卷积层等。
4.使用模型量化和裁剪技术: 量化可以显著减少模型大小和计算量,从而提高推理速度。模型裁剪(pruning)通过去除不重要的权重来优化模型。
import tensorflow_model_optimization as tfmotprune_low_magnitude = tfmot.sparsity.keras.prune_low_magnitude
pruning_params = {'pruning_schedule': tfmot.sparsity.keras.PolynomialDecay(initial_sparsity=0.30,final_sparsity=0.70,begin_step=2000,end_step=10000)
}model_for_pruning = prune_low_magnitude(model, **pruning_params)
model_for_pruning.compile(optimizer='adam',loss=tf.keras.losses.categorical_crossentropy,metrics=['accuracy'])model_for_pruning.fit(train_data, train_labels, epochs=2, validation_split=0.1)
💖问题3:模型兼容性问题💕
解决方案:
-
确保模型文件和库版本匹配: 在不同平台上使用模型时,确保模型文件与库版本匹配非常重要。例如,TensorFlow模型的版本和TensorFlow库的版本必须一致。
-
重新训练和导出模型: 如果遇到兼容性问题,尝试在目标平台上重新训练并导出模型。这样可以确保模型和运行环境的完全兼容。
import tensorflow as tf# 重新训练模型 model = tf.keras.models.Sequential([tf.keras.layers.Conv2D(32, (3, 3), activation='relu', input_shape=(224, 224, 3)),tf.keras.layers.MaxPooling2D((2, 2)),tf.keras.layers.Conv2D(64, (3, 3), activation='relu'),tf.keras.layers.MaxPooling2D((2, 2)),tf.keras.layers.Flatten(),tf.keras.layers.Dense(64, activation='relu'),tf.keras.layers.Dense(10, activation='softmax') ])model.compile(optimizer='adam', loss='sparse_categorical_crossentropy', metrics=['accuracy']) model.fit(train_images, train_labels, epochs=10)# 导出模型 model.save('retrained_model.h5')3.使用中间格式进行转换: 使用ONNX(开放神经网络交换)格式,可以在不同的深度学习框架之间转换模型。可以使用tf2onnx将TensorFlow模型转换为ONNX格式,然后在目标平台上加载ONNX模型。
import tf2onnx
import tensorflow as tfmodel = tf.keras.models.load_model('model.h5')
spec = (tf.TensorSpec((None, 224, 224, 3), tf.float32, name="input"),)
output_path = "model.onnx"model_proto, _ = tf2onnx.convert.from_keras(model, input_signature=spec, opset=13)
with open(output_path, "wb") as f:f.write(model_proto.SerializeToString())
然后在C++中使用ONNX Runtime加载和推理ONNX模型:
#include <onnxruntime/core/providers/cpu/cpu_provider_factory.h>
#include <onnxruntime/core/providers/tensorrt/tensorrt_provider_factory.h>
#include <onnxruntime/core/session/onnxruntime_cxx_api.h>int main() {Ort::Env env(ORT_LOGGING_LEVEL_WARNING, "ONNXModel");Ort::SessionOptions session_options;session_options.AppendExecutionProvider_TensorRT();session_options.SetGraphOptimizationLevel(GraphOptimizationLevel::ORT_ENABLE_EXTENDED);Ort::Session session(env, "model.onnx", session_options);// 输入、输出和推理代码略...return 0;
}
相关文章:
【C++】和【预训练模型】实现【机器学习】【图像分类】的终极指南
目录 💗1. 准备工作和环境配置💕 💖安装OpenCV💕 💖安装Dlib💕 下载并编译TensorFlow C API💕 💗2. 下载和配置预训练模型💕 💖2.1 下载预训练的ResNet…...

HTML5 Web SQL数据库:浏览器中的轻量级数据库解决方案
在HTML5时代,Web开发迎来了一系列创新特性,其中之一便是Web SQL数据库。尽管Web SQL标准已被W3C废弃,转而推荐IndexedDB作为替代,但了解Web SQL对于学习Web存储技术的演进历程仍有其价值。本文将详细介绍Web SQL数据库的基本概念、…...

C++ const关键字有多种用法举例
C const关键字有多种用法 可以用来修饰变量、指针、函数参数、成员函数等。可以看到const在C中有多种用法,主要用于保证数据的不可变性,增强代码的安全性和可读性。在实际编程中,根据需要选择适当的const用法,可以有效避免意外修…...
Makefile-快速掌握
引用 本文完全参照大佬的文档写的,写这篇文章只是为了梳理一下知识 https://github.com/marmotedu/geekbang-go/blob/master/makefile/Makefile%E5%9F%BA%E7%A1%80%E7%9F%A5%E8%AF%86.md 介绍 Makefile是一个工程文件的编译规则,描述了整个工程的编译…...
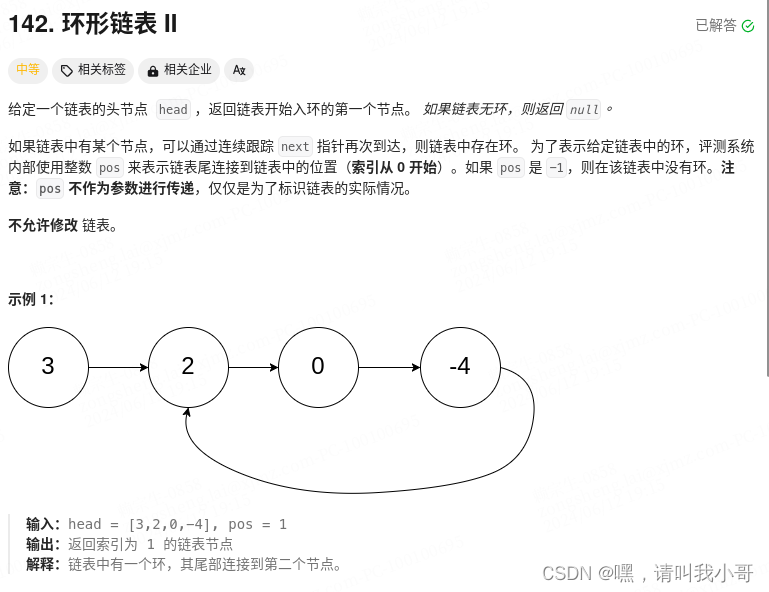
定个小目标之刷LeetCode热题(20)
这题与上一题有一点不同,上一题是判断链表是否存在环,这题是寻找入环的第一个节点,有一个规则是这样的,在存在环的情况下,运用快慢指针判断是否有环结束时,把快指针指向头结点,慢指针不变&#…...

短剧分销小程序:影视产业链中的新兴力量
一、引言 在数字化浪潮的推动下,影视产业正迎来一场深刻的变革。短剧分销小程序作为这场变革中的新兴力量,正以其独特的魅力和价值,逐渐在影视产业链中崭露头角。本文将探讨短剧分销小程序在影视产业链中的新兴地位、其带来的变革以及未来的…...
使用fvm切换flutter版本
切换flutter版本 下载fvm 1、dart pub global activate fvm dart下载fvm 2、warning中获取下载本地的地址 3、添加用户变量path: 下载地址 终端查看fvm版本 fvm --version 4、指定fvm文件缓存地址 fvm config --cache-path C:\src\fvm(自定义地址&…...
python通过selenium实现自动登录及轻松过滑块验证、点选验证码(2024-06-14)
一、chromedriver配置环境搭建 请确保下载的驱动程序与你的Chrome浏览器版本匹配,以确保正常运行。 1、Chrome版本号 chrome的地址栏输入chrome://version,自然就得到125.0.6422.142 版本 125.0.6422.142(正式版本) (…...

【C++】开源项目收集
C 是一种强大的、静态类型的通用编程语言,它的开源生态系统非常丰富,拥有众多高质量的项目。以下是一些知名的C开源项目: Boost: 这是一个庞大的库集合,提供了大量的实用工具和组件,如文件系统、网络编程、智能指针等&…...
爬虫相关面试题
一,如何抓取一个网站? 1,去百度和谷歌搜一下这个网站有没有分享要爬取数据的API 2, 看看电脑网页有没有所需要的数据,写代码测试调查好不好拿,如果好拿直接开始爬取 3,看看有没有电脑能打开的手机网页&a…...

Spring Cloud Netflix 之 Ribbon
前言 前些天发现了一个巨牛的人工智能学习网站,通俗易懂,风趣幽默,忍不住分享一下给大家:https://www.captainbed.cn/z ChatGPT体验地址 文章目录 前言前言1、负载均衡1.1、服务端负载均衡1.2、客户端负载均衡 2、Ribbon实现服务…...

C语言怎样记住那么多的颜⾊?
一、问题 ⾚、橙、⻩、绿、⻘、蓝、紫,如此之多的颜⾊,数字不好记,英⽂看程序还可以, 直接写也不好写。那么怎样记住那么多的颜⾊呢? 二、解答 颜⾊枚举值如下: enum COLORS {BLACK, /*O⿊*/BLUE, …...
LabVIEW软件开发任务的工作量估算方法
在开发LabVIEW软件时,如何准确估算软件开发任务的工作量。通过需求分析、功能分解、复杂度评估和资源配置等步骤,结合常见的估算方法,如专家判断法、类比估算法和参数估算法,确保项目按时按质完成,提供项目管理和资源分…...
【已解决】引入 element 组件无法使用编译错误 ERROR Failed to compile with 1 error
如果大家使用这个vue 配合 element 框架不熟练,当你顺利按照文档安装好 vue 和 element 的时候想要使用element 的组件时候确无法展示出来,甚至报错。不妨看看是不是这个问题, 1.首先使用element 的时候,前提是把必须要的 elemen…...
Prometheus的四种指标类型
目录 一、Counter 计数器 1.1Counter 是计数器类型 1.2Counter 类型示例 二、Gauge 仪表盘 2.1Gauge是测量器类型 2.2Gauge 类型示例 三、Histogram 累积直方图 3.1Histogram 作用及特点 3.2使用 histogram 柱状图 四、Summary 摘要 一、Counter 计数器 1.1Counter …...

FastDFS SpringBoot 客户端 Demo搭建,支持文件上传下载
一、准备 fastdfs-client-java 依赖包 1、从 Git 下载 FastDFS java client SDK 源码 https://github.com/happyfish100/fastdfs-client-java.git<fastdfs-client-java 源码见附件> 2、使用ant从源码构建 ant clean package3、使用maven从源码安装 mvn clean instal…...
十大成长型思维:定位思维、商业思维、时间管理思维、学习成长思维、精力管理思维、逻辑表达思维、聚焦思维、金字塔原理、目标思维、反思思维
一、定位思维 定位思维是一种在商业和管理领域中至关重要的思维模式,它涉及到如何在顾客心智中确立品牌的独特位置,并使其与竞争对手区分开来。以下是关于定位思维的清晰介绍: 1、定义 定位思维是一种从潜在顾客的心理认知出发,通…...
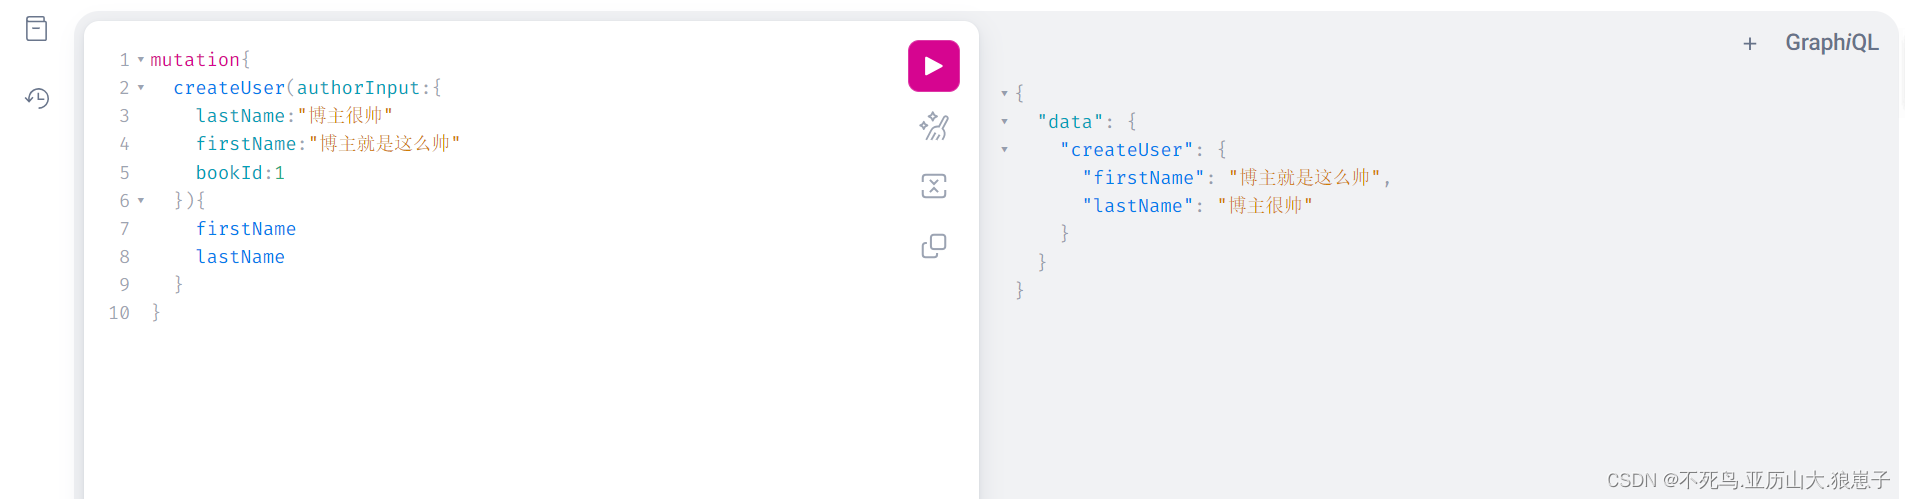
GraphQL(9):Spring Boot集成Graphql简单实例
1 安装插件 我这边使用的是IDEA,需要先按照Graphql插件,步骤如下: (1)打开插件管理 在IDEA中,打开主菜单,选择 "File" -> "Settings" (或者使用快捷键 Ctrl Alt S …...
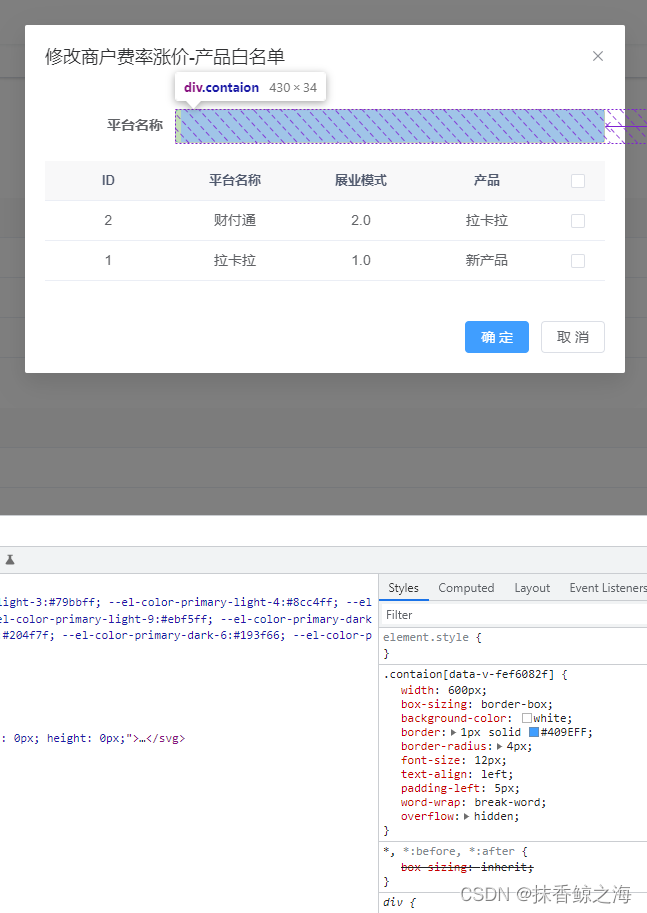
vue3+ Element-Plus 点击勾选框往input中动态添加多个tag
实现效果: template: <!--产品白名单--><div class"con-item" v-if"current 0"><el-form-item label"平台名称"><div class"contaion" click"onclick"><!-- 生成的标签 …...

唯美仙侠手游【九幽仙域】win服务端+GM后台+详细教程
资源下载地址:九幽仙域搭建-...
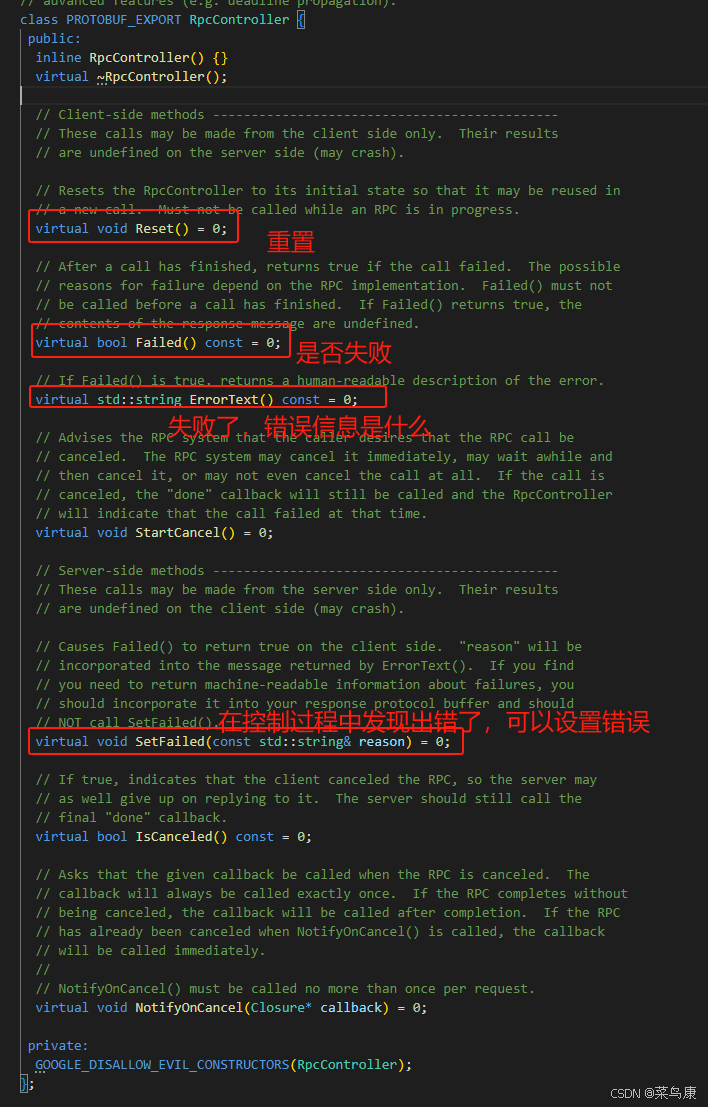
C++实现分布式网络通信框架RPC(3)--rpc调用端
目录 一、前言 二、UserServiceRpc_Stub 三、 CallMethod方法的重写 头文件 实现 四、rpc调用端的调用 实现 五、 google::protobuf::RpcController *controller 头文件 实现 六、总结 一、前言 在前边的文章中,我们已经大致实现了rpc服务端的各项功能代…...

逻辑回归:给不确定性划界的分类大师
想象你是一名医生。面对患者的检查报告(肿瘤大小、血液指标),你需要做出一个**决定性判断**:恶性还是良性?这种“非黑即白”的抉择,正是**逻辑回归(Logistic Regression)** 的战场&a…...

java 实现excel文件转pdf | 无水印 | 无限制
文章目录 目录 文章目录 前言 1.项目远程仓库配置 2.pom文件引入相关依赖 3.代码破解 二、Excel转PDF 1.代码实现 2.Aspose.License.xml 授权文件 总结 前言 java处理excel转pdf一直没找到什么好用的免费jar包工具,自己手写的难度,恐怕高级程序员花费一年的事件,也…...
HTML 列表、表格、表单
1 列表标签 作用:布局内容排列整齐的区域 列表分类:无序列表、有序列表、定义列表。 例如: 1.1 无序列表 标签:ul 嵌套 li,ul是无序列表,li是列表条目。 注意事项: ul 标签里面只能包裹 li…...
最新SpringBoot+SpringCloud+Nacos微服务框架分享
文章目录 前言一、服务规划二、架构核心1.cloud的pom2.gateway的异常handler3.gateway的filter4、admin的pom5、admin的登录核心 三、code-helper分享总结 前言 最近有个活蛮赶的,根据Excel列的需求预估的工时直接打骨折,不要问我为什么,主要…...

spring:实例工厂方法获取bean
spring处理使用静态工厂方法获取bean实例,也可以通过实例工厂方法获取bean实例。 实例工厂方法步骤如下: 定义实例工厂类(Java代码),定义实例工厂(xml),定义调用实例工厂ÿ…...
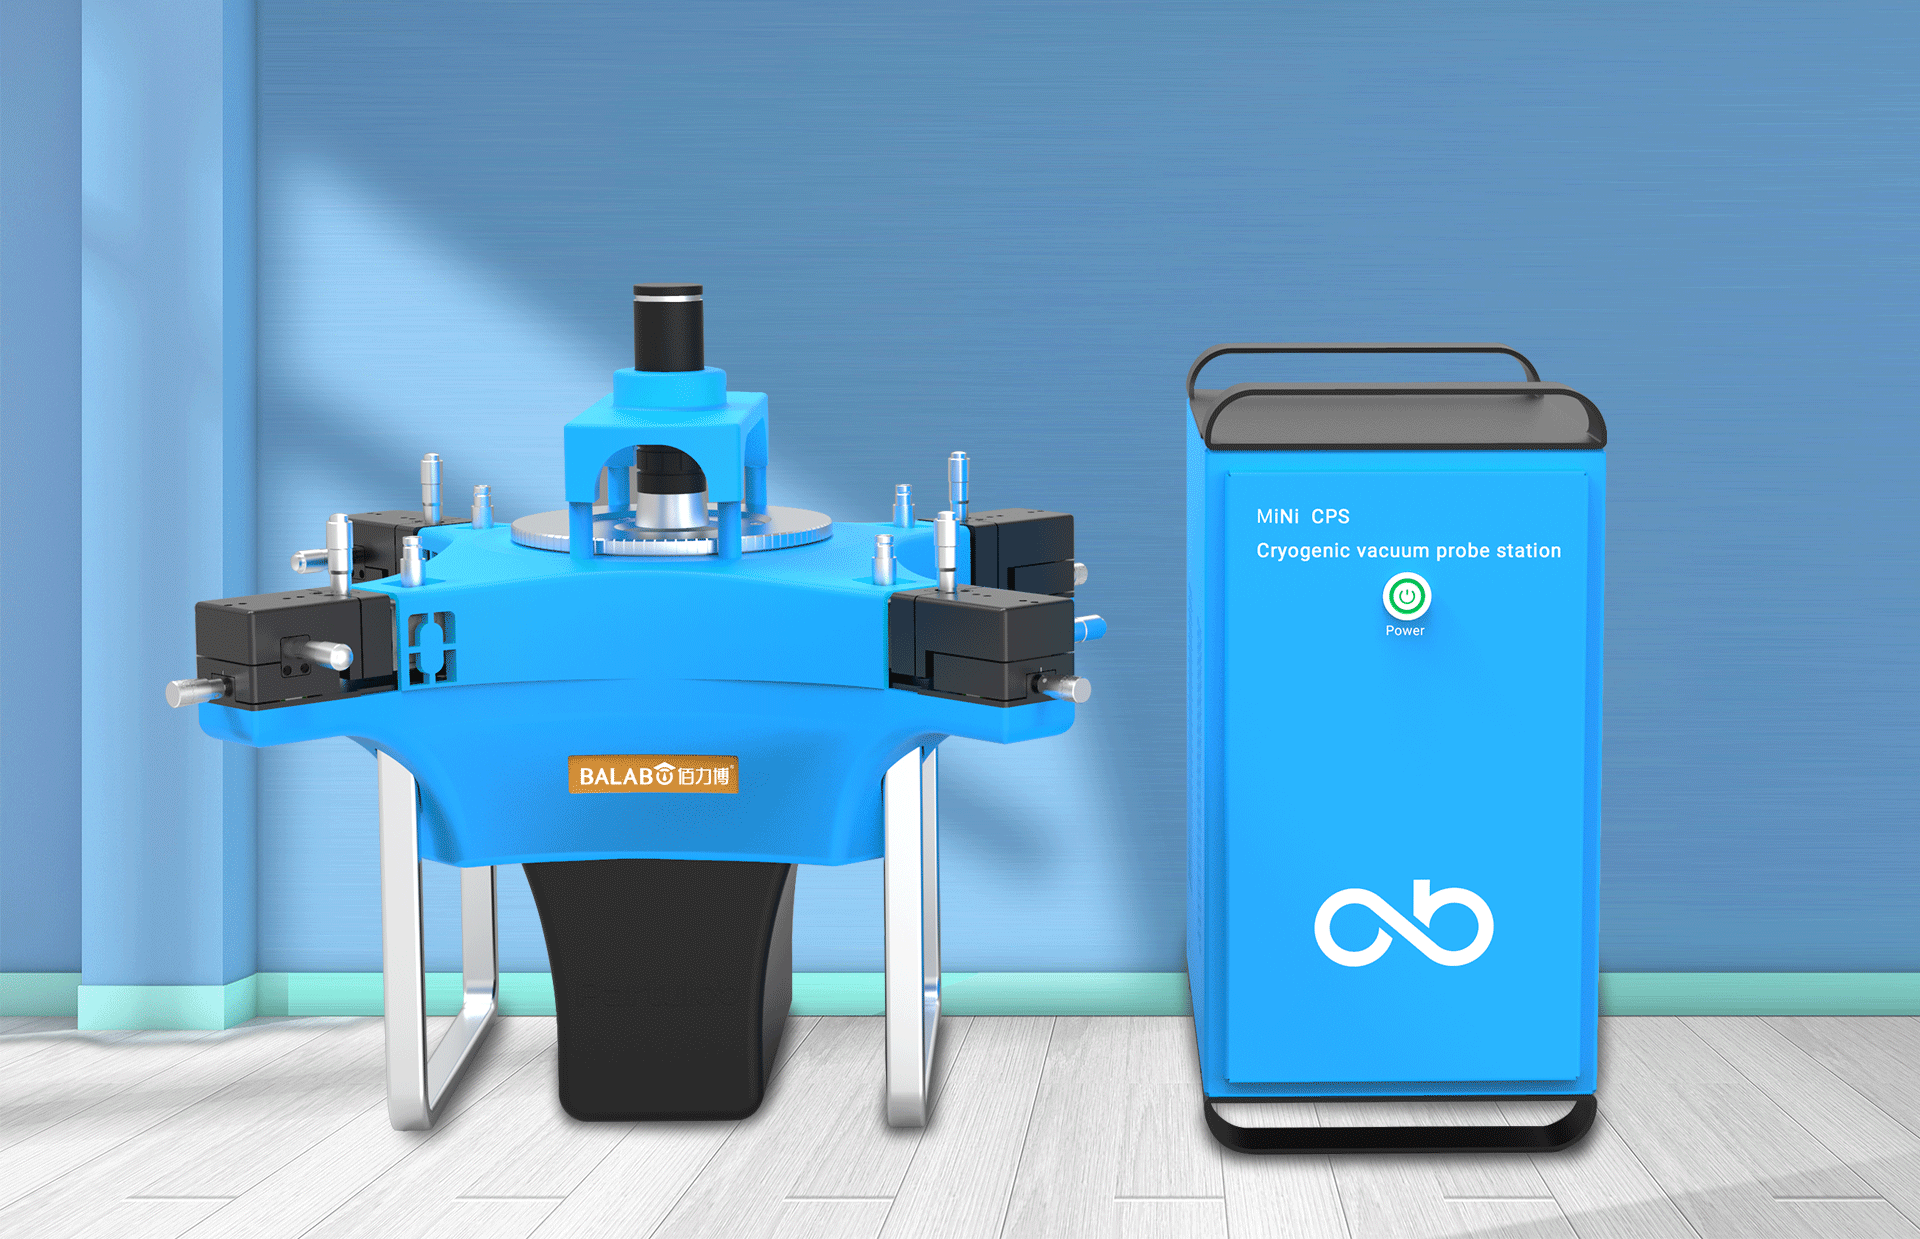
佰力博科技与您探讨热释电测量的几种方法
热释电的测量主要涉及热释电系数的测定,这是表征热释电材料性能的重要参数。热释电系数的测量方法主要包括静态法、动态法和积分电荷法。其中,积分电荷法最为常用,其原理是通过测量在电容器上积累的热释电电荷,从而确定热释电系数…...
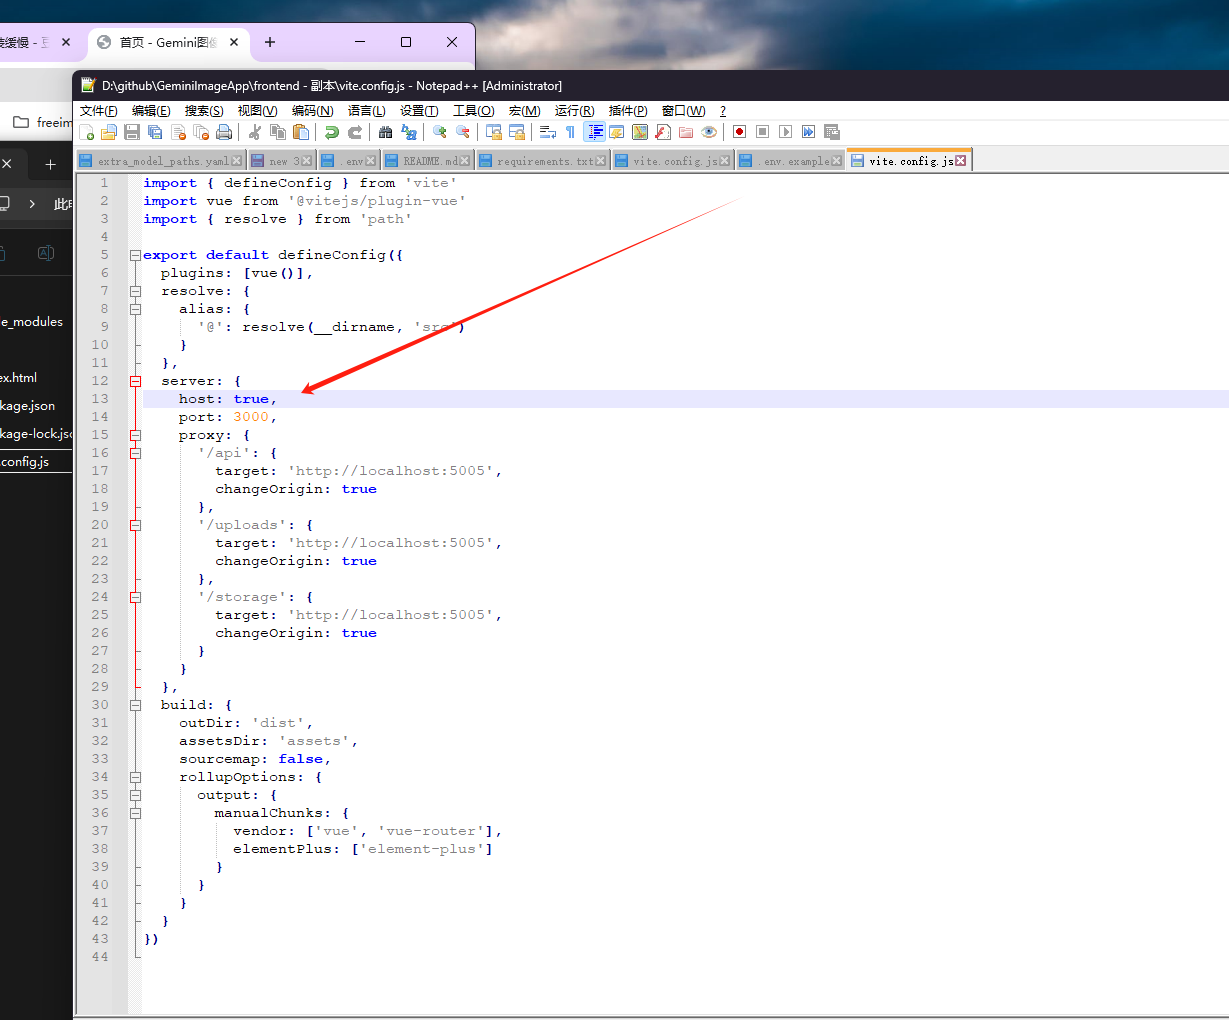
推荐 github 项目:GeminiImageApp(图片生成方向,可以做一定的素材)
推荐 github 项目:GeminiImageApp(图片生成方向,可以做一定的素材) 这个项目能干嘛? 使用 gemini 2.0 的 api 和 google 其他的 api 来做衍生处理 简化和优化了文生图和图生图的行为(我的最主要) 并且有一些目标检测和切割(我用不到) 视频和 imagefx 因为没 a…...
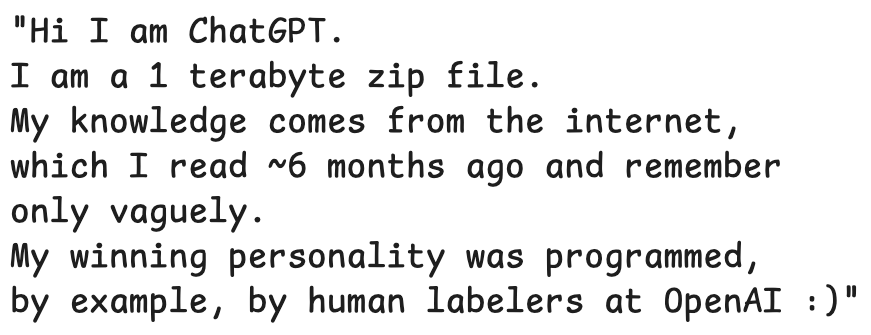
LLMs 系列实操科普(1)
写在前面: 本期内容我们继续 Andrej Karpathy 的《How I use LLMs》讲座内容,原视频时长 ~130 分钟,以实操演示主流的一些 LLMs 的使用,由于涉及到实操,实际上并不适合以文字整理,但还是决定尽量整理一份笔…...

Web后端基础(基础知识)
BS架构:Browser/Server,浏览器/服务器架构模式。客户端只需要浏览器,应用程序的逻辑和数据都存储在服务端。 优点:维护方便缺点:体验一般 CS架构:Client/Server,客户端/服务器架构模式。需要单独…...