如何通过自定义模块DIY出专属个性化的CSDN主页?一招教你搞定!

个人主页:学习前端的小z
个人专栏:HTML5和CSS3悦读
本专栏旨在分享记录每日学习的前端知识和学习笔记的归纳总结,欢迎大家在评论区交流讨论!

文章目录
- 💯如何通过HTML+CSS自定义模板diy出自己的个性化csdn主页?
- 🎲1 最终效果展示
- 🎲2 自定义模板介绍
- 🎁2.1 自定义模块入口
- 🎁2.2 自定义模块使用前置条件
- 🎁2.3 自定义模块使用限制
- 🎲3 实现效果所需的前置知识
- 🎲4 实现效果原理
- 🎲5 DIV系统自带CSS样式-应用CSS三大特性之特殊性
- 🎁5.1 如何DIV主页背景
- 🎁5.2 如何DIV主页头部背景,或者设置为透明
- 🎁5.3 如何DIV主题区域颜色
- 🎁5.4 如何DIY主页ID个性化样式
- 🎁5.5 如何DIV左部栏颜色
- 🎁5.6 如何DIV头部栏背景透明颜色
- 🎁5.7 如何DIV个人简介样式
- 🎁5.8 如何DIV主页文章展示字体
- 🎁5.9 如何DIV个人信息和文章数据展示效果
- 🎁5.10 如何DIV主页扩展信息
- 🎲6 如何制作背景透明的免抠图标
- 🎲7 如何DIV系统自带的认证图标
- 🎲8 在系统原有基础上DIV新标签增加页面内容-应用CSS定位
- 🎁8.1 如何给头像加上头像框(静态贴图)
- 🎁8.2 如何在主页最上方加段醒目的欢迎语
- 🎲5.10 如何DIV头部导航栏颜色?(补到第5点)
- 🎲9 注意事项
- 🎲10 小结

注意:该文章中出现的代码块都是可以复制粘贴进自定义模块直接使用的,样式是随着文章深入逐步累加的,本人亲测可以使用(●⁰౪⁰●)
💯如何通过HTML+CSS自定义模板diy出自己的个性化csdn主页?
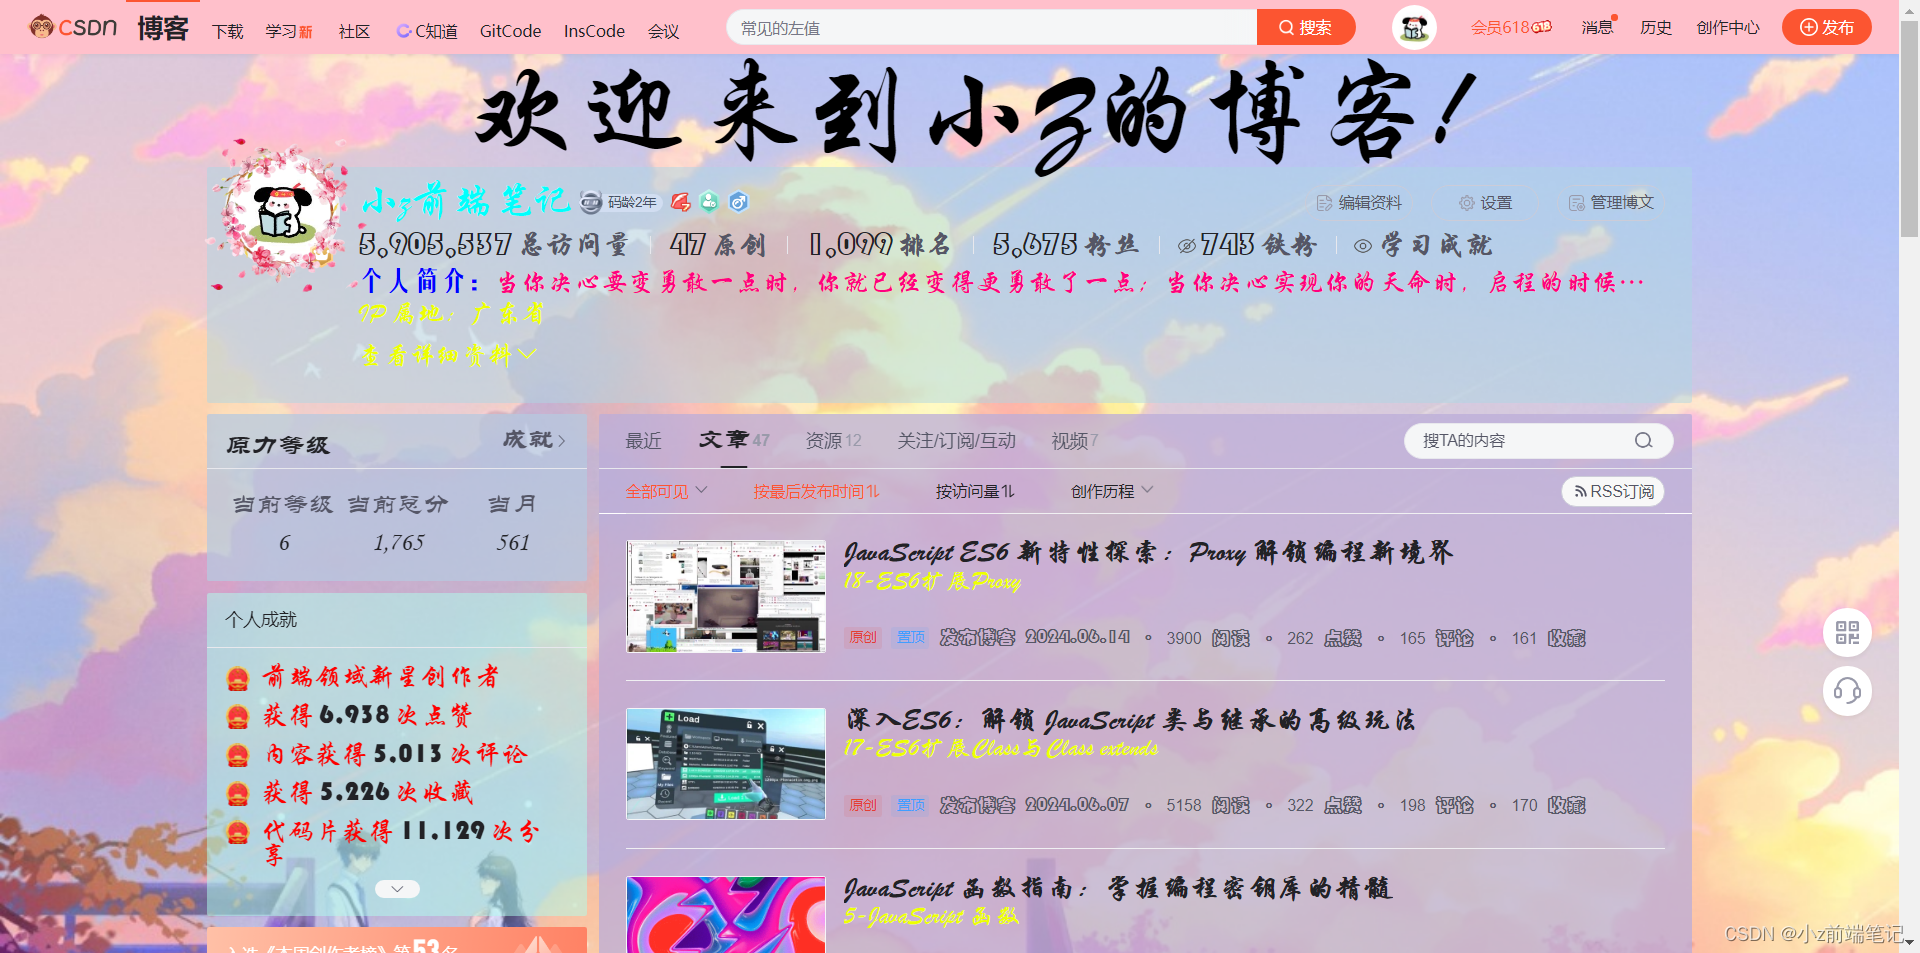
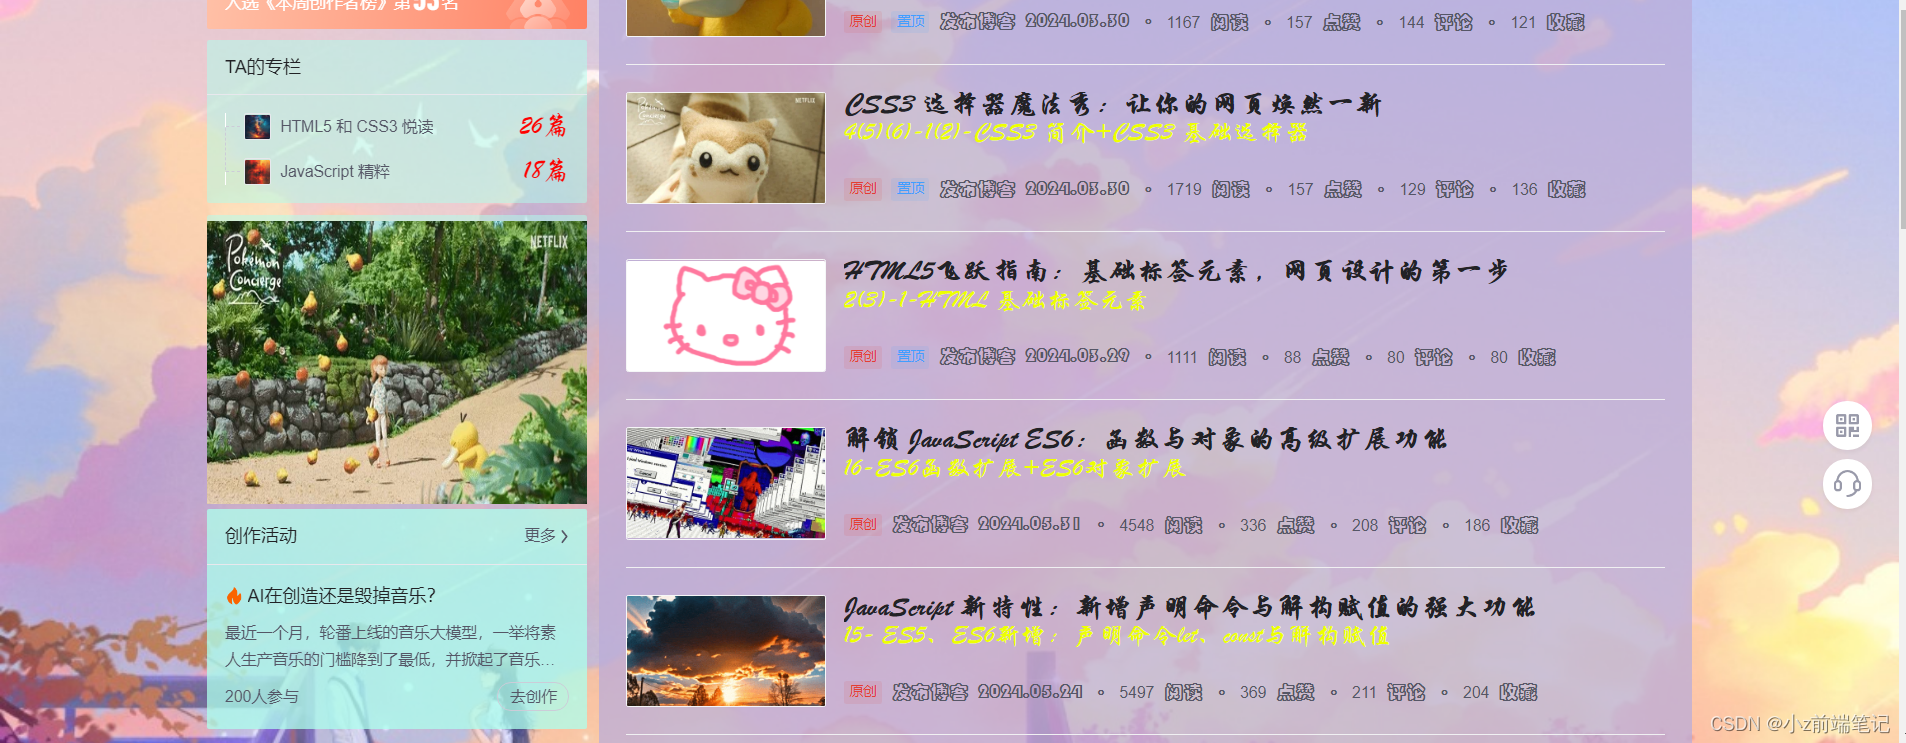
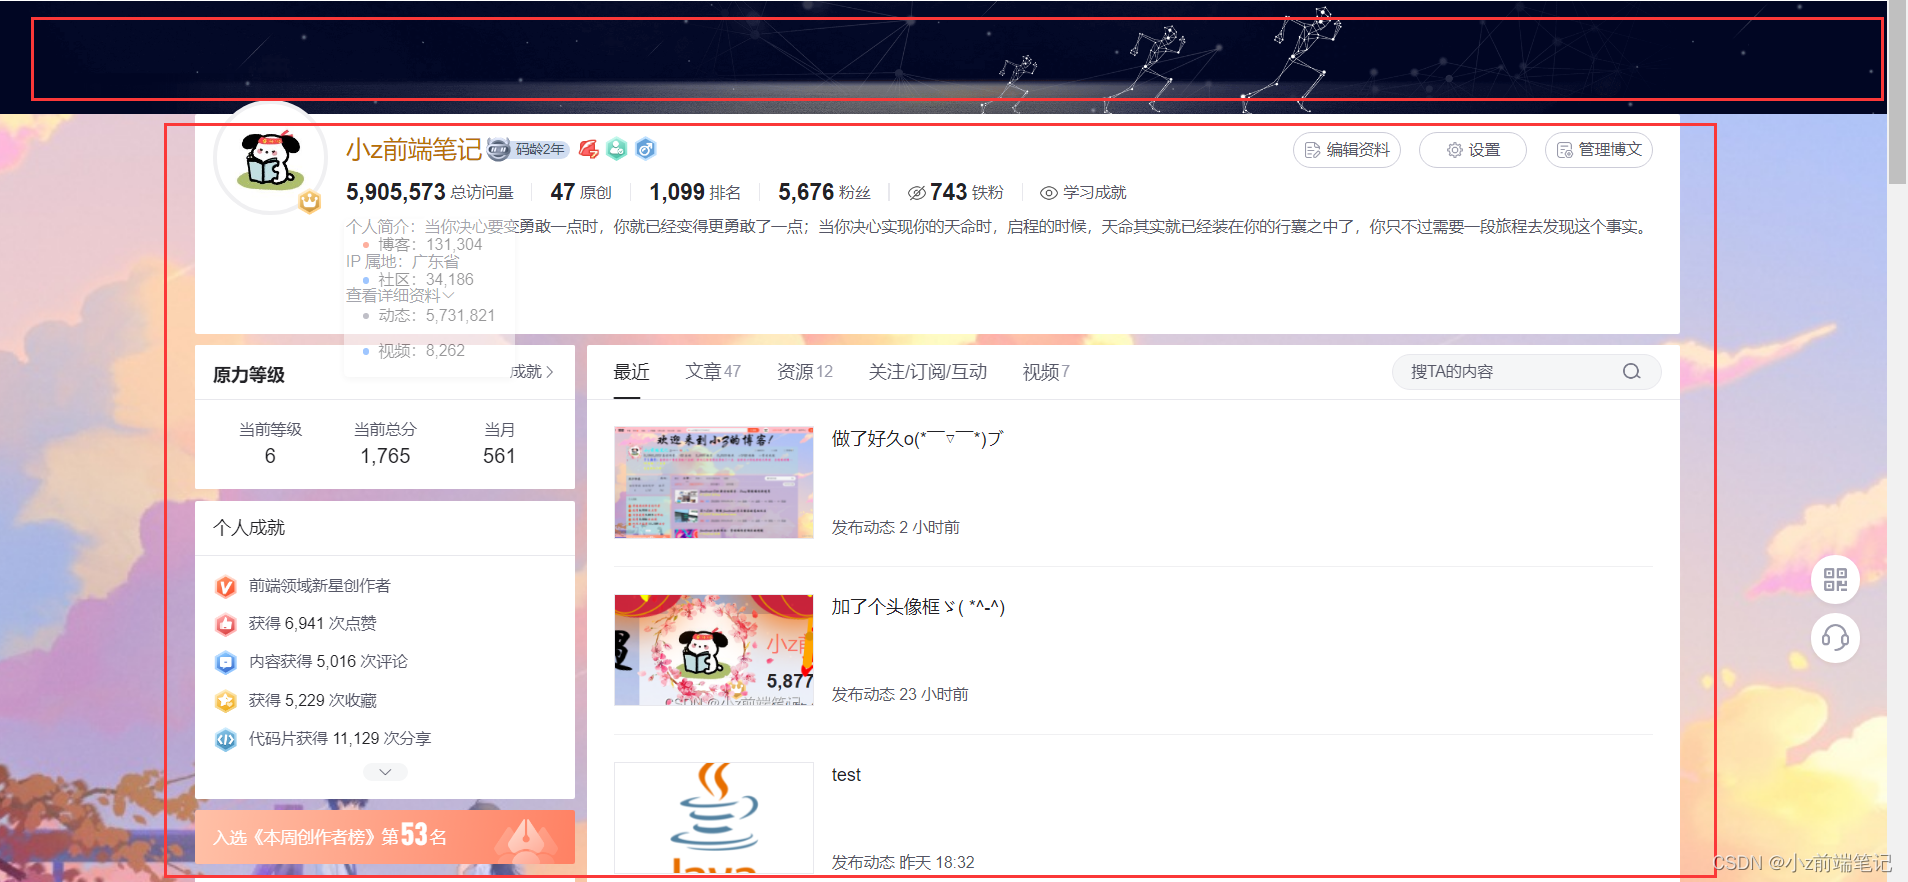
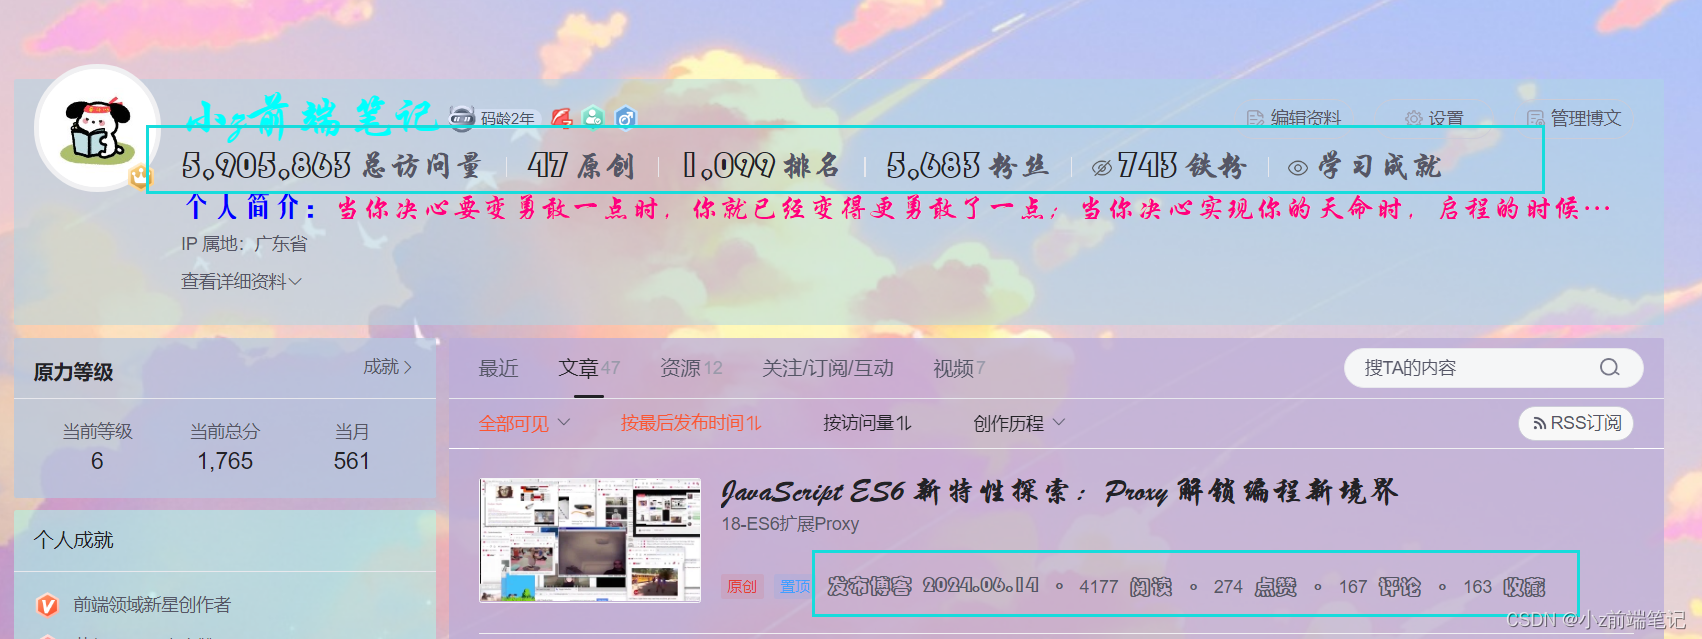
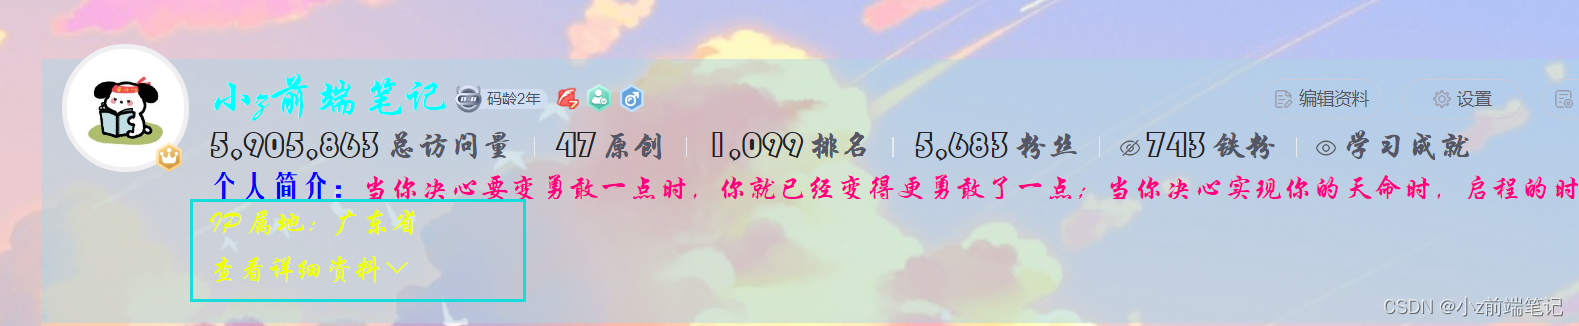
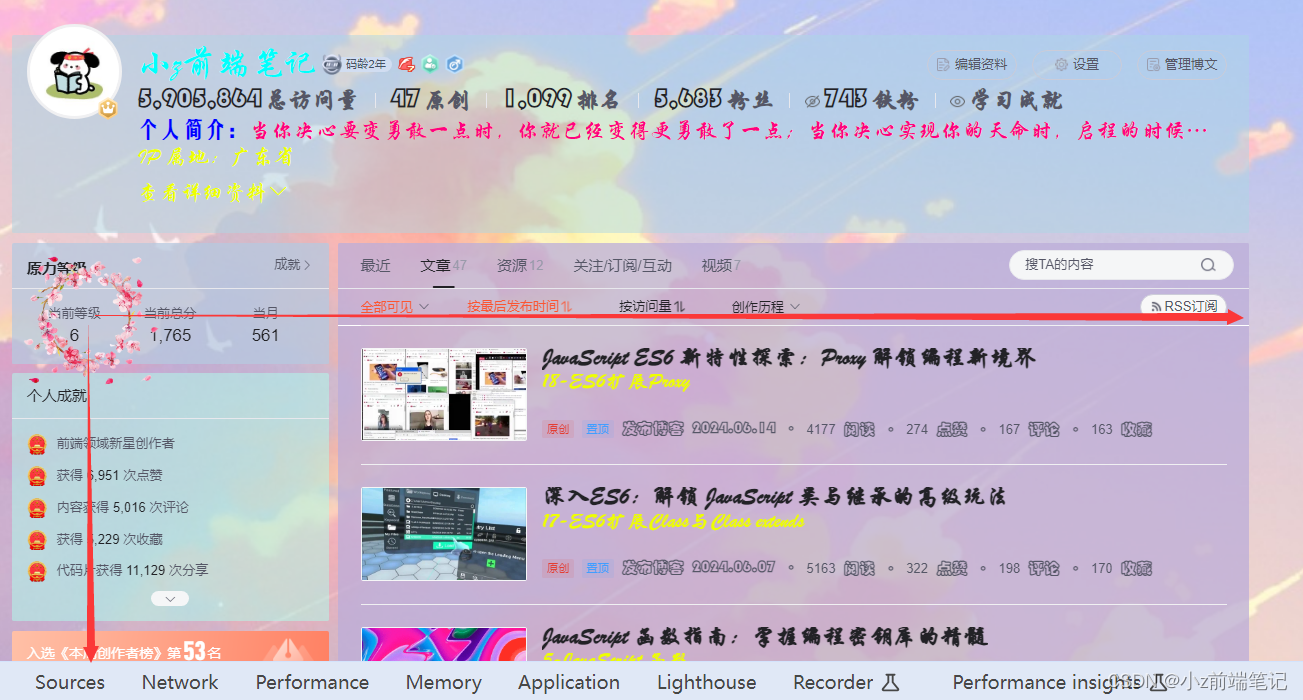
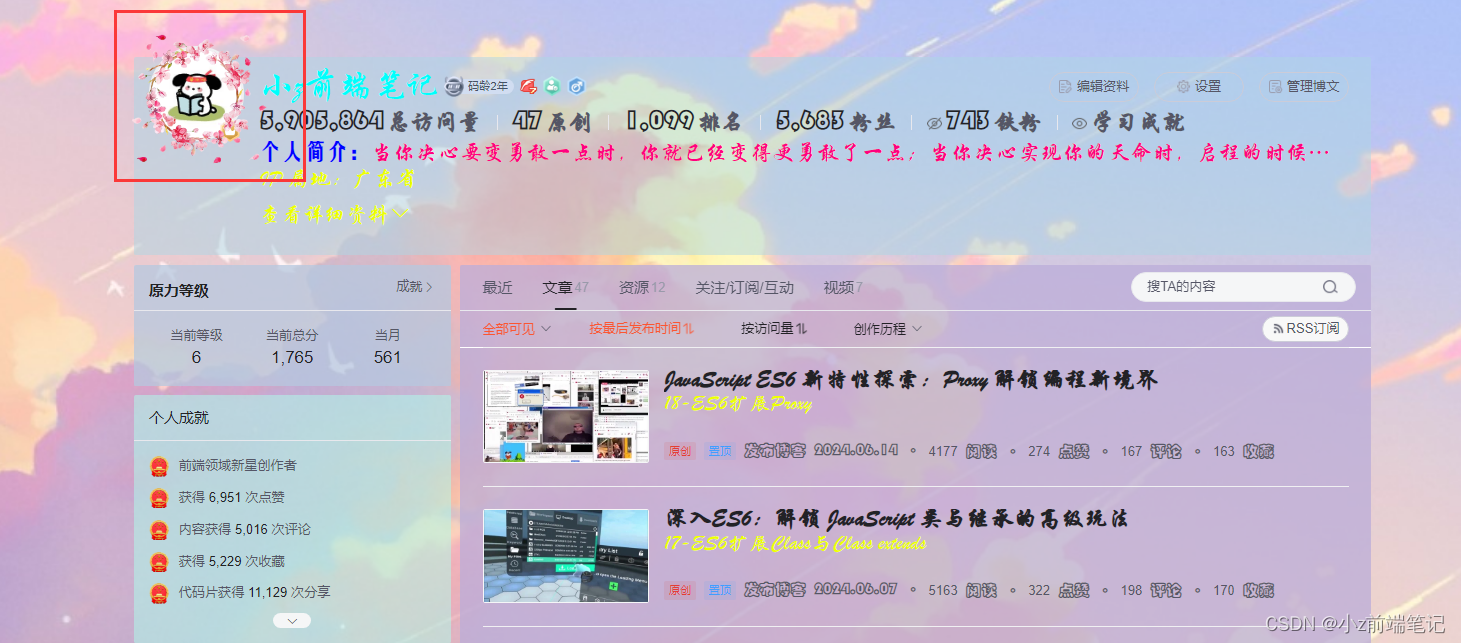
🎲1 最终效果展示
前提:必须是VIP、博客专家、企业博客才可在个人详情页显示!!!
发这个是为了分享好玩的功能(●⁰౪⁰●)(//●⁰౪⁰●)//
🎲2 自定义模板介绍
🎁2.1 自定义模块入口
1.首先从右上角个人头像找到内容管理进入。
>2.从左侧栏下滑找到自定义模块

🎁2.2 自定义模块使用前置条件
必须是VIP、博客专家、企业博客才可在个人详情页显示
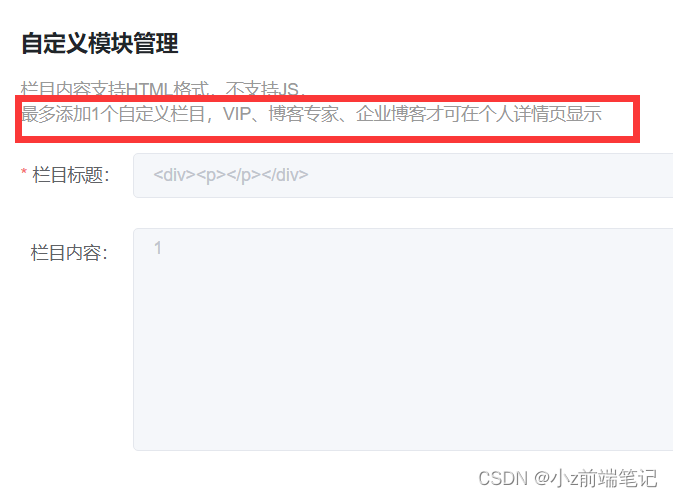
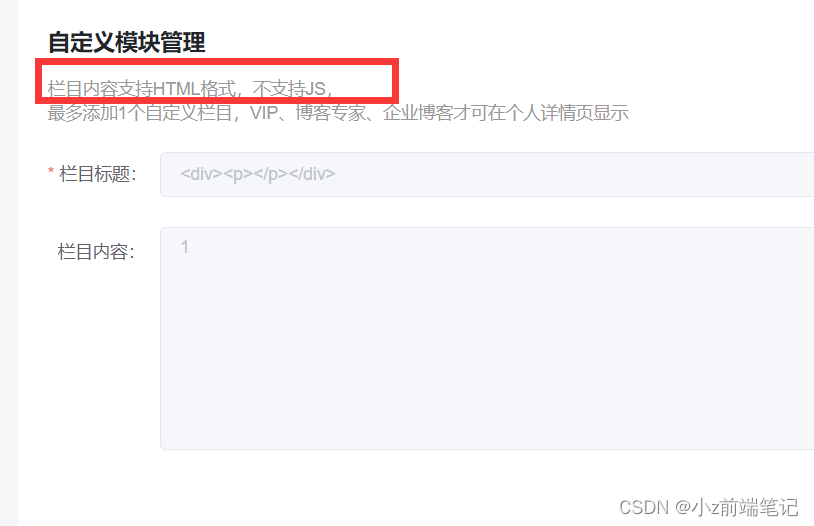
🎁2.3 自定义模块使用限制
只能使用基本的HTML格式,包括css样式,不能设置js,此外栏目内容长度也有限制。
🎲3 实现效果所需的前置知识
1.CSS选择器
2.CSS定位(绝对定位)
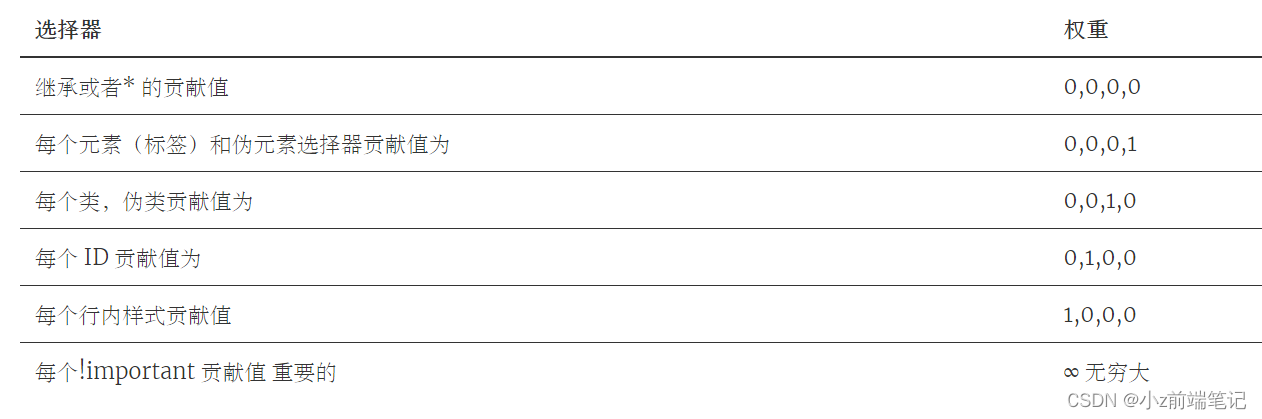
3.CSS三大特性(特殊性)
4.Chrom调试技巧(提高效率)
可以参考之前我发过的文章:
CSS3 选择器
CSS3 复合选择器
CSS3 定位
CSS3 三大特性+Chrome 调试代码技巧
🎲4 实现效果原理
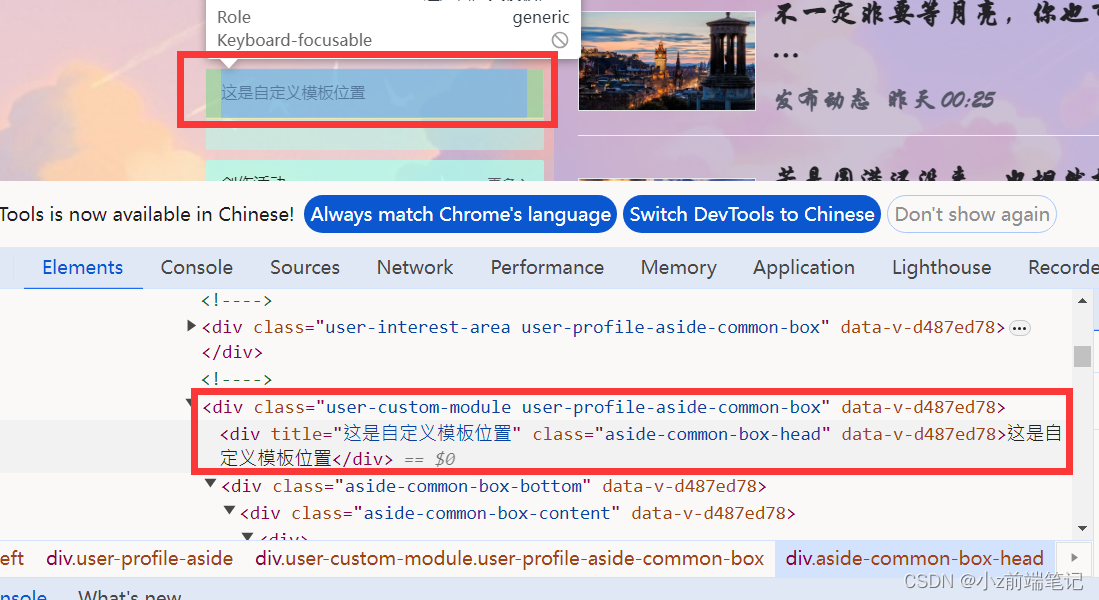
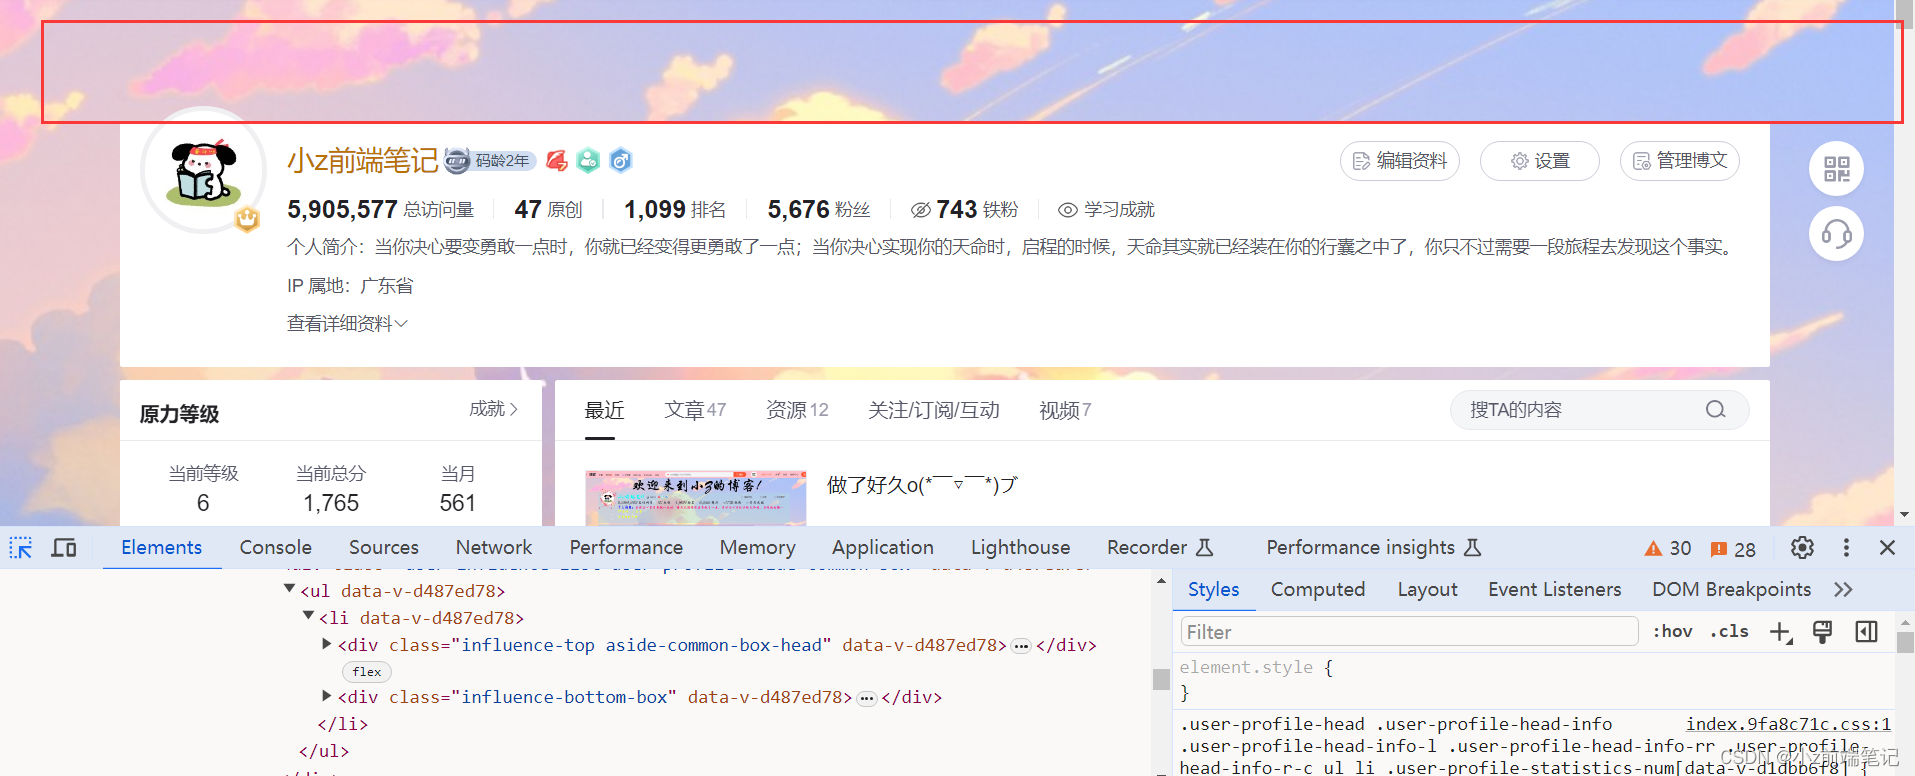
首先我们按F12打开调试工具到自定义模块的位置,可以看到自定义模块的内容实际是在一个
<div>盒子。我们可以在<div>中放入一些新的HTML标签写我们想要的样式,以及一个<style>标签存放我们所要用到的CSS样式。
但是最奇妙的点在于,这个通过自定义模块中插入csdn主页的<div>标签是在CSDN个人主页<body>标签中!!这就意味着我们或许可以在这个<div>盒子中设置的<style>标签中的同样可以影响到整个CSDN主页的CSS样式!
那我们来试试看!
1.找到系统自己设置的class类
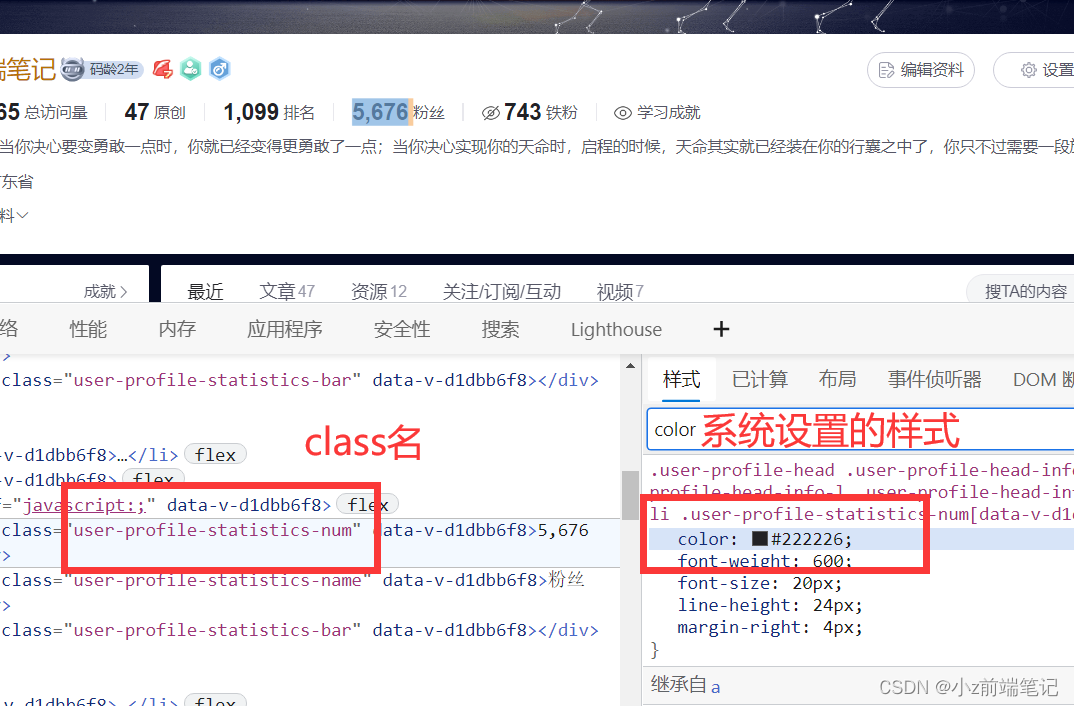
<div><style>.user-profile-statistics-num{color:red;}</style>
</div>
2.在自定义模块中写入
<style>标签并写和系统相同的类名,进行修改

不出意外的话,肯定没有实现成功≥Ö‿Ö≤,难道真的要放弃了吗?
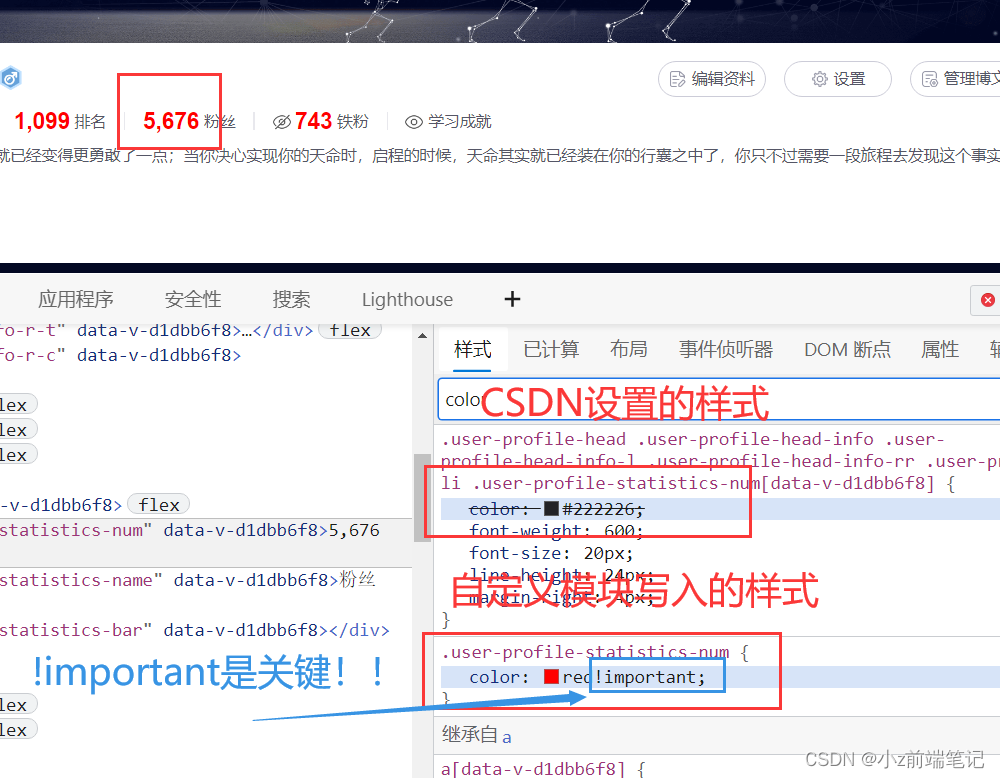
但是我们发现!在我们自定义模块中写入的<style>标签中的CSS属性确实在系统主页中出现了,只是因为选择器权重的问题被系统原有的样式覆盖了!等等,选择器权重?你肯定也想到了!
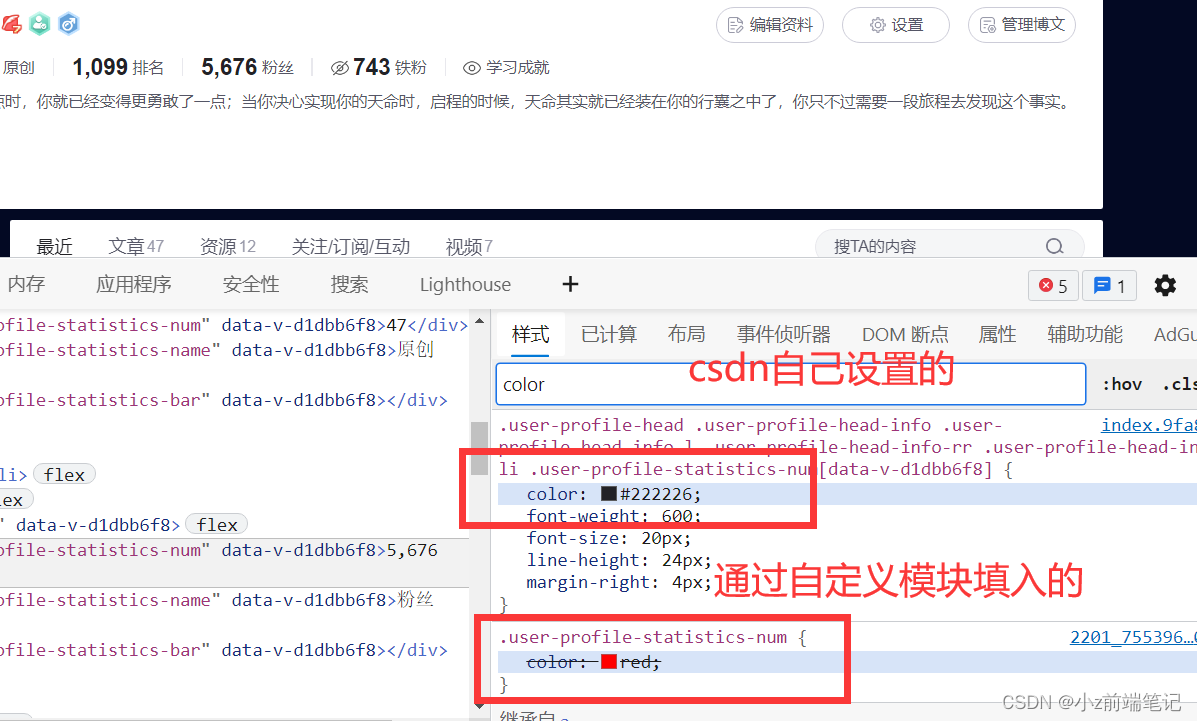
没错!!!只需再加一步我们的样式就可以在CSDN主页中显示!!(这是CSS3 三大特性中特殊性的内容)就是
!important这个属性,可以让选择器的权重无限大,从而强制生效其中的CSS样式!那么,我们需要在设置样式的末尾加上!important就可以让他强制生效!
那我们来试试看!在自定义模块中样式末尾加入!important
<div><style>.user-profile-statistics-num{color:red!important;}</style>
</div>

真的生效了!!,字体变成我们所设置的红色!我们设置的样式成功通过
!important覆盖了csdn原先设置的样式!
那么好玩的来了,我们只要可以知道CSDN中主页样式的选择器名,我们就可以通过自定义模块中设置<style>标签中定义与其同名的选择器,将CSDN同类名中原有样式进行覆盖,遇到权重低而不能生效的问题我们就可以通过!important使其强制覆盖CSDN原有类中的样式。
那么就意味着理论上我们可以通过自定义模板来修改CSDN主页中存在任何样式!!DIV一个专属于自己的独特的CSDN个人主页(‐^▽^‐)>。这也是CSDN设置这个模块的初衷吧!这就是程序员的浪漫吗☆*・゜゚・(O)/・゜゚・*☆゚・✿ヾ╲(。◕‿◕。)╱✿・゚\( ● ⌒ ∇ ⌒ ● )/
🎲5 DIV系统自带CSS样式-应用CSS三大特性之特殊性
接下来我将这两天所做主页样式经验和总结分享给大家!
开始前要先掌握以下三个我们将用到的知识点:
CSS3 选择器
CSS3 复合选择器
CSS3 定位
CSS3 三大特性+Chrome 调试代码技巧
注意:由于个人定义模板有字数限制,所以我打在代码块上都是紧凑的没有格式化的代码,防止超出字数!
🎁5.1 如何DIV主页背景
首先我们打开F12调试找到了主页背景图所在的位置,选择器名为#userSkin.skin-ai
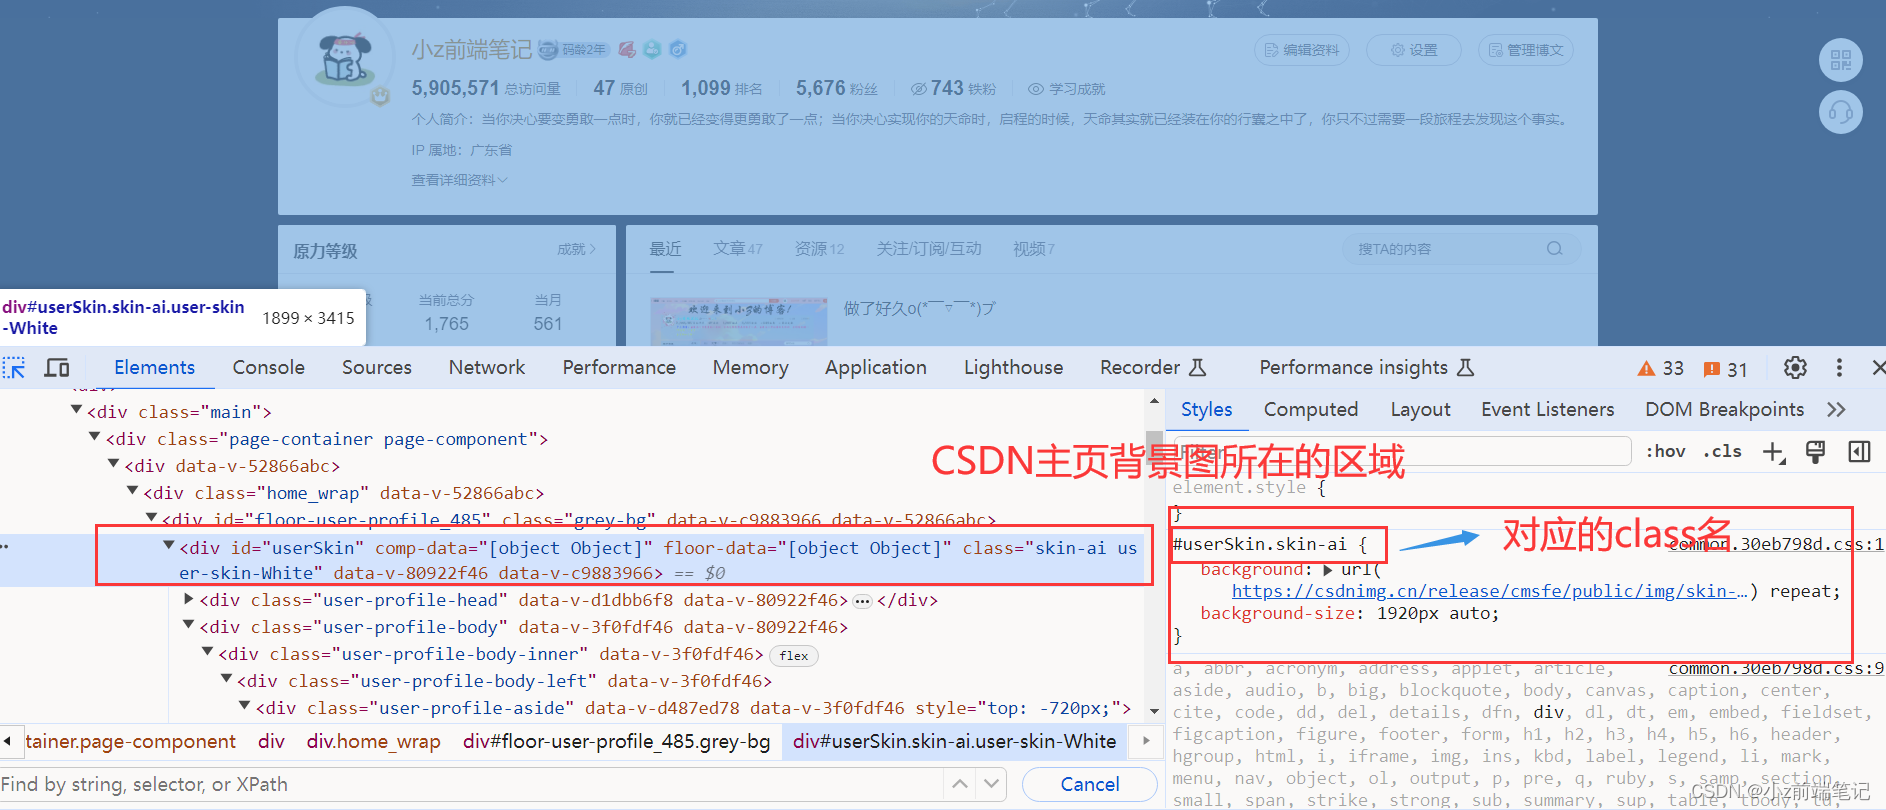
这时候我们可以在自定义模板中设置
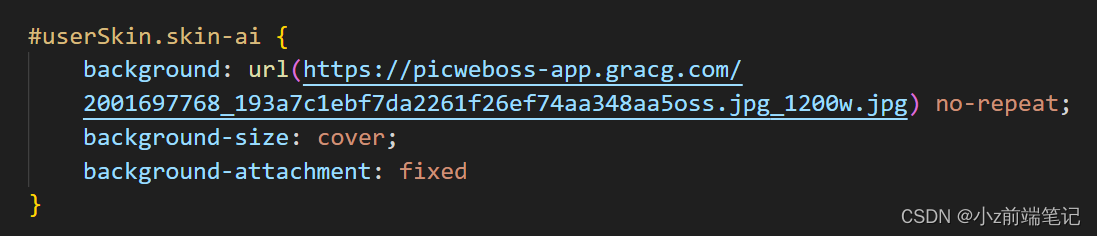
<div><style>#userSkin.skin-ai{background:url(https://picweboss-app.gracg.com/2001697768_193a7c1ebf7da2261f26ef74aa348aa5oss.jpg_1200w.jpg) no-repeat;background-size: cover;background-attachment: fixed}</style></div>
来解释一下代码
1.background: url(“https://picweboss-app.gracg.com/2001697768_193a7c1ebf7da2261f26ef74aa348aa5oss.jpg_1200w.jpg”) no-repeat;
这个是设置背景图片,no-repeat表示背景图片不会重复,即只显示一次。
2.background-size: cover;
表示完全覆盖内容区域,但背景图像的长宽比会保持不变。
3.background-attachment: fixed
表示背景图像是固定的,不会随着页面的滚动而移动。
这里权重足够,所以不用!important
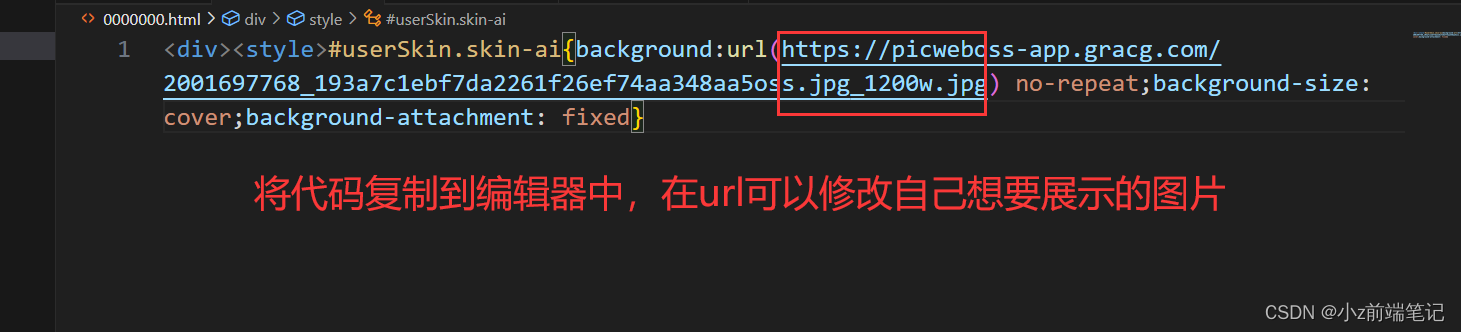
注意:选图尽量选择宽图。
url中可以填入自己所需要设置的背景图片
我们发现头部区域仍有图片,已经要如何将中心区域换成透明和自己喜欢的颜色呢?
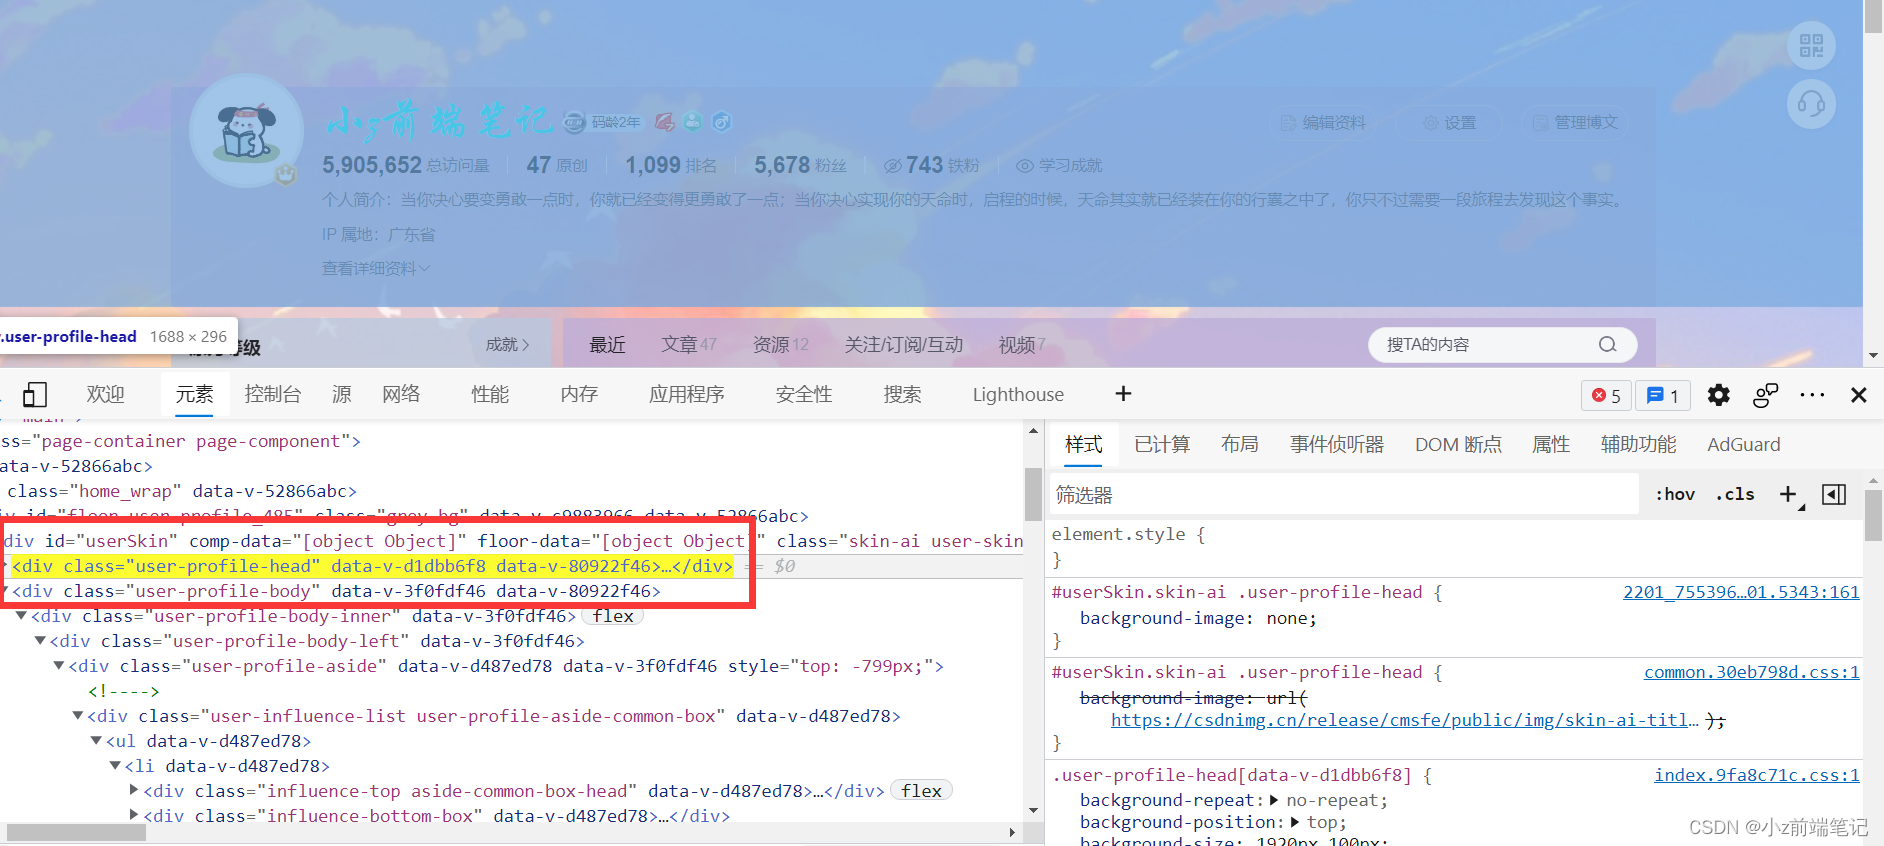
🎁5.2 如何DIV主页头部背景,或者设置为透明
首先我们打开F12调试找到了主页头部背景图所在的位置,选择器名为##userSkin.skin-ai .user-profile-headi
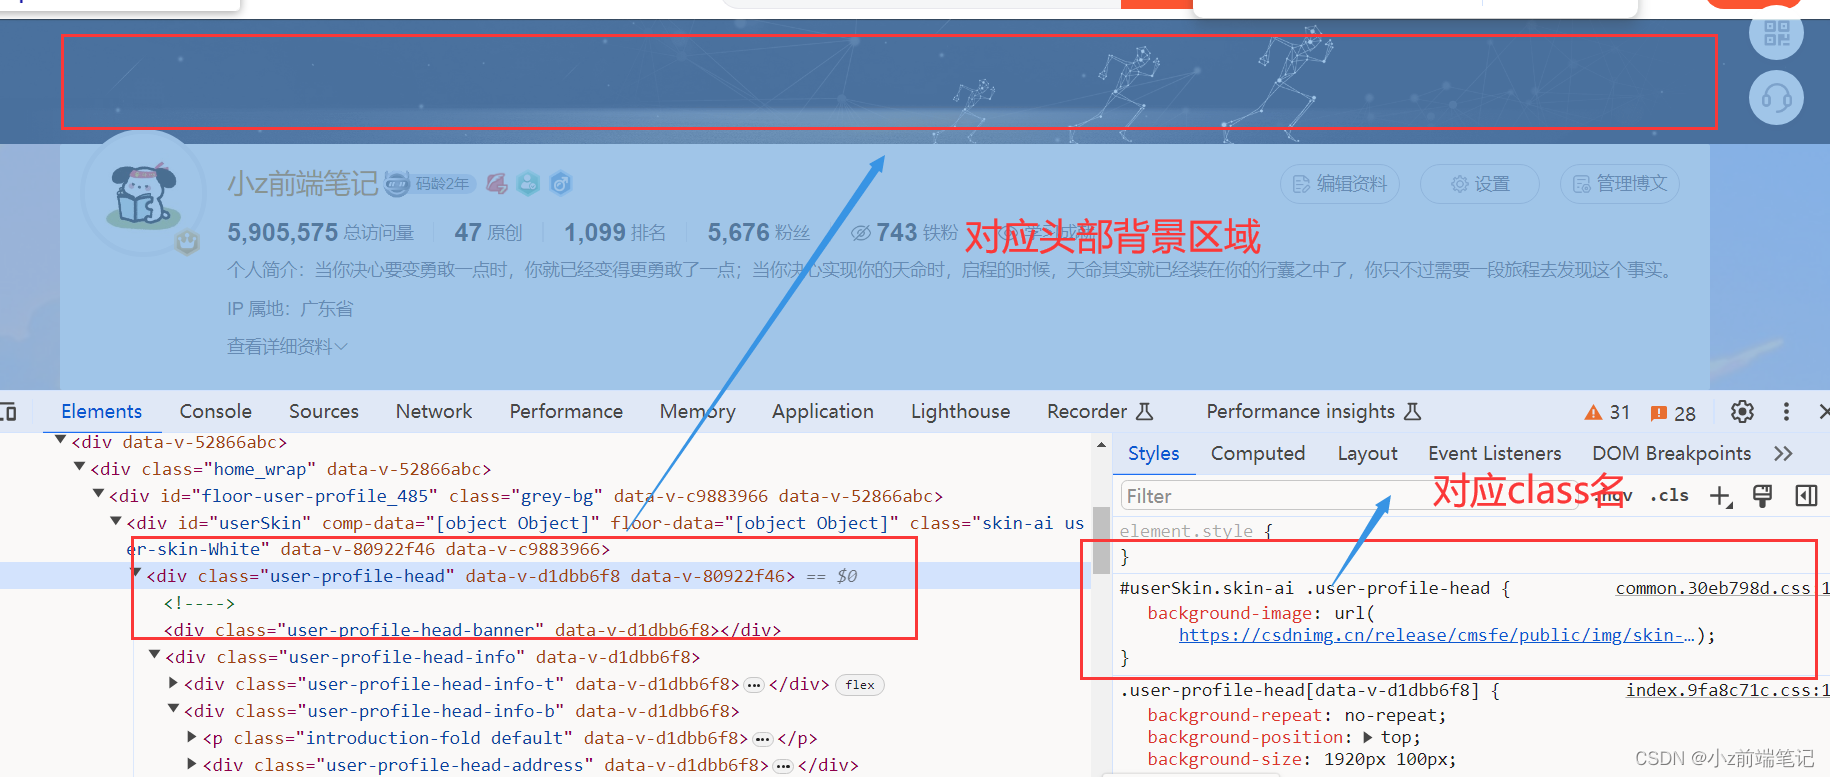
这时候我们可以在自定义模板中设置
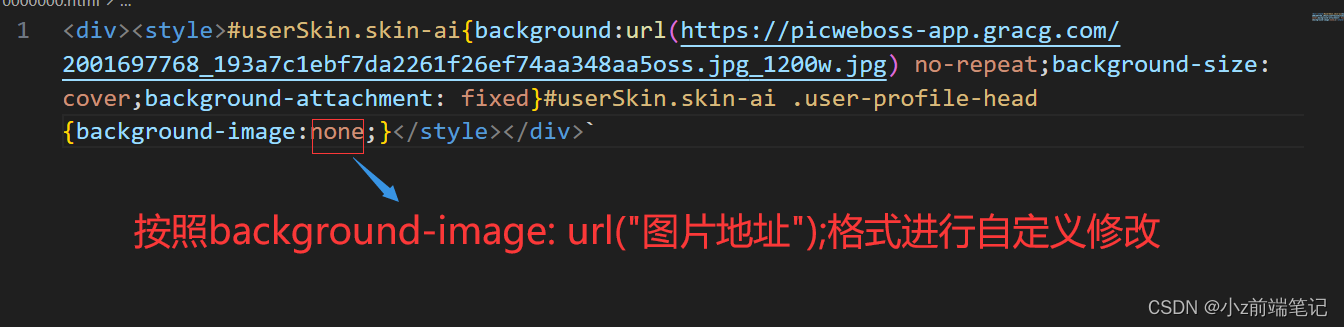
<div><style>#userSkin.skin-ai{background:url(https://picweboss-app.gracg.com/2001697768_193a7c1ebf7da2261f26ef74aa348aa5oss.jpg_1200w.jpg) no-repeat;background-size: cover;background-attachment: fixed}#userSkin.skin-ai .user-profile-head{background-image:none;}</style></div>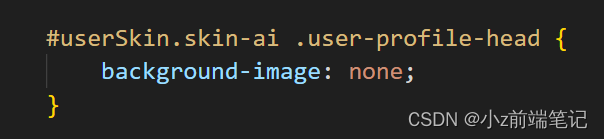
来解释一下代码
background-image: none;
这里background-image设置是none,意思是不要背景图片,这里权重足够,所以不用!important
当然你也可以设置
background-image: url(“图片地址”);
在url中填入自己需要设置成头部背景的图片
可以看到我们的头部区域以及清除啦!
🎁5.3 如何DIV主题区域颜色
\( ● ⌒ ∇ ⌒ ● )/
找到背景图所在选择器
#userSkin.skin-ai .user-profile-head{background-image:none;}.user-profile-aside .user-profile-aside-common-box,.blog_extension,.user-profile-aside .user-influence-list ul li,.user-profile-head .user-profile-head-info,.navList-box .navList,.navList-box .blog-second-list,.blog-list-box,.el-input__inner,.blink-list-box,.sub-people-list-box,.live-list-box,.resources-list-box,.answer-list-box,.navList-box .ask-second-list,.answer-list-box,.navList-box ,.sub-second-list
<div><style>#userSkin.skin-ai{background:url(https://picweboss-app.gracg.com/2001697768_193a7c1ebf7da2261f26ef74aa348aa5oss.jpg_1200w.jpg) no-repeat;background-size: cover;background-attachment: fixed}#userSkin.skin-ai .user-profile-head{background-image:none;}.user-profile-aside .user-profile-aside-common-box,.blog_extension,.user-profile-aside .user-influence-list ul li,.user-profile-head .user-profile-head-info,.navList-box .navList,.navList-box .blog-second-list,.blog-list-box,.el-input__inner,.blink-list-box,.sub-people-list-box,.live-list-box,.resources-list-box,.answer-list-box,.navList-box .ask-second-list,.answer-list-box,.navList-box ,.sub-second-list{background:rgba(187, 173, 217, 0.5) !important}</style></div>
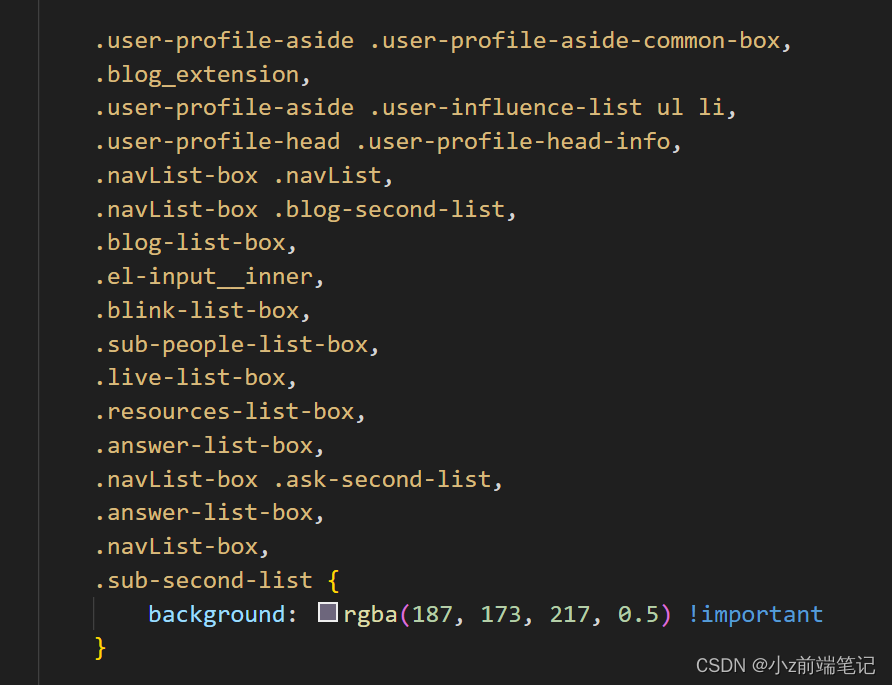
解释代码:background设置背景颜色,这里可以选择自己喜欢的颜色,这里权重不够,
!important是为了强制覆盖csdn原有的样式。
放入模板效果如下:
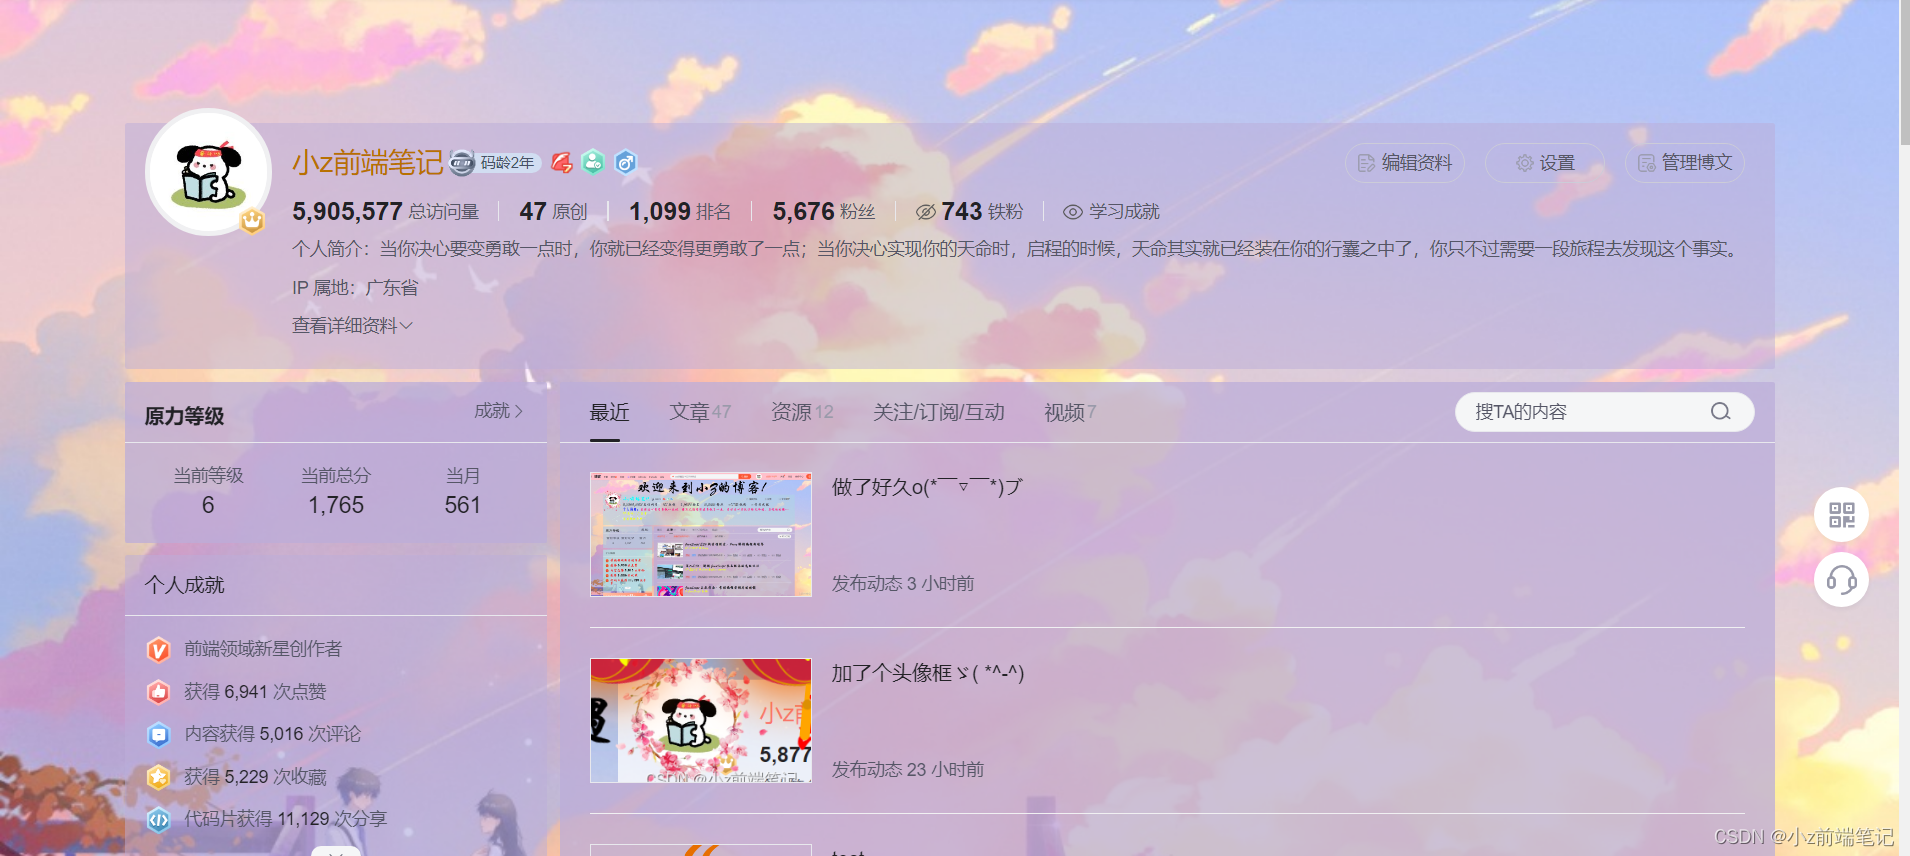
🎁5.4 如何DIY主页ID个性化样式
找到个人id所在选择器
.user-profile-head-name-vip
<div><style>#userSkin.skin-ai{background:url(https://picweboss-app.gracg.com/2001697768_193a7c1ebf7da2261f26ef74aa348aa5oss.jpg_1200w.jpg) no-repeat;background-size: cover;background-attachment: fixed}#userSkin.skin-ai .user-profile-head{background-image:none;}.user-profile-aside .user-profile-aside-common-box,.blog_extension,.user-profile-aside .user-influence-list ul li,.user-profile-head .user-profile-head-info,.navList-box .navList,.navList-box .blog-second-list,.blog-list-box,.el-input__inner,.blink-list-box,.sub-people-list-box,.live-list-box,.resources-list-box,.answer-list-box,.navList-box .ask-second-list,.answer-list-box,.navList-box ,.sub-second-list{background:rgba(187, 173, 217, 0.5) !important}.user-profile-head-name-vip[data-v-d1dbb6f8]{color:#00FFFD!important;font-family:华文行楷;font-size:1.8em}</style></div>
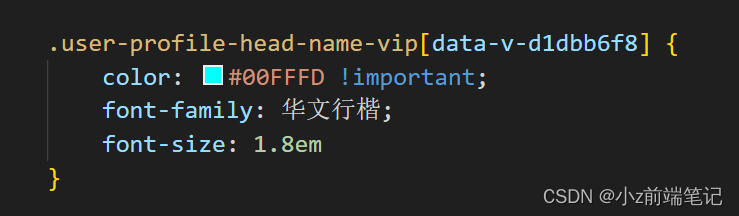
解释代码:
color是颜色;
font-family是字体;
font-size是字体大小;
这些都是可以自己变换的哦~
名字就有颜色啦

🎁5.5 如何DIV左部栏颜色
找到左部栏所在选择器
.navList-box .blog-second-list>ul>li .blog-time-filter .el-select .el-input .el-input__inner, .user-profile-aside .user-profile-aside-common-box
<div><style>#userSkin.skin-ai{background:url(https://picweboss-app.gracg.com/2001697768_193a7c1ebf7da2261f26ef74aa348aa5oss.jpg_1200w.jpg) no-repeat;background-size: cover;background-attachment: fixed}#userSkin.skin-ai .user-profile-head{background-image:none;}.user-profile-aside .user-profile-aside-common-box,.blog_extension,.user-profile-aside .user-influence-list ul li,.user-profile-head .user-profile-head-info,.navList-box .navList,.navList-box .blog-second-list,.blog-list-box,.el-input__inner,.blink-list-box,.sub-people-list-box,.live-list-box,.resources-list-box,.answer-list-box,.navList-box .ask-second-list,.answer-list-box,.navList-box ,.sub-second-list{background:rgba(187, 173, 217, 0.5) !important}.user-profile-head-name-vip[data-v-d1dbb6f8]{color:#00FFFD!important;font-family:华文行楷;font-size:1.8em}.navList-box .blog-second-list>ul>li .blog-time-filter .el-select .el-input .el-input__inner,.user-profile-aside .user-profile-aside-common-box{background: rgb(173, 255, 238, 0.5) !important}</style></div>

这里也是设置背景颜色,可以自己替换自己喜欢的
可以看到效果:
但是我们发现了不兼容的部分
找到对应的选择器:
#blogExtensionBox .blog_extension .navList-box .blog-second-list>ul>li .blog-time-filter .el-select .el-input .el-input__inner

更改代码:
<div><style>#userSkin.skin-ai{background:url(https://picweboss-app.gracg.com/2001697768_193a7c1ebf7da2261f26ef74aa348aa5oss.jpg_1200w.jpg) no-repeat;background-size: cover;background-attachment: fixed}#userSkin.skin-ai .user-profile-head{background-image:none;}.user-profile-aside .user-profile-aside-common-box,.blog_extension,.user-profile-aside .user-influence-list ul li,.user-profile-head .user-profile-head-info,.navList-box .navList,.navList-box .blog-second-list,.blog-list-box,.el-input__inner,.blink-list-box,.sub-people-list-box,.live-list-box,.resources-list-box,.answer-list-box,.navList-box .ask-second-list,.answer-list-box,.navList-box ,.sub-second-list{background:rgba(187, 173, 217, 0.5) !important}.user-profile-head-name-vip[data-v-d1dbb6f8]{color:#00FFFD!important;font-family:华文行楷;font-size:1.8em}.navList-box .blog-second-list>ul>li .blog-time-filter .el-select .el-input .el-input__inner,.user-profile-aside .user-profile-aside-common-box{background: rgb(173, 255, 238, 0.5) !important}#blogExtensionBox .blog_extension{background: #ffffff3b !important}.navList-box .blog-second-list>ul>li .blog-time-filter .el-select .el-input .el-input__inner{ background: #f9020200 !important}</style></div>
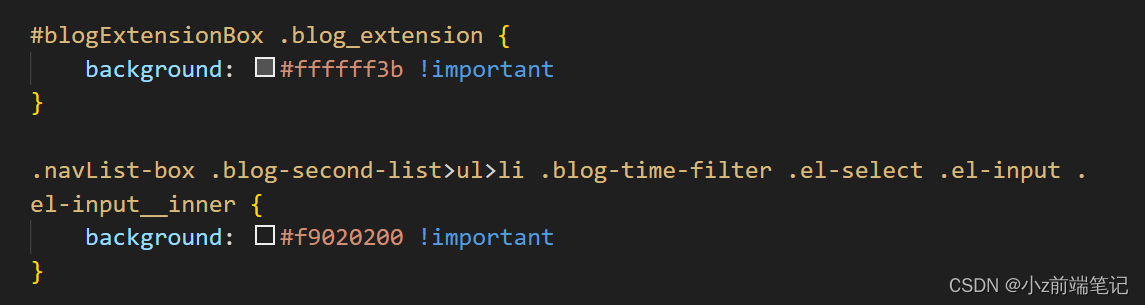
恢复正常啦

🎁5.6 如何DIV头部栏背景透明颜色
首先清空背景,确保设置颜色不会被影响
找到对应选择器:
#userSkin.skin-cookblue .user-profile-head
<div><style>#userSkin.skin-ai{background:url(https://picweboss-app.gracg.com/2001697768_193a7c1ebf7da2261f26ef74aa348aa5oss.jpg_1200w.jpg) no-repeat;background-size: cover;background-attachment: fixed}#userSkin.skin-ai .user-profile-head{background-image:none;}.user-profile-aside .user-profile-aside-common-box,.blog_extension,.user-profile-aside .user-influence-list ul li,.user-profile-head .user-profile-head-info,.navList-box .navList,.navList-box .blog-second-list,.blog-list-box,.el-input__inner,.blink-list-box,.sub-people-list-box,.live-list-box,.resources-list-box,.answer-list-box,.navList-box .ask-second-list,.answer-list-box,.navList-box ,.sub-second-list{background:rgba(187, 173, 217, 0.5) !important}.user-profile-head-name-vip[data-v-d1dbb6f8]{color:#00FFFD!important;font-family:华文行楷;font-size:1.8em}.navList-box .blog-second-list>ul>li .blog-time-filter .el-select .el-input .el-input__inner,.user-profile-aside .user-profile-aside-common-box{background: rgb(173, 255, 238, 0.5) !important}#blogExtensionBox .blog_extension{background: #ffffff3b !important}.navList-box .blog-second-list>ul>li .blog-time-filter .el-select .el-input .el-input__inner{ background: #f9020200 !important}#userSkin.skin-cookblue .user-profile-head{background:none;}</style></div>

将背景清空后,加入想要的背景色:
<div><style>#userSkin.skin-ai{background:url(https://picweboss-app.gracg.com/2001697768_193a7c1ebf7da2261f26ef74aa348aa5oss.jpg_1200w.jpg) no-repeat;background-size: cover;background-attachment: fixed}#userSkin.skin-ai .user-profile-head{background-image:none;}.user-profile-aside .user-profile-aside-common-box,.blog_extension,.user-profile-aside .user-influence-list ul li,.user-profile-head .user-profile-head-info,.navList-box .navList,.navList-box .blog-second-list,.blog-list-box,.el-input__inner,.blink-list-box,.sub-people-list-box,.live-list-box,.resources-list-box,.answer-list-box,.navList-box .ask-second-list,.answer-list-box,.navList-box ,.sub-second-list{background:rgba(187, 173, 217, 0.5) !important}.user-profile-head-name-vip[data-v-d1dbb6f8]{color:#00FFFD!important;font-family:华文行楷;font-size:1.8em}.navList-box .blog-second-list>ul>li .blog-time-filter .el-select .el-input .el-input__inner,.user-profile-aside .user-profile-aside-common-box{background: rgb(173, 255, 238, 0.5) !important}#blogExtensionBox .blog_extension{background: #ffffff3b !important}.navList-box .blog-second-list>ul>li .blog-time-filter .el-select .el-input .el-input__inner{ background: #f9020200 !important}#userSkin.skin-cookblue .user-profile-head{background:none;}#userSkin .user-profile-head .user-profile-head-info{ background: rgba(173, 216, 230, 0.5)!important}</style></div>

头部栏透明颜色设置好啦,也可以根据自己喜好更改颜色~
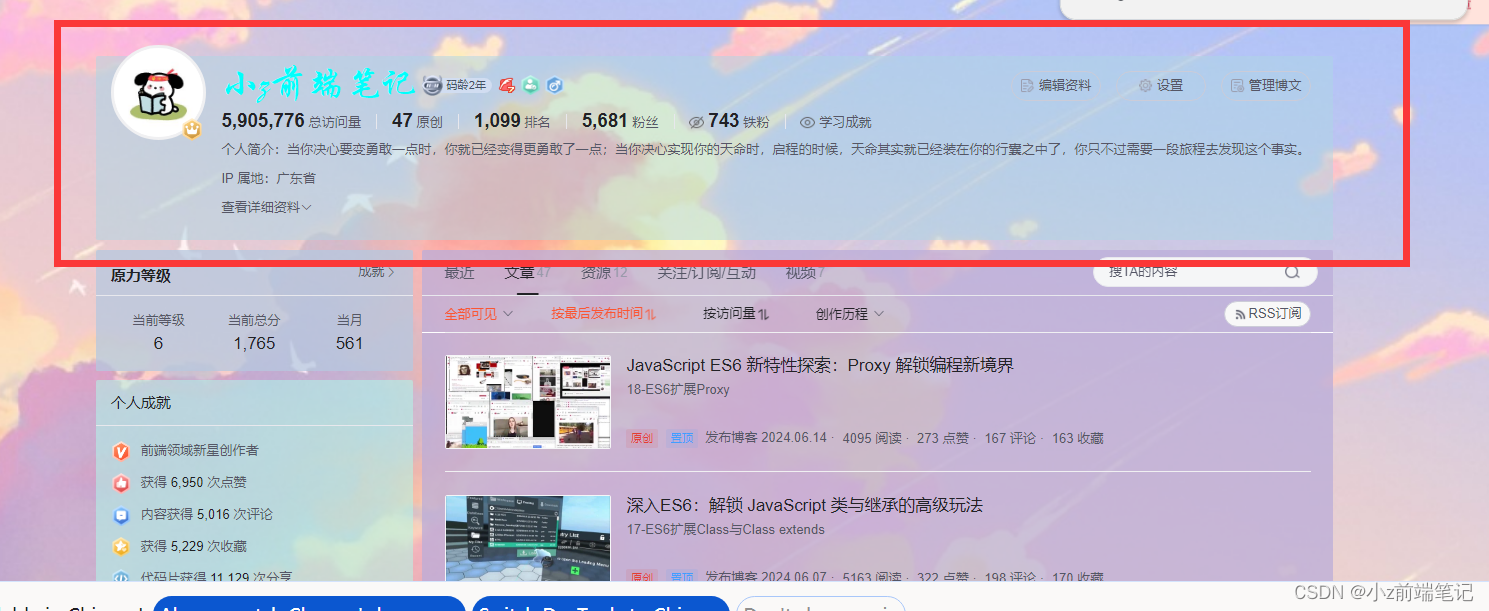
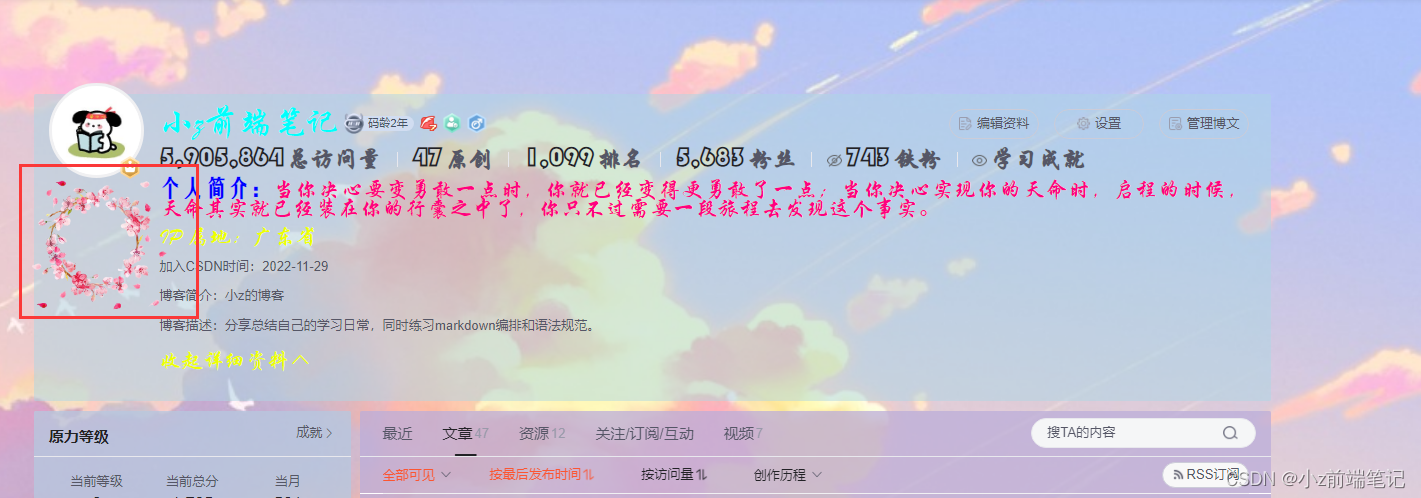
🎁5.7 如何DIV个人简介样式
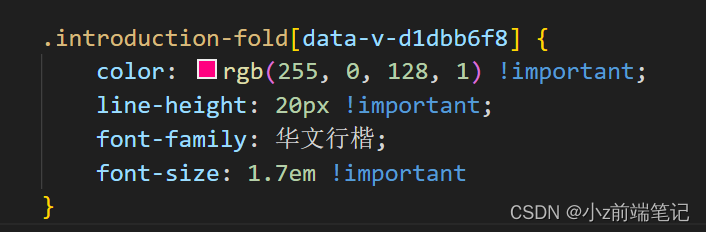
找到对应的选择器:.introduction-fold[data-v-d1dbb6f8]
<div><style>#userSkin.skin-ai{background:url(https://picweboss-app.gracg.com/2001697768_193a7c1ebf7da2261f26ef74aa348aa5oss.jpg_1200w.jpg) no-repeat;background-size: cover;background-attachment: fixed}#userSkin.skin-ai .user-profile-head{background-image:none;}.user-profile-aside .user-profile-aside-common-box,.blog_extension,.user-profile-aside .user-influence-list ul li,.user-profile-head .user-profile-head-info,.navList-box .navList,.navList-box .blog-second-list,.blog-list-box,.el-input__inner,.blink-list-box,.sub-people-list-box,.live-list-box,.resources-list-box,.answer-list-box,.navList-box .ask-second-list,.answer-list-box,.navList-box ,.sub-second-list{background:rgba(187, 173, 217, 0.5) !important}.user-profile-head-name-vip[data-v-d1dbb6f8]{color:#00FFFD!important;font-family:华文行楷;font-size:1.8em}.navList-box .blog-second-list>ul>li .blog-time-filter .el-select .el-input .el-input__inner,.user-profile-aside .user-profile-aside-common-box{background: rgb(173, 255, 238, 0.5) !important}#blogExtensionBox .blog_extension{background: #ffffff3b !important}.navList-box .blog-second-list>ul>li .blog-time-filter .el-select .el-input .el-input__inner{ background: #f9020200 !important}#userSkin.skin-cookblue .user-profile-head{background:none;}#userSkin .user-profile-head .user-profile-head-info{ background: rgba(173, 216, 230, 0.5)!important}.introduction-fold[data-v-d1dbb6f8]{color:rgb(255, 0, 128, 1)!important;line-height: 20px!important;font-family:华文行楷;font-size:1.7em!important}</style></div>
uu可以根据自己的喜好更改样式~
效果如下:

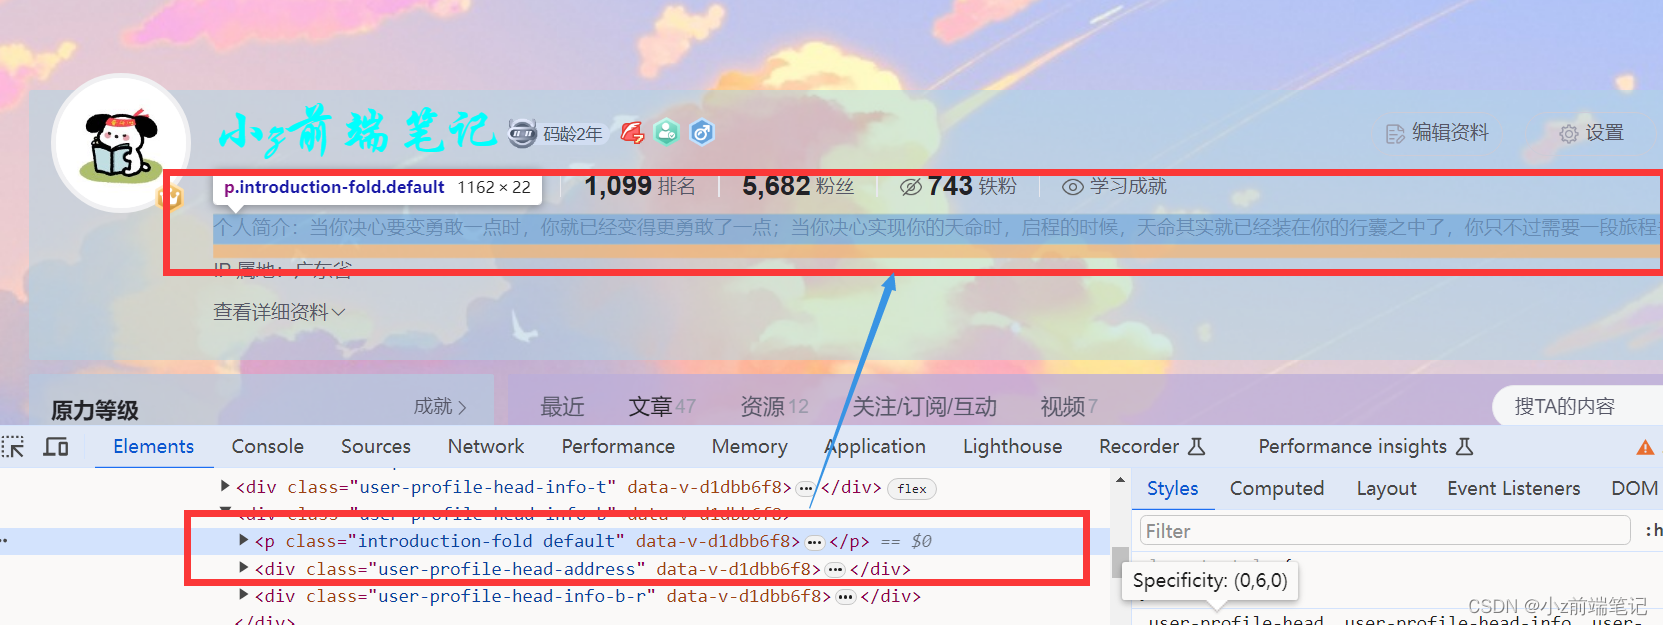
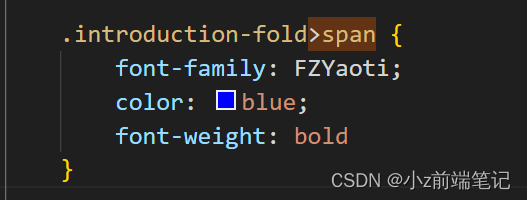
我们发现个人简介这四个字样式没变,我们继续找对应的选择器
但是这个好像没有选择器,只是一个<span>标签,那我们在浏览器里修改一下看看!important可不可以,
什么?!important也不行,我想应该是继承的关系,不知道有没有大佬可以解释一下
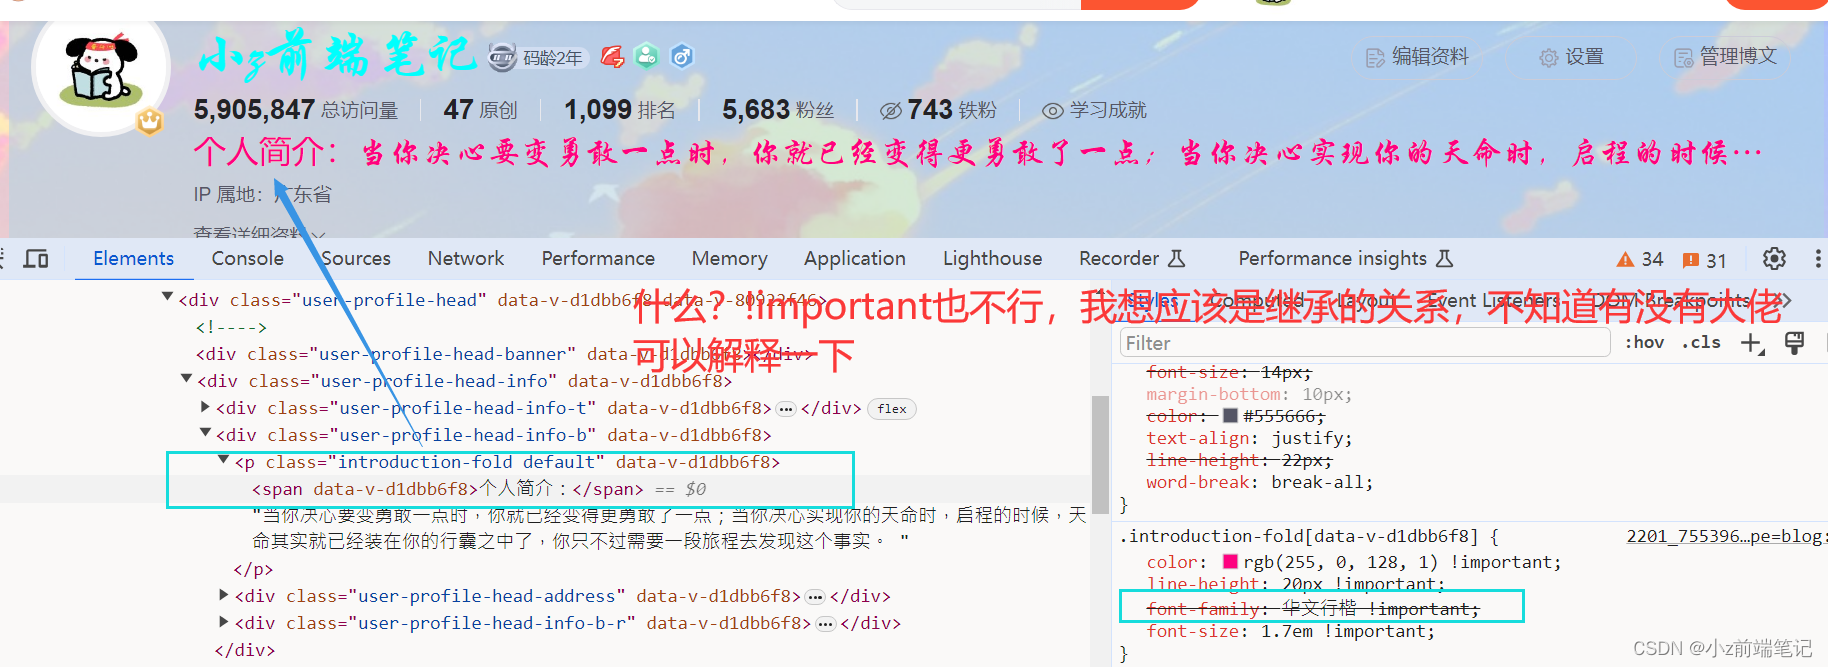
那我们就用后代选择器试试可不可以
<div><style>#userSkin.skin-ai{background:url(https://picweboss-app.gracg.com/2001697768_193a7c1ebf7da2261f26ef74aa348aa5oss.jpg_1200w.jpg) no-repeat;background-size: cover;background-attachment: fixed}#userSkin.skin-ai .user-profile-head{background-image:none;}.user-profile-aside .user-profile-aside-common-box,.blog_extension,.user-profile-aside .user-influence-list ul li,.user-profile-head .user-profile-head-info,.navList-box .navList,.navList-box .blog-second-list,.blog-list-box,.el-input__inner,.blink-list-box,.sub-people-list-box,.live-list-box,.resources-list-box,.answer-list-box,.navList-box .ask-second-list,.answer-list-box,.navList-box ,.sub-second-list{background:rgba(187, 173, 217, 0.5) !important}.user-profile-head-name-vip[data-v-d1dbb6f8]{color:#00FFFD!important;font-family:华文行楷;font-size:1.8em}.navList-box .blog-second-list>ul>li .blog-time-filter .el-select .el-input .el-input__inner,.user-profile-aside .user-profile-aside-common-box{background: rgb(173, 255, 238, 0.5) !important}#blogExtensionBox .blog_extension{background: #ffffff3b !important}.navList-box .blog-second-list>ul>li .blog-time-filter .el-select .el-input .el-input__inner{ background: #f9020200 !important}#userSkin.skin-cookblue .user-profile-head{background:none;}#userSkin .user-profile-head .user-profile-head-info{ background: rgba(173, 216, 230, 0.5)!important}.introduction-fold[data-v-d1dbb6f8]{color:rgb(255, 0, 128, 1)!important;line-height: 20px!important;font-family:华文行楷;font-size:1.7em!important}.introduction-fold>span{font-family:FZYaoti;color:blue;font-weight: bold}</style></div>
成功啦o͡͡͡͡͡͡͡͡͡͡͡͡͡͡╮(^ ਊ ^)╭o͡͡͡͡͡͡͡͡͡͡͡͡͡͡

🎁5.8 如何DIV主页文章展示字体
找到对应选择器:
p[data-v-46274ba1],h4[data-v-6fe2b6a7], .blink-list-bottom, .user-profile-statistics-name

<div><style>#userSkin.skin-ai{background:url(https://picweboss-app.gracg.com/2001697768_193a7c1ebf7da2261f26ef74aa348aa5oss.jpg_1200w.jpg) no-repeat;background-size: cover;background-attachment: fixed}#userSkin.skin-ai .user-profile-head{background-image:none;}.user-profile-aside .user-profile-aside-common-box,.blog_extension,.user-profile-aside .user-influence-list ul li,.user-profile-head .user-profile-head-info,.navList-box .navList,.navList-box .blog-second-list,.blog-list-box,.el-input__inner,.blink-list-box,.sub-people-list-box,.live-list-box,.resources-list-box,.answer-list-box,.navList-box .ask-second-list,.answer-list-box,.navList-box ,.sub-second-list{background:rgba(187, 173, 217, 0.5) !important}.user-profile-head-name-vip[data-v-d1dbb6f8]{color:#00FFFD!important;font-family:华文行楷;font-size:1.8em}.navList-box .blog-second-list>ul>li .blog-time-filter .el-select .el-input .el-input__inner,.user-profile-aside .user-profile-aside-common-box{background: rgb(173, 255, 238, 0.5) !important}#blogExtensionBox .blog_extension{background: #ffffff3b !important}.navList-box .blog-second-list>ul>li .blog-time-filter .el-select .el-input .el-input__inner{ background: #f9020200 !important}#userSkin.skin-cookblue .user-profile-head{background:none;}#userSkin .user-profile-head .user-profile-head-info{ background: rgba(173, 216, 230, 0.5)!important}.introduction-fold[data-v-d1dbb6f8]{color:rgb(255, 0, 128, 1)!important;line-height: 20px!important;font-family:华文行楷;font-size:1.7em!important}.introduction-fold>span{font-family:FZYaoti;color:blue;font-weight: bold}p[data-v-46274ba1],h4[data-v-6fe2b6a7],.blink-list-bottom, .user-profile-statistics-name{ font-weight: bold!important; font-family:STXingkai!important;font-size:1.8em!important}</style></div>
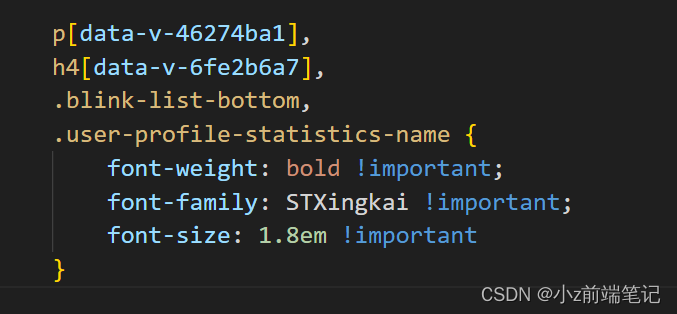
成功啦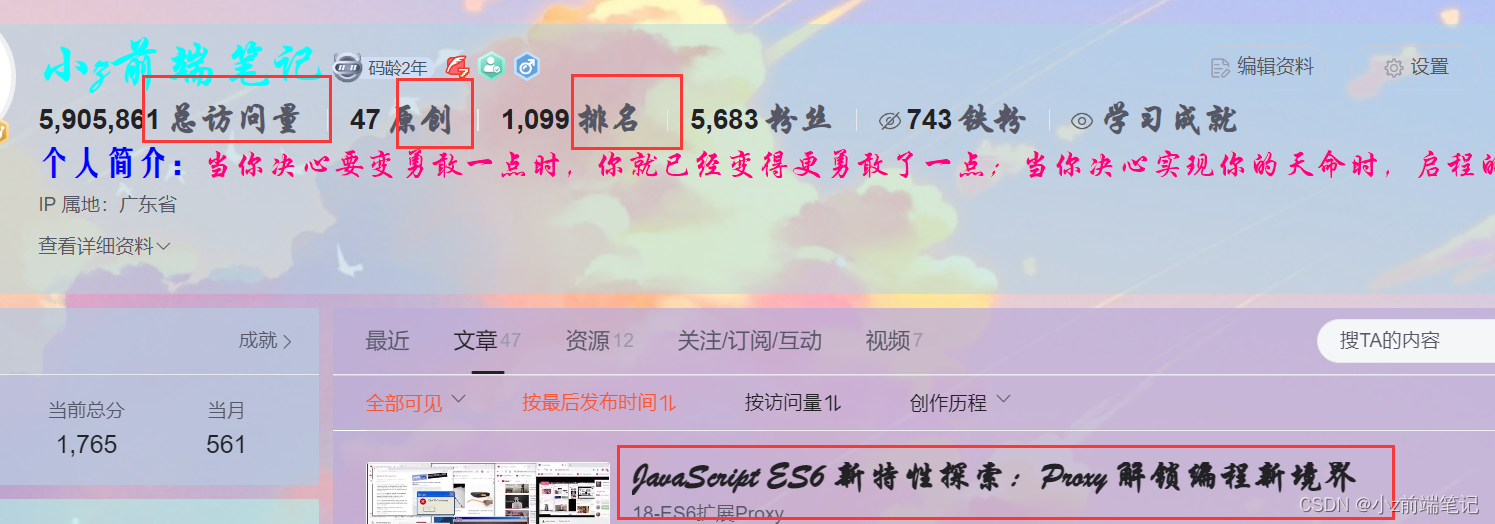
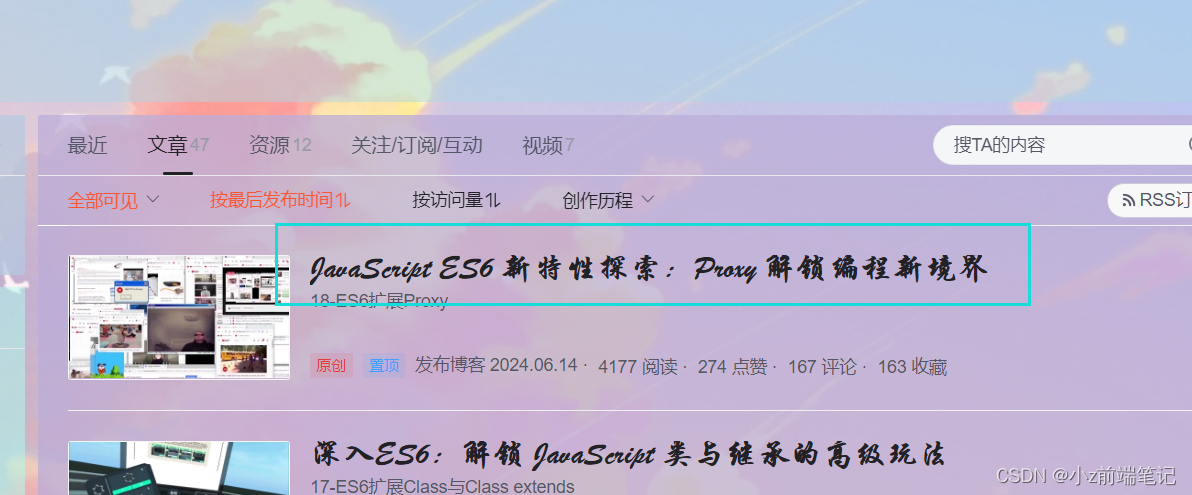
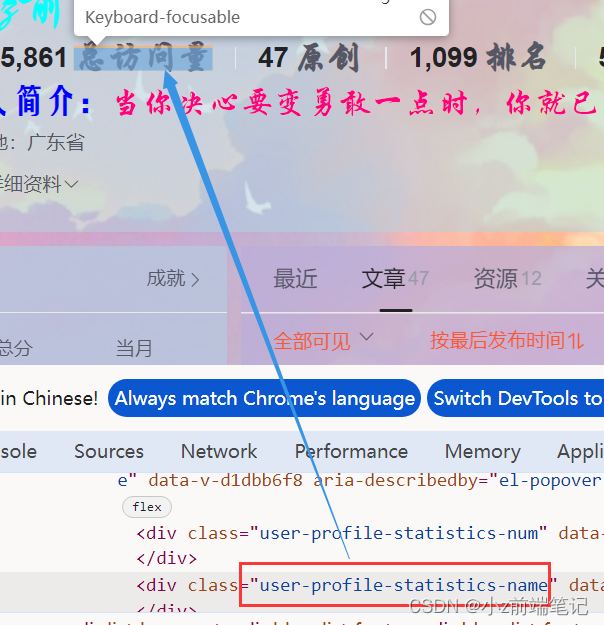
🎁5.9 如何DIV个人信息和文章数据展示效果
找到个人信息的数字对应的选择器
.user-profile-statistics-num
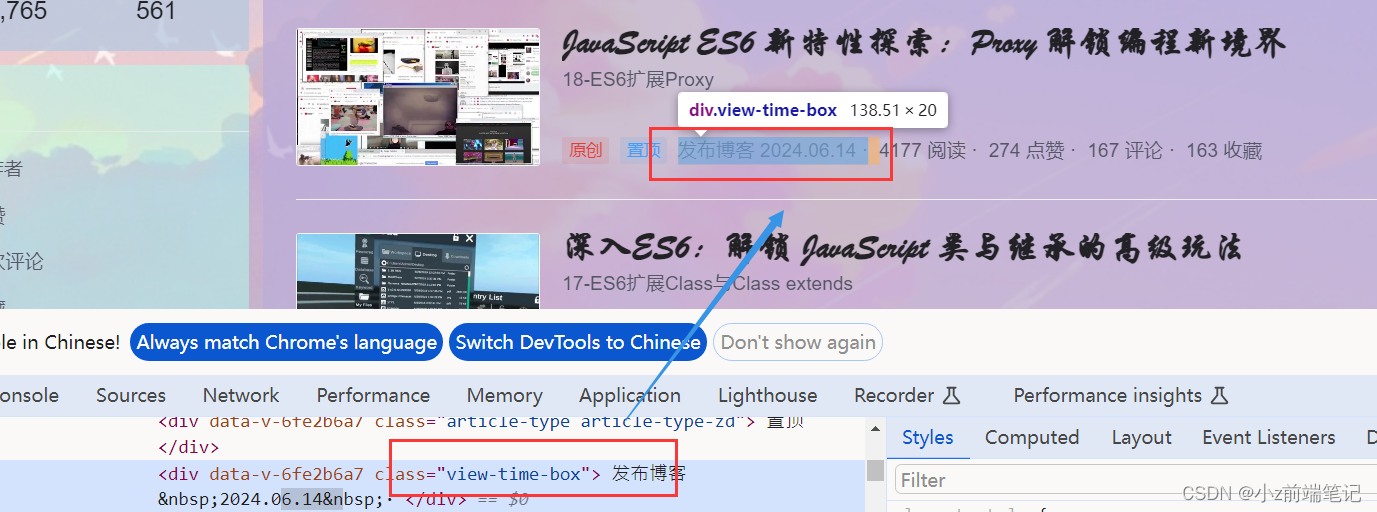
找到文章数据数字对应的选择器:
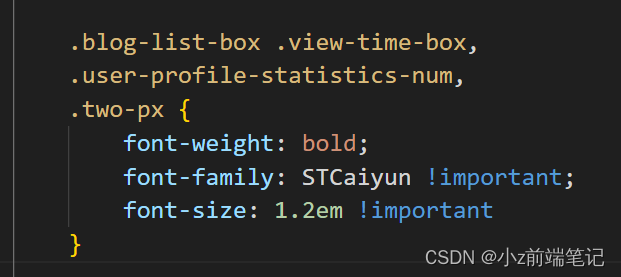
.blog-list-box .view-time-box, .two-px

<div><style>#userSkin.skin-ai{background:url(https://picweboss-app.gracg.com/2001697768_193a7c1ebf7da2261f26ef74aa348aa5oss.jpg_1200w.jpg) no-repeat;background-size: cover;background-attachment: fixed}#userSkin.skin-ai .user-profile-head{background-image:none;}.user-profile-aside .user-profile-aside-common-box,.blog_extension,.user-profile-aside .user-influence-list ul li,.user-profile-head .user-profile-head-info,.navList-box .navList,.navList-box .blog-second-list,.blog-list-box,.el-input__inner,.blink-list-box,.sub-people-list-box,.live-list-box,.resources-list-box,.answer-list-box,.navList-box .ask-second-list,.answer-list-box,.navList-box ,.sub-second-list{background:rgba(187, 173, 217, 0.5) !important}.user-profile-head-name-vip[data-v-d1dbb6f8]{color:#00FFFD!important;font-family:华文行楷;font-size:1.8em}.navList-box .blog-second-list>ul>li .blog-time-filter .el-select .el-input .el-input__inner,.user-profile-aside .user-profile-aside-common-box{background: rgb(173, 255, 238, 0.5) !important}#blogExtensionBox .blog_extension{background: #ffffff3b !important}.navList-box .blog-second-list>ul>li .blog-time-filter .el-select .el-input .el-input__inner{ background: #f9020200 !important}#userSkin.skin-cookblue .user-profile-head{background:none;}#userSkin .user-profile-head .user-profile-head-info{ background: rgba(173, 216, 230, 0.5)!important}.introduction-fold[data-v-d1dbb6f8]{color:rgb(255, 0, 128, 1)!important;line-height: 20px!important;font-family:华文行楷;font-size:1.7em!important}.introduction-fold>span{font-family:FZYaoti;color:blue;font-weight: bold}p[data-v-46274ba1],h4[data-v-6fe2b6a7],.blink-list-bottom, .user-profile-statistics-name{ font-weight: bold!important; font-family:STXingkai!important;font-size:1.8em!important}.blog-list-box .view-time-box,.user-profile-statistics-num,.two-px{font-weight: bold;font-family:STCaiyun!important;font-size:1.2em!important}</style></div>
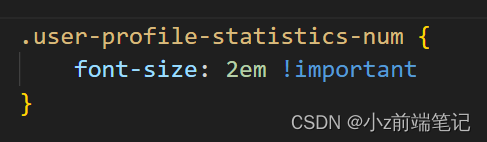
效果展示发现个人信息的字体太小了,我们调大一点
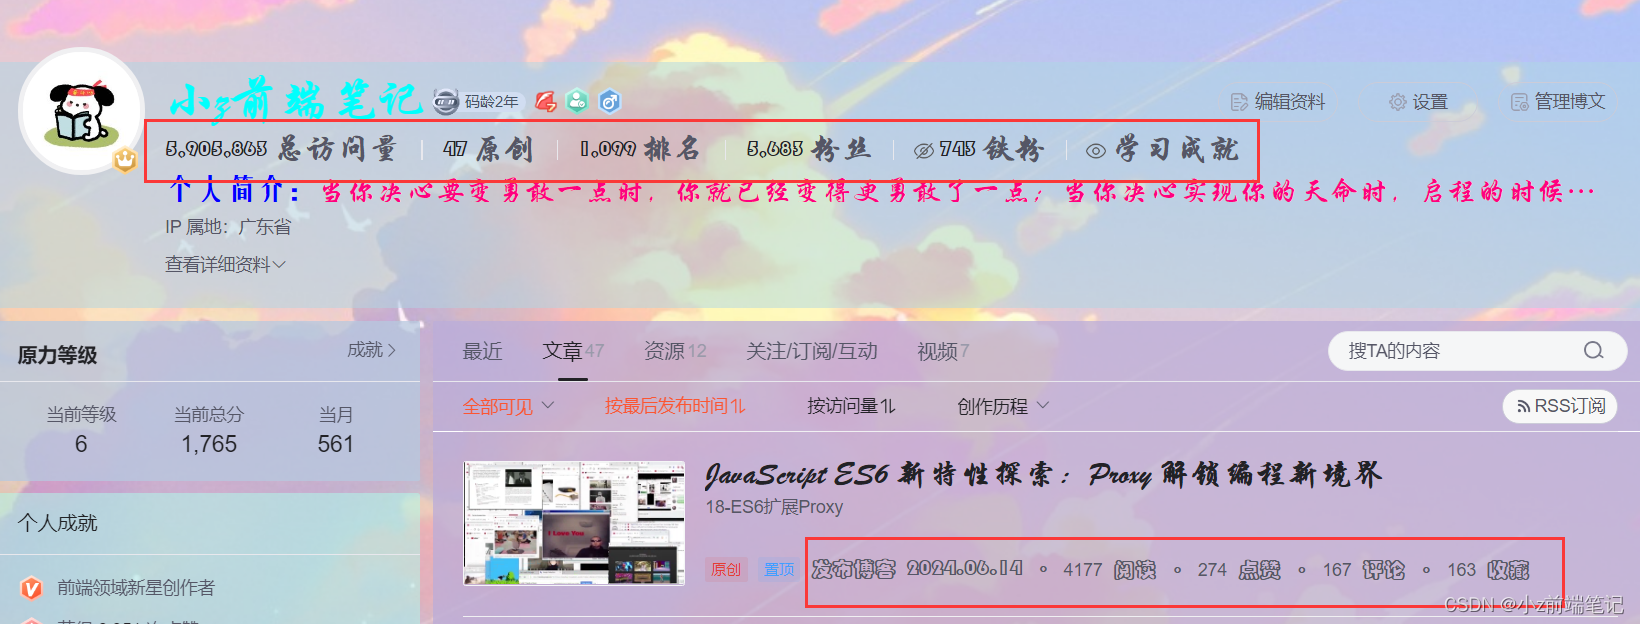
<div><style>#userSkin.skin-ai{background:url(https://picweboss-app.gracg.com/2001697768_193a7c1ebf7da2261f26ef74aa348aa5oss.jpg_1200w.jpg) no-repeat;background-size: cover;background-attachment: fixed}#userSkin.skin-ai .user-profile-head{background-image:none;}.user-profile-aside .user-profile-aside-common-box,.blog_extension,.user-profile-aside .user-influence-list ul li,.user-profile-head .user-profile-head-info,.navList-box .navList,.navList-box .blog-second-list,.blog-list-box,.el-input__inner,.blink-list-box,.sub-people-list-box,.live-list-box,.resources-list-box,.answer-list-box,.navList-box .ask-second-list,.answer-list-box,.navList-box ,.sub-second-list{background:rgba(187, 173, 217, 0.5) !important}.user-profile-head-name-vip[data-v-d1dbb6f8]{color:#00FFFD!important;font-family:华文行楷;font-size:1.8em}.navList-box .blog-second-list>ul>li .blog-time-filter .el-select .el-input .el-input__inner,.user-profile-aside .user-profile-aside-common-box{background: rgb(173, 255, 238, 0.5) !important}#blogExtensionBox .blog_extension{background: #ffffff3b !important}.navList-box .blog-second-list>ul>li .blog-time-filter .el-select .el-input .el-input__inner{ background: #f9020200 !important}#userSkin.skin-cookblue .user-profile-head{background:none;}#userSkin .user-profile-head .user-profile-head-info{ background: rgba(173, 216, 230, 0.5)!important}.introduction-fold[data-v-d1dbb6f8]{color:rgb(255, 0, 128, 1)!important;line-height: 20px!important;font-family:华文行楷;font-size:1.7em!important}.introduction-fold>span{font-family:FZYaoti;color:blue;font-weight: bold}p[data-v-46274ba1],h4[data-v-6fe2b6a7],.blink-list-bottom, .user-profile-statistics-name{ font-weight: bold!important; font-family:STXingkai!important;font-size:1.8em!important}.blog-list-box .view-time-box,.user-profile-statistics-num,.two-px{font-weight: bold;font-family:STCaiyun!important;font-size:1.2em!important}.user-profile-statistics-num{font-size:2em!important}</style></div>
可以可以,刚刚好☆ミヾ(∇≦((ヾ(≧∇≦)〃))≧∇)ノ彡☆
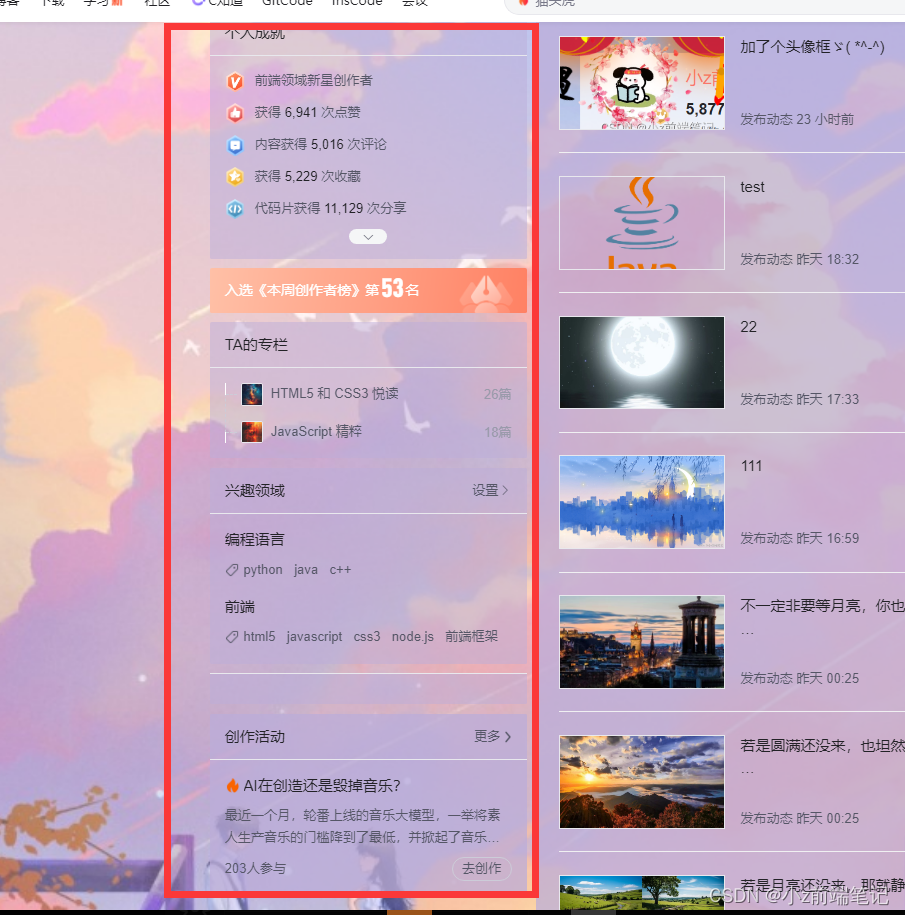
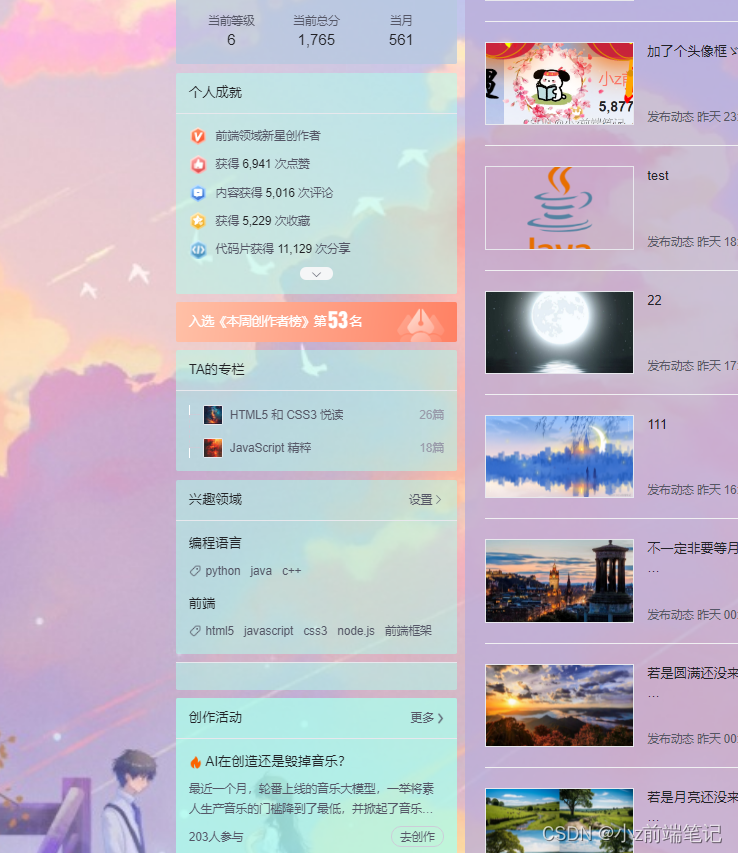
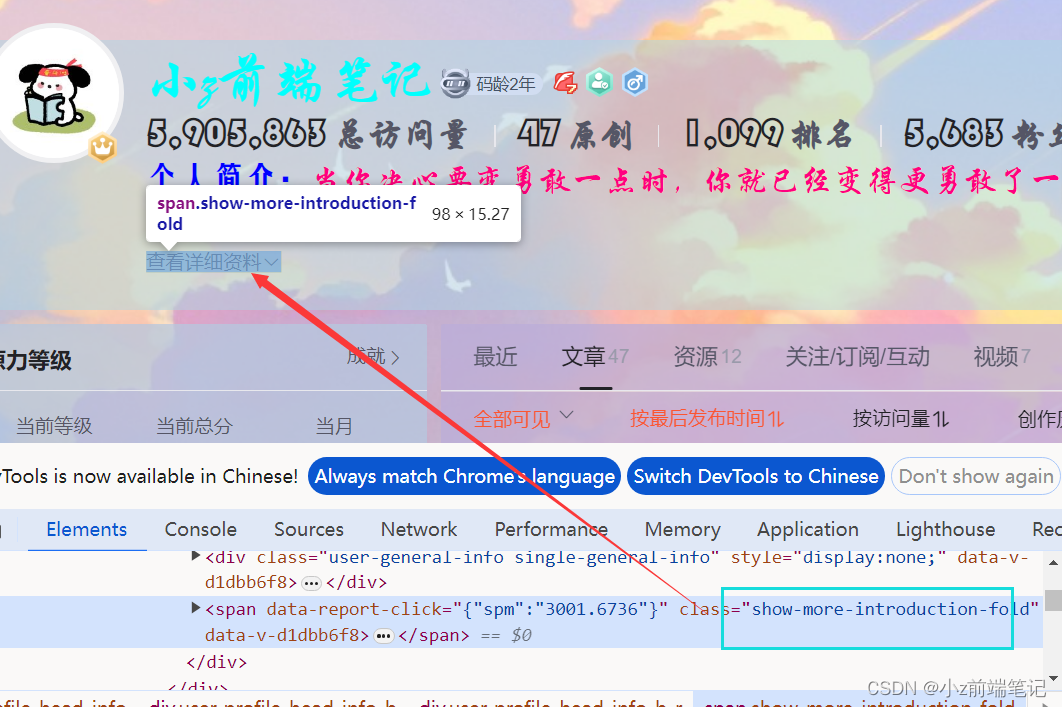
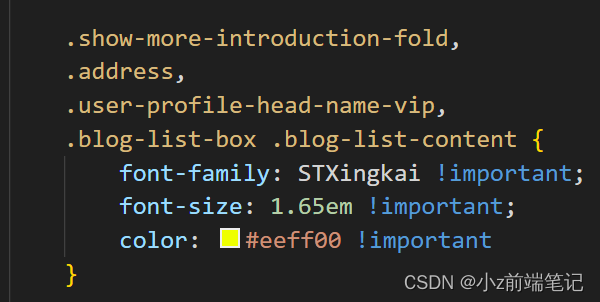
🎁5.10 如何DIV主页扩展信息
找到对应选择器
.show-more-introduction-fold,.address, .user-profile-head-name-vip,.blog-list-box .blog-list-content

<div><style>#userSkin.skin-ai{background:url(https://picweboss-app.gracg.com/2001697768_193a7c1ebf7da2261f26ef74aa348aa5oss.jpg_1200w.jpg) no-repeat;background-size: cover;background-attachment: fixed}#userSkin.skin-ai .user-profile-head{background-image:none;}.user-profile-aside .user-profile-aside-common-box,.blog_extension,.user-profile-aside .user-influence-list ul li,.user-profile-head .user-profile-head-info,.navList-box .navList,.navList-box .blog-second-list,.blog-list-box,.el-input__inner,.blink-list-box,.sub-people-list-box,.live-list-box,.resources-list-box,.answer-list-box,.navList-box .ask-second-list,.answer-list-box,.navList-box ,.sub-second-list{background:rgba(187, 173, 217, 0.5) !important}.user-profile-head-name-vip[data-v-d1dbb6f8]{color:#00FFFD!important;font-family:华文行楷;font-size:1.8em}.navList-box .blog-second-list>ul>li .blog-time-filter .el-select .el-input .el-input__inner,.user-profile-aside .user-profile-aside-common-box{background: rgb(173, 255, 238, 0.5) !important}#blogExtensionBox .blog_extension{background: #ffffff3b !important}.navList-box .blog-second-list>ul>li .blog-time-filter .el-select .el-input .el-input__inner{ background: #f9020200 !important}#userSkin.skin-cookblue .user-profile-head{background:none;}#userSkin .user-profile-head .user-profile-head-info{ background: rgba(173, 216, 230, 0.5)!important}.introduction-fold[data-v-d1dbb6f8]{color:rgb(255, 0, 128, 1)!important;line-height: 20px!important;font-family:华文行楷;font-size:1.7em!important}.introduction-fold>span{font-family:FZYaoti;color:blue;font-weight: bold}p[data-v-46274ba1],h4[data-v-6fe2b6a7],.blink-list-bottom, .user-profile-statistics-name{ font-weight: bold!important; font-family:STXingkai!important;font-size:1.8em!important}.blog-list-box .view-time-box,.user-profile-statistics-num,.two-px{font-weight: bold;font-family:STCaiyun!important;font-size:1.2em!important}.user-profile-statistics-num{font-size:2em!important}.show-more-introduction-fold,.address ,.user-profile-head-name-vip,.blog-list-box .blog-list-content{font-family:STXingkai!important;font-size:1.65em!important;color:#eeff00!important}</style></div>
效果展示:
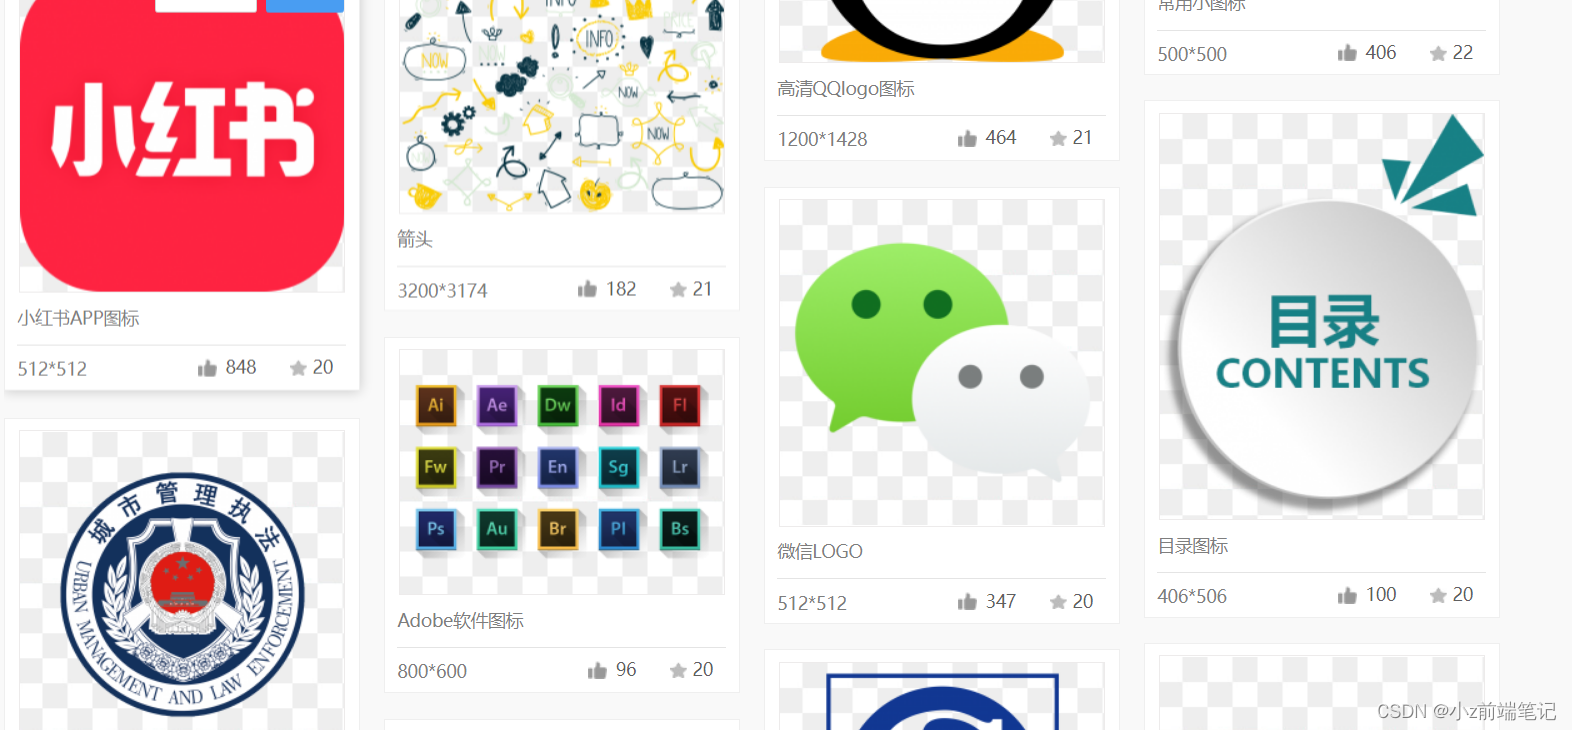
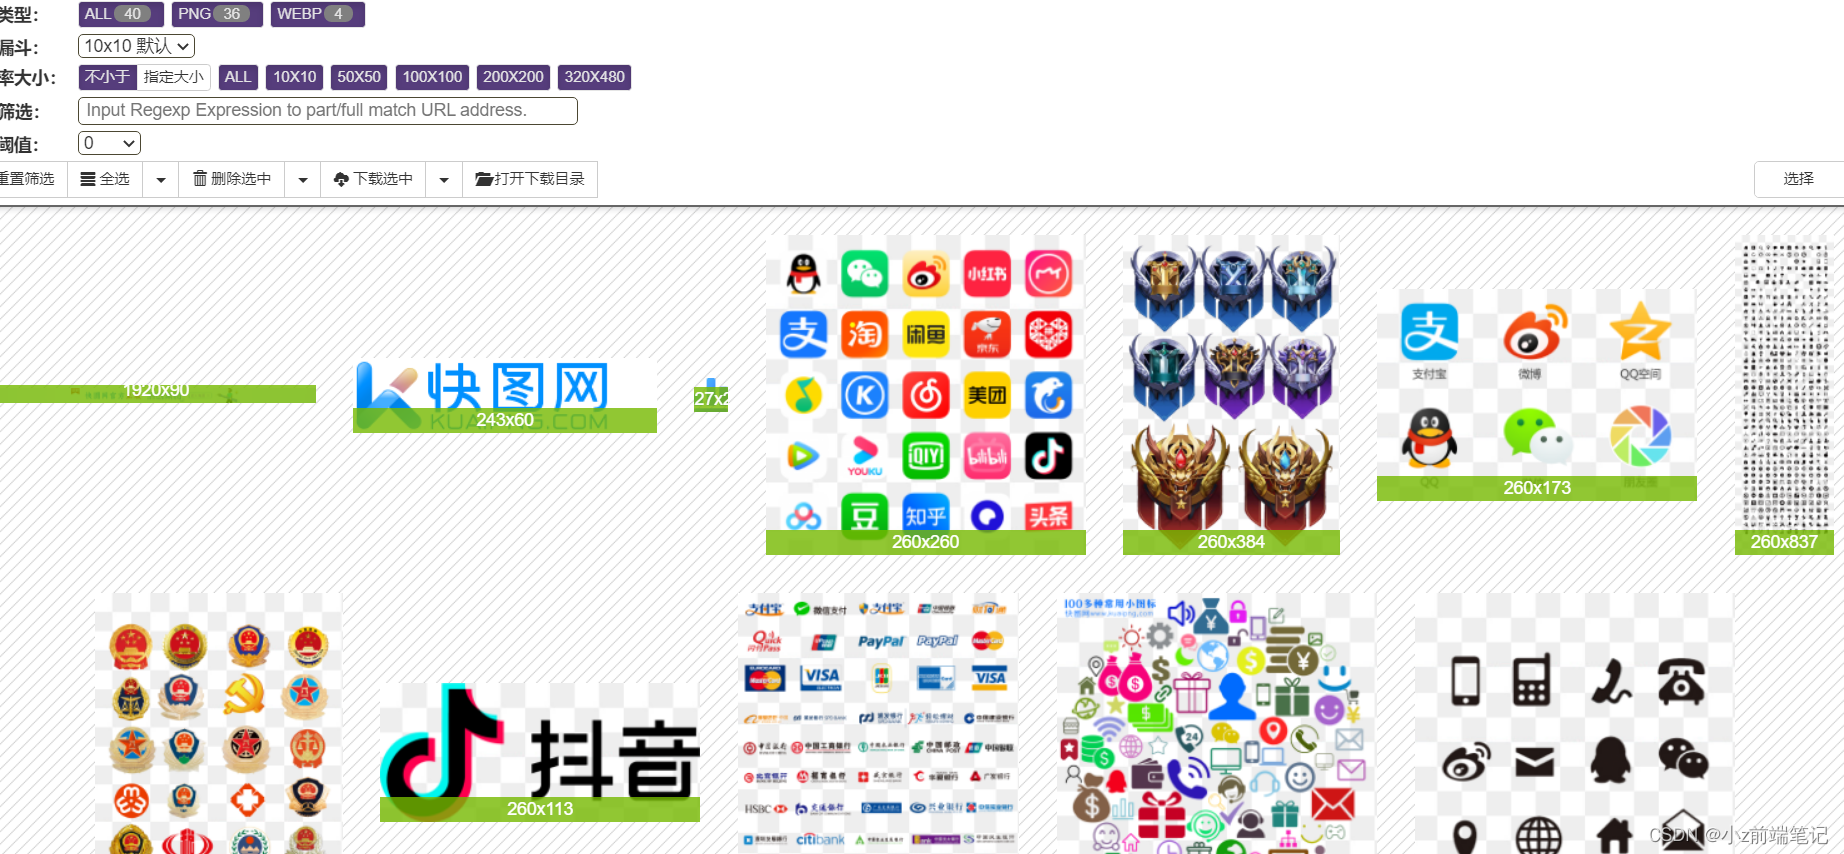
🎲6 如何制作背景透明的免抠图标
我找的是
快图网http://www.kuaipng.com/sucai/95734.html
搜索图标后有各种已经扣好的图片
但是好像只能下载一次,后面要开vip
没事,还有办法!
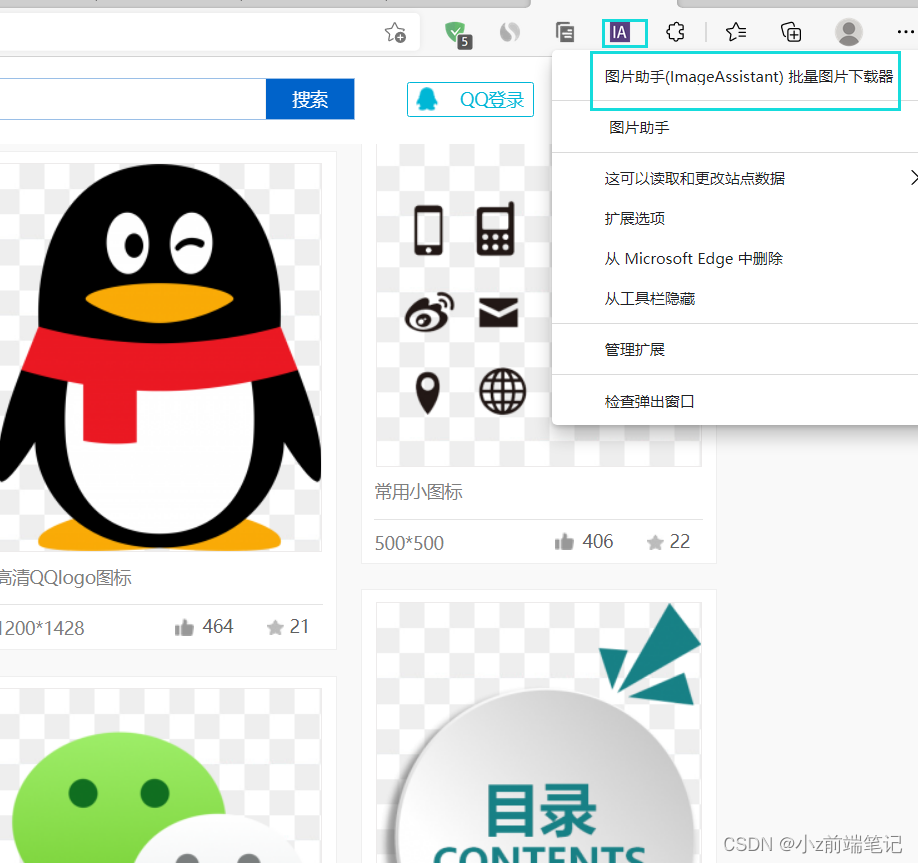
在浏览器扩展商店找到图片助手点击下载后
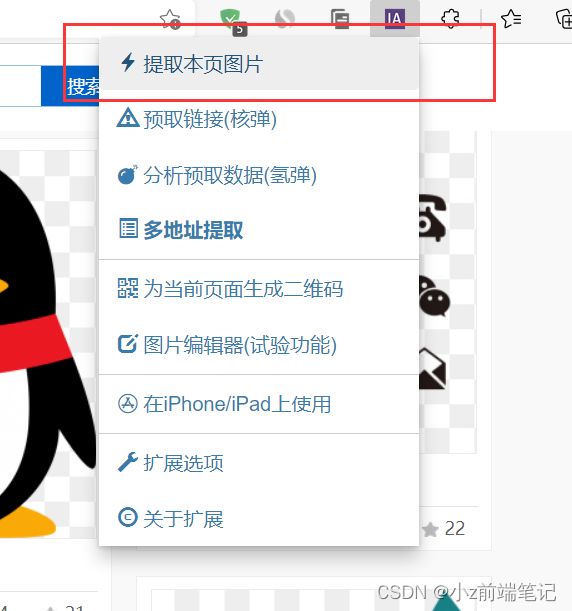
在页面找到图标点击提取本页图片
我们可以在这里下载以后截取的图片,但是这个是没有抠好的
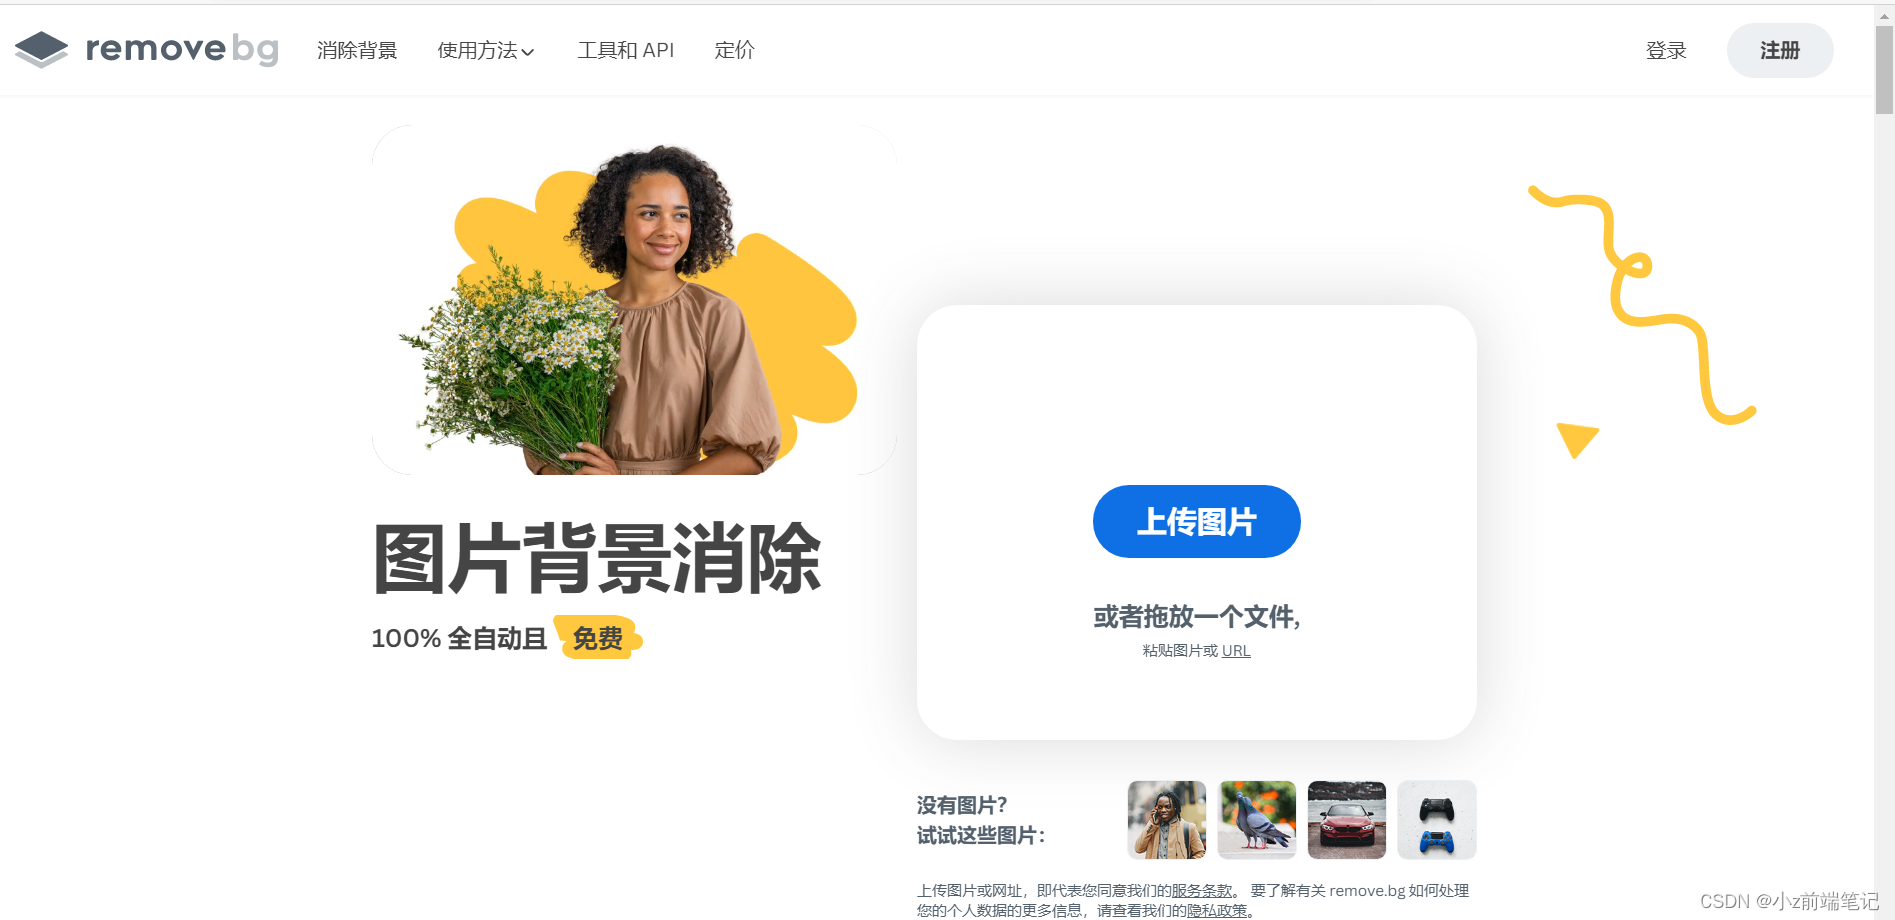
我们去抠图网https://www.remove.bg/zh把图片抠出来
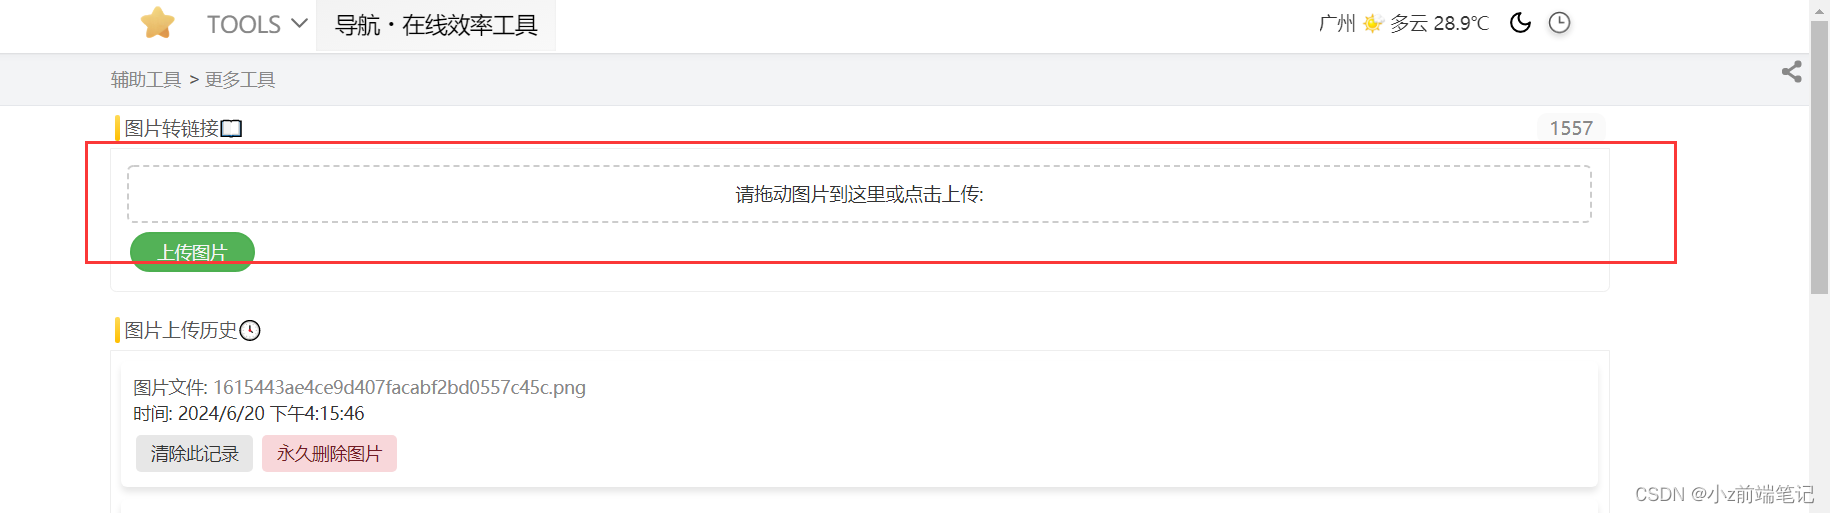
最后去生成一个图片在线链接
在线生成图片链接https://www.gptkong.com/tools/image_to_link
拿着这个链接就可以去做我们的图标啦

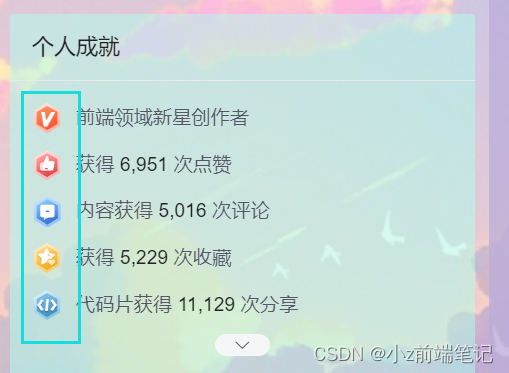
🎲7 如何DIV系统自带的认证图标
没错,系统自带的黄v也可以修改!
我们发现图标是内联样式,我们不能直接用li,因为主页中不止这一个li,那我们就使用后代选择器,使用一个有设置class的父级元素去绑定它的位置,这里我们选择了离i最近的<ul>,因此我们找到的选择器是.aside-common-box-achievement li
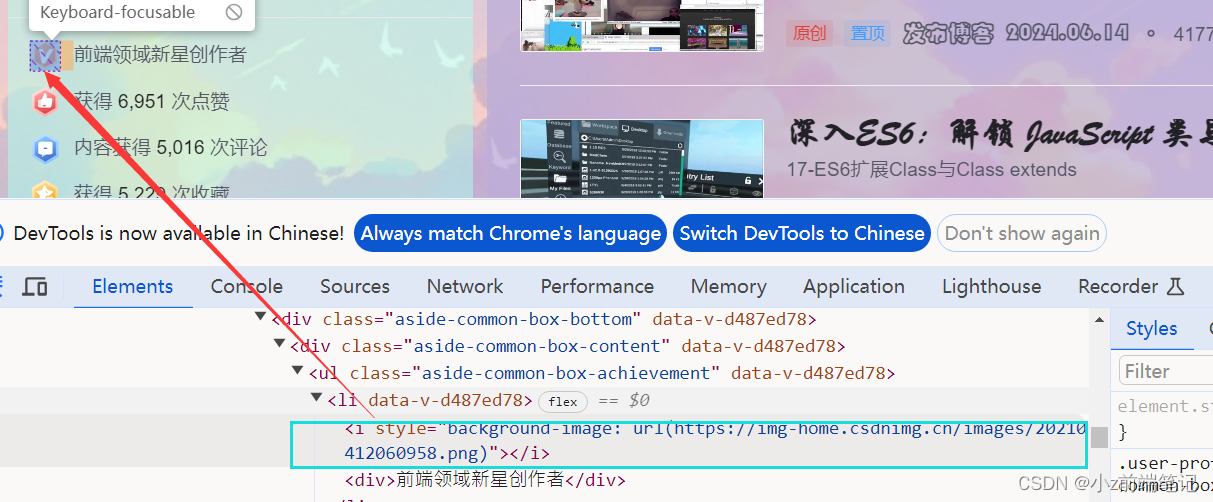
<div><style>#userSkin.skin-ai{background:url(https://picweboss-app.gracg.com/2001697768_193a7c1ebf7da2261f26ef74aa348aa5oss.jpg_1200w.jpg) no-repeat;background-size: cover;background-attachment: fixed}#userSkin.skin-ai .user-profile-head{background-image:none;}.user-profile-aside .user-profile-aside-common-box,.blog_extension,.user-profile-aside .user-influence-list ul li,.user-profile-head .user-profile-head-info,.navList-box .navList,.navList-box .blog-second-list,.blog-list-box,.el-input__inner,.blink-list-box,.sub-people-list-box,.live-list-box,.resources-list-box,.answer-list-box,.navList-box .ask-second-list,.answer-list-box,.navList-box ,.sub-second-list{background:rgba(187, 173, 217, 0.5) !important}.user-profile-head-name-vip[data-v-d1dbb6f8]{color:#00FFFD!important;font-family:华文行楷;font-size:1.8em}.navList-box .blog-second-list>ul>li .blog-time-filter .el-select .el-input .el-input__inner,.user-profile-aside .user-profile-aside-common-box{background: rgb(173, 255, 238, 0.5) !important}#blogExtensionBox .blog_extension{background: #ffffff3b !important}.navList-box .blog-second-list>ul>li .blog-time-filter .el-select .el-input .el-input__inner{ background: #f9020200 !important}#userSkin.skin-cookblue .user-profile-head{background:none;}#userSkin .user-profile-head .user-profile-head-info{ background: rgba(173, 216, 230, 0.5)!important}.introduction-fold[data-v-d1dbb6f8]{color:rgb(255, 0, 128, 1)!important;line-height: 20px!important;font-family:华文行楷;font-size:1.7em!important}.introduction-fold>span{font-family:FZYaoti;color:blue;font-weight: bold}p[data-v-46274ba1],h4[data-v-6fe2b6a7],.blink-list-bottom, .user-profile-statistics-name{ font-weight: bold!important; font-family:STXingkai!important;font-size:1.8em!important}.blog-list-box .view-time-box,.user-profile-statistics-num,.two-px{font-weight: bold;font-family:STCaiyun!important;font-size:1.2em!important}.user-profile-statistics-num{font-size:2em!important}.show-more-introduction-fold,.address ,.user-profile-head-name-vip,.blog-list-box .blog-list-content{font-family:STXingkai!important;font-size:1.65em!important;color:#eeff00!important} .aside-common-box-content i {background-image: url(https://img-home.csdnimg.cn/images/20210114022826.png) !important}</style></div>

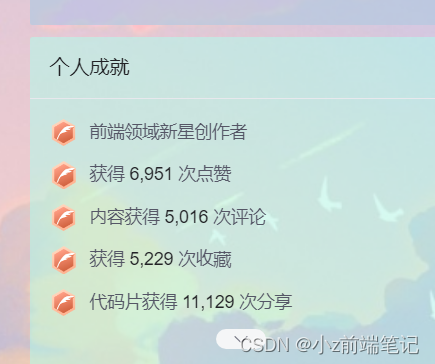
这里我使用的是一个博客专家的图标,选择的图片最好是抠图抠出来的底部是透明的比较适合,抠图方法在上面,以下是效果展示:
🎲8 在系统原有基础上DIV新标签增加页面内容-应用CSS定位
🎁8.1 如何给头像加上头像框(静态贴图)
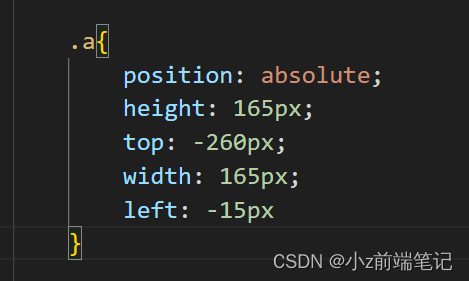
CSDN页面绝对定位的x,y轴是这样子的:
<div><img class="a" src="https://picture.gptkong.com/20240619/23170053c526f04519aae1ebdb8538628e.png"><style>#userSkin.skin-ai{background:url(https://picweboss-app.gracg.com/2001697768_193a7c1ebf7da2261f26ef74aa348aa5oss.jpg_1200w.jpg) no-repeat;background-size: cover;background-attachment: fixed}#userSkin.skin-ai .user-profile-head{background-image:none;}.user-profile-aside .user-profile-aside-common-box,.blog_extension,.user-profile-aside .user-influence-list ul li,.user-profile-head .user-profile-head-info,.navList-box .navList,.navList-box .blog-second-list,.blog-list-box,.el-input__inner,.blink-list-box,.sub-people-list-box,.live-list-box,.resources-list-box,.answer-list-box,.navList-box .ask-second-list,.answer-list-box,.navList-box ,.sub-second-list{background:rgba(187, 173, 217, 0.5) !important}.user-profile-head-name-vip[data-v-d1dbb6f8]{color:#00FFFD!important;font-family:华文行楷;font-size:1.8em}.navList-box .blog-second-list>ul>li .blog-time-filter .el-select .el-input .el-input__inner,.user-profile-aside .user-profile-aside-common-box{background: rgb(173, 255, 238, 0.5) !important}#blogExtensionBox .blog_extension{background: #ffffff3b !important}.navList-box .blog-second-list>ul>li .blog-time-filter .el-select .el-input .el-input__inner{ background: #f9020200 !important}#userSkin.skin-cookblue .user-profile-head{background:none;}#userSkin .user-profile-head .user-profile-head-info{ background: rgba(173, 216, 230, 0.5)!important}.introduction-fold[data-v-d1dbb6f8]{color:rgb(255, 0, 128, 1)!important;line-height: 20px!important;font-family:华文行楷;font-size:1.7em!important}.introduction-fold>span{font-family:FZYaoti;color:blue;font-weight: bold}p[data-v-46274ba1],h4[data-v-6fe2b6a7],.blink-list-bottom, .user-profile-statistics-name{ font-weight: bold!important; font-family:STXingkai!important;font-size:1.8em!important}.blog-list-box .view-time-box,.user-profile-statistics-num,.two-px{font-weight: bold;font-family:STCaiyun!important;font-size:1.2em!important}.user-profile-statistics-num{font-size:2em!important}.show-more-introduction-fold,.address ,.user-profile-head-name-vip,.blog-list-box .blog-list-content{font-family:STXingkai!important;font-size:1.65em!important;color:#eeff00!important} .aside-common-box-content i {background-image: url(https://picture.gptkong.com/20240620/1615443ae4ce9d407facabf2bd0557c45c.png) !important} .a,.b{position: absolute;height:165px;top: -260px; width:165px;left:-15px}</style></div>
这里只放了一个<img>标签,之所以class设置这么简短,是因为自定义模块有字数限制,代码能省则省呀

这里我用了一个绝对定位,对准了头像位置,参数直接用就好了
最终效果:
缺点:点开详情资料的时候页面被拉下来,这个位置也会被拉下来,不知道有没有大佬有更好的解决方法
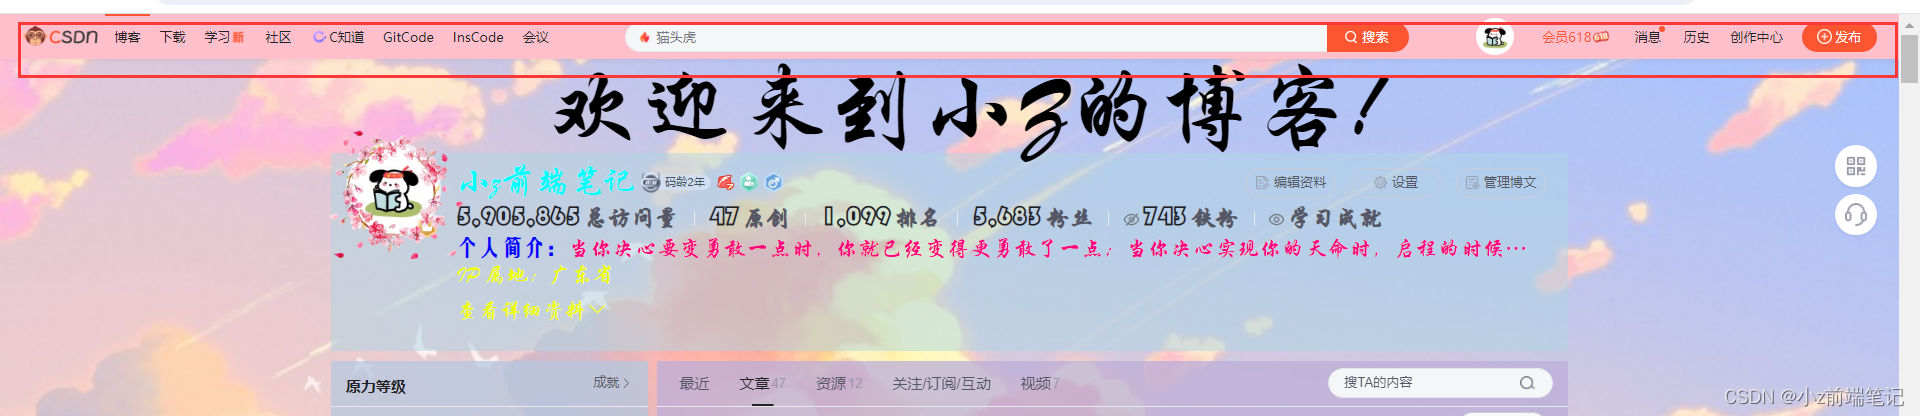
🎁8.2 如何在主页最上方加段醒目的欢迎语
<div><p class="b">欢迎来到小Z的博客!</p><img class="a" src="https://picture.gptkong.com/20240619/23170053c526f04519aae1ebdb8538628e.png"><style>#userSkin.skin-ai{background:url(https://picweboss-app.gracg.com/2001697768_193a7c1ebf7da2261f26ef74aa348aa5oss.jpg_1200w.jpg) no-repeat;background-size: cover;background-attachment: fixed}#userSkin.skin-ai .user-profile-head{background-image:none;}.user-profile-aside .user-profile-aside-common-box,.blog_extension,.user-profile-aside .user-influence-list ul li,.user-profile-head .user-profile-head-info,.navList-box .navList,.navList-box .blog-second-list,.blog-list-box,.el-input__inner,.blink-list-box,.sub-people-list-box,.live-list-box,.resources-list-box,.answer-list-box,.navList-box .ask-second-list,.answer-list-box,.navList-box ,.sub-second-list{background:rgba(187, 173, 217, 0.5) !important}.user-profile-head-name-vip[data-v-d1dbb6f8]{color:#00FFFD!important;font-family:华文行楷;font-size:1.8em}.navList-box .blog-second-list>ul>li .blog-time-filter .el-select .el-input .el-input__inner,.user-profile-aside .user-profile-aside-common-box{background: rgb(173, 255, 238, 0.5) !important}#blogExtensionBox .blog_extension{background: #ffffff3b !important}.navList-box .blog-second-list>ul>li .blog-time-filter .el-select .el-input .el-input__inner{ background: #f9020200 !important}#userSkin.skin-cookblue .user-profile-head{background:none;}#userSkin .user-profile-head .user-profile-head-info{ background: rgba(173, 216, 230, 0.5)!important}.introduction-fold[data-v-d1dbb6f8]{color:rgb(255, 0, 128, 1)!important;line-height: 20px!important;font-family:华文行楷;font-size:1.7em!important}.introduction-fold>span{font-family:FZYaoti;color:blue;font-weight: bold}p[data-v-46274ba1],h4[data-v-6fe2b6a7],.blink-list-bottom, .user-profile-statistics-name{ font-weight: bold!important; font-family:STXingkai!important;font-size:1.8em!important}.blog-list-box .view-time-box,.user-profile-statistics-num,.two-px{font-weight: bold;font-family:STCaiyun!important;font-size:1.2em!important}.user-profile-statistics-num{font-size:2em!important}.show-more-introduction-fold,.address ,.user-profile-head-name-vip,.blog-list-box .blog-list-content{font-family:STXingkai!important;font-size:1.65em!important;color:#eeff00!important} .aside-common-box-content i {background-image: url(https://picture.gptkong.com/20240620/1615443ae4ce9d407facabf2bd0557c45c.png) !important} .a,.b{position: absolute;height:165px;top: -260px; width:165px;left:-15px}.b{height:70px;width:900px;top: -276px;left: 231px;;font-family:华文行楷;font-size:100px;color:black}</style></div>

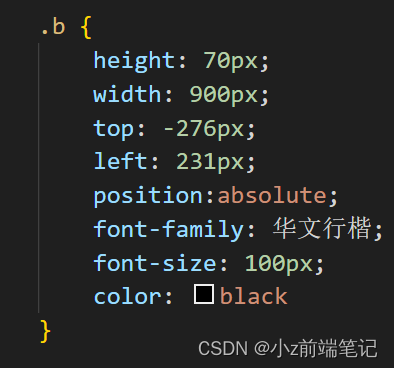
这里也是用到一个<p>标签,加上定位,定位的参数都找好了,可以直接用上去就好啦,注意行高不能设置太高,要不然会挡住一些按键从而按不了。

🎲5.10 如何DIV头部导航栏颜色?(补到第5点)
本来该在上面加的,现在刚想起来,一个一个加太麻烦了,就在这里加吧。
找到导航栏的选择器.toolbar-container
<div><p class="b">欢迎来到小Z的博客!</p><img class="a" src="https://picture.gptkong.com/20240619/23170053c526f04519aae1ebdb8538628e.png"><style>#userSkin.skin-ai{background:url(https://picweboss-app.gracg.com/2001697768_193a7c1ebf7da2261f26ef74aa348aa5oss.jpg_1200w.jpg) no-repeat;background-size: cover;background-attachment: fixed}#userSkin.skin-ai .user-profile-head{background-image:none;}.user-profile-aside .user-profile-aside-common-box,.blog_extension,.user-profile-aside .user-influence-list ul li,.user-profile-head .user-profile-head-info,.navList-box .navList,.navList-box .blog-second-list,.blog-list-box,.el-input__inner,.blink-list-box,.sub-people-list-box,.live-list-box,.resources-list-box,.answer-list-box,.navList-box .ask-second-list,.answer-list-box,.navList-box ,.sub-second-list{background:rgba(187, 173, 217, 0.5) !important}.user-profile-head-name-vip[data-v-d1dbb6f8]{color:#00FFFD!important;font-family:华文行楷;font-size:1.8em}.navList-box .blog-second-list>ul>li .blog-time-filter .el-select .el-input .el-input__inner,.user-profile-aside .user-profile-aside-common-box{background: rgb(173, 255, 238, 0.5) !important}#blogExtensionBox .blog_extension{background: #ffffff3b !important}.navList-box .blog-second-list>ul>li .blog-time-filter .el-select .el-input .el-input__inner{    background: #f9020200 !important}#userSkin.skin-cookblue .user-profile-head{background:none;}#userSkin .user-profile-head .user-profile-head-info{ background: rgba(173, 216, 230, 0.5)!important}.introduction-fold[data-v-d1dbb6f8]{color:rgb(255, 0, 128, 1)!important;line-height: 20px!important;font-family:华文行楷;font-size:1.7em!important}.introduction-fold>span{font-family:FZYaoti;color:blue;font-weight: bold}p[data-v-46274ba1],h4[data-v-6fe2b6a7],.blink-list-bottom, .user-profile-statistics-name{ font-weight: bold!important; font-family:STXingkai!important;font-size:1.8em!important}.blog-list-box .view-time-box,.user-profile-statistics-num,.two-px{font-weight: bold;font-family:STCaiyun!important;font-size:1.2em!important}.user-profile-statistics-num{font-size:2em!important}.show-more-introduction-fold,.address ,.user-profile-head-name-vip,.blog-list-box .blog-list-content{font-family:STXingkai!important;font-size:1.65em!important;color:#eeff00!important}  .aside-common-box-content i {background-image: url(https://picture.gptkong.com/20240620/1615443ae4ce9d407facabf2bd0557c45c.png) !important} .a,.b{position: absolute;height:165px;top: -260px; width:165px;left:-15px}.b{height:70px;width:900px;top: -276px;left: 231px;;font-family:华文行楷;font-size:100px;color:black}.toolbar-container {
background: pink;}</style></div>
最终效果:
🎲9 注意事项
1.如果只在
自定义模块设置<style>,必须在<style>标签外加上<div>,否则<style>不能生效!
2.当!important不能生效的时候,大多数是因为继承的因素,因为继承无论权重多大,相对于其他的都是0,这时候我们需要找更近的class,如果我们想要的样式标签没有设置class或者是内联样式,我们可以通过后代选择器或者子代选择器进行间接选中。可参考:CSS3 复合选择器。
3.自己设置css定位以及调整属性的时候,可以直接在主页打开F12利用调试进行测试,找到自己想要设定的值,提高效率。可参考:CSS3 三大特性+Chrome 调试代码技巧
4.由于自定义模块有字数限制,所以我们设定的class名要尽可能简短,已经有相同属性的我们可以进行合并,多余的空格也可以删除。
🎲10 小结
阅读好这篇文章你一定了解了div个人主页的原理了吧!修改个人主页主要用到就是css选择器和css定位,要多加使用chrome调试简化修改过程,加强效率。同时自定义模块有字数限制,我们要尽可能简化我们的代码。自定义模块还有更多可以被挖掘出来的功能,现有的也还在被挖掘,uu们可以自己div专属自己的页面。昨天还想着怎么串灯笼,后面受到空白诗大佬的启发,知道了可以改系统的样式\( ● ⌒ ∇ ⌒ ● )/非常感谢。本来期末打算好好复习了,一下子又过去了五个小时ෆු(˃ர்˂)ෆු

相关文章:
如何通过自定义模块DIY出专属个性化的CSDN主页?一招教你搞定!
个人主页:学习前端的小z 个人专栏:HTML5和CSS3悦读 本专栏旨在分享记录每日学习的前端知识和学习笔记的归纳总结,欢迎大家在评论区交流讨论! 文章目录 💯如何通过HTMLCSS自定义模板diy出自己的个性化csdn主页&#x…...
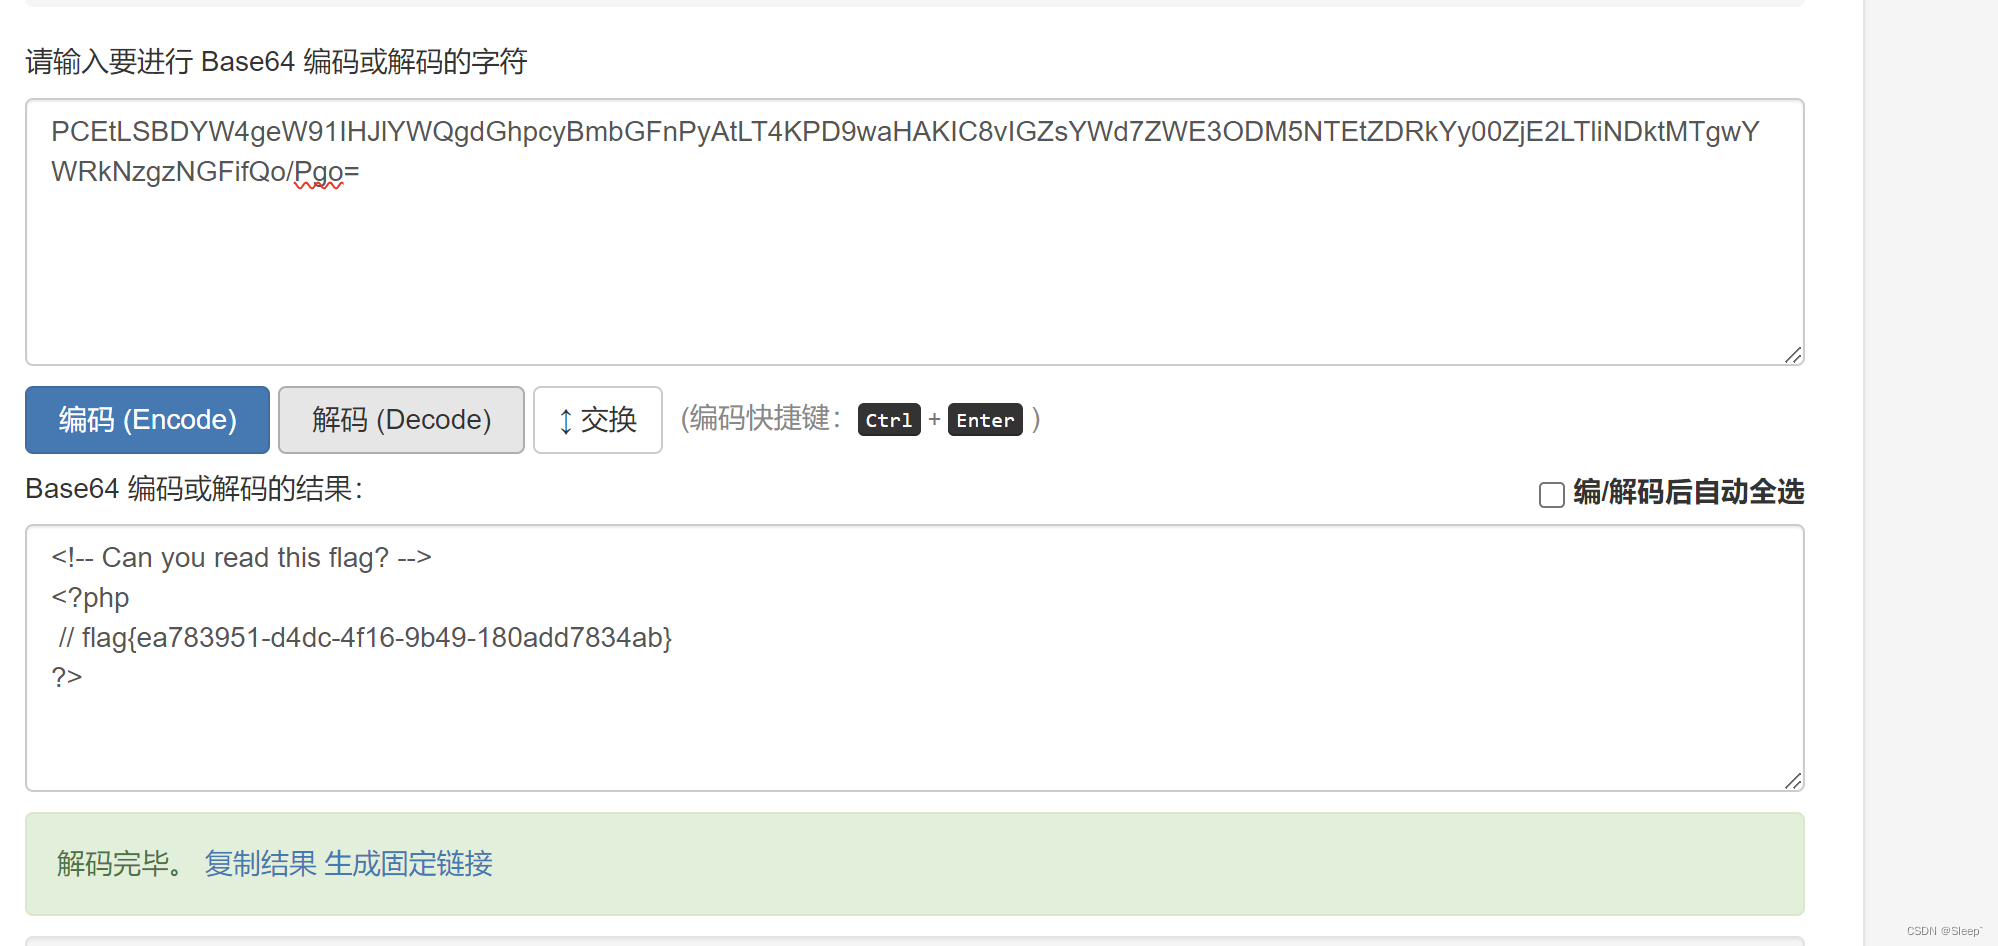
[BSidesCF 2020]Had a bad day1
看到页面有两个按钮 先随便点一个试一下,当我们点击之后发现url是有变动的 感觉url是有点东西的,可能是某种注入,先尝试一下sql注入,发现给出了报错 通过报错我们可以确定是文件包含漏洞,那我们试试php伪协议去读取一下…...

从媒体网站的频道划分看媒体邀约的分类?
传媒如春雨,润物细无声,大家好,我是51媒体网胡老师。 媒体宣传加速季,100万补贴享不停,一手媒体资源,全国100城线下落地执行。详情请联系胡老师。 在我们举行活动的时候,通常会邀请媒体到现场来…...

Day40
Day40 监听器 概念: 监听器用于监听web应用中某些对象信息的创建、销毁、增加,修改,删除等动作的 发生,然后作出相应的响应处理。当范围对象的状态发生变化的时候,服务器自动调用 监听器对象中的方法。 常用于统计在线…...

linux基础 - 内核的基础概念
目录 零. 前言 一. 源码简介 二. 存储管理 物理内存管理: 虚拟内存管理: 内存分配与回收: 三. CPU 和进程管理 进程管理: CPU 管理: 四. 文件系统 文件系统的概念 常见的 Linux 文件系统类型 文件系统的工…...
centos7系统使用docker-compose安装部署jenkins
CentOS7系统使用docker-compose安装部署jenkins,并实现前后端自动构建 记录一次工作中部署jenkins的真实经历,总结了相关经验 1.准备环境 1.java 由于最新的jenkins需要jdk11以上才能支持,而系统里的jdk是1.8的,因此等jenkins安…...

传染病报卡内容——丙型
--丙型 select a.morbiditdate 发病日期, diagnosedate 诊断日期, a.deathdate 死亡日期, a.casetypequality 病例分类,a.hcvrna "HCR_RNA定量" from zl_sdmb.t_报卡记录 t, c1_infectiousv1_6 a where t.id a.fileid and t.卡片种类 传…...
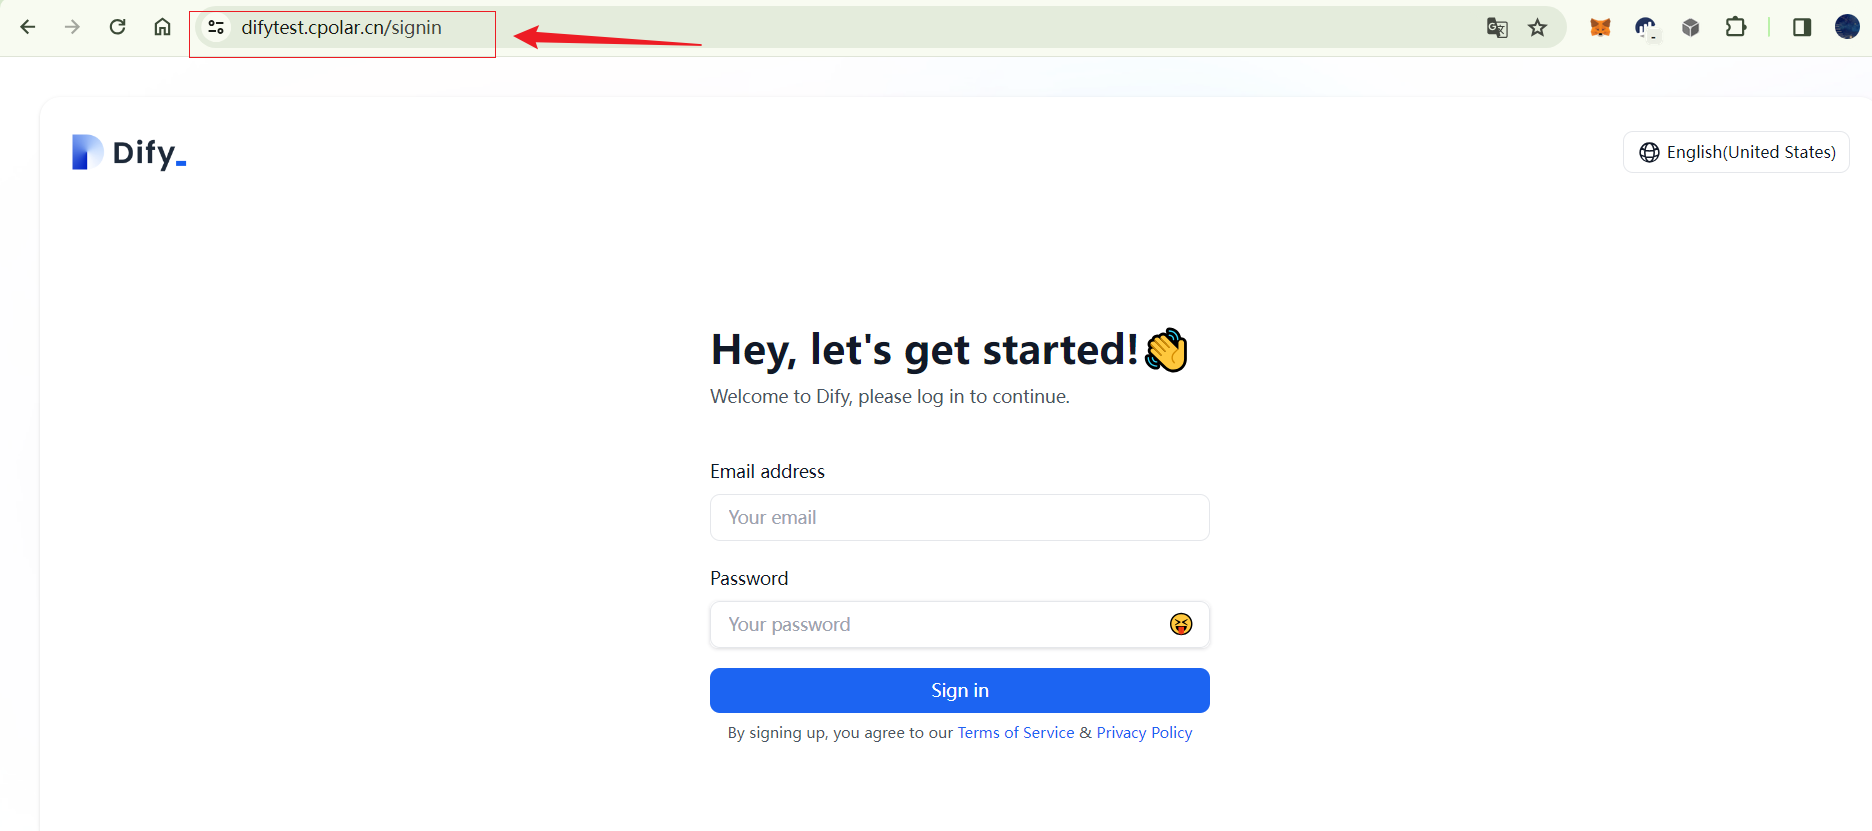
本地快速部署大语言模型开发平台Dify并实现远程访问保姆级教程
文章目录 前言1. Docker部署Dify2. 本地访问Dify3. Ubuntu安装Cpolar4. 配置公网地址5. 远程访问6. 固定Cpolar公网地址7. 固定地址访问 前言 本文主要介绍如何在Linux Ubuntu系统使用Docker快速部署大语言模型应用开发平台Dify,并结合cpolar内网穿透工具实现公网环境远程访问…...
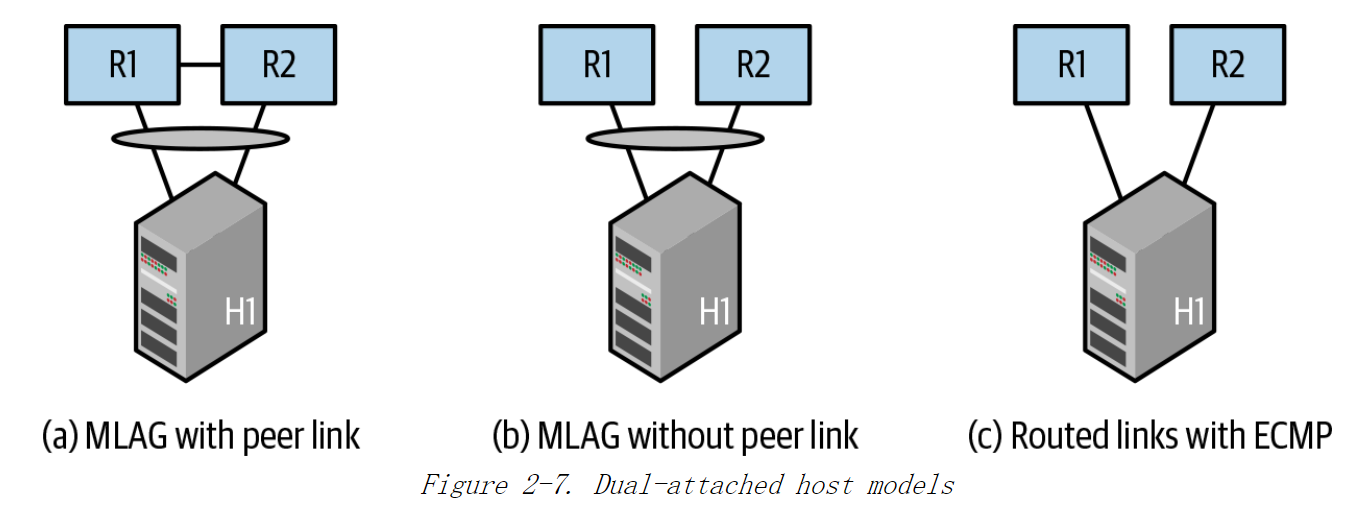
《Cloud Native Data Center Networking》(云原生数据中心网络设计)读书笔记 -- 02 Clos拓扑
本章回答以下问题: 什么是 Clos 拓扑,它与“接入 - 汇聚 - 核心”拓扑有何不同?Clos 拓扑的特征是什么?Clos 拓扑对数据中心网络的影响是什么? Clos拓扑 云原生数据中心基础设施的先行者们想要构建一种支持大规模水平扩展网络。 基本的Clos拓扑如图…...
VUE3版本新特性
VUE3版本新特性 VUE3和VUE2的区别路由的使用vite安装项目新特性使用 1.VUE3和VUE2的区别 2020年9月18日,Vue.js发布版3.0版本,代号:One Piece 于 2022 年 2 月 7 日星期一成为新的默认版本! Vue3性能更高,初次渲染快55%, 更新渲染快133% 。…...

【Oracle篇】Oracle数据库坏块处理:rman修复坏块实践与案例分析(第七篇,总共八篇)
💫《博主介绍》:✨又是一天没白过,我是奈斯,DBA一名✨ 💫《擅长领域》:✌️擅长Oracle、MySQL、SQLserver、阿里云AnalyticDB for MySQL(分布式数据仓库)、Linux,也在扩展大数据方向的知识面✌️…...

学懂C#编程:从一个简单的例子理解事件处理
在C#中,事件是一种特殊的委托类型,用于在对象上发生某些事情时通知订阅者。事件的处理通常包括定义事件,创建触发事件的条件,以及订阅该事件的事件处理程序。 以下是一个简单的C#事件处理示例: using System;// 定义…...
深入理解指针(2)
4. const 修饰指针 4.1 const修饰变量 变量是可以修改的,如果把变量的地址交给⼀个指针变量,通过指针变量的也可以修改这个变量。 但是如果我们希望⼀个变量加上⼀些限制,不能被修改,怎么做呢?这就是const的作⽤。 …...

C#.Net筑基-集合知识全解
01、集合基础知识 .Net 中提供了一系列的管理对象集合的类型,数组、可变列表、字典等。从类型安全上集合分为两类,泛型集合 和 非泛型集合,传统的非泛型集合存储为Object,需要类型转。而泛型集合提供了更好的性能、编译时类型安全…...
AI PPT生成器,一键在线智能生成PPT工具
PPT作为商业沟通和教育培训中的重要工具,PPT制作对于我们来说并不陌生。但是传统的PPT制作不仅耗时,而且想要做出精美的PPT,需要具备一定的设计技能。下面小编就来和大家分享几款AI PPT工具,只要输入主题,内容就可以在…...
stm32学习笔记---零基础入门介绍2
目录 STM32介绍 STM32家族系列 ARM介绍 ARM内核型号种类 我们学习用的STM32 片上资源/外设(Peripheral) 命名规则 系统结构 引脚定义 STM32的启动配置 STM32最小系统电路和其他部分电路 最小系统板的实物图 附:安装软件准备 声明…...
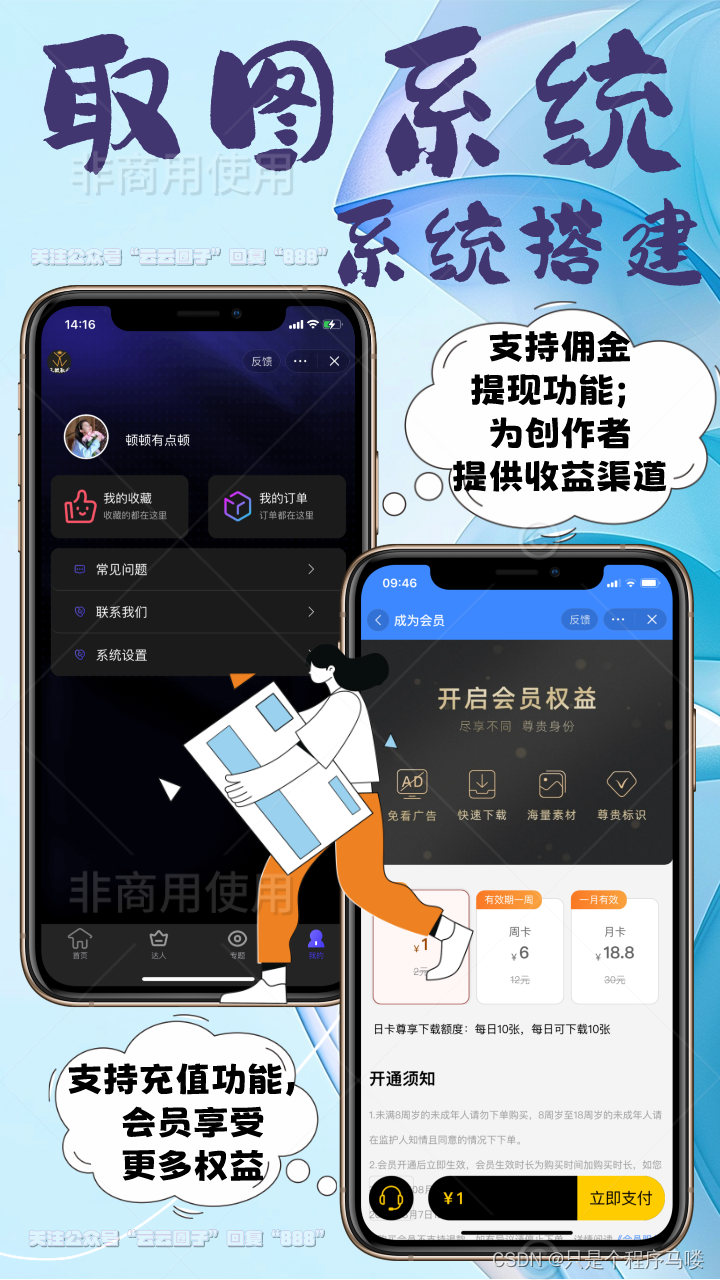
搭建取图系统app源码开发,满足广泛应用需求
提示:文章写完后,目录可以自动生成,如何生成可参考右边的帮助文档 前言 图片已成为信息传递的重要媒介,广泛应用于各个领域。为满足日益增长的图片需求,搭建一款高效的取图系统,可以为用户提供便捷、全面的…...
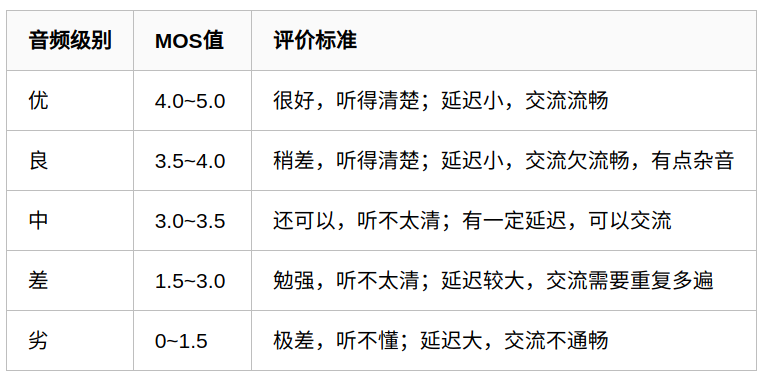
语音质量评价方法之MOS
引言 在语音增强、语音合成、语音转换、声音转换、语音克隆、语音修复等等领域,常常要对输出的语音进行评价。对语音的质量评价一般关注两个方面,即主观评价和客观评价。主观评价就是人凭借听觉感受对语音进行打分,客观评价比较广泛…...

gorm简介
【1】ORM: 即Object-Relational Mapping,它的作用是在关系型数据库和对象之间作一个映射,这样我们在具体的操作数据库的时候,就不需要再去和复杂的SQL语句打交道,只要像平时操作对象一样操作它们就可以了。 【2】GORM gorm是go语言的一个orm…...

MySQL:SELECT list is not in GROUP BY clause 报错 解决方案
一、前言 一大早上测试环境,发现测试环境的MySQL报错了。 SELECT list is not in GROUP BY clause and contains nonaggregated column二、解决方案 官方文档中提到: 大致意思: 用于GROUP BY的SQL / 92标准要求满足以下条件: SE…...

SEO 系统培训班有哪些推荐_SEO 系统培训班包括哪些内容
SEO 系统培训班推荐及其内容详解 在当前数字化和信息化飞速发展的时代,SEO(搜索引擎优化)已经成为每一个网站和企业不可或缺的一部分。SEO系统培训班不仅能帮助你了解SEO的基本原理,还能深入探讨其实际应用和最新技巧。本文将详细…...

【Git 内部原理】`.git` 是怎么记住所有版本的
每次 git commit,Git 都说"已记录"。但你有没有想过:改了几十次、几百次,Git 是怎么全记住的?难道每次提交,它都复制一份完整项目? 这篇文章不讲命令,也不背概念。 我们直接打开…...

KK-HF_Patch技术解析:游戏增强补丁的架构设计与实践方法
KK-HF_Patch技术解析:游戏增强补丁的架构设计与实践方法 【免费下载链接】KK-HF_Patch Automatically translate, uncensor and update Koikatu! and Koikatsu Party! 项目地址: https://gitcode.com/gh_mirrors/kk/KK-HF_Patch 核心价值:重新定义…...

FramePack完整指南:5个关键技巧解决AI视频生成难题
FramePack完整指南:5个关键技巧解决AI视频生成难题 【免费下载链接】FramePack Lets make video diffusion practical! 项目地址: https://gitcode.com/gh_mirrors/fr/FramePack 你是否曾为AI视频生成中的内存溢出、生成速度缓慢和画面漂移问题而烦恼&#x…...

如何用iTorrent在iPhone上轻松管理种子下载?iOS种子客户端全攻略
如何用iTorrent在iPhone上轻松管理种子下载?iOS种子客户端全攻略 【免费下载链接】iTorrent Torrent client for iOS 16 项目地址: https://gitcode.com/gh_mirrors/it/iTorrent iTorrent是一款专为iOS 16设备设计的开源种子客户端,让iPhone和iPa…...

CUDA中Shared Memory的Bank Conflict
1. 核心概念引入 (What & Why)笔记的开头需要明确 Shared Memory 的物理结构,这是理解冲突的前提。Shared Memory 的组织方式: CUDA 的共享内存被划分为 32 个大小相等的内存块,称为 Banks(存储体)。Bank 的宽度&a…...

年没人敢碰的老代码,我用AI重构了它——然后翻车了
1 安装与初始化 # 全局安装 OpenSpec npm install -g fission-ai/openspeclatest # 在项目目录下初始化 cd /path/to/your-project openspec init 初始化时,OpenSpec 会提示你选择使用的 AI 工具(Claude Code、Cursor、Trae、Qoder 等)。 3 O…...

3步完成B站视频转文字:免费开源工具bili2text终极指南
3步完成B站视频转文字:免费开源工具bili2text终极指南 【免费下载链接】bili2text Bilibili视频转文字,一步到位,输入链接即可使用 项目地址: https://gitcode.com/gh_mirrors/bi/bili2text 还在为手动记录B站视频内容而烦恼吗&#x…...

SEO 白帽优化的费用一般是多少
SEO 白帽优化的费用一般是多少? 在当今互联网时代,网站的排名直接影响到访问量和商业收益。其中,搜索引擎优化(SEO)是提升网站在搜索结果中排名的重要手段。而在SEO中,白帽优化(White Hat SEO&…...

RVC模型在Claude API生态中的应用探索
RVC模型在Claude API生态中的应用探索 最近和几个做AI应用的朋友聊天,大家不约而同地提到了一个痛点:现在的AI助手,比如Claude,文本对话能力已经很强了,但声音总是冷冰冰的合成音,缺乏个性和温度。能不能让…...