如何将重量传感器 HX711 与 Arduino 一起使用
How to use a Weight Sensor / Load Cell + HX711 with an Arduino
原文
OVERVIEW
We’ve all used a scale to determine the weight of something at some point in our lives.
Using a Load Cell or Weight sensor you can add this capability to your Arduino projects.
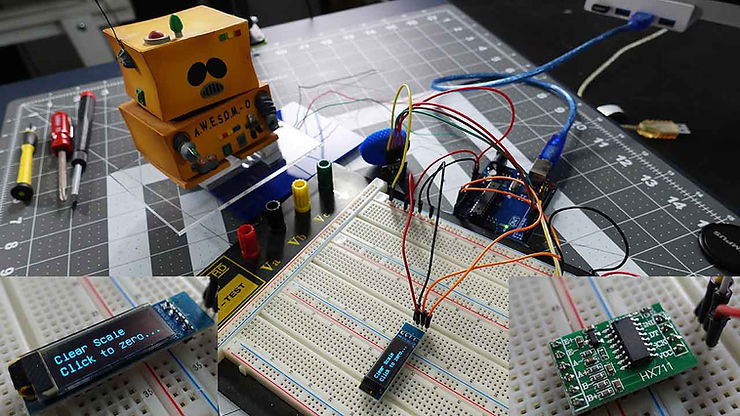
In this tutorial we will see how to connect, calibrate and display the weight on a small OLED display, and by using a rotary encoder we will be able to change the units from: grams, kg or pounds.
We will be using the HX711 ADC converter board to amplify the signal received from the weight sensor.
This amplifier enables the Arduino to detect the changes in resistance from the load cell.
PARTS USED
1KG Load Cell
Rotary Encoder Module
HX711 Module
LOAD CELL and HX711 INTRODUCTION

So what is a Load Cell?
They are many types of Load Cell, but today we will be using the straight bar type.
When pressure or a load is applied, the electrical resistance will change in response to this applied pressure and by taking this information and after some calibration we can determine the precise weight.
Load cell like this one come in different weight limits, the one we will be using today is rated up to 1KG, but you can get others that will support more weight if needed.
What about this HX711?
The changes in electrical resistance provided by the Load Cell need to be amplified so that they can be read by an Arduino.
That’s exactly what the HX711 board does.
It reads the information from the Load Cell, amplifies the signals and then sends it to the Arduino for processing.
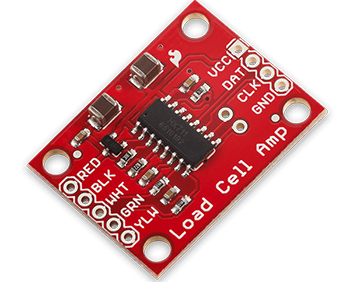
Common Load cells have four-wire to connect the HX711 to a microcontroller like the Arduino.
- Red (VCC)
- Black (GND)
- Data
- Clock
To connect the HX711 to the Arduino you only need 2 pins (Clock and Data).
On the opposite side you can see the connection for the Load cell.
We will be using a simple Arduino library to communicate with the HX711 that provides a calibration and Tare (reset) feature to easily determine the weight of an object.
LOAD CELL SETUP
The bar type we are using has different screws holes on the bottom and the top.
To it up as a scale, you attach the bottom left or right screw holes to a table or stable object, and then attach a piece of platic or any other material to serve as the scale to put objects on, to the top opposite screw holes.
**Each bar type has an arrow that indicate the direction of deflection and should be positioned the correct way for your project.You can see a simple setup here:
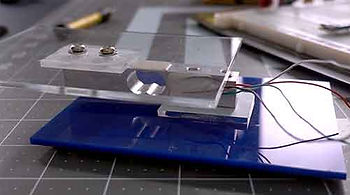
This setup is for using the Load Cell has a simple scale, but you could also connect it the detect deflection between two object if you wanted.
CONNECTIONS
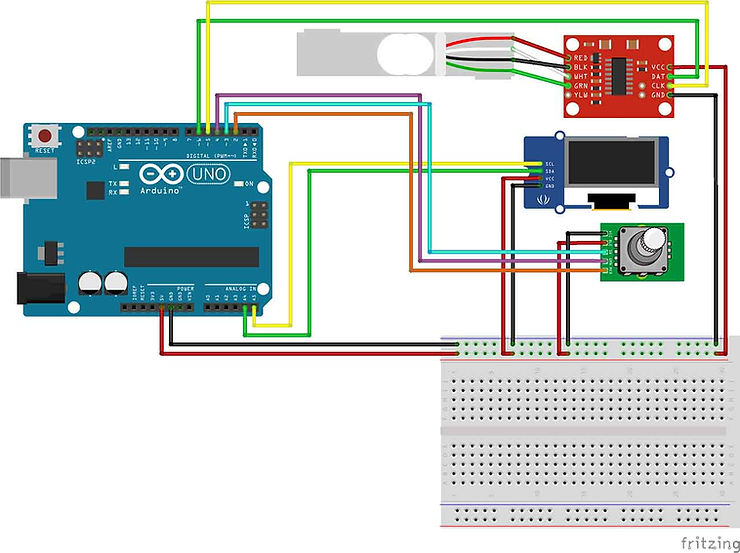
The connections for this tutorial are pretty straightforward:
The 5V and GND of the UNO is connected to each modules VCC and GND.
Since the OLED display uses I2C we are using pins A4 (SDA), A5 (SCL) on the UNO to connect it.
The rotary encoder is connected to these pins: CLK to pin 2, DT to pin 3 and SW to pin 4.The HX711 is connected to: DATA to pin 4 and CLOCK to pin 5.
Depending on the HX711 your purchase it may have different connections: If it has color designation, then connect the corrresponding wires from the Load Cell to the HX711.
In my case my HX711 had these connections:
E+ : Connected to RED of the Load Cell E- : Connected to BLACK
A- : Connected to GREEN A+ : Connected to WHITE
B- : no connections B+ : no connections
THE CODE
We are using a library written for the HX711 to communicate with the Arduino, you can find a link to download the library at the bottom of this page.
The first code is used to get the calibration factor for a particular Load cell, this will have to be run for each Load Cell you own, since each one is a little different.
The second code uses that calibration factor to print out the correct weight on the OLED display.
As always for more information please have a look at the tutorial video.
/* Calibration sketch for HX711 */#include "HX711.h"  // Library needed to communicate with HX711 https://github.com/bogde/HX711#define DOUT  6  // Arduino pin 6 connect to HX711 DOUT
#define CLK  5  //  Arduino pin 5 connect to HX711 CLKHX711 scale(DOUT, CLK);  // Init of libraryvoid setup() {Serial.begin(9600);scale.set_scale();  // Start scalescale.tare();       // Reset scale to zero
}void loop() {float current_weight=scale.get_units(20);  // get average of 20 scale readingsfloat scale_factor=(current_weight/0.145);  // divide the result by a known weightSerial.println(scale_factor);  // Print the scale factor to use
}
/* Arduino Scale using HX711 and Load CellCreated by Yvan / https://Brainy-Bits.comThis code is in the public domain...You can: copy it, use it, modify it, share it or just plain ignore it!
Thx!
*/#include "U8glib.h"   // Library for Oled display https://github.com/olikraus/u8glib/
#include "HX711.h"    // Library for Load Cell amplifier boardvolatile boolean TurnDetected;  // variable used to detect rotation of Rotary encoder
volatile int Rotary_Flag=0;     // flag to indicate rotation as occured// Rotary Encoder Module connections
#define RotaryCLK 2   // Rotary encoder CLK pin connected to pin 2 of Arduino
#define RotaryDT 3    // Rotary encoder DT pin connected to pin 3
#define RotarySW 4    // Rotary encoder Switch pin connected to pin 4// HX711 Module connections
#define CLK 5   // CLK of HX711 connected to pin 5 of Arduino
#define DOUT 6  // DOUT of HX711 connected to pin 6 of Arduinoint reset_screen_counter=0;      // Variable used to decide what to display on Oled
volatile int current_units=0;    // Used to select which measuring unit to use (KG,Grams,Pounds)
float unit_conversion;           // Used to convert between measuring units
int decimal_place;               // how many decimal number to displayHX711 scale(DOUT, CLK);  // Init of the HX711U8GLIB_SSD1306_128X32 u8g(U8G_I2C_OPT_FAST);	// Init of the OLED// Interrupt routine runs if Rotation detected from Rotary encoder
void rotarydetect ()  {
Rotary_Flag=1; // Set Rotary flag from 0 to 1
delay(500);
}// Used to change the measurement units (0=grams, 1=KG, 2=pounds)
void change_units ()  { if (current_units == 0) current_units=1;else if (current_units == 1) current_units=2;else if (current_units == 2) current_units=0;
}// Run at Startup and when Resetting with Rotary encoder switch
void startupscreen(void) {u8g.setFont(u8g_font_unifont);u8g.firstPage(); do {u8g.drawStr( 0, 10, "Clear Scale");u8g.drawStr( 0, 28, "Click to zero...");} while( u8g.nextPage() );
}// Reset Scale to zero
void tare_scale(void) {scale.set_scale(-1073000);  //Calibration Factor obtained from calibration sketchscale.tare();             //Reset the scale to 0
}// Start Displaying information on OLED
void start_scale(void) {char temp_current_units[15];  // Needed to store String to Char conversionString KG="KG";String GRAMS="GRAMS";String LBS="POUNDS";if (current_units == 0) {                     // 0 = gramsGRAMS.toCharArray(temp_current_units, 15);  // Convert String to Char for OLED displayunit_conversion=1000;                        // conversion value for gramsdecimal_place=0;                            // how many decimal place numbers to display} else if (current_units == 1) {              // 1 = KilogramsKG.toCharArray(temp_current_units, 15);unit_conversion=1;decimal_place=3;} else {                                      // else 2 = PoundsLBS.toCharArray(temp_current_units, 15);unit_conversion=2.2046226218;decimal_place=3;}u8g.setFont(u8g_font_unifont);u8g.firstPage(); do {u8g.drawStr( 0, 10, temp_current_units);  // Display the current measurement unitu8g.setPrintPos(38, 28);u8g.print(scale.get_units(3)*unit_conversion, decimal_place);  // Display the average of 3 scale value reading} while( u8g.nextPage() );
}void setup(void) {// Set pinmode for Rotary encoder pinspinMode(RotarySW,INPUT_PULLUP);pinMode(RotaryCLK,INPUT_PULLUP);pinMode(RotaryDT,INPUT_PULLUP);  // Attach interrupt 0 (Pin 2 on UNO) to the Rotary EncoderattachInterrupt (0,rotarydetect,RISING);   // interrupt 0 always connected to pin 2 on Arduino UNO// Rotate screen 180 degrees on OLED, if requiredu8g.setRot180();// Set color of OLED to Monochromeu8g.setColorIndex(1);// Select font to useu8g.setFont(u8g_font_unifont);String start_count_string="Starting up....";  // Message to display at Startupchar start_count[15];  // Used to String to Char conversion// Loop to display counting dotsfor (int x=12; x < 16; x++) {  // Select the first 12 to 16 character of Stringstart_count_string.toCharArray(start_count, x);u8g.firstPage(); do {u8g.drawStr( 0, 10, "ARDUINO SCALE");u8g.drawStr( 0, 28, start_count);} while( u8g.nextPage() );delay(500);  // Delay between dots}
}void loop(void) {// If Switch is pressed on Rotary Encoderif (!digitalRead(RotarySW)) {       // Check to see which action to takeif(reset_screen_counter == 1) {   tare_scale();                   // 1 = zero and start scalereset_screen_counter=2;delay(500);} else {if(reset_screen_counter == 2) { // 2 = Scale already started so restart from beginingreset_screen_counter=0;delay(500); }}}// If Rotation was detectedif (Rotary_Flag == 1) {change_units();  // change the measuring unitsRotary_Flag=0;   // reset flag to zero}// If system was just started display intro screen  if (reset_screen_counter == 0) {    startupscreen();reset_screen_counter=1;  // set to 1 and wait for Rotary click to zero scale}// if zero (tare) of scale as occured start display of weightif (reset_screen_counter == 2) {start_scale();}
}
TUTORIAL VIDEO
DOWNLOAD
Copy and Paste the above code/sketch in your Arduino IDE software.
Donwload the HX711 library here:
https://github.com/bogde/HX711
相关文章:
如何将重量传感器 HX711 与 Arduino 一起使用
How to use a Weight Sensor / Load Cell HX711 with an Arduino 原文 OVERVIEW We’ve all used a scale to determine the weight of something at some point in our lives. Using a Load Cell or Weight sensor you can add this capability to your Arduino projects.…...

HarmonyOS Next开发学习手册——应用启动框架AppStartup
概述 AppStartup提供了一种简单高效的初始化组件的方式,开发者可以使用AppStartup来显示的设置组件的初始化顺序以及之间的依赖关系,支持异步初始化组件加速应用的启动时间。开发者需要分别为待初始化的组件实现AppStartup提供的 StartupTask 接口&…...
)
如何在Springboot中添加事务执行?(以MySQL为例)
目录 1. 添加依赖 2. 配置数据库连接 3. 启用事务管理 4. 创建实体类和存储库 5. 创建服务类并使用Transactional注解 6. 编写测试用例 7. 运行应用程序 在Springboot中开启数据库的事务的应用开发过程中非常重要的业务,以下是一个使用MySQL数据库࿰…...

优化MySQL并发事务:如何避免更新丢失问题?
背景描述 现在有两个事务,事务A和事务B,他们都需要修改同一行数据,这行数据原始值为100,事务A的操作是数据增加100,事务B的操作也是增加100,预期的最终结果是300,现在如何保证最终的数据是300的…...

物联网设备管理系统设计
一、引言 物联网设备管理系统设计旨在通过物联网技术实现对设备的全面监控、控制和管理,以提高设备的运行效率、降低运维成本,并确保数据的安全性和完整性。本设计将结合当前物联网技术的发展趋势和实际应用需求,提出一个清晰、可扩展的物联网…...
python之Bible快速检索器
内容将会持续更新,有错误的地方欢迎指正,谢谢! python之Bible快速检索器 TechX 坚持将创新的科技带给世界! 拥有更好的学习体验 —— 不断努力,不断进步,不断探索 TechX —— 心探索、心进取! 助力快…...
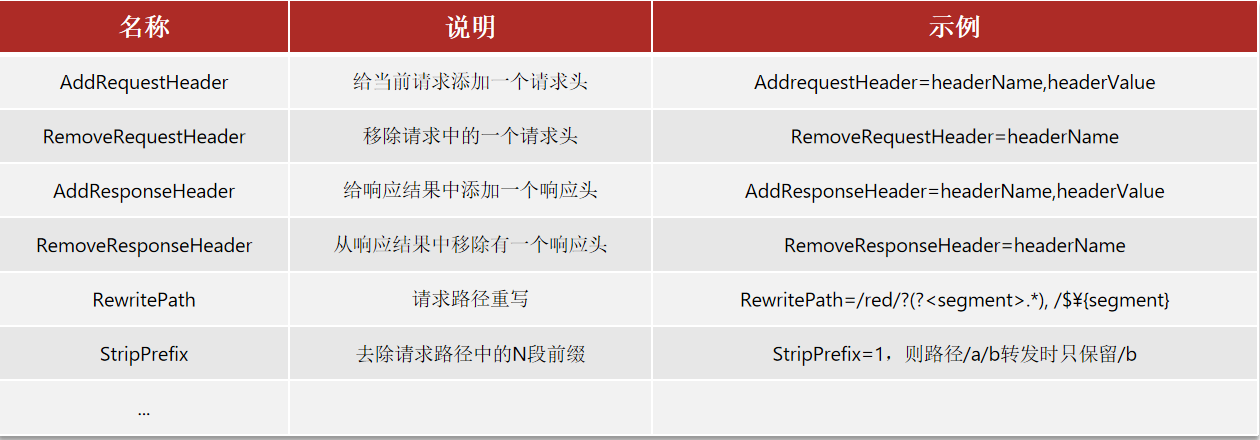
微服务-网关
网关:就是网络的关口,负责请求的路由、转发、身份校验 在SpringCloud中网关的实现包括两种: 快速入门 引入依赖 路由属性 网关路由对应的Java类型是RouteDefinition,其中常见的属性有: id:路由唯一标示ur…...

OpenAI项目爆改GLM——以基于llama_index的pdf阅读助手
最近在做大模型agent构建,看了许多不错的开源项目,但是clone下来就是一整个不能用,因为github上开源的项目基本都是基于openai做的。而如果想要转成国内大模型backbone,需要修改的地方挺多的。 现在以一个简单的pdf reader agent…...

如何在Java中处理ParseException异常?
如何在Java中处理ParseException异常? 大家好,我是免费搭建查券返利机器人省钱赚佣金就用微赚淘客系统3.0的小编,也是冬天不穿秋裤,天冷也要风度的程序猿! 在Java编程中,ParseException异常是开发者在处理…...

Java中如何解决BadPaddingException异常?
Java中如何解决BadPaddingException异常? 大家好,我是免费搭建查券返利机器人省钱赚佣金就用微赚淘客系统3.0的小编,也是冬天不穿秋裤,天冷也要风度的程序猿! 在Java编程中,BadPaddingException异常是一个…...
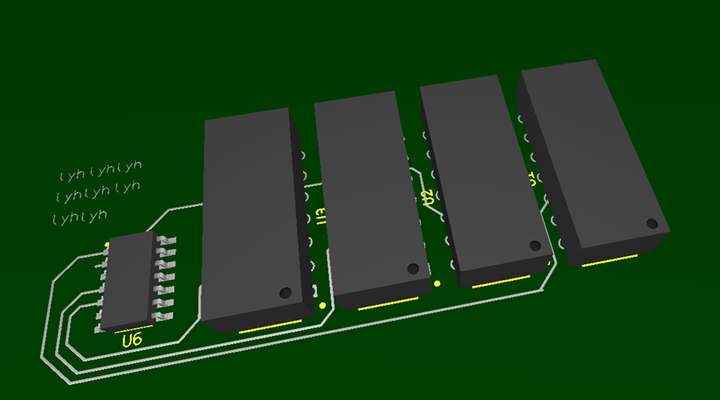
数电大作业-四输入表决器
(PCB和multisim仿真画的有很大问题,没有VCC输入和GND,没学过直接裸画的,之后会好好看视频学习) 应用背景: 四个评委,三个及以上评委同时按下通过按钮时,选手才能通过。否则不通过。…...

ONLYOFFICE 桌面编辑器 8.1重磅来袭:全新功能提升您的办公效率
文章目录 前言ONLYOFFICE 桌面编辑器8.1一、PDF编辑:告别“头痛”时刻二、幻灯片版式:秒变“设计大师”三、无缝切换:办公界的“快速通道”四、语言支持:全球通吃的“翻译官”五、 隐藏“连接到云”板块:摆脱“云”的束…...
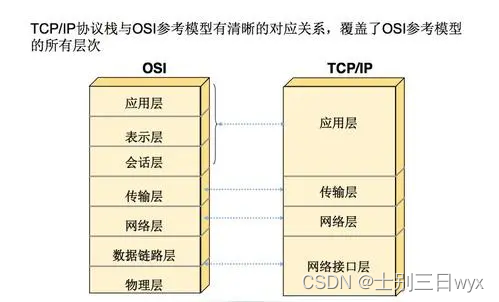
网络协议安全:TCP/IP协议栈的安全问题和解决方案
「作者简介」:北京冬奥会网络安全中国代表队,CSDN Top100,就职奇安信多年,以实战工作为基础对安全知识体系进行总结与归纳,著作适用于快速入门的 《网络安全自学教程》,内容涵盖Web安全、系统安全等12个知识域的一百多个知识点,持续更新。 这一章节我们需要知道TCP/IP每…...

VERYCLOUD睿鸿股份亮相亚马逊云科技中国峰会2024
5月30日,为期两天的亚马逊云科技中国峰会在上海世博中心圆满落幕。 多位大咖现场分享,生成式AI时代的数据战略,企业级AI应用,最新技术、产品重磅发布,创新行业解决方案 …… 作为亚马逊云科技的生态合作伙伴&#x…...
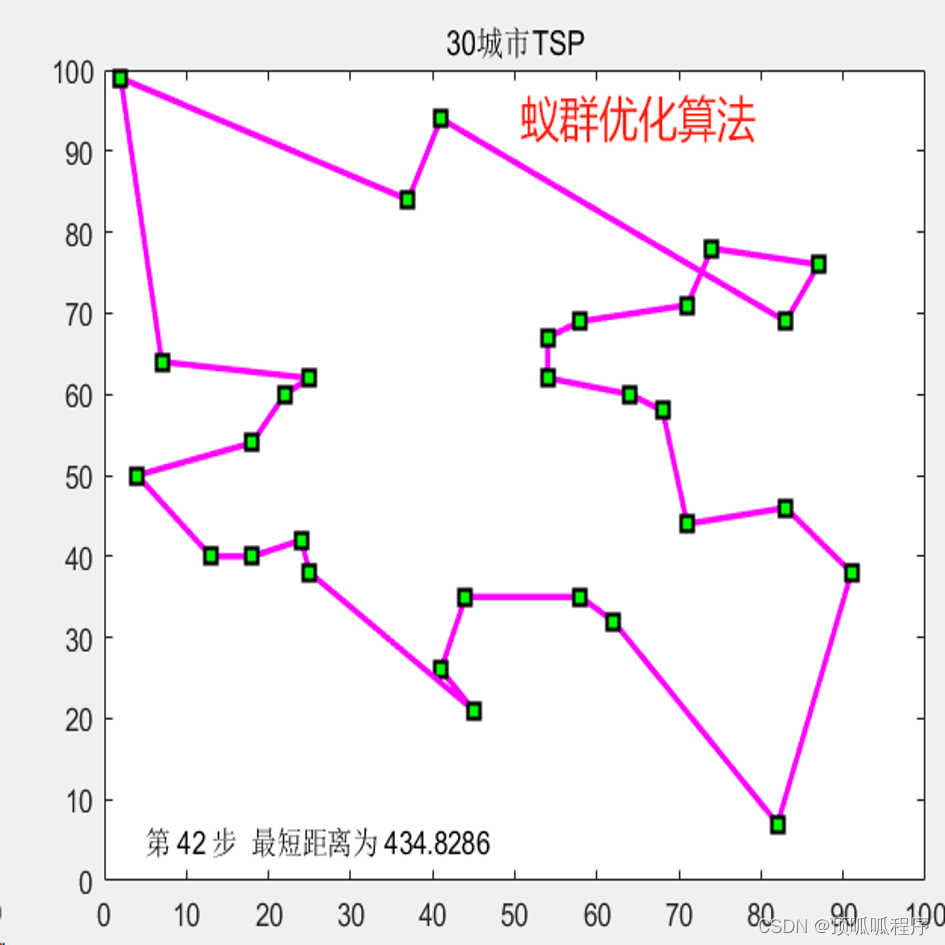
2-15 基于matlab的蚁群,模拟退火,遗传,神经网络,禁忌搜索等智能优化算法对TSP问题
基于matlab的蚁群,模拟退火,遗传,神经网络,禁忌搜索等智能优化算法对TSP问题。五种优化算法对多个城市路径进行规划,通过优化速度、距离可比较五种方法的优劣。程序已调通,可直接运行。 2-15 蚁群优化算法 …...

kylinos 国产操作系统离线安装firefox 麒麟操作系统安装新版本firefox
1. 火狐地址: 下载 Firefox 浏览器,这里有简体中文及其他 90 多种语言版本供您选择 2. 选择: 3. 下载完之后,上传到离线机器 4. 解压缩: tar -xvjf firefox-127.0.1.tar.bz2 5. 去点击解压后的文件夹,找…...
Python 类对象
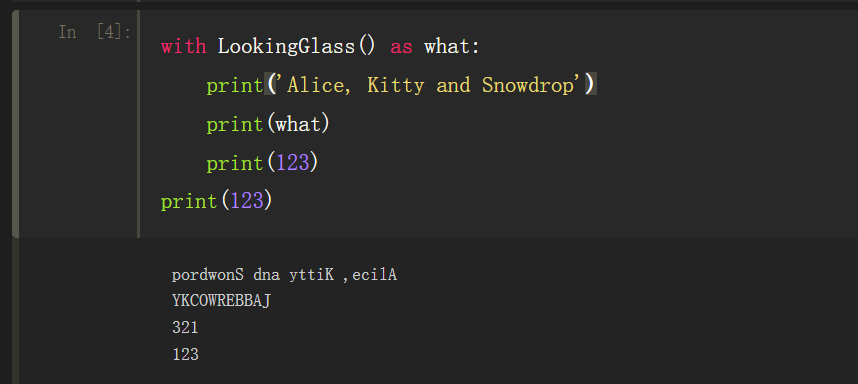
Python 类对象 经典迭代器 可迭代对象的定义: 使用内置的iter可以获取迭代器的对象。如果对象实现了能返回迭代器的__iter__方法,那么对象就是可迭代的。序列都可以迭代。实现了__getitem__方法,而且接受从0开始的索引,这种对象也…...

pytest unittest temp path单元测试创建临时文件
参考了这个:Test Files Creating a Temporal Directory in Python Unittests | Simple IT 🤘 Rocks 并使用pathlib做了优化: import tempfile import unittest from pathlib import Pathclass TestExample(unittest.TestCase):def test_exa…...
在线样机生成器,制作精美的电脑手机壁纸图片展示
在线样机生成器,可以制作精美的电脑手机壁纸图片展示。在线样机生成器支持不同的模型如浏览器、手机、笔记本电脑、手表等结合使用,帮助用户快速生成样机展示图片。下面小编就来和大家分享一款免费的在线样机生成器-壁纸样机生成器。 壁纸样机生成器是一…...
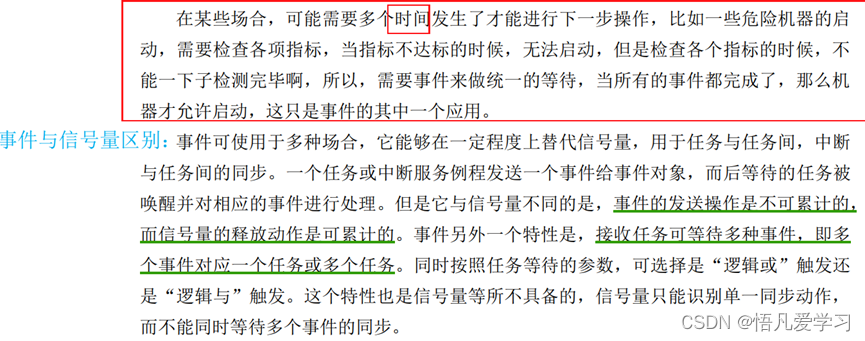
FreeRTOS实时操作系统
1.认识实施操作系统 1.1 裸机和实时操作系统 裸机: 早期嵌入式开发没有嵌入式操作系统的概念,直接操作裸机,在裸机上写程序,比如用51单片机基本就没有操作系统的概念。 通常把程序设计为前后台系统,主要分为两部分&a…...

5大核心功能带你探索Xournal++:跨平台数字手写笔记的无限可能
5大核心功能带你探索Xournal:跨平台数字手写笔记的无限可能 【免费下载链接】xournalpp Xournal is a handwriting notetaking software with PDF annotation support. Written in C with GTK3, supporting Linux (e.g. Ubuntu, Debian, Arch, SUSE), macOS and Win…...

ESP-CSI实战指南:用Wi-Fi信号实现无接触智能感知的完整解决方案
ESP-CSI实战指南:用Wi-Fi信号实现无接触智能感知的完整解决方案 【免费下载链接】esp-csi Applications based on Wi-Fi CSI (Channel state information), such as indoor positioning, human detection 项目地址: https://gitcode.com/GitHub_Trending/es/esp-c…...

GitHub 中文插件:3分钟让全球最大开发者平台说你的语言
GitHub 中文插件:3分钟让全球最大开发者平台说你的语言 【免费下载链接】github-chinese GitHub 汉化插件,GitHub 中文化界面。 (GitHub Translation To Chinese) 项目地址: https://gitcode.com/gh_mirrors/gi/github-chinese 作为一名开发者&am…...
)
从TROPOMI/NO2数据说起:新手在Linux下载NASA数据最容易踩的3个坑(及解决办法)
从TROPOMI/NO2数据说起:新手在Linux下载NASA数据最容易踩的3个坑(及解决办法) 当你第一次尝试在Linux系统上下载NASA的卫星数据时,可能会感到既兴奋又忐忑。TROPOMI/NO2这类大气成分监测数据对科研工作至关重要,但下载…...

得物小程序响应体解密
声明 本文章中所有内容仅供学习交流使用,不用于其他任何目的,抓包 内容、敏感网址、数据接口等均已做脱敏处理,严禁用于商业用途和非法用途,否则由此产生的一切后果均与作者无关!侵权通过头像私信或名字简介叫我删除博…...
如何让机器人感知未知扰动)
从“盲人摸象”到“心中有数”:ESO(扩张状态观测器)如何让机器人感知未知扰动
从“盲人摸象”到“心中有数”:ESO如何赋予机器人感知未知扰动的第六感 想象一下驾驶汽车穿越崎岖山路时,方向盘会自动补偿颠簸带来的偏移;或者工业机械臂在负载突然变化时,依然能保持精准轨迹——这些场景背后都隐藏着一个关键挑…...

告别熬夜与焦虑:用百考通AI 轻松搞定本科毕业论文,把毕业季还给自己
又到了毕业季,图书馆的灯亮到深夜,Word 文档里的字数像蜗牛一样爬行,导师的批注一遍遍染红屏幕……你是否也在经历这样的时刻:明明只想好好写完论文,却总被格式、查重、文献和逻辑绕得头晕眼花? 对大多…...
)
别再死记硬背了!用Multisim仿真带你直观理解运放负反馈的三大魔法(增益、带宽、阻抗)
别再死记硬背了!用Multisim仿真带你直观理解运放负反馈的三大魔法(增益、带宽、阻抗) 第一次接触运算放大器负反馈时,我盯着课本上那些晦涩的公式和抽象的理论推导,感觉就像在看天书。"增益灵敏度降低"、&qu…...

为什么92%的R用户在4.5升级后分块失败?——4步诊断法+3个隐藏参数修复清单
更多请点击: https://intelliparadigm.com 第一章:R 4.5分块失败现象与核心归因全景图 R 4.5 版本中,data.table::fread() 与 dplyr::bind_rows() 在处理超大 CSV 分块读取时频繁触发“分块失败(Chunk Failure)”&…...

Windows 11下用PaddleOCR 2.6.1训练专属OCR模型:从数据标注到模型部署的完整避坑指南
Windows 11下PaddleOCR 2.6.1定制化训练实战:从数据标注到生产部署的全链路解析 在数字化转型浪潮中,光学字符识别(OCR)技术正成为企业处理纸质文档、票据和证件信息的关键工具。当通用OCR模型无法满足特定业务场景的识别需求时&a…...