Android13 WMS窗口层级树
1,认识层级树
可以通过dumpsys activity containers 看到 WMS 层级树的结构
ACTIVITY MANAGER CONTAINERS (dumpsys activity containers)
ROOT type=undefined mode=fullscreen override-mode=undefined requested-bounds=[0,0][0,0] bounds=[0,0][1440,2960]#0 Display 0 name="Built-in Screen" type=undefined mode=fullscreen override-mode=fullscreen requested-bounds=[0,0][1440,2960] bounds=[0,0][1440,2960]#2 Leaf:36:36 type=undefined mode=fullscreen override-mode=undefined requested-bounds=[0,0][0,0] bounds=[0,0][1440,2960]#1 WindowToken{6cc524e type=2024 android.os.BinderProxy@8ffb949} type=undefined mode=fullscreen override-mode=undefined requested-bounds=[0,0][0,0] bounds=[0,0][1440,2960]#0 888c47c ScreenDecorOverlayBottom type=undefined mode=fullscreen override-mode=undefined requested-bounds=[0,0][0,0] bounds=[0,0][1440,2960]#0 WindowToken{4346895 type=2024 android.os.BinderProxy@ad2b04c} type=undefined mode=fullscreen override-mode=undefined requested-bounds=[0,0][0,0] bounds=[0,0][1440,2960]#0 da08538 ScreenDecorOverlay type=undefined mode=fullscreen override-mode=undefined requested-bounds=[0,0][0,0] bounds=[0,0][1440,2960]#1 HideDisplayCutout:32:35 type=undefined mode=fullscreen override-mode=undefined requested-bounds=[0,0][0,0] bounds=[0,0][1440,2960]#2 OneHanded:34:35 type=undefined mode=fullscreen override-mode=undefined requested-bounds=[0,0][0,0] bounds=[0,0][1440,2960]#0 FullscreenMagnification:34:35 type=undefined mode=fullscreen override-mode=undefined requested-bounds=[0,0][0,0] bounds=[0,0][1440,2960]#0 Leaf:34:35 type=undefined mode=fullscreen override-mode=undefined requested-bounds=[0,0][0,0] bounds=[0,0][1440,2960]#1 FullscreenMagnification:33:33 type=undefined mode=fullscreen override-mode=undefined requested-bounds=[0,0][0,0] bounds=[0,0][1440,2960]#0 Leaf:33:33 type=undefined mode=fullscreen override-mode=undefined requested-bounds=[0,0][0,0] bounds=[0,0][1440,2960]#0 OneHanded:32:32 type=undefined mode=fullscreen override-mode=undefined requested-bounds=[0,0][0,0] bounds=[0,0][1440,2960]#0 Leaf:32:32 type=undefined mode=fullscreen override-mode=undefined requested-bounds=[0,0][0,0] bounds=[0,0][1440,2960]#0 WindowedMagnification:0:31 type=undefined mode=fullscreen override-mode=undefined requested-bounds=[0,0][0,0] bounds=[0,0][1440,2960]#6 HideDisplayCutout:26:31 type=undefined mode=fullscreen override-mode=undefined requested-bounds=[0,0][0,0] bounds=[0,0][1440,2960]#0 OneHanded:26:31 type=undefined mode=fullscreen override-mode=undefined requested-bounds=[0,0][0,0] bounds=[0,0][1440,2960]#2 FullscreenMagnification:29:31 type=undefined mode=fullscreen override-mode=undefined requested-bounds=[0,0][0,0] bounds=[0,0][1440,2960]#0 Leaf:29:31 type=undefined mode=fullscreen override-mode=undefined requested-bounds=[0,0][0,0] bounds=[0,0][1440,2960]#1 Leaf:28:28 type=undefined mode=fullscreen override-mode=undefined requested-bounds=[0,0][0,0] bounds=[0,0][1440,2960]#0 FullscreenMagnification:26:27 type=undefined mode=fullscreen override-mode=undefined requested-bounds=[0,0][0,0] bounds=[0,0][1440,2960]#0 Leaf:26:27 type=undefined mode=fullscreen override-mode=undefined requested-bounds=[0,0][0,0] bounds=[0,0][1440,2960]#5 Leaf:24:25 type=undefined mode=fullscreen override-mode=undefined requested-bounds=[0,0][0,0] bounds=[0,0][1440,2960]#1 WindowToken{914ccc0 type=2024 android.os.BinderProxy@60ae43} type=undefined mode=fullscreen override-mode=undefined requested-bounds=[0,0][0,0] bounds=[0,0][1440,2960]#0 20f913e pip-dismiss-overlay type=undefined mode=fullscreen override-mode=undefined requested-bounds=[0,0][0,0] bounds=[0,0][1440,2960]#0 WindowToken{4af2b8f type=2019 android.os.BinderProxy@d5bc069} type=undefined mode=fullscreen override-mode=undefined requested-bounds=[0,0][0,0] bounds=[0,0][1440,2960]#0 e66fa25 NavigationBar0 type=undefined mode=fullscreen override-mode=undefined requested-bounds=[0,0][0,0] bounds=[0,0][1440,2960]#4 HideDisplayCutout:18:23 type=undefined mode=fullscreen override-mode=undefined requested-bounds=[0,0][0,0] bounds=[0,0][1440,2960]#0 OneHanded:18:23 type=undefined mode=fullscreen override-mode=undefined requested-bounds=[0,0][0,0] bounds=[0,0][1440,2960]#0 FullscreenMagnification:18:23 type=undefined mode=fullscreen override-mode=undefined requested-bounds=[0,0][0,0] bounds=[0,0][1440,2960]#0 Leaf:18:23 type=undefined mode=fullscreen override-mode=undefined requested-bounds=[0,0][0,0] bounds=[0,0][1440,2960]#3 OneHanded:17:17 type=undefined mode=fullscreen override-mode=undefined requested-bounds=[0,0][0,0] bounds=[0,0][1440,2960]#0 FullscreenMagnification:17:17 type=undefined mode=fullscreen override-mode=undefined requested-bounds=[0,0][0,0] bounds=[0,0][1440,2960]#0 Leaf:17:17 type=undefined mode=fullscreen override-mode=undefined requested-bounds=[0,0][0,0] bounds=[0,0][1440,2960]#0 WindowToken{2cb42e4 type=2040 android.os.BinderProxy@9c0076} type=undefined mode=fullscreen override-mode=undefined requested-bounds=[0,0][0,0] bounds=[0,0][1440,2960]#0 bbfae02 NotificationShade type=undefined mode=fullscreen override-mode=undefined requested-bounds=[0,0][0,0] bounds=[0,0][1440,2960]#2 HideDisplayCutout:16:16 type=undefined mode=fullscreen override-mode=undefined requested-bounds=[0,0][0,0] bounds=[0,0][1440,2960]#0 OneHanded:16:16 type=undefined mode=fullscreen override-mode=undefined requested-bounds=[0,0][0,0] bounds=[0,0][1440,2960]#0 FullscreenMagnification:16:16 type=undefined mode=fullscreen override-mode=undefined requested-bounds=[0,0][0,0] bounds=[0,0][1440,2960]#0 Leaf:16:16 type=undefined mode=fullscreen override-mode=undefined requested-bounds=[0,0][0,0] bounds=[0,0][1440,2960]#1 OneHanded:15:15 type=undefined mode=fullscreen override-mode=undefined requested-bounds=[0,0][0,0] bounds=[0,0][1440,2960]#0 FullscreenMagnification:15:15 type=undefined mode=fullscreen override-mode=undefined requested-bounds=[0,0][0,0] bounds=[0,0][1440,2960]#0 Leaf:15:15 type=undefined mode=fullscreen override-mode=undefined requested-bounds=[0,0][0,0] bounds=[0,0][1440,2960]#0 WindowToken{36a0a7c type=2000 android.os.BinderProxy@57ea84e} type=undefined mode=fullscreen override-mode=undefined requested-bounds=[0,0][0,0] bounds=[0,0][1440,2960]#0 f20fb5a StatusBar type=undefined mode=fullscreen override-mode=undefined requested-bounds=[0,0][0,0] bounds=[0,0][1440,2960]#0 HideDisplayCutout:0:14 type=undefined mode=fullscreen override-mode=undefined requested-bounds=[0,0][0,0] bounds=[0,0][1440,2960]#0 OneHanded:0:14 type=undefined mode=fullscreen override-mode=undefined requested-bounds=[0,0][0,0] bounds=[0,0][1440,2960]#1 ImePlaceholder:13:14 type=undefined mode=fullscreen override-mode=undefined requested-bounds=[0,0][0,0] bounds=[0,0][1440,2960]#0 ImeContainer type=undefined mode=fullscreen override-mode=undefined requested-bounds=[0,0][0,0] bounds=[0,0][1440,2960]#0 WindowToken{18b2fcb type=2011 android.os.Binder@f3da9a} type=undefined mode=fullscreen override-mode=undefined requested-bounds=[0,0][0,0] bounds=[0,0][1440,2960]#0 3a9ce61 InputMethod type=undefined mode=fullscreen override-mode=undefined requested-bounds=[0,0][0,0] bounds=[0,0][1440,2960]#0 FullscreenMagnification:0:12 type=undefined mode=fullscreen override-mode=undefined requested-bounds=[0,0][0,0] bounds=[0,0][1440,2960]#2 Leaf:3:12 type=undefined mode=fullscreen override-mode=undefined requested-bounds=[0,0][0,0] bounds=[0,0][1440,2960]#0 WindowToken{fc9ff07 type=2038 android.os.BinderProxy@d280149} type=undefined mode=fullscreen override-mode=undefined requested-bounds=[0,0][0,0] bounds=[0,0][1440,2960]#0 d5c8415 ShellDropTarget type=undefined mode=fullscreen override-mode=undefined requested-bounds=[0,0][0,0] bounds=[0,0][1440,2960]#1 DefaultTaskDisplayArea type=undefined mode=fullscreen override-mode=undefined requested-bounds=[0,0][0,0] bounds=[0,0][1440,2960]#2 Task=1 type=home mode=fullscreen override-mode=undefined requested-bounds=[0,0][0,0] bounds=[0,0][1440,2960]#0 Task=24 type=home mode=fullscreen override-mode=undefined requested-bounds=[0,0][0,0] bounds=[0,0][1440,2960]#0 ActivityRecord{7246b16 u0 com.android.launcher3/.uioverrides.QuickstepLauncher} t24} type=home mode=fullscreen override-mode=undefined requested-bounds=[0,0][0,0] bounds=[0,0][1440,2960]#0 bd08f5d com.android.launcher3/com.android.launcher3.uioverrides.QuickstepLauncher type=home mode=fullscreen override-mode=undefined requested-bounds=[0,0][0,0] bounds=[0,0][1440,2960]#1 Task=3 type=undefined mode=fullscreen override-mode=fullscreen requested-bounds=[0,0][0,0] bounds=[0,0][1440,2960]#0 Task=4 type=undefined mode=fullscreen override-mode=fullscreen requested-bounds=[0,0][0,0] bounds=[0,0][1440,2960]#1 Task=6 type=undefined mode=multi-window override-mode=multi-window requested-bounds=[0,0][0,0] bounds=[0,0][1440,2960]#0 Task=5 type=undefined mode=multi-window override-mode=multi-window requested-bounds=[0,0][0,0] bounds=[0,0][1440,2960]#0 Leaf:0:1 type=undefined mode=fullscreen override-mode=undefined requested-bounds=[0,0][0,0] bounds=[0,0][1440,2960]#0 WallpaperWindowToken{a0c14b1 token=android.os.Binder@c234b58} type=undefined mode=fullscreen override-mode=fullscreen requested-bounds=[0,0][0,0] bounds=[0,0][1440,2960]#0 b9a90a8 com.android.systemui.ImageWallpaper type=undefined mode=fullscreen override-mode=undefined requested-bounds=[0,0][0,0] bounds=[0,0][1440,2960]
可以看出,层级机构树一共有37层,层级越高,越接近我们的"眼睛",以上父子关系,做成图表格式,可以看的更直观,如下:

2,层级结构树的构建过程
SystemServer启动时,调用startOtherServices方法
private void startOtherServices(@NonNull TimingsTraceAndSlog t) {//省略t.traceBegin("SetWindowManagerService");mActivityManagerService.setWindowManager(wm);t.traceEnd();//省略
}
AMS.setWindowManager
public void setWindowManager(WindowManagerService wm) {synchronized (this) {mWindowManager = wm;mWmInternal = LocalServices.getService(WindowManagerInternal.class);mActivityTaskManager.setWindowManager(wm);}}
ATMS.setWindowManager
public void setWindowManager(WindowManagerService wm) {synchronized (mGlobalLock) {//省略mRootWindowContainer.setWindowManager(wm);//省略}}RootWindowContainer.setWindowManager
void setWindowManager(WindowManagerService wm) {//省略final Display[] displays = mDisplayManager.getDisplays();//得到系统有几个显示设备for (int displayNdx = 0; displayNdx < displays.length; ++displayNdx) {//遍历displayfinal Display display = displays[displayNdx];final DisplayContent displayContent = new DisplayContent(display, this);//创建DisplayContentaddChild(displayContent, POSITION_BOTTOM);//将DisplayContent挂在root下if (displayContent.mDisplayId == DEFAULT_DISPLAY) {mDefaultDisplay = displayContent;}}//省略}对于每个显示设备,系统都会创建一个DisplayContent对象,并将DisplayContent对象挂在root下。接着来看一下DisplayContent的创建
DisplayContent(Display display, RootWindowContainer root) {//省略configureSurfaces(pendingTransaction);//省略
}
configureSurfaces
private void configureSurfaces(Transaction transaction) {final SurfaceControl.Builder b = mWmService.makeSurfaceBuilder(mSession).setOpaque(true).setContainerLayer().setCallsite("DisplayContent");mSurfaceControl = b.setName(getName()).setContainerLayer().build();if (mDisplayAreaPolicy == null) {// Setup the policy and build the display area hierarchy.// Build the hierarchy only after creating the surface so it is reparented correctlymDisplayAreaPolicy = mWmService.getDisplayAreaPolicyProvider().instantiate(mWmService, this /* content */, this /* root */,mImeWindowsContainer);}//省略
getDisplayAreaPolicyProvider得到的是DefaultProvider对象,然后调用其instantiate方法。源码路径:frameworks/base/services/core/java/com/android/server/wm/DisplayAreaPolicy.java
static final class DefaultProvider implements DisplayAreaPolicy.Provider {@Overridepublic DisplayAreaPolicy instantiate(WindowManagerService wmService,DisplayContent content, RootDisplayArea root,DisplayArea.Tokens imeContainer) {final TaskDisplayArea defaultTaskDisplayArea = new TaskDisplayArea(content, wmService,"DefaultTaskDisplayArea", FEATURE_DEFAULT_TASK_CONTAINER);//创建DefaultTaskDisplayAreafinal List<TaskDisplayArea> tdaList = new ArrayList<>();tdaList.add(defaultTaskDisplayArea);// Define the features that will be supported under the root of the whole logical// display. The policy will build the DisplayArea hierarchy based on this.final HierarchyBuilder rootHierarchy = new HierarchyBuilder(root);// Set the essential containers (even if the display doesn't support IME).rootHierarchy.setImeContainer(imeContainer).setTaskDisplayAreas(tdaList);//1if (content.isTrusted()) {// Only trusted display can have system decorations.configureTrustedHierarchyBuilder(rootHierarchy, wmService, content);//2}// Instantiate the policy with the hierarchy defined above. This will create and attach// all the necessary DisplayAreas to the root.return new DisplayAreaPolicyBuilder().setRootHierarchy(rootHierarchy).build(wmService);//3}首先创建HierarchyBuilder对象,注释1处将imeContainer和tdaList(tdaList此时只有一个元素就是DefaultTaskDisplayArea)分别保存在HierarchyBuilder对象中的mImeContainer和mTaskDisplayAreas中。注释2处创建Feature并设置Feature的层级。注释3处开始构建层级树
2.1,创建Feature
configureTrustedHierarchyBuilder
//frameworks/base/services/core/java/com/android/server/wm/DisplayAreaPolicy.java
private void configureTrustedHierarchyBuilder(HierarchyBuilder rootHierarchy,WindowManagerService wmService, DisplayContent content) {// WindowedMagnification should be on the top so that there is only one surface// to be magnified.rootHierarchy.addFeature(new Feature.Builder(wmService.mPolicy, "WindowedMagnification",FEATURE_WINDOWED_MAGNIFICATION).upTo(TYPE_ACCESSIBILITY_MAGNIFICATION_OVERLAY).except(TYPE_ACCESSIBILITY_MAGNIFICATION_OVERLAY)// Make the DA dimmable so that the magnify window also mirrors the dim layer..setNewDisplayAreaSupplier(DisplayArea.Dimmable::new).build());if (content.isDefaultDisplay) {// Only default display can have cutout.// See LocalDisplayAdapter.LocalDisplayDevice#getDisplayDeviceInfoLocked.rootHierarchy.addFeature(new Feature.Builder(wmService.mPolicy, "HideDisplayCutout",FEATURE_HIDE_DISPLAY_CUTOUT).all().except(TYPE_NAVIGATION_BAR, TYPE_NAVIGATION_BAR_PANEL, TYPE_STATUS_BAR,TYPE_NOTIFICATION_SHADE).build()).addFeature(new Feature.Builder(wmService.mPolicy, "OneHanded",FEATURE_ONE_HANDED).all().except(TYPE_NAVIGATION_BAR, TYPE_NAVIGATION_BAR_PANEL,TYPE_SECURE_SYSTEM_OVERLAY).build());}rootHierarchy.addFeature(new Feature.Builder(wmService.mPolicy, "FullscreenMagnification",FEATURE_FULLSCREEN_MAGNIFICATION).all().except(TYPE_ACCESSIBILITY_MAGNIFICATION_OVERLAY, TYPE_INPUT_METHOD,TYPE_INPUT_METHOD_DIALOG, TYPE_MAGNIFICATION_OVERLAY,TYPE_NAVIGATION_BAR, TYPE_NAVIGATION_BAR_PANEL).build()).addFeature(new Feature.Builder(wmService.mPolicy, "ImePlaceholder",FEATURE_IME_PLACEHOLDER).and(TYPE_INPUT_METHOD, TYPE_INPUT_METHOD_DIALOG).build());}}
可以看出,这里创建了几个Feature,以及它们对应的层级是:
- WindowedMagnification:0~31
- HideDisplayCutout: 0~ 14 16 18~ 23 26~35
- OneHanded:0~ 23 26~ 32 34~35
- FullscreenMagnification:0~ 12 15~ 23 26~ 27 29~ 31 33~35
- ImePlaceholder:13 14
至于层级是怎么得出来的,具体查看Feature.Builder的 all,except等等方法。Feature以及对应的层级设置好之后,接下来就是要开始构建层级树了。
2.2, 层级树的构建
源码路径:frameworks/base/services/core/java/com/android/server/wm/DisplayAreaPolicyBuilder.java
Result build(WindowManagerService wmService) {validate();// Attach DA group roots to screen hierarchy before adding windows to group hierarchies.mRootHierarchyBuilder.build(mDisplayAreaGroupHierarchyBuilders);//省略}
mRootHierarchyBuilder就是之前创建的HierarchyBuilder对象,调用其build方法。构建层级树的核心就是该方法,来分步分析它
2.2.1 挂载 Feature
private void build(@Nullable List<HierarchyBuilder> displayAreaGroupHierarchyBuilders) {final WindowManagerPolicy policy = mRoot.mWmService.mPolicy;final int maxWindowLayerCount = policy.getMaxWindowLayer() + 1;// 37final DisplayArea.Tokens[] displayAreaForLayer =new DisplayArea.Tokens[maxWindowLayerCount];final Map<Feature, List<DisplayArea<WindowContainer>>> featureAreas =new ArrayMap<>(mFeatures.size());//前面创建了5个Feature,所以size为5for (int i = 0; i < mFeatures.size(); i++) {featureAreas.put(mFeatures.get(i), new ArrayList<>());}PendingArea[] areaForLayer = new PendingArea[maxWindowLayerCount];final PendingArea root = new PendingArea(null, 0, null);Arrays.fill(areaForLayer, root);//此时里面的每个元素都是root 0,0// Create DisplayAreas to cover all defined features.final int size = mFeatures.size();for (int i = 0; i < size; i++) {final Feature feature = mFeatures.get(i);PendingArea featureArea = null;for (int layer = 0; layer < maxWindowLayerCount; layer++) {if (feature.mWindowLayers[layer]) {if (featureArea == null || featureArea.mParent != areaForLayer[layer]) {// No suitable DisplayArea:// Create a new one under the previous area (as parent) for this layer.featureArea = new PendingArea(feature, layer, areaForLayer[layer]);areaForLayer[layer].mChildren.add(featureArea);}areaForLayer[layer] = featureArea;} else {featureArea = null;}}}
创建一个临时的层级结构树PendingArea(后面还需要转换成真正的层级树的),对于Feature,其构造结果如下

2.2.2,挂载leaf叶子结点
private void build(@Nullable List<HierarchyBuilder> displayAreaGroupHierarchyBuilders) {//省略// Create Tokens as leaf for every layer.PendingArea leafArea = null;int leafType = LEAF_TYPE_TOKENS;for (int layer = 0; layer < maxWindowLayerCount; layer++) {int type = typeOfLayer(policy, layer);// Check whether we can reuse the same Tokens with the previous layer. This happens// if the previous layer is the same type as the current layer AND there is no// feature that applies to only one of them.if (leafArea == null || leafArea.mParent != areaForLayer[layer]|| type != leafType) {// Create a new Tokens for this layer.leafArea = new PendingArea(null /* feature */, layer, areaForLayer[layer]);areaForLayer[layer].mChildren.add(leafArea);leafType = type;if (leafType == LEAF_TYPE_TASK_CONTAINERS) {// We use the passed in TaskDisplayAreas for task container type of layer.// Skip creating Tokens even if there is no TDA.addTaskDisplayAreasToApplicationLayer(areaForLayer[layer]);addDisplayAreaGroupsToApplicationLayer(areaForLayer[layer],displayAreaGroupHierarchyBuilders);leafArea.mSkipTokens = true;} else if (leafType == LEAF_TYPE_IME_CONTAINERS) {// We use the passed in ImeContainer for ime container type of layer.// Skip creating Tokens even if there is no ime container.leafArea.mExisting = mImeContainer;leafArea.mSkipTokens = true;}}leafArea.mMaxLayer = layer;}
}
首先也是创建临时的叶子PendingArea,leafType默认为LEAF_TYPE_TOKENS,在typeOfLayer方法中,对于IME和Application 有处理,将其leafType设为LEAF_TYPE_TASK_CONTAINERS和LEAF_TYPE_IME_CONTAINERS。注意对于这两种类型,有特殊的处理,mSkipTokens设置为了true,后续将临时的结构树转成真正的层级树的时候有用。
经过这一步,此时结构树的构造结果如下

2.2.3 将临时的结构树转成真正的结构树
在build方法的最后,调用instantiateChildren方法,进行结构树的转换
void instantiateChildren(DisplayArea<DisplayArea> parent, DisplayArea.Tokens[] areaForLayer,int level, Map<Feature, List<DisplayArea<WindowContainer>>> areas) {mChildren.sort(Comparator.comparingInt(pendingArea -> pendingArea.mMinLayer));for (int i = 0; i < mChildren.size(); i++) {final PendingArea child = mChildren.get(i);final DisplayArea area = child.createArea(parent, areaForLayer);//转换if (area == null) {// TaskDisplayArea and ImeContainer can be set at different hierarchy, so it can// be null.continue;}parent.addChild(area, WindowContainer.POSITION_TOP);if (child.mFeature != null) {areas.get(child.mFeature).add(area);}child.instantiateChildren(area, areaForLayer, level + 1, areas);//迭代的过程}}
在createArea中,对于IME和Application Layer是有特殊处理的,删掉上面对应结点下的leaf叶子,最终转换好的结构树如下

相关文章:
Android13 WMS窗口层级树
1,认识层级树 可以通过dumpsys activity containers 看到 WMS 层级树的结构 ACTIVITY MANAGER CONTAINERS (dumpsys activity containers) ROOT typeundefined modefullscreen override-modeundefined requested-bounds[0,0][0,0] bounds[0,0][1440,2960]#0 Displa…...

计算机毕业设计Python+LSTM+Tensorflow股票分析预测 基金分析预测 股票爬虫 大数据毕业设计 深度学习 机器学习 数据可视化 人工智能
基于TensorFlow-LSTM的股票预测系统开题报告 一、研究背景与意义 随着信息技术的飞速发展,股票市场作为现代经济活动的重要组成部分,其价格波动受到广泛关注。投资者们迫切希望通过科学的方法预测股票价格,以优化投资决策,实现利…...

仓库管理系统14--仓库设置
1、添加窗体 <UserControl x:Class"West.StoreMgr.View.StoreView"xmlns"http://schemas.microsoft.com/winfx/2006/xaml/presentation"xmlns:x"http://schemas.microsoft.com/winfx/2006/xaml"xmlns:mc"http://schemas.openxmlformats.…...
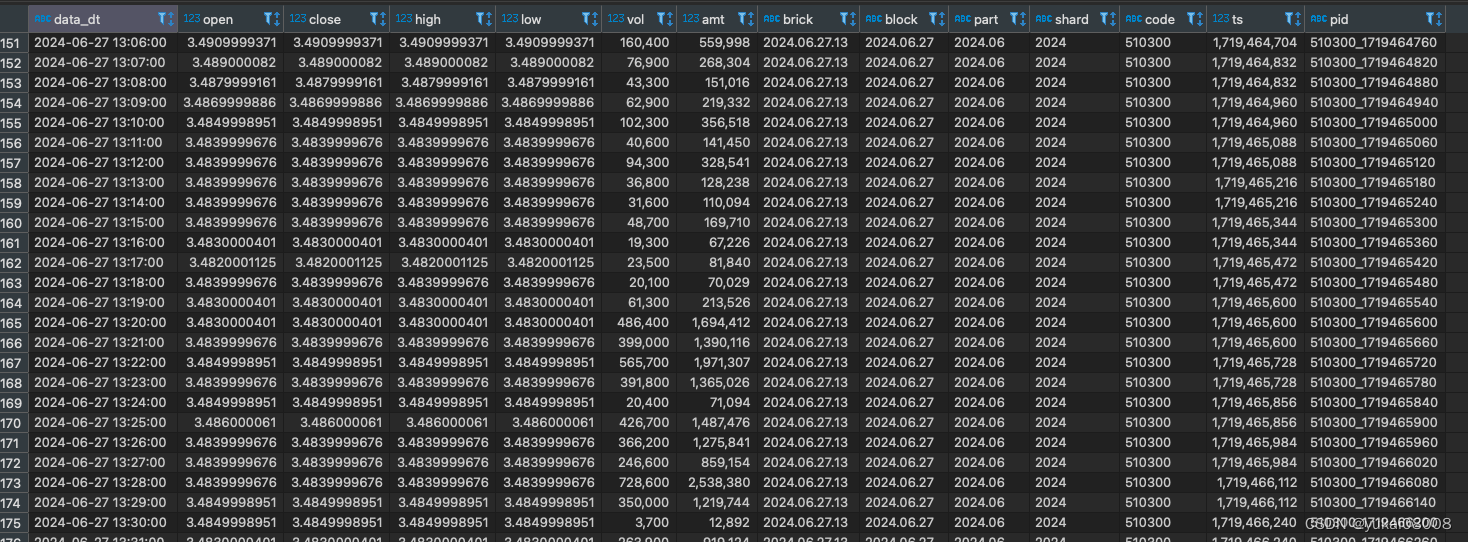
Python 算法交易实验73 QTV200第二步: 数据清洗并写入ClickHouse
说明 先检查一下昨天启动的worker是否正常工作,然后做一些简单的清洗,存入clickhouse。 内容 1 检查数据 from Basefuncs import * # 将一般字符串转为UCS 名称 def dt_str2ucs_blockname(some_dt_str):some_dt_str1 some_dt_str.replace(-,.).re…...

记录:有趣的C#多元运算符 ? : 表达式写法
有时候用 if //...Whatre you she wanna go else if //...do do do else //...and i know something just like this... 感觉代码太多了怎么优雅的、高端的替换? 看个高端的栗子菊: LedCOM["parity"] ledData[4] "N" ? …...

华宽通中标长沙市政务共性能力建设项目,助力智慧政务建设新飞跃
在数字化浪潮的推动下,长沙市政府正积极拥抱智慧城市建设,以科技力量提升政务服务效能。华宽通凭借其卓越的技术实力与丰富的项目经验,成功中标长沙市政务共性能力建设项目,这无疑是对华宽通在智慧城市领域实力的高度认可。 华宽…...

[面试题]计算机网络
[面试题]Java【基础】[面试题]Java【虚拟机】[面试题]Java【并发】[面试题]Java【集合】[面试题]MySQL[面试题]Maven[面试题]Spring Boot[面试题]Spring Cloud[面试题]Spring MVC[面试题]Spring[面试题]MyBatis[面试题]Nginx[面试题]缓存[面试题]Redis[面试题]消息队列[面试题]…...

企业级低代码开发效率变革赋能业务增长
企业级低代码开发已经成为当今软件开发领域的一大趋势,它为企业带来了前所未有的效率变革,从而赋能业务增长。本文将围绕这一主题,深入探讨低代码开发的概念、优势以及如何在企业级应用中实现高效的低代码开发,以助力我国企业实现…...
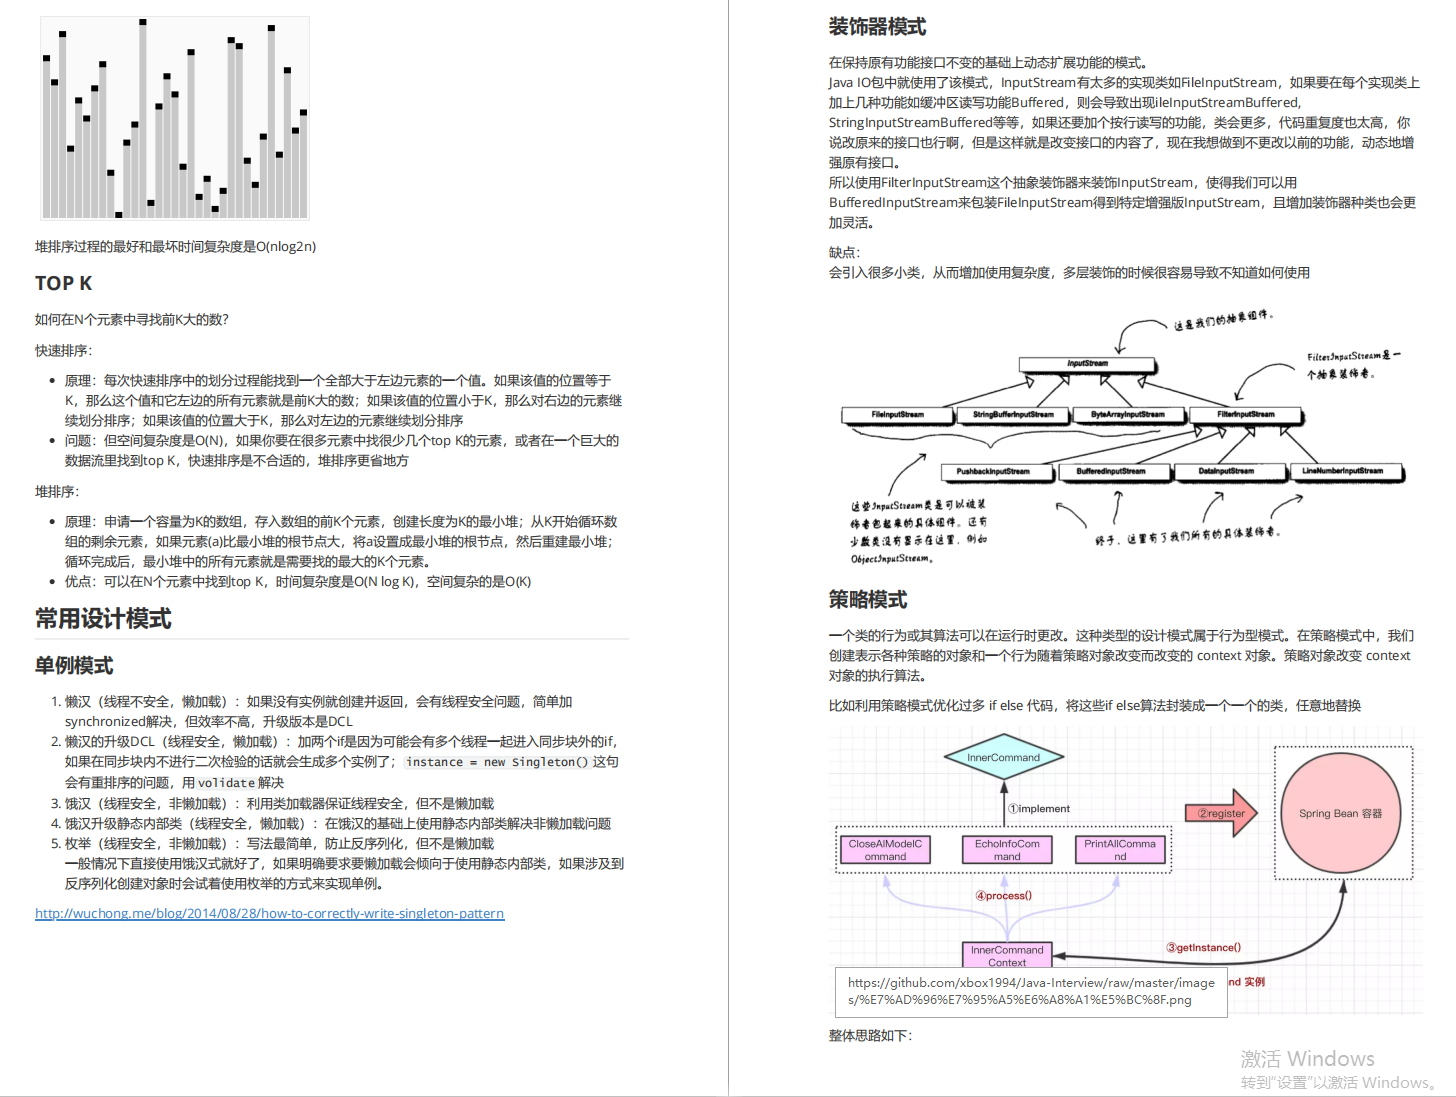
2024最新总结:1500页金三银四面试宝典 记录35轮大厂面试(都是面试重点)
学习是你这个职业一辈子的事 手里有个 1 2 3,不要想着去怼别人的 4 5 6,因为还有你不知道的 7 8 9。保持空瓶心态从 0 开始才能学到 10 全。 毕竟也是跳槽高峰期,我还是为大家准备了这份1500页金三银四宝典,记录的都是真实大厂面…...

使用Spring Boot和Thymeleaf构建动态Web页面
使用Spring Boot和Thymeleaf构建动态Web页面 大家好,我是免费搭建查券返利机器人省钱赚佣金就用微赚淘客系统3.0的小编,也是冬天不穿秋裤,天冷也要风度的程序猿!今天,我们将探讨如何利用Spring Boot和Thymeleaf构建动…...

扫盲之webSocket
介绍 webSocket 是一种协议,设计用于在客户端和服务器之间提供低延迟、全双工、和长期运行的连接。 全双工:通信的两个参与方可以同时发送和接收数据,不需要等待对方的响应或传输完成 websocket就是为了解决实时通信的问题 建立webSocke…...

一些硬件知识(十二)
1、请说明一下滤波磁珠和滤波电感的区别。 因此磁珠通常用于模数地的连接。 磁珠由导线穿过铁氧体组成,直流电阻很小,在低频时阻抗也很小,对直流信号几乎没有影响。 在高频(几十兆赫兹以上)时磁珠阻抗比较大࿰…...

Adobe Acrobat编辑器最新版下载安装 Adobe Acrobat版本齐全!
功能强大,Adobe Acrobat无疑是PDF文档处理领域的翘楚。这款软件集多种PDF文档处理功能于一身,不仅使得用户可以轻松地编辑PDF文档,更能轻松应对转换和合并等多种需求。 在编辑功能上,Adobe Acrobat的表现尤为出色。无论是添加文字…...

k8s如何使用 HPA 实现自动扩展
使用Horizontal Pod Autoscaler (HPA) 实验目标: 学习如何使用 HPA 实现自动扩展。 实验步骤: 创建一个 Deployment,并设置 CPU 或内存的资源请求。创建一个 HPA,设置扩展策略。生成负载,观察 HPA 如何自动扩展 Pod…...
Hi3861 OpenHarmony嵌入式应用入门--0.96寸液晶屏 iic驱动ssd1306
使用iic驱动ssd1306,代码来源hihope\hispark_pegasus\demo\12_ssd1306 本样例提供了一个HarmonyOS IoT硬件接口的SSD1306 OLED屏驱动库,其功能如下: 内置了128*64 bit的内存缓冲区,支持全屏刷新;优化了屏幕刷新速率,…...

代码随想录训练营第二十二天 77组合
第一题: 原题链接:77. 组合 - 力扣(LeetCode) 思路: 经典的回溯模板题: 终止条件,当中间变量用来存储单个结果的大小等于k,则将中间变量存放到结果数组中。 一个for循环横向遍历…...
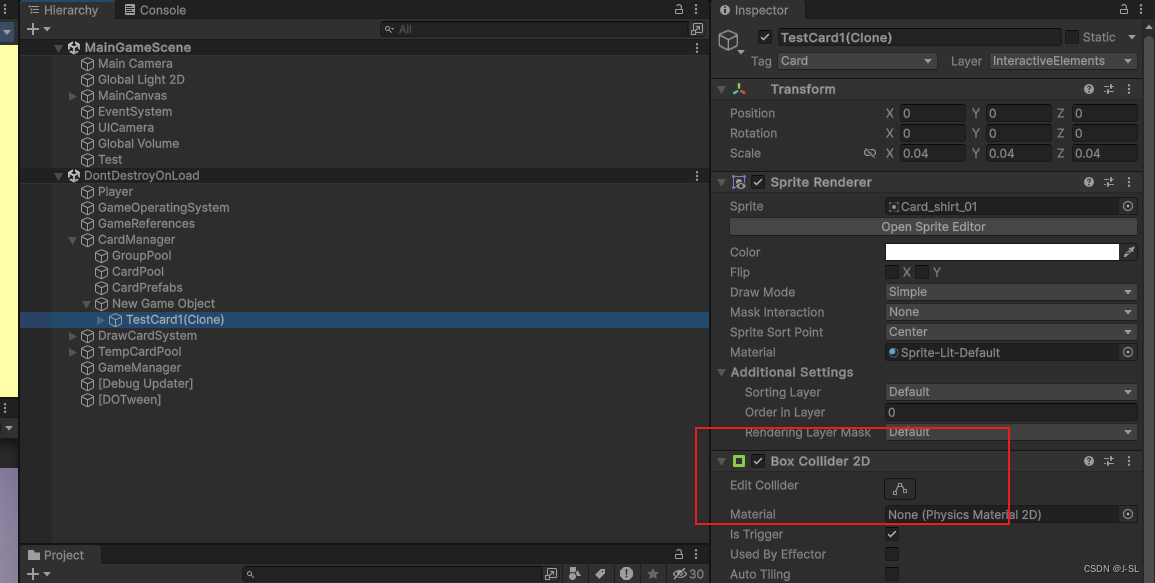
Unity踩坑记录
1. 如果同时在父物体和子物体上挂载BoxCollider,那么当使用: private void OnTriggerEnter2D(Collider2D collision){if (collision.CompareTag("CardGroup")){_intersectCardGroups.Add(collision.GetComponent<CardGroup>());}} 来判…...

内容安全复习 1 - 信息内容安全概述
文章目录 信息内容安全简介网络空间信息内容安全大模型 人工智能简介 信息内容安全简介 网络空间 网络空间是融合物理域、信息域、认知域和社会域,控制实体行为的信息活动空间。 上图展示了网络空间安全的结构。可以看到将网络空间划分为了网络域和内容域两个部分。…...

【深度学习】python之人工智能应用篇--跨模态生成技术
跨模态生成技术概述 跨模态生成技术是一种将不同模态的数据(如文本、图像、音频、视频等)进行融合和转换的技术。其目标是通过将一个模态的数据作为输入,生成与之对应的另一个模态的输出。这种技术对于突破单一模态的局限性,提高…...

springboot中获取某个注解下面的某个方法的方法名,参数值等等详细实例
在Spring Boot应用中,获取某个类或方法上的注解及其相关信息,包括方法名称、参数值等,通常涉及到反射和Spring的AOP(面向切面编程)特性。下面是一个示例,展示如何利用Spring AOP的Around注解来拦截带有特定…...

Python爬虫实战:研究MechanicalSoup库相关技术
一、MechanicalSoup 库概述 1.1 库简介 MechanicalSoup 是一个 Python 库,专为自动化交互网站而设计。它结合了 requests 的 HTTP 请求能力和 BeautifulSoup 的 HTML 解析能力,提供了直观的 API,让我们可以像人类用户一样浏览网页、填写表单和提交请求。 1.2 主要功能特点…...
C++实现分布式网络通信框架RPC(3)--rpc调用端
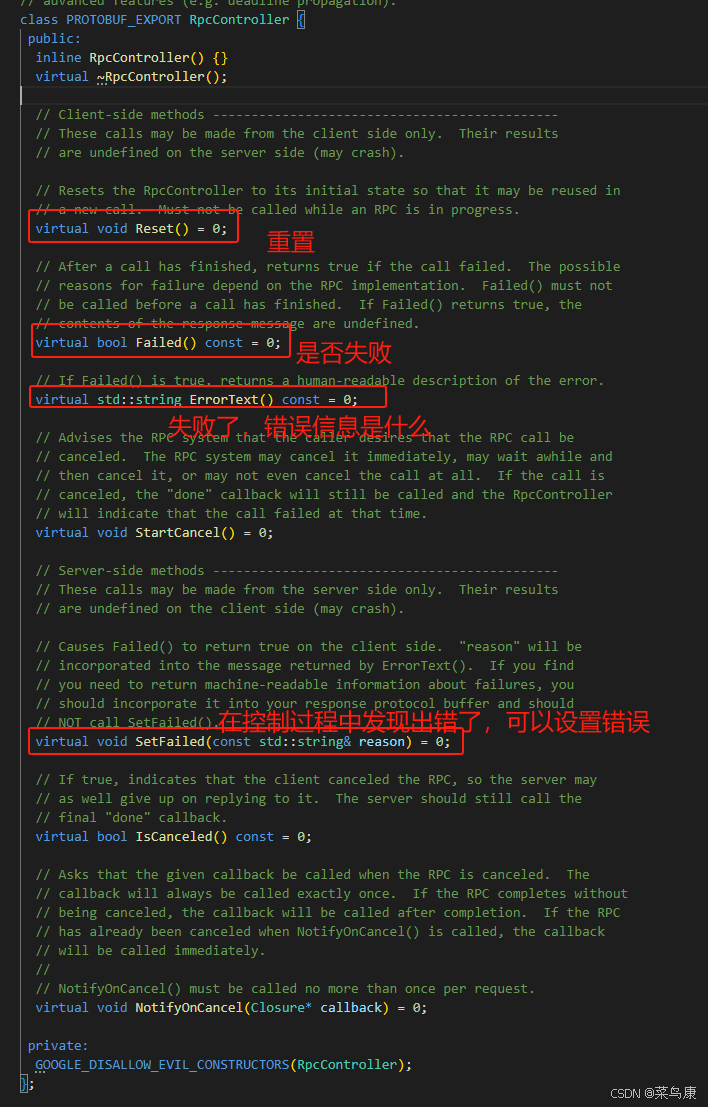
目录 一、前言 二、UserServiceRpc_Stub 三、 CallMethod方法的重写 头文件 实现 四、rpc调用端的调用 实现 五、 google::protobuf::RpcController *controller 头文件 实现 六、总结 一、前言 在前边的文章中,我们已经大致实现了rpc服务端的各项功能代…...

Linux 文件类型,目录与路径,文件与目录管理
文件类型 后面的字符表示文件类型标志 普通文件:-(纯文本文件,二进制文件,数据格式文件) 如文本文件、图片、程序文件等。 目录文件:d(directory) 用来存放其他文件或子目录。 设备…...

循环冗余码校验CRC码 算法步骤+详细实例计算
通信过程:(白话解释) 我们将原始待发送的消息称为 M M M,依据发送接收消息双方约定的生成多项式 G ( x ) G(x) G(x)(意思就是 G ( x ) G(x) G(x) 是已知的)࿰…...
基于Flask实现的医疗保险欺诈识别监测模型
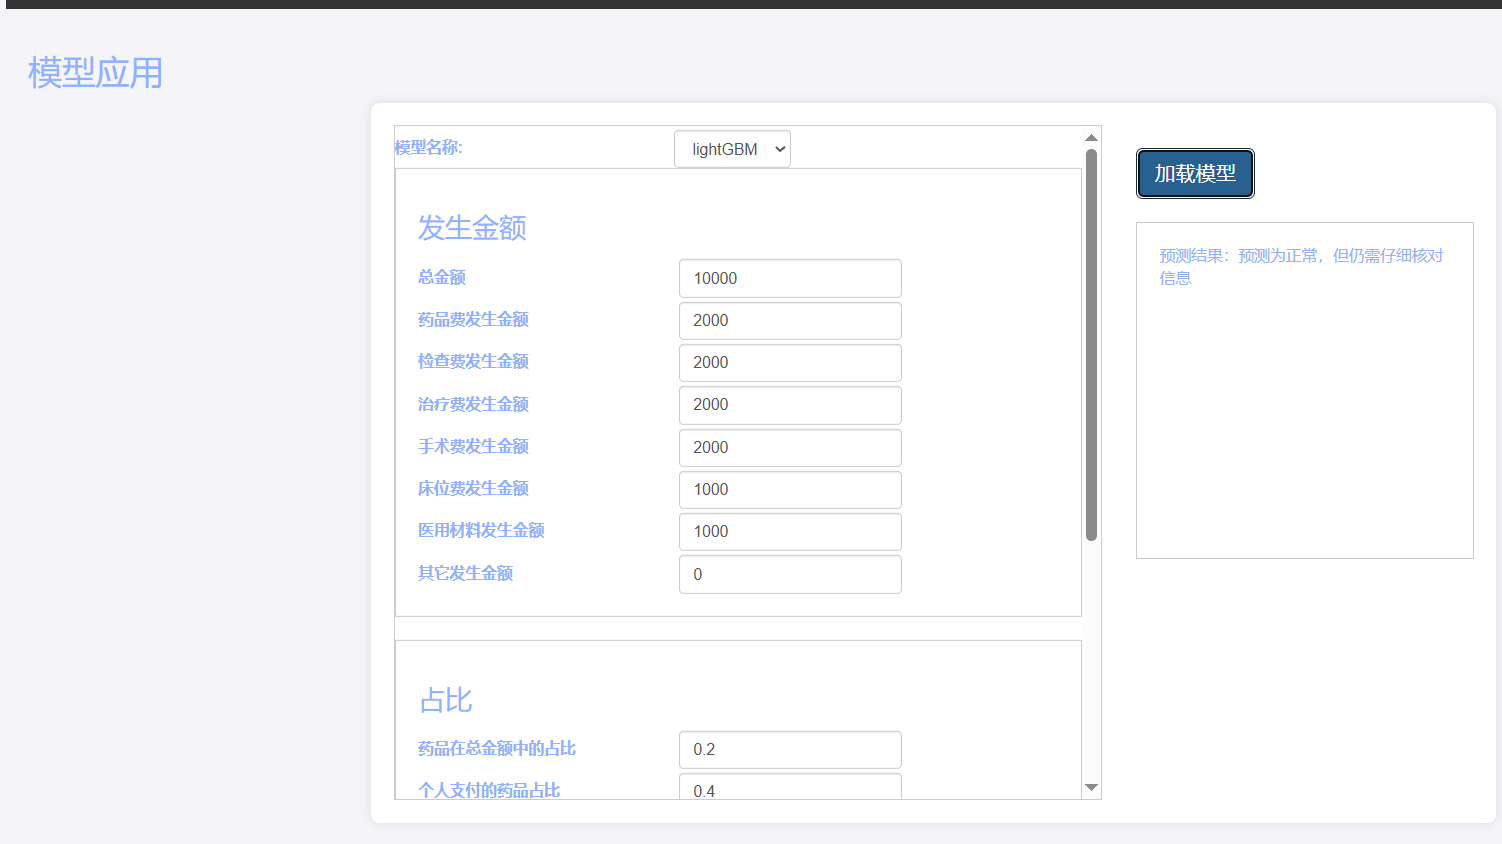
基于Flask实现的医疗保险欺诈识别监测模型 项目截图 项目简介 社会医疗保险是国家通过立法形式强制实施,由雇主和个人按一定比例缴纳保险费,建立社会医疗保险基金,支付雇员医疗费用的一种医疗保险制度, 它是促进社会文明和进步的…...

【Go】3、Go语言进阶与依赖管理
前言 本系列文章参考自稀土掘金上的 【字节内部课】公开课,做自我学习总结整理。 Go语言并发编程 Go语言原生支持并发编程,它的核心机制是 Goroutine 协程、Channel 通道,并基于CSP(Communicating Sequential Processes࿰…...

Axios请求超时重发机制
Axios 超时重新请求实现方案 在 Axios 中实现超时重新请求可以通过以下几种方式: 1. 使用拦截器实现自动重试 import axios from axios;// 创建axios实例 const instance axios.create();// 设置超时时间 instance.defaults.timeout 5000;// 最大重试次数 cons…...
的原因分类及对应排查方案)
JVM暂停(Stop-The-World,STW)的原因分类及对应排查方案
JVM暂停(Stop-The-World,STW)的完整原因分类及对应排查方案,结合JVM运行机制和常见故障场景整理而成: 一、GC相关暂停 1. 安全点(Safepoint)阻塞 现象:JVM暂停但无GC日志,日志显示No GCs detected。原因:JVM等待所有线程进入安全点(如…...

智能AI电话机器人系统的识别能力现状与发展水平
一、引言 随着人工智能技术的飞速发展,AI电话机器人系统已经从简单的自动应答工具演变为具备复杂交互能力的智能助手。这类系统结合了语音识别、自然语言处理、情感计算和机器学习等多项前沿技术,在客户服务、营销推广、信息查询等领域发挥着越来越重要…...

人工智能--安全大模型训练计划:基于Fine-tuning + LLM Agent
安全大模型训练计划:基于Fine-tuning LLM Agent 1. 构建高质量安全数据集 目标:为安全大模型创建高质量、去偏、符合伦理的训练数据集,涵盖安全相关任务(如有害内容检测、隐私保护、道德推理等)。 1.1 数据收集 描…...