Arduino - LED 矩阵
Arduino - LED 矩阵
Arduino - LED Matrix
LED matrix display, also known as LED display, or dot matrix display, are wide-used. In this tutorial, we are going to learn:
LED矩阵显示器,也称为LED显示器,或点阵显示器,应用广泛。在本教程中,我们将学习:
- LED matrix LED矩阵
- How to connect Arduino to 8x8 LED matrix
如何将Arduino连接到8x8 LED矩阵 - How to connect Arduino to 32x8 LED matrix
如何将Arduino连接到32x8 LED矩阵 - How to connect Arduino to display text, numbers, and animated effects on the LED matrix.
如何连接Arduino以在LED矩阵上显示文本,数字和动画效果。
After that, you can easily adapt the code for other LED matrices such as 16x8 LED matrix, 64x8 LEd matrix …
之后,您可以轻松地将代码调整为其他 LED 矩阵,例如 16x8 LED 矩阵、64x8 LEd 矩阵…
About LED Matrix 关于LED Matrix
There are many kinds of LED Matrix. With Arduino, the MAX7219-based LED matrix is widely used. MAX7219-based LED matrix has the following features:
LED矩阵有很多种。在Arduino中,基于MAX7219的LED矩阵被广泛使用。基于MAX7219的LED矩阵具有以下特点:
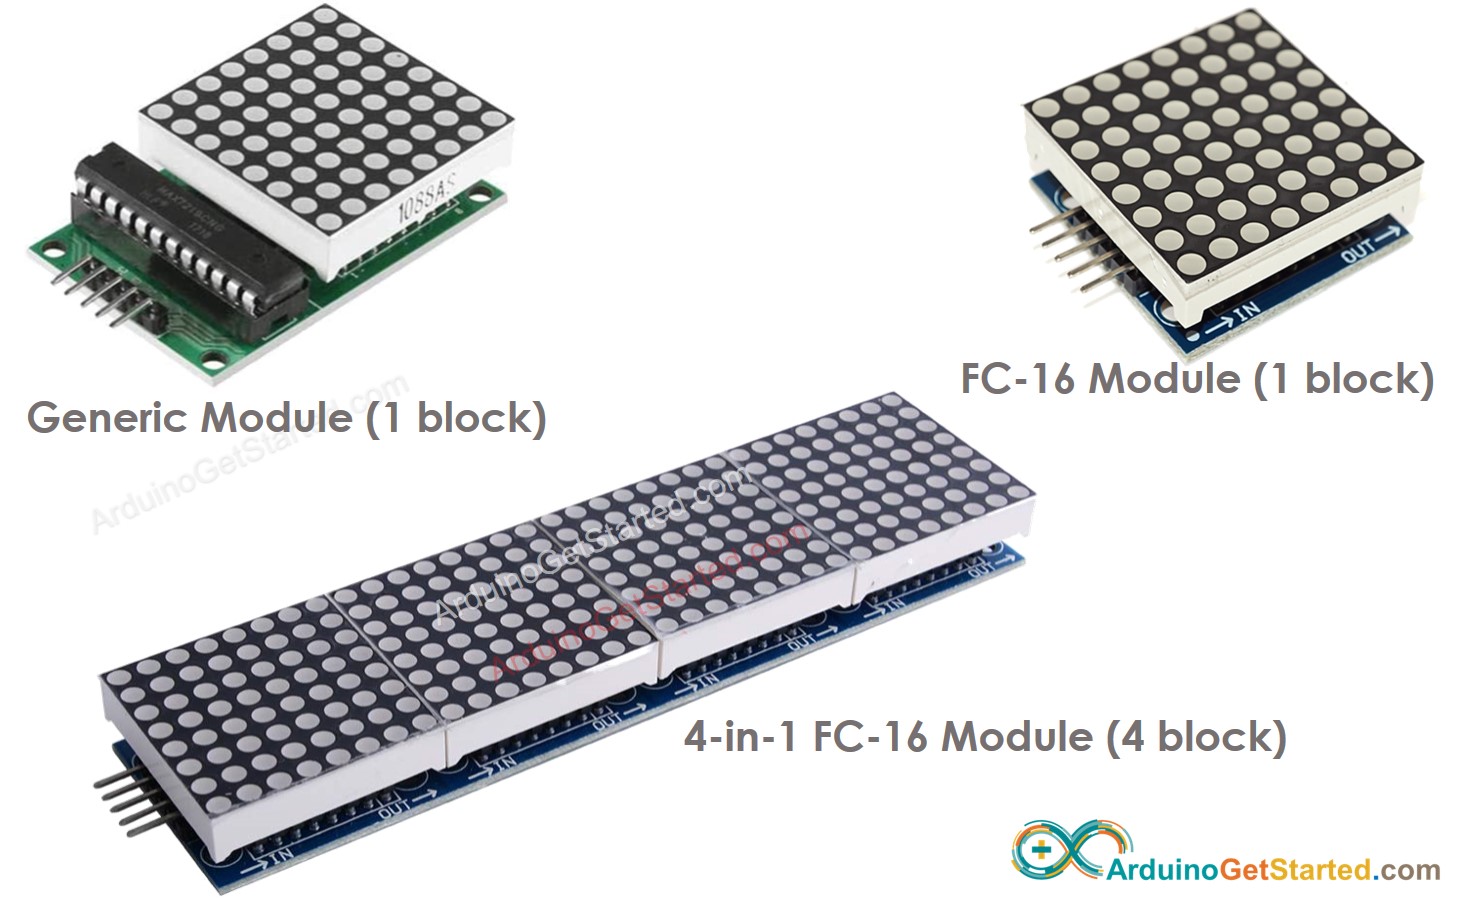
- A base unit of an LED matrix is a block
LED 矩阵的基本单元是一个块 - Each block has an 8x8 LED matrix (64 LED) and a MAX7219 driver.
每个模块都有一个 8x8 LED 矩阵 (64 LED) 和一个MAX7219驱动器。 - There are two popular block forms: the generic module and the FC-16 module.
有两种流行的块形式:通用模块和 FC-16 模块。 - A LED matrix can be composed of a single block or multiple blocks in a daisy-chain
LED矩阵可以由菊花链中的单个块或多个块组成 - You can buy a pre-built multiple-block LED Matrix (e.g. 4-in-1, 8-in-1)
您可以购买预制的多块 LED 矩阵(例如 4 合 1、8 合 1) - You can also buy multiple blocks and wire them to form a LED matrix with the desired size.
您还可以购买多个块并将它们连接起来以形成具有所需尺寸的 LED 矩阵。 - You will declare the size of the LED matrix you use in the Arduino code.
您将声明在Arduino代码中使用的LED矩阵的大小。
Pinout 引脚排列
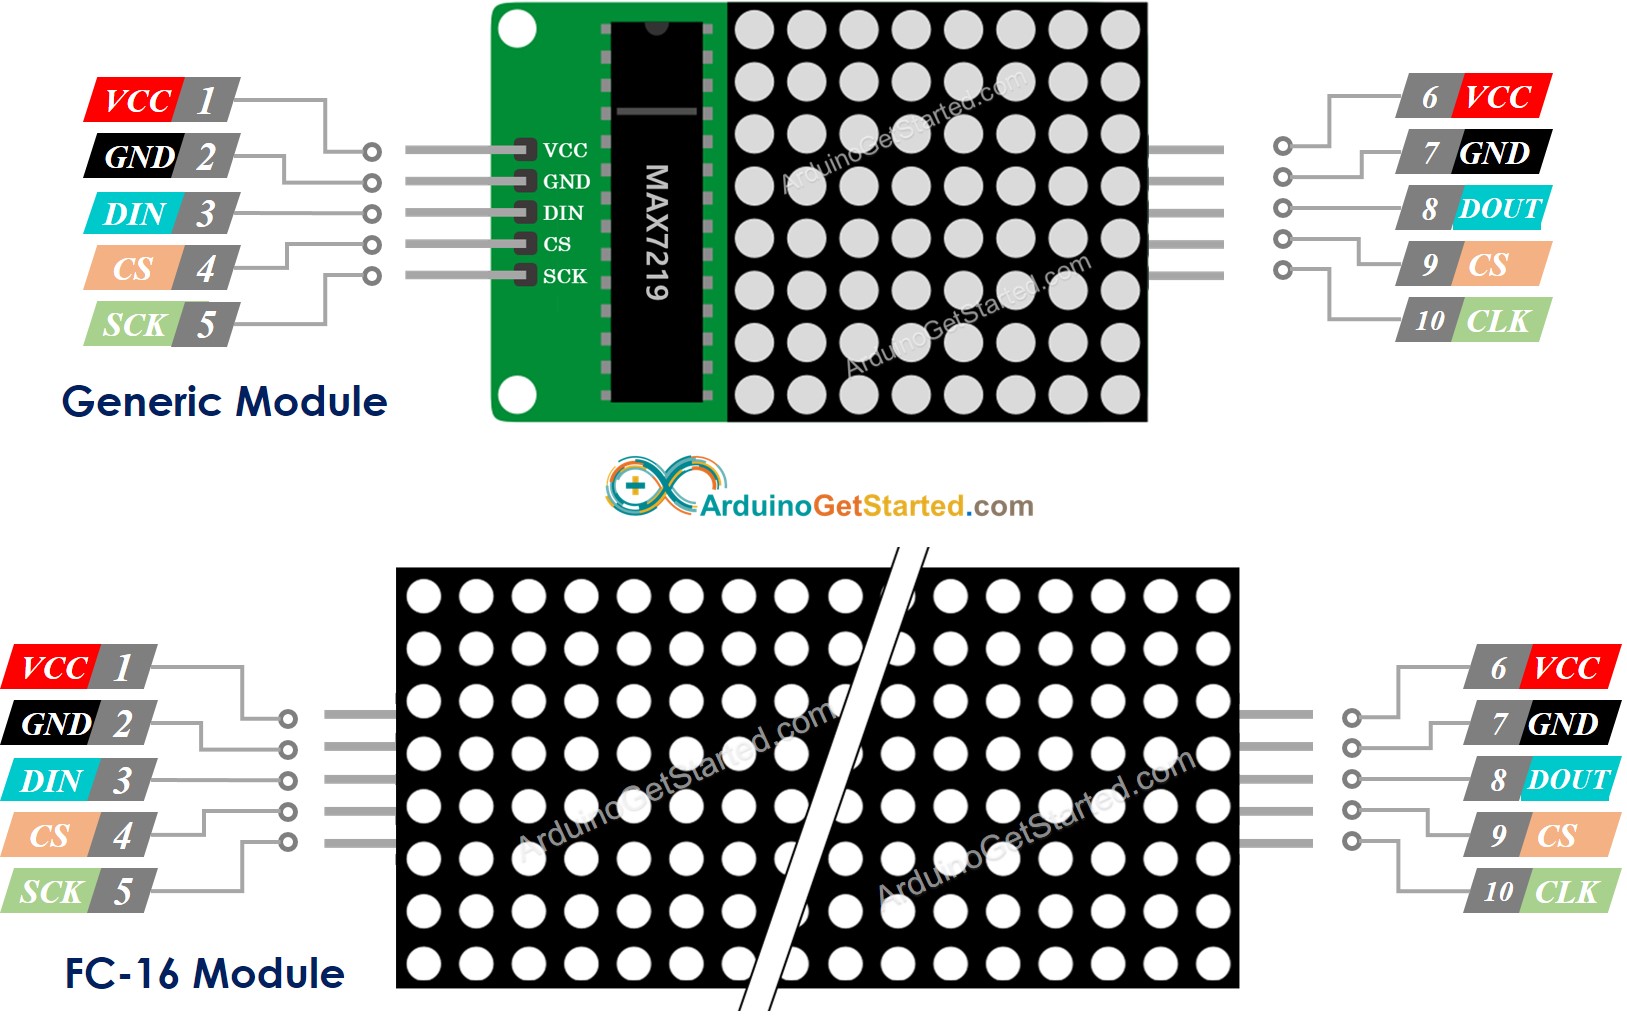
A LED Matrix is formed by a single or multiple blocks. Each block includes two groups of pins:
LED矩阵由单个或多个块组成。每个模块包括两组引脚:
- Input pins group: 输入引脚组:
- VCC: connected to 5V. VCC:连接到 5V。
- GND: connected to GND. GND:连接到 GND。
- DIN is the Data pin, Connect it to SPI MOSI pin of the Arduino.
DIN是数据引脚,将其连接到Arduino的SPI MOSI引脚。 - CS: Chip Select, Connect it to any digital pin of the Arduino.
CS:芯片选择,将其连接到Arduino的任何数字引脚。 - CLK: Clock pin, Connect it to SPI CLK pin of the Arduino.
CLK:时钟引脚,将其连接到Arduino的SPI CLK引脚。
- Output pins group: 输出引脚组:
- VCC: connects to VCC on the next module.
VCC:连接到下一个模块上的 VCC。 - GND: connects to GND on the next module.
GND:连接到下一个模块上的 GND。 - DOUT: Data Out, connects to the DIN pin of the next module.
DOUT:数据输出,连接到下一个模块的DIN引脚。 - CS: connects to CS on the next module.
CS:连接到下一个模块的 CS。 - CLK connects to CLK on the next module.
CLK 连接到下一个模块上的 CLK。
- VCC: connects to VCC on the next module.
Wiring Diagram 接线图
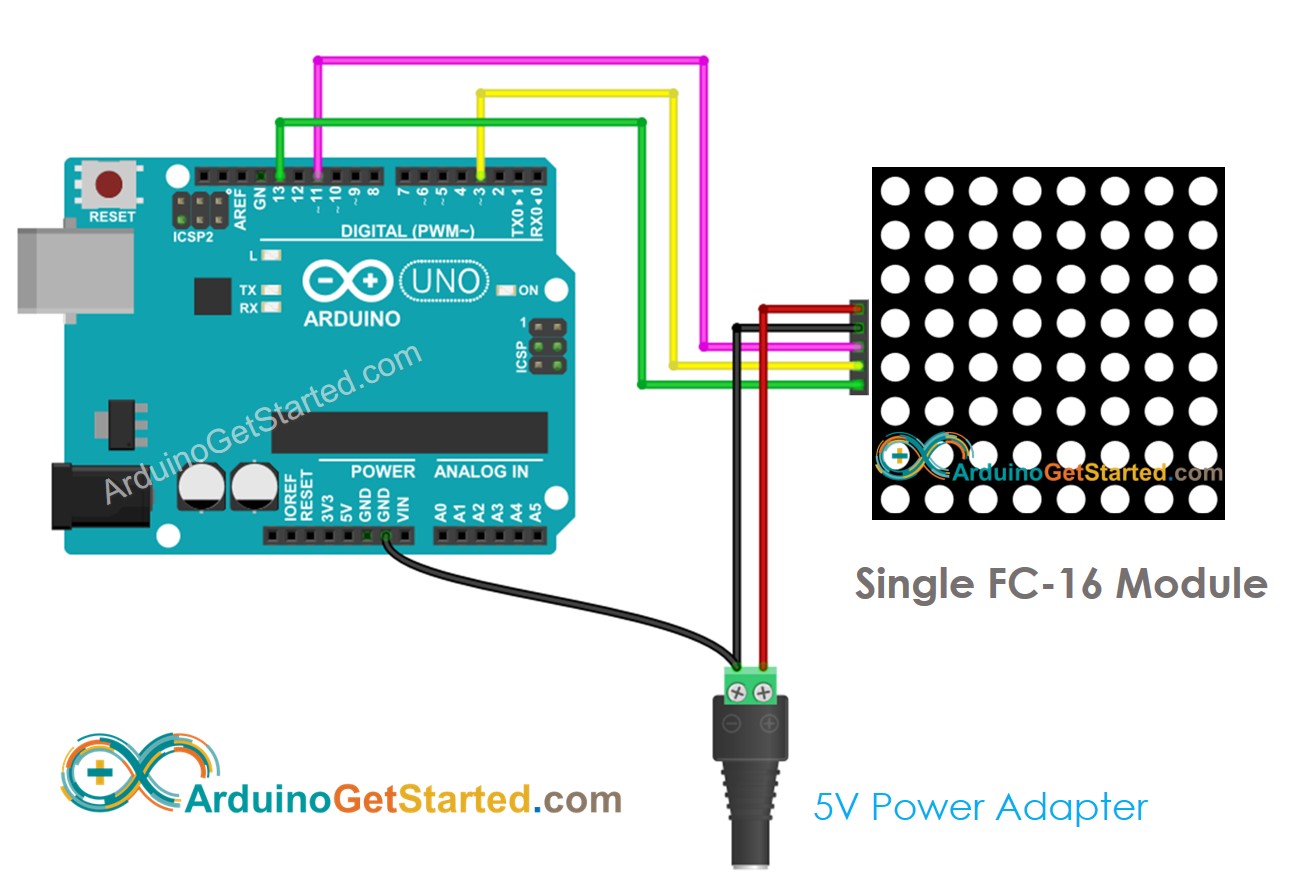
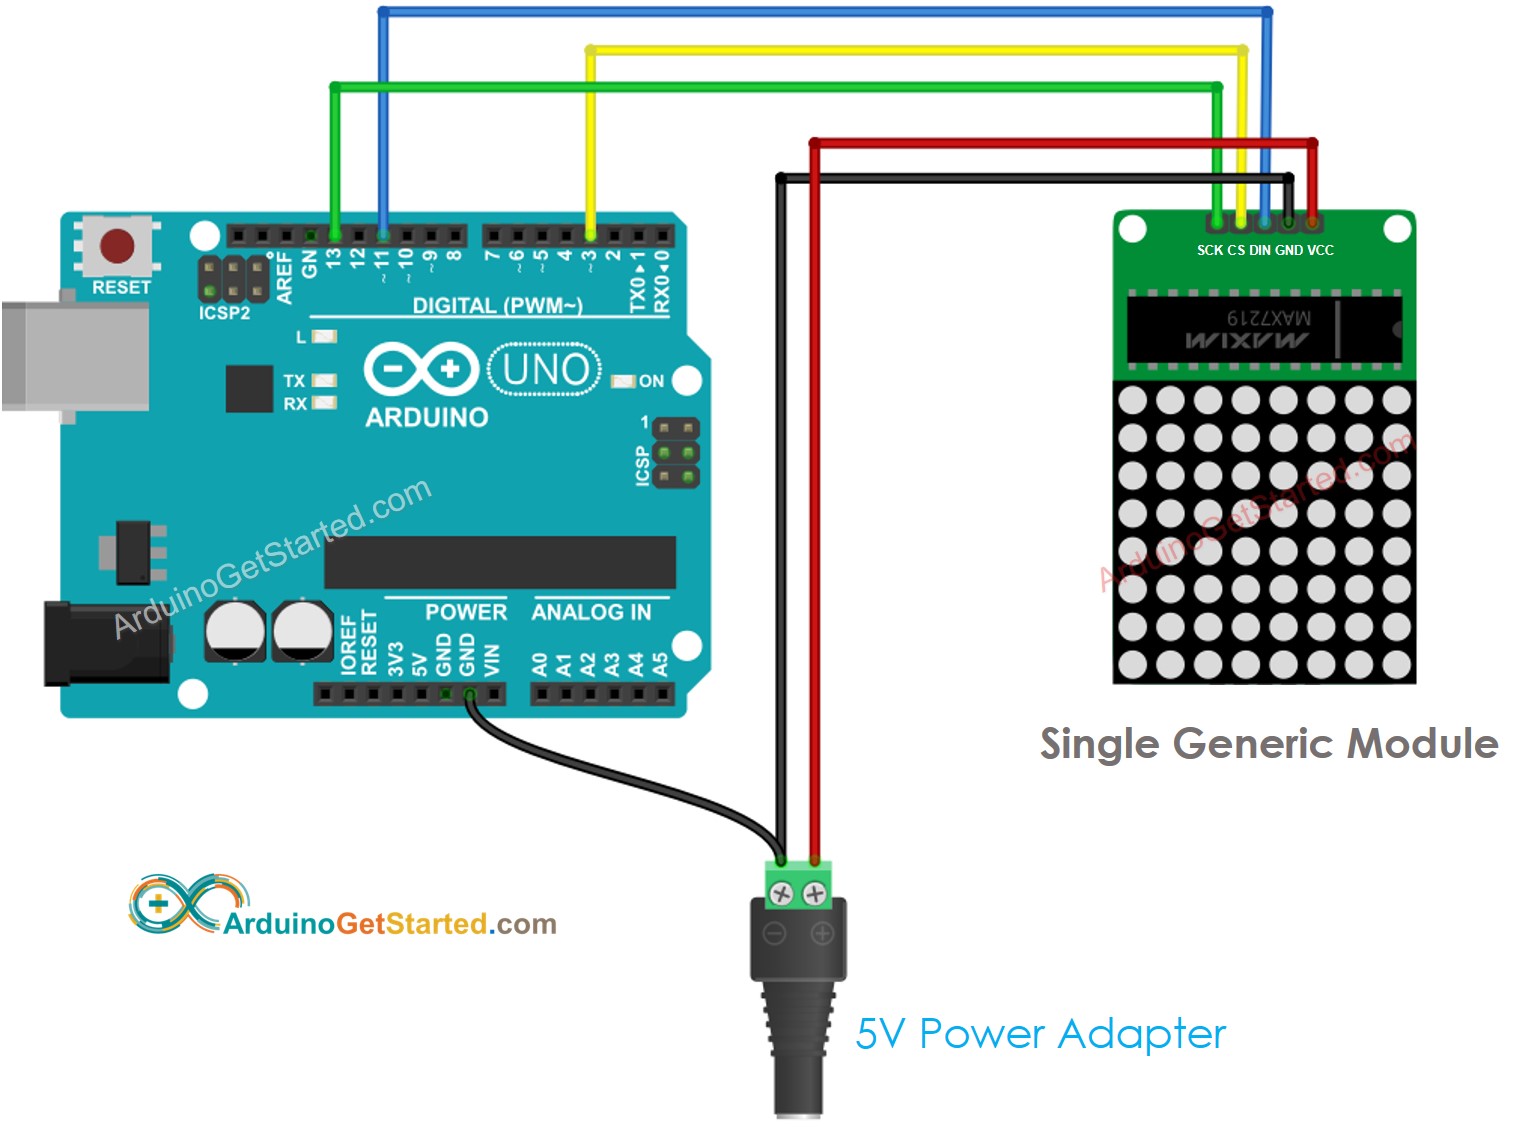
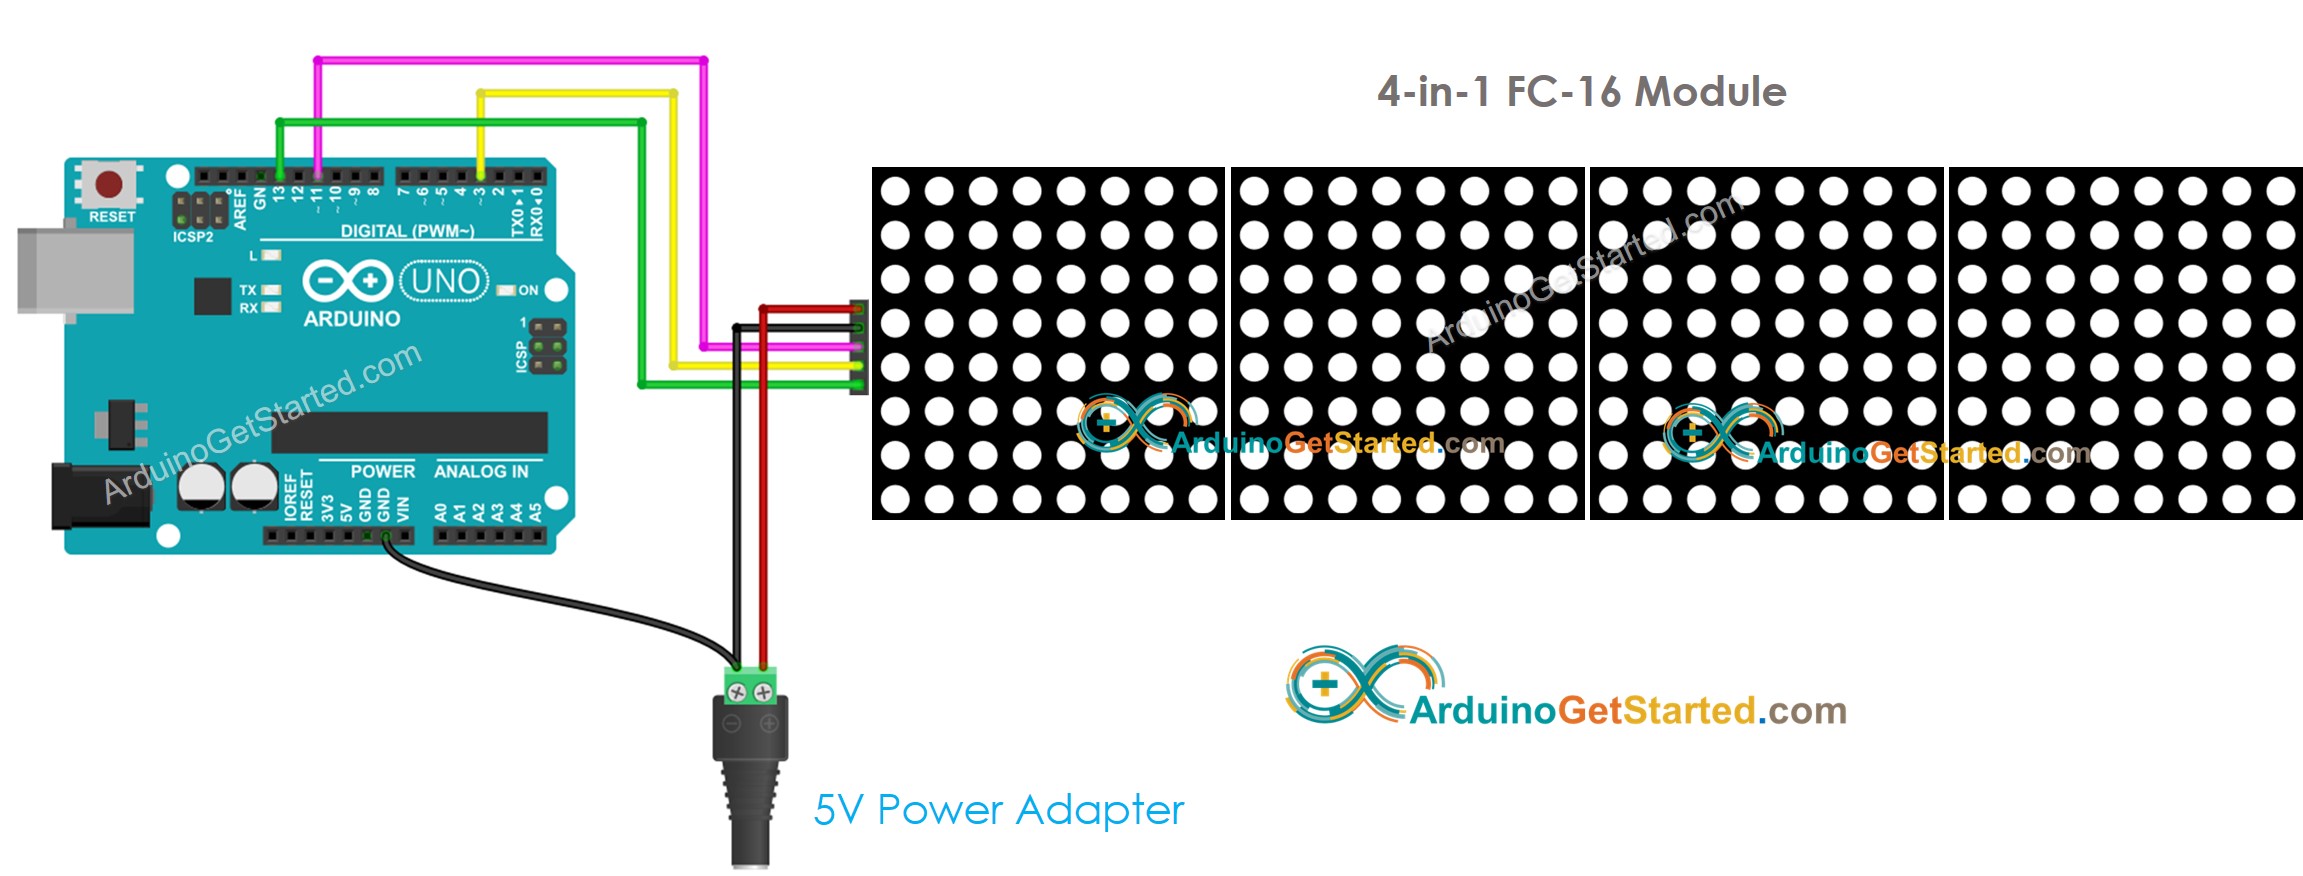
If the LED matrix is made of a single block:
如果 LED 矩阵由单个块组成:
- Connect the input pins groups to Arduino
将输入引脚组连接到Arduino - Let the output pins group unconnected
让输出引脚组断开连接
If the LED matrix is pre-built multiple blocks:
如果 LED 矩阵是预先构建的多个块:
- Connect the input pins groups to Arduino
将输入引脚组连接到Arduino - Let the output pins group unconnected
让输出引脚组断开连接
If the LED matrix is made of multiple blocks by yourself:
如果 LED 矩阵由多个块组成:
- Connect the input pins groups of the first block to Arduino
将第一个模块的输入引脚组连接到Arduino - Connect the output pins groups of each block to the input pins groups of the next block
将每个模块的输出引脚组连接到下一个模块的输入引脚组 - Let the output pins group of the last block unconnected
让最后一个块的输出引脚组解开连接
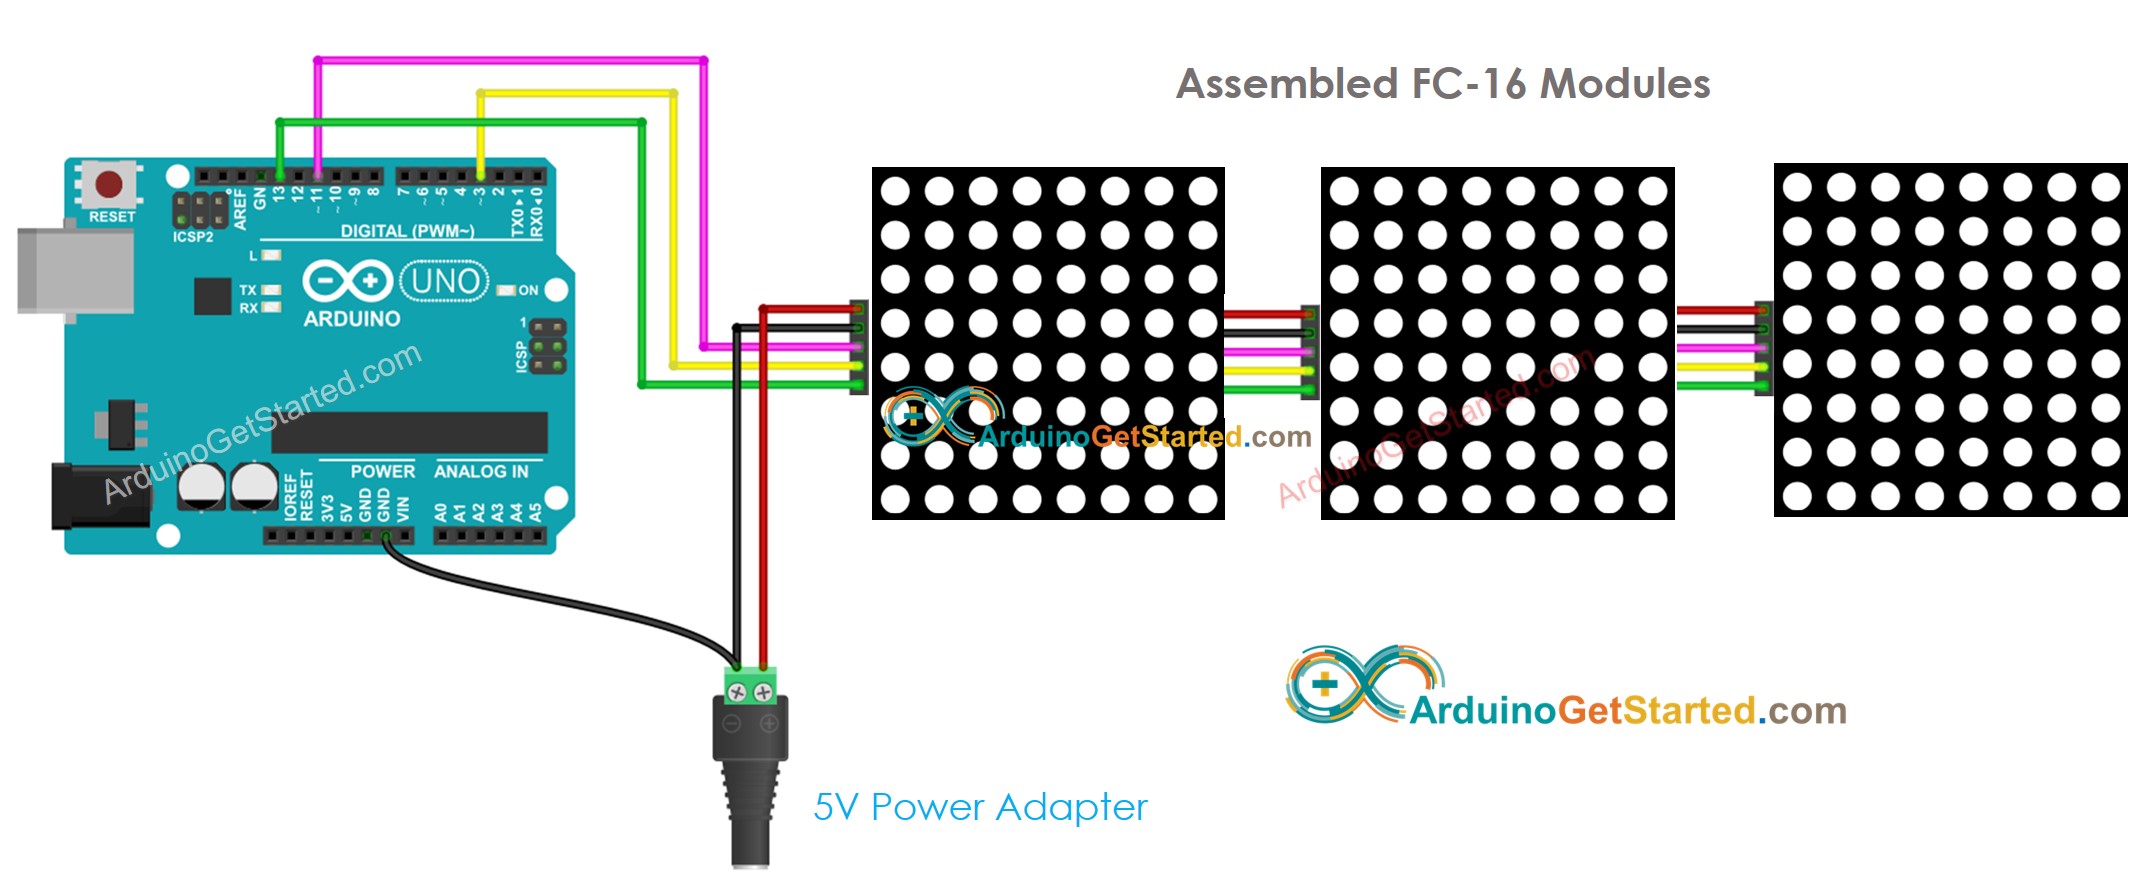
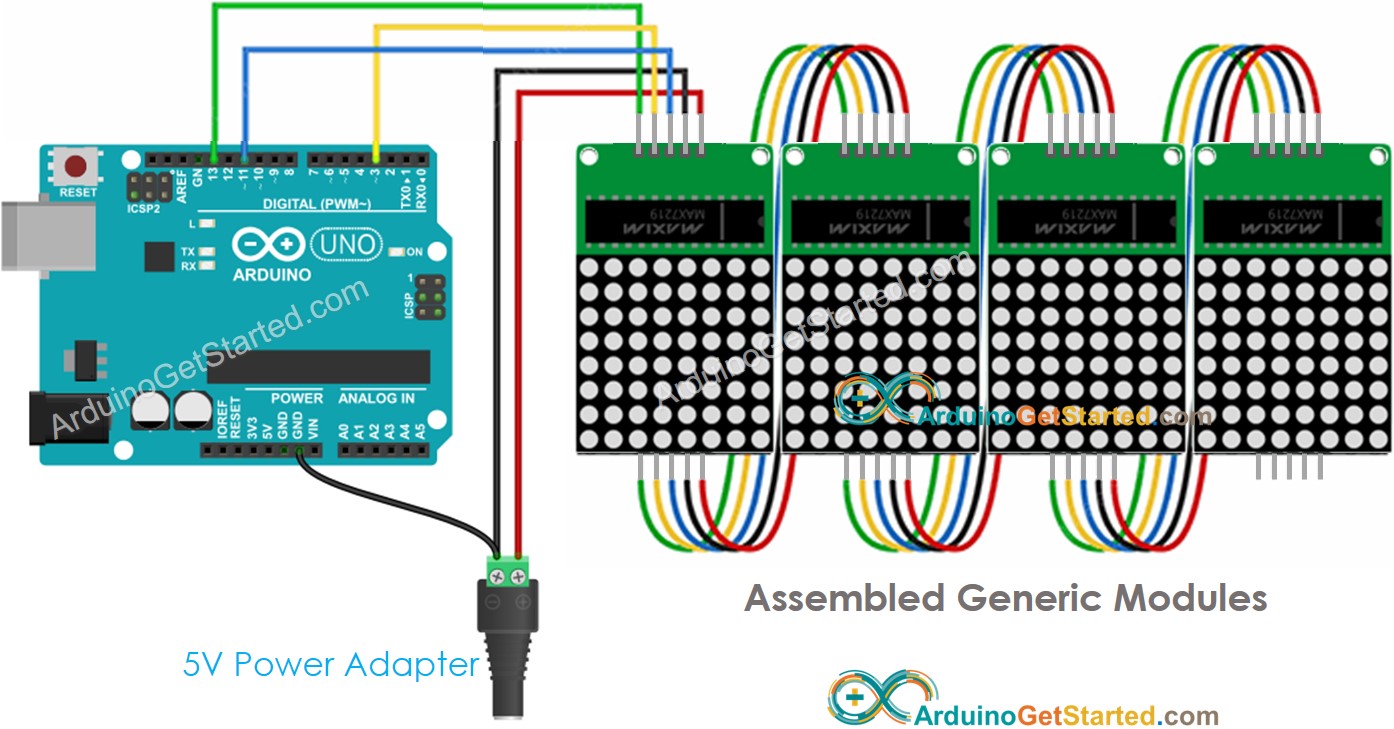
This image is created using Fritzing. Click to enlarge image
此图像是使用 Fritzing 创建的。点击放大图片
Because the display draws a lot of currents (up to 1A at maximum brightness):
因为显示器消耗了大量电流(最大亮度下高达 1A):
- Do not use the power from the 5V pin of Arduino.
请勿使用 Arduino 的 5V 引脚供电。 - Use an external 5V power supply instead. Arduino and LED matrix can share power from a 5V power adapter
请改用外部 5V 电源。Arduino 和 LED 矩阵可以共享来自 5V 电源适配器的电源
Because Arduino connects to LED matrix via SPI pins:
由于Arduino通过SPI引脚连接到LED矩阵:
- Pin 13 (SCK) and 11 (MOSI) on Arduino Uno must be used. If you’re using another Arduino board, check the official documentation for equivalent SPI pins.
必须使用 Arduino Uno 上的引脚 13 (SCK) 和 11 (MOSI)。如果您使用的是另一块Arduino板,请查看官方文档以获取等效的SPI引脚。 - Pin 3 (CS) can be changed to any pin
引脚 3 (CS) 可以更改为任何引脚
How To Program For LED Matrix 如何对 LED 矩阵进行编程
It is not easy to control the LED matrix. Fortunately, libraries are available to make it easy. Below is a step-by-step on how to write Arduino code to control the LED matrix
控制LED矩阵并不容易。幸运的是,可以使用库来简化它。以下是如何编写Arduino代码来控制LED矩阵的分步操作
Include libraries: 包括库:
#include <MD_Parola.h>
#include <MD_MAX72xx.h>- Specify which hardware is being used: GENERIC_HW or FC16_HW.
指定正在使用的硬件:GENERIC_HW 或 FC16_HW。
#define HARDWARE_TYPE **MD_MAX72XX**::FC16_HW
- Define how many LED block is used. for example, a 4-in-1 LED matrix has 4 blocks.
定义使用多少个 LED 块。例如,一个 4 合 1 LED 矩阵有 4 个模块。
#define MAX_DEVICES 4
- Define the pin that connects to the LED matrix’s CS pin. For example, pin D3
定义连接到 LED 矩阵的 CS 引脚的引脚。例如,引脚 D3
#define CS_PIN 3
- Create a new instance of the MD_Parola class for the LED matrix display.
为 LED 矩阵显示创建 MD_Parola 类的新实例。
MD_Parola ledMatrix = MD_Parola(HARDWARE_TYPE, CS_PIN, MAX_DEVICES);- Code in the setup() function:
setup() 函数中的代码:
void setup() {ledMatrix.begin();         // initialize the object ledMatrix.setIntensity(0); // set the brightness of the LED matrix display (from 0 to 15)ledMatrix.displayClear();  // clear led matrix display
}- Display text, number and show animated effects: see next part
显示文本、数字和显示动画效果:请参阅下一部分
Arduino - LED Matrix Code Arduino - LED矩阵代码
The below code is for 32x8 FC-16 LED matrix display (4 blocks). But you can easily adapt it for 8x8, 16x8, 64x8…
以下代码适用于 32x8 FC-16 LED 矩阵显示器(4 块)。但是您可以轻松地将其调整为 8x8、16x8、64x8…
/** Created by ArduinoGetStarted.com** This example code is in the public domain** Tutorial page: https://arduinogetstarted.com/tutorials/arduino-led-matrix*/#include <MD_Parola.h>
#include <MD_MAX72xx.h>#define HARDWARE_TYPE MD_MAX72XX::FC16_HW
#define MAX_DEVICES 4 // 4 blocks
#define CS_PIN 3// create an instance of the MD_Parola class
MD_Parola ledMatrix = MD_Parola(HARDWARE_TYPE, CS_PIN, MAX_DEVICES);void setup() {ledMatrix.begin();         // initialize the objectledMatrix.setIntensity(0); // set the brightness of the LED matrix display (from 0 to 15)ledMatrix.displayClear();  // clear LED matrix display
}void loop() {ledMatrix.setTextAlignment(PA_LEFT);ledMatrix.print("Left"); // display textdelay(2000);ledMatrix.setTextAlignment(PA_CENTER);ledMatrix.print("Center"); // display textdelay(2000);ledMatrix.setTextAlignment(PA_RIGHT);ledMatrix.print("Right"); // display textdelay(2000);ledMatrix.setTextAlignment(PA_CENTER);ledMatrix.setInvert(true);ledMatrix.print("Invert"); // display text inverteddelay(2000);ledMatrix.setInvert(false);ledMatrix.print(1234); // display numberdelay(2000);
}
Quick Steps 快速步骤
- Connect Arduino to LED matrix as above wiring diagram
如上接线图所示将Arduino连接到LED矩阵 - Connect Arduino to PC via USB cable
通过USB线将Arduino连接到PC - Navigate to the Libraries icon on the left bar of the Arduino IDE.
导航到 Arduino IDE 左侧栏上的 Libraries 图标。 - Search “MD_Parola”, then find the MD_Parola library
搜索“MD_Parola”,然后找到MD_Parola库 - Click Install button. 单击“安装”按钮。

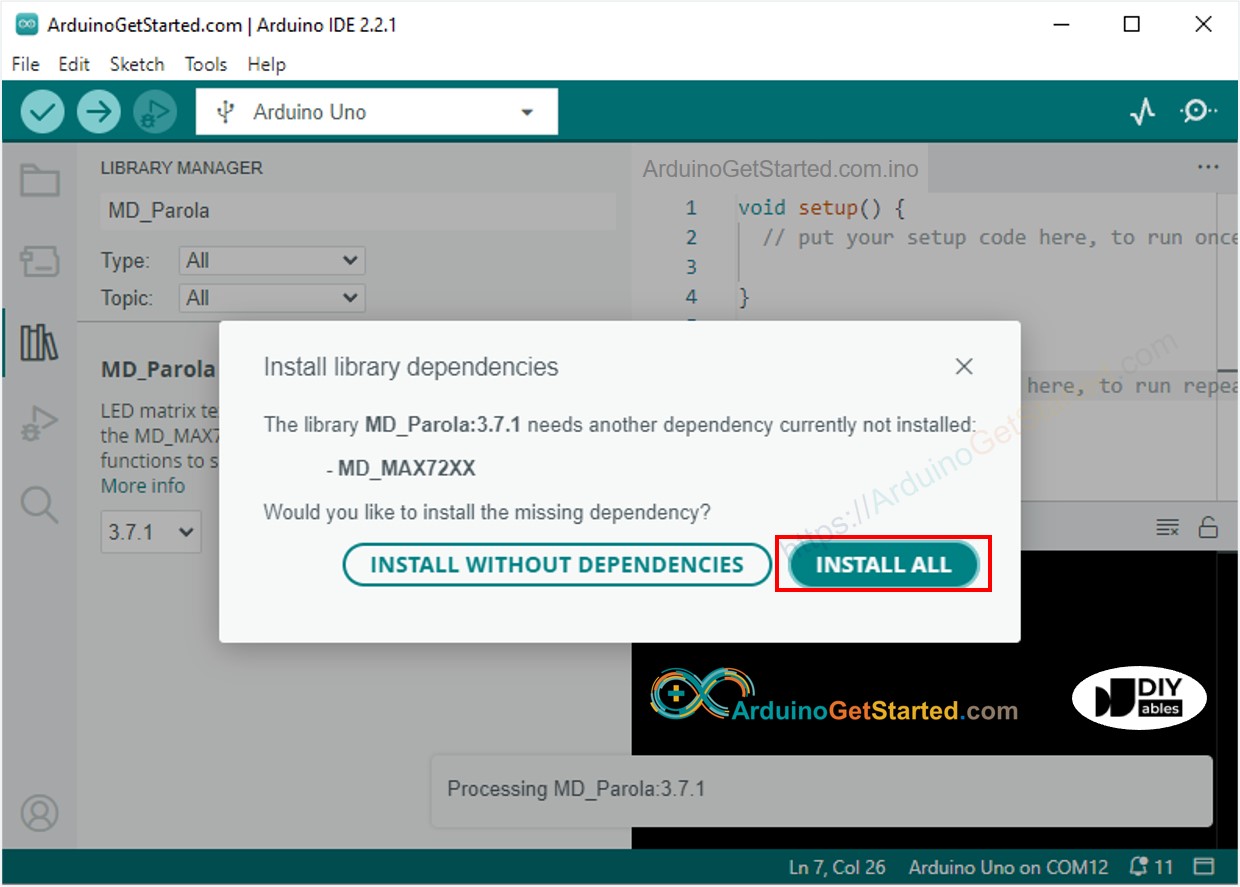
- You will be asked to install the MD_MAX72XX library for dependency. Click Install All button.
系统将要求您安装 MD_MAX72XX 库以进行依赖。单击“全部安装”按钮。
- Copy the above code and open it with Arduino IDE
复制上面的代码并使用Arduino IDE打开它 - Click Upload button on Arduino IDE to upload code to Arduino
单击Arduino IDE上的“上传”按钮,将代码上传到Arduino - See the LED matrix display
查看 LED 矩阵显示
Arduino LED Matrix Code – Scrolling Text Arduino LED 矩阵代码 – 滚动文本
When you want to print a long message that is too long to fit on a LED matrix display, you can use the scroll text effect technique.
当您想要打印太长而无法安装在 LED 矩阵显示器上的长消息时,您可以使用滚动文本效果技术。
The below Arduino code shows how to scroll a message on the LED matrix display.
下面的Arduino代码显示了如何在LED矩阵显示屏上滚动消息。
/** Created by ArduinoGetStarted.com** This example code is in the public domain** Tutorial page: https://arduinogetstarted.com/tutorials/arduino-led-matrix*/#include <MD_Parola.h>
#include <MD_MAX72xx.h>#define HARDWARE_TYPE MD_MAX72XX::FC16_HW
#define MAX_DEVICES 4 // 4 blocks
#define CS_PIN 3// create an instance of the MD_Parola class
MD_Parola ledMatrix = MD_Parola(HARDWARE_TYPE, CS_PIN, MAX_DEVICES);void setup() {ledMatrix.begin();         // initialize the objectledMatrix.setIntensity(0); // set the brightness of the LED matrix display (from 0 to 15)ledMatrix.displayClear();  // clear led matrix displayledMatrix.displayScroll("Hello", PA_CENTER, PA_SCROLL_LEFT, 100);
}void loop() {if (ledMatrix.displayAnimate()) {ledMatrix.displayReset();}
}
For more text effects, please visit MD_Parola Library Reference.
如需更多文本效果,请访问MD_Parola库参考。
相关文章:
Arduino - LED 矩阵
Arduino - LED 矩阵 Arduino - LED Matrix LED matrix display, also known as LED display, or dot matrix display, are wide-used. In this tutorial, we are going to learn: LED矩阵显示器,也称为LED显示器,或点阵显示器,应用广泛。在…...
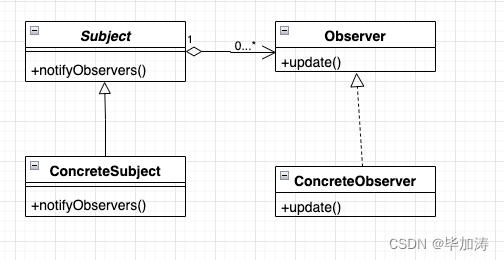
设计模式 - Observer Pattern 观察者模式
文章目录 定义观察者模式的实现构成构成UML图 观察者模式的代码实现场景代码实现 总结优点缺点应用场景 其他设计模式文章: 定义 观察者模式是行为型模式的一种,它定义对象间的一种一对多的依赖关系,使得每当一个对象改变状态,它…...

【面试系列】C++ 高频面试题
欢迎来到我的博客,很高兴能够在这里和您见面!欢迎订阅相关专栏: ⭐️ 全网最全IT互联网公司面试宝典:收集整理全网各大IT互联网公司技术、项目、HR面试真题. ⭐️ AIGC时代的创新与未来:详细讲解AIGC的概念、核心技术、…...

程序猿大战Python——实现简单的图书馆系统操作
步骤1:安装和导入库 首先,确保已经安装了 pymysql 库。如果没有安装,请执行以下命令: pip install pymysql 然后,导入必要的库: import pymysql 步骤2:创建数据库和表的函数 编写一个函数来…...

液体粒子计数器的原理及常见型号选择 lighthouse代理商北京中邦兴业
液体颗粒计数用于测量液体样品中颗粒的大小和分布。通过用激光二极管照射液体样品并检测散射光来测量颗粒分布和尺寸。散射光的性质与粒子大小的大小有关。液体颗粒计数器可用于批量取样或在线(连续监测)应用,如水处理厂,或用于…...

Java知识点整理 16 — Spring Bean
在之前的文章 Java知识点整理 8 — Spring 简介 中介绍了 Spring 的两大核心概念 IoC 和 AOP,但对 Spring Bean 的介绍不全面,本文将补充 Spring 中 Bean 的概念。 一. 什么是 Spring Bean 在 Spring 官方文档中,对 bean 的定义为…...

Nvidia Jetson/RK3588+AI双目立体相机,适合各种割草机器人、扫地机器人、AGV等应用
双目立体视觉是基于视差原理,依据成像设备从不同位置获取的被测物体的图像,匹配对应点的位置偏移,得到视差数据,进而计算物体的空间三维信息。为您带来高图像质量的双目立体相机,具有高分辨率、低功耗、远距离等优点&a…...

springboot使用feign调用不依赖cloud
在使用spring boot调用第三方api中,常用的是okhttp、apache http client等,但是直接使用下来还是有点繁琐,需要手动转换实体。 在springcloud中有个openfeign调用,第一次体验到调用接口还能这么丝滑。注解写道接口上,…...
springboot中使用springboot cache
前言:SpringBoot中使用Cache缓存可以提高对缓存的开发效率 此图片是SpringBootCache常用注解 Springboot Cache中常用注解 第一步:引入依赖 <!--缓存--><dependency><groupId>org.springframework.boot</groupId><artifactId…...

Promise,async/await的运用
一,了解Promise Promise是异步编程的一种解决方案,它是一个对象,可以获取异步操作的消息,它的出现避免了地狱回调。 (1)Promise的实例有三个状态: Pending(进行中) Re…...

图论·多源最短路径Floyddijsktra
例题地址 多源最短路径 多个源点多个终点可以使用Floyd算法直接求各源点到终点的最短距离,也可以直接多次使用dijsktra算法求单源点到终点的最短距离 Floyd算法 使用条件 多源最短路径权值正负皆可 核心思想:动态规划 子问题: 设(A,B)…...
微服务 | Springboot整合GateWay+Nacos实现动态路由
1、简介 路由转发 执行过滤器链。 网关,旨在为微服务架构提供一种简单有效的统一的API路由管理方式。同时,基于Filter链的方式提供了网关的基本功能,比如:鉴权、流量控制、熔断、路径重写、黑白名单、日志监控等。 基本功能…...

做google SEO 有哪些好用的工具?这12款谷歌SEO工具值得收藏!
1、Google Trends 谷歌旗下一款基于搜索数据推出的一款免费分析工具 外贸人有句老话,七分靠选品,三分靠运营。在你开始做独立站之前,在你不清楚你的行业在Google上面能否有足够的流量时,那么Google Trends则是你最好的工具。 你只…...

【变频调速在锅炉引风机控制中的应用】
变频调速在锅炉引风机控制中的应用 变频器的选型 变频器是利用电力半导体器件的通断作用将工频电源变换为另一种频率的电能控制装置,能宏观对交流异步电机软启动,变频调速,提高运转精度,改变功率因数,过流/过压/过载保护等功能,国内技术较领先的品牌有汇川、欧瑞(原烟台…...

网络配置(IP、NETMASK、GATEWAY、DNS、DHCP) <持续更新中>
参考: 初学Linux之网络配置(IP、NETMASK、GATEWAY、DNS、DHCP)-CSDN博客【学习笔记】网关 & 路由_网关和路由-CSDN博客【学习笔记】计算机网络 IP地址与MAC地址_根据mac分配ip-CSDN博客【学习笔记】TCP 和 UDP 协议_tcp 发送 syn 应答没有syn ack-CSDN博客 一…...
【ArcGIS 脚本工具】拯救密恐,隐藏唯一值渲染图层的标记符号
最近拿到了【Hello 图狗】制作的三调/变更样式符号库,确实比之前网上下载的版本好用很多。 ArcGIS Pro三调23变更符号库V1.02(汇总)_中大比例尺.stylx和样式属性对调 不过使用过程中触发了一个旧病,就是匹配样式之后,…...

tensorflow学习1.3-创建会话,启动会话
tensorflow学习1.3-创建会话,启动会话 会话的由来与作用由来作用 会话的定义与结构定义 用法基本用法上下文管理器执行部分计算图获取多个结果 总结 练习代码报错原因:TensorFlow 2.x中的Eager Execution使用兼容模式来启用SessionEager Execution和计算…...
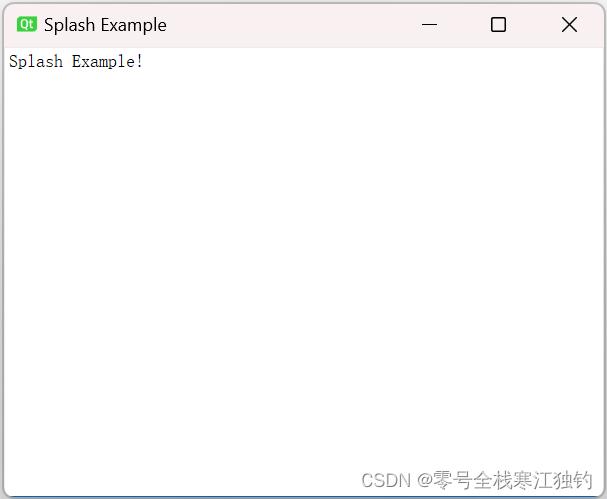
QT基本对话框(基本对话框、工具盒类、进度条、调色板与电子钟、可扩展对话框、程序启动画面)
此篇文章通过实例介绍基本对话框的用法。首先介绍标准文件对话框(QFileDialog)、标准颜色对话框(QColorDialog)、标准字体对话框(QFontDialog)、标准输入对话框(QInputDialog)以及标…...
Docker 部署 MariaDB 数据库 与 Adminer 数据库管理工具
文章目录 MariaDBmariadb.cnf开启 binlog Adminerdocker-compose.ymlAdminer 连接 MariaDB MariaDB MariaDB是一个流行的开源关系型数据库管理系统(RDBMS),它是MySQL的一个分支和替代品。 官网:https://mariadb.com/镜像ÿ…...

qt 可以在一个函数中读一个文件,然后再将内容写入另一个文件中
是的,Qt 允许你在一个函数中读取一个文件的内容,并将这些内容写入到另一个文件中。这可以通过结合使用 QFile 和 QTextStream(或 QDataStream,取决于你的具体需求)来实现。以下是一个简单的示例,展示了如何…...

Hirschmann RS20-0800M4M4SDAE工业以太网交换机
Hirschmann RS20-0800M4M4SDAE 工业以太网交换机产品特点:端口配置:共8个端口,含6个RJ45电口和2个ST光纤接口。端口速率:所有端口均为100Mbps快速以太网。光纤类型:2个光纤端口为多模、ST接头。管理类型:二…...

番茄小说下载器终极指南:三步构建你的离线阅读自由王国
番茄小说下载器终极指南:三步构建你的离线阅读自由王国 【免费下载链接】Tomato-Novel-Downloader 番茄小说下载器不精简版 项目地址: https://gitcode.com/gh_mirrors/to/Tomato-Novel-Downloader 你是否曾在地铁里读到精彩章节时突然断网?是否在…...

13456
12356...
)
别再只测accuracy!DeepSeek集成测试必须监控的5个隐性指标(P99首token延迟、context bleed率、tool-call schema漂移)
更多请点击: https://intelliparadigm.com 第一章:DeepSeek集成测试的核心范式演进 DeepSeek大模型的工程化落地对集成测试提出了全新挑战:传统基于接口响应码与字段校验的测试范式已难以覆盖语义一致性、推理链鲁棒性、上下文敏感度等高阶质…...

阿波罗登月,不可能:读心术与影子叙事 ——不是向全世界展示登月,而是向全世界注射登月
阿波罗登月,不可能:读心术与影子叙事 ——不是向全世界展示登月,而是向全世界注射登月 Jianbing Zhu 1^{1}1 1^{1}1 ECT-OS-JiuHuaShan 文明实验室 ORCID: 0009-0006-8591-1891 DOI: 10.5281/zenodo.20373157 Email: ect-os-jiuhuashanzoho…...

Windows Cleaner深度解析:5大核心模块彻底解决系统空间不足问题
Windows Cleaner深度解析:5大核心模块彻底解决系统空间不足问题 【免费下载链接】WindowsCleaner Windows Cleaner——专治C盘爆红及各种不服! 项目地址: https://gitcode.com/gh_mirrors/wi/WindowsCleaner Windows Cleaner是一款完全免费开源的…...

WebSocket实时通信架构进阶:Room、命名空间与集群部署
WebSocket实时通信架构进阶:Room、命名空间与集群部署 作者:Crown_22 | AI Agent & Hermes Agent 桌面程序开发者 前言 WebSocket已经成为实时应用的标准技术,但大多数教程只停留在"建立连接、发送消息"的基础阶段。在生产环境中,你需要处理Room管理、命名空…...

CPU架构启发的智能仓储布局优化实践
1. 仓库布局优化的核心挑战与创新机遇在物流仓储领域,拣货环节通常占据运营成本的55%-65%,而其中约50%的时间消耗在无效行走路径上。传统矩形仓库布局虽然易于规划和施工,但其正交的通道设计导致拣货员需要频繁进行90度转向,这种&…...

Atomic Layout核心概念解析:Composition组件如何实现布局与间距分离的终极指南
Atomic Layout核心概念解析:Composition组件如何实现布局与间距分离的终极指南 【免费下载链接】atomic-layout Build declarative, responsive layouts in React using CSS Grid. 项目地址: https://gitcode.com/gh_mirrors/at/atomic-layout Atomic Layout…...
)
Unity3D深度纹理实战:手把手教你实现可交互的激光雷达扫描特效(附完整C#/Shader代码)
Unity3D深度纹理实战:手把手教你实现可交互的激光雷达扫描特效(附完整C#/Shader代码)在科幻题材的游戏开发中,激光雷达扫描特效是营造科技感的经典元素。从《赛博朋克2077》的战术目镜到《看门狗》的环境扫描,这种动态…...