mindspore打卡第9天 transformer的encoder和decoder部分
mindspore打卡第9天 transformer的encoder和decoder部分
import mindspore
from mindspore import nn
from mindspore import ops
from mindspore import Tensor
from mindspore import dtype as mstypeclass ScaledDotProductAttention(nn.Cell):def __init__(self, dropout_p=0.):super().__init__()self.softmax = nn.Softmax()self.dropout = nn.Dropout(1-dropout_p)self.sqrt = ops.Sqrt()def construct(self, query, key, value, attn_mask=None):"""scaled dot product attention"""# 计算scaling factorembed_size = query.shape[-1]scaling_factor = self.sqrt(Tensor(embed_size, mstype.float32))# 注意力权重计算# 计算query和key之间的点积,并除以scaling factor进行归一化attn = ops.matmul(query, key.swapaxes(-2, -1) / scaling_factor)# 注意力掩码机制if attn_mask is not None:attn = attn.masked_fill(attn_mask, -1e9)# softmax,保证注意力权重范围在0-1之间attn = self.softmax(attn)# dropoutattn = self.dropout(attn)# 对value进行加权output = ops.matmul(attn, value)  ## QK  Vreturn (output, attn)
def get_attn_pad_mask(seq_q, seq_k, pad_idx):"""注意力掩码:识别序列中的<pad>占位符Args:seq_q (Tensor): query序列,shape = [batch size, query len]seq_k (Tensor): key序列,shape = [batch size, key len]pad_idx (Tensor): key序列<pad>占位符对应的数字索引"""batch_size, len_q = seq_q.shapebatch_size, len_k = seq_k.shape# 如果序列中元素对应<pad>占位符,则该位置在mask中对应元素为True# pad_attn_mask: [batch size, key len]pad_attn_mask = ops.equal(seq_k, pad_idx)# 增加额外的维度# pad_attn_mask: [batch size, 1, key len]pad_attn_mask = pad_attn_mask.expand_dims(1)# 将掩码广播到[batch size, query len, key len]pad_attn_mask = ops.broadcast_to(pad_attn_mask, (batch_size, len_q, len_k))return pad_attn_mask
q = k = Tensor([[1, 1, 0, 0]], mstype.float32)
pad_idx = 0
mask = get_attn_pad_mask(q, k, pad_idx)
print(mask)
print(q.shape, mask.shape)
[[[False False  True  True][False False  True  True][False False  True  True][False False  True  True]]]
(1, 4) (1, 4, 4)
自注意力分数的计算还是遵循着上述的公式,只不过这里的query, key和value都变成了句子本身。
给定序列 X ∈ R n × d m o d e l X \in \mathbb{R}^{n \times d_{model}} X∈Rn×dmodel,序列长度为 n n n,维度为 d m o d e l d_{model} dmodel。在计算自注意力时, Q = K = V = X Q = K = V = X Q=K=V=X
Attention ( Q , K , V ) = softmax ( Q K T d m o d e l ) V = softmax ( X X T d m o d e l ) X \text{Attention}(Q, K, V) = \text{softmax}\left(\frac{QK^T}{\sqrt{d_{model}}}\right)V = \text{softmax}\left(\frac{XX^T}{\sqrt{d_{model}}}\right)X Attention(Q,K,V)=softmax(dmodelQKT)V=softmax(dmodelXXT)X
其中,序列中位置为 i i i的词与位置为 j j j的词之间的自注意力分数为:
Attention ( Q , K , V ) i , j = exp ( Q i K j T d m o d e l ) ∑ k = 1 n exp ( Q i K k T d m o d e l ) V j \text{Attention}(Q, K, V)_{i,j} = \frac{\text{exp}\left(\frac{Q_iK_j^T}{\sqrt{d_{model}}}\right)}{\sum_{k=1}^{n}\text{exp}\left(\frac{Q_iK_k^T}{\sqrt{d_{model}}}\right)}V_j Attention(Q,K,V)i,j=∑k=1nexp(dmodelQiKkT)exp(dmodelQiKjT)Vj
多头注意力(Multi-Head Attention)

图片来源:Ashish Vaswani, Noam Shazeer, Niki Parmar, Jakob Uszkoreit, Llion Jones, Aidan N. Gomez, Lukasz Kaiser, and Illia Polosukhin. Attention is all you need, 2017.
多头注意力是注意力机制的扩展,它可以使模型通过不同的方式关注输入序列的不同部分,从而提升模型的训练效果。
不同于之前一次计算整体输入的注意力分数,多头注意力是多次计算,每次计算输入序列中某一部分的注意力分数,最后再将结果进行整合。
多头注意力通过对输入的embedding乘以不同的权重参数 W Q W^{Q} WQ、 W K W^{K} WK和 W V W^{V} WV,将其映射到多个小维度空间中,我们称之为“头”(head),每个头部会并行计算自己的自注意力分数。
head i = Attention ( Q W i Q , K W i K , V W i V ) = softmax ( Q i K i T d k ) V i \text{head}_i = \text{Attention}(QW^Q_i, KW^K_i, VW^V_i) = \text{softmax}\left(\frac{Q_iK_i^T}{\sqrt{d_{k}}}\right)V_i headi=Attention(QWiQ,KWiK,VWiV)=softmax(dkQiKiT)Vi
W i Q ∈ R d m o d e l × d k W^Q_i \in \mathbb{R}^{d_{model}\times d_{k}} WiQ∈Rdmodel×dk、 W i K ∈ R d m o d e l × d k W^K_i \in \mathbb{R}^{d_{model}\times d_{k}} WiK∈Rdmodel×dk和 W i V ∈ R d m o d e l × d v W^V_i \in \mathbb{R}^{d_{model}\times d_{v}} WiV∈Rdmodel×dv为可学习的权重参数。一般为了平衡计算成本,我们会取 d k = d v = d m o d e l / n h e a d d_k = d_v = d_{model} / n_{head} dk=dv=dmodel/nhead。
在获得多组自注意力分数后,我们将结果拼接到一起,得到多头注意力的最终输出。 W O W^O WO为可学习的权重参数,用于将拼接后的多头注意力输出映射回原来的维度。
MultiHead ( Q , K , V ) = Concat ( head 1 , . . . , head h ) W O \text{MultiHead}(Q, K, V)=\text{Concat}(\text{head}_1, ..., \text{head}_h)W^O MultiHead(Q,K,V)=Concat(head1,...,headh)WO
简单来说,在多头注意力中,每个头部可以’解读’输入内容的不同方面,比如:捕捉全局依赖关系、关注特定语境下的词元、识别词和词之间的语法关系等。
class MultiHeadAttention(nn.Cell):def __init__(self, d_model, d_k, n_heads, dropout_p=0.):super().__init__()self.n_heads = n_headsself.d_k = d_kself.W_Q = nn.Dense(d_model, d_k * n_heads)self.W_K = nn.Dense(d_model, d_k * n_heads)self.W_V = nn.Dense(d_model, d_k * n_heads)self.W_O = nn.Dense(n_heads * d_k, d_model)self.attention = ScaledDotProductAttention(dropout_p=dropout_p)def construct(self, query, key, value, attn_mask):"""query: [batch_size, len_q, d_model]key: [batch_size, len_k, d_model]value: [batch_size, len_k, d_model]attn_mask: [batch_size, seq_len, seq_len]"""batch_size = query.shape[0]# 将query,key和value分别乘以对应的权重,并分割为不同的“头”# q_s: [batch_size, len_q, n_heads, d_k]# k_s: [batch_size, len_k, n_heads, d_k]# v_s: [batch_size, len_k, n_heads, d_k]q_s = self.W_Q(query).view(batch_size, -1, self.n_heads, self.d_k)k_s = self.W_K(key).view(batch_size, -1, self.n_heads, self.d_k)v_s = self.W_V(value).view(batch_size, -1, self.n_heads, self.d_k)# 调整query,key和value的维度# q_s: [batch_size, n_heads, len_q, d_k]# k_s: [batch_size, n_heads, len_k, d_k]# v_s: [batch_size, n_heads, len_k, d_k]q_s = q_s.transpose((0, 2, 1, 3)) ###变成 bz head dmodel dkk_s = k_s.transpose((0, 2, 1, 3))v_s = v_s.transpose((0, 2, 1, 3))# attn_mask的dimension需与q_s, k_s, v_s对应# attn_mask: [batch_size, n_heads, seq_len, seq_len]attn_mask = attn_mask.expand_dims(1)attn_mask = ops.tile(attn_mask, (1, self.n_heads, 1, 1))# 计算每个头的注意力分数# context: [batch_size, n_heads, len_q, d_k]# attn: [batch_size, n_heads, len_q, len_k]context, attn = self.attention(q_s, k_s, v_s, attn_mask)# concatenate# context: [batch_size, len_q, n_heads * d_k]context = context.transpose((0, 2, 1, 3)).view((batch_size, -1, self.n_heads * self.d_k))# 乘以W_O# output: [batch_size, len_q, n_heads * d_k]output = self.W_O(context)return output, attn
dmodel, dk, nheads = 10, 2, 5
q = k = v = ops.ones((1, 2, 10), mstype.float32)  ##2单词  10长度
attn_mask = Tensor([False]).broadcast_to((1, 2, 2))
multi_head_attn = MultiHeadAttention(dmodel, dk, nheads)
output, attn = multi_head_attn(q, k, v, attn_mask)
print(output.shape, attn.shape)
[WARNING] ME(6511:281472949233968,MainProcess):2024-06-29-07:47:27.910.248 [mindspore/nn/layer/basic.py:173] For Dropout, this parameter `keep_prob` will be deprecated, please use `p` instead.(1, 2, 10) (1, 5, 2, 2)
attn_mask
Tensor(shape=[1, 2, 2], dtype=Bool, value=
[[[False, False],[False, False]]])
attn_mask1 = attn_mask.expand_dims(1)
attn_mask1
Tensor(shape=[1, 1, 2, 2], dtype=Bool, value=
[[[[False, False],[False, False]]]])
attn_mask2 = ops.tile(attn_mask1, (1, 5, 1, 1))
attn_mask2
Tensor(shape=[1, 5, 2, 2], dtype=Bool, value=
[[[[False, False],[False, False]],[[False, False],[False, False]],[[False, False],[False, False]],[[False, False],[False, False]],[[False, False],[False, False]]]])
#context, attn = self.attention(q_s, k_s, v_s, attn_mask) ##可能是根据某种规则计算了 10长度的某些 掩码的位置
from mindspore import numpy as mnpclass PositionalEncoding(nn.Cell):"""位置编码"""def __init__(self, d_model, dropout_p=0.1, max_len=100):super().__init__()self.dropout = nn.Dropout(1 - dropout_p)# 位置信息# pe: [max_len, d_model]self.pe = ops.Zeros()((max_len, d_model), mstype.float32)# pos: [max_len, 1]# angle: [d_model/2, ]# pos/angle: [max len, d_model/2]pos = mnp.arange(0, max_len, dtype=mstype.float32).view((-1, 1))angle = ops.pow(10000.0, mnp.arange(0, d_model, 2, dtype=mstype.float32)/d_model)# pe: [max len, d_model]self.pe[:, 0::2] = ops.sin(pos/angle)self.pe[:, 1::2] = ops.cos(pos/angle)def construct(self, x):batch_size = x.shape[0]# broadcast# pe: [batch_size, max_len, d_model]pe = self.pe.expand_dims(0)pe = ops.broadcast_to(pe, (batch_size, -1, -1))# 将位置编码截取至x同等大小# x: [batch_size, seq_len, d_model]x = x + pe[:, :x.shape[1], :]return self.dropout(x)
x = ops.Zeros()((1, 2, 4), mstype.float32)
pe = PositionalEncoding(4)
print(pe(x))
[WARNING] ME(6511:281472949233968,MainProcess):2024-06-29-07:53:48.481.316 [mindspore/nn/layer/basic.py:173] For Dropout, this parameter `keep_prob` will be deprecated, please use `p` instead.[[[0. 1. 0. 1. ][0.84147096 0.5403023 0.00999983 0.99995 ]]]
编码器(Encoder)
Transformer的Encoder负责处理输入的源序列,并将输入信息整合为一系列的上下文向量(context vector)输出。
每个encoder层中存在两个子层:多头自注意力(multi-head self-attention)和基于位置的前馈神经网络(position-wise feed-forward network)。
子层之间使用了残差连接(residual connection),并使用了层规范化(layer normalization)。二者统称为“Add & Norm”

基于位置的前馈神经网络 (Position-Wise Feed-Forward Network)
基于位置的前馈神经网络被用来对输入中的每个位置进行非线性变换。它由两个线性层组成,层与层之间需要经过ReLU激活函数。
F F N ( x ) = R e L U ( x W 1 + b 1 ) W 2 + b 2 \mathrm{FFN}(x) = \mathrm{ReLU}(xW_1 + b_1)W_2 + b_2 FFN(x)=ReLU(xW1+b1)W2+b2
相比固定的ReLU函数,基于位置的前馈神经网络可以处理更加复杂的关系,并且由于前馈网络是基于位置的,可以捕获到不同位置的信息,并为每个位置提供不同的转换。
class PoswiseFeedForward(nn.Cell):def __init__(self, d_ff, d_model, dropout_p=0.):super().__init__()self.linear1 = nn.Dense(d_model, d_ff)self.linear2 = nn.Dense(d_ff, d_model)self.dropout = nn.Dropout(1-dropout_p)self.relu = nn.ReLU()def construct(self, x):"""前馈神经网络x: [batch_size, seq_len, d_model]"""# x: [batch_size, seq_len, d_ff]x = self.linear1(x)x = self.relu(x)x = self.dropout(x)# x: [batch_size, seq_len, d_model]output = self.linear2(x)return output
x = ops.ones((1, 2, 4), mstype.float32)
ffn = PoswiseFeedForward(16, 4)
print(ffn(x).shape)
[WARNING] ME(6511:281472949233968,MainProcess):2024-06-29-07:55:56.758.194 [mindspore/nn/layer/basic.py:173] For Dropout, this parameter `keep_prob` will be deprecated, please use `p` instead.(1, 2, 4)
Add & Norm
Add & Norm层本质上是残差连接后紧接了一个LayerNorm层。
Add&Norm ( x ) = LayerNorm ( x + Sublayer ( x ) ) \text{Add\&Norm}(x) = \text{LayerNorm}(x + \text{Sublayer}(x)) Add&Norm(x)=LayerNorm(x+Sublayer(x))
- Add:残差连接,帮助缓解网络退化问题,注意需要满足 x x x与 SubLayer ( x ) 的形状一致 \text{SubLayer}(x)的形状一致 SubLayer(x)的形状一致;
- Norm:Layer Norm,层归一化,帮助模型更快地进行收敛;
class AddNorm(nn.Cell):def __init__(self, d_model, dropout_p=0.):super().__init__()self.layer_norm = nn.LayerNorm((d_model, ), epsilon=1e-5)self.dropout = nn.Dropout(1-dropout_p)def construct(self, x, residual):return self.layer_norm(self.dropout(x) + residual)
x = ops.ones((1, 2, 4), mstype.float32)
residual = ops.ones((1, 2, 4), mstype.float32)
add_norm = AddNorm(4)
print(add_norm(x, residual).shape)
[WARNING] ME(6511:281472949233968,MainProcess):2024-06-29-07:56:31.658.630 [mindspore/nn/layer/basic.py:173] For Dropout, this parameter `keep_prob` will be deprecated, please use `p` instead.(1, 2, 4)
EncoderLayer
我们首先实现encoder中的一个层。
class EncoderLayer(nn.Cell):def __init__(self, d_model, n_heads, d_ff, dropout_p=0.):super().__init__()d_k = d_model // n_headsif d_k * n_heads != d_model:raise ValueError(f"The `d_model` {d_model} can not be divisible by `num_heads` {n_heads}.")self.enc_self_attn = MultiHeadAttention(d_model, d_k, n_heads, dropout_p)self.pos_ffn = PoswiseFeedForward(d_ff, d_model, dropout_p)self.add_norm1 = AddNorm(d_model, dropout_p)self.add_norm2 = AddNorm(d_model, dropout_p)def construct(self, enc_inputs, enc_self_attn_mask):"""enc_inputs: [batch_size, src_len, d_model]enc_self_attn_mask: [batch_size, src_len, src_len]"""residual = enc_inputs# multi-head attentionenc_outputs, attn = self.enc_self_attn(enc_inputs, enc_inputs, enc_inputs, enc_self_attn_mask)# add & normenc_outputs = self.add_norm1(enc_outputs, residual)residual = enc_outputs# feed-forwardenc_outputs = self.pos_ffn(enc_outputs)# add & normenc_outputs = self.add_norm2(enc_outputs, residual)return enc_outputs, attn
x = ops.ones((1, 2, 8), mstype.float32)
mask = Tensor([False]).broadcast_to((1, 2, 2))
encoder_layer = EncoderLayer(8, 4, 16)
output, attn = encoder_layer(x, mask)
print(output.shape, attn.shape)
[WARNING] ME(6511:281472949233968,MainProcess):2024-06-29-07:59:57.449.30 [mindspore/nn/layer/basic.py:173] For Dropout, this parameter `keep_prob` will be deprecated, please use `p` instead.
[WARNING] ME(6511:281472949233968,MainProcess):2024-06-29-07:59:57.520.09 [mindspore/nn/layer/basic.py:173] For Dropout, this parameter `keep_prob` will be deprecated, please use `p` instead.
[WARNING] ME(6511:281472949233968,MainProcess):2024-06-29-07:59:57.559.25 [mindspore/nn/layer/basic.py:173] For Dropout, this parameter `keep_prob` will be deprecated, please use `p` instead.
[WARNING] ME(6511:281472949233968,MainProcess):2024-06-29-07:59:57.595.56 [mindspore/nn/layer/basic.py:173] For Dropout, this parameter `keep_prob` will be deprecated, please use `p` instead.(1, 2, 8) (1, 4, 2, 2)
Encoder
将上面实现的encoder层堆叠n_layers次,并添加wording embedding与positional encoding。
class Encoder(nn.Cell):def __init__(self, src_vocab_size, d_model, n_heads, d_ff, n_layers, dropout_p=0.):super().__init__()self.src_emb = nn.Embedding(src_vocab_size, d_model)self.pos_emb = PositionalEncoding(d_model, dropout_p)self.layers = nn.CellList([EncoderLayer(d_model, n_heads, d_ff, dropout_p) for _ in range(n_layers)])self.scaling_factor = ops.Sqrt()(Tensor(d_model, mstype.float32))def construct(self, enc_inputs, src_pad_idx):"""enc_inputs : [batch_size, src_len]"""# 将输入转换为embedding,并添加位置信息# enc_outputs: [batch_size, src_len, d_model]enc_outputs = self.src_emb(enc_inputs.astype(mstype.int32))enc_outputs = self.pos_emb(enc_outputs * self.scaling_factor)# 输入的padding掩码# enc_self_attn_mask: [batch_size, src_len, src_len]enc_self_attn_mask = get_attn_pad_mask(enc_inputs, enc_inputs, src_pad_idx)# 堆叠encoder层# enc_outputs: [batch_size, src_len, d_model]# enc_self_attns: [batch_size, n_heads, src_len, src_len]enc_self_attns = []for layer in self.layers:enc_outputs, enc_self_attn = layer(enc_outputs, enc_self_attn_mask)enc_self_attns.append(enc_self_attn)return enc_outputs, enc_self_attns
解码器 (Decoder)

解码器将编码器输出的上下文序列转换为目标序列的预测结果 Y ^ \hat{Y} Y^,该输出将在模型训练中与真实目标输出 Y Y Y进行比较,计算损失。
不同于编码器,每个Decoder层中包含两层多头注意力机制,并在最后多出一个线性层,输出对目标序列的预测结果。
- 第一层:计算目标序列的注意力分数的掩码多头自注意力;
- 第二层:用于计算上下文序列与目标序列对应关系,其中Decoder掩码多头注意力的输出作为query,Encoder的输出(上下文序列)作为key和value;
带掩码的多头注意力
在处理目标序列的输入时,t时刻的模型只能“观察”直到t-1时刻的所有词元,后续的词语不应该一并输入Decoder中。
为了保证在t时刻,只有t-1个词元作为输入参与多头注意力分数的计算,我们需要在第一个多头注意力中额外增加一个时间掩码,使目标序列中的词随时间发展逐个被暴露出来。
该注意力掩码可通过三角矩阵实现,对角线以上的词元表示为不参与注意力计算的词元,标记为1。
0 1 1 1 1 0 0 1 1 1 0 0 0 1 1 0 0 0 0 1 0 0 0 0 0 \begin{matrix} 0 & 1 & 1 & 1 & 1\\ 0 & 0 & 1 & 1 & 1\\ 0 & 0 & 0 & 1 & 1\\ 0 & 0 & 0 & 0 & 1\\ 0 & 0 & 0 & 0 & 0\\ \end{matrix} 0000010000110001110011110
该掩码一般被称作subsequent mask。
最后,将subsequent mask和padding mask合并为一个整体的掩码,确保模型既不会注意到t时刻以后的词元,也不会关注为<pad>的词元。

def get_attn_subsequent_mask(seq_q, seq_k):"""生成时间掩码,使decoder在第t时刻只能看到序列的前t-1个元素Args:seq_q (Tensor): query序列,shape = [batch size, len_q]seq_k (Tensor): key序列,shape = [batch size, len_k]"""batch_size, len_q = seq_q.shapebatch_size, len_k = seq_k.shape# 生成三角矩阵# subsequent_mask: [batch size, len_q, len_k]ones = ops.ones((batch_size, len_q, len_k), mindspore.float32)subsequent_mask = mnp.triu(ones, k=1)return subsequent_mask
q = k = ops.ones((1, 4), mstype.float32)  ##因为 batch_size, len_q = seq_q.shape  其实修改为 1 4 4 也可以
mask = get_attn_subsequent_mask(q, k)
print(mask)
[[[0. 1. 1. 1.][0. 0. 1. 1.][0. 0. 0. 1.][0. 0. 0. 0.]]]
Decoder Layer
首先实现Decoder中的一个层。
class DecoderLayer(nn.Cell):def __init__(self, d_model, n_heads, d_ff, dropout_p=0.):super().__init__()d_k = d_model // n_headsif d_k * n_heads != d_model:raise ValueError(f"The `d_model` {d_model} can not be divisible by `num_heads` {n_heads}.")self.dec_self_attn = MultiHeadAttention(d_model, d_k, n_heads, dropout_p)self.dec_enc_attn = MultiHeadAttention(d_model, d_k, n_heads, dropout_p)self.pos_ffn = PoswiseFeedForward(d_ff, d_model, dropout_p)self.add_norm1 = AddNorm(d_model, dropout_p)self.add_norm2 = AddNorm(d_model, dropout_p)self.add_norm3 = AddNorm(d_model, dropout_p)def construct(self, dec_inputs, enc_outputs, dec_self_attn_mask, dec_enc_attn_mask):"""dec_inputs: [batch_size, trg_len, d_model]enc_outputs: [batch_size, src_len, d_model]dec_self_attn_mask: [batch_size, trg_len, trg_len]dec_enc_attn_mask: [batch_size, trg_len, src_len]"""residual = dec_inputs# decoder multi-head attentiondec_outputs, dec_self_attn = self.dec_self_attn(dec_inputs, dec_inputs, dec_inputs, dec_self_attn_mask)# add & normdec_outputs = self.add_norm1(dec_outputs, residual)residual = dec_outputs# encoder-decoder multi-head attention dec_outputs, dec_enc_attn = self.dec_enc_attn(dec_outputs, enc_outputs, enc_outputs, dec_enc_attn_mask)## dec_outputs作为Q enc作为KV# add & normdec_outputs = self.add_norm2(dec_outputs, residual)residual = dec_outputs# feed-forwarddec_outputs = self.pos_ffn(dec_outputs)# add & normdec_outputs = self.add_norm3(dec_outputs, residual)return dec_outputs, dec_self_attn, dec_enc_attn
x = y = ops.ones((1, 2, 4), mstype.float32)
mask1 = mask2 = Tensor([False]).broadcast_to((1, 2, 2))
decoder_layer = DecoderLayer(4, 1, 16)  ## d_model, n_heads, d_ff,
output, attn1, attn2 = decoder_layer(x, y, mask1, mask2)
print(output.shape, attn1.shape, attn2.shape)
[WARNING] ME(6511:281472949233968,MainProcess):2024-06-29-08:13:42.292.865 [mindspore/nn/layer/basic.py:173] For Dropout, this parameter `keep_prob` will be deprecated, please use `p` instead.
[WARNING] ME(6511:281472949233968,MainProcess):2024-06-29-08:13:42.304.560 [mindspore/nn/layer/basic.py:173] For Dropout, this parameter `keep_prob` will be deprecated, please use `p` instead.
[WARNING] ME(6511:281472949233968,MainProcess):2024-06-29-08:13:42.311.160 [mindspore/nn/layer/basic.py:173] For Dropout, this parameter `keep_prob` will be deprecated, please use `p` instead.
[WARNING] ME(6511:281472949233968,MainProcess):2024-06-29-08:13:42.315.077 [mindspore/nn/layer/basic.py:173] For Dropout, this parameter `keep_prob` will be deprecated, please use `p` instead.
[WARNING] ME(6511:281472949233968,MainProcess):2024-06-29-08:13:42.318.475 [mindspore/nn/layer/basic.py:173] For Dropout, this parameter `keep_prob` will be deprecated, please use `p` instead.
[WARNING] ME(6511:281472949233968,MainProcess):2024-06-29-08:13:42.321.795 [mindspore/nn/layer/basic.py:173] For Dropout, this parameter `keep_prob` will be deprecated, please use `p` instead.(1, 2, 4) (1, 1, 2, 2) (1, 1, 2, 2)
Decoder
将上面实现的DecoderLayer堆叠n_layer次,添加word embedding与positional encoding,以及最后的线性层。
输出的dec_outputs为对目标序列的预测。
class Decoder(nn.Cell):def __init__(self, trg_vocab_size, d_model, n_heads, d_ff, n_layers, dropout_p=0.):super().__init__()self.trg_emb = nn.Embedding(trg_vocab_size, d_model)self.pos_emb = PositionalEncoding(d_model, dropout_p)self.layers = nn.CellList([DecoderLayer(d_model, n_heads, d_ff) for _ in range(n_layers)])self.projection = nn.Dense(d_model, trg_vocab_size)self.scaling_factor = ops.Sqrt()(Tensor(d_model, mstype.float32)) def construct(self, dec_inputs, enc_inputs, enc_outputs, src_pad_idx, trg_pad_idx):"""dec_inputs: [batch_size, trg_len]enc_inputs: [batch_size, src_len]enc_outputs: [batch_size, src_len, d_model]"""# 将输入转换为Embedding,并添加位置信息# dec_outputs: [batch_size, trg_len, d_model]dec_outputs = self.trg_emb(dec_inputs.astype(mstype.int32))dec_outputs = self.pos_emb(dec_outputs * self.scaling_factor)# decoder中自注意力的掩码# dec_self_attn_mask: [batch_size, trg_len, trg_len]dec_self_attn_pad_mask = get_attn_pad_mask(dec_inputs, dec_inputs, trg_pad_idx)dec_self_attn_subsequent_mask = get_attn_subsequent_mask(dec_inputs, dec_inputs)dec_self_attn_mask = ops.gt((dec_self_attn_pad_mask + dec_self_attn_subsequent_mask), 0)# encoder-decoder中的注意力padding掩码# dec_enc_attn_mask: [batch_size, trg_len, src_len]dec_enc_attn_mask = get_attn_pad_mask(dec_inputs, enc_inputs, src_pad_idx)# 堆叠decoder层# dec_outputs: [batch_size, trg_len, d_model]dec_self_attns, dec_enc_attns = [], []for layer in self.layers:dec_outputs, dec_self_attn, dec_enc_attn = layer(dec_outputs, enc_outputs, dec_self_attn_mask, dec_enc_attn_mask)dec_self_attns.append(dec_self_attn)dec_enc_attns.append(dec_enc_attn)# 线性层# dec_outputs: [batch_size, trg_len, trg_vocab_size]dec_outputs = self.projection(dec_outputs)return dec_outputs, dec_self_attns, dec_enc_attns
Transformer
将实现的Encoder与Decoder组合起来。
class Transformer(nn.Cell):def __init__(self, encoder, decoder):super().__init__()self.encoder = encoderself.decoder = decoderdef construct(self, enc_inputs, dec_inputs, src_pad_idx, trg_pad_idx):"""enc_inputs: [batch_size, src_len]dec_inputs: [batch_size, trg_len]"""# encoder,输出表示源序列信息tensor# enc_ouputs: [batch_size, src_len, d_model]enc_outputs, enc_self_attns = self.encoder(enc_inputs, src_pad_idx)# decoder# de_outputs: [batch_size, trg_len, trg_vocab_size]dec_outputs, dec_self_attns, dec_enc_attns = self.decoder(dec_inputs, enc_inputs, enc_outputs, src_pad_idx, trg_pad_idx)# decoder logits# dec_logits: [batch_size * trg_len, trg_vocab_size]dec_logits = dec_outputs.view((-1, dec_outputs.shape[-1]))return dec_logits, enc_self_attns, dec_self_attns, dec_enc_attns通过Transformer实现文本机器翻译
全流程
- 数据预处理: 将图像、文本等数据处理为可以计算的Tensor
- 模型构建: 使用框架API, 搭建模型
- 模型训练: 定义模型训练逻辑, 遍历训练集进行训练
- 模型评估: 使用训练好的模型, 在测试集评估效果
- 模型推理: 将训练好的模型部署, 输入新数据获得预测结果
数据准备
我们本次使用的数据集为Multi30K数据集,它是一个大规模的图像-文本数据集,包含30K+图片,每张图片对应两类不同的文本描述:
- 英语描述,及对应的德语翻译;
- 五个独立的、非翻译而来的英语和德语描述,描述中包含的细节并不相同;
因其收集的不同语言对于图片的描述相互独立,所以训练出的模型可以更好地适用于有噪声的多模态内容。

在本次文本翻译任务中,德语是源语言(source languag),英语是目标语言(target language)。
数据下载模块
使用download进行数据下载,并将tar.gz文件解压到指定文件夹。
from torchtext.datasets import multi30kmulti30k.URL["train"] = "https://raw.githubusercontent.com/neychev/small_DL_repo/master/datasets/Multi30k/training.tar.gz"
multi30k.URL["valid"] = "https://raw.githubusercontent.com/neychev/small_DL_repo/master/datasets/Multi30k/validation.tar.gz"
multi30k.URL["test"] = "https://raw.githubusercontent.com/neychev/small_DL_repo/master/datasets/Multi30k/mmt16_task1_test.tar.gz"multi30k.MD5["train"] = "20140d013d05dd9a72dfde46478663ba05737ce983f478f960c1123c6671be5e"
multi30k.MD5["valid"] = "a7aa20e9ebd5ba5adce7909498b94410996040857154dab029851af3a866da8c"
multi30k.MD5["test"] = "6d1ca1dba99e2c5dd54cae1226ff11c2551e6ce63527ebb072a1f70f72a5cd36"https://discuss.pytorch.org/
#train_path '/home/nginx/.mindspore_examples/train'
'/home/nginx/.mindspore_examples/train'
!wget -c -t 0 https://raw.githubusercontent.com/neychev/small_DL_repo/master/datasets/Multi30k/training.tar.gz
--2024-06-29 08:52:16--  https://raw.githubusercontent.com/neychev/small_DL_repo/master/datasets/Multi30k/training.tar.gz
Resolving raw.githubusercontent.com (raw.githubusercontent.com)... 185.199.111.133, 185.199.109.133, 185.199.108.133, ...
Connecting to raw.githubusercontent.com (raw.githubusercontent.com)|185.199.111.133|:443... failed: Connection timed out.
Connecting to raw.githubusercontent.com (raw.githubusercontent.com)|185.199.109.133|:443... failed: Connection timed out.
Connecting to raw.githubusercontent.com (raw.githubusercontent.com)|185.199.108.133|:443...
!wget -c -t 0 https://raw.githubusercontent.com/neychev/small_DL_repo/master/datasets/Multi30k/training.tar.gz
!wget -c -t 0 https://raw.githubusercontent.com/neychev/small_DL_repo/master/datasets/Multi30k/validation.tar.gz
!wget -c -t 0https://raw.githubusercontent.com/neychev/small_DL_repo/master/datasets/Multi30k/mmt16_task1_test.tar.gz -O mmt_task1_test2016.tar.gz
from download import download
from pathlib import Path
from tqdm import tqdm
import os# 训练、验证、测试数据集下载地址
urls = {'train': 'https://raw.githubusercontent.com/neychev/small_DL_repo/master/datasets/Multi30k/training.tar.gz','valid': 'https://raw.githubusercontent.com/neychev/small_DL_repo/master/datasets/Multi30k/validation.tar.gz','test': 'https://raw.githubusercontent.com/neychev/small_DL_repo/master/datasets/Multi30k/mmt16_task1_test.tar.gz'
}# 指定保存路径为 `home_path/.mindspore_examples`
cache_dir = Path.home() / '.mindspore_examples'train_path = download(urls['train'], os.path.join(cache_dir, 'train'), kind='tar.gz')
valid_path = download(urls['valid'], os.path.join(cache_dir, 'valid'), kind='tar.gz')
#test_path = download(urls['test'], os.path.join(cache_dir, 'test'), kind='tar.gz')
Replace is False and data exists, so doing nothing. Use replace=True to re-download the data.
Creating data folder...---------------------------------------------------------------------------OSError                                   Traceback (most recent call last)File ~/miniconda/envs/jupyter/lib/python3.9/urllib/request.py:1346, in AbstractHTTPHandler.do_open(self, http_class, req, **http_conn_args)1345 try:
-> 1346     h.request(req.get_method(), req.selector, req.data, headers,1347               encode_chunked=req.has_header('Transfer-encoding'))1348 except OSError as err: # timeout errorFile ~/miniconda/envs/jupyter/lib/python3.9/http/client.py:1285, in HTTPConnection.request(self, method, url, body, headers, encode_chunked)1284 """Send a complete request to the server."""
-> 1285 self._send_request(method, url, body, headers, encode_chunked)File ~/miniconda/envs/jupyter/lib/python3.9/http/client.py:1331, in HTTPConnection._send_request(self, method, url, body, headers, encode_chunked)1330     body = _encode(body, 'body')
-> 1331 self.endheaders(body, encode_chunked=encode_chunked)File ~/miniconda/envs/jupyter/lib/python3.9/http/client.py:1280, in HTTPConnection.endheaders(self, message_body, encode_chunked)1279     raise CannotSendHeader()
-> 1280 self._send_output(message_body, encode_chunked=encode_chunked)File ~/miniconda/envs/jupyter/lib/python3.9/http/client.py:1040, in HTTPConnection._send_output(self, message_body, encode_chunked)1039 del self._buffer[:]
-> 1040 self.send(msg)1042 if message_body is not None:1043 1044     # create a consistent interface to message_bodyFile ~/miniconda/envs/jupyter/lib/python3.9/http/client.py:980, in HTTPConnection.send(self, data)979 if self.auto_open:
--> 980     self.connect()981 else:File ~/miniconda/envs/jupyter/lib/python3.9/http/client.py:1447, in HTTPSConnection.connect(self)1445 "Connect to a host on a given (SSL) port."
-> 1447 super().connect()1449 if self._tunnel_host:File ~/miniconda/envs/jupyter/lib/python3.9/http/client.py:946, in HTTPConnection.connect(self)945 """Connect to the host and port specified in __init__."""
--> 946 self.sock = self._create_connection(947     (self.host,self.port), self.timeout, self.source_address)948 # Might fail in OSs that don't implement TCP_NODELAYFile ~/miniconda/envs/jupyter/lib/python3.9/socket.py:844, in create_connection(address, timeout, source_address)843 try:
--> 844     raise err845 finally:846     # Break explicitly a reference cycleFile ~/miniconda/envs/jupyter/lib/python3.9/socket.py:832, in create_connection(address, timeout, source_address)831     sock.bind(source_address)
--> 832 sock.connect(sa)833 # Break explicitly a reference cycleOSError: [Errno 99] Cannot assign requested addressDuring handling of the above exception, another exception occurred:URLError                                  Traceback (most recent call last)File ~/miniconda/envs/jupyter/lib/python3.9/site-packages/download/download.py:208, in _fetch_file(url, file_name, resume, hash_, timeout, progressbar, verbose)207 req = request_agent(url)
--> 208 u = urllib.request.urlopen(req, timeout=timeout)209 u.close()File ~/miniconda/envs/jupyter/lib/python3.9/urllib/request.py:214, in urlopen(url, data, timeout, cafile, capath, cadefault, context)213     opener = _opener
--> 214 return opener.open(url, data, timeout)File ~/miniconda/envs/jupyter/lib/python3.9/urllib/request.py:517, in OpenerDirector.open(self, fullurl, data, timeout)516 sys.audit('urllib.Request', req.full_url, req.data, req.headers, req.get_method())
--> 517 response = self._open(req, data)519 # post-process responseFile ~/miniconda/envs/jupyter/lib/python3.9/urllib/request.py:534, in OpenerDirector._open(self, req, data)533 protocol = req.type
--> 534 result = self._call_chain(self.handle_open, protocol, protocol +535                           '_open', req)536 if result:File ~/miniconda/envs/jupyter/lib/python3.9/urllib/request.py:494, in OpenerDirector._call_chain(self, chain, kind, meth_name, *args)493 func = getattr(handler, meth_name)
--> 494 result = func(*args)495 if result is not None:File ~/miniconda/envs/jupyter/lib/python3.9/urllib/request.py:1389, in HTTPSHandler.https_open(self, req)1388 def https_open(self, req):
-> 1389     return self.do_open(http.client.HTTPSConnection, req,1390         context=self._context, check_hostname=self._check_hostname)File ~/miniconda/envs/jupyter/lib/python3.9/urllib/request.py:1349, in AbstractHTTPHandler.do_open(self, http_class, req, **http_conn_args)1348 except OSError as err: # timeout error
-> 1349     raise URLError(err)1350 r = h.getresponse()URLError: <urlopen error [Errno 99] Cannot assign requested address>During handling of the above exception, another exception occurred:RuntimeError                              Traceback (most recent call last)Cell In[30], line 1714 cache_dir = Path.home() / '.mindspore_examples'16 train_path = download(urls['train'], os.path.join(cache_dir, 'train'), kind='tar.gz')
---> 17 valid_path = download(urls['valid'], os.path.join(cache_dir, 'valid'), kind='tar.gz')18 test_path = download(urls['test'], os.path.join(cache_dir, 'test'), kind='tar.gz')File ~/miniconda/envs/jupyter/lib/python3.9/site-packages/download/download.py:95, in download(url, path, kind, progressbar, replace, timeout, verbose)93 path_temp = _TempDir()94 path_temp_file = op.join(path_temp, "tmp.{}".format(kind))
---> 95 _fetch_file(96     download_url,97     path_temp_file,98     timeout=timeout,99     verbose=verbose,100     progressbar=progressbar,101 )103 # Unzip the file to the out path104 if verbose:File ~/miniconda/envs/jupyter/lib/python3.9/site-packages/download/download.py:277, in _fetch_file(url, file_name, resume, hash_, timeout, progressbar, verbose)275     shutil.move(temp_file_name, file_name)276 except Exception as ee:
--> 277     raise RuntimeError(278         "Error while fetching file %s."279         " Dataset fetching aborted.\nError: %s" % (url, ee)280     )RuntimeError: Error while fetching file https://raw.githubusercontent.com/neychev/small_DL_repo/master/datasets/Multi30k/validation.tar.gz. Dataset fetching aborted.
Error: <urlopen error [Errno 99] Cannot assign requested address>
test_path
# from download import download
# from pathlib import Path
# from tqdm import tqdm
# import os# # 训练、验证、测试数据集下载地址
# urls = {
#     'train': 'http://www.quest.dcs.shef.ac.uk/wmt16_files_mmt/training.tar.gz',
#     'valid': 'http://www.quest.dcs.shef.ac.uk/wmt16_files_mmt/validation.tar.gz',
#     'test': 'http://www.quest.dcs.shef.ac.uk/wmt17_files_mmt/mmt_task1_test2016.tar.gz'
# }# # 指定保存路径为 `home_path/.mindspore_examples`
# cache_dir = Path.home() / '.mindspore_examples'# train_path = download(urls['train'], os.path.join(cache_dir, 'train'), kind='tar.gz')
# valid_path = download(urls['valid'], os.path.join(cache_dir, 'valid'), kind='tar.gz')
# test_path = download(urls['test'], os.path.join(cache_dir, 'test'), kind='tar.gz')
Creating data folder...---------------------------------------------------------------------------timeout                                   Traceback (most recent call last)File ~/miniconda/envs/jupyter/lib/python3.9/urllib/request.py:1346, in AbstractHTTPHandler.do_open(self, http_class, req, **http_conn_args)1345 try:
-> 1346     h.request(req.get_method(), req.selector, req.data, headers,1347               encode_chunked=req.has_header('Transfer-encoding'))1348 except OSError as err: # timeout errorFile ~/miniconda/envs/jupyter/lib/python3.9/http/client.py:1285, in HTTPConnection.request(self, method, url, body, headers, encode_chunked)1284 """Send a complete request to the server."""
-> 1285 self._send_request(method, url, body, headers, encode_chunked)File ~/miniconda/envs/jupyter/lib/python3.9/http/client.py:1331, in HTTPConnection._send_request(self, method, url, body, headers, encode_chunked)1330     body = _encode(body, 'body')
-> 1331 self.endheaders(body, encode_chunked=encode_chunked)File ~/miniconda/envs/jupyter/lib/python3.9/http/client.py:1280, in HTTPConnection.endheaders(self, message_body, encode_chunked)1279     raise CannotSendHeader()
-> 1280 self._send_output(message_body, encode_chunked=encode_chunked)File ~/miniconda/envs/jupyter/lib/python3.9/http/client.py:1040, in HTTPConnection._send_output(self, message_body, encode_chunked)1039 del self._buffer[:]
-> 1040 self.send(msg)1042 if message_body is not None:1043 1044     # create a consistent interface to message_bodyFile ~/miniconda/envs/jupyter/lib/python3.9/http/client.py:980, in HTTPConnection.send(self, data)979 if self.auto_open:
--> 980     self.connect()981 else:File ~/miniconda/envs/jupyter/lib/python3.9/http/client.py:946, in HTTPConnection.connect(self)945 """Connect to the host and port specified in __init__."""
--> 946 self.sock = self._create_connection(947     (self.host,self.port), self.timeout, self.source_address)948 # Might fail in OSs that don't implement TCP_NODELAYFile ~/miniconda/envs/jupyter/lib/python3.9/socket.py:844, in create_connection(address, timeout, source_address)843 try:
--> 844     raise err845 finally:846     # Break explicitly a reference cycleFile ~/miniconda/envs/jupyter/lib/python3.9/socket.py:832, in create_connection(address, timeout, source_address)831     sock.bind(source_address)
--> 832 sock.connect(sa)833 # Break explicitly a reference cycletimeout: timed outDuring handling of the above exception, another exception occurred:URLError                                  Traceback (most recent call last)File ~/miniconda/envs/jupyter/lib/python3.9/site-packages/download/download.py:208, in _fetch_file(url, file_name, resume, hash_, timeout, progressbar, verbose)207 req = request_agent(url)
--> 208 u = urllib.request.urlopen(req, timeout=timeout)209 u.close()File ~/miniconda/envs/jupyter/lib/python3.9/urllib/request.py:214, in urlopen(url, data, timeout, cafile, capath, cadefault, context)213     opener = _opener
--> 214 return opener.open(url, data, timeout)File ~/miniconda/envs/jupyter/lib/python3.9/urllib/request.py:517, in OpenerDirector.open(self, fullurl, data, timeout)516 sys.audit('urllib.Request', req.full_url, req.data, req.headers, req.get_method())
--> 517 response = self._open(req, data)519 # post-process responseFile ~/miniconda/envs/jupyter/lib/python3.9/urllib/request.py:534, in OpenerDirector._open(self, req, data)533 protocol = req.type
--> 534 result = self._call_chain(self.handle_open, protocol, protocol +535                           '_open', req)536 if result:File ~/miniconda/envs/jupyter/lib/python3.9/urllib/request.py:494, in OpenerDirector._call_chain(self, chain, kind, meth_name, *args)493 func = getattr(handler, meth_name)
--> 494 result = func(*args)495 if result is not None:File ~/miniconda/envs/jupyter/lib/python3.9/urllib/request.py:1375, in HTTPHandler.http_open(self, req)1374 def http_open(self, req):
-> 1375     return self.do_open(http.client.HTTPConnection, req)File ~/miniconda/envs/jupyter/lib/python3.9/urllib/request.py:1349, in AbstractHTTPHandler.do_open(self, http_class, req, **http_conn_args)1348 except OSError as err: # timeout error
-> 1349     raise URLError(err)1350 r = h.getresponse()URLError: <urlopen error timed out>During handling of the above exception, another exception occurred:RuntimeError                              Traceback (most recent call last)Cell In[27], line 1613 # 指定保存路径为 `home_path/.mindspore_examples`14 cache_dir = Path.home() / '.mindspore_examples'
---> 16 train_path = download(urls['train'], os.path.join(cache_dir, 'train'), kind='tar.gz')17 valid_path = download(urls['valid'], os.path.join(cache_dir, 'valid'), kind='tar.gz')18 test_path = download(urls['test'], os.path.join(cache_dir, 'test'), kind='tar.gz')File ~/miniconda/envs/jupyter/lib/python3.9/site-packages/download/download.py:95, in download(url, path, kind, progressbar, replace, timeout, verbose)93 path_temp = _TempDir()94 path_temp_file = op.join(path_temp, "tmp.{}".format(kind))
---> 95 _fetch_file(96     download_url,97     path_temp_file,98     timeout=timeout,99     verbose=verbose,100     progressbar=progressbar,101 )103 # Unzip the file to the out path104 if verbose:File ~/miniconda/envs/jupyter/lib/python3.9/site-packages/download/download.py:277, in _fetch_file(url, file_name, resume, hash_, timeout, progressbar, verbose)275     shutil.move(temp_file_name, file_name)276 except Exception as ee:
--> 277     raise RuntimeError(278         "Error while fetching file %s."279         " Dataset fetching aborted.\nError: %s" % (url, ee)280     )RuntimeError: Error while fetching file http://www.quest.dcs.shef.ac.uk/wmt16_files_mmt/training.tar.gz. Dataset fetching aborted.
Error: <urlopen error timed out>
print("yangge mindspore 打卡第九天 trainsformer之encoder和decoder部分 2024-06-29")
yangge mindspore 打卡第九天 trainsformer之encoder和decoder部分 2024-06-29
相关文章:
mindspore打卡第9天 transformer的encoder和decoder部分
mindspore打卡第9天 transformer的encoder和decoder部分 import mindspore from mindspore import nn from mindspore import ops from mindspore import Tensor from mindspore import dtype as mstypeclass ScaledDotProductAttention(nn.Cell):def __init__(self, dropout_…...

Python实现IPv4地址和16进制互相转换
Python实现IPv4地址和16进制互相转换 import socketdef ip_to_hex16(ipaddr):# 使用 socket 库中的方法将IP地址转换为网络字节序的二进制表示hex_bytes socket.inet_aton(ipaddr)# 将二进制数据转换为整数, 其中byteorderbig 表示使用大端字节序(从高位到低位&…...

计算机视觉 | 基于图像处理和边缘检测算法的黄豆计数实验
目录 一、实验原理二、实验步骤1. 图像读取与预处理2. 边缘检测3. 轮廓检测4. 标记轮廓序号 三、实验结果四、完整代码 Hi,大家好,我是半亩花海。 本实验旨在利用 Python 和 OpenCV 库,通过图像处理和边缘检测算法实现黄豆图像的自动识别和计…...

深入分析 Android BroadcastReceiver (七)
文章目录 深入分析 Android BroadcastReceiver (七)1. 高级应用场景1.1 示例:动态权限请求1.2 示例:应用内通知更新 2. 安全性与性能优化2.1 示例:设置权限防止广播攻击2.2 示例:使用 LocalBroadcastManager2.3 示例:在…...
C++中的数据结构
一.STL标准库 结构:STL中有六大组件,分别是:容器,算法,迭代器,仿函数,配接器,配置器;以下分别介绍这六大组件中的最主要的三个。 1.容器 容器来配置存储空间,算法通过…...

武汉星起航:一站式服务,助力亚马逊卖家高效运营,实现收益飞跃
在跨境电商的浪潮中,武汉星起航电子商务有限公司以其独特的一站式跨境电商服务,为众多亚马逊卖家提供了强有力的支持,助力他们在不断发展的市场中脱颖而出,实现收益的大幅提升。 武汉星起航的一站式跨境电商服务,以其…...

从灵感到实践:Kimi辅助完成学术论文选题的文艺之旅
学境思源,一键生成论文初稿: AcademicIdeas - 学境思源AI论文写作 昨天我们为大家介绍了ChatGPT辅助完成实现设计(AI与学术的交响:ChatGPT辅助下的实验设计新篇章)。今天我们再来看看Kimi对于论文选题都能提供哪些帮助…...

华为od-C卷200分题目4 -电脑病毒感染
华为od-C卷200分题目4 -电脑病毒感染 一个局域网内有很多台电脑,分别标注为0 - N-1的数字。相连接的电脑距离不一样,所以感染时间不一样,感染时间用t表示。其中网络内一个电脑被病毒感染,其感染网络内所有的电脑需要最少需要多长…...

show-overflow-tooltip 解决elementui el-table标签自动换行的问题
elementui中 el-table中某一行的高度不想因为宽度不够而撑开换行展示的解决方法。可通过show-overflow-tooltip属性解决,如下 代码是这样的 <el-table-column width"80" prop"id" label"ID"></el-table-column> <el…...

数字社交的领航者:解析Facebook的引领作用
在当今数字化社会中,社交网络已经成为了人们日常生活不可或缺的一部分。而在众多社交平台中,Facebook凭借其巨大的用户基础和创新的技术应用,被公认为数字社交领域的领航者之一。本文将深入解析Facebook在数字社交中的引领作用,探…...

深度分析 Apache Flink 窗口机制
什么是 Flink 窗口? Apache Flink 是一个用于处理实时流数据的开源框架,其核心功能之一是窗口(Window)机制。窗口是 Flink 在处理流数据时用于划分数据流的逻辑概念,它将无限的流数据切割成有限的、可管理的部分&…...
)
ubuntu 软链接(ubuntu20.04)
ubuntu 软链接(ubuntu20.04) 在Ubuntu和其他Linux系统中,软链接(也称为符号链接)是文件系统中的一个特殊类型的文件,它作为一个引用或指针,指向另一个文件或目录。软链接类似于Windows中的快捷…...
如何在LabVIEW中使用FPGA模块
LabVIEW FPGA模块是NI公司推出的一款强大工具,它允许用户使用LabVIEW图形化编程环境来开发FPGA(现场可编程门阵列)应用程序。与传统的HDL(硬件描述语言)编程相比,LabVIEW FPGA模块大大简化了FPGA开发的过程…...

FPGA开发技能(7)Vivado设置bit文件加密
文章目录 前言1. AES加密原理2.xilinx的AES方案3.加密流程3.1生成加密的bit流3.2将密钥写入eFUSE寄存器 4.验证结论5.传送门 前言 在FPGA的项目发布的时候需要考虑项目工程加密的问题,一方面防止自己的心血被盗,另一方面也保护公司资产,保护知…...

【算法专题--链表】旋转链表 -- 高频面试题(图文详解,小白一看就懂!!)
目录 一、前言 二、题目描述 三、解题方法 ⭐解题思路---闭合为环 🍍 案例图解 四、总结与提炼 五、共勉 一、前言 旋转链表 这道题,可以说是--链表专题--,最经典的一道题,也是在面试中频率最高的一道题目&#x…...
ElasticSearch 和 MySQL的区别
MySQLElasticSearch 数据库(database)索引(index)数据表(table) 类型(type) 记录文档(document,json格式) 一、ES基础命令 1. ES cat查询命令 2.…...

Linux部署wordpress站点
先安装宝塔面板 yum install -y wget && wget -O install.sh https://download.bt.cn/install/install_6.0.sh && sh install.sh ed8484bec 因为wordpress需要php,mysql,apache ,httpd环境 参考:Linux 安装宝塔…...
实体零售连锁企业如何通过物流接口实现数智化转型升级?
在电子商务浪潮的持续冲击下,传统的实体零售行业面临着巨大的挑战。为了在线上线下融合的新零售时代保持竞争力,众多实体零售企业积极寻求数字化转型的突破。 某中国零售连锁百强企业近年来致力于打造自有品牌的线上销售体系,自2021年8月起接…...

AWS EKS上GPU工作负载自动扩缩容的异常排查指南
在AWS EKS上使用Karpenter和KEDA实现GPU工作负载的自动扩缩容是一个复杂的过程,涉及多个组件的协同工作。当遇到问题时,系统性的排查方法可以帮助我们快速定位和解决问题。本文将详细介绍如何对这个系统进行全面的异常排查。 1. Karpenter相关组件检查 1.1 NodePool检查 N…...
Pytest+Allure+Yaml+Jenkins+Gitlab接口自动化中Jenkins配置
一、背景 Jenkins(本地宿主机搭建) 拉取GitLab(服务器)代码到在Jenkins工作空间本地运行并生成Allure测试报告 二、框架改动点 框架主运行程序需要先注释掉运行代码(可不改,如果运行报allure找不到就直接注释掉) …...
XML Group端口详解
在XML数据映射过程中,经常需要对数据进行分组聚合操作。例如,当处理包含多个物料明细的XML文件时,可能需要将相同物料号的明细归为一组,或对相同物料号的数量进行求和计算。传统实现方式通常需要编写脚本代码,增加了开…...
网络六边形受到攻击
大家读完觉得有帮助记得关注和点赞!!! 抽象 现代智能交通系统 (ITS) 的一个关键要求是能够以安全、可靠和匿名的方式从互联车辆和移动设备收集地理参考数据。Nexagon 协议建立在 IETF 定位器/ID 分离协议 (…...
idea大量爆红问题解决
问题描述 在学习和工作中,idea是程序员不可缺少的一个工具,但是突然在有些时候就会出现大量爆红的问题,发现无法跳转,无论是关机重启或者是替换root都无法解决 就是如上所展示的问题,但是程序依然可以启动。 问题解决…...

内存分配函数malloc kmalloc vmalloc
内存分配函数malloc kmalloc vmalloc malloc实现步骤: 1)请求大小调整:首先,malloc 需要调整用户请求的大小,以适应内部数据结构(例如,可能需要存储额外的元数据)。通常,这包括对齐调整,确保分配的内存地址满足特定硬件要求(如对齐到8字节或16字节边界)。 2)空闲…...

React hook之useRef
React useRef 详解 useRef 是 React 提供的一个 Hook,用于在函数组件中创建可变的引用对象。它在 React 开发中有多种重要用途,下面我将全面详细地介绍它的特性和用法。 基本概念 1. 创建 ref const refContainer useRef(initialValue);initialValu…...

Leetcode 3577. Count the Number of Computer Unlocking Permutations
Leetcode 3577. Count the Number of Computer Unlocking Permutations 1. 解题思路2. 代码实现 题目链接:3577. Count the Number of Computer Unlocking Permutations 1. 解题思路 这一题其实就是一个脑筋急转弯,要想要能够将所有的电脑解锁&#x…...

【git】把本地更改提交远程新分支feature_g
创建并切换新分支 git checkout -b feature_g 添加并提交更改 git add . git commit -m “实现图片上传功能” 推送到远程 git push -u origin feature_g...

DeepSeek 技术赋能无人农场协同作业:用 AI 重构农田管理 “神经网”
目录 一、引言二、DeepSeek 技术大揭秘2.1 核心架构解析2.2 关键技术剖析 三、智能农业无人农场协同作业现状3.1 发展现状概述3.2 协同作业模式介绍 四、DeepSeek 的 “农场奇妙游”4.1 数据处理与分析4.2 作物生长监测与预测4.3 病虫害防治4.4 农机协同作业调度 五、实际案例大…...

【生成模型】视频生成论文调研
工作清单 上游应用方向:控制、速度、时长、高动态、多主体驱动 类型工作基础模型WAN / WAN-VACE / HunyuanVideo控制条件轨迹控制ATI~镜头控制ReCamMaster~多主体驱动Phantom~音频驱动Let Them Talk: Audio-Driven Multi-Person Conversational Video Generation速…...
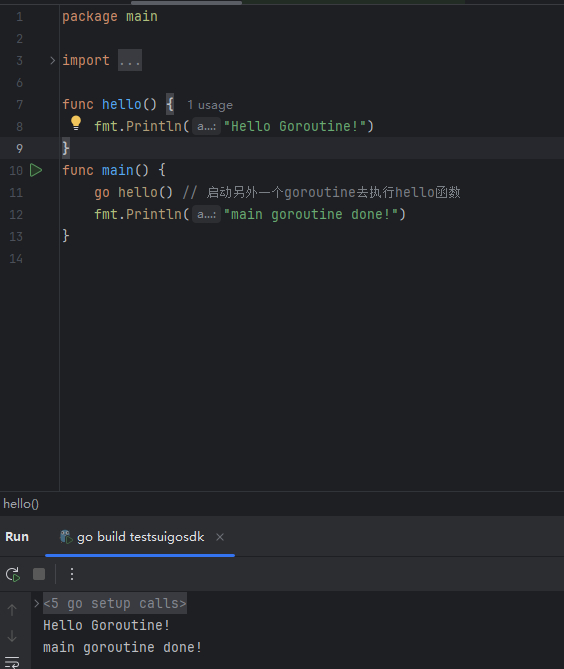
GO协程(Goroutine)问题总结
在使用Go语言来编写代码时,遇到的一些问题总结一下 [参考文档]:https://www.topgoer.com/%E5%B9%B6%E5%8F%91%E7%BC%96%E7%A8%8B/goroutine.html 1. main()函数默认的Goroutine 场景再现: 今天在看到这个教程的时候,在自己的电…...