pytorch: cpu,cuda,tensorRt 推理对比学习
0:先看结果
针对resnet模型对图片做处理
| 原图 | 结果 |
 |  |
分别使用cpu,cuda,TensorRt做推理,所需要的时间对比
| 方法 | 时间 |
| cpu | 13s594ms |
| cuda | 711ms |
| tensorRt | 113ms |
项目地址:
GitHub - july1992/Pytorch-vily-study: vily 学习pytorch,机器学习,推理加速~
模型地址:
cpu+cuda:
Deeplabv3 | PyTorch
tensorRt: 因为需要数onnx模型文件,所以使用nvida官方的resnet onnx
Quick Start Guide :: NVIDIA Deep Learning TensorRT Documentation
wget https://download.onnxruntime.ai/onnx/models/resnet50.tar.gz一:学习历程
因为需要gpu,所以在xxxx宝上买一个带gpu的ubuntu服务器,20.x版本之上(gpu :3060 12g)
1.1 查看服务器的gpu版本
nvidia-smi

1.2: 在linux上安装cuda版本的pytorch, 可选历史版本安装

1.3: 当前安装版本:
Python 3.11.5
cuda_11.7
PyTorch 2.3.0
CUDA available with version: 11.8
cuDNN version: 870
tensor: 10.2.0
1.4: 这里使用resnet50 测试
模型地址;Deeplabv3 | PyTorch
1.5 分析代码:
import torchmodel = torch.hub.load('pytorch/vision:v0.10.0', 'deeplabv3_resnet50', pretrained=True)model.eval()这里会将模型下载到/home/wuyou/.cache/torch/hub/ 目录下,如果下载失败,可以手动下载,在放入相关位置,要记得改名字

2: cpu和cuda运行对比
2.1 cpu和cuda的代码
import torch
from datetime import datetimenow = datetime.now()
print('0--',now.strftime('%Y-%m-%d %H:%M:%S.%f')[:-3])model = torch.hub.load('pytorch/vision:v0.10.0', 'deeplabv3_resnet50', pretrained=True)
# or any of these variants
# model = torch.hub.load('pytorch/vision:v0.10.0', 'deeplabv3_resnet101', pretrained=True)
# model = torch.hub.load('pytorch/vision:v0.10.0', 'd\eeplabv3_mobilenet_v3_large', pretrained=True)
model.eval()# print('model:',model)now = datetime.now()
print('1--',now.strftime('%Y-%m-%d %H:%M:%S.%f')[:-3])# sample execution (requires torchvision)from PIL import Image
from torchvision import transforms
input_image = Image.open('img/dog.jpg')
input_image = input_image.convert("RGB")# 定义图像转换(这应该与训练模型时使用的转换相匹配)
preprocess = transforms.Compose([transforms.ToTensor(),transforms.Normalize(mean=[0.485, 0.456, 0.406], std=[0.229, 0.224, 0.225]),
])input_tensor = preprocess(input_image)# 对图像进行转换
input_batch = input_tensor.unsqueeze(0) # create a mini-batch as expected by the modelnow = datetime.now()
print('2--前',now.strftime('%Y-%m-%d %H:%M:%S.%f')[:-3])# move the input and model to GPU for speed if available
if torch.cuda.is_available():print('走进cuda了')input_batch = input_batch.to('cuda')model.to('cuda')
# 使用模型进行预测
with torch.no_grad():print('走进no_grad了')output = model(input_batch)['out'][0]
output_predictions = output.argmax(0)now = datetime.now()
print('2--后',now.strftime('%Y-%m-%d %H:%M:%S.%f')[:-3])print(output_predictions[0])# import numpy as np
# # 使用 np.ndarray
# ## 将预测结果转换为numpy数组
palette = torch.tensor([2 ** 25 - 1, 2 ** 15 - 1, 2 ** 21 - 1])
colors = torch.as_tensor([i for i in range(21)])[:, None] * palette
colors = (colors % 255).numpy().astype("uint8")# # plot the semantic segmentation predictions of 21 classes in each color
r = Image.fromarray(output_predictions.byte().cpu().numpy()).resize(input_image.size)
r.putpalette(colors)# now = datetime.now()
# print('3--',now.strftime('%Y-%m-%d %H:%M:%S.%f')[:-3])r.save('img1.png')# import matplotlib.pyplot as plt
# plt.imshow(r)
# plt.show()# input("Press Enter to close...")
2.2 使用cpu的时候,下面这段代码要隐藏
if torch.cuda.is_available():print('走进cuda了')input_batch = input_batch.to('cuda')model.to('cuda')2.3 分别执行得到结果
| cpu |  | 13s594ms |
| cuda |  | 711ms |
19倍
2: 使用tensor
使用tensor RT的理由, 它可以加速模型推理,榨干你的G PU使用率,官方声称可以提高4-6倍速度。
2.1 安装好tensor环境,查看上一篇文章
Tensor安装和测试-CSDN博客
2.2 下载一个onnx的模型,至于为什么要使用onnx,可以去b站看

Quick Start Guide :: NVIDIA Deep Learning TensorRT Documentation

解压后,进入文件夹得到 model.onnx

2.3 将上面model.onnx 转换成引擎
trtexec --onnx=resnet50/model.onnx --saveEngine=resnet_engine.trt
这里遇到一些bug,放在本文BUG章节描述
2.4 部署模型
参考官方例子

创建py
import numpy as npPRECISION = np.float32from onnx_helper import ONNXClassifierWrapperBATCH_SIZE=32N_CLASSES = 1000 # Our ResNet-50 is trained on a 1000 class ImageNet task
trt_model = ONNXClassifierWrapper("resnet_engine.trt", [BATCH_SIZE, N_CLASSES], target_dtype = PRECISION)dummy_input_batch = np.zeros((BATCH_SIZE, 224, 224, 3), dtype = PRECISION)
predictions = trt_model.predict(dummy_input_batch)print('结果:',predictions[0])
这里报错找不到onnx_help ,等等一些bug,放在本文bug章节。
2.5 运行结果:

2.6 修改demo,引入图片,
import numpy as npimport torchPRECISION = np.float32from onnx_helper import ONNXClassifierWrapperfrom datetime import datetimeBATCH_SIZE=32N_CLASSES = 1000 # Our ResNet-50 is trained on a 1000 class ImageNet task# 获取当前时间
now = datetime.now()# 格式化输出当前时间,包括毫秒
print('1--',now.strftime('%Y-%m-%d %H:%M:%S.%f')[:-3])trt_model = ONNXClassifierWrapper("resnet_engine.trt", [BATCH_SIZE, N_CLASSES], target_dtype = PRECISION)# dummy_input_batch = np.zeros((BATCH_SIZE, 224, 224, 3), dtype = PRECISION)
from PIL import Image
from torchvision import transforms
input_image = Image.open('dog.jpg')
input_image = input_image.convert("RGB")
preprocess = transforms.Compose([transforms.ToTensor(),transforms.Normalize(mean=[0.485, 0.456, 0.406], std=[0.229, 0.224, 0.225]),
])input_tensor = preprocess(input_image)
input_batch = input_tensor.unsqueeze(0) # create a mini-batch as expected by the model
# print(dummy_input_batch[0])now = datetime.now()# 格式化输出当前时间,包括毫秒
print('2--前',now.strftime('%Y-%m-%d %H:%M:%S.%f')[:-3])dummy_input_batch=input_batch.numpy()
predictions = trt_model.predict(dummy_input_batch)now = datetime.now()# 格式化输出当前时间,包括毫秒
print('3--后',now.strftime('%Y-%m-%d %H:%M:%S.%f')[:-3])#print('结果:',predictions[0])output_predictions = predictionsimport numpy as np# plot the semantic segmentation predictions of 21 classes in each color
r = Image.fromarray(output_predictions,'L').resize(input_image.size)# 获取当前时间
now = datetime.now()# 格式化输出当前时间,包括毫秒
#print('4--',now.strftime('%Y-%m-%d %H:%M:%S.%f')[:-3])r.save('img1.png')
2.7。结果 , 113ms

三 bugs
3.1 执行trtexec --onnx=resnet50/model.onnx --saveEngine=resnet_engine.trt 报错
TensorTR trtexec:未找到命令解决:
解决: 在~/.bashrc下添加新环境变量
export LD_LIBRARY_PATH=/vily/TensorRT-10.2.0.19/lib:$LD_LIBRARY_PATHexport PATH=/vily/TensorRT-10.2.0.19/bin:$PATH3.2 Onnx 已经下载了,还提示 没有onnx-help

or
No matching distribution found for onnx_helper解决:
找到官方的onyx-help
TensorRT/quickstart/IntroNotebooks/onnx_helper.py at release/10.0 · NVIDIA/TensorRT · GitHub
将文件下载下来,放在当前目录下

3.3。执行报错 找不到v2
解决:
找到代码 将
self.context.execute_async_v2(self.bindings, self.stream.handle, None)
改成
self.context.execute_async_v3( self.stream.handle)
3.4 报错

or

解决onnx_help: Pytorch-vily-study/onxx/onnx_helper.py at base-platform · july1992/Pytorch-vily-study · GitHub
#
# SPDX-FileCopyrightText: Copyright (c) 1993-2024 NVIDIA CORPORATION & AFFILIATES. All rights reserved.
# SPDX-License-Identifier: Apache-2.0
#
# Licensed under the Apache License, Version 2.0 (the "License");
# you may not use this file except in compliance with the License.
# You may obtain a copy of the License at
#
# http://www.apache.org/licenses/LICENSE-2.0
#
# Unless required by applicable law or agreed to in writing, software
# distributed under the License is distributed on an "AS IS" BASIS,
# WITHOUT WARRANTIES OR CONDITIONS OF ANY KIND, either express or implied.
# See the License for the specific language governing permissions and
# limitations under the License.
#import numpy as np
#import tensorflow as tf
import tensorrt as trtimport pycuda.driver as cuda
import pycuda.autoinit# For ONNX:class ONNXClassifierWrapper():def __init__(self, file, num_classes, target_dtype = np.float32):self.target_dtype = target_dtypeself.num_classes = num_classesself.load(file)self.stream = Nonedef load(self, file):f = open(file, "rb")runtime = trt.Runtime(trt.Logger(trt.Logger.WARNING)) # 修改了这里self.engine = runtime.deserialize_cuda_engine(f.read())self.context = self.engine.create_execution_context()def allocate_memory(self, batch):self.output = np.empty(self.num_classes, dtype = self.target_dtype) # Need to set both input and output precisions to FP16 to fully enable FP16# Allocate device memoryself.d_input = cuda.mem_alloc(1 * batch.nbytes)self.d_output = cuda.mem_alloc(1 * self.output.nbytes)self.bindings = [int(self.d_input), int(self.d_output)]self.stream = cuda.Stream()def predict(self, batch): # result gets copied into outputif self.stream is None:self.allocate_memory(batch)print('1--')# Transfer input data to devicecuda.memcpy_htod_async(self.d_input, batch, self.stream)# Execute modelprint('2--')# 这里修改了self.context.set_tensor_address(self.engine.get_tensor_name(0), int(self.d_input))self.context.set_tensor_address(self.engine.get_tensor_name(1), int(self.d_output))# 这里也修改了self.context.execute_async_v3(self.stream.handle)# Transfer predictions backprint('3--')cuda.memcpy_dtoh_async(self.output, self.d_output, self.stream)# Syncronize threadsprint('4--')self.stream.synchronize()return self.outputdef convert_onnx_to_engine(onnx_filename, engine_filename = None, max_batch_size = 32, max_workspace_size = 1 << 30, fp16_mode = True):logger = trt.Logger(trt.Logger.WARNING)with trt.Builder(logger) as builder, builder.create_network() as network, trt.OnnxParser(network, logger) as parser:builder.max_workspace_size = max_workspace_sizebuilder.fp16_mode = fp16_modebuilder.max_batch_size = max_batch_sizeprint("Parsing ONNX file.")with open(onnx_filename, 'rb') as model:if not parser.parse(model.read()):for error in range(parser.num_errors):print(parser.get_error(error))print("Building TensorRT engine. This may take a few minutes.")engine = builder.build_cuda_engine(network)if engine_filename:with open(engine_filename, 'wb') as f:f.write(engine.serialize())return engine, logger
相关文章:
pytorch: cpu,cuda,tensorRt 推理对比学习
0:先看结果 针对resnet模型对图片做处理 原图结果 分别使用cpu,cuda,TensorRt做推理,所需要的时间对比 方法时间cpu13s594mscuda711mstensorRt 113ms 项目地址: GitHub - july1992/Pytorch-vily-study: vily 学…...
SoundPool音频播放实例)
android 音频播放器,(一)SoundPool音频播放实例
1. Apk内,预定义按键与触发按键: layout 按键定义: <Button android:id"id/start" android:layout_width"match_parent" android:layout_height"wrap_content" android:textAllC…...

AVL解析
本节主要看板书 概念 AVL树(Adelson-Velsky and Landis tree)是一种自平衡二叉查找树,用于在动态集合中进行高效的插入、删除和查找操作。它保持树的高度接近最小可能值,从而确保这些操作的时间复杂度始终保持在O(log n)。AVL树…...

用C#和WinForms打造你的专属视频播放器:从多格式支持到全屏播放的完整指南
使用 C# 和 WinForms 创建一个功能齐全的视频播放器,支持 MP4 和 AVI 格式,并具有文件夹导入、多视频播放、全屏切换、视频列表管理等功能,是一个相对复杂的项目。下面我会给出一个基本的实现方案,包括所需的关键功能和相关代码示…...

Spring security学习笔记
目录 1. 概要2. spring security原理2.1 DelegatingFilterProxy2.2 FilterChainProxy2.3 SecurityFilterChain2.4 Spring Security 作用机制 3.Spring Security快速入门4.高级自定义配置5. Spring Security 结合 JWT使用 1. 概要 Spring Security是一个用于在Java应用程序中实…...

MySQL:基础增删查改
MySQL:基础增删查改 插入插入冲突 查询distinctwhereorder bylimit 删除deletetruncate 更新 插入 基本插入语法: insert [into] 表名 (列1, 列2 ...) values (值1, 值2 ...);into可以省略(列1, 列2 ...)与后面的(值1, 值2)一一对应如果插入时数据完全…...

Apache DolphinScheduler 1.3.4升级至3.1.2版本过程中的踩坑记录
因为在工作中需要推动Apache DolphinScheduler的升级,经过预研,从1.3.4到3.1.2有的体验了很大的提升,在性能和功能性有了很多的改善,推荐升级。 查看官方的升级文档,可知有提供升级脚本,如果只是跨小版本的…...
)
最后一块石头的重量(超级妙的背包问题)
1049. 最后一块石头的重量 II 有一堆石头,用整数数组 stones 表示。其中 stones[i] 表示第 i 块石头的重量。 每一回合,从中选出任意两块石头,然后将它们一起粉碎。假设石头的重量分别为 x 和 y,且 x < y。那么粉碎的可能结果…...

如何评估和提升审查者在前端代码审查中的专业技能?
评估和提升审查者在前端代码审查中的专业技能可以通过以下步骤: 技能评估: 定期进行技能评估,了解审查者在前端开发各方面的能力,包括但不限于HTML、CSS、JavaScript、框架使用、代码规范等。 代码审查实践: 通过实…...

C++(区别于C的)基础内容总结
参考: C 教程 | 菜鸟教程 (runoob.com) 简介 C 被认为是一种中级语言,它综合了高级语言和低级语言的特点。 C 是由 Bjarne Stroustrup 于 1979 年在新泽西州美利山贝尔实验室开始设计开发的。C 进一步扩充和完善了 C 语言,最初命名为带类的C&…...

实现代码灵活性:用Roslyn动态编译和执行存储在数据库中的C#代码
在许多现代应用程序中,动态编译和执行代码是提升灵活性和功能的一种强大技术。本文将介绍如何使用Roslyn编译器平台动态编译和执行存储在数据库中的C#代码,并结合实际公司案例来说明这些技术的应用场景。 1. 引言 在很多应用场景中,我们可能…...

探索哈希表:C++中的实现与操作详解【Map、Set、数据结构】
探索哈希表:C中的实现与操作详解 介绍 哈希表(Hash Table)是一种常见的数据结构,它提供了一种高效的键值对存储方式,能够快速进行插入、删除和查找操作。在这篇博客中,我们将详细介绍哈希表的概念、在C中的…...

Python酷库之旅-第三方库Pandas(062)
目录 一、用法精讲 241、pandas.Series.view方法 241-1、语法 241-2、参数 241-3、功能 241-4、返回值 241-5、说明 241-6、用法 241-6-1、数据准备 241-6-2、代码示例 241-6-3、结果输出 242、pandas.Series.compare方法 242-1、语法 242-2、参数 242-3、功能 …...

python学习之旅(基础篇看这篇足够了!!!)
目录 前言 1.输入输出 1.1 输入 1.2 输出 2. 变量与常量 2.1 变量 2.2 常量 2.3 赋值 2.4格式化输出 3. 数据类型 4. 四则运算 5.“真与假” 5.1 布尔数 5.2 比较运算和逻辑运算 5.3 布尔表达式 6.判断语句 6.1 基本的if语句 6.2 if-else语句 6.3 if-elif-el…...

Azure OpenAI Embeddings vs OpenAI Embeddings
题意:Azure OpenAI 嵌入与 OpenAI 嵌入的比较 问题背景: Is anyone getting different results from Azure OpenAI embeddings deployment using text-embedding-ada-002 than the ones from OpenAI? Same text, same model, and the results are cons…...

重生奇迹MU职业成长三步走
在重生奇迹MU游戏中,转职是最重要的玩法之一。每个职业在转职后都会发生巨大的变化,经过三次转职后,你才有资格成为该游戏中最强大的冒险者。 一转,一切才刚刚开始 玩家完成第一次转职任务后,标志着我们成功度过了游…...

2024年中国数据中台行业研究报告
数据中台丨研究报告 核心摘要: 数据中台是企业数字化建设的重要构成,其通过整合企业基础设施和数据能力,实现数据资产化和服务复用,降低运营成本,支撑业务创新。受宏观经济影响,部分企业减少了对数据中台等…...

MySQL——数据表的基本操作(一)创建数据表
数据库创建成功后,就需要创建数据表。所谓创建数据表指的是在已存在的数据库中建立新表。需要注意的是,在操作数据表之前,应该使用 “ USE 数据库名 ” 指定操作是在哪个数据库中进行,否则会抛出 “ No database selected ” 错误。创建数据表…...

EPLAN EDZ 文件太大导入很慢如何解决?
目前各个品牌都在提供 EPLAN EDZ部件库文件,但是一般都是一个总的EDZ文件,导入过程中,因为电脑配置和其他问题,导致导入过程中EPLAN会崩溃或者长时间不动。 我们分析下EDZ文件的构成,这是个压缩文件,换了个壳而已。用压缩软件把edz打开,这里不是解压,直接右键,用解压…...

刷题——缺失的第一个正整数
缺失的第一个正整数_牛客题霸_牛客网 我选择了一个我比较能看懂的, int minNumberDisappeared(vector<int>& nums) {// write code heremap<int, int>hash;int n nums.size();//哈希表记录数组中出现的每个数字for(int i 0; i < n; i)hash[n…...

使用docker在3台服务器上搭建基于redis 6.x的一主两从三台均是哨兵模式
一、环境及版本说明 如果服务器已经安装了docker,则忽略此步骤,如果没有安装,则可以按照一下方式安装: 1. 在线安装(有互联网环境): 请看我这篇文章 传送阵>> 点我查看 2. 离线安装(内网环境):请看我这篇文章 传送阵>> 点我查看 说明:假设每台服务器已…...

Python爬虫实战:研究MechanicalSoup库相关技术
一、MechanicalSoup 库概述 1.1 库简介 MechanicalSoup 是一个 Python 库,专为自动化交互网站而设计。它结合了 requests 的 HTTP 请求能力和 BeautifulSoup 的 HTML 解析能力,提供了直观的 API,让我们可以像人类用户一样浏览网页、填写表单和提交请求。 1.2 主要功能特点…...
:OpenBCI_GUI:从环境搭建到数据可视化(下))
脑机新手指南(八):OpenBCI_GUI:从环境搭建到数据可视化(下)
一、数据处理与分析实战 (一)实时滤波与参数调整 基础滤波操作 60Hz 工频滤波:勾选界面右侧 “60Hz” 复选框,可有效抑制电网干扰(适用于北美地区,欧洲用户可调整为 50Hz)。 平滑处理&…...

模型参数、模型存储精度、参数与显存
模型参数量衡量单位 M:百万(Million) B:十亿(Billion) 1 B 1000 M 1B 1000M 1B1000M 参数存储精度 模型参数是固定的,但是一个参数所表示多少字节不一定,需要看这个参数以什么…...

.Net框架,除了EF还有很多很多......
文章目录 1. 引言2. Dapper2.1 概述与设计原理2.2 核心功能与代码示例基本查询多映射查询存储过程调用 2.3 性能优化原理2.4 适用场景 3. NHibernate3.1 概述与架构设计3.2 映射配置示例Fluent映射XML映射 3.3 查询示例HQL查询Criteria APILINQ提供程序 3.4 高级特性3.5 适用场…...
关于nvm与node.js
1 安装nvm 安装过程中手动修改 nvm的安装路径, 以及修改 通过nvm安装node后正在使用的node的存放目录【这句话可能难以理解,但接着往下看你就了然了】 2 修改nvm中settings.txt文件配置 nvm安装成功后,通常在该文件中会出现以下配置&…...

HTML 列表、表格、表单
1 列表标签 作用:布局内容排列整齐的区域 列表分类:无序列表、有序列表、定义列表。 例如: 1.1 无序列表 标签:ul 嵌套 li,ul是无序列表,li是列表条目。 注意事项: ul 标签里面只能包裹 li…...
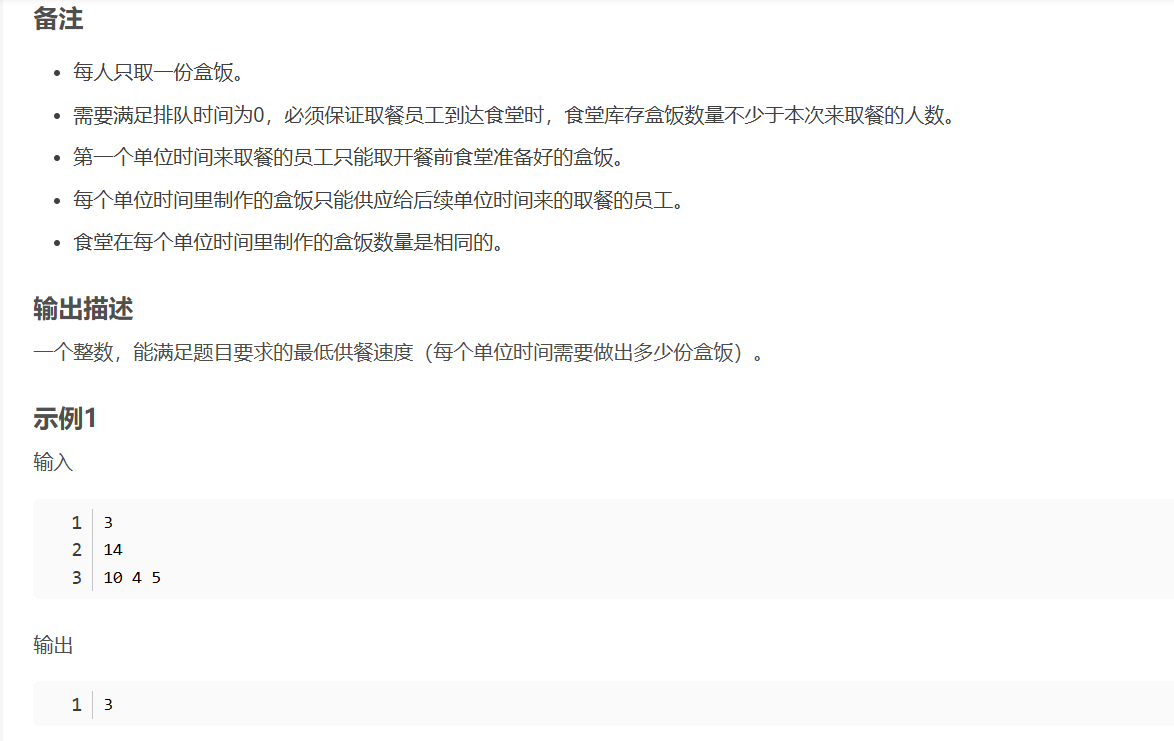
华为OD机试-食堂供餐-二分法
import java.util.Arrays; import java.util.Scanner;public class DemoTest3 {public static void main(String[] args) {Scanner in new Scanner(System.in);// 注意 hasNext 和 hasNextLine 的区别while (in.hasNextLine()) { // 注意 while 处理多个 caseint a in.nextIn…...

【C语言练习】080. 使用C语言实现简单的数据库操作
080. 使用C语言实现简单的数据库操作 080. 使用C语言实现简单的数据库操作使用原生APIODBC接口第三方库ORM框架文件模拟1. 安装SQLite2. 示例代码:使用SQLite创建数据库、表和插入数据3. 编译和运行4. 示例运行输出:5. 注意事项6. 总结080. 使用C语言实现简单的数据库操作 在…...

多种风格导航菜单 HTML 实现(附源码)
下面我将为您展示 6 种不同风格的导航菜单实现,每种都包含完整 HTML、CSS 和 JavaScript 代码。 1. 简约水平导航栏 <!DOCTYPE html> <html lang"zh-CN"> <head><meta charset"UTF-8"><meta name"viewport&qu…...