haproxy 原理+实战
haproxy
- 1 haproxy简介
- 1.1 定义
- 1.2 原理讲解
- 1.3 HAProxy的优点:
- 2. haproxy的基本部署
- 2.1 实验环境
- 2.1.2 haproxy主机配置
- 2.1.3 webserver1配置
- 2.1.4 webserver2配置
- 3. haproxy的全局配置
- 4. haproxy代理参数
- 5. haporxy的热处理
- 6.haproxy的算法
- 6.1 静态算法
- 6.1.1static-rr:基于权重的轮询调度
- 6.2 动态算法
- 6.2.1roundrobin
- 6.2.2 leastconn
- 6.3 其他算法
- 6.3.1 source
- 6.3.2 uri
- 7. haproxy的状态页
- 8. 基于cookie的会话保持
- 9. ip透传
- 9.1 七层透传(mode=http)nginx
- 9.1.1 主机操作
- 9.1.2 web主机操作
- 9.2 四层透传(mode=tcp)nginx
- 10. haproxy的acl基本访问控制
- 10.1 主机操作
- 10.2 client测试
- 11. haproxy的acl一些常用限制
- 11.1 基于ip的访问控制
- 11.2 基于ip的访问控制之黑名单
- 11.3 基于浏览器的访问控制
- 11.3 基于文件后缀名实现动静分离
- 12. haproxy自定义错误页面
- 13. haproxy四层负载数据库
- 14. haproxy之https网站加密
- 15. haproxy之https网站强制全站加密
1 haproxy简介
1.1 定义
HAProxy是一个使用C语言编写的自由及开放源代码软件,其提供高可用性、负载均衡,以及基于TCP和HTTP的应用程序代理。
HAProxy特别适用于那些负载特大的web站点,这些站点通常又需要会话保持或七层处理。HAProxy运行在当前的硬件上,完全可以支持数以万计的并发连接。并且它的运行模式使得它可以很简单安全的整合进您当前的架构中, 同时可以保护你的web服务器不被暴露到网络上。
HAProxy实现了一种事件驱动, 单一进程模型,此模型支持非常大的并发连接数。多进程或多线程模型受内存限制、系统调度器限制以及无处不在的锁限制,很少能处理数千并发连接。事件驱动模型因为在有更好的资源和时间管理的用户空间(User-Space) 实现所有这些任务,所以没有这些问题。此模型的弊端是,在多核系统上,这些程序通常扩展性较差。这就是为什么他们必须进行优化以 使每个CPU时间片(Cycle)做更多的工作。
包括 GitHub、Bitbucket、Stack Overflow、Reddit、Tumblr、Twitter和 Tuenti在内的知名网站,及亚马逊网络服务系统都使用了HAProxy。
1.2 原理讲解

负载均衡集群
负载均衡集群运行时,一般是通过一个或多个前端负载均衡器将客户访问请求分发到后端的一组服务器上,从而达到整个系统的高性能和高可用性。一般高可用性集群和负载均衡集群会使用类似的技术,或同时具有高可用性与负载均衡的特点。
HAProxy是基于四层和七层技术,可提供TCP和HTTP应用的负载均衡综合解决方案。
1.3 HAProxy的优点:
1)可靠性和稳定性非常好,可以与硬件的F5相媲美
2)最高可以同时维护40000–50000个并发连接,单位时间内处理的最大请求数为20000个,最大数据处理能力可达10Gbps
3)支持多于8种负载均衡算法 ,同时也支持session保持
4)支持虚拟主机功能从HAProxy 1.3版本后开始支持连接拒绝、全透明代理等功能
5)HAProxy拥有一个功能强大的服务器状态监控页面
6)HAProxy拥有功能强大的ACL支持
2. haproxy的基本部署
2.1 实验环境

| 功能 | ip |
|---|---|
| haproxy | eth0:172.25.254.100 |
| RS1 | eth0:172.25.254.10 |
| RS2 | eth0:172.25.254.20 |
2.1.2 haproxy主机配置
[root@haproxy ~]# dnf install haproxy -y[root@haproxy ~]# rpm -qc haproxy
/etc/haproxy/haproxy.cfg
/etc/logrotate.d/haproxy
/etc/sysconfig/haproxy[root@haproxy ~]# vim /etc/haproxy/haproxy.cfg
# 修改内容如下
#---------------------------------------------------------------------
# main frontend which proxys to the backends
#---------------------------------------------------------------------
frontend webclusterbind *:80mode httpuse_backend webcluster-hostbackend webcluster-hostbalance roundrobinserver  web1    172.25.254.10:80server  web2    172.25.254.20:80
或者
listen webclusterbind *:80mode httpbalance roundrobinserver web1 172.25.254.10:80server web2 172.25.254.20:80
[root@haproxy ~]# systemctl restart haproxy.service
# 测试
[root@haproxy ~]# for i in {1..10}
> do
> curl 172.25.254.100
> done
webserver1 - 172.25.254.10
webserver2 - 172.25.254.20
webserver1 - 172.25.254.10
webserver2 - 172.25.254.20
webserver1 - 172.25.254.10
webserver2 - 172.25.254.20
webserver1 - 172.25.254.10
webserver2 - 172.25.254.20
webserver1 - 172.25.254.10
webserver2 - 172.25.254.20
2.1.3 webserver1配置
[root@webserver1 ~]# dnf install nginx -y
[root@webserver1 ~]# echo webserver1 - 172.25.254.10 > /usr/share/nginx/html/index.html[root@webserver1 ~]# systemctl enable --now nginx.service
Created symlink /etc/systemd/system/multi-user.target.wants/nginx.service → /usr/lib/systemd/system/nginx.service.
2.1.4 webserver2配置
[root@webserver2 ~]# dnf install -y nginx
[root@webserver2 ~]# echo webserver2 - 172.25.254.20 > /usr/share/nginx/html/index.html
[root@webserver2 ~]# systemctl enable --now nginx.service
Created symlink /etc/systemd/system/multi-user.target.wants/nginx.service → /usr/lib/systemd/system/nginx.service.
3. haproxy的全局配置
#多进程
[root@haproxy ~]# vim /etc/haproxy/haproxy.cfgnbproc 2cpu-map 1 0cpu-map 2 1
[root@haproxy ~]# systemctl restart haproxy.service
#查看多进程信息
[root@haproxy ~]# pstree -p | grep haproxy|-haproxy(31828)-+-haproxy(31831)|                `-haproxy(31832)
# 启用多线程
[root@haproxy ~]# vim /etc/haproxy/haproxy.cfgnbthread 2
#定义日志
[root@haproxy ~]# vim /etc/haproxy/haproxy.cfg log         127.0.0.1 local2
[root@haproxy ~]# systemctl restart haproxy.service
[root@haproxy ~]# vim /etc/rsyslog.conf
module(load="lmudp") #udp的这个打开
input(type="imudp" port="514")
local2.*                               /var/log/haproxy.log
#查看多线程信息
[root@haproxy ~]# pstree -p | grep haproxy|-haproxy(31841)---haproxy(31843)---{haproxy}(31844)
4. haproxy代理参数
#关掉webserver1\2的,可以访问100的
[root@webserver1 ~]# systemctl stop nginx.service
[root@webserver2 ~]# systemctl stop nginx.service
[root@haproxy ~]# dnf install httpd -y
[root@haproxy ~]# vim /etc/httpd/conf/httpd.conf
#backup --sorryserver 的端口
Listen 8080
[root@haproxy ~]# systemctl enable --now httpd
[root@haproxy ~]# echo sorry > /var/www/html/index.html
[root@haproxy ~]# curl 172.25.254.100
sorry
#如果是开启的话,需在文件里注释掉
[root@webserver1 ~]# systemctl start nginx.service
[root@webserver2 ~]# systemctl start nginx.service
[root@haproxy ~]# vim /etc/haproxy/haproxy.cfg
listen webclusterbind *:80mode httpbalance roundrobin#server web1 172.25.254.10:80 check inter 2 fall 3 rise 5 weight 2#server web2 172.25.254.20:80 check inter 2 fall 3 rise 5 weight 2server web_sorry 172.25.254.100:8080 backup
[root@haproxy ~]# systemctl restart haproxy.service
测试
[root@haproxy ~]# for i in {1..10}; do curl 172.25.254.100; done
webserver1 - 172.25.254.10
webserver1 - 172.25.254.20
webserver1 - 172.25.254.10
webserver1 - 172.25.254.20
#下线指定realserver
[root@haproxy ~]# vim /etc/haproxy/haproxy.cfg
listen webclusterbind *:80mode httpbalance roundrobinserver web1 172.25.254.10:80 check inter 2 fall 3 rise 5 weight 2 disabledserver web2 172.25.254.20:80 check inter 2 fall 3 rise 5 weight 2server web_sorry 172.25.254.100:8080 backup
[root@haproxy ~]# systemctl restart haproxy.service
[root@haproxy ~]# for i in {1..10}; do curl 172.25.254.100; done
webserver1 - 172.25.254.20
webserver1 - 172.25.254.20#网页重定向
[root@haproxy ~]# vim /etc/haproxy/haproxy.cfg
listen webclusterbind *:80mode httpbalance roundrobinredirect prefix http://www.baidu.com/#server web1 172.25.254.10:80 check inter 2 fall 3 rise 5 weight 2#server web2 172.25.254.20:80 check inter 2 fall 3 rise 5 weight 2#server web_sorry 172.25.254.100:8080 backup
[root@haproxy ~]# systemctl restart haproxy.service 5. haporxy的热处理
[root@haproxy ~]# vim /etc/haproxy/haproxy.cfg
globallog 127.0.0.1 local2chroot /var/lib/haproxypidfile /var/run/haproxy.pidmaxconn 4000user haproxygroup haproxydaemon# turn on stats unix socket# 开启socker热处理,并且以root账户的身份去处理stats socket /var/lib/haproxy/stats mode 600 level admin# utilize system-wide crypto-policiesssl-default-bind-ciphers PROFILE=SYSTEMssl-default-server-ciphers PROFILE=SYSTE[root@haproxy ~]# systemctl restart haproxy.service
# 下载socat工具
[root@haproxy ~]# dnf install socat-1.7.4.1-5.el9.x86_64 -y[root@haproxy ~]# echo "get weight webcluster/web1" | socat stdio /var/lib/haproxy/stats
2 (initial 2)[root@haproxy ~]# echo "get weight webcluster/web2" | socat stdio /var/lib/haproxy/stats
1 (initial 1)[root@haproxy ~]# echo "set weight webcluster/web1 1" | socat stdio /var/lib/haproxy/stats [root@haproxy ~]# echo "get weight webcluster/web1" | socat stdio /var/lib/haproxy/stats
1 (initial 2)[root@haproxy ~]# echo "show servers state" | socat stdio /var/lib/haproxy/stats
1
# be_id be_name srv_id srv_name srv_addr srv_op_state srv_admin_state srv_uweight srv_iweight srv_time_since_last_change srv_check_status srv_check_result srv_check_health srv_check_state srv_agent_state bk_f_forced_id srv_f_forced_id srv_fqdn srv_port srvrecord srv_use_ssl srv_check_port srv_check_addr srv_agent_addr srv_agent_port
2 webcluster 1 web1 172.25.254.10 2 0 1 2 218 6 0 7 7 0 0 0 - 80 - 0 0 - - 0
2 webcluster 2 web2 172.25.254.20 2 0 1 1 103 6 0 7 7 0 0 0 - 80 - 0 0 - - 0
4 static 1 static 127.0.0.1 0 0 1 1 217 8 2 0 6 0 0 0 - 4331 - 0 0 - - 0
5 app 1 app1 127.0.0.1 0 0 1 1 217 8 2 0 6 0 0 0 - 5001 - 0 0 - - 0
5 app 2 app2 127.0.0.1 0 0 1 1 217 8 2 0 6 0 0 0 - 5002 - 0 0 - - 0
5 app 3 app3 127.0.0.1 0 0 1 1 217 8 2 0 6 0 0 0 - 5003 - 0 0 - - 0
5 app 4 app4 127.0.0.1 0 0 1 1 216 8 2 0 6 0 0 0 - 5004 - 0 0 - - 0
[root@haproxy ~]# echo "show info" | socat stdio /var/lib/haproxy/stats
Name: HAProxy
Version: 2.4.17-9f97155
Release_date: 2022/05/13
Nbthread: 2
Nbproc: 1
Process_num: 1
Pid: 2634
Uptime: 0d 0h05m04s
Uptime_sec: 304
Memmax_MB: 0
PoolAlloc_MB: 0
PoolUsed_MB: 0
PoolFailed: 0
Ulimit-n: 8037
Maxsock: 8037
Maxconn: 4000
Hard_maxconn: 4000
CurrConns: 0
CumConns: 40675
CumReq: 13
MaxSslConns: 0
CurrSslConns: 0
CumSslConns: 0
Maxpipes: 0
PipesUsed: 0
PipesFree: 0
ConnRate: 0
ConnRateLimit: 0
MaxConnRate: 0
SessRate: 0
SessRateLimit: 0
MaxSessRate: 0
SslRate: 0
haproxy多进程如何热处理
[root@haproxy ~]# vim /etc/haproxy/haproxy.cfg # turn on stats unix socket# 为每一个进程独立建立一个控制文件stats socket /var/lib/haproxy/stats1 mode 600 level admin process 1   stats socket /var/lib/haproxy/stats2 mode 600 level admin process 2# utilize system-wide crypto-policiesssl-default-bind-ciphers PROFILE=SYSTEMssl-default-server-ciphers PROFILE=SYSTEM# 开启多进程nbproc 2cpu-map 1 0cpu-map 2 1[root@haproxy ~]# systemctl restart haproxy.service
[root@haproxy ~]# ll /var/lib/haproxy/
总用量 0
srw------- 1 root root 0  8月  9 11:39 stats
srw------- 1 root root 0  8月  9 11:50 stats1
srw------- 1 root root 0  8月  9 11:50 stats2
6.haproxy的算法
HAProxy通过固定参数 balance 指明对后端服务器的调度算法
balance参数可以配置在listen或backend选项中。
HAProxy的调度算法分为静态和动态调度算法
有些算法可以根据参数在静态和动态算法中相互转换。
6.1 静态算法
静态算法:按照事先定义好的规则轮询公平调度,不关心后端服务器的当前负载、连接数和响应速度等,且无法实时修改权重(只能为0和1,不支持其它值),只能靠重启HAProxy生效。
6.1.1static-rr:基于权重的轮询调度
- 不支持运行时利用socat进行权重的动态调整(只支持0和1,不支持其它值)
- 不支持端服务器慢启动
- 其后端主机数量没有限制,相当于LVS中的 wrr
慢启动是指在服务器刚刚启动上不会把他所应该承担的访问压力全部给它,而是先给一部分,当没问题后在给一部分
# 不要多进程
stats socket /var/lib/haproxy/stats mode 600 level admin
[root@haproxy ~]# vim /etc/haproxy/haproxy.cfg
listen webclusterbind *:80mode http#balance roundrobinbalance static-rrserver web1 172.25.254.10:80 check inter 2 fall 3 rise 5 weight 2server web2 172.25.254.20:80 check inter 2 fall 3 rise 5 weight 1
[root@haproxy ~]# systemctl restart haproxy.service
# 测试
[root@haproxy ~]# for i in {1..10}; do curl 172.25.254.100; done
webserver1 - 172.25.254.10
webserver1 - 172.25.254.10
webserver2 - 172.25.254.20
webserver1 - 172.25.254.10
webserver1 - 172.25.254.10
webserver2 - 172.25.254.20
webserver1 - 172.25.254.10
webserver1 - 172.25.254.10
webserver2 - 172.25.254.20
webserver1 - 172.25.254.102、first
[root@haproxy ~]# vim /etc/haproxy/haproxy.cfg
listen webclusterbind *:80mode http#balance roundrobin#balance static-rrbalance firstserver web1 172.25.254.10:80 maxconn 1 check inter 2 fall 3 rise 5 weight 2server web2 172.25.254.20:80 check inter 2 fall 3 rise 5 weight 1
[root@haproxy ~]# systemctl restart haproxy.service
# 测试: 多台主机执行死循环,可看到
[root@webserver1 ~]# while true ; do curl 172.25.254.100; sleep 0.1 ; done
[root@webserver2 ~]# while true ; do curl 172.25.254.100; sleep 0.1 ; done
6.2 动态算法
动态算法
基于后端服务器状态进行调度适当调整, 新请求将优先调度至当前负载较低的服务器 权重可以在haproxy运行时动态调整无需重启
6.2.1roundrobin
- 基于权重的轮询动态调度算法,
- 支持权重的运行时调整,不同于lvs中的rr轮训模式,
- HAProxy中的roundrobin支持慢启动(新加的服务器会逐渐增加转发数), 4. 其每个后端backend中最多支持4095个real server,
- 支持对real server权重动态调整,
- roundrobin为默认调度算法,此算法使用广泛
[root@haproxy ~]# vim /etc/haproxy/haproxy.cfg
listen webclusterbind *:80mode httpbalance roundrobin#balance static-rr#balance firstserver web1 172.25.254.10:80 maxconn 1 check inter 2 fall 3 rise 5 weight 2server web2 172.25.254.20:80 check inter 2 fall 3 rise 5 weight 1
[root@haproxy ~]# systemctl restart haproxy.service
#测试
[root@haproxy ~]# for i in {1..10}; do curl 172.25.254.100; done
webserver2 - 172.25.254.20
webserver1 - 172.25.254.10
webserver2 - 172.25.254.20
webserver1 - 172.25.254.10
webserver1 - 172.25.254.10
webserver1 - 172.25.254.10
webserver1 - 172.25.254.10
webserver2 - 172.25.254.20
webserver1 - 172.25.254.10
webserver2 - 172.25.254.20
6.2.2 leastconn
leastconn加权的最少连接的动态
- 支持权重的运行时调整和慢启动,即:根据当前连接最少的后端服务器而非权重进行优先调度(新客户
端连接) - 比较适合长连接的场景使用,比如:MySQL等场景。
[root@haproxy ~]# vim /etc/haproxy/haproxy.cfg
listen webclusterbind *:80mode http#balance static-rr#balance first#balance roundrobinbalance leastconnserver web1 172.25.254.10:80 maxconn 1 check inter 2 fall 3 rise 5 weight 2server web2 172.25.254.20:80 check inter 2 fall 3 rise 5 weight 1
[root@haproxy ~]# systemctl restart haproxy.service
#测试
[root@haproxy ~]# for i in {1..10}; do curl 172.25.254.100; done
webserver1 - 172.25.254.10
webserver2 - 172.25.254.20
webserver1 - 172.25.254.10
webserver2 - 172.25.254.20
webserver1 - 172.25.254.10
webserver2 - 172.25.254.20
webserver1 - 172.25.254.10
webserver2 - 172.25.254.20
webserver1 - 172.25.254.10
webserver2 - 172.25.254.20
6.3 其他算法
其它算法即可作为静态算法,又可以通过选项成为动态算法
6.3.1 source
源地址hash,基于用户源地址hash并将请求转发到后端服务器,后续同一个源地址请求将被转发至同一 个后端web服务器。此方式当后端服务器数据量发生变化时,会导致很多用户的请求转发至新的后端服务器,默认为静态方式,但是可以通过hash-type支持的选项更改这个算法一般是在不插入Cookie的TCP 模式下使用,也可给拒绝会话cookie的客户提供最好的会话粘性,适用于session会话保持但不支持 cookie和缓存的场景源地址有两种转发客户端请求到后端服务器的服务器选取计算方式,分别是取模法和一致性hash
[root@haproxy ~]# vim /etc/haproxy/haproxy.cfg
listen webclusterbind *:80mode http#balance static-rr#balance first#balance roundrobin#balance leastconnbalance sourceserver web1 172.25.254.10:80 maxconn 1 check inter 2 fall 3 rise 5 weight 2server web2 172.25.254.20:80 check inter 2 fall 3 rise 5 weight 1
[root@haproxy ~]# systemctl restart haproxy.service
#测试
[root@haproxy ~]# for i in {1..10}; do curl 172.25.254.100; done
webserver2 - 172.25.254.20
webserver2 - 172.25.254.20
webserver2 - 172.25.254.20
webserver2 - 172.25.254.20
webserver2 - 172.25.254.20
webserver2 - 172.25.254.20
webserver2 - 172.25.254.20
webserver2 - 172.25.254.20
webserver2 - 172.25.254.20
webserver2 - 172.25.254.20
6.3.2 uri
基于对用户请求的URI的左半部分或整个uri做hash,再将hash结果对总权重进行取模后
根据最终结果将请求转发到后端指定服务器
适用于后端是缓存服务器场景
默认是静态算法,也可以通过hash-type指定map-based和consistent,来定义使用取模法还是一致性 hash
注意:此算法基于应用层,所以只支持 mode http ,不支持 mode tcp
#webserver1上
[root@webserver1 ~]# echo 172.25.254.10 - index1.html > /usr/share/nginx/html/index1.html
[root@webserver1 ~]# echo 172.25.254.10 - index2.html > /usr/share/nginx/html/index2.html
[root@webserver1 ~]# echo 172.25.254.10 - index3.html > /usr/share/nginx/html/index3.html
#webserver2
[root@webserver2 ~]# echo 172.25.254.20 - index1.html > /usr/share/nginx/html/index1.html
[root@webserver2 ~]# echo 172.25.254.20 - index2.html > /usr/share/nginx/html/index2.html
[root@webserver2 ~]# echo 172.25.254.20 - index3.html > /usr/share/nginx/html/index3.html
[root@haproxy ~]# vim /etc/haproxy/haproxy.cfg
listen webclusterbind *:80mode http#balance roundrobin#balance leastconn#balance static-rr#balance first#balance sourcebalance urihash-type consistentserver web1 172.25.254.10:80 check inter 2 fall 3 rise 5 weight 2server web2 172.25.254.20:80 check inter 2 fall 3 rise 5 weight 1
[root@haproxy ~]# systemctl restart haproxy.service
#测试
[root@haproxy ~]# curl 172.25.254.100/index1.html
172.25.254.10 - index1.html
[root@haproxy ~]# curl 172.25.254.100/index2.html
172.25.254.20 - index2.html
[root@haproxy ~]# curl 172.25.254.100/index3.html
172.25.254.10 - index3.html
7. haproxy的状态页
通过web界面,显示当前HAPROXY的运行状态
root@haproxy ~]# vim /etc/haproxy/haproxy.cfg
listen statsmode httpbind *:9999stats enablestats refresh 3stats uri /statusstats auth shanxin:shanxin[root@haproxy ~]# systemctl restart haproxy.service
登陆状态页

8. 基于cookie的会话保持
在一个浏览器访问后,会记住选择,之后刷新一直是该后端主机,另一个浏览器访问则是另一个后端主机
[root@haproxy ~]# vim /etc/haproxy/haproxy.cfg
listen webclusterbind *:80mode httpbalance roundrobin#redirect prefix http://www.baidu.com/#server web1 172.25.254.10:80 check inter 2 fall 3 rise 5 weight 2#server web2 172.25.254.20:80 check inter 2 fall 3 rise 5 weight 1#server web_sorry 172.25.254.100:8080 backup# 添加cookie功能cookie WEBCOOKIE insert nocache indirectserver web1 172.25.254.10:80 cookie lee1 check inter 2 fall 3 rise 5 weight 1server web2 172.25.254.20:80 cookie lee2 check inter 2 fall 3 rise 5 weight 1[root@haproxy ~]# systemctl restart haproxy.service
# 访问测速
[root@haproxy ~]# curl -b WEBCOOKIE=lee1 172.25.254.100
webserver1 - 172.25.254.10
[root@haproxy ~]# curl -b WEBCOOKIE=lee1 172.25.254.100
webserver1 - 172.25.254.10
[root@haproxy ~]# curl -b WEBCOOKIE=lee2 172.25.254.100
webserver2 - 172.25.254.20
[root@haproxy ~]# curl -b WEBCOOKIE=lee2 172.25.254.100
webserver2 - 172.25.254.20
[root@haproxy ~]# curl -b WEBCOOKIE=lee2 172.25.254.100
webserver2 - 172.25.254.20
9. ip透传
9.1 七层透传(mode=http)nginx
IP透传的用途:web服务器中需要记录客户端的真实IP地址,用于做访问统计、安全防护、行为分析、区域排行等场景。
9.1.1 主机操作
[root@haproxy ~]# vim /etc/haproxy/haproxy.cfg defaultsmode httplog globaloption httplogoption dontlognulloption http-server-close# IP透传的参数,需要保持开启option forwardfor except 127.0.0.0/8[root@haproxy ~]# systemctl restart haproxy.service9.1.2 web主机操作
[root@webserver2 ~]# > /var/log/nginx/access.log
[root@webserver2 ~]# cat /var/log/nginx/access.log
# 此时这里显示了真实访问主机的IP,透传成功
172.25.254.100 - - [10/Aug/2024:10:34:36 +0800] "GET / HTTP/1.1" 200 27 "-" "curl/7.76.1" "172.25.254.200"
9.2 四层透传(mode=tcp)nginx
haproxy主机操作
[root@haproxy ~]# vim /etc/haproxy/haproxy.cfg listen webclusterbind *:80# 这里需要更改为tcpmode tcpbalance roundrobin#redirect prefix http://www.baidu.com/#server web1 172.25.254.10:80 check inter 2 fall 3 rise 5 weight 2#server web2 172.25.254.20:80 check inter 2 fall 3 rise 5 weight 1#server web_sorry 172.25.254.100:8080 backup#cookie WEBCOOKIE insert nocache indirectserver web1 172.25.254.10:80 check inter 2 fall 3 rise 5 weight 1# 这里需要加上send-proxyserver web2 172.25.254.20:80 send-proxy check inter 2 fall 3 rise 5 weight 1[root@haproxy ~]# systemctl restart haproxy.service[root@webserver2 ~]# vim /etc/nginx/nginx.conf
http {log_format main '$remote_addr - $remote_user [$time_local] "$request" ''$status $body_bytes_sent "$http_referer" '# 在访问日志中通过变量$proxy_protocol_addr 记录透传过来的客户端IP' "$proxy_protocol_addr"''"$http_user_agent" "$http_x_forwarded_for"';server {listen 80 proxy_protocol; # 需要添加这个,才可以通过四层代理访问此网站listen [::]:80;server_name _;root /usr/share/nginx/html;# Load configuration files for the default server block.include /etc/nginx/default.d/*.conf;[root@webserver2 ~]# systemctl restart nginx.service # 测试
[root@webserver2 ~]# tail -n 3 /var/log/nginx/access.log
[root@webserver1 ~]# tail -n 3 /etc/httpd/logs/access_log
再次访问后,查看日志可以看到地址
10. haproxy的acl基本访问控制
10.1 主机操作
[root@haproxy ~]# vim /etc/haproxy/haproxy.cfg# 进行一下配置文件的编写
frontend webclusterbind *:80mode httpacl test  hdr_end(host) -i .orguse_backend webcluster-host if testdefault_backend default-hostbackend webcluster-hostmode httpserver web1 172.25.254.10:80 check inter 2 fall 2 rise 5backend default-hostmode httpserver web2 172.25.254.20:80 check inter 2 fall 2 rise 5[root@haproxy ~]# systemctl restart haproxy.service
10.2 client测试
[root@client ~]# vim /etc/hosts
[root@client ~]# cat /etc/hosts
127.0.0.1   localhost localhost.localdomain localhost4 localhost4.localdomain4
::1         localhost localhost.localdomain localhost6 localhost6.localdomain6
172.25.254.200  client.shanxin.org
172.25.254.10   www.shanxin.org
172.25.254.20   www.shanxin.com# 测试成功
[root@client ~]# curl www.shanxin.org
webserver1 - 172.25.254.10
[root@client ~]# curl www.shanxin.com
webserver2 - 172.25.254.20
11. haproxy的acl一些常用限制
11.1 基于ip的访问控制
主机操作
[root@haproxy ~]# vim /etc/haproxy/haproxy.cfg frontend webclusterbind *:80mode httpacl ctrl_ip src 172.25.254.200 172.25.254.20 192.168.0.0/24use_backend webcluster-host if ctrl_ipdefault_backend default-hostbackend webcluster-hostmode httpserver web1 172.25.254.10:80 check inter 2 fall 2 rise 5backend default-hostmode httpserver web2 172.25.254.20:80 check inter 2 fall 2 rise 5[root@haproxy ~]# systemctl restart haproxy.serviceclient主机操作
[root@haproxy ~]# vim /etc/haproxy/haproxy.cfg frontend webclusterbind *:80mode httpacl ctrl_ip src 172.25.254.200 172.25.254.20 192.168.0.0/24use_backend webcluster-host if ctrl_ipdefault_backend default-hostbackend webcluster-hostmode httpserver web1 172.25.254.10:80 check inter 2 fall 2 rise 5backend default-hostmode httpserver web2 172.25.254.20:80 check inter 2 fall 2 rise 5[root@haproxy ~]# systemctl restart haproxy.service测试
[root@haproxy ~]# curl 172.25.254.100
webserver2 - 172.25.254.20
11.2 基于ip的访问控制之黑名单
主机操作
[root@haproxy ~]# vim /etc/haproxy/haproxy.cfg
frontend webclusterbind *:80mode httpacl ctrl_ip src 172.25.254.200 172.25.254.20 192.168.0.0/24# use_backend webcluster-host if ctrl_iphttp-request deny if ctrl_ipdefault_backend default-hostbackend webcluster-hostmode httpserver web1 172.25.254.10:80 check inter 2 fall 2 rise 5backend default-hostmode httpserver web2 172.25.254.20:80 check inter 2 fall 2 rise 5[root@haproxy ~]# systemctl restart haproxy.service
client主机操作
[root@client ~]# curl 172.25.254.100
<html><body><h1>403 Forbidden</h1>
Request forbidden by administrative rules.
</body></html>
11.3 基于浏览器的访问控制
主机操作
[root@haproxy ~]# vim /etc/haproxy/haproxy.cfg frontend webclusterbind *:80mode httpacl badwebrowers hdr_sub(User-Agent) -i curl wgethttp-request deny if badwebrowersdefault_backend default-hostbackend webcluster-hostmode httpserver web1 172.25.254.10:80 check inter 2 fall 2 rise 5backend default-hostmode httpserver web2 172.25.254.20:80 check inter 2 fall 2 rise 5[root@haproxy ~]# systemctl restart haproxy.service client主机操作
[root@client ~]# curl 172.25.254.100
<html><body><h1>403 Forbidden</h1>
Request forbidden by administrative rules.
</body></html>
测试

11.3 基于文件后缀名实现动静分离
主机操作
[root@haproxy ~]# vim /etc/haproxy/haproxy.cfg
frontend webclusterbind *:80mode httpacl static path_end -i .html .jpg .png .css .jsacl php path_end -i .phpuse_backend webcluster-host if phpdefault_backend default-hostbackend webcluster-hostmode httpserver web1 172.25.254.10:80 check inter 2 fall 2 rise 5backend default-hostmode httpserver web2 172.25.254.20:80 check inter 2 fall 2 rise 5[root@haproxy ~]# systemctl restart haproxy.service
webserver1操作
[root@webserver1 ~]# dnf install php -y
[root@webserver1 ~]# systemctl disable --now nginx.service [root@webserver1 ~]# systemctl restart httpd.service
[root@webserver1 ~]# vim /var/www/html/index.php
[root@webserver1 ~]# cat /var/www/html/index.php
<?phpphpinfo();
?>
client主机操作
[root@client ~]# curl 172.25.254.100
webserver2 - 172.25.254.20
浏览器访问测试

12. haproxy自定义错误页面
主机操作
# 查看错误页面文件的存储路径
[root@haproxy ~]# rpm -ql haproxy | grep http
/usr/share/doc/haproxy/design-thoughts/http2.txt
/usr/share/doc/haproxy/design-thoughts/http_load_time.url
/usr/share/doc/haproxy/internals/http-cookies.txt
/usr/share/doc/haproxy/internals/http-docs.txt
/usr/share/doc/haproxy/internals/http-parsing.txt
/usr/share/doc/haproxy/option-http_proxy.cfg
/usr/share/haproxy/400.http
/usr/share/haproxy/403.http
/usr/share/haproxy/408.http
/usr/share/haproxy/500.http
/usr/share/haproxy/502.http
/usr/share/haproxy/503.http
/usr/share/haproxy/504.http[root@haproxy ~]# mkdir  /etc/haproxy/errorpage/
[root@haproxy ~]# cp /usr/share/haproxy/503.http /etc/haproxy/errorpage/503.http
[root@haproxy ~]# vim /etc/haproxy/errorpage/503.http
# 修改内容如下
HTTP/1.0 503 Service Unavailable
Cache-Control: no-cache
Connection: close
Content-Type: text/html<html><body><h1>errrrrrrrrrrrr</h1>
No server is available to handle this request.
</body></html># 配置haproxy主配置文件
[root@haproxy conf.d]# vim /etc/haproxy/haproxy.cfg timeout client          1mtimeout server          1mtimeout http-keep-alive 10stimeout check           10smaxconn                 3000# 这条语句要放在default里面errorfile   503 /etc/haproxy/errorpage/503.http[root@haproxy conf.d]# systemctl restart haproxy.service
webserver主机操作
[root@webserver1 ~]# systemctl stop httpd.service
[root@webserver2 static]# systemctl stop nginx.service
client主机操作
[root@client ~]# curl 172.25.254.100
<html><body><h1>errrrrrrrrrrrr</h1>
No server is available to handle this request.
</body></html>[root@client ~]# curl 172.25.254.10
curl: (7) Failed to connect to 172.25.254.10 port 80: 拒绝连接
[root@client ~]# curl 172.25.254.20
curl: (7) Failed to connect to 172.25.254.20 port 80: 拒绝连接
浏览器访问测试
haproxy报错后跳转指定网站
[root@haproxy conf.d]# vim /etc/haproxy/haproxy.cfg #errorfile  503 /etc/haproxy/errorpage/503.http # 也是在defualt语句块中errorloc    503 https://www.baidu.com
[root@haproxy conf.d]# systemctl restart haproxy.service 
13. haproxy四层负载数据库
主机操作
# 在haproxy的子配置文件中配置
[root@haproxy conf.d]# vim /etc/haproxy/conf.d/web.cfg
[root@haproxy conf.d]# cat /etc/haproxy/conf.d/web.cfg
listen dbserverbind *:3306mode tcpbalance static-rrserver db1      172.25.254.10:3306 check inter 2 fall 2 rise 5server db2      172.25.254.20:3306 check inter 2 fall 2 rise 5[root@haproxy conf.d]# systemctl restart haproxy.service
webserver1/2主机操作
[root@webserver1 ~]# dnf install mariadb-server -y
[root@webserver1 ~]# systemctl enable --now mariadb
[root@webserver1 ~]# vim /etc/my.cnf.d/mariadb-server.cnf [mysqld]
server-id=1
datadir=/var/lib/mysql
socket=/var/lib/mysql/mysql.sock
log-error=/var/log/mariadb/mariadb.log
pid-file=/run/mariadb/mariadb.pid[root@webserver1 ~]# systemctl restart mariadb.service [root@webserver1 ~]# mysql # 建立普通用户lee,并授予权限,为了之后的远程登录测试
MariaDB [(none)]> create user lee@'%' identified by 'lee';
Query OK, 0 rows affected (0.001 sec)MariaDB [(none)]> grant all on *.* to lee@'%' identified by 'lee';
Query OK, 0 rows affected (0.001 sec)MariaDB [(none)]> quit
Bye
[root@webserver2 ~]# dnf install mariadb-server -y
[root@webserver2 ~]# systemctl enable --now mariadb
[root@webserver2 ~]# vim /etc/my.cnf.d/mariadb-server.cnf[mysqld]
server-id=2 # server-id=1 # 设置数据库的id为了在之后的测试方便
datadir=/var/lib/mysql
socket=/var/lib/mysql/mysql.sock
log-error=/var/log/mariadb/mariadb.log
pid-file=/run/mariadb/mariadb.pid[root@webserver2 ~]# systemctl restart mariadb.service [root@webserver2 ~]# mysql
MariaDB [(none)]> create user lee@'%' identified by 'lee';
Query OK, 0 rows affected (0.001 sec)MariaDB [(none)]> grant all on *.* to lee@'%' identified by 'lee';
Query OK, 0 rows affected (0.001 sec)
MariaDB [(none)]> quit
Bye
client主机操作
[root@client ~]# mysql -ulee -plee -h 172.25.254.100
MariaDB [(none)]> select @@server_id;
+-------------+
| @@server_id |
+-------------+
|           1 |
+-------------+
1 row in set (0.001 sec)
MariaDB [(none)]> quit
Bye[root@client ~]# mysql -ulee -plee -h 172.25.254.100
MariaDB [(none)]> select @@server_id;
+-------------+
| @@server_id |
+-------------+
|           2 |
+-------------+
1 row in set (0.001 sec)
MariaDB [(none)]> quit
Bye[root@client ~]# mysql -ulee -plee -h 172.25.254.100
MariaDB [(none)]> select @@server_id;
+-------------+
| @@server_id |
+-------------+
|           1 |
+-------------+
1 row in set (0.001 sec)
MariaDB [(none)]> quit
Bye[root@client ~]# mysql -ulee -plee -h 172.25.254.100
MariaDB [(none)]> select @@server_id;
+-------------+
| @@server_id |
+-------------+
|           2 |
+-------------+
1 row in set (0.001 sec)
14. haproxy之https网站加密
主机操作
# 建立证书以及密钥的存储目录
[root@haproxy ~]# mkdir -p /etc/haproxy/certs
# 生成证书以及密钥
[root@haproxy ~]# openssl req -newkey rsa:2048 -nodes -sha256 -keyout /etc/haproxy/certs/shanxin.org.key -x509 -days 365 -out /etc/haproxy/certs/shanxin.org.crt[root@haproxy ~]# ll /etc/haproxy/certs/
总用量 8
-rw-r--r-- 1 root root 1415  8月 10 17:19 shanxin.org.crt
-rw------- 1 root root 1708  8月 10 17:18 shanxin.org.key# 将证书以及密钥文件都存储在配置默认路径中
[root@haproxy ~]# cat /etc/haproxy/certs/shanxin.org.key /etc/haproxy/certs/shanxin.org.crt > /etc/haproxy/certs/shanxin.org.pem
[root@haproxy ~]# ll /etc/haproxy/certs/shanxin.org.pem
-rw-r--r-- 1 root root 3123  8月 10 17:21 /etc/haproxy/certs/shanxin.org.pem[root@haproxy ~]# vim /etc/haproxy/conf.d/web.cfg listen web-httpsbind *:443 ssl crt /etc/haproxy/certs/shanxin.org.pemmode httpbalance roundrobinserver web1 172.25.254.10:80 check inter 2 fall 2 rise 5 # 这里实际上是对haproxy主机进行了https加密,真实的服务器还是80端口,未加密server web2 172.25.254.20:80 check inter 2 fall 2 rise 5[root@haproxy ~]# systemctl restart haproxy.service
webserver主机操作
[root@webserver1 ~]# systemctl start httpd.service
//
[root@webserver2 ~]# systemctl start nginx.service

15. haproxy之https网站强制全站加密
[root@haproxy ~]# vim /etc/haproxy/conf.d/web.cfg listen webclusterbind *:80mode httpredirect scheme https if !{ ssl_fc }
n
[root@haproxy ~]# systemctl restart haproxy.service
浏览器访问测试

相关文章:
haproxy 原理+实战
haproxy 1 haproxy简介1.1 定义1.2 原理讲解1.3 HAProxy的优点: 2. haproxy的基本部署2.1 实验环境2.1.2 haproxy主机配置2.1.3 webserver1配置2.1.4 webserver2配置 3. haproxy的全局配置4. haproxy代理参数5. haporxy的热处理6.haproxy的算法6.1 静态算法6.1.1sta…...

OSPF进阶
一、LSA详解 Type:LSA的类型(1、2、3、4、5、7类) link-state-ID:链路状态表示符 ADV router:产生该LSA的路由器 age:老化时间 Metric:开销值,一般都为ADV router到达该路由的开…...
SuccBI+低代码文档中心 — 可视化分析(仪表板)(下)
制作仪表板 引入数据模型 仪表板所需模型已经在数据模块中准备好,可以将对应模型表添加到数据模型中。提供了两种添加方式: 在数据栏中点击添加按钮,在弹出框中通过搜索或直接在其所在目录下选中该模型,点击确定。 点击数据按钮…...

前端创作纪念日
机缘 作者也是一名新人大学生,在学习过程中总是get不到专业的知识体系,机缘巧合下了解通过md文档记笔记然后分享在各大博客平台上面,可以吸引社区博客朋友们的关注的鼓励,使得直接创作努力学习的心更加澎湃。 实战项目中的经验分…...

丰收季遇科技之光:北斗卫星导航引领现代农业新篇章
在这个金风送爽、硕果累累的丰收时节,广袤的田野上洋溢着农民们欢声笑语,每一粒饱满的果实都是大自然与辛勤耕耘者的共同馈赠。而在这片希望的田野上,一项科技革命的浪潮正悄然改变着传统农业的面貌——北斗卫星导航系统,正以它精…...

解决windows7虚拟机安装不了vmtools问题
安装不了vmtools问题所在: 没打补丁 打补丁问题 补丁在本地下载之后无法传到win7虚拟机中 补丁获取 补丁链接如下: https://catalog.s.download.windowsupdate.com/c/msdownload/update/software/secu/2019/09/windows6.1-kb4474419-v3-x64_b5614c6…...

Microsoft VBA Excel VBA函数学习笔记——数据切分熟练度+1
问题场景 123456Stock006006006002002002MarketUSUSUSUSUSUSWeight0.010.1090.2280.2220.2390.72CurrencyEURUSDCNYEURUSDCNYTerm10.0740.0820.0120.0470.0580.067Term20.040.020.010.070.0580.067Term30.0540.0520.0140.0870.0480.017Term40.0710.0840.0020.0170.0180.097………...
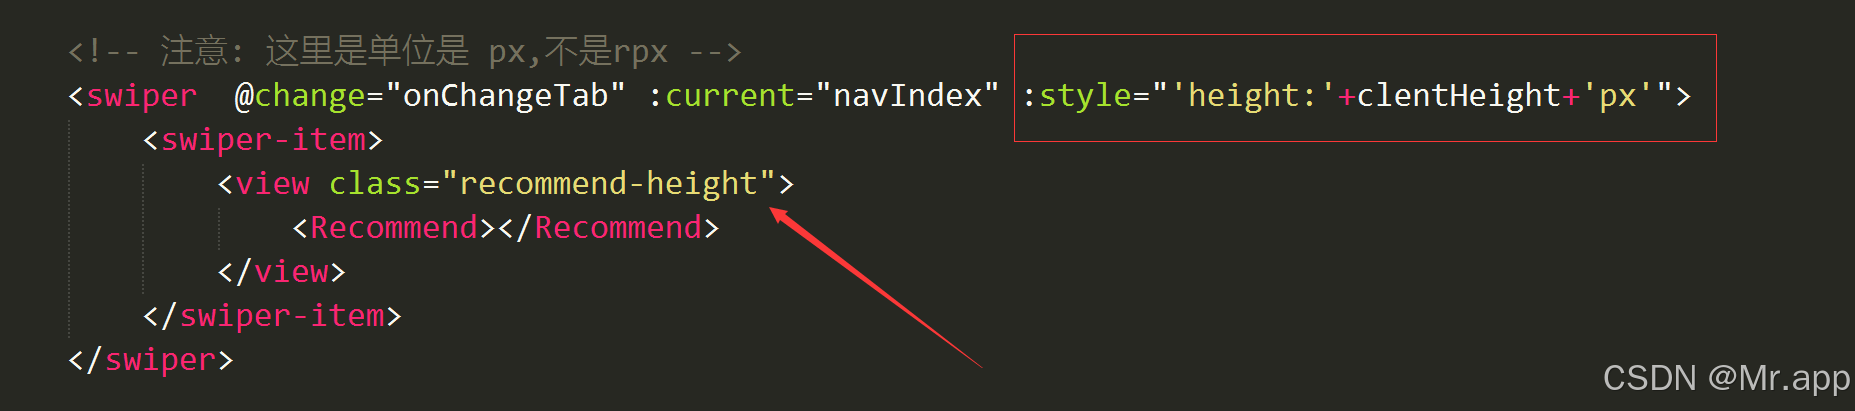
uniapp获取swiper中子组件的内容高度
swiper有默认高度,如果不单独设置一个具体高度,swiper后面的内容将不会展示 这里展示的例子是: swiper中放有一个子组件,想要完整展示子组件的内容,swiper就需要获取到子组件的内容高度并设置 <!-- 注意: 这里的单位是 px,不是rpx --><swiper…...

基于计算机爱心小屋公益机构智慧管理(源码+论文+部署讲解等)
博主介绍: ✌我是阿龙,一名专注于Java技术领域的程序员,全网拥有10W粉丝。作为CSDN特邀作者、博客专家、新星计划导师,我在计算机毕业设计开发方面积累了丰富的经验。同时,我也是掘金、华为云、阿里云、InfoQ等平台的优…...

详细学习PyQt5的样式表与界面美化
Pyqt5相关文章: 快速掌握Pyqt5的三种主窗口 快速掌握Pyqt5的2种弹簧 快速掌握Pyqt5的5种布局 快速弄懂Pyqt5的5种项目视图(Item View) 快速弄懂Pyqt5的4种项目部件(Item Widget) 快速掌握Pyqt5的6种按钮 快速掌握Pyqt5的10种容器&…...

遥控器android设备键值原理
输入设备触发事件发送数据-》将键值映射到内核中预定义的键值-》上报键值,通过kl文件将按键码转化为标签字符串 内核获取键码,扫描码 按键标签其实对应的也是一个按键码。与kernel上报的按键码不同,按键标签所对应的按键…...

零基础也想学编程?Java零基础入门学习路线 + Java教程已准备好!
本文作者:程序员鱼皮 免费编程学习 - 编程导航网:https://www.code-nav.cn 符号表 可以通过路线知识点前的表情字符,根据自己的实际情况选择学习: 🌕 所有同学必须学习!!!…...

Avnet ZUBoard 1CG开发板上手—深度学习新选择
Avnet ZUBoard 1CG 开发板上手—深度学习新选择 摘要 本文主要介绍了 Avnet ZUBoard 1CG 开发板的特性、架构、硬件单元等概念,并对如何使用以太网接口和串口连接开发板进行基本介绍,同时辅以两个应用例程演示其功能。 原文链接: FreakSt…...

C/C++复习 day1
C/C复习 day1 文章目录 C/C复习 day1前言一、C语言1.memcpy函数2.memmove函数3.strstr函数4.宏定义的函数5.大小端的介绍以及判断 二、C入门基础1.C是如何支持函数重载的?2.建议用const enum inline去替代宏 三、C类和对象1.类大小的计算2.移动构造和移动赋值1.右值…...

再见Figma!!新的设计,代码协作神器!【送源码】
软件介绍 Penpot 是一款专门用来帮助设计师和开发者更好地合作的软件。它可以让设计师轻松地做出漂亮的设计稿,还能让这些设计稿变成真正的网站或者应用的一部分。这样,设计师和开发者之间就不会因为沟通不畅而产生麻烦了。 Penpot 专为设计师与开发者之…...

快速拷贝复制工具软件@拷贝工具@多线程拷贝@robocopy
文章目录 refs常见复制工具高速拷贝工具特性对比 Robocopy👺Robocopy工具基本用法语法示例 常用选项常见选项列表示例 高级用法多线程复制日志记录 用例案例直接递归复制大量文件的文件夹多线程复制监视被打开文件文件数 复制时排除某个目录排除交接点跳过无法复制的…...
JavaScript 逆向爬取实战
准备介绍: 当我们学习完整个 JS 逆向技巧后,这里是一次完整的分析爬取实战 案例介绍 本节案例网站不仅在 API 参数有加密, 而且前端 JS 也带有压缩混淆,其前端压缩打包工具使用 webpack , 混淆工具使用 javascript-obfuscator 。…...
Vue 项目中导入文件时如何默认找寻该文件夹下的 index.vue 文件
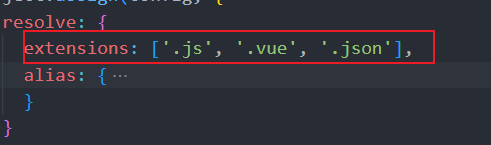
文章目录 需求分析 需求 如下图,在Vue 项目中导入 frequencyChange 文件夹时如何默认找寻该文件夹下的 index.vue 文件 分析 确保项目结构和命名约定 首先,确保你的 Vue 单文件组件按照约定命名,例如: components/Example/inde…...
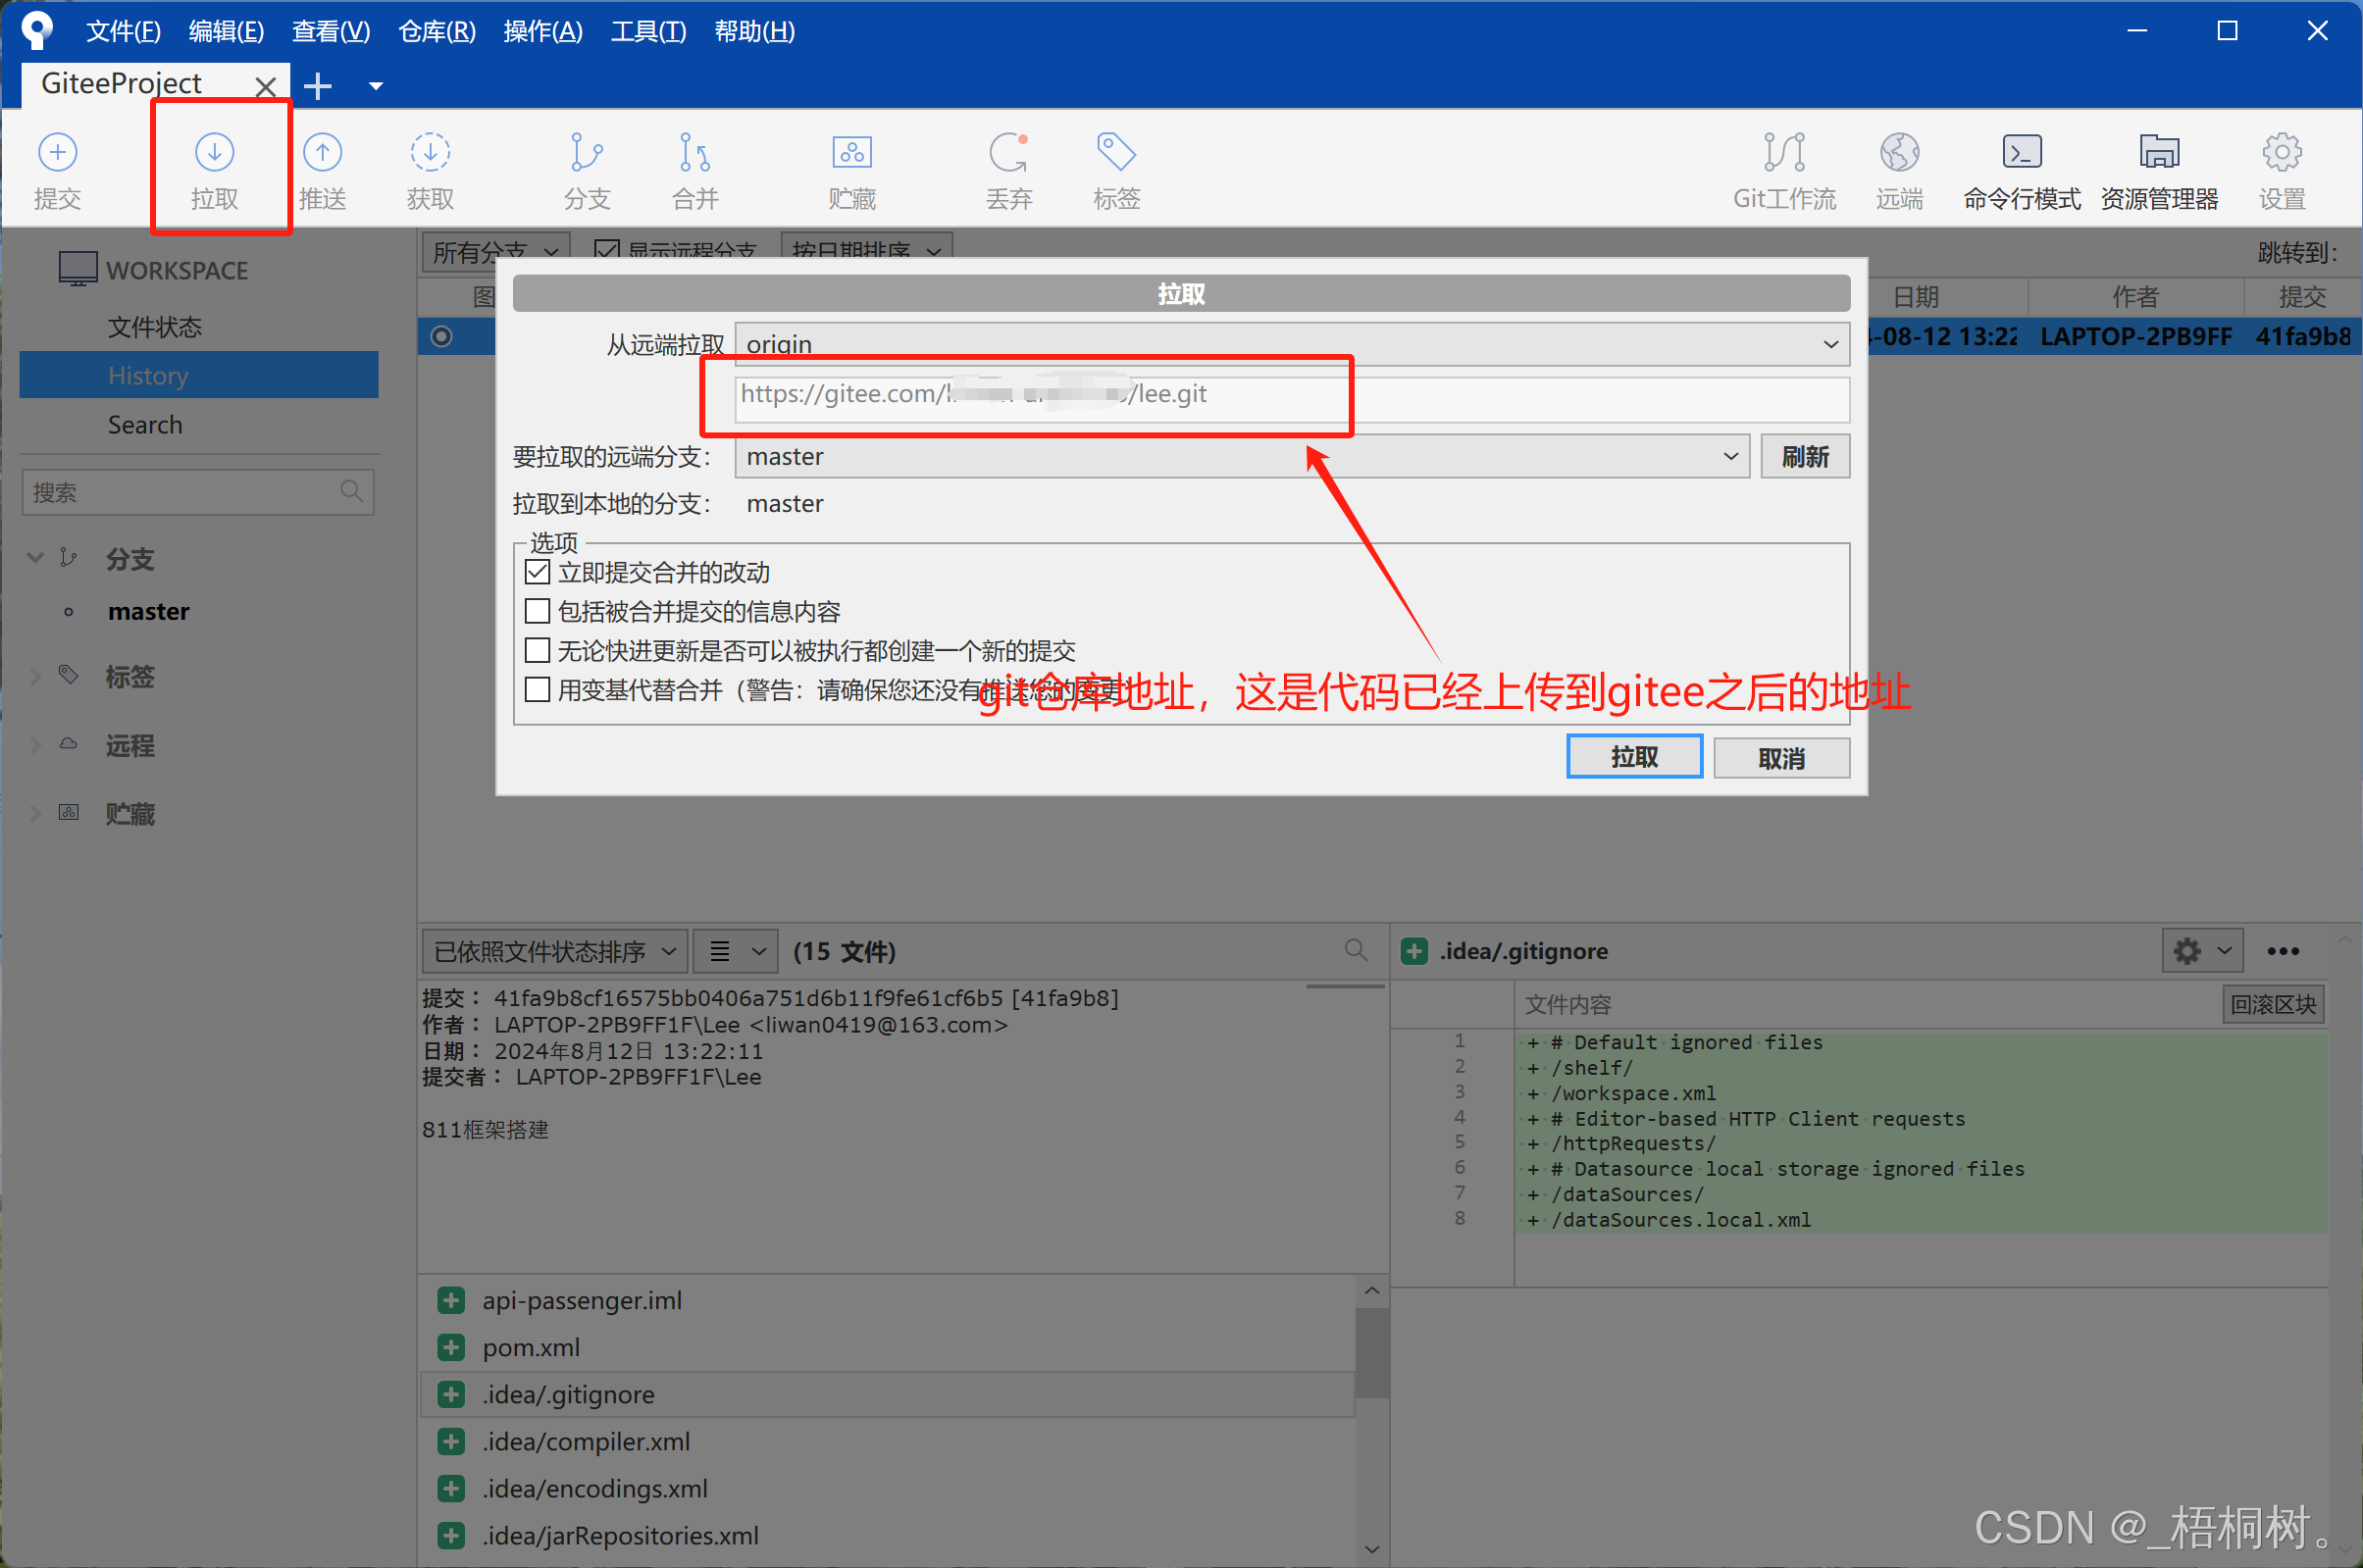
Idea2023.3.3 —— SourceTree与gitee关联
SourceTree SourceTree链接: https://pan.baidu.com/s/1oqPxhpHeNOOiuRRQydes6g?pwdngru 提取码: ngru 点击Generate 分别保存私钥和公钥 gitee官网注册 这是gitee的公钥,与上面SourceTree的公钥私钥不一样 gitee生成公钥,确保本地安装好git git链接: h…...

一文HDMI (High-Definition Multimedia Interface)
HDMI(High-Definition Multimedia Interface,高清多媒体接口)是一种紧凑的音视频接口,它能够将未压缩的视频数据以及压缩或未压缩的数字音频数据,从符合HDMI标准的源设备无缝传输到兼容的计算机显示器、视频投影仪、数…...

实战指南:用快马平台生成团队统一的homebrew环境配置脚本,保障协作无忧
最近在团队协作中遇到了一个头疼的问题:新成员加入时,光是搭建开发环境就要折腾一整天。不同成员的电脑上软件版本参差不齐,导致"在我机器上能跑"的经典问题频繁出现。经过一番摸索,我发现用homebrew配合bash脚本可以完…...

从nvidia-smi到npu-smi:给CUDA开发者的华为昇腾NPU监控指南
从nvidia-smi到npu-smi:CUDA开发者快速掌握昇腾NPU监控的实战手册 当你的技术栈从英伟达GPU扩展到华为昇腾NPU时,监控工具的使用体验就像从自动挡切换到手动挡——虽然最终目的地相同,但操作逻辑需要重新适应。作为曾经每天与nvidia-smi打交道…...
)
Thumb-2指令集在Cortex-M3上的5个高效编程技巧(附真实项目代码)
Thumb-2指令集在Cortex-M3上的5个高效编程技巧(附真实项目代码) 在嵌入式开发领域,Cortex-M3处理器凭借其出色的性能功耗比占据着重要地位。而Thumb-2指令集作为其核心特性之一,通过巧妙混合16位和32位指令,为开发者提…...

遇到复杂车线桥耦合分析总被建模效率卡脖子?试试Simpack+Abaqus/ANSYS这套组合拳,咱们直接上干货聊聊那些提效黑科技
simpack abaqus ansys车线桥耦合高效建模分析工具 1.快速生成非线性柔性轨节点处mark 2.桥梁纵向轨底处的对应的mark及坐标 3.快速建立力元并设置preload方向 4.免安装运行环境点击exe输入 5.基于ansys或者abaqus和simpack联合仿真的5跨、3跨简支梁车线桥耦合分析实例轨节点标记…...

IndexTTS 2.0情感控制效果:用自然语言描述生成对应语气语音
IndexTTS 2.0情感控制效果:用自然语言描述生成对应语气语音 1. 引言:语音合成的革命性突破 想象一下这样的场景:你正在制作一部动画短片,主角需要说一句"我受够了!"——但你不只是想让它"说出来"…...
到底怎么选?)
别再混着用了!Matplotlib的两种画图接口(plt.plot vs. ax.plot)到底怎么选?
Matplotlib接口选择指南:何时用plt.plot,何时用ax.plot? 在数据可视化领域,Matplotlib无疑是Python生态中最强大的工具之一。但许多用户在使用过程中常常困惑:为什么有的代码用plt.plot(),有的却用ax.plot(…...
)
提升工作效率的利器:哦我的Claude代码(Oh-My-ClaudeCode)
轻松掌握Claude Code的多代理 orchestration——oh-my-claudecode 在我们的工程师和开发者面前,常常会遇到复杂的任务调度和多代理协作的问题。如何有效地利用可用的AI助手并提高工作效率,成为了一个不容忽视的挑战。oh-my-claudecode正是为了解决这些问…...

如何用OBS Multi RTMP插件实现一键多平台直播:终极免费解决方案
如何用OBS Multi RTMP插件实现一键多平台直播:终极免费解决方案 【免费下载链接】obs-multi-rtmp OBS複数サイト同時配信プラグイン 项目地址: https://gitcode.com/gh_mirrors/ob/obs-multi-rtmp 你是否曾经梦想过在YouTube、Twitch和Bilibili等平台上同时直…...

5分钟精通Android系统精简:Universal Android Debloater终极指南
5分钟精通Android系统精简:Universal Android Debloater终极指南 【免费下载链接】universal-android-debloater Cross-platform GUI written in Rust using ADB to debloat non-rooted android devices. Improve your privacy, the security and battery life of y…...

颠覆传统体验!5步打造完美魔兽争霸3环境:WarcraftHelper全方位优化指南
颠覆传统体验!5步打造完美魔兽争霸3环境:WarcraftHelper全方位优化指南 【免费下载链接】WarcraftHelper Warcraft III Helper , support 1.20e, 1.24e, 1.26a, 1.27a, 1.27b 项目地址: https://gitcode.com/gh_mirrors/wa/WarcraftHelper 经典游…...