前端使用 Konva 实现可视化设计器(21)- 绘制图形(椭圆)
本章开始补充一些基础的图形绘制,比如绘制:直线、曲线、圆/椭形、矩形。这一章主要分享一下本示例是如何开始绘制一个图形的,并以绘制圆/椭形为实现目标。
请大家动动小手,给我一个免费的 Star 吧~
大家如果发现了 Bug,欢迎来提 Issue 哟~
github源码
gitee源码
示例地址
接下来主要说说:
- UI
- Graph(图形)
- canvas2svg 打补丁
- 拐点旋转修复
UI - 图形绘制类型切换
先找几个图标,增加按钮,分别代表绘制图形:直线、曲线、圆/椭形、矩形:

选中图形类型后,即可通过拖动绘制图形(绘制完成后,清空选择):

定义图形类型:
// src/Render/types.ts	/*** 图形类型*/
export enum GraphType {Line = 'Line', // 直线Curve = 'Curve', // 曲线Rect = 'Rect', // 矩形Circle = 'Circle' // 圆/椭圆形
}
在 Render 中记录当前图形类型,并提供修改方法与事件:
// src/Render/index.ts // 略// 画图类型graphType: Types.GraphType | undefined = undefined// 略// 改变画图类型changeGraphType(type?: Types.GraphType) {this.graphType = typethis.emit('graph-type-change', this.graphType)}
工具栏按钮通讯:
// src/components/main-header/index.vue	// 略const emit = defineEmits([/* 略 */, 'update:graphType'])const props = withDefaults(defineProps<{// 略graphType?: Types.GraphType
}>(), {// 略
});// 略watch(() => props.render, () => {if (props.render) {// 略props.render?.on('graph-type-change', (value) => {emit('update:graphType', value)})}}, {immediate: true
})// 略function onGraph(type: Types.GraphType) {emit('update:graphType', props.graphType === type ? undefined : type)
以上就是绘制图形的工具栏入口。
Graph - 图形定义及其相关实现
相关代码文件:
1、src/Render/graphs/BaseGraph.ts - 抽象类:定义通用属性、逻辑、外部接口定义。
2、src/Render/graphs/Circle.ts 继承 BaseGraph - 构造 圆/椭形 ;处理创建部分交互信息;关键逻辑的实现。
3、src/Render/handlers/GraphHandlers.ts - 收集图形创建所需交互信息,接着交给 Circle 静态处理方法处理。
4、src/Render/draws/GraphDraw.ts - 绘制图形、调整点 - 绘制 调整点 的锚点;收集并处理交互信息,接着并交给 Circle 静态处理方法处理。
BaseGraph 抽象类
// src/Render/graphs/BaseGraph.ts// 略/*** 图形类* 实例主要用于新建图形时,含新建同时的大小拖动。* 静态方法主要用于新建之后,通过 调整点 调整的逻辑定义*/
export abstract class BaseGraph {/*** 更新 图形 的 调整点 的 锚点位置* @param width 图形 的 宽度* @param height 图形 的 高度* @param rotate 图形 的 旋转角度* @param anchorShadows 图形 的 调整点 的 锚点*/static updateAnchorShadows(width: number,height: number,rotate: number,anchorShadows: Konva.Circle[]) {console.log('请实现 updateAnchorShadows', width, height, anchorShadows)}/*** 更新 图形 的 连接点 的 锚点位置* @param width 图形 的 宽度* @param height 图形 的 高度* @param rotate 图形 的 旋转角度* @param anchors 图形 的 调整点 的 锚点*/static updateLinkAnchorShadows(width: number,height: number,rotate: number,linkAnchorShadows: Konva.Circle[]) {console.log('请实现 updateLinkAnchorShadows', width, height, linkAnchorShadows)}/*** 生成 调整点* @param render 渲染实例* @param graph 图形* @param anchor 调整点 定义* @param anchorShadow 调整点 锚点* @param adjustingId 正在操作的 调整点 id* @returns*/static createAnchorShape(render: Render,graph: Konva.Group,anchor: Types.GraphAnchor,anchorShadow: Konva.Circle,adjustType: string,adjustGroupId: string): Konva.Shape {console.log('请实现 createAnchorShape', render, graph, anchor, anchorShadow, adjustingId, adjustGroupId)return new Konva.Shape()}/*** 调整 图形* @param render 渲染实例* @param graph 图形* @param graphSnap 图形 的 备份* @param rect 当前 调整点* @param rects 所有 调整点* @param startPoint 鼠标按下位置* @param endPoint 鼠标拖动位置*/static adjust(render: Render,graph: Konva.Group,graphSnap: Konva.Group,rect: Types.GraphAnchorShape,rects: Types.GraphAnchorShape[],startPoint: Konva.Vector2d,endPoint: Konva.Vector2d) {console.log('请实现 updateAnchorShadows', render, graph, rect, startPoint, endPoint)}//protected render: Rendergroup: Konva.Groupid: string // 就是 group 的id/*** 鼠标按下位置*/protected dropPoint: Konva.Vector2d = { x: 0, y: 0 }/*** 调整点 定义*/protected anchors: Types.GraphAnchor[] = []/*** 调整点 的 锚点*/protected anchorShadows: Konva.Circle[] = []/*** 调整点 定义*/protected linkAnchors: Types.LinkDrawPoint[] = []/*** 连接点 的 锚点*/protected linkAnchorShadows: Konva.Circle[] = []constructor(render: Render,dropPoint: Konva.Vector2d,config: {anchors: Types.GraphAnchor[]linkAnchors: Types.AssetInfoPoint[]}) {this.render = renderthis.dropPoint = dropPointthis.id = nanoid()this.group = new Konva.Group({id: this.id,name: 'asset',assetType: Types.AssetType.Graph})// 调整点 定义this.anchors = config.anchors.map((o) => ({...o,// 补充信息name: 'anchor',groupId: this.group.id()}))// 记录在 group 中this.group.setAttr('anchors', this.anchors)// 新建 调整点 的 锚点for (const anchor of this.anchors) {const circle = new Konva.Circle({adjustType: anchor.adjustType,name: anchor.name,radius: 0// radius: this.render.toStageValue(1),// fill: 'red'})this.anchorShadows.push(circle)this.group.add(circle)}// 连接点 定义this.linkAnchors = config.linkAnchors.map((o) =>({...o,id: nanoid(),groupId: this.group.id(),visible: false,pairs: [],direction: o.direction,alias: o.alias}) as Types.LinkDrawPoint)// 连接点信息this.group.setAttrs({points: this.linkAnchors})// 新建 连接点 的 锚点for (const point of this.linkAnchors) {const circle = new Konva.Circle({name: 'link-anchor',id: point.id,x: point.x,y: point.y,radius: this.render.toStageValue(1),stroke: 'rgba(0,0,255,1)',strokeWidth: this.render.toStageValue(2),visible: false,direction: point.direction,alias: point.alias})this.linkAnchorShadows.push(circle)this.group.add(circle)}this.group.on('mouseenter', () => {// 显示 连接点this.render.linkTool.pointsVisible(true, this.group)})this.group.on('mouseleave', () => {// 隐藏 连接点this.render.linkTool.pointsVisible(false, this.group)// 隐藏 hover 框this.group.findOne('#hoverRect')?.visible(false)})this.render.layer.add(this.group)this.render.redraw()}/*** 调整进行时* @param point 鼠标位置 相对位置*/abstract drawMove(point: Konva.Vector2d): void/*** 调整结束*/abstract drawEnd(): void
}
这里的:
- 静态方法,相当定义了绘制图形必要的工具方法,具体实现交给具体的图形类定义;
- 接着是绘制图形必要的属性及其初始化;
- 最后,抽象方法约束了图形实例必要的方法。
绘制 圆/椭形
图形是可以调整的,这里 圆/椭形 拥有 8 个 调整点:

还要考虑图形被旋转后,依然能合理调整:

调整本身也是支持磁贴的:

图形也支持 连接点:

图形类 - Circle
// src/Render/graphs/Circle.ts// 略/*** 图形 圆/椭圆*/
export class Circle extends BaseGraph {// 实现:更新 图形 的 调整点 的 锚点位置static override updateAnchorShadows(width: number,height: number,rotate: number,anchorShadows: Konva.Circle[]): void {for (const shadow of anchorShadows) {switch (shadow.attrs.id) {case 'top':shadow.position({x: width / 2,y: 0})breakcase 'bottom':shadow.position({x: width / 2,y: height})breakcase 'left':shadow.position({x: 0,y: height / 2})breakcase 'right':shadow.position({x: width,y: height / 2})breakcase 'top-left':shadow.position({x: 0,y: 0})breakcase 'top-right':shadow.position({x: width,y: 0})breakcase 'bottom-left':shadow.position({x: 0,y: height})breakcase 'bottom-right':shadow.position({x: width,y: height})break}}}// 实现:更新 图形 的 连接点 的 锚点位置static override updateLinkAnchorShadows(width: number,height: number,rotate: number,linkAnchorShadows: Konva.Circle[]): void {for (const shadow of linkAnchorShadows) {switch (shadow.attrs.alias) {case 'top':shadow.position({x: width / 2,y: 0})breakcase 'bottom':shadow.position({x: width / 2,y: height})breakcase 'left':shadow.position({x: 0,y: height / 2})breakcase 'right':shadow.position({x: width,y: height / 2})breakcase 'center':shadow.position({x: width / 2,y: height / 2})break}}}// 实现:生成 调整点static createAnchorShape(render: Types.Render,graph: Konva.Group,anchor: Types.GraphAnchor,anchorShadow: Konva.Circle,adjustType: string,adjustGroupId: string): Konva.Shape {// stage 状态const stageState = render.getStageState()const x = render.toStageValue(anchorShadow.getAbsolutePosition().x - stageState.x),y = render.toStageValue(anchorShadow.getAbsolutePosition().y - stageState.y)const offset = render.pointSize + 5const shape = new Konva.Line({name: 'anchor',anchor: anchor,//// stroke: colorMap[anchor.id] ?? 'rgba(0,0,255,0.2)',stroke:adjustType === anchor.adjustType && graph.id() === adjustGroupId? 'rgba(0,0,255,0.8)': 'rgba(0,0,255,0.2)',strokeWidth: render.toStageValue(2),// 位置x,y,// 路径points:{'top-left': _.flatten([[-offset, offset / 2],[-offset, -offset],[offset / 2, -offset]]),top: _.flatten([[-offset, -offset],[offset, -offset]]),'top-right': _.flatten([[-offset / 2, -offset],[offset, -offset],[offset, offset / 2]]),right: _.flatten([[offset, -offset],[offset, offset]]),'bottom-right': _.flatten([[-offset / 2, offset],[offset, offset],[offset, -offset / 2]]),bottom: _.flatten([[-offset, offset],[offset, offset]]),'bottom-left': _.flatten([[-offset, -offset / 2],[-offset, offset],[offset / 2, offset]]),left: _.flatten([[-offset, -offset],[-offset, offset]])}[anchor.id] ?? [],// 旋转角度rotation: graph.getAbsoluteRotation()})shape.on('mouseenter', () => {shape.stroke('rgba(0,0,255,0.8)')document.body.style.cursor = 'move'})shape.on('mouseleave', () => {shape.stroke(shape.attrs.adjusting ? 'rgba(0,0,255,0.8)' : 'rgba(0,0,255,0.2)')document.body.style.cursor = shape.attrs.adjusting ? 'move' : 'default'})return shape}// 实现:调整 图形static override adjust(render: Types.Render,graph: Konva.Group,graphSnap: Konva.Group,shapeRecord: Types.GraphAnchorShape,shapeRecords: Types.GraphAnchorShape[],startPoint: Konva.Vector2d,endPoint: Konva.Vector2d) {// 目标 圆/椭圆const circle = graph.findOne('.graph') as Konva.Ellipse// 镜像const circleSnap = graphSnap.findOne('.graph') as Konva.Ellipse// 调整点 锚点const anchors = (graph.find('.anchor') ?? []) as Konva.Circle[]// 连接点 锚点const linkAnchors = (graph.find('.link-anchor') ?? []) as Konva.Circle[]const { shape: adjustShape } = shapeRecordif (circle && circleSnap) {let [graphWidth, graphHeight] = [graph.width(), graph.height()]const [graphRotation, anchorId, ex, ey] = [Math.round(graph.rotation()),adjustShape.attrs.anchor?.id,endPoint.x,endPoint.y]let anchorShadow: Konva.Circle | undefined, anchorShadowAcross: Konva.Circle | undefinedswitch (anchorId) {case 'top':{anchorShadow = graphSnap.findOne(`#top`)anchorShadowAcross = graphSnap.findOne(`#bottom`)}breakcase 'bottom':{anchorShadow = graphSnap.findOne(`#bottom`)anchorShadowAcross = graphSnap.findOne(`#top`)}breakcase 'left':{anchorShadow = graphSnap.findOne(`#left`)anchorShadowAcross = graphSnap.findOne(`#right`)}breakcase 'right':{anchorShadow = graphSnap.findOne(`#right`)anchorShadowAcross = graphSnap.findOne(`#left`)}breakcase 'top-left':{anchorShadow = graphSnap.findOne(`#top-left`)anchorShadowAcross = graphSnap.findOne(`#bottom-right`)}breakcase 'top-right':{anchorShadow = graphSnap.findOne(`#top-right`)anchorShadowAcross = graphSnap.findOne(`#bottom-left`)}breakcase 'bottom-left':{anchorShadow = graphSnap.findOne(`#bottom-left`)anchorShadowAcross = graphSnap.findOne(`#top-right`)}breakcase 'bottom-right':{anchorShadow = graphSnap.findOne(`#bottom-right`)anchorShadowAcross = graphSnap.findOne(`#top-left`)}break}if (anchorShadow && anchorShadowAcross) {const { x: sx, y: sy } = anchorShadow.getAbsolutePosition()const { x: ax, y: ay } = anchorShadowAcross.getAbsolutePosition()// anchorShadow:它是当前操作的 调整点 锚点// anchorShadowAcross:它是当前操作的 调整点 反方向对面的 锚点// 调整大小{// 略// 计算比较复杂,不一定是最优方案,详情请看工程代码。// 基本逻辑:// 1、通过鼠标移动,计算当前鼠标位置、当前操作的 调整点 锚点 位置(原位置) 分别与 anchorShadowAcross(原位置)的距离;// 2、 保持 anchorShadowAcross 位置固定,通过上面两距离的变化比例,计算最新的宽高大小;// 3、期间要约束不同角度不同方向的宽高处理,有的只改变宽、有的只改变高、有的同时改变宽和高。}// 调整位置{// 略// 计算比较复杂,不一定是最优方案,详情请看工程代码。// 基本逻辑:// 利用三角函数,通过最新的宽高,调整图形的坐标。}}// 更新 圆/椭圆 大小circle.x(graphWidth / 2)circle.radiusX(graphWidth / 2)circle.y(graphHeight / 2)circle.radiusY(graphHeight / 2)// 更新 调整点 的 锚点 位置Circle.updateAnchorShadows(graphWidth, graphHeight, graphRotation, anchors)// 更新 图形 的 连接点 的 锚点位置Circle.updateLinkAnchorShadows(graphWidth, graphHeight, graphRotation, linkAnchors)// stage 状态const stageState = render.getStageState()// 更新 调整点 位置for (const anchor of anchors) {for (const { shape } of shapeRecords) {if (shape.attrs.anchor?.adjustType === anchor.attrs.adjustType) {const anchorShadow = graph.findOne(`#${anchor.attrs.id}`)if (anchorShadow) {shape.position({x: render.toStageValue(anchorShadow.getAbsolutePosition().x - stageState.x),y: render.toStageValue(anchorShadow.getAbsolutePosition().y - stageState.y)})shape.rotation(graph.getAbsoluteRotation())}}}}}}/*** 默认图形大小*/static size = 100/*** 圆/椭圆 对应的 Konva 实例*/private circle: Konva.Ellipseconstructor(render: Types.Render, dropPoint: Konva.Vector2d) {super(render, dropPoint, {// 定义了 8 个 调整点anchors: [{ adjustType: 'top' },{ adjustType: 'bottom' },{ adjustType: 'left' },{ adjustType: 'right' },{ adjustType: 'top-left' },{ adjustType: 'top-right' },{ adjustType: 'bottom-left' },{ adjustType: 'bottom-right' }].map((o) => ({adjustType: o.adjustType, // 调整点 类型定义type: Types.GraphType.Circle // 记录所属 图形})),linkAnchors: [{ x: 0, y: 0, alias: 'top', direction: 'top' },{ x: 0, y: 0, alias: 'bottom', direction: 'bottom' },{ x: 0, y: 0, alias: 'left', direction: 'left' },{ x: 0, y: 0, alias: 'right', direction: 'right' },{ x: 0, y: 0, alias: 'center' }] as Types.AssetInfoPoint[]})// 新建 圆/椭圆this.circle = new Konva.Ellipse({name: 'graph',x: 0,y: 0,radiusX: 0,radiusY: 0,stroke: 'black',strokeWidth: 1})// 加入this.group.add(this.circle)// 鼠标按下位置 作为起点this.group.position(this.dropPoint)}// 实现:拖动进行时override drawMove(point: Konva.Vector2d): void {// 鼠标拖动偏移量let offsetX = point.x - this.dropPoint.x,offsetY = point.y - this.dropPoint.y// 确保不翻转if (offsetX < 1) {offsetX = 1}if (offsetY < 1) {offsetY = 1}// 半径const radiusX = offsetX / 2,radiusY = offsetY / 2// 圆/椭圆 位置大小this.circle.x(radiusX)this.circle.y(radiusY)this.circle.radiusX(radiusX)this.circle.radiusY(radiusY)// group 大小this.group.size({width: offsetX,height: offsetY})// 更新 图形 的 调整点 的 锚点位置Circle.updateAnchorShadows(offsetX, offsetY, 1, this.anchorShadows)// 更新 图形 的 连接点 的 锚点位置Circle.updateLinkAnchorShadows(offsetX, offsetY, 1, this.linkAnchorShadows)// 重绘this.render.redraw([Draws.GraphDraw.name, Draws.LinkDraw.name])}// 实现:拖动结束override drawEnd(): void {if (this.circle.radiusX() <= 1 && this.circle.radiusY() <= 1) {// 加入只点击,无拖动// 默认大小const width = Circle.size,height = widthconst radiusX = Circle.size / 2,radiusY = radiusX// 圆/椭圆 位置大小this.circle.x(radiusX)this.circle.y(radiusY)this.circle.radiusX(radiusX - this.circle.strokeWidth())this.circle.radiusY(radiusY - this.circle.strokeWidth())// group 大小this.group.size({width,height})// 更新 图形 的 调整点 的 锚点位置Circle.updateAnchorShadows(width, height, 1, this.anchorShadows)// 更新 图形 的 连接点 的 锚点位置Circle.updateLinkAnchorShadows(width, height, 1, this.linkAnchorShadows)// 对齐线清除this.render.attractTool.alignLinesClear()// 重绘this.render.redraw([Draws.GraphDraw.name, Draws.LinkDraw.name])}}
}
GraphHandlers
// src/Render/handlers/GraphHandlers.ts	// 略export class GraphHandlers implements Types.Handler {// 略/*** 新建图形中*/graphing = false/*** 当前新建图形类型*/currentGraph: Graphs.BaseGraph | undefined/*** 获取鼠标位置,并处理为 相对大小* @param attract 含磁贴计算* @returns*/getStagePoint(attract = false) {const pos = this.render.stage.getPointerPosition()if (pos) {const stageState = this.render.getStageState()if (attract) {// 磁贴const { pos: transformerPos } = this.render.attractTool.attractPoint(pos)return {x: this.render.toStageValue(transformerPos.x - stageState.x),y: this.render.toStageValue(transformerPos.y - stageState.y)}} else {return {x: this.render.toStageValue(pos.x - stageState.x),y: this.render.toStageValue(pos.y - stageState.y)}}}return null}handlers = {stage: {mousedown: (e: Konva.KonvaEventObject<GlobalEventHandlersEventMap['mousedown']>) => {if (this.render.graphType) {// 选中图形类型,开始if (e.target === this.render.stage) {this.graphing = truethis.render.selectionTool.selectingClear()const point = this.getStagePoint()if (point) {if (this.render.graphType === Types.GraphType.Circle) {// 新建 圆/椭圆 实例this.currentGraph = new Graphs.Circle(this.render, point)}}}}},mousemove: () => {if (this.graphing) {if (this.currentGraph) {const pos = this.getStagePoint(true)if (pos) {// 新建并马上调整图形this.currentGraph.drawMove(pos)}}}},mouseup: () => {if (this.graphing) {if (this.currentGraph) {// 调整结束this.currentGraph.drawEnd()}// 调整结束this.graphing = false// 清空图形类型选择this.render.changeGraphType()// 对齐线清除this.render.attractTool.alignLinesClear()// 重绘this.render.redraw([Draws.GraphDraw.name, Draws.LinkDraw.name])}}}}
}
GraphDraw
// src/Render/draws/GraphDraw.ts	// 略export interface GraphDrawState {/*** 调整中*/adjusting: boolean/*** 调整中 id*/adjustType: string
}// 略export class GraphDraw extends Types.BaseDraw implements Types.Draw {// 略state: GraphDrawState = {adjusting: false,adjustType: ''}/*** 鼠标按下 调整点 位置*/startPoint: Konva.Vector2d = { x: 0, y: 0 }/*** 图形 group 镜像*/graphSnap: Konva.Group | undefinedconstructor(render: Types.Render, layer: Konva.Layer, option: GraphDrawOption) {super(render, layer)this.option = optionthis.group.name(this.constructor.name)}/*** 获取鼠标位置,并处理为 相对大小* @param attract 含磁贴计算* @returns*/getStagePoint(attract = false) {const pos = this.render.stage.getPointerPosition()if (pos) {const stageState = this.render.getStageState()if (attract) {// 磁贴const { pos: transformerPos } = this.render.attractTool.attractPoint(pos)return {x: this.render.toStageValue(transformerPos.x - stageState.x),y: this.render.toStageValue(transformerPos.y - stageState.y)}} else {return {x: this.render.toStageValue(pos.x - stageState.x),y: this.render.toStageValue(pos.y - stageState.y)}}}return null}// 调整 预处理、定位静态方法adjusts(shapeDetailList: {graph: Konva.GroupshapeRecords: { shape: Konva.Shape; anchorShadow: Konva.Circle }[]}[]) {for (const { shapeRecords, graph } of shapeDetailList) {for (const { shape } of shapeRecords) {shape.setAttr('adjusting', false)}for (const shapeRecord of shapeRecords) {const { shape } = shapeRecord// 鼠标按下shape.on('mousedown', () => {this.state.adjusting = truethis.state.adjustType = shape.attrs.anchor?.adjustTypethis.state.adjustGroupId = graph.id()shape.setAttr('adjusting', true)const pos = this.getStagePoint()if (pos) {this.startPoint = pos// 图形 group 镜像,用于计算位置、大小的偏移this.graphSnap = graph.clone()}})// 调整中this.render.stage.on('mousemove', () => {if (this.state.adjusting && this.graphSnap) {if (shape.attrs.anchor?.type === Types.GraphType.Circle) {// 调整 圆/椭圆 图形if (shape.attrs.adjusting) {const pos = this.getStagePoint(true)if (pos) {// 使用 圆/椭圆 静态处理方法Graphs.Circle.adjust(this.render,graph,this.graphSnap,shapeRecord,shapeRecords,this.startPoint,pos)// 重绘this.render.redraw([Draws.GraphDraw.name, Draws.LinkDraw.name])}}}}})// 调整结束this.render.stage.on('mouseup', () => {this.state.adjusting = falsethis.state.adjustType = ''this.state.adjustGroupId = ''// 恢复显示所有 调整点for (const { shape } of shapeRecords) {shape.opacity(1)shape.setAttr('adjusting', false)shape.stroke('rgba(0,0,255,0.2)')document.body.style.cursor = 'default'}// 销毁 镜像this.graphSnap?.destroy()// 对齐线清除this.render.attractTool.alignLinesClear()})this.group.add(shape)}}}override draw() {this.clear()// 所有图形const graphs = this.render.layer.find('.asset').filter((o) => o.attrs.assetType === Types.AssetType.Graph) as Konva.Group[]const shapeDetailList: {graph: Konva.GroupshapeRecords: { shape: Konva.Shape; anchorShadow: Konva.Circle }[]}[] = []for (const graph of graphs) {// 非选中状态才显示 调整点if (!graph.attrs.selected) {const anchors = (graph.attrs.anchors ?? []) as Types.GraphAnchor[]const shapeRecords: { shape: Konva.Shape; anchorShadow: Konva.Circle }[] = []// 根据 调整点 信息,创建for (const anchor of anchors) {// 调整点 的显示 依赖其隐藏的 锚点 位置、大小等信息const anchorShadow = graph.findOne(`#${anchor.id}`) as Konva.Circleif (anchorShadow) {const shape = Graphs.Circle.createAnchorShape(this.render,graph,anchor,anchorShadow,this.state.adjustingId,this.state.adjustGroupId)shapeRecords.push({ shape, anchorShadow })}}shapeDetailList.push({graph,shapeRecords})}}this.adjusts(shapeDetailList)}
}
稍显臃肿,后面慢慢优化吧 -_-
canvas2svg 打补丁
上面已经实现了绘制图形(圆/椭形),但是导出 svg 的时候报错了。经过错误定位以及源码阅读,发现:
1、当 Konva.Group 包含 Konva.Ellipse 的时候,无法导出 svg 文件
2、对 Konva.Ellipse 调整如 radiusX、radiusY 属性时,无法正确输出 path 路径
1、canvas2svg 尝试给 g 节点赋予 path 属性,导致异常报错。
现通过 hack __applyCurrentDefaultPath 方法,增加处理 nodeName === ‘g’ 的场景
2、查看 Konva.Ellipse.prototype._sceneFunc 方法源码,Konva 绘制 Ellipse 是通过 canvas 的 arc + scale 实现的,对应代码注释 A。
实际效果,无法仿照 canvas 的平均 scale,会出现 stroke 粗细不一。
因此,尝试通过识别 scale 修改 path 特征,修复此问题。
// src/Render/tools/ImportExportTool.ts	C2S.prototype.__applyCurrentDefaultPath = function () {// 补丁:修复以下问题:// 1、当 Konva.Group 包含 Konva.Ellipse 的时候,无法导出 svg 文件// 2、对 Konva.Ellipse 调整如 radiusX、radiusY 属性时,无法正确输出 path 路径//// PS:// 1、canvas2svg 尝试给 g 节点赋予 path 属性,导致异常报错。// 现通过 hack __applyCurrentDefaultPath 方法,增加处理 nodeName === 'g' 的场景//// 2、查看 Konva.Ellipse.prototype._sceneFunc 方法源码,// Konva 绘制 Ellipse 是通过 canvas 的 arc + scale 实现的,对应代码注释 A,// 实际效果,无法仿照 canvas 的平均 scale,会出现 stroke 粗细不一。// 因此,尝试通过识别 scale 修改 path 特征,修复此问题。//// (以上 hack 仅针对示例绘制 图形 时的特征进行处理,并未深入研究 canvas2svg 为何会进入错误的逻辑)if (this.__currentElement.nodeName === 'g') {const g = this.__currentElement.querySelector('g')if (g) {// 注释 A// const d = this.__currentDefaultPath// const path = document.createElementNS('http://www.w3.org/2000/svg', 'path') as SVGElement// path.setAttribute('d', d)// path.setAttribute('fill', 'none')// g.append(path)const scale = g.getAttribute('transform')if (scale) {const match = scale.match(/scale\(([^),]+),([^)]+)\)/)if (match) {const [sx, sy] = [parseFloat(match[1]), parseFloat(match[2])]let d = this.__currentDefaultPathconst reg = /A ([^ ]+) ([^ ]+) /const match2 = d.match(reg)if (match2) {const [rx, ry] = [parseFloat(match2[1]), parseFloat(match2[2])]d = d.replace(reg, `A ${rx * sx} ${ry * sy} `)const path = document.createElementNS('http://www.w3.org/2000/svg','path') as SVGElementpath.setAttribute('d', d)path.setAttribute('fill', 'none')this.__currentElement.append(path)}}} else {const d = this.__currentDefaultPathconst path = document.createElementNS('http://www.w3.org/2000/svg', 'path') as SVGElementpath.setAttribute('d', d)path.setAttribute('fill', 'none')this.__currentElement.append(path)}}console.warn('[Hacked] Attempted to apply path command to node ' + this.__currentElement.nodeName)return}// 原逻辑if (this.__currentElement.nodeName === 'path') {const d = this.__currentDefaultPaththis.__currentElement.setAttribute('d', d)} else {throw new Error('Attempted to apply path command to node ' + this.__currentElement.nodeName)}
}
以上 hack 仅针对示例绘制 图形 时的特征进行处理,并未深入研究 canvas2svg 为何会进入错误的逻辑
拐点旋转修复
测试发现,连接线 的 拐点 并没有能跟随旋转角度调整坐标,因此补充一个修复:

// src/Render/handlers/SelectionHandlers.ts	// 略/*** 矩阵变换:坐标系中的一个点,围绕着另外一个点进行旋转* -  -   -        - -   -   - -* |x`|   |cos -sin| |x-a|   |a|* |  | = |        | |   | +* |y`|   |sin  cos| |y-b|   |b|* -  -   -        - -   -   - -* @param x 目标节点坐标 x* @param y 目标节点坐标 y* @param centerX 围绕的点坐标 x* @param centerY 围绕的点坐标 y* @param angle 旋转角度* @returns*/rotatePoint(x: number, y: number, centerX: number, centerY: number, angle: number) {// 将角度转换为弧度const radians = (angle * Math.PI) / 180// 计算旋转后的坐标const newX = Math.cos(radians) * (x - centerX) - Math.sin(radians) * (y - centerY) + centerXconst newY = Math.sin(radians) * (x - centerX) + Math.cos(radians) * (y - centerY) + centerYreturn { x: newX, y: newY }}lastRotation = 0// 略handlers = {
// 略transformer: {transform: () => {// 旋转时,拐点也要跟着动const back = this.render.transformer.findOne('.back')if (back) {// stage 状态const stageState = this.render.getStageState()const { x, y, width, height } = back.getClientRect()const rotation = back.getAbsoluteRotation() - this.lastRotationconst centerX = x + width / 2const centerY = y + height / 2const groups = this.render.transformer.nodes()const points = groups.reduce((ps, group) => {return ps.concat(Array.isArray(group.getAttr('points')) ? group.getAttr('points') : [])}, [] as Types.LinkDrawPoint[])const pairs = points.reduce((ps, point) => {return ps.concat(point.pairs ? point.pairs.filter((o) => !o.disabled) : [])}, [] as Types.LinkDrawPair[])for (const pair of pairs) {const fromGroup = groups.find((o) => o.id() === pair.from.groupId)const toGroup = groups.find((o) => o.id() === pair.to.groupId)// 必须成对移动才记录if (fromGroup && toGroup) {// 移动if (fromGroup.attrs.manualPointsMap && fromGroup.attrs.manualPointsMapBefore) {let manualPoints = fromGroup.attrs.manualPointsMap[pair.id]const manualPointsBefore = fromGroup.attrs.manualPointsMapBefore[pair.id]if (Array.isArray(manualPoints) && Array.isArray(manualPointsBefore)) {manualPoints = manualPointsBefore.map((o: Types.ManualPoint) => {const { x, y } = this.rotatePoint(this.render.toBoardValue(o.x) + stageState.x,this.render.toBoardValue(o.y) + stageState.y,centerX,centerY,rotation)return {x: this.render.toStageValue(x - stageState.x),y: this.render.toStageValue(y - stageState.y)}})fromGroup.setAttr('manualPointsMap', {...fromGroup.attrs.manualPointsMap,[pair.id]: manualPoints})}}}}}// 重绘this.render.redraw([Draws.GraphDraw.name, Draws.LinkDraw.name, Draws.PreviewDraw.name])}}
// 略}
Thanks watching~
More Stars please!勾勾手指~
源码
gitee源码
示例地址
相关文章:
前端使用 Konva 实现可视化设计器(21)- 绘制图形(椭圆)
本章开始补充一些基础的图形绘制,比如绘制:直线、曲线、圆/椭形、矩形。这一章主要分享一下本示例是如何开始绘制一个图形的,并以绘制圆/椭形为实现目标。 请大家动动小手,给我一个免费的 Star 吧~ 大家如果发现了 Bug,…...

Python 将单词拆分为单个字母组成的列表对象
Python 将单词拆分为单个字母组成的列表对象 正文 正文 这里介绍一个简单算法,将英文单词拆分为其对应字母组成的列表。 str1 ACG lst1 [i for i in str1] lst2 list(str1)# Method 1 print(lst1) # Method 2 print(lst2) """ result: [A, C, G…...

欧洲 摩纳哥税务知识
摩纳哥是一个位于法国南部的城邦国家,以其豪华的生活环境和宽松的税收政策而闻名。自1869年以来,摩纳哥取消了个人所得税的征收,这使得它成为富裕人士和外籍人士的理想居住地。然而,这并不意味着摩纳哥的税收制度完全不存在。以下…...

域控制器的四大支柱分别是车载以太网、自适应Autosar
域控制器的四大支柱分别是车载以太网、自适应Autosar、高性能处理器和集中式E/E架构。 百度安全验证 。自适应Autosar采用Proxy/Skeleton的通信架构,同时采用中间件SOME/IP...
写给大数据开发:如何优化临时数据查询流程
你是否曾因为频繁的临时数据查询请求而感到烦恼?这些看似简单的任务是否正在蚕食你的宝贵时间,影响你的主要工作?如果是,那么这篇文章正是为你而写。 目录 引言:数据开发者的困境问题剖析:临时数据查询的…...
【MongoDB】Java连接MongoDB
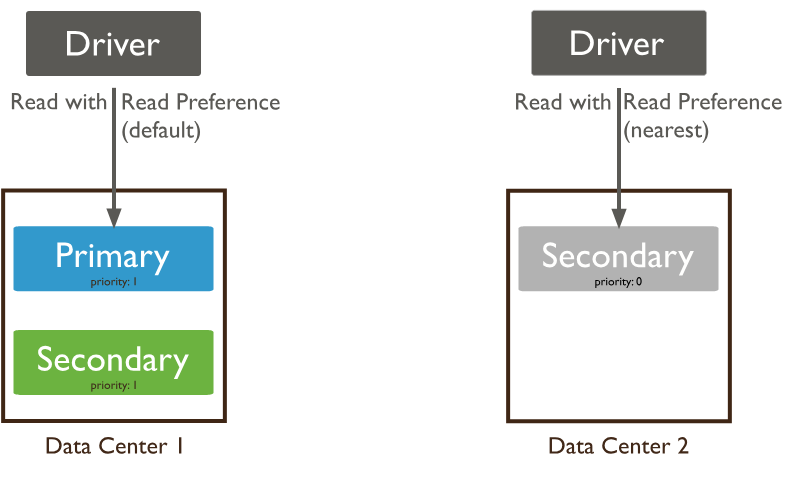
连接URI 连接 URI提供驱动程序用于连接到 MongoDB 部署的指令集。该指令集指示驱动程序应如何连接到 MongoDB,以及在连接时应如何运行。下图解释了示例连接 URI 的各个部分: 连接的URI 主要分为 以下四个部分 第一部分 连接协议 示例中使用的 连接到具有…...

nginx支持的不同事件驱动模型
Nginx 支持的不同事件驱动模型 Nginx 是一款高性能的 Web 和反向代理服务器,它支持多种事件驱动模型来处理网络 I/O 操作。不同的操作系统及其版本支持不同的事件驱动模型,这些模型对于 Nginx 的并发处理能力和性能至关重要。下面详细介绍 Nginx 支持的…...

C++ TinyWebServer项目总结(7. Linux服务器程序规范)
进程 PID 进程的PID(Process ID)是操作系统中用于唯一标识一个进程的整数值。每个进程在创建时,操作系统都会分配一个唯一的PID,用来区分不同的进程。 PID的特点 唯一性: 在操作系统运行的某一时刻,每个…...

基于STM32单片机设计的秒表时钟计时器仿真系统——程序源码proteus仿真图设计文档演示视频等(文末工程资料下载)
基于STM32单片机设计的秒表时钟计时器仿真系统 演示视频 基于STM32单片机设计的秒表时钟计时器仿真系统 摘要 本设计基于STM32单片机,设计并实现了一个秒表时钟计时器仿真系统。系统通过显示器实时显示当前时间,并通过定时器实现秒表计时功能。显示小时…...

人才流失预测项目
在本项目中,通过数据科学和AI的方法,分析挖掘人力资源流失问题,并基于机器学习构建解决问题的方法,并且,我们通过对AI模型的反向解释,可以深入理解导致人员流失的主要因素,HR部门也可以根据分析…...

BUG——imx6u开发_结构体导致的死机问题(未解决)
简介: 最近在做imx6u的linux下裸机驱动开发,由于是学习的初级阶段,既没有现成的IDE可以使用,也没有GDB等在线调试工具,只能把代码烧写在SD卡上再反复插拔,仅靠卑微的亮灯来判断程序死在哪一步。 至于没有使…...

问答:什么是对称密钥、非对称密钥,http怎样变成https的?
文章目录 对称密钥 vs 非对称密钥HTTP 变成 HTTPS 的过程 对称密钥 vs 非对称密钥 1. 对称密钥加密 定义: 对称密钥加密是一种加密算法,其中加密和解密使用的是同一个密钥。特点: 速度快: 因为只使用一个密钥,所以加密和解密速度较快。密钥分发问题: 双…...

虚拟滚动列表组件ReVirtualList
虚拟滚动列表组件ReVirtualList 组件实现基于 Vue3 Element Plus Typescript,同时引用 vueUse lodash-es tailwindCss (不影响功能,可忽略) 在 ReList 的基础上,增加虚拟列表功能,在固定高度的基础上,可以优化大数…...

稳定、耐用、美观 一探究竟六角头螺钉螺栓如何选择
在机器与技术未被发现的过去,紧固件设计和品质并不稳定。但是,他们已成为当今许多行业无处不在的构成部分。六角头标准件或六角头标准件是紧固件中持续的头部设计之一,它有六个面,对广泛工业应用大有益处。六角头标准件或常分成六…...

数据库Mybatis基础操作
目录 基础操作 删除 预编译SQL 增、改、查 自动封装 基础操作 环境准备 删除 根据主键动态删除数据:使用了mybatis中的参数占位符#{ },里面是传进去的参数。 单元测试: 另外,这个方法是有返回值的,返回这次操作…...

人物形象设计:塑造独特角色的指南
引言 人物形象设计是一种创意过程,它利用强大的设计工具,通过视觉和叙述元素塑造角色的外在特征和内在性格。这种设计不仅赋予角色以生命,还帮助观众或读者在心理层面上与角色建立联系。人物形象设计的重要性在于它能够增强故事的吸引力和说…...

网络安全-安全策略初认识
文章目录 前言理论介绍1. 安全策略1.1 定义:1.2 关键术语: 2. 防火墙状态监测 实战步骤1:实验环境搭建步骤2:配置实现 总结1. 默认安全策略2. 自定义安全策略3. 防火墙状态会话表 前言 who:本文主要写给入门防火墙的技…...

python import相对导入与绝对导入
文章目录 相对导入与绝对导入绝对导入相对导入何时使用相对导入何时使用绝对导入示例 相对导入与绝对导入 在Python中,from .file_manager import SomeFunction 和 from file_manager import SomeFunction 两种导入方式看似相似,但在模块寻找机制上存在…...

深入理解 Go 语言原子内存操作
原子内存操作提供了实现其他同步原语所需的低级基础。一般来说,你可以用互斥体和通道替换并发算法的所有原子操作。然而,它们是有趣且有时令人困惑的结构,应该深入了解它们是如何工作的。如果你能够谨慎地使用它们,那么它们完全可以成为代码优化的好工具,而不会增加复杂性…...

PostgreSQL几个扩展可以帮助实现数据的分词和快速查询
在 PostgreSQL 数据库中,有几个扩展可以帮助实现数据的分词和快速查询,特别是在处理全文搜索和文本分析时。以下是几个常用的扩展: 1. pg_trgm pg_trgm(Trigram)扩展是 PostgreSQL 中的一个强大的工具,它可以通过计算字符串之间的相似度来实现快速文本搜索。它支持基于…...

四旋翼变形控制:RL与MPC在混合动力学中的对比
1. 四旋翼变形控制的技术挑战与解决方案四旋翼变形控制(Quadrotor Morpho-Transition)是当前机器人领域最具挑战性的前沿技术之一。这项技术使机器人能够在空中完成形态变换,实现从飞行模式到地面模式的平滑切换。想象一下,一架四…...

作业本耐用度差距巨大?深圳大明印刷厂拆解合规工艺,告别定制作业本掉页开裂通病
在校园日常教学中,很多学校都会遇到同一个难题:同一学期采购的作业本、定制作业本,品质差距悬殊,有的完好无损用到期末,有的短短几周就出现书脊开裂、页面脱落、边角破损、翻页卡顿等问题。不少人误以为是学生使用习惯…...

极致精简,功能强大的PDF编辑工具
这是一款功能全面的PDF编辑工具 你只需要导入一份PDF格式文件 就可以快速的对它进行插入 批注编辑保护转换等各种操作 而且无需登录 也可以直接使用 在插入选项中可以进行插入文字图片 页面页眉页脚页码文档背景水印视频音频等 在批注选项中可以管理批注隐藏批注 高亮显示 文本…...

Wechat2RSS:微信公众号转RSS订阅工具
文章目录Wechat2RSS:微信公众号转RSS订阅工具Wechat2RSS:微信公众号转RSS订阅工具 ttttmr开源的Wechat2RSS项目,目前在GitHub上获得1409颗Star,项目地址为https://github.com/ttttmr/Wechat2RSS。该工具的核心作用是将微信公众号…...
)
Postgresql基础实践教程(八)
⭐️⭐️⭐️⭐️⭐️ 完整数据详见 练习数据免费 ⭐️⭐️⭐️⭐️⭐️ 六十九、查找会员ID 27的向上推荐链 问题 查找会员ID 27的向上推荐链:即推荐该会员的人,以及推荐那个人的人,依此类推。返回会员ID、名字和姓氏。按会员ID降序排列。…...

基于USB ACA模式实现安卓手机边玩边充的游戏手柄设计
1. 项目缘起:当手机性能过剩,却败给了触摸屏几年前,我清理手机游戏时,发现一个挺无奈的现象:性能足以媲美掌机的智能手机里,只剩下一些慢节奏的平台解谜或者数独。那些曾经让我在掌机上废寝忘食的赛车、动作…...

PCB的常规机械通孔与HDI工艺钻孔差异
结合常规 4 层通孔 PCB(非 HDI) 标准制程,分步骤讲清钻孔时机、先后顺序,区分机械通孔与板件结构,专业且贴合工厂实际流程。一、先明确 4 层通孔板基础结构4 层板结构:L1 → PP 半固化片 → L2/L3ÿ…...

【审计专栏】【财务领域】 第四十九篇 人在企业中的核心资产和核心利益01
编号 类型 企业 (行业/企业产品/企业利益链/生态位与层级) 业务领域 企业性质 企业中人的角色/岗位/利益矩阵 人在企业中的核心资产/附属资产 资产的业务-财务数学模型及数字/数值 关联知识 1 核心经营性资产(如IP、数据、品牌) 行业:人工智能 产品:工业视觉检…...
)
别再纠结了!给激光焊接新手讲透单模和多模激光到底怎么选(附M²因子解读)
激光焊接设备选型指南:单模与多模激光的实战抉择 当你第一次站在激光焊接设备采购的十字路口,面对"单模"和"多模"这两个专业术语时,那种迷茫感我深有体会。五年前,我作为产线技术负责人,需要为汽车…...

3PEAK思瑞浦 TPA6531-S5TR SOT23-5 运算放大器
特性 供电电压:1.75V至5.5V 偏移电压:1.5mV(最大值) 最大可调工作频率:300kHz,斜率:0.15V/us 轨到轨输入和输出 0.1赫兹至10赫兹电压噪声:1伏峰值 开关电源时无显著输出抖动 低功耗:每通道最大25安培 工作温度范围:-40C至125C...